Showing 22 items matching "rails and overhead"
-
 Ballarat Tramway Museum
Slide - 35mm slide/s - set of 5, John Theodore, c1973
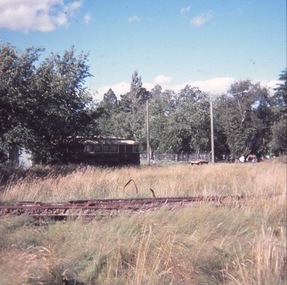
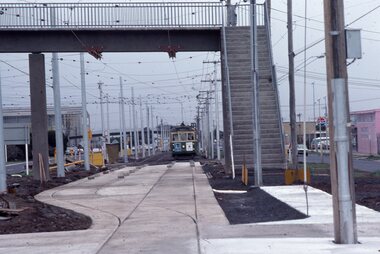
Yields information about depot activities of the BTPS in building the depot fan and access track.Set of 4 AGFA blue and white plastic mount 27mm sq and Fuji film 35mm slides of views of the depot from across the parklands c1973 - 1974. .1 - looking north with the rail stack in the park. .2 - ditto with 26 on the fan - note overhead is up. .3 - from the east side of the fish hatchery - overhead is up .4 - from the east side, with rails, earth stacks and pipes - no overhead up - early 1973 - 26 and 27 are on the fan .5 - ditto - some tidying up - power is on - 26 on the fan.Various notations by John as to the slide number and the trams in pencil and ink.tramways, trams, btps, depot, overhead, track construction, tram 26, tram 27 -
 Ballarat Tramway Museum
Functional Object - Tower Truck, Bedford and NSW Government Tramways, 1952
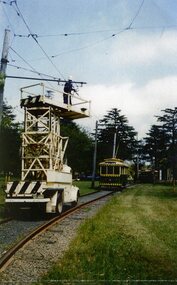
Overhead Maintenance motor truck with hydraulic elevating and rotating platform on a 1952 Bedford Chassis. Engine no. KM 237540, with purpose built platform, lockers, cupboards and elevating platform, ladders, hand rails and a gong. Fitted with turn indicators and flashing lights by BTPS and vice. In MMTB cream paint.mmtb, overhead, support vehicle -
 Ballarat Tramway Museum
Negative - Set of 2, Geoff Grant, 19/06/1955 12:00:00 AM
Negatives No. N334 and 335 and black and white prints made by a laser printer (stored in folder ) of fitters, overhead crews lining up the overhead at the Russell St. crossover in Bourke St. Has W6 988 in the photo, along with tower wagons 2 and 8. 1606.2 shows device laid between rails that allows the location of the overhead to be checked, relative the to the centre line of the track. Photo taken 19/6/1955. Dave Macartney 12/1/2001 identified Doug Lees in black coat and hat looking at instrument. Doug was an Engineer with the MMTB. Negative scanned hi res and imaged updated 22/5/2020.trams, tramways, melbourne, bourke st, russell st., testing overhead, commissioning, tram w6 988 -
 Ballarat Tramway Museum
Document - Photocopy, Ballarat Star, "The Electric Tramway System - What it will be in Ballarat - A revolution in street traffic", 22/06/1959 12:00:00 AM
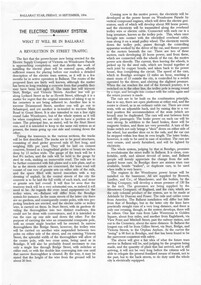
Yields information about the construction of the tramway in Ballarat from a newspaper viewpoint of 1904 and compares the construction with that of Bendigo.Photocopy of an extract and article from the Ballarat Start, Friday 16 September 1904" titled "The Electric Tramway System - What it will be in Ballarat - A revolution in street traffic". Describes the tramway system that is planned for Ballarat, including the power station, the routes, rails, gauge, overhead, tramcars, with comparison with the Bendigo system. Photocopy provided by Andrew Cook 15-1-2015.trams, tramways, ballarat, esco, ballarat a power station, opening, newspaper clippings, bendigo -
 Melbourne Tram Museum
Photograph - W2s and bus at City Rd, St Kilda rd intersection, c1930
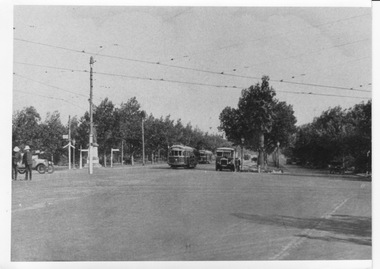
Photograph looks southward along St Kilda Rd from its intersection with City Rd and Alexander Pde, but trees obscure the view towards the Shrine of Remembrance, which may still be under construction (1927-34). Tram rails and overhead can be seen turning from St Kilda Rd into City Rd and several W2 class trams and a half cab bus can be seen. Two policeman in white helmets stand in the intersection controlling traffic.Yields information about early electric trams on St Kilda Rd Black and white print with no note.w2 class, half cab bus, st kilda rd, city rd, alexander ave, shrine of remembrance, rails and overhead, white helmet -
 Eltham District Historical Society Inc
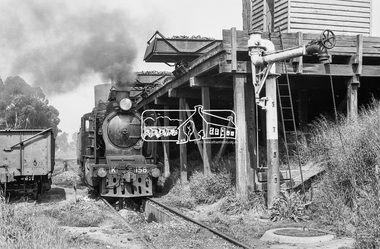
Photograph, Steam locomotive K-185 at the coal hopper, Echuca Railway Station, c.Aug. 1963
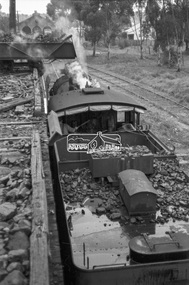
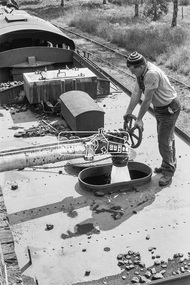
THE ECHUCA COALING STAGE. Locomotives would stop alongside to receive coal dropped into their tenders from small overhead rail mounted tipping trays. Water could be obtained from either the elevated tank at one end or the connected standpipe at the opposite end. Locomotive firebox contents could be dumped into pits between the rails from locomotives once they were carefully positioned above them. Such locomotives then could move onto the Engine Shed area for overnight parking. Firebox fires would be re-lit when the locomotive was next needed in a day or so.Digital TIFF file Scan of 35mm Ilford FP3 black and white negative transparencygeorge coop collection, echuca railway station, k-185, k-class steam locomotive (vr newport workshops), railway workshop -
 Eltham District Historical Society Inc
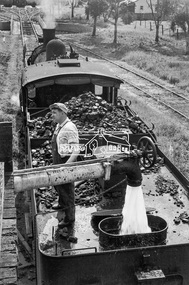
Photograph, Steam locomotive K-158 filling up with water at the coal hopper, Echuca Railway Station, November 1963, 1963
THE ECHUCA COALING STAGE. Locomotives would stop alongside to receive coal dropped into their tenders from small overhead rail mounted tipping trays. Water could be obtained from either the elevated tank at one end or the connected standpipe at the opposite end. Locomotive firebox contents could be dumped into pits between the rails from locomotives once they were carefully positioned above them. Such locomotives then could move onto the Engine Shed area for overnight parking. Firebox fires would be re-lit when the locomotive was next needed in a day or so.Digital TIFF file Scan of 35mm Ilford FP3 black and white negative transparencycoal hopper, echuca railway station, george coop collection, k-158, k-class steam locomotive (vr newport workshops) -
 Eltham District Historical Society Inc
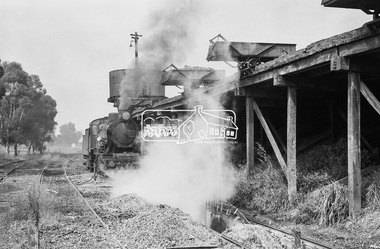
Photograph, Steam locomotive J-500 at the coal hopper, Echuca Railway Station, November 1963, 1963
THE ECHUCA COALING STAGE. Locomotives would stop alongside to receive coal dropped into their tenders from small overhead rail mounted tipping trays. Water could be obtained from either the elevated tank at one end or the connected standpipe at the opposite end. Locomotive firebox contents could be dumped into pits between the rails from locomotives once they were carefully positioned above them. Such locomotives then could move onto the Engine Shed area for overnight parking. Firebox fires would be re-lit when the locomotive was next needed in a day or so.Digital TIFF file Scan of 35mm Ilford FP3 black and white negative transparencyechuca railway station, george coop collection, j-500, j-class steam locomotive (vulcan foundry) -
 Eltham District Historical Society Inc
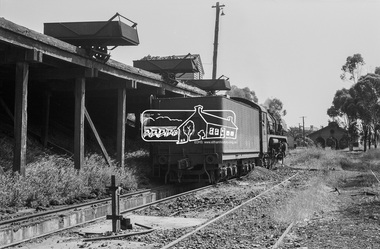
Photograph, Steam locomotive R-727 at the coal hopper, Echuca Railway Station, November 1963, 1963
THE ECHUCA COALING STAGE. Locomotives would stop alongside to receive coal dropped into their tenders from small overhead rail mounted tipping trays. Water could be obtained from either the elevated tank at one end or the connected standpipe at the opposite end. Locomotive firebox contents could be dumped into pits between the rails from locomotives once they were carefully positioned above them. Such locomotives then could move onto the Engine Shed area for overnight parking. Firebox fires would be re-lit when the locomotive was next needed in a day or so.Digital TIFF file Scan of 35mm Ilford FP3 black and white negative transparencycoal hopper, echuca, echuca railway station, george coop collection, r-727, r-class steam locomotive -
 Eltham District Historical Society Inc
Photograph, Steam locomotive R-727 being filled with water at the coal hopper, Echuca Railway Station, November 1963, 1963
THE ECHUCA COALING STAGE. Locomotives would stop alongside to receive coal dropped into their tenders from small overhead rail mounted tipping trays. Water could be obtained from either the elevated tank at one end or the connected standpipe at the opposite end. Locomotive firebox contents could be dumped into pits between the rails from locomotives once they were carefully positioned above them. Such locomotives then could move onto the Engine Shed area for overnight parking. Firebox fires would be re-lit when the locomotive was next needed in a day or so.Digital TIFF file Scan of 35mm Ilford FP3 black and white negative transparencycoal hopper, echuca, echuca railway station, george coop collection, r-727, r-class steam locomotive -
 Melbourne Tram Museum
Photograph - Black & White Photograph/s, Melbourne & Metropolitan Tramways Board (MMTB), early 1955
Black and white photographs of the construction of the junction at Gertrude and Nicholson St c1955. On the right hand side of the photograph are two buses showing the Destination of Northcote. The former cable tram track in Nicholson St is yet to be removed - shows the offset between the tracks and the wood blocks. Possibly only the junction tracks have been completed at this time as there appears to be an excavation and a hut in the distance. There is a detour sign indicating that possibly vehicles used the completed section and that trackwork was underway for Gertrude St. The overhead has been erected. In the background is Osborne House. signs for The Age, The Sun and Peters Ice Cream. Early 1955?trams, tramways, trackwork, rails, track materials, track repairs, sleepers, equipment, cable trams, gertrude st, nicholson st, overhead -
 Eltham District Historical Society Inc
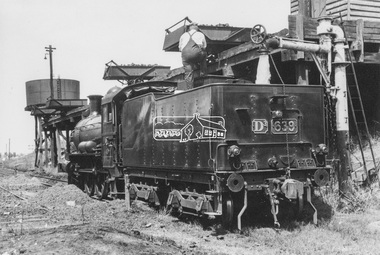
Photograph, VR Commissioner's Special train, steam locomotive D3-639 at Echuca Railway Station, 1962
VR Commissioner's Special train, steam locomotive D3-639 filling up with water at the coal hopper, Echuca Railway Station, 1962. The tender has been all polished up. THE ECHUCA COALING STAGE. Locomotives would stop alongside to receive coal dropped into their tenders from small overhead rail mounted tipping trays. Water could be obtained from either the elevated tank at one end or the connected standpipe at the opposite end. Locomotive firebox contents could be dumped into pits between the rails from locomotives once they were carefully positioned above them. Such locomotives then could move onto the Engine Shed area for overnight parking. Firebox fires would be re-lit when the locomotive was next needed in a day or so.Digital TIFF file Scan of black and white print enlargement on textured paper (14.5 x 21 cm)coal hopper, d3-639, d3-class steam locomotive, echuca railway station, george coop collection, vr commissioner's special train -
 Melbourne Tram Museum
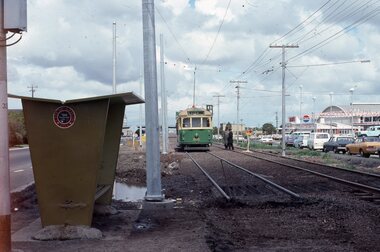
Photograph - Changing the Location of the Essendon Airport terminus, Ron Scholten, 7-10-1976
The original line to the Essendon Aerodrome was constructed in 1943 to serve the airport and aircraft construction. It was funded by the Commonwealth Government. By 1976, patronage to the airport terminus in Vaughan St had dropped, the crossing of the highway to the Tullamarine Airport opened in 1970, was dangerous, and the highway needed to be widened. The new terminus was a short distance to the north between Mathews Ave and the Highway. This series of photographs show the operation of a tram service during the changeover. Trams ran from the Niddrie crossover near Keilor Road to a temporary terminus just short of the worksite, with cars running "bang" road or the wrong way for one trip along either line. This would have been controlled by an Inspector at the Niddrie end. The work was done over a 7-hour period, including changing the overhead over. Work would have been completed after the changeover period. .1 - W5 800 at “temporary” Essendon Airport terminus, Cnr Mathews Ave, Vaughan St. after running “bang” road or the wrong way to this point from the Niddrie or Keilor Road crossover. Curves have been removed.. Has an Inspector chatting to a man with a hat standing alongside the tram. The shelter has a City of Keilor logo on it. .2 - W5 684, taken from the overbridge at the TAA stop - during the changeover of the tracks. Tram running “bang” road from Niddrie to the temporary terminus. .3 - SW5 787, temporary terminus in Mathews Ave, about to return to Niddrie as an “up” car on the “down” line. .4 - MMTB Track gang commissioning and placing rails at the new terminus with scrubber 10 waiting. Overhead in position with overhead for the curves partly removed. Mobile Crane on the left-hand side moving a formwork piece into position .5 - 10W cleaning new track at the new terminus. .6 - Rail Scrubber 10W at work cleaning head of rails where new concrete section. Has a TAA bus on the right side. .7 - W5 783 is about to be the first passenger tram to the terminus, at 3.50 pm About 20 workmen are completing the inbound or up track. .8 - W5 783 about to be the first passenger tram to the terminus, at 3.50 pm About 20 workmen are completing the inbound or up track.Yields information about the last day of the operation of the original Essendon Airport tram line and the works done for the new terminus.Set of 8 Kodachrome cardboard mount colour slides of the relocation of the Essendon Airport tram terminus 7-10-1976, by Ron Scholten. All slides have detailed descriptions on the rear trams, tramways, essendon aerodrome, essendon airport, closure, new tramways, route 59, mmtb, trackwork, w5 800, w5 684, sw5 787, scrubber 10w, w5 783, w5 class, sw5 class, taa airlines, city of keilor -
 Eltham District Historical Society Inc
Photograph, Steam locomotive K-158 at the coal hopper, Echuca Railway Station, November 1963, 1963
THE ECHUCA COALING STAGE. Locomotives would stop alongside to receive coal dropped into their tenders from small overhead rail mounted tipping trays. Water could be obtained from either the elevated tank at one end or the connected standpipe at the opposite end. Locomotive firebox contents could be dumped into pits between the rails from locomotives once they were carefully positioned above them. Such locomotives then could move onto the Engine Shed area for overnight parking. Firebox fires would be re-lit when the locomotive was next needed in a day or so. Image dated as November 1963 based on same image in Port of Echuca collection (possibly frame 32 of film) (print 19.5 x 24.5cm) On reverse in pencil: " K Class at Echuca" Echuca K Class. 1940-1968". In blue pen:" Photo by: George L. Coop Nov 1963" https://victoriancollections.net.au/items/59de9cc421ea6b12dc3f7597Digital TIFF file Scan of 35mm Ilford FP3 black and white negative transparencycoal hopper, echuca railway station, george coop collection, k-158, k-class steam locomotive (vr newport workshops) -
 Melbourne Tram Museum
Photograph - Last day of original Essendon Airport tram terminus, Ron Scholten, 7-10-1976
The original line to the Essendon Aerodrome was constructed in 1943 to serve the airport and aircraft construction. It was funded by the Commonwealth Government. By 1976, patronage to the airport terminus in Vaughan St had dropped, the crossing of the highway to the Tullamarine Airport opened in 1970, was dangerous, and the highway needed to be widened. The new terminus was a short distance to the north between Mathews Ave and the Highway. This series of photographs show the last day of operations to the original terminus and the changeover, which was done in about 7 hours. No buses were required. It was done by workers of the Melbourne and Metropolitan Tramways Board. The line was later extended to Airport West. .1 - W5 789, (Essendon Airport Route 59) about to turn from Mathews Ave into Vaughan St. Has new track and footbridge in the foreground. .2 - W5 791 on the siding or spur at the airport terminus, the last tram to use this facility. .3 - W2 571, at the Airport terminus alongside Vaughan St on the last morning of the use of this terminus. The Bundy clock can be seen behind the pole on the lefthand side and the Brick passenger shelter. Shows buffer stops, and Forestair hanger behind. .4 - W2 595 turning from Vaughan St into Mathews Ave. Has the tram stop No. 55 in the view. .5 - W5 839 turning from Vaughan St into Mathews Ave. Shows the flashing yellow light that gave some protection to the trams. .6 - W2 247 about to turn into Vaughan St. Driver about to reboard the tram. Note the new copper trolley wire is up for the new track but has been pulled to the west side using rope. .7 - W5 805, turning from Mathews Ave into Vaughan St, to the old Essendon Airport terminus. Has a new track in the foreground, and the overhead for the curves is still in position. .8 - W6 991 turning from Vaughan St into Matthews Ave, at 855am, the last tram from the old terminus. The track gang has commenced work to remove the outbound curve. Would appear four passengers waiting at the tram stop, two with lunch bags. Note the cattle grid in the foreground between the rails. New rails on the ground on the left-hand side. See Reg Item 6163 for further photos of this event.Yields information about the last day of the operation of the original Essendon Airport tram line.Set of 8 Kodachrome cardboard mount colour slides of the relocation of the Essendon Airport tram terminus 7-10-1976, by Ron Scholten.All slides have detailed descriptions on the reartrams, tramways, essendon aerodrome, essendon airport, closure, new tramways, route 59, w5 789, w5 791, w2 571, w2 595, w5 839, w2 247, w5 805, w6 991, w2 class, w5 class, w6 class, mmtb, trackwork -
 Ringwood and District Historical Society
Photograph, Duplication of the five-kilometre section of railway line between Ringwood and Croydon in 1983
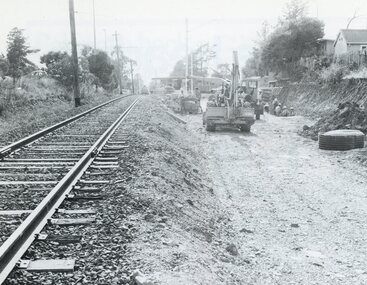
Digital scanFrom Vicrail News magazine, April 1983. “Duplication of the five-kilometre section of line between Ringwood and Croydon is on the way. Several major works will be undertaken over the next few months so the two tracks can be brought into service later this year. Intensive work on this section follows completion of duplication works between Ringwood and Bayswater on the Belgrave line last December. The completion of this 5.17 kilometre section between Ringwood and Bayswater means that this Belgrave line is now duplicated as far out as Ferntree Gully. Commuters using the Belgrave line now have an improved service with the intro duction in January of an additional evening peak train to Upper Ferntree Gully, two additional peak hour services in the morning from both Belgrave and Upper Ferntree Gully, and with the additional tracks delays on one line will not affect trains travelling in the opposite direction. Commenting on the completion of this stretch of track the Minister of Transport, Mr. Crabb, said a further improvement had been made with the commissioning of boom barriers at the Bedford Road level crossing in Ringwood. "The installation is part of the State Government's $9.4 million four-year plan to equip 70 dangerous level crossings throughout the State with boom barriers", he said. Works to be carried out on the Ringwood/ Croydon section include laying of new track, station works at Croydon and installation of boom barriers at East Ringwood. Already completed are bridge works to cater for double tracks at both Mt. Dandenong and Eastfield Roads between Croydon and East Ringwood and construction of an island platform at East Ringwood station. At several locations alignment of the existing track will be slightly relocated. The new line is being constructed with concrete sleepers and heavyweight rails. The existing line will also be reconstructed using these heavy 60kg per metre rails. Engineering works to be completed include installation of overhead wiring necessary to supply power to trains, construction of two new station buildings and a new platform at Croydon, provision of boom barriers, and pedestrian boom barriers at Dublin Road level crossing. East Ringwood, and replacement of existing timber overhead wire support structures with steel structures. Other works in this program included installation of boom barriers at Bedford Road, Ringwood and Scoresby Road, Bayswater and provision of a new platform for trains going to Melbourne and Heathmont. A new timetable on the Lilydale and Belgrave lines will commence when the Ringwood—Croydon duplication track work is completed.” -
 Ballarat Tramway Museum
Slide - 35mm slide/s - set of 32, Noel Simons, 25/02/1971 12:00:00 AM
Set of 31 transparencies taken on 25/2/1972 on Kodak mounts. 1201.1 - Bendigo No. 26 in Bond St. just after leaving Long Gully en route for Quarry Hill. Has Norris Supermarket in background. Has two SEC roof ads. 1201.2 - No. 26 climbing View St. from Charing Cross en route to Eaglehawk. Has ANZ bank and AMOCO service station in background. 1201.3 - as for 1201.3, but after tram has passed photographer. Has buildings west of Mackenzie St. in photograph. 1201.4 - Tram stop and centre of the road pole with two "CARS STOP BY REQUEST" signs mounted on pole at the corner of Mackenzie St. 1201.5 - same position as for 1201.3, but with No. 5 descending the street. 1201.6 - same position as for 1201.2, but with No. 5 descending the street. Photo taken after tram has passed photographer. 1201.7 - No. 7 in Nolan St. from across the park at Lake Weeroona. 1201.8 - No. 7 entering McCrae St from Nolan St. - distant view. Note "TRAM "sign on left hand side under tree and overhead in McCrae St. from former track that once was in this street. 1201.9 - No. 7 in High St. with Cathedral in background. Tram en route to North Bendigo. Note scaffolding around Cathedral main spire area. 1201.10 - No. 7 crossing Bendigo Creek bridge in High St. near Golden Square. Has a Caltex Service station in the background. 1201.11 - No. 7 at Golden Square terminus with Sunburst Fruit Juices and a Peters Ice cream delivery vans alongside. 1201.12 - as for 1201.11 but photo taken from behind tram, with the end of the rails in the photograph. 1201.13 - No. 7 and 21 in Pall Mall at Charing Cross with No. 5 in the background. Taken some distance away from the location. 1201.14 - No. 7 at Golden Square terminus, taken a short distance from the tram terminus. Shows Milk Bar on right hand side and the hotel on the left hand side. Taken from the south side of the roadway. 1201.15 - as from 1201.14 but taken from the north side of the roadway. 1201.16 - No 5 waiting at California Gully loop. Distant photo showing surrounds 1201.17 - No. 5 en route for Quarry Hill crossing No. 26 at California Gully. 1201.18 - No. 26 at Eaglehawk terminus with Eaglehawk Town Hall and Post Office in background. 1201.19 - No. 21 arriving at Charing Cross en route to North Bendigo. Has Alexandra Fountain in the background, ANZ bank RACV building, and other buildings on the north side of Pall Mall or Nolan St. 1201.20 - No. 26 en route for Quarry Hill at Charing Cross, with crew standing by front door. Has Colonial Mutual life building, Armstrong Tyre Service (Firestone) and a sign for Cohns Drinks in the background. 1201.21 - as for 1201.20 but with No. 5 en route to Eaglehawk now in photograph. 1201.22 - No. 26 at Quarry Hill terminus. 1201.23 - No. 26 at Quarry Hill terminus, view of front portion of tram only from a gate at the Bendigo cemetery. 1201.24 - Track at the end of the Quarry Hill line showing the point blades of the former "Y" terminus and the overhead for this. 1201.25 - No. 2 at the Quarry Hill terminus, looking along the former Trackwork. 1201.26 - as for 1201.25 1201.27 - number not used. 1201.28 - Golden Square terminus from some distance from the actual terminus, showing the Warning sign "TRAM" for motorists from the south. No. 7 at the terminus. 1201.29 - No. 7 passing through the Golden Square shopping centre. Numerous cars and pedestrians. Tram en route for North Bendigo. 1201.30 - No. 7 in High St. Golden Square, en route for North Bendigo. Photo taken after tram has passed photographer. 1201.31 - No. 7 in High St. just past Wattle St. with the Cathedral in the background. Tram has two SEC roof ads good side on photo, 'Everything's fine in my all electric kitchen' and 'Electrical cooking - clean, quick, economical'. 1201.32 - No. 7 in High St. nearing Wattle St. Has Cathedral in the background. Photo taken after tram has passed photographer.Information written on in black ink and date stamped on purple ink. 1201.1 - "No. 26 in Bond St just after leaving Long Gully" 1201.2 - "No. 26 climbing View St. from Charing Cross" 1201.3 - "No. 26 ascending View St. from Charing Cross (At Mackenzie St.)" 1201.4 - "View St. & Mackenzie St." 1201.5 - "No. 5 in View St. near Mackenzie St." 1201.6 - "No. 5 in View St. nearing Charing Cross." 1201.7 - "No. 7 in Nolan St. seen from Lake Weeroona Park." 1201.8 - "No. 7 entering McRae St. from Nolan St. Note "TRAM" warning sign on left. 1201.9 - "No. 7 in High St. passing Short St." 1201.10 - "No. 7 crossing Bendigo Creek bridge in High St. near Golden Square." 1201.11 - "No. 7 at Golden Square terminus" 1201.12 - "No. 7 at Golden Square terminus" 1201.13 - "No 7, 21 and 5 at Charing Cross" 1201.14 - "No. 7 at Golden Square terminus" 1201.15 - "No. 7 at Golden Square terminus" 1201.16 - "No 5 waiting at California Gully loop." 1201.17 - "Nos. 5 and 26 crossing at California Gully loop" 1201.18 - "No. 26 at Eaglehawk terminus" 1201.19 - "No. 21 arriving at Charing Cross from Golden Square" 1201.20 - "No. 26 at Charing Cross" 1201.21 - "Nos. 5 and 26 at Charing Cross." 1201.22 - "No. 26 at Quarry Hill terminus" 1201.23 - "No. 26 at Quarry Hill terminus seen through the gates of the Bendigo Cemetery." 1201.24 - "Quarry Hill terminus showing remains for former double track layout abandoned before 1964." 1201.25 - "No. 2 at Quarry Hill terminus" 1201.26 - "No. 2 at Quarry Hill terminus" 1201.28 - "The Southern approach to Golden Square with No. 7 standing at the terminus, "TRAM" warning sign on the left. 1201.29 - "No. 7 passing through Golden Square Shopping Centre" 1201.30 - "No. 7 in High St. Golden Square" 1201.31 - "No. 7 in High St. passing Wattle St." 1201.32 - "No. 7 in High St. nearing Wattle St."tramways, trams, bendigo, bond st., view st., nolan st., high st., eaglehawk, california gully, charing cross, quarry hill, trackwork, tram 2, tram 5, tram 7, tram 21, tram 26 -
 Ballarat Tramway Museum
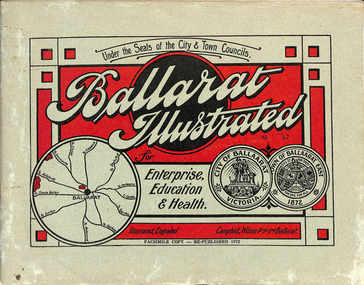
Book, "Ballarat Illustrated", 1972
Original c 1914 (see below), facsimile copy - re-published 1972. Original features photos of Ballarat City and Town, its buildings, parks and the various industries and organisations that were in Ballarat at the time of publication, including ESCo. Many photos features ESCo trams. Photos sepia toned. Has some red colour block printing on the front cover and rear, for Star Oil Engines. On inside back cover is a map with the places of interest and tram route map, marked in red. Pages are un-numbered. Original published by Ballarat East Town Council and Ballaarat City Council. On cover has number stamped in black in, "No. 87" (assume facsimile copy No.). Photos with publication show tram No. 21, built 1913 and ESCo photo page shows Mr. Pringle as Manager. Mr Pringle became manager in January 1911, As there is no photos of the "Avenue of Honour", or other mention of the first world war, assume original published about 1913 or 1914. Original shows Engravings and printing by "Campbell Wilson Prop Ltd, Ballarat". See Other Information as well for more listing details. High Resolution image added 31/8/2012 of i2 of ESCo page and i3 for Ballarat identies and sheet i4 extracted for Mr Pringle. PDF scan of full document added 21/5/2019 - see images btm633-1i.pdf and btm633-2i.pdf Notes on "Ballarat Illustrated" Reg. Item No. 733 From notes made by Neville Gower 12/1/1997 Cover: Inside front cover: Last paragraph, "Facilities for Travelling" - Electric trams serve all parts of Ballarat. Page 3: Street Scene, Municipal Town Hall, showing tram wiring Page 7: Street Scene, Lydiard St. North, intersection and tramway centre, with ESCo tram No. 21 in the bottom photo. Other photos features trams as well in Sturt St and Lydiard St. North. Page 9: Street Scene, Top photo of Sturt St. from Lydiard St. looking east, shows piles on right-hand side of road. Car parked by Post Office has a car registration number "9007". Bottom photo, an tram climbing hill, shows double trolley in the street, with early English type of pull offs. Page 13: Street Scenes and Historic Buildings: One of five photos, shows Victoria St. looking East, with tram track prominent in photo and how stone work was set up about the rails and overhead poles. Page 23: Street scene, Gardens North Entrance gates, shows details of gates near St. Aidans Drive. Note double trolley wire on poles, and style of insulators. No trams in photo, three ladies walking down the track. Page 37: Street Scene; Lydiard St views, top left hand photo, shows Railway station and railway gates with signal gantry and horse drawn vehicles. Tram tracks apparent. Bottom left hand photo shows Lydiard St. North, near Post Office, double track with centre poles - Single wire per track. Top right hand photo, showing Cemetery gates in background. Bottom right hand photo - from north end of Lydiard St. South, looking north, with an ESCo tram in background. Also has a parked car on left hand side. Page 45: Street Scenes - Bridge St; top photo at west end of Bridge St. with ESCo No. 11 with possibly double trolley wire in photo. Bottom photo at east end of Bridge St. with tram in background, shows junction. Double trolley heading out to Mt. Pleasant, single trolley for Victoria St. Page 45: Street Scenes - Bridge St; top photo at west end of Bridge St. with ESCo No. 11 with possibly double trolley wire in photo. Bottom photo at east end of Bridge St. with tram in background, shows junction. Double trolley heading out to Mt. Pleasant, single trolley for Victoria St. Page 61: Street Scenes and Historic Buildings - Public Institutions Ballarat - top left hand photo of the Hospital shows some tram track in foreground, with double trolley wire. Top right photo is of the Orphanage, the name of the tram terminus for many years. Page 68: Electric Supply Co. of Victoria's pages - top photo showing powerhouse in background, across the lake, can hardly see anything for the trees, except for the chimney. Bottom photos of the steam Turbo Generators and the switchboard. Gives Mr. P.J. Pringle as Chief Engineer and General Manager. He took over in Jan. 1911. Page 69: Ballarat East Views - features photo of Black Hill open cut, Ballarat East Railway Station, Ballarat Fire Station and "Victoria St. looking East", repeat of photo printed on page 12, but slightly darker. Image on system includes fire station and railway station, - Ballarat East. Page 78: Series of photos of various Ballarat VIP's of the era, fourth one in on top line features "P.J.Pringle, Electric Supply Co." Inside Back cover - map of Ballarat including tram lines and places of interest marked in red. Gives a detailed photographic presentation of Ballarat in 1914.80 page book with, in addition, light green card covers, titled "Ballarat Illustrated". Loose copy of page 9 and 10 held.trams, tramways, ballarat, local history, heritage buildings, esco -
 Ballarat Tramway Museum
Film - Movie Film & Box, Kodak, 1960
Yields information in movie film format of Ballarat trams in 1960, how the system operated and was used by people., Yields information in movie film format of Ballarat trams in 1960, how the system operated and was used by people.Movie film - 8mm, approx. 30mins, with leader strip on a plastic reel, within a black and white plastic box, titled "Ballarat No. 1. 1960". Has been transferred to DVD - see Reg item 4100 as Segment No. 2. Made by Ben Parle. Also transferred to DVD by Rod Cook Oct. 2015, via Roger Greenwood for use in his DVD, "The City of Ballarat Trams, Gardens & Gold" of 2016. See Reg Item 6883. Synopsis: based on time. 0:00 View of typed introduction, noting that this is a pictorial record of Ballarat. 0:10 Title “The Tramways of Ballarat 1960, Part 1” 0:16 13, showing “View Point” at Stones Corner, Bridge St, east end, with trolley pole being turned, while another single trucker heads out towards Mt Pleasant. 0:25 13 leaving Stones Corner, short approach and then longer trailing shot of the tram going towards the City in Bridge St. 0:44 View out of front of tram in Bridge St heading towards the City, with cars in the photo, then passing through city Loop, no trams in the loop and running up to Lydiard St Nth and crossing the road. 1:22 Running up Sturt St from Armstrong St, passes over Dawson St X-over and up to the next intersection, Lyons St. 1:54 Title “The View Point Line” 1:59 19 inbound, in Ripon St, from crossing Mair St, towards camera and then passing away and turning into Sturt St. 2:49 View of a “Warning Oncoming Trams” sign 2:52 19 in Ripon St, going to View Point, crossing Webster St towards camera, then going away through the disconnected Victoria Ave loop, pass the “Warning Oncoming Trams” sign. Note very windy scene with people running across roads. 3:17 19 in Wendouree Parade, in bound, though showing destination View Point, going away from the camera, past the View Point Hotel. 3:39 19 coming towards camera near Excerpt or Devon St and then going away towards the terminus. 4:04 19 at the terminus, stationary, with a single trucker 3?, passing from Macarthur St into Wendouree Parade, behind 19. 4:20 33 coming towards camera in Wendouree Parade from St Aidans Drive, stopping to pick up passenger at Forest St and then going away towards the City, photographed from near the depot, on a wet and windy day. 4:54 35 in Wendouree Parade, coming towards the Camera from St Aidans Drive and then going away with the Gardens Loop area in the background. Tram stops at stop to let a passenger off. 5:28 21 leaving Gardens Loop for the City via the Depot, green light in signal can be seen. 5:43 28?, closely followed by 26 turn from Drummond St South into Sturt St. 6:18 Scene opens with shot of “Sebastopol” destination on a bogie tram. 6:21 Title “The Sebastopol Line” 6:24 21 turning from Sturt St into Drummond St Sth with destination of Bell St and then going away from the camera. 6:55 38 in Drummond St Sth, coming towards the camera and then passing the camera with Sturt St just in the view. 7:10 21, showing Gregory St, in Drummond St Sth, approaching and then going away, entering the Urquhart St Loop, 7:39 34 in Drummond St Sth (location check required (Latrobe?)), approaches camera, picks up passengers and the goes away. 8:09 39 at ? Street, turns from Drummond St Sth into Skipton St, after picking up and setting down passengers, bound for Sebastopol 8:55 35 inbound in Skipton St passes through the Bell Street Loop, and then goes away from the camera. 9:33 42 outbound in Skipton St, approaches the camera, passes and then crosses over the half the road into Albert St. 10:00 39 inbound in Albert St – location? 10:31 34 outbound for Sebastopol, approaches camera and just starts to pass by. 10:36 34 in Grey St crossing loop, crosses 42 inbound. 10:59 39 outbound in Albert St, with shopping centre in bound, approaches camera, passes and then crosses over Albert St. Mid morning scene. 11:39 39 inbound, Albert St south, approaches camera and then passes and the crosses over Albert St. 12:16 41 outbound in Albert St passes the camera, and pulls into the terminus with the conductor getting out on the back bumper to pull the pole down as the tram stops and a passenger walks into the Royal Hotel. 12:39 Title “The Lydiard Street North Line” 12:44 Filmed from the Hotel balcony, 21 inbound in Lydiard St Nth passes over Mair St, stops while 33 passes in the other direction. 13:18 With the red light showing on the Seymour St loop signal, 33 inbound for Sebastopol stops and picks up many passengers, passes the camera and runs past the VRI building in the background and through the loop. Possibly filmed on a Sunday given the ladies dresses and quieter streets. 14:01 30 outbound, passes the camera and stops at Macarthur St. Filmed alongside the brick wall of the cutting. 14:28 30 inbound arrives, passes through the Gregory St loop and then proceeds past the camera, making a stop to pick up passengers. 15:14 28 in Lydiard St Nth – location?, approaches and goes away from the camera, north of Gregory St. 15:34 28 ditto location? 15:53 21 arrives at the terminus with passengers getting on and off. 16:11 View of the a vertical positioned “End of Section” sign on a pole at the terminus and then lifting the camera to see the timetable board and the stop sign. 16:33 31 in Bridge St passing Morseheads and then turning into Sturt St, stops at the Grenville St stop, while another single trucker comes down to the stop from the City. 16:58 31 outbound in Bridge St, with destination of Victoria St. 17:14 Title “The Victoria Street Line” 17:18 31 outbound to Victoria St from Stones Corner. Starts with an overhead shot, shows clock at the Caltex service station,. 17:37 31 inbound approaching Bakery Hill and then descending to the junction after it passes camera. 18:09 25 climbing outbound in Victoria St, passing the camera, to then pass through the King St loop. 18:47 25 inbound in Victoria St, passing the camera, then pass through the King St loop, with St Alypius Church in the background. 19:36 14 approaching the rail bridge in Victoria St and stopping at the 2nd last stop to left of passengers. 20:01 14 leaving the terminus and approaching the camera and the a short sequence going away, to the next stop to pick up quite a few passengers. 20:14 “Trams Stop Here” sign, metal wrap around on a steel pole. 20:16 Title “The Mount Pleasant Line” 20:21 11 inbound in Main St, with a passenger leaping off the tramcar and another getting off just before the junction. 20:45 11 passes the junction and then proceeds away from the camera in Bridge St. 21:04 30 outbound in Main St, then turns into Barkly St, a bus (Eclipse Motors) passes in Main St just before the sequence ends. 21:31 30 inbound near Steinfield St. (exact location?) 21:49 25 approaches the camera, then proceeds away and passes through the Grant St. loop. 22:29 25 inbound, windy day, between Grant and Cobden, (exact location?), with a horse drawn bread van in the view and the breadman walking behind the tram as it passes. 23:02 11 outbound in Barkly St, (exact location?) 23:37 11 inbound in Barkly St (exact location?) 23:44 Mt Pleasant terminus signage 23:50 30 approaches the terminus and then stops with the conductor alighting turning the pole, passengers getting on and off and the driver appearing at the other end. 24:32 Title “The Gardens Via Sturt St. West Line” 24:35 21 outbound in Sturt St near Raglan St, approaches and passes the Camera. 25:09 12, showing City Oval, approaches and passes the camera, outbound near Windermere St. 25:33 13 showing View Point, goes away from the camera – location? 25:44 12 comes from St. West, inbound passes the camera and then stop as the next stop next Talbot St? 26:21 Short sequence of a “Warning Oncoming Trams” sign 26:28 42 inbound in Sturt St West, just before Ripon St, view coming towards camera and then going away to cross Ripon St. 27:10 34 passes through the Parker St loop 27:25 35 or 39 inbound past the college in Sturt St West 28:04 41 outbound at the Russell St curve, passes away from the camera. 28:11 35? inbound passes away from the camera through the Victoria Park or Morrison St loop, swinging out into the roadway. 28:29 View of timetable sign at Hamilton Ave. 28:37 35 turning from Sturt St West into Hamilton Ave, can see the conductor changing over the barrier rails. 29:11 42 inbound, crosses another bogie tram (35?) at Carlton St loop then passes the camera and goes past the Olympic rings monument. 29:42 12 approaches the Carlton St gates. 30:07 12 outbound, crosses a bogie tram in the loop with both trams then leaving the loop. 30:20 Title “End of Part One” Written labels giving title information on outside of box.trams, tramways, ballarat, sebastopol, lydiard st north, victoria st, mt pleasant, sturt st west -
 Ballarat Tramway Museum
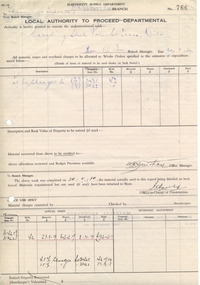
Document - Form/s, State Electricity Commission of Victoria (SECV), "Local Authority to Proceed - Departmental", May. 1939
Yields information about the way work was authorised by the SEC in Ballarat and how costs were then charged and recorded. Demonstrates that the ESCo steel poles were not earth to the tramway rails.Single sheet, foolscap form, pre-printed and given running number 766, titled "Local Authority to Proceed - Departmental", sent to the Tramway's Inspector, dated 30/5/39 for the earthing of steel poles to tram rails - and costs and materials used (on page 2) for the work.Has been filled in using ink and penciltrams, tramways, overhead, trolley wire, poles -
 Ballarat Tramway Museum
Negative, Wal Jack, Oct. 1951
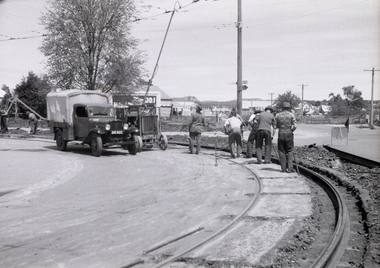
Yields information about the relay of the track at the corner of Main Road and Barkly St.Negative and Digital images of the Wal Jack Ballarat Negative file of trackwork to relay the outer rail at the corner of Barkly St and Main Road. Shows the methodology of the work. Has the compressor connected to the overhead in the view. Done at the same time as Bridge St and Main Road - see Reg Item 7731? See Reg Item 5294 for the first tram over the curve - 21/10/1951trams, tramways, main road, barkly st, trackwork, track repairs, welding truck, rails -
 Ballarat Tramway Museum
Slide - SECV Welding truck - View Point, Ben Parle, 8/04/1958
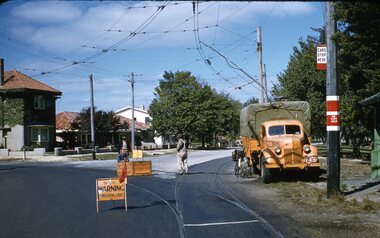
Photo taken by Ben Parle 8/4/1958. Photo of the SEC Ballarat Ford welding truck, at the intersection of Macarthur St and Wendouree Parade, View Point Junction. Note tram stop signage. Three SEC workers in view, with road signage set up and truck connected to the overhead for welding work. Note bicycle leaning against truck. Welder - Weld. See Reg Item 7700 for another photo of the truck in the Power Station yard and 10003 at Lydiard St level crossing. For high resolution scan see btm2864.tif Yields information about the use of the SECV welding truck to repair rail joints or the rail head.Kodachrome Transparency - 35mm slide - cardboard mount, with one side with red border and words "Kodachrome Transparency / Processed by Kodak" top and bottom."Drummond St. and View Point Junction Ballarat" / "8-4-58". Has slide No. "5" stamped in black in top corner.tramways, trams, rails, welding, trucks