Showing 20 items matching "russell st terminus"
-
 Melbourne Tram Museum
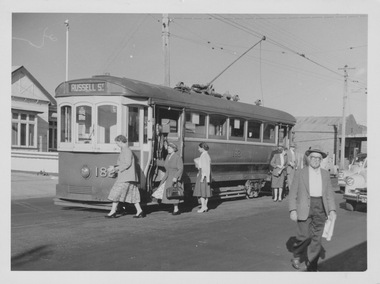
Photograph - T class tram No. 182, M&MTB, 1950s-1960s
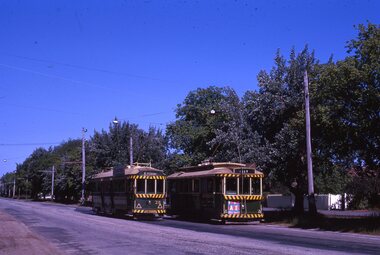
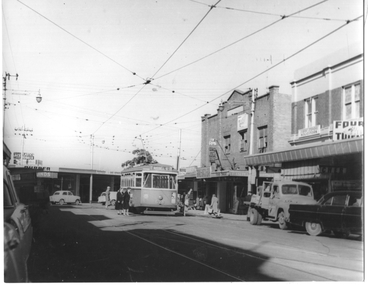
... ...Russell St terminus...Official M&MTB photograph showing T class 182 just arriving at the Russell St and Barkly St, Footscray single track terminus with male and female passengers alighting and others waiting to board. ...Russell St'. A local shop and private residence are evident in the background. Yields information about T class 182 and Russell St, Footscray terminus T class tram 182 Barkly St Footscray Russell St terminus alighting trolley pole destination blind In pencil: "M&MT Photograph $20" Black and white print with note on rear. ...Official M&MTB photograph showing T class 182 just arriving at the Russell St and Barkly St, Footscray single track terminus with male and female passengers alighting and others waiting to board. Motor cars are stopped to allow passenger movement, the trolley pole has not yet been reset and the destination blind still reads 'Russell St'. A local shop and private residence are evident in the background. Yields information about T class 182 and Russell St, Footscray terminusBlack and white print with note on rear.In pencil: "M&MT Photograph $20"t class tram, 182, barkly st, footscray, russell st terminus, alighting, trolley pole, destination blind -
 Melbourne Tram Museum
Negative, Wal Jack, 21/04/1945 12:00:00 AM
... Black and white negative, by Wal Jack, of S 166 at the Russell St terminus in Barkly St West Footscray. ...Melbourne Tram Museum 8 Wallen Road Hawthorn melbourne Trams tramways Russell St Barkly St Footscray S Class tram 166 MMTB Black and white negative, by Wal Jack, of S 166 at the Russell St terminus in Barkly St West Footscray. ...Black and white negative, by Wal Jack, of S 166 at the Russell St terminus in Barkly St West Footscray. In the Wal Jack Melbourne album, the date is 21-4-1945.trams, tramways, russell st, barkly st, footscray, s class, tram 166, mmtb -
 Melbourne Tram Museum
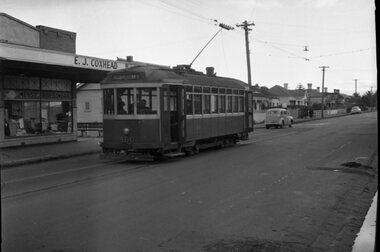
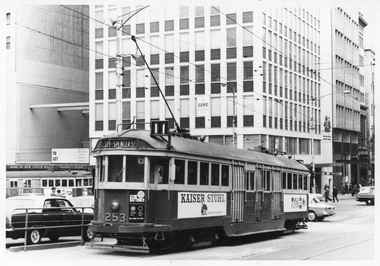
Negative - MMTB Tram 460 at Russell St Footscray, Hugh Ballment, c1960
... The photograph shows MMTB X1 class tram No. 460 at the Russell St terminus in Barkly St West Footscray. ...Melbourne Tram Museum 8 Wallen Road Hawthorn melbourne The photograph shows MMTB X1 class tram No. 460 at the Russell St terminus in Barkly St West Footscray. The tram has the return destination of Williamstown Road. ...The photograph shows MMTB X1 class tram No. 460 at the Russell St terminus in Barkly St West Footscray. The tram has the return destination of Williamstown Road. In the background is E J Coxhead, Mens and Boys Wear shop. This line closed in 1962.Yields information about MMTB Tram X1 class 460 and the Russell St line in Barkly St West Footscray.Negative - 127 film black and white.tramways, footscray, russell st, barkly st, tram 460, x1 class -
 Melbourne Tram Museum
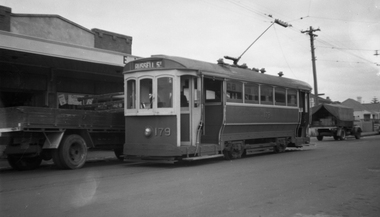
Negative, Wal Jack, 17/12/1954 12:00:00 AM
... Black and white negative, by Wal Jack, of T 179 at the Russell St West Footscray terminus in Barkly St. The building facade in the background remains at entry date. ...Melbourne Tram Museum 8 Wallen Road Hawthorn melbourne Trams tramways Footscray T Class Barkly St Russell St tram 179 Black and white negative, by Wal Jack, of T 179 at the Russell St West Footscray terminus in Barkly St. ...Black and white negative, by Wal Jack, of T 179 at the Russell St West Footscray terminus in Barkly St. The building facade in the background remains at entry date. Tram has the destination of Russell St.trams, tramways, footscray, t class, barkly st, russell st, tram 179 -
 Melbourne Tram Museum
Slide - MMTB, MTA and VR tramway operations set of 12, Hugh Ballment, 1950s to 1980s
... HBM088 - MMTB PCC 980, 26/05/1954, Preston Workshops, HBM089 - MMTB X1 460, c1960, at the Russell St terminus in Barkly Street, West Footscray. ...HBM088 - MMTB PCC 980, 26/05/1954, Preston Workshops, HBM089 - MMTB X1 460, c1960, at the Russell St terminus in Barkly Street, West Footscray. ...Set of 12 photos by Hugh Ballment, unless noted, of VR, MTA and MMTB trams: HBM081 - VR Tram No 50, mid 1950s, Elwood Depot, with a Don't move sign. Tram 38 is alongside HBM082 - MMTB, c1975, Spring Street, Z1 class cars- (fuzzy photo) HBM083 - MMTB Trams X1 466 and 463, early 1960s, Leeds Street, Footscray station. In the background are J Burmah tailor, K C Field pawn broker, HBM084 - MTA, B 2001, Showing "Southbank Depot" Route 91, late 1980s, Albert Park, Light rail level crossing at Birdport Street. HBM085 - MMTB X2 677, late 1950s, Elsternwick, Glen Huntly Road, with the Railway level crossing gates closed. In the background are adverts for The Rex Fruit shop, The Sun, The Age, spray painting, Turf, and Holden cars. HBM086 - MMTB Tram 677, late 1950s, in Glen Huntly Road at the intersection of Broadway and Ormond Road bound for Port Ormond. In the background is a Chemist, Morley Auctioneers, State Savings Bank, and a motor dealer advertising Standard Cars. HBM087 - MMTB X1 459, early 1960s, Barkly Street?, running a Russell Street service. HBM088 - MMTB PCC 980, 26/05/1954, Preston Workshops, HBM089 - MMTB X1 460, c1960, at the Russell St terminus in Barkly Street, West Footscray. The tram has the return destination of Williamstown Road. In the background is E J Coxhead, Men's and Boy's Wear shop. This line closed in 1962. HBM090 - MMTB T 181, c1960, in Ballarat Road at the Rosamond Road terminus showing Williamstown Road on the destination. HBM091 - MMTB Tram 678, c1960, Ballarat Road, At Eleanor Street, with E V Young general store in the background advertising Robur Tea, and Cadbury's chocolate. HBM092 - MMTB Tram 467, c1960, in Francis Street at the Williamstown Road terminus, showing the return destination of Ballarat Road. Has a Gent's Hairdresser in the background. Yields information about Melbourne tram operations, with 1950s or 1960s photos of Melbourne tramways.Kodachrome cardboard and plastic mounts, with notes - set of 12tramways, vr, st kilda brighton tramway, tram 50, z class, tram 466, tram 463, footscray, williamstown road, russell st, ballarat road, tram 2001, tram 677, tram 459, tram 980, preston workshops, glen huntly road, trams, elwood depot, spring st, leeds st, x1 class, pcc class, route 91, birdport st, b class, albert park, yarraville, west footscray, barkly st, broadway, ormond road, rosamond road, tram 460, x2 class, t class, tram 181, francis st, tram 678, tram 467 -
 Ballarat Tramway Museum
Photograph - Colour Photograph/s - set of 25, Austin Brehaut, 7/04/2000 12:00:00 AM
... St. North terminus from cemetery .15 - Lydiard St. North at Macarthur St. .16 - Lydiard St. North at Sturt St facing South East - Post Office on left .17 - Looking north along Lydiard St at Sturt St .18 - Sturt and Lydiard Sts corner from Post Office .19 - Centre plantation Sturt St. looking east .20 - Sturt St. West near Ballarat and Clarendon College .21 - Sturt St. West facing west at Russell...St. North terminus from cemetery .15 - Lydiard St. North at Macarthur St. .16 - Lydiard St. North at Sturt St facing South East - Post Office on left .17 - Looking north along Lydiard St at Sturt St .18 - Sturt and Lydiard Sts corner from Post Office .19 - Centre plantation Sturt St. looking east .20 - Sturt St. West near Ballarat and Clarendon College .21 - Sturt St. West facing west at Russell ...Yields information about various locations in Ballarat in March 2000 for comparison with previous photographs.Set of 25 colour photographs taken by Austin Brehaut on 7 April 2000 showing various locations that Ballarat trams once ran in, for use in a BTM presentation, named "Ballarat Past and Present" at the COTMA 2000 Ballarat Conference. All on Fujicolour Crystal Archive Paper. On rear in blue ink is the date, location and where relevant a reference number to photo locations that the author of the presentation had requested. Letter from Austin, filed with the worksheet for Reg. Item 1772. 1773.1 - Base Hospital, Cnr Drummond St. North and Mair St. .2 - Hospital Corner - Base Hospital Along Drummond St. North .3 - St John of God Hospital, cnr Mair and Drummond St. Nth. .4 - Hospital Corner, looking South East from Base Hospital .5 - Gardens at Loop (Wendouree Parade) .6 - Gardens Loop and Shelter .7 - Shelter at Gardens Loop .8 - Bridge Mall looking west .9 - Lower Victoria St. along Bridge St .10 - Railway crossing, Ballarat Station, with gates open .11 - Victoria St. hill facing west .12 - Railway crossing, Lydiard St. North .13 - Railway crossing, Ballarat Station, with gates closed .14 - Lydiard St. North terminus from cemetery .15 - Lydiard St. North at Macarthur St. .16 - Lydiard St. North at Sturt St facing South East - Post Office on left .17 - Looking north along Lydiard St at Sturt St .18 - Sturt and Lydiard Sts corner from Post Office .19 - Centre plantation Sturt St. looking east .20 - Sturt St. West near Ballarat and Clarendon College .21 - Sturt St. West facing west at Russell St. .22 - Victoria St. terminus .23 - Victoria St. terminus .24 - St Alipius Church, Victoria St. .25 - Junction of tramline and Phoenix foundry railway in Sturt St. at Armstrong St. (transferred from roadway) See Reg item 4645 and 4646 for the 2010 comparisons.See Aboveballarat, hospital corner, gardens loop, railway crossing, lydiard st. north, sturt st, phoenix foundry, armstrong st., victoria st., sturt st. west -
 Warrnambool and District Historical Society Inc.
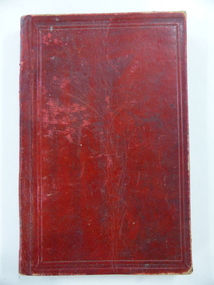
Book, John Ross notebook, 1890s
... St) Warrnambool great-ocean-road This small note book belonged to John Ross, the Warrnambool Town Surveyor and Engineer (1889-1906 & 1913-1914). The book lists the levels taken for the benefit of contractors undertaking jobs for the Warrnambool Council from 1898 to 1902. The jobs include ‘Russells Creek from the Merri River upwards’, ‘Outlet at the Flume’, ‘Guns at the Battery’ and Drainage from the Terminus ...This small note book belonged to John Ross, the Warrnambool Town Surveyor and Engineer (1889-1906 & 1913-1914). The book lists the levels taken for the benefit of contractors undertaking jobs for the Warrnambool Council from 1898 to 1902. The jobs include ‘Russells Creek from the Merri River upwards’, ‘Outlet at the Flume’, ‘Guns at the Battery’ and Drainage from the Terminus Hotel to the end of the Japan Street Tunnel’. John Ross was also in private practice with the architectural firm of Ross and Jackman. This notebook is of considerable interest because it is an original note book that belonged to John Ross, the Warrnambool Town Surveyor and Engineer in the late 19th century and early 20th century. The note book contains important information on the engineering projects in Warrnambool and district from 1898 to 1902. This note book has a red leather cover. The cover is a little creased. The inside pages have ruled red lines and printed headings regarding the levels taken of a site and the location of the site (1898 to 1902). The engineer’s entries in the printed columns are handwritten , mostly in pencil. The inscription on the first page is handwritten in black ink. ‘Jno C Ross, Town Surveyor Wbool 19/5/98’ john ross, warrnambool town council, history of warrnambool -
 Ballarat Tramway Museum
Photograph - SECV Ballarat - operations - set of 10, George Stevens, 15/8/1971
... Set of 10 Digital images, from slides taken by George Stevens on 15/8/1971: 1 - Tram 27 derailed at depot junction in Wendouree Parade 2 - Tram 27 ditto 3 - Tram 33 Inbound in Drummond St North. 4 - Tram 33 In Sturt St 5 - Tram 33 In Bridge St with a Victoria St destination, and a Twin Lakes sign at Stones Corner' 6 - Tram 33 At Victoria St terminus with orphanage buildings in the background. 7 - Tram 31 inbound to Mt Pleasant in Sturt St west, just past Russell St 8 - Tram 33 Victoria St, with St Alipius church in the background. ...Ballarat Tramway Museum South Gardens Reserve Wendouree Parade Ballarat Ballarat goldfields Set of 10 Digital images, from slides taken by George Stevens on 15/8/1971: 1 - Tram 27 derailed at depot junction in Wendouree Parade 2 - Tram 27 ditto 3 - Tram 33 Inbound in Drummond St North. 4 - Tram 33 In Sturt St 5 - Tram 33 In Bridge St with a Victoria St destination, and a Twin Lakes sign at Stones Corner' 6 - Tram 33 At Victoria St terminus with orphanage buildings in the background. 7 - Tram 31 inbound to Mt Pleasant in Sturt St west, just past Russell St 8 - Tram 33 Victoria St, with St Alipius church in the background. ...Set of 10 Digital images, from slides taken by George Stevens on 15/8/1971: 1 - Tram 27 derailed at depot junction in Wendouree Parade 2 - Tram 27 ditto 3 - Tram 33 Inbound in Drummond St North. 4 - Tram 33 In Sturt St 5 - Tram 33 In Bridge St with a Victoria St destination, and a Twin Lakes sign at Stones Corner' 6 - Tram 33 At Victoria St terminus with orphanage buildings in the background. 7 - Tram 31 inbound to Mt Pleasant in Sturt St west, just past Russell St 8 - Tram 33 Victoria St, with St Alipius church in the background. Tram has an Eureka tiles advert, an SEC Cooking advert, and a Pay-as-you-Enter sign. 9 - Tram 12 at Grenville St in Sturt St alongside the tram stop shelter. In the background are Gear Chemist, Edments Hartleys, Patersons, the T& G offices and the Ballarat Mechanics building without any advertising on the east face. Behind the tram is the 8 hour day monument. 10 - Tram 12 In Victoria St with St Alipius church in the background. Yields information about the tramcars used on 15/8/1971 and the various locations around the system.Set of 10 digital images scanned from slides.tramways, lydiard st nth, wendouree parade, derailment, tram 27, tram 33, sturt st, drummond st nth, bridge st, tram 31, tram 12, victoria st, sturt st west -
 Ballarat Tramway Museum
Negative - SECV Ballarat operations - set of 6, Robert Green, 31/12/1968
... St terminus, with the shelter in the background. The tram has the destination of City 2 -Tram 30 Turning into Macarthur St from Wendouree Parade with another tram at View Point, possibly No. 20 3 -Tram 28 In Sturt St West with the destination of Gardens. Tram has two SEC Electrical roof adverts. 4 -Tram 37 Inbound in Sturt St West for Mt Pleasant 5 -Trams 30, 37 Crossing at the Parker St loop. Tram 30 has the destination of Sturt St West 6 -Tram 30 just west of Russell...St terminus, with the shelter in the background. The tram has the destination of City 2 -Tram 30 Turning into Macarthur St from Wendouree Parade with another tram at View Point, possibly No. 20 3 -Tram 28 In Sturt St West with the destination of Gardens. Tram has two SEC Electrical roof adverts. 4 -Tram 37 Inbound in Sturt St West for Mt Pleasant 5 -Trams 30, 37 Crossing at the Parker St loop. Tram 30 has the destination of Sturt St West 6 -Tram 30 just west of Russell ...Set of 6 photographs by Robert Green 31/12/1968, showing the tramcar operations of the SECV system on that day: 1 -Tram 30 at the Haddon St terminus, with the shelter in the background. The tram has the destination of City 2 -Tram 30 Turning into Macarthur St from Wendouree Parade with another tram at View Point, possibly No. 20 3 -Tram 28 In Sturt St West with the destination of Gardens. Tram has two SEC Electrical roof adverts. 4 -Tram 37 Inbound in Sturt St West for Mt Pleasant 5 -Trams 30, 37 Crossing at the Parker St loop. Tram 30 has the destination of Sturt St West 6 -Tram 30 just west of Russell St in Sturt St West with Victoria Park on the right. On the adjacent pole is the School Children only tram stop. Yields information about the SECV Ballarat tram operations on 31/12/1968.35mm negative in a film strip - set of 6tramways, drummond st nth, tram 30, wendouree parade, sturt st west, parker st loop, victoira park, tram 37, haddon st, macarthur st, tram 28 -
 Ballarat Tramway Museum
Slide - 35mm slide/s - set of 7, Noel Simons, 22/11/1962 12:00:00 AM
... St. Ballarat near Russell Street" - in blue and black ink. The "Russell St" is a later addition, over white out. 1161.2 - "33 near Botanic Gardens terminus, Wendouree Parade, Ballarat" 1161.3 - "No. 39 in Lydiard St. ...St. Ballarat near Russell Street" - in blue and black ink. The "Russell St" is a later addition, over white out. 1161.2 - "33 near Botanic Gardens terminus, Wendouree Parade, Ballarat" 1161.3 - "No. 39 in Lydiard St. ...Set of 7 Kodachrome transparencies taken on 22/11/1962. 1161.1 - trams 38 and 20 in Sturt St. West at the Russell St. loop. No. 20 has possibly terminated and is showing "CITY" while 38 is showing "Mt Pleasant" Both trams fitted with dash canopy lighting, but no large white stripe. 20 has a Twin Lakes sign. 1161.2 - tram 33 just before Gardens Loop in Wendouree Parade, with destination of "Victoria St." Has a Twin Lakes sign. 1161.3 - tram 39 at corner of Lydiard St. North and Sturt St. with Post Office in background. 1161.4 - tram 40 turning from Sturt St into Lydiard St. North with Post Office in background and showing destination of Lydiard St. North. A blue Holden with red stripes for the Radio Cabs co. is in the foreground, along with pedestrians. 1161.5 - tram 41 in Sturt St. at the City terminus, showing destination of Mt Pleasant with Post Office and ANZ Bank buildings in background. Numerous people waiting on the seats at the tram stop. 1161.6 - tram 13 in Sturt St. near Doveton St. showing destination of Bell St. Many cars and pedestrians on the south side of Sturt St. Note the Austin motor car by the tram showing a stop signal. Tram 13 has a Twin Lakes sign. 1161.7 - trams 13, 26, and 39 in the City Loop near Bridge St. Has Morseheads and Grenville St. tram shelter in the background.1161.1 - "38 and 20 crossing in Sturt St. Ballarat near Russell Street" - in blue and black ink. The "Russell St" is a later addition, over white out. 1161.2 - "33 near Botanic Gardens terminus, Wendouree Parade, Ballarat" 1161.3 - "No. 39 in Lydiard St. Ballarat at Cnr. of Sturt St." 1161.4 - "No. 40 entering Lydiard St. from Sturt St. Ballarat" 1161.5 - "No. 41 in Sturt St. Ballarat at cnr of Lydiard St." 1161.6 - "No. 13 in Sturt St. Ballarat, at Cnr. of Doveton St." 1161.7 - "Nos. 13, 26, and 39 in Sturt St. Ballarat near Bridge St." All have date stamp of "22 Nov. 1962" in purple ink. All black ink unless otherwise noted.tramways, trams, ballarat, sturt st. west, wendouree parade, lydiard st., city loop, taxis, radio cabs, tram 13, tram 20, tram 26, tram 33, tram 38, tram 39, tram 40, tram 41 -
 Melbourne Tram Museum
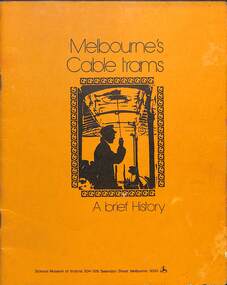
Book, Science Museum, "Melbourne's Cable Trams - A brief history", 1975
... Russell St. The additional sheet with the book provides details for each route of route, the location of the city terminus, suburban terminus, running time, night light, route length, first and last car for each day of the week. ...Russell St. The additional sheet with the book provides details for each route of route, the location of the city terminus, suburban terminus, running time, night light, route length, first and last car for each day of the week. ...Book produced by the Science Museum provides a brief history of the cable tram system, with photos. Includes details of the engine houses, the cable, the grip mechanism, the ticket bell punch, and why "Mind the Curve". Has a list of acknowledgments. Published shortly after or at the time of the launch of the tram in the enclosure in Russell St. The additional sheet with the book provides details for each route of route, the location of the city terminus, suburban terminus, running time, night light, route length, first and last car for each day of the week. Not known who compiled the sheet.Demonstrates the work of the Science Museum - now Scienceworks.Book - 16 pages + card cover +postcard of cable tram set No. 1 at the Science Museum 1975. Inside the book is a ruled sheet of paper with details of the cable tram routes, handmade with ink.tramways, cable trams, science museum, melbourne -
 Melbourne Tram Museum
Photograph - Set of 3 Black & White Photograph/s, 1960's
... A series of three Black and white photographs of tram T class 182 at the Williamstown Road terminus of the Footscray tram system, c1960. Tram photograph in Somerville Road. All showing the return destination of Russell St. .1 - Shows the shops in the background. ...Melbourne Tram Museum 8 Wallen Road Hawthorn melbourne Trams tramways Footscray Williamstown Rd Somerville Rd tram 182 T class MMTB Stamped in black ink on back "TMSV Sales" A series of three Black and white photographs of tram T class 182 at the Williamstown Road terminus of the Footscray tram system, c1960. Tram photograph in Somerville Road. All showing the return destination of Russell St. .1 - Shows the shops in the background. ...A series of three Black and white photographs of tram T class 182 at the Williamstown Road terminus of the Footscray tram system, c1960. Tram photograph in Somerville Road. All showing the return destination of Russell St. .1 - Shows the shops in the background. Trolley pole reversed and appears the driver is about to enter the cab of the tram. Has the run number F6. Has a Caltex, Ampol, Kix and Caravan park sign in the background. .2 - 182 at the terminus with trolley pole reversed and under the wheel locating guard. Has Run No. F5 in the rear cabin window. .3 - ditto, but before trolley pole reversed with passengers leaving the car and one lady waiting to board. Printed on Fujichrome paper. Not known who took the photograph or when it was printed. Two copies of .1 held.Stamped in black ink on back "TMSV Sales"trams, tramways, footscray, williamstown rd, somerville rd, tram 182, t class, mmtb -
 Melbourne Tram Museum
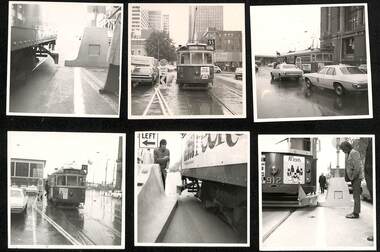
Document - Report, Melbourne & Metropolitan Tramways Board (MMTB), "Interim Report - Nicholson Street Safety Bars", 1978c, 1973
... .4 - tram and traffic at the Bourke St terminus. .5 - not used. .6 - tram 1000 at ditto on a wet day .7 - as for .2 .8 - ditto .9 - ditto .10 - side on view of W2 447 with a concrete prow fitted with a set of flashing lights. .11 - to .15 - series of large prints of enlarged 35mm negatives of night testing of safety zone sign taken at South Melbourne Depot and in St Kilda Road. .16 Bourke St - looking west at Russell St? ....4 - tram and traffic at the Bourke St terminus. .5 - not used. .6 - tram 1000 at ditto on a wet day .7 - as for .2 .8 - ditto .9 - ditto .10 - side on view of W2 447 with a concrete prow fitted with a set of flashing lights. .11 - to .15 - series of large prints of enlarged 35mm negatives of night testing of safety zone sign taken at South Melbourne Depot and in St Kilda Road. .16 Bourke St - looking west at Russell St? ...Report and photographs of various mechanisms to identify and check clearances for Safety Zones on tramways. .1 - Report - 4 pages stapled in top left hand corner - titled "Interim Report - Nicholson Street Safety Bars", dated 20/6/1978 signed by R. G. Vanselow. Describes the work involved in providing a type of "jiggle bars" leading up to the safety zone. Many photographs of the various types of safety zone marks were included within the folder. The photos of 912 are related to the clearance testing carried out during 1973 for the Z class. See also Reg Item 480? .2 - tram 912 fitted with a wooden device to measure clearances - with a concrete safety zone being checked. .3 - tram 1040 in Bourke St with a Safety Zone sign on the left - King St? .4 - tram and traffic at the Bourke St terminus. .5 - not used. .6 - tram 1000 at ditto on a wet day .7 - as for .2 .8 - ditto .9 - ditto .10 - side on view of W2 447 with a concrete prow fitted with a set of flashing lights. .11 - to .15 - series of large prints of enlarged 35mm negatives of night testing of safety zone sign taken at South Melbourne Depot and in St Kilda Road. .16 Bourke St - looking west at Russell St? with caption "prow replacing type 2 (Hairpin sign) with both original (white) and new MCC (Yellow) line marking on approach". .17 - Bourke St - looking west at Kings St and caption "Prow replacing type 2 (Hairpin sign) with original line marking on approach. .16 and .17 taken on Polaroid Instamatic cameras.Some of the photos have captions written on the rear.trams, tramways, tram stops, bourke st, safety zone, testing, z class, safety, tram 912, tram 1040, tram 1000, tram 447 -
 Melbourne Tram Museum
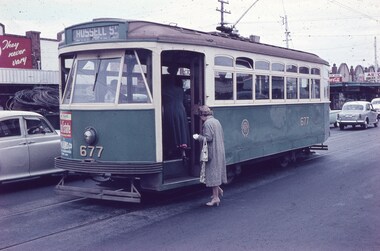
Slide - Set of 7, Keith Caldwell, 10/03/1960 12:00:00 AM
... terminus of the Footscray tram system. Tram photographed in Somerville Road, showing the return destination of Russell St. ...Melbourne Tram Museum 8 Wallen Road Hawthorn melbourne Trams tramways Footscray X2 class Russell St Williamstown Rd Leeds St Ballarat Rd Barkly St Nicholson St Irving St tram 677 tram 460 tram 467 tram 464 All hand stamped "10 Mar '60". .1 - marked "Footscray" .2 - "Footscray (NB curves)" .3 - to .7 "Footscray" Set of 7 Agfa Colour slide, cardboard mount, by Keith Caldwell of 10 March 1960 - .1 - X2 677 - at the Williamstown Road terminus of the Footscray tram system. ...Set of 7 Agfa Colour slide, cardboard mount, by Keith Caldwell of 10 March 1960 - .1 - X2 677 - at the Williamstown Road terminus of the Footscray tram system. Tram photographed in Somerville Road, showing the return destination of Russell St. In the background are a row of shops. .2 - X1 460 turning from Leeds St into Barkly St. Tram has the destination of Ballarat Road. In the background is the bus stop and tram stop and the Trocadero Theatre side wall. See Image i6 for the Theatre. Has a Gant Motors advert. .3 - X1 467 out bound turning into Nicholson St from Irving St. Footscray with the Rockmans Store in the background. This store was later demolished for the Ring Road. Tram has adverts for Gant Motors and Swing Bridge Motors - Holdens. .4 - X1 460 turning from Barkly St into Leeds St, showing the destination of Ballarat Road. Has adverts for Calders watches and Coca Cola - drive safely. In the background is a cafe advertising Oysters, Grey Cigarettes and Vincents Powders. .5 - X1 464 turnings from Nicholson St into Irving St. Footscray with the Rockmans Store in the background. This store was later demolished for the Ring Road. Also is J. Boltons Chemist shop advertising Kodak film and another shop - ? dry cleaners, Footscray Fish Shop and Kings Hotel. Tram has adverts for Gant Motors and Doods Dry cleaning. There is a PMG truck parked outside Rockmans. .6 - X2 677 turning from Barkly St into Leeds St with the Trocadero Theatre in the background. Tram has the destination of Williamstown Road. Tram has an advert for Bridge and Webster. .7 - X1 467 outbound to Williamstown Road, turning from Leeds St into Irving St Footscray. Tram has adverts for Doods dry cleaning and Gant Motors.All hand stamped "10 Mar '60". .1 - marked "Footscray" .2 - "Footscray (NB curves)" .3 - to .7 "Footscray"trams, tramways, footscray, x2 class, russell st, williamstown rd, leeds st, ballarat rd, barkly st, nicholson st, irving st, tram 677, tram 460, tram 467, tram 464 -
 Melbourne Tram Museum
Negative, Wal Jack, late 1930's?
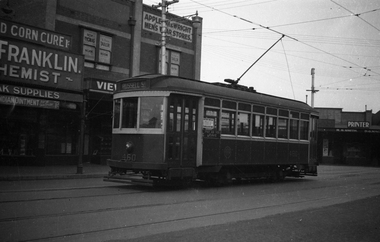
... Black and white negative, by Wal Jack, of X1 460, at the Footscray Railway Station terminus in Leeds St. Has the destination of Russell St. Tram has a Pay as You leave sign. ...Melbourne Tram Museum 8 Wallen Road Hawthorn melbourne Trams tramways Footscray Leeds St X1 class tram 460 Black and white negative, by Wal Jack, of X1 460, at the Footscray Railway Station terminus in Leeds St. Has the destination of Russell ...Black and white negative, by Wal Jack, of X1 460, at the Footscray Railway Station terminus in Leeds St. Has the destination of Russell St. Tram has a Pay as You leave sign. In the background is the Franklin Chemist, Appleton and Wright Menswear, Roy Thomas Tailor, and R. S. Smith Printer. Either late 1930's, 1940 or post 1945 no white stripe on tram.trams, tramways, footscray, leeds st, x1 class, tram 460 -
 Melbourne Tram Museum
Photograph - Black and White photograph, Ellen Butland, Set of 53 photos, 1974 and 1998
... St, Route 96 service between Russell and Exhibition Streets. Hoys cinema Centre behind. Advertisement for Lloyd Triestino Line. late 1968 Ellen Butland.jpg EB20 W6 968 in Bourke St, Route 89 service. late 1968 Ellen Butand.jpg EB21 9B Truck under a W3 Class car, c1969 Ellen Butland.jpg EB22 Y1 611 at Batman Avenue, c1964 Ellen Butland.jpg EB23 W2 588 at South Melbourne Siding, Albert Road. c1968 Ellen Butland.jpg EB24 W2 578 in Riversdale Road, at Glenferrie Road. Route 74 service. c1968 Ellen Butand.jpg EB25 W2 507 on route 7 service and SW6 851 at Camberwell Terminus...St, Route 96 service between Russell and Exhibition Streets. Hoys cinema Centre behind. Advertisement for Lloyd Triestino Line. late 1968 Ellen Butland.jpg EB20 W6 968 in Bourke St, Route 89 service. late 1968 Ellen Butand.jpg EB21 9B Truck under a W3 Class car, c1969 Ellen Butland.jpg EB22 Y1 611 at Batman Avenue, c1964 Ellen Butland.jpg EB23 W2 588 at South Melbourne Siding, Albert Road. c1968 Ellen Butland.jpg EB24 W2 578 in Riversdale Road, at Glenferrie Road. Route 74 service. c1968 Ellen Butand.jpg EB25 W2 507 on route 7 service and SW6 851 at Camberwell Terminus ...Set of 53 black and white photographs collected or taken by Ellen Butland - 1964 to 1975 For a listing of the prints see htd5720list.pdf. Word file and scanning by Gary Davey 5/2021 EB1 W2 253 in Collins St, Route 11 service, W2 314 visible in Swanston St. bound for East Coburg. circa 1970 Ellen Butland.jpg EB2 W2 349 on a tour in Dandenong Road, circa 1975 Ellen Butland.jpg EB3 W2 249 in William St, Note the center poles, Route 56 service, Demolition of the Menzies Hotel in progress, c1970 Ellen Butland.jpg EB4 W2 399 in Elizabeth St, Route 59 service. Trans Australia Airlines (TAA) Building in Franklin St. in the background. c1970 Ellen Butland.jpg EB5 W2's 470, 397, 273, 526, W5 811 Camberwell Depot, c1970 Ellen Butland.jpg EB6 W2 388 & SW6 852 in Riversdale Road, c1967 Ellen Butland.jpg EB7 W2 410 in Flinders St, Route 48 service. c1970 Ellen Butland.jpg EB8 W2 349 in Royal Park, c1973 Ellen Butland.jpg EB9 W2 385 and AEC MK.VI bus 720 in South Melbourne Depot, This Doncaster Depot bus is on a meal break from working East Malvern tram replacement. c1974 Ellen Butland.jpg EB10 W2 606 in St Kilda Road, Route 67. c1973 Ellen Butland.jpg EB11 W2 434 on a tour at South Melbourne Depot, c1974 Ellen Butand.jpg EB12 W2 433 in Riversdale Road, Route 74 service. c1969 Ellen Butand.jpg EB13 W2 418 in St Kida Road, c1974 Ellen Butland.jpg EB14 W2's 432 & 273 in Camberwell Depot, c1968 Ellen Butland.jpg EB15 W2 410, Cotham Road Kew c1968 Ellen Butland.jpg EB16 W2 415 in Riversdale Road, Route 74 service. c1969 Ellen Butland.jpg EB17 W2 418 in St Kilda Road, Route 4D service. c1968 Ellen Butand.jpg EB18 W6 992 in Camberwell Depot, with W2's on other roads c1975 Ellen Butand.jpg EB19 W6 983 in Bourke St, Route 96 service between Russell and Exhibition Streets. Hoys cinema Centre behind. Advertisement for Lloyd Triestino Line. late 1968 Ellen Butland.jpg EB20 W6 968 in Bourke St, Route 89 service. late 1968 Ellen Butand.jpg EB21 9B Truck under a W3 Class car, c1969 Ellen Butland.jpg EB22 Y1 611 at Batman Avenue, c1964 Ellen Butland.jpg EB23 W2 588 at South Melbourne Siding, Albert Road. c1968 Ellen Butland.jpg EB24 W2 578 in Riversdale Road, at Glenferrie Road. Route 74 service. c1968 Ellen Butand.jpg EB25 W2 507 on route 7 service and SW6 851 at Camberwell Terminus Burke Road Deepdene, c1967 Ellen Butland.jpg EB26 W4 674 in Swanston St, Route 2A service. c1964 Ellen Butland.jpg EB27 W5 681 on Route 56 entering William St from Peel St. c1969 Ellen Butland.jpg EB28 W5 682 leaving River Street reserve track and swinging into Gordon St. Maribyrnong. Route 82 service. c1971 Ellen Buckland.jpg EB29 W5 772 in Elizabeth St. at Bourke St. Route 19 service. c1968 Ellen Butland.jpg EB30 W5 776 on Route 69 in Glenferrie Road at Henrietta St, Hawthorn. c1968 Ellen Buckland.jpg EB31 W5 786 in Leeds St Footscray Terminus, Route 82. c1972 Ellen Butland.jpg EB32 W3 667 in Swanston St, c1958 or earlier outside the State Library. Ellen Butland.jpg EB33 W2 267 in St Kilda Rd, on Route 8 service, c1935. Copy of a Murray View No.72 Postcard. Ellen Butland.jpg EB34 SW6 900 Advertising Car and a L class car at South Melbourne Depot, Jan 1975 Ellen Butland.jpg EB35 W7 1003 in Spring St, on Route 95 service. c1965 Ellen Butland.jpg EB36 SW6 958 Glen Huntley Road on Route 4, c1953 Ellen Butland.jpg EB37 Z Class 1 and 7 in Victoria Parade, 1975 Ellen Butland.jpg EB38 Z Class 3, 2 & 5 at Preston Workshops, 30-4-1975 Ellen Butland.jpg EB39 Z class 3 in Nicholson St, at Victoria Parade 30-4-1975 Ellen Butland.jpg EB40 Z class no 3 in Queens Parade, 30-4-1975 Ellen Butland.jpg EB41 X 217 in Coldblo Road Malvern Depot, 13-1-1974 Ellen Butland.jpg EB42 W2 220 in Collins St, Route 9 service. c1970 Ellen Butland.jpg EB43 W2 225 in Swanston St, Route 6 service. c1967 Ellen Butland.jpg EB44 W2 233 Road Line Marker Car in South Melbourne Per way yard, c1976 Ellen Butland.jpg EB45 W2 242 in Brunswick Depot, c1968 Ellen Butland.jpg EB46 W7 1007 in Collins St, at Market St. Route 9A service. c1970 Ellen Butland.jpg EB47 W7 1013 in Bourke St, The Southern Cross Hotel behind. Route 88 service. c1970 Ellen Butland.jpg EB48 W7 1020 in LaTrobe St, at Elizabeth St. Route 9E service. c1969 Ellen Butland.jpg EB49 W7 1025 in Collins St, Route 9A service. c1969 Ellen Butland.jpg EB50 W7 1037 in Bourke St. The Southern Cross Hotel behind, Route 97 service. c1970 Ellen Butland.jpg EB51 W5 838 in South Melbourne Depot, c1975 Ellen Butland.jpg EB52 W2's including 526, 653 and 588 plus the AEC Matador R10 recovery vehicle in Glenhuntly Depot, c1975 Ellen Butland.jpg EB53 W7 1001 in Bourke St, Between Swanston and Russell Streets. Route 97 service. c1970 Ellen Butland.jpgtrams, tramways, glenferrie road, collins st, elizabeth st, batman ave, nicholson st, victoria parade, preston workshops, malvern depot, glenhuntly depot, camberwell depot, riversdale road, flinders st, tram 253, tram 606, tram 434, tram 433, tram 418, tram 432, tram 273, tram 410, tram 415, tram 418, tram 992, tram 983, tram 349, tram 968, tram 611, tram 588, tram 578, tram 507, tram 674, tram 681, tram 682, tram 772, tram 249, tram 776, tram 786, tram 667, tram 267, tram 900, tram 1003, tram 958, tram 1, tram 7, tram 3, tram 2, tram 5, tram 399, tram 217, tram 220, tram 225, tram 233, tram 242, tram 1007, tram 1013, tram 1020, tram 1025, tram 1037, tram 838, tram 1001, w2 class, w3 class, w4 class, w5 class, sw6 class, w6 class, w7 class, y1 class, x class, z1 class, tram 811, tram 397, tram 526, tram 385, tram 653, r10 vehicle, route 11, route 56, route 59, route 48, route 74, route 7, route 4, route 9a, route 9e, route 97, swanston st, tram 314, dandenong road, st kilda road, william st, tram 470, royal park, bus 720, mmtb buses, aec mk.vi class, south melbourne depot, route 3, cotham road, route 4d, route 96, route 89, 9b trucks, albert road, burke road, tram 851, route 2a, route 5a, peel st, route 82, gordon st, river st, route 19, route 69, leeds st, route 1, advertising trams, route 8, spring st, route 95, glenhuntly road, queens parade, coldblo road, route 9, route 6, works cars, brunswick depot, market st, route 88, la trobe st -
 Melbourne Tram Museum
Photograph - X2 676 Leeds St Footscray, Jim Seletto, c1960
... Russell St in Leeds St Footscray. Has the station buildings in the background as well as signs for Four & Twenty Pies, Ace Plastic & Rubber and a shore repair shop Photo by Jim Seletto c1960. Yields information about MMTB X2 676 and the Footscray Station terminus ...The photograph shows X2 class tram No. 676 with the destination of Russell St in Leeds St Footscray. Has the station buildings in the background as well as signs for Four & Twenty Pies, Ace Plastic & Rubber and a shore repair shop Photo by Jim Seletto c1960.Yields information about MMTB X2 676 and the Footscray Station terminus.Black and white photograph, with photographer's notes on the rear."Footscray Station, JSE6" and Jim Seletto stamp.trams, leeds st, footscray, x2 class, tram 676 -
 Melbourne Tram Museum
Book - Cable tram records - book 2 of 4, Alf Twentyman, c1940
... Pages 16 to 37 provide cable and track diagrams and notes on St Kilda Junction, Collins and Market St, City Road & Clarendon St, Elizabeth St, Spring-Albert and Brunswick Sts, Swanston St, (Princes Bridge to Lonsdale St) and Lonsdale St to Russell St, Spencer St and Flinders St including the Bourke St terminus, Clifton Hill terminus, Nicholson and Gertrude, Spring and Nicholson, Lygon Elgin and Rathdowne Sts, various terminal arrangements and car shed access, Queensberry and Abbotsford, St Kilda Road, Chapel and Wellington, Acland St and other notes on the last pages....Pages 16 to 37 provide cable and track diagrams and notes on St Kilda Junction, Collins and Market St, City Road & Clarendon St, Elizabeth St, Spring-Albert and Brunswick Sts, Swanston St, (Princes Bridge to Lonsdale St) and Lonsdale St to Russell St, Spencer St and Flinders St including the Bourke St terminus, Clifton Hill terminus, Nicholson and Gertrude, Spring and Nicholson, Lygon Elgin and Rathdowne Sts, various terminal arrangements and car shed access, Queensberry and Abbotsford, St Kilda Road, Chapel and Wellington, Acland St and other notes on the last pages. ...Second of four documents compiled by Alf Twentyman about the history of Melbourne cable trams. The first seven pages list each cable car or trailer (1 to 601) and its depot, including some notes on their individual disposal. Page 15 lists additions to the fleet of cars - 1-7-1916 to 3-6-2024 including numbers and notes. Pages 16 to 37 provide cable and track diagrams and notes on St Kilda Junction, Collins and Market St, City Road & Clarendon St, Elizabeth St, Spring-Albert and Brunswick Sts, Swanston St, (Princes Bridge to Lonsdale St) and Lonsdale St to Russell St, Spencer St and Flinders St including the Bourke St terminus, Clifton Hill terminus, Nicholson and Gertrude, Spring and Nicholson, Lygon Elgin and Rathdowne Sts, various terminal arrangements and car shed access, Queensberry and Abbotsford, St Kilda Road, Chapel and Wellington, Acland St and other notes on the last pages.Demonstrates the recording and drawing work of Alf Twentyman and his notes.Exercise book - printed for Scotch College, ruled in an accounting ledger format - 40 pages with red card covers.On cover in ink "A E Twentyman, Inter Maths B Ledger"tramways, cable trams, alf twentyman, history, track plans, records -
 Melbourne Tram Museum
Negative - MMTB Tram T class 181 at Williamstown Road terminus, Yarraville, Hugh Ballment, c1960
... The photograph shows MMTB T class tram No. 181 at the Williamstown Road terminus in Yarraville. Tram has the return destination of Russell St West Footscray. ...Melbourne Tram Museum 8 Wallen Road Hawthorn melbourne The photograph shows MMTB T class tram No. 181 at the Williamstown Road terminus in Yarraville. Tram has the return destination of Russell St West Footscray. ...The photograph shows MMTB T class tram No. 181 at the Williamstown Road terminus in Yarraville. Tram has the return destination of Russell St West Footscray. In the background is the row of shops at the terminus including a Gents Hairdresser. This line closed in 1962.Yields information about MMTB Tram T class 181 and the Williamstown Road line.Negative - 127 film black and white.tramways, footscray, williamstown rd, t class, tram 181 -
 Melbourne Tram Museum
Album - Ron Scholten Slide Collection, Ron Scholten
... Trams on route 88 delayed in Queens Parade Clifton Hill RSC10 Flinders Street at William Street with Cable Cars RSC11 L 104 on the fan of the new shed at Malvern Depot on a TMSV tour RSC12 Cable Set 1 after it’s restoration at Preston Workshops on the fan near the front gate RSC13 X1 466 at a suburban terminus of the Footscray System RSC14 X2 680 at Point Ormond Terminus RSC15 An ex Launceston Tram at the outside terminus of the Penny Royal Complex Tramway in Launceston RSC16 Q 148 at Preston Workshops awaiting disposal RSC17 Elizabeth Street with Cable Cars RSC18 Elizabeth and Bourke Streets corner outside the GPO with cable cars RSC19 Collins Street with Cable Cars RSC20 A photo taken from the observation deck of the ICI building showing a view of Parliament House with a W class tram in Nicholson Street RSC21 Auburn Horse car with a posed photo of all the tramway men employed RSC22 Cheltenham Double Deck Horsecar with a full load of passengers RSC23 City of Northcote cable trailer No 3 at a terminus RSC24 City of Northcote Cable cars passing in High Street Northcote RSC25 St Kilda Road at Princes Bridge with Cable Cars RSC26 Flinders Street with Cable Cars RSC27 Cable Cars RSC28 Bourke Street looking towards Elizabeth Street from Queen Street RSC29 Cable cars in Bourke Street at Elizabeth Street looking east RSC30 Cable cars in Elizabeth Street at the terminus at Flinders Street RSC31 Cable cars in Bourke Street at Swanston Street looking west RSC32 Cable cars in Swanston Street at Flinders Street looking north RSC33 Cable cars in Collins Street near Russell Street RSC34 Cable cars in Elizabeth Street at Bourke Street RSC35 Cable cars in Collins Street at Elizabeth Street RSC36 Cable Cars in Swanston Street at Flinders Street RSC37 Cable cars in Collins Street RSC38 Cable Cars RSC39 Cable cars in St Kilda Road near Princes Bridge RSC40 Cable cars in Collins Street east of Swanston Street RSC41 Cable cars in Spring Street outside Parliament House RSC42 K class No 92 in M&MTB Chocolate and cream livery but with a P&MTT Destination box on Route 14 RSC43 Thornbury Depot viewed from Miller Street and St Georges Road. ...Trams on route 88 delayed in Queens Parade Clifton Hill RSC10 Flinders Street at William Street with Cable Cars RSC11 L 104 on the fan of the new shed at Malvern Depot on a TMSV tour RSC12 Cable Set 1 after it’s restoration at Preston Workshops on the fan near the front gate RSC13 X1 466 at a suburban terminus of the Footscray System RSC14 X2 680 at Point Ormond Terminus RSC15 An ex Launceston Tram at the outside terminus of the Penny Royal Complex Tramway in Launceston RSC16 Q 148 at Preston Workshops awaiting disposal RSC17 Elizabeth Street with Cable Cars RSC18 Elizabeth and Bourke Streets corner outside the GPO with cable cars RSC19 Collins Street with Cable Cars RSC20 A photo taken from the observation deck of the ICI building showing a view of Parliament House with a W class tram in Nicholson Street RSC21 Auburn Horse car with a posed photo of all the tramway men employed RSC22 Cheltenham Double Deck Horsecar with a full load of passengers RSC23 City of Northcote cable trailer No 3 at a terminus RSC24 City of Northcote Cable cars passing in High Street Northcote RSC25 St Kilda Road at Princes Bridge with Cable Cars RSC26 Flinders Street with Cable Cars RSC27 Cable Cars RSC28 Bourke Street looking towards Elizabeth Street from Queen Street RSC29 Cable cars in Bourke Street at Elizabeth Street looking east RSC30 Cable cars in Elizabeth Street at the terminus at Flinders Street RSC31 Cable cars in Bourke Street at Swanston Street looking west RSC32 Cable cars in Swanston Street at Flinders Street looking north RSC33 Cable cars in Collins Street near Russell Street RSC34 Cable cars in Elizabeth Street at Bourke Street RSC35 Cable cars in Collins Street at Elizabeth Street RSC36 Cable Cars in Swanston Street at Flinders Street RSC37 Cable cars in Collins Street RSC38 Cable Cars RSC39 Cable cars in St Kilda Road near Princes Bridge RSC40 Cable cars in Collins Street east of Swanston Street RSC41 Cable cars in Spring Street outside Parliament House RSC42 K class No 92 in M&MTB Chocolate and cream livery but with a P&MTT Destination box on Route 14 RSC43 Thornbury Depot viewed from Miller Street and St Georges Road. ...Photo - see pdf file for further information. Number Brief Description RSC1 PCC 1041 at the gates of Preston Workshops on a test run without its trolley retriever RSC2 PCC 1041 in Glenhuntly Road on Route 67 en-route to Carnegie crossing the Railway Gates at Glenhuntly Station RSC3 W2 482 stored at Malvern Depot with Olympic Park on the Destination RSC4 Cable Car Set 64 in Swanston Street outside Princess Bridge Station in bound with open top Double Deck Bus, Trak Motors ? Departing from Flinders St Station RSC5 W3 669 in St George Road at Sumner Street en-route to Preston Workshops for scrapping RSC6 Cable Car in Lygon Street en-route to Carlton RSC7 PCC 1041 turning from St Georges Road into Miller Street to enter the Preston Workshops RSC8 Flinders Street Station with cable cars RSC9 PCC 1041 in strife on its maiden day in service. Trams on route 88 delayed in Queens Parade Clifton Hill RSC10 Flinders Street at William Street with Cable Cars RSC11 L 104 on the fan of the new shed at Malvern Depot on a TMSV tour RSC12 Cable Set 1 after it’s restoration at Preston Workshops on the fan near the front gate RSC13 X1 466 at a suburban terminus of the Footscray System RSC14 X2 680 at Point Ormond Terminus RSC15 An ex Launceston Tram at the outside terminus of the Penny Royal Complex Tramway in Launceston RSC16 Q 148 at Preston Workshops awaiting disposal RSC17 Elizabeth Street with Cable Cars RSC18 Elizabeth and Bourke Streets corner outside the GPO with cable cars RSC19 Collins Street with Cable Cars RSC20 A photo taken from the observation deck of the ICI building showing a view of Parliament House with a W class tram in Nicholson Street RSC21 Auburn Horse car with a posed photo of all the tramway men employed RSC22 Cheltenham Double Deck Horsecar with a full load of passengers RSC23 City of Northcote cable trailer No 3 at a terminus RSC24 City of Northcote Cable cars passing in High Street Northcote RSC25 St Kilda Road at Princes Bridge with Cable Cars RSC26 Flinders Street with Cable Cars RSC27 Cable Cars RSC28 Bourke Street looking towards Elizabeth Street from Queen Street RSC29 Cable cars in Bourke Street at Elizabeth Street looking east RSC30 Cable cars in Elizabeth Street at the terminus at Flinders Street RSC31 Cable cars in Bourke Street at Swanston Street looking west RSC32 Cable cars in Swanston Street at Flinders Street looking north RSC33 Cable cars in Collins Street near Russell Street RSC34 Cable cars in Elizabeth Street at Bourke Street RSC35 Cable cars in Collins Street at Elizabeth Street RSC36 Cable Cars in Swanston Street at Flinders Street RSC37 Cable cars in Collins Street RSC38 Cable Cars RSC39 Cable cars in St Kilda Road near Princes Bridge RSC40 Cable cars in Collins Street east of Swanston Street RSC41 Cable cars in Spring Street outside Parliament House RSC42 K class No 92 in M&MTB Chocolate and cream livery but with a P&MTT Destination box on Route 14 RSC43 Thornbury Depot viewed from Miller Street and St Georges Road. Two W2 class cars are laying over between the peaks RSC44 Z3 No 201 in Met Livery passes D1 No 3510 in new M/Tram livery. A staff member in uniform stands in the doorway. Dandenong Road RSC45 D1 No 3530 advertising Heinekin Super Golf on Route 55 in Royal Park RSC46 D1 No 3504 in M/Tram livery on the reserved track in Matthews Avenue near Essendon Airport showing Route 81 Travancore. I suspect it is a private enthusiasts charter due to the Malvern W class run number in the rear windscreen RSC47 D1 No 3504 on Route 64 in Dandenong Road in M/Tram Livery RSC48 D1 No 3504 in M/Tram Livery at Airport West Terminus RSC49 D1 No 3504 in M Tram Livery in Union Road outside the Showgrounds RSC50 D1 No 3504 at West Maribyrnong Terminus in M/Tram Livery RSC51 D1 No 3503 in M/Tram Livery in Malvern Depot RSC52 SW6 No 960 and VR No 53 in Harbour Esplanade for the NMEL&T Co Centenary RSC53 Hawthorn Tramways Trust No 32 in Harbour Esplanade for the NMEL&T Co Centenary RSC54 VR 53 & B 2042 in Harbour Esplanade for the NMEL&T Co Centenary RSC55 VR 53 & C 3016 in Harbour Esplanade for the NMEL&T Co Centenary RSC56 NMEL&T Co No 13 (Formerly No 214) in Harbour Esplanade for the NMEL&T Co Centenary RSC57 NMEL&T Co 13 (formerly No 214) at Preston Workshops for the NMEL&T Co Centenary RSC58 Hawthorn Tramways Trust Lettering on HTT No 32 in Harbour Esplanade for the NMEL&T Co Centenary RSC59 Hawthorn Tramways Trust No 32 in Harbour Esplanade for the NMEL&T Co Centenary RSC60 Hawthorn Tramways Trust No 32 in Harbour Esplanade for the NMEL&T Co Centenary RSC61 Hawthorn Tramways Trust No 32 in Harbour Esplanade for the NMEL&T Co Centenary RSC62 NMEL&T Co No 13 (formerly No 214) at Preston Workshops for the NMEL&T Co Centenary RSC63 W2 516 and another on route 59 wait to shunt at Essendon Aerodrome Terminus as W2 571 on route 49 departs. This was the last day of operation. RSC64 Australia’s First Electric Tram at Box Hill with tramway men including H J Hilton who is in the centre RSC65 W2 484 en-route to St Kilda Junction and another wait for passengers after a race meeting at Caulfield Racecourse RSC66 X1 463 on the Footscray system en-route to Russell Street RSC67 Geelong 35 on Chilwell Route, Formerly HTT 13, M&MTB 119, then Bendigo 1 and Ballarat 37 RSC68 P&MTT No 4 on Opening Day of the system in Glenferrie Road RSC69 Bendigo No 6 in McCrae Street near the Depot en-route to North Bendigo RSC70 P&MTT No 4 in Glenferrie Road on opening day of the system RSC71 Scrubber No 3 stripped and awaiting scrapping at Preston Workshops RSC72 Scrubber No 4 at South Melbourne Depot RSC73 Q 191 & 139 at Preston Workshops awaiting scrapping RSC74 Rail Grinder No 3 at Preston Workshops as purchased from Sydney RSC75 Y 469 waits to shunt at Wattle Park Terminus as Y1 613 departs on driver training duties RSC76 VR 53 on the outside roads at Essendon Depot RSC77 W5 796 with three doors and square windows running out of Brunswick Depot in Cameron Street, with a supplementary destination board showing “City via Swanston St” RSC78 W2 258 on the wheel grinder road at Brunswick Depot RSC79 X2 676 on a TMSV tour, W5 817 & 836 & VR 53 on the open roads at Essendon Depot RSC80 PCC 1041 on test, passes W7 1035 in High Street Preston RSC81 D1 class production number 7 as delivered on test in Matthews Avenue RSC82 W2 383 on route 5 turning from the reserved track in Dandenong Road into St Kilda Road at St Kilda Junction RSC83 Z3 204 as advertising tram for Vodaphone Grand Prix running into Malvern Depot new shed RSC84 Z1 No 4 on test in St Georges Road RSC85 PCC 1041 on Route 96 in Bourke Street near Exhibition Street RSC86 Z1 No 3 without numbers on test turning from Miller Street in St Georges Road RSC87 Track components stored in Coldblo Road at Malvern Depot with Z class cars adjacent RSC88 D1 3501 in M/Tram Livery on Route 55 in Peel Street at Franklin Street RSC89 C 3001 in Yarra Trams Livery Porto No 018 & D1 3502 in M/Tram Livery on display in Harbourside Esplanade RSC90 D1 class tram production number 7, in as delivered condition on test in Matthews Avenue RSC91 D1 3503 inside Malvern Depot RSC92 SW6 955 and W6 974 in St Kilda Road at City Road at dusk. RSC93 Freight Car No 19 at Preston Workshops in green Livery RSC94 Rail Grinder No 3 in green Livery at South Melbourne Per Way Yard RSC95 A SW6 class car on route 50 shunting at Elizabeth Street Terminus at night, taken from Flinders Street Station RSC96 W2 588 & 435 in St Kilda Road at Batman Avenue RSC97 Y1 613 in service at Wattle Park Terminus RSC98 W2 588 in Wellington Parade en-route to the City with a Grand Final Load of passengers followed closely by No 384 RSC99 W2 558 on MCG Footy Special entering the Simpson Street siding RSC100 W3 657 & an L Class in the new shed at Malvern Depot RSC101 Y1 613 in St Kilda Road on an enthusiast's tour in St Kilda Road south of St Kilda Junction RSC102 Y1 613 on an enthusiast's tour in Clarendon Street with the two extra tracks on the Railways viaduct under construction RSC103 W6 976 on the fan of the new shed at Malvern Depot RSC104 W7 1024 as an advertising car for Bank of NSW at the route 1 terminus at South Melbourne Beach RSC105 PCC 980 on route 96 in Nicholson Street near North Fitzroy Depot RSC106 SW6 890 with dash canopy lighting in Market Street on the opening day of William Street Services RSC107 W2 444 with big numbers heads a line of footy specials in Simpson Street Siding RSC108 Cable Cars in Elizabeth Street RSC109 NMEL&T co No 2 with a trailer outside the power station in Mount Alexander Road RSC110 Alf Twentyman’s cable car set in his Northcote backyard RSC111 Cable Cars in Queens Parade Clifton Hill RSC112 Cable cars in Collins Street outside the Town Hall RSC113 PCC 1041 at Carnegie terminus RSC114 Cable cars in Elizabeth Street RSC115 Cable cars in Collins St near Swanston St RSC116 HTT 19 turns from Riversdale Road into Camberwell Road at Camberwell Junction RSC117 W1 419 official builders photo of first car of the class RSC118 Cable car with a full load of passengers RSC119 W1 422 illuminated for the visit of T.R.H. The Duke and Duchess of York RSC120 PCC 1041 in strife on it’s maiden day in service. Trams on route 88 delayed in Queens Parade Clifton Hill RSC121 Bendigo Birney car in Finn Street near North Bendigo terminus RSC122 SW6 in St Kilda Road at Domain Road at night RSC123 All 3 of Alf Twentyman’s cable cars in his Northcote backyard RSC124 Cable trailer 256 being unloaded into the shed at Bylands RSC125 Cable grip car 1 being removed from the Melbourne Museum RSC126 Alf Twentyman's cable cars in his Northcote Backyard RSC127 Alf Twentyman's cable cars in his Northcote Backyard RSC128 Alf Twentyman's cable cars in his Northcote Backyard RSC129 Alf Twentyman's cable cars in his Northcote Backyard RSC130 W class car in Swanston Street at Collins Street RSC131 Y1 469, L & W3 on the run out of Glenhuntly Depot on a tour RSC132 W7 1024 as an advertising tram for Bank of NSW at Clifton Hill RSC133 W2 496 on a footy special in Simpson Street Siding RSC134 W2 as originally converted to a test car at Preston Workshops RSC135 W3 667 in Brunswick Depot with Ellen Butland at the controls RSC136 W3 669 on its final run at Victoria Parade and Brunswick Street RSC137 W2 571 in Wellington Parade at Clarendon Street with a Footy Final load of Passengers RSC138 Y1 613 shunts at Spencer Street Terminus as X 217 waits on Australia Day Pageant RSC139 PCC 1041 on Route 96 in Bourke Street outside the Southern Cross Hotel RSC140 SW6 890 with accident damage on the outside roads at Preston Workshops, c1978 RSC141 W2 535 on Route 4 at the old St Kilda Junction, c1967 RSC142 PCC 1041 on Route 88 turns from Bourke Street into Spring Street, 1973 RSC143 L 102 on a tour at Albert Park Beach Terminus, Feb 1972 RSC144 W5 class Nos 833, 834 & 835 in Malvern Depot, c1976 RSC145 W2 No 281 in Wellington Parade on a football very crowded special c1974 RSC146 X1 No 464 Ballarat Road 1960 RSC147 T No 181 bound for the Explosives Factory - at Footscray Station - July 1960 RSC148 T No 181 at Williamstown Road, 1960 RSC149 Cable car set in Alf Twentyman’s back yard, c1970 RSC150 X No 217 at Malvern Depot, c1970 RSC151 X1 No 465 and T No181 Footscray Football ground in Barkly Street. c1960 RSC152 Scrubber No 5 at South Melbourne Depot, c1960 RSC153 X1 No 465 Footscray to Russell Street, c1960 RSC154 X1 No 467 Leeds Street Footscray, 1960 RSC155 PMTT No 4 Glenferrie Road, 1910 RSC156 S No 164 at Malvern Depot c1970 RSC157 T No 178 Footscray c1960 RSC158 Cleaner No. 7 at South Melbourne Depot c1960 RSC159 Two Y classes at Princes Bridge and Batman Avenue mid 1950s RSC160 Swanston Street – Nu color vue slide – M142 Demonstrates the work of Ron Scholten in photography, collection and/or production of duplicate slidesAssembled album in a black presentation folder of 160 colour slides, 8 slide sleeves, collected or produced by Ron Scholten. Many are TMSV or Windsor Publications slides. All photographs have been scanned and placed on the Museum's G drive. A list of all photographs with details has been compiled. melbourne, tramways, trams, cable trams, horse tram, route 67, route 88, route 55, route 64, route 59, route 49, route 50, point ormond, royal park, swanston st, footscray, essendon depot, matthews ave, brunswick depot, glenhuntly depot, malvern depot, st.georges road, preston workshops, pcc class, vr class, w2 class, w3 class, l class, s class, x class, x1 class, k class, z3 class, d1 class, sw6 class, w6 class, w7 class, t class, b1 class, c class, q class, y class, y1 class, w5 class, z1 class, tram 465, tram 181, tram 217, tram 467, tram 164, tram 102, tram 669, tram 667, tram 976, tram 890, tram 558, tram 657, tram 571, tram 484, tram 535, flinders st, tram 980, tram 1041, tram 482, tram 64, tram 104, tram 1, tram 466, tram 680, tram 676, tram 955, tram 92, tram 201, tram 3510, tram 3530, tram 3504, tram 3503, tram 53, tram 588, tram 383, tram 960, tram 32, tram 2042, tram 3016, tram 516, tram 43, tram 463, tram 191, tram 139, tram 469, tram 613, tram 796, tram 258, tram 384