Showing 69 items matching "station trolley"
-
 Flagstaff Hill Maritime Museum and Village
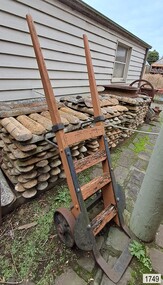
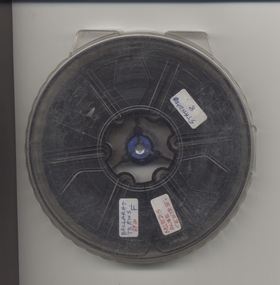
Functional object - Hand Trolley, Melbourne Steamship Company (MSS Co), Late 19th to mid-20th century
... ...station trolley...More recently, as well as the continued use of this simple style of trolley, the design has been improved to include specialised trolleys that fold, climb stairs, move pianos and even easily turn corners on their spinning, pivoting wheels. warrnambool flagstaff-hill flagstaff-hill-maritime-museum maritime-museum shipwreck-coast flagstaff-hill-maritime-village Hand Trolley Sack Truck Trolley Luggage Trolley hand truck trundler sack barrow bag barrow leverage marine technology cargo handling docks wharft shipping trade vintage antique hand card rolling cart station trolley dolly stack truck box cart two-wheeler material handling equipment shipping trade MSS Co MSSC Melbourne Steamship Company interstate shipping Hugh R. ...This hand trolley was originally marked M.S.S. Co., and likely to have once belonged to the Melbourne Steamship Company, often referred to by those initials. Flagstaff Hill’s collection has several other objects connected to the M.S.S. Co. The firm was established in 1873 under the name Hugh R. Reid and Company, renamed Melbourne Steamship Company Ltd in 1895, and became Melbourne’s foremost interstate shipping line. Warrnambool was one of the ports of call at least between 1922 and 1956; for example, on September 27 1934, the ship Coolana left Warrnambool on its way to Stanley, Burnie and Devonport, then on to Sydney and Newcastle, while other of its vessels were visiting Fremantle, Port Lincoln, Whyalla, Adelaide, and Melbourne. The firm remained in business until around 1960. A hand trolley can be loaded with heavy and bulky objects such as luggage, and stacks of boxes such as produce, cargo and equipment. It uses the principles of wheels and leverage, like a wheelbarrow, and can easily be wheeled from one place to another. Hand trolleys are still used by farmers, railway workers, shipping companies, porters, airports, hospitals, warehouses, logistical firms, furniture removalists, factory labourers and even in private homes when heavy loads need to be moved. Hand trolleys were first used in the 18th century in industries where children were used to move heavy loads. By using a hand trolley, the young labourers could move the piles of objects with the same efficiency as the adult workers. This hand trolley is significant for its likely connection to the Melbourne Steamship Company, or MSSCo, Melbourne’s foremost shipping line for interstate trade in the late nineteenth and early-to- mid twentieth century, representing many aspects of early trade within maritime Australia; Warrnambool was one of the ports visited by the company’s ships. The design of the hand trolley is an example of equipment used since the 18th century to move heavy loads at docks and shipyards. It is associated with the maritime industries of shipping, transportation, travel, and trade, as well as the colonial primary production sectors of farming, markets, and produce. The design represents an early step in the evolution of the simple hand trolley. More recently, as well as the continued use of this simple style of trolley, the design has been improved to include specialised trolleys that fold, climb stairs, move pianos and even easily turn corners on their spinning, pivoting wheels. Hand trolley: an L-shaped handcart with handles and supporting legs at one end, wheels at the other, and a ledge or platform to hold the load. This hand trolley has orange wooden slats and handles, two metal wheels, and a black metal frame with semi-circular side flanges. An inscription is stamped on one side.Stamped: "M.S.S.CO."warrnambool, flagstaff-hill, flagstaff-hill-maritime-museum, maritime-museum, shipwreck-coast, flagstaff-hill-maritime-village, hand trolley, sack truck, trolley, luggage trolley, hand truck, trundler, sack barrow, bag barrow, leverage, marine technology, cargo handling, docks, wharft, shipping, trade, vintage, antique, hand card, rolling cart, station trolley, dolly, stack truck, box cart, two-wheeler, material handling equipment, shipping trade, mss co, mssc, melbourne steamship company, interstate shipping, hugh r. reid and company -
 Flagstaff Hill Maritime Museum and Village
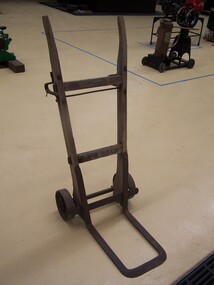
Equipment - Hand Trolley
... ...station trolley...Flagstaff Hill Warrnambool Shipwreck Coast Maritime Museum Flagstaff Hill Maritime Museum and Village vintage antique hand trolley hand card hand truck rolling cart luggage trolley station trolley dolly stack truck sack truck trundler box cart sack barrow bag barrow two-wheeler leverage material handling equipment marine technology cargo handling docks shipping trade Hand trolley: an L-shaped hand-operated trolley with handles and supporting legs at one end, wheels at the other, and a ledge or platform to hold the load. ...A hand trolley can be loaded with heavy and bulky objects such as luggage, and stacks of boxes such as produce, cargo and equipment. It uses the principles of wheels and leverage, like a wheelbarrow, and can easily be wheeled from one place to another. Hand trolleys are still used by farmers, railway workers, shipping companies, porters, airports, hospitals, warehouses, logistical firms, furniture removalists, factory labourers and even in private homes when heavy loads need to be moved. Hand trolleys were first used in the 18th century in industries where children were used to move heavy loads. By using a hand trolley, the young labourers could move the piles of objects with the same efficiency as the adult workers. The design of the hand trolley is an example of equipment used since the 18th century to move heavy loads at the docks and shipyards. It is associated with the maritime industries of shipping, transportation, travel and trade as well as the colonial primary production sectors of farming, markets and produce. The design represents an early step in the evolution of the simple hand trolley. More recently, as well as the continued use of this simple style of trolley, the design has been improved to include specialised trolleys that fold, climb stairs, move pianos and even easily turn corners on their spinning, pivoting wheels. Hand trolley: an L-shaped hand-operated trolley with handles and supporting legs at one end, wheels at the other, and a ledge or platform to hold the load. This hand trolley has orange wooden slats and handles, two metal wheels, and a black metal frame with curved corners on its rectangular side flanges.flagstaff hill, warrnambool, shipwreck coast, maritime museum, flagstaff hill maritime museum and village, vintage, antique, hand trolley, hand card, hand truck, rolling cart, luggage trolley, station trolley, dolly, stack truck, sack truck, trundler, box cart, sack barrow, bag barrow, two-wheeler, leverage, material handling equipment, marine technology, cargo handling, docks, shipping trade -
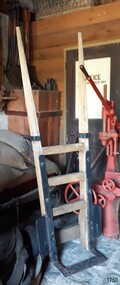
 Puffing Billy Railway
Platform Luggage Trolley, Station Porters - two smaller unpainted ones
... station porters platform luggage trolley...Station Porters platform Luggage Trolley - two smaller unpainted ones ...Station Porters platform Luggage Trolley - two smaller unpainted ones - made of wood and wrought iron...Puffing Billy Railway 1 old monbulk road Belgrave yarra-valley-and-the-dandenong-ranges Station Porters platform Luggage Trolley - two smaller unpainted ones Historic - Victorian Railways - Station Porters platform Luggage Trolley station porters platform luggage trolley puffing billy victorian railways Station Porters platform Luggage Trolley - two smaller unpainted ones - made of wood and wrought iron Station Porters - two smaller unpainted ones Platform Luggage Trolley ...Station Porters platform Luggage Trolley - two smaller unpainted ones Historic - Victorian Railways - Station Porters platform Luggage TrolleyStation Porters platform Luggage Trolley - two smaller unpainted ones - made of wood and wrought ironstation porters platform luggage trolley, puffing billy, victorian railways -
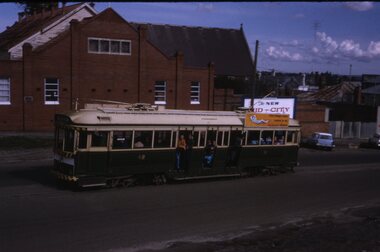
 Ballarat Tramway Museum
Photograph - Black & White Photograph/s, Mar. 1947
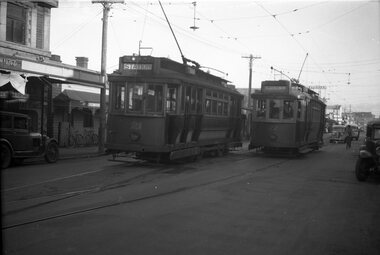
... Dave O'Neil confirmed June 30/2009, at the railway station, note the double trolley wire. See Related documents....Dave O'Neil confirmed June 30/2009, at the railway station, note the double trolley wire. See Related documents. ...Yields information about the appearance of Geelong tram No.21.Black and white photograph of Geelong 21 in the City area, railway station?? No details of photograph or date, on Agfa paper. Dave O'Neil confirmed June 30/2009, at the railway station, note the double trolley wire. See Related documents.tramways, trams, geelong, railway station, tram 21 -
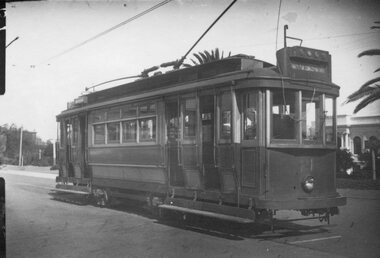
 Melbourne Tram Museum
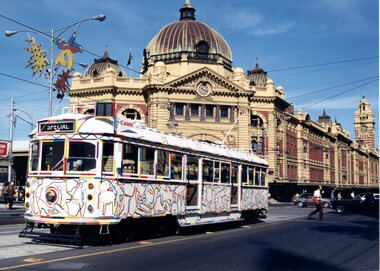
Photograph - SW5.806 at Flinders Street Station, Michael McLeod, c. 1980s
... Photograph shows SW5 No. 806 (with "Special" indicated on the route banner) in Flinders Street with Flinders Street Station in the background. Trolley poles are visible and in use. ...Photograph shows SW5 No. 806 (with "Special" indicated on the route banner) in Flinders Street with Flinders Street Station in the background. Trolley poles are visible and in use. ...Photograph shows SW5 No. 806 (with "Special" indicated on the route banner) in Flinders Street with Flinders Street Station in the background. Trolley poles are visible and in use. The tram is painted in a livery of the Transporting Art program, as a so-called "Art Tram." The artwork is by Elizabeth Gower, sponsored by Canon Australia. Photo by Michael McLeod.Shows a now-withdrawn tram with obsolete equipment (i.e., trolley poles) and livery representing a culturally important event in Melbourne's transit history.Colour Photograph - SW5.806 at Flinders Street Stationtrams, tramways, sw5 class, art trams, transporting art, public transport, tram 806, flinders st -
 Charlton Golden Grains Museum Inc
Photograph - 1939 Marmal Creek flooded
... station as it was the only course available. The Marmal Creek was a rageing stream a mile wide and caused damage to the railway line. Passengers travelled by motor trolley...station as it was the only course available. The Marmal Creek was a rageing stream a mile wide and caused damage to the railway line. Passengers travelled by motor trolley ...Easter 1939. The photo has the Barrakee station in the background. Photo is of the flooded Marmal Creek at Barrakee railway station. George Howell and visitors walked home from the station as it was the only course available. The Marmal Creek was a rageing stream a mile wide and caused damage to the railway line. Passengers travelled by motor trolley from Barrakee to Charlton. The photo was taken by the Howell family. Black and white original photo. -
 Otway Districts Historical Society
Photograph, R. Preston, Kawarren: Down goods with G42 shunting, 1955, 14 December 1955
... station busy until trade ceased in 1957. A postal motor started in October 1938, Kawarren being a point where the postal motor and trains were permitted to cross. kawarren; railways; limestone; timber; charcoal; B/W. G42 with a Down goods train at Kawarren on 14 December 1955. On No.2 Road empty NQR wagons proceeding to get filled at a covered lime loading operation. A three workmen are checking aspects of the train while a group appear to be clustered at the guard's van around an NKS motor trolley ...Originally known as Loves River it became Kawarren station on 16 June 1902. It consisted of a loop siding and combined office and passenger shelter. Goods loading was sawn timber (brought in on four tramways operating between 1905 and 1939), firewood, charcoal and limestone. In 1920 the limestone company built a store shed and a covered loading area at the terminus to assist operations. The company also requested the siding to be extended by three metres, which Victorian Railways did in the same year. This gave the loop a capacity of 21 trucks. Around 2,000 tonnes per year of limestone traffic kept the station busy until trade ceased in 1957. A postal motor started in October 1938, Kawarren being a point where the postal motor and trains were permitted to cross.B/W. G42 with a Down goods train at Kawarren on 14 December 1955. On No.2 Road empty NQR wagons proceeding to get filled at a covered lime loading operation. A three workmen are checking aspects of the train while a group appear to be clustered at the guard's van around an NKS motor trolley.kawarren; railways; limestone; timber; charcoal; -
 Otway Districts Historical Society
Photograph, Beech Forest Railway Station, 1910, 1910
... station in 1910. Note the Goods Shed, three tracks with No.3 Road having a NU louvre van and loaded NQR wagons, timber stacks to the left, and Devitt's Tramway with unloaded trolleys at the lower left. ...station in 1910. Note the Goods Shed, three tracks with No.3 Road having a NU louvre van and loaded NQR wagons, timber stacks to the left, and Devitt's Tramway with unloaded trolleys at the lower left. ...By 1910 revenue from the Beech Forest railway was $15,500, working expenditure $12,000, with a net loss (including interest charges) of about $4,000. This and the following year were the lowest net losses ever experienced. Passenger journeys rose steadily, outwards goods traffic rose to a record 12,959 tons (in 1911), and inwards goods traffic was a record 3,359 tons.. The railway station possessed a goods shed, stock race and yards, engine shed, coal stage, crew cabins, a refreshment room, and a four-roomed station building, with the station staff to match. Beech Forest was the principal despatch centre at this stage for split timber. Bill Devitt laid a timber tramway to the Beech Forest railway station to cart the palings for on-shipment..B/W. 177mm x 271mm. A general view from the eastern end of Beech Forest station in 1910. Note the Goods Shed, three tracks with No.3 Road having a NU louvre van and loaded NQR wagons, timber stacks to the left, and Devitt's Tramway with unloaded trolleys at the lower left. To the right, crew cabins with shops and houses in the background.beech forest; railways; timber; tramway; -
 Otway Districts Historical Society
Photograph, Near Weeaproinah (Dinmont) railway station, 1907, 1907
... Near the Weeaproinah railway station (later known as Dinmont railway station) in 1907. Note the trolley with two men aboard following the line on the left-hand side....Near the Weeaproinah railway station (later known as Dinmont railway station) in 1907. Note the trolley with two men aboard following the line on the left-hand side. ...Photograph, B/W, A4. Near the Weeaproinah railway station (later known as Dinmont railway station) in 1907. Note the trolley with two men aboard following the line on the left-hand side.weeaproinah; dinmont; railways; -
 Port Melbourne Historical & Preservation Society
Photograph - Former milkbar and bakery, corner Princes and Liardet Streets, Port Melbourne, Pat Grainger, c. 1993
... Woman with trolley is Dawn ? from Station St....Woman with trolley is Dawn ? from Station St. Photograph Former milkbar and bakery, corner Princes and Liardet Streets, Port Melbourne Pat Grainger ...Photographed around the neighbourhood in the early 1990s.One of three panoramic colour photos taken in the 1990s 1990s view of former milkbar and bakery at the corner of Princes and Liardet streets. Woman with trolley is Dawn ? from Station St.dawn (?), built environment - domestic, built environment - commercial, business and traders - milkbars -
 Ballarat Tramway Museum
Slide - Set of 7, Warren Doubleday, Ballarat - last Saturday of full operations, 21/8/1971
... Photos taken on the last Saturday of full operations by the SECV in Ballarat prior to the first closure of the Victoria St line on 22/8/1971. 1 - Tram 42 climbing Victoria St with a sign for the site of the "New Mid - City Motel" behind. 2 - Tram 13 in Victoria St from the Anglican church tower with Black Hill in the background. 3 - Barkly and Main St from the Anglican church tower with an outbound tram the Ampol Service station in the view. 4 - Tram 39 in Wendouree Parade near depot with swans in the background. 5 - Ballarat 26 Wendouree Parade Olympic monument with the tram crossing from the side of the road into the middle of the road for Hamilton Ave. 6 - Trams 21 and 27 crossing at the Skipton St loop. 7 - Tram 27 and others on the ARHS tour at Sebastopol with the conductor unhooking the trolley pole rope before turning the pole. ...Ballarat Tramway Museum South Gardens Reserve Wendouree Parade Ballarat Ballarat goldfields Photos taken on the last Saturday of full operations by the SECV in Ballarat prior to the first closure of the Victoria St line on 22/8/1971. 1 - Tram 42 climbing Victoria St with a sign for the site of the "New Mid - City Motel" behind. 2 - Tram 13 in Victoria St from the Anglican church tower with Black Hill in the background. 3 - Barkly and Main St from the Anglican church tower with an outbound tram the Ampol Service station in the view. 4 - Tram 39 in Wendouree Parade near depot with swans in the background. 5 - Ballarat 26 Wendouree Parade Olympic monument with the tram crossing from the side of the road into the middle of the road for Hamilton Ave. 6 - Trams 21 and 27 crossing at the Skipton St loop. 7 - Tram 27 and others on the ARHS tour at Sebastopol with the conductor unhooking the trolley pole rope before turning the pole. ...Photos taken on the last Saturday of full operations by the SECV in Ballarat prior to the first closure of the Victoria St line on 22/8/1971. 1 - Tram 42 climbing Victoria St with a sign for the site of the "New Mid - City Motel" behind. 2 - Tram 13 in Victoria St from the Anglican church tower with Black Hill in the background. 3 - Barkly and Main St from the Anglican church tower with an outbound tram the Ampol Service station in the view. 4 - Tram 39 in Wendouree Parade near depot with swans in the background. 5 - Ballarat 26 Wendouree Parade Olympic monument with the tram crossing from the side of the road into the middle of the road for Hamilton Ave. 6 - Trams 21 and 27 crossing at the Skipton St loop. 7 - Tram 27 and others on the ARHS tour at Sebastopol with the conductor unhooking the trolley pole rope before turning the pole. Yields information about the last full Saturday of SEC Tramway operations in Ballarat and has a strong association with the archivist. Set of 7 Kodachrome colour slides - cardboard mountsHave the photographer's slide numbers written on them.trams, tramways, closure, tram 26, tram 27, tram 13, tram 17, wendouree parade, victoria st, barkly st, tram 39, olympics, sebastopol, skipton st loop, tram 42, tram 21 -
Ballarat Tramway Museum
Document, Hector Bell Junior, "Street passenger transport system of Geelong Urban Area", 1949
... trolley buses, industry and recommendations. Said the tramway system was obsolete, should be a rail service between North and South Geelong, set up a street transport body, replan the Geelong railway station, additional roads to service the North Shore area. ...trolley buses, industry and recommendations. Said the tramway system was obsolete, should be a rail service between North and South Geelong, set up a street transport body, replan the Geelong railway station, additional roads to service the North Shore area. ...Report by Hector H Bell Junior of the MMTB early 1949, titled "Street passenger transport system of Geelong Urban Area". Looks at the history of public transport in Geelong, tramway data, financial analysis, the Geelong bus system, buses servicing the North Shore industries - principally the Ford Works, the condition of the bus fleet, taxi and private car hire services, functions of a street transport authority, town planning, populations and traffic surveys, relative values of passenger vehicles, trolley buses, industry and recommendations. Said the tramway system was obsolete, should be a rail service between North and South Geelong, set up a street transport body, replan the Geelong railway station, additional roads to service the North Shore area. Refers to attachments. Has a list of people involved in the preparation of the report. See item 112 for the AETA response of April 1949 to this report.Yields information about the Geelong tram and bus services in 1948/49 and how it could be developed or reformed. Has a close association with Hector Bell Junior, the son of the then MMTB Chairman.Document - 18 foolscap sheets photocopied and stapled in three places along the side.tramways, secv, geelong, statistics, history, passenger services, reports, aeta -
 Ballarat Tramway Museum
Photograph - SECV Ballarat - last days of operations - set of 10, George Stevens, 17/9/1971
... Trolley Wire which notes use for school tours. Note the bus stop sign on the left hand edge of the photograph. Yields information about the tramcars used on 17/9/1971 and the various locations around the system. Tramways Wendouree Parade Lydiard St Nth level crossing Ballarat Railway Station ...Set of 10 Digital images, from slides taken by George Stevens on 17/9/1971: 1 - Tram 34 at the level crossing in Lydiard St Nth 2 - Tram 35 Albert St Sebastopol 3 - Tram 35 Returning from Sebastopol, picking up a passenger with the Conductor leaning out of the tram 4 - Tram 35 At the terminus with the Royal Mail Hotel in the background 5 - Tram 35 Northbound crossing Albert St 6 - Trams 35, 17 Crossing at the Grey St Loop with 17 southbound for Sebastopol 7 - Tram 35 In Skipton St with a lady passenger walking out to the tram. In the background is Ford Eclipse Motors 8 - Tram 35 Turning into Drummond St Sth 9 - Trams 30, 34 At Hospital corner with tram 30 in Drummond St Sth for Sebastopol and 34 turning into Drummond St Nth. 10 - Trams 41,34 Specials possibly for a school group in Drummond St Nth, though "strictly speaking" this section of track had been closed for public use. See page 19 of the Oct. 1971 issue or Trolley Wire which notes use for school tours. Note the bus stop sign on the left hand edge of the photograph. Yields information about the tramcars used on 17/9/1971 and the various locations around the system.Set of 10 digital images scanned from slides.tramways, wendouree parade, lydiard st nth, level crossing, ballarat railway station, tram 34, tram 17, tram 35, tram 41, tram 30, albert st, sebastpol, drummond st sth, skipton st, passengers, grey st loop, drummond st nth -
 Ballarat Tramway Museum
Negative - SECV Ballarat operations set of 4, Robert Green, 2/1968
... Set of 4 photographs by Robert Green during Feb. 1968, showing the tramcar operations of the SECV system. 1 - SECV Welding truck fitted with a trolley pole 2 -Tram 17 At Hospital Corner, with two ladies boarding the tram. Note the gutter crossing. In the background is the Ballarat Base Hospital and the Shell Service station 3 -Tram 17 At Hospital Corner, with the destination of Victoria St 4 -Tram 17 In Sturt St inward bound past Drummond St. ...Ballarat Tramway Museum South Gardens Reserve Wendouree Parade Ballarat Ballarat goldfields Set of 4 photographs by Robert Green during Feb. 1968, showing the tramcar operations of the SECV system. 1 - SECV Welding truck fitted with a trolley pole 2 -Tram 17 At Hospital Corner, with two ladies boarding the tram. Note the gutter crossing. In the background is the Ballarat Base Hospital and the Shell Service station 3 -Tram 17 At Hospital Corner, with the destination of Victoria St 4 -Tram 17 In Sturt St inward bound past Drummond St. ...Set of 4 photographs by Robert Green during Feb. 1968, showing the tramcar operations of the SECV system. 1 - SECV Welding truck fitted with a trolley pole 2 -Tram 17 At Hospital Corner, with two ladies boarding the tram. Note the gutter crossing. In the background is the Ballarat Base Hospital and the Shell Service station 3 -Tram 17 At Hospital Corner, with the destination of Victoria St 4 -Tram 17 In Sturt St inward bound past Drummond St. Yields information about the SECV Ballarat tramways operations during Feb. 196835mm negative in a film strip - set of 4 - black and white print of item 3 held.tramways, wendouree parade, welding truck, tram 17, hospital corner, sturt st -
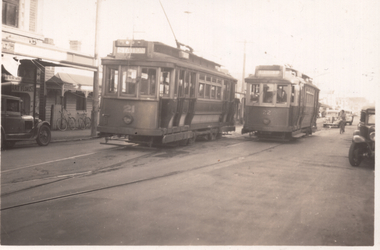 Ballarat Tramway Museum
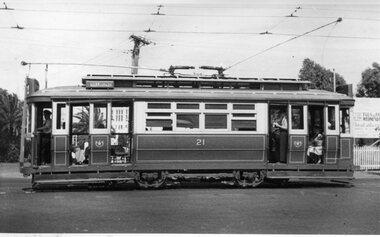
Photograph - SECV Geelong 21 and 22 crossing at the Albert St loop in Pakington St, Wal Jack, 23-6-1949
... Station, and 22 the destination of West. Tram 21 has a set of reflectors to act as a "T" light in the bottom left-hand corner of the photograph - see item 10417 for a newspaper clipping re these reflectors.. See item 7815 for negative. Date - 23-6-1949. Refer to "Twenty five years ago, the Closure of the Geelong Tramways", by Ken McCarthy, April 1981 issue of Trolley...Station, and 22 the destination of West. Tram 21 has a set of reflectors to act as a "T" light in the bottom left-hand corner of the photograph - see item 10417 for a newspaper clipping re these reflectors.. See item 7815 for negative. Date - 23-6-1949. Refer to "Twenty five years ago, the Closure of the Geelong Tramways", by Ken McCarthy, April 1981 issue of Trolley ...Geelong 21 and 22 crossing at the Albert St loop, the second loop in Pakington St. Tram 21 has the destination of Station, and 22 the destination of West. Tram 21 has a set of reflectors to act as a "T" light in the bottom left-hand corner of the photograph - see item 10417 for a newspaper clipping re these reflectors.. See item 7815 for negative. Date - 23-6-1949. Refer to "Twenty five years ago, the Closure of the Geelong Tramways", by Ken McCarthy, April 1981 issue of Trolley Wire page 10 for routing information.Yields information about tram operations in Pakington St and T light reflectors.Black and white photograph, with hand written details on rear.See rear image. tramways, trams, geelong, tram 21, tram 22, pakington st, tail lights -
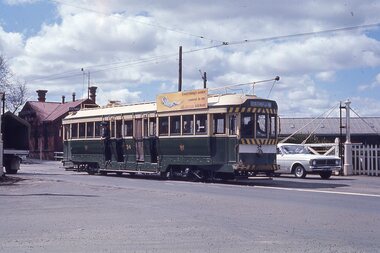
 Ballarat Tramway Museum
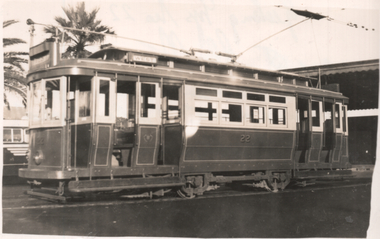
Photograph - Geelong 22 at Railway Station, C Roy G Field, 6/1949
... station . Photo by Roy Field 6/49. Roy provides notes on the rear of the photo about the tram's two trolley poles, radial truck and that it was built by Pengelley. ...station . Photo by Roy Field 6/49. Roy provides notes on the rear of the photo about the tram's two trolley poles, radial truck and that it was built by Pengelley. ...The photograph shows Geelong tram No. 22 at the Geelong Railway station . Photo by Roy Field 6/49. Roy provides notes on the rear of the photo about the tram's two trolley poles, radial truck and that it was built by Pengelley. Yields information about tram 22 and the railway station terminus.Black and white photograph with details on rear.See rear image a C Roy Field stamptramways, trams, geelong, geelong railway station, tram 22 -
 Ballarat Tramway Museum
Negative - Geelong 21 and 22 crossing at the Albert St loop in Pakington St, Wal Jack, 23/6/1949
... Station, and 22 the destination of West. Tram 21 has "T" light in the bottom left-hand corner of the photograph. See item 9053 for details of the location and date - 23-6-1949. Refer to "Twenty five years ago, the Closure of the Geelong Tramways", by Ken McCarthy, April 1981 issue of Trolley Wire page 10 for routing information. ...Station, and 22 the destination of West. Tram 21 has "T" light in the bottom left-hand corner of the photograph. See item 9053 for details of the location and date - 23-6-1949. Refer to "Twenty five years ago, the Closure of the Geelong Tramways", by Ken McCarthy, April 1981 issue of Trolley Wire page 10 for routing information. ...Geelong 21 and 22 crossing at the Albert St loop, the second loop in Pakington St. Tram 21 has the destination of Station, and 22 the destination of West. Tram 21 has "T" light in the bottom left-hand corner of the photograph. See item 9053 for details of the location and date - 23-6-1949. Refer to "Twenty five years ago, the Closure of the Geelong Tramways", by Ken McCarthy, April 1981 issue of Trolley Wire page 10 for routing information. Yields information about tram operations in Pakington St.Negative and Digital images..trams, tramways, geelong, pakington st, west, station, tram 21, tram 22 -
 Ballarat Tramway Museum
Album - Postcards & Photographs - Vic Solomons and others - Australian Tramways, Vic Solomons, 2023
... - photo Ben Parle Feb. 1950 Sydney 163 Photo Electric tram No. 2 - North Sydney with side trolley pole running Unknown Sydney 164 Photo George St - Horden's Corner Unknown Sydney 165 Photo George St at Martin Place c1920 Sydney 166 Photo Castlereagh St Sydney c1928 c1928 Sydney 167 Photo Railway Sqare c1920 c1920 Sydney 168 Photo Darling St Countereweight Unknown Sydney 169 Photo Trolley bus depot Unknown Sydney 170 Photo Trolley bus No. 14 Unknown Sydney 171 Photo Newcastle Railway Station with steam tram - Wharf Road?? ...- photo Ben Parle Feb. 1950 Sydney 163 Photo Electric tram No. 2 - North Sydney with side trolley pole running Unknown Sydney 164 Photo George St - Horden's Corner Unknown Sydney 165 Photo George St at Martin Place c1920 Sydney 166 Photo Castlereagh St Sydney c1928 c1928 Sydney 167 Photo Railway Sqare c1920 c1920 Sydney 168 Photo Darling St Countereweight Unknown Sydney 169 Photo Trolley bus depot Unknown Sydney 170 Photo Trolley bus No. 14 Unknown Sydney 171 Photo Newcastle Railway Station with steam tram - Wharf Road?? ...Contains 184 images of postcards and photographs collected primarily by Vic Solomons of Sydney, with others from the collection of Wal Jack and Warren Doubleday. Covers almost all of Australia's tramway systems. 1 Post Card Hay St Perth Looking East No 3 Unknown Perth 2 Post Card Cars 30 & 90 both on Route 19 pass in Barrack St looking South Perth WA 1935.02.18 Perth 3 Post Card Hay St Looking East Perth WA Unknown Perth 4 Post Card William St Perth WA Unknown Perth 5 Post Card Perth from Shaftsbury Hotel Unknown Perth 6 Post Card Hay St Perth WA Looking East Unknown Perth 7 Post Card Barrack St Perth Unknown Perth 8 Post Card Murray Views No 3 High St Showing Town Hall Fremantle WA Unknown Fremantle 9 Post Card High St Fremantle WA Unknown Fremantle 10 Post Card View of Bolder City Golden Mile in the Background (Section No 1) 1908.08.20 Kalgoolie 11 Post Card Hannan St Kalgoolie 1900.08.19 Kalgoolie 12 Post Card Hannan St Kalgoolie WA (No 2) Unknown Kalgoolie 13 Post Card Intersection Hannan & Maritana Sts Kalgoolie WA Unknown Kalgoolie 14 Post Card Hannan St Kalgoolie Unknown Kalgoolie 15 Post Card Lane Street Bolder City Unknown Kalgoolie 16 Post Card Hobart Double Deck Tram Unknown Hobart 17 Post Card Macquarie St Hobart Unknown Hobart 18 Photo Liverpool Street Hobart Unknown Hobart 19 Photo Hobart 21 Unknown Hobart 20 Photo Hobart 14 in Elizabeth St Hobart Unknown Hobart 21 Post Card Macquarie St Hobart Unknown Hobart 22 Post Card Macquarie St Hobart Tas Unknown Hobart 23 Photo Double Decker Tram 3 at G.P.O. Hobart Tas No 31 Unknown Hobart 24 Post Card Double Decker Tram 19 Hobart Tas A B Series No 24 Unknown Hobart 25 Photo Hobart Municipal Tramways Tas No 95 Unknown Hobart 26 Post Card Elizabeth St Hobart Unknown Hobart 27 Post Card Elizabeth St Hobart Unknown Hobart 28 Post Card Elizabeth St Hobart Unknown Hobart 29 Post Card Elizabeth St Hobart Tas Unknown Hobart 30 Post Card HMT 21 with crew at Beach Road Terminus Unknown Hobart 31 Post Card HMT 9 & another with crew at Beach Road Terminus. Front cover photo of Destination GPO 1921.01.00 Hobart 32 Post Card Cascade Road and Mount Wellington Hobart Unknown Hobart 33 Post Card Elizabeth St Hobart Unknown Hobart 34 Post Card Elizabeth St Hobart Unknown Hobart 35 Post Card Elizabeth St Hobart 1915.04.07 Hobart 36 Post Card Macquarie St Hobart Tas Unknown Hobart 37 Post Card Macquarie St showing Post Office Hobart 1908.03.12 Hobart 38 Post Card Hobart Municipal Tramways 21 Unknown Hobart 39 Post Card Elizabeth St Hobart Tas Unknown Hobart 40 Post Card Liverpool Street Hobart Unknown Hobart 41 Post Card Electric Tram Launceston Tas 446 W J Little Photo 1919.02.08 Launbceston 42 Post Card Launceston Tram no 3 1911.08.30 Launbceston 43 Post Card Launceston Tram no 3 passes tram No 1 Unknown Launbceston 44 Post Card Tram 6 at Trevallyn a popular suburb Launceston Tasmania Unknown Launbceston 45 Post Card Tram 7 at Trevallyn Road Terminus Launceston Tasmania Unknown Launbceston 46 Post Card Tram 4 in Brisbane St Launceston Unknown Launbceston 47 Post Card Tram 9 in Brisbane St Launceston Tasmania Unknown Launbceston 48 Post Card Camerom Street Launceston Tasmania Unknown Launbceston 49 Post Card Murray Views No 15 Jetty Road Glenelg Terminus 1962-02-08 Adelaide 50 Post Card Bay Tram at Jetty Road Terminus Glenelg SA Unknown Adelaide 51 Post Card Tram 3 in King William Street Adelaide S Aust Unknown Adelaide 52 Post Card Valentine Series No 3065 The Old Horse Tram Victor Harbour Unknown Victor Harbour 53 Post Card Bourke Street Melbourne with Cable Car Looking East 1904.04.25 Melbourne 54 Post Card Opening of New Electric Tramway Elsternwick 1913-11-13 Melbourne 55 Post Card Cable trams in Clarendon St Sth Melb Unknown Melbourne 56 Post Card Pall Mall from Charing Cross Bendigo Unknown Bendigo 57 Post Card Tram 4 & 7 pass at The Fountain and Mitchell Street Bendigo Vic Rose Series P 3198 Unknown Bendigo 58 Post Card M&MTB 133 at Charing Cross bound for Eaglehawk Bendigo Vic Murray Views No 45 Unknown Bendigo 59 Post Card Pall Mall Bendigo Vic Unknown Bendigo 60 Post Card Charing Cross & Mitchell St Bendigo Trams passing 1919.00.00 Bendigo 61 Post Card Pall Mall Looking East Unknown Bendigo 62 Post Card Electric Trams and City Hotel Bendigo Vic Unknown Bendigo 63 Post Card Moorabool Street Geelong V 23 Unknown Geelong 64 Post Card Murray Views No 3 Moorabool Street Geelong Vic Unknown Geelong 65 Post Card The Rose Series P 2487 Ryrie Street Geelong Vic Unknown Geelong 66 Post Card Southern Cross Series 2696 Ryrie Stret Geelong Vic Unknown Geelong 67 Post Card The Rose Series P 1490 Ryrie Street Geelong Vic 1920-03-04 Geelong 68 Post Card Valentine Series No 1568 Lower Sturt Street Ballarat Unknown Ballarat 69 Post Card Rose Series P 1710 Sturt Street Ballarat Victoria Unknown Ballarat 70 Post Card Sturt Street Ballarat Victoria Unknown Ballarat 71 Post Card Horse Tram In Sturt Street Ballarat 1905.11.10 Ballarat 72 Post Card Sturt Street Ballarat Looking North-West Unknown Ballarat 73 Post Card Shoppes Square Sturt Street Ballarat Looking North Unknown Ballarat 74 Post Card Junction Sturt and Lydiard Streets Ballarat 1909-09-01 Ballarat 75 Post Card The Electric Supply Co Souvenir Tram Ticket No 3085of the opening of Electric System August 18 1905 1905.08.18 Ballarat 76 Post Card Sturt Street Ballarat Victoria 1907.11.25 Ballarat 77 Post Card Off to the Gardens Electric Tram Ballarat Unknown Ballarat 78 Post Card Sturt Street Ballarat 1907.04.16 Ballarat 79 Post Card Sturt Street Ballarat Looking East Electric tram with Double Deck Trailer 1911.04.17 Ballarat 80 Post Card Sturt Street Ballarat Looking East Unknown Ballarat 81 Post Card Sturt Street Ballarat Looking West 1911.03.01 Ballarat 82 Post Card Town Hall and Sturt Street Ballarat Unknown Ballarat 83 Post Card Lydiard Street Ballarat 1906.11.23 Ballarat 84 Post Card Looking North along Adelaide Street from George Street Brisbane Sidues Series No 764 Unknown Brisbane 85 Post Card Looking South along Queen Street from the Creek Street Intersection Brisbane Qld Sirues Series No 1379 Unknown Brisbane 86 Post Card George Street from near Supreme Court Brisbane Unknown Brisbane 87 Post Card Queen and Eagle Streets Brisbane 1907.07.04 Brisbane 88 Post Card Queen Street showing His Majesty’s Theatre Brisbane Unknown Brisbane 89 Post Card Queen Street Treasury Building 1908.01.20 Brisbane 90 Post Card G P O and Queen Street Brisbane Unknown Brisbane 91 Post Card Queen Street Brisbane Looking from Wharf Street Unknown Brisbane 92 Post Card Customs House Brisbane 1905.02.16 Brisbane 93 Post Card Queen St Brisbane 1905.09.16 Brisbane 94 Post Card Queen St Brisbane 1907.11.19 Brisbane 95 Post Card Treasury Buildings Brisbane Unknown Brisbane 96 Post Card Queen and Eagle Streets Brisbane Unknown Brisbane 97 Post Card The Valley Corner Brisbane Unknown Brisbane 98 Post Card Brisbane Queen Street opposite General Post Office Unknown Brisbane 99 Post Card North Quay and Milton Beach Brisbane Q Unknown Brisbane 100 Post Card Victoria Bridge Brisbane South Side 1907.08.14 Brisbane 101 Post Card Victoria Bridge Brisbane Unknown Brisbane 102 Post Card Breakfast Creek Bridge Brisbane Q Unknown Brisbane 103 Post Card Melbourne Street Station South Brisbane Queensland Unknown Brisbane 104 Post Card General Post Office Queen Street Brisbane 1955.09.23 Brisbane 105 Post Card Customs House Brisbane 1904.11.04 Brisbane 106 Post Card Queen St Brisbane 1919.11.00 Brisbane 107 Post Card Queen St Brisbane Sidues Series No 627 Unknown Brisbane 108 Post Card Creek Street Brisbane Queensland Unknown Brisbane 109 Post Card Customs House and Garden Reach Brisbane Queensland 1910.00.08 Brisbane 110 Post Card Queen and Creek Streets Brisbane 1909.06.07 Brisbane 111 Post Card Queensland National Bank andd Queen Street Brisbane Queensland Unknown Brisbane 112 Post Card Queen Street and Treasury Buildings Brisbane 0000.09.07 Brisbane 113 Post Card Queen Street showing “Courier” Buildings Brisbane Unknown Brisbane 114 Post Card Intersection George & Roma Streets Brisbane Q 1916.05.11 Brisbane 115 Post Card Adelaide Street Brisbane Q Unknown Brisbane 116 Post Card G P O Queen Street Brisbane Q Unknown Brisbane 117 Post Card Treasury Building Brisbane 1906.03-20 Brisbane 118 Post Card Queen and Eagle Streets Brisbane 1907.02.01 Brisbane 119 Post Card Queen St Brisbane Unknown Brisbane 120 Post Card Queen St Brisbane Q Unknown Brisbane 121 Post Card Victoria Bridge Brisbane 1906.07.30 Brisbane 122 Post Card An Unusual View showing Head of Queen Street Victoria Bridge & South SideSuburbs Brisbane Q Unknown Brisbane 123 Post Card Petries Bight Brisbane Q Unknown Brisbane 124 Post Card South End Victoria Bridge Brisbane Q Unknown Brisbane 125 Post Card Customs House Brisbane Unknown Brisbane 126 Post Card Photo of toastrack car circa 1910 Unknown Brisbane 127 Post Card Treasury Buildings Brisbane Unknown Brisbane 128 Post Card East Street Rockhampton with Steam Tram & trailer Unknown Rockhampton 129 Post Card Post Office Rockhampton with steam tram Unknown Rockhampton 130 Post Card East Street Rockhampton with Steam Trams Rose Series P 7154 Unknown Rockhampton 131 Post Card William Street Rockhampton Rose Series P 7156 Unknown Rockhampton 132 Post Card Central East Street Rockhampton Q with Steam Trams Unknown Rockhampton 133 Photo Sturt St Ballarat Unknown Ballarat 134 Photo Bridge Street Ballarat Unknown Ballarat 135 Post Card George St Sydney Unknown Sydney 136 Post Card Elizabeth St Sydney Unknown Sydney 137 Post Card Railway Square Unknown Sydney 138 Post Card Sydney Harbor Bridge - pending receipt 139 Post Card Kings Cross - Mowbray Series with description on rear from C Roy G Field Unknown Sydney 140 Post Card Kings Cross - Mowbray Series with description on rear from C Roy G Field Unknown Sydney 141 Post Card Central Railway Station Sydney - Rose Series P6033 1954-01-26 Sydney 142 Post card William Street Darlinghurst looking towards City - Rose Series P6602 unknown Sydney 143 Post Card Circular Quay Sydney - Rose Series P6680 Unknown Sydney 144 Post Card View at Manly NSW - Rose Series B1003 Unknown Sydney 145 Post Card Hunter St Newcastle NSW - Rose Series P7843 Unknown Newcastle 146 Post Card Bank Corner Newcastle NSW - Mowbray Series No. 155 Unknown Newcastle 147 Post Card Hunter St Newcastle NSW Unknown Newcastle 148 Post Card Criterion Hotel Hunter St Newcastle NSW Unknown Newcastle 149 Photo Horse tram at Newtown Station 1894 to 1898 - PTC photo c1894 Newtown 150 Photo Steam tram motor No 3 at Railway Square 1879 1879 Sydney 151 Photo Railway steam tram c1900 with a horse drawn double deck bus c1900 Sydney 152 Photo Steam motor 5A and doubled deck bus Unknown Sydney 153 Photo Steam motor 53A with detail notes on rear 1922 Sydney 154 Photo Cable tram set at Milsons Point ferry terminal c1900 Sydney 155 Photo Early Sydney electric car - Ocean St - Rose Bay Unknown Sydney 156 Photo George St looking souoth c1905 c1905 Sydney 157 Photo Tram 165 at Circular Quay Unknown Sydney 158 Photo Tramcar ferry or transporter at The Spit Unknown Sydney 159 Photo tram 882 George St at Marti Place, 1937 1937 Sydney 160 Photo Tram 826 Railway Sq area Unknown Sydney 161 Photo Railway Sq in background, Broadway with double decker bus and toastrack car late 1930s Sydney 162 Photo Coupled St Pitt St? - photo Ben Parle Feb. 1950 Sydney 163 Photo Electric tram No. 2 - North Sydney with side trolley pole running Unknown Sydney 164 Photo George St - Horden's Corner Unknown Sydney 165 Photo George St at Martin Place c1920 Sydney 166 Photo Castlereagh St Sydney c1928 c1928 Sydney 167 Photo Railway Sqare c1920 c1920 Sydney 168 Photo Darling St Countereweight Unknown Sydney 169 Photo Trolley bus depot Unknown Sydney 170 Photo Trolley bus No. 14 Unknown Sydney 171 Photo Newcastle Railway Station with steam tram - Wharf Road?? Unknown Newcastle 172 Photo High St West Maitland - steam tram Unknown Maitland 173 Photo High St West Maitland - steam tram Unknown Maitland 174 Post Card Argent St near tram terminal Broken Hill NSW c1900 Broken Hill 175 postcard Argent St looking south Broken Hill - with Ken Magor's notes on rear Unknown Broken Hill 176 Photo Toronto - steam tram 61A Unknown Toronto 177 Photo 124A trial run 1911? Sutherland - Cronulla line 1911 Sutherland 178 Photo 103A at a tram stop Unknown Sydney 179 Photo Cable tram set at Crows Nest terminus grip car 12, trailer 22 Unknown Sydney 180 Photo Cable tram Queens Square Sydney 1903 Sydney 181 Photo cars 2078 and 2077 Chatswood late 1950s Sydney 182 Photo car 1877 Balmain area late 1950s Sydney 183 Photo Trolley bus - Rockdale destination Late 1950s Sydney 184 Photo Broken Hill steam tram - motor 18A North Tram Unknown Broken Hill 185 Photo Millars Point Sydney NSW - ferry/tram interchange, unknown Sydney All items imaged including the rear or back where there was writing of information. All files stored on the Museum's Photo Collections directory. Demonstrates through the medium of many images, Australian tramway systems and Ballarat's place in them.Album - heavy card covers, plastic lined with postcard or 6x4 photo sleeves.australia, tramways, postcards, photographs, steam trams, horse trams, cable trams, trolley buses -
 Ballarat Tramway Museum
Photograph - Geelong 37 Pakington at Aphrasia Sts, Keith Kings, Jan. 1956
... Photographer notes the Newtown turns right at this location shown in the trolley wire. The Municipal Hall and fire station tower are on the right. ...Photographer notes the Newtown turns right at this location shown in the trolley wire. The Municipal Hall and fire station tower are on the right. ...Photo shows the track layout and operation at the corner of Pakington St and Aphrasia St looking south from the passing loop. Shows Geelong tram 37, ex Chilwell swinging out before entering the loop. Photographer notes the Newtown turns right at this location shown in the trolley wire. The Municipal Hall and fire station tower are on the right. Photo by Keith Kings 8/1/1956, photo number Q(w)(7). Yields information about the junction of the Chillwell and Newtown tram routes in Geelong.Black and white photograph with notes on rear.See rear image and context.trams, tramways, pakington st, geelong, tram 37, newtown, aphrasia st -
 Ballarat Tramway Museum
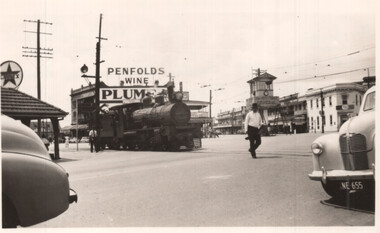
Photograph - QGR locomotive at Woolloongabba Brisbane, Keith Kings, 10/1/1951
... trolley bus route. The photographer noted that trains could block all tram lines at times. Trains were always proceeded by a man carrying a red flag and ringing a bell. Has the tramway signal box in the background and a large Penfolds Wines advert on a building, a Caltex service station and an advert for Plume petrol....trolley bus route. The photographer noted that trains could block all tram lines at times. Trains were always proceeded by a man carrying a red flag and ringing a bell. Has the tramway signal box in the background and a large Penfolds Wines advert on a building, a Caltex service station and an advert for Plume petrol. ...Wal Jack swapped photographs with his correspondents. This photo by Keith Kings, a railway photograph of QGR locomotive 748 crossing the complex arrangements of tracks at Woolloongabba - three tram tracks, one trolley bus route. The photographer noted that trains could block all tram lines at times. Trains were always proceeded by a man carrying a red flag and ringing a bell. Has the tramway signal box in the background and a large Penfolds Wines advert on a building, a Caltex service station and an advert for Plume petrol.Demonstrates a photograph that would have been sent to Wal Jack by Keith Kings.Black and white photograph of QGR locomotive 748Has extensive details of the photograph on the rear. Keith Kings photo number E(k)(vii)letter, wal jack, keith kings, qgr, railways, woolloongabba -
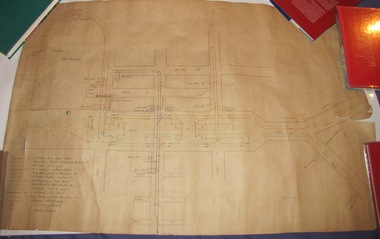
 Ballarat Tramway Museum
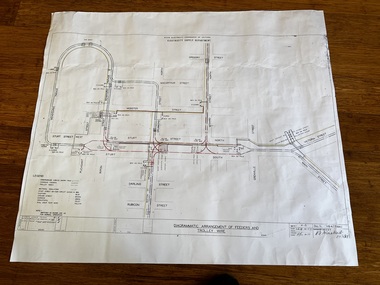
Drawing - VB4/7184C, State Electricity Commission of Victoria - Ballarat office, "Diagrammatic Arrangement of Feeders and Trolley Wire", 2-9-1958
... Trolley Wire...Feeder cables...Overhead...Power Station...trolley wire arrangements for the central part of Ballarat and the Gardens line. Shows the detailed switch locations that enable the overhead to be isolated or changed when electrical work was being undertaken on the overhead that required it to be isolated. Shows how the various sections were fed from the power station...Yields information about the arrangement of the power supply to the trams from the power station and changes made to the system about 13 years prior to closure. Tramways Ballarat SECV Trolley Wire Feeder cables Overhead Power Station electrical engineering electrical switching Dyeline print on white paper of Drawing - "Diagrammatic Arrangement of Feeders and Trolley Wire" - VB4/7184C "Diagrammatic Arrangement of Feeders and Trolley Wire" Drawing VB4/7184C State Electricity Commission of Victoria - Ballarat office ...Print of drawing number VB4/7184C "Diagrammatic Arrangement of Feeders and Trolley Wire", marked up in colour showing the various feeder and trolley wire arrangements for the central part of Ballarat and the Gardens line. Shows the detailed switch locations that enable the overhead to be isolated or changed when electrical work was being undertaken on the overhead that required it to be isolated. Shows how the various sections were fed from the power station. Revision C issued 2-9-1958.Yields information about the arrangement of the power supply to the trams from the power station and changes made to the system about 13 years prior to closure. Dyeline print on white paper of Drawing - "Diagrammatic Arrangement of Feeders and Trolley Wire" - VB4/7184Ctramways, ballarat, secv, trolley wire, feeder cables, overhead, power station, electrical engineering, electrical switching -
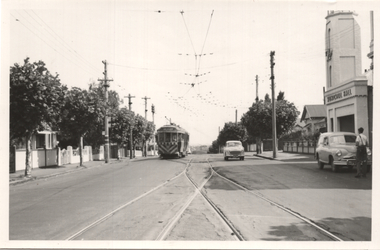
 Ballarat Tramway Museum
Photograph - SECV Geelong 21 Mercer St, 1954
... trolley poles. Photo by an unknown photographer, 1954. Dave O'Neil confirmed June 30/2009, the tram is travelling from North to Belmont, most likely at Mercer and Railway Terrace. Entrance to the goods yard is at the rear of the tram, and Gordon institute can been seen through the front entrance. See Related documents. Yields information about the appearance of Geelong 21 and the crews operating it on a hot summers day. tramways trams Geelong Crews Railway Station ...Photograph of Geelong No. 21, side on view, inbound to the city area with the destination of Belmont. Shows the crews in shirt sleeves, the blinds drawn and the length of the tram with its two trolley poles. Photo by an unknown photographer, 1954. Dave O'Neil confirmed June 30/2009, the tram is travelling from North to Belmont, most likely at Mercer and Railway Terrace. Entrance to the goods yard is at the rear of the tram, and Gordon institute can been seen through the front entrance. See Related documents.Yields information about the appearance of Geelong 21 and the crews operating it on a hot summers day.Black and white photograph with notes on the rear. Two copies held. Second copy on AGFA paper.In pencil on the rear 1954.tramways, trams, geelong, crews, railway station, tram 21 -
 Ballarat Tramway Museum
Drawing, Electric Supply Co. of Vic (ESCo), Tramway Power supply arrangements 1914, Jan. 2014
... Rolled drawing showing Tramway Power supply arrangements 1914, track map, power station, feeder cable, switches, section insulators, box locations, lightning arrestors and feeder cables for the various routes in Ballarat. Dated 2/1/1914, with initials GL. The various cables and trolley...Ballarat Power Station Overhead Section Insulators Rolled drawing showing Tramway Power supply arrangements 1914, track map, power station, feeder cable, switches, section insulators, box locations, lightning arrestors and feeder cables for the various routes in Ballarat. Dated 2/1/1914, with initials GL. The various cables and trolley ...Yields information about the electrical power supply and overhead switching for Ballarat in 1914.Rolled drawing showing Tramway Power supply arrangements 1914, track map, power station, feeder cable, switches, section insulators, box locations, lightning arrestors and feeder cables for the various routes in Ballarat. Dated 2/1/1914, with initials GL. The various cables and trolley wire has been drawing in differing colours.ballarat, power station, overhead, section insulators -
 Ballarat Tramway Museum
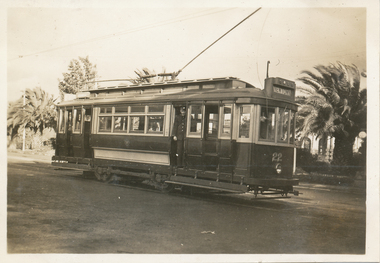
Photograph - SECV Geelong 22 at Railway station, Wal Jack, Jun. 1939
... Station. Photographer probably Wal Jack - see date on Reg Item 5861. Wal's album notes dates the photo as June 1939. Printed on Kodak Velox paper. The tram has two trolley...Station. Photographer probably Wal Jack - see date on Reg Item 5861. Wal's album notes dates the photo as June 1939. Printed on Kodak Velox paper. The tram has two trolley ...Black and White print contained within the Wal Jack Bendigo and Geelong Album, see Reg Item 5003 for more details. Photo of No. 22 at the Geelong Railway Station. Photographer probably Wal Jack - see date on Reg Item 5861. Wal's album notes dates the photo as June 1939. Printed on Kodak Velox paper. The tram has two trolley poles, the destination of Newtown, older style lineout on the panels and is fitted with a tow bar. A conductor is standing in one of the doorways. i1 - scan of print in the album i2 - rear of image i3 - scan of negative at 3200dpi added 6/6/2020.Yields information about Geelong 22 and the railway station precinct.Black and white photo with an associated negative.trams, tramways, geelong, railway station, tram 22 -
 Ballarat Tramway Museum
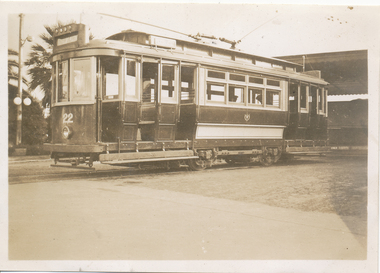
Photograph - SECV Geelong 22 at Railway station, Wal Jack, Jun. 1939
... Station. Photographer probably Wal Jack - see date on Reg Item 5861. Wal's album notes dates the photo as June 1939. Printed on Kodak Velox paper. The tram has two trolley...Station. Photographer probably Wal Jack - see date on Reg Item 5861. Wal's album notes dates the photo as June 1939. Printed on Kodak Velox paper. The tram has two trolley ...Black and White print contained within the Wal Jack Bendigo and Geelong Album, see Reg Item 5003 for more details. Photo of No. 22 at the Geelong Railway Station. Photographer probably Wal Jack - see date on Reg Item 5861. Wal's album notes dates the photo as June 1939. Printed on Kodak Velox paper. The tram has two trolley poles and its tow bar. Note the two round electric lights on the pole behind the tram. i1 - scan of print in the album i2 - rear of image i3 - scan of negative at 3200dpi added 6/6/2020.Yields information about Geelong 22 and the railway station precinct.trams, tramways, geelong, railway station, tram 22 -
 Ballarat Tramway Museum
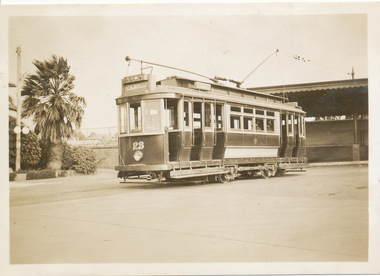
Photograph - SECV Geelong 23 at Railway Station, Wal Jack, Jun. 1939
... station buildings in the background. Wal's album notes dates the photo as June 1939. Printed on Kodak Velox paper. The tram has two trolley...station buildings in the background. Wal's album notes dates the photo as June 1939. Printed on Kodak Velox paper. The tram has two trolley ...Black and White print contained within the Wal Jack Bendigo and Geelong Album, see Reg Item 5003 for more details. Photo of No. 23 at the Geelong Railway Station with the station buildings in the background. Wal's album notes dates the photo as June 1939. Printed on Kodak Velox paper. The tram has two trolley poles, tow bars and the destination of Newtown. i1 - scan of print in the album i2 - rear of image i3 - scan of negative at 3200dpi added 6/6/2020.Yields information about Geelong tram No. 23 and the railway station precinct.Black and white print with notes on the rear and an associated negative.Has the rear in ink "Geelong Tramways, No. 23 "Two man trams", built by A. Pengelley South Australia"trams, tramways, geelong, railway station, tram 23 -
 Ballarat Tramway Museum
Film - Movie Film & Box, Kodak, 1960 to 1971
... August 1971 11.30 - R761 crossing Melton (Exford Wier) on the special train to Ballarat and then the bridge between Ballan and Gordon Stations. 12.16 - View from the front of a tram, following No. 26 along Lydiard St North, crossing at Gregory St and returning to the City. 12.39 - No. 14 and one other tram running along Albert St to Sebastopol, crossing No. 21 at Grey St and then to Sebastopol terminus, crossing Albert St and return and running along Albert St. 13.36 - No. 26, 39 crossing 13 at Gardens Loop. 14.00 - view looking across Lake Wendouree. 14.07 - 26 arriving at Victoria St, running part of Destination roll, passengers getting off with hotel in the background, trolley pole being turned and then with 39 following tram along Victoria St, crossing at the King St Loop. 15.07 - view of a trolley pole tracking through the overhead at curve 15.10 - end. ...August 1971 11.30 - R761 crossing Melton (Exford Wier) on the special train to Ballarat and then the bridge between Ballan and Gordon Stations. 12.16 - View from the front of a tram, following No. 26 along Lydiard St North, crossing at Gregory St and returning to the City. 12.39 - No. 14 and one other tram running along Albert St to Sebastopol, crossing No. 21 at Grey St and then to Sebastopol terminus, crossing Albert St and return and running along Albert St. 13.36 - No. 26, 39 crossing 13 at Gardens Loop. 14.00 - view looking across Lake Wendouree. 14.07 - 26 arriving at Victoria St, running part of Destination roll, passengers getting off with hotel in the background, trolley pole being turned and then with 39 following tram along Victoria St, crossing at the King St Loop. 15.07 - view of a trolley pole tracking through the overhead at curve 15.10 - end. ...Yields information in movie film format of Ballarat trams in 1960 through to 1971, how the system operated and was used by people, including special trams., Yields information in movie film format of Ballarat trams in 1960 through to 1971, how the system operated and was used by people, including special trams.Movie film - 8mm, approx. 15 mins, without leader strip on a plastic reel, within a clear plastic case - Standard 8, titled "Ballarat Trams". See Reg Item 4957 for DVD and Mini DVD. Has been transferred to DVD - see Reg item 4957 Made by Arthur Hill. Also transferred to DVD by Rod Cook Oct. 2015, via Roger Greenwood for use in his DVD, "The City of Ballarat Trams, Gardens & Gold" of 2016. See Reg Item 6883. In Arthur's letter - on file - Made between 1960 and August 1971. Synopsis: based on time. Between 1960 and 1968 0:00 Trams Ahead sign before the Victoria St terminus with 20 at terminus 0.14 - No. 20 leaving Victoria St terminus and being followed along Victoria St by car and then passengers jointing the tram at a tram stop. 00.40 - No. 12 (c1960) in bound along Lydiard St North and arriving in the Gregory St loop. 00.56 - No. 12 and 14 crossing at Gregory St. 01.20 - No. 33 and a bogie car crossing at depot loop. 01.31 - No. 18 travelling along Wendouree Parade with the Lake in the background. 01.42 - No 41 at depot junction and running into the depot No. 2 road with a short sequence of a tramway signal. 02.17 - SEC Sign at the depot gate, shot of 41 in No. 2 road, with the lights other way around, Caution beware of trams sign and a red signal. 02.31- Timetable sign at Gardens Loop 02.36 - No. 30 arriving at Loop and view of a signal with no lights showing. 02.48 - Destination roll being changed through a number of destinations. 03.26 - No. 20 arriving at Carlton St loop with the Olympic monument in the background and the red signal light going out. 03.31 - a lady standing at the front of No. 20, with an ice cream in hand, and No. 17 arriving at the Carlton St loop with a short sped up sequence and No. 20 departing from the loop, followed by No. 17 leaving the loop, heading into the city. 03.41 - No. 13 inbound from Sebastopol crossing Albert St and heading into the city. 04.12 - view of signal and contactor, the light going green and the tram passing underneath. 04.24 - No. 12 at the Sebastopol terminus and departing. 04.51 - No. 12 crossing Albert St Sebastopol. 05.16 - Following No. 12 along Albert St, with Borough Offices in background initially. 05.28 - No. 12 arriving at the Grey St loop with No. 14 arriving at the loop from the city and both trams departing. March 1971 05.58 - No. 30 being followed along Barkly St, Mt Pleasant and the pole being turned at the terminus 06.32 - No. 30 picking up a lady passenger. 06.38 - view from the front of a tram, with the drivers hand and a cigarette, view from the back of the tram, along the Mt Pleasant route and running through the loop and then turning into Main St - has the Ballarat (East) fire station in one sequence, and finally running along Main St. 07.35 - view from tram, with car turning into Bridge St. and then running into Sturt St passed the Parking Loop, and along Sturt St. 08.32 - Points at Drummond St North being changed, doors changed over and the tram running along Drummond St. North, through the Mill St loop and into Macarthur St and in Wendouree Parade, with the Lake Wendouree in view and crossing No. 12 at the Depot Loop, with crews chatting, past the depot, a lady passenger getting off the tram near Forest St., and arriving at Gardens Loop with the same lady passenger who got on in Barkly St, getting off the tram. 11.09 - view of No. 30 at Gardens Loop, departing the loop. August 1971 11.30 - R761 crossing Melton (Exford Wier) on the special train to Ballarat and then the bridge between Ballan and Gordon Stations. 12.16 - View from the front of a tram, following No. 26 along Lydiard St North, crossing at Gregory St and returning to the City. 12.39 - No. 14 and one other tram running along Albert St to Sebastopol, crossing No. 21 at Grey St and then to Sebastopol terminus, crossing Albert St and return and running along Albert St. 13.36 - No. 26, 39 crossing 13 at Gardens Loop. 14.00 - view looking across Lake Wendouree. 14.07 - 26 arriving at Victoria St, running part of Destination roll, passengers getting off with hotel in the background, trolley pole being turned and then with 39 following tram along Victoria St, crossing at the King St Loop. 15.07 - view of a trolley pole tracking through the overhead at curve 15.10 - end. Written labels giving title information on reel.trams, tramways, ballarat, sebastopol, lydiard st north, victoria st, mt pleasant, lake wendouree, depot, tram 12, tram 13, tram 14, tram 17, tram 18, tram 21, tram 26, tram 33, tram 39, tram 41 -
 Ballarat Tramway Museum
Magazine, Australian Electric Traction Association (AETA), "The Trolley Wire", Vol 1, No. 3, "The Trolley Wire", Vol 1, No. 4, "The Trolley Wire", Vol 1, No. 7, "The Trolley Wire", Vol 1, No. 8, "The Trolley Wire", Vol 1, No. 10, 1952
... Has items on Sydney trams, a Map of Ballarat tramways (See image i2), Newcastle News, and a discussion of the influx of transport experts into Sydney from England. 5685.2 - Spirit duplicated magazine, 7 quarto pages, single sided - " The Trolley Wire", Vol 1, No. 4, May 1952, stapled down along the left hand side. Has notes on use of tramway power for pumping stations, map of Bendigo (see image i4), news from Brisbane, Sydney news, association news, tramcar painting letters, Newcastle Destination roll 5685.3 - Spirit duplicated magazine, 7 quarto pages, single sided - " The Trolley Wire", Vol 1, No. 7, August 1952, stapled down along the left hand side. ...Has items on Sydney trams, a Map of Ballarat tramways (See image i2), Newcastle News, and a discussion of the influx of transport experts into Sydney from England. 5685.2 - Spirit duplicated magazine, 7 quarto pages, single sided - " The Trolley Wire", Vol 1, No. 4, May 1952, stapled down along the left hand side. Has notes on use of tramway power for pumping stations, map of Bendigo (see image i4), news from Brisbane, Sydney news, association news, tramcar painting letters, Newcastle Destination roll 5685.3 - Spirit duplicated magazine, 7 quarto pages, single sided - " The Trolley Wire", Vol 1, No. 7, August 1952, stapled down along the left hand side. ...5685.1 - Spirit duplicated magazine, 4 quarto pages, single sided - " The Trolley Wire", Vol 1, No. 3, April 1952, stapled down along the left hand side. Has items on Sydney trams, a Map of Ballarat tramways (See image i2), Newcastle News, and a discussion of the influx of transport experts into Sydney from England. 5685.2 - Spirit duplicated magazine, 7 quarto pages, single sided - " The Trolley Wire", Vol 1, No. 4, May 1952, stapled down along the left hand side. Has notes on use of tramway power for pumping stations, map of Bendigo (see image i4), news from Brisbane, Sydney news, association news, tramcar painting letters, Newcastle Destination roll 5685.3 - Spirit duplicated magazine, 7 quarto pages, single sided - " The Trolley Wire", Vol 1, No. 7, August 1952, stapled down along the left hand side. Has notes on Brisbane, Association news, map of the La Perouse - Botany - Mascot district, Ryde Cemetery, Sydney R 1890 runaway, North Sydney destination roll (1910) 5685.4 - Spirit duplicated magazine, 8 quarto pages, single sided - " The Trolley Wire", Vol 1, No. 8, September 1952, stapled down along the left hand side. Has notes on Association news, (left hand side very faded), map of the Enfield's lines, Brisbane Trolley Bus system 1952, Sydney news, and Eastern Suburbs roll. 5285.5 - Spirit duplicated magazine, 9 quarto pages, single sided - " The Trolley Wire", Vol 1, No. 10, November 1952, stapled down along the left hand side. Has notes on Brisbane, Wylde St trolley bus route in Sydney, Sydney news, association notes, Proposed lines in Sydney - Haberfield to Dobroyd, use of triple trams in Sydney, Broken Hill destination roll, Fort Macquarie depot track drawing and Newcastle news. See Reg Item 5685 for other Vol 1 issues and Reg Item 5686 for Vol. 2 issues.Vol 1, No. 4 has pencil inscription of "H. H. Matthews" in top right hand corner.trams, tramways, tramway news, history, sydney, newcastle, broken hill, brisbane, ballarat, bendigo, map -
 Ballarat Tramway Museum
Photograph - Demolition of Ballarat A power station and foundation stone, Alan Bradley, Nov. 1993
... Trolley Wire... ESCo... Power Station...Trolley Wire. Taken during November 1993. 1140.3 - Demolition work well advanced showing foundations and basement areas of power station - taken during March 1994. ...Ballarat Tramway Museum South Gardens Reserve Wendouree Parade Ballarat Ballarat goldfields Yields information about the demolition of Ballarat A Power station. Trolley Wire ESCo Power Station Demolition All have yellow stickers with photo number for magazine printer, and white sticky labels with photo number and words "same size" written on black ink. 1140.1 and 1140.2 have pencil cropping marks. ...Yields information about the demolition of Ballarat A Power station.Set of three colour photographs of buildings and demolition of the former ESCo / SECV Wendouree Parade Power station sent to the Editor of Trolley Wire - used in the November 1997 issue of Trolley Wire. All photos by Alan Bradley. Photos taken during November 1993 or March 1994. All photos on AGFA paper. 1140.1 - The gate house building in Wendouree Parade - Nov. 1993 - used on page 21 of Nov. 1997 Trolley Wire. 1140.2 - Foundation stone - 23/8/1904 - of the ESCo power house. Gives names of people involved and contractors etc. - used on page 20 of Trolley Wire. Taken during November 1993. 1140.3 - Demolition work well advanced showing foundations and basement areas of power station - taken during March 1994. Used on page 25 of Trolley Wire. See also item 10286 for other photos.All have yellow stickers with photo number for magazine printer, and white sticky labels with photo number and words "same size" written on black ink. 1140.1 and 1140.2 have pencil cropping marks.trolley wire, esco, power station, demolition -
 Ballarat Tramway Museum
Photograph - Black & White Photograph/s - set of 4, Richard Gilbert, 20/08/1971 12:00:00 AM
... Trolley Wire... ESCo... Power Station...Set of four black and white photographs of interior and equipment of the former ESCo / SECV Wendouree Parade Ballarat A power station sent to the Editor of Trolley Wire - used in the November 1997 issue of Trolley Wire. ...Set of four black and white photographs of interior and equipment of the former ESCo / SECV Wendouree Parade Ballarat A power station sent to the Editor of Trolley Wire - used in the November 1997 issue of Trolley Wire. ...Set of four black and white photographs of interior and equipment of the former ESCo / SECV Wendouree Parade Ballarat A power station sent to the Editor of Trolley Wire - used in the November 1997 issue of Trolley Wire. All photos by Richard Gilbert. Photos taken on 20/8/1971. All photos on Kodak paper. 1144.1 - Looking along building at main distribution switch panel - used on page 24 of trolley wire. 1144.2 - a view across the main steam generator section of the power station - and AC plant - used on page 23. 1144.3 - of the British Thomson Houston rotary converters in used at the time of the photo - used on page 23. 1144.4 - a view from the opposite end of the building shown in 1144.1 - showing the rotary converters are in the front of the photo, AC generators in the middle and foreman's cabin - used on page 22. All have yellow stickers with photo number for magazine printer, and white sticky labels with photo number and words "photo xx same size" written on black ink and photo numbers in pencil from Richard.trams, tramways, trolley wire, esco, power station, ballarat a power station, rotary converters