Showing 4764 items matching "tram 2"
-
 Ballarat Tramway Museum
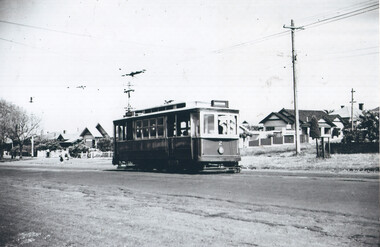
Photograph - SECV Geelong tram 2 at Eastern Park, c1954
... SECV Geelong tram 2 at Eastern Park......tram 2...Photograph shows Geelong tram 2 at the Eastern Park terminus. The tram has been fitted with tail lights and has the return destination of Newtown. ...Photograph SECV Geelong tram 2 at Eastern Park ...Photograph shows Geelong tram 2 at the Eastern Park terminus. The tram has been fitted with tail lights and has the return destination of Newtown. Photographer unknown, c1954.Yields information about the Eastern Park terminus and tram 2.Black and white photograph printed on plain paper with the printers marks on the rear.On rear in ink "Eastern Pk"geelong, tramways, eastern park, tram 2 -
 Melbourne Tram Museum
Photograph - VR tram 2 second fleet
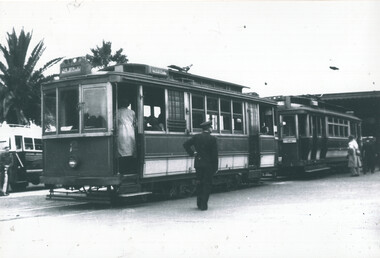
... VR tram 2 second fleet......VR tram 2...Photograph shows VR single truck tram 2 second fleet showing destination St Kilda. ...Melbourne Tram Museum 8 Wallen Road Hawthorn melbourne Photograph shows VR single truck tram 2 second fleet showing destination St Kilda. ...Photograph shows VR single truck tram 2 second fleet showing destination St Kilda. Driver leaning out of glass windscreen and conductor standing on roadway with arms folded.Yields information of Railways tramcar 2 and crew Black and white photograph with stamp and notes on rear TMSV stamp, black biro writing 'Print from RH Prentice negative - August 1980 (Original from L Marshall Wood collection)'victorian railways, single truck, vr tram 2, second fleet, st kilda -
 Ballarat Tramway Museum
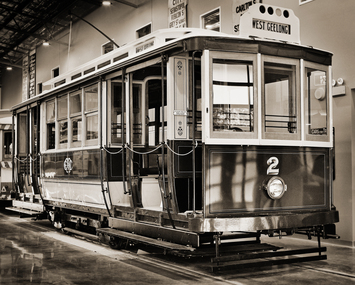
Photograph - Digital images of BTM - Geelong tram No. 2, Greg Naylor, 21/1/2023
... Digital images of BTM - Geelong tram No. 2......tram 2...Digital images of BTM - Geelong tram No. 2 in the New Museum section of the depot. ...Black and white photo of - Digital images of BTM - Geelong tram No. 2...Yields information about BTM tram 2. BTM trams tramcars Geelong tram 2 Black and white photo of - Digital images of BTM - Geelong tram No. 2 Photograph Digital images of BTM - Geelong tram No. 2 Greg Naylor ...Digital images of BTM - Geelong tram No. 2 in the New Museum section of the depot. Photographed 21/1/2023 on a Mamiya RB67 large format film camera.Yields information about BTM tram 2.Black and white photo of - Digital images of BTM - Geelong tram No. 2btm, trams, tramcars, geelong, tram 2 -
 Ballarat Tramway Museum
Photograph - SECV Geelong tram 2 near East terminus, mid to late 1940s
... SECV Geelong tram 2 near East terminus.......tram 2...Photograph shows Geelong tram 2 in the SECV green and cream colour scheme near East terminus in Ormond Road on a summers day. ...Photograph shows Geelong tram 2 in the SECV green and cream colour scheme near East terminus in Ormond Road on a summers day. ...Photograph shows Geelong tram 2 in the SECV green and cream colour scheme near East terminus in Ormond Road on a summers day. Tram fitted with metal gates. Photographer unknown. The tram bumper bars were lowered during the late 1940s and in 1950 repainted in the SECV green colour scheme. In this photo the bumpers have not be lowered. Photo mid to late 1940s.Yields information about Geelong tram 2 prior to the lowering of the bumper bars to match those of the ex Melbourne bogie trams.Black and white photograph printed on plain paper.geelong, tramways, tram 2 -
 Ballarat Tramway Museum
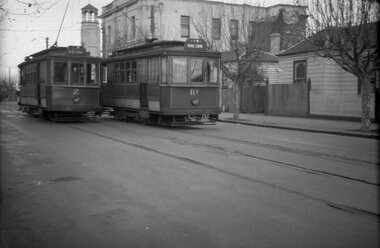
Photograph - SECV Geelong tram 2 & 16 Moorabool St, mid to late 1940s
... SECV Geelong tram 2 & 16 Moorabool St......tram 2...Photograph shows Geelong trams 2 and 16 in Moorabool St looking south at the intersection at Malop St. ...Photograph shows Geelong trams 2 and 16 in Moorabool St looking south at the intersection at Malop St. ...Photograph shows Geelong trams 2 and 16 in Moorabool St looking south at the intersection at Malop St. Both trams are on the Belmont to North runs. Tram 16 has the destination of North. There is another tram in the background, There are two safety zones in the view. Photographer unknown, possibly from a postcard, c1940. Shows the Geelong neon bar traffic lights at this location. Original image from the Geelong Heritage Centre.Yields information about Geelong trams 2 and 16 in Moorabool St c1940.Black and white photograph printed on plain paper with a note on the rear."These lights installed early '39" and 1939"geelong, tramways, tram 2, moorabool st, safety zones, traffic lights, tram 16 -
 Melbourne Tram Museum
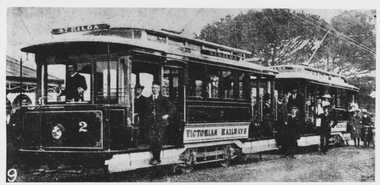
Photograph - VR tram 2 first fleet with sister car
... VR tram 2 first fleet with sister car......tram 2...Photograph shows single truck VR tram 2 first fleet with destination showing St Kilda, immediately in front of sister car with same destination (number obscured) and trolley poles on both cars are raised. ...Stamp and notes on rear Photograph VR tram 2 first fleet with sister car ...Photograph shows single truck VR tram 2 first fleet with destination showing St Kilda, immediately in front of sister car with same destination (number obscured) and trolley poles on both cars are raised. Driver of VR 2 stands at controls with no driver windscreen and conductor stands on side running board. Numerous adults are shown aboard both trams and at sides and rear of cars with trees in the background. Yields information of Railways tramcar 2 first fleet Black and white photograph with number 9 showing in lower left corner of print from previous collection. Stamp and notes on rear Blue biro note ' MMTB Print (from TMSV collection?). victorian railways, single truck, st kilda, tram 2, first fleet -
 Ballarat Tramway Museum
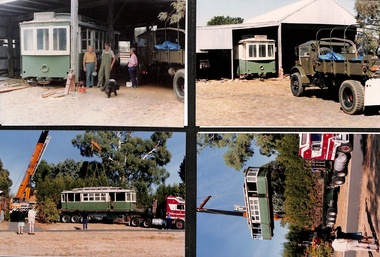
Photograph - Recovery and reconstruction of Geelong tram 2 - set of 24
... Recovery and reconstruction of Geelong tram 2 - set of 24......tram 2...Set of 24 photographs of the recovery of Geelong tram No 2, transport to Canberra, and its reconstruction between March 1991 and 2004. ...Geelong Canberra Brill 21E 21E trucks tram 2 tram 3 reconstruction Set of 24 colour prints Photograph Recovery and reconstruction of Geelong tram 2 - set of 24 ...Set of 24 photographs of the recovery of Geelong tram No 2, transport to Canberra, and its reconstruction between March 1991 and 2004. Includes a photo of Geelong No. 3 in Newtown from which parts were recovered, and a photo of the ex Brussels 21E type truck prior to its fitting to the tramcar.Yields information about the recovery and restoration or reconstruction work undertaken in Canberra by the tram donor.Set of 24 colour printsgeelong, canberra, brill 21e, 21e trucks, tram 2, tram 3, reconstruction -
 Ballarat Tramway Museum
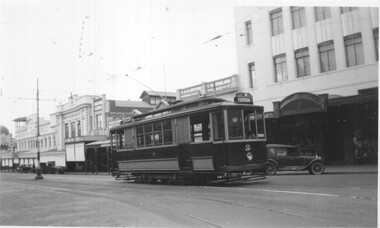
Photograph - Geelong tram 2 - Moorabool St, late 1930s
... Geelong tram 2 - Moorabool St.......tram 2...Photograph shows Geelong tram No. 2 in Moorabool St with the destination of East, operating as a one-man tram. ...Photograph Geelong tram 2 - Moorabool St. ...Photograph shows Geelong tram No. 2 in Moorabool St with the destination of East, operating as a one-man tram. Photograph and date unknown - though taken at the same time as item 9954, given the parked motor cars. In the background are Bright & Hitchcocks store, Drayton stores, a sign for Berger paints, and W T Wiggs Tobacconist shop.Yields information about Geelong tram 2, possibly late 1930s and Moorabool St.Black and white print with notes on the rear.In pencil on the rear "Geelong tram"geelong, tramways, tramcars, moorabool st, tram 2 -
 Ballarat Tramway Museum
Document, Launch of restored Geelong tram 2 - 6-2-2022
... Launch of restored Geelong tram 2 - 6-2-2022......Tram 2...Prepared for the launch of Geelong Tram No. 2 giving details of the program and the tram itself. ...Yields information about the program to launch Geelong No. 2 and the tram itself. Trams tramways Geelong Tram 2 BTM Programmes Program Printed A3 sheet, double sided, giving details of the Launch programme 6/2/2022 Launch of restored Geelong tram 2 - 6-2-2022 Document ...Prepared for the launch of Geelong Tram No. 2 giving details of the program and the tram itself. Has a list of speakers and timing. Launched on 6/2/2022 at Depot Junction.Yields information about the program to launch Geelong No. 2 and the tram itself.Printed A3 sheet, double sided, giving details of the Launch programme 6/2/2022trams, tramways, geelong, tram 2, btm, programmes, program -
 Ballarat Tramway Museum
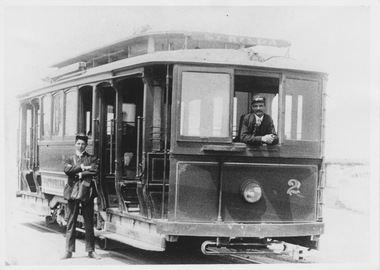
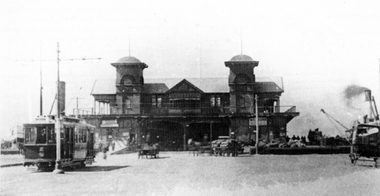
Photograph - SECV Geelong tram No. 2 at the Wharf terminus, c1920
... SECV Geelong tram No. 2 at the Wharf terminus.......tram 2...The photograph shows Geelong No. 2, built by Duncan and Fraser of Adelaide in 1911 in its as-built configuration, c1920 at the Wharf terminus, known as the Moorabool Street Pier. The tram...Black and white photograph of Geelong tram No. 2 at the Wharf terminus c1920. Two copies held....Geelong Wharf MESCo Moorabool St Pier Edina tram 2 Black and white photograph of Geelong tram No. 2 at the Wharf terminus c1920. ...The photograph shows Geelong No. 2, built by Duncan and Fraser of Adelaide in 1911 in its as-built configuration, c1920 at the Wharf terminus, known as the Moorabool Street Pier. The tram line was opened in 1912 and closed in 1940 when the track in Corio St was extended to the Beach terminus. There are several horse-drawn vehicles in the view with goods being loaded or unloaded on the ship moored on the right. The tramway was operated by the Melbourne Electric Supply Co. (MESCo). The photograph from the collection of Ken Magor was published in the Sydney Tramway Museum's magazine Trolley Wire in April 1981. The photo caption advises - "The steamship to the right is the Edina, a veteran Port Phillip steamer which was launched in 1854 and was not broken up until 1957." This tram is part of the collection at the Ballarat Tramway Museum.Yields information about Geelong No.2 and the Wharf terminus.Black and white photograph of Geelong tram No. 2 at the Wharf terminus c1920. Two copies held.geelong, wharf, mesco, moorabool st pier, edina, tram 2 -
 Ballarat Tramway Museum
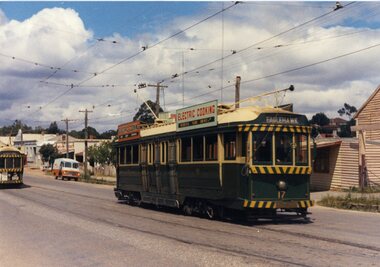
Photograph - SECV Bendigo tram 2 at Eaglehawk, Wal Jack, 7/10/1939
... SECV Bendigo tram 2 at Eaglehawk...... tram 2...Photo of Bendigo No. 2 at the Eaglehawk terminus, 7-10-1939, High St, with the Park Hotel in the background. Photo by Wal Jack. Tram...Photograph SECV Bendigo tram 2 at Eaglehawk Wal Jack ...Photo of Bendigo No. 2 at the Eaglehawk terminus, 7-10-1939, High St, with the Park Hotel in the background. Photo by Wal Jack. Tram has the destination of Quarry Hill. Photo contained within the Wal Jack Bendigo and Geelong Album, see Reg Item 5003 for more details. Printed on Ilford paper. i1 - scan of print in the album i2 - rear of image i3 - scan of negative at 3200dpi added 7/6/2020. Yields information about Bendigo tram No. 2 and the Eaglehawk terminus.Black and White print with photographer's notes on the rear.On the rear in blue ink "SEC Bendigo No 2 (ex MMTB 115 M class) in High St Eaglehawk (terminus) 7th Oct. 1939." with Wal Jack copyright stamp in the top right hand corner and the number "T194" written in.trams, tramways, bendigo, high st, eaglehawk, tram 2 -
 Melbourne Tram Museum
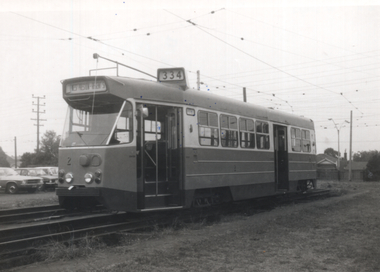
Photograph - Black & White, David Menzies, Tram Z 2 at Preston Workshops, June 1975
... Tram Z 2 at Preston Workshops......tram 2...Black and white print of Z class tram No. 2 at Preston Workshops. Has the destination of West Preston Regent St with a route number "334". ...Tram Z 2 at Preston Workshops Photograph Black & White David Menzies ...Black and white print of Z class tram No. 2 at Preston Workshops. Has the destination of West Preston Regent St with a route number "334". Photo possibly at the time around the trams entry to service on 28/6/1975. See reference.Yields information about Z class 2 around the time of its commissioning.Black and White photograph - printed on plain paper with photographers stamp on rear.Has stamp of David Menzies on rear. and in ink "Z 2 W'shops"tramways, trams, mmtb, z class, tram 2 -
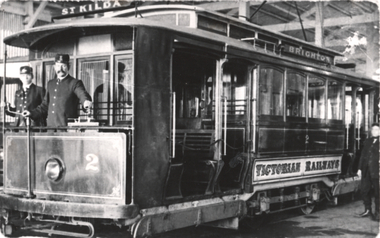 Melbourne Tram Museum
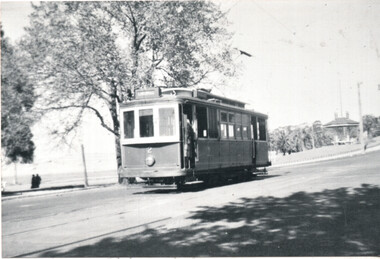
Photograph - VR Tram No. 2 Elwood Depot, c1906
... VR Tram No. 2 Elwood Depot......tram 2...Copy photograph of a postcard featuring Victorian Railways Tram No. 2 at Elwood Depot. Based on the photo on page 6 of The Brighton Electric Line by Leon Marshall Wood, it is one of the original fleet which destroyed by the depot fire on 7/3/1907. ...Photograph VR Tram No. 2 Elwood Depot ...Copy photograph of a postcard featuring Victorian Railways Tram No. 2 at Elwood Depot. Based on the photo on page 6 of The Brighton Electric Line by Leon Marshall Wood, it is one of the original fleet which destroyed by the depot fire on 7/3/1907. See item 1351. Has the driver and possibly a conductor on the platform. Shows both destinations of St Kilda and Brighton. Yields information about the first VR tram No. 2 at Elwood DepotBlack and white copy photograph of a postcard with remnants of adhesive tape on the rear.tramways, vr trams, elwood depot, st kilda brighton, tram 2 -
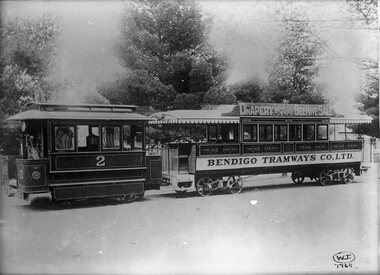 Ballarat Tramway Museum
Photograph - Glass plate - Bendigo steam tram No 2 Mollison St, William H Robinson, 1892/1895
... Glass plate - Bendigo steam tram No 2 Mollison St....... tram 2...Glass plate negative of Bendigo Tramways Co. Ltd steam tram motor (No. 2) and trailer No. 6, Trailer No. 6 has a roof advertising board "Drapery half price Beehive Sale". ...Photograph Glass plate - Bendigo steam tram No 2 Mollison St. William H Robinson ...Glass plate negative of Bendigo Tramways Co. Ltd steam tram motor (No. 2) and trailer No. 6, Trailer No. 6 has a roof advertising board "Drapery half price Beehive Sale". Shows in detail the presentation of the trams, painting scheme, bogie arrangements. Photo in Mollison St. See items 987, 1439 and 4369 for other reproductions of this photograph.Yields information about Bendigo steam tram and their trailers.Glass plate negative in a brown paper envelope.The envelope has Wal Jack stamps T168 and T169 and a written note "Bendigo Steam Trams"trams, tramways, bendigo, mollison st, steam trams, trailers, tram 2, tram 6 -
 Ballarat Tramway Museum
Photograph - Bendigo steam tram No 2 Mollison St, William H Robinson, 1892/1895
... Bendigo steam tram No 2 Mollison St....... tram 2...Copy print of a sepia toned image of a Bendigo Tramways Co. Ltd steam tram motor (No. 2) and trailer No. 6, possibly on the depot access track. ...Copy print of a sepia toned image of a Bendigo Tramways Co. Ltd steam tram motor (No. 2) and trailer No. 6, possibly on the depot access track. ...Copy print of a sepia toned image of a Bendigo Tramways Co. Ltd steam tram motor (No. 2) and trailer No. 6, possibly on the depot access track. Shown as a W. H. Robinson photograph, was scanned from a block mounted print. Has in pencil "1892 - 1902" reproduced on the photograph. Trailer No. 6 has a roof advertising board "Drapery half price Beehive Sale". shows in detail the presentation of the trams, painting scheme, bogie arrangements. Two copies held. 4369.2 - Black and White copy print contained within the Wal Jack Bendigo and Geelong Album, see Reg Item 5003 for more details. Added 30/6/2013. Has 'WJ T168" written in ink on the front of the photograph. See item 9464 for a glass plate negative of this image and 987 and 1439 for other images.Yields information about Bendigo steam tram and their trailers.Black and White reproduction printCopy 1 - Has "17)" in the top left hand corner of the front of the photograph. On the rear "(8)" in pencil in the top left hand corner. In pencil and ink "Bendigo Tramways (steam system) 1892", "Copied from William H Robinson / Leonard C. Bennetts Collection" and a "William F Scott" address label in the bottom right hand corner. Also has cropping instructions and other marks. Copy 2 - In pencil "Bendigo / William H Robinson / Leonard C. Bennett Collection" 4369.1 - on rear in ink "Bendigo No. 2 Motor, No. 6 Car, Mollison St. 1895" Motor No. 2 by Baldwin B/No. 12242 of 1891" Has Wal Jack copyright stamp on rear and number T168 written in.trams, tramways, bendigo, mollison st, steam trams, trailers, tram 2, tram 6 -
 Ballarat Tramway Museum
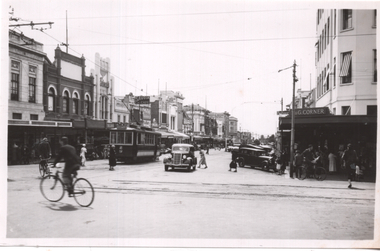
Photograph - SECV Geelong tram No. 2 at T&G Corner Geelong, c1938
... SECV Geelong tram No. 2 at T&G Corner Geelong......tram 2...The photo shows Geelong No. 2 in Moorabool St at the intersection with Ryrie St. The tram has the destination of North. ...Photograph SECV Geelong tram No. 2 at T&G Corner Geelong ...The photo shows Geelong No. 2 in Moorabool St at the intersection with Ryrie St. The tram has the destination of North. The tram is in its modified form that provides for one-man operation. In the photo are Edments, Savoia Cafe, Commercial Bank of Australia, and the T&G building. The photo has been dated between 1935 when the tram was converted and 1939 when the bar neon traffic lights were installed at the intersection. The photograph was taken from a Victorian Railways glass negative held at the State Library of Victoria. See item 8360 for a digital copy of the SLV scan - http://handle.slv.vic.gov.au/10381/97173Yields information about Geelong No.2 and the intersection of Ryrie and Moorabool Streets Geelong.Black and white photograph with a number of rear. Two copies held.In pencil "2171" on rear.tramways, trams, geelong, ryrie st, moorabool st, temperance & general, tram 2, geelong tramway -
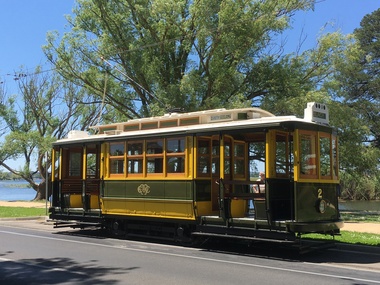 Ballarat Tramway Museum
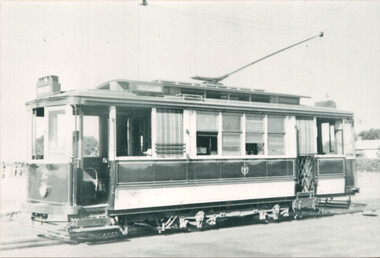
Photograph - Digital Image, Neville Britton, Geelong tram No.2 at St Aidans, 10-11-2020
... Geelong tram No.2 at St Aidans...Shows Melbourne Electric Supply Co. tram No. 2 after its reconstruction to an operable condition at the Museum's St Aidans Drive terminus on 10-11-2020 following transport from Bendigo where the mechanical work was carried out. ...Digital image of Geelong tram No. 2 after its reconstruction and recommissioning at the St Aidans Drive terminus of the Museum's tram line on 10-11-2020...Geelong MESCo trams tramways Geelong No. 2 reconstruction restoration Wendouree Parade St Aidans Drive BTM Digital image of Geelong tram No. 2 after its reconstruction and recommissioning at the St Aidans Drive terminus of the Museum's tram line on 10-11-2020 Geelong tram No.2 at St Aidans Photograph Digital Image Vic Ballarat Neville Britton ...Shows Melbourne Electric Supply Co. tram No. 2 after its reconstruction to an operable condition at the Museum's St Aidans Drive terminus on 10-11-2020 following transport from Bendigo where the mechanical work was carried out. The body work was rebuilt from a farm shed in Canberra.Yields information about the appearance of the tram when it was delivered to the Museum. Further work was done to complete the interior.Digital image of Geelong tram No. 2 after its reconstruction and recommissioning at the St Aidans Drive terminus of the Museum's tram line on 10-11-2020geelong, mesco, trams, tramways, geelong no. 2, reconstruction, restoration, wendouree parade, st aidans drive, btm -
 Ballarat Tramway Museum
Photograph - Digital image of Geelong tram No. 2 in Ryrie St, 1920
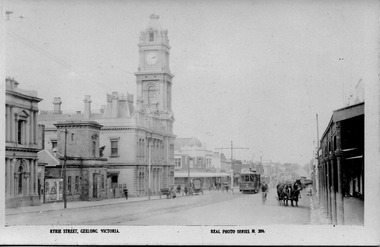
... Digital image of Geelong tram No. 2 in Ryrie St....2, built by Duncan and Fraser of Adelaide in 1911 in its as-built configuration in Ryrie St with the former Geelong Post Office in the view. Next door to the Post Office is the Telegraph Station. Dated on the basis of a poster next to the Telegraph station advertising a 1920 film by Irene Castle. The full name of the film cannot be read, but starts with "The..." This tram...Digital image of Geelong tram No. 2 in Ryrie St, 1920....Photograph Digital image of Geelong tram No. 2 in Ryrie St. ...The photograph, Real Photo Series M 324, shows Geelong No. 2, built by Duncan and Fraser of Adelaide in 1911 in its as-built configuration in Ryrie St with the former Geelong Post Office in the view. Next door to the Post Office is the Telegraph Station. Dated on the basis of a poster next to the Telegraph station advertising a 1920 film by Irene Castle. The full name of the film cannot be read, but starts with "The..." This tram is part of the collection at the Ballarat Tramway Museum. Yields information about Geelong No.2 and Ryrie St in particular the Geelong Post Office.Digital image of Geelong tram No. 2 in Ryrie St, 1920.geelong, geelong 2, mesco, geelong town, geelong post office, ryrie st, geelong telegraph station. -
 Ballarat Tramway Museum
Photograph - Digital image of Geelong tram No. 2 at T&G Corner Geelong, c1938
... Digital image of Geelong tram No. 2 at T&G Corner Geelong...The photo shows Geelong No. 2 in Moorabool St at the intersection with Ryrie St. The tram has the destination of North. ...Digital image of Geelong tram No. 2 in Moorabool St at the intersection with Ryrie St, c1938. ...Photograph Digital image of Geelong tram No. 2 at T&G Corner Geelong ...The photograph was taken from a Victorian Railways glass negative held at the State Library of Victoria. The photo shows Geelong No. 2 in Moorabool St at the intersection with Ryrie St. The tram has the destination of North. The tram is in its modified form that provides for one-man operation. In the photo are Edments, Savoia Cafe, Commercial Bank of Australia, and the T&G building. The photo has been dated between 1935 when the tram was converted and 1939 when the bar neon traffic lights were installed at the intersection. For reference to the SLV photograph - see http://handle.slv.vic.gov.au/10381/97173. See item 9075 for a copy print. This tram is now part of the collection of the Ballarat Tramway Museum.Yields information about Geelong No.2 and the intersection of Ryrie and Moorabool Streets Geelong.Digital image of Geelong tram No. 2 in Moorabool St at the intersection with Ryrie St, c1938. geelong, geelong 2, ryrie st, moorabool st, trams, tramways, temperance & general -
 Ballarat Tramway Museum
Slide - 35mm slide/s, Wal Jack, 3/09/1958 12:00:00 AM
... ... tram 2...Bendigo, bogie tram No. 2 standing alongside the fountain before proceeding to Eaglehawk. ...'7 55 am Wed 3 Sept. 1958, Tram No. 2 at Fountain, Bendigo'...Ballarat Tramway Museum South Gardens Reserve Wendouree Parade Ballarat Ballarat goldfields Tramways trams Bendigo tram 2 '7 55 am Wed 3 Sept. 1958, Tram No. 2 at Fountain, Bendigo' Bendigo, bogie tram No. 2 standing alongside the fountain before proceeding to Eaglehawk. ...Bendigo, bogie tram No. 2 standing alongside the fountain before proceeding to Eaglehawk. Tram fitted with small reflective triangles on front panels, all blinds drawn and gate closed. Has fountain in background and shops on the west side of Charing cross.'7 55 am Wed 3 Sept. 1958, Tram No. 2 at Fountain, Bendigo'tramways, trams, bendigo, tram 2 -
 Ballarat Tramway Museum
Photograph - Bendigo Tram No. 2, 4/1949
... Bendigo Tram No. 2...Bendigo Tram No. 2. Photographer :I.K. Winney, tram displaying a white disc on the front dash that indicates a following tram in the same single line section....Ballarat Tramway Museum South Gardens Reserve Wendouree Parade Ballarat Ballarat goldfields Bendigo Tram No. 2. Photographer :I.K. Winney, tram displaying a white disc on the front dash that indicates a following tram in the same single line section. ...Bendigo Tram No. 2. Photographer :I.K. Winney, tram displaying a white disc on the front dash that indicates a following tram in the same single line section.Yields information about SEC tramway operations.Black and white photograph on plain paper"BENDIGO No2 on EAGLEHAWK Route" "Taken by I.K.Winney 4/49" "N.J. THORPE NEG." "15 154/88"bendigo, bendigo tramcar 2, eaglehawk -
 Ballarat Tramway Museum
Photograph - SECV Geelong trams 2 and 23 at the Railway Station, Charles Craig, 29-3-1948
... ...tram 2...Photograph shows Geelong trams 2 and 23 at the railway station. The tram behind tram 2 has an auxiliary AETA tour board as shown on item 8525, dating the photo as 29-3-1948. ...Ballarat Tramway Museum South Gardens Reserve Wendouree Parade Ballarat Ballarat goldfields Photograph shows Geelong trams 2 and 23 at the railway station. The tram behind tram 2 has an auxiliary AETA tour board as shown on item 8525, dating the photo as 29-3-1948. ...Photograph shows Geelong trams 2 and 23 at the railway station. The tram behind tram 2 has an auxiliary AETA tour board as shown on item 8525, dating the photo as 29-3-1948. An inspector is standing alongside tram 2 possibly checking that passengers are on the correct tram. In the background is the station canopy and a bus. Fares Please! - April 2019 gives the photographer as Charles Craig.Yields information about the Geelong railway station, trams 2 and 23 while on an AETA Tour.Black and white photograph printed on Kodak Royal paper.geelong, tramways, tram 2, tram 23, railway station, station, aeta tour -
 Melbourne Tram Museum
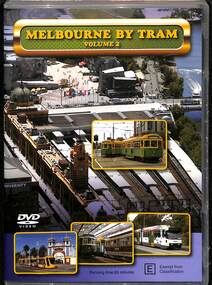
Film - Compact Diskette with video, Association of Railway Enthusiasts (ARE), "Melbourne by Tram Vol. 2", c2012
... "Melbourne by Tram Vol. 2"...DVD, with plastic cover and printed paper insert, DVD printed white cover, titled "Melbourne by Tram Vol. 2", produced by the Association of Railway Enthusiasts c2012. ...DVD is not copied to the hard drive. "Melbourne by Tram Vol. 2" Film Compact Diskette with video Association of Railway Enthusiasts (ARE) ...DVD, with plastic cover and printed paper insert, DVD printed white cover, titled "Melbourne by Tram Vol. 2", produced by the Association of Railway Enthusiasts c2012. Approx 65mins. Produced and filmed by Tony Marsden. DVD is not copied to the hard drive.trams, tramways, melbourne trams, are, video tape -
 Ballarat Tramway Museum
Slide - 35mm slide/s - set of 2, Eldon Hogan?, late 1950's
... ... tram 2....1 - "Tram No. 13 in Pall Mall Bendigo / 24)" in red ink. .2 - "Tram No. 2 approaching Bendigo / 25)" in red ink....Tramways trams Bendigo Eaglehawk Pall Mall tram 13 tram 2 .1 - "Tram No. 13 in Pall Mall Bendigo / 24)" in red ink. .2 - "Tram No. 2 approaching Bendigo / 25)" in red ink. ...Set of two Agfacolor cardboard mounted slides - have handwritten captions and two numbers - no date, pre dash canopy stripes and additional lights, late 1950's? Scanned on the Canon scanner at the depot 15/12/1971 at the time of the installation of the scanner. .1 - Bendigo 13, outbound in Pall Mall with the Shamrock Hotel in the background. .2 - Bendigo 2, in bound from Eaglehawk in a very rural situation, unsealed road sides, with the Destination of Quarry Hill..1 - "Tram No. 13 in Pall Mall Bendigo / 24)" in red ink. .2 - "Tram No. 2 approaching Bendigo / 25)" in red ink.tramways, trams, bendigo, eaglehawk, pall mall, tram 13, tram 2 -
 Ballarat Tramway Museum
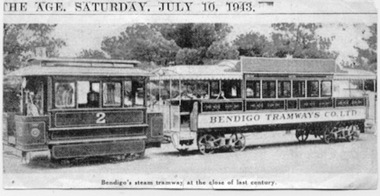
Newspaper, The Age, Image of Bendigo steam tram No. 2 and trailer, July 10, 1943
... Image of Bendigo steam tram No. 2 and trailer...Reproduction of a photograph of Bendigo Steam tram No. 2 and Bendigo Tramways Co. Ltd. bogie trailer. ...Image of Bendigo steam tram No. 2 and trailer Newspaper The Age ...Reproduction of a photograph of Bendigo Steam tram No. 2 and Bendigo Tramways Co. Ltd. bogie trailer. Caption "Bendigo's steam tramway at the close of last century." Same photo as that in Keith Kings "The Bendigo Tramways" but the roof ad board on the trailer has been altered to cover the advertisers name. Keith Kings gives the trailer as No. 6, rebuilt from the unsuccessful battery tram No. 1. See item 9464 for a glass plate negative of this photograph.Yields information about Bendigo Steam trams.Newspaper Clipping from The AGE, Saturday July 10, 1943.trams, tramways, steam trams, bendigo, trailers, bendigo tramways co. ltd. -
 Ballarat Tramway Museum
Photograph - Geelong trams 2 and 28, 2004
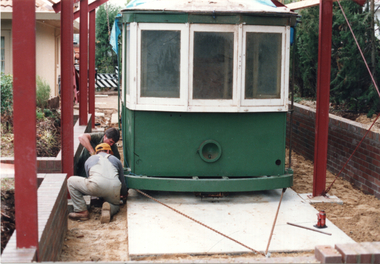
... ...tram 2...The set of three colour prints shows various stages housing Geelong trams 2 and 28 by their donor when he was living in Canberra. 1 - tram 2 being winched into position with the frame of the shed to house them being built - 20/6/1991 2 - Temporary truck for Geelong 2 before unloaded - 25/5/2004 3 - Showing the "shed" housing the two trams - 26/5/2004....Photograph Geelong trams 2 and 28 ...The set of three colour prints shows various stages housing Geelong trams 2 and 28 by their donor when he was living in Canberra. 1 - tram 2 being winched into position with the frame of the shed to house them being built - 20/6/1991 2 - Temporary truck for Geelong 2 before unloaded - 25/5/2004 3 - Showing the "shed" housing the two trams - 26/5/2004.Yields information the reconstruction of two Geelong trams in Canberra before being gifted to the BTM.Set of three colour prints on Kodak paper with dates on rear.Two have the date and details on rear.tramcars, tram 28, geelong 2, geelong 28, tram 2 -
 Ballarat Tramway Museum
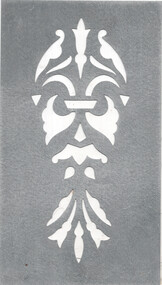
Tool - Stencil - decorative motif on Geelong trams, c2010
... ...tram 2...Stencil made for use on the saloon side staunchions for Geelong tram 2. Replicated the ?...Stencil made for use on the saloon side staunchions for Geelong tram 2. Replicated the ? Demonstrates the method of reproduction of the decorative motifs on Geelong tram 2. ...Stencil made for use on the saloon side staunchions for Geelong tram 2. Replicated the ?Demonstrates the method of reproduction of the decorative motifs on Geelong tram 2.Stencil or tool - aluminium sheet and mylar sheet that was used to make the stencil. Five ready to place motifs, - need more info on these.geelong, tramways, tram 2, painting -
 Ballarat Tramway Museum
Photograph - Colour Photograph/s, 23/11/1962 12:00:00 AM
... ... tram 2...Colour postcard size print of SEC Bendigo trams 2 and 17 at the California or Thorne St. ...Ballarat Tramway Museum South Gardens Reserve Wendouree Parade Ballarat Ballarat goldfields Bendigo Eaglehawk tram 2 tram 17 On rear top left hand corner "21.11.62" in very wavy handwriting typical of an aged person. ...Colour postcard size print of SEC Bendigo trams 2 and 17 at the California or Thorne St. Loop on the Eaglehawk line. Photo dated 21.11.1962. Printed on AGFA paper. Both trams fitted with dash canopy lighting, but no large white strip under the driver's windows. 17 showing destination of "Eaglehawk", has two SEC ads on the side re Electric Cooking . Tram 2 showing destination of "Quarry Hill", has various ads. On rear top left hand corner "21.11.62" in very wavy handwriting typical of an aged person.bendigo, eaglehawk, tram 2, tram 17 -
 Ballarat Tramway Museum
Negative - SECV Geelong trams 2 & 10 Pakington St, Wal Jack, c1949
... ...tram 2...Tram 2 - has destination of Newtown and 10, East. ...Tram 2 - has destination of Newtown and 10, East. ...Negative and Digital images from the Wal Jack Geelong Negative file of Geelong trams 2 and 10 crossing at the Retreat Rd loop in Pakington St, just north of Aphasia St. Tram 2 - has destination of Newtown and 10, East. In the background is 271 Pakington St - City of Newtown and Chilwell offices, in 2020, a Residential property as well as the fire station tower. Photo c1949 as No. 2 has a white on black destination roll when they were introduced to Geelong.Yields information about the Newtown - Chilwell lines and trams 2 and 10.Negativetrams, tramways, geelong, pakington st, aphasia st, tram 2, tram 10 -
 Ballarat Tramway Museum
Photograph - SECV Geelong trams 2 at Beach, early 1950s
... ...tram 2...Photograph shows Geelong tram 2 at the Beach terminus through routed to Chilwell. ...Photograph shows Geelong tram 2 at the Beach terminus through routed to Chilwell. ...Photograph shows Geelong tram 2 at the Beach terminus through routed to Chilwell. Photographer unknown. The tram has been fitted with tail lights, probably 1955.Yields information about Geelong trams 2 and the Beach terminus.Black and white photograph printed on Agfa paper.geelong, tramways, tram 2, beach