
Showing 108 items matching "wall tiles"
-
 Buninyong Visitor Information Centre
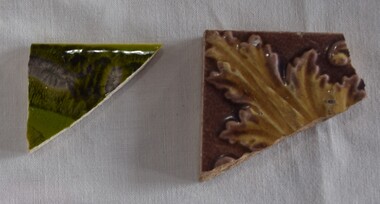
Decorative object - Tile Shards, two sections of broken wall tiles, c. 19th Century
... two sections of broken wall tiles, c. 19th Century....Triangular piece of wall tile with green and black glazed decoration. 2. ...Broken glazed wall tile section with Brown and tan leaf decoration. two sections of broken wall tiles, c. 19th Century. ...Details about these tile sections to be researched. 1. Triangular piece of wall tile with green and black glazed decoration. 2. Broken glazed wall tile section with Brown and tan leaf decoration.decorations, ceramics, buidling materials -
 Canterbury History Group
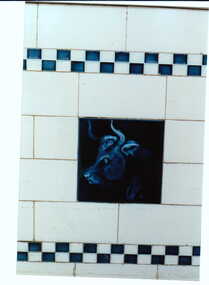
Photograph - Close up of decorative wall tiles outside No. 82 Maling Road, Jan Pigot, 27/03/1993 12:00:00 AM
... Close up of decorative wall tiles outside No. 82 Maling Road...... Edwardian Wall Tiles...Canterbury Maling Road Shops Edwardian Wall Tiles Photograph Close up of decorative wall tiles outside No. 82 Maling Road Jan Pigot ...canterbury, maling road, shops, edwardian wall tiles -
 Canterbury History Group
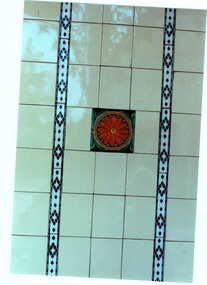
Photograph - Decorative wall tiles outside No. 82 Maling Road, Jan Pigot, 27/03/1993 12:00:00 AM
... Decorative wall tiles outside No. 82 Maling Road...... Decorative Wall Tiles...Canterbury Maling Road Shops Decorative Wall Tiles Photograph Decorative wall tiles outside No. 82 Maling Road Jan Pigot ...canterbury, maling road, shops, decorative wall tiles -
 Canterbury History Group
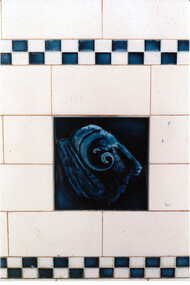
Photograph - Close up of decorative tiles on wall outside No. 82 Maling Road, Jan Pigot, 27/03/1993 12:00:00 AM
... Close up of decorative tiles on wall outside No. 82 Maling Road...... Edwardian Wall Tiles...Canterbury Maling Road Shops Edwardian Wall Tiles Photograph Close up of decorative tiles on wall outside No. 82 Maling Road Jan Pigot ...canterbury, maling road, shops, edwardian wall tiles -
 Mont De Lancey
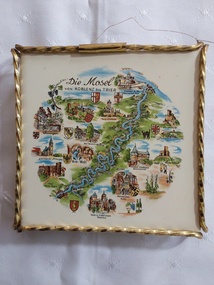
Decorative object - German Wall Tile, Wessel, Unknown
... German Wall Tile......Wall tiles...This tile has been made into a wall hanging by the attachment of fine wire at top to two of the curled feet....Tiles Wall tiles Decorative tiles On the front at the top of the tile is written - 'Die Mosel von KOBLENZ bis TRIER'. ...This tile has been made into a wall hanging by the attachment of fine wire at top to two of the curled feet.A small Wessel decorative white ceramic tile or trivet with a white porcelain type top depicting a coloured map of the Mosel River and surrounding towns in Germany. There is a twisted thin gold frame around it with rounded feet in the corners.On the front at the top of the tile is written - 'Die Mosel von KOBLENZ bis TRIER'. On the back is the manufacturer's stamp in raised letters 'Wessel Made in Germany with a crown on top of it'. There is a number '9, 6 tiny dots, K6 2 more dots, 5'tiles, wall tiles, decorative tiles -
 Canterbury History Group
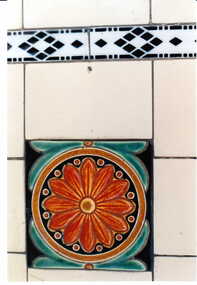
Photograph - Close up view of the tiles outside shop No. 82 Maling Road, Jan Pigot, 27/03/1993 12:00:00 AM
... ... Edwardian wall tiles...Canterbury Maling Road Shops Edwardian wall tiles Photograph Close up view of the tiles outside shop No. 82 Maling Road Jan Pigot ...canterbury, maling road, shops, edwardian wall tiles -
 Canterbury History Group
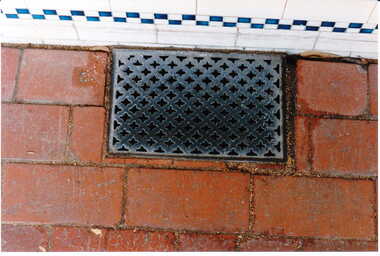
Photograph - Close up of decorative tiles and street footpath grate outside No. 82 Maling Road, Jan Pigot, 27/03/1993 12:00:00 AM
... ... Decorative wall tiles...Canterbury Maling Road Shops Decorative wall tiles Footpath Grates Photograph Close up of decorative tiles and street footpath grate outside No. 82 Maling Road Jan Pigot ...canterbury, maling road, shops, decorative wall tiles, footpath grates -
 Mont De Lancey
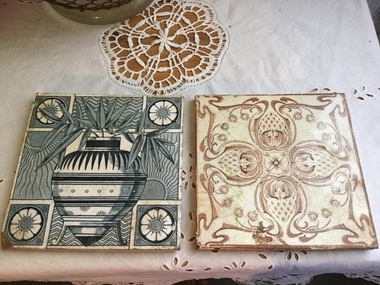
Functional object - Tile - Ceramic
... ...wall tiles...tiles wall tiles Two decorative ceramic tiles. 1 x Blue and white, Pot with leaves, with a flower in each corner. 1 x Brown and cream with a gum nut design. ...Two decorative ceramic tiles. 1 x Blue and white, Pot with leaves, with a flower in each corner. 1 x Brown and cream with a gum nut design.tiles, wall tiles -
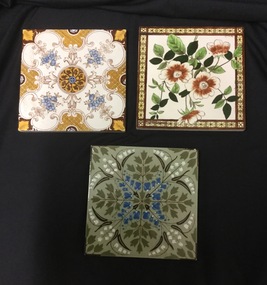 Mont De Lancey
Tile - Ceramic, Josiah Wedgwood & Sons
... ...wall tiles...tiles wall tiles Three ceramic patterned decorative tiles. 1. ...Three ceramic patterned decorative tiles. 1. Cream, brown and blue floral pattern. 2. Rust and green floral pattern. 3. Etruria - impressed tile with grey background and blue, green and white floral pattern.tiles, wall tiles -
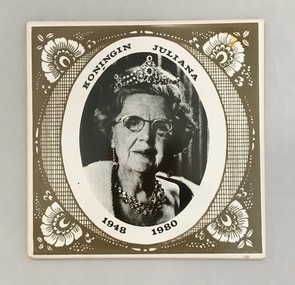 Dutch Australian Heritage Centre Victoria
Commemorative Tile (Regeerings Tegel), Wessel, 1980
... Wall tile to commemorate the reign of Queen Juliana of The Netherlands from 1948 to 1980. ...Koningin Juliana 1948-1980 (Queen Juliana 1948-1980). Wall tile to commemorate the reign of Queen Juliana of The Netherlands from 1948 to 1980. ...Queen Juliana's mother, Queen Wilhelmina, abdicated in favour of Juliana, her only child in 1948. In 1980 Juliana abdicated in favour of the eldest of her three sons Willem-Alexander.The production of this tile is significant of the Dutch monarchy's willingness to abdicate in favour of the next genration.Wall tile to commemorate the reign of Queen Juliana of The Netherlands from 1948 to 1980. An oval-shaped black and white image of the queen is at the centre surrounded by some low-key decorations.Koningin Juliana 1948-1980 (Queen Juliana 1948-1980). -
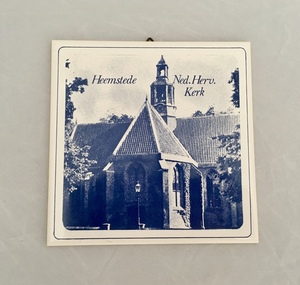 Dutch Australian Heritage Centre Victoria
Wall Tile (Tegel), Mosa
... Wall Tile (Tegel)... (a) and (b) - A set of two ceramic wall tiles featuring historic buildings in the town of Heemstede in the province of North Holland. ...(a) and (b) - A set of two ceramic wall tiles featuring historic buildings in the town of Heemstede in the province of North Holland. ...(a) and (b) - A set of two ceramic wall tiles featuring historic buildings in the town of Heemstede in the province of North Holland. The images are in shades of blue. Tile (a) depicts the Dutch Reformed Church building (Netherlands Reformed Church). Tile (b) is an image of the Cruquius Museum on the site of a one-time pumping station.On the back of each tile are the words Mosa Royal Holland. Tile (a) also has the numbers 86 and 89 imprinted. -
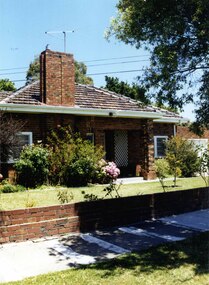 Glen Eira Historical Society
Photograph, Lindsay Avenue, 42, Murrumbeena, 2001
... Other features include an open porch with 2 brick pillars and white trellis on one wall, tiled roof, white sash windows, feature brick wide and tall chimney and low unpainted brick fence and brick garage with white door. ...Other features include an open porch with 2 brick pillars and white trellis on one wall, tiled roof, white sash windows, feature brick wide and tall chimney and low unpainted brick fence and brick garage with white door. ...Originally labelled "Beauville Estate, Established 1936, Still Thriving 65 years on, 10th March 2001", the Beauville Estate Album contains colour photographs of houses in the Estate. They were taken around the time of the Beauville Estate’s 65th Heritage Celebration held on 10/03/2001 and donated to the Caulfield Historical Society shortly afterwards. Photographer unknown. City of Glen Eira’s Heritage Management Plan Vol 2 p79 (this is p84 of the pdf version) – HO12 Beauville Estate and environs, Murrumbeena: The Beauville Historic Area is important at the State level as the first large housing estate undertaken by the AV Jennings Construction Co, later Jennings Group Limited, Victoria’s largest home builder. It is important also as a very early estate development incorporating a range of features other than houses and including made roads, shops and recreation facilities. In this respect it was the forerunner of the comprehensively planned housing estate of the post war era. The estate is distinguished by its aesthetic values, as is the earlier and comparable Hillcrest Estate, which are formed by a combination of restrained diversity in house styles, with the exception of no. 30 in the emerging International style, and by a landscaped garden environment. Colour photograph of an unpainted variegated brown brick house. Other features include an open porch with 2 brick pillars and white trellis on one wall, tiled roof, white sash windows, feature brick wide and tall chimney and low unpainted brick fence and brick garage with white door. A public footpath and nature strip are in the foreground.42murrumbeena, houses, architectural styles, 1930's, inter war style, a.v. jennings, av jennings, jennings, brick houses, beauville estate, porches, lindsay avenue, sir albert victor jennings, a v jennings construction co, beauville estate heritage area, glen eira city council, architectural features, jennings group limited, land subdivision, gardens, beauville historic area, brick features, chimneys, sash windows, garages (private), brick fences -
 Glen Eira Historical Society
Photograph, Lindsay Avenue, 42, Murrumbeena, 2001
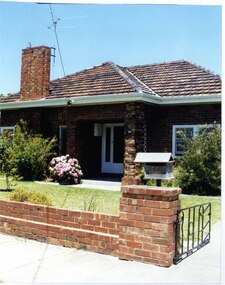
... Other features include an open porch with brick pillar and white trellis on one wall, tiled roof, white sash windows, feature brick wide and tall chimney and low unpainted brick fence with "42" on the wooden letterbox atop the brick pillar alongside a black metal gate in the foreground....Other features include an open porch with brick pillar and white trellis on one wall, tiled roof, white sash windows, feature brick wide and tall chimney and low unpainted brick fence with "42" on the wooden letterbox atop the brick pillar alongside a black metal gate in the foreground. ...Originally labelled "Beauville Estate, Established 1936, Still Thriving 65 years on, 10th March 2001", the Beauville Estate Album contains colour photographs of houses in the Estate. They were taken around the time of the Beauville Estate’s 65th Heritage Celebration held on 10/03/2001 and donated to the Caulfield Historical Society shortly afterwards. Photographer unknown. City of Glen Eira’s Heritage Management Plan Vol 2 p79 (this is p84 of the pdf version) – HO12 Beauville Estate and environs, Murrumbeena: The Beauville Historic Area is important at the State level as the first large housing estate undertaken by the AV Jennings Construction Co, later Jennings Group Limited, Victoria’s largest home builder. It is important also as a very early estate development incorporating a range of features other than houses and including made roads, shops and recreation facilities. In this respect it was the forerunner of the comprehensively planned housing estate of the post war era. The estate is distinguished by its aesthetic values, as is the earlier and comparable Hillcrest Estate, which are formed by a combination of restrained diversity in house styles, with the exception of no. 30 in the emerging International style, and by a landscaped garden environment. Colour photograph of an unpainted variegated brown brick house. Other features include an open porch with brick pillar and white trellis on one wall, tiled roof, white sash windows, feature brick wide and tall chimney and low unpainted brick fence with "42" on the wooden letterbox atop the brick pillar alongside a black metal gate in the foreground.42murrumbeena, houses, architectural styles, 1930's, inter war style, a.v. jennings, av jennings, jennings, brick houses, beauville estate, porches, lindsay avenue, sir albert victor jennings, a v jennings construction co, beauville estate heritage area, glen eira city council, architectural features, jennings group limited, land subdivision, gardens, beauville historic area, brick features, chimneys, sash windows, brick fences, cast iron work -
 Glen Eira Historical Society
Photograph, Beauville Avenue, 16, Murrumbeena, 2001
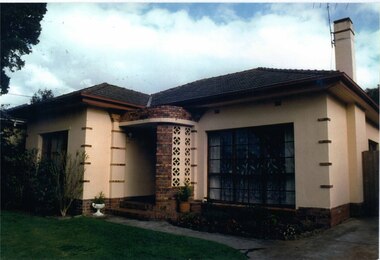
... Other features include a curved wall porch, tiled roof, and concrete driveway and path leading to the front porch. ...Other features include a curved wall porch, tiled roof, and concrete driveway and path leading to the front porch. ...Originally labelled "Beauville Estate, Established 1936, Still Thriving 65 years on, 10th March 2001", the Beauville Estate Album contains colour photographs of houses in the Estate. They were taken around the time of the Beauville Estate’s 65th Heritage Celebration held on 10/03/2001 and donated to the Caulfield Historical Society shortly afterwards. Photographer Bev Baxter. See also 2104A-19 which seems to be same property but with different colour and different larger plants in the right garden bed.City of Glen Eira’s Heritage Management Plan Vol 2 p79 (this is p84 of the pdf version) – HO12 Beauville Estate and environs, Murrumbeena: The Beauville Historic Area is important at the State level as the first large housing estate undertaken by the AV Jennings Construction Co, later Jennings Group Limited, Victoria’s largest home builder. It is important also as a very early estate development incorporating a range of features other than houses and including made roads, shops and recreation facilities. In this respect it was the forerunner of the comprehensively planned housing estate of the post war era. The estate is distinguished by its aesthetic values, as is the earlier and comparable Hillcrest Estate, which are formed by a combination of restrained diversity in house styles, with the exception of no. 30 in the emerging International style, and by a landscaped garden environment. Colour photograph of light brown coloured rendered house with unpainted brick features. Other features include a curved wall porch, tiled roof, and concrete driveway and path leading to the front porch. murrumbeena, houses, beauville avenue, architectural styles, 1930's, inter war style, a.v. jennings, av jennings, jennings, brick houses, beauville estate, porches, sir albert victor jennings, a v jennings construction co, beauville estate heritage area, glen eira city council, architectural features, jennings group limited, land subdivision, gardens, beauville historic area, brick features, chimneys -
 Robin Boyd Foundation
Slide, Robin Boyd, 1961
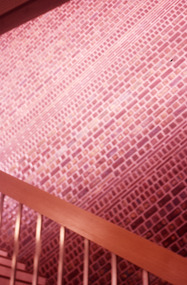
... Interior (staircase and tiled walls), Okayama Prefectural Government Building, Okayama, Japan, 1957....Interior (staircase and tiled walls), Okayama Prefectural Government Building, Okayama, Japan, 1957. ...Robin Boyd wrote two books on Japanese architects and architecture - “Kenzo Tange” published by George Braziller in 1962 and “New Directions in Japanese Architecture” published by Studio Vista in 1968. During the 1960s he travelled several times to Japan to research these books and as part of his role as Exhibits Architect for the Australian Pavilion at Expo ‘70 in Osaka. Colour slide in a mount. Interior (staircase and tiled walls), Okayama Prefectural Government Building, Okayama, Japan, 1957.Made in Australia / Inscribed 9slide, robin boyd, unknownjapan61 -
 Mission to Seafarers Victoria
Photograph - Photograph, Black and white, Bill Doyle (Reverend C.J. Eldridge-Doyle), 1960-1970
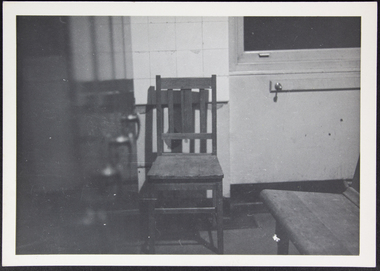
... Black and white photograph of a wooden chair against a tiled wall, possibly in or near the kitchen. To the left of the photo is a series of lockers....Black and white photograph of a wooden chair against a tiled wall, possibly in or near the kitchen. To the left of the photo is a series of lockers. ...The photograph is part of a serie likely to have been taken by Bill Doyle (Reverend C.J. Eldridge-Doyle), who was a keen photographer like many of the chaplains as he often uses the Ilford paper to print his images. Photograph is part of the collection that has been accumulated at the Mission to Seafarers. It shows how the Mission was furnished at one time.Black and white photograph of a wooden chair against a tiled wall, possibly in or near the kitchen. To the left of the photo is a series of lockers.Reverse: ILFORD repeat print across the photograph. 1940 in red stamp.photography, black-and-white, mission-to-seafarers, chair -
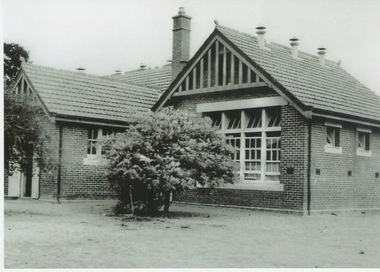 Sunbury Family History and Heritage Society Inc.
Photograph, c1910 - 1920s
... It is a federation style building with brick walls and a tiled roof....It is a federation style building with brick walls and a tiled roof. Photograph ...The photo is of the Sunbury State School No. 1002, which replaced an earlier building. The Federation style red-brick school was built in 1911 and was officially opened on 2nd May 1912. An extra room was added in 1945 to accommodate increased enrolment. In 1999 the school closed at the Stawell Street site and the students relocated to the former and refurbished bluestone Industrial School in Jacksons Hill. The former red-brick school building is now part of the Sunbury Community Health Centre complex.Many former and present-day residents in Sunbury have attended this school over the years.A non-digital black and white photograph of a small school building. It is a federation style building with brick walls and a tiled roof.sunbury state school no. 1002., schools, sunbury, education -
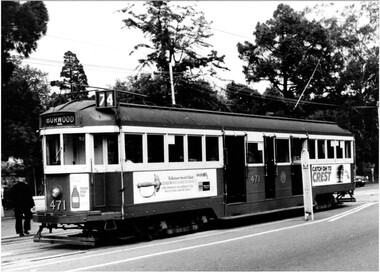 Melbourne Tram Museum
Photograph - Set of two Black & White Photograph/s, Tram 471 and 534 in Wellington Parade, 1950's? to 1960's
... , with Tolley's Brandy, Johnson ceramic wall tiles and another advertisement. Printed on Fujichrome paper. ..., with Tolley's Brandy, Johnson ceramic wall tiles and another advertisement. Printed on Fujichrome paper. ...Black and white photograph of W2's in Wellington Parade, late 1950's or early 1960's on route 74, Burwood in Wellington Parade between Clarendon and Lansdowne St, Melbourne. Has the Clifton Hill rail line in the background. .1 - W2 472, outbound - with a Wilkinson Sword razor blade and "Catch onto Crest" body adverts. .2 - W2 534, in bound?, with Tolley's Brandy, Johnson ceramic wall tiles and another advertisement. Printed on Fujichrome paper. Not known who took the photograph or when it was printed.Stamped in black ink on back "TMSV Sales"trams, tramways, wellington parade, burwood, tram 472, tram 534 -
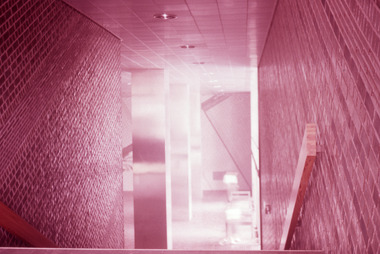 Robin Boyd Foundation
Slide, Robin Boyd, 1961
... Interior (staircase and tiled walls), Okayama Prefectural Government Building, Okayama, Japan, 1957. ...Interior (staircase and tiled walls), Okayama Prefectural Government Building, Okayama, Japan, 1957. ...Robin Boyd wrote two books on Japanese architects and architecture - “Kenzo Tange” published by George Braziller in 1962 and “New Directions in Japanese Architecture” published by Studio Vista in 1968. During the 1960s he travelled several times to Japan to research these books and as part of his role as Exhibits Architect for the Australian Pavilion at Expo ‘70 in Osaka. Colour slide in a mount. Interior (staircase and tiled walls), Okayama Prefectural Government Building, Okayama, Japan, 1957. (Architect: Kunio Maekawa.)Made in Australia / 7slide, robin boyd, japan -
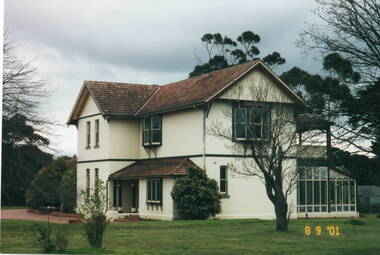 Sunbury Family History and Heritage Society Inc.
Photograph, Veronica Burgess, Ardcloney House, 8th September 2001
... A coloured photograph of two storey home with white stucco walls and red tiled roof. The house is set in large garden with lawn and trees....William Faulkner A coloured photograph of two storey home with white stucco walls and red tiled roof. The house is set in large garden with lawn and trees. ...This is a more recent photograph than entry P0854.The two storey house was built for Dr.William Faulkner in 1911. It is opposite the intersection of Evans and Macedon Streets. As well as the house, a garage was also built for the doctor's car, along with smaller building for the chauffeur. Dr. Faulkner was one of the first people in Sunbury to own a car. Doctor Faulkner lived at Ardcloney until he died in 1922. Over the years it had other owners and in the early 2000s, it was taken over by the State government and is now a day-care hospital. Other buildings have been built on the site but the original house is the Administration Section.A coloured photograph of two storey home with white stucco walls and red tiled roof. The house is set in large garden with lawn and trees.ardcloney house, dr. william faulkner -
 Bendigo Historical Society Inc.
Box - FORTUNA COLLECTION - PHOTOGRAPH
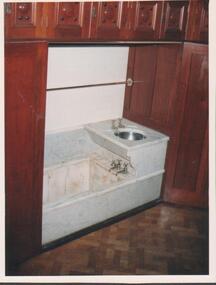
... Colour photo of partial interior bathroom showing marble looking bath, basin with silver tap fittings, white tiled wall behind bath/basin. Wood paneling above & to the sides of bath, basin and parquetry floor....Fortuna Villa Lansell Colour photo of partial interior bathroom showing marble looking bath, basin with silver tap fittings, white tiled wall behind bath/basin. Wood paneling above & to the sides of bath, basin and parquetry floor. ...Colour photo of partial interior bathroom showing marble looking bath, basin with silver tap fittings, white tiled wall behind bath/basin. Wood paneling above & to the sides of bath, basin and parquetry floor.fortuna villa, lansell -
 Sunbury Family History and Heritage Society Inc.
Photograph, c1985
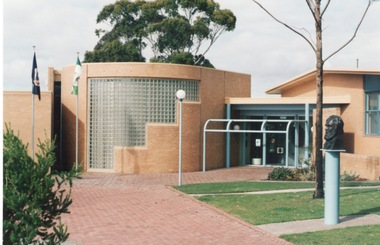
... The building with the curved wall and glass tiles was where the Shire of Bulla held their council meetings. ...The building with the curved wall and glass tiles was where the Shire of Bulla held their council meetings. ...The photograph shows the extensions that were built on to the former Shire of Bulla offices in the mid 1980s. The building with the curved wall and glass tiles was where the Shire of Bulla held their council meetings. The Victorian state flag and the Shire of Bulla flags are hoisted on the poles and the bust of George Evans, an early European squatter in the district is on the RHS of the image. The extensions completed in the 1980s to the former Shire of Bulla offices were the last major works to be undertaken on the building before Bulla Shire became part of Hume City Council in 1994.A non-digital coloured photograph of a brick paved path leading to a cream brick community building with two flags hoisted on flagpoles near the entrance. The bust of a man is visible on the RHS of the image. shire of bulla, council offices, shire of bulla council offices., george evans -
 Royal District Nursing Service (now known as Bolton Clarke)
Photograph - Photograph, black and white, c.1967
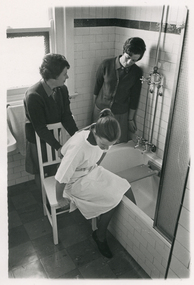
... A window is seen to the left of the tiled wall. ...Wilkinson are wearing their RDNS uniforms of a dark cardigan over a grey frock. A white tiled wall with a strip of dark tiles is behind the bath.with metal piping attached to the right tiled wall and running to taps over the bath. ...The demonstration is being carried out in the bathroom at RDNS Headquarter, 452 St. Kilda Road, Melbourne. The Sisters are wearing their grey RDNS uniforms and red cardigans of that era. From the founding of the Melbourne District Nursing Society (MDNS) in 1885, known as Royal District Nursing Service (RDNS) from 1966, the rehabilitation of patients to insure they were able to live independently in their own homes was at the forefront of care given by their Trained nurses. As well as teaching and supervising the use of equipment, their Trained nurses taught them safe transfer techniques. These techniques were also taught to family members to enable them to care for their loved ones. RDNS at first held workshops given by a contracted private Physiotherapist before employing their own Physiotherapist in 1975 who taught staff the correct techniques, not only for safety of the patient, but to reduce physical strain on RDNS nursing staff and patient’s family members. When required the Physiotherapist accompanied the Sister on her visit to the patient in their home.staff to be trained in techniques by RDNS Physiotherapists.Black and white photograph showing a safety technique demonstration. Royal District Nursing Service (RDNS) Sister Liz Thomson, with her hair drawn back, is wearing a white gown over her uniform and is being transferred by Sister Betty McDonald, dark short curled hair. She has her arms extended supporting Sr. Thomson onto a bath seat. Sister Thomson has her left leg over the bath and the wooden bath seat can be seen positioned in the upper section of a white bath. Sister Joanne Wilkinson, who has short straight dark hair is on the right observing. Both Sr. McDonald and Sr. Wilkinson are wearing their RDNS uniforms of a dark cardigan over a grey frock. A white tiled wall with a strip of dark tiles is behind the bath.with metal piping attached to the right tiled wall and running to taps over the bath. A window is seen to the left of the tiled wall. Photographers stamp and Quote No. GW 8royal district nursing service, rdns, rdns education, equipment, liz thomson, betty mcdonald, joanne wilkinson -
 Marysville & District Historical Society
Postcard (item) - Colour postcard, John Sands Pty. Ltd, Unknown
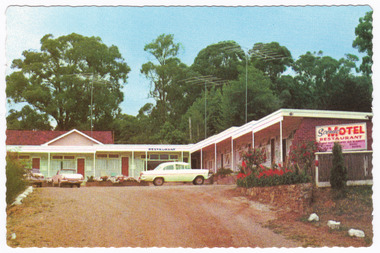
... ./ all units wall-to-wall carpets./ Tiled shower recess and toilet,/ bedside lamps, T.V., radio, refrigerator. ..../ all units wall-to-wall carpets./ Tiled shower recess and toilet,/ bedside lamps, T.V., radio, refrigerator. ...A colour postcard of the Scenic Motel in Marysville. The postcard was produced by John Sands Pty. Ltd. as a souvenir of Marysville.A colour postcard of the Scenic Motel in Marysville. The postcard was produced by John Sands Pty. Ltd. as a souvenir of Marysville.Sandscene/International PLACE/STAMP/HERE PRINTED IN/ AUSTRALIA Post Card POST OFFICE/PREFERRED John Sands Pty. Ltd., Printers, Australia SPVI-SCENIC MOTEL, 5 DARWIN STREET, MARYSVILLE,/ Phone 92 "Modern luxuriously appointed sound proof bedsitting rooms./ all units wall-to-wall carpets./ Tiled shower recess and toilet,/ bedside lamps, T.V., radio, refrigerator. Tea-making facilities./ Breakfast served to units. Parking at door. Magnificent Scenic/ Views. Restaurant open 6 p.m. A La Carte Meals."marysville, victoria, australia, scenic motel, accommodation, postcard, john sands pty. ltd., souvenir -
 Federation University Art Collection
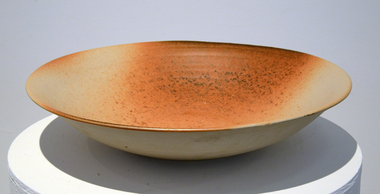
Ceramic, Roswitha Wulff, Woodfired Bowl by Roswitha Wulff, 1986, 1986
... Recently she has also been working with wall tiles. During a residency at the Canberra School of Art in 2002, she developed tiles that looked like woodfired pillows with soft rounded rims. ...Recently she has also been working with wall tiles. During a residency at the Canberra School of Art in 2002, she developed tiles that looked like woodfired pillows with soft rounded rims. ..."I am an Australian of German parents born in Persia. I was taught by Peter Rushforth, with a very strong Japanese influence. My work attempts to incorporate these four elements of my history. For form, my influence comes from Art Nouveau, or Jugendstil as it is called in Germany. Techniques are informed by pottery from Japan, China, Korea and Germany. My colours are inspired by the Australian landscape. Using the language of woodfiring, I create a personal vocabulary with new subjects, grammar and syntax, which make each pot a one-off object containing all my diverse influences." (Roswitha Wulff)Roswitha WULFF (1941- ) Born Tabrize, Iran. Arrived Austrqalia c1949 Roswitha Wulff spent her early childhood with her mother, potter Helma Klett, in Germany. In 1964, she obtained a ceramics certificate from the East Sydney Technical College. From 1964-65, she worked with Robin Welch and Ian Sprague at Sprague's Mungeribar Pottery in Upper Beaconsfield, VIC. In 1966 she worked at the Sturt Pottery in Mittagong, NSW under Les Blakebrough. Between 1967 and 1969 Roswitha Wulff travelled overseas, spending 6 monthe with Robin Welch after his return to England and 9 months as a full-time thrower at Briglin Pottery, London, as well as working in potteries in Denmark and Germany. From 1969-70, she worked in North-West Pakistan as a research scholar for the Smithonian Institute and the University of NSW. Returning to Australia in 1970, she set up a workshop in Paddington, NSW, with the help of an Australia Council grant and taught part-time at the East Sydney Technical College and the Willoughby Workshop Art Centre. Since then she has been a lecturer and Head of Ceramics in many institutions, including the National Art School. In the 1990s she moved her studio to Botany Bay, NSW.. While working with the vessel form, she sees her pots as abstract landscapes. Recently she has also been working with wall tiles. During a residency at the Canberra School of Art in 2002, she developed tiles that looked like woodfired pillows with soft rounded rims. In 2007, she used such tiles to create a mural commemorating the Sesquicentenary of St Vincent's Hospital in Paddington. Woodfired stoneware bowl with flay ashSigned on baseroswitha wulff, jan feder, jan feder memorial ceramics collection, woodfire, ceramics, gippsland campus, botany bay studio pottery -
 Kew Historical Society Inc
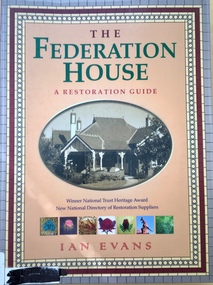
Book, Flannel Flower Press, The Federation House: a restoration guide, 1986, 2004
... Red brick walls and orange tiled roofing, decorated with ridging and chimney pots of terracotta, were among the noticeable characteristics of the majority of houses in this style. ...Red brick walls and orange tiled roofing, decorated with ridging and chimney pots of terracotta, were among the noticeable characteristics of the majority of houses in this style. ...160 p. : ill. (some col. ) ; 29 cm.non-fictionarchitecture -- domestic -- australia -- conservation and restoration, interior decoration -- australia -
 Royal District Nursing Service (now known as Bolton Clarke)
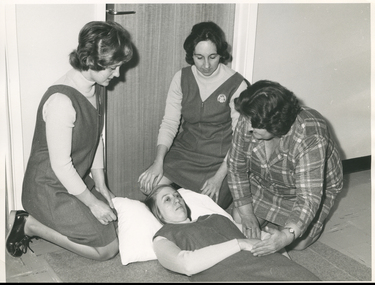
Photograph - Photograph, black and white, Barry Sutton, 19.07.1972
... A closed wooden door is behind the Sisters with pale walls either side. Lino tiles are on the floor either side the mat on which Sr. ...A closed wooden door is behind the Sisters with pale walls either side. Lino tiles are on the floor either side the mat on which Sr. ...Mrs P.. Cosh is a private Physiotherapist contracted by RDNS to educate RDNS nursing staff in safe transferring techniques. This photograph is taken in the Heidelberg Centre. The RDNS Sisters are wearing their winter uniforms of a blue/grey skivvie under a blue/grey V neck tunic style herringbone winter material dress,From the founding of the Melbourne District Nursing Society (MDNS) in 1885, known as Royal District Nursing Service (RDNS) from 1966, the rehabilitation of patients to insure they were able to live independently in their own homes was at the forefront of care given by their Trained nurses. As well as teaching and supervising the use of equipment, their Trained nurses taught them safe transfer techniques. These techniques were also taught to family members to enable them to care for their loved ones. RDNS at first held workshops given by a contracted private Physiotherapist before employing their own Physiotherapist in 1975 who taught staff the correct techniques, not only for safety of the patient, but to reduce physical strain on RDNS nursing staff and patient’s family members. When required the Physiotherapist accompanied the Sister on her visit to the patient in their home.On the left in the black and white photograph is Royal District Nursing Service (RDNS) Sister Elizabeth Francis, who has curled dark hair and is kneeling on a mat looking down at Sr. Bev. Armstrong, who has straight blonde hair and is lying on a mat on the floor with her head resting on a white pillow and her right arm resting across her body. Behind and slightly to the right of Sr. Armstrong is Sr. Daphne Geldard who has short dark curled hair. She is kneeling on the mat and looking down at Sr. Armstrong. To her right is Physiotherapist Mrs. P. Cosh, who has dark short curled hair and is wearing a check suite. She is looking at Sr. Armstrong and has her left hand resting on the out edge of Sr. Armstrong's right hand. The RDNS Sisters are wearing a light coloured skivvie under a darker V neck tunic style dress. A closed wooden door is behind the Sisters with pale walls either side. Lino tiles are on the floor either side the mat on which Sr. Armstrong lay.Barry Sutton Photographer's Stamp, Quote KY28, names of staff hand written on back of photographrdns, royal district nursing service, nurses uniforms, rdns physiotherapist, sister elizabeth francis, sister bev armstrong, sister daphne geldard, mrs p. cosh -
 Bendigo Historical Society Inc.
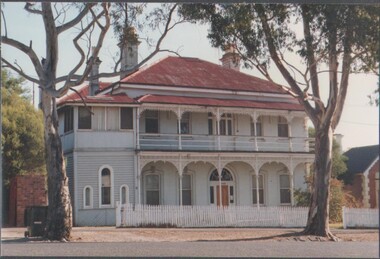
Photograph - ESTELLE HEWSTON COLLECTION: LANCEWOOD HOUSE EXTERIOR AND INTERIORS
... Green walls. 4Q Ballroom. Possible tile work in front of fireplace. 4R Upstairs off ballroom. ...Green walls. 4Q Ballroom. Possible tile work in front of fireplace. 4R Upstairs off ballroom. ...Lancewood House was built in 1882 for Thomas John Hawkey. Ernst Mueller purchased lancewood House from hawkey's widow in 1887. The house was sold to the Education Department in 1949 to be used as a student hostel.Twenty one colour photographs of Lancewood House, McLaren Street, Bendigo 4A to 4D, and 4U exterior frontage of residence 4E to 4T interior rooms and fittings (tiles and fireplaces). 4A Front view of the building. White weatherboard two storey building with red iron roof. Full width balcony on first floor. White picket fence across the front. 4B Front view of the building. 4C Front of building view on an angle. 4D Front entrance to the building. 4E Large room with high ceilings and multiple windows. Ballroom. 4F Room with yellow walls and ornate ceiling with rose in centre and fireplace. 4G View into alcove with two windows and archway entry. Area below chapel. Extension on north. 4H View of archway with alcove and lead light windows. Upstairs chapel. 4I Stairway. Door and front veranda. 4J Cupboard on landing. Stairway between front hall and ballroom. 4 K View toward front door and leadlight above the door. 4L Stairway from front door to upper floor. 4M Fireplace with surrounding parquetry floor. North room. Front ground floor. 4N Fireplace with parquetry floor. North room. Front ground floor. 4O South front room. Ground floor. Intact fireplace. 4P Ballroom with fireplace. Green walls. 4Q Ballroom. Possible tile work in front of fireplace. 4R Upstairs off ballroom. Tiled fireplace. 4S Tiled fireplace. Location in house not noted. 4T Tiled fireplace with white surround. Location in house not noted. 4U Front verandah looking towards street.Estelle Hewstonmclaren street, lancewood house -
 Flagstaff Hill Maritime Museum and Village
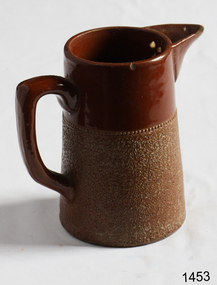
Domestic object - Jug
... That is 2,500 test tiles!!!! I’m going to make the wall behind the wheels the feature wall of pretty colours! ...That is 2,500 test tiles!!!! I’m going to make the wall behind the wheels the feature wall of pretty colours! ...The Process of Making Pottery Decorating, Firing, Glazing, Making, Technical There is a rhythm and flow to clay. It can’t be done all at once! Even the making process! It can take weeks to get everything done, especially if you can only work on your pottery once a week! Even though we have three hour classes, it’s often just not enough time! Here is an overview of some of the processes so you have a bit more grasp on some of the technical stuff! Step One – Design There are SO many ideas out there for making stuff in clay! From delicate porcelain jewellery, through to heavy sculptural work and everything in between. Deciding your direction is sometimes not that easy – when you first start, try everything, you will naturally gravitate to the style that you enjoy! The options and variations are endless and can get a wee bit overwhelming too! Check in with me before you start to ensure your ideas will work, what order you might do things, how you could achieve the look you are seeking and any other technical data required! Step Two – Making Clay is thixotropic. This means that as you work with it, the clay first gets sloppier and wetter, before is begins to dry in the atmosphere. For most things, you simply can’t do all parts of the project at once. An example of work order might look like: Get last weeks work out from the shelves Prepare clay for today’s work – roll your clay, prepare balls for throwing, make the first stage of a pinch pot) Clean up last week’s work and put it on the shelf for bisque firing Check that you have any glazing to do – and do enough of it that you will have time to finish your main project Do the next step of your next project – there might be a further step that can’t be complete immediately, in that case, wrap your work well and put onto the shelves. Letting your work rest for a while can really help keep your work clean and professional looking. Many things require bagging under plastic to keep it ready for work the next week – put your name on the outside of the bag so you can find your work easily. We have stickers and markers. Consider how you want to decorate your work – coloured slip can be applied at a fairly wet stage (remembering that it will make your work even wetter!). Trying to apply slip to dry clay won’t work! If you want to do sgraffito – you will need to keep the work leather hard (a state of dryness where you can still work the clay with a little effort and a little water and care). Step Three – Drying Most of the time your work can go into the rack uncovered to let it dry out for the following week. If you want to continue forming or shaping you will need to double bag your work – put your work on a suitable sized bat and put the bat in a bag so the base of the bag is under the bat, then put another bag over the top of the work and tuck the top of the bag under the bat. If you want to trim (or turn) your thrown work the following week, it should also be double bagged. If your work is large, delicate, or of uneven thicknesses, you should lightly cover your work for drying. When considering the drying process, bare in mind the weather, humidity and wind! The hotter and dryer, the faster things dry and work can dry unevenly in the shelves – this can lead to cracking – another time to lightly cover your work for drying. Step Four – Trimming and Cleaning Up Your work is dry! It is called greenware now and it is at it’s most fragile! Handle everything with two hands. I often refer to soft hands – keep everything gentle and with your fingers spread as much as possible. Try to not pick up things like plates too much, and always with both hands! Before your work can be bisque fired it should be “cleaned up”. You work won’t go into the kiln if it has sharp edges – when glazed, sharp edges turn into razor blades! Use a piece of fly wire to rub the work all over – this will scratch a little so be light handed. Use a knife or metal kidney to scrape any areas that require a bit more dynamic treatment than the fly wire offers! Finally, a very light wipe over with a slightly damp sponge can help soften and soothe all of your edges and dags! Trimming thrown work: If you are planning to trim (or turn) your thrown work (and you should be), make sure you bag it well – your work should be leather hard to almost dry for easiest trimming. Use this step to finish the work completely – use a metal kidney to polish the surface, or a slightly damp sponge to give a freshly thrown look. Wipe the sponge around the rim after trimming, and check the inside of the pot for dags! Trimming slip cast work: Usually I will trim the rims of your work on the wheel the following day to make that stage easier, however you will still need to check your work for lumps and bumps. Last but not least – check that your name is still clearly on the bottom of your work. Step Five – Bisque Firing When the work is completely dry it can go into the bisque kiln. The bisque kiln is fired to 1000°C. This process burns off the water in the clay as well as some of the chemically bound water. The structure of the clay is not altered that much at this temperature. Inside the bisque kiln, the work is stacked a little, small bowl inside a larger bowl and onto a heavy plate. Smaller items like decorations or drink coasters might get stacked several high. Consideration is paid to the weight of the stack and shape of the work. A bisque kiln can fire about one and a half times the amount of work that the glaze kiln can fire. The firing takes about 10 hours to complete the cycle and about two days to cool down. Once it has been emptied the work is placed in the glaze room ready for you to decorate! Step Six – Glazing Decorating your work with colour can be a lot of fun – and time consuming! There are three main options for surface treatment at this stage: Oxide Washes Underglazes Glazes Washes and underglazes do not “glaze” the work – It will still need a layer of glaze to fully seal the clay (washes don’t need glaze on surfaces not designed for food or liquid as they can gloss up a little on their own). Underglazes are stable colourants that turn out pretty much how they look in the jar. They can be mixed with each other to form other colours and can be used like water colours to paint onto your work. Mostly they should have a clear glaze on top to seal them. Oxides are a different species – the pink oxide (cobalt) wash turns out bright blue for instance. They don’t always need a glaze on top, and some glazes can change the colour of the wash! The glazes need no other “glaze” on top! Be careful of unknown glaze interactions – you can put any combination of glaze in a bowl or on a plate, but only a single glaze on the outside of any vertical surface! Glazes are a chemical reaction under heat. We don’t know the exact chemicals in the Mayco glazes we use. I can guess by the way they interact with each other, however, on the whole, you need to test every idea you have, and not run the test on a vertical surface! Simply put, glaze is a layer of glass like substance that bonds with the clay underneath. Clay is made of silica, alumina and water. Glaze is made of mostly silica. Silica has a melting point of 1700°C and we fire to 1240°C. The silica requires a “flux” to help it melt at the lower temperature. Fluxes can be all sorts of chemicals – a common one is calcium – calcium has a melting point of 2500°C, however, together they both melt at a much lower temperature! Colourants are metal oxides like cobalt (blue), chrome (green through black), copper (green, blue, even red!), manganese (black, purple and pink) iron (red brown), etc. Different chemicals in the glaze can have dramatic effects. for example, barium carbonate (which we don’t use) turns manganese bright pink! Other elements can turn manganese dioxide brown, blue, purple and reddish brown. Manganese dioxide is a flux in and of itself as well. So, glazes that get their black and purple colours, often interact with other glazes and RUN! Our mirror black is a good example – it mixes really well with many glazes because it fluxes them – causes them to melt faster. It will also bring out many beautiful colours in the glazes because it’s black colouring most definitely comes from manganese dioxide! Glaze chemistry is a whole subject on it’s own! We use commercial Mayco glazes on purpose – for their huge range of colour possibilities, stability, cool interactions, artistic freedom with the ability to easily brush the glazes on and ease of use. We currently have almost 50 glazes on hand! A major project is to test the interactions of all glazes with each other. That is 2,500 test tiles!!!! I’m going to make the wall behind the wheels the feature wall of pretty colours! Step Seven – Glaze (Gloss or sometimes called “Glost”) Firing Most of the time this is the final stage of making your creation (but not always!) The glaze kiln goes to 1240°C. This is called cone 6, or midrange. It is the low end of stoneware temperatures. Stoneware clays and glazes are typically fired at cone 8 – 10, that is 1260 – 1290°C. The energy requirement to go from 1240°C to 1280°C is almost a 30% more! Our clay is formulated to vitrify (mature, turn “glass-like”) at 1240°, as are our glazes. A glaze kiln take around 12 hours to reach temperature and two to three days to cool down. Sometimes a third firing process is required – this is for decoration that is added to work after the glaze firing. For example – adding precious metals and lustres. this firing temperature is usually around 600 – 800°C depending upon the techniques being used. There are many students interested in gold and silver trims – we will be doing this third type of firing soon! After firing your work will be in the student finished work shelves. Remember to pay for it before you head out the door! There is a small extra charge for using porcelain clay (it’s more than twice the price of regular clay), and for any third firing process! Once your work has been fired it can not turn back into clay for millennia – so don’t fire it if you don’t like it! Put it in the bucket for recycling. https://firebirdstudios.com.au/the-process-of-making-pottery/The form of the jug has been in use for many centuries.Stoneware jug. Two tone brown glaze with pierced lip behind spout. Spout chipped.None.flagstaff hill, warrnambool, shipwrecked-coast, flagstaff-hill, flagstaff-hill-maritime-museum, maritime-museum, shipwreck-coast, flagstaff-hill-maritime-village, jug, ceramic jug -
 Flagstaff Hill Maritime Museum and Village
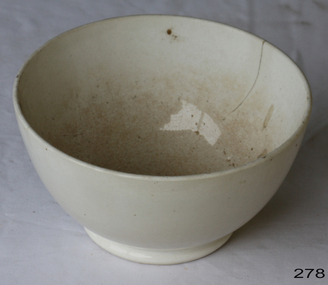
Domestic object - Bowl, Late 19th or early 20th Century
... That is 2,500 test tiles!!!! I’m going to make the wall behind the wheels the feature wall of pretty colours! ...That is 2,500 test tiles!!!! I’m going to make the wall behind the wheels the feature wall of pretty colours! ...The Process of Making Pottery Decorating, Firing, Glazing, Making, Technical There is a rhythm and flow to clay. It can’t be done all at once! Even the making process! It can take weeks to get everything done, especially if you can only work on your pottery once a week! Even though we have three hour classes, it’s often just not enough time! Here is an overview of some of the processes so you have a bit more grasp on some of the technical stuff! Step One – Design There are SO many ideas out there for making stuff in clay! From delicate porcelain jewellery, through to heavy sculptural work and everything in between. Deciding your direction is sometimes not that easy – when you first start, try everything, you will naturally gravitate to the style that you enjoy! The options and variations are endless and can get a wee bit overwhelming too! Check in with me before you start to ensure your ideas will work, what order you might do things, how you could achieve the look you are seeking and any other technical data required! Step Two – Making Clay is thixotropic. This means that as you work with it, the clay first gets sloppier and wetter, before is begins to dry in the atmosphere. For most things, you simply can’t do all parts of the project at once. An example of work order might look like: Get last weeks work out from the shelves Prepare clay for today’s work – roll your clay, prepare balls for throwing, make the first stage of a pinch pot) Clean up last week’s work and put it on the shelf for bisque firing Check that you have any glazing to do – and do enough of it that you will have time to finish your main project Do the next step of your next project – there might be a further step that can’t be complete immediately, in that case, wrap your work well and put onto the shelves. Letting your work rest for a while can really help keep your work clean and professional looking. Many things require bagging under plastic to keep it ready for work the next week – put your name on the outside of the bag so you can find your work easily. We have stickers and markers. Consider how you want to decorate your work – coloured slip can be applied at a fairly wet stage (remembering that it will make your work even wetter!). Trying to apply slip to dry clay won’t work! If you want to do sgraffito – you will need to keep the work leather hard (a state of dryness where you can still work the clay with a little effort and a little water and care). Step Three – Drying Most of the time your work can go into the rack uncovered to let it dry out for the following week. If you want to continue forming or shaping you will need to double bag your work – put your work on a suitable sized bat and put the bat in a bag so the base of the bag is under the bat, then put another bag over the top of the work and tuck the top of the bag under the bat. If you want to trim (or turn) your thrown work the following week, it should also be double bagged. If your work is large, delicate, or of uneven thicknesses, you should lightly cover your work for drying. When considering the drying process, bare in mind the weather, humidity and wind! The hotter and dryer, the faster things dry and work can dry unevenly in the shelves – this can lead to cracking – another time to lightly cover your work for drying. Step Four – Trimming and Cleaning Up Your work is dry! It is called greenware now and it is at it’s most fragile! Handle everything with two hands. I often refer to soft hands – keep everything gentle and with your fingers spread as much as possible. Try to not pick up things like plates too much, and always with both hands! Before your work can be bisque fired it should be “cleaned up”. You work won’t go into the kiln if it has sharp edges – when glazed, sharp edges turn into razor blades! Use a piece of fly wire to rub the work all over – this will scratch a little so be light handed. Use a knife or metal kidney to scrape any areas that require a bit more dynamic treatment than the fly wire offers! Finally, a very light wipe over with a slightly damp sponge can help soften and soothe all of your edges and dags! Trimming thrown work: If you are planning to trim (or turn) your thrown work (and you should be), make sure you bag it well – your work should be leather hard to almost dry for easiest trimming. Use this step to finish the work completely – use a metal kidney to polish the surface, or a slightly damp sponge to give a freshly thrown look. Wipe the sponge around the rim after trimming, and check the inside of the pot for dags! Trimming slip cast work: Usually I will trim the rims of your work on the wheel the following day to make that stage easier, however you will still need to check your work for lumps and bumps. Last but not least – check that your name is still clearly on the bottom of your work. Step Five – Bisque Firing When the work is completely dry it can go into the bisque kiln. The bisque kiln is fired to 1000°C. This process burns off the water in the clay as well as some of the chemically bound water. The structure of the clay is not altered that much at this temperature. Inside the bisque kiln, the work is stacked a little, small bowl inside a larger bowl and onto a heavy plate. Smaller items like decorations or drink coasters might get stacked several high. Consideration is paid to the weight of the stack and shape of the work. A bisque kiln can fire about one and a half times the amount of work that the glaze kiln can fire. The firing takes about 10 hours to complete the cycle and about two days to cool down. Once it has been emptied the work is placed in the glaze room ready for you to decorate! Step Six – Glazing Decorating your work with colour can be a lot of fun – and time consuming! There are three main options for surface treatment at this stage: Oxide Washes Underglazes Glazes Washes and underglazes do not “glaze” the work – It will still need a layer of glaze to fully seal the clay (washes don’t need glaze on surfaces not designed for food or liquid as they can gloss up a little on their own). Underglazes are stable colourants that turn out pretty much how they look in the jar. They can be mixed with each other to form other colours and can be used like water colours to paint onto your work. Mostly they should have a clear glaze on top to seal them. Oxides are a different species – the pink oxide (cobalt) wash turns out bright blue for instance. They don’t always need a glaze on top, and some glazes can change the colour of the wash! The glazes need no other “glaze” on top! Be careful of unknown glaze interactions – you can put any combination of glaze in a bowl or on a plate, but only a single glaze on the outside of any vertical surface! Glazes are a chemical reaction under heat. We don’t know the exact chemicals in the Mayco glazes we use. I can guess by the way they interact with each other, however, on the whole, you need to test every idea you have, and not run the test on a vertical surface! Simply put, glaze is a layer of glass like substance that bonds with the clay underneath. Clay is made of silica, alumina and water. Glaze is made of mostly silica. Silica has a melting point of 1700°C and we fire to 1240°C. The silica requires a “flux” to help it melt at the lower temperature. Fluxes can be all sorts of chemicals – a common one is calcium – calcium has a melting point of 2500°C, however, together they both melt at a much lower temperature! Colourants are metal oxides like cobalt (blue), chrome (green through black), copper (green, blue, even red!), manganese (black, purple and pink) iron (red brown), etc. Different chemicals in the glaze can have dramatic effects. for example, barium carbonate (which we don’t use) turns manganese bright pink! Other elements can turn manganese dioxide brown, blue, purple and reddish brown. Manganese dioxide is a flux in and of itself as well. So, glazes that get their black and purple colours, often interact with other glazes and RUN! Our mirror black is a good example – it mixes really well with many glazes because it fluxes them – causes them to melt faster. It will also bring out many beautiful colours in the glazes because it’s black colouring most definitely comes from manganese dioxide! Glaze chemistry is a whole subject on it’s own! We use commercial Mayco glazes on purpose – for their huge range of colour possibilities, stability, cool interactions, artistic freedom with the ability to easily brush the glazes on and ease of use. We currently have almost 50 glazes on hand! A major project is to test the interactions of all glazes with each other. That is 2,500 test tiles!!!! I’m going to make the wall behind the wheels the feature wall of pretty colours! Step Seven – Glaze (Gloss or sometimes called “Glost”) Firing Most of the time this is the final stage of making your creation (but not always!) The glaze kiln goes to 1240°C. This is called cone 6, or midrange. It is the low end of stoneware temperatures. Stoneware clays and glazes are typically fired at cone 8 – 10, that is 1260 – 1290°C. The energy requirement to go from 1240°C to 1280°C is almost a 30% more! Our clay is formulated to vitrify (mature, turn “glass-like”) at 1240°, as are our glazes. A glaze kiln take around 12 hours to reach temperature and two to three days to cool down. Sometimes a third firing process is required – this is for decoration that is added to work after the glaze firing. For example – adding precious metals and lustres. this firing temperature is usually around 600 – 800°C depending upon the techniques being used. There are many students interested in gold and silver trims – we will be doing this third type of firing soon! After firing your work will be in the student finished work shelves. Remember to pay for it before you head out the door! There is a small extra charge for using porcelain clay (it’s more than twice the price of regular clay), and for any third firing process! Once your work has been fired it can not turn back into clay for millennia – so don’t fire it if you don’t like it! Put it in the bucket for recycling. https://firebirdstudios.com.au/the-process-of-making-pottery/ The bowl is an example of kitchenware used in the 19th century and still in use today.Bowl white ceramic. Crack on side. Badly stained.Backstamp very faint and unable to be read.flagstaff hill, warrnambool, shipwrecked-coast, flagstaff-hill, flagstaff-hill-maritime-museum, maritime-museum, shipwreck-coast, flagstaff-hill-maritime-village, mixing bowl, food preparation, kitchen equipment, ceramic
