Showing 34 items matching "wash bowl"
-
 Alfred Hospital Nurses League - Nursing History Collection
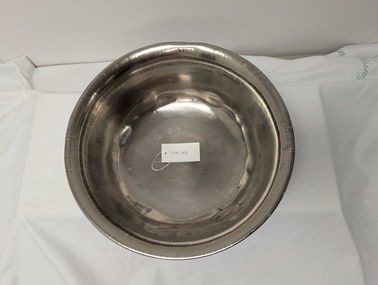
Functional object - Monelmetal wash bowl, K.G. LUKE
... Monelmetal wash bowl...Monelmetal wash bowl......wash bowl...Large monelmetal wash bowl. Bowl is round and made of metal. It has 2 cracks on the rim. ...On the base/underside of the bowl is an inscription from the maker and additional inscription from it's use on "Ward 5 - Alfred Hospital" Monelmetal wash bowl Functional object Monelmetal wash bowl K.G. ...Item that was used daily for patient ablutions. Would have been used by Alfred hospital nurses on a daily basis. Many of our membership would have memories of using this item. The item is marked with the ward as items sometimes were borrowed or used by different wards or areas of the hospital so labeling was essential for staff to retrieve their equipment back.Item that was used daily for patient ablutions. Would have been used by Alfred hospital nurses on a daily basis. Many of our membership would have memories of using and servicing/cleaning this item. The item is also a good example of wares made by K.G. Luke Pty Ltd.Large monelmetal wash bowl. Bowl is round and made of metal. It has 2 cracks on the rim. It has numerous dents and small scratches from use. On the base/underside of the bowl is an inscription from the maker and additional inscription from it's use on "Ward 5 - Alfred Hospital"PARAMOUNT/ WARE/ K.G. LUKE/ MELBOURNE/ ALFRED/ HOSPITAL/ WARD 5/ahnl, alfred hospital, nurses, patient care, bed bath, alfred hospital nurses league, ward 5 alfred hospital, metal bowl, wash bowl, ward 5, melbourne hospitals, school of nursing, prahran, nursing history, kenneth luke, k.g. luke pty ltd. -
 Wodonga & District Historical Society Inc
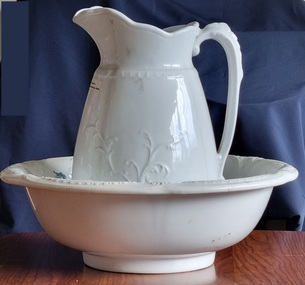
Domestic object - Ironstone China Wash bowl and jug
... Ironstone China Wash bowl and jug...Ironstone China Wash bowl and jug...Ironstone China Wash bowl and jug Domestic object Ironstone China Wash bowl and jug ...Ironstone china pieces were common domestic items during the 19th to mid 20th century in many Australian households. This kind of china is not porcelain but porous earthenware, made of clay mixed with feldspar. Patented in 1813 by Charles James Mason in Staffordshire, England, it was an immediate success and became widely produced by a range of Staffordshire potters. J & G Meakin Pottery dates back to 1845 when James Meakin started a pottery business at Lane End in Staffordshire.nIn 1848 he moved the business to Hanley in Staffordshire, before retiring in 1852 and handing the business over to his two sons James and George, who carried on with the pottery, trading as J & G Meakin. The "SOL" and sun face trademarks were registered in 1912. The firm was taken over by the Wedgwood Group in 1970. In 2000, production under the Meakin name ceased. W. H. Grindley was founded at the Newfield Pottery in 1880 by William Harry Grindley (principal partner). Mr Turner and Mr Alfred Meakin were also involved. Early advertisements stated that they produced Earthenware and Ironstone China - particularly for the Canadian, United States, South American and Australian markets. The mark on this jug was used from c1891 until 1925. W. H. Grindley China was manufactured until 1991, making it one of the last Stoke on Trent potteries.These items are representative of a common domestic item used by households in the Wodonga district and throughout Australia, many manufactured specifically for the Australian market.A white ironstone jug and bowl. The jug features a leaf design embossed on the surface. The bowl has a small circle pattern around the rim. They are not as set as the jug bears the mark W. H. Grindley and the bowl was made by J & G Meakin.Underneath Bowl: above and below image of the sun: "IRONSTONE CHINA/ REGD. SOL 391413/ J & G MEAKIN/ENGLAND Underneath jug: above and below the royal insignia: ROYAL IRONSTONE CHINA / W.H. GRINDLEY & CO. / ENGLAND"ironstone, domestic items, staffordshire pottery -
 Flagstaff Hill Maritime Museum and Village
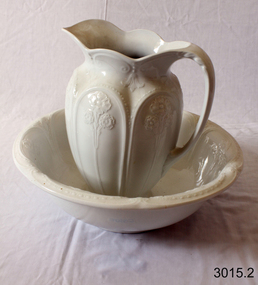
Domestic object - Wash Bowl, Early-to-mid 20th century
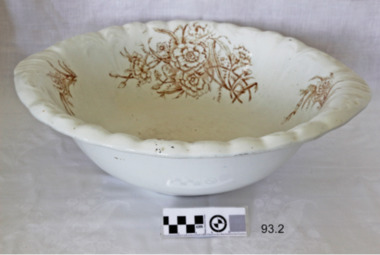
... Wash Bowl...Wash bowl with scalloped edge, cream ironstone with brown flower spray decorations. ...(ewer, bowl, vase, soap dish and lid) Domestic object Wash Bowl ...This bowl, and the complete set of five items, is believed to have been made in or around the Staffordshire area in the United Kingdom. Over 1,500 pottery firms have operated in Stoke-on-Trent since the early 1700s - some lasted only a few years, while others endured for well over 200 years. Some potters built and owned their own works. Many others were tenants in works built by others, and a succession of potters occupied the same works. It was also a common practice for a work to be split between two different pottery companies or for a larger manufacturer to subcontract a smaller section of their work to a potter who would make wares that were not of interest to the potter's owner. Some potters purchased 'blanks' from other manufacturers and put their own decoration on them. Some items have two back stamps, some have no marks at all. This adds to the confusion and frustration of trying to trace details of a particular manufacturer, such as the bowl.The early-to-mid 20th-century ewer set is an example of items used for personal hygiene in the 19th century.Wash bowl with scalloped edge, cream ironstone with brown flower spray decorations. It is part of a five-piece set. (ewer, bowl, vase, soap dish and lid)flagstaff hill, warrnambool, flagstaff hill maritime museum, maritime museum, shipwreck coast, flagstaff hill maritime village, great ocean road, porcelain container, toilet container, beauty container, ceramic, decorative object, pottery object -
 Mont De Lancey
Wash jug and bowl, J & G Meakin
... Wash jug and bowl...White jug and wash bowl with decorative pattern. Part of 1909 bedroom set....Wash jug and bowl J & G Meakin ...White jug and wash bowl with decorative pattern. Part of 1909 bedroom set.jugs, water pitcher -
 Flagstaff Hill Maritime Museum and Village
Domestic object - Wash Basin fragment
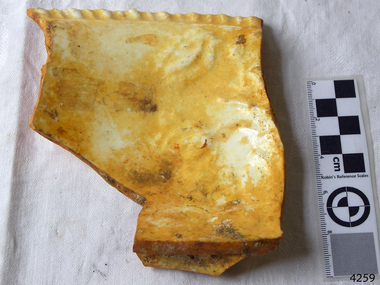
... ...wash bowl...Fragment of ceramic wash bowl from the wreck of the Schomberg. Has iron stains. ...It is historically significant for representing aspects of Victoria’s shipping history and for its association with the shipwreck and the ship, which was designed to be fastest and most luxurious of its day flagstaff hill warrnambool shipwrecked-coast flagstaff-hill flagstaff-hill-maritime-museum maritime-museum shipwreck-coast flagstaff-hill-maritime-village schomberg wash bowl Fragment of ceramic wash bowl from the wreck of the Schomberg. ...When the ship Schomberg was launched in 1855, she was considered the most perfect clipper ship ever to be built. James Blaine’s Black Ball Line had commissioned her to be built for their fleet of passenger liners. At a cost of £43,103, the Aberdeen builders designed her to sail faster than the quick clippers designed by North American Donald McKay. She was a three masted wooden clipper ship, built with diagonal planking of British oak with layers of Scottish larch. This luxury vessel was designed to transport emigrants to Melbourne in superior comfort. She had ventilation ducts to provide air to the lower decks and a dining saloon, smoking room, library and bathrooms for the first class passengers. At the launch of Schomberg’s maiden voyage, her master Captain ‘Bully’ Forbes, drunkenly predicted that he would make the journey between Liverpool and Melbourne in 60 days. Schomberg departed Liverpool on 6 October 1855 with 430 passengers and 3000 tons cargo including iron rails and equipment intended the build the Geelong Railway and a bridge over the Yarra from Melbourne to Hawthorn. The winds were poor as Schomberg sailed across the equator, slowing her journey considerably. She was 78 days out of Liverpool when she ran aground on a sand-spit near Peterborough, Victoria, on 27 December; the sand spit and the currents were not marked on Forbes’s map. Overnight, the crew launched a lifeboat to find a safe place to land the ship’s passengers. The scouting party returned to Schomberg and advised Forbes that it was best to wait until morning because the rough seas could easily overturn the small lifeboats. The ship’s Chief Officer spotted SS Queen at dawn and signalled the steamer. The master of the SS Queen approached the stranded vessel and all of Schomberg’s passengers were able to disembark safely. The Black Ball Line’s Melbourne agent sent a steamer to retrieve the passengers’ baggage from the Schomberg. Other steamers helped unload her cargo until the weather changed and prevented the salvage teams from accessing the ship. Local merchants Manifold & Bostock bought the wreck and cargo, but did not attempt to salvage the cargo still on board the ship. They eventually sold it on to a Melbourne businessman and two seafarers. After two of the men drowned when they tried to reach Schomberg, salvage efforts were abandoned.32 In 1975, divers from Flagstaff Hill, including Peter Ronald, found an ornate communion set at the wreck. The set comprised a jug, two chalices, a plate and a lid. The lid did not fit any of the other objects and in 1978 a piece of the lid broke off, revealing a glint of gold. As museum staff carefully examined the lid and removed marine growth, they found a diamond ring, which is currently on display in the Great Circle Gallery.33 Flagstaff Hill also holds ship fittings and equipment, personal effects, a lithograph, tickets and photograph from the Schomberg. Most of the artefacts were salvaged from the wreck by Peter Ronald, former director of Flagstaff Hill. The Schomberg, which is on the Victorian Heritage Register (VHR S612), has great historical significance as a rare example of a large, fast clipper ship on the England to Australia run, carrying emigrants at the time of the Victorian gold rush. She represents the technical advances made to break sailing records between Europe and Australia. Flagstaff Hill’s collection of artefacts from the Schomberg is significant for its association with the shipwreck, The collection is primarily significant because of the relationship between the objects, as together they have a high potential to interpret the story of the Schomberg. It is archaeologically significant as the remains of an international passenger Ship. It is historically significant for representing aspects of Victoria’s shipping history and for its association with the shipwreck and the ship, which was designed to be fastest and most luxurious of its day Fragment of ceramic wash bowl from the wreck of the Schomberg. Has iron stains. Artefact Reg No S/66.flagstaff hill, warrnambool, shipwrecked-coast, flagstaff-hill, flagstaff-hill-maritime-museum, maritime-museum, shipwreck-coast, flagstaff-hill-maritime-village, schomberg, wash bowl -
 Flagstaff Hill Maritime Museum and Village
Domestic object - Bowl
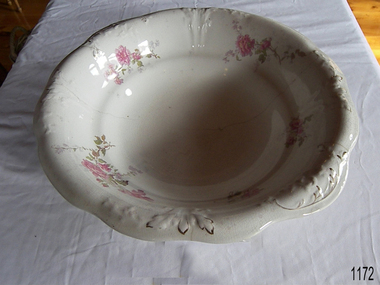
... ...wash bowl...Bowl or wash basin, white with pink and green floral decoration. ...It was made by the well-known firm Johnson Bros. in England. The wash bowl or basin is a typical example of a Victorian era household's bathing item. ...This semi-porcelain wash basin would have been used in a Victorian household for bathing and personal hygiene. It was made by the well-known firm Johnson Bros. in England. The wash bowl or basin is a typical example of a Victorian era household's bathing item. It is significant for its association with renowned potters Johnson Bros. of EnglandBowl or wash basin, white with pink and green floral decoration. Inscription on base; stamped in brown paint. Royal semi-porcelain material, made by Johnson Bros, England"ROYAL / SEMI-PORCELAIN / JOHNSON BROS. / ENGLAND" Symbol [Crown above a ribbon with maker's name.]flagstaff hill, flagstaff hill maritime museum and village, warrnambool, maritime museum, maritime village, great ocean road, shipwreck coast, wash bowl, wash basin, bathing, personal hygiene, johnson bros, pottery, percelain, semi-porcelain -
 Stawell Historical Society Inc
Memorabilia - Realia, 1910-1930
... Bedroom Water Jug Wash Bowl. Leyshon Family...Stawell Historical Society Inc 46 Longfield St Stawell grampians Stawell Bedroom Water Jug Wash Bowl. Leyshon Family Memorabilia Realia ...Bedroom Water Jug Wash Bowl. Leyshon Familystawell -
 Whitehorse Historical Society Inc.
Domestic object - Wash Set
... White China with pink and blue flowers and brown leaves. Wash bowl and jug....White China with pink and blue flowers and brown leaves. Wash bowl and jug. Domestic object Wash Set ...Six piece crockery personal wash set comprising large bowl, large jug, 3 piece soap set with bowl, perforated inlay piece and lid and small jug possibly for toothbrush. White China with pink and blue flowers and brown leaves. Wash bowl and jug.domestic items, ablutions, crockery -
 Flagstaff Hill Maritime Museum and Village
Domestic object - Enamel basin
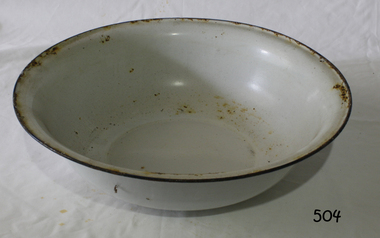
... bowl...enamel dish...white enamel...white with blue rim...kitchenware...household object...19th century...20th century...cooking...cleaning...personal care...basin...enamel basin...wash...Wash basin: white enamel bowl with blue rim. ...Flagstaff Hill Flagstaff Hill Maritime Museum and Village Warrnambool Maritime Museum Maritime Village Great Ocean Road Shipwreck Coast enamel bowl enamel dish white enamel white with blue rim kitchenware household object 19th century 20th century cooking cleaning personal care basin enamel basin wash basin metal craft tinware Wash basin: white enamel bowl with blue rim. ...A mass-produced domestic item. The design was popular in the early to mid-20th century.The basin is an example of early to mid-20th-century kitchenware.Wash basin: white enamel bowl with blue rim. flagstaff hill, flagstaff hill maritime museum and village, warrnambool, maritime museum, maritime village, great ocean road, shipwreck coast, enamel bowl, enamel dish, white enamel, white with blue rim, kitchenware, household object, 19th century, 20th century, cooking, cleaning, personal care, basin, enamel basin, wash basin, metal craft, tinware -
 Friends of Westgarthtown
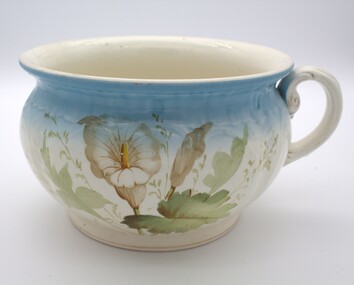
Domestic object - Chamberpot, c.1900
... The vessel formed part of a matching bedroom wash set, which also included a water jug and large wash bowl. Chamber pots such as this were commonly used in domestic settings during the nineteenth and early twentieth centuries before the widespread installation of indoor plumbing....The vessel formed part of a matching bedroom wash set, which also included a water jug and large wash bowl. Chamber pots such as this were commonly used in domestic settings during the nineteenth and early twentieth centuries before the widespread installation of indoor plumbing. ...Ceramic chamber pot with a rounded body, flared rim and single loop handle. The chamber pot is decorated with hand-painted floral motifs in white, green and brown on a pale blue ground. The vessel formed part of a matching bedroom wash set, which also included a water jug and large wash bowl. Chamber pots such as this were commonly used in domestic settings during the nineteenth and early twentieth centuries before the widespread installation of indoor plumbing.This chamber pot formed part of a matching ceramic wash set comprising a water jug, wash bowl and chamber pot. The set was donated to Ziebell's Farmhouse Museum by Sylvia Schultz (née Ziebell), a descendant of the Ziebell family of Westgarthtown. -
 Flagstaff Hill Maritime Museum and Village
Domestic object - Ewer and Bowl, J & G Meakin, 1912 - 1925
... Ironstone wash jug and bowl set, white, often referred to as a ewer and bowl. ...Item is significant as it is believed to be an early example of the SOL trademark made between 1913-1925. flagstaff hill warrnambool shipwrecked-coast flagstaff-hill flagstaff-hill-maritime-museum maritime-museum shipwreck-coast flagstaff-hill-maritime-village jug china white and basin jug jug and basin jug & bowl ewer bowl ewer & bowl j and g meakin ironstone ware bathing washing personal hygiene Both items have marks "Ironstone China Reqd SOL 39/4/3 STG Meakin England" Trademark of J & G Meakin with sun emblem . Ironstone wash ...J & G Meakin was an English pottery manufacturing company founded in 1851 and based in Hanley, Stoke-on-Trent, Staffordshire. In the 19th century, J & G Meakin was known for the vast quantities of cheap ironstone china it produced for the domestic English market and export to Australia, Canada, New Zealand, and the United States. From around 1970, designs included Liberty, Sterling, Trend, Classic, and Heirloom. Some of these were influenced by earlier designs. The newer wares can be distinguished by back stamp markings such as 'permanent colours', 'everlasting colour', or 'dishwasher proof'. J & G Meakin had close family and corporate affiliations to the potteries Johnson Brothers, and Alfred Meakin Ltd, which explains why many patterns are similar, if not almost the same. There was a takeover by J. & G. Meakin in 1968 of Midwinter Pottery. The firm was then taken over by the Wedgwood Group in 1970. In 2000 production under the Meakin name ceased and their long-established works, Eagle Pottery, was then used for the production of Johnson Bros pottery. Eagle Pottery closed in 2004 when production was transferred abroad; the works were demolished in 2005.Item is significant as it is believed to be an early example of the SOL trademark made between 1913-1925.Ironstone wash jug and bowl set, white, often referred to as a ewer and bowl. Both jug and bowl have matching raised embossing of panels with floral motifs within them.Both items have marks "Ironstone China Reqd SOL 39/4/3 STG Meakin England" Trademark of J & G Meakin with sun emblem .flagstaff hill, warrnambool, shipwrecked-coast, flagstaff-hill, flagstaff-hill-maritime-museum, maritime-museum, shipwreck-coast, flagstaff-hill-maritime-village, jug china white and basin, jug, jug and basin, jug & bowl, ewer, bowl, ewer & bowl, j and g meakin, ironstone ware, bathing, washing, personal hygiene -
 Flagstaff Hill Maritime Museum and Village
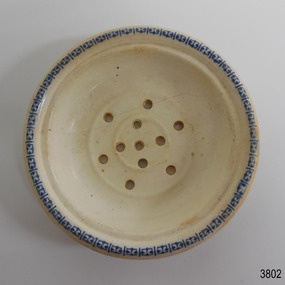
Ceramic - Soap dish, circa 1883
... Soap dishes were often part of a wash set that also included a water jug and wash bowl. The holes in the dish allowed water to drain out of the dish, keeping the soap dry for next use. ...Soap dishes were often part of a wash set that also included a water jug and wash bowl. The holes in the dish allowed water to drain out of the dish, keeping the soap dry for next use. ...This ceramic soap dish was recovered from the wreck of the 1882-1883 George Roper between the late 1960’s to early 1970’s. It is one of the shipwreck artefacts in the John Chance Collection. Soap dishes were often part of a wash set that also included a water jug and wash bowl. The holes in the dish allowed water to drain out of the dish, keeping the soap dry for next use. The GEORGE ROPER 1882 - 1883 - The George Roper was a 4-masted iron sailing ship built in Liverpool, England, in 1882 for fast international trade with Australia. The large vessel was launched in February 1883. The ship was on its first trip, departing Liverpool for Melbourne, captained by John Ward and a crew of 31. She had almost reached her destination on July 4 1883, approaching Port Phillip Bay and being towed by the steam tug William. The weather changed to rough with fog and both the George Roper and the William hit the dangerous Lonsdale Reef at Port Phillip Heads. The Captain and crew were eventually rescued and taken to Queenscliff. Salvage syndicates were able to recover a lot of the cargo before the George Roper broke up and sank. Amongst the cargo was soft goods, draperies, household items, spirits of malt and distilled liquors, chemicals, dynamite, and 1,400 tons of steel rails for the Victorian Government. Also in the hold were Russell Stourbridge bricks, as paying ballast. This 1880s soap dish is an example of personal hygiene accessories and may have been part of a set comprising jug, bowl and dish.. The soap dish is also significant as it was recovered by John Chance, a diver from the wreck of the George Roper in the 1960s-70s. Items that come from several wrecks along Victoria's coast have since been donated to the Flagstaff Hill Maritime Village’s museum collection by his family, illustrating this item’s level of historical value. The soap dish is significant for its association with the barque George Roper, which is considered historically and archaeologically significant and as such, is listed on the Victorian Heritage Database, VHR S286. The George Roper is an example of a vessel built specifically for fast travel to and from Australia with a large shipment of cargo. Its cargo of steel rails adds to the historical significance of international trade to the growing colony of Australia and Victoria in particular, with rail transportation soon to become a faster and safer form of transportation between colonial towns. Divers can still access parts of the scattered wreck and other artefacts recovered in the 1970s and 1980s can be viewed in both public and private collections. Soap dish; glazed white porcelain. Round shallow bowl with blue patterned border, resembling butterflies. Two raised, concentric rings are moulded into the base. Six pierced holes are evenly spaced between the rings, five holes are in the centre of the dish.flagstaff hill, warrnambool, flagstaff hill maritime museum, maritime museum, shipwreck coast, flagstaff hill maritime village, great ocean road, john chance, west coast trader, george roper, captain john ward, russell stourbridge bricks, port phillip heads, lonsdale reef, dive wreck, vhr s286, coastal trader, ceramic, vintage, personal hygiene, bathroom accessory, soap dish -
 Royal District Nursing Service (now known as Bolton Clarke)
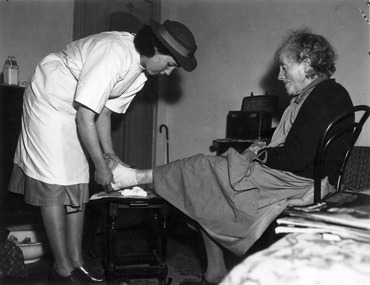
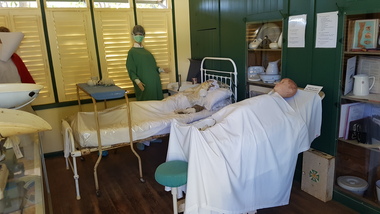
Photograph - Photograph, black and white:, 1952
... A dark curtain hangs in the doorway. A large white wash bowl is seen in the lower left of the photograph. ...A dark curtain hangs in the doorway. A large white wash bowl is seen in the lower left of the photograph. ...Sister J. Faust has dressed a wound on the ladies ankle and is applying a blue-line bandage. The photograph is taken in the lady's home. The MDNS uniform at that time was a grey frock, and stiffened brimmed grey felt hat with a light grey band and a red Maltese cross in the centre of the band. The Trained nurses (Nurses) of the Melbourne District Nursing Society (MDNS), from its inception in 1885, provided wound care to their patients, who ranged in age from the very young to the elderly. As research developed better products and dressing materials the methods and medication applied to wounds changed. MDNS received Royal patronage in 1966 and as Royal District Nursing Service (RDNS), the Education department developed programs, such as the Leg Ulcer Management Program, to provide their Trained nurses (Sisters) with methods of best quality care. The Sisters liaised with the patient’s Doctors and hospitals to provide information on the progress of patient’s wounds and to receive any change of wound care from the Doctors. RDNS introduced a Wound Care Specialist program and these Sisters did assessments and provided advice and support to the District Sisters working in the field. Black and white photograph of Melbourne District Nursing Society (MDNS) visiting Sister J. Faust, who is wearing a white gown and a grey brimmed hat over her dark curled hair. Part of her grey uniform frock is seen below the gown. She is applying a light coloured bandage to the right ankle of an elderly female patient. The lady, who has dark curled hair, and is wearing a grey frock, apron, and black cardigan is seen seated side on, on a wooden chair to the right of the Sister. She has her right leg extended and resting on a small low table, her left leg is bent to the floor.. The Sisters open case is seen on a small table to the rear of the lady and a walking stick is to the left against the door frame. A dark curtain hangs in the doorway. A large white wash bowl is seen in the lower left of the photograph. A glass jar with scissor blades into a liquid can be seen on a cabinet to the left of.Sister Faust. To the right of the photograph a partial white covered bed can be seen with a table over it with papers and a magnifying glass. Name of Sister on rear of photograph.wound care, melbourne district nursing society, royal district nursing service, rdns, mdns, sister j. faust -
 Numurkah & District Historical Society
Isolation Ward Medical Displays - overview
... Shelf One – North End of Isolation Ward 1 x slipper enamel bedpan 1 x enamel pan with spout 1 x stainless steel bedpan 1 x stainless steel urinal 2 x ceramic urinals 1 x ceramic bowl Shelf Two – North end of Isolation Ward 1 x small enamel kidney dish 2 x slipper ceramic bedpans 1 x enamel wash-bowl & jug Shelf Three – North end of Isolation Ward 1 X dry Steriliser Shelf Four – North end of Isolation Ward 1 X steam Steriliser Shelf One – South end of Isolation Ward 1 x nurse’s dictionary Domestic Medical Practice Book Doctor and Specialist Book Aids to Gynaecological Nursing Book Foundations of Anatomy & Physiology Book 2 x thermometers 1 x stainless steel swab bowl 1 x ophthalmoscope 1 x stainless bowl & bandages 1 x scissors/ tweezers kit 1 x large operating scissors & 1 x operating tweezers 1 x camode pot 1 x sigmoidoscope 3 x plessors Shelf Two – South end of Isolation Ward 1 x ceramic jug Kaarimba Ladies Auxiliary History of Num. ...Numurkah & District Historical Society Old Bank Building cnr Melville and Knox Street (118-120 Melville St) Numurkah the-murray hospital, medical equipment Shelf One – North End of Isolation Ward 1 x slipper enamel bedpan 1 x enamel pan with spout 1 x stainless steel bedpan 1 x stainless steel urinal 2 x ceramic urinals 1 x ceramic bowl Shelf Two – North end of Isolation Ward 1 x small enamel kidney dish 2 x slipper ceramic bedpans 1 x enamel wash-bowl & jug Shelf Three – North end of Isolation Ward 1 X dry Steriliser Shelf Four – North end of Isolation Ward 1 X steam Steriliser Shelf One – South end of Isolation Ward 1 x nurse’s dictionary Domestic Medical Practice Book Doctor and Specialist Book Aids to Gynaecological Nursing Book Foundations of Anatomy & Physiology Book 2 x thermometers 1 x stainless steel swab bowl 1 x ophthalmoscope 1 x stainless bowl & bandages 1 x scissors/ tweezers kit 1 x large operating scissors & 1 x operating tweezers 1 x camode pot 1 x sigmoidoscope 3 x plessors Shelf Two – South end of Isolation Ward 1 x ceramic jug Kaarimba Ladies Auxiliary History of Num. ...Shelf One – North End of Isolation Ward 1 x slipper enamel bedpan 1 x enamel pan with spout 1 x stainless steel bedpan 1 x stainless steel urinal 2 x ceramic urinals 1 x ceramic bowl Shelf Two – North end of Isolation Ward 1 x small enamel kidney dish 2 x slipper ceramic bedpans 1 x enamel wash-bowl & jug Shelf Three – North end of Isolation Ward 1 X dry Steriliser Shelf Four – North end of Isolation Ward 1 X steam Steriliser Shelf One – South end of Isolation Ward 1 x nurse’s dictionary Domestic Medical Practice Book Doctor and Specialist Book Aids to Gynaecological Nursing Book Foundations of Anatomy & Physiology Book 2 x thermometers 1 x stainless steel swab bowl 1 x ophthalmoscope 1 x stainless bowl & bandages 1 x scissors/ tweezers kit 1 x large operating scissors & 1 x operating tweezers 1 x camode pot 1 x sigmoidoscope 3 x plessors Shelf Two – South end of Isolation Ward 1 x ceramic jug Kaarimba Ladies Auxiliary History of Num. Dist. Health Nursing Certificates & Notebooks – Winifred Smith Shelf Three – South end of Isolation Ward Nursing Certificates & Notebooks – Winifred Smith Shelf Four – South end of Isolation Ward 1 x white enamel bucket 1 x enamel bowl Glass Cabinet: Premature Babies Book Handbook of Paediatrics Various health brochures 1 x enamel potty, dry liners, nappy pins 1 x infant welfare leather case 2 x breast pump 2 x dippers Medical Items placed around the room 1 x kidney dish with syringes & bandage 1 x stethoscope 1 x catheters 1 x oxygen tubing 1 x hospital bed (pre-dates 1950’s eg from local private hospital) 1 x operating table and 1 x theatre stool (original Numurkah Hospital 1950’s) 1 x heart table 1 x dental chair, mouthwash dish & stand 3 x wooden crutches 1 x early dentist chair 1 x Infant Welfare Centre sign hospital, medical equipment -
 City of Melbourne Libraries
Photograph, Bull, Hugh Jones, 1897-1993, Commercial Travellers' Association, Victoria, Board Room
... The CTA donated their archives to University of Melbourne Archives which includes original artworks and photos used in “Australia To-Day” (Melbourne University has digitised 1114 photos) and sundry items including trophies, ashtrays, commemorative souvenirs, menus, a rare “Safechek” sovereign changer, a bust of James Davies and even a CTA embossed wash bowl and chamber pot. After the death of General Secretary James Davies in 1931, the CTA held the annual “James Davies Memorial Cup” golf tournament at various Melbourne golf courses, the winner receiving a splendid silver cup. ...The CTA donated their archives to University of Melbourne Archives which includes original artworks and photos used in “Australia To-Day” (Melbourne University has digitised 1114 photos) and sundry items including trophies, ashtrays, commemorative souvenirs, menus, a rare “Safechek” sovereign changer, a bust of James Davies and even a CTA embossed wash bowl and chamber pot. After the death of General Secretary James Davies in 1931, the CTA held the annual “James Davies Memorial Cup” golf tournament at various Melbourne golf courses, the winner receiving a splendid silver cup. ...Seven seated and fifteen standing men dressed in suits around a long table in a panelled room hung with formal portraits of men. A trophy sits on the long table amongst loose paper sheets. Research by project volunteer, Fiona Collyer: The Commercial Travellers’ Association of Victoria (CTA) was formed at a meeting of 40 commercial travellers held at the Duke of Rothesay Hotel, 24 Elizabeth Street on 1 December 1880. Their charter was to advocate for better working conditions for commercial travelling salesmen, including improved accommodation at discounted rates and travel concession fares. At first by locomotive, horse and buggy, steamers and horseback, later also by motor car and motorcycle, “The Man on the Road” went into the back-blocks of the country to extend the interests of commerce to the stores and households of Australian regional towns and isolated settlements. Affiliated organisations existed in all states and New Zealand and in 1895 they integrated to form the United Commercial Travellers’ Association of Australasia (UCTAA). By the turn of the 20th century, the Victorian branch of the CTA had 421 Association Members and 520 Club members. The CTA continued to hold meetings in leased rooms in hotels and offices until 1898 when they commissioned purpose-built premises at 190-192 Flinders Street (extant, now the Macstore, next to former Metropolitan Gas Company Buildings). Designed by leading architectural firm of brothers H.W. & F.B.Tompkins (Dimmey’s Model Store, Swan Street, London Stores, Herald and Weekly Times, Myer building, Diamond House, Centreway Arcade, Manton’s Store) in the Queen Anne Revival style at the cost of £20,000, the four storey building had a facade of red Northcote bricks and an entrance of Pyrmont stone. It was very modern for the time, featuring elevators, offices, bars, kitchen, dining, card and billiard rooms and 31 bedrooms with shared bathrooms for the footsore travellers. However, despite adding two storeys in 1901, and another storey and a basement in 1905, they soon outgrew their premises, and in 1912 the CTA commissioned a new building at 328 Flinders Street. At this time, buildings in Melbourne were constrained by the city height limit of 132 feet (40 metres)- the maximum height of firefighting ladders. The new CTA building was the tallest building in Melbourne until 1932 when regulations changed allowing the Manchester Unity Building to be built. The new CTA headquarters was the epitome of comfort and luxury with cutting edge facilities to ease the fatigued salesman and prepare him for another stint on the road. General Secretary, James Davies travelled to Britain and America to acquire the very best and latest innovations. After visiting the new premises, Punch magazine 11 June 1914 reported “furnishings, appliances, and labour-saving conveniences which were more than up to date- they were up to-morrow.” The Edwardian Baroque style building was again designed by architects H.W. & F.B. Tompkins at the cost of £100,000 and built by contractors F.E. Shillabeer and Sons (Nicholas Building, Kellow-Falkiner Pty Ltd car showroom). The nine storey plus basement building is of steel frame construction with concrete floors. The ground floor facade is of grey granite and above that it is faced with cream glazed bricks chosen to combat discolouration from the pollution emitted by Flinders Street Station trains across the road. The facade is decorated with mascarons, gum leaf trim and balconies with classical style balustrade. The club was entered through revolving doors into a two storey high, circular, domed lobby with white columns, American oak panelled walls and intricate mosaic flooring. The ceiling is festooned with plaster gum leaf and gum nut detail, a theme that is repeated throughout the building. The basement kitchen had modern, labour saving appliances that would be the envy of any Edwardian housewife, including an electric toaster, a potato peeling machine, heated dumb waiter, dishwashing machine and electric refrigeration and cooking. It serviced the commodious second floor dining room which seated 200 people and the cafe/breakfast room, 80 people. Members were permitted to entertain their lady friends there for afternoon tea between the hours of 3 and 5 pm every day, except Sunday. The members’ facilities included a barbershop, clothes pressing machine, boot cleaning chair, pipe and cigar stall with electric humidor, public telephones, lockers and safe deposit. The building was serviced with five elevators, a built in vacuum cleaning plant, hot water radiators and linen and postal chutes. The first floor was devoted to business and relaxing, containing the Board, Writing, Reading and four Business Rooms. The board room had Queensland maple panelling with huge blackwood tables topped with blue morocco and golden tortoise-shell trim and cane bottomed chairs. Large framed photographs of past presidents since 1884 lined the walls. The Reading Room ran the whole width of the building. Arthur Streeton’s painting “Between the Lights, Princes Bridge 1888” and Frederick McCubbin’s “Looking North from Mount Macedon” were hung there, as well as paintings by renowned Australian artists Hans Heysen, Walter Withers, John Mather, Jan Hendrik Scheltema. The Argus 30 May 1914 quipped “Around the walls hang evidences that the commercial traveller's soul has not been killed in his pursuit of commerce”. The blackwood panelled room was furnished with Queen Anne style tables and chairs and green leather armchairs with inviting rocker foot rests allowing weary travellers to relax after traversing the railways and dusty roads of Victoria while planning their next sales trip. “The Australasia Traveller” Volume 10, Number 2, April 1914 page 35 noted “An attendant will be constantly employed on this floor to take care of the stationary supply, to tidy up newspapers, and generally study the convenience of members.” The third floor was for amusements with billiards, a bar and four rooms for playing cards, dominoes and chess. The huge billiard room had seven Alcock billiard tables including a table in a partitioned match-room for tournaments, exhibitions and matches. The walls were lined with members’ cues and for spectators, comfortable lounges with marble topped tables and electric bell pushes for drinks service. There were 150 bedrooms over five floors, each with their own telephone and wash basin and five suites with a private sitting room attached. There were four bathrooms per bedroom floor and capacious, well-lighted shaving rooms. Top rate club tariff for bed and breakfast - 6 shillings, if called for a country train leaving Melbourne before 8am - 4 shillings, suite and breakfast- 9 shillings, sixpence. “The Australasia Traveller” Volume 10, Number 2, April 1914 page 35 reported “All “early calls” will be made from the Club Office to Bedrooms by means of the Telephone, so that instead of waking everybody else up on the corridor, only the member concerned will know that it is his unpleasant duty to get up.” The new CTA premises was widely regarded as the finest club in the Southern Hemisphere. The CTA also built the adjacent six storey Commerce House with 52 sample rooms for travellers to display their wares with the remainder rented to retail businesses and a post and telegraph office. After the CTA moved into their new, larger premises in 1914, neighbouring department store Ball & Welch expanded into the former CTA. The CTA saw themselves in a nation building role and were an influential lobby group to the Government. They advocated for inter city trunk telephone lines, standard gauge railway lines between NSW and Victoria, improved roads and highways, the Murray River water scheme and maintaining the White Australia Policy. They were very active in fund raising for the war efforts. The CTA offered its members support in other ways with benevolent funds for widows and orphans, mortuary, accident, sickness and an annuities fund for members over 65 years. There were scholarships for members’ children and home purchase scheme to assist with home ownership. A secondary membership scheme provided access to non commercial travellers (men only) to its exclusive club premises. They also organised social events and activities such as billiard tourneys, golf tournaments, dances and an annual “Smoke Social” which was a social event where men gathered for a formal dinner, community singing, lectures, speeches and of course, to smoke! Daylesford born James Davies OBE, (1865-1931) worked at the CTA for 50 years, starting as an office boy and working his way up to General Secretary and editor of the monthly trade journal for UCTAA members, “The Traveller” (1890-1905, later “The Australasian Traveller” 1905-1924 and then “The Australian Traveller” 1925-1976) and the annual colour supplement magazine “Australia To-Day” (1904-1973). “The Australasia Traveller” featured commentary on the issues of the day like wars, tariffs and trade, articles on new products and hotel recommendations and their rates and lots of advertising, especially alcohol, tobacco and accommodation in regional hotels. There were regular columns, each illustrated with a line drawing and these included “Our Immigration Record” a state by state summary of arrivals of “desirable immigrants” to Australia, while bemoaning the declining (white) birth rate. The column followed the arrival of British boys sent to Australia as agricultural apprentices to work on rural properties which were short of labour. Between 1913-1928, 1750 “Barwell Boys”, some as young as 14 years of age arrived in South Australia to work. NSW had a similar program known as the Dreadnaught Boys Scheme where 5595 boys immigrated between 1911-1939. The boys were considered of “good British stock”. There was a “Home Page For The Ladies” showcasing the latest fashions in women’s clothing, millinery and hairstyles and tips and trends in home furnishings.“Children’s Corner for Dear Little Folks” which featured puzzles, jokes and stories and members could send in photographs of their children. “Road Echoes” devoted to “The Man On The Road” and his doings. “Face Massage, Smiling is the Best Face Massage”, the humour page full of jokes and funny stories. “Railway Rumbles” news of innovations, timetables, tickets and grumbles about lavatories, food and drinking water on trains and at railway stations. And in case we forget that members had a home away from their CTA home, gardening tips with “The C.T. as Gardener”column. The annual magazine “Australia To-Day” was a vehicle to promote Australia here and overseas as a modern, prosperous country with abundant opportunities and pleasant climate. It sought to showcase its manufacturing, agriculture and tourism and encourage British immigration to Australia. The magazine featured articles about recently arrived migrants at work, quirky native flora and fauna, beach culture, recreation and the Australian way of life in the settler nation. Many of the articles were written by politicians of the day, including Robert Menzies. The UCTAA commissioned original artwork for the front covers and feature articles of “Australia To-day” from leading Australian artists. These included Norman Lindsay, Frederick McCubbin, Napier Waller, Lionel Lindsay, Hans Heysen, C Dudley Wood, Louis McCubbin, Penleigh Boyd, Louis Buvelot, Christian Waller and Ellis Rowan and her Australian wildflowers. Some of the photographs in “Australia To-Day” were provided by state and federal government departments as well as manufacturers, newspapers and mining companies. Amongst of the credited photographers was Helmut Newton who later earned world acclaim as a fashion photographer and architectural and industrial photographer Wolfgang Sievers (unfortunately their photographs remain in copyright and aren’t available online). Also featured was Richard C. Strangman, a professional photographer from Canberra, William Howieson of Melbourne, who has 22 photographs in the collection of NGV, Tasmanian wilderness photographer Frederick Smithies, Athol Shmith, portrait photographer and educator from Melbourne, Gordon de Lisle, a Melbourne commercial, industrial, aerial and society portrait photographer. (One of Gordon’s assignments was as the stills photographer for the 1959 movie “On The Beach” filmed in Melbourne). Photographs taken by acclaimed Antarctic and official war photographer Captain Frank Hurley OBE for Adelaide’s Centenary were also featured. The Australian Government was keenly aware of the influence and quality of the UCTAA publications. On 1 June 1914 The Age reported that to advertise Australia in Great Britain and elsewhere, the Department of External Affairs purchased 6500 copies of “Australia To-Day” magazine for £515 to distribute free to “places where they are most likely to come under the notice of a desirable class of immigrants.” In 1950, the office of Prime Minister Robert Menzies ordered 2550 copies of that year’s issue of “Australia To-Day” for the Department of Commerce and Information to distribute. The CTA donated their archives to University of Melbourne Archives which includes original artworks and photos used in “Australia To-Day” (Melbourne University has digitised 1114 photos) and sundry items including trophies, ashtrays, commemorative souvenirs, menus, a rare “Safechek” sovereign changer, a bust of James Davies and even a CTA embossed wash bowl and chamber pot. After the death of General Secretary James Davies in 1931, the CTA held the annual “James Davies Memorial Cup” golf tournament at various Melbourne golf courses, the winner receiving a splendid silver cup. “Table Talk” magazine photographs from 29 June 1933 depict the travellers beautifully (and I would say correctly) attired in tweedy plus fours, Fair Isle knitwear, flat caps and of course fringed brogues. I have been unable to ascertain whether the trophy in our photo is for golf or another CTA social activity. The CTA Victoria membership peaked in 1951 with 4,672 Aassociation members and 3,693 Club members. In 1959, Hollywood came to Melbourne when film stars Gregory Peck, Ava Gardner, Anthony Perkins and Fred Astaire descended to film ‘On the Beach,’ directed by Stanley Kramer. The film is based on the bestselling Neville Shute novel about the aftermath of World War Three, a nuclear war that has obliterated most of the Northern Hemisphere. Radioactive dust is heading toward Australia and everyone is preparing for death. Scenes with Anthony Perkins were filmed in the CTA billiards room as the exclusive Pastoral Club. Anthony Perkins’ character, Lieutenant Commander Peter Holmes of RAN tells Gregory Peck’s character, Commander Dwight Lionel, that The Pastoral Club is…”A mahogany and polished brass sort of place-some people claim it was the stuffiest club in the Commonwealth” before assuring him that despite shortages, the club is likely to have some Scotch left. In a scene at the Pastoral Club two, old (probably red faced) codgers discuss the challenge of drinking all of the 400 bottles of Gould Campbell vintage port in the club wine cellar before they succumb to radiation sickness in five months time. The NGV has 12 photographs in their collection of wardrobe stills of Ava Gardner modelling costumes designed by the Fontana Sisters of Rome for “On The Beach”, taken by Italian photographer G.B.Poletto. During the filming, Gregory Peck and his family stayed at “Kurneh” 206 Domain Road, South Yarra, the former home of three times Grand Slam winner Norman Brookes. Through the decades, Australian society was changing and in order to stay relevant, the CTA had to change too. In 1971, two women were elected for club membership, although they were only granted limited access to the club’s facilities and in 1972, women were invited for the first time to participate in the previously men only annual “Smoke Social”. In 1975, dwindling membership forced the closure of The Commercial Travellers’ Association building and in 1977, the building was sold, with the CTA ceasing to operate in 2014. It was the end of the road for the “Knights of the Road”. In 1992, the CTA building at 328 Flinders Street was placed on the Victorian Heritage Register in recognition of its architectural and cultural significance. The building has been meticulously restored with many of the original fittings, decorative plasterwork, mosaic flooring, stained glass windows, columns, chandeliers and the panelling made from Australian timbers retained. After renovations the building became first the Euro Asia Hotel, then the Duxton Hotel and in 2005 The Rendezvous Hotel, Melbourne. In tribute to the history of the building and the film “On The Beach”, the Rendezvous Hotel has the Ms Ava Bar, Perkins room, Mr Tompkins restaurant, Commerce Room and the Davies Room. References: COMMERCIAL TRAVELLERS' ASSOCIATION OF VICTORIA. (1899, May 27). The Australasian (Melbourne, Vic. : 1864 - 1946), p. 25. Retrieved February 21, 2025, from http://nla.gov.au/nla.news-article138615498 COMMERCIAL TRAVELLERS. (1914, May 30). The Argus (Melbourne, Vic. : 1848 - 1957), p. 8. Retrieved February 13, 2025, from http://nla.gov.au/nla.news-article7272511 NEWS OF THE DAY. (1914, June 1). The Age (Melbourne, Vic. : 1854 - 1954), p. 8. Retrieved February 19, 2025, from http://nla.gov.au/nla.news-article189414314 COMMERCIAL TRAVELLERS' "AT HOME." (1914, June 11). Punch (Melbourne, Vic. : 1900 - 1918; 1925), p. 32. Retrieved March 19, 2025, from http://nla.gov.au/nla.news-article129699692 https://archives.library.unimelb.edu.au/nodes/view/69669 https://vhd.heritagecouncil.vic.gov.au/places/757 http://www.pikitiapress.com/blog/2015/1/26/australia-today Commercial Travellers at Yarra Yarra (1933, June 29). Table Talk (Melbourne, Vic. : 1885 - 1939), p. 6. Retrieved February 28, 2025, from http://nla.gov.au/nla.news-article149547845 https://archives.library.unimelb.edu.au/nodes/view/537460 https://viewer.slv.vic.gov.au/?entity=IE7420895&file=FL19171568&mode=browse https://www.history.sa.gov.au/wp-content/uploads/2021/03/Barwell_Boys_Catalogue-compressed-compressed-compressed.pdf Australia Today," 1927 (1926, December 11). Weekly Times (Melbourne, Vic. : 1869 - 1954), p. 15. Retrieved March 17, 2025, from http://nla.gov.au/nla.news-article223844810 https://blogs.unimelb.edu.au/librarycollections/2020/12/19/an-inhabited-space-helmut-newtons-lovers/ https://www.ngv.vic.gov.au/explore/collection/artist/2075/ https://www.ngv.vic.gov.au/?s=Poletto+&type=collection https://rendezvousmelbourne.com.au/digital-history-tour/Photographer notations on slide: "Commercial Travellers Group B6".clubs, department stores, 1930-1939, commerce, manufacturing, federation/edwardian style architecture, railways, tourism, games, agriculture -
 Orbost & District Historical Society
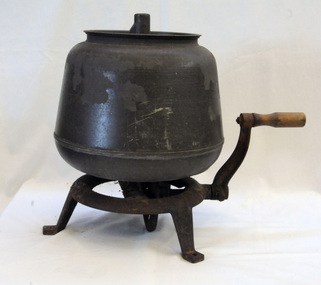
metal butter churn, first half 20th century
... washed in cold water until the water ran clear. Generally salt and bicarbonate of soda were added. Two pats were used to form butter into 1lb lots. This butter was most typically meant for consumption by the family, but in some instances it may be taken away for consignment by commercial receivers of dairy produce. This item is typical of the period when food processing was done at home. It would have been before the time of mass food processing factories. dairy butter-churn farming A metal butter churn with cast iron hand crank on side. The bowl ...Used domestically, though any extra butter could have been sold to neighbours. Many families kept a cow or two for milk etc. Cream needed to be at least 2 days old - the thicker the better. The handle was turned until the cream turned to butter,the whey was poured off and the butter washed in cold water until the water ran clear. Generally salt and bicarbonate of soda were added. Two pats were used to form butter into 1lb lots. This butter was most typically meant for consumption by the family, but in some instances it may be taken away for consignment by commercial receivers of dairy produce. This item is typical of the period when food processing was done at home. It would have been before the time of mass food processing factories.A metal butter churn with cast iron hand crank on side. The bowl container has a steel lid. It sits on a tripod stand.dairy butter-churn farming -
![Domestic object - Ewer and Basin Set, Swinnerton, [Wash basin and jug], 1905=1917](/media/collectors/4f729f5697f83e03086015b8/items/60dd22a2ea1f34911e89881f/item-media/60f14b76fb583ed98b6b6ece/item-fit-380x285.jpg?cb=6) Greensborough Historical Society
Greensborough Historical SocietyDomestic object - Ewer and Basin Set, Swinnerton, [Wash basin and jug], 1905=1917
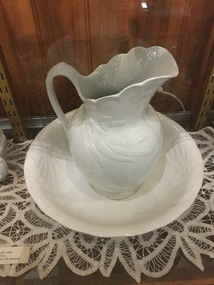
... wash face and hands when running water not available. This set is possibly made by the Swinnerton factory (England) between 1905 and 1917. toilet set ewer and basin sets jugs basins Ceramic toilet set, comprising water bowl and ewer, blue and white with rose decorations [Wash basin and jug] Domestic object Ewer and Basin Set Swinnerton ...Used, probably in a bedroom, to wash face and hands when running water not available. This set is possibly made by the Swinnerton factory (England) between 1905 and 1917.Ceramic toilet set, comprising water bowl and ewer, blue and white with rose decorationstoilet set, ewer and basin sets, jugs, basins -
 Halls Gap & Grampians Historical Society
Magazine - B/W, C 1915
... bowled along towards the hills. The would hitch up their skirts to saw and chop wood for the stoves and fires. They milked cows and delivered calves. They shore sheep and trimmed their feet. They mustered their cattle as the seasons rolled by, and the paying guests watched and participated, fascinated. With laughter and song, the girls would wash...bowled along towards the hills. The would hitch up their skirts to saw and chop wood for the stoves and fires. They milked cows and delivered calves. They shore sheep and trimmed their feet. They mustered their cattle as the seasons rolled by, and the paying guests watched and participated, fascinated. With laughter and song, the girls would wash ...Large families were the norm, rather than the exception up to the time of the World wars. perhaps the senseless destruction of those young lives sickened humanity- perhaps the increased taxes and cost of living resulting from the wars caused a necessary reduction in family size. Perhaps the independence won by women as they carried on their daily lives without their men, made mothers say, "Enough" The Warren family farmed the fertile Fyans Creek flats in the Grampian Mountains of Western Victoria. Some say Halls Gap was so named because the bushranger Hall holed up there in the early days. The rugged slopes and hidden gullies could have hidden a whole gang of bushrangers, but little remained undiscovered to a wandering family of 12 children growing up with their flocks and herds grazing the ranges. A tired rider could nod off, safe in the knowledge a trusty stockhorse would plod steadily homeward into the night. Responsibility quickly made youngsters capable and reliable. Then Australia went to war. There were three older brothers, then the girls, then young Frank. All the men went, including Frank. So the girls had to run the farm alone. Their mother had her hands full with the youngsters, still attending school, a daily walk over the mountain to Pomonal and return. But the loss of the men's casual wages from timber cutting and labouring jobs, meant great hardship is some method of earning a cash income had to be devised. Paying guests! That was it. So Myrtle Bank Guest House was born. City folk flocked to the mountain resort. High stepping mountain horses met them at the Stawell raid-head, with the tall and beautiful Warren girls driving them in experienced fashion, their auburn hair sometimes falling from its pins to fly free, as the dray bowled along towards the hills. The would hitch up their skirts to saw and chop wood for the stoves and fires. They milked cows and delivered calves. They shore sheep and trimmed their feet. They mustered their cattle as the seasons rolled by, and the paying guests watched and participated, fascinated. With laughter and song, the girls would wash up in a tin dish, throw on their house clothes to wait on table, sing and play piano, violin, accordion, enjoying the talk of the city and that other world so far away from their mountain home. The simple country menu was a hit, and the homemade bread, butter, jams and preserves, fruit and vegetables sent guests staggering to their armchairs. Picnics, hikes, goodbyes and welcomes blurred as the years of the war dragged by. Bookings were made and remade as the new enterprise became established. Peace was declared. the men returned A whole new building rose with two floors, inviting verandahs and bathrooms. Myrtle Bank would remain a family business all its lifetime, until buried below the Bellfield Dam, by which time more than one the girls had joined their beloved Frank, lost on Flanders Field. Article in book or magazine describing life at Myrtlebank during war years Other article written from letter from soldier P Lillis to his sister 3rd article of woman from country enlisting in WAAF Submitted by Carol of Bannockburn, Submitted by D Langley Submitted by Meryl of South Frankstonaccommodation, myrtlebank, people, warren -
 Flagstaff Hill Maritime Museum and Village
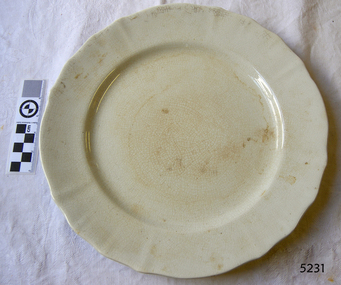
Domestic object - Plate
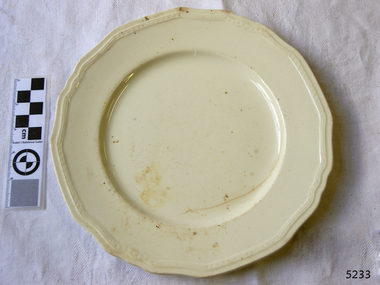
... wash! The glazes need no other “glaze” on top! Be careful of unknown glaze interactions – you can put any combination of glaze in a bowl or on a plate, but only a single glaze on the outside of any vertical surface! ...wash! The glazes need no other “glaze” on top! Be careful of unknown glaze interactions – you can put any combination of glaze in a bowl or on a plate, but only a single glaze on the outside of any vertical surface! ...The Process of Making Pottery Decorating, Firing, Glazing, Making, Technical There is a rhythm and flow to clay. It can’t be done all at once! Even the making process! It can take weeks to get everything done, especially if you can only work on your pottery once a week! Even though we have three hour classes, it’s often just not enough time! Here is an overview of some of the processes so you have a bit more grasp on some of the technical stuff! Step One – Design There are SO many ideas out there for making stuff in clay! From delicate porcelain jewellery, through to heavy sculptural work and everything in between. Deciding your direction is sometimes not that easy – when you first start, try everything, you will naturally gravitate to the style that you enjoy! The options and variations are endless and can get a wee bit overwhelming too! Check in with me before you start to ensure your ideas will work, what order you might do things, how you could achieve the look you are seeking and any other technical data required! Step Two – Making Clay is thixotropic. This means that as you work with it, the clay first gets sloppier and wetter, before is begins to dry in the atmosphere. For most things, you simply can’t do all parts of the project at once. An example of work order might look like: Get last weeks work out from the shelves Prepare clay for today’s work – roll your clay, prepare balls for throwing, make the first stage of a pinch pot) Clean up last week’s work and put it on the shelf for bisque firing Check that you have any glazing to do – and do enough of it that you will have time to finish your main project Do the next step of your next project – there might be a further step that can’t be complete immediately, in that case, wrap your work well and put onto the shelves. Letting your work rest for a while can really help keep your work clean and professional looking. Many things require bagging under plastic to keep it ready for work the next week – put your name on the outside of the bag so you can find your work easily. We have stickers and markers. Consider how you want to decorate your work – coloured slip can be applied at a fairly wet stage (remembering that it will make your work even wetter!). Trying to apply slip to dry clay won’t work! If you want to do sgraffito – you will need to keep the work leather hard (a state of dryness where you can still work the clay with a little effort and a little water and care). Step Three – Drying Most of the time your work can go into the rack uncovered to let it dry out for the following week. If you want to continue forming or shaping you will need to double bag your work – put your work on a suitable sized bat and put the bat in a bag so the base of the bag is under the bat, then put another bag over the top of the work and tuck the top of the bag under the bat. If you want to trim (or turn) your thrown work the following week, it should also be double bagged. If your work is large, delicate, or of uneven thicknesses, you should lightly cover your work for drying. When considering the drying process, bare in mind the weather, humidity and wind! The hotter and dryer, the faster things dry and work can dry unevenly in the shelves – this can lead to cracking – another time to lightly cover your work for drying. Step Four – Trimming and Cleaning Up Your work is dry! It is called greenware now and it is at it’s most fragile! Handle everything with two hands. I often refer to soft hands – keep everything gentle and with your fingers spread as much as possible. Try to not pick up things like plates too much, and always with both hands! Before your work can be bisque fired it should be “cleaned up”. You work won’t go into the kiln if it has sharp edges – when glazed, sharp edges turn into razor blades! Use a piece of fly wire to rub the work all over – this will scratch a little so be light handed. Use a knife or metal kidney to scrape any areas that require a bit more dynamic treatment than the fly wire offers! Finally, a very light wipe over with a slightly damp sponge can help soften and soothe all of your edges and dags! Trimming thrown work: If you are planning to trim (or turn) your thrown work (and you should be), make sure you bag it well – your work should be leather hard to almost dry for easiest trimming. Use this step to finish the work completely – use a metal kidney to polish the surface, or a slightly damp sponge to give a freshly thrown look. Wipe the sponge around the rim after trimming, and check the inside of the pot for dags! Trimming slip cast work: Usually I will trim the rims of your work on the wheel the following day to make that stage easier, however you will still need to check your work for lumps and bumps. Last but not least – check that your name is still clearly on the bottom of your work. Step Five – Bisque Firing When the work is completely dry it can go into the bisque kiln. The bisque kiln is fired to 1000°C. This process burns off the water in the clay as well as some of the chemically bound water. The structure of the clay is not altered that much at this temperature. Inside the bisque kiln, the work is stacked a little, small bowl inside a larger bowl and onto a heavy plate. Smaller items like decorations or drink coasters might get stacked several high. Consideration is paid to the weight of the stack and shape of the work. A bisque kiln can fire about one and a half times the amount of work that the glaze kiln can fire. The firing takes about 10 hours to complete the cycle and about two days to cool down. Once it has been emptied the work is placed in the glaze room ready for you to decorate! Step Six – Glazing Decorating your work with colour can be a lot of fun – and time consuming! There are three main options for surface treatment at this stage: Oxide Washes Underglazes Glazes Washes and underglazes do not “glaze” the work – It will still need a layer of glaze to fully seal the clay (washes don’t need glaze on surfaces not designed for food or liquid as they can gloss up a little on their own). Underglazes are stable colourants that turn out pretty much how they look in the jar. They can be mixed with each other to form other colours and can be used like water colours to paint onto your work. Mostly they should have a clear glaze on top to seal them. Oxides are a different species – the pink oxide (cobalt) wash turns out bright blue for instance. They don’t always need a glaze on top, and some glazes can change the colour of the wash! The glazes need no other “glaze” on top! Be careful of unknown glaze interactions – you can put any combination of glaze in a bowl or on a plate, but only a single glaze on the outside of any vertical surface! Glazes are a chemical reaction under heat. We don’t know the exact chemicals in the Mayco glazes we use. I can guess by the way they interact with each other, however, on the whole, you need to test every idea you have, and not run the test on a vertical surface! Simply put, glaze is a layer of glass like substance that bonds with the clay underneath. Clay is made of silica, alumina and water. Glaze is made of mostly silica. Silica has a melting point of 1700°C and we fire to 1240°C. The silica requires a “flux” to help it melt at the lower temperature. Fluxes can be all sorts of chemicals – a common one is calcium – calcium has a melting point of 2500°C, however, together they both melt at a much lower temperature! Colourants are metal oxides like cobalt (blue), chrome (green through black), copper (green, blue, even red!), manganese (black, purple and pink) iron (red brown), etc. Different chemicals in the glaze can have dramatic effects. for example, barium carbonate (which we don’t use) turns manganese bright pink! Other elements can turn manganese dioxide brown, blue, purple and reddish brown. Manganese dioxide is a flux in and of itself as well. So, glazes that get their black and purple colours, often interact with other glazes and RUN! Our mirror black is a good example – it mixes really well with many glazes because it fluxes them – causes them to melt faster. It will also bring out many beautiful colours in the glazes because it’s black colouring most definitely comes from manganese dioxide! Glaze chemistry is a whole subject on it’s own! We use commercial Mayco glazes on purpose – for their huge range of colour possibilities, stability, cool interactions, artistic freedom with the ability to easily brush the glazes on and ease of use. We currently have almost 50 glazes on hand! A major project is to test the interactions of all glazes with each other. That is 2,500 test tiles!!!! I’m going to make the wall behind the wheels the feature wall of pretty colours! Step Seven – Glaze (Gloss or sometimes called “Glost”) Firing Most of the time this is the final stage of making your creation (but not always!) The glaze kiln goes to 1240°C. This is called cone 6, or midrange. It is the low end of stoneware temperatures. Stoneware clays and glazes are typically fired at cone 8 – 10, that is 1260 – 1290°C. The energy requirement to go from 1240°C to 1280°C is almost a 30% more! Our clay is formulated to vitrify (mature, turn “glass-like”) at 1240°, as are our glazes. A glaze kiln take around 12 hours to reach temperature and two to three days to cool down. Sometimes a third firing process is required – this is for decoration that is added to work after the glaze firing. For example – adding precious metals and lustres. this firing temperature is usually around 600 – 800°C depending upon the techniques being used. There are many students interested in gold and silver trims – we will be doing this third type of firing soon! After firing your work will be in the student finished work shelves. Remember to pay for it before you head out the door! There is a small extra charge for using porcelain clay (it’s more than twice the price of regular clay), and for any third firing process! Once your work has been fired it can not turn back into clay for millennia – so don’t fire it if you don’t like it! Put it in the bucket for recycling. https://firebirdstudios.com.au/the-process-of-making-pottery/Ceramics have evolved over thousands of years.White earthenware dinner plate. Crazing evident all over.Backstamped ‘Made in England S LTD’flagstaff hill, warrnambool, shipwrecked-coast, flagstaff-hill, flagstaff-hill-maritime-museum, maritime-museum, shipwreck-coast, flagstaff-hill-maritime-village, ceramics, tableware -
 Flagstaff Hill Maritime Museum and Village
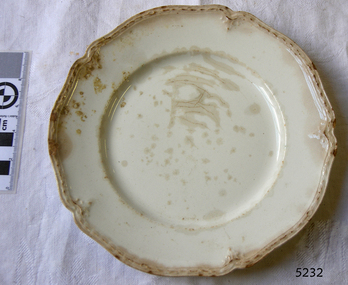
Domestic object - Plate, Johnson Bros
... wash! The glazes need no other “glaze” on top! Be careful of unknown glaze interactions – you can put any combination of glaze in a bowl or on a plate, but only a single glaze on the outside of any vertical surface! ...wash! The glazes need no other “glaze” on top! Be careful of unknown glaze interactions – you can put any combination of glaze in a bowl or on a plate, but only a single glaze on the outside of any vertical surface! ...The Process of Making Pottery Decorating, Firing, Glazing, Making, Technical There is a rhythm and flow to clay. It can’t be done all at once! Even the making process! It can take weeks to get everything done, especially if you can only work on your pottery once a week! Even though we have three hour classes, it’s often just not enough time! Here is an overview of some of the processes so you have a bit more grasp on some of the technical stuff! Step One – Design There are SO many ideas out there for making stuff in clay! From delicate porcelain jewellery, through to heavy sculptural work and everything in between. Deciding your direction is sometimes not that easy – when you first start, try everything, you will naturally gravitate to the style that you enjoy! The options and variations are endless and can get a wee bit overwhelming too! Check in with me before you start to ensure your ideas will work, what order you might do things, how you could achieve the look you are seeking and any other technical data required! Step Two – Making Clay is thixotropic. This means that as you work with it, the clay first gets sloppier and wetter, before is begins to dry in the atmosphere. For most things, you simply can’t do all parts of the project at once. An example of work order might look like: Get last weeks work out from the shelves Prepare clay for today’s work – roll your clay, prepare balls for throwing, make the first stage of a pinch pot) Clean up last week’s work and put it on the shelf for bisque firing Check that you have any glazing to do – and do enough of it that you will have time to finish your main project Do the next step of your next project – there might be a further step that can’t be complete immediately, in that case, wrap your work well and put onto the shelves. Letting your work rest for a while can really help keep your work clean and professional looking. Many things require bagging under plastic to keep it ready for work the next week – put your name on the outside of the bag so you can find your work easily. We have stickers and markers. Consider how you want to decorate your work – coloured slip can be applied at a fairly wet stage (remembering that it will make your work even wetter!). Trying to apply slip to dry clay won’t work! If you want to do sgraffito – you will need to keep the work leather hard (a state of dryness where you can still work the clay with a little effort and a little water and care). Step Three – Drying Most of the time your work can go into the rack uncovered to let it dry out for the following week. If you want to continue forming or shaping you will need to double bag your work – put your work on a suitable sized bat and put the bat in a bag so the base of the bag is under the bat, then put another bag over the top of the work and tuck the top of the bag under the bat. If you want to trim (or turn) your thrown work the following week, it should also be double bagged. If your work is large, delicate, or of uneven thicknesses, you should lightly cover your work for drying. When considering the drying process, bare in mind the weather, humidity and wind! The hotter and dryer, the faster things dry and work can dry unevenly in the shelves – this can lead to cracking – another time to lightly cover your work for drying. Step Four – Trimming and Cleaning Up Your work is dry! It is called greenware now and it is at it’s most fragile! Handle everything with two hands. I often refer to soft hands – keep everything gentle and with your fingers spread as much as possible. Try to not pick up things like plates too much, and always with both hands! Before your work can be bisque fired it should be “cleaned up”. You work won’t go into the kiln if it has sharp edges – when glazed, sharp edges turn into razor blades! Use a piece of fly wire to rub the work all over – this will scratch a little so be light handed. Use a knife or metal kidney to scrape any areas that require a bit more dynamic treatment than the fly wire offers! Finally, a very light wipe over with a slightly damp sponge can help soften and soothe all of your edges and dags! Trimming thrown work: If you are planning to trim (or turn) your thrown work (and you should be), make sure you bag it well – your work should be leather hard to almost dry for easiest trimming. Use this step to finish the work completely – use a metal kidney to polish the surface, or a slightly damp sponge to give a freshly thrown look. Wipe the sponge around the rim after trimming, and check the inside of the pot for dags! Trimming slip cast work: Usually I will trim the rims of your work on the wheel the following day to make that stage easier, however you will still need to check your work for lumps and bumps. Last but not least – check that your name is still clearly on the bottom of your work. Step Five – Bisque Firing When the work is completely dry it can go into the bisque kiln. The bisque kiln is fired to 1000°C. This process burns off the water in the clay as well as some of the chemically bound water. The structure of the clay is not altered that much at this temperature. Inside the bisque kiln, the work is stacked a little, small bowl inside a larger bowl and onto a heavy plate. Smaller items like decorations or drink coasters might get stacked several high. Consideration is paid to the weight of the stack and shape of the work. A bisque kiln can fire about one and a half times the amount of work that the glaze kiln can fire. The firing takes about 10 hours to complete the cycle and about two days to cool down. Once it has been emptied the work is placed in the glaze room ready for you to decorate! Step Six – Glazing Decorating your work with colour can be a lot of fun – and time consuming! There are three main options for surface treatment at this stage: Oxide Washes Underglazes Glazes Washes and underglazes do not “glaze” the work – It will still need a layer of glaze to fully seal the clay (washes don’t need glaze on surfaces not designed for food or liquid as they can gloss up a little on their own). Underglazes are stable colourants that turn out pretty much how they look in the jar. They can be mixed with each other to form other colours and can be used like water colours to paint onto your work. Mostly they should have a clear glaze on top to seal them. Oxides are a different species – the pink oxide (cobalt) wash turns out bright blue for instance. They don’t always need a glaze on top, and some glazes can change the colour of the wash! The glazes need no other “glaze” on top! Be careful of unknown glaze interactions – you can put any combination of glaze in a bowl or on a plate, but only a single glaze on the outside of any vertical surface! Glazes are a chemical reaction under heat. We don’t know the exact chemicals in the Mayco glazes we use. I can guess by the way they interact with each other, however, on the whole, you need to test every idea you have, and not run the test on a vertical surface! Simply put, glaze is a layer of glass like substance that bonds with the clay underneath. Clay is made of silica, alumina and water. Glaze is made of mostly silica. Silica has a melting point of 1700°C and we fire to 1240°C. The silica requires a “flux” to help it melt at the lower temperature. Fluxes can be all sorts of chemicals – a common one is calcium – calcium has a melting point of 2500°C, however, together they both melt at a much lower temperature! Colourants are metal oxides like cobalt (blue), chrome (green through black), copper (green, blue, even red!), manganese (black, purple and pink) iron (red brown), etc. Different chemicals in the glaze can have dramatic effects. for example, barium carbonate (which we don’t use) turns manganese bright pink! Other elements can turn manganese dioxide brown, blue, purple and reddish brown. Manganese dioxide is a flux in and of itself as well. So, glazes that get their black and purple colours, often interact with other glazes and RUN! Our mirror black is a good example – it mixes really well with many glazes because it fluxes them – causes them to melt faster. It will also bring out many beautiful colours in the glazes because it’s black colouring most definitely comes from manganese dioxide! Glaze chemistry is a whole subject on it’s own! We use commercial Mayco glazes on purpose – for their huge range of colour possibilities, stability, cool interactions, artistic freedom with the ability to easily brush the glazes on and ease of use. We currently have almost 50 glazes on hand! A major project is to test the interactions of all glazes with each other. That is 2,500 test tiles!!!! I’m going to make the wall behind the wheels the feature wall of pretty colours! Step Seven – Glaze (Gloss or sometimes called “Glost”) Firing Most of the time this is the final stage of making your creation (but not always!) The glaze kiln goes to 1240°C. This is called cone 6, or midrange. It is the low end of stoneware temperatures. Stoneware clays and glazes are typically fired at cone 8 – 10, that is 1260 – 1290°C. The energy requirement to go from 1240°C to 1280°C is almost a 30% more! Our clay is formulated to vitrify (mature, turn “glass-like”) at 1240°, as are our glazes. A glaze kiln take around 12 hours to reach temperature and two to three days to cool down. Sometimes a third firing process is required – this is for decoration that is added to work after the glaze firing. For example – adding precious metals and lustres. this firing temperature is usually around 600 – 800°C depending upon the techniques being used. There are many students interested in gold and silver trims – we will be doing this third type of firing soon! After firing your work will be in the student finished work shelves. Remember to pay for it before you head out the door! There is a small extra charge for using porcelain clay (it’s more than twice the price of regular clay), and for any third firing process! Once your work has been fired it can not turn back into clay for millennia – so don’t fire it if you don’t like it! Put it in the bucket for recycling. https://firebirdstudios.com.au/the-process-of-making-pottery/Ceramics have evolved over thousands of years.A white earthenware side plate with a gadroon edge. Has water marks and chips on front.‘Johnson Bros England Reg No 15587’flagstaff hill, warrnambool, shipwrecked-coast, flagstaff-hill, flagstaff-hill-maritime-museum, maritime-museum, shipwreck-coast, flagstaff-hill-maritime-village, johnson bros, ceramics, tableware -
 Flagstaff Hill Maritime Museum and Village
Domestic object - Plate, Alfred Meakin
... wash! The glazes need no other “glaze” on top! Be careful of unknown glaze interactions – you can put any combination of glaze in a bowl or on a plate, but only a single glaze on the outside of any vertical surface! ...wash! The glazes need no other “glaze” on top! Be careful of unknown glaze interactions – you can put any combination of glaze in a bowl or on a plate, but only a single glaze on the outside of any vertical surface! ...The Process of Making Pottery Decorating, Firing, Glazing, Making, Technical There is a rhythm and flow to clay. It can’t be done all at once! Even the making process! It can take weeks to get everything done, especially if you can only work on your pottery once a week! Even though we have three hour classes, it’s often just not enough time! Here is an overview of some of the processes so you have a bit more grasp on some of the technical stuff! Step One – Design There are SO many ideas out there for making stuff in clay! From delicate porcelain jewellery, through to heavy sculptural work and everything in between. Deciding your direction is sometimes not that easy – when you first start, try everything, you will naturally gravitate to the style that you enjoy! The options and variations are endless and can get a wee bit overwhelming too! Check in with me before you start to ensure your ideas will work, what order you might do things, how you could achieve the look you are seeking and any other technical data required! Step Two – Making Clay is thixotropic. This means that as you work with it, the clay first gets sloppier and wetter, before is begins to dry in the atmosphere. For most things, you simply can’t do all parts of the project at once. An example of work order might look like: Get last weeks work out from the shelves Prepare clay for today’s work – roll your clay, prepare balls for throwing, make the first stage of a pinch pot) Clean up last week’s work and put it on the shelf for bisque firing Check that you have any glazing to do – and do enough of it that you will have time to finish your main project Do the next step of your next project – there might be a further step that can’t be complete immediately, in that case, wrap your work well and put onto the shelves. Letting your work rest for a while can really help keep your work clean and professional looking. Many things require bagging under plastic to keep it ready for work the next week – put your name on the outside of the bag so you can find your work easily. We have stickers and markers. Consider how you want to decorate your work – coloured slip can be applied at a fairly wet stage (remembering that it will make your work even wetter!). Trying to apply slip to dry clay won’t work! If you want to do sgraffito – you will need to keep the work leather hard (a state of dryness where you can still work the clay with a little effort and a little water and care). Step Three – Drying Most of the time your work can go into the rack uncovered to let it dry out for the following week. If you want to continue forming or shaping you will need to double bag your work – put your work on a suitable sized bat and put the bat in a bag so the base of the bag is under the bat, then put another bag over the top of the work and tuck the top of the bag under the bat. If you want to trim (or turn) your thrown work the following week, it should also be double bagged. If your work is large, delicate, or of uneven thicknesses, you should lightly cover your work for drying. When considering the drying process, bare in mind the weather, humidity and wind! The hotter and dryer, the faster things dry and work can dry unevenly in the shelves – this can lead to cracking – another time to lightly cover your work for drying. Step Four – Trimming and Cleaning Up Your work is dry! It is called greenware now and it is at it’s most fragile! Handle everything with two hands. I often refer to soft hands – keep everything gentle and with your fingers spread as much as possible. Try to not pick up things like plates too much, and always with both hands! Before your work can be bisque fired it should be “cleaned up”. You work won’t go into the kiln if it has sharp edges – when glazed, sharp edges turn into razor blades! Use a piece of fly wire to rub the work all over – this will scratch a little so be light handed. Use a knife or metal kidney to scrape any areas that require a bit more dynamic treatment than the fly wire offers! Finally, a very light wipe over with a slightly damp sponge can help soften and soothe all of your edges and dags! Trimming thrown work: If you are planning to trim (or turn) your thrown work (and you should be), make sure you bag it well – your work should be leather hard to almost dry for easiest trimming. Use this step to finish the work completely – use a metal kidney to polish the surface, or a slightly damp sponge to give a freshly thrown look. Wipe the sponge around the rim after trimming, and check the inside of the pot for dags! Trimming slip cast work: Usually I will trim the rims of your work on the wheel the following day to make that stage easier, however you will still need to check your work for lumps and bumps. Last but not least – check that your name is still clearly on the bottom of your work. Step Five – Bisque Firing When the work is completely dry it can go into the bisque kiln. The bisque kiln is fired to 1000°C. This process burns off the water in the clay as well as some of the chemically bound water. The structure of the clay is not altered that much at this temperature. Inside the bisque kiln, the work is stacked a little, small bowl inside a larger bowl and onto a heavy plate. Smaller items like decorations or drink coasters might get stacked several high. Consideration is paid to the weight of the stack and shape of the work. A bisque kiln can fire about one and a half times the amount of work that the glaze kiln can fire. The firing takes about 10 hours to complete the cycle and about two days to cool down. Once it has been emptied the work is placed in the glaze room ready for you to decorate! Step Six – Glazing Decorating your work with colour can be a lot of fun – and time consuming! There are three main options for surface treatment at this stage: Oxide Washes Underglazes Glazes Washes and underglazes do not “glaze” the work – It will still need a layer of glaze to fully seal the clay (washes don’t need glaze on surfaces not designed for food or liquid as they can gloss up a little on their own). Underglazes are stable colourants that turn out pretty much how they look in the jar. They can be mixed with each other to form other colours and can be used like water colours to paint onto your work. Mostly they should have a clear glaze on top to seal them. Oxides are a different species – the pink oxide (cobalt) wash turns out bright blue for instance. They don’t always need a glaze on top, and some glazes can change the colour of the wash! The glazes need no other “glaze” on top! Be careful of unknown glaze interactions – you can put any combination of glaze in a bowl or on a plate, but only a single glaze on the outside of any vertical surface! Glazes are a chemical reaction under heat. We don’t know the exact chemicals in the Mayco glazes we use. I can guess by the way they interact with each other, however, on the whole, you need to test every idea you have, and not run the test on a vertical surface! Simply put, glaze is a layer of glass like substance that bonds with the clay underneath. Clay is made of silica, alumina and water. Glaze is made of mostly silica. Silica has a melting point of 1700°C and we fire to 1240°C. The silica requires a “flux” to help it melt at the lower temperature. Fluxes can be all sorts of chemicals – a common one is calcium – calcium has a melting point of 2500°C, however, together they both melt at a much lower temperature! Colourants are metal oxides like cobalt (blue), chrome (green through black), copper (green, blue, even red!), manganese (black, purple and pink) iron (red brown), etc. Different chemicals in the glaze can have dramatic effects. for example, barium carbonate (which we don’t use) turns manganese bright pink! Other elements can turn manganese dioxide brown, blue, purple and reddish brown. Manganese dioxide is a flux in and of itself as well. So, glazes that get their black and purple colours, often interact with other glazes and RUN! Our mirror black is a good example – it mixes really well with many glazes because it fluxes them – causes them to melt faster. It will also bring out many beautiful colours in the glazes because it’s black colouring most definitely comes from manganese dioxide! Glaze chemistry is a whole subject on it’s own! We use commercial Mayco glazes on purpose – for their huge range of colour possibilities, stability, cool interactions, artistic freedom with the ability to easily brush the glazes on and ease of use. We currently have almost 50 glazes on hand! A major project is to test the interactions of all glazes with each other. That is 2,500 test tiles!!!! I’m going to make the wall behind the wheels the feature wall of pretty colours! Step Seven – Glaze (Gloss or sometimes called “Glost”) Firing Most of the time this is the final stage of making your creation (but not always!) The glaze kiln goes to 1240°C. This is called cone 6, or midrange. It is the low end of stoneware temperatures. Stoneware clays and glazes are typically fired at cone 8 – 10, that is 1260 – 1290°C. The energy requirement to go from 1240°C to 1280°C is almost a 30% more! Our clay is formulated to vitrify (mature, turn “glass-like”) at 1240°, as are our glazes. A glaze kiln take around 12 hours to reach temperature and two to three days to cool down. Sometimes a third firing process is required – this is for decoration that is added to work after the glaze firing. For example – adding precious metals and lustres. this firing temperature is usually around 600 – 800°C depending upon the techniques being used. There are many students interested in gold and silver trims – we will be doing this third type of firing soon! After firing your work will be in the student finished work shelves. Remember to pay for it before you head out the door! There is a small extra charge for using porcelain clay (it’s more than twice the price of regular clay), and for any third firing process! Once your work has been fired it can not turn back into clay for millennia – so don’t fire it if you don’t like it! Put it in the bucket for recycling. https://firebirdstudios.com.au/the-process-of-making-pottery/Ceramics have evolved over thousands of years.Earthenware dessert plate, cream colour. Made by Alfred Meakin, England. Backstamped ‘Alfred Meakin England’. flagstaff hill, warrnambool, shipwrecked-coast, flagstaff-hill, flagstaff-hill-maritime-museum, maritime-museum, shipwreck-coast, flagstaff-hill-maritime-village, alfred meakin, ceramics, earthenware, kitchenware -
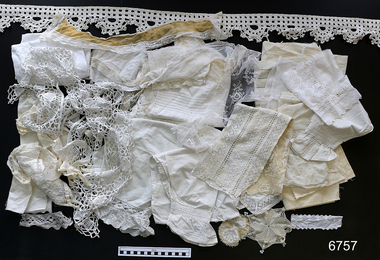 Flagstaff Hill Maritime Museum and Village
Linen, late 1800's
... Kitchen • Settee covers (made by V Giles) • 1 x sideboard • 1 x butter churner • 2 x pictures • 1 x white cheese dome • 1 x wash-up tray • 2 x jugs • 1 x vegetable bowl and dish • 1 x willow pattern dinner set • Glass butter and jam dishes. ...Kitchen • Settee covers (made by V Giles) • 1 x sideboard • 1 x butter churner • 2 x pictures • 1 x white cheese dome • 1 x wash-up tray • 2 x jugs • 1 x vegetable bowl and dish • 1 x willow pattern dinner set • Glass butter and jam dishes. ...This item is one of many 19th century items donated to Flagstaff Hill Maritime Village by the Giles Family, and known as the “Giles Family Collection”. Henry Giles was born at Tower Hill, Victoria in 1858 and worked as a labourer on the Warrnambool Breakwater. His wife, Mary Jane, was born in 1860 at Cooramook and worked as a student teacher at Mailor’s Flat Secondary School. The Giles family lived at The Maam, Wangoom in the late 19th century, before moving to New South Wales in 1895, where Henry built bridges. Henry died in 1933 and Mary Jane died seven years later. Flagstaff Hill holds a number of objects associated with the Giles family, which were donated by Flagstaff Hill volunteers Vera and Aurelin Giles (Henry and Mary Jane’s daughter and granddaughter respectively). These are predominantly located in the Lighthouse Keeper’s Cottage and include: Living room • Cloths (made by Vera Giles) • Portraits of Mary and Henry Giles • 1 x dresser • Covers on dresser • 1 x bellows Baby’s room • 1 x blessing (in the baby’s room) • 1 x picture of boy and girl • 1 x rocking chair • 1 x cushion (made by V Giles) • 1 x chest (belonging to Mary Jane Giles’s mother, Jane Fleming who migrated to Australia from Ireland in 1843) • 1 x chest cover • Bed materials Bedroom • 1 x knitted bedspread and cushion cover (knitted by V Giles) • Pillow shams and covers (Mrs Catherine King) • Pillow cases (Mary Giles) • 1 x wash stand (Mary Giles) • Towels (lace knitted by Aurelin Giles) • 1 x washstand cover • 1 x white ceramic dog • Shaving items • 1 x dressing table mirror • 1 x dressing table cover (made by Aurelin Giles) • 1 x framed motto • 2 x texts • 1 x settee (sofa) • 1x wardrobe (Vera Giles donated the wardrobe in the Lighthouse Keeper’s Cottage to Flagstaff Hill. According to Aurelin Giles, it was originally owned by William Swinton junior and was later given to a friend of the Giles family.) Kitchen • Settee covers (made by V Giles) • 1 x sideboard • 1 x butter churner • 2 x pictures • 1 x white cheese dome • 1 x wash-up tray • 2 x jugs • 1 x vegetable bowl and dish • 1 x willow pattern dinner set • Glass butter and jam dishes. The Giles family collection has social significance at a local level, because it illustrates the level of material support the Warrnambool community gave to Flagstaff Hill when the Museum was established.Calico bag of assorted fabrics, trims and sewn pieces (originally donated together with sewing machine). Items include clothing, lace, tablecloth, tray cloth, collars, oversleeves, trims, jug cover, lace inserts. (part of the Giles Collection)flagstaff hill, warrnambool, shipwrecked-coast, flagstaff-hill, flagstaff-hill-maritime-museum, maritime-museum, shipwreck-coast, flagstaff-hill-maritime-village, linen, fabric, dressmaking, sewing materials, 19th century sewing, 19th century fashion, giles family, 19th century hand craft, henry giles, tower hill, cooramook, warrnambool breakwater, mailor’s flat, wangoom, 19th century clothing, 19th century linen, 19th century handcraft -
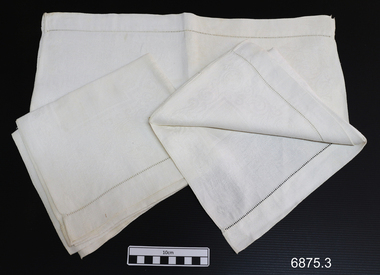 Flagstaff Hill Maritime Museum and Village
Guest towel, late 19th century
... Kitchen • Settee covers (made by V Giles) • 1 x sideboard • 1 x butter churner • 2 x pictures • 1 x white cheese dome • 1 x wash-up tray • 2 x jugs • 1 x vegetable bowl and dish • 1 x willow pattern dinner set • Glass butter and jam dishes. ...Kitchen • Settee covers (made by V Giles) • 1 x sideboard • 1 x butter churner • 2 x pictures • 1 x white cheese dome • 1 x wash-up tray • 2 x jugs • 1 x vegetable bowl and dish • 1 x willow pattern dinner set • Glass butter and jam dishes. ...This item is one of many 19th century items donated to Flagstaff Hill Maritime Village by the Giles Family, and known as the “Giles Family Collection”. Henry Giles was born at Tower Hill, Victoria in 1858 and worked as a labourer on the Warrnambool Breakwater. His wife, Mary Jane, was born in 1860 at Cooramook and worked as a student teacher at Mailor’s Flat Secondary School. The Giles family lived at The Maam, Wangoom in the late 19th century, before moving to New South Wales in 1895, where Henry built bridges. Henry died in 1933 and Mary Jane died seven years later. Flagstaff Hill holds a number of objects associated with the Giles family, which were donated by Flagstaff Hill volunteers Vera and Aurelin Giles (Henry and Mary Jane’s daughter and granddaughter respectively). These are predominantly located in the Lighthouse Keeper’s Cottage and include: Living room • Cloths (made by Vera Giles) • Portraits of Mary and Henry Giles • 1 x dresser • Covers on dresser • 1 x bellows Baby’s room • 1 x blessing (in the baby’s room) • 1 x picture of boy and girl • 1 x rocking chair • 1 x cushion (made by V Giles) • 1 x chest (belonging to Mary Jane Giles’s mother, Jane Fleming who migrated to Australia from Ireland in 1843) • 1 x chest cover • Bed materials Bedroom • 1 x knitted bedspread and cushion cover (knitted by V Giles) • Pillow shams and covers (Mrs Catherine King) • Pillow cases (Mary Giles) • 1 x wash stand (Mary Giles) • Towels (lace knitted by Aurelin Giles) • 1 x washstand cover • 1 x white ceramic dog • Shaving items • 1 x dressing table mirror • 1 x dressing table cover (made by Aurelin Giles) • 1 x framed motto • 2 x texts • 1 x settee (sofa) • 1x wardrobe (Vera Giles donated the wardrobe in the Lighthouse Keeper’s Cottage to Flagstaff Hill. According to Aurelin Giles, it was originally owned by William Swinton junior and was later given to a friend of the Giles family.) Kitchen • Settee covers (made by V Giles) • 1 x sideboard • 1 x butter churner • 2 x pictures • 1 x white cheese dome • 1 x wash-up tray • 2 x jugs • 1 x vegetable bowl and dish • 1 x willow pattern dinner set • Glass butter and jam dishes. The Giles family collection has social significance at a local level, because it illustrates the level of material support the Warrnambool community gave to Flagstaff Hill when the Museum was established.Guest towel, set of 3 white damask guest towels.(Giles Collection) flagstaff hill, warrnambool, shipwrecked-coast, flagstaff-hill, flagstaff-hill-maritime-museum, maritime-museum, shipwreck-coast, flagstaff-hill-maritime-village, giles family, henry giles, tower hill, cooramook, warrnambool breakwater, mailor’s flat,, wangoom, 19th century linen, 19th century handcraft, guest towel -
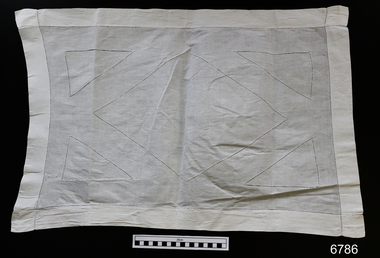 Flagstaff Hill Maritime Museum and Village
Tray cloth, late 19th century
... Kitchen • Settee covers (made by V Giles) • 1 x sideboard • 1 x butter churner • 2 x pictures • 1 x white cheese dome • 1 x wash-up tray • 2 x jugs • 1 x vegetable bowl and dish • 1 x willow pattern dinner set • Glass butter and jam dishes. ...Kitchen • Settee covers (made by V Giles) • 1 x sideboard • 1 x butter churner • 2 x pictures • 1 x white cheese dome • 1 x wash-up tray • 2 x jugs • 1 x vegetable bowl and dish • 1 x willow pattern dinner set • Glass butter and jam dishes. ...This item is one of many 19th century items donated to Flagstaff Hill Maritime Village by the Giles Family, and known as the “Giles Family Collection”. Henry Giles was born at Tower Hill, Victoria in 1858 and worked as a labourer on the Warrnambool Breakwater. His wife, Mary Jane, was born in 1860 at Cooramook and worked as a student teacher at Mailor’s Flat Secondary School. The Giles family lived at The Maam, Wangoom in the late 19th century, before moving to New South Wales in 1895, where Henry built bridges. Henry died in 1933 and Mary Jane died seven years later. Flagstaff Hill holds a number of objects associated with the Giles family, which were donated by Flagstaff Hill volunteers Vera and Aurelin Giles (Henry and Mary Jane’s daughter and granddaughter respectively). These are predominantly located in the Lighthouse Keeper’s Cottage and include: Living room • Cloths (made by Vera Giles) • Portraits of Mary and Henry Giles • 1 x dresser • Covers on dresser • 1 x bellows Baby’s room • 1 x blessing (in the baby’s room) • 1 x picture of boy and girl • 1 x rocking chair • 1 x cushion (made by V Giles) • 1 x chest (belonging to Mary Jane Giles’s mother, Jane Fleming who migrated to Australia from Ireland in 1843) • 1 x chest cover • Bed materials Bedroom • 1 x knitted bedspread and cushion cover (knitted by V Giles) • Pillow shams and covers (Mrs Catherine King) • Pillow cases (Mary Giles) • 1 x wash stand (Mary Giles) • Towels (lace knitted by Aurelin Giles) • 1 x washstand cover • 1 x white ceramic dog • Shaving items • 1 x dressing table mirror • 1 x dressing table cover (made by Aurelin Giles) • 1 x framed motto • 2 x texts • 1 x settee (sofa) • 1x wardrobe (Vera Giles donated the wardrobe in the Lighthouse Keeper’s Cottage to Flagstaff Hill. According to Aurelin Giles, it was originally owned by William Swinton junior and was later given to a friend of the Giles family.) Kitchen • Settee covers (made by V Giles) • 1 x sideboard • 1 x butter churner • 2 x pictures • 1 x white cheese dome • 1 x wash-up tray • 2 x jugs • 1 x vegetable bowl and dish • 1 x willow pattern dinner set • Glass butter and jam dishes. The Giles family collection has social significance at a local level, because it illustrates the level of material support the Warrnambool community gave to Flagstaff Hill when the Museum was established.Tray cloth, white linen, geometric pulled thread design. (Giles Collection) Tag attached "LHK n6" flagstaff hill, warrnambool, shipwrecked-coast, flagstaff-hill, flagstaff-hill-maritime-museum, maritime-museum, shipwreck-coast, flagstaff-hill-maritime-village, giles family, tower hill, cooramook, warrnambool breakwater, mailor’s flat, wangoom, 19th century linen, 19th century handcraft -
 Flagstaff Hill Maritime Museum and Village
Domestic object - Jug
... wash! The glazes need no other “glaze” on top! Be careful of unknown glaze interactions – you can put any combination of glaze in a bowl or on a plate, but only a single glaze on the outside of any vertical surface! ...wash! The glazes need no other “glaze” on top! Be careful of unknown glaze interactions – you can put any combination of glaze in a bowl or on a plate, but only a single glaze on the outside of any vertical surface! ...The Process of Making Pottery Decorating, Firing, Glazing, Making, Technical There is a rhythm and flow to clay. It can’t be done all at once! Even the making process! It can take weeks to get everything done, especially if you can only work on your pottery once a week! Even though we have three hour classes, it’s often just not enough time! Here is an overview of some of the processes so you have a bit more grasp on some of the technical stuff! Step One – Design There are SO many ideas out there for making stuff in clay! From delicate porcelain jewellery, through to heavy sculptural work and everything in between. Deciding your direction is sometimes not that easy – when you first start, try everything, you will naturally gravitate to the style that you enjoy! The options and variations are endless and can get a wee bit overwhelming too! Check in with me before you start to ensure your ideas will work, what order you might do things, how you could achieve the look you are seeking and any other technical data required! Step Two – Making Clay is thixotropic. This means that as you work with it, the clay first gets sloppier and wetter, before is begins to dry in the atmosphere. For most things, you simply can’t do all parts of the project at once. An example of work order might look like: Get last weeks work out from the shelves Prepare clay for today’s work – roll your clay, prepare balls for throwing, make the first stage of a pinch pot) Clean up last week’s work and put it on the shelf for bisque firing Check that you have any glazing to do – and do enough of it that you will have time to finish your main project Do the next step of your next project – there might be a further step that can’t be complete immediately, in that case, wrap your work well and put onto the shelves. Letting your work rest for a while can really help keep your work clean and professional looking. Many things require bagging under plastic to keep it ready for work the next week – put your name on the outside of the bag so you can find your work easily. We have stickers and markers. Consider how you want to decorate your work – coloured slip can be applied at a fairly wet stage (remembering that it will make your work even wetter!). Trying to apply slip to dry clay won’t work! If you want to do sgraffito – you will need to keep the work leather hard (a state of dryness where you can still work the clay with a little effort and a little water and care). Step Three – Drying Most of the time your work can go into the rack uncovered to let it dry out for the following week. If you want to continue forming or shaping you will need to double bag your work – put your work on a suitable sized bat and put the bat in a bag so the base of the bag is under the bat, then put another bag over the top of the work and tuck the top of the bag under the bat. If you want to trim (or turn) your thrown work the following week, it should also be double bagged. If your work is large, delicate, or of uneven thicknesses, you should lightly cover your work for drying. When considering the drying process, bare in mind the weather, humidity and wind! The hotter and dryer, the faster things dry and work can dry unevenly in the shelves – this can lead to cracking – another time to lightly cover your work for drying. Step Four – Trimming and Cleaning Up Your work is dry! It is called greenware now and it is at it’s most fragile! Handle everything with two hands. I often refer to soft hands – keep everything gentle and with your fingers spread as much as possible. Try to not pick up things like plates too much, and always with both hands! Before your work can be bisque fired it should be “cleaned up”. You work won’t go into the kiln if it has sharp edges – when glazed, sharp edges turn into razor blades! Use a piece of fly wire to rub the work all over – this will scratch a little so be light handed. Use a knife or metal kidney to scrape any areas that require a bit more dynamic treatment than the fly wire offers! Finally, a very light wipe over with a slightly damp sponge can help soften and soothe all of your edges and dags! Trimming thrown work: If you are planning to trim (or turn) your thrown work (and you should be), make sure you bag it well – your work should be leather hard to almost dry for easiest trimming. Use this step to finish the work completely – use a metal kidney to polish the surface, or a slightly damp sponge to give a freshly thrown look. Wipe the sponge around the rim after trimming, and check the inside of the pot for dags! Trimming slip cast work: Usually I will trim the rims of your work on the wheel the following day to make that stage easier, however you will still need to check your work for lumps and bumps. Last but not least – check that your name is still clearly on the bottom of your work. Step Five – Bisque Firing When the work is completely dry it can go into the bisque kiln. The bisque kiln is fired to 1000°C. This process burns off the water in the clay as well as some of the chemically bound water. The structure of the clay is not altered that much at this temperature. Inside the bisque kiln, the work is stacked a little, small bowl inside a larger bowl and onto a heavy plate. Smaller items like decorations or drink coasters might get stacked several high. Consideration is paid to the weight of the stack and shape of the work. A bisque kiln can fire about one and a half times the amount of work that the glaze kiln can fire. The firing takes about 10 hours to complete the cycle and about two days to cool down. Once it has been emptied the work is placed in the glaze room ready for you to decorate! Step Six – Glazing Decorating your work with colour can be a lot of fun – and time consuming! There are three main options for surface treatment at this stage: Oxide Washes Underglazes Glazes Washes and underglazes do not “glaze” the work – It will still need a layer of glaze to fully seal the clay (washes don’t need glaze on surfaces not designed for food or liquid as they can gloss up a little on their own). Underglazes are stable colourants that turn out pretty much how they look in the jar. They can be mixed with each other to form other colours and can be used like water colours to paint onto your work. Mostly they should have a clear glaze on top to seal them. Oxides are a different species – the pink oxide (cobalt) wash turns out bright blue for instance. They don’t always need a glaze on top, and some glazes can change the colour of the wash! The glazes need no other “glaze” on top! Be careful of unknown glaze interactions – you can put any combination of glaze in a bowl or on a plate, but only a single glaze on the outside of any vertical surface! Glazes are a chemical reaction under heat. We don’t know the exact chemicals in the Mayco glazes we use. I can guess by the way they interact with each other, however, on the whole, you need to test every idea you have, and not run the test on a vertical surface! Simply put, glaze is a layer of glass like substance that bonds with the clay underneath. Clay is made of silica, alumina and water. Glaze is made of mostly silica. Silica has a melting point of 1700°C and we fire to 1240°C. The silica requires a “flux” to help it melt at the lower temperature. Fluxes can be all sorts of chemicals – a common one is calcium – calcium has a melting point of 2500°C, however, together they both melt at a much lower temperature! Colourants are metal oxides like cobalt (blue), chrome (green through black), copper (green, blue, even red!), manganese (black, purple and pink) iron (red brown), etc. Different chemicals in the glaze can have dramatic effects. for example, barium carbonate (which we don’t use) turns manganese bright pink! Other elements can turn manganese dioxide brown, blue, purple and reddish brown. Manganese dioxide is a flux in and of itself as well. So, glazes that get their black and purple colours, often interact with other glazes and RUN! Our mirror black is a good example – it mixes really well with many glazes because it fluxes them – causes them to melt faster. It will also bring out many beautiful colours in the glazes because it’s black colouring most definitely comes from manganese dioxide! Glaze chemistry is a whole subject on it’s own! We use commercial Mayco glazes on purpose – for their huge range of colour possibilities, stability, cool interactions, artistic freedom with the ability to easily brush the glazes on and ease of use. We currently have almost 50 glazes on hand! A major project is to test the interactions of all glazes with each other. That is 2,500 test tiles!!!! I’m going to make the wall behind the wheels the feature wall of pretty colours! Step Seven – Glaze (Gloss or sometimes called “Glost”) Firing Most of the time this is the final stage of making your creation (but not always!) The glaze kiln goes to 1240°C. This is called cone 6, or midrange. It is the low end of stoneware temperatures. Stoneware clays and glazes are typically fired at cone 8 – 10, that is 1260 – 1290°C. The energy requirement to go from 1240°C to 1280°C is almost a 30% more! Our clay is formulated to vitrify (mature, turn “glass-like”) at 1240°, as are our glazes. A glaze kiln take around 12 hours to reach temperature and two to three days to cool down. Sometimes a third firing process is required – this is for decoration that is added to work after the glaze firing. For example – adding precious metals and lustres. this firing temperature is usually around 600 – 800°C depending upon the techniques being used. There are many students interested in gold and silver trims – we will be doing this third type of firing soon! After firing your work will be in the student finished work shelves. Remember to pay for it before you head out the door! There is a small extra charge for using porcelain clay (it’s more than twice the price of regular clay), and for any third firing process! Once your work has been fired it can not turn back into clay for millennia – so don’t fire it if you don’t like it! Put it in the bucket for recycling. https://firebirdstudios.com.au/the-process-of-making-pottery/The form of the jug has been in use for many centuries.Stoneware jug. Two tone brown glaze with pierced lip behind spout. Spout chipped.None.flagstaff hill, warrnambool, shipwrecked-coast, flagstaff-hill, flagstaff-hill-maritime-museum, maritime-museum, shipwreck-coast, flagstaff-hill-maritime-village, jug, ceramic jug -
 Flagstaff Hill Maritime Museum and Village
Accessory - Diamond ring, about 1855
... washed ashore on the south island of New Zealand. The wreck now lies in almost 9 meters of water and although the woodwork is mostly disintegrated the shape of the ship can still be determined due to the remaining railway irons, girders and the ship’s frame. A variety of goods and materials can be seen scattered about nearby. The actual lid in which the ring was found has not yet been completely identified and could belong to a coffee pot, sugar bowl...washed ashore on the south island of New Zealand. The wreck now lies in almost 9 meters of water and although the woodwork is mostly disintegrated the shape of the ship can still be determined due to the remaining railway irons, girders and the ship’s frame. A variety of goods and materials can be seen scattered about nearby. The actual lid in which the ring was found has not yet been completely identified and could belong to a coffee pot, sugar bowl ...In 1975, 120 years after the sailing ship Schomberg was wrecked, Flagstaff Hill divers (Peter Ronald, Colin Goodall and Gary Hayden) found an ornate communion set amongst the wreckage. The set comprised a jug, ciborium, lid, chalice and plate. The items, apart from the lid, were then displayed at Flagstaff Hill Maritime Village. The lid had etchings that did not match the chalice and sat in storage for several years. Then in 1978, while the marine concretion inside the lid was being examined, a surface layer came loose and revealed a glint of gold that was assumed to be a piece of brass. The layers of concretion were carefully removed and a ring-like band emerged. Further treatment exposed a 'large faceted stone in an intricate gold setting. Weeks later a detailed examination estimated the value of the ring, known as the Schomberg Diamond, to be $7000. When the Schomberg was launched in 1855, she was considered the "Noblest” ship that ever floated on the water. Schomberg's owners, the Black Ball Line had commissioned the ship for their fleet of passenger liners. She was built by Alexander Hall of Aberdeen at a cost of £43,103 and constructed with 3 skins. One planked fore and aft and two diagonally planked, fastened together with screw-threaded trunnels (wooden rails). Her First Class accommodation was simply luxurious with velvet pile carpets, large mirrors, rosewood, birds-eye maple and mahogany timbers throughout, soft furnishings of satin damask, an oak-lined library with a piano. Overall she had accommodation for 1000 passengers. At the launch, the Schomberg's 34-year-old master, Captain 'Bully' Forbes, had promised to reach Melbourne in sixty days stating, "with or without the help of God." Captain James Nicol Forbes was born in Aberdeen in 1821 and rose to fame with his record-breaking voyages on the famous Black Ball Line ships; Marco Polo and Lightning. In 1852 in the Marco Polo, he made the record passage from London to Melbourne in 68 days. Unfortunately there were 53 deaths on the voyage, but the great news was off the record passage by Captain Forbes. In 1854 he took the clipper “Lighting” to Melbourne in 76 days and back in 63 days, this record was never beaten by a sailing ship. He often drove his crew and ship to breaking point to beat his previous records. He cared little for the comfort of the passengers. On this, the Schomberg's maiden voyage, he was determined to break existing records. Schomberg departed Liverpool on her maiden voyage on 6th October 1855 flying a sign that read "Sixty Days to Melbourne". She departed with 430 passengers and 3000 tons cargo including iron rails and equipment intended to build the Melbourne to Geelong Railway and a bridge over the Yarra from Melbourne to Hawthorn. She also carried a cow for fresh milk, pens for fowls and pigs, 90,000 gallons of water for washing and drinking. She also carried 17,000 letters and 31,800 newspapers. The ship and cargo were insured for $300,000 a fortune for the time. The winds were poor as she sailed across the equator, slowing Schomberg's journey considerably. Land was first sighted on Christmas Day, at Cape Bridgewater near Portland, Captain Forbes followed the coastline towards Melbourne. Forbes was said to be playing cards when called by the third mate Henry Keen, who reported land about 3 miles off. Due in large part to the captain's regarding a card game as more important than his ship, it eventually ran aground on a sand spit near Curdie's Inlet (about 56 km west of Cape Otway) on 26th December 1855, 78 days after leaving Liverpool. The sand spit and the currents were not marked on Forbes's map. Overnight, the crew launched a lifeboat to find a safe place to land the ship’s passengers. The scouting party returned to Schomberg and advised Forbes that it was best to wait until morning because the rough seas could easily overturn the small lifeboats. The ship’s Chief Officer spotted the SS Queen at dawn and signaled the steamer. The master of the Queen approached the stranded vessel and all of Schomberg’s passengers and crew disembarked safely. The Black Ball Line's Melbourne agent sent a steamer to retrieve the passengers' baggage from the Schomberg. Other steamers helped unload her cargo until the weather changed and prevented the salvage teams from accessing the ship. Later one plunderer found a case of Wellington boots, but alas, all were for the left foot. Local merchants Manifold & Bostock bought the wreck and cargo but did not attempt to salvage the cargo still on board the ship. They eventually sold it on to a Melbourne businessman and two seafarers. In 1864 after two of the men drowned when they tried to reach Schomberg, salvage efforts were abandoned. In 1870, nearly 15 years after the wreck parts of the Schomberg had washed ashore on the south island of New Zealand. The wreck now lies in almost 9 meters of water and although the woodwork is mostly disintegrated the shape of the ship can still be determined due to the remaining railway irons, girders and the ship’s frame. A variety of goods and materials can be seen scattered about nearby. The actual lid in which the ring was found has not yet been completely identified and could belong to a coffee pot, sugar bowl or maybe a jug or something similar. Although all survived the wreck no-one came forward to claim the valuable diamond. The Schomberg Diamond is currently on display in the Great Circle Gallery. Flagstaff Hill Maritime Village along with the rest of the communion set. Other artefacts salvaged from the wreck include ship fittings and equipment, personal effects, a lithograph, tickets and photographs from the Schomberg. One of the Schomberg bells is in the Warrnambool Library.The Schomberg Diamond is particularly significant in that it played a crucial part in having the legislation changed to protect shipwrecks, with far tighter control over the salvaging of items from wreck sites. This ring is registered as Artefact S/105 in the Schomberg collection, the Schomberg collection as a whole is of historical and archaeological significance at a State level. Flagstaff Hill’s collection of artefacts from the Schomberg is also significant for its association with the Victorian Heritage Registered shipwreck (VHR S 612). The collection is of prime significant because of the relationship between the objects salvaged, as together they help us to interpret the story of the Schomberg. The collection as a whole is historically significant for representing aspects of Victoria's maritime history and its potential to interpret social and historical themes. A mid-Victorian gentleman's solitaire diamond dress ring with a Brazilian cut diamond (cushion cut), one and one-third carat set within an 18 carat yellow gold ring consisting of four claws within an open scroll setting and a divided scroll shank. Colour is classified as 'J', clarity SII. The setting is handmade. warrnambool, shipwrecked-coast, flagstaff-hill, flagstaff-hill-maritime-museum, maritime-museum, shipwreck-coast, flagstaff-hill-maritime-village, schomberg, shipwrecked-artefact, clipper ship, black ball line, 1855 shipwreck, aberdeen clipper ship, captain forbes, peterborough shipwreck, ss queen, ciborium, ring, schomberg-diamond, schomberg-ring, gentleman's ring, dress ring -
 Flagstaff Hill Maritime Museum and Village
Domestic object - Bowl, Late 19th or early 20th Century
... wash! The glazes need no other “glaze” on top! Be careful of unknown glaze interactions – you can put any combination of glaze in a bowl or on a plate, but only a single glaze on the outside of any vertical surface! ...wash! The glazes need no other “glaze” on top! Be careful of unknown glaze interactions – you can put any combination of glaze in a bowl or on a plate, but only a single glaze on the outside of any vertical surface! ...The Process of Making Pottery Decorating, Firing, Glazing, Making, Technical There is a rhythm and flow to clay. It can’t be done all at once! Even the making process! It can take weeks to get everything done, especially if you can only work on your pottery once a week! Even though we have three hour classes, it’s often just not enough time! Here is an overview of some of the processes so you have a bit more grasp on some of the technical stuff! Step One – Design There are SO many ideas out there for making stuff in clay! From delicate porcelain jewellery, through to heavy sculptural work and everything in between. Deciding your direction is sometimes not that easy – when you first start, try everything, you will naturally gravitate to the style that you enjoy! The options and variations are endless and can get a wee bit overwhelming too! Check in with me before you start to ensure your ideas will work, what order you might do things, how you could achieve the look you are seeking and any other technical data required! Step Two – Making Clay is thixotropic. This means that as you work with it, the clay first gets sloppier and wetter, before is begins to dry in the atmosphere. For most things, you simply can’t do all parts of the project at once. An example of work order might look like: Get last weeks work out from the shelves Prepare clay for today’s work – roll your clay, prepare balls for throwing, make the first stage of a pinch pot) Clean up last week’s work and put it on the shelf for bisque firing Check that you have any glazing to do – and do enough of it that you will have time to finish your main project Do the next step of your next project – there might be a further step that can’t be complete immediately, in that case, wrap your work well and put onto the shelves. Letting your work rest for a while can really help keep your work clean and professional looking. Many things require bagging under plastic to keep it ready for work the next week – put your name on the outside of the bag so you can find your work easily. We have stickers and markers. Consider how you want to decorate your work – coloured slip can be applied at a fairly wet stage (remembering that it will make your work even wetter!). Trying to apply slip to dry clay won’t work! If you want to do sgraffito – you will need to keep the work leather hard (a state of dryness where you can still work the clay with a little effort and a little water and care). Step Three – Drying Most of the time your work can go into the rack uncovered to let it dry out for the following week. If you want to continue forming or shaping you will need to double bag your work – put your work on a suitable sized bat and put the bat in a bag so the base of the bag is under the bat, then put another bag over the top of the work and tuck the top of the bag under the bat. If you want to trim (or turn) your thrown work the following week, it should also be double bagged. If your work is large, delicate, or of uneven thicknesses, you should lightly cover your work for drying. When considering the drying process, bare in mind the weather, humidity and wind! The hotter and dryer, the faster things dry and work can dry unevenly in the shelves – this can lead to cracking – another time to lightly cover your work for drying. Step Four – Trimming and Cleaning Up Your work is dry! It is called greenware now and it is at it’s most fragile! Handle everything with two hands. I often refer to soft hands – keep everything gentle and with your fingers spread as much as possible. Try to not pick up things like plates too much, and always with both hands! Before your work can be bisque fired it should be “cleaned up”. You work won’t go into the kiln if it has sharp edges – when glazed, sharp edges turn into razor blades! Use a piece of fly wire to rub the work all over – this will scratch a little so be light handed. Use a knife or metal kidney to scrape any areas that require a bit more dynamic treatment than the fly wire offers! Finally, a very light wipe over with a slightly damp sponge can help soften and soothe all of your edges and dags! Trimming thrown work: If you are planning to trim (or turn) your thrown work (and you should be), make sure you bag it well – your work should be leather hard to almost dry for easiest trimming. Use this step to finish the work completely – use a metal kidney to polish the surface, or a slightly damp sponge to give a freshly thrown look. Wipe the sponge around the rim after trimming, and check the inside of the pot for dags! Trimming slip cast work: Usually I will trim the rims of your work on the wheel the following day to make that stage easier, however you will still need to check your work for lumps and bumps. Last but not least – check that your name is still clearly on the bottom of your work. Step Five – Bisque Firing When the work is completely dry it can go into the bisque kiln. The bisque kiln is fired to 1000°C. This process burns off the water in the clay as well as some of the chemically bound water. The structure of the clay is not altered that much at this temperature. Inside the bisque kiln, the work is stacked a little, small bowl inside a larger bowl and onto a heavy plate. Smaller items like decorations or drink coasters might get stacked several high. Consideration is paid to the weight of the stack and shape of the work. A bisque kiln can fire about one and a half times the amount of work that the glaze kiln can fire. The firing takes about 10 hours to complete the cycle and about two days to cool down. Once it has been emptied the work is placed in the glaze room ready for you to decorate! Step Six – Glazing Decorating your work with colour can be a lot of fun – and time consuming! There are three main options for surface treatment at this stage: Oxide Washes Underglazes Glazes Washes and underglazes do not “glaze” the work – It will still need a layer of glaze to fully seal the clay (washes don’t need glaze on surfaces not designed for food or liquid as they can gloss up a little on their own). Underglazes are stable colourants that turn out pretty much how they look in the jar. They can be mixed with each other to form other colours and can be used like water colours to paint onto your work. Mostly they should have a clear glaze on top to seal them. Oxides are a different species – the pink oxide (cobalt) wash turns out bright blue for instance. They don’t always need a glaze on top, and some glazes can change the colour of the wash! The glazes need no other “glaze” on top! Be careful of unknown glaze interactions – you can put any combination of glaze in a bowl or on a plate, but only a single glaze on the outside of any vertical surface! Glazes are a chemical reaction under heat. We don’t know the exact chemicals in the Mayco glazes we use. I can guess by the way they interact with each other, however, on the whole, you need to test every idea you have, and not run the test on a vertical surface! Simply put, glaze is a layer of glass like substance that bonds with the clay underneath. Clay is made of silica, alumina and water. Glaze is made of mostly silica. Silica has a melting point of 1700°C and we fire to 1240°C. The silica requires a “flux” to help it melt at the lower temperature. Fluxes can be all sorts of chemicals – a common one is calcium – calcium has a melting point of 2500°C, however, together they both melt at a much lower temperature! Colourants are metal oxides like cobalt (blue), chrome (green through black), copper (green, blue, even red!), manganese (black, purple and pink) iron (red brown), etc. Different chemicals in the glaze can have dramatic effects. for example, barium carbonate (which we don’t use) turns manganese bright pink! Other elements can turn manganese dioxide brown, blue, purple and reddish brown. Manganese dioxide is a flux in and of itself as well. So, glazes that get their black and purple colours, often interact with other glazes and RUN! Our mirror black is a good example – it mixes really well with many glazes because it fluxes them – causes them to melt faster. It will also bring out many beautiful colours in the glazes because it’s black colouring most definitely comes from manganese dioxide! Glaze chemistry is a whole subject on it’s own! We use commercial Mayco glazes on purpose – for their huge range of colour possibilities, stability, cool interactions, artistic freedom with the ability to easily brush the glazes on and ease of use. We currently have almost 50 glazes on hand! A major project is to test the interactions of all glazes with each other. That is 2,500 test tiles!!!! I’m going to make the wall behind the wheels the feature wall of pretty colours! Step Seven – Glaze (Gloss or sometimes called “Glost”) Firing Most of the time this is the final stage of making your creation (but not always!) The glaze kiln goes to 1240°C. This is called cone 6, or midrange. It is the low end of stoneware temperatures. Stoneware clays and glazes are typically fired at cone 8 – 10, that is 1260 – 1290°C. The energy requirement to go from 1240°C to 1280°C is almost a 30% more! Our clay is formulated to vitrify (mature, turn “glass-like”) at 1240°, as are our glazes. A glaze kiln take around 12 hours to reach temperature and two to three days to cool down. Sometimes a third firing process is required – this is for decoration that is added to work after the glaze firing. For example – adding precious metals and lustres. this firing temperature is usually around 600 – 800°C depending upon the techniques being used. There are many students interested in gold and silver trims – we will be doing this third type of firing soon! After firing your work will be in the student finished work shelves. Remember to pay for it before you head out the door! There is a small extra charge for using porcelain clay (it’s more than twice the price of regular clay), and for any third firing process! Once your work has been fired it can not turn back into clay for millennia – so don’t fire it if you don’t like it! Put it in the bucket for recycling. https://firebirdstudios.com.au/the-process-of-making-pottery/ The bowl is an example of kitchenware used in the 19th century and still in use today.Bowl white ceramic. Crack on side. Badly stained.Backstamp very faint and unable to be read.flagstaff hill, warrnambool, shipwrecked-coast, flagstaff-hill, flagstaff-hill-maritime-museum, maritime-museum, shipwreck-coast, flagstaff-hill-maritime-village, mixing bowl, food preparation, kitchen equipment, ceramic -
 Flagstaff Hill Maritime Museum and Village
Domestic object - Bowl
... wash! The glazes need no other “glaze” on top! Be careful of unknown glaze interactions – you can put any combination of glaze in a bowl or on a plate, but only a single glaze on the outside of any vertical surface! ...wash! The glazes need no other “glaze” on top! Be careful of unknown glaze interactions – you can put any combination of glaze in a bowl or on a plate, but only a single glaze on the outside of any vertical surface! ...The Process of Making Pottery Decorating, Firing, Glazing, Making, Technical There is a rhythm and flow to clay. It can’t be done all at once! Even the making process! It can take weeks to get everything done, especially if you can only work on your pottery once a week! Even though we have three hour classes, it’s often just not enough time! Here is an overview of some of the processes so you have a bit more grasp on some of the technical stuff! Step One – Design There are SO many ideas out there for making stuff in clay! From delicate porcelain jewellery, through to heavy sculptural work and everything in between. Deciding your direction is sometimes not that easy – when you first start, try everything, you will naturally gravitate to the style that you enjoy! The options and variations are endless and can get a wee bit overwhelming too! Check in with me before you start to ensure your ideas will work, what order you might do things, how you could achieve the look you are seeking and any other technical data required! Step Two – Making Clay is thixotropic. This means that as you work with it, the clay first gets sloppier and wetter, before is begins to dry in the atmosphere. For most things, you simply can’t do all parts of the project at once. An example of work order might look like: Get last weeks work out from the shelves Prepare clay for today’s work – roll your clay, prepare balls for throwing, make the first stage of a pinch pot) Clean up last week’s work and put it on the shelf for bisque firing Check that you have any glazing to do – and do enough of it that you will have time to finish your main project Do the next step of your next project – there might be a further step that can’t be complete immediately, in that case, wrap your work well and put onto the shelves. Letting your work rest for a while can really help keep your work clean and professional looking. Many things require bagging under plastic to keep it ready for work the next week – put your name on the outside of the bag so you can find your work easily. We have stickers and markers. Consider how you want to decorate your work – coloured slip can be applied at a fairly wet stage (remembering that it will make your work even wetter!). Trying to apply slip to dry clay won’t work! If you want to do sgraffito – you will need to keep the work leather hard (a state of dryness where you can still work the clay with a little effort and a little water and care). Step Three – Drying Most of the time your work can go into the rack uncovered to let it dry out for the following week. If you want to continue forming or shaping you will need to double bag your work – put your work on a suitable sized bat and put the bat in a bag so the base of the bag is under the bat, then put another bag over the top of the work and tuck the top of the bag under the bat. If you want to trim (or turn) your thrown work the following week, it should also be double bagged. If your work is large, delicate, or of uneven thicknesses, you should lightly cover your work for drying. When considering the drying process, bare in mind the weather, humidity and wind! The hotter and dryer, the faster things dry and work can dry unevenly in the shelves – this can lead to cracking – another time to lightly cover your work for drying. Step Four – Trimming and Cleaning Up Your work is dry! It is called greenware now and it is at it’s most fragile! Handle everything with two hands. I often refer to soft hands – keep everything gentle and with your fingers spread as much as possible. Try to not pick up things like plates too much, and always with both hands! Before your work can be bisque fired it should be “cleaned up”. You work won’t go into the kiln if it has sharp edges – when glazed, sharp edges turn into razor blades! Use a piece of fly wire to rub the work all over – this will scratch a little so be light handed. Use a knife or metal kidney to scrape any areas that require a bit more dynamic treatment than the fly wire offers! Finally, a very light wipe over with a slightly damp sponge can help soften and soothe all of your edges and dags! Trimming thrown work: If you are planning to trim (or turn) your thrown work (and you should be), make sure you bag it well – your work should be leather hard to almost dry for easiest trimming. Use this step to finish the work completely – use a metal kidney to polish the surface, or a slightly damp sponge to give a freshly thrown look. Wipe the sponge around the rim after trimming, and check the inside of the pot for dags! Trimming slip cast work: Usually I will trim the rims of your work on the wheel the following day to make that stage easier, however you will still need to check your work for lumps and bumps. Last but not least – check that your name is still clearly on the bottom of your work. Step Five – Bisque Firing When the work is completely dry it can go into the bisque kiln. The bisque kiln is fired to 1000°C. This process burns off the water in the clay as well as some of the chemically bound water. The structure of the clay is not altered that much at this temperature. Inside the bisque kiln, the work is stacked a little, small bowl inside a larger bowl and onto a heavy plate. Smaller items like decorations or drink coasters might get stacked several high. Consideration is paid to the weight of the stack and shape of the work. A bisque kiln can fire about one and a half times the amount of work that the glaze kiln can fire. The firing takes about 10 hours to complete the cycle and about two days to cool down. Once it has been emptied the work is placed in the glaze room ready for you to decorate! Step Six – Glazing Decorating your work with colour can be a lot of fun – and time consuming! There are three main options for surface treatment at this stage: Oxide Washes Underglazes Glazes Washes and underglazes do not “glaze” the work – It will still need a layer of glaze to fully seal the clay (washes don’t need glaze on surfaces not designed for food or liquid as they can gloss up a little on their own). Underglazes are stable colourants that turn out pretty much how they look in the jar. They can be mixed with each other to form other colours and can be used like water colours to paint onto your work. Mostly they should have a clear glaze on top to seal them. Oxides are a different species – the pink oxide (cobalt) wash turns out bright blue for instance. They don’t always need a glaze on top, and some glazes can change the colour of the wash! The glazes need no other “glaze” on top! Be careful of unknown glaze interactions – you can put any combination of glaze in a bowl or on a plate, but only a single glaze on the outside of any vertical surface! Glazes are a chemical reaction under heat. We don’t know the exact chemicals in the Mayco glazes we use. I can guess by the way they interact with each other, however, on the whole, you need to test every idea you have, and not run the test on a vertical surface! Simply put, glaze is a layer of glass like substance that bonds with the clay underneath. Clay is made of silica, alumina and water. Glaze is made of mostly silica. Silica has a melting point of 1700°C and we fire to 1240°C. The silica requires a “flux” to help it melt at the lower temperature. Fluxes can be all sorts of chemicals – a common one is calcium – calcium has a melting point of 2500°C, however, together they both melt at a much lower temperature! Colourants are metal oxides like cobalt (blue), chrome (green through black), copper (green, blue, even red!), manganese (black, purple and pink) iron (red brown), etc. Different chemicals in the glaze can have dramatic effects. for example, barium carbonate (which we don’t use) turns manganese bright pink! Other elements can turn manganese dioxide brown, blue, purple and reddish brown. Manganese dioxide is a flux in and of itself as well. So, glazes that get their black and purple colours, often interact with other glazes and RUN! Our mirror black is a good example – it mixes really well with many glazes because it fluxes them – causes them to melt faster. It will also bring out many beautiful colours in the glazes because it’s black colouring most definitely comes from manganese dioxide! Glaze chemistry is a whole subject on it’s own! We use commercial Mayco glazes on purpose – for their huge range of colour possibilities, stability, cool interactions, artistic freedom with the ability to easily brush the glazes on and ease of use. We currently have almost 50 glazes on hand! A major project is to test the interactions of all glazes with each other. That is 2,500 test tiles!!!! I’m going to make the wall behind the wheels the feature wall of pretty colours! Step Seven – Glaze (Gloss or sometimes called “Glost”) Firing Most of the time this is the final stage of making your creation (but not always!) The glaze kiln goes to 1240°C. This is called cone 6, or midrange. It is the low end of stoneware temperatures. Stoneware clays and glazes are typically fired at cone 8 – 10, that is 1260 – 1290°C. The energy requirement to go from 1240°C to 1280°C is almost a 30% more! Our clay is formulated to vitrify (mature, turn “glass-like”) at 1240°, as are our glazes. A glaze kiln take around 12 hours to reach temperature and two to three days to cool down. Sometimes a third firing process is required – this is for decoration that is added to work after the glaze firing. For example – adding precious metals and lustres. this firing temperature is usually around 600 – 800°C depending upon the techniques being used. There are many students interested in gold and silver trims – we will be doing this third type of firing soon! After firing your work will be in the student finished work shelves. Remember to pay for it before you head out the door! There is a small extra charge for using porcelain clay (it’s more than twice the price of regular clay), and for any third firing process! Once your work has been fired it can not turn back into clay for millennia – so don’t fire it if you don’t like it! Put it in the bucket for recycling. https://firebirdstudios.com.au/the-process-of-making-pottery/ This bowl is an example of kitchenware used in the 19th century and still in use today.Bowl white ceramic plain that has two sets of edging around lip. Inside bowl has plaster designed to look like cooking mixture.flagstaff hill, warrnambool, shipwrecked-coast, flagstaff-hill, flagstaff-hill-maritime-museum, maritime-museum, shipwreck-coast, flagstaff-hill-maritime-village, kitchen equipment, ceramic -
 Flagstaff Hill Maritime Museum and Village
Domestic object - Bowl, J & G Meakin, Late 19th or early 20th Century
... wash! The glazes need no other “glaze” on top! Be careful of unknown glaze interactions – you can put any combination of glaze in a bowl or on a plate, but only a single glaze on the outside of any vertical surface! ...wash! The glazes need no other “glaze” on top! Be careful of unknown glaze interactions – you can put any combination of glaze in a bowl or on a plate, but only a single glaze on the outside of any vertical surface! ...The Process of Making Pottery Decorating, Firing, Glazing, Making, Technical There is a rhythm and flow to clay. It can’t be done all at once! Even the making process! It can take weeks to get everything done, especially if you can only work on your pottery once a week! Even though we have three hour classes, it’s often just not enough time! Here is an overview of some of the processes so you have a bit more grasp on some of the technical stuff! Step One – Design There are SO many ideas out there for making stuff in clay! From delicate porcelain jewellery, through to heavy sculptural work and everything in between. Deciding your direction is sometimes not that easy – when you first start, try everything, you will naturally gravitate to the style that you enjoy! The options and variations are endless and can get a wee bit overwhelming too! Check in with me before you start to ensure your ideas will work, what order you might do things, how you could achieve the look you are seeking and any other technical data required! Step Two – Making Clay is thixotropic. This means that as you work with it, the clay first gets sloppier and wetter, before is begins to dry in the atmosphere. For most things, you simply can’t do all parts of the project at once. An example of work order might look like: Get last weeks work out from the shelves Prepare clay for today’s work – roll your clay, prepare balls for throwing, make the first stage of a pinch pot) Clean up last week’s work and put it on the shelf for bisque firing Check that you have any glazing to do – and do enough of it that you will have time to finish your main project Do the next step of your next project – there might be a further step that can’t be complete immediately, in that case, wrap your work well and put onto the shelves. Letting your work rest for a while can really help keep your work clean and professional looking. Many things require bagging under plastic to keep it ready for work the next week – put your name on the outside of the bag so you can find your work easily. We have stickers and markers. Consider how you want to decorate your work – coloured slip can be applied at a fairly wet stage (remembering that it will make your work even wetter!). Trying to apply slip to dry clay won’t work! If you want to do sgraffito – you will need to keep the work leather hard (a state of dryness where you can still work the clay with a little effort and a little water and care). Step Three – Drying Most of the time your work can go into the rack uncovered to let it dry out for the following week. If you want to continue forming or shaping you will need to double bag your work – put your work on a suitable sized bat and put the bat in a bag so the base of the bag is under the bat, then put another bag over the top of the work and tuck the top of the bag under the bat. If you want to trim (or turn) your thrown work the following week, it should also be double bagged. If your work is large, delicate, or of uneven thicknesses, you should lightly cover your work for drying. When considering the drying process, bare in mind the weather, humidity and wind! The hotter and dryer, the faster things dry and work can dry unevenly in the shelves – this can lead to cracking – another time to lightly cover your work for drying. Step Four – Trimming and Cleaning Up Your work is dry! It is called greenware now and it is at it’s most fragile! Handle everything with two hands. I often refer to soft hands – keep everything gentle and with your fingers spread as much as possible. Try to not pick up things like plates too much, and always with both hands! Before your work can be bisque fired it should be “cleaned up”. You work won’t go into the kiln if it has sharp edges – when glazed, sharp edges turn into razor blades! Use a piece of fly wire to rub the work all over – this will scratch a little so be light handed. Use a knife or metal kidney to scrape any areas that require a bit more dynamic treatment than the fly wire offers! Finally, a very light wipe over with a slightly damp sponge can help soften and soothe all of your edges and dags! Trimming thrown work: If you are planning to trim (or turn) your thrown work (and you should be), make sure you bag it well – your work should be leather hard to almost dry for easiest trimming. Use this step to finish the work completely – use a metal kidney to polish the surface, or a slightly damp sponge to give a freshly thrown look. Wipe the sponge around the rim after trimming, and check the inside of the pot for dags! Trimming slip cast work: Usually I will trim the rims of your work on the wheel the following day to make that stage easier, however you will still need to check your work for lumps and bumps. Last but not least – check that your name is still clearly on the bottom of your work. Step Five – Bisque Firing When the work is completely dry it can go into the bisque kiln. The bisque kiln is fired to 1000°C. This process burns off the water in the clay as well as some of the chemically bound water. The structure of the clay is not altered that much at this temperature. Inside the bisque kiln, the work is stacked a little, small bowl inside a larger bowl and onto a heavy plate. Smaller items like decorations or drink coasters might get stacked several high. Consideration is paid to the weight of the stack and shape of the work. A bisque kiln can fire about one and a half times the amount of work that the glaze kiln can fire. The firing takes about 10 hours to complete the cycle and about two days to cool down. Once it has been emptied the work is placed in the glaze room ready for you to decorate! Step Six – Glazing Decorating your work with colour can be a lot of fun – and time consuming! There are three main options for surface treatment at this stage: Oxide Washes Underglazes Glazes Washes and underglazes do not “glaze” the work – It will still need a layer of glaze to fully seal the clay (washes don’t need glaze on surfaces not designed for food or liquid as they can gloss up a little on their own). Underglazes are stable colourants that turn out pretty much how they look in the jar. They can be mixed with each other to form other colours and can be used like water colours to paint onto your work. Mostly they should have a clear glaze on top to seal them. Oxides are a different species – the pink oxide (cobalt) wash turns out bright blue for instance. They don’t always need a glaze on top, and some glazes can change the colour of the wash! The glazes need no other “glaze” on top! Be careful of unknown glaze interactions – you can put any combination of glaze in a bowl or on a plate, but only a single glaze on the outside of any vertical surface! Glazes are a chemical reaction under heat. We don’t know the exact chemicals in the Mayco glazes we use. I can guess by the way they interact with each other, however, on the whole, you need to test every idea you have, and not run the test on a vertical surface! Simply put, glaze is a layer of glass like substance that bonds with the clay underneath. Clay is made of silica, alumina and water. Glaze is made of mostly silica. Silica has a melting point of 1700°C and we fire to 1240°C. The silica requires a “flux” to help it melt at the lower temperature. Fluxes can be all sorts of chemicals – a common one is calcium – calcium has a melting point of 2500°C, however, together they both melt at a much lower temperature! Colourants are metal oxides like cobalt (blue), chrome (green through black), copper (green, blue, even red!), manganese (black, purple and pink) iron (red brown), etc. Different chemicals in the glaze can have dramatic effects. for example, barium carbonate (which we don’t use) turns manganese bright pink! Other elements can turn manganese dioxide brown, blue, purple and reddish brown. Manganese dioxide is a flux in and of itself as well. So, glazes that get their black and purple colours, often interact with other glazes and RUN! Our mirror black is a good example – it mixes really well with many glazes because it fluxes them – causes them to melt faster. It will also bring out many beautiful colours in the glazes because it’s black colouring most definitely comes from manganese dioxide! Glaze chemistry is a whole subject on it’s own! We use commercial Mayco glazes on purpose – for their huge range of colour possibilities, stability, cool interactions, artistic freedom with the ability to easily brush the glazes on and ease of use. We currently have almost 50 glazes on hand! A major project is to test the interactions of all glazes with each other. That is 2,500 test tiles!!!! I’m going to make the wall behind the wheels the feature wall of pretty colours! Step Seven – Glaze (Gloss or sometimes called “Glost”) Firing Most of the time this is the final stage of making your creation (but not always!) The glaze kiln goes to 1240°C. This is called cone 6, or midrange. It is the low end of stoneware temperatures. Stoneware clays and glazes are typically fired at cone 8 – 10, that is 1260 – 1290°C. The energy requirement to go from 1240°C to 1280°C is almost a 30% more! Our clay is formulated to vitrify (mature, turn “glass-like”) at 1240°, as are our glazes. A glaze kiln take around 12 hours to reach temperature and two to three days to cool down. Sometimes a third firing process is required – this is for decoration that is added to work after the glaze firing. For example – adding precious metals and lustres. this firing temperature is usually around 600 – 800°C depending upon the techniques being used. There are many students interested in gold and silver trims – we will be doing this third type of firing soon! After firing your work will be in the student finished work shelves. Remember to pay for it before you head out the door! There is a small extra charge for using porcelain clay (it’s more than twice the price of regular clay), and for any third firing process! Once your work has been fired it can not turn back into clay for millennia – so don’t fire it if you don’t like it! Put it in the bucket for recycling. https://firebirdstudios.com.au/the-process-of-making-pottery/This bowl was made by renowned pottery company J & G Meakin of England. The firm was established in the mid-1800's. The bowl is an example of kitchenware used in the 19th century and still in use today.Bowl; white ceramic, round and tapering inwards towards base. Made by J and G Meakin England.On base, 'Ironstone China Reg SOL 391413' with symbolflagstaff hill, flagstaff hill maritime museum and village, warrnambool, maritime museum, maritime village, great ocean road, shipwreck coast, mixing bowl, food preparation, j & g meakin, pottery, stoke-on-trent, kitchen equipment, ceramic -
Coal Creek Community Park & Museum
Wash stand
... Coal Creek Community Park & Museum 12 Silkstone Road Korumburra gippsland Metal frame holding a circular metal bowl at top and smaller metal bowl below, with towel rail. Wash stand ...Metal frame holding a circular metal bowl at top and smaller metal bowl below, with towel rail.