Showing 41 items matching "west channel"
-
 Queenscliffe Maritime Museum
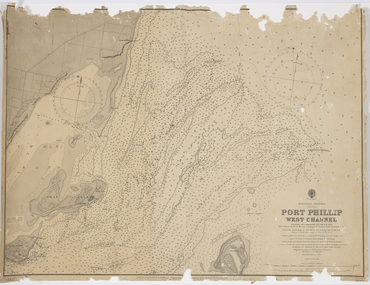
Map - Survey Charts, Port Phillip West Channel
... Port Phillip West Channel...Two charts of the Port Phillip West Channel, reference number 309. One was engraved in 1903, the other a new 1935 edition last revised in 1961....Port Phillip West Channel...Port Phillip Queencliff Channel Charts Soundings Port Phillip West Channel Two charts of the Port Phillip West Channel, reference number 309. ...These charts show changes to the depth levels surrounding Queenscliff. Earlier chart does not show the cut which can be seen in the later chart. The creation of the cut and subsequebt dredging of it has changed the shoreline due to shifting sand.Two charts of the Port Phillip West Channel, reference number 309. One was engraved in 1903, the other a new 1935 edition last revised in 1961.Port Phillip West Channelport phillip, queencliff channel, charts, soundings -
 Queenscliffe Maritime Museum
Functional object - Channel Marker - Colour Green, 1955
... ...west channel...This Port Phillip West Channel marker was built in 1955 and was run on acetylene, therefore requiring a platform and circular hut rather than the modern buoys or posts. ...West Channel Marker, Grimes No. 5 Built 1955 Accetylene powered...It was painted green as it marked the starboard side of the channel. channel markers west channel port phillip pile light West Channel Marker, Grimes No. 5 Built 1955 Accetylene powered Functional object Channel Marker - Colour Green ...Port and Starboard channel markers are internationally recognised sea markers used in maritime pilotage to indicate the edge of a channel. This Port Phillip West Channel marker was built in 1955 and was run on acetylene, therefore requiring a platform and circular hut rather than the modern buoys or posts. It was painted green as it marked the starboard side of the channel. West Channel Marker, Grimes No. 5 Built 1955 Accetylene poweredchannel markers, west channel, port phillip, pile light -
 Queenscliffe Maritime Museum
Functional object - Channel Marker - Colour Red
... West Channel Marker...Portside channel marker from west channel Port Phillip. This red circular building had a red navigational light on top and was know as Tuckey....Portside channel marker from West Channel Port Phillip. Circular red building with red navigational light on top. ...West Channel Marker Tuckey Portside channel marker from West Channel Port Phillip. ...Portside channel marker from west channel Port Phillip. This red circular building had a red navigational light on top and was know as Tuckey.Portside channel marker from West Channel Port Phillip. Circular red building with red navigational light on top. west channel marker, tuckey -
 Lakes Entrance Historical Society
Book, Shepherd Wendy, Cray Coff, Joiners Channel West Cape, Cape Conran, 2003
... Cray Coff, Joiners Channel West Cape, Cape Conran...Research interpretation and management recommendations for the cray coff, Joiner Channel, West Cape, Cape Conran, East Gippsland victoria by Forestec Student....Cray Coff, Joiners Channel West Cape, Cape Conran Book Shepherd Wendy ...Research interpretation and management recommendations for the cray coff, Joiner Channel, West Cape, Cape Conran, East Gippsland victoria by Forestec Student.fishing industry -
 Flagstaff Hill Maritime Museum and Village
Document - Chart, Admiralty Office, Port Phillip, 1899
... Stanley R.N. in 1874. The West Channel was surveyed b J.B. Mason , Engineer, in 1899. ...Stanley R.N. in 1874. The West Channel was surveyed b J.B. Mason , Engineer, in 1899. ...Accurate charts were imperative for sea farers to sail their vessels safely from one side of the world to another. The British Admiralty published many charts and updated them frequently. Specialists were employed to gather information such as depth soundings to give the navigator as many helps as possible. At regular intervals the charts had to be updated with the amount of adjustment needed to a compass to allow for magnetic variation.This chart is significant for its association with incoming and outgoin ships for trade and passengers in the late 19th century.Admiralty Chart of Port Phillip, Victoria, South Coast of Australia. It shows navigation buoys, lighthouses, tides and money other details. It was surveyed by Commander Henry L. Cox R.N. in 1864. Published by Admiralty August 19th 1865. Corrections were made by Staff Commander E.J. Stanley R.N. in 1874. The West Channel was surveyed b J.B. Mason , Engineer, in 1899. Published and cartographed in Admiralty, London, England in 1897, supervised by Capt G H Richards R N Hydrographer. Chart was updated in 1899. Sold by W D Potter Agent for Admiralty Charts 145 minorities.Printed: "Port Phillip" "Australia - South Coast, Victoria"flagstaff hill, warrnambool, maritime-museum, flagstaff hill maritime museum & village, shipwreck coast, chart, australia, south coast, port phillip, admiralty, 1899, navigation, cartography, cartographer -
 Bendigo Military Museum
Map - RASvy " Map Makers Exhibition 2025 "- Map display, RAN Hydrographic Office, 1972 - 1992
... PORT PHILLIP SOUTH and WEST CHANNELS. PROJECTION TRANSVERSE MERCATOR. ...Current as at 30 Jun 92. .2 Extract of Navigational Plotting Chart " NP22-2 Tasmania " .3 Extract of Navigational Plotting Chart " NP 27 RAAF PLOTTING CHART AUSTRALIA - SOUTHEAST " .4 Extract of Navigational Plotting Chart " RAAF LONG RANGE PLOTTING CHART NP43-4 AUSTRALIA WESTERN " .5 Extract of Navigational Plotting Chart " RAAF LONG RANGE PLOTTING CHART NP43-7 SOLOMON ISLANDS " .6 Extract of Navigational Series " RAAF AIR STAFF PLANNING CHART NS 137-2 DARWIN NORTH WEST " .7 Extract of Navigational Series " RAAF AIR STAFF PLANNING CHART NS 137-1 DARWIN NORTH EAST " .8 Extract of Navigational Series " RAAF AIR STAFF PLANNING CHART NS 137-4 DARWIN SOUTH WEST " .9 Extract of Navigational Series " RAAF AIR STAFF PLANNING CHART NS 137-3 DARWIN SOUTH EAST " .10 Extract of Tactical Pilotage Chart " TPC R-13B " .11 Extract of Hydrographic Chart " PORT PHILLIP SOUTH and WEST CHANNELS " .12 Extract of Hydrographic Chart " GEELONG HARBOUR and APPROACHES " .13 Extract of En Route Chart " AUSTRALIA ERC HIGH " " H1 and H2 " ...PORT PHILLIP SOUTH and WEST CHANNELS. PROJECTION TRANSVERSE MERCATOR. ...All of these Charts / Maps were used for the RSL Museum display " The Mapmakers " ( of RASvy. ) 10 Jun - 10 Aug 2025. .1 Catalogue of Tactical Pilotage Charts, 1:500 000 Scale. Digital Data Base available as at 30Jun 92. This catalogue page shows the extent of the Australian area of responsibility for aeronautical charting. .2 RAAF PLOTTING CHART. NP 22-2 (Navigational Plotting) Tasmania. MERCATOR PROJECTION. This series of charts were used for the training of RAAF Navigators. These charts were produced and printed at the Army Survey Regiment, Bendigo. .3 RAAF PLOTTING CHART AUSTRALIA - SOUTHEAST. NP 27 is Based on LAMBERT CONFORMAL CONIC PROJECTION. This series of charts was used by RAAF Navigators for the planning of RAAF flights. These charts were produced and printed at the Army Survey Regiment, Bendigo. .4 RAAF LONG RANGE PLOTTING CHART. NP 43-4 AUSTRALIA WESTERN. MERCATOR PROJECTION. This series of maps were used for the planning of RAAF flights. Of Particular note these charts were used to plot "Rhumb Lines or loxodromes" where a course crosses all Meridians (Lines of latitude and longitude) at the same angle. On Mercator projection charts Rhumb lines are conveniently shown as straight lines and are also lines of constant compass bearing. Rhumb lines are usually longer than the shortest distance between two points. The shortest distance between two points on the earth's surface is called a "Great Circle Route" which is a route on a circular path on the surface of the earth where the centre of that circle is also the centre of the earth. Great Circle Routes on a Mercator Projection are however curves and harder to plot. These charts were produced and printed at the Army Survey Regiment, Bendigo. .5 RAAF LONG RANGE PLOTTING CHART. NP 43-7 SOLOMON ISLANDS. MERCATOR PROJECTION. Used for the planning of RAAF flights. .6 RAAF AIR STAFF PLANNING CHART NS 137-1 DARWIN NORTH WEST. AZIMUTHAL EQUIDISTANT PROJECTION. This series of charts were used for planning by the staff. The whole chart was produced by joining the four quadrant maps together. The charts are based on a single point of tangency (in this case Darwin) and shows radius (distance) in nautical miles to and from that point. A series of charts were produced centred on each of the major airfields in Northern Australia. These charts were produced and printed at the Army Survey Regiment, Bendigo. .7 RAAF AIR STAFF PLANNING CHART NS 137-2 DARWIN NORTH EAST. AZIMUTHAL EQUIDISTANT PROJECTION. Used for the planning by the staff. The charts are based on a point of tangency and show radius in nautical miles. .8 RAAF AIR STAFF PLANNING CHART NS 137-4 DARWIN SOUTH WEST. AZIMUTHAL EQUIDISTANT PROJECTION. Used for the planning by the staff. The charts are based on a point of tangency and show radius in nautical miles. .9 RAAF AIR STAFF PLANNING CHART NS 137-3 DARWIN SOUTH EAST. AZIMUTHAL EQUIDISTANT PROJECTION. Used for the planning by the staff. The charts are based on a point of tangency and show radius in nautical miles. .10 TACTICAL PILOTAGE CHART. TPC R-13B. LAMBERT CONFORMAL PROJECTION. Used by pilots for flight planning and could be used in flight if necessary for visual navigation using major ground features shown on the chart. These charts also contained aeronautical information such as airfields, radio navigation beacons and obstructions. Contours and height information was shown in feet to be compatible with aircraft altimeters. Each graticule square also contained a Maximum Safe Elevation Figure (MEF) also in feet. Coverage of this series over Australia's area of interest were produced and printed at the Army Survey Regiment, Bendigo. .11 HYDROGRAPHIC CHART. AUS 158. PORT PHILLIP SOUTH and WEST CHANNELS. PROJECTION TRANSVERSE MERCATOR. Used by all people needing to navigate a vessel. Hydrographic charts were printed at the Army Survey Regiment, Bendigo. .12 HYDROGRAPHIC CHART. AUS 157. GEELONG HARBOUR and APPROACHES. PROJECTION TRANSVERSE MERCATOR. Used by all people needing to navigate a vessel. .13 EN ROUTE CHART. AUSTRALIA ERC HIGH. H1 and H2. LAMBERT CONFORMAL CONIC PROJECTION. This series of charts were regularly produced by the RAAF Aeronautical Information Service (AIS) and contained current aeronautical information for pilots. These charts were printed at the Army Survey Regiment, Bendigo..1 Tactical Pilotage Chart Series Catalogue. Current as at 30 Jun 92. .2 Extract of Navigational Plotting Chart " NP22-2 Tasmania " .3 Extract of Navigational Plotting Chart " NP 27 RAAF PLOTTING CHART AUSTRALIA - SOUTHEAST " .4 Extract of Navigational Plotting Chart " RAAF LONG RANGE PLOTTING CHART NP43-4 AUSTRALIA WESTERN " .5 Extract of Navigational Plotting Chart " RAAF LONG RANGE PLOTTING CHART NP43-7 SOLOMON ISLANDS " .6 Extract of Navigational Series " RAAF AIR STAFF PLANNING CHART NS 137-2 DARWIN NORTH WEST " .7 Extract of Navigational Series " RAAF AIR STAFF PLANNING CHART NS 137-1 DARWIN NORTH EAST " .8 Extract of Navigational Series " RAAF AIR STAFF PLANNING CHART NS 137-4 DARWIN SOUTH WEST " .9 Extract of Navigational Series " RAAF AIR STAFF PLANNING CHART NS 137-3 DARWIN SOUTH EAST " .10 Extract of Tactical Pilotage Chart " TPC R-13B " .11 Extract of Hydrographic Chart " PORT PHILLIP SOUTH and WEST CHANNELS " .12 Extract of Hydrographic Chart " GEELONG HARBOUR and APPROACHES " .13 Extract of En Route Chart " AUSTRALIA ERC HIGH " " H1 and H2 " royal australian survey corps, rasvy, fortuna, detachment - army survey regiment, army svy regt, asr -
 Lakes Entrance Historical Society
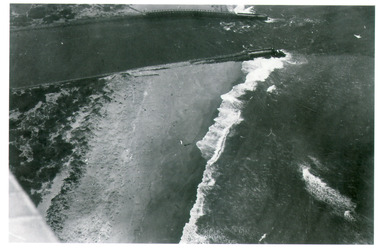
Postcard - Reeves Channel, 1910 c
... Black and white postcard showing view of Reeves channel looking west toward Metung west end of Rigby and Fraser Islands mouth of Maringa creek lower right with neat mill workers cottages on flat Lakes Entrance Victoria...Lakes Entrance Historical Society 4 Marine Parade Lakes Entrance gippsland Waterways Black and white postcard showing view of Reeves channel looking west toward Metung west end of Rigby and Fraser Islands mouth of Maringa creek lower right with neat mill workers cottages on flat Lakes Entrance Victoria Postcard Reeves Channel ...Black and white postcard showing view of Reeves channel looking west toward Metung west end of Rigby and Fraser Islands mouth of Maringa creek lower right with neat mill workers cottages on flat Lakes Entrance Victoriawaterways -
 Lakes Entrance Historical Society
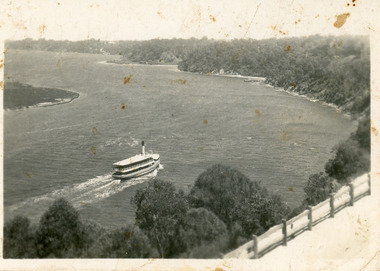
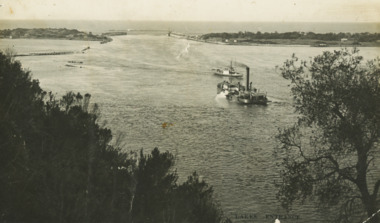
Photograph - S.S. Gippsland, 1920c
... Black and white photograph showing S S Gippsland in Reeves Channel, sailing west towards Metung, taken from Jemmys Point and showing Snake Island and end of Rigby Island and hummocks on far side of Hopetoun Channel in background. ...Lakes Entrance Historical Society 4 Marine Parade Lakes Entrance gippsland Waterways Ships and Shipping Black and white photograph showing S S Gippsland in Reeves Channel, sailing west towards Metung, taken from Jemmys Point and showing Snake Island and end of Rigby Island and hummocks on far side of Hopetoun Channel in background. ...Black and white photograph showing S S Gippsland in Reeves Channel, sailing west towards Metung, taken from Jemmys Point and showing Snake Island and end of Rigby Island and hummocks on far side of Hopetoun Channel in background. Lakes Entrance Victoria waterways, ships and shipping -
 Lakes Entrance Historical Society
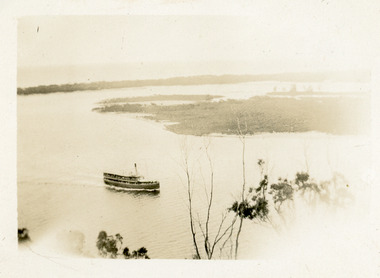
Photograph - S.S. Gippsland, 1920c
... Black and white photograph showing S S Gippsland in Reeves Channel, sailing west towards Metung, taken from Jemmys Point and showing Snake Island and end of Rigby Island and hummocks on far side of Hopetoun Channel in background. ...Lakes Entrance Historical Society 4 Marine Parade Lakes Entrance gippsland Waterways Ships and Shipping Islands Black and white photograph showing S S Gippsland in Reeves Channel, sailing west towards Metung, taken from Jemmys Point and showing Snake Island and end of Rigby Island and hummocks on far side of Hopetoun Channel in background. ...Black and white photograph showing S S Gippsland in Reeves Channel, sailing west towards Metung, taken from Jemmys Point and showing Snake Island and end of Rigby Island and hummocks on far side of Hopetoun Channel in background. Lakes Entrance Victoria waterways, ships and shipping, islands -
 Lakes Entrance Historical Society
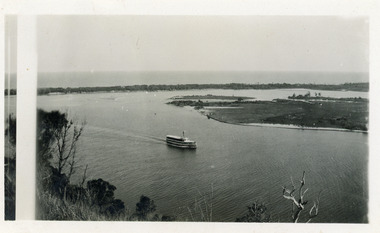
Photograph - S.S. Gippsland, 1920c
... Black and white photograph showing S S Gippsland in Reeves Channel, sailing west towards Metung, taken from Jemmys Point and showing Snake Island and end of Rigby Island and hummocks on far side of Hopetoun Channel in background. ...Lakes Entrance Historical Society 4 Marine Parade Lakes Entrance gippsland Waterways Ships and Shipping Black and white photograph showing S S Gippsland in Reeves Channel, sailing west towards Metung, taken from Jemmys Point and showing Snake Island and end of Rigby Island and hummocks on far side of Hopetoun Channel in background. ...Black and white photograph showing S S Gippsland in Reeves Channel, sailing west towards Metung, taken from Jemmys Point and showing Snake Island and end of Rigby Island and hummocks on far side of Hopetoun Channel in background. Lakes Entrance Victoria waterways, ships and shipping -
Eltham District Historical Society Inc
Document - Folder, Pearce, Daisy
... Later she was a Channel Seven commentator on the men's game and, in 2024, she became AFLW head coach at West Coast. ...Daisy Pearce to be AFLW head coach at West Coast in 2024 and continue as commentator for Channel Seven. Newspaper article: "Nine greats rewarded with a hall of fame nod", The Age, 11 June 2025. ...Daisy Pearce played for Australia in the 2006 international series in Ireland, after becoming captain of the Darebin women's football club, and in 2007 played in the E J Whitten Legends game at the Docklands stadium. She was named in the All-Australian team and played for her local Eltham club. She was the first Number 1 pick in the 2013 AFLW draft, and captained the Melbourne Football Club since the first season in 2017. Later she was a Channel Seven commentator on the men's game and, in 2024, she became AFLW head coach at West Coast. In 2025 she was admitted to the AFL Hall of Fame. Contents Newspaper article: "Not too young to be a legend", Diamond Valley Leader, 13 June 2007. Daisy Pearce to play Australian Rules at the Docklands stadium. .Newspaper article: "Daisy is starting to bloom", Diamond Valley Leader, 25 July 2007. Daisy Pearce aiming to be her club's best and fairest. Newspaper article: "League of her own: Daisy Pearce can feel the change", The Weekend Australian Magazine, 13 February 2021. Daisy Pearce to play Australian Rules at the Docklands stadium. Newspaper article: "Pearce lands top job at the Eagles", The Age, 12 December 2023. Daisy Pearce to be AFLW head coach at West Coast in 2024 and continue as commentator for Channel Seven. Newspaper article: "Nine greats rewarded with a hall of fame nod", The Age, 11 June 2025. Daisy Pearce among thoseadmitted to the hall of fame.Newspaper clippings, A4 photocopies, etcdaisy pearce, aflw, e j whitten legends games, west coast aflw, darebin women's football club, eltham women's football club, melbourne club afwl -
 Eltham District Historical Society Inc
Photograph - Digital Photograph, Alan King, Maroondah Aqueduct Siphon Bridge over the Plenty River, 26 January 2008
... It extends from the Maroondah Reservoir through Christmas Hills, Kangaroo Ground, Research, Eltham, St Helena and then previously wound west through Greensborough to Reservoir.3 Built by horse and manpower the aqueduct gravity fed 25 million gallons (113.6ML) of water a day to Melbourne along a gradient of one foot to the mile. It included 25 miles (41km) of open concrete and brick channel...It extends from the Maroondah Reservoir through Christmas Hills, Kangaroo Ground, Research, Eltham, St Helena and then previously wound west through Greensborough to Reservoir.3 Built by horse and manpower the aqueduct gravity fed 25 million gallons (113.6ML) of water a day to Melbourne along a gradient of one foot to the mile. It included 25 miles (41km) of open concrete and brick channel ...Opened in 1891, the bridge formed part of the Maroondah Aqueduct carrying water from Watts River near Healesville to the reservoir at Preston where it joined Melbourne's metropolitan water system. Covered under Heritage Overlay, Nillumbik Planning Scheme. Published: Nillumbik Now and Then / Marguerite Marshall 2008; photographs Alan King with Marguerite Marshall.; p99 Built to supply thirsty Melbourne in the late 19th century, the siphon bridge spanning the Plenty River off Leischa Court, Greensborough, was part of an engineering masterpiece. Opened in 1891, the bridge formed part of the Maroondah Aqueduct carrying water from the Watts River near Healesville to the reservoir at Preston where it joined the metropolitan distribution system. A major link in Melbourne’s water supply, it also had a huge impact on communities, which mushroomed along its route. Named after the Aboriginal word for the area around the Maroondah Reservoir, the Maroondah Aqueduct was fully operational until the 1970s. Since the 1980s the land along parts of the aqueduct have been used for walking and bicycle riding, shaded in places by Monterey Pine trees planted to stabilise the surrounding ground. From 1857 the Yan Yean Reservoir supplied Melbourne’s water but the growing city needed additional catchments.1 In 1886 work began on a weir on the Watts River to enable the aqueduct to carry most of the river water 41 miles (66km) to Melbourne. The aqueduct, built by the Board of Works, is the oldest remaining aqueduct near Melbourne and was probably the first built with concrete.2 Although the aqueduct is now only used between the Maroondah and Sugarloaf Reservoirs, it can still be traced across the Shire. It extends from the Maroondah Reservoir through Christmas Hills, Kangaroo Ground, Research, Eltham, St Helena and then previously wound west through Greensborough to Reservoir.3 Built by horse and manpower the aqueduct gravity fed 25 million gallons (113.6ML) of water a day to Melbourne along a gradient of one foot to the mile. It included 25 miles (41km) of open concrete and brick channel, six miles (10km) of tunnels, and nine miles (15km) of 14 inverted siphons of riveted wrought-iron across creeks. Bricks for the aqueduct were made from clay found near the sites and remains of several kilns can still be found between Kangaroo Ground and Christmas Hills. Building the aqueduct transformed local communities. An abattoir was established at Christmas Hills. Grog shanties and labourers’ camps sprang up and local courts dealt with cases of ‘petty pilfering and boisterous behaviour’.4 The Kangaroo Ground school population jumped to 91, crammed into a room with one teacher. Miners who built the tunnels camped just north of Churinga in Greensborough – then called Tunnel Hill Camp – and adjacent to the Evelyn Arms Hotel. The miners’ high spirits were sometimes quenched in horse troughs or by a ‘welt under the ear and kick on the behind’ as the local constable calmed them down rather than lock them up.5 But the growing city of Melbourne needed more water, so the O’Shannassy catchment, east of Warburton, was added to the system in 1914. In 1920 work began on the present concrete Maroondah Dam one mile (1.6km) from the weir on the Watts River. The aqueduct capacity was thus doubled to 50 million gallons (227ML) a day.6 Intense land development threatened to pollute the open water supply, so channel sections were replaced with large pipes. In the late 1960s a large water main was built from the tunnel outlet at Research and extended through St Helena and Greensborough, so this section of the aqueduct was taken out of use. Long sections of the unused open channels in Greensborough and Bundoora were destroyed, but the old channel in Research and Eltham North remained largely intact. In the 1970s, the Sugarloaf Reservoir was constructed, inundating 445 hectares of land in Christmas Hills. Sugarloaf was officially opened in 1980 and serves as a water storage and treatment plant supplying Melbourne. In the early 1980s pipes replaced the section from Sugarloaf Reservoir to the tunnel entrance at Kangaroo Ground. The Research-Kangaroo Ground tunnel operates as part of the pipeline system.This collection of almost 130 photos about places and people within the Shire of Nillumbik, an urban and rural municipality in Melbourne's north, contributes to an understanding of the history of the Shire. Published in 2008 immediately prior to the Black Saturday bushfires of February 7, 2009, it documents sites that were impacted, and in some cases destroyed by the fires. It includes photographs taken especially for the publication, creating a unique time capsule representing the Shire in the early 21st century. It remains the most recent comprehenesive publication devoted to the Shire's history connecting local residents to the past. nillumbik now and then (marshall-king) collection, maroondah aqueduct, pipe bridge, siphon bridge -
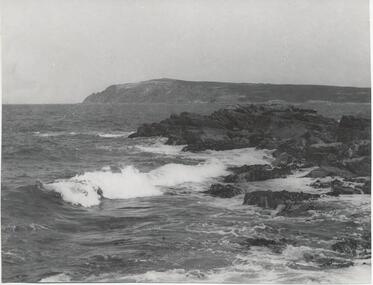 Phillip Island and District Historical Society Inc.
Photograph, Bryant West
... channel...phillip island...cape woolamai...john jenner...bryant west...Phillip Island and District Historical Society Inc. phillip-island-and-the-bass-coast One of a collection of over 400 photographs in an album commenced in 1960 and presented to the Phillip Island & Westernport Historical Society by the Shire of Phillip Island local history photography photographs coastline eastern channel phillip island cape woolamai john jenner bryant west Photograph of Cape Woolamai looking south west across the Eastern Passage. ...One of a collection of over 400 photographs in an album commenced in 1960 and presented to the Phillip Island & Westernport Historical Society by the Shire of Phillip IslandPhotograph of Cape Woolamai looking south west across the Eastern Passage.local history, photography, photographs, coastline, eastern channel, phillip island, cape woolamai, john jenner, bryant west -
Port Melbourne Historical & Preservation Society
Document - Specification, Metalling and chanelling, unnamed street from Esplanade East to Esplanade West, Engineering Department, Town of Port Melbourne, Mar 1893
... Specification for metalling and channelling unnamed street from Esplanade West to Esplanade East Loan Works 1893 plan 19; relates to plan 100.2...Port Melbourne Historical & Preservation Society Port Melbourne Town Hall 333 Bay Street Port Melbourne melbourne Engineering - Roads Streets Lanes and Footpaths Town Planning Town Clerks Mayors Arthur Victor HEATH James John BARTLETT Signed by JJ Bartlett (Mayor) 14.3.1893 Specification for metalling and channelling unnamed street from Esplanade West to Esplanade East Loan Works 1893 plan 19; relates to plan 100.2 Document Specification, Metalling and chanelling, unnamed street from Esplanade East to Esplanade West Engineering Department, Town of Port Melbourne ...Specification for metalling and channelling unnamed street from Esplanade West to Esplanade East Loan Works 1893 plan 19; relates to plan 100.2Signed by JJ Bartlett (Mayor) 14.3.1893engineering - roads streets lanes and footpaths, town planning, town clerks, mayors, arthur victor heath, james john bartlett -
Port Melbourne Historical & Preservation Society
Plan - Metalling and channelling Unnamed Street from Esplanade West to Esplanade East, Engineering Department, Town of Port Melbourne, Mar 1893
... Plan for metalling and channelling unnamed street from Esplanade West to Esplanade East Loan Works 1893 plan 19; relates to specification 100.1...Port Melbourne Historical & Preservation Society Port Melbourne Town Hall 333 Bay Street Port Melbourne melbourne Engineering - Roads Streets Lanes and Footpaths Town Planning Town Clerks Mayors Arthur Victor HEATH James John BARTLETT Signed by JJ Bartlett (Mayor) 14.3.1893 Plan for metalling and channelling unnamed street from Esplanade West to Esplanade East Loan Works 1893 plan 19; relates to specification 100.1 Plan Metalling and channelling Unnamed Street from Esplanade West to Esplanade East Engineering Department, Town of Port Melbourne ...Plan for metalling and channelling unnamed street from Esplanade West to Esplanade East Loan Works 1893 plan 19; relates to specification 100.1Signed by JJ Bartlett (Mayor) 14.3.1893engineering - roads streets lanes and footpaths, town planning, town clerks, mayors, arthur victor heath, james john bartlett -
Port Melbourne Historical & Preservation Society
Document - Specification, Metalling and channelling Liardet Street from Esplanade East to Esplanade West, 14 Mar 1893
... Specifications (102.1) & Plan (102.2) for metalling and channelling Liardet Street from Esplanade East to Esplanade West 1893.....Specifications (102.1) & Plan (102.2) for metalling and channelling Liardet Street from Esplanade East to Esplanade West 1893.. Document Specification, Metalling and channelling Liardet Street from Esplanade East to Esplanade West ...Specifications (102.1) & Plan (102.2) for metalling and channelling Liardet Street from Esplanade East to Esplanade West 1893..Both signed by J.J. Bartlett. (Mayor).engineering - roads streets lanes and footpaths, town planning, town clerks, mayors, arthur victor heath, james john bartlett, liardet street -
Port Melbourne Historical & Preservation Society
Plan - Metalling and channelling Liardet Street from Esplanade East to Esplanade West, 14 Mar 1893
... Specifications (102.1) & Plan (102.2) for metalling and channelling Liardet Street from Esplanade East to Esplanade West 1893.....Specifications (102.1) & Plan (102.2) for metalling and channelling Liardet Street from Esplanade East to Esplanade West 1893.. Plan Metalling and channelling Liardet Street from Esplanade East to Esplanade West ...Specifications (102.1) & Plan (102.2) for metalling and channelling Liardet Street from Esplanade East to Esplanade West 1893..Both signed by J.J. Bartlett. (Mayor).engineering - roads streets lanes and footpaths, town planning, town clerks, mayors, arthur victor heath, james john bartlett -
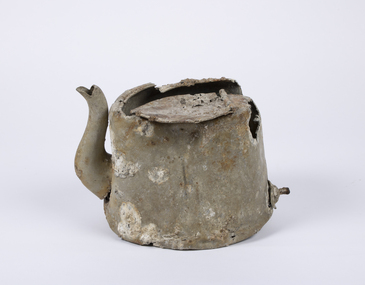 Queenscliffe Maritime Museum
Domestic object - Teapot
... west Bass Strait which quickly claimed merchant ships Cambridge (British) and the City of Rayville (American). HMAS Goorangai had finished mine sweeping duties and after resupply was crossing from Queenscliff to Point Nepean to seek better anchorage due to impending bad weather. At around 20:30 on the 20th of November 1940 the 10,400-ton MV Duntroon was transiting the South Channel...west Bass Strait which quickly claimed merchant ships Cambridge (British) and the City of Rayville (American). HMAS Goorangai had finished mine sweeping duties and after resupply was crossing from Queenscliff to Point Nepean to seek better anchorage due to impending bad weather. At around 20:30 on the 20th of November 1940 the 10,400-ton MV Duntroon was transiting the South Channel ...In 1940, German minefields were laid in east and west Bass Strait which quickly claimed merchant ships Cambridge (British) and the City of Rayville (American). HMAS Goorangai had finished mine sweeping duties and after resupply was crossing from Queenscliff to Point Nepean to seek better anchorage due to impending bad weather. At around 20:30 on the 20th of November 1940 the 10,400-ton MV Duntroon was transiting the South Channel on her way to Sydney from Perth via Melbourne carrying 65 passengers and general and perishable cargo. It struck HMAS Goorangai forward of the funnel on the port side and cut her in two. At about 20:45 HMAS Goorangai sank in less than a minute resulting in the loss of her whole ship’s company, a complement of 24 officers and sailors.HMAS Goorangai was the first Royal Australian Navy (RAN) ship lost in WWII, the first RAN surface ship lost in wartime, and the first RAN surface ship lost with all hands. A memorial cairn was erected at Queenscliff in 1981 and a service of commemoration is held there every year.A severely damaged and corroded aluminium teapot recovered from the wreck of HMAS Goorangaihmas goorangai, wwii, collision at sea -
 Port Melbourne Historical & Preservation Society
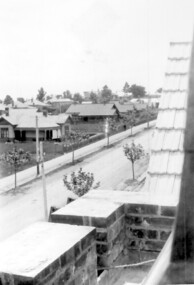
Photograph - West and rear wall balcony, first floor, Administration Building, J Kitchen & Sons, Port Melbourne, Lionel Layfield, 2014 - 2015
... Channel 9 TV program. See also cat nos 3846, 3847 and 3848 Industry - Manufacturing Built Environment - Industrial Built Environment - Commercial J Kitchen & Sons Pty Ltd Lionel LAYFIELD Demolitions First floor series of colour photographs taken inside and from the J Kitchen & Sons Administration Building, Ingles St, Port Melbourne. Details where possible are on the back of the photographs. .12 -.16 West ...Photographs taken by ex-employee of Kitchen's, Lionel LAYFIELD (refer catalogue numbers 3411 and 3412) just before the building sold to "The Block" - a Channel 9 TV program. See also cat nos 3846, 3847 and 3848First floor series of colour photographs taken inside and from the J Kitchen & Sons Administration Building, Ingles St, Port Melbourne. Details where possible are on the back of the photographs. .12 -.16 West and rear wall balcony and windowsindustry - manufacturing, built environment - industrial, built environment - commercial, j kitchen & sons pty ltd, lionel layfield, demolitions -
 Bendigo Historical Society Inc.
Document - CONNELLY, TATCHELL, DUNLOP COLLECTION: LEGAL PAPERS, 1890 1910
... Connelly, Tatchell & Dunlop - Legal Papers. 1 - 1910 - Wilson W H Re Income Tax Return. 2 - Map of Tragowel Plains Irrigation Trust, Parish of Mincha West, County of Gunbower, Portion of Allot 77. Shows channel on William Quinlan Junr block and Henry Bott on neighbouring block. 3 - 1893 - Shmick? ...Connelly, Tatchell & Dunlop - Legal Papers. 1 - 1910 - Wilson W H Re Income Tax Return. 2 - Map of Tragowel Plains Irrigation Trust, Parish of Mincha West, County of Gunbower, Portion of Allot 77. Shows channel on William Quinlan Junr block and Henry Bott on neighbouring block. 3 - 1893 - Shmick? ...Document. Connelly, Tatchell & Dunlop - Legal Papers. 1 - 1910 - Wilson W H Re Income Tax Return. 2 - Map of Tragowel Plains Irrigation Trust, Parish of Mincha West, County of Gunbower, Portion of Allot 77. Shows channel on William Quinlan Junr block and Henry Bott on neighbouring block. 3 - 1893 - Shmick? W N? H. Notes concerning. Mentions Heffernan. 4 - Vear S. Notes concerning. 5 - Notes concerning Adair W. Mentions Goodwin, Receiver of Revenue, Inglewood. 6 - 1893 - Envelope - Returned Letters - addressed to Connelly, Tatchell & Dunlop, Bendigo. 7 - 1910 - Torn letter to Green B, Solicitor, Charlton re Beckham to McGowan.cottage, miners, connelly, tatchell & dunlop, wilson w h, tragowel plains irrigation trust, quinlan william junr, bott henry, shmick? w n?, heffernan, vear s, adair w, goodwin, green b, beckham, mcgowan -
 Bendigo Historical Society Inc.
Document - PETHARD COLLECTION: FOLDER FOR GTV 9
... GEORGE PETHARD COLLECTION INCLUDING REFERENCES TO TARAXALE BREWING COMPANY PTY LTD / Blue cardboard folder - from GTV channel 9 - General television Corporation Pty Ltd , 22-46 Bendigo St Richmond - Title on front cover 'First Sponsor's Success Story' - containing letter from k A Pethard , managing Director , Taraxale Brewing Co Pty Ltd dated 3.4.1957 West Brunswick to Colin Bednall , General manager GTV Channel 9 announcing the decision to associate Taraxale permanently with the tarax Happy show as a result of increased product demand from the TV exposure .A further letter dated 4.4.1957 from Colin Bednall , General Manager GTV 9 noting his thanks ....History House 11 Mackenzie Street Bendigo goldfields DOCUMENT Memo george a pethard GEORGE PETHARD /TARAXALE BREWING COMPANY PTY LTD/ / k A Pethard /Colin Bednall General manager GTV Channel 9 / The Tarax Happy show GEORGE PETHARD COLLECTION INCLUDING REFERENCES TO TARAXALE BREWING COMPANY PTY LTD / Blue cardboard folder - from GTV channel 9 - General television Corporation Pty Ltd , 22-46 Bendigo St Richmond - Title on front cover 'First Sponsor's Success Story' - containing letter from k A Pethard , managing Director , Taraxale Brewing Co Pty Ltd dated 3.4.1957 West Brunswick to Colin Bednall , General manager GTV Channel 9 announcing the decision to associate Taraxale permanently with the tarax Happy show as a result of increased product demand from the TV exposure .A further letter dated 4.4.1957 from Colin Bednall , General Manager GTV 9 noting his thanks . ...GEORGE PETHARD COLLECTION INCLUDING REFERENCES TO TARAXALE BREWING COMPANY PTY LTD / Blue cardboard folder - from GTV channel 9 - General television Corporation Pty Ltd , 22-46 Bendigo St Richmond - Title on front cover 'First Sponsor's Success Story' - containing letter from k A Pethard , managing Director , Taraxale Brewing Co Pty Ltd dated 3.4.1957 West Brunswick to Colin Bednall , General manager GTV Channel 9 announcing the decision to associate Taraxale permanently with the tarax Happy show as a result of increased product demand from the TV exposure .A further letter dated 4.4.1957 from Colin Bednall , General Manager GTV 9 noting his thanks .document, memo, george a pethard, george pethard /taraxale brewing company pty ltd/ / k a pethard /colin bednall , general manager gtv channel 9 / the tarax happy show -
 Flagstaff Hill Maritime Museum and Village
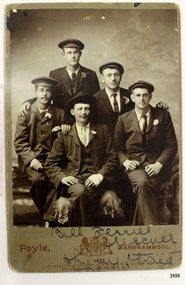
Postcard - People, Bill Ferrier - rescuer, 11th November, 1905
... West coast. On November 10th, the 37th day of her journey, La Bella approached Warrnambool. Captain Mylius steered her towards Lady Bay Channel in heavy south-west seas and evening mist. ...West coast. On November 10th, the 37th day of her journey, La Bella approached Warrnambool. Captain Mylius steered her towards Lady Bay Channel in heavy south-west seas and evening mist. ...The postcard shows a photograph of William Ferrier, the 25-year-old Warrnambool fisherman from South Warrnambool whose rescue of two sailors from the wrecked La Bella made him an overnight National hero, quoted as “one of the most heroic rescues in Victoria’s shipwreck history”. The La Bella was wrecked on 10th November 1905 and the photograph was taken on the next day. In the photograph, William Ferrier is seated in the centre, with four of the five survivors beside him: (from left to right) Leonard Robertson, R. Payne, Oscar Rosenholme and Jack Noake. The photograph was taken by Foyle Photography Studio in Warrnambool, originally owned by James Charles Foyle. He previously had a photographic studio in Melbourne 1882 1887, then opened “Foyle’s Photo Card Studios” in Liebig St, Warrnambool. James Foyle died on 13th July 1905 and his son and daughter, Charles and Lilian Foyle continued on with the business until 1945. This photograph was most likely taken by either Charles or Lilian Foyle. The story of William Ferrier’s brave act follows on below … The ship from which the sailors were rescued was the three-masted, iron and steel barquentine the La Bella, built in Norway in 1893. She was one of two iron and steel ships by Johan Smith, the company was one of the leading shipping families in Tvedestrand, Norway. She was significant to Norwegian shipping, being one of only 27 iron and steel ships ever built in Norway. She was registered in New Zealand and engaged from 1902 in inter-colonial trading of timber in the Pacific, between New Zealand and Australia and was often in Port Phillip Bay, Victoria. On 5th October 1905, the twelve-year-old La Bella left Lyttleton, New Zealand carrying a cargo of timber bound for Warrnambool, Australia. She was manned by a crew of twelve: the Master, (Captain Mylius, previously 1st Mate of La Bella, appointed Captain to La Bella on 6th February 1903) 2 Mates, Cook, six able seamen, one ordinary seaman and a boy. Bad weather en route caused her to shelter at Burnie on Tasmania's North West coast. On November 10th, the 37th day of her journey, La Bella approached Warrnambool. Captain Mylius steered her towards Lady Bay Channel in heavy south-west seas and evening mist. He ordered the helmsman to steer for the light. As the ship came round, a tremendous sea struck her on the port quarter, causing her to breach broadside in a northwesterly direction into breakers. The helm was brought round twice more, but each time heavy seas broke over her, the third time throwing the La Bella on to a submerged reef in Lady Bay now known as La Bella Reef (about 100 yards from the Warrnambool breakwater). The sea was so rough that it even wrenched a one-and-a-half ton anchor from its fastenings and into the sea. As Captain Mylius headed to the steel wheelhouse, intending to send up a rocket flare, a huge sea slammed the steel door into him (resulting in massive bruising front and back) Despite his injuries he still managed to set off a blue light, which he held up in his hands. La Bella’s lifeboats were filled with seawater and broke up on their chocks. The blue light was the first indication to people on the shore that there was a ship in distress. The Harbour Master, Captain Roe (who lived in the Harbour Master’s House opposite Flagstaff Hill), organised a group of volunteers to crew the lifeboat because the trained crew was unavailable; the crewmen were working on a steamer in Port Fairy at the time. He then poured oil onto the water to try and smooth the sea. At around 11 pm three of the crew took shelter in the steel forecastle but the sea crashed into it and broke it up. While the rest of the crew and onlookers watched helplessly in the moonlight the bodies were washed away into the sea, never to be seen again. Some of the crew lashed themselves to the weather rail to keep from being washed away. Watson, the ordinary seaman, became tangled in the rigging lines and was too weak to move, so the 2nd Mate, Robertson, put a line onto him so that he wouldn’t wash off. Around 11 pm three of the crew were unconscious from exhaustion. The situation on La Bella was becoming dangerous. The 2nd Mate moved to the ‘house’ and soon afterwards the ship slipped in the heavy sea. The lashings of the 1st Mate and the ‘boy’ Denham had kept them safe until about 2 am when they were washed overboard; no one was able to help. One by one, the exhausted crew were being washed overboard, too weak to hold on any longer. During the night the La Bella had broken into two and the deckhouse ran out towards the sea. Two more men drowned when trying to reach the lifeboat. By sunrise, the only survivors of the twelve were the Master, 2nd Mate and three seamen. Early in the morning, Captain Roe used the rocket apparatus on shore to try and shoot a line to the ship for a safer rescue but each attempt fell short of the target. Several attempts were made by the lifeboat to rescue the stricken sailors, but the rough conditions made this difficult for the boat to get close enough to the ship and the lifeboat had to return to shore. During a final attempt to reach the ship Captain Mylius ordered his men to jump into the sea. Leonard Robertson, 2nd mate, jumped and swam towards the lifeboat, taking hold of the boat hook offered to him. Oscar Rosenholme managed to reach the boat floating on a piece of timber from the ship’s load and a third survivor, Noake, also made the boat. Along with the lifeboat rescue crew, 25-year-old William Ferrier rowed his small dingy through the heavy seas and managed to rescue the Captain, whom he landed on the breakwater. Ferrier then returned to the ship to attempt a final rescue, losing his oars and rowlocks into the high sea. Using just a spare paddle he skulled towards the La Bella, reaching her stern in time to cut loose the lone surviving sailor, Payne, from the lashing that held him to the ship; the terrified sailor dropped from the ship and into the dingy. Shortly after the last man was rescued, the La Bella was lifted by a huge wave and crashed back down on the reef; she broke up and sank. The ordeal had lasted ten hours. The survivors were taken to the nearby Bay View Hotel and gratefully received warm food and clothing, medical attention and a place to sleep. In the following days, an unidentified body of a young person had washed ashore; it was either Watson or Denham. The body was buried in the Warrnambool cemetery with an appropriate gravestone and inscription. William Ferrier became a national hero as news of the daring rescue spread. In recognition of his bravery in the two daring rescues, he was awarded the Silver Medal for Bravery by the Royal Humane Society and was honoured in the letter from the Prime Minister and the Parliament of the Commonwealth, telegrams and a cheque for £20 from the Governor-General, over £150 subscribed by the public, including Warrnambool and district and readers of The Argus, and a gold medal from the Glenelg Dinghy Club of South Australia. Ferrier’s rescue efforts are one of the most heroic in Victoria’s shipwreck history. (William Ferrier’s son, Frank, received a similar award almost fifty years later when he helped rescue four members of the crew on the yacht Merlan after it ran on to a reef near the Point Lonsdale Lighthouse. ) The wreck of La Bella now lies on her port side in 13 metres of sheltered water inside the reef she struck. The bow section is relatively intact and part of the stern has drifted north-easterly towards the mouth of the Hopkins River. The reef the La Bella struck now bears its name. Those five rescued from the La Bella were Captain George Mylius, Leonard Robertson (2nd Mate, 21 years old), R. Payne, Oscar Rosenholme and Jack Noake. Those seven who lost their lives were Mr Coulson (1st mate), Charles Jackman (cook) Gustave Johnson, Pierre Johann and Robert Gent (all able seamen), Harry Watson (ordinary seaman) and Jack Denham (ship’s boy), Captain Mylius was found guilty of careless navigation; he had sailed into the bay without the services of a pilot. His Master Certificate was suspended for twelve months. Later he was also charged with manslaughter of one of the crew who had died when the La Bella was wrecked but found not guilty. The event’s adverse publicity and damage to his career took a toll on his health and he died of a heart attack six months after the wreck; he was only thirty-seven. His body was buried in the Melbourne General Cemetery. The La Bella was “the best documented of all sailing ships owned in New Zealand”. Her record books, ship logs, correspondence and supporting papers are still available. At the time of the tragedy, she was owned by Messers David C.Turnbull and Co. of Timaru, New Zealand timber merchants and shipping agents, who had purchased her on 13th December 1901. A detailed account of the last journey of La Bella can be read in “Leonard Robertson, the Whangaroa & La Bella” written by Jack Churchouse, published in 1982 by Millwood Press Ltd, Wellington, NZ. As well as this postcard, Flagstaff Hill’s La Bella Collection includes a photograph of the wrecked La Bella, a brass rail holder and the letter from the Prime Minister and other Members of Parliament that was sent to William Ferrier to commend him for his bravery. Some 15 – 17 ships are believed to have sunk in Lady Bay, but only two have been discovered on the seafloor; the “La Bella” and the “Edinburgh Castle”. Both wrecks are popular diving sites and are preserved as significant historical marine and marine archaeological sites. This postcard is part of the La Bella Collection and is significant at both a local and state level. Its connection to the La Bella shipwreck and the rescue of five survivors highlights the dangers of Victoria’s Shipwreck Coast. The photograph of William Ferrier and four of the five survivors demonstrates the bravery of ordinary Australians who risked their lives to save victims of shipwrecks along the coast. The postcard is significant to the history of Warrnambool as it portrays William Ferrier, a local fisherman whose descendants continue to live in the area. It highlights the way of life of people who lived in coastal towns in 19th century Victoria and the effects of shipwrecks upon them. The postcard connects to the congratulatory letter which was sent to William Ferrier by the Prime Minister and Government of Australia and demonstrates the importance they attached to his efforts for Victoria and to Australia. The postcard is also an example of the photography of Foyle Photographers who were in the town of Warrnambool from the late 1800’s. Charles and Lillian Foyle took over the business when their father James died in 1905. Lillian Foyle is significant as the first woman photographer in Warrnambool. It is not known whether Charles of Lillian took this photograph. This postcard is significant because of its association with the sailing ship “La Bella”. The “La Bella” is of local and state and national significance. It is one of the only two shipwrecks discovered in Lady Bay, Warrnambool, out of the 15-17 shipwrecks in the bay. Sepia photograph of William (Bill) Ferrier (seated in the middle), heroic rescuer of two crew members of the La Bella, wrecked at Warrnambool. The photograph is a postcard and shows five men dressed formally in suits and hats. Printed below the photograph are the name and place of the photographer, a royal crest and the details of two patrons of the photographer. Also below the photograph are some handwritten words in black pen. On the back of the postcard is a handwritten message in the same writing as the front.Printed on the front of the card is “Foyle, WARRNAMBOOL” “PATRONS: / HIS ROYAL HIGHNESS THE DUKE OF CORNWALL & YORK. / HIS EXCELLENCY LORD BRAS_ EY, R.O.B.” Handwritten on the front of the card is “Bill Ferrier / rescuer / Oh my hero _ _ _ “ Handwritten on the back of the card is a message. “La Bella” Wrecked off W.Bool Breakwater Nov. 1906 (_ _ _ _ show night) Payne Noake Rosenholme Robertson and Capt Mylius (saved) (moonlight bright) Watson (_ _ _ _ boy) Richwoud [possibly Richmond] drowned” and signed “Desdewoua [possibly Desdemona] Slogos”la bella, foyle, william ferrier, bill ferrier, lady bay, 1905, 10th november 1905, 11th november 1905, parliament of the commonwealth, royal humane society medal, flagstaff hill, warrnambool, shipwrecked coast, flagstaff hill maritime museum, maritime museum, shipwreck coast, flagstaff hill maritime village -
 Flagstaff Hill Maritime Museum and Village
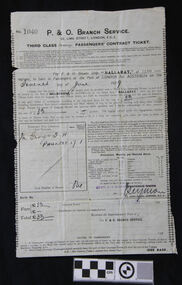
Document - Ticket, voyage, P & O Branch Service, P & O, Australia via The Cape Service, Bef.3rd June 1929
... George relates his trip from England to Australia, summarised as follows: He caught a bus from Bolton to Manchester, in the north west U.K., then the train from Manchester to London and the boat train to Tilbury Docks (near Gravesend). On the morning of June 7th 1929, the ship S.S. Ballarat sailed down the Thames estuary and into the English Channel...George relates his trip from England to Australia, summarised as follows: He caught a bus from Bolton to Manchester, in the north west U.K., then the train from Manchester to London and the boat train to Tilbury Docks (near Gravesend). On the morning of June 7th 1929, the ship S.S. Ballarat sailed down the Thames estuary and into the English Channel ...The bearer of this ticket was George Thomas Henry Phillpot, who was only 17 years old when he sailed on the S.S. Ballarat (II), built in 1921. (The first S.S. Ballarat was built in 1911 and sunk after being hit by a torpedo in 1917 while serving during WWI). George relates his trip from England to Australia, summarised as follows: He caught a bus from Bolton to Manchester, in the north west U.K., then the train from Manchester to London and the boat train to Tilbury Docks (near Gravesend). On the morning of June 7th 1929, the ship S.S. Ballarat sailed down the Thames estuary and into the English Channel. The next port of call was Southampton, UK, to take on board some technical equipment. The S.S. Ballarat then sailed through the Bay of Biscay. Instead of taking the customary route around the Cape of Good Hope, this trip, on her maiden voyage, was through the Suez Canal. She sailed through the Straits of Gibraltar, into the Mediterranean Sea and on to Malta, where George and others paid a local boat owner to take them ashore for a short time. They then sailed to Port Said, stopping to load cargo, then at night through the Suez Canal. They woke up early the next morning to watch the locals working on the banks of the canal. The excessive heat on board the ship caused much illness. As they travelled through the Red Sea, the heat and the smell of oil also caused sickness. On they went through the Arabian Sea to Colombo, the capital of Sri Lanka (which at that time was called Ceylon). A Navigation Slip, donated together with this ticket, shows the coordinates for a location 16 miles from Colombo. They again went ashore for a meal at four-pence a head and a bottle of lemonade for a penny. George and another passenger walked to the slums area and were shocked at the state of it compared to Britain’s slums. They then sailed via the Indian Ocean to Fremantle, stopping again for goods to be unloaded. While ashore, they played a game of soccer against the ship’s crew. Then on to Port Adelaide via the Great Australian Bight. Here they shopped for suitable clothing under the advice of some Australian passengers. They then arrived at Port of Melbourne on July 20th 1929, and two days later (on George’s mother’s birthday). George left for Warrnambool. He received his Citizenship Award in 1971. He conducted an electrical retail business in Liebig Street for many years. His son William became principal of the accounting business Sinclair and Wilson, on the retirement of Bill Sinclair, and was actively involved in support of many community organisations. His daughter-in-law, Glenys Phillpot, is actively involved in the Warrnambool community and local government. George was one of 3 orphans on the S.S. Ballarat. (The daughter and son-in-law of one of the other orphans also live in Warrnambool.) Herbert B.G. Larkin, whose rubber-stamped name appears on the ticket, later migrated to Australia and passed away in NSW in 1944. Of Historical Significance, this ticket is for the ship’s maiden voyage via the Suez Canal route (previously the ship travelled via the Cape of Good Hope). It is also the only existing ticket for the "S.S. Ballarat"(3rd) in our collection. Socially, it shows the fare, luggage restrictions, conditions and weekly provisions for a third-class passenger’s voyage from London to Melbourne, which has research potential. This ticket is also of significance to the Local Community, giving the background of the ancestor of a local family. It was also of Personal Significance to the bearer as he kept and preserved it in his possession for at least 46 years before donating it to our museum, together with a Navigation Slip, a map and a summary of his journey to Australia.Third Class steerage Passenger’s Contract Ticket, accompanied by the Navigation Slip, for passage on board the P & O line’s steamer, S.S. Ballarat, to Australia via the Cape Service, from Port of London to Port of Melbourne. The ticket contract is printed on both sides of a thin paper page. The documents have been completed by hand, and the pages have creases as though they have been folded. Details include the date of sailing, amount paid, and the signature of the P & O Branch Service’s representative. The contract ticket lists weekly provisions for the voyage, a disclaimer of the shipping company, a list of dangerous goods not to be carried on board, and fines. The page has straight edges, top and bottom, and perforated edges on the sides; some perforation holes are complete. A small fleur de lies is printed along the inside of each perforation, forming a decorative left and right border. Stamps and inscriptions are on the contract ticket and navigation slip, which also has a black and white photo of a steam ship.The ticket has been stamped in black, No. ‘1040’. Handwritten details are in black pen and ink. Date of departure: ‘Seventh June [192]9’ for the cost of,’33’ [poind], and the sum of ‘33’ pounds is acknowledged as received. ‘Mr George T.H. PHILLPOT’, the age is written as ‘17’, equal to the status of ‘1’ adult, the total number of persons is ‘One’. The fare is handwritten in pen £’33’ and the total £’33’. It has a purple stamp ‘HERBT. B G LARKIN’ and a crossed out stamp ‘FREDERICK WHITE, A handwritten signature ‘_Seymore’. Under the signature, the date is stamped ‘3 JUNE 1929’.warrnambool, shipwrecked coast, flagstaff hill, flagstaff hill maritime museum, maritime museum, shipwreck coast, flagstaff hill maritime village, s.s.ballarat, phillpot, 7 june 1929, george phillpot, george t.h. phillpot, third class passenger, steerage passenger, herbert b g larkin, ticket, voyage, p & o, australia via the cape, cape of good hope, suez canal, passengers’ contract ticket, navigation slip, s.s. ballarat, steamship, 1929, 3-6-1929, 7-6-1929, third-class, steerage, port of london, port of melboune, 33 pounds, george thomas henry phillpot, herbt. b g larkin, _seymore, bolton, manchester, english channel, southampton, bay of biscay, straits of gibraltar, maritia, port said, arabian sea, colombo, sri lanka, ceylon, indian ocean, fremantle, port adelaide, citizenship, 1971, herbert b.g. larkin, s.s. ballarat ii, -
 Flagstaff Hill Maritime Museum and Village
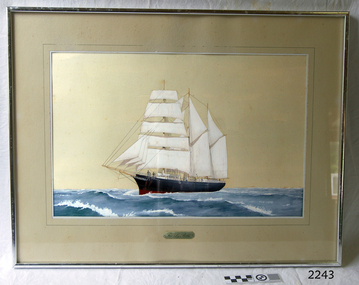
Painting - Maritime painting, The La Bella, 1980s
... West coast. On November 10th, the 37th day of her journey, La Bella approached Warrnambool. Captain Mylius steered her towards Lady Bay Channel in heavy south-west seas and evening mist. ...West coast. On November 10th, the 37th day of her journey, La Bella approached Warrnambool. Captain Mylius steered her towards Lady Bay Channel in heavy south-west seas and evening mist. ...This painting of the “La Bella” is associated with Flagstaff Hill’s collection of artefacts from the wreck of the “La Bella”. It was painted around the 1980s by maritime artist Philip J. Gray. Some 15 – 17 ships are believed to have sunk in Lady Bay, but only two have been discovered on the seafloor; the “La Bella” and the “Edinburgh Castle”. Both wrecks are popular diving sites and are preserved as significant historical marine and marine archaeological sites. The Kosnar Picture Framing and Mirrors Shop identified the "GRAY 3135, Y04/111" as their job number for the framing and said that the label "ANOTHER KOSNAR FEATURE" was last used before about 1990. About artist Philip J. Gray “Philip is one of Australia’s leading maritime artists and his meticulous research and social commentary paintings of ships, such as, the Loch Ard and Schomberg form an important part of Warrnambool’s Flagstaff Hill Maritime Museum.” [Dr Marion Manifold, Artist and Art Historian, 2014] Philip James Gray was born in London but has lived most of his life in Australia. He graduated from a London school of art as an illustrator, specialising in technical and scientific illustration as well as other commercial and applied art. He was also a student for a time of Fyffe Christie - British figurative artist, mural painter and humanitarian – who had a great influence on his career. Philip has always worked as a professional artist and illustrator. Many publications on maritime history have featured his work. His paintings have been released and sold all over the world as limited edition prints. The State Library of Victoria’s ‘Latrobe Collection’ holds two of his paintings. His street painting of ‘The Ashes Contest’ decorates the brick wall of Old Bakery Laneway in Sunbury and a Sunbury café owner commissioned him to paint the ‘Sunbury Pop Festival’ as a remembrance of local history. Philip has been an active member of the Sunbury Art Society in Victoria for several years, serving on the committee for some of that time and being involved in exhibitions. He enjoys helping new artists and sharing his skills and experience. About the “La Bella” The wreck of the La Bella lies at the bottom of the Warrnambool Harbour in Lady Bay. Some 15 ships are believed to have been wrecked there but only two have been discovered on the sea floor; the La Bella and the Edinburgh Castle. Both wrecks are popular diving sites and are preserved as significant historical marine and marine archaeological sites. The story of the final voyage of the La Bella is summarised as follows … The ship from which the sailors were rescued was the three-masted, iron and steel barquentine the La Bella, built in Norway in 1893. She was one of two iron and steel ships by Johan Smith, the company being one of the leading shipping families in Tvedestrand, Norway. She was significant to Norwegian shipping, being one of only 27 iron and steel ships ever built in Norway. La Bella was registered in New Zealand and engaged from 1902 in inter-colonial trading of timber in the pacific, between New Zealand and Australia and was often in Port Phillip Bay, Victoria. On 5th October 1905 the twelve year old La Bella left Lyttleton, New Zealand carrying a cargo of timber bound for Warrnambool, Australia . She was manned by a crew of twelve: the Master, (Captain Mylius, previously 1st Mate of La Bella, appointed Captain to La Bella on 6th February 1903) 2 Mates, Cook, six able seamen, one ordinary seaman and a boy. Bad weather en-route caused her to shelter at Burnie on Tasmania's North West coast. On November 10th, the 37th day of her journey, La Bella approached Warrnambool. Captain Mylius steered her towards Lady Bay Channel in heavy south-west seas and evening mist. He ordered the helmsman to steer for the light. As the ship came round, a tremendous sea struck her on the port quarter, causing her to breach broadside in a north-westerly direction into breakers. The helm was brought round twice more, but each time heavy seas broke over her, the third time throwing the La Bella on to a submerged reef in Lady Bay now known as La Bella Reef (about 100 yards from the Warrnambool breakwater). The sea was so rough that it even wrenched a one-and-a-half ton anchor from its fastenings and into the sea. As Captain Mylius headed to the steel wheelhouse, intending to send up a rocket flare, a huge sea slammed the steel door into him (resulting in massive bruising front and back) Despite his injuries he still managed to set off a blue light, which he held up in his hands. La Bella’s lifeboats were filled with sea water and broke up on their chocks. The blue light was the first indication to people on shore that there was a ship in distress. The Harbour Master, Captain Roe (who lived in the Harbour Master’s House opposite Flagstaff Hill), organised a group of volunteers to crew the lifeboat because the trained crew was unavailable; the crewmen were working on a steamer in Port Fairy at the time. He then poured oil onto the water to try and smooth the sea. At around 11pm three of the crew took shelter in the steel forecastle but the sea crashed into it and broke it up. While the rest of the crew and onlookers watched helplessly in the moonlight the bodies were washed away into the sea, never to be seen again. Some of the crew lashed themselves to the weather rail to keep from being washed away. Watson, the ordinary seaman, became tangled in the rigging lines and was too weak to move, so the 2nd Mate, Robertson, put a line onto him so that he wouldn’t wash off. Around 11pm three of the crew were unconscious from exhaustion. The situation on La Bella was becoming dangerous. The 2nd Mate moved to the ‘house’ and soon afterwards the ship slipped in the heavy sea. The lashings of the 1st Mate and the ‘boy’ Denham had kept them safe until about 2am when they were washed overboard; no one was able to help. One by one, the exhausted crew were being washed overboard, too weak to hold on any longer. During the night the La Bella had broken into two and the deckhouse ran out towards the sea. Two more men drowned when trying to reach the lifeboat. By sunrise the only survivors of the twelve were the Master, 2nd Mate and three seamen. Early in the morning Captain Roe used the rocket apparatus on shore to try and shoot a line to the ship for a safer rescue but each attempt fell short of the target. Several attempts were made by the lifeboat to rescue the stricken sailors, but the rough conditions made this difficult for the boat to get close enough to the ship and the lifeboat had to return to shore. During a final attempt to reach the ship Captain Mylius ordered his men to jump into the sea. Leonard Robertson, 2nd mate, jumped and swam towards the lifeboat, taking hold of the boat hook offered to him. Oscar Rosenholme managed to reach the boat floating on a piece of timber from the ship’s load and a third survivor, Noake, also made the boat. Along with the lifeboat rescue crew, 25 year old William Ferrier rowed his small dingy through the heavy seas and managed to rescue the Captain, whom he landed on the breakwater. Ferrier then returned to the ship to attempt a final rescue, losing his oars and rowlocks into the high sea. Using just a spare paddle he skulled towards the La Bella, reaching her stern in time to cut loose the lone surviving sailor, Payne, from the lashing that held him to the ship; the terrified sailor dropped from the ship and into the dingy. Shortly after the last man was rescued, the La Bella was lifted by a huge wave and crashed back down on the reef; she broke up and sank. The ordeal had lasted ten hours. The survivors were taken to the nearby Bay View Hotel and gratefully received warm food and clothing, medical attention and a place to sleep. In the following days an unidentified body of a young person was washed ashore; it was either Watson or Denham. The body was buried in the Warrnambool cemetery with an appropriate gravestone and inscription. William Ferrier became a national hero as news of the daring rescue spread. In recognition of his bravery in the two daring rescues he was awarded the Silver Medal for Bravery by the Royal Humane Society and was honoured in the letter from the Prime Minister and the Parliament of the Commonwealth, telegrams and a cheque for £20 from the Governor General, over £150 subscribed by the public, including Warrnambool and district and readers of The Argus, and a gold medal from the Glenelg Dinghy Club of South Australia. Ferrier’s rescue efforts are one of the most heroic in Victoria’s shipwreck history. (William Ferrier’s son, Frank, received a similar award almost fifty years later, when he helped rescue four members of the crew on the yacht Merlan, after it ran on to a reef near the Point Lonsdale Lighthouse. ) The wreck of La Bella now lies on her port side in 13 metres of sheltered water inside the reef she struck. The bow section is relatively intact and part of the stern has drifted north-easterly towards the mouth of the Hopkins River. The reef the La Bella struck now bears its name. Those five rescued from the La Bella were Captain George Mylius, Leonard Robertson (2nd Mate, 21 years old), R. Payne, Oscar Rosenholme and Jack Noake. Those seven who lost their lives were Mr Coulson (1st mate), Charles Jackman (cook) Gustave Johnson, Pierre Johann and Robert Gent (all able seamen), Harry Watson (ordinary seaman) and Jack Denham (ship’s boy). Captain Mylius was found guilty of careless navigation; he had sailed into the bay without the services of a pilot. His Master Certificate was suspended for twelve months. Later he was also charged with manslaughter of one of the crew who had died when the La Bella was wrecked, but found not guilty. The event’s adverse publicity and damage to his career took a toll on his health and he died of a heart attack six months after the wreck; he was only thirty-seven. His body was buried in the Melbourne General Cemetery. The La Bella was “the best documented of all sailing ships owned in New Zealand”. Her record books, ship logs, correspondence and supporting papers are still available. At the time of the tragedy she was owned by Messers David C.Turnbull and Co. of Timaru, New Zealand timber merchants and shipping agents, who had purchased her on 13th December 1901. A detailed account of the last journey of La Bella can be read in “Leonard Robertson, the Whangaroa & La Bella” written by Jack Churchouse, published in 1982 by Millwood Press Ltd, Wellington, NZ.This painting of the La Bella by Philip J. Gray is part of the La Bella Collection and is significant at both a local and state level. Its connection to the La Bella shipwreck and the rescue of five survivors highlights the dangers of Victoria’s Shipwreck Coast. The painting connects with other objects and artefacts associated with the wreck of the La Bella. This painting is significant because of its association with the sailing ship “La Bella” . the “La Bella” is of local and state and national significance. It is one of the only two shipwrecks discovered in Lady Bay, Warrnambool, out of the 15-17 shipwrecks in the bay. Large framed painting of the three masted barquentine "La Bella" fully rigged. Painted by Phillip J Gray. A fine printed line squares off the painting. Beneath painting and line is a gold plate with black copper plate designating "La Bella" is encased in glass, surrounded by a silver-metal frame. Yellow and brown paper label is adhered to back of painting. Picture framed by Kosnar in Melbourne."The La Bella" on gold plaque Logo of "K" inside a brown square. "GRAY 3135, Y04/111", "ANOTHER KOSNAR FEATURE" flagstaff hill, warrnambool, shipwrecked-coast, flagstaff-hill, flagstaff-hill-maritime-museum, maritime-museum, shipwreck-coast, flagstaff-hill-maritime-village, painting, la bella, artist phillip j gray, maritime painting, lady bay warrnambool -
 Federation University Historical Collection
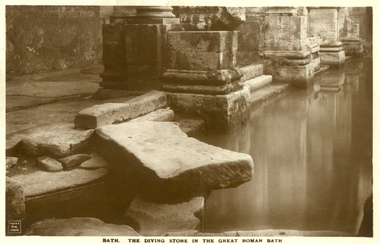
Postcard - Sepia, The Diving Stone in the Great Roman Bath, Bath, Somerset
... The Diving stone, at the north-west corner of the great Roman Bath, still shows where the feet of bygone bathers wore away its surface. The hot mineral waters flowed into the bath through a channel under this stone. ...The Diving stone, at the north-west corner of the great Roman Bath, still shows where the feet of bygone bathers wore away its surface. The hot mineral waters flowed into the bath through a channel under this stone. ...The Great Bath is a massive pool, lined with 45 sheets of lead, and filled with hot spa water. It once stood in an enormous barrel-vaulted hall that rose to a height of 40 metres. For many Roman visitors this may have been the largest building they had ever entered in their life. The bath is 1.6 metres deep, which was ideal for bathing, and it has steps leading down on all sides. Niches around the baths would have held benches for bathers and possibly small tables for drinks or snacks. A large flat slab of stone is set across the point where hot water flows into the bath. It is known today as the diving stone. The Roman Baths complex is a site of historical interest in the English city of Bath. The house is a well-preserved Roman site for public bathing. The Roman Baths themselves are below the modern street level. There are four main features: the Sacred Spring, the Roman Temple, the Roman Bath House and the Museum, holding finds from Roman Bath. The buildings above street level date from the 19th century. Sepia postcard of a section of the Great Roman Bath at Bath, Somerset featuring the Diving Stone.printed verso: The Diving Stone in the great roman bath. The Diving stone, at the north-west corner of the great Roman Bath, still shows where the feet of bygone bathers wore away its surface. The hot mineral waters flowed into the bath through a channel under this stone. chatham-holmes family collection, bath, great roman bath, swimming pool -
 Federation University Art Collection
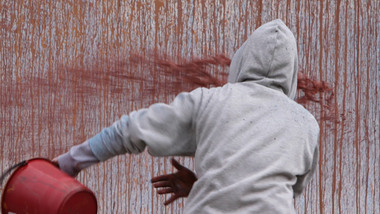
Artwork, other - Artwork, "West Park Proposition' by Ash Keating, 2013
... 'West Park Proposition', 2012, is a three channel and screen video installation, utilising multiple camera video documentation of an endurance painting intervention undertaken on the morning of 01 September 2012 on the east facing wall of a newly built tilt-slab industrial building, situated on the direct edge of the current urban and rural boundary in Truganina, Victoria. ...Frequently working beyond the gallery, and often harnessing community narrative and energy, his work also draws upon myth, ritual and ceremony. artist artwork keating ash keating guirguis guirguis new art prize gnap gnap13 'West Park Proposition', 2012, is a three channel and screen video installation, utilising multiple camera video documentation of an endurance painting intervention undertaken on the morning of 01 September 2012 on the east facing wall of a newly built tilt-slab industrial building, situated on the direct edge of the current urban and rural boundary in Truganina, Victoria. ...Ash KEATING Among fifteen finalists this artwork won the 2012 Guirguis New Art Prize, a prestigious national acquisitive biennial art prize administered by Federation University Australia. The Guirguis New Art Prize (GNAP) is a national acquisitive $20,000 contemporary art prize which presents a selection of Australia's most exciting contemporary artists with works that explore and embrace new ways of artistic expression, utilising existing mediums and new technologies in innovative ways. Initiated and generously supported by local Ballarat surgeon Mr Mark Guirguis, this prestigious art prize is administered by the Federation University Australia (FedUni). As a local philanthropist and art collector, in developing the Prize, Mark Guirguis' aims were to celebrate the significance of the arts to communities and to Ballarat, emphasising contemporary art and 'living' culture, and to highlight FedUni's Arts Academy. Artist Ash Keating works across a conceptual, site-responsive and often collaborative art practice that incorporates painting, sculpture, installation, video, performance and public interventions, and has referenced a wide range of social and environmental issues within his art. Frequently working beyond the gallery, and often harnessing community narrative and energy, his work also draws upon myth, ritual and ceremony. 'West Park Proposition', 2012, is a three channel and screen video installation, utilising multiple camera video documentation of an endurance painting intervention undertaken on the morning of 01 September 2012 on the east facing wall of a newly built tilt-slab industrial building, situated on the direct edge of the current urban and rural boundary in Truganina, Victoria. The multi-screen work documents an endurance guerilla-style action painting intervention and ritualised painting performance in which a symbolic violence is enacted against a storehouse of commodity production and consumption. Upon winning the award artists Ash Keating said; “The work was made near Ballarat on the Deer Park bypass. It is an aesthetic comment about the way these new tilt-slab industrial buildings spring up without caring for the environment." The work, which took eight hours to create, was about reclaiming the space from “cost-effective architecture” without any aesthetics. The inaugural judge for the Prize, Jason Smith, Director, Heide Museum of Modern Art (MoMA) said, "Selecting the winner of this inaugural GNAP was exhilarating and excruciating: exhilarating because the seriousness of each artist's enterprise, and their uncompromising resolution of concepts, has created an inaugural exhibition of exceptional power. This first GNAP is a survey of some of the most poetic and provocative imaginations working in Australia today. Selecting one winner from such a show in which each of these artists has in some way transformed my thinking about the world was the excruciating part. Ash Keating's work West Park Proposition, 2012 kept drawing me back in the several hours I spent viewing the works. It simultaneously affirms the political and critical role of the artist as a key agent of change and action, and someone who reminds us of the beauty and resilience of humanity and nature in the face of unrelenting change. As a work combining performance, collaboration and hope, Keating's West Park Proposition is a work of immense and compelling poetry."artist, artwork, keating, ash keating, guirguis, guirguis new art prize, gnap, gnap13 -
Tatura Irrigation & Wartime Camps Museum
Photographs, Anderson collection of irrigation and farm photos, c.1920 (Loaned), c.1920
... West Mooroopna, 2 miles from the school. Bill had been a stretcher bearer in WW1. Photos taken by Anderson family of general farming activities, irrigation channel construction with horse teams, Goulburn Weir, Waranga Basin western outlet structure and channel, official opening ceremony. ...West Mooroopna, 2 miles from the school. Bill had been a stretcher bearer in WW1. Photos taken by Anderson family of general farming activities, irrigation channel construction with horse teams, Goulburn Weir, Waranga Basin western outlet structure and channel, official opening ceremony. ...Collection of photos taken c.1920 by the Anderson family. Carlton and Bill Anderson left Murchison for a soldier settlement block at North West Mooroopna, 2 miles from the school. Bill had been a stretcher bearer in WW1. Photos taken by Anderson family of general farming activities, irrigation channel construction with horse teams, Goulburn Weir, Waranga Basin western outlet structure and channel, official opening ceremony. Photos loaned for copying.|1. Outlet structure, possibly the opening.|2.Western Channel.|3.Waranga Basin inlet.|4. Waranga Basin outlet.|5,6.Goulburn Weir.|7,8 Channel construction with horse teams.|9.Skid scoop.|10. Group at Bain.|11."Spot", Bill Anderson and the team.|12.Teams take time off.|13.Washing up.|14.Spring cart and "Smoko"|15.Bill Anderson holding horse.|16.Team of four.|17.A good crop.|18.Wonkey scoop with two horse team.|19,Horses at rest.|20.Head in nose bag.|21.Bill Anderson & Marty Clooney, tents, wagons and gig.|22.Wally Wybrow grooming horse.|23 Bill Anderson, Marty Clooney and furphy tank.|24. Four horse teams.|25.Carlton Anderson? cutting hair.|26,27.|28.Three wheel trolley made from old harvester.|29. Harvester.|30.Wally.|31.Marty Clooney and horse.|32|33.Seven horse team.|34-43.Various farm photos -
 Lakes Entrance Historical Society
Photograph - The Entrance, Bulmer H D, 1935
... Black and white photograph of the entrance, shows entrance channel east and west piers, ocean surf breaking on sandy beach. ...Lakes Entrance Historical Society 4 Marine Parade Lakes Entrance gippsland Piers Ocean Black and white photograph of the entrance, shows entrance channel east and west piers, ocean surf breaking on sandy beach. ...Black and white photograph of the entrance, shows entrance channel east and west piers, ocean surf breaking on sandy beach. Lakes Entrance Victoriapiers, ocean -
 Lakes Entrance Historical Society
Postcard - Dredge Pioneer, Segerberg and Bulmer, 1910 c
... Black and white postcard showing dredge Pioneer working below Jemmys Point facing entrance rock groynes on west of Bullock Island calm entrance in distance steamer JCD heading across Reeves Channel after leaving Lakes Entrance Victoria...Lakes Entrance Historical Society 4 Marine Parade Lakes Entrance gippsland Message on back Arrived safe 25th have a good time hoping you are well from FCG Addressed to Mrs FC Gason, Jessops Hill, Lower Nicholson Waterways Dredges Correspondence Lakes Entrance Black and white postcard showing dredge Pioneer working below Jemmys Point facing entrance rock groynes on west of Bullock Island calm entrance in distance steamer JCD heading across Reeves Channel after leaving Lakes Entrance Victoria Postcard Dredge Pioneer Segerberg and Bulmer ...Message on back Arrived safe 25th have a good time hoping you are well from FCG Addressed to Mrs FC Gason, Jessops Hill, Lower NicholsonBlack and white postcard showing dredge Pioneer working below Jemmys Point facing entrance rock groynes on west of Bullock Island calm entrance in distance steamer JCD heading across Reeves Channel after leaving Lakes Entrance VictoriaLakes Entrance waterways, dredges, correspondence -
 Surrey Hills Historical Society Collection
Photograph, Union Road looking west from the steeple of Holy Trinity Church, 1922, 1922
... west. In the foreground immature street trees can be seen and an original telephone pole with white insulators. The street has formed paths and bluestone kerb and channelling. ...west. In the foreground immature street trees can be seen and an original telephone pole with white insulators. The street has formed paths and bluestone kerb and channelling. ...At the edge of the church roof and on the horizon is 'The Knoll' on the corner of Union Road and Wandsworth Road. To the left of this is 297 Mont Albert Road, home of the Michael Parer family and further left is "Quamby", home of the Sherar family. This is easily recognised by the square viewing tower located on the west wing of the house. The Sherar family owned 'Quamby' from 1900 until 1925, when it became Mosgiel Private Hospital. Norman Carter took many photos of Surrey Hills and Mont Albert in the 1920s; many associated with events and activities of the Church of England. Black and white photo of taken from the steeple of Holy Trinity Church, during its construction, across Union Road to the north-west. In the foreground immature street trees can be seen and an original telephone pole with white insulators. The street has formed paths and bluestone kerb and channelling. holy trinity anglican church, union road, the knoll, quamby, street trees, telegraph and light poles, mosgiel hospital