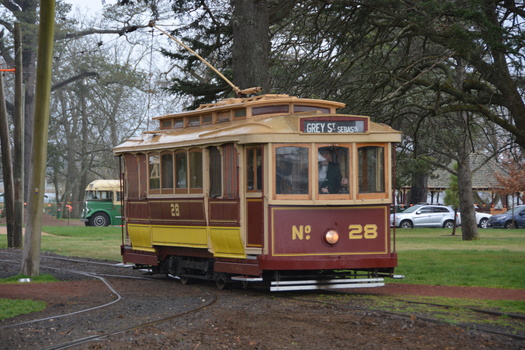
Functional Object - Tramcar, Duncan and Fraser, SECV Tram No. 28, 1916
Other items from this collection
-
Ballarat Tramway Museum
Postcard - ESCo, Electric Supply Co. of Vic (ESCo), "Souvenir tram ticket - Railway Picnic", c1905
Printed postcard/ticket for the 16/9/1905 Railway Picnic by the Electric Supply Co of Victoria promoting Bendigo Tramways. Has three views of ESCo's depot and power station and one of a tram. Ticket priced at 6d. On the rear is an advertisement for Henderson & Goodisson's Beehive drapery, furniture, and Carpets. The letter has been sent to Mr Lewis Morgan of Pitfield Plains Vic, noting the trams. In the top right-hand corner is "B Deakin Engineer and Manager", following an English practice of providing details of the Manager;s name.
Demonstrates an ESCo printed ticket for a specific event of 1905.
Postcard - ticket - divided back used number 6188
Hand written message written on the rear - see image 2
tramways, trams, bendigo, esco, ticket, railway picnic
-
Ballarat Tramway Museum
Postcard, "High Street Eaglehawk", c1905
Printed coloured postcard of a view of High St Eaglehawk with the Town Hall in the background. An ESCo Bendigo tram, possibly No 8 is returning to Bendigo. On the rear is a message to a person in Collingwood saying that this is the third of three views of Eaglehawk - see also item 9082.
Yields information about Eaglehawk Bendigo and ESCo trams.
Postcard - colour divided back used
Hand written message written on the rear - card 3
tramways, trams, bendigo, eaglehawk, esco, high st
-
Ballarat Tramway Museum
Postcard, "Town Hall Eaglehawk", c1905
Printed coloured postcard of the Eaglehawk Town Hall, a Bendigo Suburb, with an ESCo Bendigo tram. On the rear is a message to a person in Collingwood saying that this is the second of three views of Eaglehawk - see also item 9083.
Yields information about Eaglehawk Bendigo and ESCo trams.
Postcard - colour divided back used
Hand written message written on the rear - card 2
tramways, trams, bendigo, eaglehawk, town hall, esco
-
Ballarat Tramway Museum
Postcard, "Charing Cross and Pall Mall Bendigo", 1908
Printed black and white postcard of Charing Cross Bendigo with three trams in the view and several horse-drawn cabs. Has Town Hall and other buildings in the background. See item 3451 for a similar photograph with a different crop, produced for the visit of The American fleed in 1908. The card was printed in Saxony, Germany.
Yields information about Charing Cross Bendigo and ESCo trams.
Postcard - black and white, divided back, used as a letter.
Hand written letter on rear.
tramways, trams, bendigo, charing cross
-
Ballarat Tramway Museum
Postcard, WTP, "General view of Mitchell Street Bendigo", 1910s
The photograph shows a Bendigo ESCo tram climbing the hill in Mitchell St to where the double track converged into a single track before crossing over the railway line. The photo is looking west. Has a two-storey hotel on the right. See item 8452 for a black-and-white version.
Yields information about Mitchell St Bendigo and ESCo trams.
Postcard - colour divided back, unused.
tramways, trams, bendigo, mitchell st
-
Ballarat Tramway Museum
Postcard, "Charing Cross & View Point Bendigo", 1903
The photo shows three Bendigo California Combination single truck cars at Charing Cross, looking southwest with the Alexandria Fountain in the centre. Trams 5 and 14 are in the view along with another behind them. The Bendigo electric tram system commenced operations in 1903 and given the appearance of the roadways and tram tracks, the photo was taken soon after opening. In the view are the View Point Hotel, signs for Moran Cato, Coperative Distribution, W J Jackson Tailor, The Age and several horse-drawn cabs. Card was printed in Germany.
Yields information about Charing Cross and Bendigo's trams in 1903.
Postcard - colour divided back, used as a letter.
Card to a Mother from her son Alex.
tramways, trams, bendigo, charing cross, alexandra fountain, view point, tram 5
-
Ballarat Tramway Museum
Postcard, "Bendigo looking towards Mitchell Street", 1905
The photo shows three Bendigo California Combination single truck cars at Charing Cross, looking east along Mitchell St with the Alexandria Fountain on the right. Has the C Plumbe (tailor?) shop and other buildings. The Bendigo electric tram system commenced operations in 1903.
Yields information about Charing Cross and Bendigo's trams.
Sepia toned postcard divided back, used, date stamped 28-8-1905 with a Bendigo cancellation stamp.
Card to a lady in Newcastle with birthday greetings.
tramways, trams, bendigo, charing cross, mitchell st, alexandra fountain
-
Ballarat Tramway Museum
Functional object - Trolley Pole Signal Skate or contactor, The Forest City Electric Co. Limited England, 1930s
Used by the Forrest City Signal system to initiate or cancel a signal indication. The trolley wheel would make contact with the steel strips which would send an electrical impulse to the control box that either would enable the signal to be shown or cancelled. There was one on the trolley wire at either end of the section. See reference for further details.
Demonstrates part of the Forest City Signal system.
Signal contactor mechanism comprising two brass ears, a section of copper trolley wire, two steel strips assembled onto a section of wood fitted with steel covers where the ears are fitted through. Item refurbished for display purposes by Depot staff 2023.
forest city signals, tramways, overhead
-
Ballarat Tramway Museum
Currency - Two Dollar Note, Coins - Australian Mint, 1966-1988
Circulated between 1966 and 1988, the two dollar note was issued following Australia's switch to decimal currency. It was later replaced by the two dollar coin.
Demonstrates the two dollar note as it was circulated between 1966 and 1988 and used by passengers to pay their tram fares or received by crews/staff in wages.
Green and yellow minted note on treated white paper. Front depicts John Macarthur, a merino ram and a "2" denoting its value. The back depicts William James Farrer, alongside ears of wheat and the "2".
"2" "COMMONWELATH OF AUSTRALIA" "TWO DOLLARS" "GJJ 982843"
btm, ballarat tramway museum, coins, currency, cash
-
Ballarat Tramway Museum
Currency - One Dollar Note, Coins - Australian Mint, 1966-1984
Circulated between 1966 and 1984, the one dollar note was issued following Australia's switch to decimal currency. It was later replaced by the dollar coin.
Demonstrates the one dollar note as it was circulated between 1966 and 1984.
Orange, yellow and brown minted note on white treated paper. The front depicts Queen Elizabeth the II, the Australian Coat of Arms and the "1" denoting value. The back depicts Aborginal drawings, including animals and people, as well as the "1".
"1" "COMMONWEALTH OF AUSTRALIA" "ONE DOLLAR" "AYD 66732"
btm, ballarat tramway museum], cash, coin, currency
-
Ballarat Tramway Museum
Functional object - Conductors Tin D81, 1950s ?
Each crew member was issued with a series of tins, A, B and C which allowed for the various days and weekends to enable Revenue Clerks to accept returns and restock the tins with new tickets etc. Known to crews as "Two bottle boxes" - could fit two bottles of ale into them.
Has a strong association with tram crews and the ticket / revenue collection system. Tram crews used them to contain their tickets and to undertake their returns. Also used to "hide" bottles of ale.
Metal box formed from four sheets of metal, spot welded together with a formed lid, hinged to box and fitted with a hasp and staple. Stamped with red lettering reading "D81".
btm, ballarat tramway museum, conductors tin, fares, tickets
-
Ballarat Tramway Museum
Uniform - Conductors Hat, Commonwealth Government Clothing Factories Melbourne, 1960s
Demonstrates uniform cap manufacture.
SEC Motorman/Drivers/Conductors cap - green cloth exterior, grey cotton interior lining, brown leather internal hat band, black cotton hat band on exterior with a plastic band at the front half of the cap terminating in two small SEC metal buttons on either side, black plastic beak. Sewn on the inside is a label "Commonwealth Government Clothing Factories Melbourne" and stamped "6 3/8".
btm, ballarat tramway museum, conductors, conductors hat, uniforms, sec, conductors cap
-
Ballarat Tramway Museum
Functional object - Conductors Bag
Demonstrates the method in which conductors stored tickets and fares.
Leather bag with outside pocket (for ticket wallet) with metal strips on openable section, fitted with steel catch, and adjustable shoulder strap. Has been fitted with a steel divider inside. Sewn heavy brown leather. White and brown cotton thread used. Four steel studs attached to the bottom to allow bag to be freestanding.
btm, ballarat tramway museum, ballarat tramways, conductors, conductors bag, fares, cash bag, tickets
-
Ballarat Tramway Museum
Coin - Coin Dispenser
Would have been issued to crews in order to hold coins within their cash bags.
Demonstrates the method by which conductors collected fare tender.
Manufactured coin dispenser for 1, 2, 5, 10, 20 and 50 cent coins, made from black and white plastic with metal springs under each coin support plate. Held in position by three metal screws.
btm, ballarat tramway museum, trams, conductors, currency, coin, fares, cash, cash handling, tickets
-
Ballarat Tramway Museum
Functional object - Ticket Wallet with 4 blocks of tickets
Used by conductors or conductors to retain and sell tickets from.
Demonstrates the method of dispensing tickets by conductors, how the tickets could be arranged. Yields information about the style and printing of tickets used in Ballarat tramways and how they were presented.
Sheet of leather, approx 2mm thick, stained brown with four pockets formed on each side with another sheet of leather, stitched on all sides to form pockets to hold eight blocks of tickets. Stitching is a white colour cotton. Has four blocks of tickets. 80c - blue - A 1016901 - Ballarat Vintage Tramway 30c - purple - A 69601 - Ballarat Tourist Tramway 10c - black - A 114000 - Ballarat Tourist Tramway 5c - red - A 137000 - Ballarat Tourist Tramway
btm, ballarat tramway museum, ballarat tramways, tickets, ticket wallet, sec, conductors
-
Ballarat Tramway Museum
Newspaper - The Courier report, "All Aboard", 9/4/2024
Report by Alex Ford with photos by Lachlan Bence of the operation of Horse tram No. 1 on Sunday 7/4/2024. Clydesdales from Sandy Creek Clydesdales Noah and Brooke hauled the tram. Quotes Paul Mong.
Yields information about the BTM's activities in running the horse tram.
Newspaper pages 1 and 5 - full colour photos on newsprint.
horse trams, btm, clydesdales, tramcars, operations
-
Ballarat Tramway Museum
Photograph - Geelong tram 10 at Beach, 26/2/1948
The photo shows Geelong No. 10 at the Beach terminus. The tram has the return destination of West. A lady and a young child are walking across the road to the tram.
Yields information about Geelong No.10 and the Beach terminus.
Black and white photograph with some details on the rear
In pencil "1947, 26/2/48" and in the bottom left hand corner on rear, the camera settings.
tramways, trams, geelong, tram 10, beach, passengers
-
Ballarat Tramway Museum
Photograph - Geelong tram No. 2 at T&G Corner Geelong, c1938
The photo shows Geelong No. 2 in Moorabool St at the intersection with Ryrie St. The tram has the destination of North. The tram is in its modified form that provides for one-man operation. In the photo are Edments, Savoia Cafe, Commercial Bank of Australia, and the T&G building. The photo has been dated between 1935 when the tram was converted and 1939 when the bar neon traffic lights were installed at the intersection. The photograph was taken from a Victorian Railways glass negative held at the State Library of Victoria. See item 8360 for a digital copy of the SLV scan - http://handle.slv.vic.gov.au/10381/97173
Yields information about Geelong No.2 and the intersection of Ryrie and Moorabool Streets Geelong.
Black and white photograph with a number of rear.
In pencil "2171" on rear.
tramways, trams, geelong, ryrie st, moorabool st, temperance & general, tram 2
-
Ballarat Tramway Museum
Photograph - Geelong 22 Moorabool St, 14-1-1954
The photograph shows Geelong tram No. 22 in Moorabool St with the destination of North. A number of ladies carrying shopping baskets are in the view. Photo by an unknown photographer on 14-1-1954.
Yields information Geelong tram services in Brougham St.
Black and white photograph with details on rear.
In ink "22 at City Corner Geelong, ex Belmon bound for North 14-1-54" and number '1034" in ink.
tramways, trams, geelong, brougham st, tram 40
-
Ballarat Tramway Museum
Photograph - Geelong 40 Brougham St, 14-1-1954
The photograph shows Geelong tram No. 40 inbound in Brougham St with the SEC-operated power station and tram depot behind. Another tram can be seen in the distance. Photo by an unknown photographer on 14-1-1954.
Yields information Geelong tram services in Brougham St.
Black and white photograph with details on rear.
In ink "40 on Beach line Geelong 14-1-54" and number '1042" in ink.
tramways, trams, geelong, brougham st, tram 40
-
Ballarat Tramway Museum
Photograph - Geelong 2 at Newtown, 14-1-1954
The photograph shows Geelong tram No. 2 at the Newtown tram terminus with the conductor or motorman with a conductor's bag standing by the rear of the tram and two ladies carrying bags approaching the tram. The tram has the return destination of Eastern Park. Photo by an unknown photographer on 14-1-1954.
Yields information about tram 2
Black and white photograph with details on rear.
In pencil "#2 at Newtown Geelong 14-1-54" and number '1106" in ink.
tramways, trams, geelong, newtown, tram 2
-
Ballarat Tramway Museum
Photograph - Geelong 22 at Railway Station, C Roy G Field, 6/1949
The photograph shows Geelong tram No. 22 at the Geelong Railway station . Photo by Roy Field 6/49. Roy provides notes on the rear of the photo about the tram's two trolley poles, radial truck and that it was built by Pengelley.
Yields information about tram 22 and the railway station terminus.
Black and white photograph with details on rear.
See rear image a C Roy Field stamp
tramways, trams, geelong, geelong railway station, tram 22
-
Ballarat Tramway Museum
Photograph - Moorabool St at Malop St - tram 4, c1920
The photograph shows Geelong tram No. 4 southbound in Moorabool St at Malop St. Has the Solomons store in the background. In the view is one motor vehicle and some horse-drawn cars. On the corner can be seen a fire alarm and a letterbox. Photo 1910s to 1920s.
Yields information about Moorabool St Geelong.
Black and white photograph with some details on rear.
In ink "No 4 in Moorabool St looking towards Ryrie St from Malop St. Photo before 1930 as No. 4 is shown in its original condition and was altered in early 1931."
tramways, trams, geelong, moorabool st, malop st, tram 4
-
Ballarat Tramway Museum
Photograph - Tram 4 and others - school excursion, 10/1913
The photograph shows two tramcars and two trailers on a school excursion for Bird Day, October 1913 in what is now Brougham St Geelong, led by tram No 4 with the MESCo Power station behind. Many students can be seen in the first trailer.
Yields information about the use of trams for a school excursion.
Black and white photograph with some details on rear.
In ink "State school excursion bird day Oct 1913" and "Tramcars in services in 1947 but not trailers"
tramways, trams, geelong, brougham st, tram 4, mesco, power station
-
Ballarat Tramway Museum
Photograph - Corner Ryrie and Garden Streets - Eastern Park, 9/1923
The photograph shows at least 6 six trams at Eastern Park after a football match and the Garden St junction for the East line. Tram No. 5 with a destination of West Geelong is leaving the junction. Another tram is arriving with at least four parked on the Eastern Park line.
Yields information about the use of trams after a football match in Geelong.
Black and white photograph with some details on rear.
In ink "Cr Ryrie & Garden Sts, this type of tramcar also in service 1947" and hand date stamp of "15 Sep 1923"
tramways, trams, geelong, ryrie st, garden st, eastern park, football, tram 5
-
Ballarat Tramway Museum
Photograph, "Moorabool Street looking towards Corio Bay Geelong", c1915
Photograph or illustration from a magazine or book with a photograph of a cross bench tram - tram 12 in Moorabool St. Photo taken from an elevated position and looking towards Corio Bay. Has some horse-drawn carts in the view. The chimney of the MESCo power station can be seen. On the reverse is a photo of the Geelong wharves, with some ships docked on the wharf.
Yields information about the view of Moorabool St c1915.
Black and white photographs from an illustration.
tramways, trams, geelong, moorabool st, cross bench tram, geelong wharf, tram 12
-
Ballarat Tramway Museum
Postcard, Murray Views, "Murray Views No. 27 Ryrie Street Geelong Vic", early 1950s
Postcard produced by Murray View of Gympie, of Ryrie St looking east from the west side of Yarra Street. A tram can be seen turning at Moorabool St. In the view are the Geelong Theatre, Cox, the T&G building, Preston Hotel and H F Richardson live stock sale and a taxis sign. Also shows the wood centre of the road poles.
Yields information about the view of Moorabool St at Ryrie St early 1950s.
Black and white Postcard divided back, unused. Card No. 27
tramways, trams, geelong, ryrie st
-
Ballarat Tramway Museum
Postcard, Murray Views, "Murray Views No. 3 Moorabool Street Geelong Vic", early 1950s
Postcard produced by Murray View of Gympie, of the corner of Malop and Moorabool Streets Geelong, looking south along Moorabool St. In the distance can be seen two trams. In the view at Solomans, the T&G building, Hookers, Coles, and a set of neon bar traffic lights.
Yields information about the view of Moorabool St at Malop St early 1950s.
Black and white Postcard divided back, unused. Card No. 3
tramways, trams, geelong, moorabool st, malop st
-
Ballarat Tramway Museum
Postcard, Valentine & Sons Publishing Co, "Moorabool Street Geelong", early 1950s
Postcard produced by the Valentine publishing company of Moorabool St looking north at the corner of Ryrie St. Tram No. 33 is picking up passengers at the safety zone at the intersection with Ryrie St where the front of another bogie tram can be seen. In the view are the T&G building, the Bank of NSW which has a chemist shop, and the Savoia cafe. The rear of the card notes it is a genuine photograph. The card number V24 is the same number used in item 9064, but a later version, the early 1950s. The note on the rear of the card gives details of Ken's Victorian trip during Jan 1954.
Yields information about the view of Moorabool St at Ryrie St early 1950s.
Black and white Postcard undivided back, unused. Card No. V24.
Has a note written to Ken Magor from Ken Winney? dated 14-1-1954 - see image 2
tramways, trams, geelong, moorabool st, tram 33
-
Ballarat Tramway Museum
Postcard, Valentine & Sons Publishing Co, "Moorabool Street Geelong", c1950
Postcard produced by the Valentine publishing company of Moorabool St looking north and the corner of Ryrie St. In the view is tram No. 17 and another tram further north. Note the safety zone sign. In the view is the T&G building, the Bank of NSW, with a sign "Service for the Sick". The rear of the card notes it is a genuine photograph. Photo c1950.
Yields information about the view of Moorabool St at Ryrie St c1950.
Black and white Postcard undivided back, unused. Card No. V24.
tramways, trams, geelong, moorabool st, tram 17