Showing 67 items
matching 22 view st.
-
 Ballarat Tramway Museum
Film - Movie Film & Box, Kodak, 1960
Yields information in movie film format of Ballarat trams in 1960, how the system operated and was used by people., Yields information in movie film format of Ballarat trams in 1960, how the system operated and was used by people.Movie film - 8mm, approx. 30mins, with leader strip on a plastic reel, within a black and white plastic box, titled "Ballarat No. 1. 1960". Has been transferred to DVD - see Reg item 4100 as Segment No. 2. Made by Ben Parle. Also transferred to DVD by Rod Cook Oct. 2015, via Roger Greenwood for use in his DVD, "The City of Ballarat Trams, Gardens & Gold" of 2016. See Reg Item 6883. Synopsis: based on time. 0:00 View of typed introduction, noting that this is a pictorial record of Ballarat. 0:10 Title “The Tramways of Ballarat 1960, Part 1” 0:16 13, showing “View Point” at Stones Corner, Bridge St, east end, with trolley pole being turned, while another single trucker heads out towards Mt Pleasant. 0:25 13 leaving Stones Corner, short approach and then longer trailing shot of the tram going towards the City in Bridge St. 0:44 View out of front of tram in Bridge St heading towards the City, with cars in the photo, then passing through city Loop, no trams in the loop and running up to Lydiard St Nth and crossing the road. 1:22 Running up Sturt St from Armstrong St, passes over Dawson St X-over and up to the next intersection, Lyons St. 1:54 Title “The View Point Line” 1:59 19 inbound, in Ripon St, from crossing Mair St, towards camera and then passing away and turning into Sturt St. 2:49 View of a “Warning Oncoming Trams” sign 2:52 19 in Ripon St, going to View Point, crossing Webster St towards camera, then going away through the disconnected Victoria Ave loop, pass the “Warning Oncoming Trams” sign. Note very windy scene with people running across roads. 3:17 19 in Wendouree Parade, in bound, though showing destination View Point, going away from the camera, past the View Point Hotel. 3:39 19 coming towards camera near Excerpt or Devon St and then going away towards the terminus. 4:04 19 at the terminus, stationary, with a single trucker 3?, passing from Macarthur St into Wendouree Parade, behind 19. 4:20 33 coming towards camera in Wendouree Parade from St Aidans Drive, stopping to pick up passenger at Forest St and then going away towards the City, photographed from near the depot, on a wet and windy day. 4:54 35 in Wendouree Parade, coming towards the Camera from St Aidans Drive and then going away with the Gardens Loop area in the background. Tram stops at stop to let a passenger off. 5:28 21 leaving Gardens Loop for the City via the Depot, green light in signal can be seen. 5:43 28?, closely followed by 26 turn from Drummond St South into Sturt St. 6:18 Scene opens with shot of “Sebastopol” destination on a bogie tram. 6:21 Title “The Sebastopol Line” 6:24 21 turning from Sturt St into Drummond St Sth with destination of Bell St and then going away from the camera. 6:55 38 in Drummond St Sth, coming towards the camera and then passing the camera with Sturt St just in the view. 7:10 21, showing Gregory St, in Drummond St Sth, approaching and then going away, entering the Urquhart St Loop, 7:39 34 in Drummond St Sth (location check required (Latrobe?)), approaches camera, picks up passengers and the goes away. 8:09 39 at ? Street, turns from Drummond St Sth into Skipton St, after picking up and setting down passengers, bound for Sebastopol 8:55 35 inbound in Skipton St passes through the Bell Street Loop, and then goes away from the camera. 9:33 42 outbound in Skipton St, approaches the camera, passes and then crosses over the half the road into Albert St. 10:00 39 inbound in Albert St – location? 10:31 34 outbound for Sebastopol, approaches camera and just starts to pass by. 10:36 34 in Grey St crossing loop, crosses 42 inbound. 10:59 39 outbound in Albert St, with shopping centre in bound, approaches camera, passes and then crosses over Albert St. Mid morning scene. 11:39 39 inbound, Albert St south, approaches camera and then passes and the crosses over Albert St. 12:16 41 outbound in Albert St passes the camera, and pulls into the terminus with the conductor getting out on the back bumper to pull the pole down as the tram stops and a passenger walks into the Royal Hotel. 12:39 Title “The Lydiard Street North Line” 12:44 Filmed from the Hotel balcony, 21 inbound in Lydiard St Nth passes over Mair St, stops while 33 passes in the other direction. 13:18 With the red light showing on the Seymour St loop signal, 33 inbound for Sebastopol stops and picks up many passengers, passes the camera and runs past the VRI building in the background and through the loop. Possibly filmed on a Sunday given the ladies dresses and quieter streets. 14:01 30 outbound, passes the camera and stops at Macarthur St. Filmed alongside the brick wall of the cutting. 14:28 30 inbound arrives, passes through the Gregory St loop and then proceeds past the camera, making a stop to pick up passengers. 15:14 28 in Lydiard St Nth – location?, approaches and goes away from the camera, north of Gregory St. 15:34 28 ditto location? 15:53 21 arrives at the terminus with passengers getting on and off. 16:11 View of the a vertical positioned “End of Section” sign on a pole at the terminus and then lifting the camera to see the timetable board and the stop sign. 16:33 31 in Bridge St passing Morseheads and then turning into Sturt St, stops at the Grenville St stop, while another single trucker comes down to the stop from the City. 16:58 31 outbound in Bridge St, with destination of Victoria St. 17:14 Title “The Victoria Street Line” 17:18 31 outbound to Victoria St from Stones Corner. Starts with an overhead shot, shows clock at the Caltex service station,. 17:37 31 inbound approaching Bakery Hill and then descending to the junction after it passes camera. 18:09 25 climbing outbound in Victoria St, passing the camera, to then pass through the King St loop. 18:47 25 inbound in Victoria St, passing the camera, then pass through the King St loop, with St Alypius Church in the background. 19:36 14 approaching the rail bridge in Victoria St and stopping at the 2nd last stop to left of passengers. 20:01 14 leaving the terminus and approaching the camera and the a short sequence going away, to the next stop to pick up quite a few passengers. 20:14 “Trams Stop Here” sign, metal wrap around on a steel pole. 20:16 Title “The Mount Pleasant Line” 20:21 11 inbound in Main St, with a passenger leaping off the tramcar and another getting off just before the junction. 20:45 11 passes the junction and then proceeds away from the camera in Bridge St. 21:04 30 outbound in Main St, then turns into Barkly St, a bus (Eclipse Motors) passes in Main St just before the sequence ends. 21:31 30 inbound near Steinfield St. (exact location?) 21:49 25 approaches the camera, then proceeds away and passes through the Grant St. loop. 22:29 25 inbound, windy day, between Grant and Cobden, (exact location?), with a horse drawn bread van in the view and the breadman walking behind the tram as it passes. 23:02 11 outbound in Barkly St, (exact location?) 23:37 11 inbound in Barkly St (exact location?) 23:44 Mt Pleasant terminus signage 23:50 30 approaches the terminus and then stops with the conductor alighting turning the pole, passengers getting on and off and the driver appearing at the other end. 24:32 Title “The Gardens Via Sturt St. West Line” 24:35 21 outbound in Sturt St near Raglan St, approaches and passes the Camera. 25:09 12, showing City Oval, approaches and passes the camera, outbound near Windermere St. 25:33 13 showing View Point, goes away from the camera – location? 25:44 12 comes from St. West, inbound passes the camera and then stop as the next stop next Talbot St? 26:21 Short sequence of a “Warning Oncoming Trams” sign 26:28 42 inbound in Sturt St West, just before Ripon St, view coming towards camera and then going away to cross Ripon St. 27:10 34 passes through the Parker St loop 27:25 35 or 39 inbound past the college in Sturt St West 28:04 41 outbound at the Russell St curve, passes away from the camera. 28:11 35? inbound passes away from the camera through the Victoria Park or Morrison St loop, swinging out into the roadway. 28:29 View of timetable sign at Hamilton Ave. 28:37 35 turning from Sturt St West into Hamilton Ave, can see the conductor changing over the barrier rails. 29:11 42 inbound, crosses another bogie tram (35?) at Carlton St loop then passes the camera and goes past the Olympic rings monument. 29:42 12 approaches the Carlton St gates. 30:07 12 outbound, crosses a bogie tram in the loop with both trams then leaving the loop. 30:20 Title “End of Part One” Written labels giving title information on outside of box.trams, tramways, ballarat, sebastopol, lydiard st north, victoria st, mt pleasant, sturt st west -
 Ballarat Tramway Museum
Film - Movie Film & Box, Gevaert, 1962
Yields information in movie film format of Ballarat trams in 1962, a enthusiast tour, how the system operated and was used by people., Yields information in movie film format of Ballarat trams in 1962, a enthusiast tour, how the system operated and was used by people.Movie film - 8mm, approx. 4.15mins, with green leader strip on a plastic reel, within a Gevaert film cardboard box, with a Harvin Film Laboratory r, Marrickville NSW label and address to B.J. Parle, Chatswood and a 5d stamp. Titled "Ballarat 1962". Has been transferred to DVD - see Reg item 4100 as Segment No. 6. Filmed and made by Ben Parle. Also transferred to DVD by Rod Cook Oct. 2015, via Roger Greenwood for use in his DVD, "The City of Ballarat Trams, Gardens & Gold" of 2016. See Reg Item 6883. Synopsis: based on time - Black and White film Title "Ballarat 1962" 0:00 37 departing City Centre in Sturt St, east bound, followed by 18 0:23 18 and 37 arriving into City Loop from Bridge St. 0:40 18 and 37 passing through the Gregory St Loop 0:54 18 and 37 arriving and at Lydiard St Nth terminus 1:15 18 and 37 in Lydiard St Nth 1:22 18 and 37 at Railway St gates, with gates closed with B class hauled passenger train, wooden and air-conditioned carriages departing. 1:51 Interior view of passengers in 18 2:10 View from a side window of 18 turning from Lydiard St Nth into Sturt St, heading east, with an inspector getting off No. 18 2:23 View from front window in Victoria St and entering King St loop to cross No. 14. 2:55 18 and 37 departing King St loop, in bound. 3:10 18 in Barkly St, outbound 3:38 42 in bound Drummond St Nth and turning into Sturt St at Hospital corner. 4:16 End Written labels giving title information on outside of box.trams, tramways, ballarat, gardens, victoria st, bridge st, sturt st, tram 18, tram 37, tram 42 -
 Ballarat Tramway Museum
Photograph - Black & White Photograph/s, Ron Hann, Jan. 1963
Yields information about the City Loop and Sturt St buildings terminus, passengers and the tram liveries in 1963.Black and white print on heavy matt photographic paper of a view looking from Lydiard St, down Sturt St towards Grenville St with many motor cars in the street and trams parked in City Loop, c1963. Has cars parked on the median strip and given the number, a working day. At least four trams in the loop. In the background is the Neptune sign and the Dickins Food store. 2nd copy - laser print - with date etc on rear - added 22/2/2010, copy from Ron Hann. Printed on Fujifilm, Fujicolour Crystal Archive for Frontier"On rear in pencil "Sturt St 1963", 2nd copy has label "Reference 6/113/11 Photo by Ron Hann" and another label "Ballarat 01.63"tramways, trams, sturt st, city loop, grenville st -
 Ballarat Tramway Museum
Photograph - Black & White Photograph/s, Ron Hann, Jan. 1963
Yields information about the Lydiard St North terminus, tramcars at the time and a family boarding the tram.Black and white print on heavy matt photographic paper of a view at the Lydiard St Nth terminus of No. 26 with the cemetery buildings in the background and a family (two ladies and pram) boarding the tramcar. The tram has the destination of Grey St Sebastopol, and a Whitehorse Whiskey advertisements on the front dash panel. 2nd copy - laser print - with date etc on rear - added 22/2/2010, copy from Ron Hann. Printed on Fujifilm, Fujicolour Crystal Archive for Frontier"On rear in pencil "26 Lydiard St Nth 1963" 2nd copy has label "Reference 6/113/7 Photo by Ron Hann" and another label "Ballarat 01.63"tramways, trams, lydiard st nth, cemetery, tram 26 -
 Ballarat Tramway Museum
Photograph - Black & White Photograph/s, Ron Hann, Jan. 1963
Yields information about the Charing Cross Bendigo tram terminal, and nature of the traffic arrangements.Black and white print on heavy matt photographic paper of a view of Bendigo Charing Cross tram terminal area from western side. Has two single truckers in Pall Mall and a bogie tram. Shows the tram crossover in High St and a number of motor vehicles. Has the Ezywalkin building on the north east corner. 2nd copy - laser print - with date etc on rear - added 22/2/2010, copy from Ron Hann. Printed on Fujifilm, Fujicolour Crystal Archive for Frontier"On rear in pencil "Charing Cross 1963" 2nd copy has label "Reference 6/214/25" Photo by Ron Hann" and another label "Charing Cross Bendigo 01.63"tramways, trams, bendigo, charing cross -
 Ballarat Tramway Museum
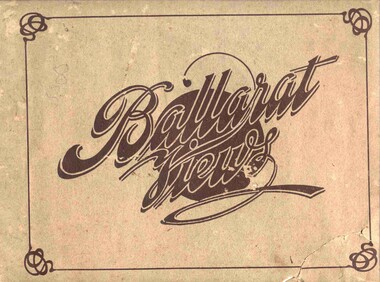
Book, Baxter & Stubbs, "Ballarat Views", 1920's
Yields information about Ballarat through pictures of the 1910-1920's various locations, institutions and street scenes, including tramways and railways.Twenty four page book within light brown covers, titled "Ballarat Views". Sheets, other than covers have been individually printed both sides, stapled within the covers. Cover - gives title, rear cover has printer details - Baxter and Stubbs. Pages 1 - Tonner Memorial , Fountain Lake Wendouree, Ballarat District Hospital, Sturt St south side at Grenville St with tram in distance and Sturt St North Side showing shops (image btm3900i2.jpg). 2 - Ballarat Street Scenes - Sturt Streets, Lydiard St with ESCo 18 in view, and Railway station with R193 in platform on passenger train. (image btm3900i3.jpg). 3 - Lake Wendouree views. 4 - Lake Wendouree, fish hatchery, Gardens and Sturt St at Dawson St (image btm3900i4.jpg). 5 - Art Gallery Ballarat 6 - Botanical Gardens 7 - Public Institution s- Benevolent asylum, Orphanage, Nazareth House, St Joseph Home, Hospital 8 & 9 - Statues, the Flight from Pompeii and others. 10 & 11 - Churches of Ballarat 12 - The Arch at The Avenue of Honour 13 - McDonald Pergola at the Gardens 14 - Zoological Gardens Ballarat 15 - Gardens aerial view and gates at the South End with tram in the distance (image btm3900i5.jpg). 16 - Some views in Ballarat East - Eureka Stockade, Ballarat East Bowling Green, Bridge St looking east and the lake at the Eureka Gardens (image btm3900i6.jpg). 17 - Snow Scene at Botanical Gardens, Begonia House 18 & 19 - Ballarat Water supply reservoirs 20 - Ballarat State Schools 21 - Ballarat East Views, includes view of track in Victoria St looking east (image btm3900i7.jpg). 22 - Views of the Water Reserves 23 - Views about the City - includes City fire station , agricultural High School, City Baths and View Point. 24 - Views at Lake Wendouree. \ Pdf copy of full book added 8/5/2019 - see btm3900i9.pdf trams, tramways, ballarat, lydiard st, sturt st, gardens, railway station, hospital, lake wendouree, wendouree parade, carlton st, esco -
 Ballarat Tramway Museum
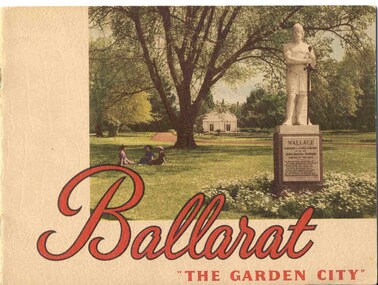
Book, Nu-color-vue or Nucolorvue Productions, "Ballarat - 'The Garden City' ", late 1940's or early 1950s
Yields information about Ballarat through pictures of the 1940-50's various locations, institutions and street scenes, including tramways. Good comparison with earlier books, eg Item 3900.24 page book, plus embossed covers saddle stapled with two staples titled "Ballarat - 'The Garden City' ". Features photographs of Ballarat and district - full colour with accompanying text about Ballarat and its history. Cover features Gardens view with statute of Wallace in foreground - see image c1 p3 - photo of No. 22 (bogie) at Grenville St in Sturt St with a single trucker behind in the City loop - see image c2 - see also Reg Item 5354 for a postcard version. p5 - Eureka Stockade memorial p6 - Lake Wendouree p7 - Sturt St with Town hall in background, and No. 33 in Sturt St. south side. p9 - Begonia hothouse p10 - St Andrews Kirk p11 - St Peter's Church of England p12 - Lake Wendouree p13 - Botanical Gardens p14 - Monuments and statues around Ballarat p15 - Post Office, State Offices, Ballarat Orphanage and Queen Elizabeth Benevolent Home p16 - A Ballarat Reservoir p17 - Botanical Gardens p18 - Gordon's Cottage, Congregational Church, Lydiard St and The Cenotaph p19 - Ballarat Grammar School, St. Patrick's Cathedral (no spire), St. Patrick's College, street scene p20 - Arch of Victory, Lake Wendouree, Sturt St with tram in distance and Eureka Swimming pool p22 - Avenue of Prime Ministers p23 - Harvest near Mt Warrenheip, Country side photo, I&R Morley Pty Ltd factory and houses in the lake area. Purchased through eBay 25/10/2004. See worksheet for eBay emails. See also Reg. Item 3041 for the same image of No. 22. 2nd Copy added 26/12/2007 - donation of Ron Scholten. pdf image of the full book added 8/5/19 as btm2925i.pdf trams, tramways, ballarat, sturt st, history, gardens -
 Ballarat Tramway Museum
Photograph - Colour Photograph/s - set of 2, Sturt Keenan, 22/11/2000 12:00:00 AM
Set of 2 colour prints of the BTM No. 40 at Carlton St. terminus, Wendouree Parade, side on view - 22/11/2000. Taken during the COTMA Conference tram day. Photos taken by Stuart Keenan. Printed on Agfa paper.btm, cotma, carlton st, wendouree parade, tram 40 -
 Ballarat Tramway Museum
Photograph - Digital image Set of 20, 1971-72
Set of 22 digital images of Bendigo Tramways, 1972 at or before closure while on a tram tour by Stuart Lodington. .1 - No. 7 arriving at North Bendigo .2 - No. 5 departing Charing Cross along View St, with a Firestone tyres in the background. .3 - front view of a tram in View St with a blurred background image. .4 - No. 24 showing Eaglehawk destination .5 - No 26 and 3 in View St, with the Armstrong Tyre Service building in the background and signs for T&G and Cohn's Drinks. .6 - ditto .7 - No. 3 arriving at Charing Cross from Eaglehawk in View St, with a Quarry Hill destination. .8 - No. 3 and 18 at Charing Cross. .9 - No. 24 on the Quarry Hill line. .10 - No 26 in View St, with the Armstrong Tyre Service building in the background and signs for T&G and Cohn's Drinks. .11 - ditto, with fountain in view, Colonial Mutual building and a newsagent with a Herald sign on the building. .12 - No. 7 at North Bendigo terminus .13 - ditto with pole being reversed. .14 - No. 18 at Quarry Hill terminus with Northern Terrazzo sign in the background. .15 - No. 24 at Quarry Hill terminus .16 - No. 18 arriving at Charring Cross, with Fountain Plaza and Bendigo Pharmacy in the background. .17 - No. 3 and 18 at Charing Cross. .18 - No. 7 at North Bendigo terminus with pole being placed on the overhead. .19 - No. 26 in View St inbound, with Sandhurst Trustees sign in the background. .20 - No. 6 leaving Charing Cross in Pall Mall with Myer and other buildings in the background. .21 - No. 7 at North Bendigo .22 - Single trucker with two roof Advertisements crossing View St with fountain in view, Colonial Mutual building and a newsagent with a Herald sign on the building.trams, tramways, bendigo, eaglehawk, quarry hill, north bendigo, charing cross, view st, tram 7, tram 5, tram 24, tram 26, tram 5, tram 3, tram 18, tram 6 -
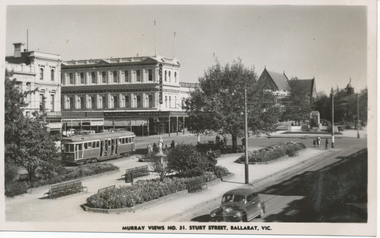
 Ballarat Tramway Museum
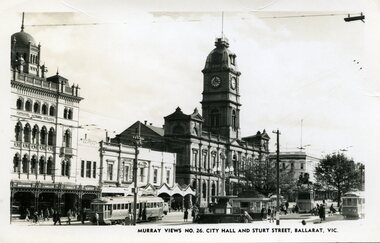
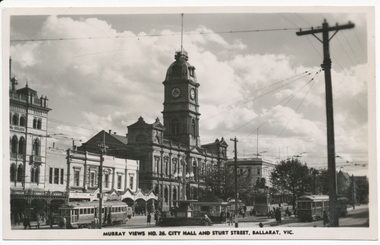
Photograph - Black & White Photograph/s, Murray Views, Murray Views No. 26 City Hall and Sturt St Ballarat Vic, c1950
Demonstrates a typical street view following the delivery of the bogie trams following the second world war and the street scape at the time. Able to determine the tramcar numbers. Yields information about the era of the photograph.B&W print, postcard print of Sturt St Ballarat, looking towards the Town Hall from the Post Office, City terminus. Photo taken by Murray Views to form "Murray Views No. 26, City Hall and Sturt St, Ballarat Vic." No. 22 on south side and No. 34 on north side - see Hi-Res scans. Has the National Mutual, Town Hall and Myers and other buildings in the view. Photo taken c1950, prior to renumbering of No. 22. 2nd copy added 28-12-2021 - most likely a reproduction of the original as it does not have a postcard back.On reverse side - black ink stamp "E.G.Butland" On reverse of 2nd copy - "Ballarat, Sturt St, west from Lydiard Sts" and Keith Kings stamp.tramways, trams, sturt st, bogie trams, tramway centre, town hall, tram 22, tram 34 -
 Ballarat Tramway Museum
Photograph - Black & White Photograph/s, Doug Colquhoun, 23/03/1959 12:00:00 AM
Yields information about the Eaglehawk terminus, tram 18 and the tram liveries in 1963.Black and white print of Ballarat 12, crossing Lydiard St, in Sturt St with the destination of Gardens via View Point. Has the Commonwealth Bank, Odeon theatre, Mechanics Institute, Ballarat Gas Co, Unicorn Hotel, and Colonial Mutual Life buildings in the background. A group of children with bicycles are on the corner and the newspaper seller stand. Photo Doug Colquhoun 23/3/1959. Photo print courtesy of Port Dock Railway Museum, now the National Railway Museum. See worksheet 4311 for letter and details of prints sent to Bill Scott, 19/10/2001. Any photo credit to mention NRM Collection.On rear of copy In top left hand corner "72) No . 71 withdrawn" a yellow label with "24" crossed out over a sticker "Photo No. Reduced to 82% 145x80 see photocopy for masking" and "22" crossed out in the top right hand corner. In the lower left hand corner "SEC Ballarat #12 / Sturt St @ Lydiard / 23/3/59 / Douglas A Colquhoun"trams, tramways, sturt st, lydiard st, tram 12 -
 Ballarat Tramway Museum
Photograph - Digital image, Murray Views, Murray Views No. 26 city Hall and Sturt St Ballarat Vic, 1948c
Digital image from the Wal Jack Ballarat Album of No 22, 28, 34 and another tram at Tramway Centre, late 1940's. Murray Views No. 26 city Hall and Sturt St Ballarat Vic.. Has Town Hall, Penfolds', Reeds and Berry Anderson shops in the view between the National Mutual building and the Town Hall. See image i2 for rear of photograph and 8973 for the actual postcard.Yields information about the appearance of Sturt St looking towards the Town Hall and the trams used - late 1940's view.Digital image of a postcard from an album compiled by Wal Jack, loaned to the Museum.Printed on rear - Real Photograph Produced in Australia by Murray Views, Gympie Q" and places for stamp, dividing line and word "postcard"trams, tramways, lydiard st, sturt st, tram 22, tram 28, tram 34 -
 Ballarat Tramway Museum
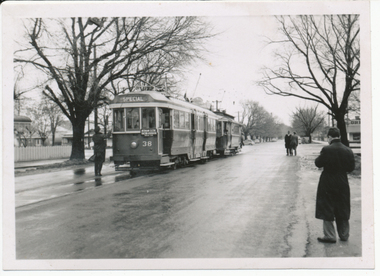
Photograph - Digital image, Keith Kings, 20/08/1955 12:00:00 AM
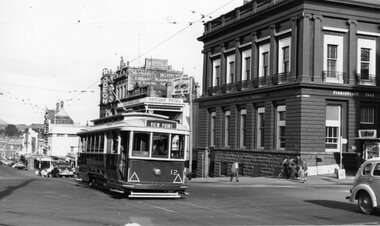
Yields information about the trams used by the AETA for a Ballarat tour to celebrate the Golden Jubilee of electric trams.Digital image from the Wal Jack Ballarat Album of the AETA Ballarat Golden Jubilee tour of 20/8/1955, of Specials 21 and 38, in Ripon St at near Sturt St, on View Point line. Photograph by Keith Kings. See image i2 for rear of photograph. i3 - hi res scan of print i4 - cleaned image by PCW - 22-9-2022On rear of photograph in ink "Ballarat Golden Jubilee of electric trams, Specials 21 & 38, in Ripon St at Sturt ST on View Point line. 20/8/1955" and Keith Kings stamp in top right hand corner with number "P(c)(4)" written in.trams, tramways, aeta, tours, golden jubilee of trams, ripon st, view point, tram 21, tram 38 -
 Ballarat Tramway Museum
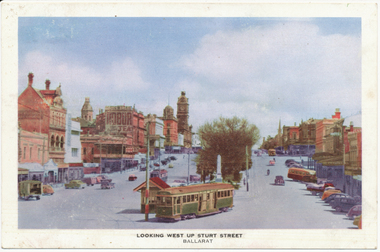
Photograph - Digital image, Nu-color-vue or Nucolorvue Productions, "Looking west up Sturt Street", c1950
Postcard of No. 22 leaving Sturt St for Bridge St, c1949, with Sturt St buildings in the background. See also Reg Item 3041 and 2925 for a printed view of the same photo in books and 8987 for an actual postcard. See image i2 for rear of photograph. Has published, and spaces for stamp, correspondence and address on rear.Yields information about Ballarat and Sturt St c1950 following the information of bogie trams.Digital image from the Wal Jack Ballarat Album of a Nucolorvue postcard No. 8On rear of photograph in ink "No. 22, 1951"trams, tramways, postcards, sturt st, grenville st, tram 22 -
 Ballarat Tramway Museum
Photograph - Digital image, Murray Views, Murray Views No. 31 Sturt Street Ballarat Vic, c1950
Yields information the appearance of Sturt St and Doveton about 1950 with an SEC bogie tram in the photograph.Digital image from the Wal Jack Ballarat Album of a black and white postcard, titled "Murray Views No. 31, Sturt Street Ballarat Vic" , photo looking south west at corner of Doveton and Sturt St with the Harry Davies store in the background. Bogie tram No. 22 is outbound in the street. Has many people in the median strip. Photo c1950. Published by Murray Views, Gympie Queensland - real photo. For rear of postcard - see image i2.trams, tramways, sturt st, doveton st, tram 22 -
 Ballarat Tramway Museum
Negative, Wal Jack, early 1950's
Negative and Digital images of the Wal Jack Geelong Negative file of Geelong 35 in Ryrie St with the destination of Station followed by No. 22 going to West. A shop in the background is advertising the Geelong Advertiser Newspaper. Possibly late 1940's given the two cars in the view. trams, tramways, geelong, ryrie st, tram 35 tram 22 -
 Kew Historical Society Inc
Photograph - High Street looking north to Burke Road, 1907-08
While a number of subdivisions of what was to become Kew East occurred in the 1880s, such as the 'Mount Pleasant Estate' (1888) and 'Monterey Estate' (1888), Glynn's Lot 91 remained open farmland until the Harp Estate (1912) was sold, hence the undeveloped nature of the view in 1907-8.A rare image of the open farmland in the eastern part of Kew looking towards Burke Road in 1907-8.Damaged, and very rare, black & white photograph of what was to become the suburb of East Kew, taken by a member of the Bennett family in 1907-8. The photograph is taken from the Harp of Erin Hotel showing, apart from a building on the left (no longer extant), fenced open farmland stretching into the far distance.HIGH ST LOOKING NOTRTH TO BURKE RD FROM HARP / EDWD GLYNN'S LOT 91 FROM 1851 / GIFT FROM BENNETT FAMILY 22 HARP RD EAST KEW 1980 / 1907-8harp of erin, high street -- east kew (vic), harp estate -
 Ballarat Tramway Museum
Slide - Set of 9, Warren Doubleday, Ballarat - last weekday of full operations, 20/8/1971
Photos taken on the last weekday of full operations by the SECV in Ballarat prior to the first closure of the Victoria St line on 22/8/1971. 1 - trams 33, 13, 30, and 12 in the City loop. Has the Dickins food store, Thomas Jewellers, Gear Chemist, Patersons stores in the view. 2 - tram 37 running a Special passing the trams above in the City Loop. Also has the Hartley's and the T& G buildings in the view. 3 - tram 27 descending the Lydiard St hill about to pass the Titanic Bandstand. 4 - tram 35 turns from Sturt St into Lydiard St north with the Town Hall in the background. 5 - tram 27, Victoria St inbound in Wendouree Parade near Haddon St. Has the tram stop shelter in the view. 6 - tram 39 climbing the Lydiard St North hill. 7 - tram 32 in bound in Sturt St west passing a 40mph speed limit sign. 8 - trams 21 and 34 crossing at the Grant St loop on the Mt Pleasant line. 9 - tram 37 inbound in Lydiard St North with the Ballarat Station building in the background and the signal gantry.Yields information about the last full week day of SEC Tramway operations in Ballarat and has a strong association with the archivist. Set of 9 Kodachrome colour slides - cardboard mountsHave the photographer's slide numbers written on them.trams, tramways, closure, sturt st, lydiard st, tram 13, tram 30, tram 12, tram 37, tram 43 -
 Ballarat Tramway Museum
Slide - Set of 7, Warren Doubleday, Ballarat - last Saturday of full operations, 21/8/1971
Photos taken on the last Saturday of full operations by the SECV in Ballarat prior to the first closure of the Victoria St line on 22/8/1971. 1 - Tram 42 climbing Victoria St with a sign for the site of the "New Mid - City Motel" behind. 2 - Tram 13 in Victoria St from the Anglican church tower with Black Hill in the background. 3 - Barkly and Main St from the Anglican church tower with an outbound tram the Ampol Service station in the view. 4 - Tram 39 in Wendouree Parade near depot with swans in the background. 5 - Ballarat 26 Wendouree Parade Olympic monument with the tram crossing from the side of the road into the middle of the road for Hamilton Ave. 6 - Trams 21 and 27 crossing at the Skipton St loop. 7 - Tram 27 and others on the ARHS tour at Sebastopol with the conductor unhooking the trolley pole rope before turning the pole. Yields information about the last full Saturday of SEC Tramway operations in Ballarat and has a strong association with the archivist. Set of 7 Kodachrome colour slides - cardboard mountsHave the photographer's slide numbers written on them.trams, tramways, closure, tram 26, tram 27, tram 13, tram 17, wendouree parade, victoria st, barkly st, tram 39, olympics, sebastopol, skipton st loop, tram 42, tram 21 -
 Ballarat Tramway Museum
Slide - Set of 7, Warren Doubleday, Ballarat - last Saturday of full operations, 21/8/1971
Photos taken on the last Saturday of full operations by the SECV in Ballarat prior to the first closure of the Victoria St line on 22/8/1971. 1 - Tram 42 running a special inbound in Albert St Sebastopol with a closed Antiques shop in the background. 2 - Trams 26 and 30 Grant St loop on the Mt Pleasant line. 3 - Tram 39 using the Dawson St cross over with tram 26 behind. 4 - Tram 26 on Dawson St cross over 5 - Tram 31 or 32? in Lydiard St north crossing over the level crossing with Reids Coffee Palace, the Provincial Hotel and the signal gantry in the view. 6 - Running through the Gardens with the McDonald Gates and a wedding. 7 - Tram 30 turning from Macarthur St into Wendouree Parade View Point with the tram stop shelter and Swans in the view.Yields information about the last full Saturday of SEC Tramway operations in Ballarat and has a strong association with the archivist. Set of 7 Kodachrome colour slides - cardboard mountsHave the photographer's slide numbers written on them.trams, tramways, closure, tram 26, wendouree parade, barkly st, tram 42, tram 30, level crossing, lydiard st nth, railway, ballarat station, view point, macarthur st -
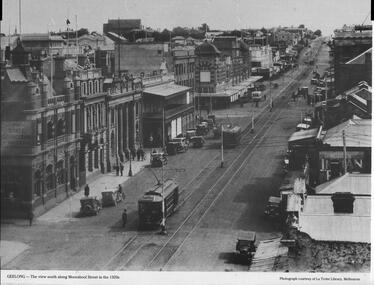 Ballarat Tramway Museum
Photograph - Illustration, La Trobe Library, "Geelong - the view south along Moorabool Street", late 1920s
Photograph shows Moorabool St looking south from near Corio St Geelong. Shows the track junction with Malop St. Has Pengelley built tram 22 southbound with a Birney tram in front. The two trams are going from the Wharf to Newtown and South respectively. In the background is the State Savings Bank, The Geelong Library, Solomons store, and a building advert sign for Dr Morses Indian Root Pills. There are many motor cars, some horse-drawn vehicles, and one bus in the view. Photo, late 1920s, sourced from the La Trobe Library Melbourne.Yields information about Moorabool St Geelong late 1920s.Publish Black and white photograph with caption and source printed along bottom edge.ballarat, trams, tramways, geelong, tram 22, birney tramcars, moorabool st -
 Ballarat Tramway Museum
Photograph - Illustration, Rose Stereograph Co, "Sturt Street, Ballarat", c1913
Illustration or photograph looking at the Grenville St tram terminus. One of the trams is a Sebastopol-type tram No 22. Has the large shelter in the background and another tram in the view. Taken c1913, following the introduction of the Sebastopol-type tram. From a Rose Series postcard - Rose Number 1710. Note the Mechanics Institute advertising sign on their building advertising the institute rather than a company. The 8-hour monument at the end of the central median can be seen. On the rear is an illustration of Shoppee's Square in the median strip. See item 4083 for a postcard.Yields information about the operation of ESCo trams in Sturt St and in particular the Sebastopol type.Black and white Illustration cut from a journaltramways, trams, sturt st, esco, grenville st, sebastopol type, tram 22, shoppee's square -
 Ballarat Tramway Museum
Photograph - Black and White - ESCo trams at Grenville St, Rose Stereograph Co, 1913c
One of the trams is a Sebastopol-type tram No 22. Has the large shelter in the background and another tram in the view. Taken c1913, following the introduction of the Sebastopol type tram. From a Rose Series postcard - Rose Number 1710. Note the Mechanics Institute advertising sign on their building advertising the institute rather than a company. The 8-hour monument at the end of the central median can be seen. See item 9012 for a printed illustration of this photograph,Yields information about the operation of ESCo trams in Sturt St and in particular the Sebastopol type.Black and white copy photograph of a postcard showing two ESCo trams at the Grenville St terminus, looking west along Sturt St.tramways, trams, ballarat, sturt st, esco, grenville st, sebastopol type, tram 22 -
 Bendigo Historical Society Inc.
Document - SPECIMEN COTTAGE COLLECTION: VARIOUS DOCUMENTS
In 1853, Bendigo Miners protested against the 30 shilling miners licence the had to pay the government. They wore red ribbons to show their protest and shopkeepers hung red ribbons outside their premises in support. Thousands of miners signed a petition to Governor LaTrobe to no avail. A protest gathering in Pall Mall marched to the Government camp on Camp Hill but this was a peaceful event again to no real avail.Various documents. The topics are: 1. Public donations and organised charities in Bendigo (1850's to 1900's by Carol Holsworth. 2. The spirit of Bendigo R711 and the loco driver on the return trip from Bendigo by Rod Giri, also several photographs of the train. 3. Diary of a new chum - Johnny Greenfield Gill. 4. Family history by Pat Hocking. 5. The story of the Gaylards as told by Ella Gaylard. 6. Journalism- History first draft by Wayne Gregson. 7. List of residents of Thistle Street, Bendigo approx. 1950's compiled by Cynthia Stringer. 8. Sandhurst club history by David Cotton. 9. Sandhurst boys centre compiled by Brian Dillon. 10. Lily Street Walk 24/04/2018 notes by Jim Evans. 11. Document - All things Bendigo, wine food and music fest. 12. White Hills Sandhurst copies of maps and two pages of district directory1908. 13. Draft report of interview with Noel Smith of 5 Summit Drive, Kennington. 14. Three brothers from Scotland by Rae Alexander Anderson. Also, seven newspaper articles by James Lerk on William, Alexander Rae and John Rae. 15. St. John Presbyterian church, Bendigo. Historical record. 16. Journal of Thomas Llewellyn Raston. 17. Recollections of Sandhurst in the 1850's - Joseph Anderson Panton, 22 segments from Panton manuscript by Terry Davidson. Also, a photographs of a portrait of Joseph Panton. 18. Photocopy of letter of Chinese storekeepers, miners and residents to Joseph Anderson Panton esquire, resident warden of Bendigo dated August 28th, 1858, with transcription and the reply from Esquire Panton dated 29 August, 1858. 19. View street reborn, tours of inspection ''welcome to View Street'' view Street properties part of stage 1 of the project: National Trust Chambers, Temperance Hall, Art Gallery Annexe, Trades Hall, Bendigo Regional Arts Centre, Bendigo Regional Performing Arts Centre, Dudley House. 20. View Street early 1900's in between and now. From handwritten notes by Mr. Bob Carr written in 1989. The handwriting has been transcribed by Beverly Ellis. 21. Transcription of ''Diary of a voyage to the colony of Victoria and back'' June1856-September 1858 by Charles Groves. 22. Adelaide Vale historic homestead built by Cr. John Harney. Tour notes prepared by the Central Victorian Branch of the National Trust. 23. Four pages essay titled Spanish Tomato Growers. 24. Eight pages of notes compiled by Leonard Henderson title: Trade token issuers of Bendigo district. The issuers mentioned are: Grieve, Hodgson, Stead and Williams. 25. City of Bendigo tourist promotion Committee. Eight pages document describing the formation of committee for the promotion of tourism in the City of Bendigo. 26. Article ''The Birdman of Bendigo'' Bendigo Advertiser 17th January 1968 detailing the life of Mr. Redvers James Eddy. 27. Speech presented by Miss Margaret Brennan on the occasion of the Drechsler family reunion, Sunday 5th April 1987. 28. Robert Gray Ford - A man before his time! Talk by James Lerk to the Bendigo Historical Society 3 February 2006. 29. Copy of an article from The Bendigonian Annual from November 16, 1910. The demand for good music, how a Bendigo firm has met it. The article is about the life of Oscar Flight. 30. Five photocopies of the Bendigonian masthead showing the changes through the years, plus the notice of the final issue on April 8th, 1920. 31. The red ribbon rebellion & the Bendigo petition, a proposal to commemorate a significant event in Bendigo. Also three different sizes poster for the August 26, 2016 re-enactment and two invitations to join the red ribbon agitation memorial. 32. Two handwritten pages of notes on the red ribbon rebellion. 33. Three pages of typewritten notes on the Creeth and Howie families. 34. An Australian Edward Medallist - Joseph Davies honoured by Paul Street. 35. A. H. Chisholm obituary. 36. Catalogue auction sale of the entire collection of antique furniture, objects d'art etc of Mr. and Mrs S. Cragg. 37. two coloured photographs of Cherry Tree Hotel in Melbourne Road just north of Tuckerman's lane, Big Hill. Photos taken March 2000 by Joan Paynter. -
 Melbourne Tram Museum
Album - David Frost Slide Collection, David Frost
Photo - see pdf file for further information. Number Brief Description date DFC1 A general view from the former railway platform at Port Melb Station looking towards Station Pier on opening day 20-12-1987 DFC2 A2 285 in the Tramway Platform at Port Melbourne Station on opening Day 20-12-1987 DFC3 A2 285 in the Tramway Platform at Port Melbourne Station on opening Day 20-12-1987 DFC4 A2 285 in the Tramway Platform at Port Melbourne Station on opening Day 20-12-1987 DFC5 A2 273 at St Kilda Tramway Station on opening day 22-11-1987 DFC6 A2 273 turning from Fitzroy St into St Kilda Tramway Station on opening day 22-11-1987 DFC7 B1 2001 at St Kilda Tramway Station turning into Fitzroy St on opening day 22-11-1987 DFC8 B1 2002 enters St Kilda Tramway Station on opening day 22-11-1987 DFC9 An A2 approaches St Kilda Tramway Station on opening day 22-11-1987 DFC10 Concreting the connecting curve from Fitroy St into St Kilda Station c July 1987 DFC11 An MTA AEC MKVI bus in Grey St St Kilda at Dalgety St with Tramway works in the background c July 1987 DFC12 Grey St St Kilda at Dalgety St with Tramway works in the background in Fitzroy St c July 1987 DFC13 Concreting the connecting curve from Fitroy St into St Kilda Station c July 1987 DFC14 Restaurant Tram 442 in Fitzroy St at Grey St Passing MTA bus 59 outside St Kilda Station c1986 DFC15 Former VR tram stop sign painted on a pole at Glenhuntly Rd & Broadway DFC16 Former VR Elwood Tram Depot under demolition 1996 DFC17 Former VR Elwood Tram Depot under demolition 1996 DFC18 Former VR Elwood Tram Depot under demolition 1996 DFC19 Former VR Elwood Tram Depot under demolition 1996 DFC20 Former VR Elwood Tram Depot under demolition 1996 DFC21 Former VR Elwood Tram Depot under demolition 1996 DFC22 Former VR Elwood Tram Depot under demolition 1996 DFC23 Former VR Elwood Tram Depot under demolition 1996 DFC24 MTS Tower waggon in use at the former VR Elwood Tram Depot under demolition 1996 DFC25 A Sign advertising the sale of the Former VR Elwood Tram Depot – 10/8/1996 1996 DFC26 Former VR Elwood Tram Depot under demolition 1996 DFC27 Interior of a shed at the former VR Elwood Tram Depot under demolition 1996 DFC28 Former VR Elwood Tram Depot under demolition 1996 DFC29 Former VR Elwood Tram Depot under demolition 1996 DFC30 Former VR Elwood Tram Depot under demolition 1996 DFC31 VR 20, former breakdown car in Bob Prentice’s Back Yard Jan 1974 DFC32 VR 20 on a low loader en route to Bob Prentice’s for preservation 1959 DFC33 VR 20 as the breakdown car on the St Kilda Electric Street Railway c1955 DFC34 VR 39 waits in St Kilda St as breakdown car 20 enters Elwood Depot c1955 DFC35 VR 54 and 50 in the rear yard of Elwood Depot c1958 DFC36 VR 50 in the rear yard of Elwood Depot c1958 DFC37 VR 50 in the rear yard of Elwood Depot c1958 DFC38 VR 28 in St Kilda St outside Elwood depot after the line had been cut back to this point c1958 DFC39 VR 29 in St Kilda St outside Elwood depot after the line had been cut back to this point c1958 DFC40 VR 35 passes 28 on the St Kilda Electric Street Railway c1955 DFC41 VR 39 on the St Kilda Electric Street Railway c1955 DFC42 Y1 613 on a tour c1970 DFC43 VR 54 in St Kilda St outside Elwood Depot c1955 DFC44 VR 28 at Brighton Beach Terminus c1955 DFC45 VR 33 being washed in the wash bay at the rear of Elwood Depot c1955 DFC46 VR 20 breakdown car running into Elwood Depot c1955 DFC47 VR 3 in the rear yard at Elwood Depot c1955 DFC48 VR 51 on an AETA Tour running out of Elwood Depot c1958 DFC49 VR 28 on the St Kilda Electric Street Railway c1955 DFC50 VR 28 with crew in St Kilda St outside Elwood depot after the line had been cut back to this point 1959 DFC51 VR 52 in Grey St near Fitzroy St c1958 DFC52 VR 51 on a AETA Tour passes 33 in Grey St near Fitzroy St c1958 DFC53 VR 29 in Grey St near Fitzroy St c1958 DFC54 VR51 on an AETA Tour shunts as 52 waits on the St Kilda Electric Street Railway c1958 DFC55 VR 51 on the Black Rock Electric Street Railway c1955 DFC56 VR 28 in St Kilda St outside Elwood depot after the line had been cut back to this point c1958 DFC57 Combined Rail-Tram Tickets of the Black Rock Electric Street Railway Feb 1975 DFC58 Combined Rail-Tram Tickets of the St Kilda Electric Street Railway Feb 1975 DFC59 Electric Street Railway & Motor Coach Paper Tear off Tickets Feb 1975 DFC60 VR 52 & 53 on Rt 82 pass in Cordite Ave near Wests Rd Sept 1975 DFC61 Z 68 & 52 in East Preston Depot in M&MTB Livery c1977 DFC62 Copy photo of VR 18 in Elwood Depot c1910 DFC63 VR 51 as a one man car at Black Rock Terminus c1955 DFC64 VR 53 on Rt 82 in Droop St Footscray Jan 1974 DFC65 B2 2027 on Rt 96 in South Melb Station c1988 DFC66 VR 20 as preserved in Bob Prentice’s backyard High St Prahran Jan 1974 DFC67 VR 700 on Rt 82 in Droop St Footsray c1978 DFC68 VR 28 as the last car from ST Kilda Station 28-2-1959 DFC69 VR 700 at the Rt 82 Moonee Ponds Terminus c1978 DFC70 VR 52 waiting time at the Rt 82 Footscray Terminus, the driver intently stares at the bundy clock as the Braid and the Connie gossip Jul 1972 DFC71 VR 54 shunting outside Elwood Depot to return to St Kilda Station 1959 DFC72 SW6 969 in MTA Livery blocking the entrance to South Melb Depot presumably during the scratch ticket dispute Jan 1990 DFC73 VR 52 & 53 on Rt 82 pass in Droop St Footscray Sept 1975 DFC74 VR 700 after withdrawl in the Newport Railway museum in the process of a repaint c1985 DFC75 VR 700 after withdrawl in the Newport Railway museum in the process of a repaint c1985 DFC76 VR 700 on Rt 82 in Droop St Footsray at The Cresent c1978 DFC77 VR 700 on Rt 82 in Droop St Footsray c1978 DFC78 Former VR tram depot in use as an MTA Bus depot c1990 DFC79 VR 52 waiting time at the Rt 82 Footscray Terminus Jul 1972 DFC80 VR 52 waiting time at the Rt 82 Footscray Terminus with Connie changing the pole Jul 1972 DFC81 VR 52 at the Rt 82 Moonee Ponds Terminus with the crew chatting 7-12-1974 DFC82 VR 52 on Rt 82 on the reserved track in Raleigh Rd Ascot Vale Jan 1974 DFC83 VR 53 on Rt 82 in Leeds St Footscray about to turn into Hopkins St April 1976 DFC84 VR 53 on Rt 82 in Droop St Footsray Jan 1974 DFC85 VR 700 on Rt 82 in Droop St Footsray at Hopkins St c1978 DFC86 Z 52 in MTA livery on Rt 19 in Elizabeth St near Bourke St c1985 DFC87 VR 52 at the Rt 82 Moonee Ponds Terminus Jul 1972 DFC88 VR 53 at the Rt 82 Footscray Terminus Jan 1974 DFC89 VR 52 freshly outshopped from the workshops and W7 1011 at the Bourke St Terminus with 52 on display for the 1968 railway exhibition 1968 DFC90 Painting of W class 369 in Chocolate & Cream c1930 DFC91 Charing Cross, Bendigo at night c1965 DFC92 Ballarat ? c1965 DFC93 Bendigo 18 on an AETA tour in McCrae St near Tramway Ave c1965 DFC94 View from the roof of a tram in the body shop at Preston Workshops 1977 DFC95 View from the roof of a tram in the body shop at Preston Workshops 1977 DFC96 View from the roof of a tram in the body shop at Preston Workshops showing the panto on 546 1977 DFC97 Interior view of Carlton Control Centre showing desk and wall panel c1968 DFC98 W2 493 on Rt 55 in Kingsway outside South Melb Depot Aug 1973 DFC99 W2 496 in Sturt St at Kingsway on Rt 1 Jul 1973 DFC100 Z class truck c1975 DFC101 Z3 116 in Bourke St at King St as new c1979 DFC102 Bob Prentice on tour c1968 DFC103 SW6 900 as an advertising tram for Newsday at night 1969 DFC104 597 Jul 1973 DFC105 W2 480 on Rt 3 passing under the railway bridge at Caulfield Oct 1972 DFC106 Interior view of Carlton Control Centre showing desk c1968 DFC107 SW6 856 on Rt 77 at night Jul 1973 DFC108 W2 496 in Sturt St at Kingsway on Rt 1 Jul 1973 DFC109 PCC 980 on a tour at South Melb Depot c1968 DFC110 SW6 856 on Rt 77 at night Jul 1973 DFC111 View from the roof of a tram in the body shop at Preston Workshops showing the panto on 546 1977 DFC112 Dandenong Rd from Chapel St Nov 1968 DFC113 A Z class car turns from Gertrude into Nicholson St c1990 DFC114 SW6 900 as an advertising tram for Newsday at night 1969 DFC115 Port Melbourne Station showing Centennial bridge and station building prior to closure. 10-1987 DFC116 Port Melbourne station with train prior to closure, looking south 10-1987 Demonstrates the work of David Frost in photography and or collecting slides.Assembled album in a black presentation folder of 116 colour slides, 6 slide sleeves, collected or photographed by David Frost. Many are TMSV or Windsor Publications slides. All photographs have been scanned and placed on the Museum's G drive. A list of all photographs with details has been compiled. melbourne, tramways, trams, vr trams, elwood, st kilda light rail, port melbourne, opening, elwood depot, buses -
 Ballarat Tramway Museum
Photograph - Geelong 22 Moorabool St, 14-1-1954
The photograph shows Geelong tram No. 22 in Moorabool St with the destination of North. A number of ladies carrying shopping baskets are in the view. Photo by an unknown photographer on 14-1-1954.Yields information Geelong tram services in Brougham St.Black and white photograph with details on rear.In ink "22 at City Corner Geelong, ex Belmon bound for North 14-1-54" and number '1034" in ink.tramways, trams, geelong, brougham st, tram 40 -
 Melbourne Tram Museum
Album - Photo Album, Brian Weedon, Tramway photos, 1970 to 1980's
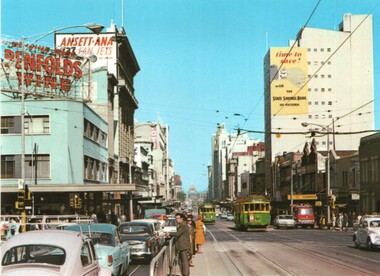
Photo Album - green card slip case containing heavy grey card covers front and rear, front protective page and 12 photo pages with adhesive surface and clear plastic sheet cover - on cardboard sheet bound by a heavy white comb binder marked "Photo Album" on the front inside cover. Each page has scanned to a pdf file. Page 1 - newspaper cutting and two photos of Ballarat No. 27 completing 1,000,000 miles. Item from "A Place in the Sun" written by Keith Dunstan. Photo of tram 27 by the Ballarat Courier. Date of Photo. 29/6/1968, taken prior to the TMSV Tour of that date. Black and white photograph of a group of the passengers on No. 27 during the celebration of the tram reaching 1,000,000 (million) miles in Ballarat. Glenys George, Brian Weedon, John Fitzsimons, Graeme Turnball, Paul Nicholson, Barry George and Kevin Clark. Page 2 - black and white photograph of Geelong Nos 2, 8, 4, 1 and another 4 wheel tramcar and a open cab motor bus photographed within the interior of Geelong depot, prior to 1924. From notes provided by David O'Neill, 12/2003, advises that bus driver is either Bill Hamaling or Charles Stafford. Gentlemen next to No. 8 could be Vic Phipps. Page 3 - Black and White photograph of Geelong No. 7 - c1912, soon after opening with driver, conductor and passengers. Shows the magnetic brake shoe. Page 4 - Black and White photograph of Geelong Cross bench tram No. 11 in Corio Tce, now Brougham St outside Marks Hotel. Tram has the destination of Newtown. Page 5 - Black and White photograph - T 180, showing "Pyrotechnic Fty" possibly on No. 9 Road at Malvern Depot Page 6 - Black and White photograph of L 105 prior to any modifications - see also Reg Item 2498 for another print. - ditto - interior view show off centre seats in the drop centre. Page 7 - Black and White photographs of W308 and W1 419 - - see also Reg Item 3422 for another print. Page 8 - Black and White photograph of W3 665 Page 9 - Black and White photograph of W4 670 - - see also Reg Item 3154 for another print. - ditto Interior view. Page 10 - Black and White photograph of SW6 850 with the dash canopy lighting - as built. - ditto Interior view - - see also Reg Item 674 and 3426 for another prints. Page 11 - not used. Page 12 - Black and White photographs of Y469 and X2 674 (This tram was later renumbered 680 - see page 30 of Destination City 5th Edition). - - see also Reg Item 3161 an d 3427 respectively for another prints. Page 13 - Black and White photographs of Y1 611 and an interior view - - see also Reg Item 3160 for another print. Page 14 - Set of 6 colour prints of Bendigo 28 decorated as the 1968 Myer Christmas tram, Birney 23 and 29. Page 15 - Set of 4 colour prints of Bendigo 3, 17, 6 and 17, Page 16 - Colour print of traffic and trams on Princes Bridge with Batman Ave terminus in the view. - Postcard of Swanston St looking south just north of Lonsdale St with W2 432 and another W2. See 3558.1 for a loose copy of the postcard - NuColorVue No. BP 1060-1 - titled on rear "A view towards the Shrine during peak traffic" Has signs advertising Penfolds Wines, Ansett-ANA, State Savings Bank and Foys. Page 17 - Set of two colour postcards - W2 405 and another tram southbound in St Kilda Road with the Prince Henry hospital in the background and Bourke St with W7 1026 and other trams in the view. Page 18 - Set of two photographs of W2's in Collins St at Spring St, with No. 512 in the view. Page 19 - View looking across the Gardens with two W2 class trams in Macarthur St. - W2 637 at corner of Collins and Exhibition St - see also Reg Item 1999 for another print. Page 20 - set of three colour photographs - W2 303 in bound on St Kilda Road, destination City, Route 4D, see also Reg Item 324 - W7 965 turning from Queens Road into St Kilda Road at St Kilda Junction. - W4 671 at South Melbourne Depot. Page 21 - not used Page 22 - MMTB Bus 702 Mark VI MMTB Freighter body and W7 1035 Page 23 - not used Page 24 - SEC coal locomotive 108 at night. Most photographs are MMTB Official. Listed 22-5-2019trams, tramways, melbourne, geelong, ballarat, bendigo, postcards, l class, interiors, new trams, mmtb, t class, w class, w1 class, w3 class, w4 class, sw6 class, y class, x2 class, princes bridge, batman ave, swanston st, st kilda rd, bourke st, collins st, macarthur st, st kilda junction, w7 class, buses, secv, tram 27, tram 2, tram 8, tram 1026, tram 4, tram 1, tram 11, tram 105, tram 308, tram 419, tram 665, tram 670, tram 850, tram 469, tram 674, tram 611, tram 23, tram 29, tram 17, tram 3, tram 6, tram 28, tram 405, tram 29, tram 432, tram 1017, tram 512, tram 303, tram 965, tram 671, tram 1035, tram 637 -
 Melbourne Tram Museum
Slide, David Verrier, 22/04/1977 12:00:00 AM
Agfa colour slide, white blue plastic mount. Photograph by David Verrier. View from Spencer St south just before bridge looking back to the city skyline and the Flinders St railway viaduct. An L class is crossing the viaduct. Photo has the City Mutual and SEC Buildings along with some construction work for the new railway viaduct underway. A Shell service station sign is visible. Photos taken 22/4/1977In ink: "Fri 22/4/77 Flinders St Viaduct"trams, tramways, railways, flinders st, melbourne -
 Melbourne Tram Museum
Slide, David Verrier, 22/04/1977 12:00:00 AM
Agfa colour slide, white blue plastic mount. Photograph by David Verrier. View of the Bourke St terminus looking east with tram Z 40 and 27 in the view. Shows the terminal, tram stop, arrangements, signage and buildings in the background. Photos taken 22/4/1977In ink: "Fri 22/4/77 40 27 Bourke St terminustrams, tramways, bourke st, terminus, north fitzroy park st, route 97, tram stops, z class, tram 48, tram 27 -
 Melbourne Tram Museum
Slide, David Verrier, 28/09/1977 12:00:00 AM
Kodak Kodachrome colour slide, white cardboard mount. Photograph by David Verrier. View of five trams, 1025, 370, 1038, 643 and 1033 outbound in Collins St at intersection with Exhibition St. Tram 1025 has destination of Northcote Via St Georges Rd, route 9 and advertisements for Robo 3 min car wash, and "1 a day man". Would appear the driver is being trained - 2nd person sitting in the cab. Photos taken 22/4/1977.In ink: "Wed 28/9/77 Collins & Exhibition St Melb 1025, 370, 1038, 643, 1033"trams, tramways, collins st, route 9, northcote, w7 class, tram 1025, tram 370, tram 1038, tram 643, tram 1033