Showing 4260 items
matching tram 2
-
 Melbourne Tram Museum
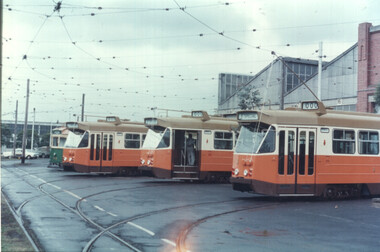
Photograph - Colour print - Z's 1, 2, 3 at Preston Workshops, June 1975
... tram 2...Colour print showing Z1 class trams, 1, 2, and 3 on the fan... Colour print showing Z1 class trams, 1, 2, and 3 on the fan ...Colour print showing Z1 class trams, 1, 2, and 3 on the fan at Preston Workshops, possibly late May or June 1975 at the time of entry into service. All the trams are showing special. In the background is a W7, possibly 1036. Yields information about the then new Z1 class trams at the time of the entry into service. Colour print on Kodak Royal paper.trams, tramways, z1 class, tram 1, tram 2, tram 3 -
 Ballarat Tramway Museum
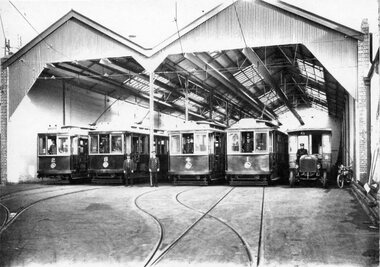
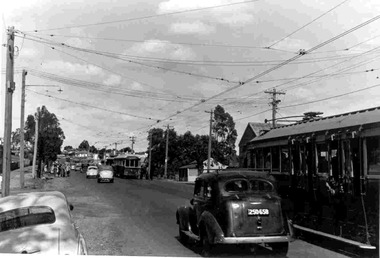
Photograph - Black & White Photograph/s, 1915
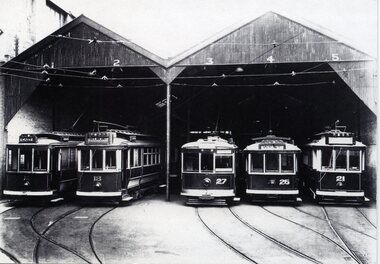
... tram 2... of the tramway, four roads - 1915. Has trams 2, 8, 4 and 1 on front... tram 2 tram 8 tram 4 Copy 1 - " Depot view about 1915 - Geelong ...Yields information about the form and style of the early Geelong trams and in particular one of the cross bench trams.Black and white photograph, printed onto card (inkjet printer?) of the front of the Geelong depot soon after the opening of the tramway, four roads - 1915. Has trams 2, 8, 4 and 1 on front of the track and alongside is a small motor bus and a motorcycles. Each tram has a person vehicle in the front. Shows depot arrangements. Two copies held. Dave O'Neil advised 20/7/2009 - agree with date.Copy 1 - " Depot view about 1915 - Geelong Hist Soc / W F S Collection." Copy 2 on rear "Depot view about 1915. Note bus in right road. Buses were housed there until 1922" in Bill Scot's handwriting and in bottom right hand corner "William F. Scott" address label. and "20" in top left hand corner. Also "Geelong Trys" "C1915" and "W.F. Scott Collection." trams, tramways, geelong, depot, buses, tram 1, tram 2, tram 8, tram 4 -
 Stawell Historical Society Inc
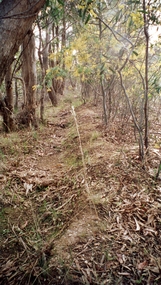
Photograph, Tram Track -- 2 Photos -- Coloured
... Tram Track -- 2 Photos -- Coloured... in bush setting. Tram Track -- 2 Photos -- Coloured Photograph ...Two colour photographs taken on Big Hill 1999 of the old tram track. Shows the track and bush.Two coloured photographs in bush setting. -
 Ballarat Tramway Museum
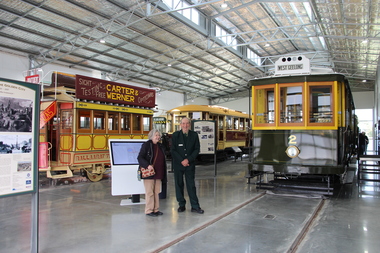
Photograph - Digital Image - set of 2, Peter Knife, New Museum views, 5/9/2023
... Tram 2... Knife and Chris Phillips with trams 1 and 2 in the view. Photo... BTM Tram 2 tram 1 New Museum Set of two Digital images, New ...Set of two digital images of the New Museum views - Maggie Knife and Chris Phillips with trams 1 and 2 in the view. Photo by Peter Knife 5/9/2023. Yields information about trams on display at the Museum.Set of two Digital images,tramways, tramcars, btm, tram 2, tram 1, new museum -
 Ballarat Tramway Museum
Photograph - Digital image, John Ward, 1/01/1972 12:00:00 AM
... tram 2... Birney tram 28 passing bogie tram 2 in Carpenter St on Quarry... Carpenter St Pinders Loop Quarry Hill tram 28 tram 2 Digital image ...Digital image of the Bendigo 28 crossing No. 2 at Pinders Loop in Carpenter Loop on the Quarry Hill line. No. 28 has the destination of Quarry Hill, while No. 2 Eaglehawk. Photo by John Ward 01 - 01- 1972 Slide title "04751 010172 7207-H SECV Birney tram 28 passing bogie tram 2 in Carpenter St on Quarry Hill line Bendigo Vic"trams, tramways, bendigo, carpenter st, pinders loop, quarry hill, tram 28, tram 2 -
 Ballarat Tramway Museum
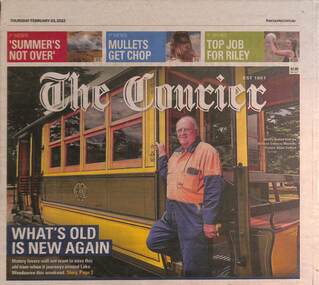
Newspaper, What's old is new again - 3-2-2022
... Tram 2... with photos of Neville Britton and Geelong tram No. 2, providing... and Geelong tram No. 2, providing details of the tram, its ...Article by Ellie Mitchell, photo by Adam Trafford with photos of Neville Britton and Geelong tram No. 2, providing details of the tram, its reconstruction and the launch. Quotes Rod Atkins, Vice President of the COTMA, and details of visiting the museum.Yields information about the formal launch of Geelong tram No. 2Newspaper - The Courier, front page and page 2 - What's old is new again - 3-2-2022 - Geelong 2btm, tramways, tram 2, geelong, tramcars -
 Ballarat Tramway Museum
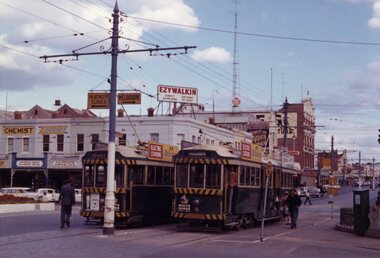
Photograph - Colour Photograph/s, 21/11/1962 12:00:00 AM
... tram 2...Colour print of Bendigo SECV Bendigo trams 2 and 4... Mitchell St. Safety Zone tram 2 tram 4 On rear top left hand corner ...Colour print of Bendigo SECV Bendigo trams 2 and 4 at Charing Cross. On Kodacolor paper with a Kodak red ink stamp on rear. Trams have dash canopy lights, but no large white strip under the drivers windows. Photo dated 21.11.1962. Buildings on corner of Pall Mall and Mitchell St in background. Both trams fitted with roof ads and dash canopy ads - White Horse Whiskey. Shows "safety zone" arrangements. No. 2 has destination of "Quarry Hill" while 4 has destination of "Eaglehawk". Has a number of passengers boarding trams. Note "PYE" name on radio tower mast.On rear top left hand corner "2 and 4 / 21.11.62" in very wavy handwriting, typical of an aged person.charing cross, bendigo, mitchell st., safety zone, tram 2, tram 4 -
 Ballarat Tramway Museum
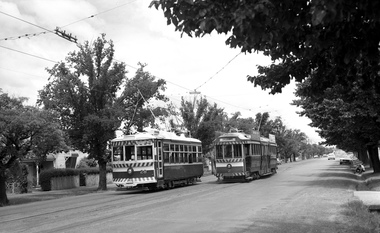
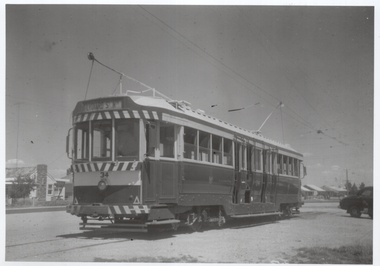
Photograph - Geelong 2 at Newtown, 14-1-1954
... tram 2...The photograph shows Geelong tram No. 2 at the Newtown tram...The photograph shows Geelong tram No. 2 at the Newtown tram ...The photograph shows Geelong tram No. 2 at the Newtown tram terminus with the conductor or motorman with a conductor's bag standing by the rear of the tram and two ladies carrying bags approaching the tram. The tram has the return destination of Eastern Park. Photo by an unknown photographer on 14-1-1954.Yields information about tram 2Black and white photograph with details on rear.In pencil "#2 at Newtown Geelong 14-1-54" and number '1106" in ink.tramways, trams, geelong, newtown, tram 2 -
 Ballarat Tramway Museum
Photograph - Black & White Photograph/s, c1942
... tram 2... printer?) of the Geelong depot with five trams parked - Nos. 2... Depot tram 2 tram 13 tram 27 tram 26 tram 21 "28 / Geelong ...Yields information about the appearance of Bendigo Birney trams mid 1950's.Black and white photograph, printed onto card (inkjet printer?) of the Geelong depot with five trams parked - Nos. 2, 13, 27, 26 and 21 in the front. Roads marked 1 to 5. c1942"28 / Geelong publicity view taken about 1929 (crossed out), 1936 (crossed out) 1942? with WFS Collection in bottom left hand corner and "William Scott" address label in bottom right hand corner.trams, tramways, geelong, depot, tram 2, tram 13, tram 27, tram 26, tram 21 -
 Ballarat Tramway Museum
Photograph - Digital image, John Ward, 22/03/1970 12:00:00 AM
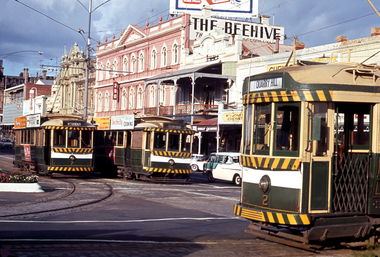
... tram 2.... Trams 7 (North Bendigo), 21 (Golden Square) and 2 (Quarry Hill... Charing Cross Pall Mall Mitchell St tram 7 tram 21 tram 2 Digital ...Digital image of three Bendigo trams at Charing Cross. Trams 7 (North Bendigo), 21 (Golden Square) and 2 (Quarry Hill). Has the Beehive building in the background, along with sings for 3BO, Myer, Amor gowns and Wm I Jones Chemist. The trams have some SEC Roof adverts. Photo by John Ward 22 March 1970. Slide title "00757 220370 SEC single truck trams 7 & 21 Pall Mall bogie tram 2 Mitchell St Charing Cross Bendigo Vic"trams, tramways, bendigo, charing cross, pall mall, mitchell st, tram 7, tram 21, tram 2 -
 Ballarat Tramway Museum
Document, Mal Rowe, "The Tramways of Geelong", 25-2-2023
... tram 2...Item authored by Mal Rowe for the Geelong 2 tram day... for the Geelong 2 tram day at the Ballarat Tramway Museum 25 and 26 March ...Item authored by Mal Rowe for the Geelong 2 tram day at the Ballarat Tramway Museum 25 and 26 March 2023. Gives an overview of the history of the Geelong tramway system and its tramcars. Yields information about Geelong tramwaysPdf file of a PowerPoint presentation titled "The Tramways of Geelong" geelong, tramways, history, tram 2, mal rowe -
 Ballarat Tramway Museum
Newspaper, Restored tram a time capsule
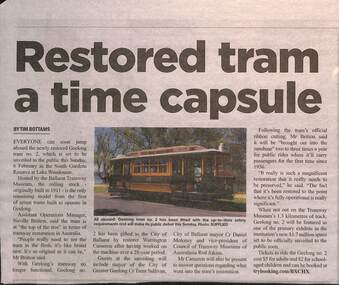
... tram 2... and the times. 2 - "Geelong Tram reborn in a new city" - by Edwina... on 6-2-2022 of Geelong 2 by the Museum:- 1 - "Restored tram ...Two articles about the launch on 6-2-2022 of Geelong 2 by the Museum:- 1 - "Restored tram a time capsule" - by Tim Bottams - giving details of the launch, some details of the tram and the times. 2 - "Geelong Tram reborn in a new city" - by Edwina Williams with details of the previous weekends event, quotes from Paul Mong, Warrington Cameron, its history and that it will be operating again on 27-2-2022.Yields information about the formal launch of Geelong 2.Newspaper - Ballarat Times News Group - set of two cuttings from Thursday 3-2-2022 and 10-2-2022 re launch of Geelong 2.btm, tramways, tramcars, tram 2, geelong, events -
 Ballarat Tramway Museum
Photograph - Digital Image - set of 6, Peter Knife, Geelong 2 and Ballarat 27 on display and other trams, 5/9/2023
... Tram 2... are photos of tram 38 on No. 2 road and No. 12.... by Peter Knife 5/9/2023. Included are photos of tram 38 on No. 2 ...Set of four digital images of trams on display in the Ballarat Tramway Museum, new building. Geelong 2 and Ballarat 27, and includes interior photos. Photo by Peter Knife 5/9/2023. Included are photos of tram 38 on No. 2 road and No. 12.Yields information about trams on display at the Museum.Set of six Digital images,tramways, tramcars, btm, tram 2, tram 27, interiors, tram 38, tram 12 -
 Bendigo Historical Society Inc.
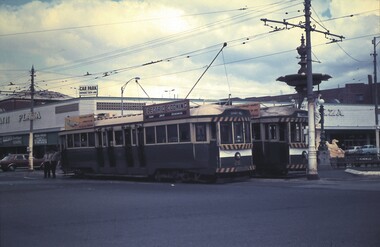
Slide - BENDIGO & EASTER FAIR, 1972
... bendigo trams charring cross tram No 2 and no 26...Bendigo tram at Alexandra Fountain, Charring Cross, Bendigo... No 2 and no 26 Bendigo tram at Alexandra Fountain, Charring ...Bendigo tram at Alexandra Fountain, Charring Cross, Bendigo. Fountain Plaza in background. Quarry Hill No.26 and Eaglehawk tram No.2.slide, bendigo, bendigo trams., bendigo trams charring cross tram no 2 and no 26 -
 Ballarat Tramway Museum
Photograph - Black & White Photograph/s, Keith Kings, 7/03/1958 12:00:00 AM
... tram 2..., with trams 21, 2 and 23 to the city with No. 20 and 17 waiting... Fair Manchester Loop Eaglehawk tram 21 tram 2 tram 23 tram 20 ...Black and White photograph contained with Reg. Item 1902 - Photo Album from Keith Kings to Les Denmead 1970. Photograph of SEC Bendigo - Manchester Loop on the Eaglehawk route, with trams 21, 2 and 23 to the city with No. 20 and 17 waiting in the loop to proceed to Eaglehawk. Part of the Bendigo Easter Fair day? Large group of people waiting to board tram in the background. A number of motor vehicles in the photo. Photo taken Easter Monday, 7/3/1958. On rear of photo is stamped "ll317A and 28.5.70", possibly indicating print manufacture dates. Keith Kings No. A(e)(12) Scanning: i - image file, p - presentation file, b - back of photograph.Stamp in top left hand corner and handwritten number with "K.S. Kings No. A(e)(12) Copyright reserved". In blue ink "Bendigo / The second track cleaning car / Depot / Easter Monday 7/3/54".trams, tramways, bendigo, easter fair, manchester loop, eaglehawk, tram 21, tram 2, tram 23, tram 20, tram 17 -
 Melbourne Tram Museum
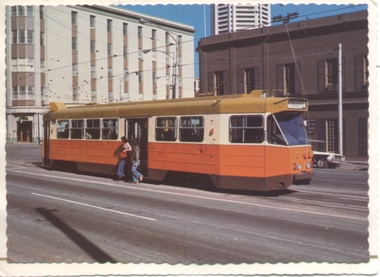
Postcard, Nu-color-Vue, tramcar Z2, c1975
... tram 2... "Melbourne's new Z class Tram Number 2" Would appear to be have been... Trams tramways MMTB Bourke St Spring St Z class tram 2 Colour ...Colour postcard with serrated edges of new tramcar Z2, at the corner of Bourke and Spring Streets, c1975, mounted onto a sheet of paper with a window cut in to show the postcard title "Melbourne's new Z class Tram Number 2" Would appear to be have been produced by Nucolorvue Productions for the TMSV, as has the same style printing as Reg Item 72. Other details not known. In the background are the Windsor Hotel and The Imperial Hotel. Two copies held.trams, tramways, mmtb, bourke st, spring st, z class, tram 2 -
 Ballarat Tramway Museum
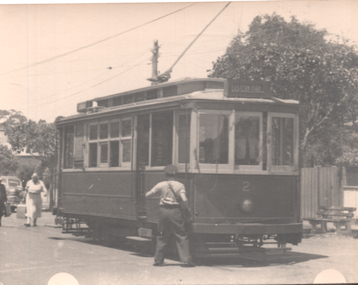
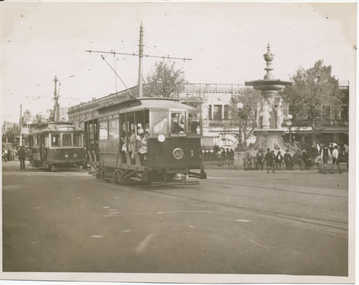
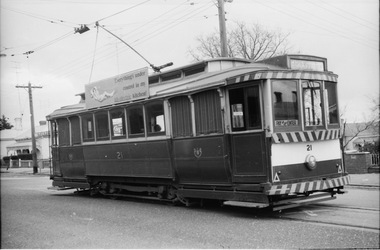
Photograph - Black & White Photograph/s, Wal Jack, Easter Saturday 1941
... tram 2... of ESCo tram No. 1 (carrying a white disc) and No. 2 at Charing... SECV Charing Cross tram 1 tram 2 On rear in ink "T196, Bendigo ...Black and White print contained within the Wal Jack Bendigo and Geelong Album, see Reg Item 5003 for more details. Photograph of ESCo tram No. 1 (carrying a white disc) and No. 2 at Charing Cross, Easter Saturday 1941. No. 1 is on the "wrong line", about to run through the cross over in front of the tram. No. 2 has the destination of Quarry Hill. i1 - scan of print in the album i2 - rear of image i3 - scan of negative at 3200dpi added 6/6/2020. On rear in ink "T196, Bendigo Tramways, No. 1 Original Class, No. 2 - ex MMTB A class, Charing Cross, Easter Saturday 1941. Wal Jack Photo.trams, tramways, bendigo, esco, secv, charing cross, tram 1, tram 2 -
 Ballarat Tramway Museum
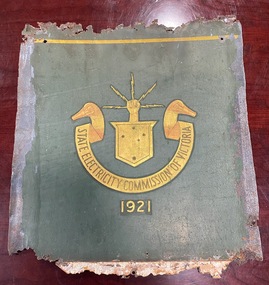
Functional object - Tramcar component - Panel ex Geelong tramcar No. 2 with SECV logo
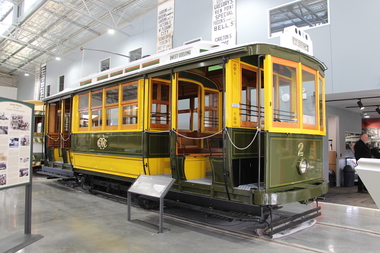
... tram 2... Geelong tram No. 2 and provided information about the paint scheme... by the restorer of MESCo/SECV Geelong tram No. 2 and provided information ...The penel was recovered by the restorer of MESCo/SECV Geelong tram No. 2 and provided information about the paint scheme and layout. The Geelong tramway system closed in March 1956, No. 2 making its last run in January 1956. The body was subsequently sold to Phil Shoppee, a farmer at Murradoc on the Bellarine Peninsula. The farmer had used the tram body as a feed store, with this part placed up against a water tank or similar. This prevented it from being painted over. The panel shows the methodology of securing it to the tram body and the location of the lining and the emblem. The SECV logo or emblem dates from the formation of the SECV in 1921. The panel dates from the 1950s, possibly from a repaint after the side entry gates on the car were replaced by hinged doors in the mid-1950s. See reference.Yields information about the location of the lining and logo on the tram body and colours. One of the few original SECV logos formed from gold leaf in the Museum's collection.Sheet steel - treated - SEC green paint with a gold leaf SECV logo or emblemtrams, tramways, geelong, tram 2, secv tramways, logos, secv, emblems -
 Ballarat Tramway Museum
Slide - 27 mm sq slide/s - set of 2 - tram stop shelters, Lilian Butler, c1971
... 27 mm sq slide/s - set of 2 - tram stop shelters..." Slide 27 mm sq slide/s - set of 2 - tram stop shelters Lilian ...Yields information about some of the tramway shelters in Ballarat.Set of AGFA slides blue and white plastic slides of Ballarat tram shelters. .1 - Grenville St shelter with the remains of the Christmas decoration ? Would appear the tram overhead has been removed. In the background is the Camp Hotel, the Courier office, The Pie shop and a barber. .2 - Drummond St shelter with the Southern Cross Hotel in the background. Has two men standing in the shelter. Photo from the collection of Lilian Butler. For a newspaper cutting regarding the removal of the roof of the shelter see Reg Item 6665.4 - for a copy of a newspaper item "Tram Shelter for Christmas Crib" ballarat, tramways, trams, shelters, sturt st, grenville st, drummond st -
 Ballarat Tramway Museum
Slide - 42mm slide/s - set of 2 - tram 36 being moved to Melbourne, Mrs. Williamson?, 14/09/1971 12:00:00 AM
... 42mm slide/s - set of 2 - tram 36 being moved to Melbourne... clipping. Slide 42mm slide/s - set of 2 - tram 36 being moved ...Yields information through a photograph of the transportation of Ballarat No. 36 for Tourism Week in September 1971, possibly called via the home of the truck driver in Ligar St. Two large format (42mm square approx. colour positive film) within a Kodak Ektachrome Transparency (50mm sq) of Ballarat tram No. 36 enroute to Melbourne, making a house call in Ligar St Ballarat. Has the advertisements for Melbourne in position. See also Reg item 3503 of tram in Melbourne and 3432 for newspaper clipping.On both slides "14/9/71" and "Tram in Ligar St"ballarat, tramways, trams, melbourne, tourism, mmtb, ligar st, tram 36 -
 Ballarat Tramway Museum
Photograph - Digital image Set of 2 - tram 21, Graham Parry, 1971
... Digital image Set of 2 - tram 21... image Set of 2 - tram 21 Graham Parry ...Photographed inn Ballarat during 1971 prior to closure of the system by Graham Parry. All images from the scanned negative. .1 - tram 21 at the city terminus, Sturt St, with a Lydiard St North destination and a Twin Lakes sign. In the background is another tram on the other side of the road, the short tram stop pole and the Town Hall. .2 - ditto taken from the Post Office steps.Yields information about the Mt Pleasant terminus and tram operations in 1971.Set of two digital images of photograph of tramstrams, tramways, sturt st, lydiard st north, town hall, tram 21 -
 Ballarat Tramway Museum
Photograph - Digital image Set of 2 - tram 21 Mt Pleasant, Graham Parry, 1971
... Digital image Set of 2 - tram 21 Mt Pleasant...Photographs of trams in Ballarat during 1971 prior ...Photographs of trams in Ballarat during 1971 prior to closure of the system by Graham Parry. All images from the scanned negative. .1 - tram 21 at the Mt Pleasant terminus. Tram has the destination of Gardens via Drummond Nth and a Twin Lakes sign. .2 - dittoYields information about the Mt Pleasant line and tram operations in 1971.Set of two Digital image of photographs. trams, tramways, mt pleasant, tram 21 -
 Melbourne Tram Museum
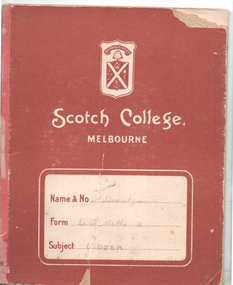
Book - Cable tram records - book 2 of 4, Alf Twentyman, c1940
... Cable tram records - book 2 of 4... cable trams Alf Twentyman History track plans Records On cover ...Second of four documents compiled by Alf Twentyman about the history of Melbourne cable trams. The first seven pages list each cable car or trailer (1 to 601) and its depot, including some notes on their individual disposal. Page 15 lists additions to the fleet of cars - 1-7-1916 to 3-6-2024 including numbers and notes. Pages 16 to 37 provide cable and track diagrams and notes on St Kilda Junction, Collins and Market St, City Road & Clarendon St, Elizabeth St, Spring-Albert and Brunswick Sts, Swanston St, (Princes Bridge to Lonsdale St) and Lonsdale St to Russell St, Spencer St and Flinders St including the Bourke St terminus, Clifton Hill terminus, Nicholson and Gertrude, Spring and Nicholson, Lygon Elgin and Rathdowne Sts, various terminal arrangements and car shed access, Queensberry and Abbotsford, St Kilda Road, Chapel and Wellington, Ackland St and other notes on the last pages.Demonstrates the recording and drawing work of Alf Twentyman and his notes.Exercise book - printed for Scotch College, ruled in an accounting ledger format - 40 pages with red card covers.On cover in ink "A E Twentyman, Inter Maths B Ledger"tramways, cable trams, alf twentyman, history, track plans, records -
 Ballarat Tramway Museum
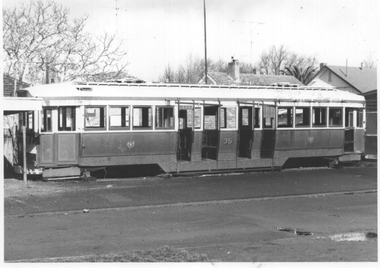
Photograph - Set of 2 - Tram 34 Sebastopol terminus, c1970
... Set of 2 - Tram 34 Sebastopol terminus...The two photographs show SEC Ballarat tram No. 34 ...The two photographs show SEC Ballarat tram No. 34 at the Sebastopol terminus in Albert St. The second photo has the Royal Mail Hotel in the background. Not known who took the photo or the date, c1970.Yields information about tram 34 appearance c1970.Set of two Black and white prints on plain paper.tramcars, tram 34, sebastopol, royal mail hotel, albert st -
 Ballarat Tramway Museum
Photograph - set of 2 - Tram 35 Ballarat College, late 1971
... set of 2 - Tram 35 Ballarat College ... back. Photograph set of 2 - Tram 35 Ballarat College ...The photographs show SEC Ballarat tram No. 35 "parked" at the Junior School of Ballarat College after the closure of the Ballarat SEC-operated system. Item 3929 gives a disposal date of 5-10-1971. The bogies had been removed at the time of transportation. Photographer unknown. Yields information about tram 35 after its disposal in 1971.Set of two black and white prints, plain back.tramcars, tram 35, disposal, sale of trams, ballarat college -
 Melbourne Tram Museum
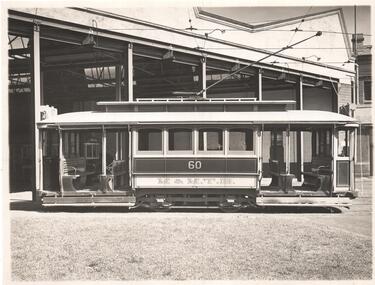
Photograph - Set of 2 - tram 60 Kew Depot, Sutcliffe Pty Ltd, c1920
... Set of 2 - tram 60 Kew Depot... and White, Photograph Set of 2 - tram 60 Kew Depot Sutcliffe Pty Ltd ...Photographs of H class car 60 at the Kew Depot c1920's. .1 - Tram painted in MMTB chocolate and cream colour scheme. Side elevation photo with depot buildings in background. Taken prior to modification of roofs at end of cars to building in destination box. Tram of same class at SEC No. 18. Tram E45 can be seen in the shed. .2 - Front elevation photo with depot buildings in background. Has old style destination box on roof, showing "DEEPDENE" and a route number box above the headlight. Both photos Print and photograph by Sutcliffe of Cromwell buildings 366a Bourke St. Melbourne.Yields information about H class tram No. 60 and Kew DepotSet of two Photograph, Black and White, In ink on the rear: .1 - "M&MTB H-60, Kew Depot `1920's (E45 in shed)" and the photographers stamp. .2 - ditto. KSK print number SA938 and 939.trams, tramways, h class, kew depot, deepdene, e class, tram 60, tram 45 -
 Melbourne Tram Museum
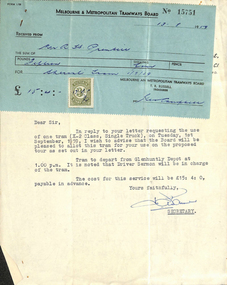
Letter, Melbourne & Metropolitan Tramways Board (MMTB), Use of X-2 tram, 11/08/1959 12:00:00 AM
... Use of X-2 tram.../59. Use of X-2 tram Letter Melbourne & Metropolitan Tramways ...Letter and receipt from Mr HA Warner, Secretary MMTB, to Mr R Prentice, for use of X-2 tramcar for proposed tour on Tuesday 1st September 1959. Letter dated 11 August 1959 and receipt dated 13/8/59.trams, tramways, tram hire, receipts, glenhuntly depot, tram tours -
 Ballarat Tramway Museum
Slide - 35mm slide/s, Noel Simons, 21/11/1962 12:00:00 AM
... tram 2... Theatre. Tram has destination of Eaglehawk. 1188.4 - Trams 2... Square tram 2 tram 3 tram 4 tram 11 tram 17 tram 21 tram Scrubber ...Set of 17 transparencies taken on 21/11/1962 on Kodak mounts. 1188.1 - Bendigo No. 11 at Depot Junction McCrae and Arnold St. with driver/conductor changing points. 1188.2 - Bendigo No. 4 at Charing Cross, side on photo, with City Club Hotel and Alexandra Fountain in the background. Tram has Castrol and SEC 'Electric Cooking' ads. 1188.3 - Bendigo No. 4 climbing View St. after tram has passed photographer. Tram has Streets Ice Cream and Cohns Soft Drinks ad on rear dash panel. In the background are the buildings in View St., including the Princess Theatre. Tram has destination of Eaglehawk. 1188.4 - Trams 2 and 4 crossing at the California Gully or Thorpe St Loop. 1188.5 - Bendigo 4 in Mt Korong Road. Tram inbound with destination of Quarry Hill, just leaving Garden Gully Loop. 1188.6 - Bendigo 4 and 17 crossing at the Hayes St. or Iron Bark Gully Loop. No. 17 bound for Eaglehawk, No. 4, Quarry Hill. 17 has two SEC roof ads and a white horse whiskey ad. 1188.7 - No. 17 bound for Eaglehawk, soon after leaving California Gully. Has large mullock heap in background. 1188.8 - Bendigo 2 and 17 crossing at the Thorpe St. or California Gully Loop. Has butchers shop in background. 1188.9 - Bendigo 17 at the Eaglehawk terminus. Has destination of Quarry Hill. In background is the hotel and shops at the terminus, showing ads for "Melbourne Bitter". Tram has two SEC 'Electric Cooking' ads. Driver and conductor about to assist two lady passengers with a pram and baby. 1188.10 - No. 17 at Eaglehawk terminus, awaiting departure. Has Eaglehawk Town Hall and Post Office in background. Tram has a Whitehorse Whiskey ad on the front dash panel. 1188.11 - No. 3 in High St. Eaglehawk, with destination of Eaglehawk. Has the shops on the south side of High St. in the background, including the Eaglehawk fish shop. Tram has two roof ads, one an SEC roof ad, and Cohns Drinks and Streets Ice cream ads on front dash panel. 1188.12 - as above, but after tram has passed photographer. Note the centre of the road poles. 1188.13 - No. 2 outbound for Eaglehawk at the intersection of Mt. Korong Road and the Calder Highway. Photo taken after the tram has passed the photographer. Has an Ampol service station in the background. 1188.14 - No. 11 leaving the Bendigo depot, crossing the bridge, with the Scrubber car in the background. 1188.15 - No. 21 at the North Bendigo terminus. Tram has destination of Golden Square and Cohns drink ad on front dash and two roof ads on side. 1188.16 - No. 11 on Golden Square route, in High St. at intersection with Old High St. 1188.17 - No. 11 at the Golden Square terminus, conductor turning the pole. Hotel on the left side of the photo. Note the road works barrier and red flag behind the tram. Slide has an end of roll mark on the right hand side of the image.Information written on in black ink and date stamped on purple ink. 1188.1 - "Birney car No. 11 in McCrae St. at Cnr of Arnold about to run into depot, Bendigo" 1188.2 - "No. 4 at Alexandra Fountain, Charing Cross Bendigo" 1188.3 - "No. 4 climbing the View St. Hill from Charing Cross, Bendigo (Eaglehawk Route)" 1188.4 - "No. 4 and 2 at Thorpe St. Loop, California Gully" 1188.5 - "No. 4 in Mt Korong Rd., Long Gully, Near Havilah Rd. (Bendigo) (Eaglehawk Route)" 1188.6 - "Nos. 17 and 4 crossing on Hayes St. Loop, Ironbark, Bendigo" 1188.7 - "No. 17 soon after leaving California Gully (Eaglehawk Route)" 1188.8 - "No.2 and 17 crossing on Thorpe St. Loop, California Gully (Eaglehawk Route)" 1188.9 - "No. 17 at Eaglehawk terminus" 1188.10 - "No. 17 at Eaglehawk terminus" 1188.11 - "No. 3 in High St. Eaglehawk" 1188.12 - "No. 3 nearing Eaglehawk terminus" 1188.13 - "No. 2 in Mt. Korong Rd., Ironbark. Calder highway on left (Eaglehawk route) 1188.14 - "Birney car No. 11 leaving Bendigo depot. Scrubber car at rear" 1188.15 - "No. 21 at North Bendigo Terminus" 1188.16 - "Birney car No. 11 in High St. Bendigo at intersection with Old High Street (Golden Square Route)" 1188.17 - "Birney Car No. 11 at Golden Square terminus, High St., Bendigo". tramways, trams, bendigo, depot junction, charing cross, view st., eaglehawk, north bendigo, golden square, tram 2, tram 3, tram 4, tram 11, tram 17, tram 21, tram scrubber -
 Ballarat Tramway Museum
Slide - 35mm slide/s - set of 4, Noel Simons, Apr. 1972
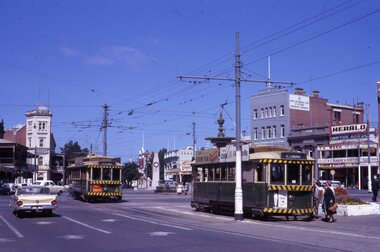
... tram 2... has a white disk on the rear of the tram. 1209.2 - Nos 2... Charing Cross Golden Square Gas Works Special Trams tram 2 tram 5 ...Set of 4 transparencies - copy slides - possibly ARE film strip dated March 1972. 1209.2 and 1209.4 on Kodak Readymount mounts. 1209.1 - Bendigo 5, 6 and 28 on a special tram service in bound to the City on a tour in Caledonia St. about to enter Lucan St, or White Hills Road or Weeroona Ave. (mis match in names in various maps). Gas works in the background. No. 5 has a white disk on the rear of the tram. 1209.2 - Nos 2 and 26 at Charing Cross with the Fountain Plaza in the background. Both trams have the destination of Quarry Hill, though 26 is on the Eaglehawk bound track. 1209.3 - No. 19 at the Golden Square terminus, with the conductor or driver swinging the pole and Billy Rodda's Golden Square hotel in the background. 1209.4 - No. 7 at Fire Station loop, en route to North Bendigo, picking up a passenger with a pram. Part of a set of 20 slides made by the Association of Railway Enthusiast Provincial Tramways film strip. Reference Item 2560 details the ARE Film Strip and provide references to other slides.Information written on in blue ink and date stamped on purple ink. 1209.1 - "Nos 5, 6 and 28 in Caledonia St. about to enter Weeroona Ave." 1209.2 - "Nos 2 and 26 at Charing Cross." 1209.3 - "Swinging the pole on No. 19 at Golden Square Terminus." 1209.4 - "No. 7 inward bound from Golden Square stops at Fire Station Loop."tramways, trams, bendigo, charing cross, golden square, gas works, special trams, tram 2, tram 5, tram 6, tram 7, tram 19, tram 28 -
 Ballarat Tramway Museum
Slide - 35mm slide/s - set of 3, Noel Simons, 22/11/1962 12:00:00 AM
... tram 2... with Electricity". Passengers are boarding the tram. 1190.2 - Bendigo... Charing Cross Alexandra Fountain tram 2 tram 7 tram 19 Information ...Set of 3 transparencies taken on 22/11/1962 on Kodak mounts. 1190.1 - No. 7 (bound for North Bendigo) at the Charing Cross stop with No. 19 just left for Quarry Hill. Has the buildings on the south side of High St. in the background, including RACV building. No. 7 has front dash panel ad for Streets ice cream, and roof ads for Ilford Film and an SEC "Cook with Electricity". Passengers are boarding the tram. 1190.2 - Bendigo No. 2 at Charing Cross with fountain in the background and other buildings on the south side of High St. Tram has two SEC roof ads - good side on view - "Electric Cooking - Matchless" and "Switch to Electric Cooking". 1190.3 - Nos. 19, 2 and 7 at Charing cross with a Austin ? motor car. Has buildings on the south side of High St. in the background, along with SEC and Ilford film roof ads.Information written on in black ink and date stamped on purple ink. 1190.1 - "Nos. 19 and 7 at Alexandra Fountain, Charing Cross, Bendigo" 1190.2 - "No. 2 at Alexandra Fountain, Charing Cross, Bendigo" 1190.3 - "Nos. 19, 2 and 7 at Alexandra Fountain, Charing Cross, Bendigo" tramways, trams, bendigo, charing cross, alexandra fountain, tram 2, tram 7, tram 19