Showing 42 items
matching admiralty -- australia
-
 Moorabbin Air Museum
Book (Item) - Australian National Airways technical training -navigation, Admiralty Navigation Manual 1938
Australan National Airwayw -
 Queenscliffe Maritime Museum
Functional object - Propeller
HMS J3 (later HMAS J3) was a J-class submarine operated by the Royal Navy and later the Royal Australian Navy. After the war, the British Admiralty decided that the best way to protect the Pacific region was with a force of submarines and cruisers. To this end, they offered the six surviving submarines of the J-class to the Royal Australian Navy as gifts. J1 and her sisters were commissioned into the RAN in April 1919, and sailed for Australia on 9 April, in the company of the cruisers Sydney and Brisbane, and the tender Platypus. The flotilla reached Thursday Island on 29 June, and Sydney on 10 July. Because of the submarines' condition after the long voyage, they were immediately taken out of service for refits. Apart from local exercises and a 1921 visit to Tasmania, the submarines saw little use, and by June 1922, the cost of maintaining the boats and deteriorating economic conditions saw the six submarines decommissioned and marked for disposal.The wreck of JR can still be seen off Swan Bay2 propellers from the J3 submarine 'HMAS Reaper'j3, j class submarines, hmas reaper -
 Queenscliffe Maritime Museum
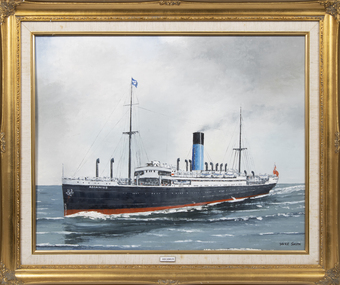
Painting - SS Ascanius, Dacre Smyth
Completed in December 1910 as a steam passenger ship she was requisitioned as a troop transport for the Australian Expeditionary Force (AEF) in 1914. She was returned to the owner in 1920 only to be requisitioned again in 1940 by the Admiralty for use as a troopship. After the war, the Ascanius brought Jewish emigrants from Marseilles to Haifa and was sold to Italy and renamed San Giovannino for Cia de Nav. Florencia (A. Motosi), Genoa in 1949. B Smythe An oil painting of the SS AscaniusAscaniusss ascanius, troop transport, aef, wwi, wwii, migrant ship -
 Tennis Australia
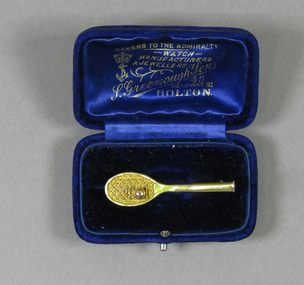
Brooch, 1910
Gold brooch in shape of a racquet and ball housed in jewellers box. Engraved on obverse: '23 MAY 1910'. Engraved in ornate script on reverse: 'MLM/HARROGATE'. Box is blue velvet, with text printed on lining of underside lid: 'MAKERS TO THE ADMIRALTY/WATCH/MANUFACTURERES/& JEWELLERS/S.GREENOUGH & SONS/45/NEWPORT ST/BOLTON'. Materials: Gold/Metal, Velvet, Wood, Metaltennis -
 Mrs Aeneas Gunn Memorial Library
Book, Oxford University Press et al, The price of admiralty, 1944
This book describes the life of a man, the late Commander J. H. Walker, and of his ship. HMAS Parramatta; both used to represent their service. Parramatta was one of the 'little ships' which made the great sacrifice in keeping the hard pressed garrison of Tobruk supplied. She went down fighting gallantly and in doing so added a glorious page to the naval history of our Empire.Ill, maps, p.328.This book describes the life of a man, the late Commander J. H. Walker, and of his ship. HMAS Parramatta; both used to represent their service. Parramatta was one of the 'little ships' which made the great sacrifice in keeping the hard pressed garrison of Tobruk supplied. She went down fighting gallantly and in doing so added a glorious page to the naval history of our Empire. world war 1939-1945 - naval operations - australia, royal australian navy - history -
 Parks Victoria - Wilsons Promontory Lightstation
Lamp, Aldis
The lamps were pioneered by the British Navy in the late nineteenth century and introduced by the Royal Australian Navy after 1918, and continue to be used to the present day. Manufactured in 1960, the Wilsons Promontory lamp was provided to the lighthouse by the Department of Shipping for signalling ships but was also used for communicating with Cliffy Island, 18 nautical miles away. This type of lamp was renowned for its brilliant light, and lightkeepers from the two lightstations ‘used to practice their signalling with each other, as its effective use was reliant on precise positioning of the scope which is located on top of the lamp’. The inside of the case is imprinted with ‘RAN (Royal Australian Navy), and details on the lamp include a serial number, the date of 1960 and the initials of the Department of Transport, which at that time incorporated the Commonwealth Lighthouse Service. Another Aldis lamp and case with a date of 1960 is held at Cape Nelson and third lamp and case is at Point Hicks; (date unconfirmed but possibly 1943). A fourth lamp and case formerly at Cape Schanck disappeared from the collection sometime between 1995 and 2003.Aldis lamp and case (WPLS 0003.2; likely provenance) The lamps are not rare in museum collections however the Wilsons Promontory example has a confirmed provenance to the lightation and has first level contributory significance as a fine example of the Aldis lamps that were distributed to lightstations throughout Victoria and Australia.1. Handheld black signaling lantern with trigger mechanism. Glass front with inner reflective disc. Black electrical cord is attached with a two pronged plug at the end. 2. Black painted wooden box for transporting lantern. brass catch, leather handle. Grey electrical cord inside plus transformer. Hinged lid. The Aldis lamp is portable, hand held visual signalling lamp with trigger mechanism and inner reflective disk used for optical communication via Morse code. The concave mirror is tilted to focus the light into pulse signals. Larger versions of the lamp are fixed on ships or pedestals and have shutters in front of the device that are opened and closed to transmit signals. Wilsons Promontory’s black metal Aldis lamp and attached electrical cord has a black painted wooden carrying case with metal clasp and leather hand grip.1. On trigger;"AP16413" Around V shaped protrusion attached to lamp "AP197873 / AEI .LTD 59" Beneath screw on face;"AD16415" Inside lamp, under glass;"ADMIRALTY PATTERN 16409 / 5 INCH HAND SIGNALING LANTERN SERIAL No. 212 Year 1960 / AEI PTY LTD SYDNEY" •2. Box. On brass plate below handle."ADMIRALTY PATTERN 16409 / BOX FOR TRANSPORTING LANTERN / PATTERN 16409" Inside box on side of metal insert attached to inside of box;"EXTRA LOW VOLTAGE TRANSFORMER / MADE BY / M.Brodribb, Melbourne/ cat & APP / No v/QR / 1811A / 50 / 60 va / CONT. 55 c / RATIO 240, 12 V TAPS " Top of metal box on sticker;"C of A / D.O.T 143076 / 12 V 5A" On Bakelite plug on metal box;"EXTRA LOW VOLTAGE" -
 Flagstaff Hill Maritime Museum and Village
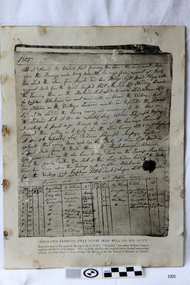
Document - Log Book page, 21/10/1805
This document is a reproduction of the page of the log book from the vessel HMS Euryalus, recording Nelson's famous signal at the Battle of Trafalgar. On October 21, 1805, Admiral Lord Nelson led the British Navy to victory against the French and Spanish navies in the Atlantic Ocean. The event became known as the Battle of Trafalgar. To commence the battle Nelson commanded his now-famous flag signal “England expects that every man will do his duty”. Nelson’s signal was transmitted from his ship HMS Victory in 12 separate flag-hoists, according to Sir Home Popham’s Telegraphic Code that had been supplied to the fleet as an experiment, with the numerical flags of the Admiralty official Day Signal book (1799 issue). The signal flags comprised eight that represented whole words and four that represented single letters - [ENGLAND] [EXPECTS] [THAT] [EVERY] [MAN] [WILL] [DO] [HIS] [D] [U] [T] [Y]. Nelson’s signal was received by the ‘reporting frigates’ who would then send them on to the other vessels. The signal was recorded by Captain Henry Blackwood who was in command of the HMS Euryalus. Captain Blackwood led a squadron of frigates, reporting back to Nelson on the movement of the French and Spanish fleets. Nelson’s famous signal was recorded in the log book of Euryalus and repeated to other vessels. The original log book is a canvas-backed manuscript written up from hour to hour during the battle. It is in the Nelson Collection at Lloyd's. Lloyd’s of London is a large insurance company in the United Kingdom. In 1803 Lloyd’s founded the Lloyd’s Patriotic Fund to honour the brave and provide for the wounded and dependents of those killed in major Napoleonic battles. Over the years Lloyd’s has accumulated an assorted collection of artefacts and memorabilia associated with Nelson, including this log book from HMS Euryalus. In 2003 Lloyds created a temporary exhibition to mark the bicentennial of Nelson’s Battle of Trafalgar. The display included key items from the Nelson Collection celebrating Nelson’s role in British Naval History. Lloyd’s now has a department called The Nelson Collection and Heritage Floor where historical artifacts are displayed and the story of Lloyd’s 300 years of history is told. This document, being a reproduction, is not significant in itself. However it's content is of historical significance for its connection to Admiral Nelson and The Battle of Trafalgar. Through the leadership and victory of Nelson, the British obtained the mastery of the seas over the French and Spanish and opened up the way for Britain to colonise many countries including Australia. The document is also associated with a wood sample from Napoleon's ship Victory that is in our Collection.Reproduction of a page of the log book of HMS Euryalus recording Nelson's famous signal at the Battle of Trafalgar. The original log book entry was handwritten, dated 21 Oct 1805.flagstaff hill, warrnambool, shipwrecked-coast, flagstaff-hill, flagstaff-hill-maritime-museum, maritime-museum, shipwreck-coast, flagstaff-hill-maritime-village, log book, flag signal, hms euryalus, nelson's famous signal, battle of trafalgar, october 21, 1805, admiral lord nelson, french and spanish navies, england expects that every man will do his duty, hms victory, sir home popham’s telegraphic code, admiralty official day signal book (1799 issue), reporting frigates, captain henry blackwood, canvas-backed manuscript, nelson collection at lloyd's, lloyd’s of london, lloyd’s patriotic fund, napoleonic battles, british naval history -
 Flagstaff Hill Maritime Museum and Village
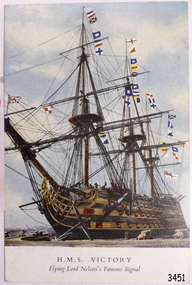
Postcard - Vessel, Sailing Ship, after October 1805
The British Royal Navy’s warship HMS Victory was once Lord Nelson’s flagship. The HMS Victory was built in 1765 and after serving active duty is now, in 2019, still a ship of the Royal Navy, in dry dock undergoing continuous restoration to preserve her for display as a museum ship, due to the vessel’s significant naval history. Battle of Trafalgar: On October 21, 1805, twenty-seven British ships of the line, led by Admiral Lord Nelson aboard HMS Victory, defeated thirty-three French and Spanish ships of the line under French Admiral Villeneuve. The battle took place in the Atlantic Ocean off the southwest coast of Spain, just west of Cape Trafalgar, near the town of Los Caños de Meca. The victory confirmed the naval supremacy Britain had established during the course of the eighteenth century and it was achieved in part through Nelson's departure from the prevailing naval tactical orthodoxy of the day. Conventional practice at the time was for opposing fleets to engage each other in single parallel lines, in order to facilitate signalling and disengagement and to maximise fields of fire and target areas. Nelson instead arranged his ships into two columns to sail perpendicularly into the enemy fleet's line. During the battle, Nelson was shot by a French musketeer and he died shortly before the battle ended. Villeneuve was captured, along with his ship Bucentaure. He later attended Nelson's funeral while a captive on parole in Britain. Admiral Federico Gravina, the senior Spanish flag officer, escaped with the remnant of the fleet. He died five months later from wounds sustained during the battle. It was prior to this battle that Nelson had issued his now-famous final orders to his ships in 12 separate flag-hoists “England expects that every man will do his duty”. This wood sample is historically significant for its association with Admiral Lord Nelson the Battle of Trafalgar. Through Nelson’s leadership and unorthodox battle tactics, he secured not only a victory against the French and Spanish but reaffirmed Britain's naval supremacy opening the way for Britain to continuing the policy of colonisation of many countries including Australia.A coloured postcard of a sailing ship, warship or battleship, deck cannons on the ship and in the foreground, many signal flags flying from the masts. Printed on the front "H.M.S. Victory Flying Lord Nelson Famous Signal". The signal was given by Lord Nelson in 1805.Printed on the front "H.M.S. Victory / Flying Lord Nelson Famous Signal"flagstaff hill, warrnambool, shipwrecked-coast, flagstaff-hill, flagstaff-hill-maritime-museum, maritime-museum, shipwreck-coast, flagstaff-hill-maritime-village, post card, postcard, sailing ship, vice-admiral lord nelson, horatio nelson, lord nelson, oak piece, piece of oak, nelson, battle of trafalgar, maritime technology, ship relics, 18th century warship, british royal navy, sir home popham’s telegraphic code, admiralty official day signal book, october 21, 1805, admiral lord nelson, french and spanish navies, nelson's famous signal, england expects that every man will do his duty, hms victory, nelson collection at lloyd's, lloyd’s of london, lloyd’s patriotic fund, napoleonic battles, british naval history, 18th century warship, 18th century battleship -
 Monbulk RSL Sub Branch
Book, Paul McGuire et al, The price of admiralty, 1944
This book describes the life of a man, the late Commander J. H. Walker, and of his ship. HMAS Parramatta; both used to represent their service. Inscription on half-title [AU-SyACU ] : "Parramatta was one of the 'little ships' which made the great sacrifice in keeping the hard pressed garrison of Tobruk supplied. She went down fighting gallantly and in doing so added a glorious page to the naval history of our Empire.Index, ill, p.308.non-fictionThis book describes the life of a man, the late Commander J. H. Walker, and of his ship. HMAS Parramatta; both used to represent their service. Inscription on half-title [AU-SyACU ] : "Parramatta was one of the 'little ships' which made the great sacrifice in keeping the hard pressed garrison of Tobruk supplied. She went down fighting gallantly and in doing so added a glorious page to the naval history of our Empire. royal australian navy - history, parramatta (destroyer) -
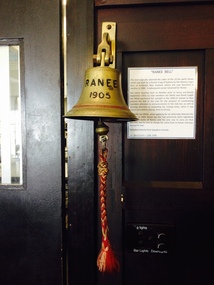 Royal Melbourne Yacht Squadron
Functional object - Yacht Bell "Ranee", 1903 (exact)
“RANEE BELL” This bell originally adorned the cabin of the 12.6m yacht “Ranee”, built for a Doctor Craig of Sydney by the famous Logan Bros of Auckland New Zealand, she was launched as Heather in 1900. A subsequent owner renamed her “Ranee”. Her name reverted to “Heather” prior to being purchased, September 1919, by club members Joe White and David Cargill. Joe White purchased her outright in season 1920-21. He then presented the bell to the club to summon members attention to announcements in the club bar where it remains today and is used for the same purpose. It was also rung to draw attention to impending bar closing times, when it was rung 5 mins before closing, then at closing. Ironically Joe White, when applying for a Admiralty Warrant for Heather in 1924, found out she had previously been registered under the name of Ranee, and the only way to carry on that Warrant, was for him to change her name back to Ranee mid-way during the season. J.H. (Bert) Ferris 1/03/09Very significant - Squadron history - Yachting history AustraliaShips bell, brass, mounted on brass bracket,Ranee 1903brass, white, bell, ranee, heather, joe white, david cargill -
 Monbulk RSL Sub Branch
Book, Pelorus Publications, Seagulls, cruisers and catapults : Australian naval aviation, 1913-1944, 1989
In 'Seagulls, Cruisers and Catapults' Ray Jones has written an authoritative account of the technical, operational and political aspects of Australian naval aviation from Admiral Creswell's 1913 plan for naval aviation until the last aircraft catapult was removed from an Australian cruiser in 1944.The Navy's role as catalyst in the formation of the Air Force is outlined for the first time and details of the sometimes acrimonius struggle between Navy and Air Force over naval aviation are provided. No serious work of RAN history can deal with the mid-war years without taking account of advice from London and the Admiralty's influence on RAN aviation planning is made clear. Operation of aircraft, such as the Seagull III and Seagull V amphibians, from Australian warships are described and the rationale of cruiser aircraft operations are illustrated by the number shot down or damaged performing their essential task in wartime. The vital role of aircraft operating from cruisers searching for raiders and taking part in fleet operations defending Australia in 1942 is stressed. Extensive archival research in Melbourne, Canberra and London, combined with hours of interviews with the men who flew aircraft from cruisers and carrier, has ensured a balanced and well-rounded narrative which is an essential addition to the library of any naval or aviation history enthusiast.Index, notes, Appendices, ill, p.134.In 'Seagulls, Cruisers and Catapults' Ray Jones has written an authoritative account of the technical, operational and political aspects of Australian naval aviation from Admiral Creswell's 1913 plan for naval aviation until the last aircraft catapult was removed from an Australian cruiser in 1944.The Navy's role as catalyst in the formation of the Air Force is outlined for the first time and details of the sometimes acrimonius struggle between Navy and Air Force over naval aviation are provided. No serious work of RAN history can deal with the mid-war years without taking account of advice from London and the Admiralty's influence on RAN aviation planning is made clear. Operation of aircraft, such as the Seagull III and Seagull V amphibians, from Australian warships are described and the rationale of cruiser aircraft operations are illustrated by the number shot down or damaged performing their essential task in wartime. The vital role of aircraft operating from cruisers searching for raiders and taking part in fleet operations defending Australia in 1942 is stressed. Extensive archival research in Melbourne, Canberra and London, combined with hours of interviews with the men who flew aircraft from cruisers and carrier, has ensured a balanced and well-rounded narrative which is an essential addition to the library of any naval or aviation history enthusiast.airplanes - military - australia, world war 1939-1945 - naval operations - australia -
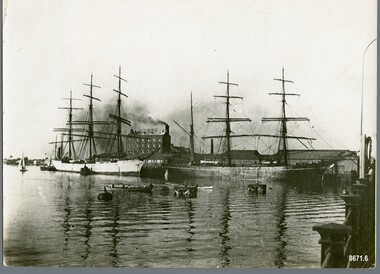 Flagstaff Hill Maritime Museum and Village
Photograph - Vessels, Sailing Ships, Circa 1910 - 1913
This photograph was one of ten photographs donated to Flagstaff Hill Maritime Museum and Village by Fred Trewartha. Frederick John Fox Trewartha (Fred) was a well-known Warrnambool businessman. He was born in Beeac near Geelong in 1920 and came to Warrnambool with his family as a very young child. He was apprenticed to his father John, as a saddler and later opened his own shop on Raglan Parade. He then moved into working with tarpaulins and canvases for the trucking industry. Fred was keenly interested in photography (and was a member of the Warrnambool Cine Club), yachting and boat building. He kept his yacht moored at Port Fairy for many years and participated in sailing events locally and interstate. He also built boats with his sons. He had the opportunity to meet many older sailors and it's thought this photo (and others in the set) may have been given to him by one of these men. Fred Trewartha died in 2016 in Warrnambool. There is some conflict re the identity of the ship in the foreground of this photograph. It has been identified as the "Dimsdale" by the original owner of this photograph and by the website "Photos of the Past" which have an identical copy of the photo, however the State Library of South Australia (who also have an identical copy of the photograph) have identified the date of the photograph as 1910 and the ship as the "Ainsdale". The "Dimsdale" and the "Lobo" were recorded several times in the local shipping news as being docked at the Port of Adelaide, at the same time, during the years 1912 and 1913, whereas the "Ainsdale" wasn't in Adelaide very often but was recorded as coming in and out of the Port of Adelaide in the years 1915 and 1916. On February 25th 1916, the two ships (the "Ainsdale" and "Lobo") were both in the Port of Adelaide at the same time, but the "Ainsdale" was loading at Outer Harbor and the "Lobo" was discharging timber at Corporation Wharf. The "Ainsdale" was owned by the same firm that had owned the "Dimsdale". The Dimsdale was a three masted steel ship built in 1890 by C. J. Bigger of Londonderry. It became notorious when it struck the Wonga Shoal lighthouse near Port Adelaide on the night of 17th November 1912, destroying the structure and killing two lighthouse keepers. The accident was investigated by the Marine Board, the Coroner, the Police Court, the Admiralty Court and by the Criminal Courts of South Australia where the Captain (John Jones) was charged with manslaughter and found "not guilty". The Dimsdale was sold to a Norwegian firm and its name was changed to "Kwango". It sank in 1915 near the Magdalen Islands in the Gulf of St. Lawrence. The "Lobo" was a well known "windjammer" trading from the Port of Adelaide to other parts of the world. For a number of years it was employed in the New Zealand and Tasmanian services, after which it made several voyages to North America. It was an iron barque of 945 tons, built at Sunderland in 1877 by Osbourne, Graham and Company. On October 18th 1916, the Lobo (owned by Walter and Morris, timber merchants) was on a voyage from Parapato (Mozambique) to New York with a cargo of mango bark and ebony, when it struck rocks and ran aground 30 miles east of the Angoche River in Portuguese East Africa. A detailed account of the incident, written by Mrs Murchison (the Captains wife who was on board with her two year old son) was published in the Adelaide newspaper "The Mail" on Saturday 9th December 1916. She, and several of the crew were put in a boat early in the morning and sent away from the wreck. Several hours later, they were joined by Captain Murchison and the remainder of the crew. They were in their small open boats for several hours before landing on a small uninhabited island where they remained for several days before being picked up by another vessel and taken back to Parapato. The captain was able to obtain a position on a steamer which took him and his wife and child back to England.This photograph is significant as a record of the world wide mercantile trade Australia was engaged in at the end of the nineteenth century and beginning of the twentieth century and as a record of the dangers faced by the crews of these ships.A black and white photograph showing two large sailing ships moored at a dock. There are industrial buildings in the background (one has smoke coming from its chimney) and several smaller craft (a rowing boat, two small boats that may be tugs and a little yacht) at the side of the ships. Pylons can be seen in the water and a metal fence is in the bottom right corner. On the back of the photo the words "Ship Dimsdale" and "Bk Lobo" are written diagonally across the top left corner in pencil. A beige paper label has been attached to the top right corner with the words "Dimsdale at Port Adelaide" and "Port Adelaide Historical Society may be interested" written in black ballpoint pen."Ship Dimsdale" / "Bk Lobo" ""Dimsdale" / at Port Adelaide" "- Port Adelaide Historical /Society may be / interested"warrnambool, dimsdale, lobo, barque lobo, port of adelaide, kwango, wonga shoal lighthouse, fred trewartha, ainsdale, frederick john fox trewartha, captain john jones, windjammer, iron barque, parapato