Showing 449 items matching "crossing of the line"
-
 Greensborough Historical Society
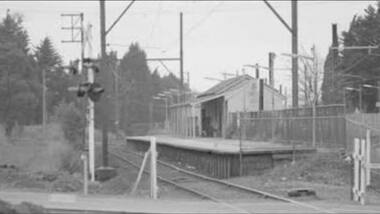
Photograph - Digital Image, Watsonia Railway Station before 1970, 1960s
... the rail line was lowered to remove level crossings and duplicate... in 1977 when the rail line was lowered to remove level crossings ...Watsonia Station before the 1970s. This photograph shows the old station. The new Watsonia Station was opened in 1977 when the rail line was lowered to remove level crossings and duplicate the line between Macleod and Greensborough.Digital copy of black and white photographwatsonia station, hurstbridge rail line -
 Ballarat Tramway Museum
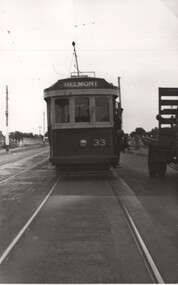
Photograph - Front of Geelong 33, Charles Craig, 29-3-1948
... , possibly at a crossing loop on the Belmont line.... of Geelong bogie tram No. 33, possibly at a crossing loop ...Photo shows the front of Geelong bogie tram No. 33, possibly at a crossing loop on the Belmont line.Yields information about the AETA's first Geelong tour in 1948 and the trams being operated on that day.Black and white photograph of Geelong No. 33tramways, trams, sec tramways, geelong, tram 33 -
 Unions Ballarat
The forgotten rebels of Eureka, Wright, Clare, 2013
... . Deliverance 3. Crossing the line 4. The road Part 2.... Deliverance 3. Crossing the line 4. The road Part 2 ...Clare Wright writes about the multitude of women who were at the Ballarat goldfields and the critical roles that they played in the goldfields and the Eureka Stockade. Contents Introduction : dust and rattling bones Part 1. Transitions 1. A virgin country 2. Deliverance 3. Crossing the line 4. The road Part 2. Transformations 5. The gold diggers on '54 6. Winners and losers 7. The winter of their discontent 8. Parting with my sex Part 3 : Transgressions 9. Burning down the house 10. High camp 11. Crossing the line (reprise) 12. Bloody Sunday. Relevant to Australian and Ballarat history and especially facts around the story of the Eureka Stockade.Paper; hardcover book. Front cover: blue and white Eureka flag background; white, fawn and blue lettering; sticker (The Stella Prize 2014 Shortlist).Front cover includes title and author's name; quotations from reviewers. Back cover: quotes from reviewers.btlc, ballarat trades hall, ballarat trades and labour council, eureka stockade, women in history, goldfields, gold miners, gold mining - ballarat, history -
 Greensborough Historical Society
Photograph - Digital Image, Building Watsonia Station 1975, 1975_
... to remove level crossings and duplicate the line between Macleod... when the rail line was lowered to remove level crossings ...Building Watsonia Station circa 1975. This photograph shows the framework for the new station being installed. The new Watsonia Station was opened in 1977 when the rail line was lowered to remove level crossings and duplicate the line between Macleod and Greensborough.Digital copy of colour photographwatsonia station, hurstbridge rail line -
 Greensborough Historical Society
Photograph - Digital Image, Watsonia Railway Station 1975, 1975_
... to remove level crossings and duplicate the line between Macleod... in 1977 when the rail line was lowered to remove level crossings ...Watsonia rail line being moved below road level mid 1970s. This photograph shows work on the cutting and beginning of station. Watsonia Station was opened in 1977 when the rail line was lowered to remove level crossings and duplicate the line between Macleod and Greensborough.Digital copy of colour photographwatsonia station, hurstbridge rail line -
 Ballarat Tramway Museum
Photograph - Black and White from a postcard of Bendigo - Mitchell St, 1910s
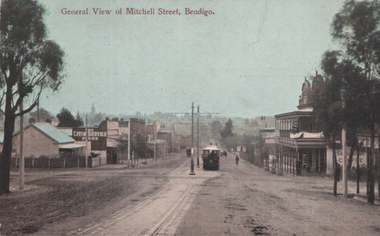
... before crossing over the railway line. Photo is looking west... before crossing over the railway line. Photo is looking west. Has ...Photograph shows a Bendigo ESCo tram climbing the hill in Mitchell St to where the double track converged into single track before crossing over the railway line. Photo is looking west. Has a two storey hotel on the right. See item 9080 for a coloured version.Yields information about Mitchell St Bendigo and ESCo trams.Black and White photograph from a postcard of Bendigo - Mitchell Sttramways, trams, bendigo, esco, mitchell street -
 Ballarat Tramway Museum
Postcard, WTP, "General view of Mitchell Street Bendigo", 1910s
... before crossing over the railway line. The photo is looking west... before crossing over the railway line. The photo is looking west ...The photograph shows a Bendigo ESCo tram climbing the hill in Mitchell St to where the double track converged into a single track before crossing over the railway line. The photo is looking west. Has a two-storey hotel on the right. See item 8452 for a black-and-white version.Yields information about Mitchell St Bendigo and ESCo trams.Postcard - colour divided back, unused.tramways, trams, bendigo, mitchell st -
 Ballarat Tramway Museum
Photograph - Black and White - tram 11 Victoria St, A T Miles, 26/11/1969
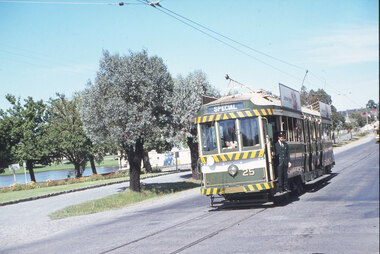
... Black and White - tram 11 in Victoria St crossing over... in Victoria St crossing over the Eureka line bridge - former Buninyong ...Black and White - tram 11 in Victoria St crossing over the Eureka line bridge - former Buninyong railway line. Taken by A T Miles 26/11/1969. The tram has a Twin Lakes advert on the front. The destination has been changed for the return trip to the Gardens via Sturt St West.Yields information about services to Victoria St.Photograph - black and white print with notes on rear. A T Miles stamp and location and date notes.tramways, trams, tram 11, victoria st, eureka line, bridge, buninyong -
 Ballarat Tramway Museum
Photograph - Black & White Photograph/s, Wal Jack, 1935
... railway line in Armstrong St. Ballarat crossing the Sturt St.... crossing Sturt St. tram line Ballarat (1935)" In Wal Jack's... of Rly line in Armstrong St. crossing Sturt St. tram line ...Black and white photograph of the former Phoenix Foundry railway line in Armstrong St. Ballarat crossing the Sturt St. (north side) tram line, looking south. Has Town Hall and Myer (formally Snows) building in the background, along with a tram stop on the corner. Track has been dug out, exposing the sleepers and one tie bar. Has road barriers in background. Photo taken1935, during the reconstruction of the tramway system. On Velox photo paper.On rear in top right hand corner in blue ink "12004". Above main writing in pencil is the number "74". On bottom half in light black ink "The old piece of Rly line in Armstrong St. crossing Sturt St. tram line Ballarat (1935)" In Wal Jack's handwriting.trams, tramways, phoenix foundry, armstrong st, sturt st, railway siding -
 Greensborough Historical Society
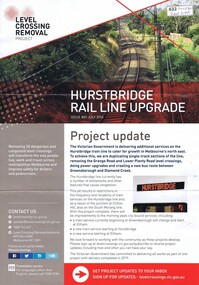
Leaflet, Level Crossing Removal Project: Hurstbridge Rail Line Upgrade. Issue #1, July 2016, July 2016
... Level Crossing Removal Project: Hurstbridge Rail Line... infrastructure and services on the Hurstbridge line as part... line as part of the Victorian Government's Level Crossing ...Updates and information sheets on changes to train infrastructure and services on the Hurstbridge line as part of the Victorian Government's Level Crossing Removal Project. Includes the Hurstbridge Line Duplication Updates 2022- .Bulletins vary with regard to size and numbering; most have colour illustrations. Includes separate leaflet about FAQs on Planning Scheme Amendment required to conduct project works associated with the Hurstbridge Line Upgrade.level crossing removal project, hurstbridge rail line -
 Ballarat Tramway Museum
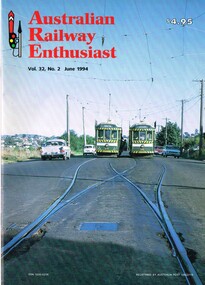
Magazine, William. F. Scott, "Australian Railway Enthusiast - Vol 32, No. 2, June 1994", Jun. 1994
... cover photograph of SEC cars 24 and 26 crossing on the Eaglehawk... cars 24 and 26 crossing on the Eaglehawk line. "Australian ...Copy of the Australian Railway Enthusiast - Vol 32, No. 2, June 1994 which has an extensive photographic article on the Bendigo Tramways written by William F. Scott. Gives the origin of the city, first tramway, battery trams, steam trams, electrification, operation by ESCo, SEC takeover, closure, operation by the Bendigo Trust, maps and a list of the Bendigo Trust fleet. Front cover photograph of SEC cars 24 and 26 crossing on the Eaglehawk line.trams, tramways, bendigo, steam trams, battery trams, esco, sec, bendigo trust -
 Ballarat Tramway Museum
Photograph - Digital image Set of 10, Tony Smith, 1971
... .3 - 11 in Victoria St, crossing the Eureka line rail bridge..., crossing the Eureka line rail bridge. .4 - 43 and another bogie ...Yields information about Ballarat Tramways and trams prior to the closure of the tramway system.Set of 10 digital images of Ballarat trams prior to closure, scanned from original slides by Tony Smith, 1971 prior to closure of the system. .1 - 11 arriving at Gardens Loop, tram has destination of Mt Pleasant, advert for Twin Lakes and SEC Briquettes. In the background is the Gardens Kiosk building. .2 - 11 at Gardens Loop .3 - 11 in Victoria St, crossing the Eureka line rail bridge. .4 - 43 and another bogie tram sitting on 1 road at the depot. .5 - 27 derailed at the depot, in Wendouree Parade - derailed all wheels. .6 - ditto .7 - 33 coupled up to 27, to pull it back onto the track. Driver adjusting the pole. Tram has an Eureka and SEC roof advertisement. .8 - 27 in Wendouree Parade, showing depot, just to the east of the depot. .9 - 33 in bound in Drummond St North at the Mill St Loop. .10 - 33 in bound in Victoria St, has Gardens via Drummond St Nth destination.trams, tramways, wendouree parade, gardens loop, victoria st, depot, derailments, drummond st nth, mill st loop, tram 11, tram 43, tram 27, tram 33 -
 Mission to Seafarers Victoria
Album (item) - Photographic album, Duncan family photographic album, c.1920
... ." Some photographs were even taken on board these ships (crossing...." Some photographs were even taken on board these ships (crossing ...The photographic album was compiled by various members of the Duncan family in connection with their social activities and charitable work with the Mission to Seafarers Victoria. Image captions refer to a number of Melbourne families: "Barker", "MacEachern", "Johnston" and "Garven." The following ships are also named: "SS Sesther Dollar", "SS Peterton" and "SS Verbania." Some photographs were even taken on board these ships (crossing the line ceremony) meaning they were likely taken by a crew member or a passenger? This would help knowing who is the photographer and maker of this album. Places named include: "Gembrook", "Portsea" and "Port Melbourne Mission."This is a photograph of social and historic significance, being part of a sub-collection of material that provides a snapshot of the type of individuals involved in the Ladies Harbour Lights Guild and the activities carried out by that organisation. Tooling on the left hand side front cover. Cover and pages tied together with mustard coloured cord as binding.barker, maceachern, johnston, garven, ss sesther dollar, ss peterton, ss oerbania, gembrook, portsea, port melbourne mission, ladies harbour lights guild, social, duncan, lillie duncan, olive duncan, duncan album -
 Southern Sherbrooke Historical Society Inc.
Photograph - Puffing Billy train
... with large puddles. A car can be seen crossing the line behind.... A car can be seen crossing the line behind the train. A lightly ...Two black and white photos dated 1962 from the National Archives of Australia, showing the Puffing Billy train in the Dandenongs. - Ground is steep and heavily treed and may be the stretch of line between Menzies Creek and Clematis Station. - Large trees line the track. There is a driveway below the line with large puddles. A car can be seen crossing the line behind the train. A lightly treed hill is visible in the background. This may be the crossing at the Clematis end of Menzies Rd with Tivoli Farm in the distance. -
 Bendigo Historical Society Inc.
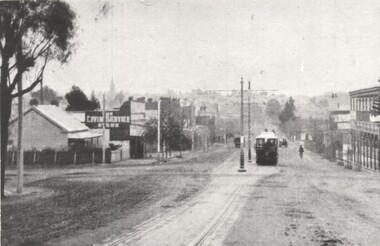
Postcard - GLADYS DEAN COLLECTION: POSTCARD, 1906 - 1908
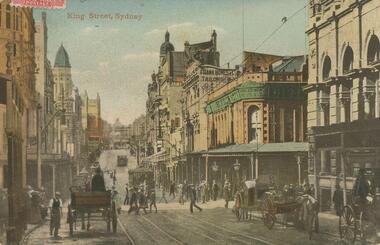
... travelling along and people walking along or crossing the road. Many... travelling along and people walking along or crossing the road. Many ...Photographic coloured postcard. Image depicts a busy city street with tram tracks down the centre, horse and carts travelling along and people walking along or crossing the road. Many buildings line both sides of the street. The words King Street Sydney are printed in red on the top left hand side.95717postcard -
 Kew Historical Society Inc
Photograph - Railway level crossing in Glenferrie Road, Glenferrie, E.J. Dower, c.1912
... crossing that existed before the line was elevated on a bridge over... crossing that existed before the line was elevated on a bridge over ...One of a series of photographs, taken by Edgar James Dower in the second decade of the twentieth century. Born and raised in Olinda, his family later moved to Surrey Hills. He worked as an adult as a clerk in the city office of the Metropolitan Gas Company, and in his role as a 'collector', he was able to photograph scenes including the construction of tramlines and associated buildings in Kew, Hawthorn, Camberwell and Surrey Hills. Later he established a real estate agency with his brother - the E.J. Dower Real Estate Agency, Dandenong Office.The image is an historically significant record of the development of transport infrastructure which was used to connect Victorians in the first two decades of the twentieth century. This development resulted from increases in population and the consequent extension of Melbourne's suburbs. The photographs, both individually and collectively, richly detail the labour of workers and the tools and machinery used to create and extend Melbourne's public transport network in the years preceding and during World War 1.Digital copy of an original mounted photograph showing Glenferrie Road Hawthorn, looking north towards the old railway level crossing that existed before the line was elevated on a bridge over Glenferrie Road. "The Don Store" at right is immediately behind the old railway level crossing. The tree and shops at left before the crossing were to be removed / demolished as part of the realignment of the train tracks.Annotated verso: "1914 [deleted]/1913 / Glenferrie Road showing railway gates / Taken just before the commencement of the regrading of railway line to Camberwell".theme --- travelling by tram, theme -- connecting victorians by transport and communications, glenferrie road -- hawthorn (vic.), railways -- hawthorn, the don store -- hawthorn (vic.) -
 Kew Historical Society Inc
Photograph - Railway level crossing in Glenferrie Road, Glenferrie, E.J. Dower, 1912
... crossing that existed before the line was elevated on a bridge over... Railway Line / Taken by E.J. Dower about 1912". Digital copy ...One of a series of photographs, taken by Edgar James Dower in the second decade of the twentieth century. Born and raised in Olinda, his family later moved to Surrey Hills. He worked as an adult as a clerk in the city office of the Metropolitan Gas Company, and in his role as a 'collector', he was able to photograph scenes including the construction of tramlines and associated buildings in Kew, Hawthorn, Camberwell and Surrey Hills. Later he established a real estate agency with his brother - the E.J. Dower Real Estate Agency, Dandenong Office.The image is an historically significant record of the development of transport infrastructure which was used to connect Victorians in the first two decades of the twentieth century. This development resulted from increases in population and the consequent extension of Melbourne's suburbs. The photographs, both individually and collectively, richly detail the labour of workers and the tools and machinery used to create and extend Melbourne's public transport network in the years preceding and during World War 1.Digital copy of an original mounted photograph showing Glenferrie Road Hawthorn, looking north towards the old railway level crossing that existed before the line was elevated on a bridge over Glenferrie Road. "The Don Store" at right is immediately behind the old railway level crossing. The tree and shops at left before the crossing were to be removed / demolished as part of the realignment of the train tracks.Annotated verso: "Glenferrie Road, Glenferrie, showing railway gates and Walker's Store / Taken prior to the construction of electric tramline and the regrading of Camberwell Railway Line / Taken by E.J. Dower about 1912".theme --- travelling by tram, theme -- connecting victorians by transport and communications, glenferrie road -- hawthorn (vic.), railways -- hawthorn, the don store -- hawthorn (vic.) -
 Eltham District Historical Society Inc
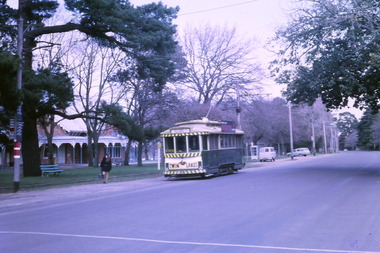
Photograph, George Coop, Tait (Red Rattler) train bound for Mordialloc at McKinnon Railway Station, c.Feb. 1964
... Road level crossing, McKinnon Railway Station, Frankston line... Road level crossing, McKinnon Railway Station, Frankston line ...Tait (Red Rattler) train bound for Mordialloc at McKinnon Road level crossing, McKinnon Railway Station, Frankston line, c. Feb. 1964 The level crossing is the old McKinnon Rd. level crossing right at Mckinnon Railway Station on the Melbourne-Franston line. It no longer exists as the level crossing was amongst the first to be removed in the State Govt. grade separation programme c 2015. The line now runs under Mckinnon Rd in a cutting that holds the new station as well. The folding metal lattice gates were the only ones of their kind in Victoria and fairly rare anywhere else in Australia as well.Digital TIFF file Scan of 35mm Ilford FP3 black and white transparencyfrankston line, george coop collection, level crossing, mckinnon railway station, mckinnon road, mordialloc, red rattler, tait train -
 Ballarat Tramway Museum
Photograph - Digital image Set of 20, Dec. 1970
... inbound on the Quarry Hill line. .8 - trams crossing... crossing on the Eaglehawk line, through the window of one tram. .9 ...Set of 20 digital images of Bendigo Tramways December 1970 by Stuart Lodington. .1 - Bendigo track gang renewing a joint, McCrae St, with welding truck alongside and Birney No. 29. .2 - No. 5 at Quarry Hill terminus? .3 - No. 24 at the depot .4 - No. 2 on the Quarry Hill line .5 - No. 5 approaching the Eaglehawk terminus .6 - No. 29? at the Golden Square Terminus with Bill Rodda's Golden Square hotel in the background. .7 - No. 3 inbound on the Quarry Hill line. .8 - trams crossing on the Eaglehawk line, through the window of one tram. .9 - side on view of a B23D controller in a bogie tram .10 - No. 5 at the Eaglehawk terminus .11 - No. 21 at No. 21 crossing on the Golden Square line. No. 29 showing special, No.21 - North Bendigo, Fire Station Loop? .12 - No. 29 and another tram - near work site? .13 - interior view from Birney looking at the front of another tram parked behind. .14 - No. 29, No. 6 crossing at .15 - No. 6, showing special at Charing Cross. .16 - No. 5 and another tram at North Bendigo on a Special .17 - No. 28 at Charing Cross .18 - No. 5 on Special at a Loop on the Eaglehawk line .19 - No. 28, and two other trams at the Myrtle St Loop .20 - No. 18 showing Quarry Hill and two other trams on View St.trams, tramways, bendigo, trackwork, mccrae st, depot, quarry hill, eaglehawk, golden square, controllers, north bendigo, view st, tram 29, tram 5, tram 24, tram 2, tram 3, tram 6, tram 28, tram 18 -
 Ballarat Tramway Museum
Slide - 35mm slide/s, Noel Simons, 21/11/1962 12:00:00 AM
... , just after crossing bridge over railway line (Quarry Hill route..., just after crossing bridge over railway line (Quarry Hill route ...Set of 6 transparencies taken on 21/11/1962 on Kodak mounts. 1189.1 - Bendigo No.11 at Quarry Hill terminus. Photo taken looking in along the route. Tram has destination of North Bendigo. 1189.2 - No. 21 in Pall Mall bound for North Bendigo. Tram has roof ads for Mamouney's furniture and SEC. In the background are the National Bank building, Dad and Dave's Cafe and the Beehive Buildings and the London Pharmacy. 1189.3 - No. 2 in Mitchell St, just after crossing over railway bridge. Photo taken after tram has passed photographer. Has what appears to be an SEC road works crew in the background. Has destination of Quarry Hill. 1189.4 - No. 17 climbing Mitchell St. on the start of the single track section, just before crossing the railway bridge. Has destination of Quarry Hill and the large Maples building sign in the background. 1189.5 - as for 1189.4 but after tram has passed photographer. Has an Ilford film roof ad and an SEC roof ad. Railway bridge in the background. 1189.6 - No. 21 at Charing Cross with passengers boarding. Tram has destination of North Bendigo and roof ads for SEC 'Electric Cooking' and Sandhurst Milk. In background are the buildings on the south side of High St. Also has a SEC worker in white overalls sweeping the track.Information written on in black ink and date stamped on purple ink. 1189.1 - "Birney car No. 11 in High St. Bendigo at Golden Square terminus" 1189.2 - "No. 21 in Pall Mall Bendigo near Charing Cross" 1189.3 - "No. 2 in Mitchell St. Bendigo, just after crossing bridge over railway line (Quarry Hill route)" 1189.4 - "No. 17 in Mitchell St. Bendigo, climbing the hill the bridge over the railway line. (Quarry Hill route)" 1189.5 - "No. 17 in Mitchell St., Bendigo approaching bridge over Railway line (Quarry Hill route)" 1189.6 - "No. 21 at Charing Cross, Bendigo"tramways, trams, bendigo, golden square, pall mall, mitchell st., quarry hill, tram 2, tram 11, tram 17, tram 21 -
 Ballarat Tramway Museum
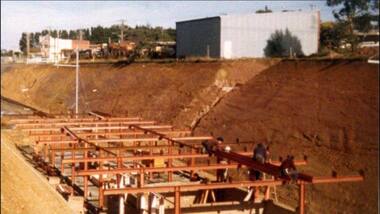
Photograph - Colour Print/s - set of 10, Warren Doubleday, 13/09/2003 12:00:00 AM
... of the sleepers under the level crossing on the main access line, BTM... of the sleepers under the level crossing on the main access line, BTM ...Set of ten colour photographs of the renewal of the sleepers under the level crossing on the main access line, BTM Depot, taken by Warren Doubleday on 13.09.2002. Printed on Agfa Paper. 2603.1 - Commencing excavations - Oedf Byslma on backhoe. 2603.2 - Exposing and pulling out sleepers. 2603.3 - offloading sleepers 2603.4 - inserting sleepers 2603.5 - ditto 2603.6 - Sleepers installed 2603.7 - view along inside rail 2603.8 - view along outside rail 2603.9 - Dog spiking - Alan Snowball, Greg Histen , Danny Smith, Richard Gilbert and Garry Wood, 2603.10 -ditto On rear of each photo in brown felt tip pen, the details of the location and date.btm, access track, trackwork -
 Ballarat Tramway Museum
Film - Movie Film & Box, Kodak, 1960s
... on front of tram, and crossing the Eureka line rail bridge. 3:23..., and crossing the Eureka line rail bridge. 3:23 No. 20 in Bridge St ...Yields information in movie film format of Ballarat trams in 1962, a enthusiast tour, how the system operated and was used by people., Yields information in movie film format of Ballarat trams in 1962, a enthusiast tour, how the system operated and was used by people.Movie film - 8mm, approx. 4.15mins, with green leader strip on a plastic reel, within a Kodachrome II colour movie cardboard box and addressed to B.J. Parle, Chatswood. Titled "Ballarat 1962" Has been transferred to DVD - see Reg item 4100 as Segment No. 3. Filmed and made by Ben Parle. Also transferred to DVD by Rod Cook Oct. 2015, via Roger Greenwood for use in his DVD, "The City of Ballarat Trams, Gardens & Gold" of 2016. See Reg Item 6883. Synopsis: based on time - Colour film Title "Ballarat 1962" 0:00 21 in Sturt St arriving City Centre tram stop from the west. 0:12 41 and another bogie car at City Centre tram stop, North side of Sturt St loading passengers 0:21 39 crosses Sturt St from Lydiard St Nth and pulls up at the tram stop in Sturt St. 0:55 39 leaves City centre and travels west along Sturt St – two sequences. 1:11 View from front of a single trucker, leaving Carlton St loop after crossing a bogie car and travelling along Wendouree Parade towards Gardens Loop 2:09 No. 20 in Gardens Loop and pan across to the Gardens Statuary pavilion with lots of flowers. 2:41 No. 20 leaving Gardens loop and heading north in Wendouree Parade. 2:54 Bogie tram in Wendouree Parade between depot and Gardens loop, southbound. 3:12 No. 32 leaving Victoria St terminus, with orphanage in the background, in bound, has a Trotting tonight sign on front of tram, and crossing the Eureka line rail bridge. 3:23 No. 20 in Bridge St, out bound, near Stones Corner 3:42 38 in bound from Mt Pleasant at Stones Corner, stops, lets of passengers and then proceeds along Bridge St into the City 4:15 endWritten labels giving title information on outside of box.trams, tramways, ballarat, wendouree parade, sturt st, victoria st, bridge st, tram 21, tram 41, tram 39, tram 20, tram 32, tram 38 -
Melbourne Tram Museum
Letter, Melbourne & Metropolitan Tramways Board, Tramway Board, Victorian Railways, interface between trains and cable trams at Level crossings, August 1919 to June 1922
... crossings on the inner circle line - Queens Parade Clifton Hill... crossings on the inner circle line - Queens Parade Clifton Hill ...Series of 14 letters, memos, correspondence, documents regarding the interface between trains and cable trams at Level crossings on the inner circle line - Queens Parade Clifton Hill. Includes a cutting about an accident from the Age 27/6/1922 where people were injured due to the safety bar. Includes discussion about the possibility of cable trams entangled in a broken strand, actions of signalmen, Victorian Railways instructions, correspondence between the MMTB, Tramway Board and the Railways including letterhead, notice to grip men and conductors describing the operation of the bolt or bar that would prevent a grip passing the point when the gates were closed. Correspondence started August 1919. File scanned into a word searchable document.trams, tramways, level crossings, cable trams, queens parade, safety, victorian railways, clifton hill, northcote, mmtb, tramway board, accidents -
 Ballarat Tramway Museum
Photograph - Black & White Photograph/s, State Electricity Commission of Victoria (SECV), late 1940's
... publicity photo c1950. Two of the bogies crossing on the Eaglehawk... at the intersection, SEC publicity photo c1950. Two of the bogies crossing ...Black and White print contained within the Wal Jack Bendigo and Geelong Album, see Reg Item 5003 for more details. Photo of the Charing Cross with three bogie trams at the intersection, SEC publicity photo c1950. Two of the bogies crossing on the Eaglehawk - Quarry Hill line have white or cream strips on the lower edge of the body. No 26 has the destination of North Bendigo, though it is on Golden Square line with the driver standing just inside the doorway. In the background is the fountain, the Gardens and Pall Mall. SEC Publicity Photo, see Inscriptions for notes re photo. On the rear is the SEC Publicity Photo stamp, with negative number 21.1 written in, "Yallourn" in pencil and a typed piece of paper taped to the rear of the photo noting the Provincial tramways owned by the SEC, but that it is loss making.trams, tramways, bendigo, charing cross, secv, pall mall, tram 26 -
 Ballarat Tramway Museum
Slide - 35mm slide/s - set of 11, Eldon Hogan, mid 1960's to early 1970's
... crossing the railway overbridge, Eaglehawk line, in bound. Trams... crossing the railway overbridge, Eaglehawk line, in bound. Trams ...Set of 11 Agfa Plastic mounted slides - from the Eldon Hogan collection - featuring an ARE tour with Nos. 21, 29 and 25 to Bendigo, mid 1960's. Scanned on the Canon scanner at the depot 15/12/1971 at the time of the installation of the scanner. .1 - four trams at Charing Cross - includes 19 and 25. .2 - 21 and 25 at the depot junction. .3 - 21 and 29 Quarry Hill route? .4 - 29 ditto .5 - 24 at Golden Square terminus - photo taken from the city side - note all the little shops and buildings on the left hand side of the photograph. .6 - 29, 21 and 25 at Eaglehawk .7 - 29 - side on view - Eaglehawk line? .8 - ditto with 21 .9 - 29 - North Bendigo line? - side on view .10 - 29 and 21 - vacant paddocks - Eaglehawk line .11 - 29 crossing the railway overbridge, Eaglehawk line, in bound. Trams have SEC roof advertisements. tramways, trams, bendigo, eaglehawk, charing cross, golden square, tram 21, tram 29, tram 25, tram 19 -
 Ballarat Tramway Museum
Slide - 35mm slide/s - set of 20, Eldon Hogan, 22/05/1971 12:00:00 AM
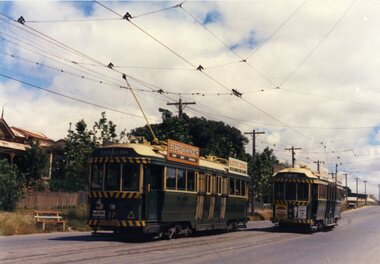
... - No. 5 and 25 crossing on the Eaglehawk Line, Ironbark? .20... - No. 5 and 25 crossing on the Eaglehawk Line, Ironbark? .20 ...Set of 20 35mm Agfa colour blue and white plastic mount slide - featuring photos taken during an Association of Railway Enthusiasts Tour by Eldon Hogan. Folder had the date "22/5/1971" on it. Scanned on the Canon scanner at the depot 15/12/2005 at the time of the installation of the scanner. .1 - No. 25 in Nolan St with Lake Weeroona in the background. .2 - Three Birneys at the Depot junction, 30 and 29 with Conoles Hotel, McCrae St in the background. .3 - No. 5 in front of the Shamrock Hotel, Pall Mall .4 - No. 29 in front of the Shamrock Hotel with Stonemasons sign in the background. .5 - No. 18 ditto .6 - No. 30 and another Birney at the Quarry Hill terminus .7 - No. 24 southbound High St at the Violet St intersection with a "Mine Open" sign in the foreground and the Cathedral in the background. .8 - No. 19 at the Golden Square terminus, with the Golden Square Hotel in the background. .9 - No. 29 - side on view, North Bendigo line? Thunder St? .10 - No. 30 crossing the railway overbridge, inbound from Eaglehawk with a number of photographers in the foreground. .11 - No. 29? ditto .12 - No. 5 outbound - side on view, Thunder St, North Bendigo line? .13 - No. 29 and 30 at the intersection of High St and Brazier St with Church or School hall in the background. .14 - ditto .15 - ditto .16 - No. 25 and the two Birneys at the Eaglehawk terminus. .17 - No. 29 and two other trams at ditto .18 - No. 30 and 19 adjacent to the Lake View Hotel, McCrae St .19 - No. 5 and 25 crossing on the Eaglehawk Line, Ironbark? .20 - No. 29 at Quarry Hilltramways, trams, bendigo, lake weeroona, pall mall, golden square, eaglehawk, quarry hill, tram 25, tram 30, tram 29, tram 5, tram 18, tram 19, tram 24, tram 25 -
 Ballarat Tramway Museum
Slide - 35mm slide/s - set of 7, Eldon Hogan, Aug. 1964
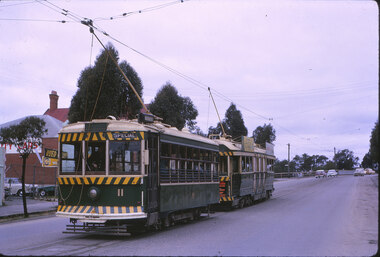
... - No. 11 crossing the Eaglehawk / Swan Hill railway line... for Eaglehawk at a Crossing loop .5 - No. 20 in bound for Quarry Hill ...Set of seven Kodak cardboard mounted slides - featuring photos taken during a visit to Bendigo by Eldon Hogan. Slides have slide number (26 to 32) and date "Aug 64" stamped onto them. Possibly a Xavier College Cadets tour - Eldon was involved with them at the time, given slide No. 27. Scanned on the Canon scanner at the depot 15/12/1971 at the time of the installation of the scanner. .1 - No 11 and a bogie car at the Railway Station .2 - ditto - note uniformed person boarding (Xavier College Cadet?) .3 - No. 11 at Charing Cross, showing "special" .4 - No. 11 bound for Eaglehawk at a Crossing loop .5 - No. 20 in bound for Quarry Hill - at the above crossing loop? .6 - No. 11 crossing the Eaglehawk / Swan Hill railway line at the overbridge. .7 - No. 11, High St Eaglehawk.tramways, trams, bendigo, railway station, eaglehawk, charing cross, birney, tram 11, tram 20 -
 Eltham District Historical Society Inc
Photograph, Steam locomotive J-521 with the Royal Train on the Wharf Spur line during a visit to Echuca by the new Governor of Victoria, His Excellency Sir Rohan Delacombe, c.May 1963
... a railway crossing along the Wharf Spur line. The train has been... a railway crossing along the Wharf Spur line. The train has been ...In this picture The Royal Train is passing through a railway crossing along the Wharf Spur line. The train has been shortened comprising steam locomotive J-521 and tender to which is attached the State car. The State car is in the design of the Spirit of Progress. George Coop advised that the occasion is the visit of the Governor of Victoria, Sir Rohan Delacombe to Echuca in 1963. Delacombe had replaced Sir Dallas Brooks in May 1963 who had departed for England on the liner Iberia,11 April 1963 (1963 'SIR DALLAS ON WAY TO U.K.', The Canberra Times (ACT : 1926 - 1995), 9 April, p. 9. , viewed 27 Jan 2020, http://nla.gov.au/nla.news-article104249252) George believes the Governor was doing a considerable formal train ride around the State and Echuca was on the schedule. The ‘platform’ was a special creation for such purposes, located on the wharf spur line that ran behind the Echuca Civic Centre. The large notice board commemorates the Queen’s visit on March 5th, 1954 for which the platform was initially built. From time to time it would get spruced up with pot plants, fresh paint and repaired hand rails for formal functions. George attended the Civic Reception held for the Governor. A picture of His Excellency Sir Rohan Delacombe, Governor of Victoria, and Lady Delacombe about to entrain at Spencer Street for a visit to western Victoria is available on page 4 of VICTORIAN RAILWAYS REPORT OF THE VICTORIAN RAILWAYS COMMISSIONERS FOR THE YEAR ENDED 30th JUNE, 1963. (http://www.victorianrailways.net/vr%20history/annual_reports/vrar1963.pdf) More information about the Victorian Railways Royal Train https://en.wikipedia.org/wiki/Victorian_Railways_Royal_Train State Car No. 5 https://www.pjv101.net/cd/pages/c160v06.htm Digital TIFF file Scan of 35mm Ilford FP3 black and white negative transparencyechuca, george coop collection, governor of victoria, j-521, railway crossing, royal train, sir rohan delacombe, state car no. 5, victorian railways, wharf spur line -
 Ballarat Tramway Museum
Photograph - Colour Photograph/s, 23/11/1962 12:00:00 AM
... and 17 at a crossing Loop on the Eaglehawk line. Photo dated... trams 4 and 17 at a crossing Loop on the Eaglehawk line. Photo ...967.1 - Colour postcard size print of SEC Bendigo trams 4 and 17 at a crossing Loop on the Eaglehawk line. Photo dated 21.11.1962. Printed on AGFA paper. Both trams fitted with dash canopy lighting, but no large white strip under the driver's windows. 17 showing destination of "Eaglehawk", has two SEC ads on the side re Electric Cook and a White Horse whiskey ad on front panel. Tram 4 showing destination of "Quarry Hill", has two ad panels on roof and two ads on front panel including one Cohn's' Drinks. 967.2 - Colour postcard size print of SEC Bendigo tram 26 in Mitchell St. crossing Hargreaves St. heading for Charing Cross. Photo dated 21.11.1962. Printed on AGFA paper. Trams fitted with dash canopy lighting, but no large white strip under the driver's windows. Has two roof ads and one ad on rear drivers panel. In background of photo are the buildings along Mitchell St. looking down along Mitchell St and into View St. Has Plaza theatre sign in photo above tram. On right hand side, is a van marked "Carrier M. Slattery". Tram has destination of "Quarry Hill" in rear box. 967.3 - Colour postcard size print of SEC Bendigo tram 19 on the North Bendigo line. Photo dated 21.11.1962. Printed on AGFA paper. Trams fitted with dash canopy lighting, but no large white strip under the driver's windows. Has destination "Nth Bendigo" and SEC roof ads and drivers panel ad for Briquettes.On rear top left hand corner "21.11.62" in very wavy handwriting typical of an aged person.bendigo, eaglehawk, mitchell st., north bendigo, tram 4, tram 17, tram 26, tram 19 -
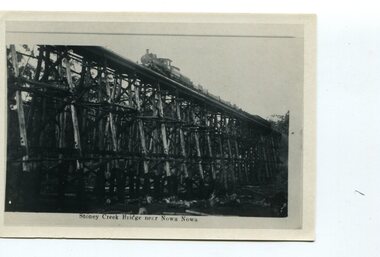 Orbost & District Historical Society
black and white photograph, first half 20th century
The Stony Creek Trestle Bridge was built in 1916 when the existing rail line from Melbourne to Bairnsdale was extended to Orbost. This 97km Bairnsdale to Orbost extension through rugged terrain was reputed to have been the most difficult rail project undertaken in Victoria. In service for over 60 years the bridge was damaged by bushfire in 1980, with the last train crossing in 1987. At 247m long and 20m high, it is the largest standing bridge of its kind in the State, and is listed on the Register of Historic Sites. Built of red ironbark and grey box timber, it is a fine example of the early engineering skills that utilised the resources and materials found on site.The Bairnsdale to Orbost rail line contains the most varied range of timber & timber composite bridges on any Victorian line. The Stoney Creek bridge is listed on the Victorian Heritage Register for its architectural and historical significance. A black / white photograph of a very tall wooden railway bridge with a train along the top.railway-bridge stoney-creek-bridge east-gippsland-railway