Showing 174 items matching "depot loop"
-
 Ballarat Tramway Museum
Photograph - Set of four black and white negatives of Ballarat trams, Warren Doubleday, 20-4-1968
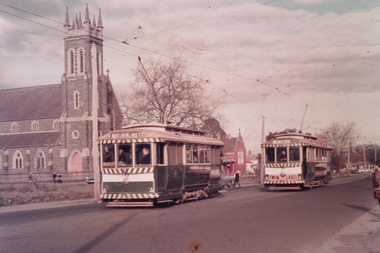
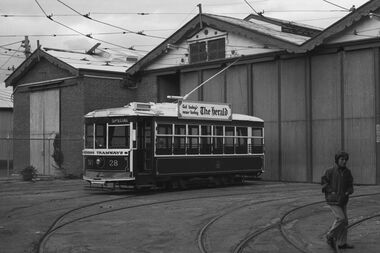
... Parade gardens loop depot tram 43 Stones Corner Caltex Set ...Photos 25-4-69, of: .1 - Ballarat 17 at Stones Corner with Caltex Service Station in the background. Tram leaving Main Road before joining Bridge St. .2 - No. 28 running from Bridge Street into Sturt Street with a "Trotting at Bray Raceway Tonight" Auxillary board. Tram has the destination of Gardens via Sturt St West. In the background are the Big W and the Dickins Store. .3 - Tram 43 on "0" road at the SEC Ballarat Depot. .4 - Tram 13 at the Gardens Loop in Wendouree Parade. Tram has an ANA Hospital and Medical Benefits (Australian Natives Association) Advertising Board.Yields information about the operation of the Ballarat tramway system that was operated by the State Electricity Commission of Victoria.Set of four black and white negatives of Ballarat Tramways, 120 size. ballarat, trams, tramways, sturt street, tram 17, main road, bridge street, tram 28, bray raceway, dickins, big w, tram 13, ana health, wendouree parade, gardens loop, depot, tram 43, stones corner, caltex -
 Ballarat Tramway Museum
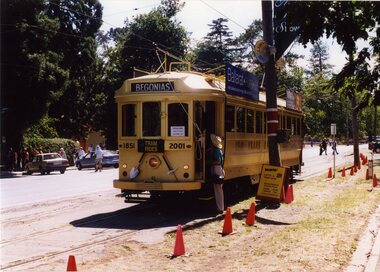
Photograph - Colour Photograph/s set of 6, Carolyn Dean, 10/03/2001 12:00:00 AM
... Begonia Festival Gold Tram Depot Junction Gardens Loop ...Set of six photographs taken by Carolyn Dean on 10.03.2001 of operations in Wendouree Parade during the 2001 Begonia Festival. Printed on Kodak paper. 1786.1 - Gold tram 45 - at Gardens Loop, heading south, with destination "Begonias". Has witches hats and special stop boards in view. Also advertising Ballarat Eureka and Sovereign Hill. .2 - Tram 33 - south bound at Depot Junction with Peter Winspur talking to crew. Has Ice Cream Man van in background. .3 - Gold tram 45 at Depot Junction, southbound, showing destination "Car Park" with Dave Macartney in view and another crew member (Phillip Bertram) in uniform holding the megaphone. .4 - Tram 33, showing "Depot" near Depot Junction, running northbound. .5 - Gold tram 45, at same location, showing "Car Park", northbound and Bendigo Cafe tram advertising board. .6 - as for .3, with Phillip Bertram in photo holding megaphoneAll have date "10.03.01" and "Photo Carolyn Dean" written on the back in blue ink.begonia festival, gold tram, depot junction, gardens loop, wendouree parade, btm, tram 45, tram 33 -
 Ballarat Tramway Museum
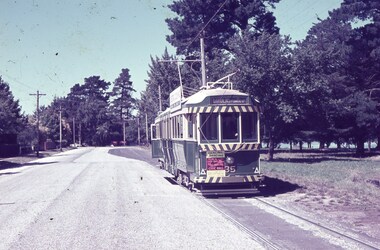
Slide - 35mm slide/s, Keith Caldwell, 1963
... Caldwell during 1963 of: Tram 35 in Wendouree Parade with Depot... Caldwell during 1963 of: Tram 35 in Wendouree Parade with Depot ...Yields information about tram 35 and Wendouree Parade and the nearby Lake Wendouree.Agfa colour slide, white cardboard mount, photo by Keith Caldwell during 1963 of: Tram 35 in Wendouree Parade with Depot Loop in the background. Tram has a Dancing at Civic Hall, SEC Electric Cooking and destination of Gardens via Drummond North. See also Reg Item 7343i for a similar photo.In ink "1963"tramways, trams, wendouree parade, lake wendouree, tram 35 -
 Ballarat Tramway Museum
Slide - 35mm slide/s, Keith Caldwell, 1963
... near Depot Loop. Tram has a Dancing at Civic Hall, SEC... near Depot Loop. Tram has a Dancing at Civic Hall, SEC Electric ...Yields information about tram 35 and Wendouree Parade and the nearby Lake Wendouree.Agfa colour slide, white cardboard mount, photo by Keith Caldwell during 1963 of: Tram 35 in Wendouree Parade. Location near Depot Loop. Tram has a Dancing at Civic Hall, SEC Electric Cooking and destination of Gardens via Drummond North. See also Reg Item 7352i for a similar photo.In ink "1963"tramways, trams, wendouree parade, lake wendouree, tram 35 -
 Ballarat Tramway Museum
Photograph - Digital image Set of 23, Warren Doubleday, 24/02/2019 12:00:00 AM
... in the selfie Studio .20 - depot loop .21 - Depot .22 and ,23... in the selfie Studio .20 - depot loop .21 - Depot .22 and ,23 ...Set of 23 digital images of the formal launch of the Flower Tram, No. 661 on Sunday 24/2/2019. .01 - Depot .02 .05 Depot Junction .06 - The Mayor Samantha McIntosh .07 - .10 - The Mayor and Pam Waugh the creator of the flowers. .11 - .14 - The event with plenty of flowers. .15 - Peter Waugh in the selfie studio .16 - .18 - Gardens Loop .19 - Peter Winspur in the selfie Studio .20 - depot loop .21 - Depot .22 and ,23 - detail photostrams, tramways, floral tram, depot junction, btm, events, launch, tram 661 -
 Ballarat Tramway Museum
Slide - 35mm slide/s, Ben Parle, 8/04/1958 12:00:00 AM
... . Photo of Ballarat No. 19 between the Depot Loop and Martin Ave... corner. Photo of Ballarat No. 19 between the Depot Loop ...Kodachrome Transparency - 35mm slide - cardboard mount, with one side with red border and words "Kodachrome Transparency / Processed by Kodak" top and bottom. Photo taken by Ben Parle 8/4/1958. Has slide No. "9" stamped in black in top corner. Photo of Ballarat No. 19 between the Depot Loop and Martin Ave Loop, in Wendouree Parade, tram appears to have destination of Victoria St. Warning oncoming tramcar sign in the background at a tram stop. For high resolution scan see btm2868.tif"Lake Wendouree Ballarat" / "8-4-58"tramways, trams, wendouree parade, martin ave, lake wendouree, tram 19 -
 Ballarat Tramway Museum
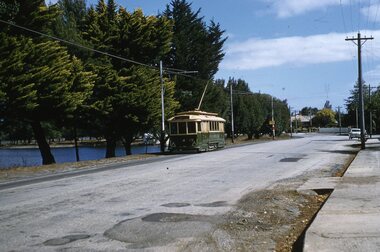
Photograph - Colour Photograph/s, John Phillips, c1980
... at the Depot Loop, c1980. Tram 27 southbound (showing St Aidans Dve... crossing at the Depot Loop, c1980. Tram 27 southbound (showing St ...Colour photograph of BTPS trams 27 and 33 crossing at the Depot Loop, c1980. Tram 27 southbound (showing St Aidans Dve, with the APM Paper roof advertisement) and tram 33 (showing Gardens via Sturt St. W, with Eureka Tiles advertisement, a SEC roof advertisement and a Twin Lakes sign) northbound through the loop. Tram 33 being driven by Carolyn Dean. Photo by John Phillips Colour photocopy, laminated, of this photograph on display 5/2000 at 02-02-06, but accidently cut off part of tram 27 in the photocopy. 2nd copy added for display purposes 24/10/05.btps, gardens loop, wendouree parade, tram 27, tram 33 -
 Melbourne Tram Museum
Document - List, Keith Kings, "Requested Tramway Extensions"
... . Also lists from this publication the duplications, Loops... this publication the duplications, Loops, extensions, depot yards ...List - "Requested Tramway Extensions" - extracted from MMTB Its "Progress and Development 1929" - see Reg Item 2138. Also lists from this publication the duplications, Loops, extensions, depot yards, conversions and their costs.Demonstrates a list extracted from a MMTB publication about tram track proposals.Set of 3 sheets (carbon copies) typed list of "Requested Tramway Extensions" 1919 to 1929trams, melbourne, mmtb, tram tracks, extensions, tram lines, tramways, lists -
 Ballarat Tramway Museum
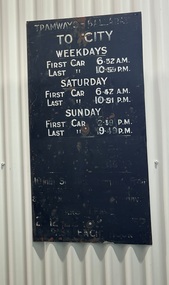
Sign - Timetable Board - Haddon St (depot), State Electricity Commission of Victoria (SECV), 1960's
... only. Reverse side painted black. Located at Depot or Haddon... only. Reverse side painted black. Located at Depot or Haddon St ...Timetable board, giving first and last trams to City for weekdays, Sat. and Sun. With mounting holes, lettered on one side only. Reverse side painted black. Located at Depot or Haddon St. loop. On lower half, writing of times apparent. See SECV TimetablesDemonstrates a SECV timetable signs that were located at various points on the tram system,Sheet metal sign, black background, white letters, painted.transport equipment, timetable boards, secv street furniture -
 Ballarat Tramway Museum
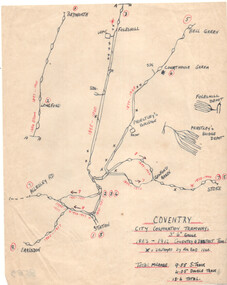
Drawing, Coventry City Corp Tramways
... shows the various lines, crossing loops, depots, routes... tramway systems. Drawing shows the various lines, crossing loops ...Wal Jack had an extensive range of correspondents throughout Australia and the world who often provided him with detailed drawings and notes on various tramway systems. Drawing shows the various lines, crossing loops, depots, routes with numbers and the location of bomb damage during 1940 air raids. The gauge of the system was 3'6". The Wikipedia reference reports that the system was closed as a result of extensive damage during the air raids. Not known who prepared the drawing.Yields information about Wal Jack's correspondents and their extensive work.Drawing - red and black ink on quarto paper, Coventry tramway system.letters, wal jack, drawings, maps, coventry, uk. -
 Ballarat Tramway Museum
Photograph - Digital image, Mal Rowe, 21/12/1967 12:00:00 AM
... with tram 18 at Depot Loop 21/12/1967. Tram 17 dressed... with tram 18 at Depot Loop 21/12/1967. Tram 17 dressed as the Bridge ...Demonstrates the use of the Santa Trams or decorated trams in Ballarat for the Christmas season. Yields information about their decorations.Digital Image of the two 1967 Santa Trams crossing with tram 18 at Depot Loop 21/12/1967. Tram 17 dressed as the Bridge St traders Santa tram and No. 32 as the Myers sponsored Santa Tram. Tram 17 as the destination of Mt Pleasant, No. 18 - Victoria St and No. 32 - Special. Photo by Mal Rowe. -------- Original Message -------- Subject: [TramsDownUnder] Happy Christmas and ... [1 Attachment] Date: Sat, 21 Dec 2013 10:10:13 +1100 From: Mal Rowe trams, tramways, secv, santa tram, myers, bridge st traders, tram 17, tram 18, tram 32 -
 Ballarat Tramway Museum
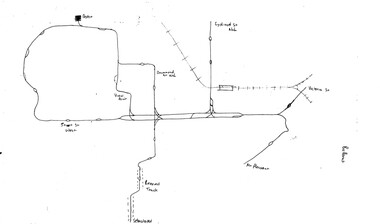
Map, H.P. James, Ballarat tramway system, 1939
... line. Shows the loops, horse tram loops, depots, ESCo bus..., horse tram loops, depots, ESCo bus routes, and notes on horse ...Hand drawn map contained within Reg. Item 2488, page 61 of the Ballarat Tramway system. Note does not show the Drummond St. North line. Shows the loops, horse tram loops, depots, ESCo bus routes, and notes on horse tram loops. Prepared by H.P. James Scan btm2515i2 and 2515i3 show the hand written notes in light pencil. Note Item Not formally Numbered.trams, tramways, map, depot, esco, horse trams, bus routes, ballarat -
 Ballarat Tramway Museum
Album - Photo Album, Ron Scholton, "661", c1989
... at Preston depot, South Melbourne loop, Camberwell depot, Thornbury.... Photos taken at Preston depot, South Melbourne loop, Camberwell ...A photo album, spiral bound with 10 cardboard sheets with photos of late Alf Twentyman cable car set on covers. Each sheet coated with a glue and overlain by a plastic sheet. Album contains 34 photos of BTM W3 661operating in Melbourne 1989 on a charter for Yapper Tours. - no date on photos. Photos taken at Preston depot, South Melbourne loop, Camberwell depot, Thornbury depot, Preston Workshop gates, Sth Melb. depot, Victoria Parade, St Kilda, Brunswick depot, Victoria Market and Kew depot. Also six photos of W1 427 at Kooyong and Dandenong Roads, St Kilda, Batman Avenue, Swan St. bridge, Hawthorn and Wattle Park. See also Reg Item 5986 for a larger more formal album of photographs. Sample of images added 19-12-2016trams, tramways, w3 class, melbourne, w1 class, yapper tours -
 Ballarat Tramway Museum
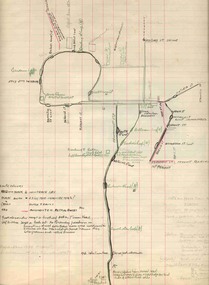
Map, Ballarat and Bendigo tram systems, 1960's or 1970's
... systems, showing loops, terminus, depots and rail lines, including... of the Ballarat and Bendigo tram systems, showing loops, terminus, depots ...Yields information about the extent of the Ballarat and Bendigo tramway systems and possibly has a strong association with the work of Tom Murray.Set of two hand drawn maps of the Ballarat and Bendigo tram systems, showing loops, terminus, depots and rail lines, including out of use loops and reserved track. Possibly made during the 1960's or early 1970's. Drawn on lined foolscap paper - have been torn from a pad.trams, tramways, map, drawings, ballarat, bendigo -
 Ballarat Tramway Museum
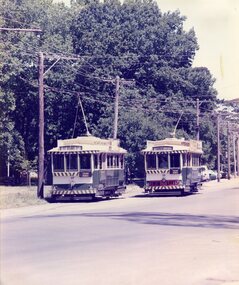
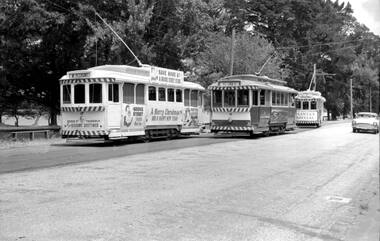
Photograph - Digital image Set of 10, Tony Smith, 1971
... - 31, a single trucker and bogie tram crossing at Depot loop... - 31, a single trucker and bogie tram crossing at Depot loop ...Yields information about Ballarat Tramways and trams prior to the closure of the tramway system.Set of 10 digital images of Ballarat trams prior to closure, scanned from original slides by Tony Smith, 1971 prior to closure of the system. The following photos have suffered colour change and showing some deterioration - fungal growth. .1 - 13 (Sturt St West) and 27 (Victoria St with Twin Lakes sign) crossing at King St loop with St Alipius church in the background. .2 - 13 (Sturt St West) and 17? (Mt Pleasant) crossing at Parker St loop, with the Ballarat College in the background. .3 - Single trucker, inbound, approaching the Parker St Loop, showing Mt Pleasant. .4 - 30 in Sturt St, descending the hill to Grenville St, with other trams in the background, including Woolworths Big W and the Dickins Store. Also has the 8 hour monument. 30 showing City. .5 - 37 running Special, no passengers, crossing Lydiard St Nth, heading for Grenville St. Has the Titanic bandstand, Mechanics Institute in the background. .6 - 33 and three other single truckers in the City Loop - has the Ballarat Gas Co and other buildings in the background. .7 - 37 showing Special passing 33 and other trams parked in the City Loop. Has Dickins, Ballarat Gas Co, Edmonds, Patersons store in the background. .8 - 17 crossing Lydiard St Nth in Sturt St. 17 has destination of Gardens via Drummond Nth, and a Twin Lakes sign. Includes the T&G sign in the background. .9 - 31, a single trucker and bogie tram crossing at Depot loop, Wendouree Parade - 31 showing Victoria St. .10 - 17 waiting in Gardens Loop, showing Mt Pleasant.trams, tramways, king st, victoria st, sturt st west, sturt st, grenville st, city loop, gardens loop, wendouree parade, tram 13, tram 27, tram 30, tram 37, tram 33, tram 17, tram 31 -
 Ballarat Tramway Museum
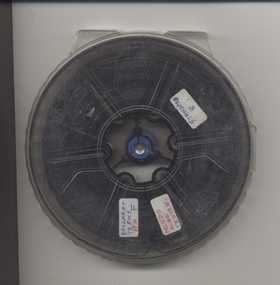
Film - Movie Film & Box, Kodak, 1960 to 1971
... - No. 33 and a bogie car crossing at depot loop. 01.31 - No. 18... and a bogie car crossing at depot loop. 01.31 - No. 18 travelling ...Yields information in movie film format of Ballarat trams in 1960 through to 1971, how the system operated and was used by people, including special trams., Yields information in movie film format of Ballarat trams in 1960 through to 1971, how the system operated and was used by people, including special trams.Movie film - 8mm, approx. 15 mins, without leader strip on a plastic reel, within a clear plastic case - Standard 8, titled "Ballarat Trams". See Reg Item 4957 for DVD and Mini DVD. Has been transferred to DVD - see Reg item 4957 Made by Arthur Hill. Also transferred to DVD by Rod Cook Oct. 2015, via Roger Greenwood for use in his DVD, "The City of Ballarat Trams, Gardens & Gold" of 2016. See Reg Item 6883. In Arthur's letter - on file - Made between 1960 and August 1971. Synopsis: based on time. Between 1960 and 1968 0:00 Trams Ahead sign before the Victoria St terminus with 20 at terminus 0.14 - No. 20 leaving Victoria St terminus and being followed along Victoria St by car and then passengers jointing the tram at a tram stop. 00.40 - No. 12 (c1960) in bound along Lydiard St North and arriving in the Gregory St loop. 00.56 - No. 12 and 14 crossing at Gregory St. 01.20 - No. 33 and a bogie car crossing at depot loop. 01.31 - No. 18 travelling along Wendouree Parade with the Lake in the background. 01.42 - No 41 at depot junction and running into the depot No. 2 road with a short sequence of a tramway signal. 02.17 - SEC Sign at the depot gate, shot of 41 in No. 2 road, with the lights other way around, Caution beware of trams sign and a red signal. 02.31- Timetable sign at Gardens Loop 02.36 - No. 30 arriving at Loop and view of a signal with no lights showing. 02.48 - Destination roll being changed through a number of destinations. 03.26 - No. 20 arriving at Carlton St loop with the Olympic monument in the background and the red signal light going out. 03.31 - a lady standing at the front of No. 20, with an ice cream in hand, and No. 17 arriving at the Carlton St loop with a short sped up sequence and No. 20 departing from the loop, followed by No. 17 leaving the loop, heading into the city. 03.41 - No. 13 inbound from Sebastopol crossing Albert St and heading into the city. 04.12 - view of signal and contactor, the light going green and the tram passing underneath. 04.24 - No. 12 at the Sebastopol terminus and departing. 04.51 - No. 12 crossing Albert St Sebastopol. 05.16 - Following No. 12 along Albert St, with Borough Offices in background initially. 05.28 - No. 12 arriving at the Grey St loop with No. 14 arriving at the loop from the city and both trams departing. March 1971 05.58 - No. 30 being followed along Barkly St, Mt Pleasant and the pole being turned at the terminus 06.32 - No. 30 picking up a lady passenger. 06.38 - view from the front of a tram, with the drivers hand and a cigarette, view from the back of the tram, along the Mt Pleasant route and running through the loop and then turning into Main St - has the Ballarat (East) fire station in one sequence, and finally running along Main St. 07.35 - view from tram, with car turning into Bridge St. and then running into Sturt St passed the Parking Loop, and along Sturt St. 08.32 - Points at Drummond St North being changed, doors changed over and the tram running along Drummond St. North, through the Mill St loop and into Macarthur St and in Wendouree Parade, with the Lake Wendouree in view and crossing No. 12 at the Depot Loop, with crews chatting, past the depot, a lady passenger getting off the tram near Forest St., and arriving at Gardens Loop with the same lady passenger who got on in Barkly St, getting off the tram. 11.09 - view of No. 30 at Gardens Loop, departing the loop. August 1971 11.30 - R761 crossing Melton (Exford Wier) on the special train to Ballarat and then the bridge between Ballan and Gordon Stations. 12.16 - View from the front of a tram, following No. 26 along Lydiard St North, crossing at Gregory St and returning to the City. 12.39 - No. 14 and one other tram running along Albert St to Sebastopol, crossing No. 21 at Grey St and then to Sebastopol terminus, crossing Albert St and return and running along Albert St. 13.36 - No. 26, 39 crossing 13 at Gardens Loop. 14.00 - view looking across Lake Wendouree. 14.07 - 26 arriving at Victoria St, running part of Destination roll, passengers getting off with hotel in the background, trolley pole being turned and then with 39 following tram along Victoria St, crossing at the King St Loop. 15.07 - view of a trolley pole tracking through the overhead at curve 15.10 - end. Written labels giving title information on reel.trams, tramways, ballarat, sebastopol, lydiard st north, victoria st, mt pleasant, lake wendouree, depot, tram 12, tram 13, tram 14, tram 17, tram 18, tram 21, tram 26, tram 33, tram 39, tram 41 -
 Ballarat Tramway Museum
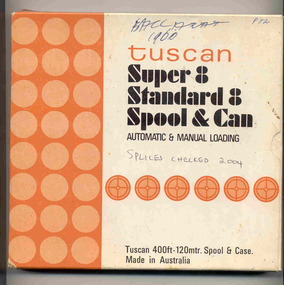
Film - Movie Film & Box, Kodak, 1960
... of it entering Tram Sheds or Depot Loop and then proceeding towards... approaching Depot Loop. 14:43 View of 42 running in with a single ...Yields information in movie film format of Ballarat trams in 1960, how the system operated and was used by people., Yields information in movie film format of Ballarat trams in 1960, how the system operated and was used by people.Movie film - 8mm, approx. 17.5 mins, with leader strip on a plastic reel, within a black and white plastic box, titled "Ballarat No. 1. 1960" contained with a cardboard box, 'Tuscan Super 8 and Standard 8 Spool and Can' . Has been transferred to DVD - see Reg item 4100 as Segment No. 1. Filmed and made by Ben Parle. Also transferred to DVD by Rod Cook Oct. 2015, via Roger Greenwood for use in his DVD, "The City of Ballarat Trams, Gardens & Gold" of 2016. See Reg Item 6883. Synopsis: based on time. 0:00 Starts with bogies cars crossing railway level crossing (34?, 39?) 0:30 SEC Logo 0:45 Ballarat Station sign and intro “Some City Scenes” 0:49 35 turning from Lydiard St Nth to Sturt St towards Grenville St with Commonwealth Bank in view. and then 42 returning 1:19 42 showing Mt Pleasant, turns from Sturt St into Lydiard St Nth 1:53 Tramway road works in Lydiard St Nth, near intersection with Mair St with Jelbart Road roller in use, starts with an SEC roadworks sign. 2:12 39 passing the works out bound to Lydiard St Nth. 2:46 Good view of the roller working before 35 arrives. 3:01 35 passing the works in bound with 3:29 14 crossing Lydiard St in Sturt St, towards Grenville St 3:47 Trams in City Loop 3:55 21 coming up the hill 4:04 31 entering Bridge St from Sturt St with Bucks Head Hotel in the background. 4:27 Overhead work at corner of Sturt and Lydiard, with view of the sign at the City terminus “Trams leave here for Sebastopol, Gardens, View Point.” 4:34 Passengers getting off and then onto 38, ex Lydiard St Nth at city terminus including a young lady wearing gloves and a wheeling a pram hurriedly the photographer. A number of other prams in the view as well as. The Conductor helps to unload the pram. 5:07 41 proceeding up Sturt St, appears to have just rained. 5:26 11 using the Dawson St crossover, with a motor car doing a U turn as well. 6:00 14 descending Sturt St towards the City, filmed at Dawson St. 6:11 Title “The Gardens via Drummond St North Line” 6:16 19 showing Victoria St, turning from Drummond St Nth into Sturt St. 6:28 30 inbound in Drummond St Nth, approach and trailing shots. Trailing shot ahs the hospital in the background. 6:49 31 outbound, Drummond St Nth, approach and trailing shots, trees are in autumn colours. 7:04 12, inbound Drummond St Nth, with Macarthur St in the background, stopping to pick up a lady, approach and trailing shots and then entering the Mill St crossing loop. 7:53 14 outbound in Drummond St Nth, dropping a lady passenger off and then turning into Macarthur St and then tram going away. 8:37 View of overhead junction at View Point Jtn. 8:45 View of “Cars Stop Here” sign and pole sign “To City Only” 8:55 30 inbound in Wendouree Parade, stops to pick up passenger, and then a trailing shot of tram entering Macarthur St loop 9:37 View of “Cars Stop Here”, “End of Section” and timetable boards at Haddon St. 9:50 34, pausing at Haddon St and then proceeding towards depot – approach and trailing shots, with “Warning Oncoming Trams” sign in shot. 10:27 “Warning Oncoming Trams” sign 10:32 34 crossing 12 at the Martin Ave loop 10:48 39? Wendouree Parade, near Barrett Ave, stopping and letting off passengers. 11:24 30 passing depot junction and then trailing shot of it entering Tram Sheds or Depot Loop and then proceeding towards the City. 12:11 Shot of the “Caution Beware of Trams” sign at the depot. 12:14 25 stopping at depot junction and then trailing shot of it going toward Forrest St. 12:47 12 passing Depot Junction, trailing shot. 13:07 Shot of :Electricity Supply Department, Ballarat Branch” sign at depot. 13:13 View of a destination showing “Depot” on a bogie tram 13:15 Title “Some Depot Scenes” 13:19 View of a trolley pole and then 13 leaving the depot through the gates, destination showing “View Point”. 13:54 View of trolley pole and then 32 stopping at the depot gates. 14:08 12 (Sunny view) running out onto Wendouree Parade and then a bogie tram approaching Depot Loop. 14:43 View of 42 running in with a single trucker behind in Wendouree Parade, and another single trucker running out. 15:02 Title “Some Scenes in the Gardens” 15:05 25 running through the Gardens, approach and trailing shots, near our Depot Junction. 15:55 View of “No Parking East of Loop” sign 15:59 View of overhead and then trackwork (with points removed), but overhead still in position at the Old Gardens Loop or Gardens South Loop and then 12 entering the loop from the south and then a trailing shot looking along the Parade. 16:33 View of “Cars Stop Here” and “End of Section” and then timetable boards at Gardens Loop. 16:55 View of 34 leaving the loop 17:14 Title “The End”Written labels giving title information on outside of box.trams, tramways, ballarat, sebastopol, lydiard st north, victoria st, mt pleasant, sturt st west -
 Ballarat Tramway Museum
Photograph - Colour Print/s - set of 15, Earl Ewers, 25/09/2005 12:00:00 AM
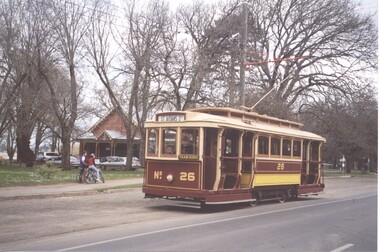
... - 1 arriving at the loop from Depot Junction .10 - 1 at loop... Depot Junction .10 - 1 at loop - side on view .11 - 1 at loop ...Yields information about the centenary celebrations of electric trams in Ballarat in 2005 and some of the people involved.Set of 15 colour prints of Ballarat Horse Tram No. 1 and Bendigo 17 in Wendouree Parade and St Aidans Drive during the celebrations for the centenary of electric trams in Ballarat - 25/9/2005. .1 - No. 26 at the loop .2 - No. 1 at the loop .3 - 26 and 1 at loop .4 - 1, ? and 17 at loop with lots of people .5 - 1 leaving the loop .6 - 1, 17 and 28 at loop .7 - ditto .8 - 28 and 1 at loop - Roger Salen and Austin Brehaut .9 - 1 arriving at the loop from Depot Junction .10 - 1 at loop - side on view .11 - 1 at loop - Alan Bradley and friends. .12 - 1 at loop .13 - ditto .14 - 17 and 28 at loop .15 - 1 at loop - Alan Bradley and friends. Printed on Kodak Royal Paper. Earl Ewers photograph. trams, tramways, bendigo, centenary, wendouree parade, btm, tram 17, tram 1, tram 26, tram 28 -
 Ballarat Tramway Museum
Negative, Bruce Herbert, "Bendigo and Ballarat Trams (AETA Convention) 30 Mar 1975", 30/03/1975 12:00:00 AM
... at the depot 2 - ditto 3 - 24 and another bogie tram in side... House 14 - 30 at depot junction and loop 15 - 28 and 18 16 ...Negative folder - made by ROW1 International of West Germany containing 40 No. 35 mm negatives of the AETA 1975 Convention visit to Ballarat and Bendigo on 30-3-1975. 17 photos of Ballarat and 23 of Bendigo. Bendigo photos: 1 - No. 28 at the depot 2 - ditto 3 - 24 and another bogie tram in side the depot 4 - No. 3? inside the depot 5 - 12, scrubber - 17 and two bogie trams 6 - scrubber and other bogie trams. 7 - general view with 24 and other bogie trams 8 - ditto 9 - Four trams at the Gold Mine, lead by 28. 10 - 19 at the Gold Mine 11 - single trucker with "tram tours" sign on the front 12 - 28 and two other cars at the Joss House, North Bendigo 13 - 19 and two other cars at the Joss House 14 - 30 at depot junction and loop 15 - 28 and 18 16 - 18 in the loop 17 - 28 and 18 McCrae St 18 - 28, 18 and 30 ditto 19 - 19 20 - No. 18 and 28 in Pall Mall with The Beehive in the background. Outside the building is an American Doughnut Kitchen van. The junction trackwork for the Eaglehawk lines remain in position. 21 - No. 30 northbound, with the City Family Hotel and other shops in the background. 22 - ditto and the cenotaph, 23 - B74 on a train at Spencer St. trams, tramways, btps, ballarat, aeta, bendigo, bendigo trust, depot, mccrae st, tram 28 tram 19 tram 30 tram 18 tram 24 tram 3 tram 12 tram 17 tram scrubber -
 Ballarat Tramway Museum
Film - Movie Film & Box, Kodak, 1960s
... tram in Wendouree Parade between depot and Gardens loop... Bogie tram in Wendouree Parade between depot and Gardens loop ...Yields information in movie film format of Ballarat trams in 1962, a enthusiast tour, how the system operated and was used by people., Yields information in movie film format of Ballarat trams in 1962, a enthusiast tour, how the system operated and was used by people.Movie film - 8mm, approx. 4.15mins, with green leader strip on a plastic reel, within a Kodachrome II colour movie cardboard box and addressed to B.J. Parle, Chatswood. Titled "Ballarat 1962" Has been transferred to DVD - see Reg item 4100 as Segment No. 3. Filmed and made by Ben Parle. Also transferred to DVD by Rod Cook Oct. 2015, via Roger Greenwood for use in his DVD, "The City of Ballarat Trams, Gardens & Gold" of 2016. See Reg Item 6883. Synopsis: based on time - Colour film Title "Ballarat 1962" 0:00 21 in Sturt St arriving City Centre tram stop from the west. 0:12 41 and another bogie car at City Centre tram stop, North side of Sturt St loading passengers 0:21 39 crosses Sturt St from Lydiard St Nth and pulls up at the tram stop in Sturt St. 0:55 39 leaves City centre and travels west along Sturt St – two sequences. 1:11 View from front of a single trucker, leaving Carlton St loop after crossing a bogie car and travelling along Wendouree Parade towards Gardens Loop 2:09 No. 20 in Gardens Loop and pan across to the Gardens Statuary pavilion with lots of flowers. 2:41 No. 20 leaving Gardens loop and heading north in Wendouree Parade. 2:54 Bogie tram in Wendouree Parade between depot and Gardens loop, southbound. 3:12 No. 32 leaving Victoria St terminus, with orphanage in the background, in bound, has a Trotting tonight sign on front of tram, and crossing the Eureka line rail bridge. 3:23 No. 20 in Bridge St, out bound, near Stones Corner 3:42 38 in bound from Mt Pleasant at Stones Corner, stops, lets of passengers and then proceeds along Bridge St into the City 4:15 endWritten labels giving title information on outside of box.trams, tramways, ballarat, wendouree parade, sturt st, victoria st, bridge st, tram 21, tram 41, tram 39, tram 20, tram 32, tram 38 -
 Ballarat Tramway Museum
Album - Photo Album, Ron Scholten, Yapper Tours, c1990
... , Essendon, South Melbourne depots and South Melbourne loop... tickets - trams 1 to 4 Page 3 6 views of 661 at Malvern Depot ...Yields information about the use of a Museum tramcar for tours in Melbourne during 1989 and has a strong association with one of the people who arranged and drove the tours. Also has a strong association with the Transporting Art project in Melbourne.Photo Album - NCL - consisting of heavy card brown cover with gold blocking and the word "PHOTOS" in gold with 8 black card board leaves, each covered in a plastic sheet or transparent film that covers the photos and bound together with screws. Assembled by Ron Scholten and others for the record of the 1989 visit to Melbourne by BTM tramcar W3 661 arranged by Yapper Tours - Ron Scholten, Peter Bardho and Bob and Monica Campbell. Page 1 - Ron Scholten and Peter Bardho W3 661 - as No. 44 at the BTM depot Three photos at Camberwell Depot Page 2 6 views of 661 at Bundoora terminus and on the "hump" by Preston workshops. Transporting Art - tram launch tickets - trams 1 to 4 Page 3 6 views of 661 at Malvern Depot, and termini that Malvern depot services. MMTB and SEC 8c/10d ticket. (possibly a tour ticket - see Reg Item 8369) Page 4 6 views of 661 - Carnegie, St Kilda, Footscray Transporting Art - tram launch tickets - trams 5 to 7 Page 5 6 photos of 661 - Albert Park, Brunswick, Thornbury? with 676, 612. Transporting Art - tram launch tickets - tram 8 Page 5 6 photos of 661 - Domain Interchange, Essendon, South Melbourne depots and South Melbourne loop. Transporting Art - tram launch tickets - tram 9. Page 6 4 photos of 661 - Essendon, airport, Essendon depot. Transporting Art - tram launch tickets - trams 10,11, and 13. page 7 Yapper Tours - advertising the tours circular with photos by John Belot. Tickets - MMTB, SEC, reproductions of some tickets, 2 hour scratch ticket, zone 1 daily. Page 8 Night photo of B1 2001 and Souvenir Ticket for Melbourne St Kilda - light rail opening 20-21, November 1987. FOHTD collection Reg Item 560 has copies of tickets issued for trams 1 to 17.trams, tramways, yapper tours, melbourne, tickets, transporting art -
 Shepparton RSL Sub Branch
Uniform, Dress Jacket, 1943
This jacket belonged to Dorothy May Mortlock (VF518245) who was part of the Australian Womens Army Service (AWAS). Dorothy Mortlock was born in Swan Hill and enlisted with the 3rd AUST AWS REC DEPOT.Khaki-coloured woollen jacket which fastens along the centre via four metal buttons. Two hip-height pockets with external flap; two chest pockets with pleat in centre fastened via a metal button. Fabric belt around waist held in place by two fabric loops on back and fastened through metal buckle and loop. Collar carries two metal rising sun badges on the left and right side. Two epaulettes on either shoulder are held in place by a button and carries a badge reading "AWAS". Colour patch on both left and right side is square, half green and half black. Interior label on base of neck.Label reads "V 579/1943/SIZE/MADE IN/AUSTRALIA/D. MORTLOCK/VF518245". Rising sun badge reads "AUSTRALIAN COMMONWEALTH/MILITARY FORCES." Buttons read "AUSTRALIAN MILITARY FORCES."world war ii, second world war, wwii, women, australian women's army service -
 Shepparton RSL Sub Branch
Uniform, Tie Badge, C. 1943
This badge belonged to Dorothy May Mortlock (VF518245) who was part of the Australian Womens Army Service (AWAS). Dorothy Mortlock was born in Swan Hill and enlisted with the 3rd AUST AWS REC DEPOT.Rising sun badge in bronze-coloured metal with pin and loop on reverse for attachment to tie.Badge reads "AUSTRALIAN COMMONWEALTH/MILITARY FORCES"world war ii, second world war, wwii, women, australian women's army service -
 Bendigo Military Museum
Uniform - TUNIC WW2, 1942
VX103961 relates to Reginald Harry Clark, he had a previous Regt No V59524 in the CMF, enlisted 17.7.1942 age 33 years, discharged 4.12.1945 with the rank of WO 2 in 1st Adv Ret Depot.Khaki, wool button down tunic with 4 regimental buttons and one tan plastic button at the top, issued to soldiers in WWII. Ends of collar have rising sun badges. Hanging loop at centre of back of neck. 4 pocket with flaps and buttons. Buttoned cuffs. Warrant Officer's badge on right sleeve and red over white colour patches indicating HQ New Guinea Force. Australia badge on each epaulette.Woven label on inside R front: “Q42 made in 1942 Australia size” Second label beneath: “Regimental No VX103961 Name Clark, R”uniforms-army, battle dress -
 J. Ward Museum Complex
Instrument - Luer's Tonsil Guillotine, c.1820 - 1900
This device was invented in 1828 and became the standard tool for removing tonsils. The object is significant because it served as an early model in tonsil removal. However, by the 20th century surgeons used a scalpel and forceps instead as the guillotine often caused heavy bleeding and left parts of the tonsil behind.Luer's tonsil guillotine, in the "French" pattern, has a sliding and positioning fork, sliding loop-blade, finger-ring grips and plunger.Medical Supply Depotmedical instrument, luer, tonsils, tonsillectomy -
 Flagstaff Hill Maritime Museum and Village
Surgical Instrument, late 19th Century
This polyp remover from Dr T.F. Ryan's Ear Nose and Throat surgical kit was donated to Flagstaff Hill Maritime Village by the family of Doctor William Roy Angus, Surgeon and Oculist. It is part of the “W.R. Angus Collection” that includes historical medical equipment, surgical instruments and material once belonging to Dr Edward Ryan and Dr Thomas Francis Ryan, (both of Nhill, Victoria) as well as Dr Angus’ own belongings. The Collection’s history spans the medical practices of the two Doctors Ryan, from 1885-1926 plus that of Dr Angus, up until 1969. ABOUT THE “W.R.ANGUS COLLECTION” Doctor William Roy Angus M.B., B.S., Adel., 1923, F.R.C.S. Edin.,1928 (also known as Dr Roy Angus) was born in Murrumbeena, Victoria in 1901 and lived until 1970. He qualified as a doctor in 1923 at University of Adelaide, was Resident Medical Officer at the Royal Adelaide Hospital in 1924 and for a period was house surgeon to Sir (then Mr.) Henry Simpson Newland. Dr Angus was briefly an Assistant to Dr Riddell of Kapunda, then commenced private practice at Curramulka, Yorke Peninsula, SA, where he was physician, surgeon and chemist. In 1926, he was appointed as new Medical Assistant to Dr Thomas Francis Ryan (T.F. Ryan, or Tom), in Nhill, Victoria, where his experiences included radiology and pharmacy. In 1927 he was Acting House Surgeon in Dr Tom Ryan’s absence. Dr Angus had become engaged to Gladys Forsyth and they decided he would take time to further his studies overseas in the UK in 1927. He studied at London University College Hospital and at Edinburgh Royal Infirmary and in 1928, was awarded FRCS (Fellow from the Royal College of Surgeons), Edinburgh. He worked his passage back to Australia as a Ship’s Surgeon on the on the Australian Commonwealth Line’s T.S.S. Largs Bay. Dr Angus married Gladys in 1929, in Ballarat. (They went on to have one son (Graham 1932, born in SA) and two daughters (Helen (died 12/07/1996) and Berenice (Berry), both born at Mira, Nhill ) Dr Angus was a ‘flying doctor’ for the A.I.M. (Australian Inland Ministry) Aerial Medical Service in 1928 . The organisation began in South Australia through the Presbyterian Church in that year, with its first station being in the remote town of Oodnadatta, where Dr Angus was stationed. He was locum tenens there on North-South Railway at 21 Mile Camp. He took up this ‘flying doctor’ position in response to a call from Dr John Flynn; the organisation was later known as the Flying Doctor Service, then the Royal Flying Doctor Service. A lot of his work during this time involved dental surgery also. Between 1928-1932 he was surgeon at the Curramulka Hospital, Yorke Peninsula, South Australia. In 1933 Dr Angus returned to Nhill where he’d previously worked as Medical Assistant and purchased a share of the Nelson Street practice and Mira hospital from Dr Les Middleton one of the Middleton Brothers, the current owners of what was once Dr Tom Ryan’s practice. Dr L Middleton was House Surgeon to the Nhill Hospital 1926-1933, when he resigned. [Dr Tom Ryan’s practice had originally belonged to his older brother Dr Edward Ryan, who came to Nhill in 1885. Dr Edward saw patients at his rooms, firstly in Victoria Street and in 1886 in Nelson Street, until 1901. The Nelson Street practice also had a 2 bed ward, called Mira Private Hospital ). Dr Edward Ryan was House Surgeon at the Nhill Hospital 1884-1902 . He also had occasions where he successfully performed veterinary surgery for the local farmers too. Dr Tom Ryan then purchased the practice from his brother in 1901. Both Dr Edward and Dr Tom Ryan work as surgeons included eye surgery. Dr Tom Ryan performed many of his operations in the Mira private hospital on his premises. He too was House Surgeon at the Nhill Hospital 1902-1926. Dr Tom Ryan had one of the only two pieces of radiology equipment in Victoria during his practicing years – The Royal Melbourne Hospital had the other one. Over the years Dr Tom Ryan gradually set up what was effectively a training school for country general-practitioner-surgeons. Each patient was carefully examined, including using the X-ray machine, and any surgery was discussed and planned with Dr Ryan’s assistants several days in advance. Dr Angus gained experience in using the X-ray machine there during his time as assistant to Dr Ryan. Dr Tom Ryan moved from Nhill in 1926. He became a Fellow of the Royal Australasian College of Surgeons in 1927, soon after its formation, a rare accolade for a doctor outside any of the major cities. He remained a bachelor and died suddenly on 7th Dec 1955, aged 91, at his home in Ararat. Scholarships and prizes are still awarded to medical students in the honour of Dr T.F. Ryan and his father, Dr Michael Ryan, and brother, John Patrick Ryan. ] When Dr Angus bought into the Nelson Street premises in Nhill he was also appointed as the Nhill Hospital’s Honorary House Surgeon 1933-1938. His practitioner’s plate from his Nhill surgery states “HOURS Daily, except Tuesdays, Fridays and Saturday afternoons, 9-10am, 2-4pm, 7-8pm. Sundays by appointment”. This plate is now mounted on the doorway to the Port Medical Office at Flagstaff Hill Maritime Village, Warrnambool. Dr Edward Ryan and Dr Tom Ryan had an extensive collection of historical medical equipment and materials spanning 1884-1926 and when Dr Angus took up practice in their old premises he obtained this collection, a large part of which is now on display at the Port Medical Office at Flagstaff Hill Maritime Village in Warrnambool. During his time in Nhill Dr Angus was involved in the merging of the Mira Hospital and Nhill Public Hospital into one public hospital and the property titles passed on to Nhill Hospital in 1939. In 1939 Dr Angus and his family moved to Warrnambool where he purchased “Birchwood,” the 1852 home and medical practice of Dr John Hunter Henderson, at 214 Koroit Street. (This property was sold in1965 to the State Government and is now the site of the Warrnambool Police Station. ). The Angus family was able to afford gardeners, cooks and maids; their home was a popular place for visiting dignitaries to stay whilst visiting Warrnambool. Dr Angus had his own silk worm farm at home in a Mulberry tree. His young daughter used his centrifuge for spinning the silk. Dr Angus was appointed on a part-time basis as Port Medical Officer (Health Officer) in Warrnambool and held this position until the 1940’s when the government no longer required the service of a Port Medical Officer in Warrnambool; he was thus Warrnambool’s last serving Port Medical Officer. (The duties of a Port Medical Officer were outlined by the Colonial Secretary on 21st June, 1839 under the terms of the Quarantine Act. Masters of immigrant ships arriving in port reported incidents of diseases, illness and death and the Port Medical Officer made a decision on whether the ship required Quarantine and for how long, in this way preventing contagious illness from spreading from new immigrants to the residents already in the colony.) Dr Angus was a member of the Australian Medical Association, for 35 years and surgeon at the Warrnambool Base Hospital 1939-1942, He served as a Surgeon Captain during WWII1942-45, in Ballarat, Victoria, and in Bonegilla, N.S.W., completing his service just before the end of the war due to suffering from a heart attack. During his convalescence he carved an intricate and ‘most artistic’ chess set from the material that dentures were made from. He then studied ophthalmology at the Royal Melbourne Eye and Ear Hospital and created cosmetically superior artificial eyes by pioneering using the intrascleral cartilage. Angus received accolades from the Ophthalmological Society of Australasia for this work. He returned to Warrnambool to commence practice as an ophthalmologist, pioneering in artificial eye improvements. He was Honorary Consultant Ophthalmologist to Warrnambool Base Hospital for 31 years. He made monthly visits to Portland as a visiting surgeon, to perform eye surgery. He represented the Victorian South-West subdivision of the Australian Medical Association as its secretary between 1949 and 1956 and as chairman from 1956 to 1958. In 1968 Dr Angus was elected member of Spain’s Barraquer Institute of Barcelona after his research work in Intrasclearal cartilage grafting, becoming one of the few Australian ophthalmologists to receive this honour, and in the following year presented his final paper on Living Intrasclearal Cartilage Implants at the Inaugural Meeting of the Australian College of Ophthalmologists in Melbourne In his personal life Dr Angus was a Presbyterian and treated Sunday as a Sabbath, a day of rest. He would visit 3 or 4 country patients on a Sunday, taking his children along ‘for the ride’ and to visit with him. Sunday evenings he would play the pianola and sing Scottish songs to his family. One of Dr Angus’ patients was Margaret MacKenzie, author of a book on local shipwrecks that she’d seen as an eye witness from the late 1880’s in Peterborough, Victoria. In the early 1950’s Dr Angus, painted a picture of a shipwreck for the cover jacket of Margaret’s book, Shipwrecks and More Shipwrecks. She was blind in later life and her daughter wrote the actual book for her. Dr Angus and his wife Gladys were very involved in Warrnambool’s society with a strong interest in civic affairs. Their interests included organisations such as Red Cross, Rostrum, Warrnambool and District Historical Society (founding members), Wine and Food Society, Steering Committee for Tertiary Education in Warrnambool, Local National Trust, Good Neighbour Council, Housing Commission Advisory Board, United Services Institute, Legion of Ex-Servicemen, Olympic Pool Committee, Food for Britain Organisation, Warrnambool Hospital, Anti-Cancer Council, Boys’ Club, Charitable Council, National Fitness Council and Air Raid Precautions Group. He was also a member of the Steam Preservation Society and derived much pleasure from a steam traction engine on his farm. He had an interest in people and the community He and his wife Gladys were both involved in the creation of Flagstaff Hill, including the layout of the gardens. After his death (28th March 1970) his family requested his practitioner’s plate, medical instruments and some personal belongings be displayed in the Port Medical Office surgery at Flagstaff Hill Maritime Village, and be called the “W. R. Angus Collection”. The W.R. Angus Collection is significant for still being located at the site it is connected with, Doctor Angus being the last Port Medical Officer in Warrnambool. The collection of medical instruments and other equipment is culturally significant, being an historical example of medicine from late 19th to mid-20th century. Dr Angus assisted Dr Tom Ryan, a pioneer in the use of X-rays and in ocular surgery. Surgical instrument from Dr T.F. Ryan's Surgical Kit, part of the W.R. Angus. Polyp remover, scissor type action,curved ends with loop shaped tips. One handle has loop, the other is curved, Inscribed "MEDICAL SUPPLY DEPOT" & "T R" Inscribed "MEDICAL SUPPLY DEPOT" & "T R" flagstaff hill, warrnambool, shipwrecked coast, flagstaff hill maritime museum, maritime museum, shipwreck coast, flagstaff hill maritime village, great ocean road, dr w r angus, dr ryan, surgical instrument, ent ear nose throat surgery, warrnambool base hospital, nhill base hospital, mira hospital, flying doctor, medical treatment, polyp remover, surgery -
 Glen Eira Historical Society
Article - Grand Union Tramway Junction, Balaclava Road and Hawthorn Road
This file contains three items. 1. A three-page Caulfield Conservation Study of the Balaclava Road/Hawthorn Road Tramway Crossing, undertake by Andrew Ward and dated September 1994. Study includes a brief history of the junction and a statement of significance. Study also includes Four black and white photographs of the junction and of architectural details of the tram tracks. 2. A letter from the Conservation Manager of the National Trust of Australia (Victoria) to the manager of the Planning Section for the City of Glen Eira, dated 15/06/2001 and attached to a six-page Classification Report. The letter informs of the Classification of the Grand Union Junction at the intersection of Balaclava and Hawthorn Road by the national trust, signed by Conservation Manager Ian Pausacker. Classification Report includes details such as the date of construction, a statement of significance, history of the junction, physical description of the junction and the condition of the junction at the time of writing. Report also includes a map of the Melbourne Tram Network drafted by Keith Kings and dated 01/005/1956, with illustration of the layout of fifteen tram depots, and updated aerial illustration of the Grand Union Junction, and a further map of Melbourne Tramways developed by North Melbourne Electric Tramways and Lighting Co. and Prahran and Malvern Tramways Trust, drafted by Keith Kings and dated January 1914 with illustrations of three tram depots. 3. Two articles from the Caulfield Leader written by Aaron Langmaid and dated 13/02/2007 and the Melbourne Bayside Weekly dated 21/02/2007 written by Joanne Sim, both concerning the Grand Union Junction. The article from the Caulfield Leader includes a picture of Executive Officer of the council of Tramway Museum of Australia Craig Tooke in front of the intersection. The article from the Bayside Weekly includes a picture of a tram passing through the junction and a brief history of the junction and tram network in Caulfield. The article also refers to twp local tram shelters at the intersection of Dandenong Road and Alma Road and also Orrong Road and Balaclava Road.caulfield, caulfield conservation, study, balaclava road, hawthorn road, grand union junction, ward andrew, tramway crossings, transport, acland street, caulfield racecourse, tram tracks, race events, event, tram routes, thorough fares, melbourne and metropolitan tramways board, prahran and malvern tramway trust, prahran and malvern district tramways, caulfield electric tramways, caulfield city council, architectural detail, city of glen eira, balaclava road and hawthorn road intersection, balaclava road and hawthorn road junction, dandenong road, glenhuntly road, four-way tram junctions, access covers darling road, cast metal access covers, hadfields patent, caulfield park, tram systems, tram networks, heritage, tramway heritage, kings keith, tram depots, glenhuntly depot, maps, glen eira, melbourne electric tramways, north melbourne electric tramways and lighting co., prahran and malvern tramways trust, caulfield leader, bayside weekly, tooke craig, tourist attractions, grand union tramways junction, caulfield junction, cable car tramways, tram shelters, building, sheds, alma road, orrong road, caulfield electric line, balaclava junction, elsternwick railway station, caulfield station, caulfield station loop, tram services, transport establishments, thoroughfares, buildings, structures, establishments, parts of buildings or structures, documents, commercial industry, sites, historic sites, melbourne bayside weekly -
 Puffing Billy Railway
Emerald Station Sign
Station Sign - Emerald Emerald Station is situated on the Puffing Billy Railway in Victoria, Australia. It was opened with the Railway on 18 December 1900 and comprised a platform track and a loop siding. A passing loop was added between the two a few years later. There was also a spur siding off the Down end of No. 3 Road. Two standard 12 ft by 20 ft timber portable station buildings with a Van Goods Shed between (all adjoining) were provided on the platform and a Goods Shed on the No. 3 Road loop siding. Other buildings included Tea Rooms, lamp room and toilets along with a cattle race and loading bank. The station building was later reduced in length by one of the portables which housed the General and Ladies' waiting rooms. Emerald today remains very similar to the early days, but has had other Roads added into a Carriage Workshops, a turntable and storage sidings. Also, a Signal and Telegraph Branch depot in the form of a large Goods Shed and a multi-purpose yard building in the form of a Locomotive Depot administration building have been added. During 2009, the station building underwent stage one of an internal restoration to its former glory. ref: https://en.wikipedia.org/wiki/Emerald_railway_station,_Victoria photos at http://www.vicrailstations.com/Gembrook/Emerald/Emerald.html Historic - Victorian Railways Station sign used at Emerald Station Station Sign - Emerald Metal rectangle Station Name Sign with white enamel back ground and black lettersEmeraldstation sign, puffing billy, emerald station -
 Forests Commission Retired Personnel Association (FCRPA)
Driptorch - Firebug (hand held), c 1985
The origins of the humble handheld driptorch have been lost in time. They are widely used for ignition in controlled burning operations in forest and grasslands. The “Pacific Forester“ with its short central wand and somewhat leaky ball-valve was made by the American Wajax company in the 1940s. The Pacific Forester is slightly different in design from the more robust and common “Panama” driptorch first manufactured in 1933 and used extensively by Queensland cane farmers. The Panama is closely related to the current “Firebug” used in Victoria which is manufactured by Rodney Industries in Brisbane and has an offset wand design which gives it good balance. The fuel is a mixture of petrol and diesel and every FCV District had their own closely-guarded secret formula ... 2:1, 3:1, 1:1, 4:1 or 3:2 ratio. There was also the choice of 91, 95 or 98 octane petrol mixed with summer or winter diesel. Occasionally some of the old Avgas or Jet-A1 lying around the depot was added with a splash of engine oil to make the mixture stick to the fuel to be ignited. The fuel mixed also varied between autumn or spring, heathland, mixed forest, or high-intensity slash burnsCommon driptorch used throughout AustraliaDrip torch with handle Wand has loop and valve. The loop is designed to assist with even flow of fuel which flows out onto the burning head of the wand. Pressure equalising value in top of aluminum fuel container which holds 4 litres of burner mix. Gravitational feed of the driptorch allows the unit to drip fire, making it simple and quick to operate. Instructions for use. CF+L written with texta pen.bushfire -
 Ballarat Tramway Museum
Photograph - Colour Print/s - set of 6, Roy J Mitchell, 17/01/2007 12:00:00 AM
Set of six colour prints of BTM operations taken by Roy J Mitchell. All photos dated on the rear as 8/2/2010 except .1 - 17/1/2007. Taken during the Begonia Festival based on the background. .1 - Tram 27 running in on the access track - note the new trees .2 - 466 at Gardens loop .3 - 26 and 671 at Gardens loop .4 - ditto .5 - 661 at Carlton St .6 - 26 at the depot on No. 7 road.Detail on the rear of each photo are the details of the image and the photographer. trams, tramways, btm, access track, depot, wendouree parade, carlton st, tram 26, tram 466, tram 27, tram 661, tram 671