Showing 129 items
matching dry area
-
 Derrinallum and Lismore Community Association - History Group
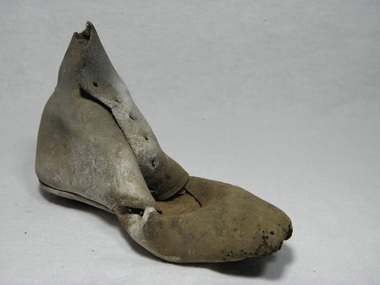
Boot, c.1870
This boot was found hidden in an alcove in a chimney in one of the first houses built in Lismore Victoria during the mid 1860's. The house belonged to scottish born George Ireland Skene who settled in Lismore in mid 1857 with his wife Elizabeth (nee Nelson) and two young children. November 1857 George had built the first blacksmith shop in Grey Street Lismore and then built his house behind the smithy's. Hiding boots in chimneys is well doucumented in folklore. Old brown leather left foot childs boot. In poor condition the leather has dried out and the front centre of the boot along the eyelets has curled into the inside of boot. The holes are in tact but the laces are missing so is the tounge. The leather is stained with a white powder mildrew. The sole and heel has perished and there is a hole in the toe area.boot, shoe, leather, folklore, concealed, chimneys, hidden, magic -
 Kiewa Valley Historical Society
Cutter Green Feed, Hocking, estimated 1935; Early 20th Century
This iron chaff cutter was a vital piece of rural machinery especial for cattle in areas subjected to limited grass growing seasons. The Kiewa Valley and Alpine regions were up to the 21st century "snowed" in. The conditions requiring summer crops and fodder to be prolonged for the harsh winter climate are now becoming less and less and may confirm the precursor of "global warming". The Kiewa Valley is still a strong base for dairy cattle and other stock requiring all year access to hay/grass supplies. The use of, now defunct, Tobacco drying sheds for the storage of hay and other fodder is typical of the Australian farmer/grazier's adaptability to utilise anything available. To think outside the square.Black Iron Chaff Cutter. The wheel has a single piece inside with 4 curved spokes with adjustable blades attached by 4 screws & 3 rivets. The wheel has a wooden handle. Operated by cogs. HOCKING GREASE BALLARAT COGS FREELYagriculture, farm machinery, stock feeding, grazier, farm animals -
 Kiewa Valley Historical Society
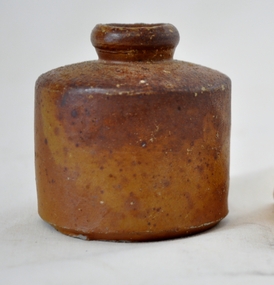
Ink Well
This inkwell was in use up until the early 1960's (especially in schools) and used as a source of ink into which a nib pen was inserted which could hold only a small amount for distribution onto mainly paper. The pen itself did not contain any "self" ink replenishment(such as fountain pens or later on biros ). Writing using this method involved a greater time period and also involved a drying application such as blotter to stop the ink from smudging(blurring or becoming smeared).This ink well is very significant to The Kiewa Valley because it represents a period before "cartridge" fountain pens and biros. It was in a "slower" paced era when written communication was not required to be an "instant" method. This was also a period in time when all forms of communication, especially in a rural settings, had no requirement, because of the facilities available, to be the "now" contingency. The "lay back" environment of semi isolated rural areas can be highlighted by the well used phrase of the times - "she'll be right mate"Brown coloured inkwell. Made of pottery, cylindrical shaped container with a raised neck opening at the top. This item has a flat bottom for positioning on a desk or other flat surfacepottery, inkwell for nib pens, stationery -
 Kiewa Valley Historical Society
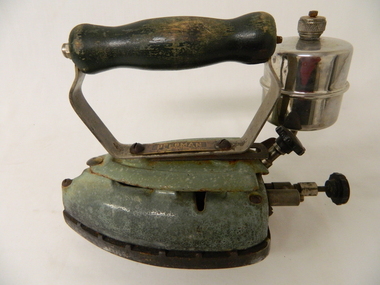
Iron Hand Kerosene, circa 1948
This item was in use before electricity and was manufactured after the flat stove irons.The weight of the iron base, is heavy, helping in smoothing out crinkly material being ironed. This item permitted ironing of clothes to be separate and away from heating stoves. It permitted greater flexibility for ironing clothes and permitted more control (consistency) of the temperature of the iron.Historically and significantly this item enforces the relative isolation of the Kiewa Valley and period when and where this domestic item was in use(manufactured circa 1950). A rural setting with mining, beef , milk and tobacco production in the early 1900s. Even though the community was in a rural setting, the standards of dress was the same as in the bigger towns and cities. Social and religious mores and values demanded that the personal appearance be clean and crisp no matter where a person was living or working. Heavy laborious work was considered by some religions as virtuous, therefore the heavy and tiring work of ironing during this period had its rewards. Rural areas where the last to be connected to electricity and therefore this item was a domestic necessity far into the 1950's.This iron has a steel base and a metal body coated with green coloured enamel. The wooden hand grip is painted dark green. The kerosene (spirit) container is a chrome metal cylinder with a flat bottom and top. The top has a small filler/air plug is located on the top side. There are two control knobs located next to and under the metal cylinder. The close to the cylinder is a lock which locks the top lid of the iron and the other knob controls the airflow to the heater rodOn the base of the handle "PEERMAN" and below this P/46, C.I. Thomas & Son Pty Ltd household, ironing, domestic kerosene, dry cleaning -
 Kiewa Valley Historical Society
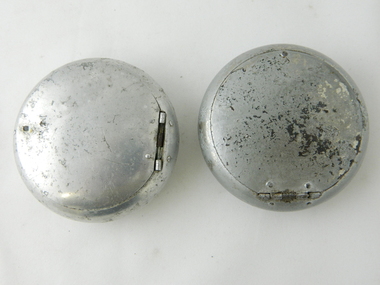
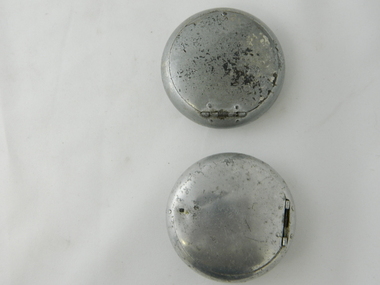
Ash Tray Pocket, Circa mid to late 1900s
... " on the ground, or if working in any rural area during a dry fire prone..." on the ground, or if working in any rural area during a dry fire prone ...This flip top pocket steel ash tray was at the beginning of the social "cleaning up" of cigarette ash and related products. This cigarette waste container was for those occasions when it was polite not to throw the cigarette ash and used up cigarettes "buts" on the ground, or if working in any rural area during a dry fire prone season, when discarding burning cigarette waste could set up a severe "bush" fire. It was also at the beginning of an intensive look at the affects of smoking upon the health of users. Later in the 1900s was a time when medical evidence supported a ground swell of the anti smoking movement which resulted in further restrictions of the use cigarette smoking in public places. Before the anti cigarette smoking revolution, it was both fashionable and manly to either roll your own cigarette or open up a packet of "tailor made's". In the rural and man's man environment the roll your own provided a visual acknowledgement that the user was "true blue" Aussie male and not a city boy. The cycle of use of cigarettes has drastically changed from when this item was first used. Today's society (post 2000) has produced a ground swell of government and non government organisations whose aim is provide a cigarette "ash" free environment and society. This is highlighted in the beginning of the 2000 millennium by a cigarette "Free" Australia campaign, and the pocket flip top personal ash tray as a practical solution for butt litter disposal.This pocket ash tray not only was used when social graces required it to, but also provided a container for any unfinished cigarettes or stogies (cheap half used cigars). In rural areas (open fresh air countryside), where time was always made available for the "smoko" (Australian rest period), at any time, especially after some hard physical work, the ability to have a self contained ashing apparatus, not to offend the gentler folk, was a pre-requisite . The rural environment, in the days of these cigarette ash containers,was one which could range from harsh and unforgiving to mild and relaxing. Smoking could be enjoyed anywhere and at any time without too much "fussing" around. This ash tray was mobile, convenient, unobtrusive and regarded by the user as being considerate to those around. It also eliminated the tell tale evidence that the "no smoking" signs had been ignored. The Kiewa Valley was like many rural ares that found it hard for smokers to come to grips with a governmental "non smoking policy" to indoor recreational and other "confined space" environments. Tin plated mild steel round container with a lid. The opening lid is spring loaded, hinged top, circular and fixed by a clasp, pop- riveted (4) onto the main housing. Opposite the hinge the lid is held closed by a small metal ball fitting tightly to the top wall of the container. The lid is opened by the use of a fingernail positioned at junction of lid to body. This edge is bevelled to allow access. personal effects, tobacco waste products, smoking accessories -
 Kiewa Valley Historical Society
Ash Tray Pocket
... cigarettes "buts" on the ground, or if working in any rural area..." on the ground, or if working in any rural area during a dry fire prone ...This flip top pocket aluminium ash tray was at the beginning of the social "cleaning up" of cigarette ash and related products. This cigarette waste container was for those occasions when it was polite not to throw the cigarette ash and used up cigarettes "buts" on the ground, or if working in any rural area during a dry fire prone season, when discarding burning cigarette waste could set up a severe "bush" fire. It was also at the beginning of an intensive look at the affects of smoking upon the health of users. Later in the 1900s was a time when medical evidence supported a ground swell of the anti smoking movement which resulted in further restrictions of the use cigarette smoking in public places. Before the anti cigarette smoking revolution, it was both fashionable and manly to either roll your own cigarette or open up a packet of "tailor made's". In the rural and man's man environment the roll your own provided a visual acknowledgement that the user was "true blue" Aussie male and not a city boy. The cycle of use of cigarettes has drastically changed from when this item was first used. Today's society (post 2000) has produced a ground swell of government and non government organisations whose aim is provide a cigarette "ash" free environment and society. This is highlighted in the beginning of the 2000 millennium by a cigarette "Free" Australia campaign, and the pocket flip top personal ash tray as a practical solution for butt litter disposal.This light weight aluminium pocket ash tray not only was used when social graces required it to, but also provided a container for any unfinished cigarettes or stogies (cheap half used cigars). In rural areas (open fresh air countryside), where time was always made available for the "smoko" (Australian rest period), at any time, especially after some hard physical work, the ability to have a self contained ashing apparatus, not to offend the gentler folk, was a pre-requisite . The rural environment, in the days of these cigarette ash containers,was one which could range from harsh and unforgiving to mild and relaxing. Smoking could be enjoyed anywhere and at any time without too much "fussing" around. This ash tray was mobile, convenient, unobtrusive and regarded by the user as being considerate to those around. It also eliminated the tell tale evidence that the "no smoking" signs had been ignored. The Kiewa Valley was like many rural ares that found it hard for smokers to come to grips with a governmental "non smoking policy" to indoor recreational and other "confined space" environments. The covered lid reduces odors and eliminates ashes from being blown around.Aluminium round container with a lid. The opening lid is spring loaded, hinged top, circular and fixed by a clasp, pop- riveted (4) onto the main housing. Opposite the hinge the lid is held closed by a small metal ball fitting tightly to the top wall of the container. The lid is opened by the use of a fingernail positioned at junction of lid to body. This edge is bevelled to allow access.personal effects, tobacco waste products, smoking accessories, tobacco -
 Kiewa Valley Historical Society
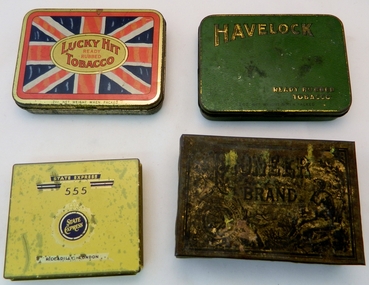
Tins - Tobacco (Lucky Hit) x4, Mid to late 1900s Possibly c1910
The British Australasian Tobacco Co. (based in Melbourne and Sydney. The parent company was founded in England, circa 1902). This item "Lucky Hit" was the fore runner of the "Lucky Strike" brand name. The ready rubbed tobacco held within the tin was mainly used by those smokers who rolled their own cigarettes. These smokers would have mainly used their palm and formed a cup then placing their choice of the amount of tobacco to be rolled. This would then be placed on the fine cigarette paper and rolled and sealed (using saliva in the mouth) into the required shape. There were mechanical "roll you own" gadgets on the market but most rural users, especially males used their palms. The quantity of tobacco used to make up the cigarette was up to the individual user. The thinner that the cigarette was rolled the longer and more economical did the supply last. The by -products of this method were nicotine stained fingers and hands. "Chain" smokers were easily identified and could therefore be discriminated against obtaining smoke sensitive employment. The two world wars (1914-18 and1939-45) produced a significant rise in the consumption of cigarette use by men and the eventual overflow to women. Cigarette smoking before the 1900s was seen as rough and uncouth (socially frowned upon), however after the introduction of overseas films (U.K. and U.S.A.) and film stars presenting smoking as socially acceptable the rise of smoking cigarettes, especially roll you own (American western movies) in rural areas was an accepted way of life. Things however started to change in the mid 1900s when medical evidence pointed to the health problems of regular smokers. Governments were now implementing non smoking education material. Restrictions on where and when smoking was permitted and acceptable started to creep into all areas of society whether city or rural. This was the era that highlighted the use of roll your own cigarettes, especially when the costs of "tailor made" cigarettes were taxed at an increasing amount. Roll your own cigarettes also provided an avenue for the consumption of illicit drug use.The significance of this ready rubbed tobacco tin to this rural region is, stems from how much influence that the Western novels and overseas films (portraying rural lifestyles) played in shaping the rural social and working mores of the Kiewa Valley. The post war depression (financially) resulted in more smokers turning away from expensive machine (tailor) made cigarettes to the roll your own, using ready rubbed tobacco. This tobacco tin relays a long ago era, when personal contact, and not something that has been written down by some "unknown", was valued as the true appraisal of a member of the community. This was especially relevant in a small regional area such as the Kiewa Valley. Although social networking was not as fast then as the internet provides now, appearances, manners, fashion and etiquette with first impressions high on the order of evaluating someone in the community. Pointer such as the brand of tobacco smoked was part of the rural assessment method. Up until the demise of the Australian Tobacco Industry, circa 2004, the Kiewa Valley and surrounding district was part of a vibrant producer of tobacco leaves. The remnants of this industry still remain today but the drying sheds (for tobacco leaves) are now used to store hay for the valley's dairy and beef cattle industries. Tins 2,3 and 4 were found (in 2009) at Wallace's Hut on the Bogong High Plains. This tobacco tin is constructed from tin plated thin rolled steel. The lid is attached by two pressed and formed (from the main frame) hinges using the nip and tuck construction method. The lid and outside frame have been gold & silver anodised. Tins 2,3 and 4 have the Union Jack on the front lid. One is too rusty to read. The other two have "A blend containing choice selected Australian grown leaf" in white across the bottom on the red border and above the "2oz net weight when packed". In the centre and on the outside of the lid and surrounded by a reproduction of the "Union Jack" is stamped, "Lucky Hit Tobacco" within these words are also stamped "Ready Rubbed". The bottom of the lid is stamped (in smaller script) "2oz NET WEIGHT WHEN PACKED" and underneath this and on the rim of the lid is "THE BRITISH AUSTRALASIAN TOBACCO CO. PTY. LTD. MELBOURNE" on the inside of the lid and stamped in black print on a gold anodised lid is " NOTICE "(underlined) "Every tin of genuine "Lucky Hit has the name of the Manufacturing Company printed on wax paper lining; also on the band or wrapper with which the tin is sealed. THE BRITISH-AUSTRALIAN TOBACCO CO. PTY. LTD., MELBOURNE" and underneath this and underlined is " None genuine without the band or wrapper" On the hinge side of the lid is "LUCKY HIT READY RUBBED TOBACCO" Tins 2,3 and 4 Vary to the above inscription.roll your own, cigarette tins, smoking accessories, personal effects, tobacco containers, tobacco -
 Kiewa Valley Historical Society
Tin Tobacco, Mid to late 1900s
The British Australasian Tobacco Co. (based in Melbourne and Sydney. The parent company was founded in England, circa 1902). This item "HAVELOCK" is one of many ready rubbed tobacco tins produced by the British Australasian Tobacco Company.The ready rubbed tobacco held within the tin was mainly used by those smokers who rolled their own cigarettes. These smokers would have mainly used their palm and formed a cup then placing their choice of the amount of tobacco to be rolled. This would then be placed on the fine cigarette paper and rolled and sealed (using saliva in the mouth) into the required shape. There were mechanical "roll you own" gadgets on the market but most rural users, especially males used their palms. The quantity of tobacco used to make up the cigarette was up to the individual user. The thinner that the cigarette was rolled the longer and more economical did the supply last. The by -products of this method were nicotine stained fingers and hands. "Chain" smokers were easily identified and could therefore be discriminated against obtaining smoke sensitive employment. The two world wars (1914-18 and1939-45) produced a significant rise in the consumption of cigarette use by men and the eventual overflow to women. Cigarette smoking before the 1900s was seen as rough and uncouth (socially frowned upon), however after the introduction of overseas films (U.K. and U.S.A.) and film stars presenting smoking as socially acceptable, the rise of smoking cigarettes, especially roll you own (American western movies) in rural areas was an accepted way of life. Things however started to change in the mid 1900s when medical evidence pointed to the health problems of regular smokers. Governments were now implementing non smoking education material. Restrictions on where and when smoking was permitted and acceptable started to creep into all areas of society whether city or rural. This was the era that highlighted the use of roll your own cigarettes, especially when the costs of "tailor made" cigarettes were taxed at an increasing amount. Roll your own cigarettes also provided an avenue for the consumption of illicit drug use.The significance of this ready rubbed tobacco tin to this rural region is, stems from how much influence that the Western novels and overseas films (portraying rural lifestyles) played in shaping the rural social and working mores of the Kiewa Valley. The post war depression (financially) resulted in more smokers turning away from expensive machine (tailor) made cigarettes to the roll your own, using ready rubbed tobacco. This tobacco tin relays a long ago era, when personal contact, and not something that has been written down by some "unknown", was valued as the true appraisal of a member of the community. This was especially relevant in a small regional area such as the Kiewa Valley. Although social networking was not as fast then as the internet provides now, appearances, manners, fashion and etiquette with first impressions high on the order of evaluating someone in the community. Pointer such as the brand of tobacco smoked was part of the rural assessment method. Up until the demise of the Australian Tobacco Industry, circa 2004, the Kiewa Valley and surrounding district was part of a vibrant producer of tobacco leaves. The remnants of this industry still remain today but the drying sheds (for tobacco leaves) are now used to store hay for the valley's dairy and beef cattle industries.This tobacco tin is constructed from tin plated thin rolled steel. The lid is attached by two pressed and formed (from the main frame) hinges using the nip and tuck construction method.The lid and outside frame have had a green "weave" pattern anodised to the metal.On the outside of the lid and at the top left is stamped, in gold coloured letters "HAVELOCK". The bottom of the lid is stamped (in smaller script) "READY RUBBED TOBACCO" and below this in smaller lettering "2oz NET WEIGHT WHEN PACKED". On the rim of the lid is "THE BRITISH AUSTRALASIAN TOBACCO CO. PTY. LTD." Inside of the lid and stamped in black print on a gold anodised lid is "Every tin of genuine HAVELOCK Ready Rubbed Tobacco has the mane Havelock printed on the paper lining, and also on the band or wrapping sealing the tin. On the hinge side of the lid is "HAVELOCK READY RUBBED"roll your own, cigarette tins, smoking accessories, personal effects, tobacco containers -
 Kiewa Valley Historical Society
Tin Tobacco / Cigarette, Circa 1900s
This particular brand of tobacco (State Express 555) was first made in 1915, and was most popular in Asia and China. The number triple 5 was mooted as a sacred number, and may have contributed to its high level of demand by Asian smokers. This would have been a favourite "smoke" for the Chinese emigrants, and especially those who settled in rural areas of Australia. In the era where 'male' type of activities such as motor racing, were sponsored by tobacco companies, roll your own cigarettes was ingrained as a macho male requirement. It was only in the early 2000s, when cigarette advertising had greater restrictions attached to the product, that the roll your own, and cigarettes in general, became less "cool". This particular cigarette tin would have also been useful for roll your own (ready rub tobacco)The significance of this particular Qantas cigarette tin to this rural region is that it demonstrates that overseas travel by plane was not only for the affluent city dweller but also available, and not impossible to the inhabitants of the Kiewa Valley. This cigarette tin also may hint that the influx of Asian immigrants into this region where able to visit relatives back in Asia without too much effort. The use of a Qantas cigarette tin in the Kiewa Valley also suggests a degree of affluent there or tourists from elsewhere. This tobacco tin relays a long ago era, when personal contact, and not something that has been written down by some "unknown", was valued as the true appraisal of a member of the community. This was especially relevant in a small regional area such as the Kiewa Valley. Although social networking was not as fast then as the internet provides now, appearances, manners, fashion and etiquette with first impressions high on the order of evaluating someone in the community. Pointer such as the brand of tobacco smoked was part of the rural assessment method. Up until the demise of the Australian Tobacco Industry, circa 2004, the Kiewa Valley and surrounding district was part of a vibrant producer of tobacco leaves. The remnants of this industry still remain today but the drying sheds (for tobacco leaves) are now used to store hay for the valley's dairy and beef cattle industries.This tobacco/cigarette tin is constructed from tin plated thin rolled steel. The lid is attached by two pressed and formed (from the main frame) hinges using the nip and tuck construction method.The outside lid and frame has a yellow colour anodised to the metal.On the front of the lid are the following printed: "STATE EXPRESS" ,in yellow print, and below this are two horizontal lines in brown and central to these are the numbers "555" . Below this appears and within a 'royal' crest, in yellow writing on a brown circular background "STATE EXPRESS". Below this, in brown print, "PICCADILLY, LONDON". On each side of the tin are printed in brown colour: front side" ARDATH TOBACCO CO. LTD. PICCADILLY, LONDON" . On the left and right sides are printed in brown colour "20 STATE EXPRESS 555". On the rear side is with smaller print "MANUFACTURED UNDER ARRANGEMENTS WITH THE POPRIETORS". On the inside of the lid printed in red colour, are the following words, the royal crest and sketch of the winged kangaroo(symbol of the QANTAS logo). Within a red elongated square border, are the Royal Crest and in very small red print "BY APPOINTMENT TO HER MAJESTY THE QUEEN" underneath in slightly larger print "STATE EXPRESS" The print underneath this and in smaller print is "CIGARETTE MANUFACTURERS ARDARTH TOBACCO CO. LTD." Next to the royal crest and in much larger print is "STATE EXPRESS" and underneath this ,the numerals 555 with the words "CIGARETTES" below. The lower half of the inside lid has the following words and the "flying" kangaroo(winged). These words in written (running free hand) style "Specially packed for QANTAS(in red print). Underneath and in smaller print is "AUSTRALIA'S OVERSEAS AIRLINE". On the bottom of this tobacco tin is stamped into the metal surface, the number"704"qantas supplied cigarettes, roll your own, cigarette tins, smoking accessories, personal effects, tobacco containers, tobacco -
 Kiewa Valley Historical Society
Tin Tobacco, early to mid 1900s
This early tobacco tin was manufactured in England and imported to the "colony" Australia at the beginning of the 1900s. This manufacturer had won the Gold Medal at the Liverpool International Exhibition in 1884. This tobacco would have therefore been very expensive to purchase making it a must for the wealthier client of the Kiewa Valley. The Golden Flake Cavendish smells of the man of wealth and position. In this era the type of dress and the brand of tobacco smoked showed everyone at first glance where the man using it was on the social ladder and his pecking order. With the demise of tobacco smoking in the early 2000s clothes themselves do not show the pecking order in that quickly visualised manner, as at the time of manufacture of this tobacco tin. In the 21st century the level that men are in the socio economic field is realized on "the social information" available on the internet.This tobacco tin relays a long ago era, when personal contact, and not something that has been written down by some "unknown", was valued as the true appraisal of a member of the community. This was especially relevant in a small regional area such as the Kiewa Valley. Although social networking was not as fast then as the internet provides now, appearances, manners, fashion and etiquette with first impressions high on the order of evaluating someone in the community. Pointer such as the brand of tobacco smoked was part of the rural assessment method. Up until the demise of the Australian Tobacco Industry, circa 2004, the Kiewa Valley and surrounding district was part of a vibrant producer of tobacco leaves. The remnants of this industry still remain today but the drying sheds (for tobacco leaves) are now used to store hay for the valley's dairy and beef cattle industries.A dark metal tobacco tin covered in a bright metallic gold fleck pattern with a black frame on the lid around a drawing of a woodsman with a musket and axe sitting on a stump overlooking a valley that reads "Pioneer Brand", next to a company seal incorporating a wreath, eagle and shield. The front side reads "Richmond Cavendish Co./ Limited/ Liverpool." and the right and left side "Golden Flake Cavendish". The bottom has the same woodsman feature as the lid. The back side is an elongated diagram featuring tobacco leaves and plant summit. Inside lid surface has a half torn coloured (red, black and green) sketch on paper of the woodsman scene depicted on the top lid.The following inscriptions are displayed on the top and inside lid and on the bottom tobacco tin: "PIONEER BRAND" and to the left of the scene the "SEAL OF THE COMPANY TRADE MARK" Both side of the ens have the following words in large thick print "GOLDEN FLAKE CAVENDISH" and each is contained withih a black boarder.pipe tobacco, cigarette tins, smoking accessories, personal effects, tobacco containers -
 Warrnambool and District Historical Society Inc.
Book, Third Book, Late 19th century
This little book is very old, presumably 19th century, but the wording on the front cover is indecipherable, no date is evident and the first and last pages are missing. The book was owned by Mary Jane Freckleton with the main inscription written in an adult hand – ‘Mary Jane Frickelton, Mailers Flat’. The spelling of Mailers Flat with an ‘e’ was not a mistake but this was the common spelling in the 19th century and the early 20th century. According to the Freckleton family history ‘Freckleton’ was sometimes spelled ‘Frickelton’ or ‘Frickleton’. Mailors Flat is nine kilometres from Warrnambool and the Mailors Flat School, number 1210, was opened in 1872 in Caramut Road and closed in 1994. The first Head Teacher was Julian Castles. There were Freckelton families in the 19th century in Port Fairy, Caramut, Woolsthorpe, Woodford and Mailors Flat. The Freckletons at Mailors Flat were engaged in farming. Mary Jane Freckleton was for a time a pupil teacher at Mailors Flat School. She was born at the Injemira property and married Henry Giles. This is an interesting book because of its age and because it belonged to Mary Jane Freckleton, a member of the Freckleton families, early settlers in the areas north of Warrnambool. She may have used the book when she was a pupil teacher at the Mailors Flat School. This is a hard cover book of 284 pages (some pages missing). The cloth cover is brown and much torn and stained. There are 86 chapters of prose and verse and a sprig of dried flowers is enclosed in the pages. There is the red stamp of the Warrnambool & District Historical Society on the first page and several snippets of writing in black ink on the front and back pages.‘Mary Jane Frickelton Mailers Flat’mary jane freckleton, mailors flat school -
 Warrnambool and District Historical Society Inc.
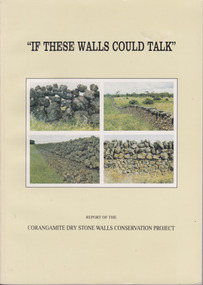
Book, If These Walls Could Talk, 1995
This publication is a result of funding made to the Corangamite Arts Council in 1990-91. Its aims were to identify and research the dry stone walls of the region, to raise their profile and through workshops continue the skills of those wanting to learn more about the craft. The book gives the history of the practice in the area and the various different styles with photographs to illustrate the different features. It also has a number of first- hand accounts written by stonewallers.This study has social, historical, artistic and interpretive significance as the walls are an important feature of the district. The account written by former builders of the walls provides an interesting insight into the various styles and reasons for their construction.Light green card cover. Front cover has 4 photographs of dry stone walls with title and other text in black. Back cover is plain. 144 pages. It contains a large number of black and white photographs of stone walls from around the district as well as maps. Report of the Corangamite dry stone walls Conservation project.dry stone walls, corangamite stone walls, warrnambool and district history, constructing dry stone walls -
 Warrnambool and District Historical Society Inc.
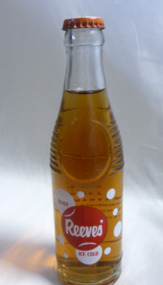
Functional object - Bottle, Reeves Dry Ginger, Circa late 20th century
Ralph Reeves purchased an established cordial factory in the early 1900’s from the estate of J Fletcher. It was operated by the Reeves family, firstly Reginald, followed by his son-in-law Murray Moon until the latter part of the 20th century. A common object familiar to a large number of people in the Warrnambool area with links to one of Warrnambool’s longest established family businesses.Two clear glass bottles with rib pattern and circles at bottom of neck. Transfer label with small white circles and one larger red one. Top is white with orange writing. Contains Dry Ginger.Enjoy Reeves’ ice cold on the front, Bottled by R.J Reeves Warrnambool. Preservative added artificially coloured. Net contents 7 FL. OZ. warrnambool, reeves, reeves soft drink, reeves cordial. -
 Learmonth and District Historical Society Inc.
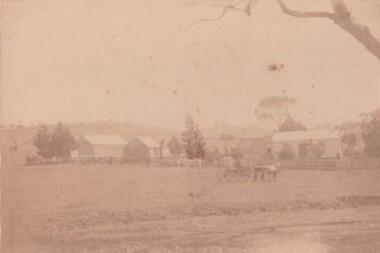
Photo, "Willow Vale" Waubra, Victoria, Late 19th Century or Early 20th Century
It show the farm "Willow Vale" Waubra that was once owned by the Christopher and Selina (nee Smith) Harrison family who once lived on this farm and whoes descendants continue to live in the same area today.A very pale sepia photo of the "Willow Vale" farm at Waubra, Victoria that was owned by Christopher and Selina (nee Smith) Harrison. It shows a horse and buggy, along with the main house/houses and out buildings with what look like it could be a slightly dry dam at the bottom of the photo.Nil -
 Flagstaff Hill Maritime Museum and Village
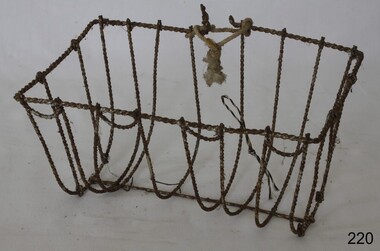
Domestic object - Soap holder, early 20th century
This wire soap holder is purpose-made by hand for holding a bar of soap in a way that allows the soap to air dry. It may have been used in the laundry, bathroom or kitchen, areas used for washing hands or bodies. Wet bars of soap could become very soft and difficult to use. The maker used short lengths of wire to create this soap holder, showing thriftiness and inventiveness.Although the soap holder is currently not associated with a historical event, person or place at this time it is being used to augment Flagstaff's village display as it is typical of items used in the 19th and early 20th centuries.Soap holder; basket shaped frame, handmade from twisted wire strands.flagstaff hill, warrnambool, shipwrecked coast, flagstaff hill maritime museum, maritime museum, shipwreck coast, flagstaff hill maritime village, great ocean road, soap h older, wire soap holder, cleaning, laundry, washing, sanitation -
 Flagstaff Hill Maritime Museum and Village
Domestic object - Bowl, Late 19th or early 20th Century
The Process of Making Pottery Decorating, Firing, Glazing, Making, Technical There is a rhythm and flow to clay. It can’t be done all at once! Even the making process! It can take weeks to get everything done, especially if you can only work on your pottery once a week! Even though we have three hour classes, it’s often just not enough time! Here is an overview of some of the processes so you have a bit more grasp on some of the technical stuff! Step One – Design There are SO many ideas out there for making stuff in clay! From delicate porcelain jewellery, through to heavy sculptural work and everything in between. Deciding your direction is sometimes not that easy – when you first start, try everything, you will naturally gravitate to the style that you enjoy! The options and variations are endless and can get a wee bit overwhelming too! Check in with me before you start to ensure your ideas will work, what order you might do things, how you could achieve the look you are seeking and any other technical data required! Step Two – Making Clay is thixotropic. This means that as you work with it, the clay first gets sloppier and wetter, before is begins to dry in the atmosphere. For most things, you simply can’t do all parts of the project at once. An example of work order might look like: Get last weeks work out from the shelves Prepare clay for today’s work – roll your clay, prepare balls for throwing, make the first stage of a pinch pot) Clean up last week’s work and put it on the shelf for bisque firing Check that you have any glazing to do – and do enough of it that you will have time to finish your main project Do the next step of your next project – there might be a further step that can’t be complete immediately, in that case, wrap your work well and put onto the shelves. Letting your work rest for a while can really help keep your work clean and professional looking. Many things require bagging under plastic to keep it ready for work the next week – put your name on the outside of the bag so you can find your work easily. We have stickers and markers. Consider how you want to decorate your work – coloured slip can be applied at a fairly wet stage (remembering that it will make your work even wetter!). Trying to apply slip to dry clay won’t work! If you want to do sgraffito – you will need to keep the work leather hard (a state of dryness where you can still work the clay with a little effort and a little water and care). Step Three – Drying Most of the time your work can go into the rack uncovered to let it dry out for the following week. If you want to continue forming or shaping you will need to double bag your work – put your work on a suitable sized bat and put the bat in a bag so the base of the bag is under the bat, then put another bag over the top of the work and tuck the top of the bag under the bat. If you want to trim (or turn) your thrown work the following week, it should also be double bagged. If your work is large, delicate, or of uneven thicknesses, you should lightly cover your work for drying. When considering the drying process, bare in mind the weather, humidity and wind! The hotter and dryer, the faster things dry and work can dry unevenly in the shelves – this can lead to cracking – another time to lightly cover your work for drying. Step Four – Trimming and Cleaning Up Your work is dry! It is called greenware now and it is at it’s most fragile! Handle everything with two hands. I often refer to soft hands – keep everything gentle and with your fingers spread as much as possible. Try to not pick up things like plates too much, and always with both hands! Before your work can be bisque fired it should be “cleaned up”. You work won’t go into the kiln if it has sharp edges – when glazed, sharp edges turn into razor blades! Use a piece of fly wire to rub the work all over – this will scratch a little so be light handed. Use a knife or metal kidney to scrape any areas that require a bit more dynamic treatment than the fly wire offers! Finally, a very light wipe over with a slightly damp sponge can help soften and soothe all of your edges and dags! Trimming thrown work: If you are planning to trim (or turn) your thrown work (and you should be), make sure you bag it well – your work should be leather hard to almost dry for easiest trimming. Use this step to finish the work completely – use a metal kidney to polish the surface, or a slightly damp sponge to give a freshly thrown look. Wipe the sponge around the rim after trimming, and check the inside of the pot for dags! Trimming slip cast work: Usually I will trim the rims of your work on the wheel the following day to make that stage easier, however you will still need to check your work for lumps and bumps. Last but not least – check that your name is still clearly on the bottom of your work. Step Five – Bisque Firing When the work is completely dry it can go into the bisque kiln. The bisque kiln is fired to 1000°C. This process burns off the water in the clay as well as some of the chemically bound water. The structure of the clay is not altered that much at this temperature. Inside the bisque kiln, the work is stacked a little, small bowl inside a larger bowl and onto a heavy plate. Smaller items like decorations or drink coasters might get stacked several high. Consideration is paid to the weight of the stack and shape of the work. A bisque kiln can fire about one and a half times the amount of work that the glaze kiln can fire. The firing takes about 10 hours to complete the cycle and about two days to cool down. Once it has been emptied the work is placed in the glaze room ready for you to decorate! Step Six – Glazing Decorating your work with colour can be a lot of fun – and time consuming! There are three main options for surface treatment at this stage: Oxide Washes Underglazes Glazes Washes and underglazes do not “glaze” the work – It will still need a layer of glaze to fully seal the clay (washes don’t need glaze on surfaces not designed for food or liquid as they can gloss up a little on their own). Underglazes are stable colourants that turn out pretty much how they look in the jar. They can be mixed with each other to form other colours and can be used like water colours to paint onto your work. Mostly they should have a clear glaze on top to seal them. Oxides are a different species – the pink oxide (cobalt) wash turns out bright blue for instance. They don’t always need a glaze on top, and some glazes can change the colour of the wash! The glazes need no other “glaze” on top! Be careful of unknown glaze interactions – you can put any combination of glaze in a bowl or on a plate, but only a single glaze on the outside of any vertical surface! Glazes are a chemical reaction under heat. We don’t know the exact chemicals in the Mayco glazes we use. I can guess by the way they interact with each other, however, on the whole, you need to test every idea you have, and not run the test on a vertical surface! Simply put, glaze is a layer of glass like substance that bonds with the clay underneath. Clay is made of silica, alumina and water. Glaze is made of mostly silica. Silica has a melting point of 1700°C and we fire to 1240°C. The silica requires a “flux” to help it melt at the lower temperature. Fluxes can be all sorts of chemicals – a common one is calcium – calcium has a melting point of 2500°C, however, together they both melt at a much lower temperature! Colourants are metal oxides like cobalt (blue), chrome (green through black), copper (green, blue, even red!), manganese (black, purple and pink) iron (red brown), etc. Different chemicals in the glaze can have dramatic effects. for example, barium carbonate (which we don’t use) turns manganese bright pink! Other elements can turn manganese dioxide brown, blue, purple and reddish brown. Manganese dioxide is a flux in and of itself as well. So, glazes that get their black and purple colours, often interact with other glazes and RUN! Our mirror black is a good example – it mixes really well with many glazes because it fluxes them – causes them to melt faster. It will also bring out many beautiful colours in the glazes because it’s black colouring most definitely comes from manganese dioxide! Glaze chemistry is a whole subject on it’s own! We use commercial Mayco glazes on purpose – for their huge range of colour possibilities, stability, cool interactions, artistic freedom with the ability to easily brush the glazes on and ease of use. We currently have almost 50 glazes on hand! A major project is to test the interactions of all glazes with each other. That is 2,500 test tiles!!!! I’m going to make the wall behind the wheels the feature wall of pretty colours! Step Seven – Glaze (Gloss or sometimes called “Glost”) Firing Most of the time this is the final stage of making your creation (but not always!) The glaze kiln goes to 1240°C. This is called cone 6, or midrange. It is the low end of stoneware temperatures. Stoneware clays and glazes are typically fired at cone 8 – 10, that is 1260 – 1290°C. The energy requirement to go from 1240°C to 1280°C is almost a 30% more! Our clay is formulated to vitrify (mature, turn “glass-like”) at 1240°, as are our glazes. A glaze kiln take around 12 hours to reach temperature and two to three days to cool down. Sometimes a third firing process is required – this is for decoration that is added to work after the glaze firing. For example – adding precious metals and lustres. this firing temperature is usually around 600 – 800°C depending upon the techniques being used. There are many students interested in gold and silver trims – we will be doing this third type of firing soon! After firing your work will be in the student finished work shelves. Remember to pay for it before you head out the door! There is a small extra charge for using porcelain clay (it’s more than twice the price of regular clay), and for any third firing process! Once your work has been fired it can not turn back into clay for millennia – so don’t fire it if you don’t like it! Put it in the bucket for recycling. https://firebirdstudios.com.au/the-process-of-making-pottery/ The bowl is an example of kitchenware used in the 19th century and still in use today.Bowl white ceramic. Crack on side. Badly stained.Backstamp very faint and unable to be read.flagstaff hill, warrnambool, shipwrecked-coast, flagstaff-hill, flagstaff-hill-maritime-museum, maritime-museum, shipwreck-coast, flagstaff-hill-maritime-village, mixing bowl, food preparation, kitchen equipment, ceramic -
 Flagstaff Hill Maritime Museum and Village
Domestic object - Bowl
The Process of Making Pottery Decorating, Firing, Glazing, Making, Technical There is a rhythm and flow to clay. It can’t be done all at once! Even the making process! It can take weeks to get everything done, especially if you can only work on your pottery once a week! Even though we have three hour classes, it’s often just not enough time! Here is an overview of some of the processes so you have a bit more grasp on some of the technical stuff! Step One – Design There are SO many ideas out there for making stuff in clay! From delicate porcelain jewellery, through to heavy sculptural work and everything in between. Deciding your direction is sometimes not that easy – when you first start, try everything, you will naturally gravitate to the style that you enjoy! The options and variations are endless and can get a wee bit overwhelming too! Check in with me before you start to ensure your ideas will work, what order you might do things, how you could achieve the look you are seeking and any other technical data required! Step Two – Making Clay is thixotropic. This means that as you work with it, the clay first gets sloppier and wetter, before is begins to dry in the atmosphere. For most things, you simply can’t do all parts of the project at once. An example of work order might look like: Get last weeks work out from the shelves Prepare clay for today’s work – roll your clay, prepare balls for throwing, make the first stage of a pinch pot) Clean up last week’s work and put it on the shelf for bisque firing Check that you have any glazing to do – and do enough of it that you will have time to finish your main project Do the next step of your next project – there might be a further step that can’t be complete immediately, in that case, wrap your work well and put onto the shelves. Letting your work rest for a while can really help keep your work clean and professional looking. Many things require bagging under plastic to keep it ready for work the next week – put your name on the outside of the bag so you can find your work easily. We have stickers and markers. Consider how you want to decorate your work – coloured slip can be applied at a fairly wet stage (remembering that it will make your work even wetter!). Trying to apply slip to dry clay won’t work! If you want to do sgraffito – you will need to keep the work leather hard (a state of dryness where you can still work the clay with a little effort and a little water and care). Step Three – Drying Most of the time your work can go into the rack uncovered to let it dry out for the following week. If you want to continue forming or shaping you will need to double bag your work – put your work on a suitable sized bat and put the bat in a bag so the base of the bag is under the bat, then put another bag over the top of the work and tuck the top of the bag under the bat. If you want to trim (or turn) your thrown work the following week, it should also be double bagged. If your work is large, delicate, or of uneven thicknesses, you should lightly cover your work for drying. When considering the drying process, bare in mind the weather, humidity and wind! The hotter and dryer, the faster things dry and work can dry unevenly in the shelves – this can lead to cracking – another time to lightly cover your work for drying. Step Four – Trimming and Cleaning Up Your work is dry! It is called greenware now and it is at it’s most fragile! Handle everything with two hands. I often refer to soft hands – keep everything gentle and with your fingers spread as much as possible. Try to not pick up things like plates too much, and always with both hands! Before your work can be bisque fired it should be “cleaned up”. You work won’t go into the kiln if it has sharp edges – when glazed, sharp edges turn into razor blades! Use a piece of fly wire to rub the work all over – this will scratch a little so be light handed. Use a knife or metal kidney to scrape any areas that require a bit more dynamic treatment than the fly wire offers! Finally, a very light wipe over with a slightly damp sponge can help soften and soothe all of your edges and dags! Trimming thrown work: If you are planning to trim (or turn) your thrown work (and you should be), make sure you bag it well – your work should be leather hard to almost dry for easiest trimming. Use this step to finish the work completely – use a metal kidney to polish the surface, or a slightly damp sponge to give a freshly thrown look. Wipe the sponge around the rim after trimming, and check the inside of the pot for dags! Trimming slip cast work: Usually I will trim the rims of your work on the wheel the following day to make that stage easier, however you will still need to check your work for lumps and bumps. Last but not least – check that your name is still clearly on the bottom of your work. Step Five – Bisque Firing When the work is completely dry it can go into the bisque kiln. The bisque kiln is fired to 1000°C. This process burns off the water in the clay as well as some of the chemically bound water. The structure of the clay is not altered that much at this temperature. Inside the bisque kiln, the work is stacked a little, small bowl inside a larger bowl and onto a heavy plate. Smaller items like decorations or drink coasters might get stacked several high. Consideration is paid to the weight of the stack and shape of the work. A bisque kiln can fire about one and a half times the amount of work that the glaze kiln can fire. The firing takes about 10 hours to complete the cycle and about two days to cool down. Once it has been emptied the work is placed in the glaze room ready for you to decorate! Step Six – Glazing Decorating your work with colour can be a lot of fun – and time consuming! There are three main options for surface treatment at this stage: Oxide Washes Underglazes Glazes Washes and underglazes do not “glaze” the work – It will still need a layer of glaze to fully seal the clay (washes don’t need glaze on surfaces not designed for food or liquid as they can gloss up a little on their own). Underglazes are stable colourants that turn out pretty much how they look in the jar. They can be mixed with each other to form other colours and can be used like water colours to paint onto your work. Mostly they should have a clear glaze on top to seal them. Oxides are a different species – the pink oxide (cobalt) wash turns out bright blue for instance. They don’t always need a glaze on top, and some glazes can change the colour of the wash! The glazes need no other “glaze” on top! Be careful of unknown glaze interactions – you can put any combination of glaze in a bowl or on a plate, but only a single glaze on the outside of any vertical surface! Glazes are a chemical reaction under heat. We don’t know the exact chemicals in the Mayco glazes we use. I can guess by the way they interact with each other, however, on the whole, you need to test every idea you have, and not run the test on a vertical surface! Simply put, glaze is a layer of glass like substance that bonds with the clay underneath. Clay is made of silica, alumina and water. Glaze is made of mostly silica. Silica has a melting point of 1700°C and we fire to 1240°C. The silica requires a “flux” to help it melt at the lower temperature. Fluxes can be all sorts of chemicals – a common one is calcium – calcium has a melting point of 2500°C, however, together they both melt at a much lower temperature! Colourants are metal oxides like cobalt (blue), chrome (green through black), copper (green, blue, even red!), manganese (black, purple and pink) iron (red brown), etc. Different chemicals in the glaze can have dramatic effects. for example, barium carbonate (which we don’t use) turns manganese bright pink! Other elements can turn manganese dioxide brown, blue, purple and reddish brown. Manganese dioxide is a flux in and of itself as well. So, glazes that get their black and purple colours, often interact with other glazes and RUN! Our mirror black is a good example – it mixes really well with many glazes because it fluxes them – causes them to melt faster. It will also bring out many beautiful colours in the glazes because it’s black colouring most definitely comes from manganese dioxide! Glaze chemistry is a whole subject on it’s own! We use commercial Mayco glazes on purpose – for their huge range of colour possibilities, stability, cool interactions, artistic freedom with the ability to easily brush the glazes on and ease of use. We currently have almost 50 glazes on hand! A major project is to test the interactions of all glazes with each other. That is 2,500 test tiles!!!! I’m going to make the wall behind the wheels the feature wall of pretty colours! Step Seven – Glaze (Gloss or sometimes called “Glost”) Firing Most of the time this is the final stage of making your creation (but not always!) The glaze kiln goes to 1240°C. This is called cone 6, or midrange. It is the low end of stoneware temperatures. Stoneware clays and glazes are typically fired at cone 8 – 10, that is 1260 – 1290°C. The energy requirement to go from 1240°C to 1280°C is almost a 30% more! Our clay is formulated to vitrify (mature, turn “glass-like”) at 1240°, as are our glazes. A glaze kiln take around 12 hours to reach temperature and two to three days to cool down. Sometimes a third firing process is required – this is for decoration that is added to work after the glaze firing. For example – adding precious metals and lustres. this firing temperature is usually around 600 – 800°C depending upon the techniques being used. There are many students interested in gold and silver trims – we will be doing this third type of firing soon! After firing your work will be in the student finished work shelves. Remember to pay for it before you head out the door! There is a small extra charge for using porcelain clay (it’s more than twice the price of regular clay), and for any third firing process! Once your work has been fired it can not turn back into clay for millennia – so don’t fire it if you don’t like it! Put it in the bucket for recycling. https://firebirdstudios.com.au/the-process-of-making-pottery/ This bowl is an example of kitchenware used in the 19th century and still in use today.Bowl white ceramic plain that has two sets of edging around lip. Inside bowl has plaster designed to look like cooking mixture.flagstaff hill, warrnambool, shipwrecked-coast, flagstaff-hill, flagstaff-hill-maritime-museum, maritime-museum, shipwreck-coast, flagstaff-hill-maritime-village, kitchen equipment, ceramic -
 Flagstaff Hill Maritime Museum and Village
Domestic object - Bowl, J & G Meakin, Late 19th or early 20th Century
The Process of Making Pottery Decorating, Firing, Glazing, Making, Technical There is a rhythm and flow to clay. It can’t be done all at once! Even the making process! It can take weeks to get everything done, especially if you can only work on your pottery once a week! Even though we have three hour classes, it’s often just not enough time! Here is an overview of some of the processes so you have a bit more grasp on some of the technical stuff! Step One – Design There are SO many ideas out there for making stuff in clay! From delicate porcelain jewellery, through to heavy sculptural work and everything in between. Deciding your direction is sometimes not that easy – when you first start, try everything, you will naturally gravitate to the style that you enjoy! The options and variations are endless and can get a wee bit overwhelming too! Check in with me before you start to ensure your ideas will work, what order you might do things, how you could achieve the look you are seeking and any other technical data required! Step Two – Making Clay is thixotropic. This means that as you work with it, the clay first gets sloppier and wetter, before is begins to dry in the atmosphere. For most things, you simply can’t do all parts of the project at once. An example of work order might look like: Get last weeks work out from the shelves Prepare clay for today’s work – roll your clay, prepare balls for throwing, make the first stage of a pinch pot) Clean up last week’s work and put it on the shelf for bisque firing Check that you have any glazing to do – and do enough of it that you will have time to finish your main project Do the next step of your next project – there might be a further step that can’t be complete immediately, in that case, wrap your work well and put onto the shelves. Letting your work rest for a while can really help keep your work clean and professional looking. Many things require bagging under plastic to keep it ready for work the next week – put your name on the outside of the bag so you can find your work easily. We have stickers and markers. Consider how you want to decorate your work – coloured slip can be applied at a fairly wet stage (remembering that it will make your work even wetter!). Trying to apply slip to dry clay won’t work! If you want to do sgraffito – you will need to keep the work leather hard (a state of dryness where you can still work the clay with a little effort and a little water and care). Step Three – Drying Most of the time your work can go into the rack uncovered to let it dry out for the following week. If you want to continue forming or shaping you will need to double bag your work – put your work on a suitable sized bat and put the bat in a bag so the base of the bag is under the bat, then put another bag over the top of the work and tuck the top of the bag under the bat. If you want to trim (or turn) your thrown work the following week, it should also be double bagged. If your work is large, delicate, or of uneven thicknesses, you should lightly cover your work for drying. When considering the drying process, bare in mind the weather, humidity and wind! The hotter and dryer, the faster things dry and work can dry unevenly in the shelves – this can lead to cracking – another time to lightly cover your work for drying. Step Four – Trimming and Cleaning Up Your work is dry! It is called greenware now and it is at it’s most fragile! Handle everything with two hands. I often refer to soft hands – keep everything gentle and with your fingers spread as much as possible. Try to not pick up things like plates too much, and always with both hands! Before your work can be bisque fired it should be “cleaned up”. You work won’t go into the kiln if it has sharp edges – when glazed, sharp edges turn into razor blades! Use a piece of fly wire to rub the work all over – this will scratch a little so be light handed. Use a knife or metal kidney to scrape any areas that require a bit more dynamic treatment than the fly wire offers! Finally, a very light wipe over with a slightly damp sponge can help soften and soothe all of your edges and dags! Trimming thrown work: If you are planning to trim (or turn) your thrown work (and you should be), make sure you bag it well – your work should be leather hard to almost dry for easiest trimming. Use this step to finish the work completely – use a metal kidney to polish the surface, or a slightly damp sponge to give a freshly thrown look. Wipe the sponge around the rim after trimming, and check the inside of the pot for dags! Trimming slip cast work: Usually I will trim the rims of your work on the wheel the following day to make that stage easier, however you will still need to check your work for lumps and bumps. Last but not least – check that your name is still clearly on the bottom of your work. Step Five – Bisque Firing When the work is completely dry it can go into the bisque kiln. The bisque kiln is fired to 1000°C. This process burns off the water in the clay as well as some of the chemically bound water. The structure of the clay is not altered that much at this temperature. Inside the bisque kiln, the work is stacked a little, small bowl inside a larger bowl and onto a heavy plate. Smaller items like decorations or drink coasters might get stacked several high. Consideration is paid to the weight of the stack and shape of the work. A bisque kiln can fire about one and a half times the amount of work that the glaze kiln can fire. The firing takes about 10 hours to complete the cycle and about two days to cool down. Once it has been emptied the work is placed in the glaze room ready for you to decorate! Step Six – Glazing Decorating your work with colour can be a lot of fun – and time consuming! There are three main options for surface treatment at this stage: Oxide Washes Underglazes Glazes Washes and underglazes do not “glaze” the work – It will still need a layer of glaze to fully seal the clay (washes don’t need glaze on surfaces not designed for food or liquid as they can gloss up a little on their own). Underglazes are stable colourants that turn out pretty much how they look in the jar. They can be mixed with each other to form other colours and can be used like water colours to paint onto your work. Mostly they should have a clear glaze on top to seal them. Oxides are a different species – the pink oxide (cobalt) wash turns out bright blue for instance. They don’t always need a glaze on top, and some glazes can change the colour of the wash! The glazes need no other “glaze” on top! Be careful of unknown glaze interactions – you can put any combination of glaze in a bowl or on a plate, but only a single glaze on the outside of any vertical surface! Glazes are a chemical reaction under heat. We don’t know the exact chemicals in the Mayco glazes we use. I can guess by the way they interact with each other, however, on the whole, you need to test every idea you have, and not run the test on a vertical surface! Simply put, glaze is a layer of glass like substance that bonds with the clay underneath. Clay is made of silica, alumina and water. Glaze is made of mostly silica. Silica has a melting point of 1700°C and we fire to 1240°C. The silica requires a “flux” to help it melt at the lower temperature. Fluxes can be all sorts of chemicals – a common one is calcium – calcium has a melting point of 2500°C, however, together they both melt at a much lower temperature! Colourants are metal oxides like cobalt (blue), chrome (green through black), copper (green, blue, even red!), manganese (black, purple and pink) iron (red brown), etc. Different chemicals in the glaze can have dramatic effects. for example, barium carbonate (which we don’t use) turns manganese bright pink! Other elements can turn manganese dioxide brown, blue, purple and reddish brown. Manganese dioxide is a flux in and of itself as well. So, glazes that get their black and purple colours, often interact with other glazes and RUN! Our mirror black is a good example – it mixes really well with many glazes because it fluxes them – causes them to melt faster. It will also bring out many beautiful colours in the glazes because it’s black colouring most definitely comes from manganese dioxide! Glaze chemistry is a whole subject on it’s own! We use commercial Mayco glazes on purpose – for their huge range of colour possibilities, stability, cool interactions, artistic freedom with the ability to easily brush the glazes on and ease of use. We currently have almost 50 glazes on hand! A major project is to test the interactions of all glazes with each other. That is 2,500 test tiles!!!! I’m going to make the wall behind the wheels the feature wall of pretty colours! Step Seven – Glaze (Gloss or sometimes called “Glost”) Firing Most of the time this is the final stage of making your creation (but not always!) The glaze kiln goes to 1240°C. This is called cone 6, or midrange. It is the low end of stoneware temperatures. Stoneware clays and glazes are typically fired at cone 8 – 10, that is 1260 – 1290°C. The energy requirement to go from 1240°C to 1280°C is almost a 30% more! Our clay is formulated to vitrify (mature, turn “glass-like”) at 1240°, as are our glazes. A glaze kiln take around 12 hours to reach temperature and two to three days to cool down. Sometimes a third firing process is required – this is for decoration that is added to work after the glaze firing. For example – adding precious metals and lustres. this firing temperature is usually around 600 – 800°C depending upon the techniques being used. There are many students interested in gold and silver trims – we will be doing this third type of firing soon! After firing your work will be in the student finished work shelves. Remember to pay for it before you head out the door! There is a small extra charge for using porcelain clay (it’s more than twice the price of regular clay), and for any third firing process! Once your work has been fired it can not turn back into clay for millennia – so don’t fire it if you don’t like it! Put it in the bucket for recycling. https://firebirdstudios.com.au/the-process-of-making-pottery/This bowl was made by renowned pottery company J & G Meakin of England. The firm was established in the mid-1800's. The bowl is an example of kitchenware used in the 19th century and still in use today.Bowl; white ceramic, round and tapering inwards towards base. Made by J and G Meakin England.On base, 'Ironstone China Reg SOL 391413' with symbolflagstaff hill, flagstaff hill maritime museum and village, warrnambool, maritime museum, maritime village, great ocean road, shipwreck coast, mixing bowl, food preparation, j & g meakin, pottery, stoke-on-trent, kitchen equipment, ceramic -
 Flagstaff Hill Maritime Museum and Village
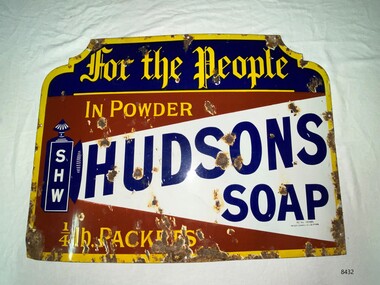
Sign - Hudson's Soap Enamel Advertising Sign, Patent Enamel Co Ltd, c. late 19th century- early 20th century
... , and a large printing room, plus a huge area for steampipe drying..., and a large printing room, plus a huge area for steampipe drying ...Hudson's Soap Powder, was the first satisfactory and commercially successful soap powder and was made in Liverpool by Robert Spear Hudson. He was also an innovator in using advertising, commissioning striking images from professional artists and paid for publicity , something which few other businesses did, and as such Hudson's soap became a household name. Horse, steam and electric tramcars, print periodicals and chemist shops carried his advertisements. This sign was manufactured by Patent Enamel Co Ltd was a company built in 1889 at Selly Oak, Borough of Birmingham, West Midlands, England, United Kingdom. The business was the first factory specifically devoted to enameled iron sign making. It had twelve furnaces for fusing the enamel, two scaling furnaces, and a large printing room, plus a huge area for steampipe drying. The company also smelted its own enamels and colour oxides. It is believed that the factory was decommissioned and demolished in the 1960's.the first factory specifically devoted to enameled iron sign making. It had twelve furnaces for fusing the enamel, two scaling furnaces, and a large printing room, plus a huge area for steampipe drying. The company also smelted its own enamels and colour oxides.The factory was decommissioned and demolished in the 1960s.The signage demonstrates the increasing demand for domestic soap products and new forms of advertising. The soap business was apart of the flourishing export trade between Australia and Britain during the height of the British Empire.Enamel advertising sign for Hudson's soapflagstaff hill, warrnambool, maritime museum, hudson's soap, advertising signage, patent enamel co ltd, selly oak, borough of birmingham, robert spear hudson -
 Flagstaff Hill Maritime Museum and Village
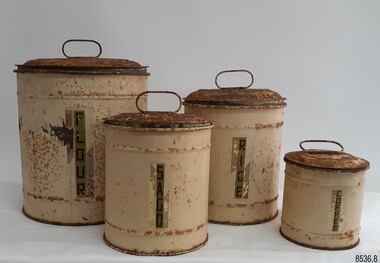
Container - Kitchen Canister set, Late 19th to early 20th century
This set of kitchen dry food canisters is made of metal; each container has a different height, width and capacity. The rolled thin metal has created a strong, round design with decorative rings on the circumference. The base and close-fitting lid protect the contents from vermin and most insects, and the handle on top aids in the removal of the lid. Metal containers like these are reusable and can be re-purposed, which is advantageous when living in regional or rural areas. The type of manufacture indicates that the set was made in the late 19th to early 20th century. Gradually, colourful and attractive plastic kitchenware began to replace metalware. One of the canisters is labelled 'coffee'; coffee plants and seeds were transported from Brazil into Australia in 1788 when the First Fleet arrived although their growth was unsuccessful. However, by the 1920s, a tenth of the Australian population was drinking readily stored coffee. Large quantities of harvested grains such as maize, wheat and barley were protected from pests by being stored in airy buildings, often raised from the ground. This was an age-old practice used by civilizations such as the ancient Egyptians and early Hebrews. Smaller quantities of food for short-term use in the homes were stored in woven baskets or clay pots.This set of kitchen food containers is an example of colonial food storage used in a domestic setting to store and preserve dry ingredients. These canisters give a snapshot of early domestic life in Australia. Canister set; four cylindrical cream coloured metal canisters with domed lids that have lift-up handles on top. They are made from rolled metal and the bases and lids have a side seam. Each canister is a different size and displays a label for different contents. The adhesive labels are vertical, and a gold colour with black vertical text. The cream paint has brush strokes and small areas have exposed green paint under the cream. The insides of the bases are painted dark grey but the lids have no paint underneath. The empty canisters can fit one inside the other. Labels, in descending order: "FLOUR" "RICE" "SAGO" "COFFEE"flagstaff hill, flagstaff hill maritime museum and village, warrnambool, maritime museum, maritime village, great ocean road, shipwreck coast, canister set, kitchen storage, food storage, metal canisters, dry food storage, food packaging, kitchen container, vintage, flour, rice, sago, coffee, kitchenalia, late 19th to early 20th centuries, nesting canisters -
 Federation University Historical Collection
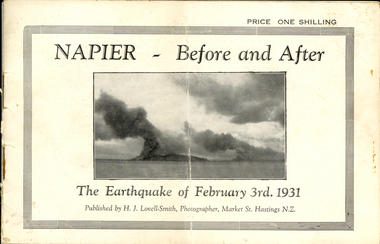
Booklet, Nelson Stedman, Napier Before and After the Earthquake of February 3rd 1931, c1931
The earthquake at Napier, also known as the Hawke's Bay Earthquake, took place on 03 February 1931 at about 10.45 am. There was no warning before the ground started to heave and roll in waves. It was not possible to stand without support, and the violent motion caused stone and brick buildings to collapse into the streets causing death and injury to hundreds who were going about there daily business. Fires started almost immediately, and with the water mains shattered, the fire fighters were powerless to stop or prevent the spread of the flames. Within twelve hours the greater part of the business area of Napier and its port was totally destroyed. As a result of the pressure which caused the upheaval, the levels of the town and the surrounding district have been altered. The town and the harbour were raised from five to seven feet, and many parts of the inner harbour became dry land. Small booklet of 18 pages with photographic comparisons of New Zealand's Napier region before and after the 1931 earthquake.napier, new zealand, earthquake, lovell-smith, stedman, boston, port ahururu, westshore, clive square, hawke's bay -
 Federation University Historical Collection
Programme, The Opening of Civic Hall, 1956, 1956
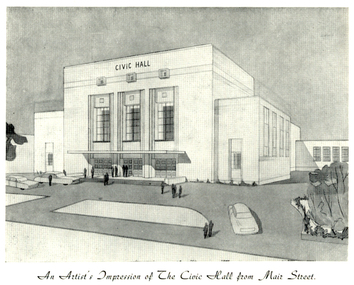
The City of Ballarat unanimously resolved to erect a Civic Hall in Mair Street in 1951. The architects, Gordon Murphy, of Melbourne, and H.L. and L.J. Coburn, of Ballarat, were commissioned in 1952. The Council constructed the foundations and footings for the building under the supervision of the former City engineer, Mr L.H. Finch, in 1953. These footings are of massed concrete. The design for the building took advantage of the cross fall of the land, providing for the Small Hall to be entered from the Doveton Street frontage through a foyer under the Main Stage, the structure is steel with brick panels, with accommodation for 1,592 persons in the Main Hall and 440 persons in the Lower Hall. The front facade faces Mair Street, set back from the building line to provide for the entrance drive-ways and kerbed gardens. Tenders were invited on a firm price basis. A young Ballarat master Builter, Walter Benbow Trahar was the successful tenderer, the contract price being 139,841 pounds. the work was commenced in 1953 and has proceeded in spite of material and labour difficulties until its completion. The following statistics are of interest:- * The foundations contained 200 cubic yards of concrete. * The constructional steel work weighs approximately 270 tons. * The reinforcing steel 47 tons. * Reinforced concrete in the structure, 1,100 cubic yards. * The approximate number of bricks in the building, 580,000. * The flooring is of selected kiln-dried hard wood and totals 40,000 lineal feet. * The dimensions of the Main Auditorium, 100ft by 86 ft, including the side promenades each 82ft by 13ft. *The Main stage, of reinforced concret with parquette finish measures 62 ft by 40ft. *The floor area of the Lower Hall is 74 ft by 38 ft, and has a stage dimensions of 40ft by 20 ft. * Each hall has independent heating and ventillating systems. Where possible the material in the building was furnished from local business houses. The public address installation, which provided for additional microphones, is on the main Stage. There is inter-communication throughout the building connecting the front office, with the bioscope box, the stages in both the large and lower halls, and the Hallkeeper's residence. Local craftsmen have completed the painting, plaster work, and the electrical installation; local produced materials being used in the construction of the buildings with the exception of the timber for the Main Floor, the roofing and the structural steel. The City of Ballarat Councillors in 1956 were Councillors N. T. Callow, F.J. Cutts, K.C. Webb, W.E. Roff, O.W. Curnow, F.T. Woodward, Allan C. Pittard, A.W. Nicholson, J.A. Chisholm, G.L. Scott, F.W. Oliver, A.D. Mason. The Town clerk was H.R. Maddern and the City Engineer was G. Murrowood. A City of Ballarat Council meeting of 25 September 2013 voted to demolish the Ballarat Civic Hall. The Council heard from nearly 50 members of the public during a marathon six-hour meeting. Councilors John Birt, Des Hudson, Amy Johnson, Josh Morris, Peter Innes, John Philips supported the motion to demolish Civic Hall. Councillors Samantha McIntosh, Vicki Coltman and Belinda Coates voted against the motion.Six page souvenir Program of citizens' entertainment on the occasion of the Opening of Ballarat Civic Hall on in August 1956. The front cover features the City of Ballarat Coat of Arms. The programme starts with a message from the Mayor, Cr Neil T. Carrow. It includes the Concert Programme directed by James H. Davey, an asrtist's impression of the Civic Hall from Mair Street, and information relative to the New Civic Hall. The programme features images of the City of Ballarat Coat of Arms, Cr N.T. Callow, , James H, Davey, and an artist's impression of the Ballarat Civic Hall. Mayor Neil Callow's Message: "To-day, our citizens witness the fulfilment of the most extensive Municipal undertaking in the City's period of recent prosperity and development. Their Hall now fills a requirement of which they have been deprived since the Coliseum building was destroyed by fire over 20 years ago. The building has been designed as an all purpose structure and I am hopeful the citizens will use it and enjoy it to its fullest extent. Your Council and its Architects have planned as broadly as possible for the benefit of all to-day and for years to come. We are proud of the work executed by a Ballaarat Master Builder whose work is a monument to the City's craftsmen. I feel I should also remind this assembly that the women of Ballaarat, back in 1951, provided funds which have been applied in the purchase of a Grand Piano and two Upright Pianos which are now installed in this building. The sincere hope of myself and your Councillors is that this Hall and its amenities will prove of immense value to the development of the cultural and artistic tastes of this community and that it will be freely used for these and many other purposes. From now on this magnificent building and its furnishings and equipment will be available to all. I strongly exhort you to use and protect it. My hope is that the citizens will, for many years to come, enjoy the amenities which it has to offer. ballarat civic hall, civic hall, architecture, finch, art deco, city of ballarat, coat of arms, city of ballarat coat of arms, callow, shugg, lemke, oates, gullan, tuuri, john, robertson, sorrell, antonio, gordon murphy, walter benbow trahar, trahar, coburn, h.l. coburn, l.j. coburn, n.t. callow -
 Flagstaff Hill Maritime Museum and Village
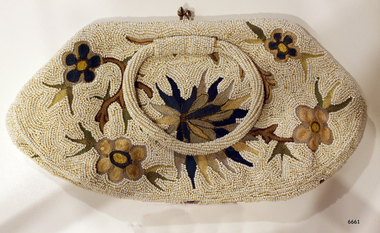
Accessory - Bag, 1930's
In the words of Donor, Betty Stone, "Owned by my aunt Mrs Elsie Mary (nee Dale) Towers, born 24 December 1895, daughter of Ellis and Ann Dale, of Latrigg, Wangoom, Warrnambool. This beaded bag was a personal gift from Miss Lake to Elsie Dale sometime in the early 1930s. Miss Lake was a member of a leading Warrnambool family whose property Lyndoch was situated by the banks of the Hopkins River. After completing her nursing course at Warrnambool Hospital and working there for a time, Elsie Dale was appointed Sister-in-Charge of the newly formed Baby Health Centre, which initially operated in temporary accommodation at or near the Council Chambers. In 1928 the Centre moved into new brick premises on Liebig Street. The building comprised of five rooms, a back yard and a front veranda where mothers parked their prams. The Warrnambool Standard reported in February 1928. The purpose of the Clinic is to the saving of infant's life. Many mothers attended the Clinic in the former location. They were able to acquire valuable knowledge from Sister Dale who is in charge of the Clinic and also have their infants weighed and measured each week. During the early days of the Centre Miss Lake, as a patron, took a keen interest in all aspects of the Centre and co-operated very closely with Sister Dale. Miss Lake would often call in at the centre while her uniformed chauffeur would wait beside her limousine parked in the street outside the Baby Heath Centre. I also recall my aunt driving to Lyndoch to discuss matters concerning the Centre with Miss Lake. Miss Lake purchased this evening bag in England, and upon her return from her overseas tour in the early 1930s, presented it to Sister Dale as a token of appreciation. Dedicated to her vocation, Sister Dale gave unstintingly of her effort, time and resources to create an attractive venue for mothers to visit. Her contribution to the welfare of all mothers and babies in the Warrnambool area, particularly during the Depression years, was considerable. Sister Dale, who drove a Dodge Tourer car, visited mothers in their homes when necessary and regularly visited the indigenous settlement at Framlingham. Amongst my early childhood memories are those of accompanying my aunt when she drove to the Nestles factory at Dennington to purchase large tins of dried milk baby food which she then delivered to the mothers who lived at the Framlingham settlement. Sister Elsie Dale retired in 1949 and moved to Mooroopna after her marriage to Solomon Towers. (Died aged 75 years 27 July 1971) (Note: For additional information please refer to Betty Stone’s book “Pioneers and Places - A History of three Warrnambool Pioneering Families” ie. Chamberlain, Dale and Lees Families)This item is associated with the families of Chamberlain, Dale and Lees. These families are listed in the "Pioneers' Register" for Warrnambool Township and the Shire, 1835-1900, published by A.I.G.S. Warrnambool Branch. Elsie Dale was the first Sister to work in the newly established Baby Health Centre in Warrnambool.Beaded evening bag or clutch purse. The bag was a gift to Elsie Dale from friend Miss Lake, purchased in England early 1930's. The fabric is covered in tiny white beads and features a floral design in browns and greens. The bag has two bead-covered handles and the lining includes a small pocket. Part of the 'Chamberlain Dale Lees Collection'.flagstaff hill, warrnambool, shipwrecked coast, flagstaff hill maritime museum, maritime museum, shipwreck coast, flagstaff hill maritime village, great ocean road, chamberlain, dale, lees, stone, betty stone, warrnambool pioneers, elsie dale, miss lake, lyndoch, handbag, purse, evening bag, beaded handbag, beaded purse, ladies' accessory, clutch purse, warrnambool baby health centre, infant welfare centre -
 Federation University Historical Collection
Document, Retirement of Alan Sonsee, 1976, 08/1976
Born in 1911, Cecil Alan Sonsee lived at Springmount near Creswick, and taught natural history at the Ballarat Teachers' College for 30 years. His teaching career stretched over a 48 year period. He spent six years as a student teacher before reaching the position of first class teacher. He had the distinction of never attending a teachers' college, but spending half his teaching career training students to become teachers. At the time of his retirement Mr Sonsee said during his years at the college, "the training had changed from a one year course to a two year course, followed by a three year course, and now a four year course was offered." He recalled "in the early days all country schools had eight grades and a child finished with a merit certificate. Today [1976], children went to high schools from sixth grade and most of the country schools had disappeared.' Alan Sonsee spent 10 years on a television program on BTV6 answering questions sent by viewers regarding aspects of plant and animal live. Mr Sonsee was a life member of both Creswick and Ballarat Field naturalists Clubs. Alan Sonsee died in 1985.1) Foolscap Department of Victoria Ballarat newsletter titled Education 'Regional Views'. The newsletter depicts an image of Alan Sonsee and outlines his career at the time of his retirement on 20 July 1976. The author of the newsletter is unknown. .2) newspaper article on the retirement of Alan Sonsee dated 25 August 1976 (probably from the Ballarat Courier).1) Mr "Nature Man" Retires After a quiet celebration, Mr C.A. Sonsee, a well-known staff member at Ballarat State College, retired from the Victorian Education Department on 20th July, 1976. Alan was the longest serving primary teacher seconded to the State College (Formerly the Ballarat teachers' College), probably the best known and certainly one of the most highly respected educationalists in this region. Leaving Ballarat high School in 1927, he spent the following years teaching at Smeaton, Willowvale, Lawrence (originally called Jerusalem) and Kooroocheang primary schools. However, during the last twenty-nine years, his fame and his influence spread further and further afield. From 1947 to 1976, under a number of principals, Alan endeared himself to thousands of students undergoing their tertiary preparation for teaching. And thousands is the word! Hundreds and hundreds of practising teachers of all ages came to this great teacher again and again for assistance in understanding natural phenomena, a broad field in which he is an acknowledged expert. What undoubtedly made him so accessible to the young and the no-so-young alike was his ready willingness to share with them is rich experience. The warmth of his nature, his kindliness, his dry humour enriched and enlivened the gifts he lavished liberally on all who needed help. Nor did he spare himself in the process. During his ling period of service to teachers, students and some two generations or so of school children, Field Naturalists also, within and well beyond Ballarat, profited from his participation and guidance. A car trip from Ballarat to Lancefield was made unforgettable by Alan's running and lively commentary; the time spent with him viewing and fossicking in an aboriginal flint area is still vivid, thouhg many moons have waxed and waned since then. And who can ever forget his palcid, home;y handling of "Mr nature Man" programmes on BTV 6 for over ten years? his name became a hose-hold word over an existence viewing area in Western Victoria - as his mail bag showed. Mr T. Turner was closely associated with C.A.S. for some twenty-three years as colleague and college principal. Recently tome said, "Alan was highly esteemed by staff and students, When I saw him lecturing I would be struck by the depth and breadth of his knowledge, and by the smooth, almost deceptively simple way he shared what he knew with others. I remember, too, his consideration for the views and the feelings of others; for the tolerance and range of his understanding of human nature. But, above all else, I remember him as a friend." All who know him in any way at all will want to say, "Thanks you, Alan, for everything you did for us. Thank you, Alan for what you are."alan sonsee, ballarat teachers' college, ballarat state college, education, teaching, ballarat field naturalists, creswick field naturalists, aborigines, lancefield flint, smeaton primary school, willowvale primary school, lawrence primary school, jerusalum primary school, kooroocheang primary school, nature studies, mr nature man -
 Federation University Historical Collection
Document - Reports, Martin Westbrooke, Nanya Station
Nanya Station, owned and managed by the University of Ballarat (now Federation University Australia), was purchased with assistance from the Department of Environment and Heritage Government Caring for our Country program. Nanya Station is located in the Scotia country, west of the Darling Ana-Branch in far western New South Wales and consists of the Nanya Western Lands Pastoral Lease 3281 – Perpetual Leasehold Lot 1244 in Deposited Plan 762778, Parish of Winnebaga, County of Tara and part of Lot 1242 County of Windeyer. Nanya is within the tribal area of the Danggali Aboriginal people, a sub-group of the Barkindji. Many Aboriginal sites have been recorded adjacent to major rivers in the region providing evidence that these areas supported a large population. The Scotia region has one of the shortest stock grazing histories of western NSW. Along with five other Scotia properties, Nanya was created as a pastoral lease in 1927. The first European settlement on the land followed exploration of the area by Sturt and Eyre. In 1854, the Lake Victoria lease which encompassed this area comprised 465,000ha.included Scotia blocks 1, 2, 3 and 4, Amoskeag and Winnebaga which formed the area known as the Scotia. It was described as a region of thick mallee scrub, interspersed with bluebush flats and Belah woodland. In the 1920s artesian water was found and the dry Scotia country was surveyed and divided into six Homestead leases allocated by ballot (Withers 1989). All properties were approximately 30,000ha, with a recommended stocking level of 3,000 sheep. Winnebaga (renamed Nanya) was taken up by Gordon Cumming. He initially dug a dam near the southeast corner of the property. A larger ground tank and rudimentary dwelling at the site of the present complex was later established. An adjacent area was cleared and cropped to provide feed for the horses used in digging the earth tanks. The ruins of the original building are located between the shearing shed and Homestead Tank. A cottage was built in the 1930s and a more substantial Red Gum framed homestead in the early 1950s. The lease was held by Mr Gordon Cumming until 1984 when it was purchased by Mr Norm Scadding as an extension to the adjacent lease, Belvedere. It was sold in 1995 to Mr Rob Taylor of Waikerie then in 1999 to BeMax Pty. Ltd., a sand mining company. These last three owners all permitted use of the property by the University for teaching and research. The Centre for Environmental Management at the University of Ballarat had been involved in studies of flora and fauna in western New South Wales since 1988. Studies became concentrated on the Scotia region with its variety of intact ecosystems due to a short pastoral history. Of particular significance is a system of natural salt lakes of which the most extensive is the Scotia Discharge Complex located on Nanya Station. An extensive vegetation survey of the Scotia region Westbrooke et al. 1998) highlighted the significance of the area both in terms of the range of communities in relatively intact condition and the occurrence of species and communities of restricted distribution. Nearly 400 species were recorded of which nine had either not previously been recorded or have restricted distribution in western NSW. Twenty-two plant communities occur on Nanya Station of which two, Halosarcia lylei low open shrubland and Hemichroa diandra/Halosarcia/Frankenia low open shrubland, are dominated by species not previously recorded from NSW. H. lylei and Acacia loderi shrublands are listed as endangered under the NSW Threatened Species Conservation Act. As noted, the area has a relatively short grazing history and, due to the presence of large areas of mallee with a Triodia understorey and restricted water supplies, stocking rates have been low. The diversity of ecosystems in relatively intact condition and extensive areas of old growth mallee made Nanya a highly significant refuge for biological diversity. This factors led to the purchase of Nanya Station by the University of Ballarat in 2004 with the assistance of the Department of Environment and Heritage for the purposes of conservation, research and education. In 2010 the southern paddocks of Nagaella Station (10,000ha.) which lie along the northern boundary, were purchased with the assistance of Lower Murray Darling Catchment Management Authority and added to the Nanya lease to provide complete protection for the communities of the Nanya Discharge Complex and further high quality Malleefowl habitat. Four digital reports documents relating to Federation University's Nanya Station, Western New South Walesnanya station, scotia country, pastoral lease, winnebaga county, darling ana-branch, martin westbrooke, environmental education, nagaella station, lower murray darling catchment management authority, conservation research education, ian gribble, pat prevett, ian henderson, danggali -
 Flagstaff Hill Maritime Museum and Village
Domestic object - Plate
The Process of Making Pottery Decorating, Firing, Glazing, Making, Technical There is a rhythm and flow to clay. It can’t be done all at once! Even the making process! It can take weeks to get everything done, especially if you can only work on your pottery once a week! Even though we have three hour classes, it’s often just not enough time! Here is an overview of some of the processes so you have a bit more grasp on some of the technical stuff! Step One – Design There are SO many ideas out there for making stuff in clay! From delicate porcelain jewellery, through to heavy sculptural work and everything in between. Deciding your direction is sometimes not that easy – when you first start, try everything, you will naturally gravitate to the style that you enjoy! The options and variations are endless and can get a wee bit overwhelming too! Check in with me before you start to ensure your ideas will work, what order you might do things, how you could achieve the look you are seeking and any other technical data required! Step Two – Making Clay is thixotropic. This means that as you work with it, the clay first gets sloppier and wetter, before is begins to dry in the atmosphere. For most things, you simply can’t do all parts of the project at once. An example of work order might look like: Get last weeks work out from the shelves Prepare clay for today’s work – roll your clay, prepare balls for throwing, make the first stage of a pinch pot) Clean up last week’s work and put it on the shelf for bisque firing Check that you have any glazing to do – and do enough of it that you will have time to finish your main project Do the next step of your next project – there might be a further step that can’t be complete immediately, in that case, wrap your work well and put onto the shelves. Letting your work rest for a while can really help keep your work clean and professional looking. Many things require bagging under plastic to keep it ready for work the next week – put your name on the outside of the bag so you can find your work easily. We have stickers and markers. Consider how you want to decorate your work – coloured slip can be applied at a fairly wet stage (remembering that it will make your work even wetter!). Trying to apply slip to dry clay won’t work! If you want to do sgraffito – you will need to keep the work leather hard (a state of dryness where you can still work the clay with a little effort and a little water and care). Step Three – Drying Most of the time your work can go into the rack uncovered to let it dry out for the following week. If you want to continue forming or shaping you will need to double bag your work – put your work on a suitable sized bat and put the bat in a bag so the base of the bag is under the bat, then put another bag over the top of the work and tuck the top of the bag under the bat. If you want to trim (or turn) your thrown work the following week, it should also be double bagged. If your work is large, delicate, or of uneven thicknesses, you should lightly cover your work for drying. When considering the drying process, bare in mind the weather, humidity and wind! The hotter and dryer, the faster things dry and work can dry unevenly in the shelves – this can lead to cracking – another time to lightly cover your work for drying. Step Four – Trimming and Cleaning Up Your work is dry! It is called greenware now and it is at it’s most fragile! Handle everything with two hands. I often refer to soft hands – keep everything gentle and with your fingers spread as much as possible. Try to not pick up things like plates too much, and always with both hands! Before your work can be bisque fired it should be “cleaned up”. You work won’t go into the kiln if it has sharp edges – when glazed, sharp edges turn into razor blades! Use a piece of fly wire to rub the work all over – this will scratch a little so be light handed. Use a knife or metal kidney to scrape any areas that require a bit more dynamic treatment than the fly wire offers! Finally, a very light wipe over with a slightly damp sponge can help soften and soothe all of your edges and dags! Trimming thrown work: If you are planning to trim (or turn) your thrown work (and you should be), make sure you bag it well – your work should be leather hard to almost dry for easiest trimming. Use this step to finish the work completely – use a metal kidney to polish the surface, or a slightly damp sponge to give a freshly thrown look. Wipe the sponge around the rim after trimming, and check the inside of the pot for dags! Trimming slip cast work: Usually I will trim the rims of your work on the wheel the following day to make that stage easier, however you will still need to check your work for lumps and bumps. Last but not least – check that your name is still clearly on the bottom of your work. Step Five – Bisque Firing When the work is completely dry it can go into the bisque kiln. The bisque kiln is fired to 1000°C. This process burns off the water in the clay as well as some of the chemically bound water. The structure of the clay is not altered that much at this temperature. Inside the bisque kiln, the work is stacked a little, small bowl inside a larger bowl and onto a heavy plate. Smaller items like decorations or drink coasters might get stacked several high. Consideration is paid to the weight of the stack and shape of the work. A bisque kiln can fire about one and a half times the amount of work that the glaze kiln can fire. The firing takes about 10 hours to complete the cycle and about two days to cool down. Once it has been emptied the work is placed in the glaze room ready for you to decorate! Step Six – Glazing Decorating your work with colour can be a lot of fun – and time consuming! There are three main options for surface treatment at this stage: Oxide Washes Underglazes Glazes Washes and underglazes do not “glaze” the work – It will still need a layer of glaze to fully seal the clay (washes don’t need glaze on surfaces not designed for food or liquid as they can gloss up a little on their own). Underglazes are stable colourants that turn out pretty much how they look in the jar. They can be mixed with each other to form other colours and can be used like water colours to paint onto your work. Mostly they should have a clear glaze on top to seal them. Oxides are a different species – the pink oxide (cobalt) wash turns out bright blue for instance. They don’t always need a glaze on top, and some glazes can change the colour of the wash! The glazes need no other “glaze” on top! Be careful of unknown glaze interactions – you can put any combination of glaze in a bowl or on a plate, but only a single glaze on the outside of any vertical surface! Glazes are a chemical reaction under heat. We don’t know the exact chemicals in the Mayco glazes we use. I can guess by the way they interact with each other, however, on the whole, you need to test every idea you have, and not run the test on a vertical surface! Simply put, glaze is a layer of glass like substance that bonds with the clay underneath. Clay is made of silica, alumina and water. Glaze is made of mostly silica. Silica has a melting point of 1700°C and we fire to 1240°C. The silica requires a “flux” to help it melt at the lower temperature. Fluxes can be all sorts of chemicals – a common one is calcium – calcium has a melting point of 2500°C, however, together they both melt at a much lower temperature! Colourants are metal oxides like cobalt (blue), chrome (green through black), copper (green, blue, even red!), manganese (black, purple and pink) iron (red brown), etc. Different chemicals in the glaze can have dramatic effects. for example, barium carbonate (which we don’t use) turns manganese bright pink! Other elements can turn manganese dioxide brown, blue, purple and reddish brown. Manganese dioxide is a flux in and of itself as well. So, glazes that get their black and purple colours, often interact with other glazes and RUN! Our mirror black is a good example – it mixes really well with many glazes because it fluxes them – causes them to melt faster. It will also bring out many beautiful colours in the glazes because it’s black colouring most definitely comes from manganese dioxide! Glaze chemistry is a whole subject on it’s own! We use commercial Mayco glazes on purpose – for their huge range of colour possibilities, stability, cool interactions, artistic freedom with the ability to easily brush the glazes on and ease of use. We currently have almost 50 glazes on hand! A major project is to test the interactions of all glazes with each other. That is 2,500 test tiles!!!! I’m going to make the wall behind the wheels the feature wall of pretty colours! Step Seven – Glaze (Gloss or sometimes called “Glost”) Firing Most of the time this is the final stage of making your creation (but not always!) The glaze kiln goes to 1240°C. This is called cone 6, or midrange. It is the low end of stoneware temperatures. Stoneware clays and glazes are typically fired at cone 8 – 10, that is 1260 – 1290°C. The energy requirement to go from 1240°C to 1280°C is almost a 30% more! Our clay is formulated to vitrify (mature, turn “glass-like”) at 1240°, as are our glazes. A glaze kiln take around 12 hours to reach temperature and two to three days to cool down. Sometimes a third firing process is required – this is for decoration that is added to work after the glaze firing. For example – adding precious metals and lustres. this firing temperature is usually around 600 – 800°C depending upon the techniques being used. There are many students interested in gold and silver trims – we will be doing this third type of firing soon! After firing your work will be in the student finished work shelves. Remember to pay for it before you head out the door! There is a small extra charge for using porcelain clay (it’s more than twice the price of regular clay), and for any third firing process! Once your work has been fired it can not turn back into clay for millennia – so don’t fire it if you don’t like it! Put it in the bucket for recycling. https://firebirdstudios.com.au/the-process-of-making-pottery/Ceramics have evolved over thousands of years.White earthenware dinner plate. Crazing evident all over.Backstamped ‘Made in England S LTD’flagstaff hill, warrnambool, shipwrecked-coast, flagstaff-hill, flagstaff-hill-maritime-museum, maritime-museum, shipwreck-coast, flagstaff-hill-maritime-village, ceramics, tableware -
 Flagstaff Hill Maritime Museum and Village
Domestic object - Plate, Johnson Bros
The Process of Making Pottery Decorating, Firing, Glazing, Making, Technical There is a rhythm and flow to clay. It can’t be done all at once! Even the making process! It can take weeks to get everything done, especially if you can only work on your pottery once a week! Even though we have three hour classes, it’s often just not enough time! Here is an overview of some of the processes so you have a bit more grasp on some of the technical stuff! Step One – Design There are SO many ideas out there for making stuff in clay! From delicate porcelain jewellery, through to heavy sculptural work and everything in between. Deciding your direction is sometimes not that easy – when you first start, try everything, you will naturally gravitate to the style that you enjoy! The options and variations are endless and can get a wee bit overwhelming too! Check in with me before you start to ensure your ideas will work, what order you might do things, how you could achieve the look you are seeking and any other technical data required! Step Two – Making Clay is thixotropic. This means that as you work with it, the clay first gets sloppier and wetter, before is begins to dry in the atmosphere. For most things, you simply can’t do all parts of the project at once. An example of work order might look like: Get last weeks work out from the shelves Prepare clay for today’s work – roll your clay, prepare balls for throwing, make the first stage of a pinch pot) Clean up last week’s work and put it on the shelf for bisque firing Check that you have any glazing to do – and do enough of it that you will have time to finish your main project Do the next step of your next project – there might be a further step that can’t be complete immediately, in that case, wrap your work well and put onto the shelves. Letting your work rest for a while can really help keep your work clean and professional looking. Many things require bagging under plastic to keep it ready for work the next week – put your name on the outside of the bag so you can find your work easily. We have stickers and markers. Consider how you want to decorate your work – coloured slip can be applied at a fairly wet stage (remembering that it will make your work even wetter!). Trying to apply slip to dry clay won’t work! If you want to do sgraffito – you will need to keep the work leather hard (a state of dryness where you can still work the clay with a little effort and a little water and care). Step Three – Drying Most of the time your work can go into the rack uncovered to let it dry out for the following week. If you want to continue forming or shaping you will need to double bag your work – put your work on a suitable sized bat and put the bat in a bag so the base of the bag is under the bat, then put another bag over the top of the work and tuck the top of the bag under the bat. If you want to trim (or turn) your thrown work the following week, it should also be double bagged. If your work is large, delicate, or of uneven thicknesses, you should lightly cover your work for drying. When considering the drying process, bare in mind the weather, humidity and wind! The hotter and dryer, the faster things dry and work can dry unevenly in the shelves – this can lead to cracking – another time to lightly cover your work for drying. Step Four – Trimming and Cleaning Up Your work is dry! It is called greenware now and it is at it’s most fragile! Handle everything with two hands. I often refer to soft hands – keep everything gentle and with your fingers spread as much as possible. Try to not pick up things like plates too much, and always with both hands! Before your work can be bisque fired it should be “cleaned up”. You work won’t go into the kiln if it has sharp edges – when glazed, sharp edges turn into razor blades! Use a piece of fly wire to rub the work all over – this will scratch a little so be light handed. Use a knife or metal kidney to scrape any areas that require a bit more dynamic treatment than the fly wire offers! Finally, a very light wipe over with a slightly damp sponge can help soften and soothe all of your edges and dags! Trimming thrown work: If you are planning to trim (or turn) your thrown work (and you should be), make sure you bag it well – your work should be leather hard to almost dry for easiest trimming. Use this step to finish the work completely – use a metal kidney to polish the surface, or a slightly damp sponge to give a freshly thrown look. Wipe the sponge around the rim after trimming, and check the inside of the pot for dags! Trimming slip cast work: Usually I will trim the rims of your work on the wheel the following day to make that stage easier, however you will still need to check your work for lumps and bumps. Last but not least – check that your name is still clearly on the bottom of your work. Step Five – Bisque Firing When the work is completely dry it can go into the bisque kiln. The bisque kiln is fired to 1000°C. This process burns off the water in the clay as well as some of the chemically bound water. The structure of the clay is not altered that much at this temperature. Inside the bisque kiln, the work is stacked a little, small bowl inside a larger bowl and onto a heavy plate. Smaller items like decorations or drink coasters might get stacked several high. Consideration is paid to the weight of the stack and shape of the work. A bisque kiln can fire about one and a half times the amount of work that the glaze kiln can fire. The firing takes about 10 hours to complete the cycle and about two days to cool down. Once it has been emptied the work is placed in the glaze room ready for you to decorate! Step Six – Glazing Decorating your work with colour can be a lot of fun – and time consuming! There are three main options for surface treatment at this stage: Oxide Washes Underglazes Glazes Washes and underglazes do not “glaze” the work – It will still need a layer of glaze to fully seal the clay (washes don’t need glaze on surfaces not designed for food or liquid as they can gloss up a little on their own). Underglazes are stable colourants that turn out pretty much how they look in the jar. They can be mixed with each other to form other colours and can be used like water colours to paint onto your work. Mostly they should have a clear glaze on top to seal them. Oxides are a different species – the pink oxide (cobalt) wash turns out bright blue for instance. They don’t always need a glaze on top, and some glazes can change the colour of the wash! The glazes need no other “glaze” on top! Be careful of unknown glaze interactions – you can put any combination of glaze in a bowl or on a plate, but only a single glaze on the outside of any vertical surface! Glazes are a chemical reaction under heat. We don’t know the exact chemicals in the Mayco glazes we use. I can guess by the way they interact with each other, however, on the whole, you need to test every idea you have, and not run the test on a vertical surface! Simply put, glaze is a layer of glass like substance that bonds with the clay underneath. Clay is made of silica, alumina and water. Glaze is made of mostly silica. Silica has a melting point of 1700°C and we fire to 1240°C. The silica requires a “flux” to help it melt at the lower temperature. Fluxes can be all sorts of chemicals – a common one is calcium – calcium has a melting point of 2500°C, however, together they both melt at a much lower temperature! Colourants are metal oxides like cobalt (blue), chrome (green through black), copper (green, blue, even red!), manganese (black, purple and pink) iron (red brown), etc. Different chemicals in the glaze can have dramatic effects. for example, barium carbonate (which we don’t use) turns manganese bright pink! Other elements can turn manganese dioxide brown, blue, purple and reddish brown. Manganese dioxide is a flux in and of itself as well. So, glazes that get their black and purple colours, often interact with other glazes and RUN! Our mirror black is a good example – it mixes really well with many glazes because it fluxes them – causes them to melt faster. It will also bring out many beautiful colours in the glazes because it’s black colouring most definitely comes from manganese dioxide! Glaze chemistry is a whole subject on it’s own! We use commercial Mayco glazes on purpose – for their huge range of colour possibilities, stability, cool interactions, artistic freedom with the ability to easily brush the glazes on and ease of use. We currently have almost 50 glazes on hand! A major project is to test the interactions of all glazes with each other. That is 2,500 test tiles!!!! I’m going to make the wall behind the wheels the feature wall of pretty colours! Step Seven – Glaze (Gloss or sometimes called “Glost”) Firing Most of the time this is the final stage of making your creation (but not always!) The glaze kiln goes to 1240°C. This is called cone 6, or midrange. It is the low end of stoneware temperatures. Stoneware clays and glazes are typically fired at cone 8 – 10, that is 1260 – 1290°C. The energy requirement to go from 1240°C to 1280°C is almost a 30% more! Our clay is formulated to vitrify (mature, turn “glass-like”) at 1240°, as are our glazes. A glaze kiln take around 12 hours to reach temperature and two to three days to cool down. Sometimes a third firing process is required – this is for decoration that is added to work after the glaze firing. For example – adding precious metals and lustres. this firing temperature is usually around 600 – 800°C depending upon the techniques being used. There are many students interested in gold and silver trims – we will be doing this third type of firing soon! After firing your work will be in the student finished work shelves. Remember to pay for it before you head out the door! There is a small extra charge for using porcelain clay (it’s more than twice the price of regular clay), and for any third firing process! Once your work has been fired it can not turn back into clay for millennia – so don’t fire it if you don’t like it! Put it in the bucket for recycling. https://firebirdstudios.com.au/the-process-of-making-pottery/Ceramics have evolved over thousands of years.A white earthenware side plate with a gadroon edge. Has water marks and chips on front.‘Johnson Bros England Reg No 15587’flagstaff hill, warrnambool, shipwrecked-coast, flagstaff-hill, flagstaff-hill-maritime-museum, maritime-museum, shipwreck-coast, flagstaff-hill-maritime-village, johnson bros, ceramics, tableware -
 Flagstaff Hill Maritime Museum and Village
Domestic object - Plate, Alfred Meakin
The Process of Making Pottery Decorating, Firing, Glazing, Making, Technical There is a rhythm and flow to clay. It can’t be done all at once! Even the making process! It can take weeks to get everything done, especially if you can only work on your pottery once a week! Even though we have three hour classes, it’s often just not enough time! Here is an overview of some of the processes so you have a bit more grasp on some of the technical stuff! Step One – Design There are SO many ideas out there for making stuff in clay! From delicate porcelain jewellery, through to heavy sculptural work and everything in between. Deciding your direction is sometimes not that easy – when you first start, try everything, you will naturally gravitate to the style that you enjoy! The options and variations are endless and can get a wee bit overwhelming too! Check in with me before you start to ensure your ideas will work, what order you might do things, how you could achieve the look you are seeking and any other technical data required! Step Two – Making Clay is thixotropic. This means that as you work with it, the clay first gets sloppier and wetter, before is begins to dry in the atmosphere. For most things, you simply can’t do all parts of the project at once. An example of work order might look like: Get last weeks work out from the shelves Prepare clay for today’s work – roll your clay, prepare balls for throwing, make the first stage of a pinch pot) Clean up last week’s work and put it on the shelf for bisque firing Check that you have any glazing to do – and do enough of it that you will have time to finish your main project Do the next step of your next project – there might be a further step that can’t be complete immediately, in that case, wrap your work well and put onto the shelves. Letting your work rest for a while can really help keep your work clean and professional looking. Many things require bagging under plastic to keep it ready for work the next week – put your name on the outside of the bag so you can find your work easily. We have stickers and markers. Consider how you want to decorate your work – coloured slip can be applied at a fairly wet stage (remembering that it will make your work even wetter!). Trying to apply slip to dry clay won’t work! If you want to do sgraffito – you will need to keep the work leather hard (a state of dryness where you can still work the clay with a little effort and a little water and care). Step Three – Drying Most of the time your work can go into the rack uncovered to let it dry out for the following week. If you want to continue forming or shaping you will need to double bag your work – put your work on a suitable sized bat and put the bat in a bag so the base of the bag is under the bat, then put another bag over the top of the work and tuck the top of the bag under the bat. If you want to trim (or turn) your thrown work the following week, it should also be double bagged. If your work is large, delicate, or of uneven thicknesses, you should lightly cover your work for drying. When considering the drying process, bare in mind the weather, humidity and wind! The hotter and dryer, the faster things dry and work can dry unevenly in the shelves – this can lead to cracking – another time to lightly cover your work for drying. Step Four – Trimming and Cleaning Up Your work is dry! It is called greenware now and it is at it’s most fragile! Handle everything with two hands. I often refer to soft hands – keep everything gentle and with your fingers spread as much as possible. Try to not pick up things like plates too much, and always with both hands! Before your work can be bisque fired it should be “cleaned up”. You work won’t go into the kiln if it has sharp edges – when glazed, sharp edges turn into razor blades! Use a piece of fly wire to rub the work all over – this will scratch a little so be light handed. Use a knife or metal kidney to scrape any areas that require a bit more dynamic treatment than the fly wire offers! Finally, a very light wipe over with a slightly damp sponge can help soften and soothe all of your edges and dags! Trimming thrown work: If you are planning to trim (or turn) your thrown work (and you should be), make sure you bag it well – your work should be leather hard to almost dry for easiest trimming. Use this step to finish the work completely – use a metal kidney to polish the surface, or a slightly damp sponge to give a freshly thrown look. Wipe the sponge around the rim after trimming, and check the inside of the pot for dags! Trimming slip cast work: Usually I will trim the rims of your work on the wheel the following day to make that stage easier, however you will still need to check your work for lumps and bumps. Last but not least – check that your name is still clearly on the bottom of your work. Step Five – Bisque Firing When the work is completely dry it can go into the bisque kiln. The bisque kiln is fired to 1000°C. This process burns off the water in the clay as well as some of the chemically bound water. The structure of the clay is not altered that much at this temperature. Inside the bisque kiln, the work is stacked a little, small bowl inside a larger bowl and onto a heavy plate. Smaller items like decorations or drink coasters might get stacked several high. Consideration is paid to the weight of the stack and shape of the work. A bisque kiln can fire about one and a half times the amount of work that the glaze kiln can fire. The firing takes about 10 hours to complete the cycle and about two days to cool down. Once it has been emptied the work is placed in the glaze room ready for you to decorate! Step Six – Glazing Decorating your work with colour can be a lot of fun – and time consuming! There are three main options for surface treatment at this stage: Oxide Washes Underglazes Glazes Washes and underglazes do not “glaze” the work – It will still need a layer of glaze to fully seal the clay (washes don’t need glaze on surfaces not designed for food or liquid as they can gloss up a little on their own). Underglazes are stable colourants that turn out pretty much how they look in the jar. They can be mixed with each other to form other colours and can be used like water colours to paint onto your work. Mostly they should have a clear glaze on top to seal them. Oxides are a different species – the pink oxide (cobalt) wash turns out bright blue for instance. They don’t always need a glaze on top, and some glazes can change the colour of the wash! The glazes need no other “glaze” on top! Be careful of unknown glaze interactions – you can put any combination of glaze in a bowl or on a plate, but only a single glaze on the outside of any vertical surface! Glazes are a chemical reaction under heat. We don’t know the exact chemicals in the Mayco glazes we use. I can guess by the way they interact with each other, however, on the whole, you need to test every idea you have, and not run the test on a vertical surface! Simply put, glaze is a layer of glass like substance that bonds with the clay underneath. Clay is made of silica, alumina and water. Glaze is made of mostly silica. Silica has a melting point of 1700°C and we fire to 1240°C. The silica requires a “flux” to help it melt at the lower temperature. Fluxes can be all sorts of chemicals – a common one is calcium – calcium has a melting point of 2500°C, however, together they both melt at a much lower temperature! Colourants are metal oxides like cobalt (blue), chrome (green through black), copper (green, blue, even red!), manganese (black, purple and pink) iron (red brown), etc. Different chemicals in the glaze can have dramatic effects. for example, barium carbonate (which we don’t use) turns manganese bright pink! Other elements can turn manganese dioxide brown, blue, purple and reddish brown. Manganese dioxide is a flux in and of itself as well. So, glazes that get their black and purple colours, often interact with other glazes and RUN! Our mirror black is a good example – it mixes really well with many glazes because it fluxes them – causes them to melt faster. It will also bring out many beautiful colours in the glazes because it’s black colouring most definitely comes from manganese dioxide! Glaze chemistry is a whole subject on it’s own! We use commercial Mayco glazes on purpose – for their huge range of colour possibilities, stability, cool interactions, artistic freedom with the ability to easily brush the glazes on and ease of use. We currently have almost 50 glazes on hand! A major project is to test the interactions of all glazes with each other. That is 2,500 test tiles!!!! I’m going to make the wall behind the wheels the feature wall of pretty colours! Step Seven – Glaze (Gloss or sometimes called “Glost”) Firing Most of the time this is the final stage of making your creation (but not always!) The glaze kiln goes to 1240°C. This is called cone 6, or midrange. It is the low end of stoneware temperatures. Stoneware clays and glazes are typically fired at cone 8 – 10, that is 1260 – 1290°C. The energy requirement to go from 1240°C to 1280°C is almost a 30% more! Our clay is formulated to vitrify (mature, turn “glass-like”) at 1240°, as are our glazes. A glaze kiln take around 12 hours to reach temperature and two to three days to cool down. Sometimes a third firing process is required – this is for decoration that is added to work after the glaze firing. For example – adding precious metals and lustres. this firing temperature is usually around 600 – 800°C depending upon the techniques being used. There are many students interested in gold and silver trims – we will be doing this third type of firing soon! After firing your work will be in the student finished work shelves. Remember to pay for it before you head out the door! There is a small extra charge for using porcelain clay (it’s more than twice the price of regular clay), and for any third firing process! Once your work has been fired it can not turn back into clay for millennia – so don’t fire it if you don’t like it! Put it in the bucket for recycling. https://firebirdstudios.com.au/the-process-of-making-pottery/Ceramics have evolved over thousands of years.Earthenware dessert plate, cream colour. Made by Alfred Meakin, England. Backstamped ‘Alfred Meakin England’. flagstaff hill, warrnambool, shipwrecked-coast, flagstaff-hill, flagstaff-hill-maritime-museum, maritime-museum, shipwreck-coast, flagstaff-hill-maritime-village, alfred meakin, ceramics, earthenware, kitchenware -
 Flagstaff Hill Maritime Museum and Village
Domestic object - Jug
The Process of Making Pottery Decorating, Firing, Glazing, Making, Technical There is a rhythm and flow to clay. It can’t be done all at once! Even the making process! It can take weeks to get everything done, especially if you can only work on your pottery once a week! Even though we have three hour classes, it’s often just not enough time! Here is an overview of some of the processes so you have a bit more grasp on some of the technical stuff! Step One – Design There are SO many ideas out there for making stuff in clay! From delicate porcelain jewellery, through to heavy sculptural work and everything in between. Deciding your direction is sometimes not that easy – when you first start, try everything, you will naturally gravitate to the style that you enjoy! The options and variations are endless and can get a wee bit overwhelming too! Check in with me before you start to ensure your ideas will work, what order you might do things, how you could achieve the look you are seeking and any other technical data required! Step Two – Making Clay is thixotropic. This means that as you work with it, the clay first gets sloppier and wetter, before is begins to dry in the atmosphere. For most things, you simply can’t do all parts of the project at once. An example of work order might look like: Get last weeks work out from the shelves Prepare clay for today’s work – roll your clay, prepare balls for throwing, make the first stage of a pinch pot) Clean up last week’s work and put it on the shelf for bisque firing Check that you have any glazing to do – and do enough of it that you will have time to finish your main project Do the next step of your next project – there might be a further step that can’t be complete immediately, in that case, wrap your work well and put onto the shelves. Letting your work rest for a while can really help keep your work clean and professional looking. Many things require bagging under plastic to keep it ready for work the next week – put your name on the outside of the bag so you can find your work easily. We have stickers and markers. Consider how you want to decorate your work – coloured slip can be applied at a fairly wet stage (remembering that it will make your work even wetter!). Trying to apply slip to dry clay won’t work! If you want to do sgraffito – you will need to keep the work leather hard (a state of dryness where you can still work the clay with a little effort and a little water and care). Step Three – Drying Most of the time your work can go into the rack uncovered to let it dry out for the following week. If you want to continue forming or shaping you will need to double bag your work – put your work on a suitable sized bat and put the bat in a bag so the base of the bag is under the bat, then put another bag over the top of the work and tuck the top of the bag under the bat. If you want to trim (or turn) your thrown work the following week, it should also be double bagged. If your work is large, delicate, or of uneven thicknesses, you should lightly cover your work for drying. When considering the drying process, bare in mind the weather, humidity and wind! The hotter and dryer, the faster things dry and work can dry unevenly in the shelves – this can lead to cracking – another time to lightly cover your work for drying. Step Four – Trimming and Cleaning Up Your work is dry! It is called greenware now and it is at it’s most fragile! Handle everything with two hands. I often refer to soft hands – keep everything gentle and with your fingers spread as much as possible. Try to not pick up things like plates too much, and always with both hands! Before your work can be bisque fired it should be “cleaned up”. You work won’t go into the kiln if it has sharp edges – when glazed, sharp edges turn into razor blades! Use a piece of fly wire to rub the work all over – this will scratch a little so be light handed. Use a knife or metal kidney to scrape any areas that require a bit more dynamic treatment than the fly wire offers! Finally, a very light wipe over with a slightly damp sponge can help soften and soothe all of your edges and dags! Trimming thrown work: If you are planning to trim (or turn) your thrown work (and you should be), make sure you bag it well – your work should be leather hard to almost dry for easiest trimming. Use this step to finish the work completely – use a metal kidney to polish the surface, or a slightly damp sponge to give a freshly thrown look. Wipe the sponge around the rim after trimming, and check the inside of the pot for dags! Trimming slip cast work: Usually I will trim the rims of your work on the wheel the following day to make that stage easier, however you will still need to check your work for lumps and bumps. Last but not least – check that your name is still clearly on the bottom of your work. Step Five – Bisque Firing When the work is completely dry it can go into the bisque kiln. The bisque kiln is fired to 1000°C. This process burns off the water in the clay as well as some of the chemically bound water. The structure of the clay is not altered that much at this temperature. Inside the bisque kiln, the work is stacked a little, small bowl inside a larger bowl and onto a heavy plate. Smaller items like decorations or drink coasters might get stacked several high. Consideration is paid to the weight of the stack and shape of the work. A bisque kiln can fire about one and a half times the amount of work that the glaze kiln can fire. The firing takes about 10 hours to complete the cycle and about two days to cool down. Once it has been emptied the work is placed in the glaze room ready for you to decorate! Step Six – Glazing Decorating your work with colour can be a lot of fun – and time consuming! There are three main options for surface treatment at this stage: Oxide Washes Underglazes Glazes Washes and underglazes do not “glaze” the work – It will still need a layer of glaze to fully seal the clay (washes don’t need glaze on surfaces not designed for food or liquid as they can gloss up a little on their own). Underglazes are stable colourants that turn out pretty much how they look in the jar. They can be mixed with each other to form other colours and can be used like water colours to paint onto your work. Mostly they should have a clear glaze on top to seal them. Oxides are a different species – the pink oxide (cobalt) wash turns out bright blue for instance. They don’t always need a glaze on top, and some glazes can change the colour of the wash! The glazes need no other “glaze” on top! Be careful of unknown glaze interactions – you can put any combination of glaze in a bowl or on a plate, but only a single glaze on the outside of any vertical surface! Glazes are a chemical reaction under heat. We don’t know the exact chemicals in the Mayco glazes we use. I can guess by the way they interact with each other, however, on the whole, you need to test every idea you have, and not run the test on a vertical surface! Simply put, glaze is a layer of glass like substance that bonds with the clay underneath. Clay is made of silica, alumina and water. Glaze is made of mostly silica. Silica has a melting point of 1700°C and we fire to 1240°C. The silica requires a “flux” to help it melt at the lower temperature. Fluxes can be all sorts of chemicals – a common one is calcium – calcium has a melting point of 2500°C, however, together they both melt at a much lower temperature! Colourants are metal oxides like cobalt (blue), chrome (green through black), copper (green, blue, even red!), manganese (black, purple and pink) iron (red brown), etc. Different chemicals in the glaze can have dramatic effects. for example, barium carbonate (which we don’t use) turns manganese bright pink! Other elements can turn manganese dioxide brown, blue, purple and reddish brown. Manganese dioxide is a flux in and of itself as well. So, glazes that get their black and purple colours, often interact with other glazes and RUN! Our mirror black is a good example – it mixes really well with many glazes because it fluxes them – causes them to melt faster. It will also bring out many beautiful colours in the glazes because it’s black colouring most definitely comes from manganese dioxide! Glaze chemistry is a whole subject on it’s own! We use commercial Mayco glazes on purpose – for their huge range of colour possibilities, stability, cool interactions, artistic freedom with the ability to easily brush the glazes on and ease of use. We currently have almost 50 glazes on hand! A major project is to test the interactions of all glazes with each other. That is 2,500 test tiles!!!! I’m going to make the wall behind the wheels the feature wall of pretty colours! Step Seven – Glaze (Gloss or sometimes called “Glost”) Firing Most of the time this is the final stage of making your creation (but not always!) The glaze kiln goes to 1240°C. This is called cone 6, or midrange. It is the low end of stoneware temperatures. Stoneware clays and glazes are typically fired at cone 8 – 10, that is 1260 – 1290°C. The energy requirement to go from 1240°C to 1280°C is almost a 30% more! Our clay is formulated to vitrify (mature, turn “glass-like”) at 1240°, as are our glazes. A glaze kiln take around 12 hours to reach temperature and two to three days to cool down. Sometimes a third firing process is required – this is for decoration that is added to work after the glaze firing. For example – adding precious metals and lustres. this firing temperature is usually around 600 – 800°C depending upon the techniques being used. There are many students interested in gold and silver trims – we will be doing this third type of firing soon! After firing your work will be in the student finished work shelves. Remember to pay for it before you head out the door! There is a small extra charge for using porcelain clay (it’s more than twice the price of regular clay), and for any third firing process! Once your work has been fired it can not turn back into clay for millennia – so don’t fire it if you don’t like it! Put it in the bucket for recycling. https://firebirdstudios.com.au/the-process-of-making-pottery/The form of the jug has been in use for many centuries.Stoneware jug. Two tone brown glaze with pierced lip behind spout. Spout chipped.None.flagstaff hill, warrnambool, shipwrecked-coast, flagstaff-hill, flagstaff-hill-maritime-museum, maritime-museum, shipwreck-coast, flagstaff-hill-maritime-village, jug, ceramic jug -
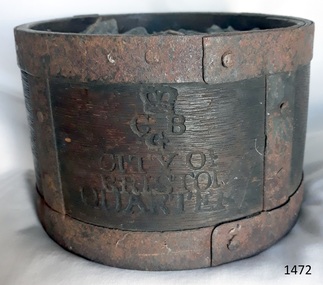 Flagstaff Hill Maritime Museum and Village
Functional object - Dry Measurement Container, Late 18th to early 19th century (before the standardised measurement was introduced in England in 1824)
The peck has been in use since the early 14th century when it was introduced as a measure for flour. The term referred to varying quantities until the modern units of measurement were defined in the 19th century. Cities in England used to have official standard weights and measures for that city or area. These containers were marked with the city's name and emblem, merchant’s weights and measures would then be checked against this to make sure they weren't trying to cheat their customers. The item in the collection is a standard measure approved by Bristol City and used by that City’s grocers to measure dry goods such as peas, beans, sugar, flour, meal etc., and its metal banding ensures that the measure cannot be reduced in size to cheat customers. Additional Information: The British Imperial System evolved from the thousands of Roman, Celtic, Anglo-Saxon, and customary local units employed in the middle Ages. Traditional names such as pound, foot, and gallon were widely used, but the values so designated varied with time, place, trade, product specifications, and dozens of other requirements. Early royal standards were established to enforce uniformity took the name Winchester, after the ancient tenth century capital of Britain. King Henry VII reaffirmed the customary Winchester standards for capacity and length and distributed royal standards throughout the realm. This process was repeated about a century later in the reign of Queen Elizabeth I. In the 16th century, the rod (5.5 yards, or 16.5 feet) was defined (once again as a learning device and not as a standard) defined by the length of the left feet of 16 men lined up heel to toe as they emerged from the church. By the 17th century usage and legal statute had established the acre, rod, and furlong at their present values together with other historic units such as the peck. Establishment of the System: The Weights and Measures Act of 1824 and the Act of 1878 established the British Imperial System based on precise definitions of selected existing units. The 1824 act sanctioned a single imperial gallon to replace the wine, ale, and corn (wheat) gallons that were in general use. The new gallon was defined as equal in volume to 10 pounds avoirdupois of distilled water weighed at 62°F with the barometer at 30 inches, or 277.274 cubic inches (later corrected to 277.421 cubic inches). The two new basic standard units were the imperial standard yard and the troy pound, which was later restricted to weighing drugs, precious metals, and jewels. In 1963 an act of parliament abolished archaic measures as the rod and chaldron and a metric system was adopted. An early example of a dry measuring container giving a snapshot of how imperial weights and measures developed in England to evolve the British measurement system into the metric arrangement that most countries have adopted today including Australia. It has social significance as an item that was in everyday use by grocers and other merchants to measure dry goods in the late 18th to early 19th centuries and used specifically in the Bristol region of England as an officially recognised measurement.Wooden measurement container with iron banding and hand made rivets container is a Quarter Peck official measurement container. Inscriptions are impressed into the sides of the wooden body. The container has the official crown and emblem of the City of Bristol, indicating this item was the Bristol City standard quarter peck measurement.Impressed into the timber on the front, a crown emblem over "C B G / CITY OF BRISTOL / QUARTER", on one side "HALF" , another side "PECK". Handwritten in white chalk on the base is "1458"flagstaff hill, warrnambool, shipwrecked-coast, flagstaff-hill-maritime-museum, flagstaff-hill-maritime-village, weights and measures, quarter peck, measurement container, dry grocery measure, bristol city measurement standard, city of bristol, british weights and measures, 18th and 19th centure standard measures