Showing 60 items matching "sponge"
-
 Royal District Nursing Service (now known as Bolton Clarke)
Photograph - Photograph, black and white, 17.10.1952
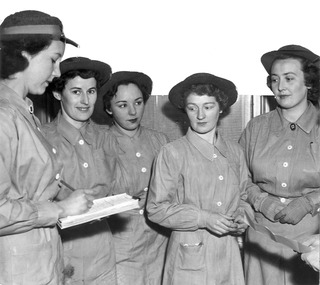
The Melbourne District Nursing Society (MDNS) Trained nurses (Sisters) are receiving their morning briefing from Matron D. Tupper before leaving their Headquarters at 39 Victoria Parade, Collingwood to go to their areas (districts) in the Melbourne suburbs to give nursing care to patients in their homes The Sisters averaged 30 calls a day each, mainly wound dressings; personal care, mostly sponges in bed; and injections (insulin and diabetes management). The Trained nurses of the Melbourne District Nursing Society (MDNS), later known as Royal District Nursing Service (RDNS), visited patients in their home and gave best practice care in many fields of nursing, and to people of many cultures, throughout its 130 years of expansion. Initial visits not only assessed the specific nursing situation but the situation as a whole. Their patients ranged in age from babes, children, adults to the elderly and referrals were taken from Hospitals, General Practitioners and allied Health facilities. Some of the care the Sisters provided is as follows: – Post-Natal care given to mother and babe, Wound Care following various types of surgery, accidents, burns, cancer, leg ulcers etc. Supervising and teaching Diabetic Care, including teaching and supervising people with Diabetes to administer their own Insulin, and administering Insulin to those unable to give their own injections. Administering other injections and setting up weekly medication boxes. The Sisters performed Catheterizations on adults suffering from conditions such as Quadriplegia, Paraplegia, Multiple Sclerosis (MS), Motor Neurone Disease (MND) and Guillan-Barre Syndrome, and when required at school on children for e.g. those with Spina Bifida. The Sisters visited those requiring Cystic Fibrosis support and care; those requiring Haemo-Oncology care, including visiting children at school; those requiring Home Enteral Feeding care, and those requiring IV therapy at home and home Dialysis. Palliative Care was given including pain relief with the use of syringe drivers, personal care as needed, and advice and support to both patient and family. The Sisters provided Stoma management to those needing Urostomy, Ileostomy and Colostomy care and those requiring Continence care. HIV/AIDS nursing care was provided; visits to Homeless Persons were made. Personal care was given to patients ranging in age and with varying mobility problems, such as those with MS, MND, Guillan-Barre Syndrome, Quadriplegia, Paraplegia, Acquired Brain Injury, to those following a Cerebrovascular Accident (Stroke), those with severe Arthritis and those with a form of Dementia. When necessary the elderly were assisted with personal care and advice given on safety factors with the use of hand rails, bath or shower seats, and hand showers. Rehabilitation with an aim towards independence remained at the forefront of the Sister’s minds and when possible using aids and instruction on safe techniques enabled the person to become fully independent. All care included giving advice and support to the patient and their Carers. The Sisters liaised with the persons Doctor, Hospital and allied Health personal when necessary.This photograph depicts five Melbourne District Nursing Society (MDNS) Sisters of varying heights standing in a row. They are wearing their grey long sleeve uniform dresses which have peaked collars, a pocket on the upper left and lower right, and white buttons down the centre. They are all wearing their grey brimmed hats over their short dark curled hair. From left to right is Sister (Sr) J Faust, who is looking down at a clipboard she is holding in her left hand which has paper held on it by a black bulldog clip. There is writing on the top sheet of white paper and she is holding a pen in her right hand poised near a section of writing on the paper. Next is Sr. M Sexton who is looking at the camera, then Sr. B Nunn who is looking towards a mainly hidden person on the far right. The next two are Sr E Blair, who has items in her lower pocket, and Sr B White who are both looking at the clipboard and paper held by Sr. Faust. In the far lower right corner of the photograph you can see the fingers of hands holding a sheet of paper. There is no further vision of this person.Operator 59. Finisher 30melbourne district nursing society, mdns, mdns uniforms, royal district nursing service, rdns, sister j. faust, sister m. sexton, sister b. nunn, sister e. blair, sister b. white -
 Orbost & District Historical Society
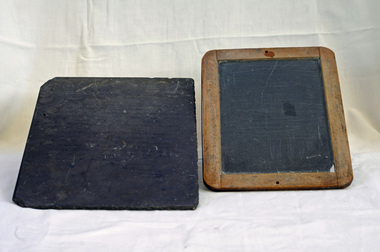
slates
The board was made from a piece of quarry slate set in a wooden frame. In early times a slate pencil (not chalk) was used to form the letters. This slate pencil was often sharpened on the school wall. The advantage of slates over paper was that they could be wiped clean and used again and again. Children had to bring a dampened cloth or sponge to school so that they could clean the slate and start again but often they would use their own spit and the cuff of their sleeve! Two rectangular slate writing boards used in schools. .1 is plain black and is unframed. .2 is wooden-framed.education slate school-equipment -
 Mont De Lancey
Book, Birn Brothers Ltd, Busy Little Folk, 1950's
A vintage, 1950's collection of young children's stories and poems, illustrated in black and white with some red highlights.A green covered vintage 1950's hardcover children's book with a coloured illustration on the front of a young boy and girl washing their toys in a red bathtub filled with water. Scrubbing brush, soap and sponge are shown. The title Busy Little Folk is written in red and pink lettering at the top. It is bound at the right side with brown tape. The back cover is plain grey cardboard. There are short stories, puzzles and simple poems included for the young child. Pp.93.fictionA vintage, 1950's collection of young children's stories and poems, illustrated in black and white with some red highlights.books, storybooks, children's books, picture books -
 City of Moorabbin Historical Society (Operating the Box Cottage Museum)
Craft work, pin-cushion, c1950
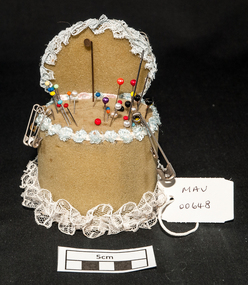
Foam rubber (also known as cellular, sponge, or expanded rubber) refers to rubber that has been manufactured with a foaming agent to create an air-filled matrix structure. Foam rubber was first produced in 1929 by Dunlop researcher chemist Eric Owen using whipped latex. In 1937 isocyanate based materials were first used for the formation of foam rubbers, after World War II styrene-butadiene rubber replaced many natural types of foam. Foam rubbers have been used commercially for a wide range of applications since around the 1940s. A foam rubber ,cylindrical, pin-cushion decorated with lace ribbon c1950 With steel dressmaking pinsmoorabbin, brighton, early settlers, pioneers, cheltenham, dressmaking, craftwork -
 Ballarat Tramway Museum
Photograph - Black & White Photograph/s, late 1950's or early 60's?
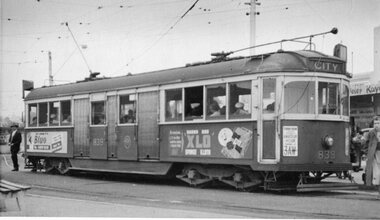
Black and white photograph, of MMTB W5 839 at the roundabout at corner of Mt Alexander Road and Fletcher St. Essendon, Essendon Station late 1950's or early 1960's. In the background is the railway bridge over Mt. Alexander Road. All blinds drawn. Tram showing destination "CITY". On the sides of the tram are advertisements for "Bluo" and "XLO Sponge cloth". On the front of the tram is an advertisement for radio station 3AW, Amateur Hour, Terry Dear. Photograph not well focused. trams, tramways, essendon, mmtb, mt alexander road, tram 839 -
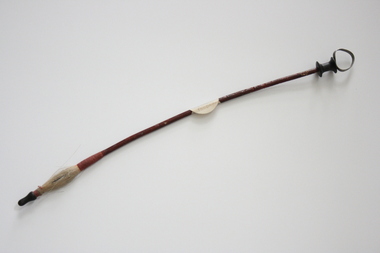 Geoffrey Kaye Museum of Anaesthetic History
Tool - Probang
Until suction became available in the 1930s, maintenance of a clear airway during oral and nasal surgery relied on posturing of the patient, mopping with sponges or the temporary placement of swabs or throat guards. Removal of surgical debris such as polyps, blood clots or foreign bodies could only be effected by the finger or devices such as probangs. The Probang is inserted blind (perhaps guided by a finger), the main shaft can then be held in the left hand whilst the right hand withdraws the inner tube. This results in a fanning out of the linear strands which are visible proximal to the tip. Held in this position the instrument is withdrawn and is supposed to scoop out the offending mass. Long flexible metal rod covered in gum resin sheath with a ring grip at the proximal end and a smooth metal rounded edge tip for insertion into the airway for clearing of obstructive matter.Stamped onto gum resin sheath: MADE FOR / CARL ZOELLER BRISBANE / GERMANY Stamped onto gum resin sheath in gold leaf: [indecipherable - presumably manufacturer's label]probang, flexible, oral, airway, horsehair, anaesthesia, obstruction, dr sharkey, lidcombe state hospital -
St Vincent's Hospital Melbourne Archives
Work on paper - Nursing training notes belonging to Freda Fatzeus at St Vincent's Hospital Melbourne
Each disease is described in length, how to nurse, what complications may occur and precautions to take, eg with Typhoid Fever, urine needs to be boiled to prevent spread of disease, container is to stand in antiseptic, kept separate, and if in the country, buried. Notes state:" the nurse must do all in her power to induce rest and sleep with the patients, eg warm sponge, frequent comfort positioning in bed." Other diseases detailed are Meningitis, Phthisis, Diptheria, Scarlet Fever, Measles, Pneumonia, all needing isolation nursing. How to prepare solutions give enemas and bowel washouts are described in these comprehensive notes indicative of the heavy, onerous nursing requirements practiced at that time. st vincent's hospital melbourne, nurse training, clinical notes, disease nursing -
 Flagstaff Hill Maritime Museum and Village
Ceramic - Serving Plate, Edward Challinor, Circa1862-1891
The pottery was at Fenton, Stoke on Trent, Staffordshire UK and was established in 1825, by C J & GM Mason, they were succeeded by Mr. Samuel Boyle from whom the works passed into the hands of E & C Challinor, formally E Challinor & Co. Of Sandyford and Tunstall. The partners in Sandyford and Tunstall works are recorded as Edward Challinor Jnr and Charles Challinor Jnr and is presumably they are the sons of the partners of the Fenton pottery business. They produced china of white granite, printed sponged common earthenware for the American, Australian, and other foreign and colonial markets. The main goods produced were tea, coffee, breakfast, dinner, and toilet ceramic sets as well as other earthenware goods. Their pottery marks were the Staffordshire rope knot with or without E & C Challinor or just E C. An early piece of earthenware pottery made in England for the Australian colonial market around the mid to late 19th century.Serving plate white body, smooth rim, and blue oriental designRope knot motif printed on back in blue with letters EC warrnambool, shipwrecked-coast, flagstaff-hill, flagstaff-hill-maritime-museum, shipwreck-coast, flagstaff-hill-maritime-village, earthenware, ceramic, willow pattern, serving plate, e & c challinor, potteries -
City of Moorabbin Historical Society (Operating the Box Cottage Museum)
Education kit - School Writing Slate early 20thC, 20thC
School children learned to write using a slate From 1880’s to mid 1950’s in most schools, very young children first learned to write their letters in sand trays using their fingers or a stick. When about 6, they progressed onto writing on slates . The board was made from a piece of quarry slate set in a wooden frame. A slate pencil (not chalk) was used to form the letters. This slate pencil was often sharpened on the school wall. The advantage of slates over paper was that they could be wiped clean and used again and again. Until the mid 20thC paper was expensive . After the pupil wrote on the Slate, the work was checked by the teacher and then erased for a new task Children had to bring a dampened cloth or sponge to school so that they could clean the slate and start again. The pioneer settlers in the Moorabbin Shire area valued education and established schools for their children in Cheltenham and East Brighton c1860's This writing slate is typical of the type used up to the mid 20th Century in preparatory classes.A writing slate in a wood frame used by school children from c1880s to c1950sschools, education, writing equipment, slate writing boards, victoria melbourne, market gardeners, pioneer, settlers, cheltenham state school no. 84., bentleigh east state school no. 2083, st stephens c of e school tucker road east brighton -
 Seaworks Maritime Museum
Emergency kit Display board
Board displaying 22 items. Items appear to be related to rescue and may belong together in a kit. Items are canvas, line and floatable, torch, Survival at Sea book (Transport and Communication), Pains-Wessex Flare, 3 1/2 C jug, Seven Oceans Drinking water sachet, plastic bags, Marine Lifesaving rations, whistle, rubber item, table spoon measurement cup, can opener, can of Drinking Water (S-HP Foods LTD), sponge, Emergency Repair kit, two foam cones, pump, Ultraplast elastic adhesive dreessing, Quick WELLS tablets, Fishing tackle, Fluorescent oragne tarp, associated photograph of ten people in a life boat. Many items are screwed onto the board.resuce kit -
 Flagstaff Hill Maritime Museum and Village
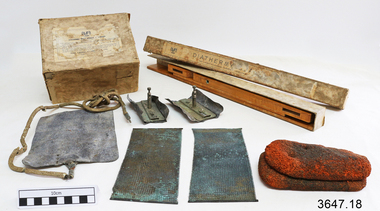
Diathermy Equipment, c. 1926
This Diathermy Equipment set once belonged to Dr T.F. Ryan of Nhill and was donated to Flagstaff Hill Maritime Village by the family of Doctor William Roy Angus, Surgeon and Oculist. It is part of the “W.R. Angus Collection” that includes historical medical equipment, surgical instruments and material once belonging to Dr Edward Ryan and Dr Thomas Francis Ryan, (both of Nhill, Victoria) as well as Dr Angus’ own belongings. The Collection’s history spans the medical practices of the two Doctors Ryan, from 1885-1926 plus that of Dr Angus, up until 1969. ABOUT THE “W.R.ANGUS COLLECTION” Doctor William Roy Angus M.B., B.S., Adel., 1923, F.R.C.S. Edin.,1928 (also known as Dr Roy Angus) was born in Murrumbeena, Victoria in 1901 and lived until 1970. He qualified as a doctor in 1923 at University of Adelaide, was Resident Medical Officer at the Royal Adelaide Hospital in 1924 and for a period was house surgeon to Sir (then Mr.) Henry Simpson Newland. Dr Angus was briefly an Assistant to Dr Riddell of Kapunda, then commenced private practice at Curramulka, Yorke Peninsula, SA, where he was physician, surgeon and chemist. In 1926, he was appointed as new Medical Assistant to Dr Thomas Francis Ryan (T.F. Ryan, or Tom), in Nhill, Victoria, where his experiences included radiology and pharmacy. In 1927 he was Acting House Surgeon in Dr Tom Ryan’s absence. Dr Angus had become engaged to Gladys Forsyth and they decided he would take time to further his studies overseas in the UK in 1927. He studied at London University College Hospital and at Edinburgh Royal Infirmary and in 1928, was awarded FRCS (Fellow from the Royal College of Surgeons), Edinburgh. He worked his passage back to Australia as a Ship’s Surgeon on the on the Australian Commonwealth Line’s T.S.S. Largs Bay. Dr Angus married Gladys in 1929, in Ballarat. (They went on to have one son (Graham 1932, born in SA) and two daughters (Helen (died 12/07/1996) and Berenice (Berry), both born at Mira, Nhill ) Dr Angus was a ‘flying doctor’ for the A.I.M. (Australian Inland Ministry) Aerial Medical Service in 1928 . The organisation began in South Australia through the Presbyterian Church in that year, with its first station being in the remote town of Oodnadatta, where Dr Angus was stationed. He was locum tenens there on North-South Railway at 21 Mile Camp. He took up this ‘flying doctor’ position in response to a call from Dr John Flynn; the organisation was later known as the Flying Doctor Service, then the Royal Flying Doctor Service. A lot of his work during this time involved dental surgery also. Between 1928-1932 he was surgeon at the Curramulka Hospital, Yorke Peninsula, South Australia. In 1933 Dr Angus returned to Nhill where he’d previously worked as Medical Assistant and purchased a share of the Nelson Street practice and Mira hospital from Dr Les Middleton one of the Middleton Brothers, the current owners of what was once Dr Tom Ryan’s practice. Dr L Middleton was House Surgeon to the Nhill Hospital 1926-1933, when he resigned. [Dr Tom Ryan’s practice had originally belonged to his older brother Dr Edward Ryan, who came to Nhill in 1885. Dr Edward saw patients at his rooms, firstly in Victoria Street and in 1886 in Nelson Street, until 1901. The Nelson Street practice also had a 2 bed ward, called Mira Private Hospital ). Dr Edward Ryan was House Surgeon at the Nhill Hospital 1884-1902 . He also had occasions where he successfully performed veterinary surgery for the local farmers too. Dr Tom Ryan then purchased the practice from his brother in 1901. Both Dr Edward and Dr Tom Ryan work as surgeons included eye surgery. Dr Tom Ryan performed many of his operations in the Mira private hospital on his premises. He too was House Surgeon at the Nhill Hospital 1902-1926. Dr Tom Ryan had one of the only two pieces of radiology equipment in Victoria during his practicing years – The Royal Melbourne Hospital had the other one. Over the years Dr Tom Ryan gradually set up what was effectively a training school for country general-practitioner-surgeons. Each patient was carefully examined, including using the X-ray machine, and any surgery was discussed and planned with Dr Ryan’s assistants several days in advance. Dr Angus gained experience in using the X-ray machine there during his time as assistant to Dr Ryan. Dr Tom Ryan moved from Nhill in 1926. He became a Fellow of the Royal Australasian College of Surgeons in 1927, soon after its formation, a rare accolade for a doctor outside any of the major cities. He remained a bachelor and died suddenly on 7th Dec 1955, aged 91, at his home in Ararat. Scholarships and prizes are still awarded to medical students in the honour of Dr T.F. Ryan and his father, Dr Michael Ryan, and brother, John Patrick Ryan. ] When Dr Angus bought into the Nelson Street premises in Nhill he was also appointed as the Nhill Hospital’s Honorary House Surgeon 1933-1938. His practitioner’s plate from his Nhill surgery states “HOURS Daily, except Tuesdays, Fridays and Saturday afternoons, 9-10am, 2-4pm, 7-8pm. Sundays by appointment”. This plate is now mounted on the doorway to the Port Medical Office at Flagstaff Hill Maritime Village, Warrnambool. Dr Edward Ryan and Dr Tom Ryan had an extensive collection of historical medical equipment and materials spanning 1884-1926 and when Dr Angus took up practice in their old premises he obtained this collection, a large part of which is now on display at the Port Medical Office at Flagstaff Hill Maritime Village in Warrnambool. During his time in Nhill Dr Angus was involved in the merging of the Mira Hospital and Nhill Public Hospital into one public hospital and the property titles passed on to Nhill Hospital in 1939. In 1939 Dr Angus and his family moved to Warrnambool where he purchased “Birchwood,” the 1852 home and medical practice of Dr John Hunter Henderson, at 214 Koroit Street. (This property was sold in1965 to the State Government and is now the site of the Warrnambool Police Station. ). The Angus family was able to afford gardeners, cooks and maids; their home was a popular place for visiting dignitaries to stay whilst visiting Warrnambool. Dr Angus had his own silk worm farm at home in a Mulberry tree. His young daughter used his centrifuge for spinning the silk. Dr Angus was appointed on a part-time basis as Port Medical Officer (Health Officer) in Warrnambool and held this position until the 1940’s when the government no longer required the service of a Port Medical Officer in Warrnambool; he was thus Warrnambool’s last serving Port Medical Officer. (The duties of a Port Medical Officer were outlined by the Colonial Secretary on 21st June, 1839 under the terms of the Quarantine Act. Masters of immigrant ships arriving in port reported incidents of diseases, illness and death and the Port Medical Officer made a decision on whether the ship required Quarantine and for how long, in this way preventing contagious illness from spreading from new immigrants to the residents already in the colony.) Dr Angus was a member of the Australian Medical Association, for 35 years and surgeon at the Warrnambool Base Hospital 1939-1942, He served as a Surgeon Captain during WWII1942-45, in Ballarat, Victoria, and in Bonegilla, N.S.W., completing his service just before the end of the war due to suffering from a heart attack. During his convalescence he carved an intricate and ‘most artistic’ chess set from the material that dentures were made from. He then studied ophthalmology at the Royal Melbourne Eye and Ear Hospital and created cosmetically superior artificial eyes by pioneering using the intrascleral cartilage. Angus received accolades from the Ophthalmological Society of Australasia for this work. He returned to Warrnambool to commence practice as an ophthalmologist, pioneering in artificial eye improvements. He was Honorary Consultant Ophthalmologist to Warrnambool Base Hospital for 31 years. He made monthly visits to Portland as a visiting surgeon, to perform eye surgery. He represented the Victorian South-West subdivision of the Australian Medical Association as its secretary between 1949 and 1956 and as chairman from 1956 to 1958. In 1968 Dr Angus was elected member of Spain’s Barraquer Institute of Barcelona after his research work in Intrasclearal cartilage grafting, becoming one of the few Australian ophthalmologists to receive this honour, and in the following year presented his final paper on Living Intrasclearal Cartilage Implants at the Inaugural Meeting of the Australian College of Ophthalmologists in Melbourne In his personal life Dr Angus was a Presbyterian and treated Sunday as a Sabbath, a day of rest. He would visit 3 or 4 country patients on a Sunday, taking his children along ‘for the ride’ and to visit with him. Sunday evenings he would play the pianola and sing Scottish songs to his family. One of Dr Angus’ patients was Margaret MacKenzie, author of a book on local shipwrecks that she’d seen as an eye witness from the late 1880’s in Peterborough, Victoria. In the early 1950’s Dr Angus, painted a picture of a shipwreck for the cover jacket of Margaret’s book, Shipwrecks and More Shipwrecks. She was blind in later life and her daughter wrote the actual book for her. Dr Angus and his wife Gladys were very involved in Warrnambool’s society with a strong interest in civic affairs. Their interests included organisations such as Red Cross, Rostrum, Warrnambool and District Historical Society (founding members), Wine and Food Society, Steering Committee for Tertiary Education in Warrnambool, Local National Trust, Good Neighbour Council, Housing Commission Advisory Board, United Services Institute, Legion of Ex-Servicemen, Olympic Pool Committee, Food for Britain Organisation, Warrnambool Hospital, Anti-Cancer Council, Boys’ Club, Charitable Council, National Fitness Council and Air Raid Precautions Group. He was also a member of the Steam Preservation Society and derived much pleasure from a steam traction engine on his farm. He had an interest in people and the community He and his wife Gladys were both involved in the creation of Flagstaff Hill, including the layout of the gardens. After his death (28th March 1970) his family requested his practitioner’s plate, medical instruments and some personal belongings be displayed in the Port Medical Office surgery at Flagstaff Hill Maritime Village, and be called the “W. R. Angus Collection”. The W.R. Angus Collection is significant for still being located at the site it is connected with, Doctor Angus being the last Port Medical Officer in Warrnambool. The collection of medical instruments and other equipment is culturally significant, being an historical example of medicine from late 19th to mid-20th century. Dr Angus assisted Dr Tom Ryan, a pioneer in the use of X-rays and in ocular surgery. Diathermy Equipment once belonging to Dr T.F. Ryan, from the W.R. Angus Collection. The equipment is stored in 2 boxes. A long box contains llight weight wooden pieces that make up a Diathermy Clamp (2 extension arms and 2 cross bars). A short deep box contains Diathermy Electrodes; metal (2), metal mesh (2), rubber sponges (2 melded into 1 by perishing), Large Diathermy Pad with cable and connector attached "DIATHERMY PAD" hand written on back. Also, documents (6); receipt to "Dr Ryan, Nhill", from Stamford X-Ray & Radium Co 8/2/1926, instructions (2), notes written on back of eye Field of Vision charts (3). Both boxes have the maker's name on the label "Liebel-Flarsheim Co., Cincinnati, Ohio."Stamped onto the label on the Clamp bos "4 1/2 x 5" and (Cat. No.) "2028" Hand written in black on back of diathermy pad "DIATHERMY PAD" Receipt made to "Dr Ryan, Nhill"flagstaff hill, warrnambool, shipwrecked coast, flagstaff hill maritime museum, maritime museum, shipwreck coast, flagstaff hill maritime village, great ocean road, dr w r angus, dr ryan, surgical instrument, t.s.s. largs bay, warrnambool base hospital, nhill base hospital, mira hospital, flying doctor, medical treatment, medical history, diathermy treatment, stamford x-ray and radium co, l-f diathermy clamp, both boxes have maker's label liebel-flarsheim co., cincinnati, ohio. -
 Flagstaff Hill Maritime Museum and Village
Ceramic - Jug, Baker & Co, 1891 to 1893
W Baker and Co-produced many different types of pottery at their Fenton Potteries, Stoke-on-Trent, Staffordshire England. The company was established in 1790 by Ralph Bourne and William Baker the company was working at capacity by the end of the century. By the late 1820's Bourne and Baker, in partnership with John Bourne, had acquired additional works opposite the first in 1833. With the deaths of John Bourne and William Baker, the partnership was dissolved, and then for a short time, the business was carried on by Ralph Bourne and William Baker junior and John Baker. By the early 1840s, William Baker was running it alone and was then using 'machinery for the potteries manufacturing operations in addition to the mill that was producing the raw clay. The business was subsequently carried on by William Baker and Company that were known for the making of printed, sponged, and pearl-white granite ware for export in the early 1880s at the Fenton works between Manor and Fountain Streets. The original works on the south side of City Road were by then an en-caustic tile works, apparently still in the hands of the Baker family. The pottery works flourished under William Baker’s management and by the middle of the nineteenth century with almost 500 employees was the biggest firm in Fenton. An early piece of ironstone Staffordshire pottery now a collector's item showing the types of domestic items that were exported from England to its colonies towards the end of the nineteenth century and into the beginning of the twentieth.Water pitcher ironstone ceramic white with raised embossed Lilly of the valley decoration around handle and lip sections. Marked on bottom, "Royal stone china, Baker and Co, England" with emblem of lion, crown and unicornflagstaff hill, warrnambool, shipwrecked coast, flagstaff hill maritime museum, maritime museum, shipwreck coast, flagstaff hill maritime village, great ocean road, jug, kitchen utensil, kitchen ware, water pitcher -
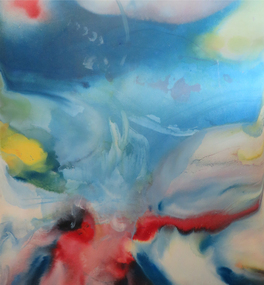 Federation University Art Collection
Painting, Norman Hofmaier, 'Promethius 1 from the Mallee Mysteries Series', by Norman Hofmaier
Norman Keith HOFMAIER (12.08.1951- ) Born Beulah, Wimmera, Victoria Norman Hofmaier was a scion of a well-known family, he completed his secondary education at Hopetoun High School and Ballarat College. Later he studied Visual Art at University of Ballarat, including painting, design and sculpture. Hofmaier’s childhood in Beulah was spent on the family property running beside the Yarriambiack Creek. Both he and his father had an intimate knowledge of the flora and fauna of the Mallee. The Wyperfeld National Park, home to the Big Desert, was a favourite place for Norman’s uncle who planted acres of native trees at the family property. Dr Di Bresciani explains: “The colours and vastness of the Mallee are represented in many works which reflect, variously, the relentless quiet and swirling energies found in the ‘dust storm might’ of the Mallee area. Most works may be described as abstract, lyrical abstract or abstract expressionist." From the 1970s until the 1990s he began an outpouring of work, using oil-based paints overlaid manually on large, specially-prepared boards using brushes, cloths, sponges, sprays or rollers. Petrol solvents were used to soften, blur and enhance shapes and edges. His work reflected his exploration of his inner state, sometimes flowing and placid, sometimes tempestuous. After a brief sojourn into city-life Norman returned to working in the country, until finally submitting to mental illness and permanent care in the mid 1990s. Norman Hofmaier's works are represented in major collections including that of the well- known artist Mitch Pearson ( an important influence and lifelong friend). The work 'Pastel of a Nude' was shown in a widely distributed magazine and two works owned by Mark Shannon were planned to be published as record covers in 1993. He won an award during the bicentennial recognising his skill as a Wimmera artist. From the 1970s until the 1990s he began an outpouring of work, using oil-based paints overlaid manually on large, specially-prepared boards using brushes, cloths, sponges, sprays or rollers. Petrol solvents were used to soften, blur and enhance shapes and edges. This work was purchased from the exhibition 'Norman Hofmaier: Mallee Mysteries' at the Lost Ones Gallery in Camp Street, Ballarat. The exhibition explored the legacy of Hofmaier’s work as well as raising money for the Ballarat Art Foundation. The Hofmaier family donated 16 works of the artist to be sold to raise funds for the foundation, to support emerging artists.Original painting in square format, featuring abstract swirls of blue, white, red, yellow and green.On back of work: 1. pools of diluted oil paint covering approximately 8 cm from each edge, 2. in right hand corner in permanent marker "N Hofmaier" 3. middle right hand side, torn exhibition label, with the words, "Belauh", "Local Art", "Prome", "Local Art", "$350", "Collect A", "oin" 4. Bottom right corner, two exhibition labels on card. Cards read: The flowing of movement before any known bodies are formed. Matter and gases bubble forming kaleidoscopic colours and shapes. Promethius 1 Oil based pigment with petrol on prepared board 1320 x 1210 mm On front of work, bottom right hand corner, in white lettering, N Hofmaier. Bottom right hand olive green frame damaged on front of work.painter, mallee, beluah, norman hofmaier, wimmera, abstract, alumni -
 Otway Districts Historical Society
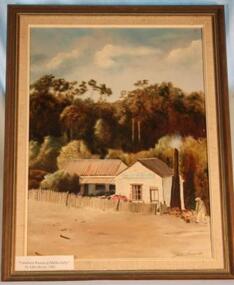
Painting - Oil painting, framed, The Luncheon Rooms at Melba Gully, 1981
Forming the headwaters of the Johanna River and noted for its majestic Myrtle Beech and Blackwood trees, in 1921 the property came into the possession of Mrs Jessie Fry, wife of Mr Thomas Fry, a well-known and respected local bushman and timber getter. Here the family lived and it was Mrs Fry who named the place 'Melba Gully'. Sometime in the late 1920s Mrs Fry was approached by Pioneer Tours, the bus company, to see if she would provide lunches and afternoon teas for their passengers travelling between Apollo Bay and Port Campbell. Mrs Fry rose to the challenge; the Melba Gully Luncheon Rooms were built adjoining the Fry home and she was in business. Mrs Fry was unfailing in her courtesy and kindness. She was also a splendid cook, known for her feather-light scones and sponges. Home-produced strawberries and cream were a special treat. Visitors were also taken on a tour of 'The Gully', often guided by one of her young sons. Melba Gully Visitors Book is testimony to her many satisfied customers. Tom and Jessie Fry sold the property on her retirement in 1947 and the tearooms ceased to operate. It again changed hands in 1958 to Otway residents Mr and Mrs Axel Madsen, and in 1975 they made the magnificent gesture of gifting the 48 hectare Melba Gully to the people of Victoria..Framed painting in oils of a weatherboard house with picket fence, before a backdrop of forest. A figure chopping wood is at the right.Signature of artist John Driver, 1981melba gully, jessie fry, thomas fry, buses, tours, weatherboard house, john driver -
 Otway Districts Historical Society
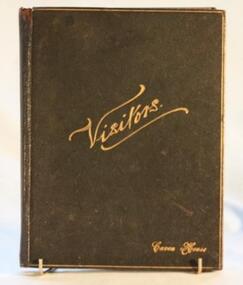
Book - Visitors Book, Melba Gully Visitors Book, 1937-1958
Forming the headwaters of the Johanna River and noted for its majestic Myrtle Beech and Blackwood trees, in 1921 the property came into the possession of Mrs Jessie Fry, wife of Mr Thomas Fry, a well-known and respected local bushman and timber getter. Here the family lived and it was Mrs Fry who named the place 'Melba Gully'. Sometime in the late 1920s Mrs Fry was approached by Pioneer Tours, the bus company, to see if she would provide lunches and afternoon teas for their passengers travelling between Apollo Bay and Port Campbell. Mrs Fry rose to the challenge; the Melba Gully Luncheon Rooms were built adjoining the Fry home and she was in business. Mrs Fry was unfailing in her courtesy and kindness. She was also a splendid cook, known for her feather-light scones and sponges. Home-produced strawberries and cream were a special treat. Visitors were also taken on a tour of 'The Gully', often guided by one of her young sons. Melba Gully Visitors Book, running from November 1937 until the end of 1958, is testimony to her many satisfied customers. Tom and Jessie Fry sold the property on her retirement in 1947 although the tearooms continued to operate. It again changed hands in 1958 to Otway residents Mr and Mrs Axel Madsen, when it finally closed, and in 1975 they made the magnificent gesture of gifting the 48 hectare Melba Gully to the people of Victoria..Melba Gully Visitors Book. Foolscap, leather-bound, lined pages with margin approximately 30mm from left. Added, 24 p. unlined quarto.Full of inscriptions, cover to coverlavers hill, melba gully, jessie fry, thomas fry, axel madsen -
 Bendigo Historical Society Inc.
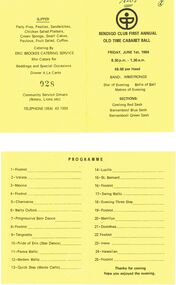
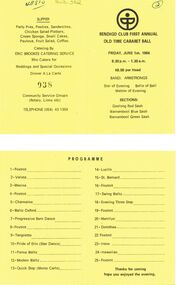
Document - PETER ELLIS COLLECTION: BENDIGO CLUB FIRST ANNUAL OLD TIME BALL, 1st June, 1984
Yellow folded card. P.Ellis and 2 in circle hand written at top on front. Circular Emblem. Bendigo Club First Annual Old Time Cabaret Ball Friday, June 1st, 1984 8.30 p.m. - 1.30 a.m. $8.00 per head Band: Armstrongs. Star of Evening Belle of Ball Matron of evening. Sections: Geelong Red Sash Warnambool Blue Sash Warnambool Green Sash. Inside reads: Programme 1 Foxtrot 2 Valeta 3 Maxina 4 Foxtrot 5 Charmaine 6 Waltz Oxford 7 Progressive Barn Dance 8 Foxtrot 9 Tangoette 10 Pride of Erin (Star Dance) 11 Parma Waltz 12 Modern Waltz 13 Quick Step (Monte Carlo) 14 Lucile 15 St. Bernard 16 Foxtrot 17 Swing Waltz 18 Evening Three Step 19 Foxtrot 20 Merrilyn 21 Dorothea 22 Foxtrot 23 Irene 24 Hawaiian 25 Foxtrot Thanks for coming hope you enjoyed the evening. Rear reads: Supper Party Pies, Pasties, Sandwiches, Chicken Salad Platters, Cream Sponge, Small cakes, Pavlova, Fruit Salad, Coffee. Catering by Eric Brookes Catering Service who caters for Weddings and Special Occasions Dinner A La Carte 028 Community Service Groups (Rotary, Lions etc) Telephone (054) 43 1359person, individual, peter ellis oam -
 Bendigo Historical Society Inc.
Document - PETER ELLIS COLLECTION: BENDIGO CLUB FIRST ANNUAL OLD TIME BALL, 1st June, 1984
Yellow card Black stick figure drawing in circle. 2 in circle handwritten in top right hand corner. Bendigo Club First Annual Old Time Cabaret Ball Friday, June 1st, 1984 8.30 p.m. - 1.30 a.m. $8.00 per Head Band Armstrongs Star of Evening Belle of Ball Matron of Evening Sections: Geelong Red Sash Warnambool Blue Sash Warnambool Green Sash. Programme 1 Foxtrot 2 Valeta 3 Maxina 4 Foxtrot 5 Charmaine 6 Waltz Oxford 7 Progressive Barn Dance 8 Foxtrot 9 Tangoette 10 Pride of Erin (Star Dance) 11 Parma Waltz 12 Modern Waltz 13 Quick Step (Monte Carlo) 14 Lucile 15 St. Bernard 16 Foxtrot 17 Swing Waltz 18 Evening Three Step 19 Foxtrot 20 Merrilyn 21 Dorothea 22 Foxtrot 23 Irene 24 Hawaiian 25 Foxtrot Thanks for coming hope you enjoyed the evening. Supper Party Pies, Pasties, Sandwiches, Chicken Salad Platters, Cream Sponge, Small Cakes, Pavlova, Fruit Salad, Coffee. Catering By Eric Brookes Catering Service Who Caters for Weddings and Special Occasions Dinner A La Carte 038 Community Service Groups (Rotary, Lions etc) Telephone (054) 43 1359. 411510 handwritten on back.person, individual, peter ellis oam -
 Flagstaff Hill Maritime Museum and Village
Furniture - Set of desks & benches, Unknown
The following are the recollections of John Elkins, who started school in February, 1945 at Maryborough in Queensland, Australia. 'I think in Prep 1 that we had some paper to write on with pencils, but my memory of the routine use of slates is much more vivid. Each slate was framed in wood and one side was inscribed with lines to guide the limits for the upper and lower extremities of letters. The slate "pencils" were made of some pale gray mineral softer than slate which had been milled into cylinders some one-eighth of an inch in diameter and inserted into metal holders so that about an inch protruded. Each student was equipped with a small tobacco tin in which was kept a damp sponge or cloth to erase the marks. Sharpening slate pencils was a regular task. We rubbed them on any suitable brick or concrete surface in the school yard. Teachers also kept a good supply of spares, all writing materials and books being provided by the school. It is possible that the retention of slates stemmed from the political imperative that public education should be free. I do recall being given a Copy Book for home practice of letter formation, a typical practice until Grade 6. The tables at which we used to sit in the Infant School were replaced in the primary Grades by long desks seating five or six pupils. These had slots into which the slates could be inserted vertically. When the teacher asked the class to clear their desks, the command issued was "slates away!" This was an occasion for a noisy expression of relief as we dropped the slates producing a sound not unlike a volley of rifle shots, and usually brought a request from the teacher to repeat the process with no noise by holding the frames throughout. Thus, I suspect we may still have used slates in Grade Three, though by then paper, which may have been scarce during the War, seemed to be used more routinely.' The full context of John's account of writing during his primary school days can be found at: https://www.readinghalloffame.org/sites/default/files/history_of_literacy_22slates_away22_penmanship_in_queensland_australia.pdfSchool desks and benches/chairs have been in use in schools since formal group education started.Eight long school desks (five higher three lower), each with four inkwells and groove along length. eight school benches (five higher three lower). Each desk and bench accommodates four children.None.flagstaff hill, warrnambool, shipwrecked-coast, flagstaff-hill, flagstaff-hill-maritime-museum, maritime-museum, shipwreck-coast, flagstaff-hill-maritime-village -
 Flagstaff Hill Maritime Museum and Village
Domestic object - Bowl, Late 19th or early 20th Century
The Process of Making Pottery Decorating, Firing, Glazing, Making, Technical There is a rhythm and flow to clay. It can’t be done all at once! Even the making process! It can take weeks to get everything done, especially if you can only work on your pottery once a week! Even though we have three hour classes, it’s often just not enough time! Here is an overview of some of the processes so you have a bit more grasp on some of the technical stuff! Step One – Design There are SO many ideas out there for making stuff in clay! From delicate porcelain jewellery, through to heavy sculptural work and everything in between. Deciding your direction is sometimes not that easy – when you first start, try everything, you will naturally gravitate to the style that you enjoy! The options and variations are endless and can get a wee bit overwhelming too! Check in with me before you start to ensure your ideas will work, what order you might do things, how you could achieve the look you are seeking and any other technical data required! Step Two – Making Clay is thixotropic. This means that as you work with it, the clay first gets sloppier and wetter, before is begins to dry in the atmosphere. For most things, you simply can’t do all parts of the project at once. An example of work order might look like: Get last weeks work out from the shelves Prepare clay for today’s work – roll your clay, prepare balls for throwing, make the first stage of a pinch pot) Clean up last week’s work and put it on the shelf for bisque firing Check that you have any glazing to do – and do enough of it that you will have time to finish your main project Do the next step of your next project – there might be a further step that can’t be complete immediately, in that case, wrap your work well and put onto the shelves. Letting your work rest for a while can really help keep your work clean and professional looking. Many things require bagging under plastic to keep it ready for work the next week – put your name on the outside of the bag so you can find your work easily. We have stickers and markers. Consider how you want to decorate your work – coloured slip can be applied at a fairly wet stage (remembering that it will make your work even wetter!). Trying to apply slip to dry clay won’t work! If you want to do sgraffito – you will need to keep the work leather hard (a state of dryness where you can still work the clay with a little effort and a little water and care). Step Three – Drying Most of the time your work can go into the rack uncovered to let it dry out for the following week. If you want to continue forming or shaping you will need to double bag your work – put your work on a suitable sized bat and put the bat in a bag so the base of the bag is under the bat, then put another bag over the top of the work and tuck the top of the bag under the bat. If you want to trim (or turn) your thrown work the following week, it should also be double bagged. If your work is large, delicate, or of uneven thicknesses, you should lightly cover your work for drying. When considering the drying process, bare in mind the weather, humidity and wind! The hotter and dryer, the faster things dry and work can dry unevenly in the shelves – this can lead to cracking – another time to lightly cover your work for drying. Step Four – Trimming and Cleaning Up Your work is dry! It is called greenware now and it is at it’s most fragile! Handle everything with two hands. I often refer to soft hands – keep everything gentle and with your fingers spread as much as possible. Try to not pick up things like plates too much, and always with both hands! Before your work can be bisque fired it should be “cleaned up”. You work won’t go into the kiln if it has sharp edges – when glazed, sharp edges turn into razor blades! Use a piece of fly wire to rub the work all over – this will scratch a little so be light handed. Use a knife or metal kidney to scrape any areas that require a bit more dynamic treatment than the fly wire offers! Finally, a very light wipe over with a slightly damp sponge can help soften and soothe all of your edges and dags! Trimming thrown work: If you are planning to trim (or turn) your thrown work (and you should be), make sure you bag it well – your work should be leather hard to almost dry for easiest trimming. Use this step to finish the work completely – use a metal kidney to polish the surface, or a slightly damp sponge to give a freshly thrown look. Wipe the sponge around the rim after trimming, and check the inside of the pot for dags! Trimming slip cast work: Usually I will trim the rims of your work on the wheel the following day to make that stage easier, however you will still need to check your work for lumps and bumps. Last but not least – check that your name is still clearly on the bottom of your work. Step Five – Bisque Firing When the work is completely dry it can go into the bisque kiln. The bisque kiln is fired to 1000°C. This process burns off the water in the clay as well as some of the chemically bound water. The structure of the clay is not altered that much at this temperature. Inside the bisque kiln, the work is stacked a little, small bowl inside a larger bowl and onto a heavy plate. Smaller items like decorations or drink coasters might get stacked several high. Consideration is paid to the weight of the stack and shape of the work. A bisque kiln can fire about one and a half times the amount of work that the glaze kiln can fire. The firing takes about 10 hours to complete the cycle and about two days to cool down. Once it has been emptied the work is placed in the glaze room ready for you to decorate! Step Six – Glazing Decorating your work with colour can be a lot of fun – and time consuming! There are three main options for surface treatment at this stage: Oxide Washes Underglazes Glazes Washes and underglazes do not “glaze” the work – It will still need a layer of glaze to fully seal the clay (washes don’t need glaze on surfaces not designed for food or liquid as they can gloss up a little on their own). Underglazes are stable colourants that turn out pretty much how they look in the jar. They can be mixed with each other to form other colours and can be used like water colours to paint onto your work. Mostly they should have a clear glaze on top to seal them. Oxides are a different species – the pink oxide (cobalt) wash turns out bright blue for instance. They don’t always need a glaze on top, and some glazes can change the colour of the wash! The glazes need no other “glaze” on top! Be careful of unknown glaze interactions – you can put any combination of glaze in a bowl or on a plate, but only a single glaze on the outside of any vertical surface! Glazes are a chemical reaction under heat. We don’t know the exact chemicals in the Mayco glazes we use. I can guess by the way they interact with each other, however, on the whole, you need to test every idea you have, and not run the test on a vertical surface! Simply put, glaze is a layer of glass like substance that bonds with the clay underneath. Clay is made of silica, alumina and water. Glaze is made of mostly silica. Silica has a melting point of 1700°C and we fire to 1240°C. The silica requires a “flux” to help it melt at the lower temperature. Fluxes can be all sorts of chemicals – a common one is calcium – calcium has a melting point of 2500°C, however, together they both melt at a much lower temperature! Colourants are metal oxides like cobalt (blue), chrome (green through black), copper (green, blue, even red!), manganese (black, purple and pink) iron (red brown), etc. Different chemicals in the glaze can have dramatic effects. for example, barium carbonate (which we don’t use) turns manganese bright pink! Other elements can turn manganese dioxide brown, blue, purple and reddish brown. Manganese dioxide is a flux in and of itself as well. So, glazes that get their black and purple colours, often interact with other glazes and RUN! Our mirror black is a good example – it mixes really well with many glazes because it fluxes them – causes them to melt faster. It will also bring out many beautiful colours in the glazes because it’s black colouring most definitely comes from manganese dioxide! Glaze chemistry is a whole subject on it’s own! We use commercial Mayco glazes on purpose – for their huge range of colour possibilities, stability, cool interactions, artistic freedom with the ability to easily brush the glazes on and ease of use. We currently have almost 50 glazes on hand! A major project is to test the interactions of all glazes with each other. That is 2,500 test tiles!!!! I’m going to make the wall behind the wheels the feature wall of pretty colours! Step Seven – Glaze (Gloss or sometimes called “Glost”) Firing Most of the time this is the final stage of making your creation (but not always!) The glaze kiln goes to 1240°C. This is called cone 6, or midrange. It is the low end of stoneware temperatures. Stoneware clays and glazes are typically fired at cone 8 – 10, that is 1260 – 1290°C. The energy requirement to go from 1240°C to 1280°C is almost a 30% more! Our clay is formulated to vitrify (mature, turn “glass-like”) at 1240°, as are our glazes. A glaze kiln take around 12 hours to reach temperature and two to three days to cool down. Sometimes a third firing process is required – this is for decoration that is added to work after the glaze firing. For example – adding precious metals and lustres. this firing temperature is usually around 600 – 800°C depending upon the techniques being used. There are many students interested in gold and silver trims – we will be doing this third type of firing soon! After firing your work will be in the student finished work shelves. Remember to pay for it before you head out the door! There is a small extra charge for using porcelain clay (it’s more than twice the price of regular clay), and for any third firing process! Once your work has been fired it can not turn back into clay for millennia – so don’t fire it if you don’t like it! Put it in the bucket for recycling. https://firebirdstudios.com.au/the-process-of-making-pottery/ The bowl is an example of kitchenware used in the 19th century and still in use today.Bowl white ceramic. Crack on side. Badly stained.Backstamp very faint and unable to be read.flagstaff hill, warrnambool, shipwrecked-coast, flagstaff-hill, flagstaff-hill-maritime-museum, maritime-museum, shipwreck-coast, flagstaff-hill-maritime-village, mixing bowl, food preparation, kitchen equipment, ceramic -
 Flagstaff Hill Maritime Museum and Village
Domestic object - Bowl
The Process of Making Pottery Decorating, Firing, Glazing, Making, Technical There is a rhythm and flow to clay. It can’t be done all at once! Even the making process! It can take weeks to get everything done, especially if you can only work on your pottery once a week! Even though we have three hour classes, it’s often just not enough time! Here is an overview of some of the processes so you have a bit more grasp on some of the technical stuff! Step One – Design There are SO many ideas out there for making stuff in clay! From delicate porcelain jewellery, through to heavy sculptural work and everything in between. Deciding your direction is sometimes not that easy – when you first start, try everything, you will naturally gravitate to the style that you enjoy! The options and variations are endless and can get a wee bit overwhelming too! Check in with me before you start to ensure your ideas will work, what order you might do things, how you could achieve the look you are seeking and any other technical data required! Step Two – Making Clay is thixotropic. This means that as you work with it, the clay first gets sloppier and wetter, before is begins to dry in the atmosphere. For most things, you simply can’t do all parts of the project at once. An example of work order might look like: Get last weeks work out from the shelves Prepare clay for today’s work – roll your clay, prepare balls for throwing, make the first stage of a pinch pot) Clean up last week’s work and put it on the shelf for bisque firing Check that you have any glazing to do – and do enough of it that you will have time to finish your main project Do the next step of your next project – there might be a further step that can’t be complete immediately, in that case, wrap your work well and put onto the shelves. Letting your work rest for a while can really help keep your work clean and professional looking. Many things require bagging under plastic to keep it ready for work the next week – put your name on the outside of the bag so you can find your work easily. We have stickers and markers. Consider how you want to decorate your work – coloured slip can be applied at a fairly wet stage (remembering that it will make your work even wetter!). Trying to apply slip to dry clay won’t work! If you want to do sgraffito – you will need to keep the work leather hard (a state of dryness where you can still work the clay with a little effort and a little water and care). Step Three – Drying Most of the time your work can go into the rack uncovered to let it dry out for the following week. If you want to continue forming or shaping you will need to double bag your work – put your work on a suitable sized bat and put the bat in a bag so the base of the bag is under the bat, then put another bag over the top of the work and tuck the top of the bag under the bat. If you want to trim (or turn) your thrown work the following week, it should also be double bagged. If your work is large, delicate, or of uneven thicknesses, you should lightly cover your work for drying. When considering the drying process, bare in mind the weather, humidity and wind! The hotter and dryer, the faster things dry and work can dry unevenly in the shelves – this can lead to cracking – another time to lightly cover your work for drying. Step Four – Trimming and Cleaning Up Your work is dry! It is called greenware now and it is at it’s most fragile! Handle everything with two hands. I often refer to soft hands – keep everything gentle and with your fingers spread as much as possible. Try to not pick up things like plates too much, and always with both hands! Before your work can be bisque fired it should be “cleaned up”. You work won’t go into the kiln if it has sharp edges – when glazed, sharp edges turn into razor blades! Use a piece of fly wire to rub the work all over – this will scratch a little so be light handed. Use a knife or metal kidney to scrape any areas that require a bit more dynamic treatment than the fly wire offers! Finally, a very light wipe over with a slightly damp sponge can help soften and soothe all of your edges and dags! Trimming thrown work: If you are planning to trim (or turn) your thrown work (and you should be), make sure you bag it well – your work should be leather hard to almost dry for easiest trimming. Use this step to finish the work completely – use a metal kidney to polish the surface, or a slightly damp sponge to give a freshly thrown look. Wipe the sponge around the rim after trimming, and check the inside of the pot for dags! Trimming slip cast work: Usually I will trim the rims of your work on the wheel the following day to make that stage easier, however you will still need to check your work for lumps and bumps. Last but not least – check that your name is still clearly on the bottom of your work. Step Five – Bisque Firing When the work is completely dry it can go into the bisque kiln. The bisque kiln is fired to 1000°C. This process burns off the water in the clay as well as some of the chemically bound water. The structure of the clay is not altered that much at this temperature. Inside the bisque kiln, the work is stacked a little, small bowl inside a larger bowl and onto a heavy plate. Smaller items like decorations or drink coasters might get stacked several high. Consideration is paid to the weight of the stack and shape of the work. A bisque kiln can fire about one and a half times the amount of work that the glaze kiln can fire. The firing takes about 10 hours to complete the cycle and about two days to cool down. Once it has been emptied the work is placed in the glaze room ready for you to decorate! Step Six – Glazing Decorating your work with colour can be a lot of fun – and time consuming! There are three main options for surface treatment at this stage: Oxide Washes Underglazes Glazes Washes and underglazes do not “glaze” the work – It will still need a layer of glaze to fully seal the clay (washes don’t need glaze on surfaces not designed for food or liquid as they can gloss up a little on their own). Underglazes are stable colourants that turn out pretty much how they look in the jar. They can be mixed with each other to form other colours and can be used like water colours to paint onto your work. Mostly they should have a clear glaze on top to seal them. Oxides are a different species – the pink oxide (cobalt) wash turns out bright blue for instance. They don’t always need a glaze on top, and some glazes can change the colour of the wash! The glazes need no other “glaze” on top! Be careful of unknown glaze interactions – you can put any combination of glaze in a bowl or on a plate, but only a single glaze on the outside of any vertical surface! Glazes are a chemical reaction under heat. We don’t know the exact chemicals in the Mayco glazes we use. I can guess by the way they interact with each other, however, on the whole, you need to test every idea you have, and not run the test on a vertical surface! Simply put, glaze is a layer of glass like substance that bonds with the clay underneath. Clay is made of silica, alumina and water. Glaze is made of mostly silica. Silica has a melting point of 1700°C and we fire to 1240°C. The silica requires a “flux” to help it melt at the lower temperature. Fluxes can be all sorts of chemicals – a common one is calcium – calcium has a melting point of 2500°C, however, together they both melt at a much lower temperature! Colourants are metal oxides like cobalt (blue), chrome (green through black), copper (green, blue, even red!), manganese (black, purple and pink) iron (red brown), etc. Different chemicals in the glaze can have dramatic effects. for example, barium carbonate (which we don’t use) turns manganese bright pink! Other elements can turn manganese dioxide brown, blue, purple and reddish brown. Manganese dioxide is a flux in and of itself as well. So, glazes that get their black and purple colours, often interact with other glazes and RUN! Our mirror black is a good example – it mixes really well with many glazes because it fluxes them – causes them to melt faster. It will also bring out many beautiful colours in the glazes because it’s black colouring most definitely comes from manganese dioxide! Glaze chemistry is a whole subject on it’s own! We use commercial Mayco glazes on purpose – for their huge range of colour possibilities, stability, cool interactions, artistic freedom with the ability to easily brush the glazes on and ease of use. We currently have almost 50 glazes on hand! A major project is to test the interactions of all glazes with each other. That is 2,500 test tiles!!!! I’m going to make the wall behind the wheels the feature wall of pretty colours! Step Seven – Glaze (Gloss or sometimes called “Glost”) Firing Most of the time this is the final stage of making your creation (but not always!) The glaze kiln goes to 1240°C. This is called cone 6, or midrange. It is the low end of stoneware temperatures. Stoneware clays and glazes are typically fired at cone 8 – 10, that is 1260 – 1290°C. The energy requirement to go from 1240°C to 1280°C is almost a 30% more! Our clay is formulated to vitrify (mature, turn “glass-like”) at 1240°, as are our glazes. A glaze kiln take around 12 hours to reach temperature and two to three days to cool down. Sometimes a third firing process is required – this is for decoration that is added to work after the glaze firing. For example – adding precious metals and lustres. this firing temperature is usually around 600 – 800°C depending upon the techniques being used. There are many students interested in gold and silver trims – we will be doing this third type of firing soon! After firing your work will be in the student finished work shelves. Remember to pay for it before you head out the door! There is a small extra charge for using porcelain clay (it’s more than twice the price of regular clay), and for any third firing process! Once your work has been fired it can not turn back into clay for millennia – so don’t fire it if you don’t like it! Put it in the bucket for recycling. https://firebirdstudios.com.au/the-process-of-making-pottery/ This bowl is an example of kitchenware used in the 19th century and still in use today.Bowl white ceramic plain that has two sets of edging around lip. Inside bowl has plaster designed to look like cooking mixture.flagstaff hill, warrnambool, shipwrecked-coast, flagstaff-hill, flagstaff-hill-maritime-museum, maritime-museum, shipwreck-coast, flagstaff-hill-maritime-village, kitchen equipment, ceramic -
 Flagstaff Hill Maritime Museum and Village
Domestic object - Bowl, J & G Meakin, Late 19th or early 20th Century
The Process of Making Pottery Decorating, Firing, Glazing, Making, Technical There is a rhythm and flow to clay. It can’t be done all at once! Even the making process! It can take weeks to get everything done, especially if you can only work on your pottery once a week! Even though we have three hour classes, it’s often just not enough time! Here is an overview of some of the processes so you have a bit more grasp on some of the technical stuff! Step One – Design There are SO many ideas out there for making stuff in clay! From delicate porcelain jewellery, through to heavy sculptural work and everything in between. Deciding your direction is sometimes not that easy – when you first start, try everything, you will naturally gravitate to the style that you enjoy! The options and variations are endless and can get a wee bit overwhelming too! Check in with me before you start to ensure your ideas will work, what order you might do things, how you could achieve the look you are seeking and any other technical data required! Step Two – Making Clay is thixotropic. This means that as you work with it, the clay first gets sloppier and wetter, before is begins to dry in the atmosphere. For most things, you simply can’t do all parts of the project at once. An example of work order might look like: Get last weeks work out from the shelves Prepare clay for today’s work – roll your clay, prepare balls for throwing, make the first stage of a pinch pot) Clean up last week’s work and put it on the shelf for bisque firing Check that you have any glazing to do – and do enough of it that you will have time to finish your main project Do the next step of your next project – there might be a further step that can’t be complete immediately, in that case, wrap your work well and put onto the shelves. Letting your work rest for a while can really help keep your work clean and professional looking. Many things require bagging under plastic to keep it ready for work the next week – put your name on the outside of the bag so you can find your work easily. We have stickers and markers. Consider how you want to decorate your work – coloured slip can be applied at a fairly wet stage (remembering that it will make your work even wetter!). Trying to apply slip to dry clay won’t work! If you want to do sgraffito – you will need to keep the work leather hard (a state of dryness where you can still work the clay with a little effort and a little water and care). Step Three – Drying Most of the time your work can go into the rack uncovered to let it dry out for the following week. If you want to continue forming or shaping you will need to double bag your work – put your work on a suitable sized bat and put the bat in a bag so the base of the bag is under the bat, then put another bag over the top of the work and tuck the top of the bag under the bat. If you want to trim (or turn) your thrown work the following week, it should also be double bagged. If your work is large, delicate, or of uneven thicknesses, you should lightly cover your work for drying. When considering the drying process, bare in mind the weather, humidity and wind! The hotter and dryer, the faster things dry and work can dry unevenly in the shelves – this can lead to cracking – another time to lightly cover your work for drying. Step Four – Trimming and Cleaning Up Your work is dry! It is called greenware now and it is at it’s most fragile! Handle everything with two hands. I often refer to soft hands – keep everything gentle and with your fingers spread as much as possible. Try to not pick up things like plates too much, and always with both hands! Before your work can be bisque fired it should be “cleaned up”. You work won’t go into the kiln if it has sharp edges – when glazed, sharp edges turn into razor blades! Use a piece of fly wire to rub the work all over – this will scratch a little so be light handed. Use a knife or metal kidney to scrape any areas that require a bit more dynamic treatment than the fly wire offers! Finally, a very light wipe over with a slightly damp sponge can help soften and soothe all of your edges and dags! Trimming thrown work: If you are planning to trim (or turn) your thrown work (and you should be), make sure you bag it well – your work should be leather hard to almost dry for easiest trimming. Use this step to finish the work completely – use a metal kidney to polish the surface, or a slightly damp sponge to give a freshly thrown look. Wipe the sponge around the rim after trimming, and check the inside of the pot for dags! Trimming slip cast work: Usually I will trim the rims of your work on the wheel the following day to make that stage easier, however you will still need to check your work for lumps and bumps. Last but not least – check that your name is still clearly on the bottom of your work. Step Five – Bisque Firing When the work is completely dry it can go into the bisque kiln. The bisque kiln is fired to 1000°C. This process burns off the water in the clay as well as some of the chemically bound water. The structure of the clay is not altered that much at this temperature. Inside the bisque kiln, the work is stacked a little, small bowl inside a larger bowl and onto a heavy plate. Smaller items like decorations or drink coasters might get stacked several high. Consideration is paid to the weight of the stack and shape of the work. A bisque kiln can fire about one and a half times the amount of work that the glaze kiln can fire. The firing takes about 10 hours to complete the cycle and about two days to cool down. Once it has been emptied the work is placed in the glaze room ready for you to decorate! Step Six – Glazing Decorating your work with colour can be a lot of fun – and time consuming! There are three main options for surface treatment at this stage: Oxide Washes Underglazes Glazes Washes and underglazes do not “glaze” the work – It will still need a layer of glaze to fully seal the clay (washes don’t need glaze on surfaces not designed for food or liquid as they can gloss up a little on their own). Underglazes are stable colourants that turn out pretty much how they look in the jar. They can be mixed with each other to form other colours and can be used like water colours to paint onto your work. Mostly they should have a clear glaze on top to seal them. Oxides are a different species – the pink oxide (cobalt) wash turns out bright blue for instance. They don’t always need a glaze on top, and some glazes can change the colour of the wash! The glazes need no other “glaze” on top! Be careful of unknown glaze interactions – you can put any combination of glaze in a bowl or on a plate, but only a single glaze on the outside of any vertical surface! Glazes are a chemical reaction under heat. We don’t know the exact chemicals in the Mayco glazes we use. I can guess by the way they interact with each other, however, on the whole, you need to test every idea you have, and not run the test on a vertical surface! Simply put, glaze is a layer of glass like substance that bonds with the clay underneath. Clay is made of silica, alumina and water. Glaze is made of mostly silica. Silica has a melting point of 1700°C and we fire to 1240°C. The silica requires a “flux” to help it melt at the lower temperature. Fluxes can be all sorts of chemicals – a common one is calcium – calcium has a melting point of 2500°C, however, together they both melt at a much lower temperature! Colourants are metal oxides like cobalt (blue), chrome (green through black), copper (green, blue, even red!), manganese (black, purple and pink) iron (red brown), etc. Different chemicals in the glaze can have dramatic effects. for example, barium carbonate (which we don’t use) turns manganese bright pink! Other elements can turn manganese dioxide brown, blue, purple and reddish brown. Manganese dioxide is a flux in and of itself as well. So, glazes that get their black and purple colours, often interact with other glazes and RUN! Our mirror black is a good example – it mixes really well with many glazes because it fluxes them – causes them to melt faster. It will also bring out many beautiful colours in the glazes because it’s black colouring most definitely comes from manganese dioxide! Glaze chemistry is a whole subject on it’s own! We use commercial Mayco glazes on purpose – for their huge range of colour possibilities, stability, cool interactions, artistic freedom with the ability to easily brush the glazes on and ease of use. We currently have almost 50 glazes on hand! A major project is to test the interactions of all glazes with each other. That is 2,500 test tiles!!!! I’m going to make the wall behind the wheels the feature wall of pretty colours! Step Seven – Glaze (Gloss or sometimes called “Glost”) Firing Most of the time this is the final stage of making your creation (but not always!) The glaze kiln goes to 1240°C. This is called cone 6, or midrange. It is the low end of stoneware temperatures. Stoneware clays and glazes are typically fired at cone 8 – 10, that is 1260 – 1290°C. The energy requirement to go from 1240°C to 1280°C is almost a 30% more! Our clay is formulated to vitrify (mature, turn “glass-like”) at 1240°, as are our glazes. A glaze kiln take around 12 hours to reach temperature and two to three days to cool down. Sometimes a third firing process is required – this is for decoration that is added to work after the glaze firing. For example – adding precious metals and lustres. this firing temperature is usually around 600 – 800°C depending upon the techniques being used. There are many students interested in gold and silver trims – we will be doing this third type of firing soon! After firing your work will be in the student finished work shelves. Remember to pay for it before you head out the door! There is a small extra charge for using porcelain clay (it’s more than twice the price of regular clay), and for any third firing process! Once your work has been fired it can not turn back into clay for millennia – so don’t fire it if you don’t like it! Put it in the bucket for recycling. https://firebirdstudios.com.au/the-process-of-making-pottery/This bowl was made by renowned pottery company J & G Meakin of England. The firm was established in the mid-1800's. The bowl is an example of kitchenware used in the 19th century and still in use today.Bowl; white ceramic, round and tapering inwards towards base. Made by J and G Meakin England.On base, 'Ironstone China Reg SOL 391413' with symbolflagstaff hill, flagstaff hill maritime museum and village, warrnambool, maritime museum, maritime village, great ocean road, shipwreck coast, mixing bowl, food preparation, j & g meakin, pottery, stoke-on-trent, kitchen equipment, ceramic -
 Flagstaff Hill Maritime Museum and Village
Domestic object - Plate
The Process of Making Pottery Decorating, Firing, Glazing, Making, Technical There is a rhythm and flow to clay. It can’t be done all at once! Even the making process! It can take weeks to get everything done, especially if you can only work on your pottery once a week! Even though we have three hour classes, it’s often just not enough time! Here is an overview of some of the processes so you have a bit more grasp on some of the technical stuff! Step One – Design There are SO many ideas out there for making stuff in clay! From delicate porcelain jewellery, through to heavy sculptural work and everything in between. Deciding your direction is sometimes not that easy – when you first start, try everything, you will naturally gravitate to the style that you enjoy! The options and variations are endless and can get a wee bit overwhelming too! Check in with me before you start to ensure your ideas will work, what order you might do things, how you could achieve the look you are seeking and any other technical data required! Step Two – Making Clay is thixotropic. This means that as you work with it, the clay first gets sloppier and wetter, before is begins to dry in the atmosphere. For most things, you simply can’t do all parts of the project at once. An example of work order might look like: Get last weeks work out from the shelves Prepare clay for today’s work – roll your clay, prepare balls for throwing, make the first stage of a pinch pot) Clean up last week’s work and put it on the shelf for bisque firing Check that you have any glazing to do – and do enough of it that you will have time to finish your main project Do the next step of your next project – there might be a further step that can’t be complete immediately, in that case, wrap your work well and put onto the shelves. Letting your work rest for a while can really help keep your work clean and professional looking. Many things require bagging under plastic to keep it ready for work the next week – put your name on the outside of the bag so you can find your work easily. We have stickers and markers. Consider how you want to decorate your work – coloured slip can be applied at a fairly wet stage (remembering that it will make your work even wetter!). Trying to apply slip to dry clay won’t work! If you want to do sgraffito – you will need to keep the work leather hard (a state of dryness where you can still work the clay with a little effort and a little water and care). Step Three – Drying Most of the time your work can go into the rack uncovered to let it dry out for the following week. If you want to continue forming or shaping you will need to double bag your work – put your work on a suitable sized bat and put the bat in a bag so the base of the bag is under the bat, then put another bag over the top of the work and tuck the top of the bag under the bat. If you want to trim (or turn) your thrown work the following week, it should also be double bagged. If your work is large, delicate, or of uneven thicknesses, you should lightly cover your work for drying. When considering the drying process, bare in mind the weather, humidity and wind! The hotter and dryer, the faster things dry and work can dry unevenly in the shelves – this can lead to cracking – another time to lightly cover your work for drying. Step Four – Trimming and Cleaning Up Your work is dry! It is called greenware now and it is at it’s most fragile! Handle everything with two hands. I often refer to soft hands – keep everything gentle and with your fingers spread as much as possible. Try to not pick up things like plates too much, and always with both hands! Before your work can be bisque fired it should be “cleaned up”. You work won’t go into the kiln if it has sharp edges – when glazed, sharp edges turn into razor blades! Use a piece of fly wire to rub the work all over – this will scratch a little so be light handed. Use a knife or metal kidney to scrape any areas that require a bit more dynamic treatment than the fly wire offers! Finally, a very light wipe over with a slightly damp sponge can help soften and soothe all of your edges and dags! Trimming thrown work: If you are planning to trim (or turn) your thrown work (and you should be), make sure you bag it well – your work should be leather hard to almost dry for easiest trimming. Use this step to finish the work completely – use a metal kidney to polish the surface, or a slightly damp sponge to give a freshly thrown look. Wipe the sponge around the rim after trimming, and check the inside of the pot for dags! Trimming slip cast work: Usually I will trim the rims of your work on the wheel the following day to make that stage easier, however you will still need to check your work for lumps and bumps. Last but not least – check that your name is still clearly on the bottom of your work. Step Five – Bisque Firing When the work is completely dry it can go into the bisque kiln. The bisque kiln is fired to 1000°C. This process burns off the water in the clay as well as some of the chemically bound water. The structure of the clay is not altered that much at this temperature. Inside the bisque kiln, the work is stacked a little, small bowl inside a larger bowl and onto a heavy plate. Smaller items like decorations or drink coasters might get stacked several high. Consideration is paid to the weight of the stack and shape of the work. A bisque kiln can fire about one and a half times the amount of work that the glaze kiln can fire. The firing takes about 10 hours to complete the cycle and about two days to cool down. Once it has been emptied the work is placed in the glaze room ready for you to decorate! Step Six – Glazing Decorating your work with colour can be a lot of fun – and time consuming! There are three main options for surface treatment at this stage: Oxide Washes Underglazes Glazes Washes and underglazes do not “glaze” the work – It will still need a layer of glaze to fully seal the clay (washes don’t need glaze on surfaces not designed for food or liquid as they can gloss up a little on their own). Underglazes are stable colourants that turn out pretty much how they look in the jar. They can be mixed with each other to form other colours and can be used like water colours to paint onto your work. Mostly they should have a clear glaze on top to seal them. Oxides are a different species – the pink oxide (cobalt) wash turns out bright blue for instance. They don’t always need a glaze on top, and some glazes can change the colour of the wash! The glazes need no other “glaze” on top! Be careful of unknown glaze interactions – you can put any combination of glaze in a bowl or on a plate, but only a single glaze on the outside of any vertical surface! Glazes are a chemical reaction under heat. We don’t know the exact chemicals in the Mayco glazes we use. I can guess by the way they interact with each other, however, on the whole, you need to test every idea you have, and not run the test on a vertical surface! Simply put, glaze is a layer of glass like substance that bonds with the clay underneath. Clay is made of silica, alumina and water. Glaze is made of mostly silica. Silica has a melting point of 1700°C and we fire to 1240°C. The silica requires a “flux” to help it melt at the lower temperature. Fluxes can be all sorts of chemicals – a common one is calcium – calcium has a melting point of 2500°C, however, together they both melt at a much lower temperature! Colourants are metal oxides like cobalt (blue), chrome (green through black), copper (green, blue, even red!), manganese (black, purple and pink) iron (red brown), etc. Different chemicals in the glaze can have dramatic effects. for example, barium carbonate (which we don’t use) turns manganese bright pink! Other elements can turn manganese dioxide brown, blue, purple and reddish brown. Manganese dioxide is a flux in and of itself as well. So, glazes that get their black and purple colours, often interact with other glazes and RUN! Our mirror black is a good example – it mixes really well with many glazes because it fluxes them – causes them to melt faster. It will also bring out many beautiful colours in the glazes because it’s black colouring most definitely comes from manganese dioxide! Glaze chemistry is a whole subject on it’s own! We use commercial Mayco glazes on purpose – for their huge range of colour possibilities, stability, cool interactions, artistic freedom with the ability to easily brush the glazes on and ease of use. We currently have almost 50 glazes on hand! A major project is to test the interactions of all glazes with each other. That is 2,500 test tiles!!!! I’m going to make the wall behind the wheels the feature wall of pretty colours! Step Seven – Glaze (Gloss or sometimes called “Glost”) Firing Most of the time this is the final stage of making your creation (but not always!) The glaze kiln goes to 1240°C. This is called cone 6, or midrange. It is the low end of stoneware temperatures. Stoneware clays and glazes are typically fired at cone 8 – 10, that is 1260 – 1290°C. The energy requirement to go from 1240°C to 1280°C is almost a 30% more! Our clay is formulated to vitrify (mature, turn “glass-like”) at 1240°, as are our glazes. A glaze kiln take around 12 hours to reach temperature and two to three days to cool down. Sometimes a third firing process is required – this is for decoration that is added to work after the glaze firing. For example – adding precious metals and lustres. this firing temperature is usually around 600 – 800°C depending upon the techniques being used. There are many students interested in gold and silver trims – we will be doing this third type of firing soon! After firing your work will be in the student finished work shelves. Remember to pay for it before you head out the door! There is a small extra charge for using porcelain clay (it’s more than twice the price of regular clay), and for any third firing process! Once your work has been fired it can not turn back into clay for millennia – so don’t fire it if you don’t like it! Put it in the bucket for recycling. https://firebirdstudios.com.au/the-process-of-making-pottery/Ceramics have evolved over thousands of years.White earthenware dinner plate. Crazing evident all over.Backstamped ‘Made in England S LTD’flagstaff hill, warrnambool, shipwrecked-coast, flagstaff-hill, flagstaff-hill-maritime-museum, maritime-museum, shipwreck-coast, flagstaff-hill-maritime-village, ceramics, tableware -
 Flagstaff Hill Maritime Museum and Village
Domestic object - Plate, Johnson Bros
The Process of Making Pottery Decorating, Firing, Glazing, Making, Technical There is a rhythm and flow to clay. It can’t be done all at once! Even the making process! It can take weeks to get everything done, especially if you can only work on your pottery once a week! Even though we have three hour classes, it’s often just not enough time! Here is an overview of some of the processes so you have a bit more grasp on some of the technical stuff! Step One – Design There are SO many ideas out there for making stuff in clay! From delicate porcelain jewellery, through to heavy sculptural work and everything in between. Deciding your direction is sometimes not that easy – when you first start, try everything, you will naturally gravitate to the style that you enjoy! The options and variations are endless and can get a wee bit overwhelming too! Check in with me before you start to ensure your ideas will work, what order you might do things, how you could achieve the look you are seeking and any other technical data required! Step Two – Making Clay is thixotropic. This means that as you work with it, the clay first gets sloppier and wetter, before is begins to dry in the atmosphere. For most things, you simply can’t do all parts of the project at once. An example of work order might look like: Get last weeks work out from the shelves Prepare clay for today’s work – roll your clay, prepare balls for throwing, make the first stage of a pinch pot) Clean up last week’s work and put it on the shelf for bisque firing Check that you have any glazing to do – and do enough of it that you will have time to finish your main project Do the next step of your next project – there might be a further step that can’t be complete immediately, in that case, wrap your work well and put onto the shelves. Letting your work rest for a while can really help keep your work clean and professional looking. Many things require bagging under plastic to keep it ready for work the next week – put your name on the outside of the bag so you can find your work easily. We have stickers and markers. Consider how you want to decorate your work – coloured slip can be applied at a fairly wet stage (remembering that it will make your work even wetter!). Trying to apply slip to dry clay won’t work! If you want to do sgraffito – you will need to keep the work leather hard (a state of dryness where you can still work the clay with a little effort and a little water and care). Step Three – Drying Most of the time your work can go into the rack uncovered to let it dry out for the following week. If you want to continue forming or shaping you will need to double bag your work – put your work on a suitable sized bat and put the bat in a bag so the base of the bag is under the bat, then put another bag over the top of the work and tuck the top of the bag under the bat. If you want to trim (or turn) your thrown work the following week, it should also be double bagged. If your work is large, delicate, or of uneven thicknesses, you should lightly cover your work for drying. When considering the drying process, bare in mind the weather, humidity and wind! The hotter and dryer, the faster things dry and work can dry unevenly in the shelves – this can lead to cracking – another time to lightly cover your work for drying. Step Four – Trimming and Cleaning Up Your work is dry! It is called greenware now and it is at it’s most fragile! Handle everything with two hands. I often refer to soft hands – keep everything gentle and with your fingers spread as much as possible. Try to not pick up things like plates too much, and always with both hands! Before your work can be bisque fired it should be “cleaned up”. You work won’t go into the kiln if it has sharp edges – when glazed, sharp edges turn into razor blades! Use a piece of fly wire to rub the work all over – this will scratch a little so be light handed. Use a knife or metal kidney to scrape any areas that require a bit more dynamic treatment than the fly wire offers! Finally, a very light wipe over with a slightly damp sponge can help soften and soothe all of your edges and dags! Trimming thrown work: If you are planning to trim (or turn) your thrown work (and you should be), make sure you bag it well – your work should be leather hard to almost dry for easiest trimming. Use this step to finish the work completely – use a metal kidney to polish the surface, or a slightly damp sponge to give a freshly thrown look. Wipe the sponge around the rim after trimming, and check the inside of the pot for dags! Trimming slip cast work: Usually I will trim the rims of your work on the wheel the following day to make that stage easier, however you will still need to check your work for lumps and bumps. Last but not least – check that your name is still clearly on the bottom of your work. Step Five – Bisque Firing When the work is completely dry it can go into the bisque kiln. The bisque kiln is fired to 1000°C. This process burns off the water in the clay as well as some of the chemically bound water. The structure of the clay is not altered that much at this temperature. Inside the bisque kiln, the work is stacked a little, small bowl inside a larger bowl and onto a heavy plate. Smaller items like decorations or drink coasters might get stacked several high. Consideration is paid to the weight of the stack and shape of the work. A bisque kiln can fire about one and a half times the amount of work that the glaze kiln can fire. The firing takes about 10 hours to complete the cycle and about two days to cool down. Once it has been emptied the work is placed in the glaze room ready for you to decorate! Step Six – Glazing Decorating your work with colour can be a lot of fun – and time consuming! There are three main options for surface treatment at this stage: Oxide Washes Underglazes Glazes Washes and underglazes do not “glaze” the work – It will still need a layer of glaze to fully seal the clay (washes don’t need glaze on surfaces not designed for food or liquid as they can gloss up a little on their own). Underglazes are stable colourants that turn out pretty much how they look in the jar. They can be mixed with each other to form other colours and can be used like water colours to paint onto your work. Mostly they should have a clear glaze on top to seal them. Oxides are a different species – the pink oxide (cobalt) wash turns out bright blue for instance. They don’t always need a glaze on top, and some glazes can change the colour of the wash! The glazes need no other “glaze” on top! Be careful of unknown glaze interactions – you can put any combination of glaze in a bowl or on a plate, but only a single glaze on the outside of any vertical surface! Glazes are a chemical reaction under heat. We don’t know the exact chemicals in the Mayco glazes we use. I can guess by the way they interact with each other, however, on the whole, you need to test every idea you have, and not run the test on a vertical surface! Simply put, glaze is a layer of glass like substance that bonds with the clay underneath. Clay is made of silica, alumina and water. Glaze is made of mostly silica. Silica has a melting point of 1700°C and we fire to 1240°C. The silica requires a “flux” to help it melt at the lower temperature. Fluxes can be all sorts of chemicals – a common one is calcium – calcium has a melting point of 2500°C, however, together they both melt at a much lower temperature! Colourants are metal oxides like cobalt (blue), chrome (green through black), copper (green, blue, even red!), manganese (black, purple and pink) iron (red brown), etc. Different chemicals in the glaze can have dramatic effects. for example, barium carbonate (which we don’t use) turns manganese bright pink! Other elements can turn manganese dioxide brown, blue, purple and reddish brown. Manganese dioxide is a flux in and of itself as well. So, glazes that get their black and purple colours, often interact with other glazes and RUN! Our mirror black is a good example – it mixes really well with many glazes because it fluxes them – causes them to melt faster. It will also bring out many beautiful colours in the glazes because it’s black colouring most definitely comes from manganese dioxide! Glaze chemistry is a whole subject on it’s own! We use commercial Mayco glazes on purpose – for their huge range of colour possibilities, stability, cool interactions, artistic freedom with the ability to easily brush the glazes on and ease of use. We currently have almost 50 glazes on hand! A major project is to test the interactions of all glazes with each other. That is 2,500 test tiles!!!! I’m going to make the wall behind the wheels the feature wall of pretty colours! Step Seven – Glaze (Gloss or sometimes called “Glost”) Firing Most of the time this is the final stage of making your creation (but not always!) The glaze kiln goes to 1240°C. This is called cone 6, or midrange. It is the low end of stoneware temperatures. Stoneware clays and glazes are typically fired at cone 8 – 10, that is 1260 – 1290°C. The energy requirement to go from 1240°C to 1280°C is almost a 30% more! Our clay is formulated to vitrify (mature, turn “glass-like”) at 1240°, as are our glazes. A glaze kiln take around 12 hours to reach temperature and two to three days to cool down. Sometimes a third firing process is required – this is for decoration that is added to work after the glaze firing. For example – adding precious metals and lustres. this firing temperature is usually around 600 – 800°C depending upon the techniques being used. There are many students interested in gold and silver trims – we will be doing this third type of firing soon! After firing your work will be in the student finished work shelves. Remember to pay for it before you head out the door! There is a small extra charge for using porcelain clay (it’s more than twice the price of regular clay), and for any third firing process! Once your work has been fired it can not turn back into clay for millennia – so don’t fire it if you don’t like it! Put it in the bucket for recycling. https://firebirdstudios.com.au/the-process-of-making-pottery/Ceramics have evolved over thousands of years.A white earthenware side plate with a gadroon edge. Has water marks and chips on front.‘Johnson Bros England Reg No 15587’flagstaff hill, warrnambool, shipwrecked-coast, flagstaff-hill, flagstaff-hill-maritime-museum, maritime-museum, shipwreck-coast, flagstaff-hill-maritime-village, johnson bros, ceramics, tableware -
 Flagstaff Hill Maritime Museum and Village
Domestic object - Plate, Alfred Meakin
The Process of Making Pottery Decorating, Firing, Glazing, Making, Technical There is a rhythm and flow to clay. It can’t be done all at once! Even the making process! It can take weeks to get everything done, especially if you can only work on your pottery once a week! Even though we have three hour classes, it’s often just not enough time! Here is an overview of some of the processes so you have a bit more grasp on some of the technical stuff! Step One – Design There are SO many ideas out there for making stuff in clay! From delicate porcelain jewellery, through to heavy sculptural work and everything in between. Deciding your direction is sometimes not that easy – when you first start, try everything, you will naturally gravitate to the style that you enjoy! The options and variations are endless and can get a wee bit overwhelming too! Check in with me before you start to ensure your ideas will work, what order you might do things, how you could achieve the look you are seeking and any other technical data required! Step Two – Making Clay is thixotropic. This means that as you work with it, the clay first gets sloppier and wetter, before is begins to dry in the atmosphere. For most things, you simply can’t do all parts of the project at once. An example of work order might look like: Get last weeks work out from the shelves Prepare clay for today’s work – roll your clay, prepare balls for throwing, make the first stage of a pinch pot) Clean up last week’s work and put it on the shelf for bisque firing Check that you have any glazing to do – and do enough of it that you will have time to finish your main project Do the next step of your next project – there might be a further step that can’t be complete immediately, in that case, wrap your work well and put onto the shelves. Letting your work rest for a while can really help keep your work clean and professional looking. Many things require bagging under plastic to keep it ready for work the next week – put your name on the outside of the bag so you can find your work easily. We have stickers and markers. Consider how you want to decorate your work – coloured slip can be applied at a fairly wet stage (remembering that it will make your work even wetter!). Trying to apply slip to dry clay won’t work! If you want to do sgraffito – you will need to keep the work leather hard (a state of dryness where you can still work the clay with a little effort and a little water and care). Step Three – Drying Most of the time your work can go into the rack uncovered to let it dry out for the following week. If you want to continue forming or shaping you will need to double bag your work – put your work on a suitable sized bat and put the bat in a bag so the base of the bag is under the bat, then put another bag over the top of the work and tuck the top of the bag under the bat. If you want to trim (or turn) your thrown work the following week, it should also be double bagged. If your work is large, delicate, or of uneven thicknesses, you should lightly cover your work for drying. When considering the drying process, bare in mind the weather, humidity and wind! The hotter and dryer, the faster things dry and work can dry unevenly in the shelves – this can lead to cracking – another time to lightly cover your work for drying. Step Four – Trimming and Cleaning Up Your work is dry! It is called greenware now and it is at it’s most fragile! Handle everything with two hands. I often refer to soft hands – keep everything gentle and with your fingers spread as much as possible. Try to not pick up things like plates too much, and always with both hands! Before your work can be bisque fired it should be “cleaned up”. You work won’t go into the kiln if it has sharp edges – when glazed, sharp edges turn into razor blades! Use a piece of fly wire to rub the work all over – this will scratch a little so be light handed. Use a knife or metal kidney to scrape any areas that require a bit more dynamic treatment than the fly wire offers! Finally, a very light wipe over with a slightly damp sponge can help soften and soothe all of your edges and dags! Trimming thrown work: If you are planning to trim (or turn) your thrown work (and you should be), make sure you bag it well – your work should be leather hard to almost dry for easiest trimming. Use this step to finish the work completely – use a metal kidney to polish the surface, or a slightly damp sponge to give a freshly thrown look. Wipe the sponge around the rim after trimming, and check the inside of the pot for dags! Trimming slip cast work: Usually I will trim the rims of your work on the wheel the following day to make that stage easier, however you will still need to check your work for lumps and bumps. Last but not least – check that your name is still clearly on the bottom of your work. Step Five – Bisque Firing When the work is completely dry it can go into the bisque kiln. The bisque kiln is fired to 1000°C. This process burns off the water in the clay as well as some of the chemically bound water. The structure of the clay is not altered that much at this temperature. Inside the bisque kiln, the work is stacked a little, small bowl inside a larger bowl and onto a heavy plate. Smaller items like decorations or drink coasters might get stacked several high. Consideration is paid to the weight of the stack and shape of the work. A bisque kiln can fire about one and a half times the amount of work that the glaze kiln can fire. The firing takes about 10 hours to complete the cycle and about two days to cool down. Once it has been emptied the work is placed in the glaze room ready for you to decorate! Step Six – Glazing Decorating your work with colour can be a lot of fun – and time consuming! There are three main options for surface treatment at this stage: Oxide Washes Underglazes Glazes Washes and underglazes do not “glaze” the work – It will still need a layer of glaze to fully seal the clay (washes don’t need glaze on surfaces not designed for food or liquid as they can gloss up a little on their own). Underglazes are stable colourants that turn out pretty much how they look in the jar. They can be mixed with each other to form other colours and can be used like water colours to paint onto your work. Mostly they should have a clear glaze on top to seal them. Oxides are a different species – the pink oxide (cobalt) wash turns out bright blue for instance. They don’t always need a glaze on top, and some glazes can change the colour of the wash! The glazes need no other “glaze” on top! Be careful of unknown glaze interactions – you can put any combination of glaze in a bowl or on a plate, but only a single glaze on the outside of any vertical surface! Glazes are a chemical reaction under heat. We don’t know the exact chemicals in the Mayco glazes we use. I can guess by the way they interact with each other, however, on the whole, you need to test every idea you have, and not run the test on a vertical surface! Simply put, glaze is a layer of glass like substance that bonds with the clay underneath. Clay is made of silica, alumina and water. Glaze is made of mostly silica. Silica has a melting point of 1700°C and we fire to 1240°C. The silica requires a “flux” to help it melt at the lower temperature. Fluxes can be all sorts of chemicals – a common one is calcium – calcium has a melting point of 2500°C, however, together they both melt at a much lower temperature! Colourants are metal oxides like cobalt (blue), chrome (green through black), copper (green, blue, even red!), manganese (black, purple and pink) iron (red brown), etc. Different chemicals in the glaze can have dramatic effects. for example, barium carbonate (which we don’t use) turns manganese bright pink! Other elements can turn manganese dioxide brown, blue, purple and reddish brown. Manganese dioxide is a flux in and of itself as well. So, glazes that get their black and purple colours, often interact with other glazes and RUN! Our mirror black is a good example – it mixes really well with many glazes because it fluxes them – causes them to melt faster. It will also bring out many beautiful colours in the glazes because it’s black colouring most definitely comes from manganese dioxide! Glaze chemistry is a whole subject on it’s own! We use commercial Mayco glazes on purpose – for their huge range of colour possibilities, stability, cool interactions, artistic freedom with the ability to easily brush the glazes on and ease of use. We currently have almost 50 glazes on hand! A major project is to test the interactions of all glazes with each other. That is 2,500 test tiles!!!! I’m going to make the wall behind the wheels the feature wall of pretty colours! Step Seven – Glaze (Gloss or sometimes called “Glost”) Firing Most of the time this is the final stage of making your creation (but not always!) The glaze kiln goes to 1240°C. This is called cone 6, or midrange. It is the low end of stoneware temperatures. Stoneware clays and glazes are typically fired at cone 8 – 10, that is 1260 – 1290°C. The energy requirement to go from 1240°C to 1280°C is almost a 30% more! Our clay is formulated to vitrify (mature, turn “glass-like”) at 1240°, as are our glazes. A glaze kiln take around 12 hours to reach temperature and two to three days to cool down. Sometimes a third firing process is required – this is for decoration that is added to work after the glaze firing. For example – adding precious metals and lustres. this firing temperature is usually around 600 – 800°C depending upon the techniques being used. There are many students interested in gold and silver trims – we will be doing this third type of firing soon! After firing your work will be in the student finished work shelves. Remember to pay for it before you head out the door! There is a small extra charge for using porcelain clay (it’s more than twice the price of regular clay), and for any third firing process! Once your work has been fired it can not turn back into clay for millennia – so don’t fire it if you don’t like it! Put it in the bucket for recycling. https://firebirdstudios.com.au/the-process-of-making-pottery/Ceramics have evolved over thousands of years.Earthenware dessert plate, cream colour. Made by Alfred Meakin, England. Backstamped ‘Alfred Meakin England’. flagstaff hill, warrnambool, shipwrecked-coast, flagstaff-hill, flagstaff-hill-maritime-museum, maritime-museum, shipwreck-coast, flagstaff-hill-maritime-village, alfred meakin, ceramics, earthenware, kitchenware -
 Flagstaff Hill Maritime Museum and Village
Domestic object - Jug
The Process of Making Pottery Decorating, Firing, Glazing, Making, Technical There is a rhythm and flow to clay. It can’t be done all at once! Even the making process! It can take weeks to get everything done, especially if you can only work on your pottery once a week! Even though we have three hour classes, it’s often just not enough time! Here is an overview of some of the processes so you have a bit more grasp on some of the technical stuff! Step One – Design There are SO many ideas out there for making stuff in clay! From delicate porcelain jewellery, through to heavy sculptural work and everything in between. Deciding your direction is sometimes not that easy – when you first start, try everything, you will naturally gravitate to the style that you enjoy! The options and variations are endless and can get a wee bit overwhelming too! Check in with me before you start to ensure your ideas will work, what order you might do things, how you could achieve the look you are seeking and any other technical data required! Step Two – Making Clay is thixotropic. This means that as you work with it, the clay first gets sloppier and wetter, before is begins to dry in the atmosphere. For most things, you simply can’t do all parts of the project at once. An example of work order might look like: Get last weeks work out from the shelves Prepare clay for today’s work – roll your clay, prepare balls for throwing, make the first stage of a pinch pot) Clean up last week’s work and put it on the shelf for bisque firing Check that you have any glazing to do – and do enough of it that you will have time to finish your main project Do the next step of your next project – there might be a further step that can’t be complete immediately, in that case, wrap your work well and put onto the shelves. Letting your work rest for a while can really help keep your work clean and professional looking. Many things require bagging under plastic to keep it ready for work the next week – put your name on the outside of the bag so you can find your work easily. We have stickers and markers. Consider how you want to decorate your work – coloured slip can be applied at a fairly wet stage (remembering that it will make your work even wetter!). Trying to apply slip to dry clay won’t work! If you want to do sgraffito – you will need to keep the work leather hard (a state of dryness where you can still work the clay with a little effort and a little water and care). Step Three – Drying Most of the time your work can go into the rack uncovered to let it dry out for the following week. If you want to continue forming or shaping you will need to double bag your work – put your work on a suitable sized bat and put the bat in a bag so the base of the bag is under the bat, then put another bag over the top of the work and tuck the top of the bag under the bat. If you want to trim (or turn) your thrown work the following week, it should also be double bagged. If your work is large, delicate, or of uneven thicknesses, you should lightly cover your work for drying. When considering the drying process, bare in mind the weather, humidity and wind! The hotter and dryer, the faster things dry and work can dry unevenly in the shelves – this can lead to cracking – another time to lightly cover your work for drying. Step Four – Trimming and Cleaning Up Your work is dry! It is called greenware now and it is at it’s most fragile! Handle everything with two hands. I often refer to soft hands – keep everything gentle and with your fingers spread as much as possible. Try to not pick up things like plates too much, and always with both hands! Before your work can be bisque fired it should be “cleaned up”. You work won’t go into the kiln if it has sharp edges – when glazed, sharp edges turn into razor blades! Use a piece of fly wire to rub the work all over – this will scratch a little so be light handed. Use a knife or metal kidney to scrape any areas that require a bit more dynamic treatment than the fly wire offers! Finally, a very light wipe over with a slightly damp sponge can help soften and soothe all of your edges and dags! Trimming thrown work: If you are planning to trim (or turn) your thrown work (and you should be), make sure you bag it well – your work should be leather hard to almost dry for easiest trimming. Use this step to finish the work completely – use a metal kidney to polish the surface, or a slightly damp sponge to give a freshly thrown look. Wipe the sponge around the rim after trimming, and check the inside of the pot for dags! Trimming slip cast work: Usually I will trim the rims of your work on the wheel the following day to make that stage easier, however you will still need to check your work for lumps and bumps. Last but not least – check that your name is still clearly on the bottom of your work. Step Five – Bisque Firing When the work is completely dry it can go into the bisque kiln. The bisque kiln is fired to 1000°C. This process burns off the water in the clay as well as some of the chemically bound water. The structure of the clay is not altered that much at this temperature. Inside the bisque kiln, the work is stacked a little, small bowl inside a larger bowl and onto a heavy plate. Smaller items like decorations or drink coasters might get stacked several high. Consideration is paid to the weight of the stack and shape of the work. A bisque kiln can fire about one and a half times the amount of work that the glaze kiln can fire. The firing takes about 10 hours to complete the cycle and about two days to cool down. Once it has been emptied the work is placed in the glaze room ready for you to decorate! Step Six – Glazing Decorating your work with colour can be a lot of fun – and time consuming! There are three main options for surface treatment at this stage: Oxide Washes Underglazes Glazes Washes and underglazes do not “glaze” the work – It will still need a layer of glaze to fully seal the clay (washes don’t need glaze on surfaces not designed for food or liquid as they can gloss up a little on their own). Underglazes are stable colourants that turn out pretty much how they look in the jar. They can be mixed with each other to form other colours and can be used like water colours to paint onto your work. Mostly they should have a clear glaze on top to seal them. Oxides are a different species – the pink oxide (cobalt) wash turns out bright blue for instance. They don’t always need a glaze on top, and some glazes can change the colour of the wash! The glazes need no other “glaze” on top! Be careful of unknown glaze interactions – you can put any combination of glaze in a bowl or on a plate, but only a single glaze on the outside of any vertical surface! Glazes are a chemical reaction under heat. We don’t know the exact chemicals in the Mayco glazes we use. I can guess by the way they interact with each other, however, on the whole, you need to test every idea you have, and not run the test on a vertical surface! Simply put, glaze is a layer of glass like substance that bonds with the clay underneath. Clay is made of silica, alumina and water. Glaze is made of mostly silica. Silica has a melting point of 1700°C and we fire to 1240°C. The silica requires a “flux” to help it melt at the lower temperature. Fluxes can be all sorts of chemicals – a common one is calcium – calcium has a melting point of 2500°C, however, together they both melt at a much lower temperature! Colourants are metal oxides like cobalt (blue), chrome (green through black), copper (green, blue, even red!), manganese (black, purple and pink) iron (red brown), etc. Different chemicals in the glaze can have dramatic effects. for example, barium carbonate (which we don’t use) turns manganese bright pink! Other elements can turn manganese dioxide brown, blue, purple and reddish brown. Manganese dioxide is a flux in and of itself as well. So, glazes that get their black and purple colours, often interact with other glazes and RUN! Our mirror black is a good example – it mixes really well with many glazes because it fluxes them – causes them to melt faster. It will also bring out many beautiful colours in the glazes because it’s black colouring most definitely comes from manganese dioxide! Glaze chemistry is a whole subject on it’s own! We use commercial Mayco glazes on purpose – for their huge range of colour possibilities, stability, cool interactions, artistic freedom with the ability to easily brush the glazes on and ease of use. We currently have almost 50 glazes on hand! A major project is to test the interactions of all glazes with each other. That is 2,500 test tiles!!!! I’m going to make the wall behind the wheels the feature wall of pretty colours! Step Seven – Glaze (Gloss or sometimes called “Glost”) Firing Most of the time this is the final stage of making your creation (but not always!) The glaze kiln goes to 1240°C. This is called cone 6, or midrange. It is the low end of stoneware temperatures. Stoneware clays and glazes are typically fired at cone 8 – 10, that is 1260 – 1290°C. The energy requirement to go from 1240°C to 1280°C is almost a 30% more! Our clay is formulated to vitrify (mature, turn “glass-like”) at 1240°, as are our glazes. A glaze kiln take around 12 hours to reach temperature and two to three days to cool down. Sometimes a third firing process is required – this is for decoration that is added to work after the glaze firing. For example – adding precious metals and lustres. this firing temperature is usually around 600 – 800°C depending upon the techniques being used. There are many students interested in gold and silver trims – we will be doing this third type of firing soon! After firing your work will be in the student finished work shelves. Remember to pay for it before you head out the door! There is a small extra charge for using porcelain clay (it’s more than twice the price of regular clay), and for any third firing process! Once your work has been fired it can not turn back into clay for millennia – so don’t fire it if you don’t like it! Put it in the bucket for recycling. https://firebirdstudios.com.au/the-process-of-making-pottery/The form of the jug has been in use for many centuries.Stoneware jug. Two tone brown glaze with pierced lip behind spout. Spout chipped.None.flagstaff hill, warrnambool, shipwrecked-coast, flagstaff-hill, flagstaff-hill-maritime-museum, maritime-museum, shipwreck-coast, flagstaff-hill-maritime-village, jug, ceramic jug -
 Halls Gap & Grampians Historical Society
Book - B/W
Norval Guest-House Aginda and Wettenhall The original Norval The story of Norval begins in 1917 when it was built as a private residence for Mr and Mrs William Thompson. Mrs Thompson was a pioneer of the tourist business, having come from Ballarat to Hall's Gap in 1909 to manage Bellfield Guest-house According to Ida Stanton, in her history of Hall's Gap entitled "Bridging the Gap", Mr Thompson and his wife acquired the six roomed shearers quarters at "Hankelow", on land leased by the Wettenhall family, on the south side of Bellfield. Mr Thompson, she says, completely dismantled the quarters, carefully marking each board, then hired George McKeon to cart the material up to where the original Norval house stood. With great care, the rooms were rebuilt into a home for William and his wife Mathilda. Catherine Good, the daughter of Viola (nee Wettenhall) and niece of Dr Roland, in here "Recollections" entitled "Look to the Mountains - Viola's View 1887-1979", mentions Hankelow. Speaking of her days at Glen Holford, the Wettenhall home at Pomonal, Viola says "Verona and Francie Dennis, my cousins, and I went for one very exciting trip. Father (i.e Dr Roland's father) had bought 300 acres in the Gap to take sheep from Carr's Plains in time of drought, and had a little cottage there with one of the Glen Holford men and his wife in charge. It was called Hankelow. So we three set off over the Range from Glen Holford on foot and leading a pack horse with our night attire and no doubt sponge bags. "We stayed the night at Hankelow with Jim and Minnie. Minnie had been a housemaid at Glen Holford. I was very fond of her. It makes one laugh to think of the excitement of "roughing it"! Minnie gave us a lovely dinner with meringues, and cream, I remember, then early morning tea. After breakfast we were driven in the buggy to the foot of the Goat Rock (since renamed Mt Rosea) and off we went - walking in our long skirts and ankle boots. There was no track of any kind, nor blazed trail - we just made for the top. It was rather frightening at times because we couldn't see where the top was an it always seemed to get further and further away. The last mile was so terribly steep, with a lot of lose shale where you went up twelve inches and slipped back six. Now you motor to about a couple of miles from the top and then have a graded path. Anyway, we got there and back safely and were rewarded with a magnificent view" By a strange coincidence, Hankelow, the source of Norval Guest-house in times past (if the name can be applied to the property as a whole, which seems likely) is in fact also the source of our Wettenhall Campsite! Hankelow was named after a property owned by the Wettenhall family in England. In 1917 William and Mathilda retired to their newly built home (Norval) "to escape from the tourist business" However, so many people made requests to stay with them that they found it necessary to add several more rooms and sleepouts to their home. In this way, early in 1921, the guest-house began to take shape. Mr Thompson, a former librarian of the Mechanics Institute in Ballarat, named the house "Norval". The name "Norval" comes from a quotation from the play 'Douglas" by John Home. Written in the mid-16th century the play is set in the Grampian Mountains of Scotland. The story is of a boy who was parted from this mother during his early childhood, and was given to a shepherd who raised him. Some eighteen years later the mother by chance happens to meet here son, and not knowing his true identity, asks his name. He answers, "My name is Norval; and in the Grampian hills my father feeds his flocks." Perhaps it was simply because "Norval" was associated with the "Grampians" that it was chosen by Mr Thompson. He may also have been conscious of feeding "flocks" of tourists in his expanding, guest-house. Norval Guest-house prospered. It was known for its fine cooking and friendly atmosphere - a tradition which has carried through to the modern Norval! It closed between 1940 and 1949 because of the second world war. In 1949 it was decided to almost completely rebuild the house. Most of the old building (Hankelow plus) was demolished and rebuilt to a much larger and more modern plan. And then, on May 1, 1965, it was purchased by the Committee of Management of the Methodist and Presbyterian Conference Centres. At this time the guest-house was owned and operated by Marjorie and Lachland McLennan, Mrs McLennan being the daughter of William and Mathilda Thompson, the pioneers of the establishment. The McLennans had operated the Guest-house since about 1930.Photocopy 2 pages of article from book titled 'In the Making' title of article Norval guest House the original Norvalaccommodation, guesthouses, norval -
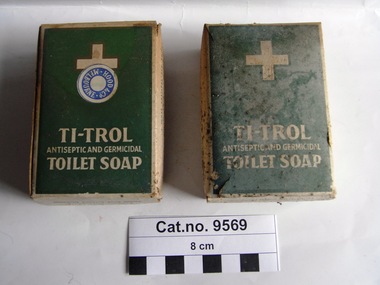 Coal Creek Community Park & Museum
Soap, TI-TROL ANTISEPTIC AND GERMICIDAL TOILET SOAP, c. 1928-1968
TROVE : Evening News (Sydney, NSW : 1869 - 1931), Thursday 11 October 1928, page 13. NEW COMPANIES The following new companies were registered this afternoon :- Australian Essential Oils Ltd : Nominal capital. £50,000, in 93.000 ordinary and 7,000 deferred shares at 10/-. to engage in business of distillers, manufacturers of, and dealers in oils from vegetables and other sub-stances, chemists etc. First directors: N. H.B.Keynor, R.K.Allport, E.M Humphries, and H. James. Head office Sydney. TROVE : Government Gazette of the State of New South Wales (Sydney, NSW : 1901 - 2001), Friday 26 July 1968 (No.89), page 3028 IN the matter of the Companies Act, 1961-1966, and in the matter of AUSTRALIAN ESSENTIAL OILS LTD (Receiver and Manager Appointed).—Roy Leslie Pegler, Receiver and Manager of Australian Essential Oils Ltd (Receiver and Manager Appointed)„ appointed by debenture holders on the 11 th July, 1966, hereby gives notice that any debenture holders and others having any claim against or to Australian Essential Oils Ltd (Receiver and Manager Appointed) are required to send particulars of their debenture or claim to the Receiver, Roy Leslie Pegler, at c.o. Messrs Pegler, Ellis & Co., Chartered Accountants, 235-7 Elizabeth Street, Sydney, N.S.W., on or before the 27th September, 1968, at the expiration of which time the Receiver and Manager will distribute the assets of the said Company to the persons and/or companies entitled, having regard only to the claims of which he then has notice.—Dated 24th July, 1968. PEGLER, ELLIS & CO., Chartered Accountants, 235-7 Elizabeth Street, Sydney, N.S.W. 8744—$5 White cardboard box printed in dark green with a round blue and white sticker on one side, containing a cream paper leaflet printed in dark green, wrapped around a greaseproof paper wrapped rectangular cake of translucent brown soap with impressed text on one side.Impressed on one side of the cake of soap ' A PRODUCT OF AUSTRALIAN ESSENTIAL OILS LTD SYDNEY'. On reverse of soap impressed 'TI-TROL ANTISEPTIC TOU\ILET SOAP'. Printed on the box 'TI-TROL ANTISEPTIC AND GERMICIDAL TOILET SOAP. Printed Leaflet wrapped around cake of soap 'Germicide TI-TROL Antiseptic, Toilet Soap ELEVEN TIMES MORE POWERFUL THAN CARBOLIC. NON IRRITANT ………NON POISONOUS. “Ti –Trol” GERMICIDAL ANTISEPTIC SOAP is the most modern of all toilet soap …..Distilled and manufactured by Australian Essential Oils Ltd., the pioneers of Tea-Tree Oil Industry in Australia, and manufacturers of that famous antiseptic solution Melasol. It has taken years of patient research, of test, trial and experiment to reach the pinnacle of perfection which Ti-Trol Soap is now offering to the public. Ti-Trol is a hand-made glycerine base soap in which only the finest ingredients are used. One of its most attractive features is that it contains a full three per cent. of “Ti-trol”. In medical and clinical practice, both in Australia and abroad, Ti Trol has given remarkable results…particularly in its cleansing properties: its soothing HEALING action on dirty and inflamed septic wounds. By incorporating Ti-Trol in a glycerine base soap, experts are agreed that the result….. Ti-Trol soap is unequalled-anywhere- for its soft soothing healing and germicidal properties. Ti-Trol soap is non-irritant and non-poisonous and can be used on the tenderest skins…babies’ or the most delicate peach-bloom complexions, with most excellent results. . PRODUCT OF A SOAP MAKER OF INTERNATIONAL EXPERIENCE Australian Essential Oils Ltd., have been fortunate in procuring the services of a soap-maker of International experience and world-wide knowledge of Soap Production, whose genius has produced Ti-Trol, and whose uncanny sense of blending has made Ti-Trol the most famous of all Germicidal Toilet Soaps. Ti-Trol is non-irritant and non-poisonous and has been proved by medical and specialised authorities top\ possess great healing and cleansing properties. It is a powerful Germicide and antiseptic….ELEVEN TIMES QUICKER THAN PURE CARBOLIC. . DANDRUFF CAN’T LIVE WITH Ti-Trol. Dandruff ......that horrible “give away” which many men and women suffer from…..can easily be dispelled by using Ti-Trol Soap this way : Rub a little Olive Oil into the scalp before retiring at night, and the following morning wash your head thoroughly with Ti-Trol Soap, allowing the lather to remain on the scalp for about a minute and a half. Then rinse the hair thoroughly in warm water. .WASH BRUSHES AND COMBS WITH Ti-Trol SOAP When you’ve done this and dried your hair, wash all your brushes and combs in a strong, soapy solution made with Ti-Trol Soap, and then carefully sponge the inside of the hat bands with a flannel or cloth moistened with this soapy solution. Follow these directions and you’ll never need to fear dandruff. .Ti-Trol…WONDERFUL HEALER OF CUTS. SORES, WOUNDS, ETC. There never was a more patent healer of CUTS, SORES, WOUNDS, ABRASIONS AND SEPTIC SORES than Ti-Trol… Here’s how to use it : Wash the affected parts with a fairly strong Ti-Trol soapy solution made with warm water, and then apply with lint soaked with Melasol, which is the miscible form of Ti-Trol (Melasol is obtainable at all chemists and stores everywhere). . Ti-Trol SOAP……..A DEODORANT, A BEAUTIFIER……a safeguard for tender skins Ti-Trol Soap, because of its delicate, pungent, aroma and antiseptic properties, is unequalled as a deodorant, and is never failing when used for this purpose. Ti-Trol Soap can be used on the tenderest skins, and even baby’s skin, with greatest safety. It’s delightful fragrance will give added pleasure to your toilet. . DO NOT WASTE Ti-Trol Soap is too valuable to waste. Therefore, use it carefully. Do not leave it in the water. To obtain greatest economy it is preferable to use a face cloth when using Ti-Trol Soap. For health, for the most economical means of insuring against disease, use Ti-Trol Ointment…..for cuts, bruises etc. Ti-Trol….for boils, cuts, sores, abrasions and septic conditions. MELASOL…..for Tinea, Mouth Wash and as a Dentifice. . All are products containing Ti-Trol, distilled and provided by Australian Essential Oils Ltd. 18 Loftus Street, Sydney. N.S.W.'. tea tree oil, soap, glycerine, antisptic, germicide -
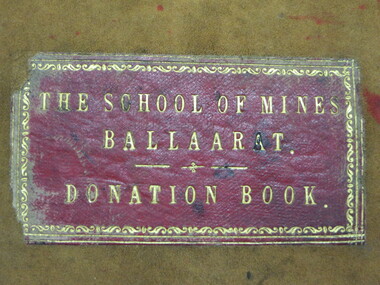 Federation University Historical Collection
Book - Ledger, Ballarat School of Mines Donation Book, 1878 - 1895, 1878-1895
The Donation Book relates to the Ballarat School of Mines Museum which opened in 1872. Very few of these items are still held by Federation University. The Museum was emptied in the 1960s with items being distrubuted to the Ballarat Historical Society, returned to original lenders (ie Pern Collection), of disposed of. Donations to the Ballarat School of Mines include: 34. M. Hamburger, Ballarat - bunsen burner 41. W.H. Shaw, Phoenix Foundry - 81 nos of 'Engineer' 89. Juvenile Industrial Exhibition Association Committee per Joseph Flude - dies used for striking medals awarded to successful exhibits. 165. Ferdinand Von Mueller 172 Ferdinand Von Mueller o hortus siccus 6 197. James Stoddart 203. Edward Gazzard, North Creswick - Model of safety Cage invented and made by donor 218. E. Morey 222. Alfred Lestor 228. J.J. Sleep, Ballarat, patent Lever escarpment Clock (displayed in laboratories) 237. Bernard Smith (Warden) per favor of James M. Bickett - Bust of Mr John Lynch, Smythesdale. (Note: This item is not in the present Federation University Historical Collection) 241. James Oddie, J.P., Ballarat, Copy of 'the Chemist and Druggist' 267. John Lynch Junior, Smythesdale - Cast of "Golden Age" nugget, found at Browns by Co-operative party, 12 men. Weight 75 oz, 12 dwts, 12 grs.(Note: This item is not in the present Federation University Historical Collection) 270. Isaac Davis, Main Road, Ballarat 294. W. H. Shaw, Ballarat - 94 nos of 'The Engineer' 295. Rivett Henry Bland, Clunes - Specimen of water pipe from the Port Phillip Company's mine encrusted with carbonites of lime and magnesium (Note: This item is not in the present Federation University Historical Collection) 299. D.J. Williams, Queenscliff - 1 case shells from Fiji 305. C. Retallack, Ballarat 314. William Henry Shaw, Ballarat - glass case 323. W. Longley, Ballarat - Botanical Specimen (Note: This item is not in the present Federation University Historical Collection) 327. W. H. Angove, Perth 337. J. Cosmo Newbery, B Sc, Melbourne 343. James Hector, M.D., New Zealand 353. R.S. Mitchell, Ballarat - 8 specimens live plants (medicinal) (for the Ballarat School of Mines Garden) 355. W. Magee, Ballarat - Sugar cane plants and seeds (for the Ballarat School of Mines Garden) 363. James Hector, Wellington, new Zealand 371. William Wesley, 28 Essex St, Strand, London - Scientific book circular 380. Jacob Upfold (deceased) per favor of the trustees - bequest of steam engine indicator and belongings (boothe and case) 381. Joseph Mitchell, 22 Macarthur Street, Ballarat - sod of turf cut from Warboy's High Few, County Huntingdon, England, 1872. 394. W.H. Barnard 401. James Orr 418. F. Ratte, Sydney 440. Alfred Mica Smith, Sandhurst (Bendigo), Inaugural Address, delivered to the Bendigo School of Mines Science Society, June 20. 1881 by P.H. Macgillivray, MA, MRCS, FLS, President. (Note: This item is not in the present Federation University Historical Collection) (Note: This item is not in the present Federation University Historical Collection) 446. C. C. Shoppee, Ballarat 462. Dr Bunce, Ballarat 468. James Black, Mining Manager "Kerrit Bureet' 479. J.S. North, Mining Manager No. 2 Queen Co, Black Hill Ballarat. 505. Smith Tibbitts - A block of ancient leaves from the Nigtingbool Estate near Haddon on the Ballarat district from shaft 80 feet deep. (Note: This item is not in the present Federation University Historical Collection) 512. F.W. Niven, Ballarat - "A Handy Book to Tasmania" 522. James Hector, Wellington, New Zealand 549. C.E. Grainger, Manager Ballarat Woollen Mills - samples of dyed and raw wools 600. (4 July 1882) Henry Sutton, Ballarat - 13th annual report of the Aeronautical Society of Great Britain; 2 papers from the Proceedings of the Royal Society, nos 217 and 218- 1882, "One a new electrical storage battery by Henry Sutton, Ballarat, Victoria. 608. H. Glenny J.P., Ballarat - Specimen of Asbestos from Tasmania 610. M.H. Edelmann, Munich, Germany 674. W.H. Shaw, Phoenix Foundry - Steel boring 95 feet long taken from bed-plate of locomotive engine. 675 - H.R. Hancock J.P. pre favour Mr James Pryor, Moonta Mines 676. Baron Ferdinand Von Mueller KCMG, etc, Melbourne 678. E.F.A. Gaunt, Royal Navy, H.M.S. Nelson, per favour Lyde Gaunt - Specimen of manganese ore from the mines - Russell - New Zealand 728. Dr Pinnock, Ballarat 760. Simon Morrison, Ballarat 784. James Shugg, Hamilton - 1 case fossils from Muddy Creek, near Hamilton. (Note: This item is not in the present Federation University Historical Collection) 786. W. Bolam (inspector of Schools), Melbourne - 2 spears and 1 fishing prong Fijian 806. James Oddie, Ballarat 708. Henry G. Hanks, San Francisco 786. W. Bolam (Inspector of Government Schools Melbourne) - 2 spears and one fishing prong Fijian 824. Henrique Gorceixm Onro Preto, Brazil 840. W. Laplau, Ballarat - Gas furnace with a large assortment of fittings, also large gas holder and oil-heating apparatus 854. Robert Borch, Main Road, Ballarat - Improved safety chain (Note: This item is not in the present Federation University Historical Collection) 928. James Oddie 944. James P. Munroe, Registrar, Massachusetts 952. L.E. Cutter per favour of Mr F.J. Martell - Unexploded bomb shell from the Eureka Stockade 957. H. Glenny, Hobart 962. George Hart, Ballarat - eagle 976. Henry Sutton, Ballarat - 1 volume "Plattner on the Blowpipe" 978. J.W. Flatow, 45 Madeline Street, Carlton, Melbourne 984. Charles C Shoppee Ballarat - Copies of ancient coins 989-95 - Specimens from Moonta, South Australia 985. W.H. Wooster BOlwarra - books microscope related 1179. James Oddie - Live hedgehog 1181 C. Crisp, Bacchus Marsh, Portugal Copper Coin, 1785 1248 James Oddie, Solomon Islands - Bow and arrows & Spears 1285. C. Colyer, Smythesdale 1327. John L. McKenna, Smeaton - Fragment of Stone Axe. 1395. Mrs O. Skoglund, Nerrina 1428. Daniel Brophy, Ballarat - Collection of mineral specimen form Silverton (Collected by Mrs James Murray) 1442. Henry Sutton, Ballarat - Specimens of fossil fruits collected at Haddon by Charles Brown. 1444. Mining Department - Underground Mine Workings from Band of Hope and others. 1517. W.H. Wooster, Ballarat 1592. Bishop of Ballarat - Stone Axe and other native items 1669. H. McHaffier, Napoleons - 1 Spanish silver coin 1681. James Oddie, Dunedin 1688. W. Burbridge, Ballarat - Native Tomahawk from Metung 1708. A. Doepel, Ballarat 1712. Marty Guerin, Ballarat 1735. Bella Guerin. M.A., Ballarat - Copy Wide Awake Vol 1 No 7 May 28th 1887 and The Bulletin, March 19th 1887. 1747. Bella Geurin M.A., Ballarat - Copy Wide Awake Vol 1 No 8 June 4 1887 1751. Bella Geurin M.A., Ballarat - Copy Wide Awake Vol 1 No 9 June 11th 1887 1842. Linnean Society, London England - Charter, By Laws, Proceedings, Transactions, Journals 1853. W.J. Corbould, Silverton, NSW - chloride of silver from Pinnacles, Broken Hill, Silverton 1888. W. J. Corbould, Sample of metallic silver from Silverton, NSW 1928. E. Morey, Ballarat - Steam Engine 1937. Henry Sutton A.S.I.E., Ballarat - Plate Electric Machine, chimes and Sportman (number crossed out) 1951. Henry Sutton A.S.I.E., Ballarat - Plate Electric Machine, chimes and Sportman 1981. Harrie Wood (per W.H.B.[Barnard?), Ballarat 1996. W.H. Shaw, Phoenix Foundry - Papers "The Vict Engineer July 1887, May June July August 1888 and others 2014. Harrie Wood, Sydney - Report Department of Mines, 18872027. W.J. Bechervaise - Copy of Book by Baldwin Spencer 2034. A.G. Randall - Native Hatchet 2045. W.H. Corbould, Silverton, Collection of silver ores 2051. Fowler, Tarnagulla - Native Tomahawk 2123-2131. James Oddie, London 2163. Roff. F. Taplier, Sturt Street - Native Tomahawk 2178. Syd. Johnson, Meredith - Native Tomahawk, Greenstone 2184. Mr Tupp for Hall - Native Spear and Club 2292. Emmanuel Steinfeld, Melbourne 2313. A. Atwood, Rowlands Factory, Dana Street 2361. Dr Pinnock, Ballarat - Collection of Living Sponges 2363. P. Curnow, Ballarat - Piece of wood with stone naturally embedded 2364. R. Dowling, Waubra 2875. Mrs C, Flude, Ballarat - Collection of (5) mineral specimens 3460. Joseph Weir, Ballarat - Sample of rolled Annibar 3466. J. Hart, Ballarat - Native Shield - supposed to have been made by King Billy 4784. Mr. O. Woolnaugh, Pleasant Street - Four Native Tomahawks 6469. L. Balhausen, Ballarat 3472. John English, Smeaton - three samples of auriferous wash dirt 3607. Columbia College, New York - Handbook of Information of the Columbia College in the Ciry of New York 1892-3. 3672. L.A. Samuels, Bendigo 3724. P. Paperhagen 3736. The Late Rivett Henry Bland per John Noble Wilson - Collection of mineral specimens and fossils 3752. G.A. Denny, South Africa 3755. J. Carroll, Ballarat - Specimen of Native bread found in Ballarat East. 4765. J. Donnelly, Springs, Bungaree I. Fowler, Coolgardie, Specimen of Gold Bearing Quartz ballarat school of mines, doantions, museum, ballarat school of mines museum, safety cage, botanical garden, materia medica garden, library, bella guerin, james oddie, phoenix foundry, w.h. shaw, john lynch, henry sutton, aboriginal, stone axe, tomahawk, geological specimens, moonta, fedinand krause, oddie collection of minerals, thomas bath, spears, solomon islands, king billy, bows and arrows, ancient coins, birds eggs, snakes -
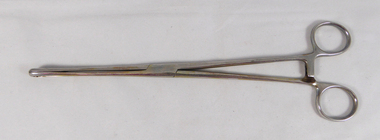 Ballarat Base Hospital Trained Nurses League
Dr Philip Griffiths - Sponge Holder Forceps
dr, philip, griffiths, sponge, holder, forceps -
 Ballarat Base Hospital Trained Nurses League
PTS October 1952, Winsome Menadue standing next to bed, left side of patient
Hard Copymenadue, pts, 1952, bed, sponge,