Showing 918 items
matching bogie
-
 Ballarat Tramway Museum
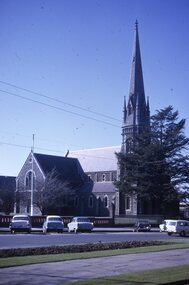
Slide - 35mm slide/s - set of 3, Les Fordham, Aug. 1967
Set of 3 Kodachrome white cardboard mount 35mm slides - dated August 1967 taken by Les Fordham. .1 - St Andrew Kirk or church .2 - Town Hall, with a tram just in the view showing Sturt St West .3 - ditto with bogie tram at the tram stop.tramways, trams, town hall, sturt st, st andrews kirk -
 Ballarat Tramway Museum
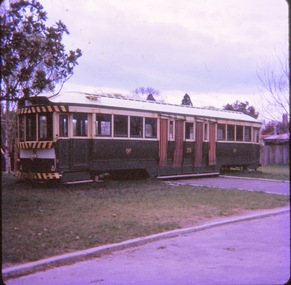
Slide - 35mm slide/s, John Theodore, tram 35 at the Ballarat College junior school, c1973
Yields information about tram 35 following its disposal and how it was sheltered.Set of 6 Kodachrome white cardboard mount 27mm square slides of former bogie tram 35 at the Ballarat College junior school, c1973. .1 - tram at the school. .2 - ditto .3 - interior .4 - interior .5 - interior 6 - interior See btm3929 for details of disposal.Various notations by John as to the slide number and the trams in pencil and ink.tramways, trams, ballarat, closure, tramcars, disposal, tram 35 -
 Ballarat Tramway Museum
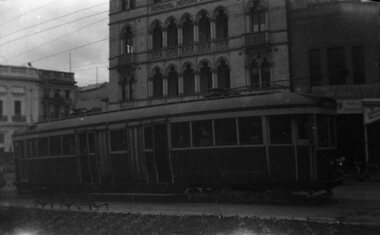
Photograph - Black & White Photograph/s, 1950's
Black and white photograph of a bogie car, ex Hawthorn type at the city centre with Sturt St south side buildings in the background. Poor print or original. Date - 1950's. Two copies held. Original negative scanned at hi res and image updated 1/6/2020.tramways, trams, sturt st -
 Ballarat Tramway Museum
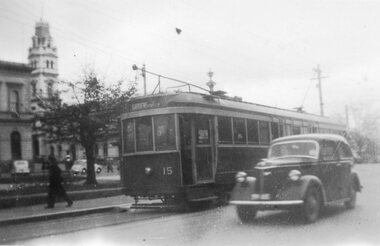
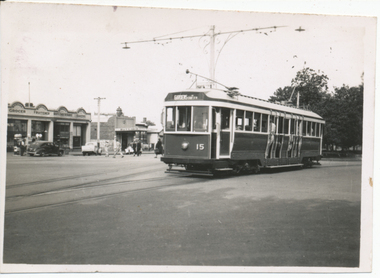
Photograph - Black & White Photograph/s, Wal Jack, Jul. 1946
Yields information about the appearance of one of Ballarat's bogie tram No. 15 soon after its arrival in Ballarat and the type of motor vehicle in use at the time.Black and white photograph of the Ballarat Bogie tram No. 15, Sturt St, July 1946. Photo by Wal Jack. A motor car is alongside the tram. Has the post office in the background. On Kodak Velox paper. Original negative scanned at hi res and image updated 1/6/2020.On rear in pencil, "Ballarat No. 15, Sturt St, July 1946."tramways, trams, bogie trams, sturt st, tram 15 -
 Ballarat Tramway Museum
Photograph - Black & White Photograph/s, John Phillips, late 1960's
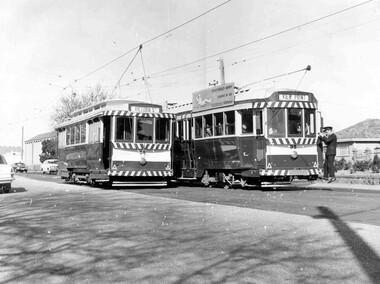
Black and white print of bogie tram No.35 and 28 crossing at the King St. Loop, late 1960's. No. 28 has destination of Victoria St and No. 35, View Point and a SEC roof advertisement. "Everything's under control in my all-electric kitchen". Photo by John Phillips. tramways, trams, king st, victoria st, tram 28, tram 35 -
 Ballarat Tramway Museum
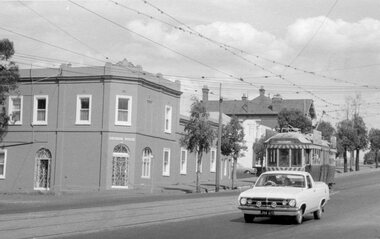
Postcard, Ron Scholten, SEC Ballarat of No. 40 at the city terminus
Colour photograph, printed on a postcard back format of SEC Ballarat of No. 40 at the city terminus, with the destination of Gardens via Sturt St West. Behind the tram is another bogie tram and a single trucker turning from Lydiard St North into Sturt St. Commonwealth Bank building is in the background.trams, tramways, sturt st, lydiard st, tram 34 -
 Ballarat Tramway Museum
Slide - 27 mm sq slide/s - set of 3, Andrew Howlett, SEC Ballarat tram depot, Feb. 1969
Yields information about the SEC depot and Wendouree Parade.Set of three Colour slide, Kodak white cardboard mount, developed Feb 1969 of the depot and Wendouree Parade. .1 - No. 38 on 0 road at the depot with another bogie car behind. .2 - General view of the front of the depot. .3 - view of the depot fan with a tram approaching the Depot ballarat, tramways, trams, depot, wendouree parade, tram 38 -
 Ballarat Tramway Museum
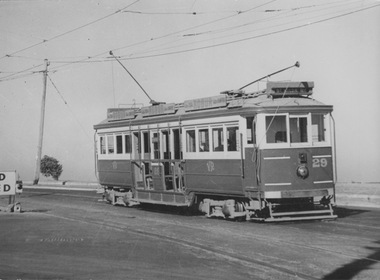
Negative, Wal Jack, c1950
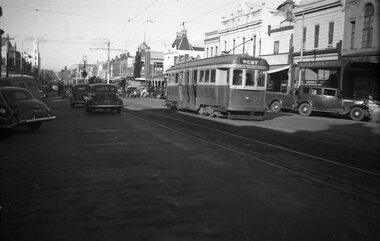
Negative and Digital images of the Wal Jack Geelong Negative file of Geelong bogie 32 at the Beach terminus, c1950. See Reg Item 7814 for a similar photograph, most likely taken at the same time. Tram 32 has the destination of "West". Shows the double track layout at this location. trams, tramways, geelong, beach, tram 32 -
 Ballarat Tramway Museum
Photograph - Digital image, Wal Jack, 14/12/1945 12:00:00 AM
Yields information about the early use of Ballarat's 2nd bogie tram and its first day in service.Digital image from the Wal Jack Ballarat Album of No. 15 running to Gardens via Sturt St west leaving Sturt St at Pleasant St to run into Sturt St West. First day in service. Note street lights, W. R Hearn Grocer and Fruitier, a boot and shoe repairer and baker in the background and Davies Butcher. Also Texaco petrol pumps in the street. See image i2 for rear of photograph. See image i3 for hi res scan of print. See image i4 for hi res scan of negativeIn ink on rear " SEC Ballarat Tramways bogie. 15 ex M&MTB 132 14-12-45 (on first day in service in Sturt St from Pleasant St)" with number "T536" within Wal Jack photo stamp.trams, tramways, sturt st, pleasant st, tram 15 -
 Ballarat Tramway Museum
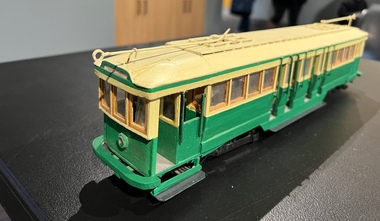
Model - Model of Bendigo tram No. 23
Model of Bendigo bogie, ex Hawthorn Tramways Trust, four centre doorways, tram, No. 23 in a SEC colour scheme with the destination of Quarry Hill. The Modeller has detailed the seats throughout the tram and the controls. Balsa wheels had broken off, repaired with 'O' gauge wheels along with other parts by the Museum's model builder.Demonstrates model tram building. One of a series of Ballarat and Bendigo tram models. Not known who built them.Model tram - made from Balsa wood, cardboard, paint, metal, styrene, wire.models, trams, bendigo, bogie tramcars, tram 23 -
 Melbourne Tram Museum
Photograph - Set of 2 - Shunting cable trams - Brunswick, Wal Larsen, May 1914
The two photographs show cable trams being shunted into the Brunswick Cable Tram Depot or car house from Sydney Road. The first shows a horse pulling a bogie tram trailer into the car house while the second shows the grip being pushed in by hand. Note the raised position of the grip when this shunting task is performed - 1920s. Yields information about the shunting of cable trams at the Brunswick car house or depot.Set of two black and white copy photographs with adhesive marks on the rear. Two copies of each held. Second copy has "Photo from W H Larsen" written on the back.tramways, tramcars, cable trams, brunswick, brunswick depot, car house, shunting, mmtb, tram 41, trams, grip -
 Melbourne Tram Museum
Photograph - VR tram 29 at Brighton Beach Baths terminus
Photograph shows bogie car VR tram 29 waiting on UP track with trolley pole raised, destination 'St Kilda Rly', driver's cab vacant, all windows closed and all off-side weather blinds open. Port Philip Bay is in the background and a partially obscured Road Closed sign is at the left of the photo. Yields information of Railways tramcar 34 and St Kilda Railway Station Black and white photograph with note on rear.In red biro: 'VR "Ricketty Kate" 29 Brighton Beach Baths Terminus Jan 58 D Print'victorian railways, vr tram 34, st kilda railway station, fitzroy st, m&mtb -
 Ballarat Tramway Museum
Slide - 35mm slide/s - set of 8, Carolyn Dean, 24/09/1970 12:00:00 AM
Set of photographs of operations, near the central area, in particular Charing Cross.Set of 13 Kodak slides, white cardboard of Bendigo trams. Taken 24.9.1970 by Carolyn Dean. .1 - "1" - No. 5 enroute to Eaglehawk passing former poppet head. .2 - "2" - Possibly No. 4 enroute to Eaglehawk - side on view (same ads shown on .4) .3 - "3" - View looking down onto Charing Cross from North East corner with single truck and Bogie car arriving. Has Ezywalkin, Maples and the Beehive buildings in the background. .4 - "7" - No 4, with destination of Eaglehawk, Mitchell St, near end of double track, with Shell Service station alongside. .5 - "8" - Alexandria Fountain, Charing Cross, with bogie tram behind. Has the Ezywalkin and The Beehive buildings in the view as well. .6 - "9" - No. 6 arriving at Charing Cross. Has the Ezywalkin and The Beehive buildings in the view as well. .7 - "10" - Bogie tram and single trucker at Charing Cross. Has the Ezywalkin and The Beehive buildings in the view as well. .8 - "11" - No. 7 departing ditto. Has the Ezywalkin and The Beehive buildings in the view as well. .Each slide has in corner a number in pencil and the first one the date of "24-9-70".tramways, trams, bendigo, charing cross, mitchell st, eaglehawk, tram 5, tram 4, tram 6, tram 7 -
 Ballarat Tramway Museum
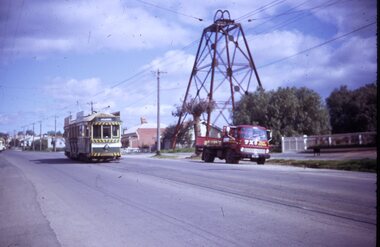
Photograph - Black & White Photograph/s, Charles Craig, mid 1950's
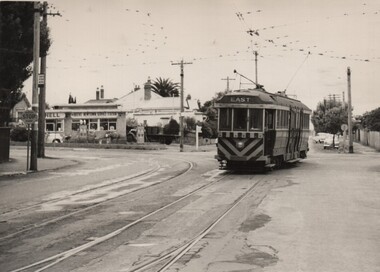
Photograph of the intersection of a bogie tram with destination of East and hazard stripes and dash canopy lighting turning from Pakington St (from West) into Aberdeen St at Pakington St junction. In the background is the Shell service station. Note the metal tram stop sign on the left. Two copies of the print held. trams, tramways, geelong, aberdeen st, east, west, tram stops -
 Ballarat Tramway Museum
Negative, Wal Jack, Late 1930's to mid 1940's
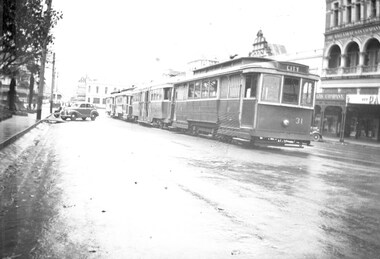
Yields information about the use of the City Loop during the late 1940s.Negative and Digital image of the Wal Jack Ballarat Negative file of a group of trams (3 single truckers and one bogie car) in City Loop late 1940's or early 1950s. Tram 31 (City) is at the head of the line up on a wet day. In the background is the Ballarat Gas Company building.trams, tramways, city loop, sturt st, tram 31 -
 Ballarat Tramway Museum
Slide - 35mm slide/s, Peter Moses, Jan. 1966
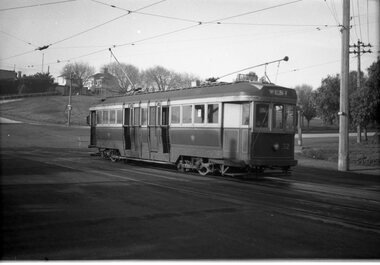
Photo of a bogie tram east bound in Sturt St. after leaving Hospital corner (corner of Sturt and Drummond Streets). Has curve from Drummond North into Sturt St. in the foreground. Note scanning error in the image. Kodak cardboard mount slide, taken by Peter Moses January 1966.On back of slide in blue ink in the bottom right hand corner "P. Moses".tramways, trams, hospital corner, sturt st. -
 Ballarat Tramway Museum
Photograph - Black & White Photograph/s, John Alfred, late 1950's
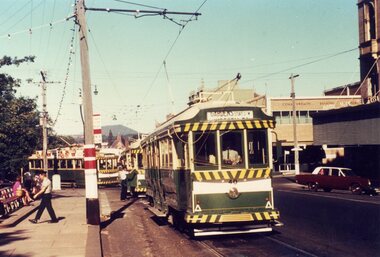
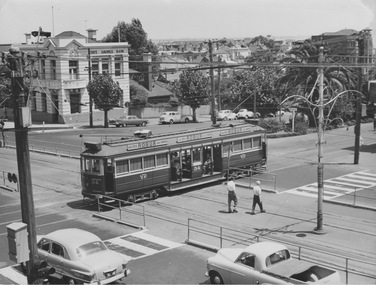
Black and white photograph of a SEC Bogie tram parked in the Loop in Wendouree Parade on a busy day. Many cars in the photograph and many around the tram stop. Photograph is scratched with semi-circular marks and not well in focus. Taken prior to application of dash canopy lights, possibly late 1950's.trams, tramways, secv, ballarat, wendouree parade, gardens loop -
 Ballarat Tramway Museum
Photograph - Black & White Photograph/s - set of 2, George Bishop, Dec. 1971
Two Black and White photograph of a in-bound bogie tram No. 3, 12/1971 descending Mitchell St Bendigo, just after the start of the double track near the railway station. Photo has Glendon House on the left hand side. Photo by George Bishop. Tram has the destination "Eaglehawk"On the back of the photos in ink "Outside Glendon House Bendigo / G. Bishop photo" and in pencil on 3609.2 "No. 3 near Rly Station Bendigo, Dec 1971, Destination Eaglehawk: and "George Bishop Photo"tramways, trams, bendigo, mitchell st, railway station, tram 3 -
 Ballarat Tramway Museum
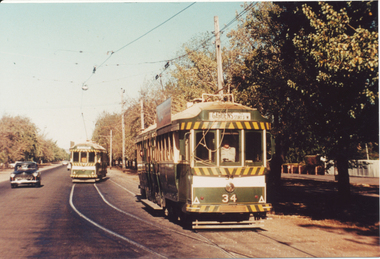
Postcard, SEC Ballarat trams 34
Yields information about the use of trams in Ballarat and tram operation in the Sturt St west as the loops, in particular the Parker St. Loop.Colour photograph, printed on a postcard back format of SEC Ballarat trams 34 and another bogie tram crossing at the Parker St loop in Sturt St West. Tram 34 has the destination of "Gardens via Sturt St West". Photo late 1960's or early 1970's.trams, tramways, sturt st west, parker st loop, tram 34 -
 Ballarat Tramway Museum
Negative, Wal Jack, c1950
Negative and Digital images of the Wal Jack Geelong Negative file of Geelong bogie 36 outbound to West after crossing Moolap St (the second set of bar lights). A four wheeler can be seen at the intersection. In the background is a Snooker / Billiard parlour and L. F. Weaver ? Agent. !950's. trams, tramways, geelong, ryrie st, tram 36 -
 Ballarat Tramway Museum
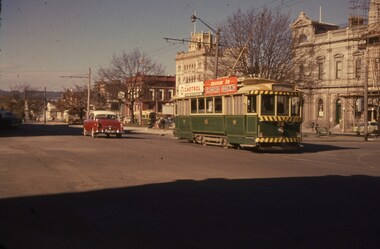
Functional Object - Tramcar, Duncan and Fraser, SECV Tram No. 40, 1913
Maximum traction trucks (2), bogie tram with drop ends and centre combination. Internal sliding doors (4 No), 4 drivers doors, 6 passenger doors (3/side), 2 trolley poles, air braked. Tram No. 40. Image used by Mal Rowe 21/9/2019.trams, tram 40 -
 Ballarat Tramway Museum
Slide - 35mm slide/s, Wal Jack, 18/07/1962 12:00:00 AM
Tram 28 opposite Town Hall in Sturt St. travelling away from photographer towards Lydiard St. Has bogie car in background on opposite side of road. Tram fitted with SEC and Castrol ads. Town Hall has scaffolding on the outside of part of it. Taken on 18-7-62.'SEC Ballarat, No. 28 in Sturt St., 18-7-62' and on reverse side, 'W.Jack Photo' in blue ink.tramways, trams, sturt st, town hall, tram 28 -
 Melbourne Tram Museum
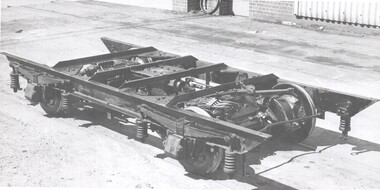
Photograph - Black & White Photograph/s, 1960's
Black and White photograph of a MMTB No. 2 truck used on X1 class cars. See Reg Item 2409 for an image of how this truck appeared on X1 class. One of a series of photographs done by the MMTB to illustrate the various types of bogies / trucks used by the MMTB. Possibly during the 1960's.trams, tramways, mmtb, bogies, trucks, preston workshops, x1 class -
 Melbourne Tram Museum
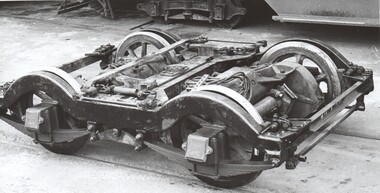
Photograph - Black & White Photograph/s, 1960's
Black and White photograph of a MMTB No. 9A truck. This truck has a cast steel side frame with the ribs on the inside. Reference Drawing R3024 One of a series of photographs done by the MMTB to illustrate the various types of bogies / trucks used by the MMTB. Possibly during the 1960's. Two copies held.trams, tramways, mmtb, bogies, trucks, preston workshops -
 Ballarat Tramway Museum
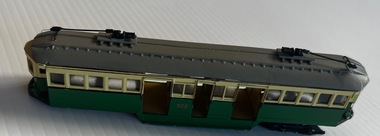
Model - Model Melbourne W2 class No. 522 - partly assembled, Weico Models
Model of a Melbourne W2 class tram, No. 522 partly assembled with some parts in a plastic bag. Fitted with one bogie or truck, but not the wheels. Does not have a route number box Painted in Melbourne colours of green and cream showing the destination of Depot. Model built by Weico. Has drop centre seats, the two saloons are left empty for motors to be fitted.Demonstrates a model that represented a successful Melbourne bogie tram.Model Melbourne W2 class No. 522 - partly assembled with some parts in packing.models, tramcars, weico models, melbourne, w2 class, tram 522 -
 Ballarat Tramway Museum
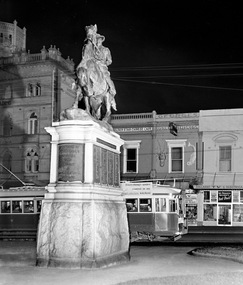
Photograph - Digital Image, Greg Triplett, Tram waiting in Sturt St by Boer War Memorial, 19-9-1971
Image of a Ballarat bogie car waiting at the City stop with the Boer War Memorial in front. Taken on the last day of operation of the SEC Ballarat tramway system - 19-9-1971. In the background is the National Mutual building, Golden Star Chinese Cafe, Georges Oyster / fish shop and Ballarat TV and Electrical store which looks a bit of wreck inside.Yields information about the last day of operation of the Ballarat SEC tramways.Digital image - 120 negative tramways, tramcars, ballarat, last day, closure, sturt st, boer war memorial -
 Ballarat Tramway Museum
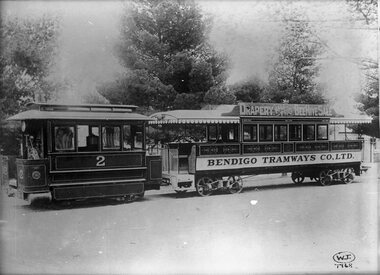
Photograph - Glass plate - Bendigo steam tram No 2 Mollison St, William H Robinson, 1892/1895
Glass plate negative of Bendigo Tramways Co. Ltd steam tram motor (No. 2) and trailer No. 6, Trailer No. 6 has a roof advertising board "Drapery half price Beehive Sale". Shows in detail the presentation of the trams, painting scheme, bogie arrangements. Photo in Mollison St. See items 987, 1439 and 4369 for other reproductions of this photograph.Yields information about Bendigo steam tram and their trailers.Glass plate negative in a brown paper envelope.The envelope has Wal Jack stamps T168 and T169 and a written note "Bendigo Steam Trams"trams, tramways, bendigo, mollison st, steam trams, trailers, tram 2, tram 6 -
 Melbourne Tram Museum
Photograph - VR tram 34 departing St Kilda Station
Photograph taken from a second floor building shows bogie car VR tram 34 crossing Fitzroy St and M&MTB tracks after departing St Kilda Railway Station. All saloon windows are open, all sunshades raised and passengers aboard. A summers day with two male pedestrians and two motor vehicles in foreground. Yields information of Railways tramcar 34 and St Kilda Railway Station Black and white photograph with note on rear.Indistinct blue stamp and 'Summer 1959'victorian railways, vr tram 34, st kilda railway station, fitzroy st, m&mtb -
 Ballarat Tramway Museum
Photograph - Black & White Photograph/s, Chris Wurr, Jan. 1971
Yields information about the closure of the Ballarat tramway system in 1971, people at the depot and the "last tram".Black and White Photograph of Ballarat No. Ballarat 42, inbound in Albert St Sebastopol , January 1971. Tram has the destination of Lydiard St North. Photo by Chris Wurr, Jan. 1971.On rear, stamped in black ink "Photo by / Chris Wurr / 12 Truscott Street / Ararat 3377 / (053) 52 3403." and in ink "Ballarat Tramways (SEC) / Bogie car 42, heads north in Albert St, Jan 1971 / purchased 5.93."trams, tramways, ballarat, albert st, sebastopol, tram 42 -
 Ballarat Tramway Museum
Photograph - Digital image, Wal Jack, 29/12/1945 12:00:00 AM
Yields information about the early use of Ballarat's first bogie tram after it had been re-numbered and Stones Corner.Digital image from the Wal Jack Ballarat Album of No. 22 turning from Bridge St into Main St 29-12-1945. Has the Castrol / Caltex service station with clock in the background and Stones Corner building. Tram proceeding to Mt Pleasant. See image i2 for rear of photograph. See image i3 for hi res scan of print. See image i4 for hi res scan of negativeIn ink on rear " SEC Ballarat Tramways bogie. 22, turning out of Bridge St into Main St, Ballarat East Post Office in background in Main St. 29-12-45" with number "T547" within Wal Jack photo stamp.trams, tramways, bridge st, stones corner, main st, bogie trams, tram 22