Showing 449 items matching "crossing of the line"
-
 Ballarat Tramway Museum
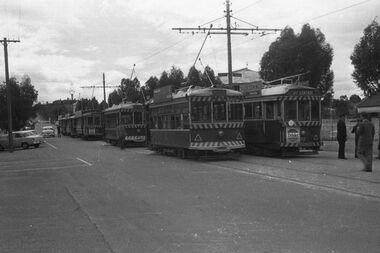
Negative - Set of 10, 20/10/1962 12:00:00 AM
Set of 10No. 35mm black and white negatives in a negative holder sheet with labels of the ARHS Vic Div. tour or trip to Bendigo, 20/10/1962 for the 100 years celebrations of Bendigo station and an associated tram tour. Strip 1 - negatives 12 to 15 - the tram convoy at Bendigo station area - trams 28, 21, 7 19 and 30. Strip 2 - negatives 18 & 19 - North Bendigo terminus Strip 3 - negative 16 - at Eaglehawk, negative 11 - Convoy at Bendigo station Strip 4 - negative 20 and 21 - Eaglehawk? .1 - Convoy of trams - two rows lined up - 21, 18, 28 .2 - Front of convoy - 28 and 18 - includes Inspectors and crews. .3 - Passengers board - 28, 18 and 26 .4 - Convoy crossing No. 25. .5 - Convoy at North Bendigo Terminus - includes No. 19 .6 - Six trams at North Bendigo - no housing construction by the terminus - vacant blocks. .7 - Convoy at Eaglehawk - 28 and 30 .8 - Pall Mall .9 - North Bendigo - 21 .10 - The depot - 30 Original sheet with negatives with worksheet fileSee sheettrams, tramways, bendigo, arhs, tours, tram 28 tram 21 tram 18 tram 26 tram 30 tram 25 tram 19 -
 Ballarat Tramway Museum
Slide - 35mm slide/s - set of 3, Eldon Hogan, 5/10/1969?
Set of three 35mm Agfa colour blue and white plastic mount slide - ARE/ARHS/AREA Vintage Train to Ballarat, possibly on 5/10/1969 - See Reg. Item 2297 for a ticket. Photo Eldon Hogan 3037.1 - part of a Ballarat Bogie tram crossing the railway crossing, with the Ballarat Station, signal gantry and Vintage Train in the background. .2 - 8 trams lined up in Sturt St. West, led by No. 20. (Note distortion in photo due to scanning error). .3 - 8 trams lined up in Drummond St. North, lead by No. 39. tramways, trams, railway station, vintage train, specials, sturt st west, drummond st nth, tram 39, tram 20 -
 Ballarat Tramway Museum
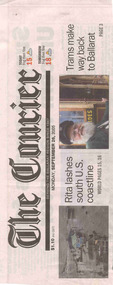
Newspaper, The Courier Ballarat, "Trams can still pull the crowds", "Trams make way back to Ballarat", 26/09/2005 12:00:00 AM
... a item on the Ballarat line fast rail service and level crossings... a item on the Ballarat line fast rail service and level crossings ...Two newspaper clippings from The Courier, Ballarat, 26/9/2005 of the BTM's 100th Anniversary celebrations on 25/09/2005. Photos by Eugene Hyland. 3149.1 - Top part of front page featuring newspaper banner and a part photo and caption "Trams make way back to Ballarat" leading to item on page 3. 3149.2 - Photo of Roger Salen standing by door of 28 with headline ""Trams can still pull the crowds", and smaller photo of Clydesdales Darcy and Prince on the horse tram. Quotes President Stephen Butler about the celebrations. Under the item has a item on the Ballarat line fast rail service and level crossings that help to improve safety.btm, horse trams, 100 years of electric trams, level crossings -
 Ballarat Tramway Museum
Slide - 35mm slide/s, Carolyn Dean, 3/11/1970 12:00:00 AM
Shows a special tram operating on the View Point line, which was not regularly used and difficult to get a tram along the line at the time. Almost not used at all prior to closure. Shows crossing on a curve of Mair St and the way the road level was built up - dates from horse tram days.Kodak slide, white cardboard of No. 21 operating a special on the View Point Ballarat line. Taken 3.11.1970 by Carolyn Dean. Tram about to cross Mair St. Shows how this section of tram line was higher than the general road level of Mair St. at this point. Tram has the destination of View Point . ."3-11-70" in ink on slide.tramways, trams, ballarat, view point, ripon st, mair st, tram 21 -
 Ballarat Tramway Museum
Photograph - Black & White Photograph/s, c1971
Yields information about the loops on the Sturt St west line and aspects of the operation of the Ballarat tramway system prior to closure.Black and white photograph of trams crossing, possible at the Parker St loop in Sturt St west - special trams - two outbound and one single trucker inbound - going to Mt Pleasant. Probably taken c1971 prior to the closure. Note the overhead wire - double overhead through the "straight" and inbound overhead only via the loop. Photographer unknown.tramways, trams, sturt st west, loops, parker st loop -
 Ballarat Tramway Museum
Photograph - Black & White Photograph/s - set of 7, 16/04/1972 12:00:00 AM
Yields information about the final day of the Bendigo tramways and some of the tramcars used.Set of seven black and white photographs of the day Bendigo Tramways closed 16-4-1972. Taken on Agfa paper. Has printing date of 18.8.72 stamped on rear. All have been used for display purposes. .1 - 25 leaving the depot .2 - 2 at Charing Cross, bound for Eaglehawk - has Ezywalkin Store in background. .3 - 18 crossing another tram at a loop on the Eaglehawk line. .4 - 28 at Charing Cross showing Special .5 - 26 inside depot, with Borough of Eaglehawk sign on the front bumper and bunting around the tram. .6 - 29 leaving the depot .7 - 26 in the final parade, with "Destination Eaglehawk" on a roof mounted advertisement board, with the Beehive building in the background and Coca Cola advertisement on top of the building. Photographer not known.3549.8 - has "photo No. 8" on rear and been marked out for publication. tramways, trams, bendigo, closure, eaglehawk, tram 25, tram 2, tram 18, tram 28, tram 26, tram 29 -
 Ballarat Tramway Museum
Film - Movie Film & Box, Kodak, 1960
Yields information in movie film format of Ballarat trams in 1960, how the system operated and was used by people., Yields information in movie film format of Ballarat trams in 1960, how the system operated and was used by people.Movie film - 8mm, approx. 30mins, with leader strip on a plastic reel, within a black and white plastic box, titled "Ballarat No. 1. 1960". Has been transferred to DVD - see Reg item 4100 as Segment No. 2. Made by Ben Parle. Also transferred to DVD by Rod Cook Oct. 2015, via Roger Greenwood for use in his DVD, "The City of Ballarat Trams, Gardens & Gold" of 2016. See Reg Item 6883. Synopsis: based on time. 0:00 View of typed introduction, noting that this is a pictorial record of Ballarat. 0:10 Title “The Tramways of Ballarat 1960, Part 1” 0:16 13, showing “View Point” at Stones Corner, Bridge St, east end, with trolley pole being turned, while another single trucker heads out towards Mt Pleasant. 0:25 13 leaving Stones Corner, short approach and then longer trailing shot of the tram going towards the City in Bridge St. 0:44 View out of front of tram in Bridge St heading towards the City, with cars in the photo, then passing through city Loop, no trams in the loop and running up to Lydiard St Nth and crossing the road. 1:22 Running up Sturt St from Armstrong St, passes over Dawson St X-over and up to the next intersection, Lyons St. 1:54 Title “The View Point Line” 1:59 19 inbound, in Ripon St, from crossing Mair St, towards camera and then passing away and turning into Sturt St. 2:49 View of a “Warning Oncoming Trams” sign 2:52 19 in Ripon St, going to View Point, crossing Webster St towards camera, then going away through the disconnected Victoria Ave loop, pass the “Warning Oncoming Trams” sign. Note very windy scene with people running across roads. 3:17 19 in Wendouree Parade, in bound, though showing destination View Point, going away from the camera, past the View Point Hotel. 3:39 19 coming towards camera near Excerpt or Devon St and then going away towards the terminus. 4:04 19 at the terminus, stationary, with a single trucker 3?, passing from Macarthur St into Wendouree Parade, behind 19. 4:20 33 coming towards camera in Wendouree Parade from St Aidans Drive, stopping to pick up passenger at Forest St and then going away towards the City, photographed from near the depot, on a wet and windy day. 4:54 35 in Wendouree Parade, coming towards the Camera from St Aidans Drive and then going away with the Gardens Loop area in the background. Tram stops at stop to let a passenger off. 5:28 21 leaving Gardens Loop for the City via the Depot, green light in signal can be seen. 5:43 28?, closely followed by 26 turn from Drummond St South into Sturt St. 6:18 Scene opens with shot of “Sebastopol” destination on a bogie tram. 6:21 Title “The Sebastopol Line” 6:24 21 turning from Sturt St into Drummond St Sth with destination of Bell St and then going away from the camera. 6:55 38 in Drummond St Sth, coming towards the camera and then passing the camera with Sturt St just in the view. 7:10 21, showing Gregory St, in Drummond St Sth, approaching and then going away, entering the Urquhart St Loop, 7:39 34 in Drummond St Sth (location check required (Latrobe?)), approaches camera, picks up passengers and the goes away. 8:09 39 at ? Street, turns from Drummond St Sth into Skipton St, after picking up and setting down passengers, bound for Sebastopol 8:55 35 inbound in Skipton St passes through the Bell Street Loop, and then goes away from the camera. 9:33 42 outbound in Skipton St, approaches the camera, passes and then crosses over the half the road into Albert St. 10:00 39 inbound in Albert St – location? 10:31 34 outbound for Sebastopol, approaches camera and just starts to pass by. 10:36 34 in Grey St crossing loop, crosses 42 inbound. 10:59 39 outbound in Albert St, with shopping centre in bound, approaches camera, passes and then crosses over Albert St. Mid morning scene. 11:39 39 inbound, Albert St south, approaches camera and then passes and the crosses over Albert St. 12:16 41 outbound in Albert St passes the camera, and pulls into the terminus with the conductor getting out on the back bumper to pull the pole down as the tram stops and a passenger walks into the Royal Hotel. 12:39 Title “The Lydiard Street North Line” 12:44 Filmed from the Hotel balcony, 21 inbound in Lydiard St Nth passes over Mair St, stops while 33 passes in the other direction. 13:18 With the red light showing on the Seymour St loop signal, 33 inbound for Sebastopol stops and picks up many passengers, passes the camera and runs past the VRI building in the background and through the loop. Possibly filmed on a Sunday given the ladies dresses and quieter streets. 14:01 30 outbound, passes the camera and stops at Macarthur St. Filmed alongside the brick wall of the cutting. 14:28 30 inbound arrives, passes through the Gregory St loop and then proceeds past the camera, making a stop to pick up passengers. 15:14 28 in Lydiard St Nth – location?, approaches and goes away from the camera, north of Gregory St. 15:34 28 ditto location? 15:53 21 arrives at the terminus with passengers getting on and off. 16:11 View of the a vertical positioned “End of Section” sign on a pole at the terminus and then lifting the camera to see the timetable board and the stop sign. 16:33 31 in Bridge St passing Morseheads and then turning into Sturt St, stops at the Grenville St stop, while another single trucker comes down to the stop from the City. 16:58 31 outbound in Bridge St, with destination of Victoria St. 17:14 Title “The Victoria Street Line” 17:18 31 outbound to Victoria St from Stones Corner. Starts with an overhead shot, shows clock at the Caltex service station,. 17:37 31 inbound approaching Bakery Hill and then descending to the junction after it passes camera. 18:09 25 climbing outbound in Victoria St, passing the camera, to then pass through the King St loop. 18:47 25 inbound in Victoria St, passing the camera, then pass through the King St loop, with St Alypius Church in the background. 19:36 14 approaching the rail bridge in Victoria St and stopping at the 2nd last stop to left of passengers. 20:01 14 leaving the terminus and approaching the camera and the a short sequence going away, to the next stop to pick up quite a few passengers. 20:14 “Trams Stop Here” sign, metal wrap around on a steel pole. 20:16 Title “The Mount Pleasant Line” 20:21 11 inbound in Main St, with a passenger leaping off the tramcar and another getting off just before the junction. 20:45 11 passes the junction and then proceeds away from the camera in Bridge St. 21:04 30 outbound in Main St, then turns into Barkly St, a bus (Eclipse Motors) passes in Main St just before the sequence ends. 21:31 30 inbound near Steinfield St. (exact location?) 21:49 25 approaches the camera, then proceeds away and passes through the Grant St. loop. 22:29 25 inbound, windy day, between Grant and Cobden, (exact location?), with a horse drawn bread van in the view and the breadman walking behind the tram as it passes. 23:02 11 outbound in Barkly St, (exact location?) 23:37 11 inbound in Barkly St (exact location?) 23:44 Mt Pleasant terminus signage 23:50 30 approaches the terminus and then stops with the conductor alighting turning the pole, passengers getting on and off and the driver appearing at the other end. 24:32 Title “The Gardens Via Sturt St. West Line” 24:35 21 outbound in Sturt St near Raglan St, approaches and passes the Camera. 25:09 12, showing City Oval, approaches and passes the camera, outbound near Windermere St. 25:33 13 showing View Point, goes away from the camera – location? 25:44 12 comes from St. West, inbound passes the camera and then stop as the next stop next Talbot St? 26:21 Short sequence of a “Warning Oncoming Trams” sign 26:28 42 inbound in Sturt St West, just before Ripon St, view coming towards camera and then going away to cross Ripon St. 27:10 34 passes through the Parker St loop 27:25 35 or 39 inbound past the college in Sturt St West 28:04 41 outbound at the Russell St curve, passes away from the camera. 28:11 35? inbound passes away from the camera through the Victoria Park or Morrison St loop, swinging out into the roadway. 28:29 View of timetable sign at Hamilton Ave. 28:37 35 turning from Sturt St West into Hamilton Ave, can see the conductor changing over the barrier rails. 29:11 42 inbound, crosses another bogie tram (35?) at Carlton St loop then passes the camera and goes past the Olympic rings monument. 29:42 12 approaches the Carlton St gates. 30:07 12 outbound, crosses a bogie tram in the loop with both trams then leaving the loop. 30:20 Title “End of Part One” Written labels giving title information on outside of box.trams, tramways, ballarat, sebastopol, lydiard st north, victoria st, mt pleasant, sturt st west -
 Ballarat Tramway Museum
Film - Movie Film & Box, Kodak, 1960
Yields information in movie film format of Ballarat trams in 1960, how the system operated and was used by people., Yields information in movie film format of Ballarat trams in 1960, how the system operated and was used by people.Movie film - 8mm, approx. 17.5 mins, with leader strip on a plastic reel, within a black and white plastic box, titled "Ballarat No. 1. 1960" contained with a cardboard box, 'Tuscan Super 8 and Standard 8 Spool and Can' . Has been transferred to DVD - see Reg item 4100 as Segment No. 1. Filmed and made by Ben Parle. Also transferred to DVD by Rod Cook Oct. 2015, via Roger Greenwood for use in his DVD, "The City of Ballarat Trams, Gardens & Gold" of 2016. See Reg Item 6883. Synopsis: based on time. 0:00 Starts with bogies cars crossing railway level crossing (34?, 39?) 0:30 SEC Logo 0:45 Ballarat Station sign and intro “Some City Scenes” 0:49 35 turning from Lydiard St Nth to Sturt St towards Grenville St with Commonwealth Bank in view. and then 42 returning 1:19 42 showing Mt Pleasant, turns from Sturt St into Lydiard St Nth 1:53 Tramway road works in Lydiard St Nth, near intersection with Mair St with Jelbart Road roller in use, starts with an SEC roadworks sign. 2:12 39 passing the works out bound to Lydiard St Nth. 2:46 Good view of the roller working before 35 arrives. 3:01 35 passing the works in bound with 3:29 14 crossing Lydiard St in Sturt St, towards Grenville St 3:47 Trams in City Loop 3:55 21 coming up the hill 4:04 31 entering Bridge St from Sturt St with Bucks Head Hotel in the background. 4:27 Overhead work at corner of Sturt and Lydiard, with view of the sign at the City terminus “Trams leave here for Sebastopol, Gardens, View Point.” 4:34 Passengers getting off and then onto 38, ex Lydiard St Nth at city terminus including a young lady wearing gloves and a wheeling a pram hurriedly the photographer. A number of other prams in the view as well as. The Conductor helps to unload the pram. 5:07 41 proceeding up Sturt St, appears to have just rained. 5:26 11 using the Dawson St crossover, with a motor car doing a U turn as well. 6:00 14 descending Sturt St towards the City, filmed at Dawson St. 6:11 Title “The Gardens via Drummond St North Line” 6:16 19 showing Victoria St, turning from Drummond St Nth into Sturt St. 6:28 30 inbound in Drummond St Nth, approach and trailing shots. Trailing shot ahs the hospital in the background. 6:49 31 outbound, Drummond St Nth, approach and trailing shots, trees are in autumn colours. 7:04 12, inbound Drummond St Nth, with Macarthur St in the background, stopping to pick up a lady, approach and trailing shots and then entering the Mill St crossing loop. 7:53 14 outbound in Drummond St Nth, dropping a lady passenger off and then turning into Macarthur St and then tram going away. 8:37 View of overhead junction at View Point Jtn. 8:45 View of “Cars Stop Here” sign and pole sign “To City Only” 8:55 30 inbound in Wendouree Parade, stops to pick up passenger, and then a trailing shot of tram entering Macarthur St loop 9:37 View of “Cars Stop Here”, “End of Section” and timetable boards at Haddon St. 9:50 34, pausing at Haddon St and then proceeding towards depot – approach and trailing shots, with “Warning Oncoming Trams” sign in shot. 10:27 “Warning Oncoming Trams” sign 10:32 34 crossing 12 at the Martin Ave loop 10:48 39? Wendouree Parade, near Barrett Ave, stopping and letting off passengers. 11:24 30 passing depot junction and then trailing shot of it entering Tram Sheds or Depot Loop and then proceeding towards the City. 12:11 Shot of the “Caution Beware of Trams” sign at the depot. 12:14 25 stopping at depot junction and then trailing shot of it going toward Forrest St. 12:47 12 passing Depot Junction, trailing shot. 13:07 Shot of :Electricity Supply Department, Ballarat Branch” sign at depot. 13:13 View of a destination showing “Depot” on a bogie tram 13:15 Title “Some Depot Scenes” 13:19 View of a trolley pole and then 13 leaving the depot through the gates, destination showing “View Point”. 13:54 View of trolley pole and then 32 stopping at the depot gates. 14:08 12 (Sunny view) running out onto Wendouree Parade and then a bogie tram approaching Depot Loop. 14:43 View of 42 running in with a single trucker behind in Wendouree Parade, and another single trucker running out. 15:02 Title “Some Scenes in the Gardens” 15:05 25 running through the Gardens, approach and trailing shots, near our Depot Junction. 15:55 View of “No Parking East of Loop” sign 15:59 View of overhead and then trackwork (with points removed), but overhead still in position at the Old Gardens Loop or Gardens South Loop and then 12 entering the loop from the south and then a trailing shot looking along the Parade. 16:33 View of “Cars Stop Here” and “End of Section” and then timetable boards at Gardens Loop. 16:55 View of 34 leaving the loop 17:14 Title “The End”Written labels giving title information on outside of box.trams, tramways, ballarat, sebastopol, lydiard st north, victoria st, mt pleasant, sturt st west -
 Ballarat Tramway Museum
Film - Movie Film & Box, Kodak, 1960s
Yields information in movie film format of Ballarat trams in 1971 at the time of one of the closure tours and, a enthusiast tour, how the system operated and was used by people., Yields information in movie film format of Ballarat trams in 1971 at the time of one of the closure tours and, a enthusiast tour, how the system operated and was used by people.Movie film - 8mm, approx. 4.14 mins, with white leader strip on a plastic reel, within a Kodak movie yellow plastic container. Has been transferred to DVD - see Reg item 4100 as Segment No. 4. Filmed and made by an unknown person. Synopsis: based on time - Colour film Title "Ballarat trams specials" 0:00 No. 41 and two other bogie trams loading passengers outside the Ballarat railway station. 0:12 Image of R class loco and K class as 2nd loco at the station and train 0:18 Inside a bogie tram looking through saloon door showing the HTT logo. 0:23 From the front of a tram, or 39 turning from Lydiard St Nth into Sturt St and then proceeding along Sturt St. 0:31 Short sequence inside the tram with some passengers in the view 0:39 No. 21, showing Special in Sturt St West and then the two bogie trams following. 1:08 21 turning from Sturt St West into Hamilton Ave, followed by 41, 35 and 37 and then loading photographers. 1:58 As above north of Gardens Loop in Wendouree Parade. 2:07 Interior view of tram moving at speed, then Forest St corner showing church, and Wendouree Parade. 2:24 Drummond St Sth, crossing two trams at Bell St loop 2:29 Sebastopol line, from the window, heading towards the terminus. 2:44 No. 32 at Sebastopol terminus with the pole being turned. 3:01 Single trucker climbing Sturt St hill towards Lydiard St Nth. 3:17 No. 21 turning from Lydiard St Nth into Sturt St 3:31 Bogie tram climbing Sturt St hill towards Lydiard St Nth 3:55 Crossing the railway level crossing in Lydiard St Nth from the window of the tram. 4:02 Train departing from station – very poor sequence – appears to be a K class locomotive. 4:15 end Placed in a blue cardboard box specially made for the item 30/08/2010.trams, tramways, ballarat, vintage train, bell st, level crossings, lydiard st nth, sturt st west, tram 41, tram 39, tram 21, tram 35, tram 37, tram 32 -
 Ballarat Tramway Museum
Photograph - Black & White Photograph/s, Ron Hann, Jan. 1963
Yields information about the California Gully or Thorpe St Loop from the front of an in-bound tramcar and the tramcar it is crossing at the loop.Black and white print on heavy matt photographic paper of the Bendigo 2, crossing another bogie tram at the California Gully or Thorpe St Loop, c1963. Taken from the window of the inbound tramcar. No. 2 has the destination of Eaglehawk, a front dash panel advertisements for Whitehorse Whiskey and another for ice-cream? 2nd copy - laser print - with date etc on rear - added 22/2/2010, copy from Ron Hann. Printed on Fujifilm, Fujicolour Crystal Archive for Frontier".On rear in pencil "Eaglehawk line 1963" 2nd copy has label "Reference 6/214/27" Photo by Ron Hann" and another label "Eaglehawk Route Bendigo 01.63" tramways, trams, bendigo, eaglehawk, california gully, tram 2 -
 Ballarat Tramway Museum
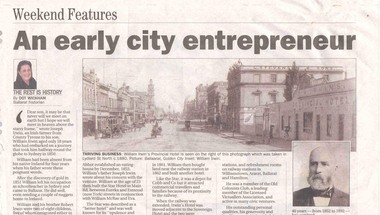
Newspaper, Dot Wickham, "An early city entrepreneur", 5/03/2005 12:00:00 AM
Yields information about William Irwin, Irwins Provincial Hotel and the tram line in Lydiard St Nth.Newspaper clipping from The Courier, 5 March 2005, titled "An early city entrepreneur" written by Dot Wickham about William Irwin, the proprietor of Irwin's Provincial Hotel. Gives a brief history of William Irwin, his Ballarat hotels, his local and other activities. Features a photo of Lydiard St Nth looking south from the railway level crossing with the horse tram lines in the photograph and Irwins Provincial Hotel on the right hand side, before reconstruction to a two story building.hotels, lydiard st nth -
 Ballarat Tramway Museum
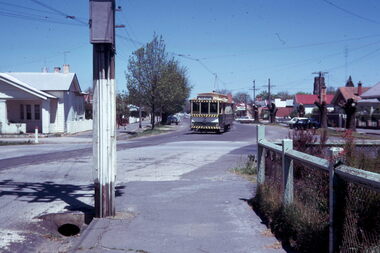
Photograph - Black & White Photograph/s, c1970
Black and white photograph of three trams crossing at Gray St. loop on the Sebastopol line in Albert St. No. 21, northbound is entering the loop, while a single trucker and No. 42 showing "Special" wait. A number of photographers are photographing the event indicating a enthusiast special. Probably taken early 1970's Item from the ARHS Archives dated 14/7/2004 via Bill Kingsley. No indication of original source, date or photographer.tramways, trams, sebastopol, gray st, special tours, albert st, tram 42, tram 21 -
 Ballarat Tramway Museum
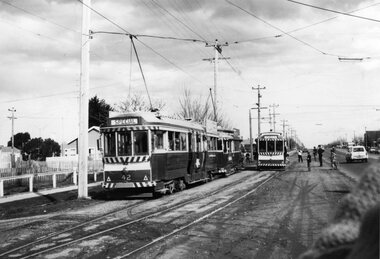
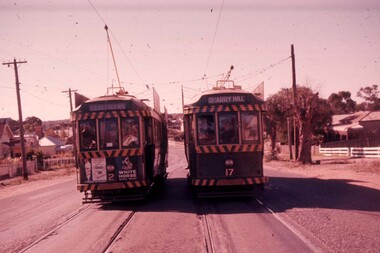
Slide - 35mm slide/s, Ben Parle, 5/04/1958 12:00:00 AM
Kodachrome Transparency - 35mm slide - cardboard mount, with one side with red border and words "Kodachrome Transparency / Processed by Kodak" top and bottom. Photo taken by Ben Parle 5/4/1958. Has slide No. "15" stamped in red in top corner and date stamped on slide. Photo of the No. 41 and 21 on an AETA tour, Skipton St. at Bell St. loop, crossing inbound tram, No. 30. No. 21 has the AETA Special tram sign and the destination Special. For high resolution scan see btm2844h.tif"Sebastopol line" "-5 APR 1958"tramways, trams, skipton st, bell st, aeta, tram 41, tram 21, tram 30 -
 Ballarat Tramway Museum
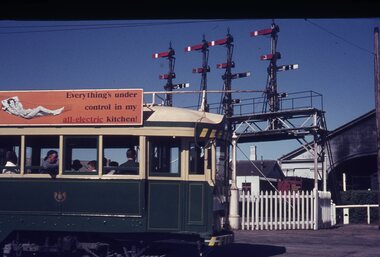
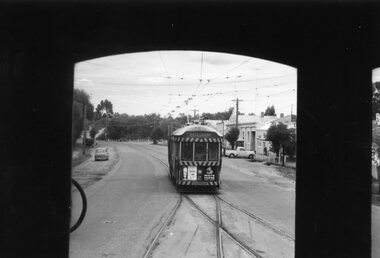
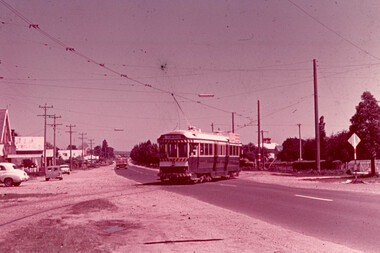
Slide - 35mm slide/s, Harry Jackson, Sept. 1971
... feature of note on the "LYDIARD St. Nth." line was the level... Lydiard St North Railway Crossing tram 40 Stamped on base of slide ...White cardboard mount, 35mm slide, from the Association of Railway Enthusiast's film strip titled "Provincial Tramway Film Strip" of No. 40 North bound for Lydiard St. North at the Railway Gates, with the gates closed. Tram carrying a heavy load of passengers. Railway station building and car park in background. Taken from the signal box. The film strip notes (Reg. Item 2560), provided the following caption details: "Principal feature of note on the "LYDIARD St. Nth." line was the level crossing at Ballarat Station. A well loaded No.40 waits patiently at the closed gates for a train.- Sept.'71 (Harry Jackson)" See image btm2566p.tif for high level scan of image. Stamped on base of slide "11776" and written in ink on top edge "No. 40 Lydiard St Ballarat"tramways, trams, are, film strip, lydiard st north, railway crossing, tram 40 -
 Ballarat Tramway Museum
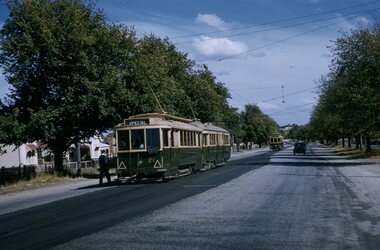
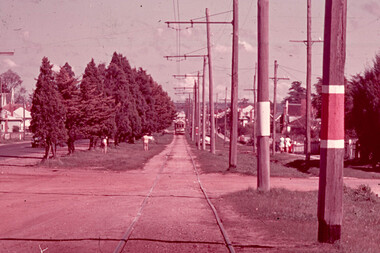
Slide - 35mm slide/s, Glen Mills, Sept. 1971
White cardboard mount, 35mm slide, from the Association of Railway Enthusiast's film strip titled "Provincial Tramway Film Strip" of No. 38, crossing Albert St, southbound, with Destination of Sebastopol. Photo taken after tram has passed photographer. Has the Anglican Trinity church in the background. The film strip notes (Reg. Item 2560), provided the following caption details: "About 1/2 mile from the terminus the line crossed to the west side of the road. Here car No. 38 outbound bowls across the asphalt. - Nov. ' 70 (Glen Mills)" See image btm2576p.tif for high level scan of image. Stamped on base of slide "11786" and written in ink on top edge "No. 38 Sebastopol line Ballarat"tramways, trams, are, film strip, albert st, sebastopol, tram 38 -
 Ballarat Tramway Museum
Slide - 35mm slide/s, Glen Mills, Sept. 1971
White cardboard mount, 35mm slide, from the Association of Railway Enthusiast's film strip titled "Provincial Tramway Film Strip" of a bogie tram on the reserved track between Ophir St and the terminus - telephoto lens. Note tram stop signs, aerial phone lines, the condition of the track and the gravel crossings. The film strip notes (Reg. Item 2560), provided the following caption details: "Years of neglect of trackage shows up here near Sebastopol as a bogie car approaches in the distance. - Sept '71 (Graham Evans)" See image btm2577p.tif for high level scan of image. Stamped on base of slide "11787" and written in ink on top edge "Sebastopol line"tramways, trams, are, film strip, albert st, sebastopol, tram 38 -
 Ballarat Tramway Museum
Slide - 35mm slide/s, Travis Jeffrey, c1962
Agfa plastic mount (blue base, white cover) with a photo of Bendigo 2, with destination of Eaglehawk, crossing No. 17 at Jobs Gull loop on the Eaglehawk line. No. 17 has destination of Quarry Hill. Has a Streets Ice cream and Whitehorse Whisky advertisements on the rear panel. Photo taken c1962."BES 27" in penciltramways, trams, bendigo, eaglehawk, jobs gully, tram 2, tram 17 -
 Ballarat Tramway Museum
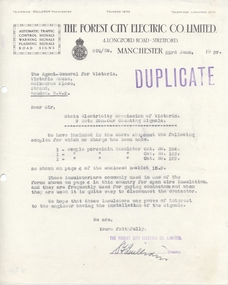
Pamphlet, State Electricity Commission of Victoria (SECV), "Overhead Line Material", Jun. 1937
Yields information about equipment made for Overhead tramway range and materials used and how correspondence was exchanged with the SEC via the Agent General.4914.1 - Letter from The Forest City Electric Co. Limited of Manchester 23/6/1937, to the Agent General for Victoria and the SEC, notifying that they have included within the shipment free of charge, three sample insulators and booklet 15.2. 4914.2 - Booklet or Sheet 15.2, titled "Overhead Line Material" comprising 12 pages showing details of porcelain insulators available from The Forest City Electric Co., and other associated equipment, including cap and cone suspensions, wood strain insulators, Giant Strain Insulators, overhead frogs, crossings, bonding compressors and contactors. Each sheet had three staples on left hand side and two punch holes. There were removed for scanning and have not been replaced.trams, tramways, overhead, forest city signals, insulation, trackwork, trolley wire -
 Ballarat Tramway Museum
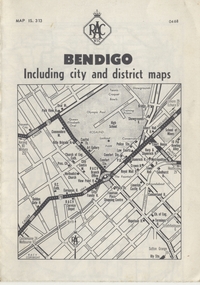
Map, Royal Automobile Club of Victoria, "Bendigo Including city and district maps - RACV", c1968
Printed street map titled "Bendigo Including city and district maps", published by the RACV, showing the central part of Bendigo on the front cover, Bendigo Outlets and notes on the city itself. Has the tram lines shown dotted, only shows the full extent of the Golden Square line. Inside has a district road map. The front cover has the number "0468" in the bottom left hand corner, indicating the publication date.in ink on the Bendigo Outlet map, has various notes showing the location of crossing loops on and off the map and the location of the tram depot itself.trams, tramways, map, bendigo, racv, railways -
 Ballarat Tramway Museum
Photograph - Digital image Set of 11, Stuart Loddington, 10 images of Ballarat trams prior to closure, 1971
Yields information about Ballarat Tramways and trams prior to the closure of the tramway system.Set of 11 digital images, comprising 1 donation text image and 10 images of Ballarat trams prior to closure, scanned from original slides by Stuart Lodington, 1971 prior to closure of the system. .1 - Donation text slide. .2 - No. 26 southbound in Lydiard St North, with the Ballarat Railway Station level crossing gates in the background. .3 - No. 27 and 30 crossing at Bell St Loop, Skipton St. (see also btm4976i4) .4 - No. 17 Wendouree Parade, near Gardens Loop .5 - Single truck tram at Victoria St terminus, taken from the west side of the Buninyong Rail line bridge, with CRB Roadwork sign, Eureka Caravan Park and Meagher Hotel in the background, possibly No. 11, see entry for .10 .6 - No. 12 and 30 crossing at the Urquhart St Loop, Drummond St South. .7 - No. 12 westbound in Sturt St, with Grenville St in the background. .8 - No. 17 at Gardens Loop with the Trolley pole being reversed. .9 - No. 30, Lydiard St North with Reid's Palace building in the background. .10 - No. 11 passing over the Buninyong rail line bridge, with Gardens via Sturt St West and a Twin Lakes sign. Has a number of children alongside the driver. .11 - No. 21 heading northbound in Wendouree Parade, Gardens, just to the north of the now BTM depot junction.trams, tramways, ballarat, level crossings, buninyong railway, lydiard st north, bell st, victoria st, wendouree parade, gardens, drummond st, sturt st, tram 26, tram 27, tram 30, tram 17, tram 12, tram 21, tram 11 -
 Ballarat Tramway Museum
Photograph - Digital image Set of 20
Set of 20 digital images of Bendigo Tramways, 1972 at or before closure while on a tram tour by Stuart Lodington. .1 - No. 28 and 5 at Eaglehawk terminus .2 - No. 28 leaving Charing Cross and travelling into View St with Armstrong Type Service building in background and Firestone Advertisements. .3 - No. 29 with Eaglehawk Town Hall and Post Office in background. .4 - No. 26 and 29 at start of double track, High St Eaglehawk .5 - No. 29 leaving Eaglehawk with shops in the background, Foodland, J. Bests .6 - No. 29 and 23 crossing Manchester Loop with Manchester Arms Hotel in the background and an old poppet head. .7 - No. 29 at ditto with poppet head in the background. .8 - No. 28 and two other trams at the Quarry Hill terminus. .9 - No. 29 in High St Bendigo with the Cathedral and Golden Gate Hotel in the background. .10 - No. 3 with destination Eaglehawk, in bound Carpenter St? .11 - No. 29 following a single trucker through a loop or the end of the double track near the depot. .12 - No. 23?, at Eaglehawk terminus, with Eaglehawk Town Hall in the background. .13 - Birney tram crossing the bridge at the Depot entrance - No. 29 .14 - No. 29 on the Eaglehawk line? .15 - as for .13 .16 - No. 29 entering the depot. .17 - No. 23, inbound from Eaglehawk, at Jobs Gully Loop with the railway overbridge in the background. .18 - No. 28 and two other trams (see also Reg Item 4982) for the same tram tour at Myrtle St. Loop. .19 - No. 21 with North Bendigo on the destination approaching the Golden Square terminus. .20 - No. 7 at Golden Square terminustrams, tramways, bendigo, eaglehawk, quarry hill, golden square, depot, tram 5, tram 29, tram 28, tram 26, tram 23, tram 7, tram 21 -
 Ballarat Tramway Museum
Photograph - Digital image Set of 20, 1971-72
... in bound on the Eaglehawk line with a crossing loop behind. .4... - No. 26 in bound on the Eaglehawk line with a crossing loop behind ...Set of 20 digital images of Bendigo Tramways, 1972 at or before closure while on a tram tour by Stuart Lodington. .1 - No. 7 at Golden Square terminus .2 - ditto .3 - No. 26 in bound on the Eaglehawk line with a crossing loop behind. .4 - Birney crossing the bridge by the tram depot. .5 - No. 29 running a special on the Eaglehawk line with a HBA billboard in the background. .6 - No. 29 with a driver walking in front of the tram at the above location. .7 - No. 29 on the Eaglehawk line .8 - ditto waiting for a tram at Manchester Loop with poppet head in the background. .9 - No. 29 on the Eaglehawk line .10 - Eaglehawk Town Hall at night. .11 - No. 7 at the depot junction in McCrae St, with Golden Square destination. .12 - No. 29 with the Camp Hotel Eaglehawk in the background. Also a Newsagent with The Sun, The Bendigo Advertiser and The Age signs on the building, High St .13 - No. 29 Mt Korong Rd, with the railway overbridge in the background. .14 - interior photo of Birney tram roof .15 - interior view of controls of Birney at Eaglehawk .16 - No. 29 outbound at the Depot Junction McCrae St. .17 - No. 18 at the Eaglehawk terminus .18 - close up view of No. 29 front. .19 - No. 29 in Nolan St, crossing the bridge, outbound. .20 - No. 18 at the Eaglehawk terminus with the Eaglehawk Town Hall, Post Office in the background. Has a circus banner on the side.trams, tramways, bendigo, eaglehawk, quarry hill, golden square, depot, mccrae st, nolan st, tram 7, tram 26, tram 29, tram 18 -
 Ballarat Tramway Museum
Photograph - Digital image Set of 20, 1971-72
Set of 20 digital images of Bendigo Tramways, 1972 at or before closure while on a tram tour by Stuart Lodington. .1 - No. 29 at the North Bendigo terminus .2 - No. 29 just past the Bendigo end of the double track in High St Eaglehawk, with a BP dealer in the background. .3 - Night photo of No. 18 at a terminus, showing "Eaglehawk" .4 - ditto .5 - Night photo of No. 24 at Eaglehawk with Leo A Hughes Photographer in the background. The Tram has "Johnnie Walker whiskey" roof adverts. .6 - No. 29 outbound in Thunder St with a train passing over the bridge in the background. .7 - view from the front window of a tram on the Eaglehawk line with a large "display event float" in the foreground and tram approaching a crossing loop. .8 - No. 29 at North Bendigo .9 - view of High St Eaglehawk looking east from the terminus, showing the track and centre poles. .10 - No. 29 outbound on the North Bendigo line turning from either Nolan St or Caledonia St, running a special. .11 - No. 7 departing North Bendigo for Golden Square. .12 - No. 3 and 18 at Charing Cross. No. 3 has two SEC roof Advertisements .13 - No. 7 at North Bendigo with the trolley pole being reversed. .14 - No. 24 at Quarry Hill with Northern Terrazzo in the background with the driver alongside .15 - No. 7 and No.6 at Charing Cross with the Beehive buildings in the background. .16 - No. 7 at North Bendigo terminus .17 - ditto .18 - No. 24 at Quarry Hill with Northern Terrazzo in the background with the conductor alongside. .19 - ditto .20 - No. 26 and other bogie tram in View St near Charing Cross with the Armstrong Tyre Service building and signs for Cohn's Drinks and T&G in the view.trams, tramways, bendigo, eaglehawk, quarry hill, golden square, depot, north bendigo, charing cross, tram 29, tram 18, tram 24, tram 3, tram 7, tram 6, tram 26 -
 Ballarat Tramway Museum
Photograph - Digital image Set of 20, 16/04/1972 12:00:00 AM
Set of 20 digital images of Bendigo Tramways, of the last running day of the Eaglehawk to Quarry Hill line 16 April 1972, .1 - No. 24 outbound to Eaglehawk .2 - No. 3? at Manchester Loop .3 - No. 24 outbound to Eaglehawk .4 - bogie tram crossing the rail over bridge from Eaglehawk .5 - No. 18 in View St .6 - No. 24 outbound to Eaglehawk .7 - No 18 at Eaglehawk with destination roll being changed, and shopping centre in the background. .8 - No. 24 crossing the railway overbridge, going to Eaglehawk .9 - No. 3 outbound to Eaglehawk .10 - No. 24 crossing the railway overbridge, going to Eaglehawk .11 - No. 3 and 24 crossing at Long Gully .12 - No. 18 at Eaglehawk with Leo A Hughes photographer building in the background and a CFA truck passing the tram. Tram SEC roof advertisement and a banner for "German -?- Circus" at Eaglehawk and dates. .13 - No. 3 inbound on the Eaglehawk line. .14 - No. 18 outbound to Eaglehawk .15 - ditto .16 - No. 18 at Eaglehawk terminus with the Mechanics Institute in the background. .17 - No. 24 at the Eaglehawk terminus .18 - No 24 at the intersection with Taylor St .19 - No. 24 at the Eaglehawk terminus .20 - dittotrams, tramways, bendigo, eaglehawk, long gully, manchester loop, tram 24, tram 18, tram 3 -
 Ballarat Tramway Museum
Photograph - Digital image Set of 20, 16/04/1972 12:00:00 AM
Set of 22 digital images of Bendigo Tramways, of the last running day of the Eaglehawk to Quarry Hill line 16 April 1972, .1 - No. 3 and 24 crossing at Long Gully .2 - No. 3 turning at the Cricket ground, Barnard and View Sts, inbound to the City and Quarry Hill .3 - No. 3 in bound to the City and Quarry Hill, Long Gully area .4 - No. 18 inbound to the City and Quarry Hill crossing the railway bridge from Eaglehawk. .5 - Manchester Loop .6 - No. 18 inbound to the City and Quarry Hill crossing the railway bridge from Eaglehawk. .7 - No. 18 about to enter Jobs Gully Loop .8 - No. 3 about to turn at the Cricket ground, Barnard and View Sts inbound to the City and Quarry Hill .9 - No. 3 turning at the Cricket ground, Barnard and View Sts, inbound to the City and Quarry Hill .10 - No. 18 at Eaglehawk terminus with the Mechanics Institute in the background. .11 - No. 3 in bound, Ironbark area. .12 - No. 3 at Long Gully Loop .13 - No. 3 outbound to Eaglehawk. .14 - No. 18 at Eaglehawk with German circus banner on tram .15 - No. 18 on the Eaglehawk line at Jobs Gully Loop .16 - No. 24 outbound to Eaglehawk at Taylor St .17 - No. 18 inbound to the City and Quarry Hill crossing the railway bridge from Eaglehawk. .18 - No. 3 at Manchester Loop .19 - No. 18 at Eaglehawk terminus .20 - No. 18 at Eaglehawk with German circus banner on tram .21 - bogie tram at Long Gully Loop. .22 - No. 24 outbound to Eaglehawk at Taylor Sttrams, tramways, bendigo, eaglehawk, long gully, jobs gully, manchester loop, tram 24, tram 18, tram 3 -
 Ballarat Tramway Museum
Newspaper, The Courier Ballarat, "Rail Lines link with Old Phoenix Foundry", 1950
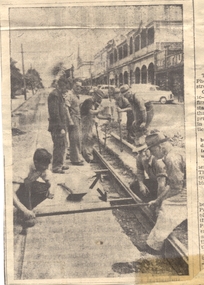
Yields information about the Phoenix foundry and tramway crossing in Sturt St in 1950.Newspaper Clipping from The Courier, 12/2/1950 titled "Rail Lines link with Old Phoenix Foundry", about the uncovering of the rails left in Sturt St at Armstrong St, part of the former Phoenix Foundry line - uncovered during rail replacement activities. Has a photograph showing the two exposed ends of workers replacing the rail line and gauging the track. Gives a short history of the Phoenix Foundry. Contained within Reg Item 5507 - Foolscap binder with green covers, black binding edge and metal clips. sturt st, trackwork, phoenix foundry -
 Ballarat Tramway Museum
Ephemera, Wal Jack, Wal Jack notebook, 1940's
Demonstrates Wal Jack's records, hand written in a recycled notebook. Note - several sheets have been cut from the book - appear to be done before use by Wal. The crossed out sheets have not been imaged - these have been transferred by Wal to Reg Item 5507 and re-ordered. Image 30 shows a sample of a crossed out page. See related documents for a pdf file of the contents. Scan No. BTM5623iX Page No. Title or Subject Notes 1 Front 2 Inside Cover Addresses for Jack McLean, John Buckland Trooper Larsen Inside front cover. 3 1 Note re NSWT steam tram motor, MMTB PCC import issues, Peter Duckett seeking info and Photo of Julien’s battery tram on test in Melbourne 4 2 MMTB No. 8, 4, photos, Tyrell’s of Sydney photos, Perth 63 dimensions and MMTB plans for Domain Road & St Kilda Rd Jtn. 5 3 Notes re NSWGR P32, VR locos at Wodonga 13/10/1941, SAR V Class V143, SAR locos – W and Wx 6 4 NSW Private locos, Woy Woy quarry and AGL at Mortlake 5 Blank 6 Blank 7 7 First cable trams – links to photos T154, 29, 154 (Adelaide) 8 8 T156, Powelltown, Ray Pearson Negs 9 9 QR B18 ¼ locos, Ray Pearson’s scrap book, PMTT Zeppelin style trams, MMTB T class locations and 178/179 rebuilding. 10 10 Hawthorn horse tramway, VR Black Rock terminus sketch 11 11 NSW Tramways, Ryde, MMTB L class, Geelong tramway notes 12 12 Locomotive “Ballarat” in WA, Brisbane and various contacts. 13 13 Notes re VR News – 1943, H class, derailments, max speeds, Koondrook tramway and Geelong level crossing. Individual typed sheets pasted onto page – loose within book. 14 to 17 14/17 List of MMTB trams to 877 and work trams Some errors noted. 18 18 Newspaper cutting – Tram Record Day revenue (Brisbane 10/1943), Steam Trams at Journey’s end – Sydney – 6/1943 list of equipment being sold by Sydney Ferries, at Parramatta, 6/1943. MMTB Tram crossings in Melbourne, list of Sydney photos sent to Wal. Cuttings and Individual typed sheets pasted onto page. 19 19 Midland locos WA, VR open wagon stencils and a siding at Mt. Evelyn. Individual typed sheets pasted onto page. 20 20 Note re Sydney four wheel tourist trams and Hawthorn Max. Traction cars locations c1945. 21 to 23 21/23 Notes on Geelong Bogie trams and carrying flags for declaration of Newtown and Chilwell as a city – 1/10/1949 (See also Reg Item 5641) 24 to 26 24/26 Notes on Wellington Corporation Tramcars 37 27 Kelburn – Karoi cable line Wellington 28 to 29 28/29 Auckland Tramway Board tramcars notes 30/31 Blank 30 32/33 Notes on Ballarat tramcars – ESCo Crossed out 34/37 Ditto – SEC Crossed out 38 Music for the people notes Crossed out 39 Notes on Ballarat trams with tail lights Crossed out 40/43 Notes on Ballarat bogie trams Crossed out 44/45 Notes on SEC tram controllers, dead man and truck lengths. Crossed out 31 45 List of Ballarat Destination roll – Dec 1949 32, 33 46/47 Notes on Bendigo Bogie Trams – 1940’s 34 48 Bendigo Destination roll on a Birney tram Easter 1950, notes on tram tail lights and fares on the Bendigo system. 49 Blank – though headed “Bendigo Birney Trams” 50 Notes trams used on special days in Ballarat Crossed out 51 Ditto and No. 24 and 23 Crossed out 52 Ditto, 15, 11, 23 and Gold tram Crossed out 53 Notes on 34 caused delays, 5/1950, and use of 23 as gold tram Crossed out 54 Notes on repair to track at Sturt and Drummond 6/1951 Crossed out - see Reg Item 7720. 55 Notes on track work in Ballarat early 1950’s Crossed out 56/57 Notes on 33, 37, pay as you enter signs and 1953 special workings Crossed out 58/60 Notes trams used on special days in Ballarat Crossed out 61/64 Blank 35 65 “Salute to the Cable Tram” – transcription of text from Truck and Bus Transportation (July 1948) 36, 37 66/67 Continued from above and list cable tram routes, opening, closing, length and route colours. 38 68 List of photos in Truck and Bus Transportation, Anniversary Issue July 1948 of cable trams. 69 Blank 39 70 Notes on Brunswick TT, Fitzroy TT colours, Adelaide Service trams and MMTB route lengths. 40 71 Notes on HTT colours, tramcars, PMTT trams and colours and NMETL colours, trams and route destination signs 41 72 Notes on MMTB routes, cable and other Melbourne tram disposals, and sale of cable trams and storage at Brunswick. 42 73 Blank - page was headed Lugarno, Switzerland and Italian border 42 Handwritten sheet – photos to get – R. Field and Peter Duckett. 43, 44 74/75 Listing of trains on all lines leaving Ballarat and days run. 45 77 Listing of negatives sent to K. Rogers in 1944 and list of MMTB Max. Traction bogie trams 117 to 138 and disposal 46 77 Listing of MMTB trams, - appears to be something to do with photos or negs held. 47 78 Listing of Ray’s (Pearson) negs /photos of Brisbane trams and other railway photos. 79 Blank 48 80 Prices of pine timber in 4/1942, list of photos “I want”, notes re VR Train length, Ironbark Gully bridge, 3817 in Harden smash 7/1948 and 1948 Ballarat destination roll. Partly crossed out. Rear Cover. Has a strong association with Wal Jack, his work to collect and record both railway and tramway information. Yields information about tramways in Ballarat, Bendigo, Geelong and other cities tramways and railways.Grey covered book with black binding containing 40 lined sheets (80 pages) with handwritten notes with the front cover partly cut out and the words "Jewellery & Engraving" book written in. Contains some newspaper clippings and pasted typed notes as listed below. The image number of each sheet is given. See individual pdf files. trams, tramways, mmtb, ballarat, bendigo, sydney, brisbane, railways, geelong, new zealand, victorian railways, sec, esco -
 Ballarat Tramway Museum
Slide - 35mm slide/s - set of 10, Campbell Duncan, Jan. 1971
Set of 10 Ferraniacolor slides - cardboard mounts taken on either 10/1/71 or 16/1/71. .1 - Birney No. 30, Golden Square line, inbound near Cathedral with car yard in background. .2 - ditto, with Cathedral gardens in background. .3 - single trucker, with two SEC roof adverts, entering Nolan St enroute to North Bendigo. Shows the driver sitting in a side on shot. A 4 square store in the background, with a fading advert for "Peeled Tomatoes". .4 - No. 6 turning from Nolan St into McCrae St with 4 square store in background. .5 - No. 26 at Quarry Hill with cemetery in background. .6 - No. 6 at the North Bendigo Terminus .7 - No. 26 outbound to Eaglehawk on the Railway Overbridge, Mt Korong Road. .8 - No. 17 (inbound to City and Quarry Hill) and another bogie crossing at a loop on the Eaglehawk line. Both trams have SEC roof adverts. The driver of the outbound car is boarding the tram. Based on .9, it is No. 3 at Long Gully. .9 - No. 3 waiting at Long Gully Loop . .10 - No. 26 at Quarry Hill terminus, with destination of Eaglehawk.In ink on slide: .1 - "1/2 mile out on Golden Square line - 10/1/71 (Sun)." .2 - "1/2 mile out on Golden Square line - 10/1/71" .3 - "Has just rounded curve near lake Weeroona on North Bendigo line - 10/1/71 (Sun)." .4 - "16/1/71" .5 - " 10/1/71 (Sun)." .6 - "North Bendigo terminus, 16/1/71 (Sat)" .7 - "10/1/71 (Sun) c 3pm" .8 - "Cross Eaglehawk line - 10/1/71 (Sun)." .9 - "Jackson St Loop on E'Hk line awaiting up - 10/1/71 " .10 - "Quarry Hill terminus Bendigo - - 10/1/71"tramways, trams, bendigo, golden square, high st, nolan st, north bendigo, quarry hill, long gully, railway bridge, tram 30, tram 6, tram 26, tram 17, tram 3 -
 Ballarat Tramway Museum
Negative - Copy, Ray Pearson
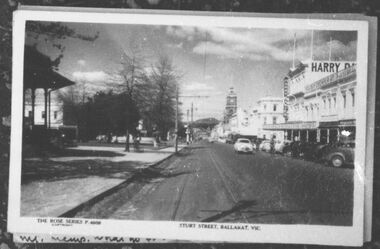
Yields information through postcard and some photos of Ballarat during the tramway eras - provides reference photographs for researchers to find original copies.Set of 12 copy negatives, of black and white photographs of Ballarat trams and postcards from Ray Pearson Collection, taken by Dave Macartney in 1975c. Original negative held in the negative file. Scanned at 2400 dpi and cropped as necessary. Images as shown replaced by scan from the original Ray Pearson Album provided by Mal Rowe, April 2020 or that there is a better image. .1 - Rose Series postcard P4609 - looking east along south of Sturt St, late 1940's. .2 - Rose Series postcard P10050 - Bridge St looking west. - see item 8975 for the actual postcard. .3 - Line up of trams in Sturt St West, for March 1968 Vintage train. .4 - Postcards or photo folder of Craigs Hotel and the Post Office, late 1900's. .5 - Postcard with Post Office in background, with horse trams crossing. .6 - Postcard or photo folder with Sturt St and "Greetings from Ballarat" .7 - Rose Series postcard P10044 - Lydiard St south, looking North - late 1940's. See item 8978 for the actual postcard. .8 - Rose Series postcard P13492 - Lower Sturt St, north side looking east. .9 - Rose Series postcard P13493 - Sturt St, south side, lower section, looking east. .10 - Postcard with horse tram arriving Grenville St, dated 5.2.04, has a miner and farmer on the right-hand side. .11 - Postcard of train at Ballarat railway station and a large crowd of people in the photo. .12 - Postcard or photo folder of an ESCo tram in Sturt St, with a "Souvenir of United States Fleet's visit to Australia" TMSV now possibly has these albums.trams, tramways, ballarat, postcards, sturt st, bridge st, post office -
 Ballarat Tramway Museum
Slide - 35mm slide/s - set of 2, Donor?, 19/09/1971 12:00:00 AM
Yields information about the operation of SEC trams on the final day of the Sebastopol line. Yields information about the operation of SEC trams on the final day of the Sebastopol line.Set of two colour slides, 35mm Kodachrome, of the last day of trams on the Sebastopol line - 19/9/1971. .1 - No. 42, southbound to Sebastopol, south of the Albert St crossover. .2 - No. 35, southbound to Sebastopol, crossing Albert St at Ophir St with another tram in the distance. See donor details for further details of the photograph,tramways, trams, closure, albert st, sebastopol, ophir st, tram 42, tram 35