Showing 387 items matching "operating systems"
-
 Bendigo Military Museum
Document - Army Topographic Support Establishment: Preferred In-House Option, 1 23 Nov 1993, .2 30 Nov 1994, .3 14 Jun 1995
.1 The Preferred In-House Option (PIHO) proposes to meet the full requirements of the Request for Tender (RFT) by disestablishing Army Survey Regiment and establishing a new organisation which they have named the Defence Topographic Support Establishment (DTSE). It is proposed to locate the DTSE at Bendigo in the GFE facilities offered by the Commonwealth. The DTSE will be staffed by 140 Defence civilians, principally sourced from ex-RASvy members transferring to the Public Service under the provisions of Section 81B of the Public Service Act. Any existing civilian members excess to DTSE requirements are proposed to be managed within the terms and conditions of the Australian Public Service Redeployment and Retirement (Redundancy) Award 1987. Military members who elect to remain in the Service will be subject to redeployment or retraining in accordance with Service requirements. .2 Proposed re-organisation of Product Construction Squadron (PCS). Due to the transfer of Image and capture Sections to Digital Acquisition Squadron wef Jan 1995 it has been necessary to review the structure of those elements remaining within PCS. The review highlighted that there was an imbalance between Mapping and Digital products Troops. This could only be resolved by collapsing these two Troops into one single production element. This would halve the senior administrative personnel needed thus allowing them to be employed in other higher priority technical areas. The proposed restructure of PCS is outlined in Annex A with redundant personnel listed in Annex B. The combined Troop is to be designated "Construction Troop" and comprises 1 Offr and 69 ORs. The role of this Tp would be to perform all digital production. It is further divided into small and Large Format Sections. This division is functionally based and reflects the hardware and software configurations now resident within the Sqn post system upgrade. .3 During the transition period leading to full implementation of the PHIO, the Army Svy Regt and DTSE (later ATSE) will at times operate concurrently whilst Army Svy Regt scales down production and progressively transfers all technical functions to DTSE. army Svy Regt and 4 Fd Svy Sqn will continue programmed production activities until declared operationally ineffective, however a contingency mapping capability will be maintained throughout the period of implementation. Implementation of the PHIO involves a number of related activities including staff recruitment, equipment acquisition and transfer of technical responsibility. This instruction details the coordination of these and related implementation activities. .1 Preferred In-House Option, Army Topographic Support Establishment. Summary of Tender. 10 x pages typed text and schematic diagrams. .2 Proposed reorganisation - product Construction Squadron. 9 x pages typed text and schematic diagrams. .3 Implementation of the Commercial Support Program (CSP) Digital Topographical support to the Australian Defence Force (ADF). Preferred In-House Option 14 Jun 1995. 22 x pages typed text and schematic diagrams. royal australian survey corps, rasvy, fortuna, army svy reg, army survey regiment, atse -
 Melbourne Tram Museum
Pamphlet - Edison Battery Cars, Railway Storage Battery Car Co, 1920s
Set of six pamphlets about the Edison storage battery system and associated rail or tramway related vehicles. Was promoted by various people, but internal combustion engines were found to be superior overall at the time.Yields detailed information about the use of the Edison battery storage system in railways.Set of five pamphlets regarding the Edison Battery Car. Was a proposal put forward to the operators of the Beaumaris Tramway Co. 1 - four page - "Edison Battery Car" - operating exhibit at American Railway Association Convention - 1920 2 - four page - ""Operations, Maintenance and performance of storage battery cars on the long island railroad" 3 - two page - "Storage battery cars for Mexican Railroad" 4 - four page - "Storage Battery cars on the Canadian National" 5 - four page - "Edison - Goodman Electric Storage Battery locomotives in New Zealand" - Christchurch 6 - one page - letter - from W Dobson of the Cambria & Indiana Railroad Co. re the use of such cars and their results.Have the stamp of the "The Southern Electric Power Co. of Gilbert Place Adelaide" and "E F Ablitt Mechanical Engineer, Melbourne"battery tramcars, edison, battery systems, new zealand, railways -
 Ballarat Tramway Museum
Slide, EX SEC tram 34 - Adelaide Tramway Museum, c1972
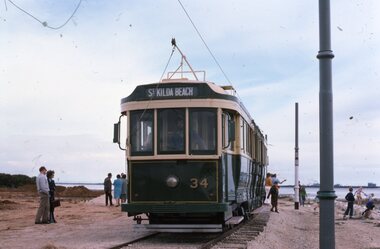
Colour duplicate slide of EX SEC Ballarat tram 34 - Adelaide Tramway Museum, operated by the Australian Electric Traction Museum at St Kilda Adelaide. Tram is in the SEC livery with the dash canopy lighting and tiger stripe panels removed. Photo taken at the the then St Kilda Beach terminus. Slide by the Tramway Museum Society of Victoria, probably 1972. Yields information about Ballarat tram 34 which was donated to the AETM following closure of the SEC system.Colour Kodak duplicate slide - white cardboard mountaetm, tramcars, tramway museums, tram 34, st kilda beach -
 Ballarat Tramway Museum
Slide, EX SEC tram 21 - Adelaide Tramway Museum, c1972
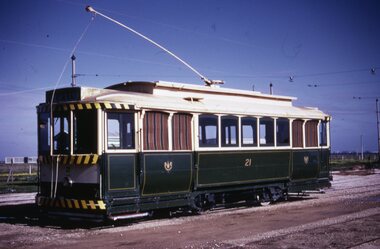
Colour duplicate slide of EX SEC Ballarat tram 21 - Adelaide Tramway Museum, operated by the Australian Electric Traction Museum at St Kilda Adelaide in the SEC livery. Photo taken at the AETM Depot. Slide by the Tramway Museum Society of Victoria, probably 1972. Yields information about Ballarat tram 21 which was donated to the AETM following closure of the SEC system.Colour Kodak duplicate slide - white cardboard mountaetm, tram 21, tramcars, tramway museums -
 Bendigo Military Museum
Photograph - Demonstration of TI4100 GPS Receiver, Royal Australian Survey Corps, c1988
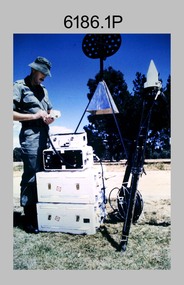
This is a set of four photographs of WO2 Graham Ragless from the Royal Australian Survey Corps demonstrating the operation of Global Positioning System equipment in c1988. The photos were probably taken at the School of Military Survey (SMS), Bonegilla, VIC. Texas Instruments TI4100 portable Global Positioning System (GPS) geodetic receivers were introduced from 1986–1988. The GPS receivers and Ferranti FILS3 helicopter and vehicle mounted Inertial Positioning System (IPS) replaced the TRANSIT satellite receivers. The equipment was deployed to establish the baseline for a GPS controlled air camera and photogrammetric system to significantly reduce the requirement for ground survey to accurately control air photography for topographic mapping. Personnel from the four field survey squadrons at this time were trained at the SMS to operate the TI4100 receivers. Field survey operations using GPS and IPS equipment followed in the late 1980s. This technology is described in more detail in the RA Svy booklet titled An Introduction to Topographic Mapping. See record ID - 6010. WO2 Graham Ragless progressed to the rank of WO1 and was appointed as RSM of the Army Survey Regiment from 1990 to 1992. Refer to item 6186.2P for more photographs of WO2 Graham Ragless demonstrating the TI4100.This is a set of four photographs of a technician from the Royal Australian Survey Corps demonstrating the operation of Global Positioning System equipment in c1988. Colour photos are on 35mm slide film and were scanned at 96 dpi. .1) to .4) - Photo, colour, c1988, WO2 Graham Ragless demonstrating the operation of a TI4100 GPS receiverThere are no annotations.royal australian survey corps, rasvy, army survey regiment, army svy regt, fortuna, asr, surveying -
 Bendigo Military Museum
Photograph - Demonstration of TI4100 GPS Receiver, Royal Australian Survey Corps, c1988
This is a set of two photographs of WO2 Graham Ragless from the Royal Australian Survey Corps demonstrating the operation of Global Positioning System equipment in c1988. The photos were probably taken at the School of Military Survey (SMS), Bonegilla, VIC. Texas Instruments TI4100 portable Global Positioning System (GPS) geodetic receivers were introduced from 1986–1988. The GPS receivers and Ferranti FILS3 helicopter and vehicle mounted Inertial Positioning System (IPS) replaced the TRANSIT satellite receivers. The equipment was deployed to establish the baseline for a GPS controlled air camera and photogrammetric system to significantly reduce the requirement for ground survey to accurately control air photography for topographic mapping. Personnel from the four field survey squadrons at this time were trained at the SMS to operate the TI4100 receivers. Field survey operations using GPS and IPS equipment followed in the late 1980s. This technology is described in more detail in the RA Svy booklet titled An Introduction to Topographic Mapping. See record ID - 6010. WO2 Graham Ragless progressed to the rank of WO1 and was appointed as RSM of the Army Survey Regiment from 1990 to 1992. Refer to item 6226.4P for more photographs of WO2 Graham Ragless demonstrating the TI4100.This is a set of two photographs of a technician from the Royal Australian Survey Corps demonstrating the operation of Global Positioning System equipment in c1988. Colour photos are on 35mm slide film and were scanned at 96 dpi. .1) and .2) - Photo, colour, c1988, WO2 Graham Ragless demonstrating the operation of a TI4100 GPS receiverThere are no annotations.royal australian survey corps, rasvy, army survey regiment, army svy regt, fortuna, asr, surveying -
 Bendigo Military Museum
Photograph - Capturing Topographic Features with a Wild B8, AUTOMAP 1 Systems Operations – Army Survey Regiment, Fortuna, Bendigo, 1980
This is a set of 24 photographs of Air Survey Squadron technicians capturing topographic Features with a Wild B8 stereo plotter and operating AUTOMAP 1 equipment at the Army Survey Regiment at Fortuna, Bendigo, 1980. 17 of these photographs were taken of SPR Nick Van Dalen and SPR Santina (Argetto) Straube capturing topographic features – plotting with a Wild B8 stereo plotter were most likely taken in 1980. See item 6185.4P for black & white copies of photos of SPR Santina (Argetto) Straube operating the Wild B8 stereo plotter. Refer to item 6204.8P for detailed information and additional photographs of the Wild B8 stereo plotter. The history of the AUTOMAP 1 system is covered in more detail with additional historic photographs in pages 116-118 of Valerie Lovejoy’s book 'Mapmakers of Fortuna – A history of the Army Survey Regiment’ ISBN: 0-646-42120-4. See items 6122.20P, 6183.19P, 6184.20P, 6200.5P, and 6222.17P for additional photographs of the AUTOMAP 1 system.This is a set of 24 photographs of Air Survey Squadron technicians capturing topographic features with a Wild B8 stereo plotter and operating AUTOMAP 1 equipment at the Army Survey Regiment at Fortuna, Bendigo, c1980. The photographic proofs were printed on photographic paper and are part of the Army Survey Regiment’s Collection. The photographic proof prints were scanned at 600 dpi. .1) to .8) Photo, black & white, 1980. SPR Santina (Argetto) Straube operating a Wild B8 stereo plotter. .9) to .17) Photo, black & white, 1980. SPR Nick Van Dalen operating a Wild B8 stereo plotter. .18) to .24) Photo, black & white, 1980. CPL Gerry Gunn undertaking AUTOMAP 1 computer system duties..1P to .24P – no annotations.automap 1, royal australian survey corps, rasvy, army survey regiment, army svy regt, fortuna, asr, photogrammetry -
 Bendigo Military Museum
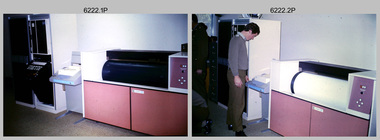
Photograph - Capturing Topographic Features with a Wild B8, AUTOMAP 2 Systems Operations – Army Survey Regiment, Fortuna, Bendigo, 1990
This is a set of two photographs of Air Survey Squadron technicians - LCPL Peter Murphy and SPR Rachel (Stanford) Scott capturing topographic features with a Wild B8 stereo plotter with AUTOMAP 2 equipment at the Army Survey Regiment, Fortuna, Bendigo, c1990. Refer to item 6185.4P and 6204.8P for detailed information and additional photographs of the Wild B8 stereo plotter. The history of the AUTOMAP 2 system is covered in more detail with additional historic photographs in pages 119, 137-142 and 180 of Valerie Lovejoy’s book 'Mapmakers of Fortuna – A history of the Army Survey Regiment’ ISBN 0-646-4: 2120-4. See items 6087.10P and 6223.23P for additional photographs of the AUTOMAP 2 system.This is a set of two photographs of Air Survey Squadron technicians capturing topographic features with a Wild B8 stereo plotter with AUTOMAP 2 equipment at the Army Survey Regiment at Fortuna, Bendigo, c1990. The photographs are on 35mm negative film. They are part of the Army Survey Regiment’s Collection. The photographic negatives were scanned at 96 dpi. .1) - Photo, colour, 1990. LCPL Peter Murphy operating a Wild B8 stereo plotter. .2) - Photo, colour, 1990. SPR Rachel (Stanford) Scott operating a Wild B8 stereo plotter..1P to .2P – no annotationsroyal australian survey corps, rasvy, army survey regiment, army svy regt, fortuna, asr, photogrammetry -
 Bendigo Military Museum
Photograph - KLIMSCH Large Format Camera and Wild OR1 Orthorectification Equipment - Army Survey Regiment, Fortuna, Bendigo, c1986
The main tasks undertaken by technicians operating the KLIMSCH Commodore large format camera were enlargements and reductions of map reproduction material. seen in photo .1P is at the operating console. See item 6189.4P for more information and photos of CPL Whaling operating the KLIMSCH camera. Orthophoto mapping provided the Survey Corps with the capability to produce map products quickly in the event of a crisis. These are four photographs of equipment used by the Army Survey Regiment to produce orthophotomaps. The WILD OR1 orthophoto projector and workstation shown in photos .3P and .4P was introduced in the mid-1980s. It was the second-generation equipment used to orthorectify colour and monochrome film aerial photography, replacing the system introduced in 1973. See items 6124.5P and 6133.4P for more photographs of orthorectification equipment.These four photographs of KLIMSCH large format camera and Wild OR1 orthorectification equipment was taken at the Army Survey Regiment at Fortuna, Bendigo, c1986. The colour photographs are on 35mm negative film and scanned at 96 dpi. They are part of the Army Survey Regiment’s Collection. .1) - Photo, colour, c1986, CPL John Whaling operating the KLIMSCH Camera. .2) - Photo, colour, c1986, large format film developer. .3) - Photo, colour, c1986, WILD OR-1 Orthorectification Workstation operated by CPL Dave Jobe. .4) - Photo, colour, c1986, WILD OR-1 Orthorectification Workstation..1P to .4P – There are no annotations.royal australian survey corps, rasvy, army survey regiment, army svy regt, fortuna, asr -
 Mission to Seafarers Victoria
Painting, WW2 AMS (Corvette): HMAS Rockhampton, early 21st Century
From his obituary published in Optometry Australia: Born in 1925 in Swan Hill, his parents were soldier settlers in the Mallee before moving to Melbourne. After obtaining his leaving certificate from Melbourne Grammar, he worked as a laboratory assistant in an explosives factory but later completed a chemistry diploma. He enlisted in the Navy in 1943 aged 17 years and due to a colour vision deficiency, served in the supply branch on HMAS Rockhampton, being discharged aged 21. His deuteranomaly steered him to learn adaptive behaviours while studying optometry, ensuring his clinical practice remained unaffected.According to wikipedia 2017 : Rockhampton began her career as a convoy escort along the east coast of Australia.[1] Following a series of Japanese submarine attacks along the east coast of Australia, a convoy system was established.[1] Rockhampton and USS Selfridge escorted the first Sydney to Brisbane convoy.[1] The corvette remained in this role until January 1944, when she began escorting convoys to and from New Guinea.[1] She underwent refit in Sydney over April and May 1944, before returning to escort duties in New Guinea waters.[1] Rockhampton operated in both Australian and New Guinea waters up until the end of World War II.[1] Following the end of the war, Rockhampton was involved in the rescue of Dutch and Indonesian prisoners-of-war and the occupation of Ambon.[1] On 8 October 1945, the corvette carried the Sultan of Ternate on his return home.[1] Rockhampton returned to Sydney in November 1945, where she was assigned to minesweeping duties off the east coast of Australia.[1] She later participated in survey duties off the coast of South Australia, before returning to Sydney on 29 April 1946.[1] The corvette received two battle honours for her wartime service: "Pacific 1942–45" and "New Guinea 1944"HMAS Rockhampton launched 1941 and de-commissioned 1946. Operated in the Pacific and New Guinea theatres of WW2 see supplementary files for details Maritime ArtJames CockburnAcrylic painting on composition board of a military or armed corvette at sea. Framed with a speckled pale blue painted moulded pine ? frame. The painting is signed on lower right corner and inscribed with both blue and black fibre tipped pen.Front: lwr right corner: "D Cockburn" in pale blue paint ; Verso "WW2 AMS (Corvette): HMAS Rockhampton / PAINTED BY DAVID M COCKBURN FORMER CREW MEMBER / PH DAVE ..."hmas rockhampton, corvette, ww2, merchant navy, world war 2, david cockburn, crew, sailors, seamen, seafarers, optometrist, artwork-paintings, hobbies -
 Eltham District Historical Society Inc
Photograph - Digital Photograph, Alan King, Maroondah Aqueduct Siphon Bridge over the Plenty River, 26 January 2008
Opened in 1891, the bridge formed part of the Maroondah Aqueduct carrying water from Watts River near Healesville to the reservoir at Preston where it joined Melbourne's metropolitan water system. Covered under Heritage Overlay, Nillumbik Planning Scheme. Published: Nillumbik Now and Then / Marguerite Marshall 2008; photographs Alan King with Marguerite Marshall.; p99 Built to supply thirsty Melbourne in the late 19th century, the siphon bridge spanning the Plenty River off Leischa Court, Greensborough, was part of an engineering masterpiece. Opened in 1891, the bridge formed part of the Maroondah Aqueduct carrying water from the Watts River near Healesville to the reservoir at Preston where it joined the metropolitan distribution system. A major link in Melbourne’s water supply, it also had a huge impact on communities, which mushroomed along its route. Named after the Aboriginal word for the area around the Maroondah Reservoir, the Maroondah Aqueduct was fully operational until the 1970s. Since the 1980s the land along parts of the aqueduct have been used for walking and bicycle riding, shaded in places by Monterey Pine trees planted to stabilise the surrounding ground. From 1857 the Yan Yean Reservoir supplied Melbourne’s water but the growing city needed additional catchments.1 In 1886 work began on a weir on the Watts River to enable the aqueduct to carry most of the river water 41 miles (66km) to Melbourne. The aqueduct, built by the Board of Works, is the oldest remaining aqueduct near Melbourne and was probably the first built with concrete.2 Although the aqueduct is now only used between the Maroondah and Sugarloaf Reservoirs, it can still be traced across the Shire. It extends from the Maroondah Reservoir through Christmas Hills, Kangaroo Ground, Research, Eltham, St Helena and then previously wound west through Greensborough to Reservoir.3 Built by horse and manpower the aqueduct gravity fed 25 million gallons (113.6ML) of water a day to Melbourne along a gradient of one foot to the mile. It included 25 miles (41km) of open concrete and brick channel, six miles (10km) of tunnels, and nine miles (15km) of 14 inverted siphons of riveted wrought-iron across creeks. Bricks for the aqueduct were made from clay found near the sites and remains of several kilns can still be found between Kangaroo Ground and Christmas Hills. Building the aqueduct transformed local communities. An abattoir was established at Christmas Hills. Grog shanties and labourers’ camps sprang up and local courts dealt with cases of ‘petty pilfering and boisterous behaviour’.4 The Kangaroo Ground school population jumped to 91, crammed into a room with one teacher. Miners who built the tunnels camped just north of Churinga in Greensborough – then called Tunnel Hill Camp – and adjacent to the Evelyn Arms Hotel. The miners’ high spirits were sometimes quenched in horse troughs or by a ‘welt under the ear and kick on the behind’ as the local constable calmed them down rather than lock them up.5 But the growing city of Melbourne needed more water, so the O’Shannassy catchment, east of Warburton, was added to the system in 1914. In 1920 work began on the present concrete Maroondah Dam one mile (1.6km) from the weir on the Watts River. The aqueduct capacity was thus doubled to 50 million gallons (227ML) a day.6 Intense land development threatened to pollute the open water supply, so channel sections were replaced with large pipes. In the late 1960s a large water main was built from the tunnel outlet at Research and extended through St Helena and Greensborough, so this section of the aqueduct was taken out of use. Long sections of the unused open channels in Greensborough and Bundoora were destroyed, but the old channel in Research and Eltham North remained largely intact. In the 1970s, the Sugarloaf Reservoir was constructed, inundating 445 hectares of land in Christmas Hills. Sugarloaf was officially opened in 1980 and serves as a water storage and treatment plant supplying Melbourne. In the early 1980s pipes replaced the section from Sugarloaf Reservoir to the tunnel entrance at Kangaroo Ground. The Research-Kangaroo Ground tunnel operates as part of the pipeline system.This collection of almost 130 photos about places and people within the Shire of Nillumbik, an urban and rural municipality in Melbourne's north, contributes to an understanding of the history of the Shire. Published in 2008 immediately prior to the Black Saturday bushfires of February 7, 2009, it documents sites that were impacted, and in some cases destroyed by the fires. It includes photographs taken especially for the publication, creating a unique time capsule representing the Shire in the early 21st century. It remains the most recent comprehenesive publication devoted to the Shire's history connecting local residents to the past. nillumbik now and then (marshall-king) collection, maroondah aqueduct, pipe bridge, siphon bridge -
 Ballarat Tramway Museum
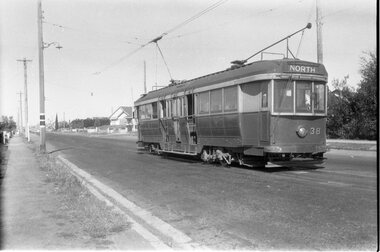
Negative - Geelong Belmont terminus tram 38, Laurie Gallop, early 1956
Photo shows Geelong No. 38 at the Belmont terminus, High Street with the return destination of North. Note the compulsory tram stop on the left-hand pole. One of a set of photos was taken between 15/2/1956 and 3/3/1956 when services operated only between Belmont and North before the final closure of the Belmont route on 25/31956 and that bogie tram 31 is not shown on the board, having gone to Ballarat on 15/2/1956 - see item 5554. See item 8213 for an article on the Geelong system by Keith Kings. Yields information about the Belmont tram terminus prior to closure.Black and white Negative - 120 sizetram stops, tramways, high st, geelong, tram 38, belmont -
 Ballarat Tramway Museum
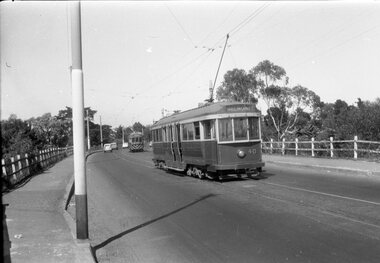
Negative - Geelong trams 33 & 40 Barwon Bridge, Laurie Gallop, early 1956
Photo shows Geelong trams 33 & 40 in Moorabool St just south of the Barwon Bridge on the long crossing loop. Based on the running board at item 8267, most likely tram No. 33. One of a set of photos was taken between 15/2/1956 and 3/3/1956 when services operated only between Belmont and North before the final closure of the Belmont route on 25/31956 and that bogie tram 31 is not shown on the board, having gone to Ballarat on 15/2/1956 - see item 5554. See item 8213 for an article on the Geelong system by Keith Kings. Yields information about the Geelong operations toward the closure of the tram system.Black and white Negative - 120 sizetramways, geelong, moorabool st, tram 33, tram 40, barwon river -
 Bendigo Military Museum
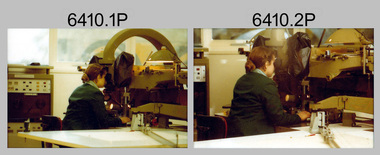
Photograph - AUTOMAP 1 Production – Army Survey Regiment, Fortuna, Bendigo, c1978-1980
This collection of 17 photos was most likely taken in c1978-1980. The AUTOMAP 1 computer assisted cartography and mapping system was introduced in 1975. The components of AUTOMAP 1 were the Input Sub-System of four Wild B8s stereoplotters and three Gradicon digitising tables, the Optical Line Following Sub-System – Gerber OLF, the Verification Sub-System – Gerber 1442 drum plotter, the General Purpose Sub-system – HP21MX computer and the Output Sub-System – Gerber 1232 flatbed plotter). The first map was published in 1978 (Strickland 3665-3, 1:50,000). AUTOMAP 1 was the first computer assisted cartography and mapping system utilised by the Survey Corps and was the first system used by Australian mapping organisations. The history of the AUTOMAP 1 system is covered in more detail with additional historic photographs, in pages 116-118 of Valerie Lovejoy’s book 'Mapmakers of Fortuna – A history of the Army Survey Regiment’ ISBN: 0-646-42120-4. See items 6122.20P, 6410.24P, 6183.19P, 6184.20P, and 6200.5P for additional photographs of the AUTOMAP 1 system.This is a set of 17 photographs of Air Survey Squadron military and civilian personnel operating AUTOMAP 1 equipment at the Army Survey Regiment at Fortuna, Bendigo, c1978-1980. The photographs were on 35mm colour slides and were scanned at 96 dpi. They are part of the Army Survey Regiment’s Collection. .1) - Photo, colour, c1978-1980, Gerber 1442 verification drum plotter. .2) - Photo, colour, c1978-1980, Gerber 1442 verification drum plotter, SPR Garry Ames. In background - Hewlett Packard (HP) 2100A Minicomputer Input Subsystem controlling Wild B8 Aviograph stereo plotters. .3) - Photo, colour, c1978-1980, Gerber 1442 verification drum plotter. .4) - Photo, colour, c1978-1980, digitising topographic features with a Wild B8 Aviograph stereo plotter, CPL Adrian Rynberk. .5) to .6) - Photo, colour, c1978-1980, Wild PEB8 stereo profiler. .7) - Photo, colour, c1980, HP 9640A Programming System. .8) - Photo, colour, c1980, HP 9640A Programming System, L to R: unidentified, SGT Alan Toogood. .9) - Photo, colour, c1978-1980, Gerber Optical Line Follow (OLF), CAPT Rob Bridge. .10) - Photo, colour, c1978-1980, Gerber OLF. .11.) to .12) - Photo, colour, c1978-1980, Gerber OLF, SPR Gerry Gunn. .13) - Photo, colour, c1978-1980, Gerber OLF. .14) - Photo, colour, c1979, Gradicon edit table. .15) to .16) - Photo, colour, c1981, Gradicon edit table, SPR Chris Gordon. .17) - Photo, colour, c1981, Gradicon edit table, L to R: SPR Chris Brown, unidentified..1P to .17P - Some of the equipment is annotated on the frame of the 35mm slides.royal australian survey corps, rasvy, army survey regiment, army svy regt, fortuna, asr, automap 1 -
 Bendigo Military Museum
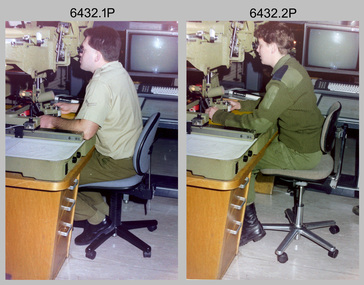
Photograph - AUTOMAP 1 Production – Army Survey Regiment, Fortuna, Bendigo, c1979
This collection of 19 photos was most likely taken in 1980. The AUTOMAP 1 computer assisted cartography and mapping system was introduced in 1975. The components of AUTOMAP 1 were the Input Sub-System of four Wild B8s stereoplotters and three Gradicon digitising tables, the Optical Line Following Sub-System – Gerber OLF, the Verification Sub-System – Gerber 1442 drum plotter, the General Purpose Sub-system – HP21MX computer and the Output Sub-System – Gerber 1232 flatbed plotter). The first map was published in 1978 (Strickland 3665-3, 1:50,000). AUTOMAP 1 was the first computer assisted cartography and mapping system utilised by the Survey Corps and was the first system used by Australian mapping organisations. The history of the AUTOMAP 1 system is covered in more detail with additional historic photographs, in pages 116-118 of Valerie Lovejoy’s book 'Mapmakers of Fortuna – A history of the Army Survey Regiment’ ISBN: 0-646-42120-4. See items 6122.20P, 6410.24P, 6184.20P, 6200.5P, and 6222.17P for additional photographs of the AUTOMAP 1 system.This is a set of 19 photographs of Air Survey Squadron military and civilian personnel operating AUTOMAP 1 equipment at the Army Survey Regiment at Fortuna, Bendigo, c1979. The photographs were on 35mm negative film and were scanned at 96 dpi. They are part of the Army Survey Regiment’s Collection. .1) - Photo, colour, c1979, Gradicon edit table, SSGT John Bennett. .2) - Photo, colour, c1979, Gradicon edit table. .3) - Photo, colour, c1979, HP21MX computer General Purpose Sub-system. .4) - Photo, colour, c1979, HP21MX computer General Purpose Sub-system. L to R: CAPT Graham Baker, SPR Ian Belmont. .5) - Photo, colour, c1979, Gerber verification drum plotter. 1130 System administration, unidentified. .6) - Photo, colour, c1979, Gerber Optical Line Follower (OLF). .7) - Photo, colour, c1979, Gerber OLF .8) - Photo, black & white, c1979, Programming and system administration, L to R: WO1 Don Taylor, Robert Cox, Tony Spurling, SSGT John Bennett, SGT Alan Toogood. .9) to .14) - Photo, black & white, c1979, .15) - Photo, black & white, c1979, Gerber OLF, unidentified. .16) - Photo, black & white, c1979, Gerber verification drum plotter, unidentified using Gradicon edit table. .17) to .18) - Photo, black & white, c1979, - Photo, black & white, c1979, Programming and system administration, SSGT John Bennett. .19)- Photo, black & white, c1979, - Photo, black & white, c1979, HP21MX computer General Purpose Sub-system..1P to .19P No personnel are identified.royal australian survey corps, rasvy, army survey regiment, army svy regt, fortuna, asr, automap 1 -
 Bendigo Military Museum
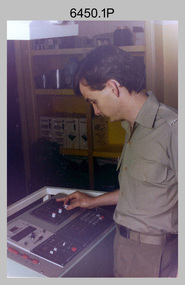
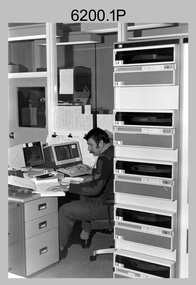
Photograph - AUTOMAP 1 Production – Army Survey Regiment, Fortuna, Bendigo, c1980
This collection of five photos was most likely taken in c1980. The AUTOMAP 1 computer assisted cartography and mapping system was introduced in 1975. The components of AUTOMAP 1 were the Input Sub-System of four Wild B8s stereoplotters and three Gradicon digitising tables, the Optical Line Following Sub-System – Gerber OLF, the Verification Sub-System – Gerber 1442 drum plotter, the General Purpose Sub-system – HP21MX computer and the Output Sub-System – Gerber 1232 flatbed plotter). The first map was published in 1978 (Strickland 3665-3, 1:50,000). AUTOMAP 1 was the first computer assisted cartography and mapping system utilised by the Survey Corps and was the first system used by Australian mapping organisations. The history of the AUTOMAP 1 system is covered in more detail with additional historic photographs, in pages 116-118 of Valerie Lovejoy’s book 'Mapmakers of Fortuna – A history of the Army Survey Regiment’ ISBN: 0-646-42120-4. See items 6410.24P, 6122.20P, 6183.19P, 6184.20P and 6222.17P for more photos of the AUTOMAP 1 computer system.This is a set of five photographs of Air Survey Squadron military personnel operating AUTOMAP 1 equipment at the Army Survey Regiment at Fortuna, Bendigo, c1980. Black and white photos are on photographic paper and were scanned at 300 dpi. They are part of the Army Survey Regiment’s Collection. .1) - Photo, black & white, c1980, SGT Cliff Webb operating AUTOMAP 1 terminal. .2) - Photo, black & white, c1980, HP21MX computer General Purpose Sub-system. .3) - Photo, black & white, c1980, Gerber verification drum plotter. .4) and .5) - Photo, black & white, c1980, unidentified personnel operating AUTOMAP 1 terminal. .1P to .5P - No personnel are identified.royal australian survey corps, rasvy, army survey regiment, army svy regt, fortuna, asr, automap 1 -
 Ballarat Tramway Museum
Negative - Tram 40 - Moorabool & Malop Streets, Laurie Gallop, early 1956
Photo shows Geelong 40 on its way to North Geelong, turning from Moorabool St into Malop St. In the background are now the National Mutual and Market Square buildings. One of a set of photos was taken between 15/2/1956 and 3/3/1956 when services operated only between Belmont and North before the final closure of the Belmont route on 25/31956 and that bogie tram 31 is not shown on the board, having gone to Ballarat on 15/2/1956 - see item 5554. See item 8213 for an article on the Geelong system by Keith Kings. Yields information about the Geelong operations toward the closure of the tram system.Black and white Negative - 120 sizetramways, geelong, moorabool st, malop st, tram 40 -
 Ballarat Tramway Museum
Negative - Geelong scrubber at depot, Laurie Gallop, early 1956
The photo shows the Geelong scrubber on the front of No. 2 road with No. 16 behind and No. 19 alongside. One of a set of photos was taken between 15/2/1956 and 3/3/1956 when services operated only between Belmont and North before the final closure of the Belmont route on 25/31956 and that bogie tram 31 is not shown on the board, having gone to Ballarat on 15/2/1956 - see item 5554. See item 8213 for an article on the Geelong system by Keith Kings. Yields information about the Geelong operations toward the closure of the tram system and in particular the Geelong scrubber or track cleaning tram.Black and white Negative - 120 sizetramways, geelong, geelong depot, scrubber, geelong 16, geelong 19 -
 Ballarat Tramway Museum
Negative - Tram 40 at the North terminus, Laurie Gallop, early 1956
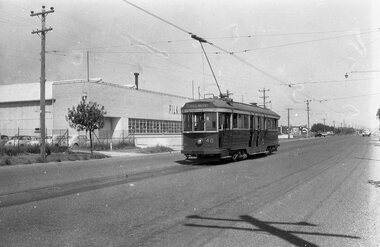
Photo shows Geelong tram 40 at the North Terminus, with the Pilkington glass factory behind. The tram has the destination of Belmont. One of a set of photos was taken between 15/2/1956 and 3/3/1956 when services operated only between Belmont and North before the final closure of the Belmont route on 25/31956 and that bogie tram 31 is not shown on the board, having gone to Ballarat on 15/2/1956 - see item 5554. See item 8213 for an article on the Geelong system by Keith Kings. Yields information about the Geelong operations toward the closure of the tram system and the North terminus.Black and white Negative - 120 sizetramways, geelong, geelong depot, tram 40, north -
 Ballarat Tramway Museum
Negative - Tram 33 Geelong depot, Laurie Gallop, early 1956
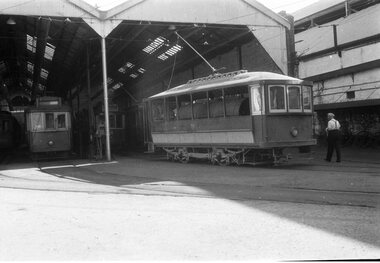
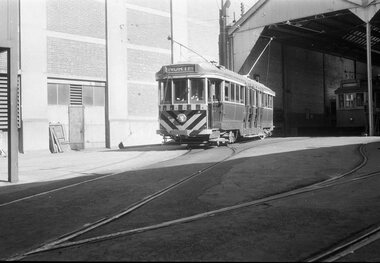
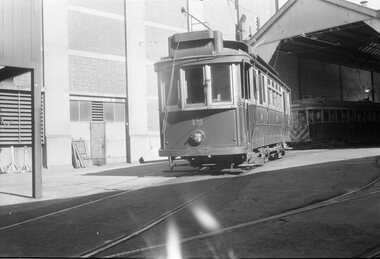
Photo shows Geelong 33 on No. 5 road at Geelong depot being driven out with the destination set to North. One of a set of photos was taken between 15/2/1956 and 3/3/1956 when services operated only between Belmont and North before the final closure of the Belmont route on 25/31956 and that bogie tram 31 is not shown on the board, having gone to Ballarat on 15/2/1956 - see item 5554. See item 8213 for an article on the Geelong system by Keith Kings. Yields information about the Geelong operations toward the closure of the tram system.Black and white Negative - 120 sizetramways, geelong, geelong depot, tram 33 -
 Ballarat Tramway Museum
Negative - Tram 40 - Mercer St, city end, early 1956
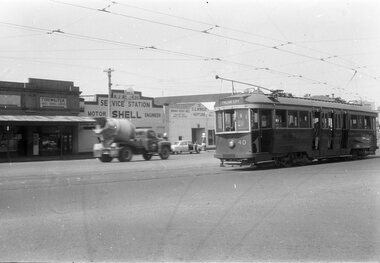
Photo shows Geelong tram 40 Mercer St, city end. The tram has the destination of North. In the background is a typewriter shop, R J Reynolds? Shell service station and S G Winkler Service station with a Neptune sign. The driver has his hand on the air brake and the controller with the front driver's window open. One of a set of photos was taken between 15/2/1956 and 3/3/1956 when services operated only between Belmont and North before the final closure of the Belmont route on 25/31956 and that bogie tram 31 is not shown on the board, having gone to Ballarat on 15/2/1956 - see item 5554. See item 8213 for an article on the Geelong system by Keith Kings. Yields information about the Geelong operations toward the closure of the tram system.Black and white Negative - 120 sizetramways, geelong, tram 40, north, mercer st -
 Ballarat Tramway Museum
Negative - Tram 38 Mercer Street, Laurie Gallop, early 1956
Photo shows Tram 38 Mercer Street, near The Esplanade with the destination of Belmont. One of a set of photos was taken between 15/2/1956 and 3/3/1956 when services operated only between Belmont and North before the final closure of the Belmont route on 25/31956 and that bogie tram 31 is not shown on the board, having gone to Ballarat on 15/2/1956 - see item 5554. See item 8213 for an article on the Geelong system by Keith Kings. Yields information about the Geelong operations toward the closure of the tram system.Black and white Negative - 120 sizetramways, geelong, tram 38, mercer st -
 Ballarat Tramway Museum
Negative - Moorabool St, looking south at the Kardinia Park loop, Laurie Gallop, early 1956
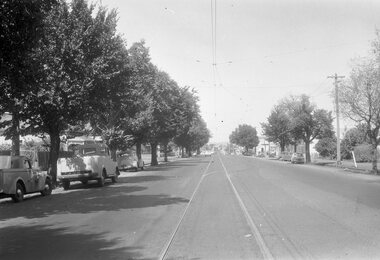
Photo shows Moorabool St, looking south at the Kardinia Park loop. One of a set of photos was taken between 15/2/1956 and 3/3/1956 when services operated only between Belmont and North before the final closure of the Belmont route on 25/31956 and that bogie tram 31 is not shown on the board, having gone to Ballarat on 15/2/1956 - see item 5554. See item 8213 for an article on the Geelong system by Keith Kings. Yields information about the Geelong tram system.Black and white Negative - 120 sizetramways, geelong, moorabool st, kardinia park loop -
 Ballarat Tramway Museum
Negative - Tram 19 at Geelong Depot, Laurie Gallop, early 1956
Photo shows Tram 19 at Geelong Depot One of a set of photos was taken between 15/2/1956 and 3/3/1956 when services operated only between Belmont and North before the final closure of the Belmont route on 25/31956 and that bogie tram 31 is not shown on the board, having gone to Ballarat on 15/2/1956 - see item 5554. See item 8213 for an article on the Geelong system by Keith Kings. Yields information about the Geelong operations toward the closure of the tram system.Black and white Negative - 120 sizetramways, geelong, geelong depot, tram 19 -
 Melbourne Tram Museum
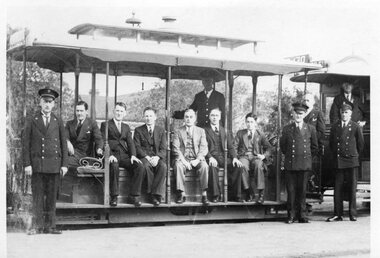
Photograph - Black and White - group cable tram employees 1940?
Photograph shows a group of three tramway inspectors, seven office or management staff, a grip man and conductor on a cable tram set possibly at ? depot prior to the closure of the cable system in October 1940. Related to Reg Item 6122, a large group photo taken with the same background location. The Poster see Reg Item 6368 contains this photo - "Official & Clerical Staff at Clifton Hill - last line to operate"Yields information about the type of uniforms or office clothing worn by cable tram staff prior to the closure of the cable tram system.Photograph - Black and White of a group of 12 cable tram employees - Inspectors, Office staff and crew 1940trams, tramways, cable trams, car houses, inspectors, grip men, conductors, clothing, suits, clifton hill -
 Melbourne Tram Museum
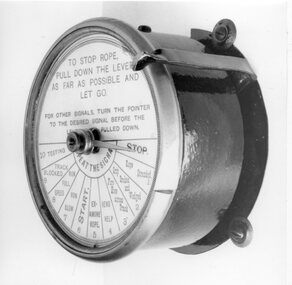
Photograph - Black and White - cable tram alarm signalling device - set of three
... of equipment the MTOCo used to operate the cable tram system. trams ...Photograph shows the device used to send a "telegraph" signal to the winding or engine house. They were positioned along the track and enabled the tram crew or a cable tram worker to send a signal about the cable. The crew member would set the pointer and depress the trigger. This sent the signal which was recorded on a telegraph tape, indicating the signal and the location of an incident. Installed by the Melbourne Tramway and Omnibus Co. (MTOCo) This photograph is Public Records Office photo H165, 166 and 167 in the Victorian Railways collection.Yields information about the type of equipment the MTOCo used to operate the cable tram system.Set of three Photographs - Black and White of a Melbourne cable tram signalling device.trams, tramways, cable trams, mtoco, signalling, cables, engine houses -
 Ballarat Tramway Museum
Negative - Geelong 38 and welding truck - Moorabool St, Laurie Gallop, early 1956
Photo shows Geelong 38 south bound to Belmont and welding truck - Moorabool St between Myers and McKillop Streets. The welding with the power supply from the overhead would most likely be repairing a broken joint. One of a set of photos was taken between 15/2/1956 and 3/3/1956 when services operated only between Belmont and North before the final closure of the Belmont route on 25/31956 and that bogie tram 31 is not shown on the board, having gone to Ballarat on 15/2/1956 - see item 5554. See item 8213 for an article on the Geelong system by Keith Kings. Yields information about the Geelong operations toward the closure of the tram system.Black and white Negative - 120 sizetramways, geelong, tram 38, moorabool st, welding truck, track repairs -
 Ballarat Tramway Museum
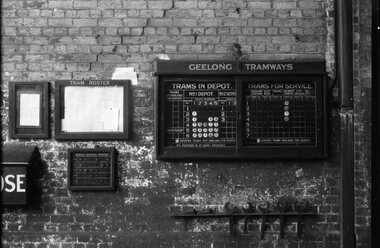
Negative - Tramcar allocation board - Geelong, Laurie Gallop, early 1956
Photo shows the Tramcar allocation board - in the Geelong depot. Shows the four bogie cars in operation or available on the day the photograph was taken. Shows that some of the Meadowbank-built trams and bogie trams had already left the depot. One of a set of photos was taken between 15/2/1956 and 3/3/1956 when services operated only between Belmont and North before the final closure of the Belmont route on 25/31956 and that bogie tram 31 is not shown on the board, having gone to Ballarat on 15/2/1956 - see item 5554. See item 8213 for an article on the Geelong system by Keith Kings. Yields information about the Geelong depot allocation board that showed the location and use of the tramcars on the day.Black and white Negative - 120 sizetramways, geelong, depot, depot allocation, tramcar allocation -
 Ballarat Tramway Museum
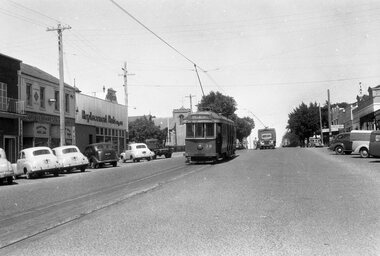
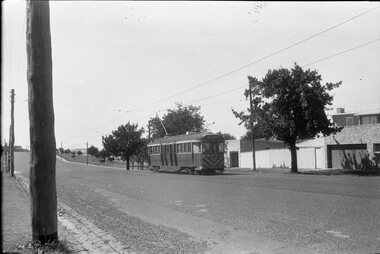
Negative - Geelong tram inbound Mercer Street, Laurie Gallop, early 1956
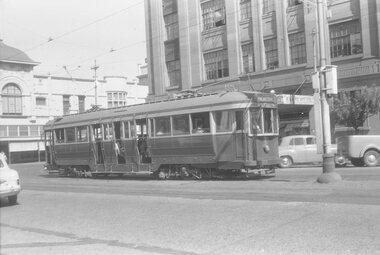
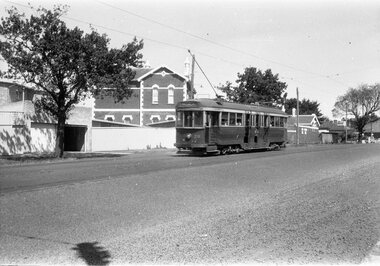
Photo shows a Geelong tram inbound in Mercer Street, near The Esplanade. Tram has the destination of Belmont. Based on the running board at item 8267, most likely No. 33. One of a set of photos was taken between 15/2/1956 and 3/3/1956 when services operated only between Belmont and North before the final closure of the Belmont route on 25/31956 and that bogie tram 31 is not shown on the board, having gone to Ballarat on 15/2/1956 - see item 5554. See item 8213 for an article on the Geelong system by Keith Kings. Yields information about tramway operations prior to closure of the Geelong system.Black and white Negative - 120 sizetram stops, tramways, geelong, mercer st, tram 33 -
 Ballarat Tramway Museum
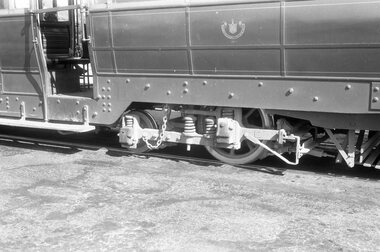
Negative - Brill 22E bogie or truck - Geelong tramcar, Laurie Gallop, early 1956
Photo shows Brill 22E Maximum Traction bogie or truck - Geelong tramcar, has the SEC logo on the side of the tramcar in the view. One of a set of photos was taken between 15/2/1956 and 3/3/1956 when services operated only between Belmont and North before the final closure of the Belmont route on 25/31956 and that bogie tram 31 is not shown on the board, having gone to Ballarat on 15/2/1956 - see item 5554. See item 8213 for an article on the Geelong system by Keith Kings. Yields information about the Geelong bogie trams.Black and white Negative - 120 sizetramways, geelong, brill 22e, maximum traction, bogie trams