Showing 570 items
matching passenger services
-
 Ballarat Tramway Museum
Photograph - Digital image Set of 10, George Coop, 1968 - 1970
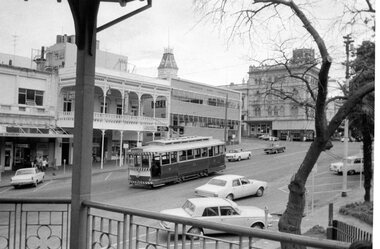
Yields information about the tram operations and the landscape views of the Sturt St median strip.Ten (10) Digital images taken by George Coop during the period 1968 - 1970, of SEC trams in Sturt St, between the City and Pleasant Streets. .1 - Tram 26 climbing the Sturt St hill to Lydiard St, with the Cook's Private Hotel, the Commonwealth Bank and the National Mutual Life building in the background. Photo taken from the Titanic Bandstand. .2 - Tram 40 Sturt St, enough to Lydiard St North just before Raglan St. Has a lady passenger by the tram stop. .3 - Tram 30 - Sturt St north side, near Armstrong St, - has a blue framing line around the photograph. .4 - Tram 39, Sturt St, near Doveton St, shows the rotunda in the median strip. .5 - Tram 18, with median step in view. .6 - Tram 31, with two Johnnie Walker whiskey roof adverts, outside the National Mutual Life building with the Alan Bros Jewellers and Golden Star Chinese Cafe in the view. .7 - Tram 31, Sturt St south side with Town Hall and the Golden City Hotel in the view. Tram has destination of Gardens via Drummond North. .8 - Tram 41 - ditto - going to Sebastopol. .9 - Tram 13, south side, Gardens via Sturt West, about , near Ripon St, with the Ampol service station in the background and about to pick up a lady passenger .10 - Tram 17, near Doveton St. Has a Twin Lakes sign and a Wilkinson Sword Razor Bladese roof advert. trams, tramways, sturt st, raglan st, passengers, doveton st, tram 26, tram 40, tram 30, tram 39, tram 18, tram 31, tram 41, tram 13, tram 17 -
 Ballarat Tramway Museum
Document - Report, City of Ballaarat, "Submission to Enquiry into Public Transport Facilities in the Ballarat Urban District by A. W. Nicholson, Mayor of Ballaarat Council", Apr. 1968
Yields information about the view of the City of Ballaarat in 1968 about the possible replacement of tram service.Report or Submission - 6 Gestener printed foolscap sheets, stapled on left hand side and bound with a blue edging tape titled "Submission to Enquiry into Public Transport Facilities in the Ballarat Urban District by A. W. Nicholson, Mayor of Ballaarat Council". Dated 2 April 1968. Submission looks at the possible closure or the future of the tramway system, the SEC involvement, employment, road surface repairs, financial loss to the SEC, reduction in passengers due to car ownership. Council submitted that the tramway system should be retained and extended and that pensioner concessions should be continued. Notes that at the time 69 men on the trams, 18 at the depot and 8 on the track. If replaced by buses, supported a government owned bus provider rather than private. Document scanned - word searchable. pdftrams, tramways, closure, city of ballaarat, bus replacement, public transport, sec, finances -
 Ballarat Tramway Museum
Slide - 35mm slide/s, Keith Caldwell, 8/03/1960 12:00:00 AM
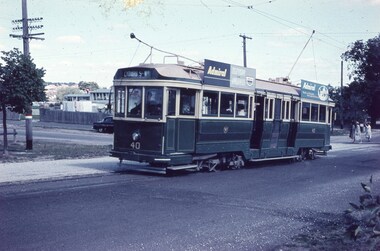
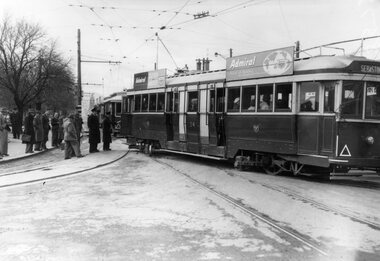
Yields information about the Lydiard St North services.Agfa colour slide, white cardboard mount, photo by Keith Caldwell on 8/3/1960 of: Tram 40 with destination of Lydiard St at the corner of ??? and >?>>>/ Tram has two Admiral TV roof advertisements. Would appear that three ladies have just got of the tram and crossing the road behind the tram.Stamped on bottom of slide "8 Mar 60". In ink "Ballarat"tramways, trams, lydiard st, tram stops, passengers, tram 40 -
 Ballarat Tramway Museum
Negative, Wal Jack, late 1930's
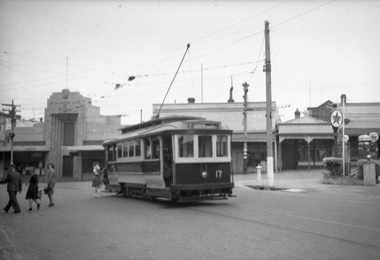
Yields information about Ballarat 's tram operations and Stones Corner.Negative and Digital image of the Wal Jack Ballarat Negative file of No. 17 loading passengers at Stones Corner, the intersection of Victoria St and Main St. A Caltex service station is on the right hand side and the State Savings Bank of Victoria. trams, tramways, victoria st, bridge st, main st, stones corner, tram 17 -
 Ballarat Tramway Museum
Negative, Wal Jack, late 1930's or early 1940's
Yields information about the use of the ex Adelaide tram No. 23 on tram services.Negative and Digital image of the Wal Jack Ballarat Negative file of No. 23 passing Hospital Corner in Sturt St, Gardens via Sturt St West, with a Shell garage, Malpass hairdressers, the Ballarat Model Diary and the Southern Cross Hotel in the view. The tram is well loaded with passengers.trams, tramways, sturt st, hospital corner, tram 23 -
 Ballarat Tramway Museum
Negative, Wal Jack, c1946
Yields information about the appearance of the ex Melbourne bogie trams and Hospital corner, carrying a large load of passengers.Negative and Digital image of the Wal Jack Ballarat Negative file of No. 22 turning from Sturt St into Drummond St North running a Gardens via Drummond North service. c1946. The tram is carrying many passengers. trams, tramways, drummond st nth, sturt st, hospital corner, tram 22 -
 Ballarat Tramway Museum
Slide - 35mm slide/s - set of 24, Noel Simons, 20/05/1971 12:00:00 AM
Set of 24 transparencies taken on 20/5/1971 on Kodak mounts. 1195.1 - Bendigo 19 arriving at Charing Cross en route to North Bendigo with Fountain Plaza and the City Family Hotel in the background. No. 19 has two roof ads for the SEC. -'Electricity better for cooking' and 'Everything's under control in my all electric kitchen' 1195.2 - as above, but standing at the Charing cross stop, with the Beehive Stores and other buildings along the east side of Pall Mall in the background. 1195.3 - No 21 ex Golden Square crossing View St. trackwork in front of No. 25 waiting to depart for Quarry Hill. No.21 has two roof ads (as for No.19 in 1195.1) and No.25 has one SEC roof ad and another. Ezywalkin sign in the background, and Fountain Plaza. 1195.4 - as for 1195.3, but after 21 has arrived and 25 left for Quarry Hill. Has Ezywalkin store and the Beehive store in the background. 1195.5 - No. 5 at the Eaglehawk terminus. Photo taken with a cannon in foreground looking along High St. Eaglehawk. Has shops on the west side of High St. in the background. 1195.6 - No. 5 at the Eaglehawk terminus, close up of the rear of the tram - note tow bar arrangement. Has destination of Quarry Hill. 1195.7-Nos.25 and 5 crossing at the Thorpe St. Loop, California Gully. No. 25 bound for Eaglehawk (has SEC Briquette and electric cooking roof ads) and 5 en route for Quarry Hill with a SEC and Cinzano roof ad. 1195.8 - as for 1195.7, but after trams have passed each other. Has Borough Auto Service building in the background. 1195.9 - No. 5 in Mt Korong Road, towards Bamard Street, photo taken after tram has passed photographer. 1195.10 - No. 30 at the Golden Square terminus with the Milk Bar on the right hand side of the photograph. 1195.11 - No. 30 inbound at Fire Station Loop, High St. Golden Square. Has old fire station in the background. Passengers are boarding the tramcar. 1195.12 - No. 30 in High St, bound for North Bendigo between Vine and Wattle Streets. 1195.13 - No. 5 bound for Eaglehawk waits at Iron Bark Gully Loop, at Hayes St. 1195.14 - No. 5 and No. 2 crossing at Iron Bark Gully Loop. 1195.15 - No. 5 bound for Eaglehawk leaving the Manchester Loop, Long gully. 1195.16 - No. 5 passing William Street, Long Gully en route to Eaglehawk. 1195.17 - No. 5 just before the California Gully Crossing Loop. 1195.18 - Nos. 5 and 26 crossing at California Gully crossing Loop. No. 5 heading to Eaglehawk, 26, Quarry Hill. 1195.19 - No. 5 in High St. Eaglehawk with Bob Moyle's Victoria Hotel and the TAB in the background. 1195.20 - No. 5 in High St. Eaglehawk approaching the terminus. Photo taken after the tram has passed the photographer. Has Foodland store and J. Best Fruit supply in the background, along with Eaglehawk Town Hall. 1195.21 - No. 5 at the Eaglehawk terminus, photo taken along seldom used track along High St. 1195.22 - as for 1195.22 - but at the very end of the track. 1195.23 - No. 5 en route for Quarry Hill climbs High St. Eaglehawk with the Victoria Hotel and Eaglehawk Town Hall in the background. 1195.24 - No. 5 and 25 crossing at Jobs Gully Loop. Note 25 has a black on white destination roll, while No. 5 has a white on black destination roll. Information written on in black ink and date stamped on purple ink. 1195.1 - "No. 19 arrives at Charing Cross Bendigo from Golden Square" 1195.2 - "No. 19 about to leave Charing Cross for North Bendigo" 1195.3 - "No. 25 awaiting departure for Quarry Hill, watches No. 21 arrive at Charring Cross from Golden Square" 1195.4 - "No. 21 on North Bendigo service and No. 25 on Quarry Hill run await departure at Charing Cross" 1195.5 - "No. 5 at Eaglehawk terminus" 1195.6 - "No. 5 at Eaglehawk terminus" 1195.7 - "Nos. 5 and 25 crossing at Thorpe St. Loop, California". 1195.8 - "Nos. 25 and 5 crossing Thorpe St. Loop, California Gully". 1195.9 - "No. 5 descending Mt Korong Rd. towards Bamard St." 1195.10 - "Birney car No. 30 at Golden Square terminus" 1195.11 - "Birney car No. 30 in High Street near Thistle Street (Fire Station Loop)" 1195.12 - "No. 30 in High St. between vine and Wattle Streets" 1195.13 - "No. 25 at Hayes Street Loop Iron Bark". 1195.14 - "Nos. 2 and 5 crossing at Hayes Street Loop Iron Bark" 1195.15 - "No. 5 at Manchester Loop opposite Havilah Road, Long Gully" 1195.16 - "No. 5 passing William Street, Long Gully". 1195.17 - "No. 5 at California Gully" 1195,18 - "Nos. 26 and 5 at Thorpe St. Loop, California Gully". 1195.19 - "No. 5 in High St. Eaglehawk". 1195.20 - "No. 5 approaching Eaglehawk terminus" 1195.21 - "No. 5 at Eaglehawk terminus" 1195.22 - "No. 5 at Eaglehawk terminus" 1195.23 - "No. 5 in High St. Eaglehawk" tramways, trams, bendigo, charing cross, eaglehawk, california gully, golden square, iron bark gully, jobs gully, tram 2, tram 5, tram 19, tram 21, tram 25, tram 26, tram 30 -
 Ballarat Tramway Museum
Slide - 35mm slide/s - set of 13, Noel Simons, 24/05/1971 12:00:00 AM
Set of 13 transparencies taken on 24/5/1971 on Kodak mounts. 1200.1 - No. 7 en route to Golden Square turning from Bridge St. into Nolan St. Photo taken after tram has passed photographer. Tram has a briquettes roof ad. 1200.2 - No. 21 in McCrae St. just before Nolan St. Photo taken after tram has passed photographer. 1200.3 - No. 7 in Nolan St at corner with McCrae St. Passenger boarding tram at a tram stop. 1200.4 - No 7 turning from Nolan into McCrae St. with Golden Fleece service station in background. 1200.5 - No. 7 in Thunder St en route to North Bendigo. Photo taken after tram has passed photographer. 1200.6 - No. 5 en route to Eaglehawk just after leaving Needle Loop between Long Gully and California Gully. 1200.7 - No. 5 at the start of the double track in High St. Eaglehawk. 1200.8 - No. 5 at Eaglehawk terminus showing "Depot" with Leo A Hughes Photographer advertisement on building in background. 1200.9 - No. 5 at Eaglehawk terminus. Has two SEC roof ads 'Everything's fine in my all electric kitchen' and 'Electricity best for cooking'. 1200.10 - No. 5 at Eaglehawk terminus, with canon, war memorial outside Town Hall and Leo A Hughes Photographer advertisement on building in background. 1200.11 - No. 5 in McCrae St. about to enter Arnold St. and depot. Tram showing depot, has driver changing points. 1200.12 - No. 5 in Arnold St. Photo taken looking up the centre of the access track - shows the overhead at depot junction. 1200.13 - Depot entrance with signage at depot entrance and depot building in background.Information written on in black ink and date stamped on purple ink. 1200.1 - "No. 7 entering Nolan St. from Bridge St." 1200.2 -"No. 21 in McRae St. about to turn into Nolan St." 1200.3 - "No. 7 in Nolan St. at corner of McRae St." 1200.4 - "No. 7 turning from Nolan St. into McRae St." 1200.5 - "No. 7 in Thunder St. just after turning from Caledonia St." 1200.6 - "No. 5 just after leaving Needle Loop between Long Gully and California Gully. 1200.7 - "No. 5 in High St. Eaglehawk at start of double track." 1200.8 - "No. 5 at Eaglehawk terminus" 1200.9 - "No. 5 at Eaglehawk terminus" 1200.10 - "No. 5 at Eaglehawk terminus."\ 1200.11 - "No. 5 in McCrae St. about to enter Arnold St." 1200.12 - "No. 5 in Arnold St." 1200.13 - "Entrance to Bendigo Tram Depot, No. 5 running into shed."tramways, trams, bendigo, mccrae st, north bendigo, california gully, eaglehawk, depot, tram 5, tram 7, tram 21 -
 Ballarat Tramway Museum
Slide - 35mm slide/s - set of 19, Noel Simons, 26/02/1972 12:00:00 AM
Set of 18 transparencies taken on 26/2/1972 on Kodak mounts. 1203.1 - Bendigo 5 at Eaglehawk terminus - with new traffic works. 1203.2 - No. 5 climbing the High St. hill Eaglehawk with the buildings on the east side in the photo. 1203.3 - No 2 descending the road over rail bridge at Job's Gully, heading for Quarry Hill. 1203.4 - as for 1202.3, but more side on. Tram has two SEC roof ads. 1203.5 - as for 1202.4 1203.6 - No. 26 entering Garden Gully Loop, Mt. Korong Road, Ironbark. Tram en route to Eaglehawk. Water column on right hand side of photograph. 1203.7 - No. 2 on the Eaglehawk route, Iron Bark area?, bound for Quarry Hill. 1203.8 - as for 1202.7, but photo taken after tram has past photographer. 1203.9 - No. 5 at Eaglehawk terminus, night photo. Tram has arrived at terminus, showing Quarry Hill, pole turned, but the tram lights have yet to be turned around. 1203.10 - as for 1202.9, but lights have been turned around. 1203.11 - No. 26 climbing the View St. Hill near the Commodore Hotel. Has Campbells Electrical Services building in the background. Photo taken after the tram has passed the photographer. 1203.12 - No. 7 end on photograph, at Golden Square, destination showing Golden Square - night photo. 1203.13 - number not used. 1203.14 - as for 1202.12, but partially side on, has a passenger looking out the tram. 1203.15 - as for 1202.12, but with hotel in the background. 1203.16 - No. 26 and 2 at Charing Cross, night photo. Tram 26 en route to Quarry Hill, 2 to Eaglehawk. 1203.17 - Interior photo of No. 26, at night. 1203.18 - No. 26 at the Quarry Hill terminus as night. 1203.19 - as for 1202.18, but central portion of the tramcar.Information written on in blue ink and date stamped on purple ink. 1203.1 - "No. 5 at Eaglehawk terminus" 1203.1 - "No. 5 in High St. Eaglehawk" 1203.3 - "No. 2" 1203.4 - "No. 2" 1203.5 - "No. 2" 1203.6 - "No. 26 at Garden Gully Loop Mt Korong Rd., Ironbark" 1203.7 - "No. 2" 1203.8 - "No. 2" 1203.9 - "No. 5 at Eaglehawk terminus" 1203.10 - "No. 5 at Eaglehawk terminus" 1203.11 - "No. 26 in View St. Near the Commodore Motel" 1203.12 - "No. 7 at Golden Square Terminus" 1203.14 - "No. 7 at Golden Square Terminus" 1203.15 - "No. 7 at Golden Square Terminus" 1203.16 - "Nos. 26 and 2 at Charing Cross" 1203.17 - "Interior of No. 26" 1203.18 - "No. 26 at the Quarry Hill terminus" 1203.19 - "No. 26 at the Quarry Hill terminus "tramways, trams, bendigo, eaglehawk, bridges, iron bark gully, night photo, quarry hill, golden square, tram 2, tram 5, tram 7, tram 26 -
 Ballarat Tramway Museum
Slide - 35mm slide/s - set of 25, Noel Simons, 26/02/1972 12:00:00 AM
Set of 25 transparencies taken on 26/2/1972 on Kodak mounts. 1204.1 - Bendigo No. 5 - just arrived at Manchester Loop near Havilah Road, Long Gully. Photo taken after tram has passed photographer. 1204.2 - No. 26 in Backhaus St. Long Gully passing William St, en route to Quarry Hill. Photo taken after tram has passed photographer. 1204.3 - No. 5 climbing the High St. Hill Eaglehawk, heading for Quarry Hill with the buildings on the West side of High St. in the background, including the Eaglehawk Town Hall. 1204.4 - as for 1204.3, but tram close up. 1204.5 - as for 1204.3, but after tram has passed photographer. 1204.6 - No. 5 at intersection of Mt Korong Road Ironbark and Calder Highway, with the AMPOL service 'station in the background. Photo taken after tram has passed photographer. 1204.7 - No. 26 en route to Quarry Hill shortly after leaving Needle Loop, passing William St., Long Gully. 1204.8 - No. 5 at California Gully Loop, picking up a passenger, with the shops at Long Gully in the background. Photo taken after tram has passed photographer. 1204.9 - No. 5 in Long Gully, en route to Quarry Hill. Photo taken after tram has passed photographer. 1204.10 - No. 2 at Eaglehawk terminus with the Eaglehawk Town Hall and Post Office in the background. Tram has two SEC roof ads. 1204.11 - No. 2 at Eaglehawk terminus, close up. 1204.12 - as for 1204.11, but through the park gates. 1204.13 - as for 1204.11, but with tram stop shelters in the foreground and buildings on the West side of High St in the background. 1204.14 - No. 2 in Mt. Korong Rd, midway between California Gully Loop and Needle Loop. Photo taken after tram has passed photographer. 1204.15 - No. 5 in Long Gully, en route to Quarry Hill. 1204.16 - as for 1204.15, but with trams departed loop. Has an ESSO service station in the background. 1204.17 - No. 26 leaves Charing Cross up View St.. Photo taken after tram has passed photographer. Has Armstrong Tyre Service, Cohns Drinks ad on a building and the T&G building in the background. Also Firestone ads on the tyre service building. 1204.18 - No. 5 waits at Charing Cross with the Alexandra Fountain in the background. Tram has two SEC roof ads, 'Everything s fine in my all electric kitchen' and 'Electricity Best for Cooking'. Has RACV, Colonial Mutual Life buildings in the background and the planting areas around Charing Cross gardens in the foreground. 1204.19 - No. 21 en route to North Bendigo arrives at Charing Cross, with passengers waiting to board. No. 5 in the background. In the background is the Fountain Gate Plaza building and the City Family Hotel. 1204.20 - as for 1204.19, but with No. 7 en route to Golden Square. 1204.21 - as for 1204.19, but closer up. 1204.22 - as for 1204.18 1204.23 - No. 25 in Nolan St. near the crossing of Bendigo Creek, running a special tram tour. 1204.24 - No. 25 on a special charter, in Weeroona Ave. at Cnr of Caledonia St. passing the Gas works. 1204.25 - Nos. 25 (showing Golden Square), 7 and 26 at Charing Cross. Has fountain in the background.Information written on in blue ink and date stamped on purple ink. 1204.1 - "No. 5 at Manchester Loop, near Havilah Rd. Long Gully." 1204.2 - "No. 26 in Backhaus St. Long Gully passing William St." 1204.3 - "No. 5 in High St. Eaglehawk." 1204.4 - "No. 5 in High St. Eaglehawk." 1204.5 - "No. 5 in High St. Eaglehawk." 1204.6 - "No. 5 in Mt. Korong Rd., Ironbark, passing Calder Highway Junctn." 1204.7 - "No. 26 shortly after leaving Needle Loop, passing William St., Long Gully. No. 5 cresting hill in distance." 1204.8 - "No. 5 at California Gully Loop." 1204.9 - "No. 5 in Long Gully" 1204.10 - "No. 2 at Eaglehawk terminus." 1204.11 - "No. 2 at Eaglehawk terminus." 1204.12 - "No. 2 at Eaglehawk terminus." 1204.13 - "No. 2 at Eaglehawk terminus." 1204.14 - "No. 2 in Mt. Korong Rd, midway between California Gully Loop and Needle Loop. 1204.15 - "Nos. 2 and 26 crossing at Long Gully." 1204.16 - "No. 26 leaves Long Gully loop for Eaglehawk as No. 2 pulls out of the far end towards Bendigo" 1204.17 - "No. 26 beginning the climb up View St. from Charing Cross." 1204.18 - "No. 5 at Charing Cross." 1204.19 - "No 21 arrives at Charing Cross from Golden Square while No. 5 awaits departure time for Eaglehawk." 1204.20 - "Nos. 7, 21, and 2 (behind which is No. 5) at Charing Cross." 1204.21 - "Nos. 7, 21, and 2 at Charing Cross." 1204.22 - "No. 5 at Charing Cross." 1204.23 - "No. 25 in Nolan St. near Bendigo creek crossing" 1204.24 - "No. 25 in Weeroona Ave. at cnr of Caledonia St." 1204.25 - "Nos. 25, 7, 26 and 2 (behind 26) at Charing Cross."tramways, trams, bendigo, eaglehawk, long gully, california gully, charing cross, north bendigo, tram 2, tram 5, tram 7, tram 21, tram 25, tram 26 -
 Ballarat Tramway Museum
Document - Correspondence, B. Prentice, 1973
1230.1 - copy of letter sent to Neville Gower from Bob Prentice enclosing a number of documents regarding submissions and other associated documents pertaining to the operation of Bendigo's trams by the Bendigo trust. Sent on the 1st March 1973. Typed onto light blue paper. 1230.2 - 14 page photocopy (Foolscap size on heat sensitive paper) of the submission prepared by the Bendigo trust - detailing the history of trams in Bendigo, types of trams in Bendigo, selection of the route, equipment and plant required, planned development, list of trams in Bendigo, their condition and financial statements of the Bendigo Trust 1972. 1230.3 - 14 pages photocopy (Foolscap size on heat sensitive paper) Appendix II - submission details projected passengers, operational details and proposals, estimated revenue, Philosophy of operation, trams required, operating budgets, how the service could be operated - internal combustion engines, batteries, stationary engine and generator or converter station and costs associated with the options. If item to be researched, copy on more stable photocopy paper to be provided.tram, trams, bendigo, bendigo trust, tourist trams, power supply -
 Ballarat Tramway Museum
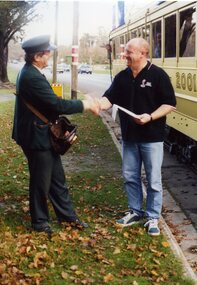
Photograph - Colour Photograph/s - set of 4, John Phillips, 10/06/2001 12:00:00 AM
Set of four colour photographs of the 500,000th passenger on BTPS/BTM tram services on Sunday June 10, 2001. Congratulating Mr. Lou Abbruzzi is Len Millar. Photos by John Phillips. Tramcar No. 45 in background. Photo on Kodak paper. For details of the event see Fares Please! July 2000. Image btm1824i4 used in the August 2001 issue of Trolley Wire (black and white). See Fares Please! July 2001On rear of each photo "9.06.01" (actual date was Sunday 10 July) and "Photo by John Phillips" in blue ink. On rear of 1824.4 is a white sticker "Photo 29, reduce to 7 x 10.5cm" instruction for use in Trolley Wire.500, 000 passenger, btm, btps, gold tram, tram 45 -
 Ballarat Tramway Museum
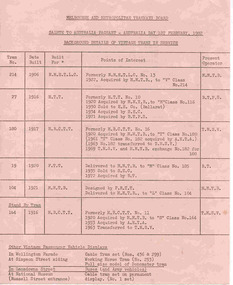
Document - List, Melbourne and Metropolitan Tramways Board (MMTB), "Salute to Australia Pageant - Australia Day 1st February 1982", Jan. 1982
List of tramcars used in the Australia Day Pageant, 1982. Prepared by the MMTB, titled "Salute to Australia Pageant - Australia Day 1st February 1982", "Background details of Vintage Trams in Service" for use on 1/2/1982. Printed on both sides of pink sheet of foolscap paper, using a wax stencil and duplicator. Gives details of MMTB 214 (V), Ballarat 27, MMTB 180 (T), Bendigo 19, MMTB 104 (L) and standby tram MMTB 164 (S). Details tram number, date built, for built for, points of interest and present operator. Also lists other vintage passenger vehicle displays in Wellington Parade, abbreviations and list of significant events concerning Melbourne tramways. 2nd copy added 22/08/04 - has had bottom section of sheet torn off. Images of this item shown.australia day, mmtb, melbourne, tramcars, pageant -
 Ballarat Tramway Museum
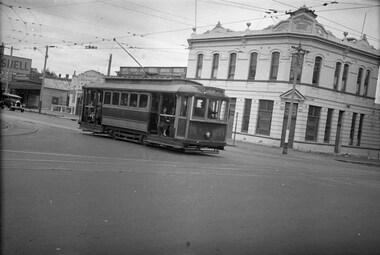
Photograph - Black & White Photograph/s, Harvey Studios, 18/02/1953 12:00:00 AM
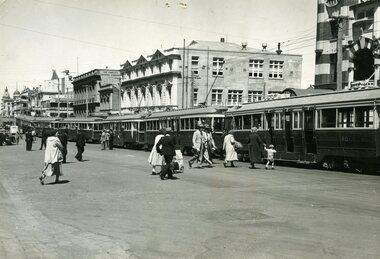
Yields information about the tram arrangements for a large group from Geelong and the Geelong wharfies made for their picnic - probably at the Gardens. Demonstrates transport arrangements in the 1950's.Black and white photograph of seven bogie trams lined up with passengers boarding in Lydiard St. North, between Mair St and the Railway Station for the Geelong Waterside Workers picnic day on Wednesday 18/2/1953. Closest tram is No. 40. Photo taken from the Railway Station car park entrance. Provincial Hotel and other buildings on west side of Lydiard St. in photo. Published in the Courier 19/2/1953 - advised by Alan Bradley - 15/3/2003. 1880.1 - Digital image of the same photo from the Wal Jack Album. See images i2 and i3 for details, i3 for the rear of the photograph. Wal Jack notes identifies the trams as Nos. 15, 35, 39, 38, 34, 37, 40"On rear in blue ink "10 - Special trams chartered to convey Geelong Waterside Workers Picnic participants from Railway Station to Lake Wendouree Botanical Gardens o Wednesday 18 Feby '53". Under writing is word "Ballarat" in pencil. In top right hand corner, in a purple ink hand stamp is "N.L. Harvey (Photo Press Service) A.M.P. Chambers Lydiard St. N Ballarat" On rear of .1 is the N.L.Harvey stamp and Wal's notes "SEC Ballarat Geelong Wharfies Specials, Lydiard St Nth at 11.5am, 18-2-53, Nos. 15, 35, 39, 38, 34, 37, 40"trams, tramways, picnics, lydiard st. nth, geelong waterside workers, charters, tram hire, tram 40 -
 Ballarat Tramway Museum
Photograph - Black & White Photograph/s, early 1960's
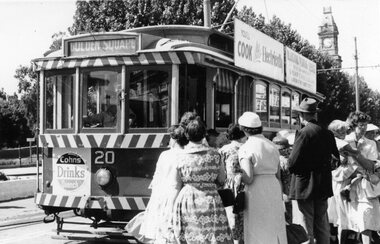
Black and White print of an SECV Bendigo tram 20 at Charing Cross terminus for the Golden Square route loading passengers. Trams has dash canopy lights, but no large white strip under the drivers windows. Photo not dated but appears to be at during early 1960's. Tram showing destination of "Golden Square", has "Cohn's Drinks Quench" ad on front dash panel, SEC Roof ad "You'll Cook better electrically" and "B.J. Osborn Plumbing Service" roof ad. Has Bendigo Post Office clock tower in background. Tram off loading passengers while others are waiting to get on. Good photo for people.trams, tramways, charing cross, bendigo, golden square, tram 20 -
 Ballarat Tramway Museum
Sign, Ballarat Tramway Preservation Society (BTPS), Winter Tram Service, c1980
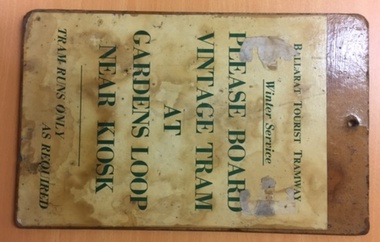
Sheet of Masonite with a printed sheet of paper, glued and then varnished with a hole in the top of the sign. Prepared to act as a notice or a sign to intending passengers to Board BTPS or BTM tram service at Gardens Loop. Wording "Ballarat Tourist Tramway Winter Service PLEASE BOARD VINTAGE TRAM AT GARDENS LOOP NEAR KIOSK TRAM RUNS ONLY AS REQUIRED" Image added 24-12-2016 See 1979-1980 Annual Report.trams, tramways, btps, timetables, signs, tram stops -
 Ballarat Tramway Museum
Photograph - Black & White Photograph/s, Geoff Grant, 25/06/1955 12:00:00 AM
Black and white photograph of the some of the passengers in front of the last bus to Northcote, ex Bourke St. prior to commencement of tram services. Destination showing "NORTHCOTE" and route no. "77". Has a wreath on the radiator "LAST BUS BOURKE ST. 25-6-1955, REPLACED BY ELECTRIC TRAMS". (See also catalogue item No. 493 and 1610). Charles Craig, 2nd from right, Ian Brady 5th from right, Len Clark (?) squatting down under radiator. Crew names - see 493. Negative No. N342 on file, 680i1 scanned from negative. See Dave Macartney re names on 31/8/97.On rear on typed paper "Last bus to Northcote with some of the crowd that travelled on it, June 25 1955.", in pencil "RK-1" and in but rh corner stamped "Geoff Grant / 189 Murrumbeena Rd. Murrumbeena, S.E.9 Victoria."trams, tramways, bourke st, melbourne, last bus, northcote -
 Ballarat Tramway Museum
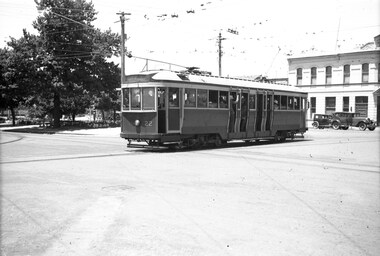
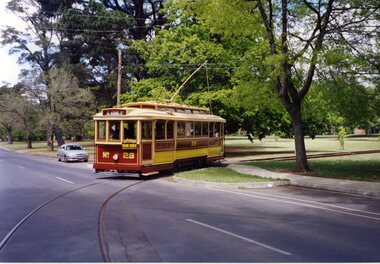
Photograph - Black & White Photograph/s, William. F. Scott, c1990
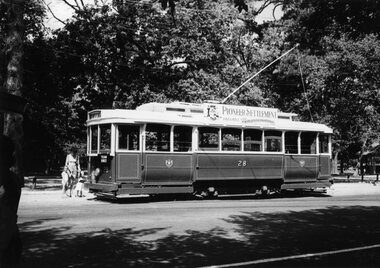
Black and White Photograph of Ballarat No. 28 in BTM Service, Wendouree Parade, picking up passengers, north bound at Depot Junction. Taken by William F. Scott. Taken c1990. Fitted with Pioneer Settlement sign. On Agfa paper.On rear in bottom left hand corner on a label - stamped "William F. Scott" in black ink and "T19 31A" written in black ink.trams, tramways, btm, 28, passengers, wendouree parade, tram 28 -
 Ballarat Tramway Museum
Photograph - Black & White Photograph/s, mid to Late 1965
Set of seven Black and white photographs of the arrangements and work for the track reconstruction at the intersection of Hoddle St/Punt Rd and Bridge Road Richmond late 1965. On Kodak paper. 1420.1 - Bridge Road looking east at River St. crossover (Hawthorn bridge in distant background). Tram-bus connection at a weekend. Note driver's uniform. Conductor walking to bus with passengers. Conductors often worked through on the bus and next tram at this time to save crews. 1420.2 - Bridge Road at Punt Rd and Hoddle St. intersection looking north west. Reconstruction of curves. Would probably be a Sunday given that new rails are in situ. 1420.3 - Ditto - looking south east 1420.4 - looking south east 1420.5 - looking east - replacement bus service passing with old cable winding house in the background. Concrete being placed. 1420.6 - Wellington Parade at Simpson St. crossover looking east. Bus-tram connection. Bus 542 and tram 966 (Kew Depot) 1420.7 - ditto - bus 570 and tram 850 (Camberwell). See P.Winspur note - see data sheet for Reg. item 1418.trams, tramways, bridge road, tram - bus connections, trackwork, mmtb, tram 939, tram 966, tram 850 -
 Ballarat Tramway Museum
Photograph - Colour Photograph/s - set of 3, Austin Brehaut, 5/11/2002 12:00:00 AM
Set of three colour photographs of BTM No 28 operating in Wendouree Parade for its first revenue trips taken on 5/11/2002, taken by Austin Brehaut on Kodak Royal Paper. 2266.1 - No. 28 crossing Wendouree Parade from the depot access track. 2266.2 - Austin Brehaut replacing the trolley pole on the wire at St. Aidans Drive 2266.3 - Roger Salen, driver, at No. 2 end of No. 28. A fourth photograph - first passengers - Gardens Loop - sent to Trolley Wire Editor 12/1/2003. Shown in image only.2266.1 - "28 re-enters Wendouree Pde to return to revenue service 5.11.02 / Driver Roger Salen / APB". 2266.2 - "Conductor Austin Brehaut turns the pole at St. Aidans Dve on 28'2 return to revenue service 5.11.02 / APB" 2266.3 - "Roger Salen gets the feel of 28'2 No. 2 end control 5.11.02 / APB",wendouree parade, btm, depot junction, tram 28 -
Ballarat Tramway Museum
document - Correspondence, Electric Supply Co. of Vic (ESCo), Apr. 1929
Set of two letters between Mr. P. J. Pringle of ESCo Ballarat and Mr. D. Murdoch, General Manager of the TB Melbourne and a copy of the Victorian Government Gazette of Wed. 20/3/1929 regarding fares along the same routes that trams and buses travel. In Bendigo and Melbourne, the fare by bus was 1 penny more than the tram. 1976.1 - Victorian Government Gazette - No. 32 - 20/3/1929 - pages 1067 to 1124 - with page 1081 highlighted on the front cover in blue pencil and a ESCo date received stamp (16/4/1929) on the front cover. Page 1081 details the City of Bendigo's By- Laws and Regulations No. 58, pursuant to the Urban and Country Act of 1927, relating to Motor Omnibuses. Details the requirements of bus owners in the Bendigo district, definitions, licence fees, routes and fares, timetables over five pages. Following this item are similar regulations for the Shire of Mildura (p1086). Item 335H x 210W, consisting of four staple sections. Damaged on left hand edges, particularly around page 1081 where the two letters were pinned. (Removed at time of cataloguing). Also yellowing and damage due to silver fish along bottom edge. Printed by H.J. Green Government Printer, Melbourne. 1976.2 - Letter from Mr. P. J. Pringle (ESCo) to A. D. Murdoch Manger TB dated 16/4/1929 forwarding a copy of the Bendigo Motor Bus regulations and noted that where the buses traversed the tram routes, the fare is 1d more and that the buses have regular service schedules. Licence fee is 5/- per annum per passenger that the bus can carry. Mr. Pringle thought that this was inadequate. Also notes the cost of insurance. On ESCo letterhead - two pages white paper, has been folded into 6, pinned in the top left hand corner., damaged on the right hand edge and top left hand corner. Size 262H x 203W. 1976.3 - Carbon copy of letter from Mr. Murdoch to Mr. Pringle on pink paper, dated 20/4/1929 thanking of the advice and noting that on the Melbourne - Brighton - Caulfield route, the minimum fare where the bus traverses the same route as the tram, is 5d, while the tram fare is 4d. All corners damaged or folded, silver fish damage on right hand edge. Size - 336H x 2089W. See Reg Item No. 2260.1 and 2260.2 for the relevant Acts of Parliament On top of the pink sheet written in pencil is the file number "22/1/2" and "52/1/15".tram, trams, bus fares, bus competition, esco, mmtb, licence fees, melbourne brighton bus -
 Ballarat Tramway Museum
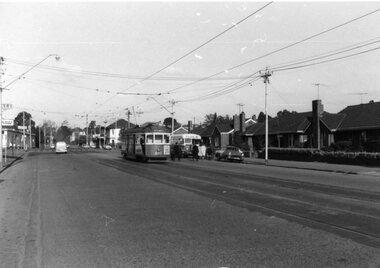
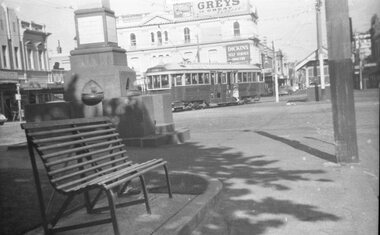
Negative - Black and white print from negative, Travis Jeffrey, 29/12/1958 12:00:00 AM
Negative No. N382 and black and white print made by a laser printer (stored in folder) of Ballarat No. 35 about to cross Grenville St, about to enter Bridge St. from Sturt St. Photo is at the tram stop with a passenger boarding. Photo taken after tram has past photographer and from the central median strip looking towards Bridge St. with a seat and a monument in the foreground. In the background is the tram stop shelter, Morshead's building with an advertisement for Greys cigarettes, Mobilgas and Dickins Self Service Grocery. Tram has destination of Victoria St. Date of photo on folder - 29/12/1958. Original negative rescanned 24/5/2020 and image file updated.Paper folder that contained the negative had "NR3A" in red ink, "BA10" in pencil, date stamp of "29 Dec 1958" on front, and on rear date stamps "26 Sep 1962" and "26 Sep 1962".trams, tramways, sturt st, grenville st, bridge st, morseheads, tram 35 -
 Ballarat Tramway Museum
Newspaper, The Courier Ballarat, "Story of Ballarat's Horse Trams", 19/06/1937 12:00:00 AM
Newspaper clipping contained within Reg. Item 2488, page 25 and 27, from The Courier, Sat. 19 June 1937, titled "Story of Ballarat's Horse Trams", 1887 to 1913. Report of a paper presented to the Ballarat Historical Society by Inspector H. P. James the previous Tuesday night. Comprises four columns of text, pasted into the book titled "Of Other Days". General image of page 25 - see image btm2489i1.jpg. For page 27, see image btm2489i3.jpg - shows positioning of Reg. Items 2490, 91 and 92. Notes details of the genesis of the system, personalities involved with the construction, details of the works, depot, Duncan and Fraser car builders, early workers, formal opening, services, extension to Sebastopol, the horses, drivers, uniforms, (and on page 27) collection of fares, housing for the staff, horse feed (chart), passenger loads, conductors, rail and track cleaning and general operational notes. Has photo of a horse tram, with two drivers and conductors and handwritten note, remarking about the Conductor's "Receivers" in the photograph. See image btm2489i2.jpg Two hand written notes in ink, give details of Mr. Bob Haines and Matthew Buckley. Note Item Not formally Numbered.Numerous on page, mainly in ink.horse trams, sebastopol, crews, depot -
 Ballarat Tramway Museum
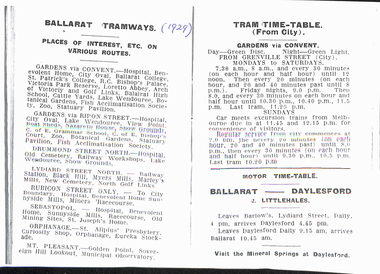
Document - Photocopy, Keith Stodden, 1929 Guide to Ballarat, Dec. 2006
Eleven sheets - photocopy and covering letter - from a 1929 Guide to Ballarat, detailing timetable for trams and buses on various routes. Tram timetables - gives Gardens via Convent, Gardens via Ripon, Drummond St North, Lydiard St North, Rubicon St, Sebastopol, Orphanage, Mount Pleasant and associated return timetables. Gives details of first cars, frequency and times past each hour basis and changes in service frequency. Details colours of the discs that the trams carry to identify them to passengers, day and night. Gives Bus timetables and operator names for: Daylesford (J. Littlehales), Monastery Bus Service (W. Wilson), Ballarat Nth and New Cemetery via Doveton St (H. W. Smith), Victoria Park via Doveton and Eyre St (Robinson), South St bus service to Western oval and racecourse (A. Sproule) and Ballarat to Elmhurst (Sandlants).trams, tramways, timetables, buses, ballarat, esco -
 Ballarat Tramway Museum
Photograph - Black & White Photograph/s, The Courier Ballarat, 20/07/1960 12:00:00 AM
Yields information about the day to day nature of the operations in Ballarat, especially derailments at points of maximum traction bogie trams and the way people behaved at such times.Black and White photograph of Ballarat No. 34 derailed, Sturt & Drummond St corner (south side), causing disruption to tram services. Photo published by The Courier 20/7/1960, published on 21/7/1960. Three single truck trams are banked up behind the tram. Note the lady passengers remained on board while the Gentlemen watched from the street in their overcoats. Tram has two Admiral roof advertisements, advertising Televisions (TV), about the time of the introduction of TV into Ballarat. Collected by Alan Bradley from the Ballarat Courier early 1980's. See Excel file "Record of Ballarat Courier Photos SEC era" (Archive Documents) for source of details. High Res Images added 5/3/2011.On rear stamped "Copyright, The Ballarat Courier Proprietary Limited."tramways, trams, sturt st, hospital corner, drummond st, derailments, accidents, tram 34 -
 Ballarat Tramway Museum
Photograph - Black & White Photograph/s, The Courier Ballarat, 19/07/1968 12:00:00 AM
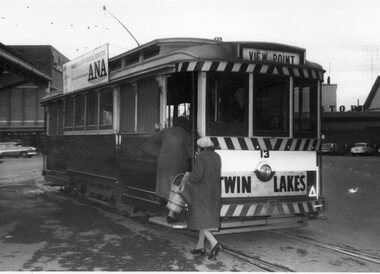
... advertisement for ANA medical services. Two lady passengers, one... 19/7/1968 of No. 13 picking up passengers, Sturt & Grenville ...Yields information about the tram stop at the east end of Sturt St, advertisements on the tram and the way the stop was used.Black and White copy photograph of a newspaper photograph taken by The Courier, published 19/7/1968 of No. 13 picking up passengers, Sturt & Grenville Sts corner, after Govt announced intention to close Ballarat & Bendigo systems. Tram has the destination of View Point, a "Twin Lakes" sign and a roof advertisement for ANA medical services. Two lady passengers, one with a shopping basket boarding the tram. In the background are Morsheads and Dickins stores. See Reg Item 2921 for the Newspaper cutting the photograph used in. Collected by Alan Bradley from the Ballarat Courier early 1980's. See Excel file "Record of Ballarat Courier Photos SEC era" (Archive Documents) for source of details.On rear stamped "Copyright, The Ballarat Courier Proprietary Limited."tramways, trams, bridge st, grenville st, sturt st, twin lakes, tram 13 -
 Ballarat Tramway Museum
Photograph - Black & White Photograph/s - set of 2, The Courier Ballarat, 18/09/1971 12:00:00 AM
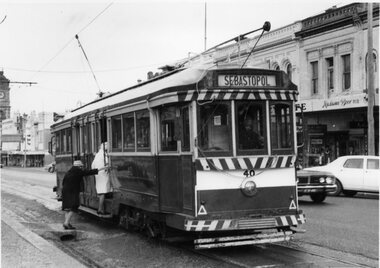
Yields information about the nature of the day on the last full day of operation in Sturt St and how passengers boarded the tram from the median strip.Black and White copy photographs of a newspaper photograph taken by The Courier - photo taken 18/9/1971, one published 20/9/1971 of No. 40 picks up shoppers, Sturt & Dawson Sts corner, last Saturday of service. 3772.1 - Shows two ladies boarding the tram from a crossover over the gutter. 3772.2 - shows the tram just after it left the stop. Has the Ritzy Cafe in the background. Also has a "Cars Stop Here" and a "End of Section sign in the photograph, that looks back along Sturt St. Tram has the destination of Sebastopol. One photo used in the Courier Supplement following the closure of the tramways. Collected by Alan Bradley from the Ballarat Courier early 1980's. See Excel file "Record of Ballarat Courier Photos SEC era" (Archive Documents) for source of details.On rear of 4772.2 stamped "Copyright, The Ballarat Courier Proprietary Limited." and "100%" in black ink, and "92A Rpt" in felt pen.tramways, trams, sturt st, closure, dawson st, signs, tram 40 -
 Ballarat Tramway Museum
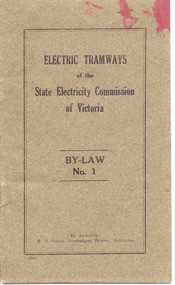
Book, State Electricity Commission of Victoria (SECV), "Electric Tramways of the State Electricity Commission of Victoria By-Law No. 1", 1937
Demonstrates aspects of the SEC governance system in issuing By-laws for the travelling public, as part of their Act. Yields information about fares charged for tram services in Ballarat, Bendigo and Geelong. Issued to crews.Twenty Four page booklet, plus medium weight card dark brown colour covers centre stapled. Book cover has title "Electric Tramways of the State Electricity Commission of Victoria By-Law No. 1". Pages are numbered pages 1 to 23, revoking By Laws dated 5/9/1932 (See Reg. Item 3109). Dated 9/3/1937. Gives definitions, fares and charges, regulations re passengers, behaviour, smoking, dangerous goods, luggage and behaviour of crews. Gives schedule of fares and charges for Ballarat, Bendigo and Geelong. Fares applied from 1937 to 1949 - see Reference. Details names of SEC Commissioners, Minister in Charge of Electrical Undertakings. Copy has numerous changes marked in red ink internally and pasted in changes to the text. Has Government Printer number 6967. Given the printing number on Reg. Item 3108 is a higher number and that H. Green was the Government Printer for this book and in 1936 (See Reg. Item 3068), indicates a copy printed in 1937. A piece of paper has been pinned to the copy on page 23, giving details of where to relieve on the Sebastopol route. Written in red ink. See Fares in Ballarat – from Alan Bradley 11/4/2005 – appendix for Book Copy - has numerous changes marked in red ink mainly, some pencil, internally and pasted in changes to the text.trams, tramways, secv rules, by laws, tickets, fares, ballarat, bendigo, geelong -
 Ballarat Tramway Museum
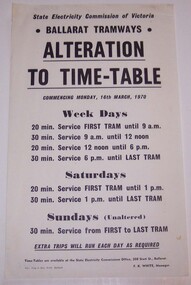
Poster, State Electricity Commission of Victoria (SECV), "Alteration to Time-Table", Mar. 1970
Significant in being a poster distributed by the SEC in Ballarat to advise passengers of the new timetable to apply from March 1970, reduction in services prior to closure, due to reducing crew numbers and to save money.Foolscap Sheet, glossy one side only, titled "Alteration to Fares", under the SEC and "Ballarat Tramways" heading. Gives details of timetable changes for Ballarat, commencing 16-3-1970. Gives details of service frequencies. Printed by Alex King & Sons Print, Ballarat and signed by F. K. White Manager. 21 copies held. See Reg Item 2474 for a mounted version of this poster.On rear in black ink 'BTPS 617"trams, tramways, timetables, sec, ballarat -
 Ballarat Tramway Museum
Film - Movie Film & Box, Kodak, 1960
Yields information in movie film format of Ballarat trams in 1960, how the system operated and was used by people., Yields information in movie film format of Ballarat trams in 1960, how the system operated and was used by people.Movie film - 8mm, approx. 30mins, with leader strip on a plastic reel, within a black and white plastic box, titled "Ballarat No. 1. 1960". Has been transferred to DVD - see Reg item 4100 as Segment No. 2. Made by Ben Parle. Also transferred to DVD by Rod Cook Oct. 2015, via Roger Greenwood for use in his DVD, "The City of Ballarat Trams, Gardens & Gold" of 2016. See Reg Item 6883. Synopsis: based on time. 0:00 View of typed introduction, noting that this is a pictorial record of Ballarat. 0:10 Title “The Tramways of Ballarat 1960, Part 1” 0:16 13, showing “View Point” at Stones Corner, Bridge St, east end, with trolley pole being turned, while another single trucker heads out towards Mt Pleasant. 0:25 13 leaving Stones Corner, short approach and then longer trailing shot of the tram going towards the City in Bridge St. 0:44 View out of front of tram in Bridge St heading towards the City, with cars in the photo, then passing through city Loop, no trams in the loop and running up to Lydiard St Nth and crossing the road. 1:22 Running up Sturt St from Armstrong St, passes over Dawson St X-over and up to the next intersection, Lyons St. 1:54 Title “The View Point Line” 1:59 19 inbound, in Ripon St, from crossing Mair St, towards camera and then passing away and turning into Sturt St. 2:49 View of a “Warning Oncoming Trams” sign 2:52 19 in Ripon St, going to View Point, crossing Webster St towards camera, then going away through the disconnected Victoria Ave loop, pass the “Warning Oncoming Trams” sign. Note very windy scene with people running across roads. 3:17 19 in Wendouree Parade, in bound, though showing destination View Point, going away from the camera, past the View Point Hotel. 3:39 19 coming towards camera near Excerpt or Devon St and then going away towards the terminus. 4:04 19 at the terminus, stationary, with a single trucker 3?, passing from Macarthur St into Wendouree Parade, behind 19. 4:20 33 coming towards camera in Wendouree Parade from St Aidans Drive, stopping to pick up passenger at Forest St and then going away towards the City, photographed from near the depot, on a wet and windy day. 4:54 35 in Wendouree Parade, coming towards the Camera from St Aidans Drive and then going away with the Gardens Loop area in the background. Tram stops at stop to let a passenger off. 5:28 21 leaving Gardens Loop for the City via the Depot, green light in signal can be seen. 5:43 28?, closely followed by 26 turn from Drummond St South into Sturt St. 6:18 Scene opens with shot of “Sebastopol” destination on a bogie tram. 6:21 Title “The Sebastopol Line” 6:24 21 turning from Sturt St into Drummond St Sth with destination of Bell St and then going away from the camera. 6:55 38 in Drummond St Sth, coming towards the camera and then passing the camera with Sturt St just in the view. 7:10 21, showing Gregory St, in Drummond St Sth, approaching and then going away, entering the Urquhart St Loop, 7:39 34 in Drummond St Sth (location check required (Latrobe?)), approaches camera, picks up passengers and the goes away. 8:09 39 at ? Street, turns from Drummond St Sth into Skipton St, after picking up and setting down passengers, bound for Sebastopol 8:55 35 inbound in Skipton St passes through the Bell Street Loop, and then goes away from the camera. 9:33 42 outbound in Skipton St, approaches the camera, passes and then crosses over the half the road into Albert St. 10:00 39 inbound in Albert St – location? 10:31 34 outbound for Sebastopol, approaches camera and just starts to pass by. 10:36 34 in Grey St crossing loop, crosses 42 inbound. 10:59 39 outbound in Albert St, with shopping centre in bound, approaches camera, passes and then crosses over Albert St. Mid morning scene. 11:39 39 inbound, Albert St south, approaches camera and then passes and the crosses over Albert St. 12:16 41 outbound in Albert St passes the camera, and pulls into the terminus with the conductor getting out on the back bumper to pull the pole down as the tram stops and a passenger walks into the Royal Hotel. 12:39 Title “The Lydiard Street North Line” 12:44 Filmed from the Hotel balcony, 21 inbound in Lydiard St Nth passes over Mair St, stops while 33 passes in the other direction. 13:18 With the red light showing on the Seymour St loop signal, 33 inbound for Sebastopol stops and picks up many passengers, passes the camera and runs past the VRI building in the background and through the loop. Possibly filmed on a Sunday given the ladies dresses and quieter streets. 14:01 30 outbound, passes the camera and stops at Macarthur St. Filmed alongside the brick wall of the cutting. 14:28 30 inbound arrives, passes through the Gregory St loop and then proceeds past the camera, making a stop to pick up passengers. 15:14 28 in Lydiard St Nth – location?, approaches and goes away from the camera, north of Gregory St. 15:34 28 ditto location? 15:53 21 arrives at the terminus with passengers getting on and off. 16:11 View of the a vertical positioned “End of Section” sign on a pole at the terminus and then lifting the camera to see the timetable board and the stop sign. 16:33 31 in Bridge St passing Morseheads and then turning into Sturt St, stops at the Grenville St stop, while another single trucker comes down to the stop from the City. 16:58 31 outbound in Bridge St, with destination of Victoria St. 17:14 Title “The Victoria Street Line” 17:18 31 outbound to Victoria St from Stones Corner. Starts with an overhead shot, shows clock at the Caltex service station,. 17:37 31 inbound approaching Bakery Hill and then descending to the junction after it passes camera. 18:09 25 climbing outbound in Victoria St, passing the camera, to then pass through the King St loop. 18:47 25 inbound in Victoria St, passing the camera, then pass through the King St loop, with St Alypius Church in the background. 19:36 14 approaching the rail bridge in Victoria St and stopping at the 2nd last stop to left of passengers. 20:01 14 leaving the terminus and approaching the camera and the a short sequence going away, to the next stop to pick up quite a few passengers. 20:14 “Trams Stop Here” sign, metal wrap around on a steel pole. 20:16 Title “The Mount Pleasant Line” 20:21 11 inbound in Main St, with a passenger leaping off the tramcar and another getting off just before the junction. 20:45 11 passes the junction and then proceeds away from the camera in Bridge St. 21:04 30 outbound in Main St, then turns into Barkly St, a bus (Eclipse Motors) passes in Main St just before the sequence ends. 21:31 30 inbound near Steinfield St. (exact location?) 21:49 25 approaches the camera, then proceeds away and passes through the Grant St. loop. 22:29 25 inbound, windy day, between Grant and Cobden, (exact location?), with a horse drawn bread van in the view and the breadman walking behind the tram as it passes. 23:02 11 outbound in Barkly St, (exact location?) 23:37 11 inbound in Barkly St (exact location?) 23:44 Mt Pleasant terminus signage 23:50 30 approaches the terminus and then stops with the conductor alighting turning the pole, passengers getting on and off and the driver appearing at the other end. 24:32 Title “The Gardens Via Sturt St. West Line” 24:35 21 outbound in Sturt St near Raglan St, approaches and passes the Camera. 25:09 12, showing City Oval, approaches and passes the camera, outbound near Windermere St. 25:33 13 showing View Point, goes away from the camera – location? 25:44 12 comes from St. West, inbound passes the camera and then stop as the next stop next Talbot St? 26:21 Short sequence of a “Warning Oncoming Trams” sign 26:28 42 inbound in Sturt St West, just before Ripon St, view coming towards camera and then going away to cross Ripon St. 27:10 34 passes through the Parker St loop 27:25 35 or 39 inbound past the college in Sturt St West 28:04 41 outbound at the Russell St curve, passes away from the camera. 28:11 35? inbound passes away from the camera through the Victoria Park or Morrison St loop, swinging out into the roadway. 28:29 View of timetable sign at Hamilton Ave. 28:37 35 turning from Sturt St West into Hamilton Ave, can see the conductor changing over the barrier rails. 29:11 42 inbound, crosses another bogie tram (35?) at Carlton St loop then passes the camera and goes past the Olympic rings monument. 29:42 12 approaches the Carlton St gates. 30:07 12 outbound, crosses a bogie tram in the loop with both trams then leaving the loop. 30:20 Title “End of Part One” Written labels giving title information on outside of box.trams, tramways, ballarat, sebastopol, lydiard st north, victoria st, mt pleasant, sturt st west