Showing 738 items
matching colonial australia
-
 Kiewa Valley Historical Society
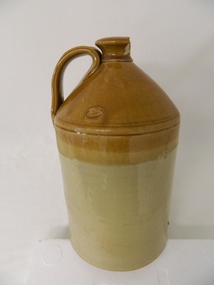
Jar/ Demi John Stone Ware, Circa 1860
This kiln glazed container for liquid's, was the type used in the 1700's to mid 1900's to contain fluids mainly for human consumption which needed to retain liquid that could be affected by sunlight and or required to be maintained at a cooler temperatures. Ginger beer and other "brews" for human consumption were the prime target. The ability to refill these vessels were of the utmost importance to the consumer. Over time these containers were reduced in size and produced for "special" liquids e.g. alcoholic Port. This Demi John stone ware was manufactured in Tamworth (England) and imported into Australia during a period when the majority of "quality" domestic items were sourced from "the Mother Country" and the ties between the still "colonial" outpost were very strong. This bondage remained longer in rural communities than in the cities. The "multi-culturalism of the post World War II era resulted in the lessening of the earlier ties. The growing of nationalism, the Aussie evolution, was brought about by the increased social and business/commercial interactions between Australia and the United States of America, post World War II.This container(jug) is very significant to the Kiewa Valley, a rural region that required these type of liquid storage vessels, especially in the late 1800's to the mid 1900's. These were times when household refrigeration, if available, would be from the "block ice" coolers or "cool" storage nooks and crannies within farmhouse locations.This large "stone ware" glazed Demi John, alias Carboy has a capacity of over 20 litres. It has a conical smooth lipped neck top with a wide, flat(three to four finger) carry and poring handle. The top third portion of the jug is caramel in colour and the bottom a darker cream. It has a manufacturer's seal stamped into the surface before glazing. This item would have been corked and then sealed (air tight) with wax.manufacturer's seal "GEORGE SKEY WILNECOTE TAMWORTH"household liquid jar container, 1800's food storage, kiln fired glazed pottery -
 Kiewa Valley Historical Society
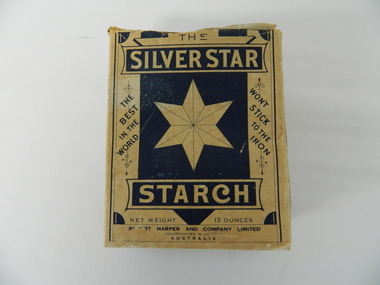
Box Starch, Pre decimal currency date(14th February 1966)
This brand of starch was first manufactured before 1966 and covered the period when Australian made was the preferred clothing due to limited imports from England. This was a period when the demand for "home grown" produce was at its peak. This was in a time when by necessity and ease of supply and not by the "Buy Australian" campaign (of later years), was the major factor for the demand of these type of laundry goods. It was in a time when starch was used in formal clothing to put a "crisp" or fresh new appearance for clothes. This product was in the era and importantly the social more of "clothes make the person" in which starched shirts and dresses was the fashion vogue. Formality of dress was a strictly British "class" up-man-ship which from the 1950's onwards became less and less visible. The Australian "Ocker" or fair "dink'm" bloke became more entrenched after World War II. The national identity was slowly developing.This box of starch is very relevant to the Kiewa Valley because this box highlights the differences ,in this period, between city and rural social standards. Rural areas were deeply entrenched into colonial and the pioneer family structure viz- a-vie social and dress fashion standards. British values and norms lingered on well beyond the changes happening in city fashion. Tradition and English "ties" were the backbone of early colonies and it was only after World War II that these "ties" were becoming irrelevant. Early traditions lingered well past the independence sought by Federation, colony to statehood and trade with other nations eg. USA and Asia. The idea that a change in "status" would automatically change the social mores of Australians, especially in rural ares, was not fully grasped by the "law makers" and those wanting change.This box (capacity 12 ozs) has white(aged into cream) and blue printing and a "white star" on five sides, the sixth side has a laundry scene with two ladies, in early 1900's fashion. The package is made from 200 gsm thick cardboard. As manufacture was made before and during the two World Wars 1914 to 1945 the promotion was heavily focused on Australian made and Australian grown maize. One side of the box has instructions of use and all the other sides are promotional, detailing "the best in the world and won't stick to the iron""SILVER STAR", "THE BEST IN THE WORLD", "WON'T STICK TO THE IRON", "REQUIRES NO BOILING", INSTRUCTIONS FOR USE", "ROBERT HARPER AND COMPANY LIMITED", "INCORPORATED IN VICTORIA, AUSTRALIA", "NET WEIGHT 12 OUNCES", "LARGE BOX 12 OZS"domestic laundry essentials, cotton clothing preparations, household starch "crisp and neat appearances. -
 4th/19th Prince of Wales's Light Horse Regiment Unit History Room
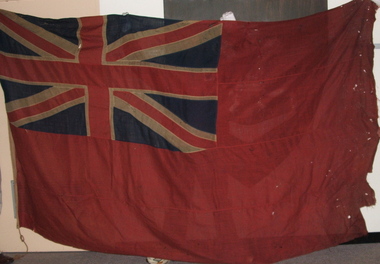
Red Ensign, Surgeons' Banner, 1850 (estimated)
Red Ensign 1801 design. - The British red ensign was altered in 1801 to include the change to the design of the Union Jack. British legislation required, with a few exceptions, that all merchant shipping throughout the British Empire fly the British Red Ensign, without any defacement or modification. The ensign is sometimes referred to as the red duster. The Royal Navy stopped using the Red Ensign in 1864. This red ensign was used by the Surgeons of the Kyneton District Mounted Rifles to indicate their location. The Banner is a large red ensign mounted on a 10 foot long polished wooden pike. The Banner was used by the Kyneton District Mounted Rifles, later The Royal Volunteer Cavalry Regiment (Prince of Wales Hussars), then Prince of Wales Victorian Light Horse, ancestor units of the modern day 4th /19th Prince of Wales’s Light Horse Regiment. In the binding is the inscription ‘Kyneton Prince of Wales Light Horse’ and three names: Surg-Major S Smith MRSLE, Dr McMillan, and Maj Thirkettle. These surgeons played a significant role in the military and civil affairs of Kyneton. Dr McMillan Dr McMillan was the first surgeon but left KPWLH 2-3 months after its formation and little else is known of him. Surgeon-Major Samuel Smith 1836 Born, Scotland 1857 Surgeon to the Hon. Hudson Bay Company. Ship “Prince Arthur” from London to Moose Fort, Hudson Bay. June 13 – Aug. 24 1857. 1858 Appointed Medical Officer of large immigrant ship to Port Phillip 1859 Appointed Assistant District Coroner, Castlemaine 1859 Appointed to Castlemaine Hospital 1862 Appointed first resident surgeon and manager of Kyneton Hospital Foundation member of Kyneton District Mounted Rifles 1874 Appointed Surgeon-Major Kyneton Volunteer Prince of Wales Light Horse Conducted a private practice in Kyneton. 1909 Died 8 November 1909, aged 73 years Samuel Smith was a Life Governor of Castlemaine Benevolent Asylum, a member of St Andrews Presbyterian Church, a Mark Master Mason of the Edward Coulson Lodge No 17, Kyneton. He also had a notable collection of stuffed native birds and animals of which he had great knowledge. Major Thirkettle 1855 Major Thirkettle arrived in Kyneton Established a timber merchant and ironmongery business in Kyneton with Robert Burton. 1857 By 1857 he was practising as an architect. His house is still standing in Yaldwin St, West Kyneton. 1860 Joined the Prince of Wales Light Horse 1863 Joined Rifle Volunteers and appointed Captain. On their disbandment he was made Honorary Major. 1864 Won Queen’s prize for rifle shooting. Major Thirkettle was noted for his skill with woodwork. He won many prizes and orders of merit for his models of yachts It is believed likely that he made the wooden pike with its metal head (now missing). He was Tyler of the Zetland Lodge, also Secretary of the MUIOOF and Bowling Club. 1904 Died in Kyneton, aged 75 years Protection for medical services The Surgeons’ Banner indicated the location of the Regimental Aid Post. The use of this device in the 1860’s overlapped the adoption of the Red Cross which became the symbol for the protection of sick and wounded soldiers. In 1864 twelve European nations signed a treaty stating that in future wars they would care for all sick and wounded military personnel, regardless of nationality. They would also recognise the neutrality of medical personnel, hospitals and ambulances identified by the emblem of a red cross on a white background. The treaty was called the Geneva Convention. This Convention was concerned only with soldiers wounded on the battlefield. Over the years, however, it has been expanded to cover everyone caught up in conflicts but not actually taking an active part in the fighting. The Surgeons’ Banner complements the Colours of the Kyneton District Mounted Rifles, also held by the Unit History Room, in presenting the colonial period of the Regiment’s history. Provenance It is believed that the Banner was manufactured in Britain and brought to Australia by Samuel Smith. After the disbanding of Colonial units, the Banner was in the care of the Shire of Kyneton until presented to the 4/19 Prince of Wales’s Light Horse Regiment on 14 September 1986 on the occasion of the Regiment exercising its right of freedom of entry to the city. There are many examples of Regimental and King’s/Queen’s Colours held by various organisations. However A Surgeons’ Banner such as this is rare, if not unique, in Australia. A large red ensign, post 1801 design. - The British red ensign was altered in 1801 to include the change to the design of the Union Jack. British legislation required, with a few exceptions, that all merchant shipping throughout the British Empire fly the British Red Ensign, without any defacement or modification. The ensign is sometimes referred to as the red duster. The Royal Navy stopped using the Red Ensign in 1864. On the binding is the inscription: "Kyneton Prince of Wales Light Horse", and three names - Surgeon Major S Smith MRSLE Dr McMillan Major Thirkettlekyneton district mounted rifles, heraldry, red ensign, surgeons banner -
 4th/19th Prince of Wales's Light Horse Regiment Unit History Room
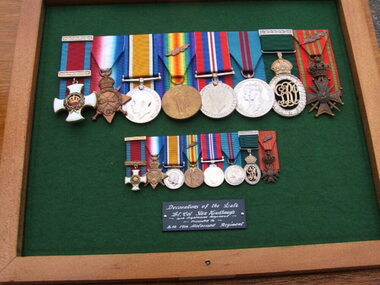
Medal Set, Col S G A Hindhaugh, 1914-1945
Stanley George Allen Hindhaugh (1883-1962), soldier, was born on 12 December 1883 at Camperdown, Victoria. His occupation was Station Manager. 14 April 1904 - Appointed Lieutenant 11th Light Horse Regiment Militia. 3 April 1911 - Promoted to Captain in the Militia. 20 August 1914 - Appointed to the Australian Imperial Forces to A Squadron, 4th Light Horse Regiment at Broadmeadows camp. 19 October 1914 - Embarked for the Middle East from Melbourne with the 4th Light Horse Regiment per Tranport A18 "Wiltshire". 11 December 1914 - Disembarked at Alexandria for camp Mena. 19 May 1915 - Promoted to Major. From 22 May 1915 - On operations at Gallipoli. 6 August 1915 - Noted in the fierce engagement at Leane's Post. 19 August 1915 - Appointed Second in Command 4th Light Horse Regiment. December 1915 - To camp at Tel El Kebir. January 1916 - Acting CO 4th Light Horse Regiment. 21 March 1916 - Embarked Alexandria per "Cestrian" for Marseilles with B Squadron 4th Light Horse Regiment for operations in France and Flanders. 16 February 1917 - Promoted to Lt Colonel. March 1918 - In action at Passchendaele - Awarded Belgian Croix de Guerre. 7 December 1918 - To 2nd Light Horse Regiment. 2nd ANZAC Mounted Regiment. 15 May 1919 - Returned to Australia. 11 October 1919 - Transferred to Reserve of Officers. 1932 - Commanded 20th Light Horse Regiment. 1934 - Commanded 11th Light Horse Regiment. 15 November 1941 - Retired. Full size and miniature sets of medals awarded to Colonel Stanley George Allen Hindhaugh. Comprising: Distinguished Service Order (Flanders 1 June 1918), 1914-1918 Star, British War Medal 1914-1920, Victory Medal (with MID) 1919, War Medal 1939-1945, King George V Coronation 1911, Colonial Officers Auxiliary Forces Decoration, Croix de Guerre (Belgium) 1917. Mounted in glass fronted display case.Plaque in case enscribed: "Decorations of the late Lt Col Stan Hindhaugh 4th Light Horse Regiment. Presented to 4th 19th Motorised Regiment". Adhesive label on case: Alwyn and Barbara Catmore 32 Morrie Crescent Blackburn Vic 3130 (03)8984124 medals, world war, 1, victory medal, 4th light horse, militia, western front, dso, king george v coronation, colonial officers auxiliary decoration, 1914 1918 star, mid, croix de guerrre belgium, passchendaele, 2nd anzac mounted regiment, 20th light horse, 11th light horse -
 4th/19th Prince of Wales's Light Horse Regiment Unit History Room
Card - Christmas Card, 1915 (exact)
Service of Frank Phillips Prior to the commencement of World War I, Frank Phillips served in the Minyip Troop of the Light Horse militia. His civilian occupation was that of clerk. On 22 August 1914 he enlisted in C Squadron 4th Light Horse Regiment. The 4th Light Horse Regiment embarked on the troop ship “Wiltshire “ for training at Mena Camp, in Egypt. During May 1915 the Regiment was deployed to the Gallipoli campaign in a dismounted role. After seven months, the Gallipoli campaigned was abandoned and the troops withdrawn. On return to Egypt the 4th Light Horse Regiment divided with one component deployed to Palestine and the other to the Western Front. Frank went on to serve in Palestine. He was promoted to Sergeant while at Gallipoli and, in Palestine, was promoted to Captain, serving as Adjutant of the Regiment. He was granted furlough to return to Australia from 14 October 1916 to 12 March 1917. On 16 January 1918 he was Mentioned in Despatches Citation: At Hill 750 near Bir El Esani on 30-4-17 he led an attack on Hill 750 under heavy rifle fire capturing the position and 7 armed Bedouins. On 23-5-17 during reconnaissance, he led and attack on 790 under very heavy rifle and machine gun fire and captured the position, inflicting losses on the Turks. He has, at all times, set a fine example of courage to his men. 22 October: 1918 he was awarded the Military Cross Recommendation of Commanding Officer – For exceptional gallantry and devotion to duty on the 28th September 1918, during the crossing of the JORDAN near EL MIN, this officer (adjutant of the Regiment) personally reconnoitred for crossings under heavy M.G. fire and led the Regiment to the only available crossing, rendering invaluable assistance during the crossing. On 3oth September when the Regiment was advanced guard on to KAUKAB, this officer’s personal reconnaissance to confirm patrol reports was of the highest order and utmost value to his C.O. culminating in the capture of KAUKAB with a mounted attack and the The 4th/19th Prince of Wales’s Light Horse Regiment has a long and distinguished history that pre-dates Federation to colonial Victoria’s mounted troops. Our history parallels that of the nation, including its active participation in some of the most inspiring events in Australian Military History including the Defence of ANZAC and the charge at Beersheba. The Regiment is based on a linkage of the two post-World War II Victorian Army Reserve RAAC units - 4th/19th Prince of Wales’ Light Horse and 8th/13th Victorian Mounted Rifles. From these units we derive our links with the six Light Horse Regiments of Victoria and Southern New South Wales (4th, 8th, 13th, 17th, 19th and 20th Light Horse Regiments.) The Regiment proudly bears the guidon of the 4th Light Horse, with the guidons of the remaining regiments being laid up in the crypt of the Melbourne Shrine of Remembrance. During World War I, the 4th Light Horse Regiment served with distinction on three fronts – Gallipoli, Palestine and the Western Front. Corporal, later Captain, Phillips was a member of the 4th Australian Light Horse Regiment. He created the post card while serving with the Regiment as a Corporal at Gallipoli. Post Card hand made and sent to familyFrom Cpl Frank Phillips, 4th Australian Light Horse Regiment. Entries in pencil Front: Addressed to Andrew Phillips (father) at Minyip, Victoria, Message: “A Merry Christmas and Happy New Year to all, Made while on my day out. Love Frank” Reverse Top Centre – 4 LH Badge Centre – cloth map of Australia stapled to card Bottom – Print of flag stapled to card, Irish green ensign, Union flag in canton, gold coloured Irish harp on fly. Notations: Broadmeadows, Wiltshire (Troop Ship), Shrapnel Gully, Suicide Gully, Courtney’s Post Mena, Mex, Heliopolis, Imbros, Gallipoli, Turkish soil underneath (flag), Australia on Turkey, Lone Pine, Leans Trench, Constantinople, All honour to our Irish comrades, To greet you 1915-16. From the shells, yells, and little Hells, of the Darda Dardenelles 0 – 0 May you enjoy your Xmas dinner as I hope to enjoy my Xmas billy in the trenches.ww1, gallipoli, 4th light horse, post card, frank phillips -
 4th/19th Prince of Wales's Light Horse Regiment Unit History Room
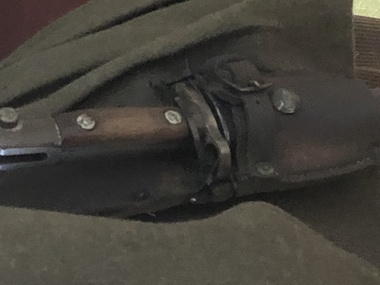
Weapon - Bayonet, Scabbard and Pattern 1892 Bayonet Frog, Bayonet, Scabbard and Pattern 1892 Bayonet Frog on Sam Brown Belt on Jack's mannequin
This type of bayonet was used by infantry Rifle Regiments of the British Army and by Infantry Battalions of the Australian State Defence Forces in the 1890's; then by some infantry battalions of the Australian Army especially in a ceremonial roleThere is no record found of this type bayonet frog in use by 4th/17th/19th Light Horse Regiments. Use by VMR (the colonial predecessor to 4th/17th/19th Light Horse Regiments) is unlikely. Bayonet, Scabbard and Pattern 1892 Bayonet Frog on Sam Brown Belt on Jack's mannequin. Bayonet frog made of 'buff' leather, and stained brown on the front. Hand stitched with reinforcing tin plated copper rivetsold hand writing illegiblebayonet frog 1892 1888 buff leather, bayonet and scabbard of usual materials, -
 4th/19th Prince of Wales's Light Horse Regiment Unit History Room
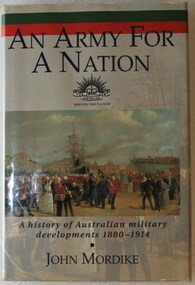
Book, John Mordike, An Army for a Nation, A history of Australian military developments 1880-1914, 1992
... australian army colonial era perfidious albion ISBN 1 86373 192 X ...For many Australians, Australia's participation in World War 1 is both an essential part of their national identity and an inevitable consequence of their British heritage; it is a popular view that Australia perceived its national interests and those of Britain to be one. In this major study, John Mordike challenges this view of Australia's past by exposing the competing national and imperial influences which shaped the foundation of the Australian Army. The book reveals how political ambition and electoral pressures subordinated a farsighted policy of defence self-reliance to the demands of imperial defence.Hard cover book, 310 pagesISBN 1 86373 192 Xmilitary history, mordike, australian army, colonial era, perfidious albion, military history, mordike, australian army, colonial era, perfidious albion -
4th/19th Prince of Wales's Light Horse Regiment Unit History Room
Military Insurance Ticket, 1910
Issued to Roy Taylor, a Sergeant in the 9th Australian Light Horse. At that time soldiers had to take out private insurance to cover the risk of death or disablement on duty.Yearly military insurance ticket to cover death or disablement while on military duty. Premium was 7 shillings per annum for cover of 100 pounds for death or 2 pounds/week up to 13 weeks for disablement.No 44998. Signed by Manager and Issuing officerinsurance, military -
4th/19th Prince of Wales's Light Horse Regiment Unit History Room
Jacket, 9th Australian Light Horse, abt 1903
Jacket, dark khaki, cream piping at cuffs and epaulettes, a scarlet bar over cream patches under the badges at the throat. Pale brass buttons with monogram "GR VII" inscribed "Australian Commonwealth". The regimental badges at the throat combine the Colonial Victorian Mounted Rifles badge with the Australian Light Horse. They show a golden kangaroo surrounded by two silver wattle branches and the motto "Pro Gloria" over "VMR" on a ribbon, all in silver. Beneath is a gold ribbon inscribed "9th AUS Lt HORSE" jacket, taylor, 9 light horse -
 Kiewa Valley Historical Society
Bible - Family, Brown's Superb Bible, circa early 1800's to 1900
This item represents one of the most important spiritual references available to a settler in countryside Australia in the period 1800s to 1900s. This is the family bible and relates to the major religious beliefs of the early settlers who pioneered British/European colonial settlements. Although the first pages are missing the family name is written on the inside cover (J.A. Fleming). Most of these bibles (of this era) showed the family genealogical record of births, baptism and deaths, however this bible has the relevant pages missing. This bible would have provided the spiritual strength needed in bad times. Throughout this bible there are copies of specially commissioned lithographic engravings, each published between March 1812 to December 1813. These photographs were provided to visualise the theme of the each chapter.This item is significant because it shows that spiritualism of a small group (family in this case) is a vital part of the cohesive forces which holds a family(the basic subgroup of society) together, against all odds, and external pressures. It demonstrates that even in isolated or sparsely populated areas, the mores of a christian community is as strong as that of the cities. Mountains (Victorian Alps) have throughout the enlightened Ages been of extreme spiritual significance and this beholds those who live in this area.The families in the Kiewa Valley fall into the "isolated rural area" when this bible was first in use. This bible contains as its introduction,scripture history starting from 4004 BC "God created all things" to 2900 AD end of the World. There is a high degree of probability that this bible belonged to a member or members of the John Ambrose Flemming extended family who resided in the Kiewa Valley. J.A. Flemming (a famous English electrical engineer and physicist) invented the first diode in 1904). He and his family were devout Christians and he helped establish the Evolution Protest Movement.Leather bound bible. Leather in some areas is in tatters revealing the thick multi-layered cardboard backing. Front and back covers are held together by the thin leather binding. The lettering of the bible is large.Hand written inscriptions are in ink on the inside front cover, " J Tangam" at the top, "J A Fleming" underneath "Tangambalanga" and below that "1900". There are penciled dates "1937 1900" which have at one point in time been scribbled over in pencil. Although not marked on cover, the bible was known as "Brown's Bible" after the Author, the Rev. John Brown. Each of the major chapters is introduced by a copy of a lithographic print detailing the relevant religious picture and all are headed by "Brown's Superb Bible" and the date of the print. bible, rev. john brown, old and new testament, christianity -
 Warrnambool RSL Sub Branch
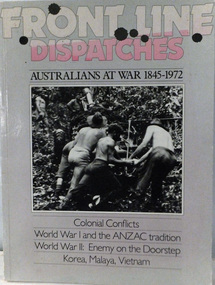
Book. Colonial Conflicts. 1845-1972, General Editor: Nic van Outdshoorn, Front Line Dispatches. Australians at War 1845-1972, No Date
PaperbackColonial Conflicts World War 1 and the ANZAC tradition World War 11: Enemy on the Doorstep Korea, Malaya and Vietnam From the writers of Two Hundred Years -
 RSL Victoria - Anzac House Reference Library and Memorabilia Collection
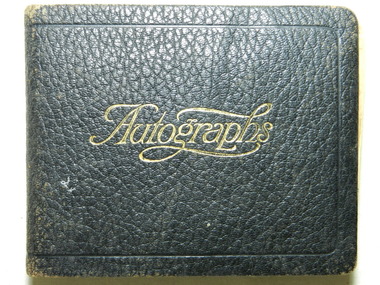
Autograph Book, Robert Wilby, 1916
Autographs and sketches collected from Colonial patients during Wilby's WW1 service on staff at Grayling Hospital in 1916. Wilby enlisted in September 1914 and returned to Australia on 12th May 1917.WW1 hard-covered, black/brown leather "Autographs" book of Robert George Wilby (189 - 1st Field Ambulance, C Squadron). -
 Emerald Museum & Nobelius Heritage Park
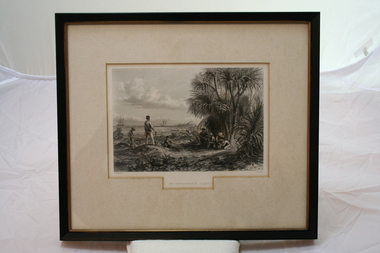
Relief prints, Thomas Baines et al, An Explorer's Camp, Circa 1875
From 'Australia' by Edwin Carton Booth. Thomas Baines joined Augustus Gregory as official artist and storekeeper, in the expedition across northern Australia between 1855-1857 sponsored by the Royal Geographical Society to evaluate the northern area of Australia for suitability as a colonial settlement. The Baines River was named after him.The item is socially and artistically significant as it is a very early image of Northern Australia.Framed black and white etching depicting a cap site located near the ocean.Artist T. Baines - J.J. Crew. From 'Australia' by Edwin Carton Booth. Thomas Baines joined Augustus Gregory as official artist and storekeeper, in the expedition across northern Australia between 1855-1857 sponsored by the Royal Geographical Society to evaluate the northern area of Australia for suitability as a colonial settlement. The Baines River was named after him.print, baines -
 Orbost & District Historical Society
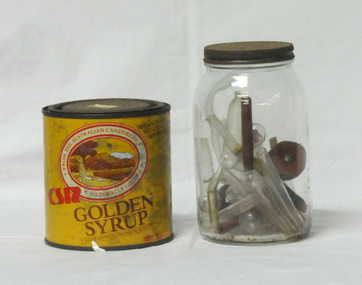
containers, 1970s
These items were used or were available for sale by chemists in Orbost. Chemists who worked in Orbost included Henry Cottman; James Alfred Dubois Williams; Harry Arthur Murray; Miss P.E .Mason (Phyllis Estelle?); Miss Sybil Monica Buzza; Thomas James Frayer; Australia Shaw; James David Torley; John William Zimmer; Dalkeith William Steele; William Thomas Hollingsworth; E.E. Cohen; R.S. Anderson; Frances John Perry Faith Everard Pardew and Charles Anthony Wurf. The tin was designed and used by the Colonial Sugar Refining Co. to store and sell golden syrup which is a by-product of cane sugar, molasses and treacle. The practices of early pharmacists are revealed through these items. The items have a clear association with Orbost.3210.15 is a rusty tin of CSR Golden Syrup. It is a yellow, red, brown, white tin with a black lid. used to sell and store golden syrup. The kilogram tin has the words 'golden syrup' printed in large red letters. There is a recipe for ANZAC BISCUITS on the back of the tin. Inside two concentric circles - "FROM THE AUSTRALIAN CANEFIELDS NATURALLY GOLDEN" around a drawing of a sugar refinery. 3210.16 is a glass jar with a black metal lid. It contains small beakers, rubber tubing, stoppers and vials. on front in red print - "FROM THE AUSTRALIAN CANEFIELDS NATURALLY GOLDEN ; CSR GOLDEN SYRUP ; GUARANTEED PREMIUM QUALITY ; NET 1KG ; SEE BACK FOR DELICIOUS RECIPE"pharmacies-orbost zimmer-john tin-golden-syrup medical-equipment -
 Ringwood and District Historical Society
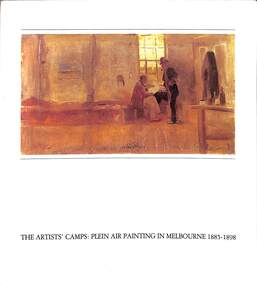
Book, Helen Tolpliss, The Artists Camps: Plein Air Painting In Melbourne 1885-1898, 1984
Image of a Charles Conder painting on front of soft covered book titled The Artists' Camps: Plein Air Painting In Melbourne 1885-1898. FOREWORD by Margaret Plant - Department of Visual Arts, Monash University. The paintings of the 'Heidelberg school" are the best loved group of works in Australian art. The affection is linked in the national mind with a recognition that the authentic Australian landscape had been discovered and colonial bonds broken. The painting activity of the 1880s and 1890s was by no means confined to Heidelberg. Helen Topliss painstakingly presents the variety of sites around Melbourne, in the bush and on the coast, reconstructing their original character and the history of their accessibility. The major figures are well known — Roberts, McCubbin, Streeton and Conder — but there were a number of 'minor' artists associated with the various painting spots that have been too long neglected. A research programme is here initiated in the hope that some of these figures might be more fully returned to us. The restoration of the sites provokes a more extensive roll-call of artists involved in the plein air phenomenon. Various expressions of nationalism in the late nineteenth century have been accorded attention: the painters contributed in varying degrees. But it is, finally, the quality of the painting, the freshness, the particularity of nuance, the calculated aesthetic angles that have governed response and inspired affection. The elegant relaxation themes of many of the paintings have in fact been overlooked in the intellectualization of the quest for 'national identity'. The orchards and the beaches, the ladies promenading a la mode on the beach at Mentone or in the grasses of Box Hill are as important to our artistic tradition and social history as the shearers of rams. -
 Flagstaff Hill Maritime Museum and Village
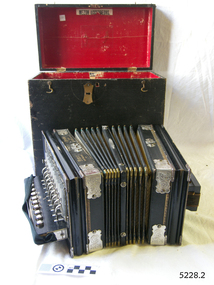
Instrument - Accordion, International Accordion Company, 1930's
... century, locally and Australia wide. In colonial Australia musical ...This MEZON brand button accordion was made specifically for Lyons, Musical Instrument Importer, 207 Bourke Street Melbourne, as can be seen on the embossed lettering on the top of the accordion. The hand inscribed nameplate indicates that the owner was T H Betts. On August 19th, 1903, Michael Edward Lyons applied to the Trade Mark’s Office of Sydney for registration of “The Invented word “MEZON” to be applied to musical instruments. In 1908 he was advertising himself as sole agents for MEZON accordions. He had been at that address for 15 years (since 1893) and was moving to larger premises at 256 Bourke Street, Melbourne. Still at this address in 1925, Lyons advertises MEZON accordions as “The ideal Xmas present, Maker your friends happy, This Xmas let the Present be a MEZON”. There was a choice of three styles: The Organ, The Wonder and The Grand Organ. They came with a Fibre Case with Lock and Key and a Leather Handle. The promise was “They Give Satisfaction”. They were obtainable at all stores or from Sole Distributors in Australia. In 1927 the MEZON was sold by Albert & Sons in Western Australia, Victoria, New South Wales and Queensland as well as by Lyons in Melbourne. The favoured German accordion brands were Monarch and Sterling, which were made by the International Accordion Company in Leipzig, Saxony, Germany. The company was founded in 1871 by Ernest Deines and made a variety of musical instruments. The company closed business in 1834. The International Accordion Company’s accordion range made the International brand and others such as MEZON, Globe, and Dienst. Australia imported the MEZON brand. American companies imported a range of the popular German branded accordions until World War II, when they were no longer available. In general, accordions produced after the war were not as high a quality and not loud enough to be heard over the electronic guitars and the drum kit of the bands. This accordion represents the type of musical instruments used in the late 19h and early 20th century, locally and Australia wide. In colonial Australia musical instruments like this one were imported from Germany as well as other countries. At that time, German made instruments represented good quality. This accordion is significant for being especially imported into Australia by a Melbourne retailer. Music was a part of family and social life, associated with dances, song and general fun.Button accordion with case. Accordion with steel reeds, three bass valves and ten treble valves. It is coloured black with very dark green trim, decorative silver metal reinforcing on main corners, gold reinforcing on corners of the bellows and delicate printed, gold printed patterned trims. Hand support for buttons is made of fabric. Folds of the bellows are light coloured with fine dark pattern. It has a nameplate on the front. Black wooden case has red lining, two brass hinges, two brass hook and eye catches and a swivel brass lock. The base of the case has a loose brass fitting. The top has a thin metal handle. Inscription on hand inscribed name on front, label inside case lid, silver reinforcing, leather on bellows top, and frame of accordion. Manufactured with the brand MEZON in Saxony, Germany, for Lyons of Melbourne. Once the property of T H Betts.Printed on label “MEZON ACCORDEONS.” Impressed in metal corners and reinforcing “MEZON” with logo [circle enclosing entwined capital D and E] “MADE IN SAXONY” Embossed in gold on frame “Made in Saxony”, “MEZON Accordion/ manufactured for LYONS / MELBOURNE, Bourke Street” Name inscribed by hand “T H Betts”flagstaff hill, warrnambool, shipwrecked coast, flagstaff hill maritime museum, maritime museum, shipwreck coast, flagstaff hill maritime village, great ocean road, mezon accordion, lyons, made in saxony, t h betts, betts, mezon, squeeze box, musical instrument, button accordion, germany, michael lyons, international accordion company, ernest deines, circle enclosing d e, d e, e d, german accordion -
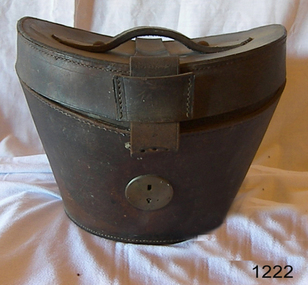 Flagstaff Hill Maritime Museum and Village
Functional object - Hat box, 1890-1910
The item was purchased from Robinson & Moffatt department store at Post Office Place Melbourne between 1884 when the store opened. Between 1911 and 1934 Robinson & Moffatt appeared to have sold out along with other businesses to became part of the Myer Emporium. Robinson & Moffatt were an early upmarket department store for the wealthy with a branch in Perth that was opened in 1899. During their time in business Robinson & Moffatt appear to have imported goods from England and Europe. The hatbox appears to be a British pattern made for a beaver type top hat around late 19th or early 20th century. A personal item made for Robinson and Moffatt department store, imported from England and sold to a wealthy colonial gentleman sometime between the late 19th and early 20th century. The item was purchased from one of the earliest department stores in Melbourne, that later was incorporated into what has become an iconic Australian department store operating out of one of Melbourne's iconic building locations,the Myer emporium.Gents leather oval hat Box, with concave lid reinforcing strap and leather handle. Has metal locking device and key hole. Handle held to top with 2 studs. Velvet inside lid. Catch inside box."Made for Robertson & Moffatt Melbourne"flagstaff hill, warrnambool, shipwrecked coast, flagstaff hill maritime museum, maritime museum, shipwreck coast, flagstaff hill maritime village, great ocean road, hat box, gentleman's hat, gent's hat box, hatbox -
 Flagstaff Hill Maritime Museum and Village
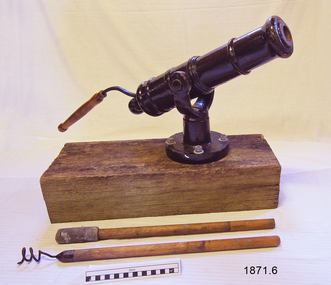
Weapon - Cannon, mid to late 19th century
The history of the Thunderchild gun is not known. It was presumably manufactured in Torquay in the second half of the 19th century. Such guns were often attached to a ship’s rail through the holes in the swivel base, as in the base of this gun. The guns fired grapeshot and were originally used on ships to repel boarders. They were also used to launch whaling harpoons and were sometimes employed for signalling. The relatively late date makes the latter application most likely. This Thunderchild gun is complete with ramrod and wad remover. It is in good working order and easily assembled. It is used locally for special ceremonies and for Whaleboat Races as a starting gun. (Guns and Cannon, South Wester Victoria, May 2008, ref W/F/03) The small bore cannon is part of a collection of nineteenth century Flagstaff Hill Guns and Cannon, which is classified as being a high level of significance, on State, National and World The nineteenth century artillery pieces are a very rare and representative collection of artillery of this era. The artillery pieces, individually and as a collection, are highly significant for historical, scientific and aesthetic reasons at the state, national and world levels. The artillery pieces are excellent examples of nineteenth century artillery designed for the shore defence of western Victoria in the mid to late 1800s. The collection demonstrates the system of nineteenth century Imperial Defence implemented by Britain and of the recycling of obsolete technology to the colonies by Britain. The collection represents the methods of artillery technology, its advancement and its modifications in order to remain active. It also illustrates the transference of defence technology from Britain to Australia and demonstrates the level of reliance Australia had on British defence equipment. The artillery pieces form prominent elements in their landscapes and, together with the batteries and sites in which they are located, create a strong visual link to the region’s defence history. Importantly the artillery pieces, individually and as a collection, represent a very rare and intact group of nineteenth century artillery. Very few examples of nineteenth century artillery have survived worldwide, the largest collections being sited in Canada. The collection is a rare collection of artillery which demonstrates the advancements made in artillery technology during the nineteenth century, and is one of the largest collections of nineteenth century artillery in Australia. Further, the collection is extremely intact, with most pieces retaining original carriages and many located within their original emplacement. This collection of artillery, with their carriages and in their locations, are of exceptional national significance as they represent the largest intact collection of artillery within a single defensive network, outside of major colonial ports. The collection of nineteenth century carriages and slides are in themselves an extremely rare and important collection, however their significance is enhanced by their placements within batteries and with guns. (Conservation Management Plan for Victorian Guns and Cannon, South Western Victoria, May 2008) Cannon; small 1pdr cast iron, smooth bore muzzle loading swivel gun, painted glass black. 19th century cannon has polished wood handle, two detachable metal stirrups and metal swivel base with cuff, attached to block of wood by four bolts. Accessories are a wood tamper and wood ramrod. Name on gun is Thunder-Child, Torquay, Vic. There are Maker’s Marks on the gun and base, and a number on the cannon.. Marks; Barrel "Thunder/ Child". Base cuff " THUNDER / -CHILD / TORQUAY / VIC ", Trunnion "2825/H"flagstaff hill, warrnambool, shipwrecked coast, flagstaff hill maritime museum, maritime museum, shipwreck coast, flagstaff hill maritime village, great ocean road, cannon, torquay, thunder child cannon, thunderchild cannon, signal cannon, muzzle loading cannon, ordinance, munitions -
 Flagstaff Hill Maritime Museum and Village
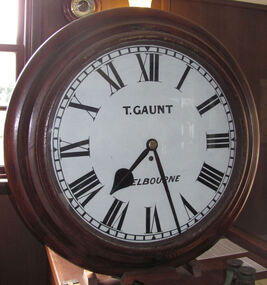
Instrument - Clock, c. 1860s
The clock was either made or sold by T. Gaunt & Co. of Melbourne, a manufacturer, importer and retailer of a wide variety of goods including jewellery, clocks and watches, navigational and measuring instruments, dinnerware, glassware and ornaments. Thomas Gaunt photograph was included in an album of security identity portraits of members of the Victorian Court, Centennial International Exhibition, Melbourne, 1888. Thomas Gaunt History: Thomas Gaunt established Melbourne's leading watchmaking, optical and jewellery business during the second half of the 19th century. Gaunt arrived in Melbourne in 1852, and by 1858 had established his own business at 14 Little Bourke Street. Around 1869 he moved to new premises in Bourke Street on the corner of Royal Arcade, Gaunt's shop quickly became a Melbourne institution. Gaunt proudly advertised that he was 'The only watch manufacturer in the Australian colonies'. While many watches and clocks may have had Gaunt's name on the dial, few would have been made locally. Gaunt did make some watches for exhibitions, and perhaps a few expensive watches for wealthy individuals. Gaunt's received a telegraph signal from Melbourne Observatory each day to correct his main clock and used this signal to rate and repair ship's chronometers and good quality watches. His main horological manufacturing was directed at turret clocks for town halls, churches and post offices. These tended to be specific commissions requiring individualised design and construction. He made the clock for the Melbourne Post Office lobby, to a design by Government Astronomer Robert Ellery, and won an award at the 1880-81 Melbourne International Exhibition for his turret clock for the Emerald Hill Town Hall. He became well known for his installation of a chronograph at Flemington Racecourse in 1876, which showed the time for the race, accurate to a quarter of a second. The firm also installed the clockwork and figures for Gog and Magog in the Royal Arcade. Thomas Gaunt also developed a department that focused on scientific instrumentation, making thermometers and barometers (from imported glass tubes), telescopes, surveying instruments and microscopes. Another department specialised in electroplating for trophies, awards and silverware, and the firm manufactured large amounts of ecclesiastical gold ware and silverware, for the church including St Patrick's Cathedral. There are no records that disclose the number of employees in the firm, but it was large enough for Gaunt to hold an annual picnic for the watchmakers and apprentices at Mordialloc from 1876; two years previously they had successfully lobbied Gaunt to win the eight hour day. Gaunt's workforce was reportedly very stable, with many workers remaining in the business for 15 to 30 years. Gaunt's wife Jane died on September 1894, aged 64. They had one son and six daughters, but only three daughters survived to adulthood. Two became nuns at the Abbotsford Convent and one daughter, Cecelia Mary Gaunt (died 28 July 1941), married William Stanislaus Spillane on 22 September 1886 and had a large family. Gaunt died at his home in Coburg, Victoria, leaving an estate valued at ₤41,453. The business continued as T. Gaunt & Co. after his death. Post Office and Clock History: Warrnambool’s Post Office has been in existence since 1857, when it was originally situated on the corner of Timor and Gilles Street. In March 1864 the Warrnambool Borough Council purchased this clock from Henry Walsh Jnr. for the sum of £25, “to be put up in front of the Post Office”. Henry Walsh Jnr was the eldest son of Melbourne’s Henry Walsh, maker and retailer of clocks, watches, thermometers and jewellery. In 1854 Henry Walsh Jnr. began business in Warrnambool as a watchmaker and jeweller later becoming a Councillor with now a local street named after him. The Post Office was extensively remodelled in 1875-76. Early photographs of this building show that the clock was installed on the northern outside wall, Timor Street, under the arches and between the 2 centre windows, where it could be seen by passers-by. Although spring loaded clocks date back to the 15th century, and fob and pocket watches evolving from these date to the 17th century, personal pocket watches were only affordable to the very fortunate. Public clocks such as this Post Office clock provided opportunity for all to know the time, and for those in possession of a personal watch to check and set their own timepieces to the correct time. During post office reservations during the 1970s the clock was removed and was eventually donated to the Flagstaff Collection. The Clock’s maker Thomas Gaunt, is historically significant and was an established and well renowned scientific instrument and clock maker in Melbourne during the 1860s. He was at that time the only watchmaker in the Australian colonies. In the 1870’s and 1880’s he won many awards for his clocks and was responsible for sending time signals to other clocks in the city and rural areas, enabling many businesses and organisations to accurate set their clocks each day. Warrnambool Borough Council purchased this clock from Henry Walsh Jnr. for the sum of £25 and the clock used to stand in front of the Warrnambool post office to allow ordinary citizens to set their time pieces as they walked by. The item is not only important because it was made by a significant early colonial clock maker and retailed by a locally known clock maker and jeweler but also that it was installed in the Warrnambool Post Office a significantly historical building in it's own right. Built in 1857 and regarded as one of the oldest postal facilities in Australia, with a listing on the National Heritage Database, (ID 15656). This 1864 hall clock originates from the Warrnambool Post Office. The clock glass is hinged to the top of the clock face and has a catch at the bottom. The metal rim of the glass is painted black. The clock face is metal, painted white, with black Roman numerals and markings for minutes and five minutes. The tip of the small hour hand is shaped like a leaf. "T. GAUNT / MELBOURNE" is printed in black on the clock face. The winding key hole is just below the centre of the clock face. The key winds a fusee chain mechanism, attached to the brass mainspring barrel that powers the pendulum with an 8-day movement. The speed of the clock can be adjusted by changing the position of the weight on the pendulum, lengthening or shortening the swing; raising the pendulum shortens its swing and speeds up the clock. The metal fusee mechanism has an inscription on it. The rectangular wooden casing is with a convex curve at the bottom that has a hinged door with a swivel latch. The original stained surface has been painted over with a matte black. There are two other doors that also allow access to the clock’s workings. The case fits over the pendulum and workings at the rear and attaches to the clock by inserting four wooden pegs into holes in the sides of the case then into the back of the clock. A flat metal plate has been secured by five screws onto the top of the case and a hole has been cut into it for the purpose of hanging up the clock. There is a nail inside the case, possibly used for a place to the key."T. GAUNT MELBOURNE" is printed on the clock face. “6 1 3” embossed on the back of the fusee mechanism behind the clock. warrnambool, shipwrecked coast, flagstaff hill, flagstaff hill maritime museum, maritime museum, shipwreck coast, flagstaff hill maritime village, shipwrecked artefact, clock, warrnambool post office, fusee, henry walsh jnr, thomas gaunt, t gaunt & co, post office clock -
 Flagstaff Hill Maritime Museum and Village
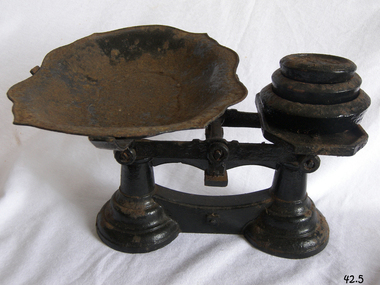
Instrument - Balance Scale, Henry Crane (Crane Foundry), 1870-1900
... a snapshot into the commercial life not only of England by Australian ...The Crane foundry opened some time before 1827 and was known as Atherton’s Foundry, run by James Atherton and Henry Crane. Initially it was a brass foundry, but by 1827 iron castings were also produced on the site. The main products were castings for the building industry, ironmongery and brassware. In the 1830s castings for the hand tool and lock industries were added to the product range and by 1836 Henry Crane had taken control of the business. The company became known as the Crane Foundry in 1847 with its own registered trademark. By the 1850s iron weights were produced, and a design was registered in 1872 with roundels decorating the edge. Brass weights were also produced, mainly after the regulation of 1890 that required weights of 2oz. or less to be made of brass. In the early 1900s the foundry began to produce castings for electric motors and continued to do so throughout its life. The Crane family continued to control the company until 1917 when William Cyril Parkes of lock makers Josiah Parkes & Sons Limited, Willenhall became a majority shareholder. Things were going well until the company’s liabilities spiraled out of control with the rise in electricity and gas prices along with the loss of two of the company’s largest customers. The factory went into liquidation and then closed in 2006 an end to one of Wolverhampton’s oldest companies.An item made by one of England's foundry’s based in Wolverhampton that exported items all over the world for many years. The scale gives a snapshot into the commercial life not only of England by Australian colonial life before Federation.Beam scale with three weights (4lb, 2lb, 1lb), metal tray, corrodedMarked on 2lb weight "Wolverhampton Crane Foundry" flagstaff hill, warrnambool, flagstaff hill maritime museum, shipwreck coast, flagstaff hill maritime village, great ocean road, scale, beam scale, pounds and ounces, imperial weight, grocers scale, domestic scale, henry crane, crane foundry -
 Flagstaff Hill Maritime Museum and Village
Functional object - Lead shot, Circa 1877
This artifact is a sample of small caliber lead shot recovered by Flagstaff Hill divers from the wreck of the Loch Ard in 1975. Included in her diverse and valuable cargo were 22 tons of lead shot, packed in cloth bags and wooden casks. Bulk quantities of lead shot, uniformly round balls of dull grey metal ranging from 2mm “birdshot” to 8mm “buckshot”, were routinely exported to the Australian colonies. Shot was used mostly as projectiles fired from smooth bored guns to bring down moving targets such as wild ducks and small game. It was also useful as ballast, when a dense, “pourable” weight was required to fill cavities or establish volume within a measuring container. The production of consistently round spheres of lead shot required the pouring of molten metal through a sieve and then a long drop through the atmosphere to a water filled basin for final cooling and collection. This “shot tower” process was first patented by William Watts of Bristol in 1782. His calculation of a 150 feet fall was not only to form evenly spherical droplets through surface tension, but also to provide partial cooling and solidification to each shot before they hit the water below. The value of his innovation was the minimising of indentation and shape distortion, avoiding the expense of re-smelting and re-moulding the lead. Lead shot was already being produced in Australia at the time the Loch Ard sinking in March 1878. James Moir had constructed a 157 feet circular stone shot tower near Hobart in 1870, with a peak annual production of 100 tons of lead shot sold in 28 pound linen bags. However colonial demand exceeded this source of local supply. The continued strength of the market for lead shot in the Colony of Victoria prompted substantial investment in additional productive capacity in Melbourne in the next decade. In 1882 Richard Hodgson erected the 160 feet round chimney-shaped Clifton Hill shot tower on Alexandra Parade (VHR H0709) and in 1889 Walter Coop built the 160 feet square tower-shaped Melbourne Central shot tower on La Trobe Street (VHR H0067). At its peak, the Coop Tower produced 6 tons of lead shot per week, or 312 tons per annum. History of the Loch Ard: The Loch Ard got its name from "Loch Ard" a loch that lies to the west of Aberfoyle, and the east of Loch Lomond. It means "high lake" in Scottish Gaelic. The vessel belonged to the famous Loch Line which sailed many vessels from England to Australia. The Loch Ard was built in Glasgow by Barclay, Curle & Co. in 1873, the vessel was a three-masted square-rigged iron sailing ship that measured 79.87 meters in length, 11.58 m in width, and 7 m in depth with a gross tonnage of 1693 tons with a mainmast that measured a massive 45.7 m in height. Loch Ard made three trips to Australia and one trip to Calcutta before its fateful voyage. Loch Ard left England on March 2, 1878, under the command of 29-year-old Captain Gibbs, who was newly married. The ship was bound for Melbourne with a crew of 37, plus 17 passengers. The general cargo reflected the affluence of Melbourne at the time. Onboard were straw hats, umbrellas, perfumes, clay pipes, pianos, clocks, confectionery, linen, and candles, as well as a heavier load of railway irons, cement, lead, and copper. There were other items included that were intended for display in the Melbourne International Exhibition of 1880. The voyage to Port Phillip was long but uneventful. Then at 3 am on June 1, 1878, Captain Gibbs was expecting to see land. But the Loch Ard was running into a fog which greatly reduced visibility. Captain Gibbs was becoming anxious as there was no sign of land or the Cape Otway lighthouse. At 4 am the fog lifted and a lookout aloft announced that he could see breakers. The sheer cliffs of Victoria's west coast came into view, and Captain Gibbs realised that the ship was much closer to them than expected. He ordered as much sail to be set as time would permit and then attempted to steer the vessel out to sea. On coming head-on into the wind, the ship lost momentum, the sails fell limp and Loch Ard's bow swung back towards land. Gibbs then ordered the anchors to be released in an attempt to hold their position. The anchors sank some 50 fathoms - but did not hold. By this time the ship was among the breakers and the tall cliffs of Mutton Bird Island rose behind. Just half a mile from the coast, the ship's bow was suddenly pulled around by the anchor. The captain tried to tack out to sea, but the ship struck a reef at the base of Mutton Bird Island, near Port Campbell. Waves subsequently broke over the ship and the top deck became loosened from the hull. The masts and rigging came crashing down knocking passengers and crew overboard. When a lifeboat was finally launched, it crashed into the side of Loch Ard and capsized. Tom Pearce, who had launched the boat, managed to cling to its overturned hull and shelter beneath it. He drifted out to sea and then on the flood tide came into what is now known as Lochard Gorge. He swam to shore, bruised and dazed, and found a cave in which to shelter. Some of the crew stayed below deck to shelter from the falling rigging but drowned when the ship slipped off the reef into deeper water. Eva Carmichael a passenger had raced onto the deck to find out what was happening only to be confronted by towering cliffs looming above the stricken ship. In all the chaos, Captain Gibbs grabbed Eva and said, "If you are saved Eva, let my dear wife know that I died like a sailor". That was the last Eva Carmichael saw of the captain. She was swept off the ship by a huge wave. Eva saw Tom Pearce on a small rocky beach and yelled to attract his attention. He dived in and swam to the exhausted woman and dragged her to shore. He took her to the cave and broke the open case of brandy that had washed up on the beach. He opened a bottle to revive the unconscious woman. A few hours later Tom scaled a cliff in search of help. He followed hoof prints and came by chance upon two men from nearby Glenample Station three and a half miles away. In a complete state of exhaustion, he told the men of the tragedy. Tom then returned to the gorge while the two men rode back to the station to get help. By the time they reached Loch Ard Gorge, it was cold and dark. The two shipwreck survivors were taken to Glenample Station to recover. Eva stayed at the station for six weeks before returning to Ireland by steamship. In Melbourne, Tom Pearce received a hero's welcome. He was presented with the first gold medal of the Royal Humane Society of Victoria and a £1000 cheque from the Victorian Government. Concerts were performed to honour the young man's bravery and to raise money for those who lost families in the disaster. Of the 54 crew members and passengers on board, only two survived: the apprentice, Tom Pearce, and the young woman passenger, Eva Carmichael, who lost her family in the tragedy. Ten days after the Lochard tragedy, salvage rights to the wreck were sold at auction for £2,120. Cargo valued at £3,000 was salvaged and placed on the beach, but most washed back into the sea when another storm developed. The wreck of Lochard still lies at the base of Mutton Bird Island. Much of the cargo has now been salvaged and some items were washed up into Lochard Gorge. Cargo and artifacts have also been illegally salvaged over many years before protective legislation was introduced in March 1982. One of the most unlikely pieces of cargo to have survived the shipwreck was a Minton majolica peacock- one of only nine in the world. The peacock was destined for the Melbourne 1880 International Exhibition. It had been well packed, which gave it adequate protection during the violent storm. Today the Minton peacock can be seen at the Flagstaff Hill Maritime Museum in Warrnambool. From Australia's most dramatic shipwreck it has now become Australia's most valuable shipwreck artifact and is one of very few 'objects' on the Victorian State Heritage Register.The shipwreck of the Loch Ard is of significance for Victoria and is registered on the Victorian Heritage Register ( S 417). Flagstaff Hill has a varied collection of artifacts from Loch Ard and its collection is significant for being one of the largest accumulation of artifacts from this notable Victorian shipwreck of which the subject items are a small part. The collection's objects give us a snapshot of how we can interpret the story of this tragic event. The collection is also archaeologically significant as it represents aspects of Victoria's shipping history that allows us to interpret Victoria's social and historical themes of the time. Through is associated with the worst and best-known shipwreck in Victoria's history.Lead shot; a group of mixed -sized lead shot. Small 2mm shot is embedded in a sea sediment clump of concretion. Also in the group are also 5 single 2mm shot and 4 single 4mm shot that are clean and free of sediment. The shot was recovered from the wreck of the Loch Ard.Nonewarrnambool, shipwreck coast, flagstaff hill, flagstaff hill maritime village, flagstaff hill maritime museum, shipwreck artefact, lead shot, loch ard, colonial industry, melbourne shot towers, victorian metallurgy, colonial imports -
 Flagstaff Hill Maritime Museum and Village
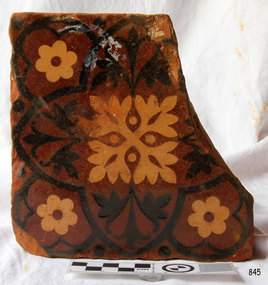
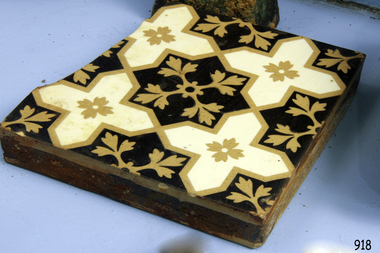
Ceramic - Tile, circa 1878
This Minton floor tile is from the wreck of the LOCH ARD along with other examples of this manufacture recovered from the wreck site and form part of the collection at Flagstaff Hill. The iron-hulled clipper ship from the Loch Line was heading for Port Phillip from London when it ran into the cliffs of Mutton Bird Island near Port Campbell and was wrecked on June 1st, 1878. The LOCH ARD was laden with high-value cargo including luxury goods intended for display at the Melbourne International Exhibition in 1880. One notable survivor from the ship’s freight manifest was the well-packed Minton porcelain peacock, a two-metre-high ceramic masterpiece of vivid glazed colours. The almost total loss of life and property from the LOCH ARD registered as a shocking tragedy for the Colony of Victoria, at a time when social confidence and economic optimism were otherwise high. The wealth generated from Gold and Wool was increasingly being spent on grandiose private residences and imposing public buildings. The demand for quality furnishings and fittings was therefore strong. Among the products consigned to burgeoning colonial markets by the Milton Pottery at Stoke upon Trent, were their new range of colourfully patterned but very durable floor tiles – ideal for the high-traffic spaces in the large civic buildings then being constructed in Australia and America. These new floor tiles were “encaustic”, meaning that their designs and colours were encased “within” the depth of the tile. Rather than their decorative patterns being glazed onto the surface of the tile, their inlaid designs were created during the manufacturing process, as “coloured slips” (or liquid clay) were poured into a deep pre-moulded casting. When fired, the resulting tile was colour-fast and design-fast. A brief history of the Loch Ard (1873-1878): - The sailing ship Loch Ard was one of the famous Loch Line ships that sailed from England to Australia. Barclay, Curdle and Co. built the three-masted iron vessel in Glasgow in 1873. It had sailed three trips to Australia and one trip to Calcutta before its fateful voyage. Loch Ard left England on March 2, 1878, under the command of recently married, 29-year-old Captain Gibbs. It was bound for Melbourne with a crew of 37, plus 17 passengers. The general cargo reflected the affluence of Melbourne at the time. Onboard were straw hats, umbrellas, perfumes, clay pipes, pianos, clocks, confectionery, linen and candles, and a heavier load of railway irons, cement, lead and copper. Other cargo included items intended for display in the Melbourne International Exhibition of 1880. The Loch Ard had been sailing for three months and was close to its destination on June 1, 1878. Captain Gibbs had expected to see land at about 3 am but the Loch Ard ran into a fog that greatly reduced visibility and there was no sign of land or the Cape Otway lighthouse. The fog lifted at 4 am and the sheer cliffs of Victoria's west coast were much closer to them than Captain Gibbs expected. He tried to manage the vessel but failed and the ship struck a reef at the base of Mutton Bird Island, near Port Campbell. The top deck loosened from the hull, and the masts and rigging crashed down, knocking passengers and crew overboard. The lifeboat was launched by Tom Pearce but crashed into the side of Loch Ard and capsized. He clung onto its overturned hull and sheltered under it. He drifted out to sea and the tide brought him back to what is now called Loch Ard Gorge. He swam to shore and found a cave for shelter. A passenger, Eva Carmichael, had raced onto the deck to find out what was happening and was confronted by towering cliffs above the ship. She was soon swept off the ship by a huge wave. Eva saw Tom Pearce on a small rocky beach and yelled to attract his attention. He swam out and dragged her to the shelter of the cave. He revived her with a bottle of brandy from a case that had washed up on the beach. Tom scaled a cliff in search of help and followed some horse hoof prints. He came from two men from Glenample Station, three and a half miles away. He told the men of the tragedy and then returned to the gorge while the two men rode back to the station to get help. They reached Loch Ard Gorge and took the two shipwreck survivors to Glenample Station to recover. Eva stayed at the station for six weeks before returning to Ireland by steamship. In Melbourne, Tom Pearce received a hero's welcome and was presented with a medal and some money. Of the 54 crew members and passengers on board, only two survived: the apprentice, Tom Pearce and the young woman passenger, Eva Carmichael, who lost her family in the tragedy. One of the most unlikely pieces of cargo to have survived the shipwreck was a Minton porcelain peacock - one of only nine in the world. The peacock was destined for the Melbourne International Exhibition in 1880. It had been well packed, which gave it adequate protection during the violent storm. Today, the Minton peacock can be seen at the Flagstaff Hill Maritime Museum in Warrnambool. From Australia's most dramatic shipwreck, it has now become Australia's most valuable shipwreck artefact and is one of very few 'objects' on the Victorian State Heritage Register. The Minton floor tile is significant for its hard-wearing yet attractive design. The shipwreck of the LOCH ARD is of State significance. Victorian Heritage Register S417. Flagstaff Hill’s collection of artefacts from LOCH ARD is significant for being one of the largest collections of artefacts from this shipwreck in Victoria. It is significant for its association with the shipwreck, which is on the Victorian Heritage Register (VHR S417). The collection is significant because of the relationship between the objects, as together they have a high potential to interpret the story of the LOCH ARD. The LOCH ARD collection is archaeologically significant as the remains of a large international passenger and cargo ship. The LOCH ARD collection is historically significant for representing aspects of Victoria’s shipping history and its potential to interpret sub-theme 1.5 of Victoria’s Framework of Historical Themes (living with natural processes). The collection is also historically significant for its association with the LOCH ARD, which was one of the worst and best-known shipwrecks in Victoria’s history. A square Minton floor tile with a black and apricot pattern against a chocolate brown background. There is a large chip missing. This decorative floor tile was recovered from the shipwreck of the LOCH ARD. On the back, or base, of the tile is inscribed the number “46” and the letters “Minton & Co Patent Stoke upon Trent”.flagstaff hill, warrnambool, shipwrecked coast, flagstaff hill maritime museum, maritime museum, shipwreck coast, flagstaff hill maritime village, great ocean road, loch line, loch ard, captain gibbs, eva carmichael, tom pearce, glenample station, mutton bird island, loch ard gorge, encaustic tile, melbourne international exhibition, floor tile, minton floor tile -
 Flagstaff Hill Maritime Museum and Village
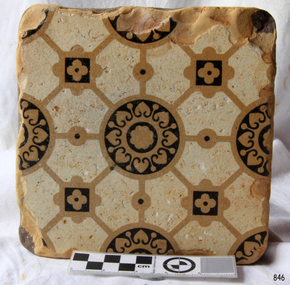
Ceramic - Tile, circa 1878
This Minton floor tile is from the wreck of the LOCH ARD. Other examples of this manufacture have been recovered from the wreck site and form part of the collection at Flagstaff Hill. The iron-hulled clipper ship from the Loch Line was heading for Port Phillip from London when it ran into the cliffs of Mutton Bird Island near Port Campbell and was wrecked on the early morning of June 1, 1878. The LOCH ARD was laden with high-value cargo including luxury goods intended for display at the Melbourne International Exhibition in 1880. One notable survivor from the ship’s freight manifest was the well-packed Minton porcelain peacock, a two-metre-high ceramic masterpiece of vivid glazed colours. The almost total loss of life and property from the LOCH ARD registered as a shocking tragedy for the Colony of Victoria, at a time when social confidence and economic optimism were otherwise high. The wealth generated from gold and wool was increasingly being spent on magnificent private residences and imposing public buildings. The demand for quality furnishings and fittings was therefore strong. Among the products consigned to burgeoning colonial markets by the Milton Pottery at Stoke upon Trent were their new range of colourfully patterned but very durable floor tiles – ideal for the high-traffic spaces in the large civic buildings then being constructed in Australia and America. These new floor tiles were “encaustic”, meaning that their designs and colours were encased within the depth of the tile. Rather than their decorative patterns being glazed onto the surface of the tile, their inlaid designs were created during the manufacturing process, as “coloured slips” (or liquid clay) that were poured into a deep pre-moulded casting. When fired, the resulting tile was colour-fast and design-fast.The Minton encaustic floor tile is significant for its method of manufacture which makes it durable as well as decorative. The shipwreck of the LOCH ARD is of State significance. Victorian Heritage Register S417. Flagstaff Hill’s collection of artefacts from LOCH ARD is significant for being one of the largest collections of artefacts from this shipwreck in Victoria. It is significant for its association with the shipwreck, which is on the Victorian Heritage Register (VHR S417). The collection is significant because of the relationship between the objects, as together they have a high potential to interpret the story of the LOCH ARD. The LOCH ARD collection is archaeologically significant as the remains of a large international passenger and cargo ship. The LOCH ARD collection is historically significant for representing aspects of Victoria’s shipping history and its potential to interpret sub-theme 1.5 of Victoria’s Framework of Historical Themes (living with natural processes). The collection is also historically significant for its association with the LOCH ARD, which was one of the worst and best-known shipwrecks in Victoria’s history.A square Minton floor tile with a black and beige pattern against a white base. This encaustic floor tile was recovered from the shipwreck of the LOCH ARD. On the back, or base, of the tile is inscribed the number “46” and the letters “Minton & Co Patent Stoke upon Trent”.flagstaff hill, warrnambool, shipwrecked coast, flagstaff hill maritime museum, maritime museum, shipwreck coast, flagstaff hill maritime village, great ocean road, loch line, loch ard, mutton bird island, loch ard gorge, minton floor tile, encaustic tile, melbourne international exhibition, floor tile -
 Flagstaff Hill Maritime Museum and Village
Tool - Stretching Hook
... sought after in colonial Australia. Their trade allowed them ...Hand forged metal tool, possibly a sailmaker's hook with the hook broken. It may be a fire iron. The twisted metal is a skill learned by a blacksmith.The item is a handmade tool, an example of the work of a blacksmith. Smiths were sought after in colonial Australia. Their trade allowed them to custom make work for the different industries necessary for survival in a new land.Sailmaker's stretching tool; long thin metal rod bent in half, with centre forming a handle or loop, and long ends twisted together to form a stem. The loose ends are formed together but appear broken.warrnambool, shipwreck coast, flagstaff hill, flagstaff hill maritime museum, flagstaff hill maritime village, tool, sailmaker's tool, fire iron, blacksmith, twisted rod, twisted wire, sailmaker's hook -
 Flagstaff Hill Maritime Museum and Village
Weapon - Cannon, 1866
In the years following the Crimean War (1854-1857J) there was a great concern in the Colony that Imperial Russia would attempt an invasion. Coastal defences in the colony of Victoria were greatly strengthened by the Government as a result. Warrnambool was originally protected by cannons at Cannon Hill, approximately 1 kilometer west of the Flagstaff Hill Fortifications. These cannons included two 1866 guns, both 80 Pound Rifled Muzzle Loaders (RML) purchased by Victoria’s Colonial Government. They were part of a shipment of 26 such guns sent from England in December 1866. They are registered as No. 23 (80cwt-2qr-0lbs) - Gun 1, and No.13 (81cwt-1qr-12lbs) - Gun 2. They were cast at the Royal Gun Factory, Woolwich Arsenal, in 1866 and have a 6.3 inch bore. Both barrels carry the Royal Cypher of Queen Victoria, Insignia of the Royal Engineers, within the Garter and Motto surmounted by the Crown, with the Royal Cypher of Queen Victoria within the Garter (letters in centre “VR”, motto “HONI SOIT QUI MAL Y PENSE”, "Shame be to him who thinks evil of it."). The guns were originally supplied with wooden carriages. (The Royal Arsenal at Woolwich, England, was established eleven years after the Restoration of King Charles II. It was the principal supplier of armaments to the British and Empire Governments. At the height of its operations during World War One the factory covered 1300 acres and employed very nearly 80,000 workers. Woolwich was the Headquarters of the Royal Artillery since the raising of that Regiment in 1716. The Arsenal was closed in the late 1960’s.) These two cannons were transferred to the Warrnambool Garrison Artillery Battery Fortifications erected at Flagstaff Hill in 1887 as part of Victoria’s Coastal Defences. The original wooden carriages were subsequently replaced with the present iron garrison carriages in 1888. They are a “C” pivot. The ‘racers’ or curved track set into the floor of the gun emplacement (which enabled the guns to be traversed more quickly) are as specified for guns up to 10 inch, being of wrought iron 2.78 inches wide. A temporary third gun, now no longer on Flagstaff Hill’s site, was a 5 inch Rifled Breech Loading (BL) Armstrong gun mounted on an Elswick hydro pneumatic disappearing carriage It was faster to load and fire than the 80 pound RMLs and its arrival spelt the end of the older 80 pound guns’ useful life, apart from being used for practice sessions. The 5 inch BL gun was the main defensive weapon of the Warrnambool Battery until the Battery was downgraded in importance and the gun was recalled to Melbourne in 1910. The State of Victoria took over the ownership of the guns at the time of Australian Federation in 1901. In about 1901/1902 the Garrison Battery was converted to the Warrnambool Battery of the Australian Field Artillery (No 4 Field Battery). It was equipped with 4.7 inch naval guns mounted on field carriages. They were now a mobile unit but continued to use the Warrnambool Garrison area at Flagstaff Hill for practice. When the Fortifications were declared obsolete the two 80 Pounder RML were relocated to Cannon Hill in 1910. On the outbreak of World War One the 4.7 inch guns were recalled to Melbourne, and the Battery was disbanded. Most of the personnel probably re-enlisted in the local 4th Australian Light Horse Regiment. The two 80 Pounder RML were moved back to the Fortifications in 1973. They were both fully restored by Army First Year Apprentices at the Ordinance Factory in Bendigo in time for the centenary year of the fortifications in 1987. The guns are capable of firing 80 pound (32.3kg) armour piercing exploding shells 3.65kms out to sea. They were original manned by volunteers before a paid Garrison was established. Now the Guns are again fired by volunteers on Special Event days. Since restoration the Gun Number 1 had been fired on a regular basis but Gun Number 2 hadn’t been fired since the mid 1990’s. In April 2015 Gun Number 2 was serviced in preparation for the firing of both cannons on the ANZAC Centenary commemorations on April 25th 2015. Other guns from the original Cannon Hill location were obsolete by the time the 1887 Warrnambool Garrison Artillery Battery was built. These guns are (1) a 32 Pounder Muzzle Loading Smooth Bore (SB) cast in 1813 at the famous Carron Foundry, number 80837 and now located in the Warrnambool Botanic Gardens (2) a 68 Pounder Muzzle Loading Smooth Bore cast in 1861 at the equally august Low Moor Foundry, number 10310 and now located on the lawn area at the entrance to Flagstaff Hill Maritime Village. Both of these guns are mounted on their original wooden garrison carriages. There are only seven 32 Pounder SB made by Carron and fifteen 68 Pounder SB made at Low Moor known to exist in the State of Victoria (Conservation Management Plan for Victorian Guns and Cannon, South Western Victoria, May 2008, ref W/F/05)The Warrnambool Garrison has been added to the Victorian Heritage Register H1250 “for its intact battery and guns, a strong reminder of Victoria’s wealth and determination to protect itself from the perceived threat of invasion in the 1880’s.” The City of Warrnambool is one of several custodians of a collection of artillery pieces of heritage significance at a state, national and international level. These pieces are directly related to the defence of south-west Victoria in the 19th century. The care and preservation come under the Heritage Act 1995. Cannon. 80 Pound Rifled Muzzle Loading (RML) Gun on iron carriage and slide, installed in the Battery at Flagstaff Hill’s Fortifications. Made in 1866 at the Royal Gun Factory (R-G-F), Woolich, England. Gun Reg No 13. Flagstaff Hill Garrison Gun 2 (Gun No. 2). Insignia of the Royal Engineers, and the weight of the gun, stamped on top of the gun’s barrel. There is a brass plate on the side of the gun with the details of 1987 restoration.Stamped into the metal on top of the barrel, Insignia of the Royal Engineers; Garter and Motto “HONI SOIT QUI MAL Y PENSE”, surmounted by the Crown, with the Royal Cypher of Queen Victoria “VR” within the Garter. Also stamped on top of the gun are 2 inward pointing arrows above the weight ”81-1-12”. Brass plate “RESTORATION / BY / FIRST YEAR / APPRENTICES / ORDANANCE FACTORY / BENDIGO 1987”flagstaff hill, warrnambool, shipwrecked coast, flagstaff hill maritime museum, maritime museum, shipwreck coast, flagstaff hill maritime village, great ocean road, colonial defences, victoria’s coastal defences, warrnambool fortification, warrnambool garrison battery, warrnambool volunteer corps, ordinance, armaments, cannon hill fortifications, 4th australian light horse regiment, no 4 field battery, 80 pound cannon rifled muzzle loaders (rml), victorian colonial government, royal gun factory england, woolwich arsenal, royal cypher of queen victoria, garrison gun -
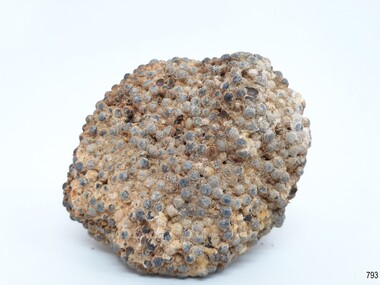
 Flagstaff Hill Maritime Museum and Village
Ceramic - Floor Tile, circa 1878
This Minton floor tile is from the wreck of the Loch Ard and is currently on display in the Great Circle Gallery at Flagstaff Hill. The iron hulled clipper ship from the Loch Line was heading for Port Phillip from London, when it ran into the cliffs of Mutton Bird Island near Port Campbell. The Loch Ard was laden with a high value cargo including luxury goods intended for display at the Melbourne International Exhibition in 1880. One notable survivor from the ship’s freight manifest was the well packed Minton porcelain peacock, a two meter high ceramic masterpiece of vivid glazed colours. (This is also on display in the Great Circle Gallery). The almost total loss of life and property from the Loch Ard registered as a shocking tragedy for the Colony of Victoria, at a time when social confidence and economic optimism were otherwise high. Wealth generated from Gold and Wool was increasingly being spent on grandiose private residences and imposing public buildings. The demand for quality furnishings and fittings was therefore strong. Among the products consigned to burgeoning colonial markets by the Milton pottery at Stoke upon Trent, were their new range of colourfully patterned but very durable floor tiles ideal for the high-traffic spaces in the large civic buildings then being constructed in Australia and America. These new floor tiles were “encaustic”, meaning that their designs and colours were encased “within” the depth of the tile. Rather than their decorative patterns being glazed onto the surface of the tile, their inlaid designs were created during the manufacturing process, as “coloured slips” (or liquid clay) were poured into a deep pre-molded casting. When fired, the resulting tile was colours-fast and design-fast. The Minton floor tile is significant for its hard-wearing yet attractive design. The shipwreck of the Loch Ard is of significance for Victoria and is registered on the Victorian Heritage Register ( S 417). Flagstaff Hill has a varied collection of artefacts from Loch Ard and its collection is significant for being one of the largest accumulations of artefacts from this notable Victorian shipwreck of which the subject items are a small part. The collections of objects give us a snapshot of how we can interpret the story of this tragic event. The collection is also archaeologically significant as it represents aspects of Victoria's shipping history that allows us to interpret Victoria's social and historical themes of the time. Through is associated with the worst and best-known shipwreck in Victoria's history. A square Minton floor tile with a dark brown, beige and white pattern. The tile has a piece broken off along one side and some chipping along the edges. This ‘encaustic’ floor tile was recovered from the shipwreck of the LOCH ARD. Branded "... MINTON&CO Patent ..."flagstaff hill, warrnambool, flagstaff hill maritime museum, shipwreck coast, flagstaff hill maritime village, great ocean road, loch line, loch ard, captain gibbs, eva carmichael, tom pearce, glenample station, mutton bird island, minton floor tile, encaustic tile, melbourne international exhibition, floor tile -
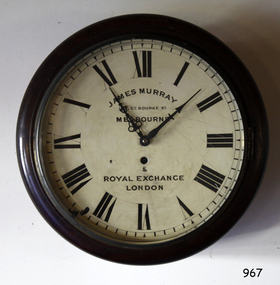 Flagstaff Hill Maritime Museum and Village
Instrument - Clock
This wall clock originated from the Bank of Australasia. The label on the base matches other items from the same donor. It was spring powered by winding the key mechanism with the clock's key through the hole in the clock face. The hinged door on the base of the clock's case allows access to the clock's working mechanism. James Murray (son of James Murray 1780-1847) was a maker of clocks and chronometers. He worked at No. 1, Royal Exchange, London and from 1861 at 107 Great Bourke Street, Melbourne. In 1854 William Kerr ordered a clock from James Murray and erected it on the Albert Street frontage of the National Model & Training School in Spring Street Melbourne. It was Melbourne's first turret clock and remained there for 80 years before it was transferred to the Public Library in Melbourne in 1934 (now Museum Victoria). The Bank of Australasia was incorporated by Royal Charter of England in March 1834. It had its Australian beginning on 14th December 1835, opening in Sydney. The Acting Superintendent of the bank at that time was David Charters McArthur. He was Superintendent from 1867-to 1876. The Melbourne branch opened on 28th August 1838 in a two-roomed brick cottage on the north side of Little Collins Street, where two huge mastiff dogs were used at night to guard the bank. The government also provided an armed military sentinel. Due to the bank's rapid growth, a new building for the Melbourne branch was opened in 1840 at 75 Collins Street West. By 1879 the bank had been upgraded to a magnificent two-storey building on the corners of Collins and Queens Streets, with the entry on Collins Street. In 1951 the Bank of Australasia amalgamated with the Union Bank to form the Australia and New Zealand Bank, now known as the ANZ. Then in 1970, the ANZ merged with both the ES&A and the London Bank of Australia to form the ANZ Banking Group Limited. The ANZ Banking Group Ltd kindly donated a variety of historic items from the Bank of Australasia. BANK of AUSTRALASIA, WARRNAMBOOL – In 1854 Warrnambool had two banks, the Union Bank and the Bank of Australasia. Later, completely different bank businesses opened; in 1867 the National Bank of Australasia, then in 1875 the Colonial Bank of Australasia. The original Warrnambool branch of the Bank of Australasia was established in July 1854, and operated from a leased cottage on Merri Street, close to Liebig Street. The bank next bought a stone building previously erected by drapers Cramond & Dickson on the corner of Timor and Gibson Streets. Samuel Hannaford was a teller and then Manager at the Warrnambool branch from 1855 to 1856 and the Warrnambool Council chose that bank for its dealings during 1856-57. In 1859 Roberts & Co. was awarded the contract to build the new Bank of Australasia branch for the sum of £3,000. The land was on a sand hill on the northeast corner of Timor and Kepler Streets and had been bought in 1855 from investor James Cust. The new building opened on May 21, 1860. The bank continued to operate there until 1951 when it merged with the Union Bank to form the ANZ Bank, which continued operating from its Liebig Street building. Warrnambool City Council purchased the former Bank of Australasia building in 1971 and renovated it, then on 3rd December 1973 it was officially opened as the Art Gallery by Cr. Harold Stephenson and Gallery Director John Welsh. The Gallery transferred to the purpose-built building in Liebig Street in 1986 and the old bank building is now the Gallery club. Staff at the Bank of Australasia in Warrnambool included the following men but others were also involved: Samuel Hannaford, Teller then Manager from 1855-1856; W H Palmer, Manager from January 1857 until November 1869 when the Teller Basil Spence was promoted to Manager; H B Chomley, Manager from April 1873 and still there in 1886; A Butt, Manager in 1895-1904; J R McCleary Accountant and Acting Manager for 12 months, until 1900; A Kirk, Manager 1904; J Moore, staff until his transfer to Bendigo in December 1908; J S Bath was Manager until 1915; C C Cox, Manager until April 1923; Richard C Stanley, Manager 1923 to April 1928. The clock has significance through its association with the Bank of Australasia. The early Australian bank was established in 1834 by Royal Charter and opened in Sydney, Australia, in Sydney in 1835. The bank had many Australian offices in November 1877, particularly on the east and south coasts. Victoria had 45 percent of all Offices. The clock is significant for its connection with the quality clockmaker James Murray, originally from Royal Exchange London with a branch that opened in Melbourne in 1861. James Murray is renown for making the first turret clock to be installed in Melbourne. The clock is locally significant for its association with the Warrnambool Bank of Australasia, which was established in 1854. It was Warrnambool Council’s first bank. The bank continued to operate until the organisation's merger in 1951 when it became the ANZ Bank Group today. The Bank was an integral part of the growth of local commerce and the community.Wall clock with a round face behind glass in a wooden case. The painted brass face has Roman numerals, two decorative hands, divisions for minutes and a keyhole. The curved base of the case has a hinged access door with a keyhole and adhesive label. The back of the clock's case has metal mounting brackets. Inscriptions on the rectangular white label. Made by James Murray, Melbourne.Face: "JAMES MURRAY / - GT. BOURKE ST. / MELBOURNE / & / ROYAL EXCHANGE / LONEON" Label: "A M / 40"flagstaff hill, warrnambool, shipwrecked coast, flagstaff hill maritime museum, maritime museum, shipwreck coast, flagstaff hill maritime village, great ocean road, bank of australasia, boa, union bank, australia & new zealand bank, anz bank, james murray, clock, wall clock, great bourke street melbourne, royal exchange london, william kerr, turret clock, old model school, national model & training school, access door, winding key -
 Flagstaff Hill Maritime Museum and Village
Plaque - Insignia, Bank of Australasia, 16-10-1980
This plaque displays the Bank of Australia's Coat of Arms and is significant because is ts the symbol printed on the Bank Notes of the Bank of Australasia. The bank of Australasia was incorporated by Royal Charter of England in March 1834. It had its Australian beginning on 14th December 1835, opening in Sydney. The Acting Superintendent of the bank at that time was David Charters McArthur. He was Superintendent from 1867-to 1876. The Melbourne branch opened on 28th August 1838 in a two-roomed brick cottage on the north side of Little Collins Street, where two huge mastiff dogs were used at night to guard the bank. The government also provided an armed military sentinel. Due to the bank's rapid growth, a new building for the Melbourne branch was opened in 1840 at 75 Collins Street West. By 1879 the bank had been upgraded to a magnificent two-storey building on the corners of Collins and Queens Streets, with the entry on Collins Street. In 1951 the Bank of Australasia amalgamated with the Union Bank to form the Australia and New Zealand Bank, now known as the ANZ. Then in 1970, the ANZ merged with both the ES&A and the London Bank of Australia to form the ANZ Banking Group Limited. The ANZ Banking Group Ltd kindly donated a variety of historic items from the Bank of Australasia. BANK of AUSTRALASIA, WARRNAMBOOL – In 1854 Warrnambool had two banks, the Union Bank and the Bank of Australasia. Later, completely different bank businesses opened; in 1867 the National Bank of Australasia, then in 1875 the Colonial Bank of Australasia. The original Warrnambool branch of the Bank of Australasia was established in July 1854, and operated from a leased cottage on Merri Street, close to Liebig Street. The bank next bought a stone building previously erected by drapers Cramond & Dickson on the corner of Timor and Gibson Streets. Samuel Hannaford was a teller and then Manager at the Warrnambool branch from 1855 to 1856 and the Warrnambool Council chose that bank for its dealings during 1856-57. In 1859 Roberts & Co. was awarded the contract to build the new Bank of Australasia branch for the sum of £3,000; the firm built the Warrnambool Post Office in 1856 and purchased land in Timor Street in 1858. The land was on a sand hill on the northeast corner of Timor and Kepler Streets and had been bought in 1855 from investor James Cust. The new building opened on May 21, 1860. The bank continued to operate there until 1951 when it merged with the Union Bank to form the ANZ Bank, which continued operating from its Liebig Street building. Warrnambool City Council purchased the former Bank of Australasia building in 1971 and renovated it, then on 3rd December 1973 it was officially opened as the Art Gallery by Cr. Harold Stephenson and Gallery Director John Welsh. The Gallery transferred to the purpose-built building in Liebig Street in 1986 and the old bank building is now the Gallery club. Staff at the Bank of Australasia in Warrnambool included the following men but others were also involved: Samuel Hannaford, Teller then Manager from 1855-1856; Hawkins, Manager in 1856, W H Palmer, Manager from January 1857 until November 1869 when the Teller Basil Spence was promoted to Manager; H B Chomley, Manager from April 1873 and still there in 1886; A Butt, Manager in 1895-1904; J R McCleary Accountant and Acting Manager for 12 months, until 1900; A Kirk, Manager 1904; J Moore, staff until his transfer to Bendigo in December 1908; J S Bath was Manager until 1915; C C Cox, Manager until April 1923; Richard C Stanley, Manager 1923 to April 1928. The plaque with the insignia has significance through its association with the Bank of Australasia. The early Australian bank was established in 1834 by Royal Charter and opened in Sydney, Australia, in Sydney in 1835. The bank had many Australian offices in November 1877, particularly on the east and south coasts. Victoria had 45 per cent of all Offices. The plaque is locally significant for its association with the Warrnambool Bank of Australasia, which was established in 1854. It was Warrnambool Council’s first bank. The bank continued to operate until the organisation's merger in 1951 when it became the ANZ Bank Group today. The Bank was an integral part of the growth of local commerce and the community.Insignia of the Bank of Australasia. Cast metal coat of arms within a gold, shield-shaped border, painted gold and red, with blue, black and white details. Decals in each corner; upper left and lower right have a white sheep suspended by a blue ribbon, upper right and lower left have a 3-masted, square-rigged sailing ship with a black hull and red flags flying on each mast, sailing on waves with storm clouds in the sky. Between the emblems are gold stars.Decals; ships, sheep, starsflagstaff hill, warrnambool, shipwrecked coast, flagstaff hill maritime museum, maritime museum, shipwreck coast, flagstaff hill maritime village, great ocean road, bank of australasia, boa, union bank, australia & new zealand bank, anz bank, david charters mcarthur, d c mcarthur, currency, banknote, commerce, banking, heraldic shield, insignia, samuel hannaford -
 Flagstaff Hill Maritime Museum and Village
Photograph - Portrait, David Charles McArthur, Superintendent, Bank of Australasia 1867-1876
The subject of this photograph, David Charteris McArthur was the founding manager of the Bank of Australasia in Port Phillip (Melbourne). McArthur was born in 1808 in Gloucester, England, and educated in Scotland. He worked for an insurance firm in Edinburgh where in 1835 he married Caroline nee Wright. McArthur and his family party sailed from the U.K. to arrive in Sydney in October 1835, where he joined the Bank of Australasia when it opened in Sydney in December. McArthur sailed to Melbourne in August 1838 with 3000 pounds in coins, protected by armed guards and two bulldogs, to open the Melbourne branch of the Bank of Australasia. The branch grew quickly, servicing both private and government customers. He opened many branches in the goldfields during the1850’s. In 1862 he was appointed as general inspector of branches. He spent time with the bank in New Zealand. On his return to Melbourne, at age 57, he was put in charge of the entire bank. McArthur lived in the hills of Heidelburg, Melbourne. He was the first chairman of Associated Banks and was advisor to politicians and merchants. He was retired in October 1876 by the London directors and given a free trip to London, an annuity and a seat on the bank’s Advisory Board. McArthur was active in the community, being a member of the Mechanics’ Institute, on the committee that advised Governor Hotham on the Colony’s finances, chairman of the Heidelburg Road Board, one of the original trustees of the Library of Victoria in 1853 and president of trustees of the Public Library, Museums and National Gallery of Victoria in 1880-83. He was also on many other community organisations. He died in his home “Charterisville” in East Ivanhoe in 1887. He and Caroline had no children. The Melbourne branch of Australia and New Zealand Bank has a portrait of McArthur in its boardroom. St John's Church, Heidelberg, commemorates him with a stained-glass window entitled 'King David'. The McArthur Gallery in the National Gallery of Victoria is also named after him. (David's brother, Donald, moved from Sydney to Melbourne in 1836 with the first government survey team.) ABOUT THE BANK OF AUSTRALASIA In 1836 the Bank of Australasia was established in London by Royal Charter. In 1951 the bank merged with the Union Bank of Australia, to form ANZ Bank Limited. In 1970 it merged with the English, Scottish and Australian Bank to become Australia and New Zealand Banking Group Limited. Since that time the ANZ has acquired other banks and introduced Internet banking and mobile banking. BANK OF AUSTRALASIA IN WARRNAMBOOL The Bank of Australasia first opened in Warrnambool in July 1854 in a building on Merri Street. The manager was Mr Samuel Hannaford. The bank then purchased and moved to a stone building on the corner of Timor and Gibson Streets, previously owned by Cramond and Dickson and almost opposite the Examiner’s office. In January 1957 Mr W.H. Palmer became the new manager and was there until November 1869. The bank then built its own building on the corner of Timor and Kepler Streets in 1859. Mr Basil Spence, the teller, was appointed acting manager in 1869 and Mr H.B. Chomley was the next appointed manager, in April 1873 and was still manager in 1886. The municipality of Warrnambool first banked with the Bank of Australasia from 1856 to April 1857. David Charteris McArthur was the founding manager of the Bank of Australasia. This photograph of him represents the beginnings of Warrnambool's commercial history, with the municipality using the Bank of Australasia as its bank from 1856-April 1857.Photograph; portrait of David Charteris McArthur. Heavily retouched black and white print in plain brown varnished frame, behind glass, with plaque on lower edge and inscription lower left corner.Lower left corner "A-H 1-9". Engraved on plaque "DAVID CHARTERS MCARTHUR \ SUPERINTENDENT \ BANK OF AUSTRALASIA \ 1867-1876"flagstaff hill, warrnambool, shipwrecked-coast, flagstaff-hill, flagstaff-hill-maritime-museum, maritime-museum, shipwreck-coast, flagstaff-hill-maritime-village, bank of australasia, david charteris mcarthur, superintendent bank of australasia, colonial commerce, manager bank of australasia melbourne, colonial bank, warrnambool bank of australasia, shipwrecked coast, flagstaff hill maritime museum, maritime museum, shipwreck coast, flagstaff hill maritime village, great ocean road, boa, union bank, australia & new zealand bank, anz bank, david charters mcarthur, d c mcarthur -
 Flagstaff Hill Maritime Museum and Village
Plaque - Insignia, Bank of Australasia, 19th Century
... in Colonial Warrnambool and throughout Australia. Flagstaff Hill ...This decorative plaque displays the insignia of the Bank of Australasia, which was incorporated by the Royal Charter of England in March 1834. The bank began in Australia on 14th December 1835, opening in Sydney. The Acting Superintendent of the bank at that time was David Charters McArthur. He was Superintendent from 1867-to 1876. The Melbourne branch opened on 28th August 1838 in a two-roomed brick cottage on the north side of Little Collins Street, where two huge mastiff dogs were used at night to guard the bank. The government also provided an armed military sentinel. Due to the bank's rapid growth, a new building for the Melbourne branch was opened in 1840 at 75 Collins Street West. By 1879 the bank had been upgraded to a magnificent two-storey building on the corners of Collins and Queens Streets, with the entry on Collins Street. In 1951 the Bank of Australasia amalgamated with the Union Bank to form the Australia and New Zealand Bank, now known as the ANZ. Then in 1970, the ANZ merged with both the ES&A and the London Bank of Australia to form the ANZ Banking Group Limited. The ANZ Banking Group Ltd kindly donated a variety of historic items from the Bank of Australasia. BANK of AUSTRALASIA, WARRNAMBOOL – In 1854 Warrnambool had two banks, the Union Bank and the Bank of Australasia. Later, completely different bank businesses opened; in 1867 the National Bank of Australasia, then in 1875 the Colonial Bank of Australasia. The original Warrnambool branch of the Bank of Australasia was established in July 1854, and operated from a leased cottage on Merri Street, close to Liebig Street. The bank later bought a stone building previously erected by drapers Cramond & Dickson on the corner of Timor and Gibson Streets. Samuel Hannaford was a teller and then Manager at the Warrnambool branch from 1855 to 1856 and the Warrnambool Council chose that bank for its dealings during 1856-57. In 1859 Roberts & Co. was awarded the contract to build the new Bank of Australasia branch for the sum of £3,000. The land was on a sand hill on the northeast corner of Timor and Kepler Streets and had been bought in 1855 from investor James Cust. The new building opened on May 21, 1860. The bank continued to operate there until 1951 when it merged with the Union Bank to form the ANZ Bank, which continued operating from its Liebig Street building. Warrnambool City Council purchased the former Bank of Australasia building in 1971 and renovated it, then on 3rd December 1973 it was officially opened as the Art Gallery by Cr. Harold Stephenson and Gallery Director John Welsh. The Gallery transferred to the purpose-built building in Liebig Street in 1986 and the old bank building is now the Gallery club. Staff at the Bank of Australasia in Warrnambool included the following men but others were also involved: Samuel Hannaford, Teller then Manager from 1855-1856; W H Palmer, Manager from January 1857 until November 1869 when the Teller Basil Spence was promoted to Manager; H B Chomley, Manager from April 1873 and still there in 1886; A Butt, Manager in 1895-1904; J R McCleary Accountant and Acting Manager for 12 months, until 1900; A Kirk, Manager 1904; J Moore, staff until his transfer to Bendigo in December 1908; J S Bath was Manager until 1915; C C Cox, Manager until April 1923; Richard C Stanley, Manager 1923 to April 1928. The plaque has historical significance as it belonged to the Bank of Australasia which was established in Australia in 1835 by Royal Charter. The plaque is significant for its association with the Bank of Australasia in Warrnambool, the first bank in Warrnambool, established in 1854. The bank continued to operate until its merger in 1951 when it became the ANZ Bank, which is still in operation today. The Bank was an integral part of the establishment and growth of commerce in Colonial Warrnambool and throughout Australia.Plaque with insignia on glass in a rectangular varnished wooden frame. Insignia of the Bank of Australasia has been painted onto the glass in a mirror-like fashion. Insignia depicts a heraldic shield with sheep hung up by their waists and ships in full sail. Inscription on insignia. Stamp and handwritten inscription on the rectangular label with a blue border on the reverse.Insignia: "BANK OF AUSTRALASIA INCORPORATED BY ROYAL CHARTER 1835" Label's red oval stamp with "AUSTRALIA AND NEW ZEALAND BANK UNITED ARCHIVES" Label's handwritten black letters "AM1" flagstaff hill, warrnambool, shipwrecked coast, flagstaff hill maritime museum, maritime museum, shipwreck coast, flagstaff hill maritime village, great ocean road, commerce, banking, plaque, insignia, bank of australasia, insignia on glass, union bank, australia & new zealand bank, anz bank, david charters mcarthur, d c mcarthur, sydney, new south wales, currency, banknote, legal tender