Showing 8656 items matching "g-howard"
-
 Melbourne Legacy
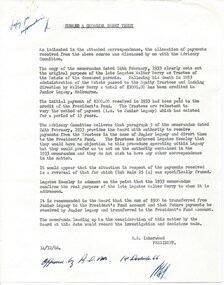
Document, Presidents' Fund Origin - Howard and Georgina Berry Trust, 1966-1981
The Presidents Fund was created in 1932 by a donation from Legatee Walter W Berry from his late father's estate "to help temporarily embarrassed Melbourne Legatees" towards the end of The Great Depression. The aim of the fund was the give the President a way to help needy cases with discretion and without having to gain approval from committees. In many cases the money was repaid by the recipient. This document is dated 1966 written by President R S Isherwood, it outlines the fund started in 1933 with an initial payment of $100 (which would have been £50 at that time). Legatee Berry passed away in 1933 and his estate passed to Equity Trustees who continued to make annual payments to Legacy. The other documents are copies of a letter from 1933 outlining the intention of the trust and a letter from 1966 to record details of arrangements wth Equity Trustees. This document was in a folder labelled President's Fund Origin and Authorisation with many other documents that included correspondence, receipts of donations and material about when money was given to help appropriate cases. The folder was marked with H40 which is part of an early archive project from the late 1960s and early 1970s.A record of the President's fund which was a fund that allowed the President to help fellow legatees with discretion.White file paper x 5 pages with black type outlining the origin of the President's Fund with copies of past correspondence to support. Handwritten in blue ink on top left 'Copy for Information' and on base of first page 'Approved by BOM 14 December 66'.financial help, presidents fund -
 Moorabbin Air Museum
Booklet - THE HOWARD HUGHES FLYING BOAT, Milton L. Schwartz et al, 1983
-
Lakes Entrance Historical Society
Book, The Letters of Henry Howard Meyrick 1840-1847
Gippsland Estates 1882 Gippsland Mercury -
 Mission to Seafarers Victoria
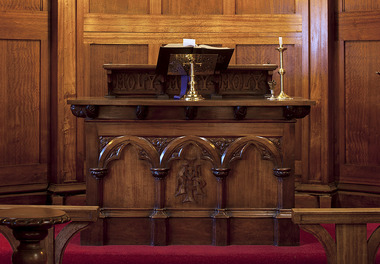
Furniture - Altar, Rodney Howard Alsop, 1907
Along with the pulpit, this Altar was designed by architect Rodney Howard Alsop (1881-1932) (Annual report 1908). It was originally made for the Siddeley Street Institute, which was built in 1907 on a block of land leased from the Melbourne Harbour Trust and donated by Mrs Amelia Shuter (nee Lord) (see Annual Report 1907). The altar is photographed in an early picture of the Siddeley Mission in a room used as chapel before the chapel built in 1909. Although a 21 year lease for the site had been granted, a notice was delivered to the Mission to quit the site in 1912. In 1915, the present site was agreed on. The Altar sits within the Chapel of Saint Peter, which belongs to the State Heritage listed (H1496) Mission to Seafarers Victoria complex. This complex was designed by Walter Richmond Butler in 1916, and officially opened on 11 September 1917. On the right hand side of the altar, is a brass plaque in memory of Charles Shuter, a colonist and police magistrate who died in 1902. The plaque was made in 1907.The Altar is significant because it is located within the Memorial Chapel of Saint Peter, forming part of the State Heritage listed Mission to Seafarers Victoria complex. It is of religious significance in catering for all denominations and the spiritual needs of visiting seafarers.The Altar has a shelf above and three panels along the front, with carved decoration and lettering. Altar bears a plaque that reads "To the Glory of God - In memory of Charles Shuter, of Melbourne, Police Magistrate, Given by his Wife, December 13th 1907". Carved letters "MTS" in centre of three panels along front of Altar, and "HOLY, HOLY, HOLY" in three panels below shelf on top of Altar.altar, mission, seafarers, seamen, melbourne, victoria, charles shuter, siddeley street institute, chapel, australian timber, walter richmond butler, australian maritime history, rodney howard alsop (1881-1932), saint peter chapel, communion table, amelia shuter nee lord, heritage listed, gifts-1917 -
 Orbost & District Historical Society
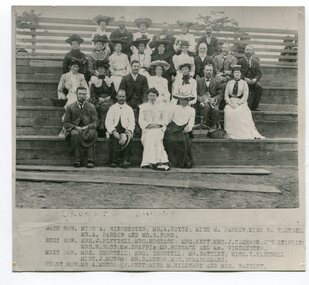
black and white photograph, Howard D. Bulmer, C1905
This photograph was taken at a combined denominational Sunday School picnic in 1905. The group was at the Orbost Show. Back Row: Miss A. winchester; Mr A. Royce; Miss M. Pardew; Miss D. Pleydell; Mr a. Pardew; Mr G, Ford Next Row: Mrs J. Pleydell; Mrs Hossack; Mrs Kant; Mrs J. Cameron; Mrs Stirling; Mrs H. Ross; Mrs Draffin; Mr Hossack; Mr Winchester Next Row; Mrs Shortell; Mrs Shortell; Mr Battley; Miss C. Pleydell; Miss J. Munro; Mr D. Munro; Mrs Scharlemann Front Row: Mr A. Munro; Mr Kent; Miss M. Hildyard; Mrs BattleyFor many years the people of Orbost enjoyed the fellowship of the church and the children, in particular, were socially and spiritually involved. This item is reminiscent of that time.A black / white photograph of a group of ladies and gentlemen sitting outside on tiered seats. The ladies are wearing hats and the men , in suits, are holding their hats. The photograph is on a cream buff card.on front - list of namesreligion sunday-schools churches-orbost orbost-show-1905 -
 Flagstaff Hill Maritime Museum and Village
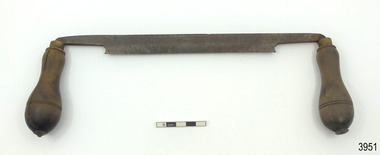
Tool - Draw knife, C Johnson (Christopher Johnson), 1855-1879
A draw knife is a hand tool that has a long straight blade between two handles. As implied by its name. it is drawn like a knife across the wood. It is used to prepare the timber for the next step of the process, removing loose wood and bark and giving a start to making the wood into a round or cylindrical shape. Then a finer smoother finish is given with a spokeshave, which has a shorter, curved blade. A draw knife could be used for the wooden spokes for cart, wagon and carriage wheels as well as for ladder staves and ship wheels. Features of a good draw knife include tight handles, a blade with plenty of metal to it and a blade length of 20 to 24 centimetres. This draw knife was likely made at least 150 years ago by C Johnson of Sheffield, who used the Trade Mark “C.J.” within a flag. Christopher Johnson began work as a cutler, making knives, pocket knives and tableware in his works at Howard Street in Sheffield. In the book ‘Hand-Saw Makers of Britain by Schaeffer and McConnel, Johnson is listed in 1855 as a saw maker. A later reference has the business name of Johnson & Company, Sheffield in 1879-1882. Australia was one of the company’s markets. The company continued until its closure in 1955.This draw knife is significant for being made in Sheffield, a location famous for steel and silver manufacturers. It is significant because of its age, being made no later than 1879, which is the time period of our maritime Village. It is a tool most suitable for the blacksmith's or a ship' smith's workshop for making spokes for the wheels of wagons and carts, and for making ship's wheels.. It is also significant for being made by C Johnson, who was well known for his good workmanship. Draw knife; flat cast steel fixed blade with rotating wooden handles each end. Round bulbous handles have two parallel scored lines around the end furthest from the blade and a brass collar between the handle and blade. A logo and inscription are cast into the centre front of the blade. Made by C Johnson. of Sheffield.Cast into steel blade: Sideways Image “C.J.” within {flag}, “JOHNSON / CAST STEEL”flagstaff hill, warrnambool, maritime village, maritime museum, shipwreck coast, great ocean road, spokes, wagon maker, blacksmith, cart maker, cart wheel maker, blacksmith tool, wagon wheel, c johnson, sheffield, wheelright, craftsman, woodwork, carriage wheel, ship wheels, shipwright, wooden spokes, ladder staves, draw knife -
 Melbourne Tram Museum
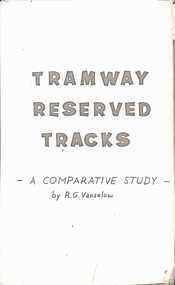
Document - Report, Bob Vanselow, "Tramway Reserved Tracks - A comparative study by R. G. Vanselow", c1969
Report or Thesis - 49 foolscap sheets photocopied onto heat sensitive paper titled "Tramway Reserved Tracks - A comparative study by R. G. Vanselow" prepared most likely for his Hons at the University of Melbourne c1969. Has a table of contents. Gives background, Literature survey, description of theoretical analysis, experimental arrangements and methods, results, discussion, conclusions and references. Pages 46 to 62, 64 to 66 missing. Document scanned into three parts. Bob passed away 18/2/2019. He spent some 10 years with the MMTB Civil Engineering.trams, tramways, trackwork, reserved track, reports, mmtb, melbourne university -
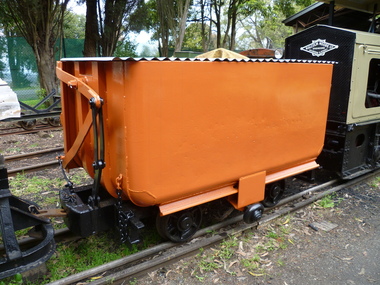 Puffing Billy Railway
Side Tipping Wagon - W. G. Allen & Sons (Tipton) Ltd
Built by W. G. Allen & Sons (Tipton) Ltd., Tipton, Staffordshire, England. This vehicle was used on the construction of dams, etc., and the Jindivick tunnel at Tarago in Gippsland for the state Rivers & Water Supply Commission of Victoria. The small wheel located on the side ran up a suitably located ramp automatically tipping the hopper and emptying the contents. Historic - Industrial Narrow Gauge Railway - side tipping wagon used by the State Rivers & Water Supply Commission of Victoria - Jindivick tunnel at Tarago, Victoria, AustraliaSide Tipping Wagon made of Iron, steel and wrought ironpuffing billy railway, pbr, side tipping wagon - w. g. allen & sons (tipton) ltd, puffing billy, side tipping wagon, w. g. allen & sons (tipton) ltd, jindivick tunnel, state rivers & water supply commission of victoria -
 Phillip Island and District Historical Society Inc.
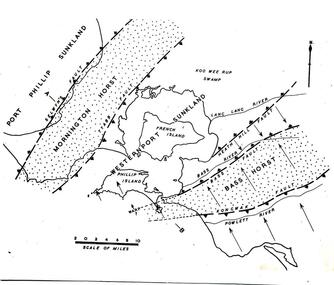
Sketch
One of a collection of over 400 sketches & photographs in an album commenced in 1960 and presented to the Phillip Island & Westernport Historical Society by the Shire of Phillip IslandSketch Map of Westernport region and environs showing physiographical faults and warps. Drawn by Dr G Bakerlocal history, illustrations, pen & ink, westernport region, black & white sketch, physiography, dr g baker, e s hill d.sc, john jenner, bryant west -
 Flagstaff Hill Maritime Museum and Village
Domestic object - Bowl, J & G Meakin, Late 19th or early 20th Century
The Process of Making Pottery Decorating, Firing, Glazing, Making, Technical There is a rhythm and flow to clay. It can’t be done all at once! Even the making process! It can take weeks to get everything done, especially if you can only work on your pottery once a week! Even though we have three hour classes, it’s often just not enough time! Here is an overview of some of the processes so you have a bit more grasp on some of the technical stuff! Step One – Design There are SO many ideas out there for making stuff in clay! From delicate porcelain jewellery, through to heavy sculptural work and everything in between. Deciding your direction is sometimes not that easy – when you first start, try everything, you will naturally gravitate to the style that you enjoy! The options and variations are endless and can get a wee bit overwhelming too! Check in with me before you start to ensure your ideas will work, what order you might do things, how you could achieve the look you are seeking and any other technical data required! Step Two – Making Clay is thixotropic. This means that as you work with it, the clay first gets sloppier and wetter, before is begins to dry in the atmosphere. For most things, you simply can’t do all parts of the project at once. An example of work order might look like: Get last weeks work out from the shelves Prepare clay for today’s work – roll your clay, prepare balls for throwing, make the first stage of a pinch pot) Clean up last week’s work and put it on the shelf for bisque firing Check that you have any glazing to do – and do enough of it that you will have time to finish your main project Do the next step of your next project – there might be a further step that can’t be complete immediately, in that case, wrap your work well and put onto the shelves. Letting your work rest for a while can really help keep your work clean and professional looking. Many things require bagging under plastic to keep it ready for work the next week – put your name on the outside of the bag so you can find your work easily. We have stickers and markers. Consider how you want to decorate your work – coloured slip can be applied at a fairly wet stage (remembering that it will make your work even wetter!). Trying to apply slip to dry clay won’t work! If you want to do sgraffito – you will need to keep the work leather hard (a state of dryness where you can still work the clay with a little effort and a little water and care). Step Three – Drying Most of the time your work can go into the rack uncovered to let it dry out for the following week. If you want to continue forming or shaping you will need to double bag your work – put your work on a suitable sized bat and put the bat in a bag so the base of the bag is under the bat, then put another bag over the top of the work and tuck the top of the bag under the bat. If you want to trim (or turn) your thrown work the following week, it should also be double bagged. If your work is large, delicate, or of uneven thicknesses, you should lightly cover your work for drying. When considering the drying process, bare in mind the weather, humidity and wind! The hotter and dryer, the faster things dry and work can dry unevenly in the shelves – this can lead to cracking – another time to lightly cover your work for drying. Step Four – Trimming and Cleaning Up Your work is dry! It is called greenware now and it is at it’s most fragile! Handle everything with two hands. I often refer to soft hands – keep everything gentle and with your fingers spread as much as possible. Try to not pick up things like plates too much, and always with both hands! Before your work can be bisque fired it should be “cleaned up”. You work won’t go into the kiln if it has sharp edges – when glazed, sharp edges turn into razor blades! Use a piece of fly wire to rub the work all over – this will scratch a little so be light handed. Use a knife or metal kidney to scrape any areas that require a bit more dynamic treatment than the fly wire offers! Finally, a very light wipe over with a slightly damp sponge can help soften and soothe all of your edges and dags! Trimming thrown work: If you are planning to trim (or turn) your thrown work (and you should be), make sure you bag it well – your work should be leather hard to almost dry for easiest trimming. Use this step to finish the work completely – use a metal kidney to polish the surface, or a slightly damp sponge to give a freshly thrown look. Wipe the sponge around the rim after trimming, and check the inside of the pot for dags! Trimming slip cast work: Usually I will trim the rims of your work on the wheel the following day to make that stage easier, however you will still need to check your work for lumps and bumps. Last but not least – check that your name is still clearly on the bottom of your work. Step Five – Bisque Firing When the work is completely dry it can go into the bisque kiln. The bisque kiln is fired to 1000°C. This process burns off the water in the clay as well as some of the chemically bound water. The structure of the clay is not altered that much at this temperature. Inside the bisque kiln, the work is stacked a little, small bowl inside a larger bowl and onto a heavy plate. Smaller items like decorations or drink coasters might get stacked several high. Consideration is paid to the weight of the stack and shape of the work. A bisque kiln can fire about one and a half times the amount of work that the glaze kiln can fire. The firing takes about 10 hours to complete the cycle and about two days to cool down. Once it has been emptied the work is placed in the glaze room ready for you to decorate! Step Six – Glazing Decorating your work with colour can be a lot of fun – and time consuming! There are three main options for surface treatment at this stage: Oxide Washes Underglazes Glazes Washes and underglazes do not “glaze” the work – It will still need a layer of glaze to fully seal the clay (washes don’t need glaze on surfaces not designed for food or liquid as they can gloss up a little on their own). Underglazes are stable colourants that turn out pretty much how they look in the jar. They can be mixed with each other to form other colours and can be used like water colours to paint onto your work. Mostly they should have a clear glaze on top to seal them. Oxides are a different species – the pink oxide (cobalt) wash turns out bright blue for instance. They don’t always need a glaze on top, and some glazes can change the colour of the wash! The glazes need no other “glaze” on top! Be careful of unknown glaze interactions – you can put any combination of glaze in a bowl or on a plate, but only a single glaze on the outside of any vertical surface! Glazes are a chemical reaction under heat. We don’t know the exact chemicals in the Mayco glazes we use. I can guess by the way they interact with each other, however, on the whole, you need to test every idea you have, and not run the test on a vertical surface! Simply put, glaze is a layer of glass like substance that bonds with the clay underneath. Clay is made of silica, alumina and water. Glaze is made of mostly silica. Silica has a melting point of 1700°C and we fire to 1240°C. The silica requires a “flux” to help it melt at the lower temperature. Fluxes can be all sorts of chemicals – a common one is calcium – calcium has a melting point of 2500°C, however, together they both melt at a much lower temperature! Colourants are metal oxides like cobalt (blue), chrome (green through black), copper (green, blue, even red!), manganese (black, purple and pink) iron (red brown), etc. Different chemicals in the glaze can have dramatic effects. for example, barium carbonate (which we don’t use) turns manganese bright pink! Other elements can turn manganese dioxide brown, blue, purple and reddish brown. Manganese dioxide is a flux in and of itself as well. So, glazes that get their black and purple colours, often interact with other glazes and RUN! Our mirror black is a good example – it mixes really well with many glazes because it fluxes them – causes them to melt faster. It will also bring out many beautiful colours in the glazes because it’s black colouring most definitely comes from manganese dioxide! Glaze chemistry is a whole subject on it’s own! We use commercial Mayco glazes on purpose – for their huge range of colour possibilities, stability, cool interactions, artistic freedom with the ability to easily brush the glazes on and ease of use. We currently have almost 50 glazes on hand! A major project is to test the interactions of all glazes with each other. That is 2,500 test tiles!!!! I’m going to make the wall behind the wheels the feature wall of pretty colours! Step Seven – Glaze (Gloss or sometimes called “Glost”) Firing Most of the time this is the final stage of making your creation (but not always!) The glaze kiln goes to 1240°C. This is called cone 6, or midrange. It is the low end of stoneware temperatures. Stoneware clays and glazes are typically fired at cone 8 – 10, that is 1260 – 1290°C. The energy requirement to go from 1240°C to 1280°C is almost a 30% more! Our clay is formulated to vitrify (mature, turn “glass-like”) at 1240°, as are our glazes. A glaze kiln take around 12 hours to reach temperature and two to three days to cool down. Sometimes a third firing process is required – this is for decoration that is added to work after the glaze firing. For example – adding precious metals and lustres. this firing temperature is usually around 600 – 800°C depending upon the techniques being used. There are many students interested in gold and silver trims – we will be doing this third type of firing soon! After firing your work will be in the student finished work shelves. Remember to pay for it before you head out the door! There is a small extra charge for using porcelain clay (it’s more than twice the price of regular clay), and for any third firing process! Once your work has been fired it can not turn back into clay for millennia – so don’t fire it if you don’t like it! Put it in the bucket for recycling. https://firebirdstudios.com.au/the-process-of-making-pottery/This bowl was made by renowned pottery company J & G Meakin of England. The firm was established in the mid-1800's. The bowl is an example of kitchenware used in the 19th century and still in use today.Bowl; white ceramic, round and tapering inwards towards base. Made by J and G Meakin England.On base, 'Ironstone China Reg SOL 391413' with symbolflagstaff hill, flagstaff hill maritime museum and village, warrnambool, maritime museum, maritime village, great ocean road, shipwreck coast, mixing bowl, food preparation, j & g meakin, pottery, stoke-on-trent, kitchen equipment, ceramic -
 Flagstaff Hill Maritime Museum and Village
Bowl, J & G Meakin
Large white ironstone china bowl. Made by J & G Meakin. Hanley England. 15' in diameter.flagstaff hill, warrnambool, shipwrecked-coast, flagstaff-hill, flagstaff-hill-maritime-museum, maritime-museum, shipwreck-coast, flagstaff-hill-maritime-village, china bowl, bowl -
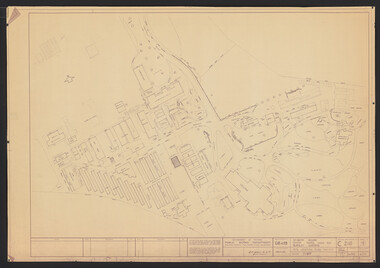 University of Melbourne, Burnley Campus Archives
Plan, M. Drake et al, Site Location Plan of Incubator Building and Random Sample Laying Test for Burnley Gardens, 1967
Plan by Public Works Dept., Melbourne. M. Drake (draughtsman), R. G. Wilson, Chief Architect.m. drake, g.r. wilson -
Port Melbourne Historical & Preservation Society
Map, G S Williams, City Engineer, City of Port Melbourne, Dec 1963
Map of City of Port Melbourne (brick areas marked in colour), 1963.G. S. Williams (City Engineer)town planning, g s williams, troedel and cooper -
Tatura Irrigation & Wartime Camps Museum
Photograph - original, G. Haire photographer, 1946
Original photograph of grades V1 and V11 Tatura state School No. 1441. Copy L0253Black and white photograph of Tatura State School Group No. 1441. Original photographon back: Photographers name "G. Haire" -
Stawell Historical Society Inc
Map, G C Birch Mining Surveyor, Magdala Cum Moonlight Co. Plan of Stawell Goldfield, c1900
Shows Sloanes & Scotchmans Coy AreaShowing underground drives. c1900G C Birch Mining Surveyor mining, gold, map -
 Kiewa Valley Historical Society
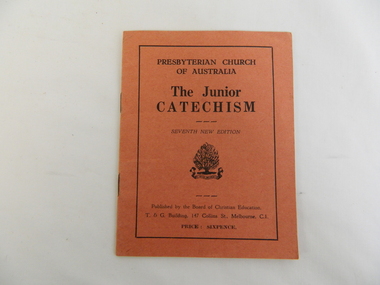
Book - Religious Education, The Junior Catechism
Catechism was taught at Sunday School by most Christian religions during the 1950s. Students attended Sunday School classes at the Kergunyah Presbyterian Church. Sunday school was held in a little 16 foot square wooden building which came from Rocky Valley after it was no longer needed there. Ewen Wallace's father initiated and organised the move. C2011 the building was knocked down because of white ants. The Presbyterian Church will be 125 years old in 2015.Historical: Religious Education: This book was used by students who attended the Sunday School classes at Kergunyah Presbyterian Church. Religion: Presbyterian Church at Kergunyah, in the Kiewa Valley, celebrates its 125th anniversary in 2015 after being handed over to the Uniting Church in the 1970s.Small, thin, orange booklet with black print on cover - for title. Also in black a tree with 'ribbon' underneath inside which are 2 Latin words. 16 pages inside thin cardboard cover. On back cover "B.C.E. Publications" Listed with price.Title and "Presbyterian Church of Australia Price: Sixpence. Seventh New Edition"religion, kergunyah, ewen wallace, catechism, presbyterian church, religious education, sunday school -
City of Moorabbin Historical Society (Operating the Box Cottage Museum)
Booklet - Cheltenham Church of Christ - Our Heritage - The History of the Cheltenham Church of Christ, by K. G. Hilbig and G. L. Daff, 1970
Cheltenham Church of Christ was opened in 1878 and is still in use today. Built on Chesterville Road, Cheltenham.Cheltenham Church of Christ was opened in 1878 and was integral to the spiritual well being and social life of the early settlers.Booklet 10 pages with typed textearly settlers, parish of moorabbin, city of moorabbin, county of bourke, shire of moorabbin, market gardeners, cheltenham, nepean highway, church of christ cheltenham, religion, chesterville road -
Moorabbin Air Museum
Manual (item) - Vickers Warwick C. Mk. 3 Aircraft Manual, Warwick C. Mk. III Aircraft Two Double Wasp Engines (S1-A4-G or 2SB-G)
-
 Inverloch Historical Society
000045 - Photograph - Luna Park - circa1932 - G N Howsam - L G Howsam
-
Moorabbin Air Museum
Booklet (Item) - Warwick C. Mk III Aircraft ,Two Double Wasp Engines (S1-A4-G Or 2SB-G)
A.P. 2068B Volume 1 -
Moorabbin Air Museum
Manual (Item) - Bell Model 47 Helicopter Maintenance and Overhaul Manual, Models 47 D-1, G, & G-2
-
 Uniting Church Archives - Synod of Victoria
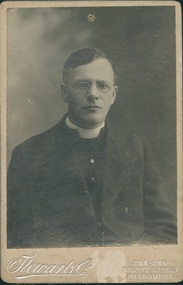
Photograph, Stewart & Co, C. 1908
G. S. Brett (unknown - 1934) was ordained in 1894, having attended college at Oberlin, Ohio (USA) and was a congregational minister in Brighton, 1900 - 1911.Matte black and white, head and shoulders studio portrait of Rev. G. S. Brett on buff card.Handwritten on back: "Rev G. S.Brett Brighton Cong."g s brett, congregational minister, congregational church brighton victoria -
 Eltham District Historical Society Inc
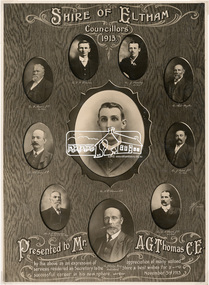
Negative - Photograph, Councillors of the Shire of Eltham in 1913. Presented to Mr A. G. Thomas C.E., Shire Secretary (centre), 1913
Sepia photograph of a portrait panel of ten councillors of the Shire of Eltham, 1913 Woodgrained Portrait panel with photos of ten Shire of Eltham Councillors 1913 presented to Mr A.G. Thomas C.E. whose photo is prominant on the panel "by the above as an expression of appreciation of many services rendered as Secretary to the Shire and best wishes for a successful career in his new sphere, November 3rd 1913.". Photographs include: Cr. W. Morris J.P. Ex Pres., Cr P.J. Downer, Cr J. Smedley, Ex-Pres., Crs R. D. Taylor, Cr. W. G. Gray J.P.. Cr. J. Fitch, J.P. Ex. Pres., Hon. E. H. Cameron, M.L.A. J.P. Ex Pres., Cr. C. H. Bath, J.P. Ex Pres and Cr. J. Darley Mealy J.P. President.This photo forms part of a collection of photographs gathered by the Shire of Eltham for their centenary project book, "Pioneers and Painters: 100 years of the Shire of Eltham" by Alan Marshall (1971). The collection of over 500 images is held in partnership between Eltham District Historical Society and Yarra Plenty Regional Library (Eltham Library) and is now formally known as 'The Shire of Eltham Pioneers Photograph Collection.' It is significant in being the first community sourced collection representing the places and people of the Shire's first one hundred years.Digital image 120 format B&W negative Printsepp, shire of eltham pioneers photograph collection, councilors, shire of eltham, a.g thomas, councillors, downer, e.h. cameron, eltham shire council, ewan hugh cameron, g.h smith, greg taylor, j smedley, w morris, w.d taylor, w.g gray -
 Mission to Seafarers Victoria
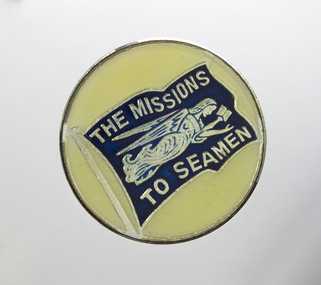
Badge, K. G. Luke, The Missions to Seamen, early to mid
The manufacturers K.G. Luke were a well known Melbourne Jeweller and manufacturer of badges buttons, silver and dec art objects for the home.Badge is visual representation of ongoing support and/or association with MTS. Round enamel badge with navy Flying Angel flag on a pale cream ( originally white?) background and "The Missions to Seamen" inscription. A pair of identical badges."K. G. LUKE MELB" stamped on backmission to seamen, enamel badges -
 Glenelg Shire Council Cultural Collection
Drawing - Drawing - "Burswood", 1890
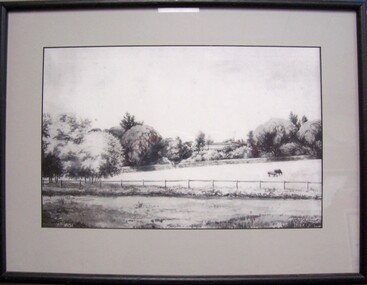
Displayed in History HousePen and ink sketch of a house partially obscured by trees. In foreground are two paddocks, with two horses grazing at centre right. Mounted in grey matt in black wooden frame, under glassFront: C G Darvall/Jan 1890 -
 Kew Historical Society Inc
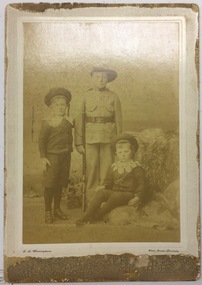
Photograph, G L Massingham, Three Boys, 1901-1910
One of a group of unprovenanced photographs donated to the Society by Betty Morgan.While its provenance is unclear, and it has suffered from fading, the photograph is a useful record of children's clothing in the first decade of the Twentieth Century. It is an example of Massingham's commercial photography at his studio in Bendigo. The clothing worn by the boys can be used to deconstruct social values in the period preceding the First World War.Faded sepia studio photograph of three unidentified boys, the oldest boy dressed in a quasi-military uniform; the two younger in berets and lace collars. The photographer is named as G.L. Massingham ( (George Leake, active 1866-1921) of View Street, Bendigo (and Geelong); active in View Street from 1901-c.1921.G. L. MASSINGHAM / VIEW STREET. BENDIGOaustralian photographers - g. l. massingham - view street - bendigo -
 Kew Historical Society Inc
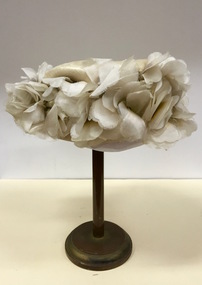
Headwear - Cream Silk Floral Hat, Erik London [C&G Kobenhaven], 'Cezanne', 1950s
Erik of London was an internationally significant milliner. He was a recognised authority on fashion, frequently quoted in the Australian press of the day. A number of his models are illustrated in Australian newspapers. It was not unusual for him to glamorise his hats with French names. A model 'Carmen' was launched in 1952.The Kew Historical Society’s fashion and design collection is comprised of costumes, hats, shoes and personal accessories. Many of these items were purchased or handmade in Victoria; some locally in Kew. The extensive hat collection comprises items dating from the 1860s to the 1970s. While most of the hats in the collection were created by milliners for women, there are a number of early and important men’s hats in the collection. The headwear collection is particularly significant in that it includes the work of notable Australian and international milliners.Ivory coloured woman’s hat bordered and almost completely covered with abstract floppy flowers of the same colour. Beside the label on the brim is the handwritten word ‘Cezanne’ which is presumably the name of the model.Label: Erik London. C & G Kobenhavenerik london, c & g kobenhaven, milliners -- london, women's clothing -- hats -
Moorabbin Air Museum
Instrument (Item) - W&G "Douglas" Combined Protractor And Parallel Rule
-
 Phillip Island and District Historical Society Inc.
Photograph
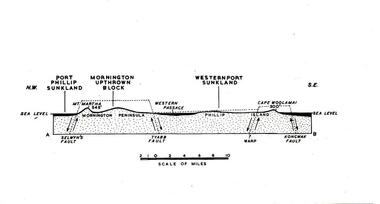
One of a collection of over 400 photographs in an album commenced in 1960 and presented to the Phillip Island & Westernport Historical Society by the Shire of Phillip IslandPhotograph of a sketch of a geological section across Mornington Peninsular Western Passage and Phillip Island. Drawn by Dr G Bakerlocal history, photography, geological fault block movements, black & white photograph, geology, phillip island, mornington peninsula, sketches, john jenner, bryant west -
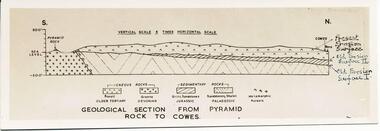 Phillip Island and District Historical Society Inc.
Photograph
One of a collection of over 400 photographs in an album commenced in 1960 and presented to the Phillip Island & Westernport Historical Society by the Shire of Phillip IslandPhotograph of a sketch of the geological section from Pyramid Rock to Cowes - drawn by Dr G Baker, CSIRO, University of Melbourne.Geological section from Pyramid Rock to Coweslocal history, photography, geological section across phillip island, black & white photograph, geography, topography, cowes, pyramid rock, sketches, dr g baker, john jenner, bryant west