Showing 878 items
matching route 2
-
 Ballarat Tramway Museum
Newspaper, The News, "Horse Drawn Public Transport", 2/10/1996 12:00:00 AM
Historical article on the routes and formation of the Ballarat Horse Tram Company, the tender process etc. written by Peter Butters of the Ballarat Historical Society. Appeared in Ballarat's "The News" on Wed. 2/10/1996. Has a photo of Horse tram No. 7 by the Lake.trams, tramways, horse trams, ballarat, ballaarat tramway company -
 Ballarat Tramway Museum
Document - Report, Tram & Bus Strategic Review Committee, "The Report of Tram & Bus Strategic Review Committee - Securing a future for Melbourne's Tram System.", May. 1992
1302.1 - A4 size, 88 page report on Melbourne's tram and bus system produced by 'Tram & Bus Strategic Review Committee' in May 1992. Report printed on white paper, with blue covers, stapled on sides. Report examines cross linking of trams routes and many other recommendations regarding services, union awards, ticketing, opportunities for expansion, reliability, revenue impacts, driver only trams, workplace reform, staffing, revenue protection and tourism opportunities. Note the report has been mis-bound with pages out of order eg 2, 1, 4, 3, 6, 5 etc. Gives a series of recommendations, few of which were implemented in reality. 1302.2 - A4 size - approx. 200 page document with blue covers - appendix to the above report. List of appendices given in 1302.1. Appendix No. 1 - Left/right turn priority at intersections 2 - draft structural efficiency proposal 3 - selection and training procedures report 4 - absenteeism report 5 - cost study of W and Z class trams 6 - Trams in Melbourne - AGB Australia Consultants 7 - Proposed tram and bus depot - South Melbourne - Detailed evaluation 8 - Depot and Route vehicle composition 9 - Options and Feasibility study of Additional W class trams in Melbourne.trams, tramways, melbourne, routes, strategic reviews, tramway systems -
 Ballarat Tramway Museum
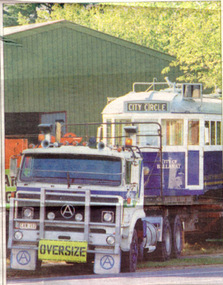
Newspaper, The Courier Ballarat, "Tram carries Ballarat message to City Circle", 24/02/1996 12:00:00 AM
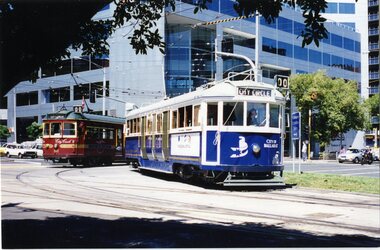
Article from the front page of The Courier, Saturday 24/2//1996 written by Ian Haberfield with photo by Herman Ruyg of BTM W4 671 leaving the depot loaded on a truck the previous day end route to Melbourne to run on the city Circle tram route. Tram has "City Circle" showing in destination box. Notes comments by Peter Hiscock about the tram itself, the BTM works, and that Alan Brown, Public Transport Minister has granted permission for the tram to run on the City Circle.trams, tramways, btm, city circle, ballarat city tramway, ballarat revival -
 Ballarat Tramway Museum
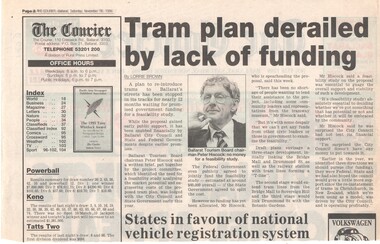
Newspaper, Lorrie Brown, "Tram plan derailed by lack of funding", 16/11/1996 12:00:00 AM
Item from the Ballarat Courier of 16/11/1996 written by Lorrie Brown quoting Peter Hiscock, chairman of the Ballarat Tourism Board that the funding for the feasibility study into the plan to re-introduce trams back to Ballarat, was still awaiting funding support from the State Government. Looks at the route outlines and the trams in Christchurch. Peter expressed surprise that the Ballarat Council had not lent its financial support. Includes a photo of Peter in a reflective mood. Item on Page 2 of the Courier.feasibility study, ballarat city tramway, ballarat revival -
 Ballarat Tramway Museum
Negative, Geoff Grant, 2/04/1955 12:00:00 AM
Negative No. 260 and colour print made by colour laser printer (stored in folder ) of Geelong No. 39 taken from the back at the Belmont route terminus by Geoff Grant on 2/4/1955 while on an Australian Electric Traction Association tour. Person by tram is John Alfred (Information from Dave Macartney). Original negative scanned at hi res 18/5/2020 and image updated.trams, tramways, geelong, a eta, belmont, tram 39 -
 Ballarat Tramway Museum
Negative - Set of 2, Geoff Grant, 25/06/1955 12:00:00 AM
Negatives No. N352 and N353 and black and white prints made by a laser printer (stored in folder ) of tram SW6's 888 travelling to Preston Depot on AETA tour (Australian Electric Traction Association) on 25/6/1955. Tram has AETA tour signs and the slogan "Electric Transport a Necessity - Protects your investment, builds your city, creates business". In route number box is letter "B". Geoff Grant's envelope notes the photos as being taken from the cabin of SW6 887. 1615.1 - In Victoria Parade - note hedges 1615.2 - in Victoria St., North Richmond, just to the west of the railway overbridge. Negative scanned hi res and imaged updated 22/5/2020.trams, tramways, melbourne, victoria st, victoria parade, aeta tour, tram sw6 888 -
 Ballarat Tramway Museum
Negative - Set of 2, Geoff Grant, 25/06/1955 12:00:00 AM
Negatives No. N354 and N355 and black and white prints made by a laser printer (stored in folder ) of tram SW6's 888 and 887 at Malvern Depot in Coldblo Road prior to travelling to Preston Depot on AETA tour (Australian Electric Traction Association) on 25/6/1955. 1616.1 - In route number box of 888 is letter "B". 1616.2 - 887 - with letter "A" in route number box and sign with slogan "Save traffic congestion, move people, not vehicles." Negative scanned hi res and imaged updated 22/5/2020.trams, tramways, melbourne, malvern depot, coldblo road, aeta tour, tram sw6 888 tram sw6 887 -
 Ballarat Tramway Museum
Ephemera - Timetable/s, State Electricity Commission of Victoria (SECV), Timetable as from 29 June 1970 - Bendigo, 1970
Two page Gestetner copy of an amended timetable for tram services in Bendigo for the SECV issued 29 June 1970. Gives times for the departure from the City and the terminus for the Eaglehawk, Quarry Hill, Golden Square and North Bendigo routes. Page 1 for Monday to Friday, page 2 for Saturday and on the bottom of page 2, details of Sunday services commencing from 2pm, until about 10.30pm. May have been the last timetable issued for Bendigo. On Gestetner foolscap sized paper, stapled in the top left corner. Headed the "Northern Electricity Supply Branch / Bendigo Tramways - Amended Timetable - 29th June, 1970" 1637.1 - 2nd copy added 22/08/04 - has two staples in top left hand corner. See pdf documents for good quality scans and history of record for details of source.bendigo, secv, timetables, tram services -
 Ballarat Tramway Museum
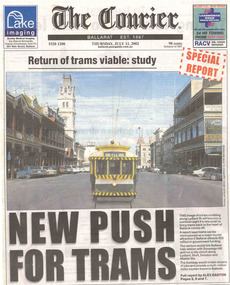
Newspaper, The Courier Ballarat, "Return of trams viable study", "New Push for Trams", "Taking tourism to the next level", "More tourists, more jobs expected", "Tram plan worthy of expected debate", 11/07/2002 12:00:00 AM
Set of three cuttings from The Courier, Ballarat dated Thursday 11/7/2002 regarding the reintroduction of trams to Ballarat. 2241.1 - Page 1 and 2 of The Courier, with page 1 titled "Return of trams viable study" and "New Push for Trams" as the commencement of a Special report showing a digitally constructed image of No. 13 in Lydiard St. North. Note the tram does not have a driver. Introduces reports by Alex Easton on pages 2, 6 and 7. On Page 2, titled "Taking tourism to the next level", has details of the Council viewpoints on the proposal, public consultation, a map of the route, and notes on the construction issues. Has a digital image of 13 crossing Sturt St. into Lydiard St. North. See images No. 1 to 3. 2241.2 - page 6 of The Courier, which joins with page 7 using the titled "More tourists, more jobs expected". Has Sections reviewing the study outcomes, benefits and a summary of the study. Page 6 has a photo of a passenger boarding No. 21, decorated as the Myers Christmas tram in Sturt St and a photo of Bridge St. in 1971 (very poor quality reproduction). See images No. 4 and 5. 2241.3 - page 7 of The Courier, has Sections detailing the history of Ballarat Trams, proposals for the City Tramway, costs, consultation, and comments from Peter Hiscock. Has a photo of Peter Hiscock and Mayor David Vendy in front of No. 13 at the BTM depot. See image No. 6. Also has a photo of Dianne Smith, Executive Director of Ballarat Tourism. On page 8, as part of The Courier's editorial Section, has comments on the proposals, titled "Tram plan worth of extended debate". Looks at the $20million cost. ballarat revival, editorial, ballarat city tramway, lydiard st. nth -
 Ballarat Tramway Museum
Slide - 35mm slide/s - set of 11, May 1979c
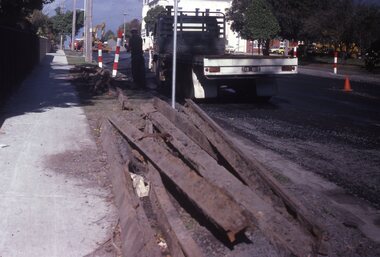
Set of eleven colour slides (Kodak) showing the removal of tram track in Geelong, c May 1979. All in Pakington St., Newtown, ex Newtown route. 2268.1 - slide 29 - look south from the north of Retreat Road. .2 - 30 - No. 276 in background, looking south .3 - 31 - City of Newtown Town Hall in background. .4 - 32 - opposite to that of No. 29. .5 - 33 - Looking south .6 - 34 - looking south with Aphrasia St. in the background. .7 - 35 - as for .2 .8 - 36 - Opposite No. 278, looking south .9 - 1 - opposite No. 276/278. .10 - 2 - ditto .11 - 3 - Outside No. 278, looking south. Bus stop still in position. See Letter to Dave O'Neil and responses.tramways, trams, geelong, track removal, pakington st, newtown -
Ballarat Tramway Museum
document - Correspondence, Electric Supply Co. of Vic (ESCo), Apr. 1929
Set of two letters between Mr. P. J. Pringle of ESCo Ballarat and Mr. D. Murdoch, General Manager of the TB Melbourne and a copy of the Victorian Government Gazette of Wed. 20/3/1929 regarding fares along the same routes that trams and buses travel. In Bendigo and Melbourne, the fare by bus was 1 penny more than the tram. 1976.1 - Victorian Government Gazette - No. 32 - 20/3/1929 - pages 1067 to 1124 - with page 1081 highlighted on the front cover in blue pencil and a ESCo date received stamp (16/4/1929) on the front cover. Page 1081 details the City of Bendigo's By- Laws and Regulations No. 58, pursuant to the Urban and Country Act of 1927, relating to Motor Omnibuses. Details the requirements of bus owners in the Bendigo district, definitions, licence fees, routes and fares, timetables over five pages. Following this item are similar regulations for the Shire of Mildura (p1086). Item 335H x 210W, consisting of four staple sections. Damaged on left hand edges, particularly around page 1081 where the two letters were pinned. (Removed at time of cataloguing). Also yellowing and damage due to silver fish along bottom edge. Printed by H.J. Green Government Printer, Melbourne. 1976.2 - Letter from Mr. P. J. Pringle (ESCo) to A. D. Murdoch Manger TB dated 16/4/1929 forwarding a copy of the Bendigo Motor Bus regulations and noted that where the buses traversed the tram routes, the fare is 1d more and that the buses have regular service schedules. Licence fee is 5/- per annum per passenger that the bus can carry. Mr. Pringle thought that this was inadequate. Also notes the cost of insurance. On ESCo letterhead - two pages white paper, has been folded into 6, pinned in the top left hand corner., damaged on the right hand edge and top left hand corner. Size 262H x 203W. 1976.3 - Carbon copy of letter from Mr. Murdoch to Mr. Pringle on pink paper, dated 20/4/1929 thanking of the advice and noting that on the Melbourne - Brighton - Caulfield route, the minimum fare where the bus traverses the same route as the tram, is 5d, while the tram fare is 4d. All corners damaged or folded, silver fish damage on right hand edge. Size - 336H x 2089W. See Reg Item No. 2260.1 and 2260.2 for the relevant Acts of Parliament On top of the pink sheet written in pencil is the file number "22/1/2" and "52/1/15".tram, trams, bus fares, bus competition, esco, mmtb, licence fees, melbourne brighton bus -
 Ballarat Tramway Museum
Ephemera - Ticket/s, State Electricity Commission of Victoria (SECV), Tourist Ticket SEC 1/, 1943, overprinted 1947
Demonstrates ticketing systems in Ballarat and in particular the use of a tourist ticket to enable people to travel around the whole of Ballarat on the trams. Yields information about the ticketting system and how surplus stocks were overprinted for future use. The same ticket stock could be used in all three of the SEC provincial tramways.Set of four SECV - Ballarat Tourist Tickets - 1/- on light weight card, light manilla colour - printed originally for the years 1944, 1945 and 1946, overprinted in red ink for 1947, 1948 and 1949. See Reg. item 499 for another example of the original ticket. Printed in black ink/ Ticket Numbers BA202587, 202590, 202591 and 202600 in body of ticket. Static number (1 - 7) on left and right indicate when validated, the route used on. Each ticket has been stamped "CANCELLED" Form No. TYE 2-17 See Reg Item 4129 for further examples of the same ticket. trams, tramways, secv, ballarat, tourist ticket, tickets -
 Ballarat Tramway Museum
Photograph - Colour Photograph/s, William. F. Scott, 5/03/1996 12:00:00 AM
Photo of 'City of Ballarat' no. 671 turning from Nicholson St. into Victoria Parade while running the City Circle route on 5-3-1996. City circle tram No. 842 in background.On rear, stamped on 'William F.Scott, 5.3.1996, 9' and a green label with '2'671, city circle, melbourne, victoria parade, nicholson st, tram 671, tram 842 -
 Ballarat Tramway Museum
Photograph - Black & White Photograph/s, Geoff Grant, 19/06/1955 12:00:00 AM
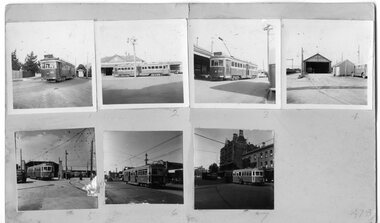
A set of seven 2 1/4" square photographs mounted onto a sheet of manila cardboard - contact prints of each negative. Numbered from left to right, top to bottom are: 478.1 - VR Tram No. 51 running on Sandringham Route - 12/55 (Negative No. 370) - see also Reg Item 3622 for the same location and tram. 478.2 -VR tram No. 50 outside Sandringham Stn - side view 12/55 (Negative No. 371) 478.3 - VR tram No. 50 outside Sandringham Stn - 3/4 view 12/55 (Negative No. 372) - see also Reg Item 3621 for a colour print of this image. 478.4 - View of Sandringham tram depot, two door short bus on right (Negative No. 373) 478.5 - M&MTB 1033, Nth Fitzroy - AETA tour - (see Reg No. 490 and item 1620.1 for negative) 478.6 - M&MTB 1033 at East Brunswick (see Reg No. 489 also and item 1620.2 for negative) 476.7 - M&MTB 1033 at Bourke St terminus, AETA tour - 7/4/1956. (See item 1620.3 for negative) . hi res scan made and image updated 23/5/2020 for negatives where held and other images rescanned at higher resolution 12/12/2020. Image btm478i is of the overall card.trams, tramways, vr, sandringham, aeta tour , tram 50. tram 51, tram 1033 -
 Ballarat Tramway Museum
Ephemera - Timetable/s, State Electricity Commission of Victoria (SECV), "Bendigo Tramways - amended Timetable", Jun. 1970
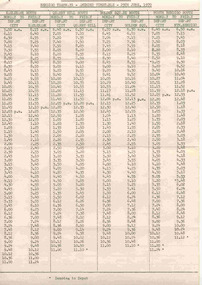
Set of Bendigo Tramway timetables. Each Two page Gestetner duplicated documents, stapled in the top left hand corner, providing weekday and weekend services for each route departing the city and the nominated route terminus. .1 - Issued 29/6/1970 - see images 1 and 2 .2 - issued 27/9/1971 - see image 3 and 4 .3 - issued 26/6/1970 - same as .1 - three copies held - three copies of SECV copies given to the BTPS at the time of closure. .4 - issued 29/6/1970 - different layout at heading and changes to the bottom of the second page - images 5 and 6. Yields information about Bendigo trams and their timetables for the various lines.Set of four SECV North Electricity Supply Branch timetables. 285.3 - each of three copies marked in ink - "BTPS No 502" in top right hand corner, with copy 1 having "408" crossed out.bendigo, secv, timetables, tram services -
 Ballarat Tramway Museum
Photograph - Black & White Photograph/s, Ian Barkla, 12/02/1966 12:00:00 AM
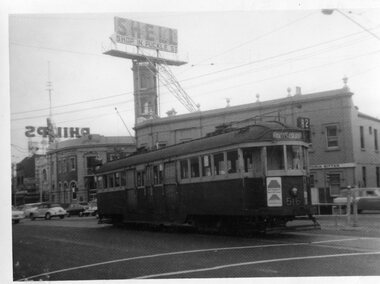
Black and white photo of W2 516 at the Moonee Ponds terminus of route 82, Moonee Ponds to Footscray. Tram has destination "Footscray", all blinds drawn and a Ramset? ad on the drivers cab dash panel. In background are the buildings at the intersection of Puckle St and Mt Alexander Road, Moonee Ponds. The hotel on the SE corner has a large ad for "SHELL" and a message underneath "Shop in Puckle St." and also in background a large ad for "Phillips".On rear in blue biro "W2 516 / 12/2/66 / Moonee Ponds Junc."trams, tramways, melbourne, moonee ponds , tram 516 -
 Ballarat Tramway Museum
Slide - 35mm slide/s, late 1960's
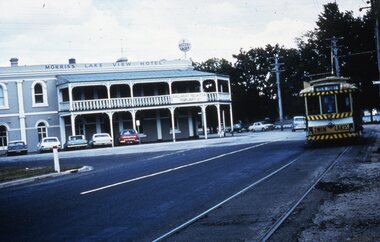
Agfa plastic mount (blue base, white cover) of a photograph of No. 14, en route to the View Point terminus in Wendouree Parade. Photo take late 1960's. Tram has destination of View Point and has a Twin Lakes sign on the front end. Has Morris's Lake View Hotel in the background. The hotel has a "Fosters Lager" symbol on the front of the building and a banner "Ballarat Regatta / February 2" banner on verandah balcony fence. The slide appears to be a copy slide, given the nature of the colour and the additional number WP403. Photographer could be Bill Pearce (WP). Slide rescanned at 3200 dpi 25-10-2020, jpg replaced, tiff file retained. This file was scanned in 2003 and may show colour changes."BAS 59 and "Tram 14" in pencil.tramways, trams, view point, wendouree parade, lake view hotel, tram 14 -
 Ballarat Tramway Museum
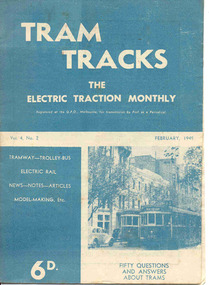
Magazine, Jack Richardson, "Tram Tracks - The Electric Traction Monthly", Feb. 1949 to August 1949
2467.1 - Vol. 4 No. 2, February 1949 of "Tram Tracks - The Electric Traction Monthly" of the Australian Electric Traction Association. Magazine consists of 16 printed pages with a 12 page supplement titled "Fifty Questions and Answers about trams in Australia". Has a single staple on the saddle. Incorporated within the magazine are articles or editorials on Tramways and Tramway Experts (Sydney and bus replacement), Interurban to St Kilda (conversion of VR St. Kilda line). General news items on Brisbane, Geelong, Launceston closure, Hobart, Bourke St routes, Perth, Adelaide, NSW, Christchurch, Overseas tramways and railways. Also has letters to the Editor, plans of a Birney tram for model makers and AETA Notes. Issue has advertisements for the Model Dockyard, ARLHS, The Hobby Shop, Barnes Tennis Centre, Fleet, Christie Model Railway Equipment of Sydney, Meadmore Model Engineering, Austral Bronze, Wattle Park, Traction Publications and Robilt "O" gauge locomotives. 2467.2 - Vol 4, No. 5 - May 1949 - 20 pages - red cover, 4th year, article by Peter Duckett with photos of Board members, "PCC Trucks here", MMTB advert for staff, news from Sydney, Newcastle, Melbourne (applications for new Chairman to replace Mr. Bell), Bendigo, Perth, Christchurch, Wellington, Wanganui, Bourke St construction work (photo of poles), Brisbane tramway history, map of CBD Melbourne, Melbourne and Sydney suburban railways, AETA News. 2467.3 - Vol 4, No. 6 - June 1949 - 16 pages - green pages, tramways and private cats, news from Sydney, Newcastle, Melbourne, Launceston, Hobart, article "Scrap Sydney Tams by 1960 - Newcastle this years say London experts", buses tackle football crowds (Sydney), Fremantle (Wal Jack letter), and Melbourne and Sydney suburban railways, AETA News. 2467.4 - Vol 4, No. 7 - July 1949 - 16 pages - tramways and the public, news from Sydney, Newcastle, Melbourne, appointment of R. Risson as new chairman, Perth, Adelaide, Launceston, tramcar solenoid brakes, National City Lines USA, and Melbourne and Sydney suburban railways, AETA News. 2467.5 - Vol 4, No. 8 - August 1949 - 8 pages - tramways and politics, photo of new points for Latrobe and William Sts, East Hills Line by C. C. Singleton, general tramway news, and advertisement for Robilt model railways. .2 to .4 added 15-2-2016 from the collection of Ian Stanley. .5 added 24-3-18 - from consolidation of Melbourne Tram Museum and BTM collections)trams, tramways, electric traction, aeta, australian tramways, mmtb, pcc, closure, sydney, newcastle, brisbane -
 Ballarat Tramway Museum
Photograph - Black & White Photograph/s - set of 3, Geoff Grant, 8/01/1956 12:00:00 AM
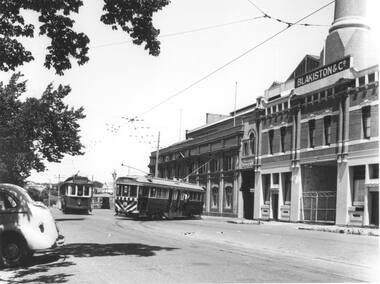
Yields information about the appearance of Geelong's trams in particular ex Melbourne J class trams after receipt in Geelong. This tram later became Ballarat No. 11.Black and white print from a Geoff Grant negative of a Geelong bogie tram entering Corio Terrace from the Geelong depot on 8/1/1956, while Pengelley 19 waits in the siding. The bogie tram (37) has destination of "Special", 19 - "Chilwell". Has the Geelong SEC depot/powerhouse building in the background with part of the Blakistons' sign visible. Photo used in Trolley Wire, Feb. 1999, page 11, article on Geelong tramways. Pencil marks on the rear of the photo indicate proposed used of the photo in the article. 2472.2 - As above but with the rear of the motor vehicle edited from the photograph. Produced by William Scott for his book, 2008. Two copies. Added 21/7/2009. 2472.3 - large format print from Lloyd Rogers collection via Robert Green 2/2014. Added 4-4-20192472 - On rear in red ink "Geelong Depot 8-1-56" in top left hand corner and in bottom left hand corner "G.A. Grant" 2472.1 - on rear of copy 1 in ink in top left hand corner "40) Geelong 8.1.1956 / G. Grant pic / modified image (background only). Last day of Chilwell Route in 1st closures. Single truck car being changed over about mid afternoon for a bogie car to cater for increased traffic / Cars 19 and 37." copy 2 - "Geelong 8.1.1956 / G. Grant pic / cars 19 & 37." copy 3 - "Geelong tram depot / 8th Jan 1956"trams, tramways, geelong, geelong depot, corio terrace, chilwell, tram 19, tram 37 -
 Ballarat Tramway Museum
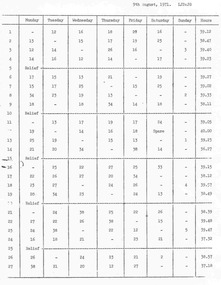
Document - Roster, State Electricity Commission of Victoria (SECV), Rotation Roster dated 9/8/1971, 9/08/1971 12:00:00 AM
Significant in being the last rotation roster sheet prepared for Ballarat, gives details of the crew working. Issued when only one route was left to be closed.Single sheet of off white foolscap size duplicating paper Rotation Roster dated 9/8/1971. Prepared for the last phase of the Ballarat Tramways, Sebastopol - Lydiard St. Nth routes only. Printed by wax cut stencil or Gestetner method. Details the run number operated by crew on a particular table for the day of the week. Two copies held. Has initials LJD:JG in top right hand corner. Stored separately with this sheet is a photocopies of the sheet reduced to A4 size. 2nd copy added 12/3/2009. 3rd copy added 2/8/2012.trams, tramways, ballarat, rosters, employees, shifts, timetables -
 Ballarat Tramway Museum
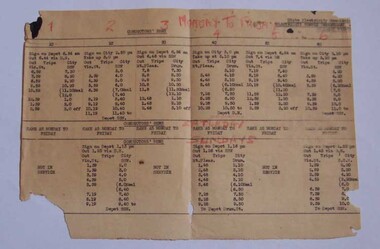
Document - Table Cards (Sheets), State Electricity Commission of Victoria (SECV), Conductors' Runs, for Mount Pleasant and Victoria St, Aug. 1971
Set of two (2) sheets, typed on thin paper, detailing Conductors' Runs, for Mount Pleasant and Victoria St routes for Mondays to Fridays, Saturdays and Sundays. Not dated. Gives run details for 12 Conductor runs Monday to Saturday and 6 on Sunday. Gives a 20min service on lines on Sundays and 20 min service at the end of the day. See Reg. Item 2993 for Sebastopol line runs. Each run details where the driver/conductor would sign on, time, the trips, meal breaks, finish time and the total time of the shift. Stored separately with these sheets are a photocopies of each sheet reduced to A4 size and full size copies made on A3 paper. Do not remove sheets from enclosures - very delicate.trams, tramways, timetables, sec, ballarat, crews -
 Ballarat Tramway Museum
Ephemera, Travis Jeffrey, Ballarat tram timetables, 1960's
Notebook, with three sections of 16 pages each, two pink, one blue, stapled individually onto a yellow coloured card cover and then covered with a printed black and gold patterned sheet to cover the staples. Shown in a tabular form are the timetables for each of the Ballarat and Bendigo routes in the 1960's, for Mondays to Fridays, Saturdays and Sundays. Gives the run number, times at various points, special workings, terminals, short workings. The tables for Sundays in Bendigo has been prepared but not filled in. In the blue section has various notes on Ballarat weekday runs, timetables. Image 1 - cover, 2 - inside front cover and timetable for Lydiard St - Sebastopol, 3 - Stones Corner - View Point, Sebastopol - Depot and Eaglehawk to Quarry Hill, 4 - blue pages run details. On inside back cover in ink, addresses, calculations and street names.trams, tramways, ballarat, bendigo, rosters, employees, shifts, timetables -
 Ballarat Tramway Museum
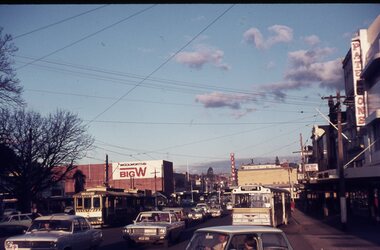
Slide - 35mm slide/s, Eldon Hogan, Sep. 1971
35mm Agfa colour blue and white plastic mount slide - photo of a Ballarat bogie tram 30 and another single trucker parked in the City Loop, Sturt St. with a busy street scene around, including a Davis Bus Lines on route 1, Wendouree West. Has the Dickins Foodstore, Woolworths Big W, Paterson store in the photograph. Taken 9/1971. Photos Eldon Hogan. All files transferred from disc to high res files 2/9/2009.tramways, trams, city loop, davis bus lines, sturt st, tram 30 -
 Ballarat Tramway Museum
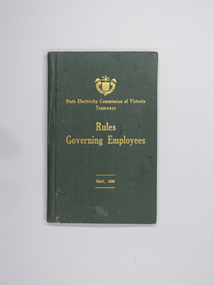
Book, State Electricity Commission of Victoria (SECV), "Rules Governing Employees", May 1936, 1943
Gives details with an index of the rules for Motorman, Conductors and both types of employees together. Has an "Issued to" form inside the front cover - no entries. Has printer details on inside title sheet and on rear sheet and print stock details "FTY 18-8,-6475 on inside front only." 3068.1 - As above, but printed in 1943 - FTY 18-8.F1927/43. On inside of front cover has a list of Route Numbers for Ballarat - see image 2, and marked as issued to R. Courtney. The government printed H.E. Daw. Added 19/1/2007. See Reg. 1260 for March 1948 version and 9534 for another versions with By-Law 1 inserted as part of the item with a 1940 date. See btm8078.4 for another copy.Demonstrates aspects of the way the SEC issued rules to employees on how they should behave and perform their duties safely. Yields information on particular items and operations. Also yields information on a route number system, not generally used for the public.Booklet with green cloth covers, titled in gold block "State Electricity Commission of Victoria - Tramways - Rules Governing Employees - May 1936"on heavy card with inside paper covers on heavy paper and 24 pages printed both sides, with stitched pages with white cotton. 3068 - On outside cover and inside cover sheet "Accountant" in ink., 3068.1 - On top of first page - "R. Courtney".trams, tramways, secv rules, rules, motormen, conductors -
 Ballarat Tramway Museum
Document - Instruction Book, Melbourne and Metropolitan Tramways Board (MMTB), "Sections and Fares", Apr. 1940
Forty Eight page book sewn with end papers on a purple colour Rexene heavy card covers. Titled "Melbourne and Metropolitan Tramways Board / Electric Tramways and Motor Omnibuses. / Sections and Fares", April 1940. Details the sections and fares for each tram and bus route on the MMTB System. Page 2 has an index of routes, includes concession fares. General Instructions re fares, such as children, city concession, value tickets, round trip excursion, Scholars concession, excess luggage, newspapers, children carriages, dental centre scholars, swimming class, state schools, Post Office, Police Concession, special hospital tickets, visiting nurses, scouts, Sunday morning, family excursions, all night services and tourist trips."Ballarat Tramway Preservation Society Catalogue No. 311" in ink on inside sheet of cover. On inside front cover fare table drawn in pencil - very faint. trams, tramways, rules, instructions, mmtb, fares -
 Ballarat Tramway Museum
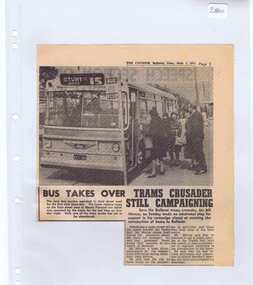
Newspaper, The Courier Ballarat, "Bus Takes Over", "Trams Crusader still campaigning", 7/09/1971 12:00:00 AM
Newspaper clipping from The Courier, Ballarat, 2/9/1971 titled ""Bus Takes Over" & "Trams Crusader still campaigning". Has a photo of people boarding a route 15 bus for Sturt St. West and an item about Mr. Alf Mercer making an emotional please for support in his campaign for the trams. Item notes that Mr. Mercer is a tram driver.closure, buses -
 Ballarat Tramway Museum
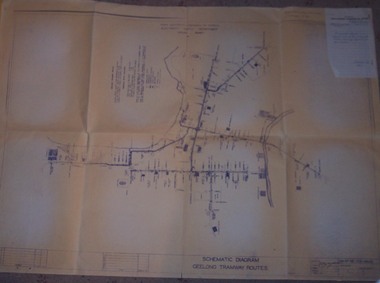
Drawing, State Electricity Commission of Victoria (SECV), "Schematic Diagram Geelong Tramway Routes", 1953
The drawing is very detailed showing streets, cross streets, route, loops, schools, woollen mills, ovals, sections, track phones, stops, route and track miles, pedestrian crossings, railway stations and notes on through route mileages.Print of a drawing showing in very good detail, the schematic layout of the Geelong Tram system. Produced in 1953 and sent to Tramway Supt. in 1970 for his records. Gives very detailed information on another SEC tramway system.Dyeline print of SEC Drawing No. GE-T13-8829, titled "Schematic Diagram Geelong Tramway Routes". Drawing prepared 27/8/1953. Stapled to the top right hand corner of the sheet is a SEC memo form from finance section, distribution services to the Dept. Tramway Superintendent, Ballarat, dated 6-2-1970 forwarding Les Denmead the plan. Was unstapled during the 1/2008 copying of the drawing. On top right hand corner of drawing, "Ballarat Tramway Preservation Society Catalogue No. 605" in ink and on rear in two places "Geelong Tramways" and one "BTPS 605"geelong, map, track layout, tram stops -
 Ballarat Tramway Museum
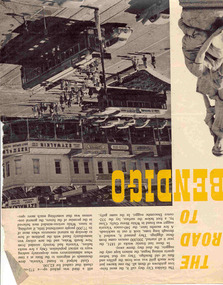
Newspaper, The Walkabout Magazine, "The Road to Bendigo", Oct. 1974
Yields information about the final day of the Bendigo tramways and some of the tramcars used.Three double sided sheets from "The Walkabout" magazine, October 1964, titled "The Road to Bendigo". Five printed pages featuring photographs of Bendigo, its buildings, its history stories, gold mining days and other information, including three illustrations containing trams. .1 - Charing Cross with bogies and single trucker - taken early 1960's. Photo by A. Doney. Features the intersection, with Ezywalkin store. Note the "Jeffrey's bread" roof advertisement on the single trucker. .2 - Bogie tram on the Eaglehawk route prior to any nearby housing development - reclaimed mining land - has Castrol roof advertisement - photo by Claver P Carroll. .3 - No. 6 outside The Beehive stores - 3BO - photo by Claver P Carroll. bendigo, eaglehawk, charing cross -
 Ballarat Tramway Museum
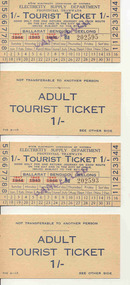
Ephemera - Ticket/s, State Electricity Commission of Victoria (SECV), Tourist Ticket SEC 1/, 1943, overprinted 1947
Demonstrates ticketing systems in Ballarat and in particular the use of a tourist ticket to enable people to travel around the whole of Ballarat on the trams. Yields information about the ticketting system and how surplus stocks were overprinted for future use. The same ticket stock could be used in all three of the SEC provincial tramways.Set of four SECV - Ballarat Tourist Tickets - 1/- on light weight card, light manilla colour - printed originally for the years 1944, 1945 and 1946, overprinted in red ink for 1947, 1948 and 1949. See Reg. item 499 for another example of the original ticket and Reg Item 2108 for another set of four tickets. Printed in black ink/ Ticket Numbers BA202592, 93, 94 and 95 in body of ticket. Static number (1 - 7) on left and right indicate when validated, the route used on. Each ticket has been stamped "CANCELLED" Form No. TYE 2-17 trams, tramways, secv, ballarat, tourist ticket, tickets -
 Ballarat Tramway Museum
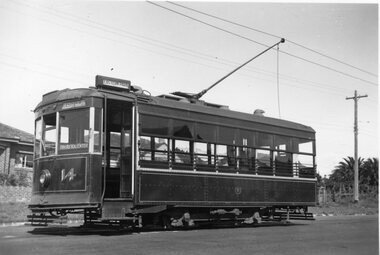
Photograph - Black & White Photograph/s, Leon Marshall Wood, Mar. 1947
Black and white photograph of Geelong No. 14, Birney, with apparent destination of Eastern Park. Photographer - Leon Marshall-Wood, March 1947. Dave O'Neil confirmed June 30/2009, photo at the Western Park terminus. Up to 1951, Eastern Park was only operated by City to Eastern Park services, after 1951 through routed to Newtown. No. 14 was in Bendigo by then. See related documents. .1 - Copy small format print from Lloyd Rogers collection via Robert Green 2/2014. Added 4-4-2019On rear in pencil "3?, S/S, L M-W" and in light green pencil, "PWD" and "Owned JR". On rear of copy print 4194.1 - "Geelong" in top left hand corner.tramways, trams, geelong, eastern park, birney, tram 14