Showing 1576 items
matching route 8
-
 Melbourne Tram Museum
Newsletter, "Public Transport Worker", June 1986
Set of two newsletters, printed on A4 sheets, produced by Rank and File workers, non union Executive, workers to note concerns that they considered the union executive was not following. .1 - Two A4 sheets stapled in the top left hand corner, dated June 1986, covers job reduction, maintenance workers, conductors, Essendon, Kew and a BBQ planned to be held on June 15. .2 - folded A3 sheet, with an introduction of the newsletter, dated Feb. 1992, covers issues with the Executive, Kew depot, unions, ATMOEA, tram routes, disability and actions of the Executive. Two copies held. Second copy added 18-4-2017, from Lindsay Bounds in addition to first donation - receive 8/4/2017. See also Reg item 2962 and 2963 for other similar documents.trams, tramways, unions, conductors, personnel, mta, doncaster depot, south melbourne depot, elwood depot -
 Melbourne Tram Museum
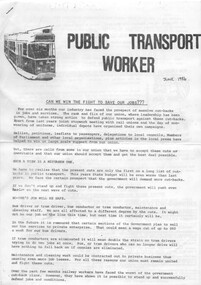
Document - Instruction, Melbourne & Metropolitan Tramways Board (MMTB), "Easter Season - 1941", Feb to April 1941
Set of 24 quarto sheets, typed some carbon copy, some original on MMTB departmental paper outlining the Easter Services for 1941 for the various depots, routes, frequency and tables to be operated. Written for both the Northern and Southern districts, including bus services. Signed by J. M. Harry District Traffic Superintendent Southern and C. E. Hall, northern suburbs.On top edge in heavy black pencil "Easter Season 1941"trams, tramways, mmtb, public transport, holiday arrangements, buses, services -
 Melbourne Tram Museum
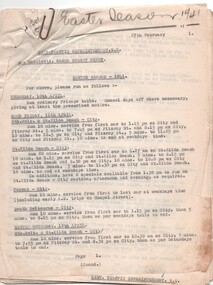
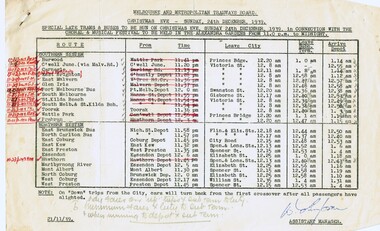
Document - Instruction, Melbourne & Metropolitan Tramways Board (MMTB), "Christmas Eve - Sunday 24 December 1939 - Special late trams", 21/11/1939 12:00:00 AM
.1 - Foolscap duplicated sheet with changes marked in red ink and pencil notes along the bottom edge, titled "Christmas Eve - Sunday 24 December 1939 - Special late trams and buses to be run in connection with the choral and musical festival to be held in Alexandra Gardens from 11pm to Midnight". Lists routes, times from terminus, city, and arrive back at the depot. Gives details for both the Southern and Northern systems. Dated 21/11/1939, signed W. Simpson Assistant Manager. .2 - Associated passenger check sheet - completed for St Kilda Road at intersection of City Road - records 10 trams with passenger number - does not give car number. Form No 3/201 - July 1939. .3 - Notice to Conductors and Bus Operators - all depots except Footscray and Clifton Hill dated 21/12/1939 on foolscap duplicated paper, advising crews of the event, minimum fares of 6d, special tickets and completion of revenue journals. signed by S. M. Richardson as Manager (stamped signature).trams, tramways, mmtb, public transport, holiday arrangements, buses, services, christmas, tickets, revenue journal, conductors -
 Melbourne Tram Museum
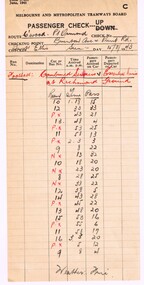
Document - Report, Melbourne & Metropolitan Tramways Board (MMTB), Passenger check - preprinted form 3/201, 15/08/1943 12:00:00 AM
Passenger check - preprinted form 3/201, dated June 1941, for the MMTB as a passenger check or passenger numbers. Completed for the Collingwood to Point Ormond Bus route, at Brunton Ave and Punt Rd of the Sunday 15/8/1943, football game Combined Services vs Essential Services at Richmond Ground - gives passenger numbers from 1.18pm to 3.08pm, completed by Inspector Ellis.On top edge in heavy black pencil "Easter Season 1941"trams, tramways, mmtb, public transport, buses, services, point ormond, collingwood, richmond, football -
 Melbourne Tram Museum
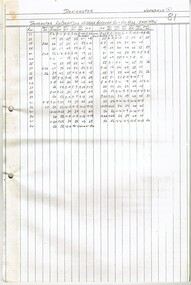
Document - List, Melbourne & Metropolitan Tramways Board (MMTB), "MMTB Route Numbers - Tram Routes", late 1960's?
Two page Gestetner printed list, foolscap sheets titled "MMTB Route Numbers - Tram Routes", giving the list of route numbers for all numbers to 99 including A to E, showing where numbers and most letters not used at the time. Does not give bus route numbers. Used up to the renumbering of Oct. 1970. For the route listing that replaced this list see Record Number 360. See Electric Traction - Oct 1955 and August 1954 for previous lists as well. A copy of the Oct list is shown in images i3 and i4. Second copy from donation of Harry Jackson 8/2/2019, added. This copy included two sheets of bus route numbers. Added as images i5.trams, tramways, mmtb, route numbers, routes, buses -
 Melbourne Tram Museum
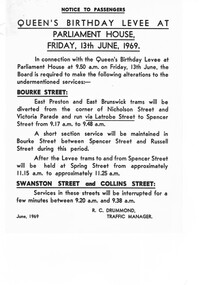
Document - Notice, Press Release, Melbourne & Metropolitan Tramways Board (MMTB), "Queen's Birthday Levee at Parliament House Friday 13th June 1969", Jun. 1969
Set of two documents issued for the "Queen's Birthday Levee at Parliament House Friday 13th June 1969". .1 - notice to passengers printed on semi gloss paper for tramcars giving details of the even, diversion for Bourke St routes, shuttle in Bourke St and minor service changes for Swanston St and Collins St. .2 - Press statement - carbon copy on foolscap paper, giving details as for .1 and for services for Queen's Birthday Holiday the following Monday.trams, tramways, mmtb, services, queens birthday, bourke st, events, parliament -
 Melbourne Tram Museum
Ephemera - Timetable, Melbourne & Metropolitan Tramways Board (MMTB), West Coburg - Domain Road - St Kilda Beach route, May. 1969
Timetable - listing the various runs, times at various timing point or locations for Essendon Depot, Weekdays as at 26-5-1969. Four photocopied pages stapled in the top left hand corner, for the West Coburg - Domain Road - St Kilda Beach route. On the rear of each sheet (all the same) details of the route, time points and changes for weekday peaks and Sundays. Front and back sheets scanned.Has number "17" in the top right hand corner - part of the index page.trams, tramways, mmtb, route 55, west coburg, domain rd -
 Melbourne Tram Museum
Ephemera - Timetable, Melbourne & Metropolitan Tramways Board (MMTB), Glenhuntly depot weekdays - Carnegie - City route, c1969
Timetable - listing the various runs, times at various timing point or locations for Glenhuntly depot weekdays - Carnegie - City route. Five photocopied pages stapled in the top left hand corner. On the rear of each sheet (all the same) details of the route, time points. Each sheet has been taped on the rear for storage and hole punched. Front and back sheets scanned.Has number "4" in the top right hand corner - part of the index page.trams, tramways, mmtb, carnegie, glenhuntly tram depot, timetables -
 Melbourne Tram Museum
Ephemera - Timetable, Melbourne & Metropolitan Tramways Board (MMTB), Doncaster Rd (Depot) - via Middleborough Rd - Box Hill - East Kew bus route, c1969
Timetable - listing the various runs, times at various timing point or locations for Doncaster Rd (Depot) - via Middleborough Rd - Box Hill - East Kew bus route, weekdays Index sheet 81 and Footscray depot - Saturday printed on yellow paper, Deer Park - Sunshine Park - Sunshine - Footscray - City index sheet 35, four pages. Each sheet has been taped on the rear for storage and hole punched. On the rear of each sheet (all the same) details of the route, time points. Front and back sheets scanned.trams, tramways, mmtb, timetables, doncaster depot, footscray, box hill -
 Melbourne Tram Museum
Ephemera - Timetable, Melbourne & Metropolitan Tramways Board (MMTB), MMTB for Queens Birthday Monday, Jun. 1969
Timetable - 26 pages photocopied on foolscap paper clipped with a fold back type metal clip in the top left hand corner, MMTB for Queens Birthday Monday 16-6-1969. Has an index page on the front cover. Gives a timetable for each route, showing both trams and buses, departure time from terminus, and running times. Has various symbols for depot run in etc.Has three MMTB stamps on the front sheet.trams, tramways, mmtb, timetables, queens birthday, buses, trams -
 Melbourne Tram Museum
Ephemera - Timetable, Melbourne & Metropolitan Tramways Board (MMTB), each tram and bus routes, for weekdays, Saturdays and Sunday, May 1967 to August 1968
Timetable - 33 pages printed or photocopied on foolscap paper for each tram and bus routes, for weekdays, Saturdays and Sunday. Gives a timetable for each route, showing both trams and buses, departure time from terminus, and running times. Has various symbols for depot run in etc. In a style for public use. Dated May 1967 to August 1968. Full Image of route 19 sheet added 9/4/17 following a query about route 19 timetables - see image i3.trams, tramways, mmtb, timetables, buses, trams -
 Melbourne Tram Museum
Book, Metlink, "Information for public transport staff - 2009 Formula 1 Australian Grand Prix", 2008
Forty page full colour publication plus covers with fold out map on the rear cover titled "Information for public transport staff - 2008 Formula 1 Australian Grand Prix". Gives details of event for train, tram and bus crews, event program and transport map, including shunting details, announcements, bus replacement services, electric or automatic points, route alterations. On the back cover has contact telephone numbers and web addresses. 2 copies held.trams, tramways, grand prix, metlink, formula 1, albert park -
 Melbourne Tram Museum
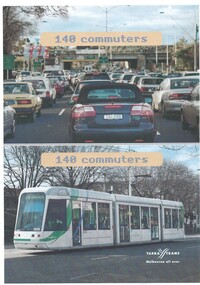
Poster, Yarra Trams, "140 Commuters", c2003
Poster - full colour on off white paper, A4 single sided, titled "140 Commuters", showing a photograph of a crowded road with a rail bridge in the background (Hoddle St Richmond) and C 3035 with the destination of St Kilda Beach on a route 96. Has the Yarra Trams Melbourne all over logo. 2 copies held. See Reg Item 2515.3 for a different version.trams, tramways, yarra trams, hoddle st, richmond, route 96, st kilda beach, c class, tram 3035 -
 Melbourne Tram Museum
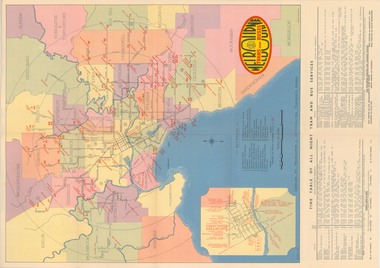
Map, Melbourne & Metropolitan Tramways Board (MMTB), "Map and timetable of Melbourne Tram and Bus Services" - March 1952", Mar. 1952
Fold out map (10 sections), coloured of Melbourne's Tram and Bus routes, route numbers, rail lines, municipalities boundaries and location of major places of interest. Titled - "Map and timetable of Melbourne Tram and Bus Services" - May 1952". At base of map - timetable of all night trams and bus services. On rear index to routes, 1st and last services, time of Sunday am services, Latrobe St. services and photo of Wattle Park. Dated March 1952 - Bourke St shown as bus. See Reg Item 413 for the May 1956 version. Very high resolution scans held. See also Reg Item 3720 for a MMTB Map of the same era.trams, tramways, melbourne, map, tram & bus services, all night services, mmtb -
 Melbourne Tram Museum
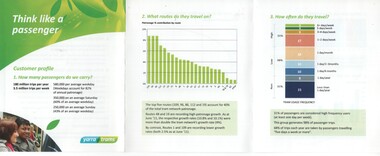
Pamphlet, Yarra Trams, "Think Like a passenger", Oct, 2011
Colour pamphlet, 3 fold horizontal titled "Think Like a passenger", for crews, with headings Customer Profile, number of passengers, the routes they travel on, how often, when, tram stop use, how they get to the stop, why and who. Dated Oct. 2011. Has photo of part of City Circle car - 961 This campaign was presented at the Oct. 2011 International Rail Safety Conference - see Reg Item 2322 for other items.trams, tramways, yarra trams, passengers, tram services -
 Melbourne Tram Museum
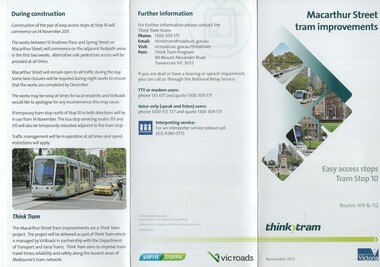
Pamphlet, VicRoads, "Macarthur Street tram improvements", Sep. 2011
Pamphlet, 3 fold DL, printed on gloss paper, titled "Macarthur Street tram improvements", giving details of the installation the installation of an "easy access" (Vienna style), for tram stop 11, routes 109 and 112. Issued Nov. 2011. Gives details of the project, how to use the stop, diagrams and artist views, arrangements for the tram stop during construction, the Think Tram project and contact details. Issued jointly by Yarra Trams and VicRoads. A photo features tram C3305 in Macarthur St. 2 copies held.trams, tramways, macarthur st, tram stops, vienna style stops, vicroads, disability services, tram c3005 -
 Melbourne Tram Museum
Pamphlet, Yarra Trams, "Passenger Bulletin - Service Information Route 96 tram Priority trial - November 2011", October and November 2011
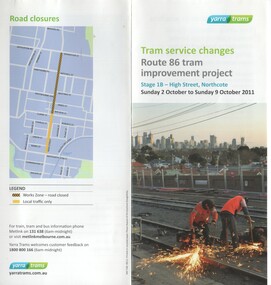
.1 - Pamphlet, 2 fold DL, full colour on gloss paper titled "Tram service changes - route 86 tram improvement project - Stage 1B - High St Northcote, Sunday 2 October to Sunday 9 October 2011", showing the road closures and alternative transport arrangements during the reconstruction of High St Northcote and the installation of the centre of the road island platform stops. Has 2 maps. Two copies held. .2 - Pamphlet - DL size, full colour on gloss paper, titled "Passenger Bulletin - Service Information Route 96 tram Priority trial - November 2011" Has photo of D2 5018 outside Museum of Victoria (IMAX sign) on front cover. Gives dates of the trials, that tram timetables had been temporarily change and that real time information could be obtained from TramTracker. .3 - Pamphlet, 3 fold DL, full colour on gloss paper titled "Tram service changes stage One - route 86 tram improvement project - High St Northcote, Saturday 9 July to Friday 15 July 2011." as for .1. Two copies held. All pamphlets have the Yarra Trams logos.trams, tramways, high st, northcote, tram stops, route 86, route 96, nicholson st, traffic lights, priority, tram d2 5018 -
 Melbourne Tram Museum
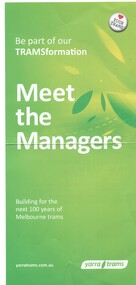
Pamphlet, Yarra Trams, "Meet the Managers", Nov. 2011
Pamphlet, DL, printed on gloss paper, titled "Meet the Managers", part of Yarra Trams "TRAMSformation" project. Event to be held at the St Kilda Station / Metropol, Thursday 17/11/2011. Has contact details and Yarra Trams logos.trams, tramways, yarra trams, management, st kilda railway station, route 96 -
 Melbourne Tram Museum
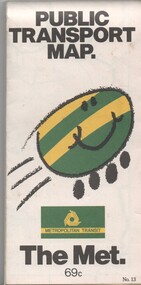
Map, Metropolitan Transit Authority (MTA), "Public Transport Map", c1984
Fold out map (36 sections 9 across x 4 deep), "Public Transport Map", coloured of Melbourne's Tram and Bus routes, route numbers, rail lines, detailed for the central part of Melbourne and the outer Metropolitan services. Includes description of tram and bus routes, private bus routes. On the front cover is The Met's Buzz symbol and their logo. Has contact details for bookings and lost property etc and how to use the map. Priced at 69c, issue No. 13 of c1984. Two copies held.trams, tramways, melbourne, map, tram & bus services, railways, the met, neighbourhood tickets -
 Melbourne Tram Museum
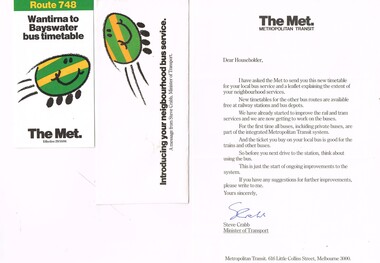
Ephemera - Timetable/s, The Met, The Met - Introducing your neighbourhood bus service", Oct. 1984
Set of six documents printed by the Met for the introduction of Neighbourhood bus services to the Box Hill area Oct. 1984. .1 - Envelope marked The Met - Introducing your neighbourhood bus service", containing at the time a message from Steve Crabb, Minister for Transport (now sealed) .2 - Letter from Steve Crabb .3 - Timetable for The Met Bus Route 748 dated 29/10/1984. .4 - Pamphlet - "Introducing your new neighbourhood bus service", with a map of the Ringwood neighbourhood. .5 - Pamphlet - "Shop for 2 hours at Box Hill Central for just 80c" .6 - Timetable for The Met Bus Route 738 dated 29/10/1984.trams, tramways, the met, timetables, melbourne, fares, box hill, doncaster, buses -
 Melbourne Tram Museum
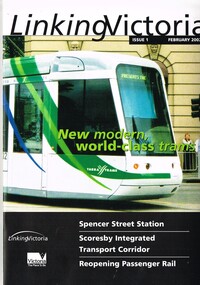
Book, Department of Infrastructure (DOI), "Linking Victoria - issue 1 February 2002", Feb. 2002
Book - 20 A4 pages, centre stapled printed on gloss paper titled "Linking Victoria - issue 1 February 2002", published by the Victorian Department of Infrastructure. Includes a message from Steve Bracks Premier and Peter Batchelor Minister for Transport. Looks at Transport Planning, Spencer St Station redevelopment, Fast rail regional links, passenger services, new low floor trams, notes Yarra and M>Tram rollingstock, route 109 to Box Hill, buses and other transport projects underway or planned. Not known if there were further publications with this title.trams, tramways, planning, doi, m>tram, spencer st, public transport, railways -
 Melbourne Tram Museum
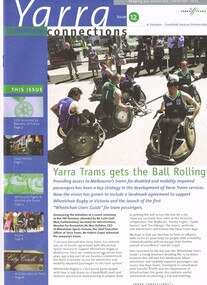
Magazine, Yarra Trams, "Yarra Connections", Dec. 2003
... Tennis TramTracker Route 75 .1 - Magazine - 8 pages, full colour ...Demonstrates a Yarra Trams staff newsletter..1 - Magazine - 8 pages, full colour, centre stapled, printed on recycled paper, titled "Yarra Connections Issue 12 December 2003", published by Yarra Trams. Notes the launch of the "Wheelchair users guide" for tram passenger, Yarra Trams support for Wheelchair Rugby, planning for Vermont South extension, French award for CEO, Hubert Guyot, photo exhibition featuring employees by Georgia Metaxas, Boroondara residents and Travelsmart, Metlink Team Tigers Basketball, Ikea store in Richmond, pram friendly trams, feedback and return of W class trams to route 30. New track maintenance vehicle -"scrubber truck". .2 - Letter on Yarra Trams letterhead, addressed to Ron Wilson of Orange Grove Bayswater, signed by Paul Matthews Marketing Manager forwarding a copy of the magazine to Ron, noting highlights. Gives address details. .3 - Magazine - as for .1 - issue 1 dated October 1999 with a forward by the CEO Steve Macdonald , Camberwell depot, Deputy CEO Hubert Guyot, new logo designs, reduction in tram stops, tennis trams, family day, Docklands route 70 extension and competition. .4 - magazine - 3 fold A4 - issue 9, dated Nov. 2002, Notes the construction of Route 109, W class, St Vincent's Plaza, Gordon Atkins, Docklands tram services, explorer program, Feedback, Line Officers, Corporate Report and Melbourne Museum tram. .5 - magazine - issue 11 - August 2003 - 8 pages - opening of Box Hill line, Harry the Wombat, trams in the press, Welcome to Dennis Cliche, B class seating trial, Metlink, Docklands, trial information at tram stops (early TramTracker) project and route 75. .6 - magazine issue 13 - April 2004 - Australian Open tram service, Collins and Spencer Superstop, tram services, feedback, Metlink, Channel 10 - The Secret life of us, PTC Cricket Squad. .7 - issue 8 - April 2002 - Grand Prix, Box Hill update, Citadis update, Collins and Spring superstop, Australia Open, Fare Evastion and track joints.trams, tramways, yarra trams, w class, disability services, vermont south, awards, metlink, route 30, camberwell depot, docklands, route 70, st vincent's plaza, line officers, box hill, route 109, b class, superstops, cricket, tennis, tramtracker, route 75 -
 Melbourne Tram Museum
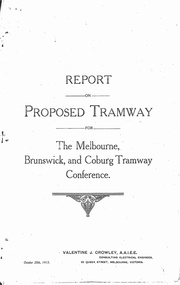
Document - Photocopy, Valentine J. Crowley Consulting Engineer, "Report on Proposed Tramway for The Melbourne, Brunswick and Coburg Tramway Conference", Original 1915
Photocopy - Report - 12 pages - titled "Report on Proposed Tramway for The Melbourne, Brunswick and Coburg Tramway Conference", prepared by Valentine J. Crowley Consulting Engineer Oct. 25, 1915. Looks at the construction of a tramway Flinders St along Queen St, to Royal Park, to Sussex St and Gaffney Road, West Coburg for the Melbourne Brunswick and Coburg Tramways Trust. Looks at the route and length of track in detail, route, administration, population, construction, permanent way, overhead lines, feeders, rolling stock, timetable, capital cost, alterations to services, expenditure for year and conclusion. Has a map of the proposed route. Included with the document is a plan of the MBCTT lines, overwritten in ball point pen with street names dated Dec. 1919. Photocopy made from original documents - has been stapled along the side in three places.trams, tramways, mbctt, maps, new tramway, west coburg, queen st, royal park -
 Melbourne Tram Museum
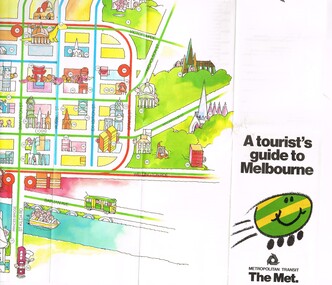
Pamphlet, The Met, "A tourist's guide to Melbourne", mid 1980's
Pamphlet, 14 fold printed in full colour on semi gloss paper, both sides. Gives a cartoon style map of the CBD, Melbourne suburbs and outer Melbourne, giving a list of places of interest and transport routes. Shows the vintage tram service along Batman Ave, Puffing Billy, Wattle Park, various precincts, shopping centres. Published by The Met, Metropolitan Transit and has the buzz logo on the front. Mid 1980's. Two copies heldtrams, tramways, maps, tourism, melbourne, wattle park, the met -
 Melbourne Tram Museum
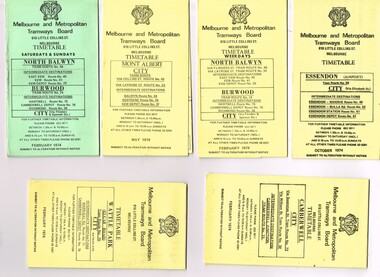
Ephemera - Timetable/s, Melbourne & Metropolitan Tramways Board (MMTB), "MMTB Tram Timetables", 1974
Set of 6 MMTB Tram timetables, folded sheets, generally 10 sections, providing timetables for specific routes, day of week giving information on tram times at specific time points, route map, sections and fares and organisation address - 616 Little Collins St. Melbourne. All printed on yellow paper unless noted otherwise. .1 - Route 48, 41, 40, 29, 74, 75, 76, 28 - North Balwyn and Burwood - City - Saturdays and Sundays - Feb. 1974, printed on green paper. .2 - Route 42, 23, 44, 45 and 37, Mont Albert - City - May 1974 .3 - Route 48, 41, 40, 29, 74, 75, 76, 28 - North Balwyn and Burwood - City - Feb. 1974 .4 -Route 59, 49, 52, 51, 81 - Essendon Airport - City - Oct. 1974 .5 - Route 70, 71 and 76 - Wattle Park - City - Feb. 1974 .6 - Route 72, 32 and 73 - Camberwell - City - Feb. 1974trams, tramways, mmtb, timetables, melbourne, fares, route 23, route 24, route 28, route 29, route 32, route 37, route 40, route 41, route 42, route 44, route 45, route 48, route 49, route 51, route 52, route 59, route 70, route 71, route 72, route 73, route 75, route 76, route 81 -
 Melbourne Tram Museum
Ephemera - Timetable/s, Melbourne & Metropolitan Tramways Board (MMTB), "MMTB Tram Timetables", 1977
Set of 5 MMTB Tram timetables, folded sheets, generally 10 sections, providing timetables for specific routes, day of week giving information on tram times at specific time points, route map, sections and fares and organisation address - 616 Little Collins St. Melbourne. All printed on yellow paper unless noted otherwise. .1 - Route 9, 10, 11, 13 and 14 - West Preston - City - June 1977 .2 - Route 14, 88, 89, 90, 95, 96, 97 - East Preston and East Brunswick - City - Feb. 1977 .3 - ditto - Saturday and Sundays - printed on green paper. .4 - Routes 48, 24, 40, 41, 29, 74, 76. 28 - August 1977 .5 - Routes 42, 23, 44, 45, 47 - Mont Albert line - Sept 1977trams, tramways, mmtb, timetables, melbourne, fares, route 9, route 10, route 11, route 13, route 14, route 23, route 42, route 44, route 45, route 47, route 88, route 89, route 90, route 95, route 96, route 97, route 48, route 24, route 40, route 41, route 29, route 74, route 76, route 28 -
 Melbourne Tram Museum
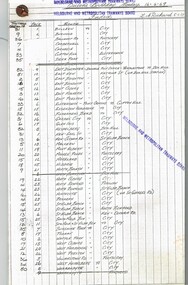
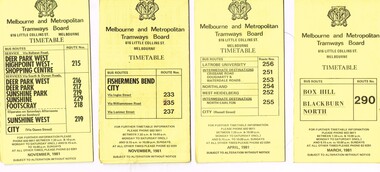
Ephemera - Timetable/s, Melbourne & Metropolitan Tramways Board (MMTB), "MMTB Bus Timetables", 1981
Timetables for specific routes, day of week giving information on tram times at specific time points, route map, sections and fares and organisation address - 616 Little Collins St. Melbourne. All printed on yellow paper unless noted otherwise. .1 - Route 215, 216, 217, 219, 229, 218 - Deer Park, Sunshine, Footscray, City - November 1981 .2 - Route 233, 235 and 237 - Fisherman's Bend - City November 1981 .3 - Route 256, 251, 253, 254, 252, 255 - Latrobe University, Northland, West Heidelberg, North Carlton - City - April 1981 .4 - Route 290 - Box Hill - Blackburn North - March 1981 5 - Williamstown Road, Footscray, Ballarat Rd and Highpoint West - Route 223 - April 1981 6 - Clifton Hill, Esternwick, Point Ormond, St Kilda Junction - routes 246, 247 and 248 - Feb. 1981Yields information about MMTB bus services 1981.Set of 6 MMTB Bus timetables, folded sheets, generally 10 sections.trams, tramways, mmtb, timetables, melbourne, fares, buses, deer park, sunshine, footscray, fisherman's bend, latrobe university, northland, heidelberg, carlton, box hill, blackburn, ballarat road, williamstown road, highpoint, clifton hill, elsternwick, point ormond -
 Melbourne Tram Museum
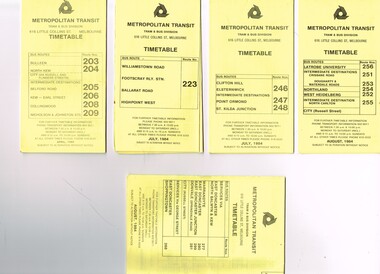
Ephemera - Timetable/s, Metropolitan Transit Authority (MTA), "MMTB Bus Timetables", 1984
Set of 5 Metropolitan Transit Bus timetables, folded sheets, generally 8 or 10 sections, providing timetables for specific routes, day of week giving information on tram times at specific time points, route map, sections and fares and organisation address - 616 Little Collins St. Melbourne. All printed on yellow paper unless noted otherwise. .1 - Route 203, 204, 205, 206, 208. 209 - Bulleen, North Kew, Belford Road, Kew, Collingwood and Nicholson and Johnson St - City - April 1984 .2 - Route 223 - Williamstown Road, Footscray Railway Station, Ballarat Road and Highpoint West - July 1984 .3 - Route 246, 247, 248 - Clifton Hill, Elsternwick, Point Ormond and St Kilda Junction - July 1984 .4 - Route 256, 251, 253, 254, 252, 255 - Latrobe University, Northland, West Heidelberg - City - Aug./ 1984 .5 - Route 277, 280, 299. 281 and 268 - services via East Doncaster, North Balwyn and Kew - Warrandyte, Donvale, Shoppingtown - August 1984trams, tramways, metropolitan transit, timetables, melbourne, fares, buses, footscray, latrobe university, northland, heidelberg, warrandyte, doncaster, donvale, bulleen, north kew, williamstown rd, highpoint, clifton hill, elsternwick, point ormond, st kilda junction -
 Melbourne Tram Museum
Ephemera - Timetable/s, Metropolitan Transit Authority (MTA), "MMTB Bus Timetables", 1982
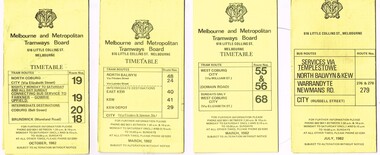
Set of 7 MMTB Tram and Bus timetables, folded sheets, generally 8 or 10 sections, providing timetables for specific routes, day of week giving information on tram times at specific time points, route map, sections and fares and organisation address - 616 Little Collins St. Melbourne. All printed on yellow paper unless noted otherwise. .1 - Routes 19, 20, 18 - North Coburg, and bus service to Fawkner, Gowrie, Upfield - nightly Monday to Saturday and all day Sunday - Oct. 1982 .2 - Route 48, 24, 40, 41, 29 - North Balwyn - City - March 1982 .3 - Route 55, 56 68 - Sunday only via Elizabeth St - March 1982 .4 - Route 276, 278 and 279 - Services via Templestowe, Warrandyte and Newmans Road - City - July 1982 .5 - Route 57, 357 (bus Sundays only), 54, 60, 58, 50 - West Maribyrnong - City - Jan. 1982 .6 - Route 59, 49, 52, 51 and 81 - Essendon Airport - City - March 1982 .7 - Route 203, 204, 205, 206, 208. 209 - Bulleen, North Kew, Belford Road, Kew, Collingwood and Nicholson and Johnson St - City - Sept. 1982trams, tramways, mmtb, timetables, melbourne, fares, buses, bus replacement, trams, upfield, route 18, route 19, route 20, route 24, route 29, route 40, route 41, route 48, route 49, route 50, route 52, route 51, route 54, route 55, route 56, route 57, route 58, route 59, route 60, route 68, route 81, route 357, warrandyte, doncaster, templestowe, kew -
 Melbourne Tram Museum
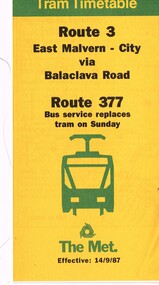
Ephemera - Timetable/s, The Met, "The Met Tram Timetable", Mar. 1987
The Met Tram timetables, folded sheets, generally 8 sections, providing timetables for specific routes, day of week giving information on tram times at specific time points, route map, sections and fares and phone contact numbers. Route 3 - East Malvern - City via Balaclava Road and Route 377 - bus service - dated 14/9/1987.trams, tramways, the met, timetables, melbourne, fares, route 3, route 377, bus replacement