Showing 571 items
matching st just
-
 Ballarat Tramway Museum
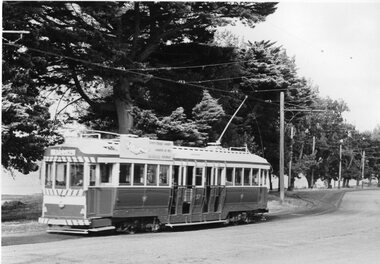
Slide - 27 mm sq slide/s - set of 11, Lilian Butler, Wendouree Parade and Sturt St West, Sep. 1971
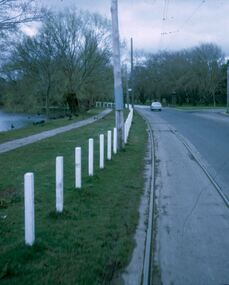
Yields information about the streetscapes of Ballarat depot to Pleasant St route and in particular buildings and people that crewed the trams.Set of eleven Colour 27 x 27 mm slide in a Kodachrome cardboard mount. .1 - Wendouree Parade looking west towards St Aidans Drive - the gate pillars can be seen. .2 - ditto looking west - Fairyland .3 - ditto looking towards Gardens Loop .4 - No. 41 at Gardens Loop, with destination of Gardens via Drummond North .5 - ditto showing Mt Pleasant .6 - ditto, just past the now BTM Depot Junction. .7 - Carlton St - showing the gates .8 - Looking towards Hamilton Ave from within Carlton St loop with the signal showing red. .9 - Turning from Hamilton Ave into Sturt St West. .10 - Sturt St west looking east with the Loreto convent walls on the left hand side. .11 - Sturt St - Pleasant St intersection - showing road surface, a tram coming towards the intersection and buildings on either side. Slide mount date September 1971. Photo from the collection of Lilian Butler.ballarat, tramways, trams, wendouree parade, st aidans drive, gardens loop, depot junction, carlton st, carlton st loop, signals, sturt st west, pleasant st, tram 41 -
 Ballarat Tramway Museum
Negative - Set of 2, Campbell Duncan, 2/07/1971 12:00:00 AM
... of trams on the Victoria St line. .1 - No. 26 inbound just past.... .1 - No. 26 inbound just past Oliver St, with the row ...Yields information about tram operations and the street views on the Victoria St line.Set of 2 photographs taken on 28/2/1971 by Campbell Duncan of trams on the Victoria St line. .1 - No. 26 inbound just past Oliver St, with the row of terrace houses in the background. Tram has a Briquettes roof advert. .2 - ditto just before Oliver St.trams, tramways, victoria st, houses, tram 26 -
 Ballarat Tramway Museum
Negative - Set of 4, Campbell Duncan, 2/07/1971 12:00:00 AM
... and the Railway Station. .1 - No. 40 just after entering Lydiard St Nth... St and the Railway Station. .1 - No. 40 just after ...Set of 4 photographs taken on 28/2/1971 by Campbell Duncan of trams on the Lydiard St North line between Sturt St and the Railway Station. .1 - No. 40 just after entering Lydiard St Nth, with Craigs Hotel, National Mutual Building and the ANZ bank in the background. .2 No. 36 entering the double track near the railway station with No. 40 waiting. Has buildings on the east side of the street, including JJ Coller & Co and Reid's Coffee Palace in the background. .3 - ditto .4 - Nos 36 and 40 crossing on the double track in Lydiard St North,trams, tramways, lydiard st north, tram 36 tram 40 -
 Ballarat Tramway Museum
Photograph - Black & White Photograph/s, Charles Craig, 1971
Yields information about the Mt Pleasant terminus just before the closure of the SEC operated system,Black and white photographs of No. 30 at the Mt Pleasant terminus, with the shops on each corner in the view. Adverts for The Sun, Streets Ice Cream. Pole on the right hand side has a "Car Stop Here" and "End of Section" sign. Tram has the destination of Mt. Pleasant. Photo by Charles Craig, probably August 1971.trams, tramways, barkly st, mt pleasant, signs, tram 30 -
 Ballarat Tramway Museum
Photograph - Black & White Photograph/s, Charles Craig, 1971
... the Victoria St terminus just before the closure of the SEC operated ...Yields information about the Victoria St terminus just before the closure of the SEC operated system,Black and white photographs of No. 12 at the Victoria St terminus, with the destination Gardens via Drummond St North. Photo most likely 21/8/1971 at the time of closure and possibly during the ARHS / TMSV tour. Has many photographers in the view. Tram has a Twin Lakes sign. Meagher's Hotel in the background with a Victoria Bitter sign. Photo by Charles Craig, probably August 1971.trams, tramways, victoria st, closure, special trams, tram 12 -
 Ballarat Tramway Museum
Photograph - Digital image, W. J. Llewelyn, c1971
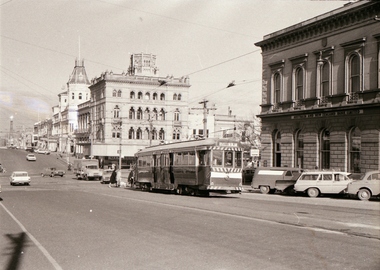
... the Royal Visit to Ballarat and the appearance of Bridge St during ...Yields information about the Royal Visit to Ballarat and the appearance of Bridge St during 1956 and just prior to the closure of the tramway.Set of three colour digital images taken of the Bridge St Ballarat by W. J. Llewelyn. .1 - Looking west along Bridge St from the Service Station, shows the various buildings, tram track, tram shelter and overhead. Appears to be c1971. .2 - Look east from Grenville St, 1954 with the Royal Visit decorations in the placed. Has the Dickins Self Service Grocery shop, Bucks Head Hotel and a sign for Morsheads store. Tram tracks and overhead apparent along with two trams in the far distance. .3 - Looking west along Sturt St from Bridge and Grenville St - shows the buildings in the background, tramway overhead, general congestion, letter box, tram stop shelter. A tram is parked in the loop. Has a Davies Bread advert on the Mechanics Institute building, also Thomas Jewellers, T& G and the Odeon Theatre sign.trams, tramways, bridge st, victoria st, stones corner, royal visit, grenville st, shelters, sturt st -
 Ballarat Tramway Museum
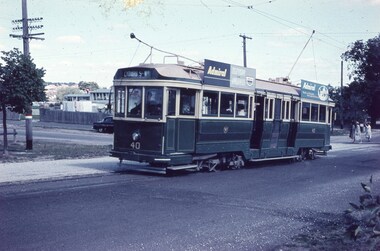
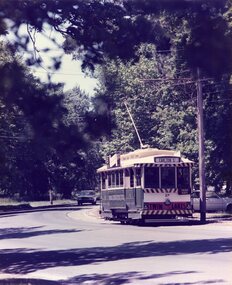
Slide - 35mm slide/s, Keith Caldwell, 8/03/1960 12:00:00 AM
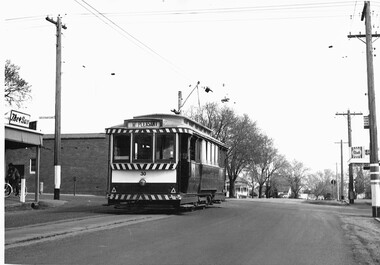
Yields information about the Lydiard St North services.Agfa colour slide, white cardboard mount, photo by Keith Caldwell on 8/3/1960 of: Tram 40 with destination of Lydiard St at the corner of ??? and >?>>>/ Tram has two Admiral TV roof advertisements. Would appear that three ladies have just got of the tram and crossing the road behind the tram.Stamped on bottom of slide "8 Mar 60". In ink "Ballarat"tramways, trams, lydiard st, tram stops, passengers, tram 40 -
 Ballarat Tramway Museum
Photograph - Digital image, John Ward, 20/08/1971 12:00:00 AM
... the Sturt St and Lydiard St intersection just before closure ...Yields information about the Sturt St and Lydiard St intersection just before closure and tram operations.Digital image of bogie tram 35 turning from Sturt St into Lydiard St North and tram 39 at the south side of the City tram stop at the corner. Has Craig's Hotel, the National Mutual building, Berry Anderson, Gemmola's Pharmacy, the Town Hall and the ANZ bank in the view. An Inspector can be seen near the tram stop. Photo taken from the Post Office tower. Photo by John Ward 20 August 1971. Slide title "04709 200871 7173-G SECV bogie trams 39 & 35 Sturt St to Lydiard St North Ballarat Vic"trams, tramways, sturt st, lydiard st, post office, city terminus, tram 39, tram 35 -
 Ballarat Tramway Museum
Negative - Set of 3, Wal Jack, c1948
Yields information about staff or safeworking system in use at Ballarat up to the time of the introduction of the signal system. No information known at the time of cataloguing of the person in the photographs.Set of three Negative and Digital images of an unknown person: .1 - showing the hook and the section staff at the Ripon St - Sturt St corner. Alongside is an ESCo Electrical connection box or pillar. In the background is the shelter at this location. .2 - the same person handing the staff to a well loaded No. 22 (c1946) at Ripon St. Tram has a Regatta Auxiliary board. Has the Western Hotel in the background. .3 - the same person holding the Sturt St to Lake View Loop. .4 - close up of the staff. Note: The Ripon St - Lake View Loop - View Point section of track was not fitted with coloured light signals. Tram 22 (Reg Item 5533) entered service - 1945; post 1947, as side numbers (which can just be seen in image i2) were painted Oct. 1947 and was renumbered to 37, in Sept. 1952.trams, tramways, signals, staff, ripon st, view point, lake view, tram 22 -
 Ballarat Tramway Museum
Book, E.D. Jenkins and Lloyd Jenkins, "Sebastopol Victoria - A Historical Survey of Early Sebastopol - 1864- 1964", 1989
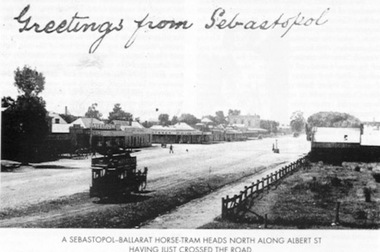
Book - 92 pages plus card covers, a historical survey of the Sebastopol district. Originally written by E.D. Jenkins for the Borough of Sebastopol's centenary in 1964, reprinted with additional text by Lloyd Jenkins to recognise the 125th anniversary of the Borough covering the years 1965 to 1989. Book covers mining history, churches, the Borough Council, early days of the district and various points, eg cabmen, horse trams and electric trams, schools, the Mechanics Institute, various clubs, fire brigade, hotels, industries, and programme of events to celebrate the centenary. The second part of the book, covering the period is laid out in a chronological order with forward by Cr. Donald, the Mayor with many photographs. Centre page has a large map of the district showing the many mines, leads, roads and other historic locations. Tramway photos are horse tram No. 7, ESCo 17 at depot (all on file) and a photo showing a horse tram heading north along Albert St. with the shopping centre in the background - see image. Photo taken just after the tram has crossed the roadway. Copy of the horse tram heading north along Albert St. made Oct. 2001 for the "gold, Gold GOLD" temporary exhibition - colour laser print onto card, with Velcro dots on rear. Stored in box D1 (Display Box) 02/2003. See Reg Item 3883 for another print of this photograph.On page 3 in black ink "Ballarat Tramway Museum Inc. With compliments, D.L. Jenkins 14/4/1999"trams, tramways, sebastopol, local history, public transport, mining, horse trams, esco -
 Ballarat Tramway Museum
Document - Photocopy, Ballarat Tramway Museum (BTM), "Cottage to go for bypass", "Fun tram just the ticket", 1991
1099.1 - photocopy of an article in The Courier, Ballarat Tuesday Feb. 9 1988, page 17 of the house that contained Ballarat ESCo tram No. 12 in the Tuesday Heritage Column of the newspaper. Contains a photograph of the house containing the tramcar. Newspaper Clipping details the former occupiers, the Rayner family, the construction of the extensions around the tramcar, family use, family history and some details of the family members and other local history. The copy of the newspaper Clipping has numerous pin holes in the corner and the rust marks due to use on a display on Tram No. 12 in a display board in the depot from about 1991 to 1998. From a copy made from the newspaper Clipping collection held by Alan Bradley. 1099.2 - copy made March 1999 of the same Clipping for record purposes and to have a good copy. (2 copies held). Also has a review by John Hindle of the "Storming St. Kilda by Tram", presented by TheatreWorks aboard a special tram for St. Kilda, from the Herald Newspaper dated 15/3/1988. Collected by Alan Bradley.trams, tramways, nerrina, rayner family, theatre, esco -
 Ballarat Tramway Museum
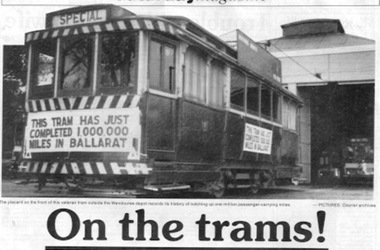
Newspaper, The Courier Ballarat, "On the trams", 19/09/1992 12:00:00 AM
Newspaper cutting from The Courier, Ballarat, Saturday 19/9/1992, page 27, written by Seaton Ashton about the history of trams in Ballarat on the 20th anniversary of their closure. Notes horse trams, ESCo, opening of lines, tram car builders, their rehabilitation in the 1930's, the involvement of the BTPS, trams 1 and 12. Has two photos, one of tram 27 sitting outside the SEC depot carrying the "This tram has just completed 1,000,000 miles in Ballarat" and one of tram 31, east bound in Bridge St. bound for Victoria St. dropping off a passenger at a stop. Both picture from the Courier Archives. Item in the Courier's "Saturday Magazine". Occupies a full page of the newspaper. 2nd copy added 11/8/2001 - folded.trams, tramways, ballarat, esco, btps, horse trams, sec -
 Ballarat Tramway Museum
Slide - 35mm slide/s - set of 7, Noel Simons, 22/11/1962 12:00:00 AM
Set of 7 Kodachrome transparencies taken on 22/11/1962. 1161.1 - trams 38 and 20 in Sturt St. West at the Russell St. loop. No. 20 has possibly terminated and is showing "CITY" while 38 is showing "Mt Pleasant" Both trams fitted with dash canopy lighting, but no large white stripe. 20 has a Twin Lakes sign. 1161.2 - tram 33 just before Gardens Loop in Wendouree Parade, with destination of "Victoria St." Has a Twin Lakes sign. 1161.3 - tram 39 at corner of Lydiard St. North and Sturt St. with Post Office in background. 1161.4 - tram 40 turning from Sturt St into Lydiard St. North with Post Office in background and showing destination of Lydiard St. North. A blue Holden with red stripes for the Radio Cabs co. is in the foreground, along with pedestrians. 1161.5 - tram 41 in Sturt St. at the City terminus, showing destination of Mt Pleasant with Post Office and ANZ Bank buildings in background. Numerous people waiting on the seats at the tram stop. 1161.6 - tram 13 in Sturt St. near Doveton St. showing destination of Bell St. Many cars and pedestrians on the south side of Sturt St. Note the Austin motor car by the tram showing a stop signal. Tram 13 has a Twin Lakes sign. 1161.7 - trams 13, 26, and 39 in the City Loop near Bridge St. Has Morseheads and Grenville St. tram shelter in the background.1161.1 - "38 and 20 crossing in Sturt St. Ballarat near Russell Street" - in blue and black ink. The "Russell St" is a later addition, over white out. 1161.2 - "33 near Botanic Gardens terminus, Wendouree Parade, Ballarat" 1161.3 - "No. 39 in Lydiard St. Ballarat at Cnr. of Sturt St." 1161.4 - "No. 40 entering Lydiard St. from Sturt St. Ballarat" 1161.5 - "No. 41 in Sturt St. Ballarat at cnr of Lydiard St." 1161.6 - "No. 13 in Sturt St. Ballarat, at Cnr. of Doveton St." 1161.7 - "Nos. 13, 26, and 39 in Sturt St. Ballarat near Bridge St." All have date stamp of "22 Nov. 1962" in purple ink. All black ink unless otherwise noted.tramways, trams, ballarat, sturt st. west, wendouree parade, lydiard st., city loop, taxis, radio cabs, tram 13, tram 20, tram 26, tram 33, tram 38, tram 39, tram 40, tram 41 -
 Ballarat Tramway Museum
Slide - 35mm slide/s - set of 6, Noel Simons, 22/05/1971 12:00:00 AM
Set of 6 Kodachrome transparencies taken on 22/5/1971. 1171.1 - Tram 33 at Sebastopol terminus, showing destination of Lydiard St. Nth, with Royal Mail Hotel in the background and three parked cars. Tram has "Twin Lakes" sign on front dash. 1171.2 - as for 1171.1 but taken from other side of tram, has hotel in part of photo. Shows arrangement of tram terminus signs on a pole in the background. 1171.3 - Tram 26 just after arrival at the Lydiard St. terminus, with passengers getting off and driver about to swap ends. Destination has been changed to Sebastopol. Has Lydiard St. shelter in the right edge of the photo. 1171.4 - as for 1171.3 - but with pole turned and looking back along street towards city. Shows the undulating nature of the street. 1171.5 - Tram 26 outbound in Albert St. for Sebastopol, crossing the street near Ophir St. Has a motor cyclist stopped for tram and shows tram stop on the west side of the road. 1171.6 - Tram 26, close up of tram at the Sebastopol terminus with two cars parked along side. Tram has destination of Lydiard St. Nth.1171.1 - "No. 33 at Sebastopol Terminus" and initials "BC" in bottom left hand corner. 1171.2 - "No. 33 at Sebastopol Terminus" and initials "BC" in bottom left hand corner. 1171.3 - "No. 26 at Lydiard St. North terminus" and initials "BC" in bottom left hand corner. 1171.4 - "No. 26 at Lydiard St. North terminus" and initials "BC" in bottom left hand corner. 1171.5 - "No. 26 crossing from left side of Albert St. Sebastopol to right side near Ophir St." and initials "BC" in bottom left hand corner. 1171.6 - No. 26 at Sebastopol Terminus" and initials "BC" in bottom left hand corner. All slides have date stamp of "22 May 1971" in purple ink and Kodak developing date of "Jun 71M7" in red ink. tramways, trams, sebastopol, lydiard st nth, royal mail hotel, tram stops, tram 33, tram 26 -
 Ballarat Tramway Museum
Slide - 35mm slide/s - set of 17, Noel Simons, 20/11/1962 12:00:00 AM
Set of 17 transparencies taken on 20/11/1962 on Kodak mounts. 1187.1 - Bendigo No. 2 at the Quarry Hill terminus, showing destination of Quarry Hill. Has Cohns Drinks and Streets Ice Cream ads on dash panel, a SEC 'electric cooking' roof ad and another roof ad. Shows the Y terminus at this location, but tram standing just before it. Overhead in position. 1187.2 - as above, but closer up. 1187.3 - as above, but from the north side, showing cemetery in the background. 1187.4 - Bendigo No.3 at Eaglehawk terminus. Tram showing destination of Quarry Hill. Has the various buildings at Eaglehawk in the background including the Foodland store. Has Streets Ice cream and White Horse Whiskey ads on the dash panel. 1187.5 - Bendigo No. 18 at Garden Gully crossing loop, in bound, with destination of Eaglehawk. Passengers waiting for an Eaglehawk tram at the stop. Has a white horse whiskey ad on dash panel and SEC roof ads. Conductor standing in doorway looking out. 1187.6 - Bendigo No. 7 inbound in Nolan St. at cnr of McCrae St. showing destination of Golden Square. Has Streets Ice cream ad on dash panel and a Castrol Roof ad. 1187.7 - Bendigo No. 19 at the North Bendigo terminus with railway level crossing in background. Tram has a Cohns Drinks ad and an SEC 'Electric Cooking' roof ad. 1187.8 - Bendigo No. 2 at the Quarry Hill terminus, looking back into Bendigo, showing destination of Eaglehawk. 1187.9 - Bendigo No. 21 in McCrae St, near Nolan St outbound for North Bendigo. Photo taken after tram has passed photographer. 1187.10 - Bendigo Nos. 4 and 26 at Charing Cross in View St. with fountain alongside and the Beehive, Ezywalkin Buildings in the background. No. 26 has a Sandhurst Milk and SEC 'Electric Cooking' roof ad. 1187.11 - close up of 22E maximum traction truck and folded footstep. 1187.12 - Bendigo No. 19 at Charing Cross terminus, after tram has passed photographer, showing destination of North Bendigo, with the Beehive building in the background and passengers boarding tram. 1187.13 - Bendigo No. 11, turning from View St. into Pall Mall, showing Special with the conductor holding point bar. Has the Beehive and Ezywalkin Buildings in the background. 1187.14 - No. 7 at Charing Cross terminus, in Pall Mall, bound for Golden Square. Has the Beehive and Ezywalkin buildings in the background and passengers waiting at the tram stop. 1187.15 - No. 18 at the Charing Cross terminus, bound for Eaglehawk. Has the Beehive and Ezywalkin buildings in the background and passengers waiting at the tram stop. Also has the 'Safety Zone' sign in the photograph. 1187.16 - No. 2 at Quarry Hill terminus, night or dusk photo. Tram showing destination of Depot. 1187.17 - No. 26 at Charing Cross, night photo. Tram has destination of Quarry Hill, but is on the line for Eaglehawk. Photo looks along Mitchell St. Also shows Safety Zone sign. Information written on in black ink and date stamped on purple ink. 1187.1 - "No. 2 at Quarry Hill terminus Bendigo" 1187.2 - "No. 2 at Quarry Hill terminus Bendigo" 1187.3 - "No. 2 at Quarry Hill terminus Bendigo" 1187.4 - "No. 3 at Eaglehawk terminus" 1187.5 - "No. 18 in Mt Korong Road, Long Gully at cnr of Havilah Road (Eaglehawk Route)" 1187.6 - "No. 7 in Nolan St. Bendigo, at Cnr of McCrae St., near lake Weeroona, (North Bendigo Route)' 1187.7 - "No. 19 at North Bendigo terminus" 1187.8 - "No. 2 at Quarry Hill terminus" 1187.9 - "No. 21 in McCrae St. Bendigo, near Nolan St. (North Bendigo Route) 1187.10 - "4 and 26 at Alexandra Fountain, Charing Cross Bendigo" 1187.11 - "Truck of Bogie Car, Bendigo Tramways" 1187.12 - "No. 19 in Pall Mall at Charing Cross, Bendigo" 1187.13 - "Birney car No. 11 entering Pall Mall from View St. at Charing Cross Bendigo" 1187.14 - "No. 7 in Pall Mall at Charing Cross, Bendigo" 1187.15 - "No. 18 at Alexandra Fountain, Charing Cross, Bendigo" 1187.16 - "No. 2 at Quarry Hill terminus, Bendigo" 1187.17 - "No. 26 at Alexandra Fountain, Charing Cross, Bendigo" tramways, trams, bendigo, quarry hill, eaglehawk, north bendigo, maximum traction, night photo, tram 2, tram 3, tram 4, tram 7, tram 11, tram 18, tram 19, tram 21, tram 26 -
 Ballarat Tramway Museum
Slide - 35mm slide/s, Noel Simons, 21/11/1962 12:00:00 AM
Set of 17 transparencies taken on 21/11/1962 on Kodak mounts. 1188.1 - Bendigo No. 11 at Depot Junction McCrae and Arnold St. with driver/conductor changing points. 1188.2 - Bendigo No. 4 at Charing Cross, side on photo, with City Club Hotel and Alexandra Fountain in the background. Tram has Castrol and SEC 'Electric Cooking' ads. 1188.3 - Bendigo No. 4 climbing View St. after tram has passed photographer. Tram has Streets Ice Cream and Cohns Soft Drinks ad on rear dash panel. In the background are the buildings in View St., including the Princess Theatre. Tram has destination of Eaglehawk. 1188.4 - Trams 2 and 4 crossing at the California Gully or Thorpe St Loop. 1188.5 - Bendigo 4 in Mt Korong Road. Tram inbound with destination of Quarry Hill, just leaving Garden Gully Loop. 1188.6 - Bendigo 4 and 17 crossing at the Hayes St. or Iron Bark Gully Loop. No. 17 bound for Eaglehawk, No. 4, Quarry Hill. 17 has two SEC roof ads and a white horse whiskey ad. 1188.7 - No. 17 bound for Eaglehawk, soon after leaving California Gully. Has large mullock heap in background. 1188.8 - Bendigo 2 and 17 crossing at the Thorpe St. or California Gully Loop. Has butchers shop in background. 1188.9 - Bendigo 17 at the Eaglehawk terminus. Has destination of Quarry Hill. In background is the hotel and shops at the terminus, showing ads for "Melbourne Bitter". Tram has two SEC 'Electric Cooking' ads. Driver and conductor about to assist two lady passengers with a pram and baby. 1188.10 - No. 17 at Eaglehawk terminus, awaiting departure. Has Eaglehawk Town Hall and Post Office in background. Tram has a Whitehorse Whiskey ad on the front dash panel. 1188.11 - No. 3 in High St. Eaglehawk, with destination of Eaglehawk. Has the shops on the south side of High St. in the background, including the Eaglehawk fish shop. Tram has two roof ads, one an SEC roof ad, and Cohns Drinks and Streets Ice cream ads on front dash panel. 1188.12 - as above, but after tram has passed photographer. Note the centre of the road poles. 1188.13 - No. 2 outbound for Eaglehawk at the intersection of Mt. Korong Road and the Calder Highway. Photo taken after the tram has passed the photographer. Has an Ampol service station in the background. 1188.14 - No. 11 leaving the Bendigo depot, crossing the bridge, with the Scrubber car in the background. 1188.15 - No. 21 at the North Bendigo terminus. Tram has destination of Golden Square and Cohns drink ad on front dash and two roof ads on side. 1188.16 - No. 11 on Golden Square route, in High St. at intersection with Old High St. 1188.17 - No. 11 at the Golden Square terminus, conductor turning the pole. Hotel on the left side of the photo. Note the road works barrier and red flag behind the tram. Slide has an end of roll mark on the right hand side of the image.Information written on in black ink and date stamped on purple ink. 1188.1 - "Birney car No. 11 in McCrae St. at Cnr of Arnold about to run into depot, Bendigo" 1188.2 - "No. 4 at Alexandra Fountain, Charing Cross Bendigo" 1188.3 - "No. 4 climbing the View St. Hill from Charing Cross, Bendigo (Eaglehawk Route)" 1188.4 - "No. 4 and 2 at Thorpe St. Loop, California Gully" 1188.5 - "No. 4 in Mt Korong Rd., Long Gully, Near Havilah Rd. (Bendigo) (Eaglehawk Route)" 1188.6 - "Nos. 17 and 4 crossing on Hayes St. Loop, Ironbark, Bendigo" 1188.7 - "No. 17 soon after leaving California Gully (Eaglehawk Route)" 1188.8 - "No.2 and 17 crossing on Thorpe St. Loop, California Gully (Eaglehawk Route)" 1188.9 - "No. 17 at Eaglehawk terminus" 1188.10 - "No. 17 at Eaglehawk terminus" 1188.11 - "No. 3 in High St. Eaglehawk" 1188.12 - "No. 3 nearing Eaglehawk terminus" 1188.13 - "No. 2 in Mt. Korong Rd., Ironbark. Calder highway on left (Eaglehawk route) 1188.14 - "Birney car No. 11 leaving Bendigo depot. Scrubber car at rear" 1188.15 - "No. 21 at North Bendigo Terminus" 1188.16 - "Birney car No. 11 in High St. Bendigo at intersection with Old High Street (Golden Square Route)" 1188.17 - "Birney Car No. 11 at Golden Square terminus, High St., Bendigo". tramways, trams, bendigo, depot junction, charing cross, view st., eaglehawk, north bendigo, golden square, tram 2, tram 3, tram 4, tram 11, tram 17, tram 21, tram scrubber -
 Ballarat Tramway Museum
Slide - 35mm slide/s - set of 3, Noel Simons, 22/11/1962 12:00:00 AM
Set of 3 transparencies taken on 22/11/1962 on Kodak mounts. 1190.1 - No. 7 (bound for North Bendigo) at the Charing Cross stop with No. 19 just left for Quarry Hill. Has the buildings on the south side of High St. in the background, including RACV building. No. 7 has front dash panel ad for Streets ice cream, and roof ads for Ilford Film and an SEC "Cook with Electricity". Passengers are boarding the tram. 1190.2 - Bendigo No. 2 at Charing Cross with fountain in the background and other buildings on the south side of High St. Tram has two SEC roof ads - good side on view - "Electric Cooking - Matchless" and "Switch to Electric Cooking". 1190.3 - Nos. 19, 2 and 7 at Charing cross with a Austin ? motor car. Has buildings on the south side of High St. in the background, along with SEC and Ilford film roof ads.Information written on in black ink and date stamped on purple ink. 1190.1 - "Nos. 19 and 7 at Alexandra Fountain, Charing Cross, Bendigo" 1190.2 - "No. 2 at Alexandra Fountain, Charing Cross, Bendigo" 1190.3 - "Nos. 19, 2 and 7 at Alexandra Fountain, Charing Cross, Bendigo" tramways, trams, bendigo, charing cross, alexandra fountain, tram 2, tram 7, tram 19 -
 Ballarat Tramway Museum
Slide - 35mm slide/s - set of 24, Noel Simons, 20/05/1971 12:00:00 AM
Set of 24 transparencies taken on 20/5/1971 on Kodak mounts. 1195.1 - Bendigo 19 arriving at Charing Cross en route to North Bendigo with Fountain Plaza and the City Family Hotel in the background. No. 19 has two roof ads for the SEC. -'Electricity better for cooking' and 'Everything's under control in my all electric kitchen' 1195.2 - as above, but standing at the Charing cross stop, with the Beehive Stores and other buildings along the east side of Pall Mall in the background. 1195.3 - No 21 ex Golden Square crossing View St. trackwork in front of No. 25 waiting to depart for Quarry Hill. No.21 has two roof ads (as for No.19 in 1195.1) and No.25 has one SEC roof ad and another. Ezywalkin sign in the background, and Fountain Plaza. 1195.4 - as for 1195.3, but after 21 has arrived and 25 left for Quarry Hill. Has Ezywalkin store and the Beehive store in the background. 1195.5 - No. 5 at the Eaglehawk terminus. Photo taken with a cannon in foreground looking along High St. Eaglehawk. Has shops on the west side of High St. in the background. 1195.6 - No. 5 at the Eaglehawk terminus, close up of the rear of the tram - note tow bar arrangement. Has destination of Quarry Hill. 1195.7-Nos.25 and 5 crossing at the Thorpe St. Loop, California Gully. No. 25 bound for Eaglehawk (has SEC Briquette and electric cooking roof ads) and 5 en route for Quarry Hill with a SEC and Cinzano roof ad. 1195.8 - as for 1195.7, but after trams have passed each other. Has Borough Auto Service building in the background. 1195.9 - No. 5 in Mt Korong Road, towards Bamard Street, photo taken after tram has passed photographer. 1195.10 - No. 30 at the Golden Square terminus with the Milk Bar on the right hand side of the photograph. 1195.11 - No. 30 inbound at Fire Station Loop, High St. Golden Square. Has old fire station in the background. Passengers are boarding the tramcar. 1195.12 - No. 30 in High St, bound for North Bendigo between Vine and Wattle Streets. 1195.13 - No. 5 bound for Eaglehawk waits at Iron Bark Gully Loop, at Hayes St. 1195.14 - No. 5 and No. 2 crossing at Iron Bark Gully Loop. 1195.15 - No. 5 bound for Eaglehawk leaving the Manchester Loop, Long gully. 1195.16 - No. 5 passing William Street, Long Gully en route to Eaglehawk. 1195.17 - No. 5 just before the California Gully Crossing Loop. 1195.18 - Nos. 5 and 26 crossing at California Gully crossing Loop. No. 5 heading to Eaglehawk, 26, Quarry Hill. 1195.19 - No. 5 in High St. Eaglehawk with Bob Moyle's Victoria Hotel and the TAB in the background. 1195.20 - No. 5 in High St. Eaglehawk approaching the terminus. Photo taken after the tram has passed the photographer. Has Foodland store and J. Best Fruit supply in the background, along with Eaglehawk Town Hall. 1195.21 - No. 5 at the Eaglehawk terminus, photo taken along seldom used track along High St. 1195.22 - as for 1195.22 - but at the very end of the track. 1195.23 - No. 5 en route for Quarry Hill climbs High St. Eaglehawk with the Victoria Hotel and Eaglehawk Town Hall in the background. 1195.24 - No. 5 and 25 crossing at Jobs Gully Loop. Note 25 has a black on white destination roll, while No. 5 has a white on black destination roll. Information written on in black ink and date stamped on purple ink. 1195.1 - "No. 19 arrives at Charing Cross Bendigo from Golden Square" 1195.2 - "No. 19 about to leave Charing Cross for North Bendigo" 1195.3 - "No. 25 awaiting departure for Quarry Hill, watches No. 21 arrive at Charring Cross from Golden Square" 1195.4 - "No. 21 on North Bendigo service and No. 25 on Quarry Hill run await departure at Charing Cross" 1195.5 - "No. 5 at Eaglehawk terminus" 1195.6 - "No. 5 at Eaglehawk terminus" 1195.7 - "Nos. 5 and 25 crossing at Thorpe St. Loop, California". 1195.8 - "Nos. 25 and 5 crossing Thorpe St. Loop, California Gully". 1195.9 - "No. 5 descending Mt Korong Rd. towards Bamard St." 1195.10 - "Birney car No. 30 at Golden Square terminus" 1195.11 - "Birney car No. 30 in High Street near Thistle Street (Fire Station Loop)" 1195.12 - "No. 30 in High St. between vine and Wattle Streets" 1195.13 - "No. 25 at Hayes Street Loop Iron Bark". 1195.14 - "Nos. 2 and 5 crossing at Hayes Street Loop Iron Bark" 1195.15 - "No. 5 at Manchester Loop opposite Havilah Road, Long Gully" 1195.16 - "No. 5 passing William Street, Long Gully". 1195.17 - "No. 5 at California Gully" 1195,18 - "Nos. 26 and 5 at Thorpe St. Loop, California Gully". 1195.19 - "No. 5 in High St. Eaglehawk". 1195.20 - "No. 5 approaching Eaglehawk terminus" 1195.21 - "No. 5 at Eaglehawk terminus" 1195.22 - "No. 5 at Eaglehawk terminus" 1195.23 - "No. 5 in High St. Eaglehawk" tramways, trams, bendigo, charing cross, eaglehawk, california gully, golden square, iron bark gully, jobs gully, tram 2, tram 5, tram 19, tram 21, tram 25, tram 26, tram 30 -
 Ballarat Tramway Museum
Slide - 35mm slide/s - set of 25, Noel Simons, 26/02/1972 12:00:00 AM
Set of 25 transparencies taken on 26/2/1972 on Kodak mounts. 1204.1 - Bendigo No. 5 - just arrived at Manchester Loop near Havilah Road, Long Gully. Photo taken after tram has passed photographer. 1204.2 - No. 26 in Backhaus St. Long Gully passing William St, en route to Quarry Hill. Photo taken after tram has passed photographer. 1204.3 - No. 5 climbing the High St. Hill Eaglehawk, heading for Quarry Hill with the buildings on the West side of High St. in the background, including the Eaglehawk Town Hall. 1204.4 - as for 1204.3, but tram close up. 1204.5 - as for 1204.3, but after tram has passed photographer. 1204.6 - No. 5 at intersection of Mt Korong Road Ironbark and Calder Highway, with the AMPOL service 'station in the background. Photo taken after tram has passed photographer. 1204.7 - No. 26 en route to Quarry Hill shortly after leaving Needle Loop, passing William St., Long Gully. 1204.8 - No. 5 at California Gully Loop, picking up a passenger, with the shops at Long Gully in the background. Photo taken after tram has passed photographer. 1204.9 - No. 5 in Long Gully, en route to Quarry Hill. Photo taken after tram has passed photographer. 1204.10 - No. 2 at Eaglehawk terminus with the Eaglehawk Town Hall and Post Office in the background. Tram has two SEC roof ads. 1204.11 - No. 2 at Eaglehawk terminus, close up. 1204.12 - as for 1204.11, but through the park gates. 1204.13 - as for 1204.11, but with tram stop shelters in the foreground and buildings on the West side of High St in the background. 1204.14 - No. 2 in Mt. Korong Rd, midway between California Gully Loop and Needle Loop. Photo taken after tram has passed photographer. 1204.15 - No. 5 in Long Gully, en route to Quarry Hill. 1204.16 - as for 1204.15, but with trams departed loop. Has an ESSO service station in the background. 1204.17 - No. 26 leaves Charing Cross up View St.. Photo taken after tram has passed photographer. Has Armstrong Tyre Service, Cohns Drinks ad on a building and the T&G building in the background. Also Firestone ads on the tyre service building. 1204.18 - No. 5 waits at Charing Cross with the Alexandra Fountain in the background. Tram has two SEC roof ads, 'Everything s fine in my all electric kitchen' and 'Electricity Best for Cooking'. Has RACV, Colonial Mutual Life buildings in the background and the planting areas around Charing Cross gardens in the foreground. 1204.19 - No. 21 en route to North Bendigo arrives at Charing Cross, with passengers waiting to board. No. 5 in the background. In the background is the Fountain Gate Plaza building and the City Family Hotel. 1204.20 - as for 1204.19, but with No. 7 en route to Golden Square. 1204.21 - as for 1204.19, but closer up. 1204.22 - as for 1204.18 1204.23 - No. 25 in Nolan St. near the crossing of Bendigo Creek, running a special tram tour. 1204.24 - No. 25 on a special charter, in Weeroona Ave. at Cnr of Caledonia St. passing the Gas works. 1204.25 - Nos. 25 (showing Golden Square), 7 and 26 at Charing Cross. Has fountain in the background.Information written on in blue ink and date stamped on purple ink. 1204.1 - "No. 5 at Manchester Loop, near Havilah Rd. Long Gully." 1204.2 - "No. 26 in Backhaus St. Long Gully passing William St." 1204.3 - "No. 5 in High St. Eaglehawk." 1204.4 - "No. 5 in High St. Eaglehawk." 1204.5 - "No. 5 in High St. Eaglehawk." 1204.6 - "No. 5 in Mt. Korong Rd., Ironbark, passing Calder Highway Junctn." 1204.7 - "No. 26 shortly after leaving Needle Loop, passing William St., Long Gully. No. 5 cresting hill in distance." 1204.8 - "No. 5 at California Gully Loop." 1204.9 - "No. 5 in Long Gully" 1204.10 - "No. 2 at Eaglehawk terminus." 1204.11 - "No. 2 at Eaglehawk terminus." 1204.12 - "No. 2 at Eaglehawk terminus." 1204.13 - "No. 2 at Eaglehawk terminus." 1204.14 - "No. 2 in Mt. Korong Rd, midway between California Gully Loop and Needle Loop. 1204.15 - "Nos. 2 and 26 crossing at Long Gully." 1204.16 - "No. 26 leaves Long Gully loop for Eaglehawk as No. 2 pulls out of the far end towards Bendigo" 1204.17 - "No. 26 beginning the climb up View St. from Charing Cross." 1204.18 - "No. 5 at Charing Cross." 1204.19 - "No 21 arrives at Charing Cross from Golden Square while No. 5 awaits departure time for Eaglehawk." 1204.20 - "Nos. 7, 21, and 2 (behind which is No. 5) at Charing Cross." 1204.21 - "Nos. 7, 21, and 2 at Charing Cross." 1204.22 - "No. 5 at Charing Cross." 1204.23 - "No. 25 in Nolan St. near Bendigo creek crossing" 1204.24 - "No. 25 in Weeroona Ave. at cnr of Caledonia St." 1204.25 - "Nos. 25, 7, 26 and 2 (behind 26) at Charing Cross."tramways, trams, bendigo, eaglehawk, long gully, california gully, charing cross, north bendigo, tram 2, tram 5, tram 7, tram 21, tram 25, tram 26 -
 Ballarat Tramway Museum
Slide - 35mm slide/s - set of 23, Noel Simons, 26/02/1972 12:00:00 AM
Set of 23 transparencies taken on 26/2/1972 on Kodak mounts. 1205.1 - Bendigo No. 25 on a special tour at Fire Station Loop, en route to Golden Square. 1205.2 - No. 21 and 25 crossing at Fire Station Loop, note photographers on the ground. No. 21 bound for North Bendigo. 1205.3 - as for 1205.3, but with trams departing loop and fire station in the background. 1205.4 - No. 25 at Golden Square Hotel with 'Rodda's Golden Square Hotel' in the background. Tram on a special tour, but showing destination of North Bendigo. 1205.5 - as for 1205.4 - but showing special. Has the end of the track in the photograph. 1205.6 - Nos. 7 and 25 (on a special tour) crossing at Myrtle St. Loop. 1205.7 - No. 7 leaving Myrtle St. loop with the mine poppet head in the background. Photo taken after tram has passed photographer. (Print made of this slide 10/2001 for use in the Gold Gold Gold exhibition of 10/2001 - See Reg. item 1979. 1205.8 - No. 25 entering depot. Tram showing 'special'. Tennis court on right has players. Photo taken after tram has passed photographer. 1205.9 - No. 24 (showing 'special') and No. 20 (showing 'Long Gully') at Bendigo Depot. 1205.10 - No. 24 on a special charter, leaving Bendigo depot. Tram has two 'Johnnie Walker' roof ads. 1205.11 - Bendigo depot with 29, 25 and a bogie car inside the depot doors. 1205.12 - As for 1205.11, but with 28 and 29. 1205.13 - No. 24 standing at front entrance of Bendigo depot with No. 20 in the background. 1205.14 - No. 24 running out into McCrae St showing special, with conductor on front step. 1205.15 - No. 24 in Caledonia St. at corner of Thunder St with the Gasworks in the background. 1205.16 - No. 5 en route for Quarry Hill at Charing cross with No. 26 (en route for Eaglehawk) about to arrive. Has former crossover at this location in the foreground. Has the Ezywalkin building in the background. 1205.17 - No. 5 and 26 at Charing Cross, with the Alexandra Fountain in the foreground and the Beehive and Ezywalkin buildings in the background. No.26 has two SEC roof ads. 1205.18 - Charing Cross looking along Pall Mall with trams 7 and 21 and 26 in the picture. 1205.19 - Charing Cross, with 21 departing for Golden Square and No. 5 heading for Quarry Hill. Has the Ezywalkin and the Beehive buildings in the background. 1205.20 - as for 1205.19, but a few moments later. Adjacent pole has a "NO ROAD" letter in reflectors vertically. 1205.21 - Charing Cross with Nos. 25, 21, 26 and 7, looking south from Pall Mall end. 1205.22 - No. 24 crossing Mitchell St. en route for Golden Square, showing 'special' with the Beehive and Ezywalkin buildings in the background. 1205.23 - Charing Cross with Nos. 24, 21 and 7 in the photo and Fountain Plaza in the background. Print of 1205.7 - stored in box D1.Information written on in blue ink and date stamped on purple ink. 1205.1 - "No. 25 at Fire Station Loop High Street, Golden Square." 1205.2 - "Nos. 25 and 21 crossing at Fire Station Loop, near Golden Square." 1205.3 - "Nos. 25 and 21 crossing at Fire Station Loop, near Golden Square." 1205.4 - "No. 25 at Golden Square terminus." 1205.5 - "No. 25 at Golden Square terminus." 1205.6 - "Nos. 7 and 25 crossing at Myrtle St. Loop." 1205.7 - "No. 7 leaving Myrtle St. Loop." 1205.8 - "No 25, entering Bendigo Depot." 1205.9 - "Nos. 20 and 24 at Bendigo Depot." 1205.10 - "No. 24 at Bendigo Depot." 1205.11 - "Nos. 25 and 29 at Bendigo Depot." 1205.12 - "Birney cars 29 and 28 at Bendigo Depot." 1205.13 - "No. 24 (with 20 beyond) at Bendigo Depot." 1205.14 - "No. 24 entering McCrae St. from Arnold St." 1204.15 - "No. 24 in Caledonia St. at cnr of Thunder St." 1204.16 - "No. 5 waits at Charing Cross as No. 26 arrives from Quarry Hill. Note remains of crossover abandoned on relocation in 1965." 1204.17 - "Nos. 5 and 26 at Charing Cross." 1204.18 - "Nos. 26, 7 and 21 at Charing Cross (No. 5 just visible behind No. 26)." 1204.19 - "No. 21 leaves Charing Cross for Golden Square as No. 5 starts off for Quarry Hill." 1204.20 - "No. 21 swings onto the single track Golden Square line as No. 5 heads into Mitchell St. towards Quarry Hill." 1204.21 - "Nos. 25, 21 and 26 watch No. 7 arrive at Charing Cross from Golden Square." 1204.22 - "No. 24 at Charing Cross crossing Mitchell St." 1204.23 - "Nos. 24, 21 and 7 at Charing Cross."tramways, trams, bendigo, golden square, myrtle st., fire station, depot, charing cross, tram 5, tram 7, tram 20, tram 21, tram 24, tram 25, tram 28, tram 29 -
 Ballarat Tramway Museum
Photograph - Colour Photograph/s set of 6, Warren Doubleday, 5/05/2001 12:00:00 AM
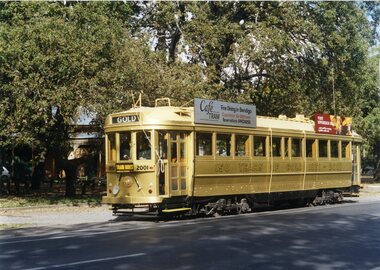
... Parade, just after leaving St. Aidans Drive .6 - Tram 45... along Wendouree Parade, just after leaving St. Aidans Drive .6 ...Set of six colour photographs taken on 5/5/2001 by Warren Doubleday. On Agfa paper. 1826.1 - Gold Tram No. 45 Wendouree Parade, outside the Gardens Kiosk. Copy made Oct. 2001 for the "gold, Gold GOLD" temporary exhibition - colour laser print onto card, with Velcro dots on rear. Stored in box D1 (Display Box) 02/2003. .2 - Len Doull and Frank Puls looking at the George and Noelene Netherway Memorial seat, near the Gardens Kiosk (see May 2001 Fares Please! for details of the photograph and seat.) .3 - ditto with 45 in the background .4 - Close up of the plaque on the seat. .5 - Tram 45, southbound along Wendouree Parade, just after leaving St. Aidans Drive .6 - Tram 45, northbound along Wendouree Parade, near the Gardens crossing. See Fares Please! May 2001gold tram, netherway, memorial, wendouree parade, tram 45 -
 Ballarat Tramway Museum
Photograph - Black & White Photograph/s, Mal Rowe, 29/06/1968 12:00:00 AM
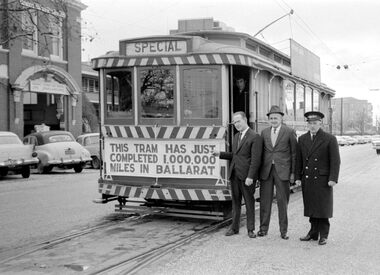
Yields information about the purported achievement of tram 27 reaching 1,000,000 miles and the TMSV Tour, and has a strong association with the people shown in the photograph.Black and white photograph of Tram 27 completing its "millionth" mile in Ballarat on Saturday 29 June 1968 at Hospital Corner. Tram in Drummond St. North. Tram showing "Special", has banner "This tram has just completed 1,000,000 (million) miles in Ballarat" on the front of the tram. Ballarat Base Hospital in background. Standing alongside is Les Denmead, pointing to the sign, ? and Inspector. Photo by Malcolm Rowe. See also Reg Item 1847 and 1850 for details of the event and press clipping. On stippled paper. 2nd copy added 29/5/05 See also Reg Items 7990 to 7995 for other photos of the day by Mal Rowe. Note: A review of the tram car mileages by Dave Macartney, showed that it was actually 900,000, due to a carryover error.On rear in blue ink " Tram No. 27, completed 1,000,000 miles at 3.10p.m. Saturday 29 June 1968 - Hospital Corner" and in black ink "Malcolm Rowe Photograph / T.M.S.V. member".trams, tramways, million miles, hospital corner, tmsv, million miles, tram 27 -
 Ballarat Tramway Museum
Magazine, Melbourne and Metropolitan Tramways Board (MMTB), "Tramway Topics" - M&MTB, 1947 and 1948
16 issues of the, "Tramway Topics" - "The Official Bulletin of The Melbourne & Metropolitan Tramways Board", issues 50, 51, 53 to 61, issued between August 1947 and October 1948. All printed on cream coloured paper. Headings of significance are listed below. Common items were; Retiring and Death Gratuities, Appointments and Promotions, long service records. 918.1 - 50 - August 1947 - 4 pages - Comment from London, Scalers in Sydney, Brisbane Services, PAYE to go, Newcastle wants to own the trams, Diesels in favour, Fares in London and Melbourne, Something like a deficit, a remarkable record (substations), Work of Testing Department, Accidents are Expensive, and Transport Operations Indicted (National City Lines - USA) 918.2 - 51 - Sept. 1947 - 4 pages - Our SW6 tram, Transport in the US, Conductresses again, How bus costs have risen, Footscray Extensions, Of Course you are good (drivers and driving), How Fares Go, 40-Hour week. 918.3 - 53 - November 1947 - 4 pages - No increase in fares, an unusually interesting tram (Glasgow), alcohol and driving do not mix, pedestrian crossing case, how wages have increased, Russia prefers trams, Sydney's "Honesty" joke, Higher Fares wanted, Tramcars as hearses, an editor on Trolley buses, buses lead - but at a cost (Leicester), the Non paying passenger (Sydney) 918.4 - 54 - December 1947 - 4 pages - Christmas 1947 (Chairman's notes on the future), New Stockholm tram, according to use and wont - Birmingham, Trams in the USA, Board re-appointed, Buses few, so coaches are hired (London), transport from Footscray, "Philadelphians must have the best" - so they are given trams!, The Merri Creek Bridge and appreciations. 918.5 - 55 - March 1948 - 4 pages - That 4/- doubts arising over the 5-day week, Buses carried pick-a-back, Sydney to lose L500,000 this year, Trolleybuses, Rapid transit with PCC trams, another compliment (rosters in Perth), the bill for it all (Melbourne tram strike), an Extraordinary award (Washington DC), Prison tram's last load (Sydney), Douglas horse trams, Lord Ashfield, Glasgow's all night buses. 918.6 -56 - April 1948 - 4 pages - The Board's ambassadors (MMTB Conductors), Brisbane's bus routes, Another deficit in sight (Liverpool UK), Poor Paris, The resilient wheel, the 5-day week rosters, a subway and its costs (Detroit), PCC's in Belgium, South London Trams. 918.7 -57 -May 1948 - 4 pages - Spread of Hours Payment - 5 day week, weak breaks, Buses multiply - losses expand (Manchester UK), Static Electricity, L750,000 deficit in Sydney, praise for conductresses, no purchase by Newcastle, a loss at Adelaide, Transport in Switzerland, Denmark's giant bus, new trams for Glasgow, Grants for sports, single deckers out of favour (UK buses), Transport by Water (London). 918.8 - 58 - June 1948 - 8 pages - Stirring up strife (Melb.) No profit - no sharing (Kansas City), Just why - prices and fares in the US, MMTB staff needs from 5 day week, Section fares in the US, trams at L5,500 each (Sheffield), The unfinished dance (Perth and Hay St.), Thanks from Bristol, Interest in Melbourne trams (letters to the Board), Adelaide's Deficit, Fares up in Sydney and Adelaide, Moscow transport, No trolleybuses thankyou in Belgium, thanks to the Traffic staff, the Late Inspector Boardman, 24,000 irregularities (passengers), Sth London trams, Melbourne's trams amazing, Winnipeg's transport Growth and Standing passengers - London. 918.9 - 59 - July 1948 - 4 pages - The Red Light - RACV and red lights on trams, A request from Argentina,, where our SW6's are, the last 5c fare (New York), Work in the Fog, Traffic headaches in the US, Brisbane's Streamlined tram, Safety glass, Now for La Trobe St. The Tramways Band (South St.), Transport Losses in Sydney. 918.10 - 60 - August 1948 - 4 pages - from Pretoria (Comments on Melbourne), Buses with sliding Doors (OPS1), PCC trams, trams of the future (Glasgow), new trams in Rome, Clearing up the Parking Problem (Sacramento), Fantastic figures - world tram car figures - anti tram, Trainer Drivers, the railway trams and disaster to Liverpool trams, Monte Video trams purchased. 918.11 - 61 - September 1948 - 4 pages - The Year's Work (Melbourne), How Absurd (transport management), items from Britain, Tramway Band News, Food from Melbourne (to Scotland floods), London's Extraordinary traffic, New trams for The Hague, who are the road hogs, the La Trobe St. extension, out clothing factory, Preston Workshops, Toil on the tracks, how the money comes in (fares distribution). 918.12 - 62 - October 1948 - 4 pages - Melbourne's tram fares, Bourke St., Sydney's Street Transport, Scientist or Baker (London), Trolleybuses out of favour, London's poor bus fleet, tram and bus fares, The band at Wattle Park, Madras tramway deal, 121 decide for 6000 (Sydney Sunday trams), Preston workshops, A Engineer's tribute, Was the Street Quiz on trams faked? (The Sun). 918.3 - No. 31 - September 1945 - Year in review - trams more reliable than buses, loss on buses to munitions and Fisherman's bend, ticket checking, Hawthorn clothing factory SW6 trams construction, news from cities in Europe, sub-stations. 918.14 - 64 - September 1949 - higher operating expenses and revenue, school children behaviour, headway recording system - communication issues, golf at Wattle Park, Mr Bell lives in Riversdale Rd. 918.15 - 67 - December 1949 - Record Payment to Consolidated Revenue, payment to MFB etc, flat fares, Latrobe St extension - delayed, fare concessions - who pays, 918.16 - 68 - January 1950 - Bourke St conversion - Risson looking for an early start, fitting of radios to MMTB vehicles, Resilient wheels 918.4 - on top edge in pencil is "Mr Russell", and 918.10 ditto.trams, tramways, mmtb, melbourne, tramways -
 Ballarat Tramway Museum
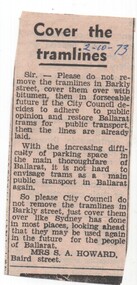
Newspaper, The Courier Ballarat, "Cover the Tramlines" - letter to the Editor, 2/10/1973 12:00:00 AM
Newspaper clipping from The Courier, of 2/10/73 - letter to the Editor - from a Mrs. S. A. Howard of Baird Street Ballarat, asking the tramlines in Barkly St. Ballarat be covered over rather than removed, just in case that are needed in the future. Notes that this was done in Sydney.date in blue ink of "2/1073" in top right hand corner of cutting.trams, tramways, sydney, barkly st., tram line removal, track removal, reinstatement -
 Ballarat Tramway Museum
Photograph - Leaf from a photo album, 1920s
Leaf from a photo album containing 4 black and white photographs pasted onto sheet of brown/grey cardboard with two punch holes at one end. Photos taken early 1920's or just after construction of the Memorial Arch. Photo 1 - "Ballarat" handwritten in pencil at top - Town Hall from the North West taken from a building near Doveton St. Has a Sebastopol tram west bound in Sturt St. passing Town Hall. Photo 2 - "Sturt Street Ballarat" handwritten in pencil at base - Sturt St. Ballarat looking east from most likely the Ballarat City fire station lookout tower. Has a Sebastopol tram travelling eastbound in the photograph. Town Hall in background. No motor vehicles in photograph. Photo 3 - "Memorial Arch, Ballarat" handwritten in pencil at top - photo of the new Memorial Arch at the start of the Avenue of Honour. Photo 4 - "Eureka Stockade, Ballarat" - photo of the Eureka Stockade monument the park.trams, tramways, ballarat, sturt st, memorial arch - avenue of honour, eureka -
 Ballarat Tramway Museum
Photograph - Black & White Photograph/s, Dave Macartney, 23/12/1967 12:00:00 AM
Black and white photograph of SEC Tram 37 in Wendouree Parade just after leaving the Haddon St. Loop, running empty into the City after leaving the depot. Tram showing SPECIAL and has SEC Roof Ad "Every things under control in my all electric kitchen" Photo by Dave Macartney - 23/12/1967. Photocopy made 4/1999 for display purposes. 2nd print added August 2000 - 127H x 177W.2nd copy - has in red ink "37 Haddon St. 23-12-67" / "Keystone Ballarat" and "Neg 1467-5" in corners.trams, tramways, wendouree parade, haddon st., special workings, tram 37 -
 Ballarat Tramway Museum
Photograph - Colour Photograph/s, John Phillips, 1983
Colour photograph of Ballarat No. 27, operated by BTPS, travelling southwards in Wendouree Parade in 1983. Tram has the destination of Carlton St. and the APM roof ad. Photo taken just prior to Gardens Loop. Colour photocopy, laminated, of this photograph on display 4/2000 at 02-02-06. Two further copies of the photo added to archives May 2000 - no damage - from Sales Stock at depot. 4th copy added 24/10/05 - for Display purposes.ballarat, wendouree parade, btps, tram 27 -
 Ballarat Tramway Museum
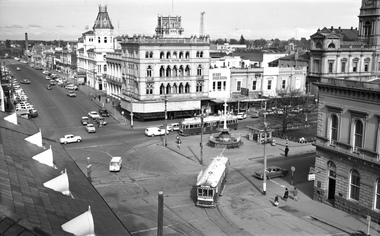
Photograph - Black & White Photograph/s, Victorian Railways, c1940
Yields information about the lower end of Sturt St from the Grenville St intersection show a mid 1940's view - shows types of vehicles, shops and streetscape.Black and white photograph of Sturt St. in the mid 1940's looking from the top of a building in Grenville St. towards the West. Has a number of parked vehicles in kerbs, two people riding horses, a Vacuum Oil Co. truck in the bottom right hand corner and an SEC tram travelling west, just past the City Loop points. Colour photocopy, laminated, of this photograph on display 4/2000 at 02-02-06. Colour postcard of same photograph see Reg Item 2981 and another print see Reg Item 4284. Copy 2 - added 30/7/2007, ex Alan Bradley collection of photographs, to depot 5/2007. State Library of Victoria has negative, VR Collection, Series 2716, Photo Number 842961. See also Reg Item 8329 for a better print. Which shows more detail.trams, tramways, ballarat, sturt st., vr photos, tram 20 -
 Ballarat Tramway Museum
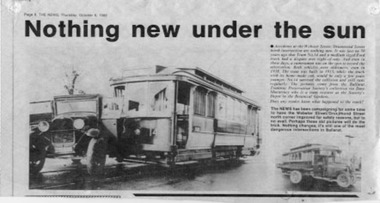
Newspaper, The Courier Ballarat, Nothing new under the sun, 6/10/1988 12:00:00 AM
A newspaper Clipping from The News in 1988. Has two pictures of tram 14 and a utility truck after a collision, accident, between the two just on fifty years ago. Includes a brief story about the accident that happened on the corner of Webster and Drummond St North. See Reg Item 1365.1 > .5 for the larger prints of this photograph.trams, tramways, accidents, trams, drummond st nth, webster st -
 Ballarat Tramway Museum
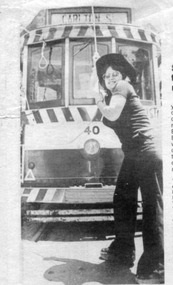
Newspaper, Ballarat News, "In Ballarat, Bendigo and Brazil ...\. Take a tram,\ - it's just the ticket", 29/01/1975 12:00:00 AM
Page 3 of the Ballarat's "The News" of Jan. 29, 1975, containing an article on the pending official opening of the BTPS tramway on Feb. 1, 1975 by Mr. J.C. Trethowan of the SEC. Notes the use of the former tramway system by Bendigo and a Brazilian tramway. Also refers to the collection of the BTPS. Has a continuation to Page 8,- not collected. Has as photograph of Maureen Holmes of Armadale holding onto the trolley rope of tram No. 40 at Carlton St.trams, tramways, btps, tramway opening, wendouree parade, opening