Showing 7141 items
matching exhibitions
-
 Flagstaff Hill Maritime Museum and Village
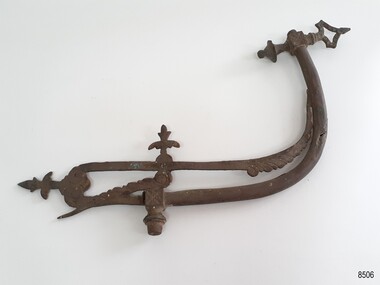
Functional object - Lamp Fitting, circa 1878
This gas pipe fitting was one of a group of artefacts in the McCulloch Collection that were recovered from the shipwreck Loch Ard and were donated together. The fitting could have been from the ship's cargo or a ship’s fitting. Lamps from this era were fuelled by gas. There are other gas lamp fittings in our collection that were recovered from the Loch Ard The object is now one of the shipwreck artefacts in Flagstaff Hill’s Mc Culloch Collection, which includes items recovered from the wrecks of the Victoria Tower (wrecked in 1869) and Loch Ard (wrecked in 1878). They were salvaged by a diver in the early 1970s from the southwest coast of Victoria. Advanced marine technology had enabled divers to explore the depths of the ocean and gather its treasures before protective legislation was introduced by the Government. The artefacts were donated to Queensland’s Department of Environment and Heritage Protection (EHP) by a passionate shipwreck lover and their locations were verified by Bruce McCulloch. In 2017 the Department repatriated them to Flagstaff Hill where they joined our vast collection of artefacts from Victoria’s Shipwreck Coast. The Loch Ard: - The three-masted, square-rigged iron ship Loch Ard belonged to the famous Loch Line which sailed many ships from England to Australia. The ship was built in Glasgow in 1873. The Loch Ard made three trips to Australia and one trip to Calcutta before its final voyage. The Loch Ard left England on March 2, 1878, under the command of Captain Gibbs, bound for Melbourne with a crew of 37, plus 17 passengers and a load of cargo. The general cargo included straw hats, umbrellas, perfumes, clay pipes, pianos, clocks, confectionery, linen and candles, as well as a heavier load of railway irons, cement, lead and copper. There were items included that were intended for display in the 1880 Melbourne International Exhibition, including the famous Loch Ard Peacock. On June 1, 1878, Captain Gibbs was expecting to see land but visibility was reduced by fog. As it lifted, the sheer cliffs of Victoria's west coast came much closer than expected. The captain was unable to steer away and the ship struck a reef at the base of Mutton Bird Island, near Port Campbell. The top deck was loosened from the hull, the masts and rigging came down and knocked passengers and crew overboard, and even the lifeboat crashed into the side of the ship and capsized. Of the 54 people on board, only two survived: the apprentice, Tom Pearce and the young woman passenger, Eva Carmichael. The well-packed Minton porcelain peacock also survived, safe inside its crate. Much of the cargo was washed up, smashed and broken, and some was salvaged. Other cargo is still with the wreck at the base of Mutton Bird Island, now protected by Government law. The artefact is an example of cargo or personal items on board a ship in 1878. It provides a reference point for classifying and dating similar items. This artefact is significant for its association with the sailing ship Loch Ard, one of the best-known, and one of the worst, shipwrecks in Victoria’s history. Flagstaff Hill’s collection of artefacts from Loch Ard is significant for being one of the largest collections of artefacts from this shipwreck in Victoria. It is significant for its association with the shipwreck, which is on the Victorian Heritage Register (VHR S417). The collection is significant because of the relationship between the objects, as together they have a high potential to interpret the story of the Loch Ard. The Loch Ard collection is archaeologically significant as the remains of a large international passenger and cargo ship. It is historically significant for representing aspects of Victoria’s shipping history. Brass decorative gas lamp fitting. Two flat arms of different lengths are joined on either side of a fitting that has a fleur-de-lis-like design. The shorter arm has a J-shaped brass pipe fitted to it with a decorative threaded cube joint part way along, and ends with a triangular tap and knob. The longer arm is also J-shaped and ends with a feather design on it. There are remnants of green paint on the cube fittings and the knob. Recovered from the wreck of the Loch Ard.flagstaff hill, warrnambool, maritime village, maritime museum, flagstaff hill maritime museum and village, shipwreck coast, great ocean road, shipwreck artefact, wreck dive, mcculloch collection, bruce mcculloch, loch ard, 1878, loch line, victorian heritage register, sailing ship, captain gibbs, eva carmichael, tom pearce, mutton bird island, loch ard gorge, migrant ship 1878, cargo ship 1878, lamp fitting, gas lamp fitting, ship’s fitting, ship’s lamp, brass lamp fitting, lighting, domestic lighting, ship’s lighting -
 Glenelg Shire Council Cultural Collection
Administrative record - Hire Purchase Agreement, c. 1939
From Aussie Velos: Alfred George Healing was born in 1868 in the suburb of Richmond, Melbourne (VIC). Starting in the cycle industry as a cycle builder and repairer in 1898, he obtained the Victorian agency for the English “Haddon” bicycle located on Bridge Road, Richmond. With many years behind him in the bicycle industry in 1907 he opened a small shop from borrowing £50 from his sister and began operating as A.G Healing. Importing bicycle parts Healing was quickly gaining a reputation for his quality and service among the cycling community, with steady business growth, Healing stumbled across an error that had been made in a recent order which resulted in twice the number of bicycle parts received. With no finances to pay for them, Healing decided to cycle around Victoria selling these parts to make the money he needed to fix up the order. As Healing travelled across Victoria he found that there was such a large market place for cycling gear that the order was soon fixed. It became apparent that Healing needed to open cycle shops in various locations. By 1912 Healing decided to open up his own proprietary company in Niagara Lane, Melbourne (VIC), the company was surging with enthusiastic cyclists and commuters and other branches began to spread all over state of Victoria. In 1921 Healing’s son Keith joined the firm and became an apprentice bicycle maker and Healing cycles grew more popular and at peak production 25,000 bicycles were made per year. Shops under the name of Healing were now operating across Australia. The business was now transferred to another location of Melbourne House, Post-office place (MELB). In 1926 Duncan and Co. wholesale and retail distributors of automotive parts was absorbed and was occupied in a larger building in Franklin Street (MELB) to maintain the warehouse operations. A.G Healing was now a public company. By 1933 the firm also began to specialize in importing radios and later began to make their own. One of the many Champions who rode on a Healing cycle was W.K “Bill” Moritz. His achievements included winning all major events in Australia and New Zealand during the years of 1936-37 path racing season. In 1936 Healing released a lightweight cycle that would rule in their supreme line-up, built from the lightest possible materials, the frame and forks were chrome plated, stripped for racing weighed exactly 16 1/2 lbs. It was fitted with special “Osgear” three-speed gear and built specially built for D. Byrant. By 1937, Healing cycles were being ridden by many, at the exhibition board track Jack Molloy won the Victorian ten-mile amateur championship, Bill Moritz captured the five mile professional, and Tassle Johnson the five-mile amateur scratch race. These wins brought up the total championships won in one week by Healing cycles to six.A hire agreement (hire purchase) between H.L. Vivian and R&G Finances Pty Ltd, for a Healing 'A' bicycle, with Eadie Coaster Hub brake. -
 Flagstaff Hill Maritime Museum and Village
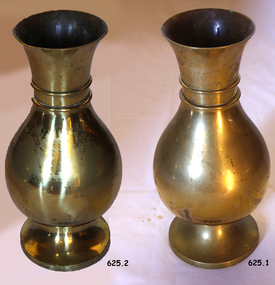
Functional object - Vase, T. Gaunt & Co, circa 1944
This pair of brass altar vases is from the St. Nicholas Seamen’s Church, 139 Nelson Place, Williamstown, Victoria, during religious services there. The Church was operated by the Mission to Seamen organisation. Each vase is inscribed with the donors' names and the year of presentation - Margaret R. Pearson 1944, Mrs B Raybould 1944, - and the maker's name T. Gaunt & Co. The two donors presented the vases to St Nicholas Seamen's Church in Williamstown as part of the furniture and furnishings for the new church that officially opened in 1944. T. Gaunt & Co. engraved on both vases. T. Gaunt & Co. of Melbourne, is a manufacturer, importer and retailer of a wide variety of goods including jewellery, clocks and watches, navigational and measuring instruments, dinnerware, glassware and ornaments. Thomas Gaunt's photograph was included in an album of security identity portraits of members of the Victorian Court, Centennial International Exhibition, Melbourne, 1888. THE MISSIONS TO SEAMEN (Brief History: for more, see our Reg. No. 611, Set of Pews) The Missions to Seamen, an Anglican charity, has served seafarers of the world since 1856 in Great Britain. It symbol is a Flying Angel, inspired by a Bible verse. Today there are centr4es in over 200 ports world-wide where seamen of all backgrounds are offered a warm welcome and provided with a wide range of facilities. In Victoria the orgainsation began in Williamstown in 1857. It was as a Sailors’ Church, also known as ‘Bethel’ or the ‘Floating Church’. Its location was an old hulk floating in Hobson’s Bay, Port of Melbourne. It soon became part of the Missions to Seamen, Victoria. In the year 2000 the organisation, now named Mission to Seafarers, still operated locally in Melbourne, Portland, Geelong and Hastings. The Ladies’ Harbour Lights Guild was formed in 1906 to support the Missions to Seamen in Melbourne and other centres such as Williamstown. Two of the most significant ladies of the Guild were founder Ethel Augusta Godfrey and foundation member Alice Sibthorpe Tracy (who established a branch of the Guild in Warrnambool in 1920). The Guild continued its work until the 1960s. In 1943 a former Williamstown bank was purchased for the Missions to Seaman Club. The chapel was named St Nicholas’ Seamen’s Church and was supported by the Ladies’ Harbour Lights Guild, the Williamstown Lightkeepers’ Auxiliary and the League of Soldiers’ and Sailors’ Friends. It ceased operation in 1966. A Missions to Seamen Chapel and Recreation Room was a significant feature of ports during the late 1800s and into the 1900s. It seemed appropriate for Flagstaff Hill to include such a representation within the new Maritime Village, so the Melbourne Board of Management of Missions to Seamen Victoria gave its permission on 21st May 1979 for the entire furnishings of the Williamstown chapel to be transferred to Flagstaff Hill. The St Nicholas Seamen’s Church was officially opened on October 11, 1981 and closely resembles the Williamstown chapel. This par of vases is significant historically for its origin in the St Nicholas Mission to Seamen's Church in Williamstown, established in 1857 to cater for the physical, social, and spiritual needs of seafarers. It originated in Bristol, England when a Seamen's Mission was formed in 1837. The connection of pair of vases to the original donation to the Mission to Seamen highlights the strong community awareness of the life of people at sea, their dangers and hardships, and their need for physical, financial, spiritual and moral support. Vase: pair of two polished brass altar vases, round, pear-shaped, bulbous body on a round pedestal, two neck rings and flared lips. Inscriptions on both vases in script around the base. Made by T. Gaunt & Co. One was presented to the church by Margaret R Pearson and the other presented by Mrs B. Raybould in 1944 The vases are part of the St Nicholas Seamen's Church Engraved on the 625.1 "Presented By Margaret R. Pearson 1944." Engraved on 625.2 "Presented By Mrs B. Raybould. 1944." Both engraved "T GAUNT & Co"flagstaff hill maritime museum and village, flagstaff hill, warrnambool, maritime museum, maritime village, shipwreck coast, great ocean road, religion, religious service, st nicholas seamen’s church, williamstown, missions to seamen victoria, brass vases, metal craft, brassware, altar vase, church vase, mrs r raybould, margaret r pearson, t gaunt & co, church furnishing -
 Federation University Historical Collection
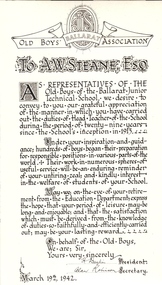
Photograph - Black and white printed card, Ballarat Old Boys' Association presentation to Albert W.Steane, 1942, 1942
Albert Steane was born at Sandhurst (now known as Bendigo) in 1877. He attended the Gravel Hill State School until the fourth class, then transferred to the Central School 1876 where he gained the Merit Certificate. The monitor system of teacher training had been introduced and he passed fourth, third, second and first class pupil teacher. At about 16 years of age he was appointed a teacher monitor at 12 pounds per annum. Albert Steane was awarded the Teachers' Certificate of Competency in 1897. The teaching of woodwork in Victoria began in 1901 and Steane was chosen, among 18 others for the inaugural training course at Queensberry State School in Melbourne. Steane was known for the teaching of Sloyd or woodwork, which was an important point in his career. He opened the Sloyd (woodwork) Centre in 1902 at the Ballarat East Art School (later known as the Ballarat East Free Library) at the School of Mines and Industries Ballarat (SMB). In 1913 Albert Steane, the young head of the East Ballarat Sloyd Centre, was appointed to establish a junior technical school in Ballarat becoming the first headmaster of the Ballarat Junior Technical School. Steane's lifelong interest in gymnastics brought him as much fame as his reputation as a headmaster. He organised the Education Department's gymnastics display at Bendigo's Golden Jubilee Exhibition in 1902. He played a major role in the establishment of the Ballarat Y.M.C.A. and from 1906 responsible for evening classes in physical culture. In 1968, aged 91, he was made a Life Member of the Association. Steane was in complete command of his school, his staff and students. It must be remembered that schooling was not as permissive, tolerant and informal as today. A.W. Steane retired in 1942 after 29 years as Headmaster of Ballarat Junior Technical School. Many visible memorials are evident of his time and influence on the growth of the Junior Tech. A good school also lives on in the memories and affections of its old boys. Many remained in touch to talk about "the old days". A simple lesson he taught was "Win Through". No matter what path was chosen by the students, many were true to his teaching. On his retirement, Mr Jeffery was appointed the new Headmaster. On 19 March 1942, a farewell meeting was held presided over by Mr Jeffery. Those present included A.F. Heseltine, G. Netherway (representing the Old Boys' Association), N. McHuthchinson (District Schools' Inspector), G.A. Simcock (High School), E. Youlden (Pleasant Street State School), and J.A. Ewins (Citizens' Representative). The following presentations were made: G Netherway - nickel-plated smokers' stand with the Old Boys' badge A. Robinson - an illuminated scroll (B&W photograph above) C. Jeffery - lounge room clock with inscribed silver plate Steane died, aged 93 years, on 13 July 1970, at Sydney, leaving his widow Grace Elliott Steane and children Eric and Violet. Black and white image of an illumination for the retirement of Albert W. Steane. Written in calligraphy and signed by the President and Secretary of the Old Boys' Association. Dated March 19th 1942 .1) Framed colour illumination with ribbons in School coloursSignatures of H. Daykin, President and Alan Robinson, Secretary of the Ballarat Junior Technical School Old Boys' Association. Dated March 19th 1942.albert steane, sandhurst, bendigo, gravel hill state school, teacher monitor system, teaching certificate, sloyd, ballarat sloyd centre, gymnastics, y.m.c.a., ballarat junior technical school, n. mchutchison, a heseltine, george netherway, c jeffery, old boys' association, illuminated scroll, h. daykin -
 Flagstaff Hill Maritime Museum and Village
Instrument - Ship Log, Early 20th Century
In times past the only way to measure a ship’s speed was to throw a wood log into the water and observe how fast it moved away from the ship. In the 16th century, the log was fastened to a rope knotted at set intervals. The log was thrown over the stern (back) of the vessel and a crew member counted the number of knots that were paid out in a set time. From this, they could estimate the vessel's speed through the water. This was known as streaming the log and is also the derivation of the knot as a measurement of nautical speed. Various manufacturers of nautical equipment had sought over the years to perfect the operation of determining a ship's speed and it wasn't until Thomas Walker and his son Ferdinand developed a mechanical system that eventually made this task became easy for marine navigators. Thomas Walker & Son were internationally renowned in the manufacturing of ship logs the founding father, Thomas Walker (1805–1871), an engineer in Birmingham, patented his mechanical log in 1878 which was a recording instrument that attached to a rail at the stern of a vessel connected by a long cord with a rotor which was towed behind the ship. The instrument dial then recorded the distance travelled. Thomas Walker first went into business to manufacture stoves at 58 Oxford Street Birmingham. Walker’s self-feeding stove was widely lauded at the Paris Exhibition of 1855, winning a prize medal and kickstarting the first of many notable innovations for the Walker family's manufacturing business. However, it wasn’t until working on an earlier ship’s log model invented by his Uncle that Thomas Walker became interested in the further development of this device, used to ascertain a ship’s speed. Walker continued to improve on the common log for the company of Massey & Sons and these improvements were deemed revolutionary. This log became a firm favourite of the West India Association (a British-based organisation promoting ties and trade with the British Caribbean), being the most common log in use for two generations. It took until 1861 for Thomas Walker and his son, Thomas Ferdinand Walker (1831-1921) to patent the first Walker log of many. Together, with the introduction of the A1 Harpoon Log two years later, they established the Walker Log Business as a force to be reckoned with. By his passing in 1871, Thomas Walker Snr had not only founded a family business with considerable staying power but also instilled a tradition of public service. Having sat as a representative on the Birmingham Town Council for 15 years and played an active role in public works, he was soon given the nickname of ‘Blue Brick Walker’. Much like his father, Thomas Ferdinand Walker changed the face of the maritime industry. His patent of 1897, the ‘Cherub’ log, was a notable departure from the past providing a far more accurate reading and replacing the majority of logs of the age. They were the first to produce an electric log (Trident) and the Walker factory was one of the first to introduce the 48-hour work week for employees.The ship log was invented and made by a significant marine instrument maker and innovator of machinery. It demonstrates the huge leap taken to improve navigational accuracy at sea with an instrument that was in use for decades.Ships Log, Walker Trident electric motor, in wooden box with instructions inside box. The motor dial with electric cord is still inside box.Inscription "Admiralty patent number 3332" and "Walker Trident Electric Ship Log (Mark III), 15-25 volt". On top of lid, hand written, is "G TAYLOR"flagstaff hill, warrnambool, shipwrecked-coast, flagstaff-hill, flagstaff-hill-maritime-museum, maritime-museum, shipwreck-coast, flagstaff-hill-maritime-village, ships log, thomas walker & son, electric ships log, marine navigation, thomas ferdinand walker, ship log -
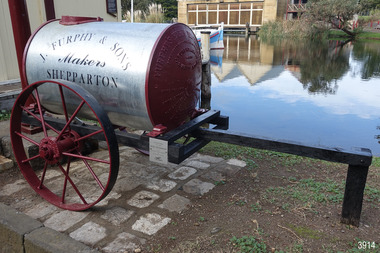 Flagstaff Hill Maritime Museum and Village
Vehicle - Furphy Water Cart, J. Furphy & Sons, c. 1942
This horse-drawn, two-wheeled cart with a tank, is known as a Furphy Farm Water Cart that was made in Shepparton, northern Victoria, c. 1942. John Furphy (1842-1920) was born in Moonee Ponds, in 1842 to Irish immigrant parents and subsequently raised in the Yarra Valley before the family moved to Kyneton in central Victoria, where he completed an apprenticeship with the firm Hutcheson and Walker. Murphy began operations of his own at a site on Piper Street in Kyneton in 1864. He relocated for a business opportunity and founded the first blacksmiths and wheelwrights shop in the newly surveyed town of Shepparton in 1873. Furphy invented many farming tools and machines including a patented grain-stripper, and won awards at the 1888-89 Melbourne International Exhibition. His most famous invention is the Furphy Farm Water Cart, designed in the 1880s, at a time when water for most households and farms was carted on wagons in wooden barrels. The Furphy’s water cart is a single item that combines a water metal tank and a cart. The design of the cart was simple yet effective, and became popular very quickly and established itself as a vital piece of farming equipment. The water cart has had a number of words cast into its ends over many years. References to the foundry’s location in Shepparton, as well as advertising of other products also manufactured by J. Furphy & Sons were present on the ends. However, the most significant set of words to feature on the tank, was a poem encouraging continual improvement: ‘Good Better Best, Never Let it Rest, Until your Good is Better, And your Better Best’. During The Great War (1914-1918), the water cart was used by the Australian militarily at a large AIF (Australian Imperial Force) camp in Broadmeadows (Melbourne) where thousands of men were camped for months, before being transported aboard. Furphy Water Carts provided water to the troops, and were usually placed near the camp latrines, which was one of the few places the troops could share gossip and tall tales away from the prying eyes and ears of their officers. The water cart drivers were also notorious sources of information, despite most of their news being hearsay, or totally unreliable. By the time the men of the AIF were in engaged in combat on the Gallipoli Peninsula and the Western Front, the carts used for water supply had no markings and became simply referred to as Furphys. This owed as much to the coining of the term ‘Furphy’, Australian slang for suspect information or rumour. After a number of decades as principally a soldier’s word, 'Furphy' entered the broader Australian vernacular and was used mainly by the political class until recently when the term was taken up by a Australian brewer as a beer brand. This Furphy Water Cart was purchased by Friends of Flagstaff Hill in 2014. The support of local individuals, organisations and businesses enabled its restoration and later its installation alongside the existing late-19th century water pipe stand and 1940s hand pump The Furphy Farm Water Cart is of historical significance as it represents a famous Australian time-saving and energy-saving invention of the 1880s, replacing the labour intensive activity of collecting and dispensing water from barrels and casks on the back of carts. The water cart’s connection with manufacturing companies J. Furphy & Sons and Furphy Foundry are significant for being early Australian businesses that are still in operation today. Furphy carts are of military significance for the role they played during The Great War (1914-1918) in Australian army camps, and theatres of war in Europe and the Middle East, to supply the AIF troops with fresh water. A wooden framed, two-wheeled, horse-drawn cart, fitted with a horizontally mounted, cylindrical metal tank. The tank is made of rolled, sheet steel with a riveted seam, and cast iron ends with cast iron ends. The spoked metal wheels have fitted flat iron tyres and metal hubs. A metal pipe is joined to the outlet. The tank is silver coloured, the ends, wheels and trims are crimson, and the script lettering on tank sides is black. There are inscriptions on the tank, ends, and hubs. The water tank was made in 1942 in Shepparton, Australia, by J. Furphy & Sons and has a capacity of 180 gallons (848 litres). Hub perimeter, embossed “J. FURPHY & SONS” “KEEP THE / BOLTS TIGHT” Hub centre embossed [indecipherable] Tank, each side, painted “J. FURPHY & SONS / Makers / SHEPPARTON” Tank ends, embossed – “FURPHY’S FARM WATER CART” “BORN ABOUT 1880 – STILL ‘GOING STRONG’ 1942” “j. FURPHY & SONS / MAKERS / SHEPPARTON - VIC “ “S - - - - - L MANUFACTURERS” [SPECIAL] “SPIKE ROLLERS” “SINGLE TREES” “PLOUGH WHEELS” “IRON CASTINGS” “LAND GRADERS” “STEEL DELVERS” “CAST IRON PIG” “CHAIN YOKES” “GOOD – BETTER – BEST / NEVER LET IT REST / TILL YOUR GOOD IS BETTER / AND YOUR BETTER – BEST” Image [Stork carrying a baby] above shorthand, transcribed "Produce and populate or perish" Image [Furphy Pig Feeder] beside ‘Cast Iron Pig’ Shorthand, transcribed “"Water is the gift of God but beer and whiskey are concoctions of the Devil, come and have a drink of water"warrnambool, flagstaff hill maritime museum, water cart, furphy cart, furphy tank, furphy farm water cart, furphy, john furphy, john furphy & sons, furphy foundry, kyneton, shepparton, mobile water tank, jinker, hutchinson & walker, blacksmith, farm equipment, implement maker, tool maker, horse drawn, stork and baby, good, better, best, barrel, tank, first world war, wwi, eastern front, gallipoli, j furphy & sons -
 Chiltern Athenaeum Trust
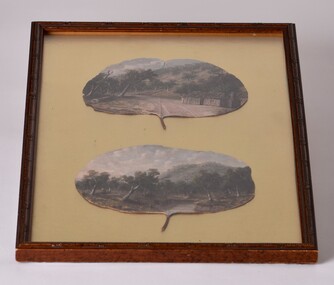
Painting - Oil painting on gumleaf by Alfred William Eustace, circa 1851 to 1907
This gum leaf painting is one of a pair displayed on foil in the same frame. It is typical of many paintings by the self-taught Australian artist Alfred William Eustace (1820-1907). A.W. Eustace, a well-known Australian artist, was born in Berkshire, England, where he was an assistant gamekeeper to the Earl of Craven at Ashdown Park. He migrated to Australia with his wife and children in 1851 and camped on the Ullina and Eldorado Runs on the Black Dog Creek at Chiltern, which was in excess of 50,000 acres of grazing land. A.W. Eustace was employed as a shepherd by Jason Withers and while tending his flocks in the solitude of the bush, Eustace turned his attention to painting and music to while away the long and weary hours. He endeavoured to capture the spirit of the bush painting on board, canvas or tin plate, but as these materials were not always readily available he then started painting on large round eucalyptus leaves from the White and Red Box trees that grew around about him. About 1856 he painted a small picture of the famous Woolshed goldrush and during the next few years became well known in North-East Victoria. John Sadlier, a police officer stationed at Beechworth said that Eustace painted 'some really exquisite scenes. He was of an easy-going dreamy temperament, a student of nature only, despising the works of men. Unfortunately his drawings were on eucalyptus leaves, the largest and roundest he could find and not on canvas, and no doubt have all perished long ago.' In 1876 the Melbourne Age newspaper reported, 'Eustace’s celebrated paintings on gum leaves are again attracting attention,…Mr Eustace is an elegant artist…he seems without effort to catch the colour and spirit of Australian scenery…' In 1864 A.W. Eustace held an Art Union in Albury, and again in 1884 in Ballarat. He exhibited at the Victorian Academy of Arts in 1877 and also held an exhibition of gum leaf paintings at Stevens Gallery, Melbourne in 1893. By 1896 he was receiving orders from heads of states in Europe, with his works acknowledged by Queen Victoria, Emperor Frederick of Germany and the Czar of Russia, as well as the Governors of New South Wales and Victoria. His paintings reflected his ability to paint the sky in his realistic style which is still noted by art critics of the day. A.W. Eustace was also a skillful taxidermist. The collection of birds and animals that can be seen at the Beechworth Museum are examples of his taxidermy skill. When not doing his work, painting or taxidermy, he regularly contributed letters and verse to the Chiltern newspaper, The Federal Standard. A book of verse in his hand writing was presented to The Athenaeum Trust by the Boadle family. In the 1870’s he became interested in spiritualism often being involved in lively debate at lectures and séances. Alfred William Eustace died in 1907 and is buried in the Chiltern New Cemetery with his wife Sarah and one of his daughters, Elizabeth.An oil painting on gum leaf by the well-known Australian artist Alfred William Eustace. He was a self-taught artist during the 19th and early 20th century and a prominent resident of Chiltern. Oil painting on gum leaf by Alfred William Eustace. A scene of a log cabin on Black Dog Creek Road, Chiltern, with Skeleton Hill in the background. The canvas is a juvenile Red Box (Eucalyptus polyanthemos) leaf. It is one of a pair of Eustace gum leaf paintings mounted on gold foil, under glass in a brown frame. Inscription on back. Labels on back: Rehoused by The Centre for Cultural Materials/ Conservation, University of Melbourne "Oil on Gum Leaf"/ by Alfred William Eustace/ Donor:- Cam & Connie Boadle/ Wales U.K. Crescent/ MUSEUM/ GRADE/ 24 OCT 1998/ CONSERVATION BOARD ALBURY/ PICTURE FRAMERS/ Shop 15 & 16/ AMP Lane,/ Albury, 2640/ Ph: 02 6021 7088black dog creek, chiltern, alfred eustace, skeleton hill, gum leaf, painting, eustace -
 Chiltern Athenaeum Trust
Painting - Oil Painting, Alfred Eustace
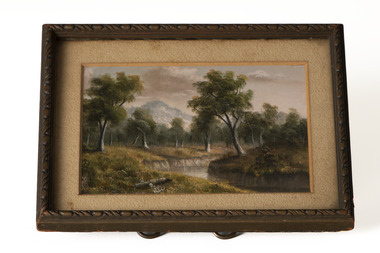
This is one of a set of 3 miniature oil paintings by the self-taught artist Alfred William Eustace (1820-1907). A.W. Eustace, an Australian artist, was born in Berkshire, England, where he was an assistant gamekeeper to the Earl of Craven at Ashdown Park. He migrated to Australia with his wife and children in 1851 and worked on the Ullina and Eldorado Runs on the Black Dog Creek at Chiltern, which was in excess of 50,000 acres of grazing land. A.W. Eustace was employed as a shepherd by Jason Withers and while tending his flocks in the solitude of the bush, Eustace turned his attention to painting and music to while away the long and weary hours. He endeavoured to capture the spirit of the bush and painted on board, canvas or tin plate, but as these materials were not always readily available he then started painting on large round eucalyptus leaves from the White and Red Box trees that grew around about him. He became known as the "Bush Artist." About 1856 he painted a small picture of the famous Woolshed goldrush and during the next few years became well known in North-East Victoria. John Sadlier, a police officer stationed at Beechworth said that Eustace painted 'some really exquisite scenes. He was of an easy-going dreamy temperament, a student of nature only, despising the works of men. Unfortunately his drawings were on eucalyptus leaves, the largest and roundest he could find and not on canvas, and no doubt have all perished long ago.' In 1876 the Melbourne Age newspaper reported, 'Eustace’s celebrated paintings on gum leaves are again attracting attention,…Mr Eustace is an elegant artist…he seems without effort to catch the colour and spirit of Australian scenery…' In 1864 A.W. Eustace held an Art Union in Albury, and again in 1884 in Ballarat. He exhibited at the Victorian Academy of Arts in 1877 and also held an exhibition of gum leaf paintings at Stevens Gallery, Melbourne in 1893. By 1896 he was receiving orders from heads of states in Europe, with his works acknowledged by Queen Victoria, Emperor Frederick of Germany and the Czar of Russia, as well as the Governors of New South Wales and Victoria. His paintings reflected his ability to paint the sky in his realistic style which is still noted by art critics of the day. A.W. Eustace was also a skilful taxidermist. The collection of birds and animals that can be seen at the Beechworth Museum are examples of his taxidermy skill. When not doing his work, painting or taxidermy, he regularly contributed letters and verse to the Chiltern newspaper, The Federal Standard. A book of verse in his hand writing was presented to The Athenaeum Trust by the Boadle family. In the 1870’s he became interested in spiritualism often being involved in lively debate at lectures and séances. Alfred William Eustace died in 1907 and is buried in the Chiltern New Cemetery with his wife Sarah and one of his daughters, Elizabeth. Miniature oil painting of a landscape, with creek in foreground and bush and hill behind, by A.W. Eustace, under glass, in original timber frame with beige matte and a twist wire stand. One of 3 miniatures. No signature visiblealfred eustace, chiltern, oil painting, landscape -
 Chiltern Athenaeum Trust
Painting - Oil painting, Alfred Eustace
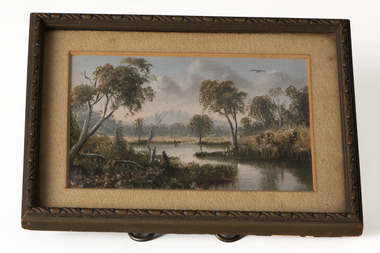
This is one of a set of 3 miniature oil paintings by the self-taught artist Alfred William Eustace (1820-1907). A.W. Eustace, an Australian artist and taxidermist, was born in Berkshire, England, where he was an assistant gamekeeper to the Earl of Craven at Ashdown Park. He migrated to Australia with his wife and children in 1851 and worked on the Ullina and Eldorado Runs on the Black Dog Creek at Chiltern, which was in excess of 50,000 acres of grazing land. A.W. Eustace was employed as a shepherd by Jason Withers and while tending his flocks in the solitude of the bush, Eustace turned his attention to painting and music to while away the long and weary hours. He endeavoured to capture the spirit of the bush painting on board, canvas or tin plate, but as these materials were not always readily available he then started painting on large round eucalyptus leaves from the White and Red Box trees that grew around about him. About 1856 he painted a small picture of the famous Woolshed goldrush and during the next few years became well known in North-East Victoria. John Sadlier, a police officer stationed at Beechworth said that Eustace painted 'some really exquisite scenes. He was of an easy-going dreamy temperament, a student of nature only, despising the works of men. Unfortunately his drawings were on eucalyptus leaves, the largest and roundest he could find and not on canvas, and no doubt have all perished long ago.' In 1876 the Melbourne Age newspaper reported, 'Eustace’s celebrated paintings on gum leaves are again attracting attention,…Mr Eustace is an elegant artist…he seems without effort to catch the colour and spirit of Australian scenery…' In 1864 A.W. Eustace held an Art Union in Albury, and again in 1884 in Ballarat. He exhibited at the Victorian Academy of Arts in 1877 and also held an exhibition of gum leaf paintings at Stevens Gallery, Melbourne in 1893. By 1896 he was receiving orders from heads of states in Europe, with his works acknowledged by Queen Victoria, Emperor Frederick of Germany and the Czar of Russia, as well as the Governors of New South Wales and Victoria. His paintings reflected his ability to paint the sky in his realistic style which is still noted by art critics of the day. A.W. Eustace was also a skilful taxidermist. The collection of birds and animals that can be seen at the Beechworth Museum are examples of his taxidermy skill. When not doing his work, painting or taxidermy, he regularly contributed letters and verse to the Chiltern newspaper, The Federal Standard. A book of verse in his hand writing was presented to The Athenaeum Trust by the Boadle family. In the 1870’s he became interested in spiritualism often being involved in lively debate at lectures and séances. Alfred William Eustace died in 1907 and is buried in the Chiltern New Cemetery with his wife Sarah and one of his daughters, Elizabeth.Miniature oil painting of a landscape, with creek and grassland in foreground surrounded by bushland and hill in distance, by A.W. Eustace, under glass in original timber frame with beige matte and a twist wire stand. One of 3 miniatures. No signature visiblealfred eustace, oil painting, landscape, chiltern -
 Chiltern Athenaeum Trust
Painting - Oil Painting, Alfred Eustace
This is one of a set of 3 miniature oil paintings by the self-taught artist Alfred William Eustace (1820-1907). A.W. Eustace, an Australian artist, was born in Berkshire, England, where he was an assistant gamekeeper to the Earl of Craven at Ashdown Park. He migrated to Australia with his wife and children in 1851 and worked on the Ullina and Eldorado Runs on the Black Dog Creek at Chiltern, which was in excess of 50,000 acres of grazing land. A.W. Eustace was employed as a shepherd by Jason Withers and while tending his flocks in the solitude of the bush, Eustace turned his attention to painting and music to while away the long and weary hours. He endeavoured to capture the spirit of the bush painting on board, canvas or tin plate, but as these materials were not always readily available he then started painting on large round eucalyptus leaves from the White and Red Box trees that grew around about him. About 1856 he painted a small picture of the famous Woolshed goldrush and during the next few years became well known in North-East Victoria. John Sadlier, a police officer stationed at Beechworth said that Eustace painted 'some really exquisite scenes. He was of an easy-going dreamy temperament, a student of nature only, despising the works of men. Unfortunately his drawings were on eucalyptus leaves, the largest and roundest he could find and not on canvas, and no doubt have all perished long ago.' In 1876 the Melbourne Age newspaper reported, 'Eustace’s celebrated paintings on gum leaves are again attracting attention,…Mr Eustace is an elegant artist…he seems without effort to catch the colour and spirit of Australian scenery…' In 1864 A.W. Eustace held an Art Union in Albury, and again in 1884 in Ballarat. He exhibited at the Victorian Academy of Arts in 1877 and also held an exhibition of gum leaf paintings at Stevens Gallery, Melbourne in 1893. By 1896 he was receiving orders from heads of states in Europe, with his works acknowledged by Queen Victoria, Emperor Frederick of Germany and the Czar of Russia, as well as the Governors of New South Wales and Victoria. His paintings reflected his ability to paint the sky in his realistic style which is still noted by art critics of the day. A.W. Eustace was also a skilful taxidermist. The collection of birds and animals that can be seen at the Beechworth Museum are examples of his taxidermy skill. When not doing his work, painting or taxidermy, he regularly contributed letters and verse to the Chiltern newspaper, The Federal Standard. A book of verse in his hand writing was presented to The Athenaeum Trust by the Boadle family. In the 1870’s he became interested in spiritualism often being involved in lively debate at lectures and séances. Alfred William Eustace died in 1907 and is buried in the Chiltern New Cemetery with his wife Sarah and one of his daughters, Elizabeth.Miniature oil painting of a landscape with creek and surrounding trees by A.W. Eustace, under glass, in original dark brown timber frame with beige matte and a twist wire stand. One of 3 miniatures. Sticker on back: 188 (original Registration number)alfred eustace, chiltern, oil, landscape -
 Chiltern Athenaeum Trust
Photograph - Gum Leaf, Alfred Eustace
This is a colour photograph of a gum leaf painting that is one of many done by the well-known self-taught Australian artist Alfred William Eustace (1820-1907). A.W. Eustace, an Australian artist, was born in Berkshire, England, where he was an assistant gamekeeper to the Earl of Craven at Ashdown Park. He migrated to Australia with his wife and children in 1851 and worked on the Ullina and Eldorado Runs on the Black Dog Creek at Chiltern, which was in excess of 50,000 acres of grazing land. A.W. Eustace was employed as a shepherd by Jason Withers and while tending his flocks in the solitude of the bush, Eustace turned his attention to painting and music to while away the long and weary hours. He endeavoured to capture the spirit of the bush painting on board, canvas or tin plate, but as these materials were not always readily available he then started painting on large round eucalyptus leaves from the White and Red Box trees that grew around about him. About 1856 he painted a small picture of the famous Woolshed goldrush and during the next few years became well known in North-East Victoria. John Sadlier, a police officer stationed at Beechworth said that Eustace painted 'some really exquisite scenes. He was of an easy-going dreamy temperament, a student of nature only, despising the works of men. Unfortunately his drawings were on eucalyptus leaves, the largest and roundest he could find and not on canvas, and no doubt have all perished long ago.' In 1876 the Melbourne Age newspaper reported, 'Eustace’s celebrated paintings on gum leaves are again attracting attention,…Mr Eustace is an elegant artist…he seems without effort to catch the colour and spirit of Australian scenery…' In 1864 A.W. Eustace held an Art Union in Albury, and again in 1884 in Ballarat. He exhibited at the Victorian Academy of Arts in 1877 and also held an exhibition of gum leaf paintings at Stevens Gallery, Melbourne in 1893. By 1896 he was receiving orders from heads of states in Europe, with his works acknowledged by Queen Victoria, Emperor Frederick of Germany and the Czar of Russia, as well as the Governors of New South Wales and Victoria. His paintings reflected his ability to paint the sky in his realistic style which is still noted by art critics of the day. A.W. Eustace was also a skilful taxidermist. The collection of birds and animals that can be seen at the Beechworth Museum are examples of his taxidermy skill. When not doing his work, painting or taxidermy, he regularly contributed letters and verse to the Chiltern newspaper, The Federal Standard. A book of verse in his hand writing was presented to The Athenaeum Trust by the Boadle family. In the 1870’s he became interested in spiritualism often being involved in lively debate at lectures and séances. Alfred William Eustace died in 1907 and is buried in the Chiltern New Cemetery with his wife Sarah and one of his daughters, Elizabeth.Colour photograph of an oil painting on gum leaf by A.W. Eustace. A man is panning for gold in a stream with a house and hills in the background. Under glass in a decorative gilt and cream coloured plastic frame.Hand writing on tape at back of frame: COPY OIL ON GUM LEAF 10" x 5" A W EUSTACE owned by Betty & Alf Brownlie 2260alfred eustace, gum leaf painting, chiltern, gold panning, gold -
 Chiltern Athenaeum Trust
Photograph - Gum Leaf, Alfred Eustace
This colour photograph of a gum leaf painting shows one of the many landscapes done by the well-known self-taught Australian artist Alfred William Eustace (1820-1907). A.W. Eustace, an Australian artist and taxidermist, was born in Berkshire, England, where he was an assistant gamekeeper to the Earl of Craven at Ashdown Park. He migrated to Australia with his wife and children in 1851 and worked on the Ullina and Eldorado Runs on the Black Dog Creek at Chiltern, which was in excess of 50,000 acres of grazing land. A.W. Eustace was employed as a shepherd by Jason Withers and while tending his flocks in the solitude of the bush, Eustace turned his attention to painting and music to while away the long and weary hours. He endeavoured to capture the spirit of the bush painting on board, canvas or tin plate, but as these materials were not always readily available he then started painting on large round eucalyptus leaves from the White and Red Box trees that grew around about him. About 1856 he painted a small picture of the famous Woolshed goldrush and during the next few years became well known in North-East Victoria. John Sadlier, a police officer stationed at Beechworth said that Eustace painted 'some really exquisite scenes. He was of an easy-going dreamy temperament, a student of nature only, despising the works of men. Unfortunately his drawings were on eucalyptus leaves, the largest and roundest he could find and not on canvas, and no doubt have all perished long ago.' In 1876 the Melbourne Age newspaper reported, 'Eustace’s celebrated paintings on gum leaves are again attracting attention,…Mr Eustace is an elegant artist…he seems without effort to catch the colour and spirit of Australian scenery…' In 1864 A.W. Eustace held an Art Union in Albury, and again in 1884 in Ballarat. He exhibited at the Victorian Academy of Arts in 1877 and also held an exhibition of gum leaf paintings at Stevens Gallery, Melbourne in 1893. By 1896 he was receiving orders from heads of states in Europe, with his works acknowledged by Queen Victoria, Emperor Frederick of Germany and the Czar of Russia, as well as the Governors of New South Wales and Victoria. His paintings reflected his ability to paint the sky in his realistic style which is still noted by art critics of the day. A.W. Eustace was also a skilful taxidermist. The collection of birds and animals that can be seen at the Beechworth Museum are examples of his taxidermy skill. When not doing his work, painting or taxidermy, he regularly contributed letters and verse to the Chiltern newspaper, The Federal Standard. A book of verse in his hand writing was presented to The Athenaeum Trust by the Boadle family. In the 1870’s he became interested in spiritualism often being involved in lively debate at lectures and séances. Alfred William Eustace died in 1907 and is buried in the Chiltern New Cemetery with his wife Sarah and one of his daughters, Elizabeth.Colour photograph of an oil painting on gum leaf by Alfred Eustace. Landscape featuring a deep creek surrounded by thick bushland displayed against dark brown backing paper which has a gilt oval surround to highlight the painting. Under glass, in a gold and dark brown metal frame.Sticker on back: 189. (the original registration number)alfred eustace, gum leaf painting, landscape -
 Chiltern Athenaeum Trust
Photograph
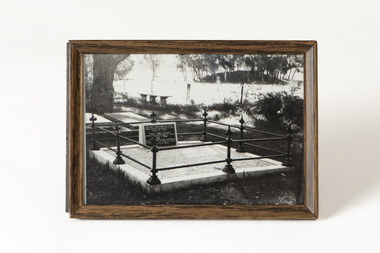
This black and white photograph of the grave of A.W. Eustace is believed to have been taken in September 1987 at the Chiltern New Cemetery. Alfred William Eustace, an Australian artist, was born in the small village of Ashbury, Berkshire, England, the son of John Eustace, Head Game-keeper to the Earl of Craven at the beautiful Ashdown Park. He migrated to Australia with his wife and children in 1851 and camped next to the Ullina and Eldorado Runs on the Black Dog Creek at Chiltern, which was owned by the Withers family and was in excess of 55,000 acres of grazing land. A.W. Eustace was employed as a shepherd by Jason Withers and while tending his flocks in the solitude of the bush, Eustace turned his attention to painting and music to while away the long and weary hours. He endeavoured to capture the spirit of the bush painting on board, canvas or tin plate, but as these materials were not always readily available he then started painting on large round eucalyptus leaves from the White and Red Box trees that grew around about him. About 1856 he painted a small picture of the famous Woolshed goldrush and during the next few years became well known in North-East Victoria. John Sadlier, a police officer stationed at Beechworth said that Eustace painted 'some really exquisite scenes. He was of an easy-going dreamy temperament, a student of nature only, despising the works of men. Unfortunately his drawings were on eucalyptus leaves, the largest and roundest he could find and not on canvas, and no doubt have all perished long ago.' In 1876 the Melbourne Age newspaper reported, 'Eustace’s celebrated paintings on gum leaves are again attracting attention,…Mr Eustace is an elegant artist…he seems without effort to catch the colour and spirit of Australian scenery…' In 1864 A.W. Eustace held an Art Union in Albury, and again in 1884 in Ballarat. He exhibited at the Victorian Academy of Arts in 1877 and also held an exhibition of gum leaf paintings at Stevens Gallery, Melbourne in 1893. By 1896 he was receiving orders from heads of states in Europe, with his works acknowledged by Queen Victoria, Emperor Frederick of Germany and the Czar of Russia, as well as the Governors of New South Wales and Victoria. His paintings reflected his ability to paint the sky in his realistic style which is still noted by art critics of the day. A.W. Eustace was also a skillful taxidermist. The collection of birds and animals that are in the Beechworth Museum collection are examples of his taxidermy skill. When not doing his work, painting or taxidermy, he regularly contributed letters and verse to the Chiltern newspaper, The Federal Standard. A book of verse in his hand writing was presented to The Athenaeum Trust by his relatives from the Boadle family. In the 1870’s he became interested in spiritualism often being involved in lively debate at lectures and séances. Alfred William Eustace died in 1907 and is buried in the Chiltern New Cemetery with his wife Sarah and one of his daughters, Elizabeth.A. W. Eustace, as well as being a well-known Australian artist, was a significant member of the Chiltern community.Black and white photograph of the grave of A.W. Eustace, under glass, in a metal frame.Sticker on back: 184 (original Registration number)a. w. eustace, grave, chiltern new cemetery -
 Chiltern Athenaeum Trust
Photograph
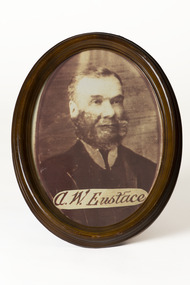
Alfred William Eustace (1820-1907), an Australian artist, was born in Berkshire, England, where he was an assistant gamekeeper to the Earl of Craven at Ashdown Park. He migrated to Australia with his wife and children in 1851 and camped beside the Ullina and Eldorado Runs on the Black Dog Creek at Chiltern, which was in excess of 50,000 acres of grazing land. A.W. Eustace was employed as a shepherd by Jason Withers and while tending his flocks in the solitude of the bush, Eustace turned his attention to painting and music to while away the long and weary hours. He endeavoured to capture the spirit of the bush and painted on board, canvas or tin plate, but as these materials were not always readily available he then started painting on large round eucalyptus leaves from the White and Red Box trees that grew around about him. He became known as the "Bush Artist." About 1856 he painted a small picture of the famous Woolshed goldrush and during the next few years became well known in North-East Victoria. John Sadlier, a police officer stationed at Beechworth said that Eustace painted 'some really exquisite scenes. He was of an easy-going dreamy temperament, a student of nature only, despising the works of men. Unfortunately his drawings were on eucalyptus leaves, the largest and roundest he could find and not on canvas, and no doubt have all perished long ago.' In 1876 the Melbourne Age newspaper reported, 'Eustace’s celebrated paintings on gum leaves are again attracting attention,…Mr Eustace is an elegant artist…he seems without effort to catch the colour and spirit of Australian scenery…' In 1864 A.W. Eustace held an Art Union in Albury, and again in 1884 in Ballarat. He exhibited at the Victorian Academy of Arts in 1877 and also held an exhibition of gum leaf paintings at Stevens Gallery, Melbourne in 1893. By 1896 he was receiving orders from heads of states in Europe, with his works acknowledged by Queen Victoria, Emperor Frederick of Germany and the Czar of Russia, as well as the Governors of New South Wales and Victoria. His paintings reflected his ability to paint the sky in his realistic style which is still noted by art critics of the day. A.W. Eustace was also a skilful taxidermist. The collection of birds and animals that can be seen at the Beechworth Museum are examples of his taxidermy skill. When not doing his work, painting or taxidermy, he regularly contributed letters and verse to the Chiltern newspaper, The Federal Standard. A book of verse in his hand writing was presented to The Athenaeum Trust by the Boadle family. In the 1870’s he became interested in spiritualism often being involved in lively debate at lectures and séances. Alfred William Eustace died in 1907 and is buried in the Chiltern New Cemetery with his wife Sarah and one of his daughters, Elizabeth. A.W. Eustace was a significant member of the Chiltern community during the 19th century and his artwork was displayed widely, even in European royal homes.Copy of sepia photograph of A.W. Eustace in a brown wooden oval frame with a copy of A.W. Eustace's signature across the bottom of the photograph.Sticker on back: 194 Sticker on back: MADE IN/ CHINA/ FABRIQUE 'AU/CHINEa.w.eustace, photograph, chiltern -
 Chiltern Athenaeum Trust
Photograph - Reproduction
These copies of five oil on gum leaf paintings by Alfred William Eustace (1820-1907) display the subjects and detail of his small gum leaf paintings. A.W. Eustace, a well-known Australian artist, was born in Berkshire, England, where he was an assistant gamekeeper to the Earl of Craven at Ashdown Park. He migrated to Australia with his wife and children in 1851 and worked on the Ullina and Eldorado Runs on the Black Dog Creek at Chiltern, which was in excess of 50,000 acres of grazing land. A.W. Eustace was employed as a shepherd by Jason Withers and while tending his flocks in the solitude of the bush, Eustace turned his attention to painting and music to while away the long and weary hours. He endeavoured to capture the spirit of the bush and painted on board, canvas or tin plate, but as these materials were not always readily available he then started painting on large round eucalyptus leaves from the White and Red Box trees that grew around about him. He became known as the "Bush Artist." About 1856 he painted a small picture of the famous Woolshed goldrush and during the next few years became well known in North-East Victoria. John Sadlier, a police officer stationed at Beechworth said that Eustace painted 'some really exquisite scenes. He was of an easy-going dreamy temperament, a student of nature only, despising the works of men. Unfortunately his drawings were on eucalyptus leaves, the largest and roundest he could find and not on canvas, and no doubt have all perished long ago.' In 1876 the Melbourne Age newspaper reported, 'Eustace’s celebrated paintings on gum leaves are again attracting attention,…Mr Eustace is an elegant artist…he seems without effort to catch the colour and spirit of Australian scenery…' In 1864 A.W. Eustace held an Art Union in Albury, and again in 1884 in Ballarat. He exhibited at the Victorian Academy of Arts in 1877 and also held an exhibition of gum leaf paintings at Stevens Gallery, Melbourne in 1893. By 1896 he was receiving orders from heads of states in Europe, with his works acknowledged by Queen Victoria, Emperor Frederick of Germany and the Czar of Russia, as well as the Governors of New South Wales and Victoria. His paintings reflected his ability to paint the sky in his realistic style which is still noted by art critics of the day. A.W. Eustace was also a skillful taxidermist. The collection of birds and animals that can be seen at the Beechworth Museum are examples of his taxidermy skill. When not doing his work, painting or taxidermy, he regularly contributed letters and verse to the Chiltern newspaper, The Federal Standard. A book of verse in his hand writing was presented to The Athenaeum Trust by the Boadle family. In the 1870’s he became interested in spiritualism often being involved in lively debate at lectures and séances. Alfred William Eustace died in 1907 and is buried in the Chiltern New Cemetery with his wife Sarah and one of his daughters, Elizabeth.Alfred William Eustace was a well-known self-taught Australian artist who was known worldwide for her unique oil on gum leaf paintings. He was also a prominent Chiltern citizen.Copies of five A.W.Eustace oil paintings on gum leaf, under glass, displayed on blue paper in a black metal frame.alfred eustace, gum leaf painting, chiltern -
 Surrey Hills Historical Society Collection
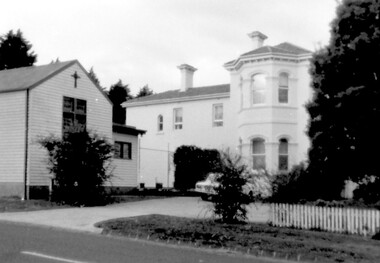
Photograph, Yielima, 31 Erasmus Street, Surrey Hills
Known as ‘Yielima’ 1888-1922 and ‘St. Aubins’ 1922-1956, this ‘modernized’ mansion was built about 1887 for Edward Kellett. He was born in Chorley, Lancashire, England. Edward Kellett married Selina Wells in 1852 at St Peters, Eastern Hill. She was born in c1827 in Aston Clinton, Buckinghamshire, daughter of William Wells and Elizabeth Allan. The family arrived from Aylesbury, Buckinghamshire on the 'Osprey' on 22 March 1849. The couple had 8 children - 5 girls and 3 boys; 3 died in infancy. All were born in Collingwood before the family came to Surrey Hills. Edward's funeral notice in The Argus of 11 July 1893 states that he was a corn merchant of Exhibition Street. His property was sworn at 1512 pounds, 1232 in realty and 280 pounds personally. He was buried in Melbourne General Cemetery (CofE Compartment K, No 306). Selina is listed in Erasmus Street in the 1903, 1905 and 1908 electoral rolls as a boarding house keeper. She died at Surrey Hills on 22/10/1911. In her will she left realty valued at 900 pounds and personally at 220 pounds. She was buried with her husband. 'Yielima' was sold on 19 Febraury 1919 with a sale of contents on 18 March 1919. From 1922-1947 Thomas Daniel O’Callaghan (c1871-1962), a police magistrate, made his home here. He is remembered as being of ‘soldierly demeanour, with a flowing mane of hair’. He always carried a walking stick and wore a flower in his buttonhole. His wife was Florence (nee Harling, c1873-1933) pre-deceased him. They had previously lived in Essendon, Moonee Ponds and Stawell before coming to Erasmus Street. After moving out of Erasmus Street he is listed in the 1949 and 1954 electoral rolls at 90 Durham Road, Surrey Hills. In 1952 the property was purchased by Father Timothy Fitzpatrick, Parish Priest of Our Holy Redeemer Parish, Surrey Hills. It consisted of a large two storey house, a coach house and stable, and an acre and a half of land. In 1954 the coach house and stable were converted into the Church of Our Lady of Perpetual Succour and the following year Father John Kelly was appointed parish priest. and resided in the house. At this time the house was not in good repair. "The gentleman who had lived there alone since his wife died many years before, lived in the servants quarters and the rest of the house had been badly neglected. (REF: https://ourholyredeemer.cam.org.au/history) At the beginning of 1957 the Missionary Sisters of the Sacred Heart opened a school next door. As they travelled from Balwyn on a daily basis, the property at 301 Elgar Road was purchased as a presbytery and 'Yielima' became a convent. The stables continued to be used as a church until 1964 when a new church was completed and opened by His Grace Archbishop Simmonds on the 20th of March. There were never large numbers of double-storey Victorian mansions in Surrey Hills. 'Yielma' is significant as one of the few remaining ones. It is also significant for its association with the Catholic Church.A black and white photograph of an Italianate style home with a weatherboard building with a cross on it in front of the main building and to the left of the photograph. There are some well established trees in the garden, a car parked in the parking area and a picket fence along the front.yielima, st aubins, house names, erasmus street, surrey hills, 1887, (mr) edward kellett, (mr) thomas daniel o'callaghan, corn merchant, police, italianate style, wattle park roman catholic church, (mrs) florence o'callaghan, mrs selina kellett, miss selina wells, convent, presbytery, our lady of perpetual succour -
 Federation University Historical Collection
Book, Victoria Education Gazette and Teachers' Aid, 1921-1930, 1921-1930
The Victoria Education Gazette and Teachers' Aid was published for Victoria's teachers and was sent to all school on the state. In 1920 The Ballarat School of Mines had donated 136 pounds 14 shillings and 10 pence to the Victorian Education Department's War Relief Account, and the Ballarat Junior Technical School had donated 10 pounds 6 shillings and 10 pence.Ten black hard covered volumes with red tape spine, covering 1921 to 1930. The gazettes include Education Department appointments, transfers, resignations and retirements, vacancies, notices, queries, notices of books, examination papers, original articles, lesson plans, suggestions for lessons, drawing, obituaries, notes on nature study, mathematics, music, sloyd woodwork, English grammar, Victorian State School Swimming Clubs, Geography, penmanship, science, History, Latin, Geography, The School Garden, horticulture, singing, World War One; ANZAC Day, lifesaving, Astronomy, Empire Day, ANZAC Buffet London, Victorian Education Department's War Relief Fund .1) 1928. Articles include: New Caledonia, Swimming and Lifesaving, School forestry, a visit to the pyramids, Exploration of Gippsland, paul de Strezelecki, Angus McMillan, Villers Bretonneux Memorial School, American Black Walnut, Red Gum, Messmate Stringybark, The Great Barrier Reef, retirement of Frank Tate, Stawell High School, Report on Some Aspects of Education in the United States, Jubilee Education Exhibition , New School Readers; measured Drawing Images include: Macarthur Street School's Plantation, Maryborough School Plantation, Pinus Insignis (Radiata) ready for Milling, Creswick State Forest, Metalwork, Daylesford Pine Plantation four years old, Henry Harvey (art Inspector); Omeo School Endowment Plantation; Frank Tate; Stawell High School Drawings From Casts; Lake Tyers School Endowment Plantation, measured drawing, Thomas H. Stuart, GEorge Swinburne. J.R. Tantham-Fryer, Cookery Class, John Edward Thomas. .3) War Savings Stampsm Swimming and Life-saving, Teh Rural School System of Victoria, Imaginative Composition, ANZAC Day, Retardation, Teh Bright Child Hudson Hard Obituary, Leeches, Relief for Distress in Europe, Dental, Teachers' Library, History of Portarlington, J.E. Stevens Obituary, Victorian Teachers in England Images: Swimming and Life-Saving Medallion .3) Swimming and Lifesaving, Bronze medallion, Victoria Leage of Victori, War Savings Stamps, Rural School Sytem of Victoria, .4) War Relief, Talbot Colony for Epileptics Masonmeadows, Discipline New and Old (Percy Samson), Soldier teachers, Preservation of Australian Birds, Arbor Day, Jubilee of Free Education, Teaching Geography, Poery in Schools, School Committees, Shelter Pavilion, Mysia Memorial School, Clovers, Jubilee Exhibition, Domestic Arts, Louis Pasteur, .5) Victoria League of Victoria, An Endowment Scheme (Pine Plantations), School Endowment Plantations, Protecting our trees by Owen Jones,. Victorian State Schools Horticultural Society, Sloyd Woodwork, School Forestry, Thomas Brodribb Obituary and portrait, Imperial Education Conference London, school Management and Method, School plantations, Eucalypt plantations in the Bendix and Heathcote District, Junior Red Cross, Jubilee Education Exhibition, Gould League Competitions, handwriting, The School Magazine, Frank Tate in London, Victorian beetles, Council of Public Education, Villers Bretonneux and its new School, Death of Samuel Summons, Woodwork Summer School, Swimming, Japanese Relief Fund, Retirement of John Cross, reminiscences of the Late Mr Albert Mattingley .6) Thomas H. Trengrove and the Villers Bretonneux School hall and pilaster carvings, forestry, visit of Maryborough teachers to Ballarat Water Reserves, noxious weeds, relief for Distressed Europe, The Dalton Plan, Empire Day, Retirement of Mr Fussell, Centenary of Hume and Hovell Expedition, League of Kindness, Effective Nature Study in a Rural School, Some Facts About Paper and their Bearing Upon School Plantations, Council of the Working Men's College Melbourne, Maria Montessori, University Vacation School, Horticulture in State Schools, An Informal Chat About French Schools (C.R. McRae), The Vacation School, Johann Heinrich Pestalozzi, Inspector's Report on a 5th-class School, Can Children Write Verse, John Adams, Victoria League of Victoria, R.F. Toutcher, Sir James Barbie's Address to High-School Girls, Impressions of a High School Teacher Abroad (R.D. Collman), The Spirit of the School Plantation Scheme, Monument of the Late Mr and Mrs A.T. Sharp at Box Hill Cemetery, The Teaching of Geography, The Treatment of Poetry in Class, Two Difficult Arithmetic Lessons, Location of Principal Australian Timbers, Dr John Smyth, Stammering and its Influence on Education, Wireless Broadcasting as an Educational Medium, Boys School at Villers Brettonneux, The New School at Villers Brettonneux, Bird Day, Messmate or Stringybark, What Every Woman Knows, Director's Report on Denmark .7)1925 . Includes: School Forestry, horticulture, J.H. Betheras retirement, Ivanhoe School, Coburg School, Moorabool Junior Technical School, Villers Bretonneux School hall and pilaster carvings, Francis Ormond, William Charles Kernot, Corsican Pnes at Creswick, Ballarat High School Plantation, Workin Men's College, RMIT, Naorrow LEafed Peppermint, Education and World Peace, Eucalypts of Victoria, John C. Eccles, Blue Gum. Manners, Giving the Poorly Nourished Boy A Chance, Native Ferns, Marybourough Technical School, Memorial School at Villers-Brettonneux .8) Experimental Plots in Country Schools (W.W. Gay), Villers Bretonneaux and its Memorial School. nominated classes for Art Teachers, The Teachers Act 1925, Horsham High School, Richmond Technical School, Farewell to Messrs C.R. Long and Ponsonby Carew-Smyth, Frank Tate, Phyiscal Training, Arbor Day, ANZAC Day, Shakespeare Day,Bendigo Junior Techncial School, Musical Appreciation, Motor Dental Unit, School Camps, Education Act of 1872: Mr Angus McKay's Part (George Mackay), A Bush Fire Experience (Irene Stable), Black Sunday, Californian Red Pine, Women's Education in America, Farewell to Lord and Lady Stradbroke, Grevilia Robusta, Silky Oak, Redwood, John E. Grant, The Need for Research (Donald Clark), Junior Drama, Ida D. Marshall, John Pounds, Australian Books, Fish Creek School, State Boundaries, History in the Curriculum, Ceramic Art in Australia (Percy E. Everett), Choice of School Songs, Tasmanian Beech, Should History be Taught on a National or an International Basis, Hydatid Disease, James Holland Obituary, Florrie Hodges, Queensland Maple, Post Bushfire Ruins at Fumina, Arbor Day at Fumina, Queensland Rosewood, Omeo Endowment Plantation, Bird Day, Junior Red Cross, Pioneers' Day, Edward Henty, Junior Technical Schools, Yellow Pine, History and Progress of Needlework, A.B.C. of Astronomy, Northumberland Mental tests, Queensland Red Cedar, Teh Globe Theatre, .9) 1927 includes The ABC of Astronomy, Atr Theatre, English Beech, Angus McMillan Art Pottery, School Singing, State Schools' Nursery, School endowment plantations, Making a Man, experimental proof of Charles's Law, John Smyth obituary and portrait, Linton Pine Planation, motivation of arithmetic, Women's Classes at Dookie, Swimming and Lifesaving, Pioneers Day, Drawing, Ballarat High School planation, biting fly, Tir-Na-N'og, John Byatt retirement and portrait, Technical Schools Conference at Daylesford, Ethel Osborne and portrait, library. Francis Thompson portrait, Adam Lindsay Gordon, Solar movement, motor transport, Liverpool Cathedral, Teh Story of the Cathedral, Bendigo School of Mines, Omeo School pine plantation, Egypt and the Nile, Self-Criticism Images include Ballarat High School Pine Plantation, Vale Park, Francis Ormond, Woking Men's College (RMIT), W.N. Kernot, A Stand of Corsican Pines at Creswick, Victoria .10) Some Remarks on the Relationship of the technical Schools to the University (Donald Clark) , Present Day Education in England , Memorial to Joseph Cornwall, Spelling, motivation, Singing, State Scholarships, Agriculture, T.W. Bothroyd, The Swimmer - A Summer School Sketch (H.H. Croll), Swimming woodwork, Farewell to Dr Sutton. ,Drowning, War Savings Movement, White Beech. George S. Browne , Example of School Honor Book, Blackwood, Optimistic teacher, Soldier settlement around Shapparton, Oral Hygiene, Cinema Machines, Basketball, Wakter M. Camble obituary, ANZAC day Pilgrimage in England, Froebel's System, Montessori Method, War Relief Fund, New Zealand Kauri Tree, Bat Tenis at a Bush School., Advice to Australian Girls, Chrysanthemums, Royal Visit, National Parks of Victoria, Maurice Copland Obituary, total eclipse of the Moon, School libraries, The teacher and the COmmunity (A.M. Barry), The Reading Lesson, Swimming and Life-saving, MElbourne Teachers' College War Memorial Windows Old Trainees War Memorial, Cultivating a Natinoal Art education gazette, school, education, teaching, teacher, world war one, school plantations, macarthur street pine plantation, school forestry, creswick state forest, anzac day, armistance celebrations, frank tate, frank tate retirement, drawing from cast, education department school readers, lake tyers pine plantation, w.n. kernot, rmit, working men's college, francis ormond, pine plantations, calenbeem park, creswick, villers-brettonneux school hall and carvings, thomas trengrove, corsican pines, creswick, pine endowment plantations, mccarthur st primary school pine plantation, ballarat high school pine plantation, vale park, mount pleasant primary school pine plantation, golden point pine plantation, angus macmillan, paul de strzelecki, gippsland, villers-bretonneaux memorial school, francis thompson, english ash, pestalozzi centenary, shakespeare day, swimming classes, clear pine, cinema in education, american black walnut, red gum, thomas wolliam bothroyd obituary, and portrait, physical training displays, teaching of spelling, ohm's law, blue gum -
 Flagstaff Hill Maritime Museum and Village
Photograph
HISTORY OF THE LOCH ARD The LOCH ARD belonged to the famous Loch Line which sailed many ships from England to Australia. Built in Glasgow by Barclay, Curdle and Co. in 1873, the LOCH ARD was a three-masted square rigged iron sailing ship. The ship measured 262ft 7" (79.87m) in length, 38ft (11.58m) in width, 23ft (7m) in depth and had a gross tonnage of 1693 tons. The LOCH ARD's main mast measured a massive 150ft (45.7m) in height. LOCH ARD made three trips to Australia and one trip to Calcutta before its final voyage. LOCH ARD left England on March 2, 1878, under the command of Captain Gibbs, a newly married, 29 year old. She was bound for Melbourne with a crew of 37, plus 17 passengers and a load of cargo. The general cargo reflected the affluence of Melbourne at the time. On board were straw hats, umbrella, perfumes, clay pipes, pianos, clocks, confectionary, linen and candles, as well as a heavier load of railway irons, cement, lead and copper. There were items included that intended for display in the Melbourne International Exhibition in 1880. The voyage to Port Phillip was long but uneventful. At 3am on June 1, 1878, Captain Gibbs was expecting to see land and the passengers were becoming excited as they prepared to view their new homeland in the early morning. But LOCH ARD was running into a fog which greatly reduced visibility. Captain Gibbs was becoming anxious as there was no sign of land or the Cape Otway lighthouse. At 4am the fog lifted. A man aloft announced that he could see breakers. The sheer cliffs of Victoria's west coast came into view, and Captain Gibbs realised that the ship was much closer to them than expected. He ordered as much sail to be set as time would permit and then attempted to steer the vessel out to sea. On coming head on into the wind, the ship lost momentum, the sails fell limp and LOCH ARD's bow swung back. Gibbs then ordered the anchors to be released in an attempt to hold its position. The anchors sank some 50 fathoms - but did not hold. By this time LOCH ARD was among the breakers and the tall cliffs of Mutton Bird Island rose behind the ship. Just half a mile from the coast, the ship's bow was suddenly pulled around by the anchor. The captain tried to tack out to sea, but the ship struck a reef at the base of Mutton Bird Island, near Port Campbell. Waves broke over the ship and the top deck was loosened from the hull. The masts and rigging came crashing down knocking passengers and crew overboard. When a lifeboat was finally launched, it crashed into the side of LOCH ARD and capsized. Tom Pearce, who had launched the boat, managed to cling to its overturned hull and shelter beneath it. He drifted out to sea and then on the flood tide came into what is now known as LOCH ARD Gorge. He swam to shore, bruised and dazed, and found a cave in which to shelter. Some of the crew stayed below deck to shelter from the falling rigging but drowned when the ship slipped off the reef into deeper water. Eva Carmichael had raced onto deck to find out what was happening only to be confronted by towering cliffs looming above the stricken ship. In all the chaos, Captain Gibbs grabbed Eva and said, "If you are saved Eva, let my dear wife know that I died like a sailor". That was the last Eva Carmichael saw of the captain. She was swept off the ship by a huge wave. Eva saw Tom Pearce on a small rocky beach and yelled to attract his attention. He dived in and swam to the exhausted woman and dragged her to shore. He took her to the cave and broke open case of brandy which had washed up on the beach. He opened a bottle to revive the unconscious woman. A few hours later Tom scaled a cliff in search of help. He followed hoof prints and came by chance upon two men from nearby Glenample Station three and a half miles away. In a state of exhaustion, he told the men of the tragedy. Tom returned to the gorge while the two men rode back to the station to get help. By the time they reached LOCH ARD Gorge, it was cold and dark. The two shipwreck survivors were taken to Glenample Station to recover. Eva stayed at the station for six weeks before returning to Ireland, this time by steamship. In Melbourne, Tom Pearce received a hero's welcome. He was presented with the first gold medal of the Royal Humane Society of Victoria and a £1000 cheque from the Victorian Government. Concerts were performed to honour the young man's bravery and to raise money for those who lost family in the LOCH ARD disaster. Of the 54 crew members and passengers on board, only two survived: the apprentice, Tom Pearce and the young woman passenger, Eva Carmichael, who lost all of her family in the tragedy. Ten days after the LOCH ARD tragedy, salvage rights to the wreck were sold at auction for £2,120. Cargo valued at £3,000 was salvaged and placed on the beach, but most washed back into the sea when another storm developed. The wreck of LOCH ARD still lies at the base of Mutton Bird Island. Much of the cargo has now been salvaged and some was washed up into what is now known as LOCH ARD Gorge. Cargo and artefacts have also been illegally salvaged over many years before protective legislation was introduced. One of the most unlikely pieces of cargo to have survived the shipwreck was a Minton porcelain peacock - one of only nine in the world. The peacock was destined for the Melbourne International Exhibition in 1880. It had been well packed, which gave it adequate protection during the violent storm. Today, the Minton peacock can be seen at the Flagstaff Hill Maritime Museum in Warrnambool. From Australia's most dramatic shipwreck it has now become Australia's most valuable shipwreck artefact and is one of very few 'objects' on the Victorian State Heritage Register. Flagstaff Hill’s collection of artefacts from LOCH ARD is significant for being one of the largest collections of artefacts from this shipwreck in Victoria. It is significant for its association with the shipwreck, which is on the Victorian Heritage Register (VHR S417). The collection is significant because of the relationship between the objects, as together they have a high potential to interpret the story of the LOCH ARD. The LOCH ARD collection is archaeologically significant as the remains of a large international passenger and cargo ship. The LOCH ARD collection is historically significant for representing aspects of Victoria’s shipping history and its potential to interpret sub-theme 1.5 of Victoria’s Framework of Historical Themes (living with natural processes). The collection is also historically significant for its association with the LOCH ARD, which was one of the worst and best known shipwrecks in Victoria’s history. Photograph of Loch Ard Gorge. Photograph taken some distance from the Gorge. Three men in the Gorge and outlines of steps can be seen. Right hand side of the photograph is written "Loch Ard Gorge"flagstaff hill, warrnambool, shipwrecked coast, flagstaff hill maritime museum, maritime museum, shipwreck coast, flagstaff hill maritime village, great ocean road, loch line, loch ard, captain gibbs, eva carmichael, tom pearce, glenample station, mutton bird island, loch ard gorge, photograph of loch ard gorge, photograph -
 Flagstaff Hill Maritime Museum and Village
Painting
HISTORY OF THE LOCH ARD The LOCH ARD belonged to the famous Loch Line which sailed many ships from England to Australia. Built in Glasgow by Barclay, Curdle and Co. in 1873, the LOCH ARD was a three-masted square rigged iron sailing ship. The ship measured 262ft 7" (79.87m) in length, 38ft (11.58m) in width, 23ft (7m) in depth and had a gross tonnage of 1693 tons. The LOCH ARD's main mast measured a massive 150ft (45.7m) in height. LOCH ARD made three trips to Australia and one trip to Calcutta before its final voyage. LOCH ARD left England on March 2, 1878, under the command of Captain Gibbs, a newly married, 29 year old. She was bound for Melbourne with a crew of 37, plus 17 passengers and a load of cargo. The general cargo reflected the affluence of Melbourne at the time. On board were straw hats, umbrella, perfumes, clay pipes, pianos, clocks, confectionary, linen and candles, as well as a heavier load of railway irons, cement, lead and copper. There were items included that intended for display in the Melbourne International Exhibition in 1880. The voyage to Port Phillip was long but uneventful. At 3am on June 1, 1878, Captain Gibbs was expecting to see land and the passengers were becoming excited as they prepared to view their new homeland in the early morning. But LOCH ARD was running into a fog which greatly reduced visibility. Captain Gibbs was becoming anxious as there was no sign of land or the Cape Otway lighthouse. At 4am the fog lifted. A man aloft announced that he could see breakers. The sheer cliffs of Victoria's west coast came into view, and Captain Gibbs realised that the ship was much closer to them than expected. He ordered as much sail to be set as time would permit and then attempted to steer the vessel out to sea. On coming head on into the wind, the ship lost momentum, the sails fell limp and LOCH ARD's bow swung back. Gibbs then ordered the anchors to be released in an attempt to hold its position. The anchors sank some 50 fathoms - but did not hold. By this time LOCH ARD was among the breakers and the tall cliffs of Mutton Bird Island rose behind the ship. Just half a mile from the coast, the ship's bow was suddenly pulled around by the anchor. The captain tried to tack out to sea, but the ship struck a reef at the base of Mutton Bird Island, near Port Campbell. Waves broke over the ship and the top deck was loosened from the hull. The masts and rigging came crashing down knocking passengers and crew overboard. When a lifeboat was finally launched, it crashed into the side of LOCH ARD and capsized. Tom Pearce, who had launched the boat, managed to cling to its overturned hull and shelter beneath it. He drifted out to sea and then on the flood tide came into what is now known as LOCH ARD Gorge. He swam to shore, bruised and dazed, and found a cave in which to shelter. Some of the crew stayed below deck to shelter from the falling rigging but drowned when the ship slipped off the reef into deeper water. Eva Carmichael had raced onto deck to find out what was happening only to be confronted by towering cliffs looming above the stricken ship. In all the chaos, Captain Gibbs grabbed Eva and said, "If you are saved Eva, let my dear wife know that I died like a sailor". That was the last Eva Carmichael saw of the captain. She was swept off the ship by a huge wave. Eva saw Tom Pearce on a small rocky beach and yelled to attract his attention. He dived in and swam to the exhausted woman and dragged her to shore. He took her to the cave and broke open case of brandy which had washed up on the beach. He opened a bottle to revive the unconscious woman. A few hours later Tom scaled a cliff in search of help. He followed hoof prints and came by chance upon two men from nearby Glenample Station three and a half miles away. In a state of exhaustion, he told the men of the tragedy. Tom returned to the gorge while the two men rode back to the station to get help. By the time they reached LOCH ARD Gorge, it was cold and dark. The two shipwreck survivors were taken to Glenample Station to recover. Eva stayed at the station for six weeks before returning to Ireland, this time by steamship. In Melbourne, Tom Pearce received a hero's welcome. He was presented with the first gold medal of the Royal Humane Society of Victoria and a £1000 cheque from the Victorian Government. Concerts were performed to honour the young man's bravery and to raise money for those who lost family in the LOCH ARD disaster. Of the 54 crew members and passengers on board, only two survived: the apprentice, Tom Pearce and the young woman passenger, Eva Carmichael, who lost all of her family in the tragedy. Ten days after the LOCH ARD tragedy, salvage rights to the wreck were sold at auction for £2,120. Cargo valued at £3,000 was salvaged and placed on the beach, but most washed back into the sea when another storm developed. The wreck of LOCH ARD still lies at the base of Mutton Bird Island. Much of the cargo has now been salvaged and some was washed up into what is now known as LOCH ARD Gorge. Cargo and artefacts have also been illegally salvaged over many years before protective legislation was introduced. One of the most unlikely pieces of cargo to have survived the shipwreck was a Minton porcelain peacock - one of only nine in the world. The peacock was destined for the Melbourne International Exhibition in 1880. It had been well packed, which gave it adequate protection during the violent storm. Today, the Minton peacock can be seen at the Flagstaff Hill Maritime Museum in Warrnambool. From Australia's most dramatic shipwreck it has now become Australia's most valuable shipwreck artefact and is one of very few 'objects' on the Victorian State Heritage Register. Flagstaff Hill’s collection of artefacts from LOCH ARD is significant for being one of the largest collections of artefacts from this shipwreck in Victoria. It is significant for its association with the shipwreck, which is on the Victorian Heritage Register (VHR S417). The collection is significant because of the relationship between the objects, as together they have a high potential to interpret the story of the LOCH ARD. The LOCH ARD collection is archaeologically significant as the remains of a large international passenger and cargo ship. The LOCH ARD collection is historically significant for representing aspects of Victoria’s shipping history and its potential to interpret sub-theme 1.5 of Victoria’s Framework of Historical Themes (living with natural processes). The collection is also historically significant for its association with the LOCH ARD, which was one of the worst and best known shipwrecks in Victoria’s history. Painting of The Loch Ard oil on board depicting wreck. It shows stormy sea and coastline in background. Ship appears to be capsized.flagstaff hill, warrnambool, shipwrecked coast, flagstaff hill maritime museum, maritime museum, shipwreck coast, flagstaff hill maritime village, great ocean road, loch line, loch ard, captain gibbs, eva carmichael, tom pearce, glenample station, mutton bird island, loch ard gorge, painting -
 Flagstaff Hill Maritime Museum and Village
Photograph
HISTORY OF THE LOCH ARD The LOCH ARD belonged to the famous Loch Line which sailed many ships from England to Australia. Built in Glasgow by Barclay, Curdle and Co. in 1873, the LOCH ARD was a three-masted square rigged iron sailing ship. The ship measured 262ft 7" (79.87m) in length, 38ft (11.58m) in width, 23ft (7m) in depth and had a gross tonnage of 1693 tons. The LOCH ARD's main mast measured a massive 150ft (45.7m) in height. LOCH ARD made three trips to Australia and one trip to Calcutta before its final voyage. LOCH ARD left England on March 2, 1878, under the command of Captain Gibbs, a newly married, 29 year old. She was bound for Melbourne with a crew of 37, plus 17 passengers and a load of cargo. The general cargo reflected the affluence of Melbourne at the time. On board were straw hats, umbrella, perfumes, clay pipes, pianos, clocks, confectionary, linen and candles, as well as a heavier load of railway irons, cement, lead and copper. There were items included that intended for display in the Melbourne International Exhibition in 1880. The voyage to Port Phillip was long but uneventful. At 3am on June 1, 1878, Captain Gibbs was expecting to see land and the passengers were becoming excited as they prepared to view their new homeland in the early morning. But LOCH ARD was running into a fog which greatly reduced visibility. Captain Gibbs was becoming anxious as there was no sign of land or the Cape Otway lighthouse. At 4am the fog lifted. A man aloft announced that he could see breakers. The sheer cliffs of Victoria's west coast came into view, and Captain Gibbs realised that the ship was much closer to them than expected. He ordered as much sail to be set as time would permit and then attempted to steer the vessel out to sea. On coming head on into the wind, the ship lost momentum, the sails fell limp and LOCH ARD's bow swung back. Gibbs then ordered the anchors to be released in an attempt to hold its position. The anchors sank some 50 fathoms - but did not hold. By this time LOCH ARD was among the breakers and the tall cliffs of Mutton Bird Island rose behind the ship. Just half a mile from the coast, the ship's bow was suddenly pulled around by the anchor. The captain tried to tack out to sea, but the ship struck a reef at the base of Mutton Bird Island, near Port Campbell. Waves broke over the ship and the top deck was loosened from the hull. The masts and rigging came crashing down knocking passengers and crew overboard. When a lifeboat was finally launched, it crashed into the side of LOCH ARD and capsized. Tom Pearce, who had launched the boat, managed to cling to its overturned hull and shelter beneath it. He drifted out to sea and then on the flood tide came into what is now known as LOCH ARD Gorge. He swam to shore, bruised and dazed, and found a cave in which to shelter. Some of the crew stayed below deck to shelter from the falling rigging but drowned when the ship slipped off the reef into deeper water. Eva Carmichael had raced onto deck to find out what was happening only to be confronted by towering cliffs looming above the stricken ship. In all the chaos, Captain Gibbs grabbed Eva and said, "If you are saved Eva, let my dear wife know that I died like a sailor". That was the last Eva Carmichael saw of the captain. She was swept off the ship by a huge wave. Eva saw Tom Pearce on a small rocky beach and yelled to attract his attention. He dived in and swam to the exhausted woman and dragged her to shore. He took her to the cave and broke open case of brandy which had washed up on the beach. He opened a bottle to revive the unconscious woman. A few hours later Tom scaled a cliff in search of help. He followed hoof prints and came by chance upon two men from nearby Glenample Station three and a half miles away. In a state of exhaustion, he told the men of the tragedy. Tom returned to the gorge while the two men rode back to the station to get help. By the time they reached LOCH ARD Gorge, it was cold and dark. The two shipwreck survivors were taken to Glenample Station to recover. Eva stayed at the station for six weeks before returning to Ireland, this time by steamship. In Melbourne, Tom Pearce received a hero's welcome. He was presented with the first gold medal of the Royal Humane Society of Victoria and a £1000 cheque from the Victorian Government. Concerts were performed to honour the young man's bravery and to raise money for those who lost family in the LOCH ARD disaster. Of the 54 crew members and passengers on board, only two survived: the apprentice, Tom Pearce and the young woman passenger, Eva Carmichael, who lost all of her family in the tragedy. Ten days after the LOCH ARD tragedy, salvage rights to the wreck were sold at auction for £2,120. Cargo valued at £3,000 was salvaged and placed on the beach, but most washed back into the sea when another storm developed. The wreck of LOCH ARD still lies at the base of Mutton Bird Island. Much of the cargo has now been salvaged and some was washed up into what is now known as LOCH ARD Gorge. Cargo and artefacts have also been illegally salvaged over many years before protective legislation was introduced. One of the most unlikely pieces of cargo to have survived the shipwreck was a Minton porcelain peacock - one of only nine in the world. The peacock was destined for the Melbourne International Exhibition in 1880. It had been well packed, which gave it adequate protection during the violent storm. Today, the Minton peacock can be seen at the Flagstaff Hill Maritime Museum in Warrnambool. From Australia's most dramatic shipwreck it has now become Australia's most valuable shipwreck artefact and is one of very few 'objects' on the Victorian State Heritage Register. Flagstaff Hill’s collection of artefacts from LOCH ARD is significant for being one of the largest collections of artefacts from this shipwreck in Victoria. It is significant for its association with the shipwreck, which is on the Victorian Heritage Register (VHR S417). The collection is significant because of the relationship between the objects, as together they have a high potential to interpret the story of the LOCH ARD. The LOCH ARD collection is archaeologically significant as the remains of a large international passenger and cargo ship. The LOCH ARD collection is historically significant for representing aspects of Victoria’s shipping history and its potential to interpret sub-theme 1.5 of Victoria’s Framework of Historical Themes (living with natural processes). The collection is also historically significant for its association with the LOCH ARD, which was one of the worst and best known shipwrecks in Victoria’s history. Photograph of Loch Ard Gorge c1900flagstaff hill, warrnambool, shipwrecked coast, flagstaff hill maritime museum, maritime museum, shipwreck coast, flagstaff hill maritime village, great ocean road, loch line, loch ard, captain gibbs, eva carmichael, tom pearce, glenample station, mutton bird island, loch ard gorge, photograph of loch ard gorge, photograph -
 Flagstaff Hill Maritime Museum and Village
Calendar
HISTORY OF THE LOCH ARD The LOCH ARD belonged to the famous Loch Line which sailed many ships from England to Australia. Built in Glasgow by Barclay, Curdle and Co. in 1873, the LOCH ARD was a three-masted square rigged iron sailing ship. The ship measured 262ft 7" (79.87m) in length, 38ft (11.58m) in width, 23ft (7m) in depth and had a gross tonnage of 1693 tons. The LOCH ARD's main mast measured a massive 150ft (45.7m) in height. LOCH ARD made three trips to Australia and one trip to Calcutta before its final voyage. LOCH ARD left England on March 2, 1878, under the command of Captain Gibbs, a newly married, 29 year old. She was bound for Melbourne with a crew of 37, plus 17 passengers and a load of cargo. The general cargo reflected the affluence of Melbourne at the time. On board were straw hats, umbrella, perfumes, clay pipes, pianos, clocks, confectionary, linen and candles, as well as a heavier load of railway irons, cement, lead and copper. There were items included that intended for display in the Melbourne International Exhibition in 1880. The voyage to Port Phillip was long but uneventful. At 3am on June 1, 1878, Captain Gibbs was expecting to see land and the passengers were becoming excited as they prepared to view their new homeland in the early morning. But LOCH ARD was running into a fog which greatly reduced visibility. Captain Gibbs was becoming anxious as there was no sign of land or the Cape Otway lighthouse. At 4am the fog lifted. A man aloft announced that he could see breakers. The sheer cliffs of Victoria's west coast came into view, and Captain Gibbs realised that the ship was much closer to them than expected. He ordered as much sail to be set as time would permit and then attempted to steer the vessel out to sea. On coming head on into the wind, the ship lost momentum, the sails fell limp and LOCH ARD's bow swung back. Gibbs then ordered the anchors to be released in an attempt to hold its position. The anchors sank some 50 fathoms - but did not hold. By this time LOCH ARD was among the breakers and the tall cliffs of Mutton Bird Island rose behind the ship. Just half a mile from the coast, the ship's bow was suddenly pulled around by the anchor. The captain tried to tack out to sea, but the ship struck a reef at the base of Mutton Bird Island, near Port Campbell. Waves broke over the ship and the top deck was loosened from the hull. The masts and rigging came crashing down knocking passengers and crew overboard. When a lifeboat was finally launched, it crashed into the side of LOCH ARD and capsized. Tom Pearce, who had launched the boat, managed to cling to its overturned hull and shelter beneath it. He drifted out to sea and then on the flood tide came into what is now known as LOCH ARD Gorge. He swam to shore, bruised and dazed, and found a cave in which to shelter. Some of the crew stayed below deck to shelter from the falling rigging but drowned when the ship slipped off the reef into deeper water. Eva Carmichael had raced onto deck to find out what was happening only to be confronted by towering cliffs looming above the stricken ship. In all the chaos, Captain Gibbs grabbed Eva and said, "If you are saved Eva, let my dear wife know that I died like a sailor". That was the last Eva Carmichael saw of the captain. She was swept off the ship by a huge wave. Eva saw Tom Pearce on a small rocky beach and yelled to attract his attention. He dived in and swam to the exhausted woman and dragged her to shore. He took her to the cave and broke open case of brandy which had washed up on the beach. He opened a bottle to revive the unconscious woman. A few hours later Tom scaled a cliff in search of help. He followed hoof prints and came by chance upon two men from nearby Glenample Station three and a half miles away. In a state of exhaustion, he told the men of the tragedy. Tom returned to the gorge while the two men rode back to the station to get help. By the time they reached LOCH ARD Gorge, it was cold and dark. The two shipwreck survivors were taken to Glenample Station to recover. Eva stayed at the station for six weeks before returning to Ireland, this time by steamship. In Melbourne, Tom Pearce received a hero's welcome. He was presented with the first gold medal of the Royal Humane Society of Victoria and a £1000 cheque from the Victorian Government. Concerts were performed to honour the young man's bravery and to raise money for those who lost family in the LOCH ARD disaster. Of the 54 crew members and passengers on board, only two survived: the apprentice, Tom Pearce and the young woman passenger, Eva Carmichael, who lost all of her family in the tragedy. Ten days after the LOCH ARD tragedy, salvage rights to the wreck were sold at auction for £2,120. Cargo valued at £3,000 was salvaged and placed on the beach, but most washed back into the sea when another storm developed. The wreck of LOCH ARD still lies at the base of Mutton Bird Island. Much of the cargo has now been salvaged and some was washed up into what is now known as LOCH ARD Gorge. Cargo and artefacts have also been illegally salvaged over many years before protective legislation was introduced. One of the most unlikely pieces of cargo to have survived the shipwreck was a Minton porcelain peacock - one of only nine in the world. The peacock was destined for the Melbourne International Exhibition in 1880. It had been well packed, which gave it adequate protection during the violent storm. Today, the Minton peacock can be seen at the Flagstaff Hill Maritime Museum in Warrnambool. From Australia's most dramatic shipwreck it has now become Australia's most valuable shipwreck artefact and is one of very few 'objects' on the Victorian State Heritage Register. Flagstaff Hill’s collection of artefacts from LOCH ARD is significant for being one of the largest collections of artefacts from this shipwreck in Victoria. It is significant for its association with the shipwreck, which is on the Victorian Heritage Register (VHR S417). The collection is significant because of the relationship between the objects, as together they have a high potential to interpret the story of the LOCH ARD. The LOCH ARD collection is archaeologically significant as the remains of a large international passenger and cargo ship. The LOCH ARD collection is historically significant for representing aspects of Victoria’s shipping history and its potential to interpret sub-theme 1.5 of Victoria’s Framework of Historical Themes (living with natural processes). The collection is also historically significant for its association with the LOCH ARD, which was one of the worst and best known shipwrecks in Victoria’s history. Calendar printed by Terang Express for December 1923 with picture of Loch Ard Gorge and survivors of wreck and also story of the episode. Has some large tears in it.flagstaff hill, warrnambool, shipwrecked coast, flagstaff hill maritime museum, maritime museum, shipwreck coast, flagstaff hill maritime village, great ocean road, loch line, loch ard, captain gibbs, eva carmichael, tom pearce, glenample station, mutton bird island, loch ard gorge, calendar, terang express -
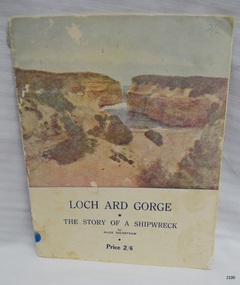 Flagstaff Hill Maritime Museum and Village
Book - Historical maritime, Terang Express, Loch Ard Gorge, 1954
HISTORY OF THE LOCH ARD The LOCH ARD belonged to the famous Loch Line which sailed many ships from England to Australia. Built in Glasgow by Barclay, Curdle and Co. in 1873, the LOCH ARD was a three-masted square rigged iron sailing ship. The ship measured 262ft 7" (79.87m) in length, 38ft (11.58m) in width, 23ft (7m) in depth and had a gross tonnage of 1693 tons. The LOCH ARD's main mast measured a massive 150ft (45.7m) in height. LOCH ARD made three trips to Australia and one trip to Calcutta before its final voyage. LOCH ARD left England on March 2, 1878, under the command of Captain Gibbs, a newly married, 29 year old. She was bound for Melbourne with a crew of 37, plus 17 passengers and a load of cargo. The general cargo reflected the affluence of Melbourne at the time. On board were straw hats, umbrella, perfumes, clay pipes, pianos, clocks, confectionary, linen and candles, as well as a heavier load of railway irons, cement, lead and copper. There were items included that intended for display in the Melbourne International Exhibition in 1880. The voyage to Port Phillip was long but uneventful. At 3am on June 1, 1878, Captain Gibbs was expecting to see land and the passengers were becoming excited as they prepared to view their new homeland in the early morning. But LOCH ARD was running into a fog which greatly reduced visibility. Captain Gibbs was becoming anxious as there was no sign of land or the Cape Otway lighthouse. At 4am the fog lifted. A man aloft announced that he could see breakers. The sheer cliffs of Victoria's west coast came into view, and Captain Gibbs realised that the ship was much closer to them than expected. He ordered as much sail to be set as time would permit and then attempted to steer the vessel out to sea. On coming head on into the wind, the ship lost momentum, the sails fell limp and LOCH ARD's bow swung back. Gibbs then ordered the anchors to be released in an attempt to hold its position. The anchors sank some 50 fathoms - but did not hold. By this time LOCH ARD was among the breakers and the tall cliffs of Mutton Bird Island rose behind the ship. Just half a mile from the coast, the ship's bow was suddenly pulled around by the anchor. The captain tried to tack out to sea, but the ship struck a reef at the base of Mutton Bird Island, near Port Campbell. Waves broke over the ship and the top deck was loosened from the hull. The masts and rigging came crashing down knocking passengers and crew overboard. When a lifeboat was finally launched, it crashed into the side of LOCH ARD and capsized. Tom Pearce, who had launched the boat, managed to cling to its overturned hull and shelter beneath it. He drifted out to sea and then on the flood tide came into what is now known as LOCH ARD Gorge. He swam to shore, bruised and dazed, and found a cave in which to shelter. Some of the crew stayed below deck to shelter from the falling rigging but drowned when the ship slipped off the reef into deeper water. Eva Carmichael had raced onto deck to find out what was happening only to be confronted by towering cliffs looming above the stricken ship. In all the chaos, Captain Gibbs grabbed Eva and said, "If you are saved Eva, let my dear wife know that I died like a sailor". That was the last Eva Carmichael saw of the captain. She was swept off the ship by a huge wave. Eva saw Tom Pearce on a small rocky beach and yelled to attract his attention. He dived in and swam to the exhausted woman and dragged her to shore. He took her to the cave and broke open case of brandy which had washed up on the beach. He opened a bottle to revive the unconscious woman. A few hours later Tom scaled a cliff in search of help. He followed hoof prints and came by chance upon two men from nearby Glenample Station three and a half miles away. In a state of exhaustion, he told the men of the tragedy. Tom returned to the gorge while the two men rode back to the station to get help. By the time they reached LOCH ARD Gorge, it was cold and dark. The two shipwreck survivors were taken to Glenample Station to recover. Eva stayed at the station for six weeks before returning to Ireland, this time by steamship. In Melbourne, Tom Pearce received a hero's welcome. He was presented with the first gold medal of the Royal Humane Society of Victoria and a £1000 cheque from the Victorian Government. Concerts were performed to honour the young man's bravery and to raise money for those who lost family in the LOCH ARD disaster. Of the 54 crew members and passengers on board, only two survived: the apprentice, Tom Pearce and the young woman passenger, Eva Carmichael, who lost all of her family in the tragedy. Ten days after the LOCH ARD tragedy, salvage rights to the wreck were sold at auction for £2,120. Cargo valued at £3,000 was salvaged and placed on the beach, but most washed back into the sea when another storm developed. The wreck of LOCH ARD still lies at the base of Mutton Bird Island. Much of the cargo has now been salvaged and some was washed up into what is now known as LOCH ARD Gorge. Cargo and artefacts have also been illegally salvaged over many years before protective legislation was introduced. One of the most unlikely pieces of cargo to have survived the shipwreck was a Minton porcelain peacock - one of only nine in the world. The peacock was destined for the Melbourne International Exhibition in 1880. It had been well packed, which gave it adequate protection during the violent storm. Today, the Minton peacock can be seen at the Flagstaff Hill Maritime Museum in Warrnambool. From Australia's most dramatic shipwreck it has now become Australia's most valuable shipwreck artefact and is one of very few 'objects' on the Victorian State Heritage Register. Flagstaff Hill’s collection of artefacts from LOCH ARD is significant for being one of the largest collections of artefacts from this shipwreck in Victoria. It is significant for its association with the shipwreck, which is on the Victorian Heritage Register (VHR S417). The collection is significant because of the relationship between the objects, as together they have a high potential to interpret the story of the LOCH ARD. The LOCH ARD collection is archaeologically significant as the remains of a large international passenger and cargo ship. The LOCH ARD collection is historically significant for representing aspects of Victoria’s shipping history and its potential to interpret sub-theme 1.5 of Victoria’s Framework of Historical Themes (living with natural processes). The collection is also historically significant for its association with the LOCH ARD, which was one of the worst and best known shipwrecks in Victoria’s history. Book, Loch Ard Gorge: The Story of a Shipwreck by Alice Goldstraw. First published 1948, Third printing November 1954. Inscription inside front cover in blue pen, signed by the author. Soft covered book containing the story of the wreck of the Loch Ard, written in poetry. Each page has a decorative border. One page has photographs, black and white, of people and the Loch Ard Gorge cavesInside front cover, script in blue ink "To Mrs Slade, with kind regards, from Alice Goldstraw"flagstaff hill, warrnambool, shipwrecked coast, flagstaff hill maritime museum, maritime museum, shipwreck coast, flagstaff hill maritime village, great ocean road, loch line, loch ard, captain gibbs, eva carmichael, tom pearce, glenample station, mutton bird island, loch ard gorge, the story of a shipwreck, book, alice goldstraw, terang express press, loch ard gorge whipwreck, ship loch ard -
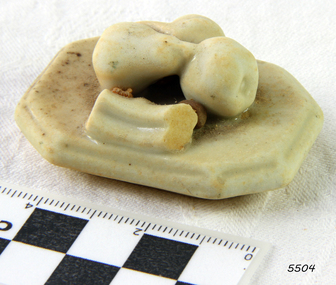 Flagstaff Hill Maritime Museum and Village
Lid
Ref: LA 2 29 274 HISTORY OF THE LOCH ARD The LOCH ARD belonged to the famous Loch Line which sailed many ships from England to Australia. Built in Glasgow by Barclay, Curdle and Co. in 1873, the LOCH ARD was a three-masted square rigged iron sailing ship. The ship measured 262ft 7" (79.87m) in length, 38ft (11.58m) in width, 23ft (7m) in depth and had a gross tonnage of 1693 tons. The LOCH ARD's main mast measured a massive 150ft (45.7m) in height. LOCH ARD made three trips to Australia and one trip to Calcutta before its final voyage. LOCH ARD left England on March 2, 1878, under the command of Captain Gibbs, a newly married, 29 year old. She was bound for Melbourne with a crew of 37, plus 17 passengers and a load of cargo. The general cargo reflected the affluence of Melbourne at the time. On board were straw hats, umbrella, perfumes, clay pipes, pianos, clocks, confectionary, linen and candles, as well as a heavier load of railway irons, cement, lead and copper. There were items included that intended for display in the Melbourne International Exhibition in 1880. The voyage to Port Phillip was long but uneventful. At 3am on June 1, 1878, Captain Gibbs was expecting to see land and the passengers were becoming excited as they prepared to view their new homeland in the early morning. But LOCH ARD was running into a fog which greatly reduced visibility. Captain Gibbs was becoming anxious as there was no sign of land or the Cape Otway lighthouse. At 4am the fog lifted. A man aloft announced that he could see breakers. The sheer cliffs of Victoria's west coast came into view, and Captain Gibbs realised that the ship was much closer to them than expected. He ordered as much sail to be set as time would permit and then attempted to steer the vessel out to sea. On coming head on into the wind, the ship lost momentum, the sails fell limp and LOCH ARD's bow swung back. Gibbs then ordered the anchors to be released in an attempt to hold its position. The anchors sank some 50 fathoms - but did not hold. By this time LOCH ARD was among the breakers and the tall cliffs of Mutton Bird Island rose behind the ship. Just half a mile from the coast, the ship's bow was suddenly pulled around by the anchor. The captain tried to tack out to sea, but the ship struck a reef at the base of Mutton Bird Island, near Port Campbell. Waves broke over the ship and the top deck was loosened from the hull. The masts and rigging came crashing down knocking passengers and crew overboard. When a lifeboat was finally launched, it crashed into the side of LOCH ARD and capsized. Tom Pearce, who had launched the boat, managed to cling to its overturned hull and shelter beneath it. He drifted out to sea and then on the flood tide came into what is now known as LOCH ARD Gorge. He swam to shore, bruised and dazed, and found a cave in which to shelter. Some of the crew stayed below deck to shelter from the falling rigging but drowned when the ship slipped off the reef into deeper water. Eva Carmichael had raced onto deck to find out what was happening only to be confronted by towering cliffs looming above the stricken ship. In all the chaos, Captain Gibbs grabbed Eva and said, "If you are saved Eva, let my dear wife know that I died like a sailor". That was the last Eva Carmichael saw of the captain. She was swept off the ship by a huge wave. Eva saw Tom Pearce on a small rocky beach and yelled to attract his attention. He dived in and swam to the exhausted woman and dragged her to shore. He took her to the cave and broke open case of brandy which had washed up on the beach. He opened a bottle to revive the unconscious woman. A few hours later Tom scaled a cliff in search of help. He followed hoof prints and came by chance upon two men from nearby Glenample Station three and a half miles away. In a state of exhaustion, he told the men of the tragedy. Tom returned to the gorge while the two men rode back to the station to get help. By the time they reached LOCH ARD Gorge, it was cold and dark. The two shipwreck survivors were taken to Glenample Station to recover. Eva stayed at the station for six weeks before returning to Ireland, this time by steamship. In Melbourne, Tom Pearce received a hero's welcome. He was presented with the first gold medal of the Royal Humane Society of Victoria and a £1000 cheque from the Victorian Government. Concerts were performed to honour the young man's bravery and to raise money for those who lost family in the LOCH ARD disaster. Of the 54 crew members and passengers on board, only two survived: the apprentice, Tom Pearce and the young woman passenger, Eva Carmichael, who lost all of her family in the tragedy. Ten days after the LOCH ARD tragedy, salvage rights to the wreck were sold at auction for £2,120. Cargo valued at £3,000 was salvaged and placed on the beach, but most washed back into the sea when another storm developed. The wreck of LOCH ARD still lies at the base of Mutton Bird Island. Much of the cargo has now been salvaged and some was washed up into what is now known as LOCH ARD Gorge. Cargo and artefacts have also been illegally salvaged over many years before protective legislation was introduced. One of the most unlikely pieces of cargo to have survived the shipwreck was a Minton porcelain peacock - one of only nine in the world. The peacock was destined for the Melbourne International Exhibition in 1880. It had been well packed, which gave it adequate protection during the violent storm. Today, the Minton peacock can be seen at the Flagstaff Hill Maritime Museum in Warrnambool. From Australia's most dramatic shipwreck it has now become Australia's most valuable shipwreck artefact and is one of very few 'objects' on the Victorian State Heritage Register. Flagstaff Hill’s collection of artefacts from LOCH ARD is significant for being one of the largest collections of artefacts from this shipwreck in Victoria. It is significant for its association with the shipwreck, which is on the Victorian Heritage Register (VHR S417). The collection is significant because of the relationship between the objects, as together they have a high potential to interpret the story of the LOCH ARD. The LOCH ARD collection is archaeologically significant as the remains of a large international passenger and cargo ship. The LOCH ARD collection is historically significant for representing aspects of Victoria’s shipping history and its potential to interpret sub-theme 1.5 of Victoria’s Framework of Historical Themes (living with natural processes). The collection is also historically significant for its association with the LOCH ARD, which was one of the worst and best known shipwrecks in Victoria’s history. Lid from child's tea set. Porcelain. Lid has small chip and some slight iron stains. Recovered from the wreck of the Loch Ard. Artefact reg No LA/16.flagstaff hill, warrnambool, shipwrecked-coast, flagstaff-hill, flagstaff-hill-maritime-museum, maritime-museum, shipwreck-coast, flagstaff-hill-maritime-village -
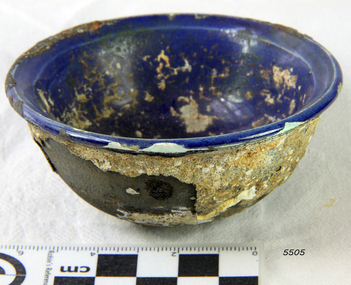 Flagstaff Hill Maritime Museum and Village
Deflector
HISTORY OF THE LOCH ARD The LOCH ARD belonged to the famous Loch Line which sailed many ships from England to Australia. Built in Glasgow by Barclay, Curdle and Co. in 1873, the LOCH ARD was a three-masted square rigged iron sailing ship. The ship measured 262ft 7" (79.87m) in length, 38ft (11.58m) in width, 23ft (7m) in depth and had a gross tonnage of 1693 tons. The LOCH ARD's main mast measured a massive 150ft (45.7m) in height. LOCH ARD made three trips to Australia and one trip to Calcutta before its final voyage. LOCH ARD left England on March 2, 1878, under the command of Captain Gibbs, a newly married, 29 year old. She was bound for Melbourne with a crew of 37, plus 17 passengers and a load of cargo. The general cargo reflected the affluence of Melbourne at the time. On board were straw hats, umbrella, perfumes, clay pipes, pianos, clocks, confectionary, linen and candles, as well as a heavier load of railway irons, cement, lead and copper. There were items included that intended for display in the Melbourne International Exhibition in 1880. The voyage to Port Phillip was long but uneventful. At 3am on June 1, 1878, Captain Gibbs was expecting to see land and the passengers were becoming excited as they prepared to view their new homeland in the early morning. But LOCH ARD was running into a fog which greatly reduced visibility. Captain Gibbs was becoming anxious as there was no sign of land or the Cape Otway lighthouse. At 4am the fog lifted. A man aloft announced that he could see breakers. The sheer cliffs of Victoria's west coast came into view, and Captain Gibbs realised that the ship was much closer to them than expected. He ordered as much sail to be set as time would permit and then attempted to steer the vessel out to sea. On coming head on into the wind, the ship lost momentum, the sails fell limp and LOCH ARD's bow swung back. Gibbs then ordered the anchors to be released in an attempt to hold its position. The anchors sank some 50 fathoms - but did not hold. By this time LOCH ARD was among the breakers and the tall cliffs of Mutton Bird Island rose behind the ship. Just half a mile from the coast, the ship's bow was suddenly pulled around by the anchor. The captain tried to tack out to sea, but the ship struck a reef at the base of Mutton Bird Island, near Port Campbell. Waves broke over the ship and the top deck was loosened from the hull. The masts and rigging came crashing down knocking passengers and crew overboard. When a lifeboat was finally launched, it crashed into the side of LOCH ARD and capsized. Tom Pearce, who had launched the boat, managed to cling to its overturned hull and shelter beneath it. He drifted out to sea and then on the flood tide came into what is now known as LOCH ARD Gorge. He swam to shore, bruised and dazed, and found a cave in which to shelter. Some of the crew stayed below deck to shelter from the falling rigging but drowned when the ship slipped off the reef into deeper water. Eva Carmichael had raced onto deck to find out what was happening only to be confronted by towering cliffs looming above the stricken ship. In all the chaos, Captain Gibbs grabbed Eva and said, "If you are saved Eva, let my dear wife know that I died like a sailor". That was the last Eva Carmichael saw of the captain. She was swept off the ship by a huge wave. Eva saw Tom Pearce on a small rocky beach and yelled to attract his attention. He dived in and swam to the exhausted woman and dragged her to shore. He took her to the cave and broke open case of brandy which had washed up on the beach. He opened a bottle to revive the unconscious woman. A few hours later Tom scaled a cliff in search of help. He followed hoof prints and came by chance upon two men from nearby Glenample Station three and a half miles away. In a state of exhaustion, he told the men of the tragedy. Tom returned to the gorge while the two men rode back to the station to get help. By the time they reached LOCH ARD Gorge, it was cold and dark. The two shipwreck survivors were taken to Glenample Station to recover. Eva stayed at the station for six weeks before returning to Ireland, this time by steamship. In Melbourne, Tom Pearce received a hero's welcome. He was presented with the first gold medal of the Royal Humane Society of Victoria and a £1000 cheque from the Victorian Government. Concerts were performed to honour the young man's bravery and to raise money for those who lost family in the LOCH ARD disaster. Of the 54 crew members and passengers on board, only two survived: the apprentice, Tom Pearce and the young woman passenger, Eva Carmichael, who lost all of her family in the tragedy. Ten days after the LOCH ARD tragedy, salvage rights to the wreck were sold at auction for £2,120. Cargo valued at £3,000 was salvaged and placed on the beach, but most washed back into the sea when another storm developed. The wreck of LOCH ARD still lies at the base of Mutton Bird Island. Much of the cargo has now been salvaged and some was washed up into what is now known as LOCH ARD Gorge. Cargo and artefacts have also been illegally salvaged over many years before protective legislation was introduced. One of the most unlikely pieces of cargo to have survived the shipwreck was a Minton porcelain peacock - one of only nine in the world. The peacock was destined for the Melbourne International Exhibition in 1880. It had been well packed, which gave it adequate protection during the violent storm. Today, the Minton peacock can be seen at the Flagstaff Hill Maritime Museum in Warrnambool. From Australia's most dramatic shipwreck it has now become Australia's most valuable shipwreck artefact and is one of very few 'objects' on the Victorian State Heritage Register. Flagstaff Hill’s collection of artefacts from LOCH ARD is significant for being one of the largest collections of artefacts from this shipwreck in Victoria. It is significant for its association with the shipwreck, which is on the Victorian Heritage Register (VHR S417). The collection is significant because of the relationship between the objects, as together they have a high potential to interpret the story of the LOCH ARD. The LOCH ARD collection is archaeologically significant as the remains of a large international passenger and cargo ship. The LOCH ARD collection is historically significant for representing aspects of Victoria’s shipping history and its potential to interpret sub-theme 1.5 of Victoria’s Framework of Historical Themes (living with natural processes). The collection is also historically significant for its association with the LOCH ARD, which was one of the worst and best known shipwrecks in Victoria’s history. Small Porcelain Heat Deflector from a kero lamp,deflector is blue inside. Outside has some encrustation. Artefact reg no LA/15. Recovered from the wreck of the Loch Ard.flagstaff hill, warrnambool, shipwrecked coast, flagstaff hill maritime museum, maritime museum, shipwreck coast, flagstaff hill maritime village, great ocean road, loch line, loch ard, captain gibbs, eva carmichael, tom pearce, glenample station, mutton bird island, loch ard gorge, porcelain heat deflector, heat deflector -
 Flagstaff Hill Maritime Museum and Village
Pump
HISTORY OF THE LOCH ARD The LOCH ARD belonged to the famous Loch Line which sailed many ships from England to Australia. Built in Glasgow by Barclay, Curdle and Co. in 1873, the LOCH ARD was a three-masted square rigged iron sailing ship. The ship measured 262ft 7" (79.87m) in length, 38ft (11.58m) in width, 23ft (7m) in depth and had a gross tonnage of 1693 tons. The LOCH ARD's main mast measured a massive 150ft (45.7m) in height. LOCH ARD made three trips to Australia and one trip to Calcutta before its final voyage. LOCH ARD left England on March 2, 1878, under the command of Captain Gibbs, a newly married, 29 year old. She was bound for Melbourne with a crew of 37, plus 17 passengers and a load of cargo. The general cargo reflected the affluence of Melbourne at the time. On board were straw hats, umbrella, perfumes, clay pipes, pianos, clocks, confectionary, linen and candles, as well as a heavier load of railway irons, cement, lead and copper. There were items included that intended for display in the Melbourne International Exhibition in 1880. The voyage to Port Phillip was long but uneventful. At 3am on June 1, 1878, Captain Gibbs was expecting to see land and the passengers were becoming excited as they prepared to view their new homeland in the early morning. But LOCH ARD was running into a fog which greatly reduced visibility. Captain Gibbs was becoming anxious as there was no sign of land or the Cape Otway lighthouse. At 4am the fog lifted. A man aloft announced that he could see breakers. The sheer cliffs of Victoria's west coast came into view, and Captain Gibbs realised that the ship was much closer to them than expected. He ordered as much sail to be set as time would permit and then attempted to steer the vessel out to sea. On coming head on into the wind, the ship lost momentum, the sails fell limp and LOCH ARD's bow swung back. Gibbs then ordered the anchors to be released in an attempt to hold its position. The anchors sank some 50 fathoms - but did not hold. By this time LOCH ARD was among the breakers and the tall cliffs of Mutton Bird Island rose behind the ship. Just half a mile from the coast, the ship's bow was suddenly pulled around by the anchor. The captain tried to tack out to sea, but the ship struck a reef at the base of Mutton Bird Island, near Port Campbell. Waves broke over the ship and the top deck was loosened from the hull. The masts and rigging came crashing down knocking passengers and crew overboard. When a lifeboat was finally launched, it crashed into the side of LOCH ARD and capsized. Tom Pearce, who had launched the boat, managed to cling to its overturned hull and shelter beneath it. He drifted out to sea and then on the flood tide came into what is now known as LOCH ARD Gorge. He swam to shore, bruised and dazed, and found a cave in which to shelter. Some of the crew stayed below deck to shelter from the falling rigging but drowned when the ship slipped off the reef into deeper water. Eva Carmichael had raced onto deck to find out what was happening only to be confronted by towering cliffs looming above the stricken ship. In all the chaos, Captain Gibbs grabbed Eva and said, "If you are saved Eva, let my dear wife know that I died like a sailor". That was the last Eva Carmichael saw of the captain. She was swept off the ship by a huge wave. Eva saw Tom Pearce on a small rocky beach and yelled to attract his attention. He dived in and swam to the exhausted woman and dragged her to shore. He took her to the cave and broke open case of brandy which had washed up on the beach. He opened a bottle to revive the unconscious woman. A few hours later Tom scaled a cliff in search of help. He followed hoof prints and came by chance upon two men from nearby Glenample Station three and a half miles away. In a state of exhaustion, he told the men of the tragedy. Tom returned to the gorge while the two men rode back to the station to get help. By the time they reached LOCH ARD Gorge, it was cold and dark. The two shipwreck survivors were taken to Glenample Station to recover. Eva stayed at the station for six weeks before returning to Ireland, this time by steamship. In Melbourne, Tom Pearce received a hero's welcome. He was presented with the first gold medal of the Royal Humane Society of Victoria and a £1000 cheque from the Victorian Government. Concerts were performed to honour the young man's bravery and to raise money for those who lost family in the LOCH ARD disaster. Of the 54 crew members and passengers on board, only two survived: the apprentice, Tom Pearce and the young woman passenger, Eva Carmichael, who lost all of her family in the tragedy. Ten days after the LOCH ARD tragedy, salvage rights to the wreck were sold at auction for £2,120. Cargo valued at £3,000 was salvaged and placed on the beach, but most washed back into the sea when another storm developed. The wreck of LOCH ARD still lies at the base of Mutton Bird Island. Much of the cargo has now been salvaged and some was washed up into what is now known as LOCH ARD Gorge. Cargo and artefacts have also been illegally salvaged over many years before protective legislation was introduced. One of the most unlikely pieces of cargo to have survived the shipwreck was a Minton porcelain peacock - one of only nine in the world. The peacock was destined for the Melbourne International Exhibition in 1880. It had been well packed, which gave it adequate protection during the violent storm. Today, the Minton peacock can be seen at the Flagstaff Hill Maritime Museum in Warrnambool. From Australia's most dramatic shipwreck it has now become Australia's most valuable shipwreck artefact and is one of very few 'objects' on the Victorian State Heritage Register. Flagstaff Hill’s collection of artefacts from LOCH ARD is significant for being one of the largest collections of artefacts from this shipwreck in Victoria. It is significant for its association with the shipwreck, which is on the Victorian Heritage Register (VHR S417). The collection is significant because of the relationship between the objects, as together they have a high potential to interpret the story of the LOCH ARD. The LOCH ARD collection is archaeologically significant as the remains of a large international passenger and cargo ship. The LOCH ARD collection is historically significant for representing aspects of Victoria’s shipping history and its potential to interpret sub-theme 1.5 of Victoria’s Framework of Historical Themes (living with natural processes). The collection is also historically significant for its association with the LOCH ARD, which was one of the worst and best known shipwrecks in Victoria’s history. Part of a pump system. Has been attached to a piece of wood. Possibly a cistern plunger. From the Loch Ard.flagstaff hill, warrnambool, shipwrecked coast, flagstaff hill maritime museum, maritime museum, shipwreck coast, flagstaff hill maritime village, great ocean road, loch line, loch ard, captain gibbs, eva carmichael, tom pearce, glenample station, mutton bird island, loch ard gorge, pump system, pump -
 Flagstaff Hill Maritime Museum and Village
Functional object - Gas Fitting, c. 1873
This gas fitting was recovered from the wreck of the Loch Ard circa 1970, at the time of the discovery of the wreck. HISTORY OF THE LOCH ARD: - The LOCH ARD belonged to the famous Loch Line which sailed many ships from England to Australia. Built in Glasgow by Barclay, Curdle and Co. in 1873, the LOCH ARD was a three-masted square rigged iron sailing ship. The ship measured 262ft 7" (79.87m) in length, 38ft (11.58m) in width, 23ft (7m) in depth and had a gross tonnage of 1693 tons. The LOCH ARD's main mast measured a massive 150ft (45.7m) in height. LOCH ARD made three trips to Australia and one trip to Calcutta before its final voyage. LOCH ARD left England on March 2, 1878, under the command of Captain Gibbs, a newly married, 29 year old. She was bound for Melbourne with a crew of 37, plus 17 passengers and a load of cargo. The general cargo reflected the affluence of Melbourne at the time. On board were straw hats, umbrella, perfumes, clay pipes, pianos, clocks, confectionary, linen and candles, as well as a heavier load of railway irons, cement, lead and copper. There were items included that intended for display in the Melbourne International Exhibition in 1880. The voyage to Port Phillip was long but uneventful. At 3am on June 1, 1878, Captain Gibbs was expecting to see land and the passengers were becoming excited as they prepared to view their new homeland in the early morning. But LOCH ARD was running into a fog which greatly reduced visibility. Captain Gibbs was becoming anxious as there was no sign of land or the Cape Otway lighthouse. At 4am the fog lifted. A man aloft announced that he could see breakers. The sheer cliffs of Victoria's west coast came into view, and Captain Gibbs realised that the ship was much closer to them than expected. He ordered as much sail to be set as time would permit and then attempted to steer the vessel out to sea. On coming head on into the wind, the ship lost momentum, the sails fell limp and LOCH ARD's bow swung back. Gibbs then ordered the anchors to be released in an attempt to hold its position. The anchors sank some 50 fathoms - but did not hold. By this time LOCH ARD was among the breakers and the tall cliffs of Mutton Bird Island rose behind the ship. Just half a mile from the coast, the ship's bow was suddenly pulled around by the anchor. The captain tried to tack out to sea, but the ship struck a reef at the base of Mutton Bird Island, near Port Campbell. Waves broke over the ship and the top deck was loosened from the hull. The masts and rigging came crashing down knocking passengers and crew overboard. When a lifeboat was finally launched, it crashed into the side of LOCH ARD and capsized. Tom Pearce, who had launched the boat, managed to cling to its overturned hull and shelter beneath it. He drifted out to sea and then on the flood tide came into what is now known as LOCH ARD Gorge. He swam to shore, bruised and dazed, and found a cave in which to shelter. Some of the crew stayed below deck to shelter from the falling rigging but drowned when the ship slipped off the reef into deeper water. Eva Carmichael had raced onto deck to find out what was happening only to be confronted by towering cliffs looming above the stricken ship. In all the chaos, Captain Gibbs grabbed Eva and said, "If you are saved Eva, let my dear wife know that I died like a sailor". That was the last Eva Carmichael saw of the captain. She was swept off the ship by a huge wave. Eva saw Tom Pearce on a small rocky beach and yelled to attract his attention. He dived in and swam to the exhausted woman and dragged her to shore. He took her to the cave and broke open case of brandy which had washed up on the beach. He opened a bottle to revive the unconscious woman. A few hours later Tom scaled a cliff in search of help. He followed hoof prints and came by chance upon two men from nearby Glenample Station three and a half miles away. In a state of exhaustion, he told the men of the tragedy. Tom returned to the gorge while the two men rode back to the station to get help. By the time they reached LOCH ARD Gorge, it was cold and dark. The two shipwreck survivors were taken to Glenample Station to recover. Eva stayed at the station for six weeks before returning to Ireland, this time by steamship. In Melbourne, Tom Pearce received a hero's welcome. He was presented with the first gold medal of the Royal Humane Society of Victoria and a £1000 cheque from the Victorian Government. Concerts were performed to honour the young man's bravery and to raise money for those who lost family in the LOCH ARD disaster. Of the 54 crew members and passengers on board, only two survived: the apprentice, Tom Pearce and the young woman passenger, Eva Carmichael, who lost all of her family in the tragedy. Ten days after the LOCH ARD tragedy, salvage rights to the wreck were sold at auction for £2,120. Cargo valued at £3,000 was salvaged and placed on the beach, but most washed back into the sea when another storm developed. The wreck of LOCH ARD still lies at the base of Mutton Bird Island. Much of the cargo has now been salvaged and some was washed up into what is now known as LOCH ARD Gorge. Cargo and artefacts have also been illegally salvaged over many years before protective legislation was introduced. One of the most unlikely pieces of cargo to have survived the shipwreck was a Minton porcelain peacock - one of only nine in the world. The peacock was destined for the Melbourne International Exhibition in 1880. It had been well packed, which gave it adequate protection during the violent storm. Today, the Minton peacock can be seen at the Flagstaff Hill Maritime Museum in Warrnambool. From Australia's most dramatic shipwreck it has now become Australia's most valuable shipwreck artefact and is one of very few 'objects' on the Victorian State Heritage Register. Flagstaff Hill’s collection of artefacts from LOCH ARD is significant for being one of the largest collections of artefacts from this shipwreck in Victoria. It is significant for its association with the shipwreck, which is on the Victorian Heritage Register (VHR S417). The collection is significant because of the relationship between the objects, as together they have a high potential to interpret the story of the LOCH ARD. The LOCH ARD collection is archaeologically significant as the remains of a large international passenger and cargo ship. The LOCH ARD collection is historically significant for representing aspects of Victoria’s shipping history and its potential to interpret sub-theme 1.5 of Victoria’s Framework of Historical Themes (living with natural processes). The collection is also historically significant for its association with the LOCH ARD, which was one of the worst and best known shipwrecks in Victoria’s history. Copper gas pipe and fitting. Tow C-shaped pipes with fittings at each end. One end of each pipe is joined to the other pipe, making a U-shape. It was recovered from the 1878 wreck of the ship Loch Ard in the 1970s. flagstaff hill, warrnambool, shipwrecked coast, flagstaff hill maritime museum, maritime museum, shipwreck coast, flagstaff hill maritime village, great ocean road, loch line, loch ard, captain gibbs, eva carmichael, tom pearce, glenample station, mutton bird island, loch ard gorge, copper gas pipe and fitting, copper gas pipe -
 Flagstaff Hill Maritime Museum and Village
Handle
Ref: LA 6 67 311 HISTORY OF THE LOCH ARD The LOCH ARD belonged to the famous Loch Line which sailed many ships from England to Australia. Built in Glasgow by Barclay, Curdle and Co. in 1873, the LOCH ARD was a three-masted square rigged iron sailing ship. The ship measured 262ft 7" (79.87m) in length, 38ft (11.58m) in width, 23ft (7m) in depth and had a gross tonnage of 1693 tons. The LOCH ARD's main mast measured a massive 150ft (45.7m) in height. LOCH ARD made three trips to Australia and one trip to Calcutta before its final voyage. LOCH ARD left England on March 2, 1878, under the command of Captain Gibbs, a newly married, 29 year old. She was bound for Melbourne with a crew of 37, plus 17 passengers and a load of cargo. The general cargo reflected the affluence of Melbourne at the time. On board were straw hats, umbrella, perfumes, clay pipes, pianos, clocks, confectionary, linen and candles, as well as a heavier load of railway irons, cement, lead and copper. There were items included that intended for display in the Melbourne International Exhibition in 1880. The voyage to Port Phillip was long but uneventful. At 3am on June 1, 1878, Captain Gibbs was expecting to see land and the passengers were becoming excited as they prepared to view their new homeland in the early morning. But LOCH ARD was running into a fog which greatly reduced visibility. Captain Gibbs was becoming anxious as there was no sign of land or the Cape Otway lighthouse. At 4am the fog lifted. A man aloft announced that he could see breakers. The sheer cliffs of Victoria's west coast came into view, and Captain Gibbs realised that the ship was much closer to them than expected. He ordered as much sail to be set as time would permit and then attempted to steer the vessel out to sea. On coming head on into the wind, the ship lost momentum, the sails fell limp and LOCH ARD's bow swung back. Gibbs then ordered the anchors to be released in an attempt to hold its position. The anchors sank some 50 fathoms - but did not hold. By this time LOCH ARD was among the breakers and the tall cliffs of Mutton Bird Island rose behind the ship. Just half a mile from the coast, the ship's bow was suddenly pulled around by the anchor. The captain tried to tack out to sea, but the ship struck a reef at the base of Mutton Bird Island, near Port Campbell. Waves broke over the ship and the top deck was loosened from the hull. The masts and rigging came crashing down knocking passengers and crew overboard. When a lifeboat was finally launched, it crashed into the side of LOCH ARD and capsized. Tom Pearce, who had launched the boat, managed to cling to its overturned hull and shelter beneath it. He drifted out to sea and then on the flood tide came into what is now known as LOCH ARD Gorge. He swam to shore, bruised and dazed, and found a cave in which to shelter. Some of the crew stayed below deck to shelter from the falling rigging but drowned when the ship slipped off the reef into deeper water. Eva Carmichael had raced onto deck to find out what was happening only to be confronted by towering cliffs looming above the stricken ship. In all the chaos, Captain Gibbs grabbed Eva and said, "If you are saved Eva, let my dear wife know that I died like a sailor". That was the last Eva Carmichael saw of the captain. She was swept off the ship by a huge wave. Eva saw Tom Pearce on a small rocky beach and yelled to attract his attention. He dived in and swam to the exhausted woman and dragged her to shore. He took her to the cave and broke open case of brandy which had washed up on the beach. He opened a bottle to revive the unconscious woman. A few hours later Tom scaled a cliff in search of help. He followed hoof prints and came by chance upon two men from nearby Glenample Station three and a half miles away. In a state of exhaustion, he told the men of the tragedy. Tom returned to the gorge while the two men rode back to the station to get help. By the time they reached LOCH ARD Gorge, it was cold and dark. The two shipwreck survivors were taken to Glenample Station to recover. Eva stayed at the station for six weeks before returning to Ireland, this time by steamship. In Melbourne, Tom Pearce received a hero's welcome. He was presented with the first gold medal of the Royal Humane Society of Victoria and a £1000 cheque from the Victorian Government. Concerts were performed to honour the young man's bravery and to raise money for those who lost family in the LOCH ARD disaster. Of the 54 crew members and passengers on board, only two survived: the apprentice, Tom Pearce and the young woman passenger, Eva Carmichael, who lost all of her family in the tragedy. Ten days after the LOCH ARD tragedy, salvage rights to the wreck were sold at auction for £2,120. Cargo valued at £3,000 was salvaged and placed on the beach, but most washed back into the sea when another storm developed. The wreck of LOCH ARD still lies at the base of Mutton Bird Island. Much of the cargo has now been salvaged and some was washed up into what is now known as LOCH ARD Gorge. Cargo and artefacts have also been illegally salvaged over many years before protective legislation was introduced. One of the most unlikely pieces of cargo to have survived the shipwreck was a Minton porcelain peacock - one of only nine in the world. The peacock was destined for the Melbourne International Exhibition in 1880. It had been well packed, which gave it adequate protection during the violent storm. Today, the Minton peacock can be seen at the Flagstaff Hill Maritime Museum in Warrnambool. From Australia's most dramatic shipwreck it has now become Australia's most valuable shipwreck artefact and is one of very few 'objects' on the Victorian State Heritage Register. Flagstaff Hill’s collection of artefacts from LOCH ARD is significant for being one of the largest collections of artefacts from this shipwreck in Victoria. It is significant for its association with the shipwreck, which is on the Victorian Heritage Register (VHR S417). The collection is significant because of the relationship between the objects, as together they have a high potential to interpret the story of the LOCH ARD. The LOCH ARD collection is archaeologically significant as the remains of a large international passenger and cargo ship. The LOCH ARD collection is historically significant for representing aspects of Victoria’s shipping history and its potential to interpret sub-theme 1.5 of Victoria’s Framework of Historical Themes (living with natural processes). The collection is also historically significant for its association with Shovel handle. Has pieces of iron and concretion visible. Artefact Reg No LA/42. Recovered from the wreck of the Loch Ard.flagstaff hill, warrnambool, shipwrecked coast, flagstaff hill maritime museum, maritime museum, shipwreck coast, flagstaff hill maritime village, great ocean road, loch line, loch ard, captain gibbs, eva carmichael, tom pearce, glenample station, mutton bird island, loch ard gorge, shovel handle -
 Flagstaff Hill Maritime Museum and Village
Flange
Ref LA 3 32 256 HISTORY OF THE LOCH ARD The LOCH ARD belonged to the famous Loch Line which sailed many ships from England to Australia. Built in Glasgow by Barclay, Curdle and Co. in 1873, the LOCH ARD was a three-masted square rigged iron sailing ship. The ship measured 262ft 7" (79.87m) in length, 38ft (11.58m) in width, 23ft (7m) in depth and had a gross tonnage of 1693 tons. The LOCH ARD's main mast measured a massive 150ft (45.7m) in height. LOCH ARD made three trips to Australia and one trip to Calcutta before its final voyage. LOCH ARD left England on March 2, 1878, under the command of Captain Gibbs, a newly married, 29 year old. She was bound for Melbourne with a crew of 37, plus 17 passengers and a load of cargo. The general cargo reflected the affluence of Melbourne at the time. On board were straw hats, umbrella, perfumes, clay pipes, pianos, clocks, confectionary, linen and candles, as well as a heavier load of railway irons, cement, lead and copper. There were items included that intended for display in the Melbourne International Exhibition in 1880. The voyage to Port Phillip was long but uneventful. At 3am on June 1, 1878, Captain Gibbs was expecting to see land and the passengers were becoming excited as they prepared to view their new homeland in the early morning. But LOCH ARD was running into a fog which greatly reduced visibility. Captain Gibbs was becoming anxious as there was no sign of land or the Cape Otway lighthouse. At 4am the fog lifted. A man aloft announced that he could see breakers. The sheer cliffs of Victoria's west coast came into view, and Captain Gibbs realised that the ship was much closer to them than expected. He ordered as much sail to be set as time would permit and then attempted to steer the vessel out to sea. On coming head on into the wind, the ship lost momentum, the sails fell limp and LOCH ARD's bow swung back. Gibbs then ordered the anchors to be released in an attempt to hold its position. The anchors sank some 50 fathoms - but did not hold. By this time LOCH ARD was among the breakers and the tall cliffs of Mutton Bird Island rose behind the ship. Just half a mile from the coast, the ship's bow was suddenly pulled around by the anchor. The captain tried to tack out to sea, but the ship struck a reef at the base of Mutton Bird Island, near Port Campbell. Waves broke over the ship and the top deck was loosened from the hull. The masts and rigging came crashing down knocking passengers and crew overboard. When a lifeboat was finally launched, it crashed into the side of LOCH ARD and capsized. Tom Pearce, who had launched the boat, managed to cling to its overturned hull and shelter beneath it. He drifted out to sea and then on the flood tide came into what is now known as LOCH ARD Gorge. He swam to shore, bruised and dazed, and found a cave in which to shelter. Some of the crew stayed below deck to shelter from the falling rigging but drowned when the ship slipped off the reef into deeper water. Eva Carmichael had raced onto deck to find out what was happening only to be confronted by towering cliffs looming above the stricken ship. In all the chaos, Captain Gibbs grabbed Eva and said, "If you are saved Eva, let my dear wife know that I died like a sailor". That was the last Eva Carmichael saw of the captain. She was swept off the ship by a huge wave. Eva saw Tom Pearce on a small rocky beach and yelled to attract his attention. He dived in and swam to the exhausted woman and dragged her to shore. He took her to the cave and broke open case of brandy which had washed up on the beach. He opened a bottle to revive the unconscious woman. A few hours later Tom scaled a cliff in search of help. He followed hoof prints and came by chance upon two men from nearby Glenample Station three and a half miles away. In a state of exhaustion, he told the men of the tragedy. Tom returned to the gorge while the two men rode back to the station to get help. By the time they reached LOCH ARD Gorge, it was cold and dark. The two shipwreck survivors were taken to Glenample Station to recover. Eva stayed at the station for six weeks before returning to Ireland, this time by steamship. In Melbourne, Tom Pearce received a hero's welcome. He was presented with the first gold medal of the Royal Humane Society of Victoria and a £1000 cheque from the Victorian Government. Concerts were performed to honour the young man's bravery and to raise money for those who lost family in the LOCH ARD disaster. Of the 54 crew members and passengers on board, only two survived: the apprentice, Tom Pearce and the young woman passenger, Eva Carmichael, who lost all of her family in the tragedy. Ten days after the LOCH ARD tragedy, salvage rights to the wreck were sold at auction for £2,120. Cargo valued at £3,000 was salvaged and placed on the beach, but most washed back into the sea when another storm developed. The wreck of LOCH ARD still lies at the base of Mutton Bird Island. Much of the cargo has now been salvaged and some was washed up into what is now known as LOCH ARD Gorge. Cargo and artefacts have also been illegally salvaged over many years before protective legislation was introduced. One of the most unlikely pieces of cargo to have survived the shipwreck was a Minton porcelain peacock - one of only nine in the world. The peacock was destined for the Melbourne International Exhibition in 1880. It had been well packed, which gave it adequate protection during the violent storm. Today, the Minton peacock can be seen at the Flagstaff Hill Maritime Museum in Warrnambool. From Australia's most dramatic shipwreck it has now become Australia's most valuable shipwreck artefact and is one of very few 'objects' on the Victorian State Heritage Register. Flagstaff Hill’s collection of artefacts from LOCH ARD is significant for being one of the largest collections of artefacts from this shipwreck in Victoria. It is significant for its association with the shipwreck, which is on the Victorian Heritage Register (VHR S417). The collection is significant because of the relationship between the objects, as together they have a high potential to interpret the story of the LOCH ARD. The LOCH ARD collection is archaeologically significant as the remains of a large international passenger and cargo ship. The LOCH ARD collection is historically significant for representing aspects of Victoria’s shipping history and its potential to interpret sub-theme 1.5 of Victoria’s Framework of Historical Themes (living with natural processes). The collection is also historically significant for its association with the LOCH ARD, which was one of the worst and best known shipwrecks in Victoria’s history. Small square brass Flange with four corner holes and one larger centre hole. Artefact Reg No LA/25. Recovered from the wreck of the Loch Ard.flagstaff hill, warrnambool, shipwrecked coast, flagstaff hill maritime museum, maritime museum, shipwreck coast, flagstaff hill maritime village, great ocean road, loch line, loch ard, captain gibbs, eva carmichael, tom pearce, glenample station, mutton bird island, loch ard gorge, flange -
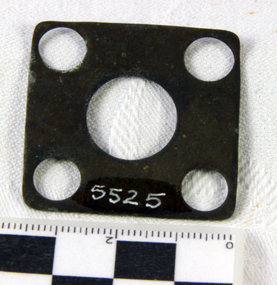 Flagstaff Hill Maritime Museum and Village
Flange
Ref LA 3 32 257 HISTORY OF THE LOCH ARD The LOCH ARD belonged to the famous Loch Line which sailed many ships from England to Australia. Built in Glasgow by Barclay, Curdle and Co. in 1873, the LOCH ARD was a three-masted square rigged iron sailing ship. The ship measured 262ft 7" (79.87m) in length, 38ft (11.58m) in width, 23ft (7m) in depth and had a gross tonnage of 1693 tons. The LOCH ARD's main mast measured a massive 150ft (45.7m) in height. LOCH ARD made three trips to Australia and one trip to Calcutta before its final voyage. LOCH ARD left England on March 2, 1878, under the command of Captain Gibbs, a newly married, 29 year old. She was bound for Melbourne with a crew of 37, plus 17 passengers and a load of cargo. The general cargo reflected the affluence of Melbourne at the time. On board were straw hats, umbrella, perfumes, clay pipes, pianos, clocks, confectionary, linen and candles, as well as a heavier load of railway irons, cement, lead and copper. There were items included that intended for display in the Melbourne International Exhibition in 1880. The voyage to Port Phillip was long but uneventful. At 3am on June 1, 1878, Captain Gibbs was expecting to see land and the passengers were becoming excited as they prepared to view their new homeland in the early morning. But LOCH ARD was running into a fog which greatly reduced visibility. Captain Gibbs was becoming anxious as there was no sign of land or the Cape Otway lighthouse. At 4am the fog lifted. A man aloft announced that he could see breakers. The sheer cliffs of Victoria's west coast came into view, and Captain Gibbs realised that the ship was much closer to them than expected. He ordered as much sail to be set as time would permit and then attempted to steer the vessel out to sea. On coming head on into the wind, the ship lost momentum, the sails fell limp and LOCH ARD's bow swung back. Gibbs then ordered the anchors to be released in an attempt to hold its position. The anchors sank some 50 fathoms - but did not hold. By this time LOCH ARD was among the breakers and the tall cliffs of Mutton Bird Island rose behind the ship. Just half a mile from the coast, the ship's bow was suddenly pulled around by the anchor. The captain tried to tack out to sea, but the ship struck a reef at the base of Mutton Bird Island, near Port Campbell. Waves broke over the ship and the top deck was loosened from the hull. The masts and rigging came crashing down knocking passengers and crew overboard. When a lifeboat was finally launched, it crashed into the side of LOCH ARD and capsized. Tom Pearce, who had launched the boat, managed to cling to its overturned hull and shelter beneath it. He drifted out to sea and then on the flood tide came into what is now known as LOCH ARD Gorge. He swam to shore, bruised and dazed, and found a cave in which to shelter. Some of the crew stayed below deck to shelter from the falling rigging but drowned when the ship slipped off the reef into deeper water. Eva Carmichael had raced onto deck to find out what was happening only to be confronted by towering cliffs looming above the stricken ship. In all the chaos, Captain Gibbs grabbed Eva and said, "If you are saved Eva, let my dear wife know that I died like a sailor". That was the last Eva Carmichael saw of the captain. She was swept off the ship by a huge wave. Eva saw Tom Pearce on a small rocky beach and yelled to attract his attention. He dived in and swam to the exhausted woman and dragged her to shore. He took her to the cave and broke open case of brandy which had washed up on the beach. He opened a bottle to revive the unconscious woman. A few hours later Tom scaled a cliff in search of help. He followed hoof prints and came by chance upon two men from nearby Glenample Station three and a half miles away. In a state of exhaustion, he told the men of the tragedy. Tom returned to the gorge while the two men rode back to the station to get help. By the time they reached LOCH ARD Gorge, it was cold and dark. The two shipwreck survivors were taken to Glenample Station to recover. Eva stayed at the station for six weeks before returning to Ireland, this time by steamship. In Melbourne, Tom Pearce received a hero's welcome. He was presented with the first gold medal of the Royal Humane Society of Victoria and a £1000 cheque from the Victorian Government. Concerts were performed to honour the young man's bravery and to raise money for those who lost family in the LOCH ARD disaster. Of the 54 crew members and passengers on board, only two survived: the apprentice, Tom Pearce and the young woman passenger, Eva Carmichael, who lost all of her family in the tragedy. Ten days after the LOCH ARD tragedy, salvage rights to the wreck were sold at auction for £2,120. Cargo valued at £3,000 was salvaged and placed on the beach, but most washed back into the sea when another storm developed. The wreck of LOCH ARD still lies at the base of Mutton Bird Island. Much of the cargo has now been salvaged and some was washed up into what is now known as LOCH ARD Gorge. Cargo and artefacts have also been illegally salvaged over many years before protective legislation was introduced. One of the most unlikely pieces of cargo to have survived the shipwreck was a Minton porcelain peacock - one of only nine in the world. The peacock was destined for the Melbourne International Exhibition in 1880. It had been well packed, which gave it adequate protection during the violent storm. Today, the Minton peacock can be seen at the Flagstaff Hill Maritime Museum in Warrnambool. From Australia's most dramatic shipwreck it has now become Australia's most valuable shipwreck artefact and is one of very few 'objects' on the Victorian State Heritage Register. Flagstaff Hill’s collection of artefacts from LOCH ARD is significant for being one of the largest collections of artefacts from this shipwreck in Victoria. It is significant for its association with the shipwreck, which is on the Victorian Heritage Register (VHR S417). The collection is significant because of the relationship between the objects, as together they have a high potential to interpret the story of the LOCH ARD. The LOCH ARD collection is archaeologically significant as the remains of a large international passenger and cargo ship. The LOCH ARD collection is historically significant for representing aspects of Victoria’s shipping history and its potential to interpret sub-theme 1.5 of Victoria’s Framework of Historical Themes (living with natural processes). The collection is also historically significant for its association with the LOCH ARD, which was one of the worst and best known shipwrecks in Victoria’s history. Small square brass Flange with four corner holes and one larger centre hole. Artefact Reg No LA/26. Recovered from the wreck of the Loch Ard.flagstaff hill, warrnambool, shipwrecked coast, flagstaff hill maritime museum, maritime museum, shipwreck coast, flagstaff hill maritime village, great ocean road, loch line, loch ard, captain gibbs, eva carmichael, tom pearce, glenample station, mutton bird island, loch ard gorge, flange -
 Flagstaff Hill Maritime Museum and Village
Flange
Ref LA 3 32 258 HISTORY OF THE LOCH ARD The LOCH ARD belonged to the famous Loch Line which sailed many ships from England to Australia. Built in Glasgow by Barclay, Curdle and Co. in 1873, the LOCH ARD was a three-masted square rigged iron sailing ship. The ship measured 262ft 7" (79.87m) in length, 38ft (11.58m) in width, 23ft (7m) in depth and had a gross tonnage of 1693 tons. The LOCH ARD's main mast measured a massive 150ft (45.7m) in height. LOCH ARD made three trips to Australia and one trip to Calcutta before its final voyage. LOCH ARD left England on March 2, 1878, under the command of Captain Gibbs, a newly married, 29 year old. She was bound for Melbourne with a crew of 37, plus 17 passengers and a load of cargo. The general cargo reflected the affluence of Melbourne at the time. On board were straw hats, umbrella, perfumes, clay pipes, pianos, clocks, confectionary, linen and candles, as well as a heavier load of railway irons, cement, lead and copper. There were items included that intended for display in the Melbourne International Exhibition in 1880. The voyage to Port Phillip was long but uneventful. At 3am on June 1, 1878, Captain Gibbs was expecting to see land and the passengers were becoming excited as they prepared to view their new homeland in the early morning. But LOCH ARD was running into a fog which greatly reduced visibility. Captain Gibbs was becoming anxious as there was no sign of land or the Cape Otway lighthouse. At 4am the fog lifted. A man aloft announced that he could see breakers. The sheer cliffs of Victoria's west coast came into view, and Captain Gibbs realised that the ship was much closer to them than expected. He ordered as much sail to be set as time would permit and then attempted to steer the vessel out to sea. On coming head on into the wind, the ship lost momentum, the sails fell limp and LOCH ARD's bow swung back. Gibbs then ordered the anchors to be released in an attempt to hold its position. The anchors sank some 50 fathoms - but did not hold. By this time LOCH ARD was among the breakers and the tall cliffs of Mutton Bird Island rose behind the ship. Just half a mile from the coast, the ship's bow was suddenly pulled around by the anchor. The captain tried to tack out to sea, but the ship struck a reef at the base of Mutton Bird Island, near Port Campbell. Waves broke over the ship and the top deck was loosened from the hull. The masts and rigging came crashing down knocking passengers and crew overboard. When a lifeboat was finally launched, it crashed into the side of LOCH ARD and capsized. Tom Pearce, who had launched the boat, managed to cling to its overturned hull and shelter beneath it. He drifted out to sea and then on the flood tide came into what is now known as LOCH ARD Gorge. He swam to shore, bruised and dazed, and found a cave in which to shelter. Some of the crew stayed below deck to shelter from the falling rigging but drowned when the ship slipped off the reef into deeper water. Eva Carmichael had raced onto deck to find out what was happening only to be confronted by towering cliffs looming above the stricken ship. In all the chaos, Captain Gibbs grabbed Eva and said, "If you are saved Eva, let my dear wife know that I died like a sailor". That was the last Eva Carmichael saw of the captain. She was swept off the ship by a huge wave. Eva saw Tom Pearce on a small rocky beach and yelled to attract his attention. He dived in and swam to the exhausted woman and dragged her to shore. He took her to the cave and broke open case of brandy which had washed up on the beach. He opened a bottle to revive the unconscious woman. A few hours later Tom scaled a cliff in search of help. He followed hoof prints and came by chance upon two men from nearby Glenample Station three and a half miles away. In a state of exhaustion, he told the men of the tragedy. Tom returned to the gorge while the two men rode back to the station to get help. By the time they reached LOCH ARD Gorge, it was cold and dark. The two shipwreck survivors were taken to Glenample Station to recover. Eva stayed at the station for six weeks before returning to Ireland, this time by steamship. In Melbourne, Tom Pearce received a hero's welcome. He was presented with the first gold medal of the Royal Humane Society of Victoria and a £1000 cheque from the Victorian Government. Concerts were performed to honour the young man's bravery and to raise money for those who lost family in the LOCH ARD disaster. Of the 54 crew members and passengers on board, only two survived: the apprentice, Tom Pearce and the young woman passenger, Eva Carmichael, who lost all of her family in the tragedy. Ten days after the LOCH ARD tragedy, salvage rights to the wreck were sold at auction for £2,120. Cargo valued at £3,000 was salvaged and placed on the beach, but most washed back into the sea when another storm developed. The wreck of LOCH ARD still lies at the base of Mutton Bird Island. Much of the cargo has now been salvaged and some was washed up into what is now known as LOCH ARD Gorge. Cargo and artefacts have also been illegally salvaged over many years before protective legislation was introduced. One of the most unlikely pieces of cargo to have survived the shipwreck was a Minton porcelain peacock - one of only nine in the world. The peacock was destined for the Melbourne International Exhibition in 1880. It had been well packed, which gave it adequate protection during the violent storm. Today, the Minton peacock can be seen at the Flagstaff Hill Maritime Museum in Warrnambool. From Australia's most dramatic shipwreck it has now become Australia's most valuable shipwreck artefact and is one of very few 'objects' on the Victorian State Heritage Register. Flagstaff Hill’s collection of artefacts from LOCH ARD is significant for being one of the largest collections of artefacts from this shipwreck in Victoria. It is significant for its association with the shipwreck, which is on the Victorian Heritage Register (VHR S417). The collection is significant because of the relationship between the objects, as together they have a high potential to interpret the story of the LOCH ARD. The LOCH ARD collection is archaeologically significant as the remains of a large international passenger and cargo ship. The LOCH ARD collection is historically significant for representing aspects of Victoria’s shipping history and its potential to interpret sub-theme 1.5 of Victoria’s Framework of Historical Themes (living with natural processes). The collection is also historically significant for its association with the LOCH ARD, which was one of the worst and best known shipwrecks in Victoria’s history. Small square brass Flange with four corner holes and one larger centre hole. Has slight bend one side. Artefact Reg No LA/27. Recovered from the wreck of the Loch Ard.flagstaff hill, warrnambool, shipwrecked coast, flagstaff hill maritime museum, maritime museum, shipwreck coast, flagstaff hill maritime village, great ocean road, loch line, loch ard, captain gibbs, eva carmichael, tom pearce, glenample station, mutton bird island, loch ard gorge, flange, brass flange