Showing 1091 items
matching north blue
-
 Ringwood and District Historical Society
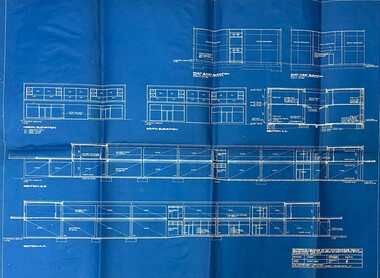
Document - Architect's Blue Print, 147 Whitehorse Road , Ringwood, Victoria - 1955
... Road Ringwood North melbourne Blue print for shopping arcade ...Blue print for shopping arcade at 147 Whitehorse Road, Ringwood, for Ringwood Investments Pty. Ltd. Rubber stamped on back and signed off by Borough of Ringwood Building Surveyor 24/5/1955, "Approved subject to Building Regulations and Bye-Laws." Architect for the project was P.E. Jorgensen, Collins House, 360 Collins Street, Melbourne. -
 Ringwood and District Historical Society
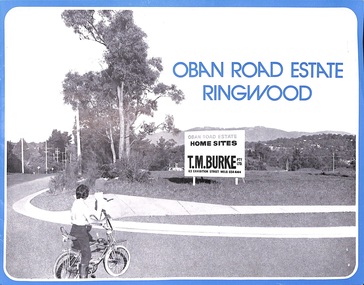
Flyer, Land Sale Advertisement, Oban Road Estate, Ringwood, Vic. - 1974
Double-sided folded page with blue border advertising sale of Oban Road Estate Ringwood building allotments. Front page features photograph of view from the estate towards Dandenong Ranges. Centrefold pages include terms of sale, layout and features of the subdivision, and summary of local services. Photocopy of typewritten price list for the 52 lots also attached.Subdivision includes Oban Road, Ambrie Avenue, Hendra Grove, and Mullum Mullum Road. (Agent) T.M. Burke Pty Ltd., 63 Exhibition Street Melbourne, Telephone 654 4144. -
 Ringwood and District Historical Society
Award - Ribbons, Ribbions awarded at flower shows Ringwood and Croydon 1950-1961
The ribbons were won by Richard Webber who was a gardener and painter .He was a member of the Ringwood Horticultural Society and was one of the organisers of the Flower Shows. The ribbons were won for Gladioli. The Best and Champion in the Show. Also two ribbons were for vases of three cut flowers. One ribbon was from the Croydon Show.15 ribbons in various colours of blue and purple with gold printing. Gold fringes at each end. -
Ringwood and District Historical Society
Document - History, Ringwood Technical School Short History (author unknown) 22.8.1960, 22/8/1960
2 page blue typed document (Foolscap) with handwritten date. No author. rts, ringwood tech -
 Learmonth and District Historical Society Inc.
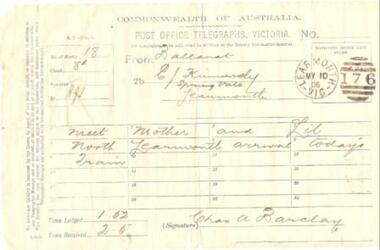
Telegram, Post Office Telegraphs, Victoria, 10/5/1906 (exact)
Buff coloured telegram form with blue printing and black ink writing.Ballarat. E J Kinnerseley. Spring Vale. Learmonth. Meet Mother and Lil North Learmonth arrival today's Train. Chas A Barklay. Learmonth Post Office Stamp dated My 10 06. Oval stamp, 6 black lines and "176".telegram, learmonth post office, kinnersely, e j kinnersely, telegraphic communication, communication form -
 Flagstaff Hill Maritime Museum and Village
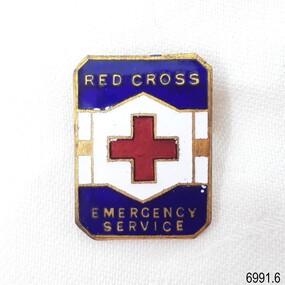
badge - Red Cross Society badge, K.G. Luke Pty. Ltd, Emergency Service, 1935-1945
The badge represents the Emergency Services section of the Red Cross Society. The Australian Red Cross was formed on 21st August 1914 at the outbreak of the First World War. The badge was made by K.G. Luke Pty. Ltd. in Melbourne. Kenneth George Luke, began work as an apprentice in 1910 at Stokes & Sons Pty. Ltd. in Melbourne and stayed with the company for eleven years. He then became a partner in a metalworking business, wholly owning this successful Carlton business in 1925. From 1935-1945 his products included silverware and supplies for military needs. The firm was K.G. Luke Pty. Ltd. by 1936, making buttons, badges, brooches, and heated food trolleys at his office and factory in North Fitzroy, and selling from his showroom in Elizabeth Street Melbourne. His customers included the Australian Red Cross, Victoria Police, TAA Airline, and the military forces of Australia and the United States. Seventeen years later the company was K.G. Luke (A/Asia) Ltd, then twenty-three years on it was Luke Ltd. until in 1983 it was taken over by National Consolidated Ltd. Sir Kenneth George Luke was also a V.F.L. football administrator. This badge is one of a set of badges collected by Dr W R Angus from the organisations in which he was involved. The set of badges is now part of Flagstaff Hill’s comprehensive W.R. Angus Collection, donated by the family of Dr W R Angus, surgeon and oculist. The W.R. Angus Collection: - The W.R. Angus Collection includes historical medical equipment, surgical instruments and material belonging to Dr Edward Ryan and Dr Thomas Francis Ryan, (both of Nhill, Victoria) and Dr Angus’ own belongings. The Collection’s history spans the medical practices of the two Doctors Ryan, from 1885-1926 plus that of Dr Angus, up until 1969. It includes historical medical and surgical equipment and instruments from the doctors Edward and Thomas Ryan of Nhill, Victoria. Dr Angus married Gladys in 1927 at Ballarat, the nearest big city to Nhill where he began as a Medical Assistant. He was also Acting House surgeon at the Nhill hospital where their two daughters were born. During World War II He served as a Military Doctor in the Australian Defence Forces. Dr Angus and his family moved to Warrnambool in 1939, where Dr Angus operated his own medical practice. He later added the part-time Port Medical Officer responsibility and was the last person appointed to that position. Both Dr Angus and his wife were very involved in the local community, including the planning stages of the new Flagstaff Hill and the layout of the gardens there. Dr Angus passed away in March 1970.This badge is significant for connecting Doctor Angus with organisations that he supported. The W.R. Angus Collection is significant for still being located at the site it is connected with, Doctor Angus being the last Port Medical Officer in Warrnambool. The Collection includes historical medical objects that date back to the late 1800s.Badge, rectangular metal and enamel badge, with a blue band across the top and bottom, and a white and gold band in the middle similar to a belt with the buckle of a red cross. The badge has a horizontal pin on the back. Inscriptions on top and bottom bands and on the reverse. It is the badge of the Red Cross Emergency Service, made by K.G. Luke of Melbourne.This badge is part of a set of badges collected by Dr W R Angus. the set represents organisations that he was involved in, and is part of the W.R. Angus Collection.Printed on front; “RED CROSS” above “EMERGENCY / SERVICE”. Embossed on back “8029” “K.G. LUKE / MELB” flagstaff hill, warrnambool, maritime village, maritime museum, shipwreck coast, great ocean road, w.r. angus, badge, organisation badge, flagstaff hill maritime museum and village, australian red cross, charity, volunteer organisation, red cross, k.g. luke pty. ltd., kenneth george luke, north fitzroy, stokes & sons, w.r. angus collection -
Glen Eira Historical Society
Plan - Kooyong Road, 18, Caulfield North
Copies of correspondence, (5 pages) dated 8/07/1954 from valuer to Mr K W Blue concerning valuation of property at 18 Kooyong Road, Caulfield North. Correspondence provides property measurements, details of property, improvements and costings. In addition, the file also includes 2 pages of handwritten notes, undated and unattributed providing valuation details. Also included in the file is a hand-drawn property plan (150mm x 155mm) undated and unattributed. The plan may be of the property at 18 Kooyong Road ; the room measurements given by the plan correspond with the measurements for 18 Kooyong Road given by the correspondence. However, the plan has been labeled (in a biro pen) as 15 Kooyong Road, East St Kilda, though 18 has been written above the number 15.blue k w, a’beckett mrs, kooyong road, malonga court, caulfield, east st kilda, brick houses, land values, caulfield north -
 Federation University Historical Collection
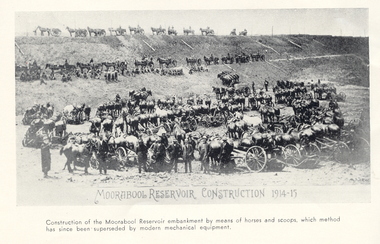
Book, A Century of Permanent Water Supply, 1962
Blue covered book.non-fictionwater, water management, moorabool reservoir, ballarat sewerage authority, sebastopol sewerage treatment works, ballarat north sewage treatment works, sebastopol sewage treatment works -
 Federation University Historical Collection
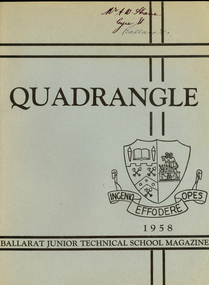
Magazine - Booklet, J.A. Hoskin & Son, Quadrangle: Magazine of the Girls and Boys of the Junior Technical School Ballarat, 1958, 1958
The 1958 edition of 'Quadrangle' was the first published as the new magazine of the Ballarat Junior Technical School. Formerly the Ballarat Junior Technical School occupied a few pages at the back of the Ballarat School of Mines Students' Magazine. In this year the Ballarat Junior Technical School's 'brother' school, Ballarat North Technical School, was publishing its own magazine called 'Green Acres'. Articles includeGrey/Blue soft covered magazine of 54 pages. Contents include: Past staff/students (Mr Whitla, Mr Hewitt, Mr Cowan, Mr Reeve, Mr Wilcock, Bullarto Camp Report, Bright Camp, Windmill Ruin (B. McLennan), Phelan Homes Competition, Baseball, Basketball, softball, Athletics, Cricket, Open Age Football, Cross Country, Your Badge, Mr Steane Recalls. An explanation of the Ballarat School of Mines Coat of Arms is given, and the first Ballara Junior Technical School Principal, Albert W. Steane recalls the early days of the school. Images include: Prefects, Dick Richards, Tank Stand Bullarto (linocut), cadets, Under 14 Football Team; Girls forms 1,2, and 4, Softball, Basketball, netball, hockey; Craig's Royal Hotel.2) cover "Mr A.W. Steane. Eyre St Ballarat"ballarat school of mines, ballarat junior technical school, ballarat north technical school, dick richards, steane, ron kirner, history, badge, crest, heraldry, garner, bullarto camp -
 Federation University Historical Collection
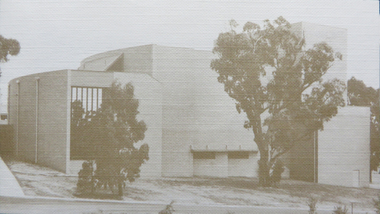
Programme, Opening of the 1870 Founders Hall, 1981, 28/03/1981
On 28 March 1981 the Ballarat College of Advanced Education 1870 Founders hall was opened. The hall was erected from the proceeds of the Centenary Appeal for a sum of approximately $800,000. The hall commemorates the initiative of the founders of the original Ballarat School of Mines and its "descendants", including Ballarat College of Advanced Education, as well as formal technical education in Australia. The hall was build to accommodate 670 persons in a theatre type seating and was intended for multiple purpose use by community groups as well as by the College. Construction of the hall commenced in 1978. It was opened approximately 110 years after the Ballarat School of Mines (26 October 1870) and 10 years after the opening of the Mt Helen Campus (31 October 1870)..1) White card with blue and brown ink relating to the opening of the 1870 Founders Hall by His Excellency the Right Honourable Sir Zelman Cowen, Governor-General of Australia. .2) Souvenir Programme and Entree to inaugural concert in the 1870 Founders Hall. .3) Invitation card to the opening of Founders Hall made out to Mr and Mrs Z.A. Plavinaballarat college of advanced education, founders theatre, founders hall, theatre, zelman cowen, m.b. john, e.j. barker, w.j.c. north, ian gordon, zig plavina, invitation, 1870 founders hall -
Federation University Historical Collection
Book, Ballarat School of Mines Assay Register, 1890-1899, 1890-1899
Marble card covered book with blue/black spine. The pages are ruled into columns and headed: Date received, Reg. No. Private Mark, Substance, Locality, Submitted by, Assay, Remarks, Report. Some mines submitting substance for assay include Britannia UNited (J.M. Bickett), Golden Ridge, CLunes UNited, NOrth Cornish Mine Daylesford.ballarat school of mines, assay register, mining -
Yarra Glen & District Historical Society
Maps, Steels Creek 1956
Ronald J Arney was a resident of Steels CreekHand drawn map of Steels Creek on A4 paper. Red, blue and black biro. Covers the area north of Willowbend Road to the end of Greenwood Lane. Shows location of homes of people residing in Steels Creek in 1956, landmarks such as ruins and huts, roads and creeks. Several other features have been added in black biro in another hand.steels creek, mud map, sketch plan -
Federation University Historical Collection
Booklet, Berry Anderson & Co, Ballarat School of Mines Student's Magazine, Fourth Term, 1907, 1907
Table of contents: Editorial, A motor problem, Electricity in mining, The wet assay of tin, Sintering slimes at the Broken Hill Pty Works, Smokeless cities, An unusual process for the treatment of concentrates, Diamond drilling, E. M. Weston, Recent advancements in the treatment of slimes from the reduction of gold bearing ores, Norman Stuckey, W. T. Cronow, The gold miner and the prospector, Cornish mining, A trip to the North-East, New Zealand coal, Rich mine water, Making standard solution of alkalies, Notes on the refining of base bullion, Pipe lines for corrosive liquors, Electro-galvanising, Ankylostomiasis or earth eating disease, News and notes, Method of preparing blue paper, Past students, Correspondence, Answers to correspondents, Magazine balance sheet, Editorial notices.Peach coloured booklet of 28 pages.Signed on front cover by Les? M. Deaneballarat school of mines, students' magazine, oliver wendell holmes, a. e. c. kerr, t. w. gronow, norman stuckey, e, m. weston, j. h. collins, s. b. vial,, t. w. hood, o. e. jager, hubert krause, s. j. lindsay, fred nettle, a. w. parramore, e. prendergast, basil a. reid, g. m. roberts, h. c. valentine, r. vaughan,, w. j. lakeland, d. scott, dave thomas, a. d. turner, tom williams, w. b. tucker, percy millar, o. c. witherden, john adam, h. f. denny, g. a. denny,, w. a. gosman, hilary dowling, d. m. deane, cecil eeles, j. o'farrell, t. f. fleetwood, miles a. gabriel, a. a. gibson, t. j. andrews, t. brennan, j. a. reid. -
 Federation University Historical Collection
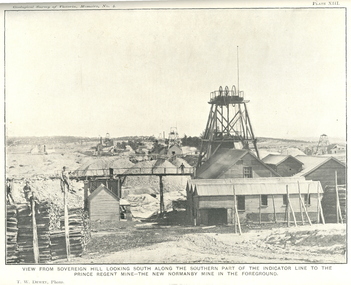
Book, J.W. Gregory, Memoirs of the Geological Survey of Victoria No. 4: The Ballarat East Gold-Field, 1907, 1907
Blue soft covered report with 40 plates and plans. Inciudes Geology of Ballarat. Little Bendigo Goldfield, Ballarat West Goldfield, Ballarat East Goldfield, history, nuggets, indicators, faults, microscopic structure of Ballarat Rocks and ores, general type of the Ballarat East Mines and the genesis of their ores. Mines include New Zealand Trust, Llanberris No. 1, Llanberris No 2, Victoria United, Britannia United, New Britannia, Last Chance, Exchange, Normanby North, New Normanby, North Woah Hawp. Photpgraphic plates include: Victoria United Mine, Llanberres No. 1, Normanby North, North Woah Hawp Mine, View looking south from the Britannia Mullock Heap, View from Sovereign Hill, The place in Learmonth Street Golden Point where gold was first discovered at Ballarat. j.w. gregory, ballarat east, ballarat east goldfield, e.j. dunn, geolological survey of victoria, new zealand trust, llanberris no. 1, llanberris no 2, victoria united, britannia united, new britannia, last chance, exchange, normanby north, new normanby, north woah hawp, mining, indicators, gold mining, poppet head -
 Federation University Historical Collection
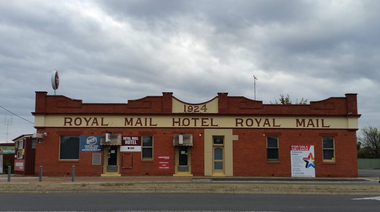
Photograph, Marilyn Jeffs, Hotels of Ballarat, 2019
Numerous photographs take by Marilyn Jeffs for use on the Ballarat and District Industrial Heritage Wikihotels, ballarat, royal mail hotel, peter lalor hotel, the george hotel, x on albert hotel, cattleyards inn, market hotel, bunch of grapes hotel, argyle hotel, atlantic hotel, ballarat hotel, black hill hotel, blue bell hotel, bluebell hotel, brown hill hotel, canberra hotel, carboni, carboni's italian kitchen, eureka stockade hotel, carriers arms hotel, eastern station hotel, centenary hotel, craig's hotel, eastern railway hotel, freight bar, athletic club hotel, grapes hotel, munster arms hotel, golden city hotel, golf house hotel, irish murphy's, camp hotel, lake view hotel, la porchetta, southern cross hotel, the mallow hotel, meaghers hotel, millers arms, miners tavern hotel, miner's tavern hotel, provincial hotel, north britain hotel, north star hotel, oscar's hotel, criterian hotel, park hotel, prince regent house, prince regent hotel, sport globe, sporting globe, jacksons hotel, railway hotel, pwtn, pater lalor hotel, royal highlander hotel, queen's head hotel, red lion hotel, robin hood hotel, military arms hotel, royal oak hotel, western hotel, imperial hotel, unicorn hotel, union hotel -
Glenelg Shire Council Cultural Collection
Photograph, 1976
Port of Portland Authority ArchivesBack: Grey Stamp Location Date 30.6.76 -blue biro Referance 74/8 - blue biro Dutton Way, pencilport of portland -
Glenelg Shire Council Cultural Collection
Photograph - Photograph - Main Breakwater construction, Portland, Jan-60
Port of Portland Authority ArchivesFront: MAIN BREAKWATER PARAPET - View North at round head showing roundhead base completed and first two "bridge pier" Key blocks cast for straight parapet Jan '60 typed Back: Main Breakwater Parapet View N at roundhead, showing roundhead box completed and first two "bridge pier" key boxes cast for straight parapet. Written in blue biroport of portland archives, main breakwater, construction, portland, harbour, harbour development -
 Red Cliffs Military Museum
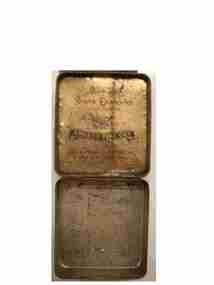
Tin Container, State Express, Tobacco Tin, (estimated); 1940
This tin is Part of the collection for A.J. Roddy VX8007Small tin for carrying tobacco, belonging to A.J. Roddy. Inside Lid: Every tin of Genuine/State Express/ ready rubbed/ Emblem/ Ardith Fine Cut/has the name ARDITH/ printed on the paper lining./ Outside of tin has a list attached to it: Melbourne; Colombo /Elquatara,Palestine/ Egypt. North Africa / Greece. Yogoslavia / Austria. Italy / Emgland. Panama / Honolulu. New Zealand / Sydney. 1940-45.of, australia, ww11, war, middle, east, prisoner, roddy, vx8007, tobacco, europe, a j blue -
 Ringwood and District Historical Society
Document, Ringwood Technical School-Misc letters, notes and forms (various dates or undated)
Several paper letters and notes "Dear Sly Eye" 1985, Mrs Phillips 1983, To Council Members1985, etc 22nd August 1960 Letter from G. M. Veitch (Principla) to Mr McCaskill re HIstory of school (Ex VC3501) Buff coloured - One page, blue typed, short letter. 16 December 1982 Letter from P Adgemis (Humanities Department) and B.K.Knox (Principla) to Mrs E.V. Pullin thanking her for her help in collecting historical material with the school magazine 'Echoes' (Ex VC3501):A4 page - typed letterrts, ringwood tech -
 Ringwood and District Historical Society
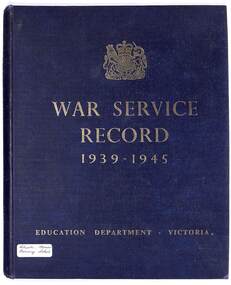
Book, Edcation Department, War Service Record 1939-1945 - Education Department, Victoria, 1959
Blue hard cover book with gold embossed title and Coat of Arms.Foreword by Alan Ramsay, Director of Education, includes: Shortly after the First World War there was published "The Education Department's Record of War Service" - a book that has an honoured place in all our schools. ... This book is the record of the part played by the teachers and children in our schools during the Second World War of 1939-1945 ... It tells the story of the schools' war effort in those critical years when war came very close to our shores and when everyone was called on to bear a share of the war effort. -
 Ringwood and District Historical Society
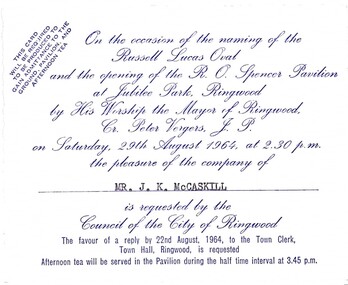
Memorabilia, Invitation to Mr. J.K. McCaskill to the Opening of the Russell Lucas Oval and R.O. Spencer Pavilion at Jubilee Park, Ringwood, Victoria, on 29th. August, 1964
Mr. McCaskill was a former Mayor of RingwoodDeckle edged white card with blue printing from Mayor Peter Vergers to Mr. J.K.McCaskill -
 Ringwood and District Historical Society
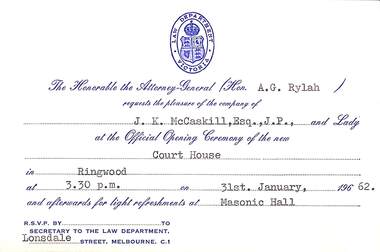
Memorabilia - Invitation card, Attorney-General the Hon. A.G. Rylah requesting the pleasure of the company of J.K. McCaskill to the opening of the Court House, Ringwood, Victoria, 31st. January, 1962
J.K.McCaskill was a Ringwood MayorPale cream coloured card with blue printing with Law Department of Victoria Crest. -
 Ringwood and District Historical Society
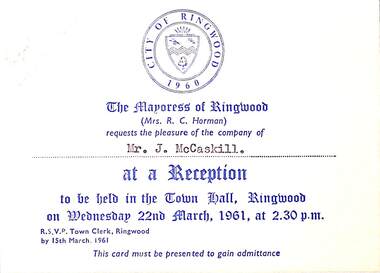
Memorabilia, Invitation to a reception in the Town Hall, Ringwood, Victoria, from the Mayoress, Mrs. R.C. Horman, to Mr. J. McCaskill - 22nd March, 1961
Mr. J. McCaskill was a Mayor of Ringwood. Cream coloured card with the City of Ringwood logo, blue writing, and small pencil hand written note "unable to attend". -
 Ringwood and District Historical Society
Journal - Documents, Ringwood Croquet Club, Minutes of the Ringwood Croquet Club 1931-1947
The records of the Ringwood Croquet Club given to Gail Abbe - Archivist for safe - keeping with the request that they may be borrowed should the club require them for reference - 10-Dec-1993.Minutes of Ringwood Croquet Club from 1931 to 1947. Includes formation meeting held on 8th September 1931 at Ringwood Town Hall. The Moyoress, Mrs Honora Blood convened the meeting and occupied the chair. At that stage, the Ringwood Bowling Club had been formed. Men joined the croquet club in years to come. The Constitution was adopted with club colours blue, orange and green at a special meeting on the 6th October 1931 at the Town Hall under the presidency of Honora Blood. -
 Ringwood and District Historical Society
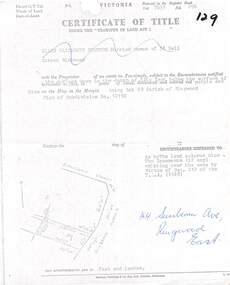
Document, Partial copy of Certificate of Title Vol 7635 Fol 096 Lot 29, 44 Sunbeam Avenue Ringwood East, Victoria
Black and white photocopied page with added notations in blue pen.Ellen Elizabeth Stanton, Married Woman of 35 Bell Street Richmond is now the Proprietor of an estate in Fee-simple, subject to the Encumbrances notified herunder in the surface down to the depth of fifty feet below the surface of the pie of land delineated and colored red purple and blue on the map in the margin, being Lot 29 Parish of Ringwood. Plan of Subdivision No. 12150. (undated). -
 Ringwood and District Historical Society
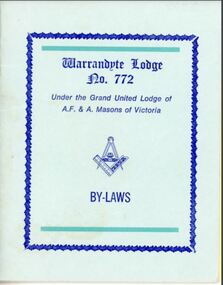
Booklet - By-Laws, Warrandyte Lodge No.772, Under the United Grand Lodge of Antient Free and Accepted Masons of Victoria, Masonic Hall, Ringwood, Victoria
... Road Ringwood North melbourne Blue covered booklet presented ...Blue covered booklet presented to Bro. Ronald E Breese on his initiation, 7th February 1974. Includes list of foundation members, first officers and past masters of the lodge. The Warrandyte Lodge, No. 772 was Consecrated by the Pro. Grand Master, M. W. Bro. Dr. George Bankin Bearham, on the 9th September, 1955, in the Masonic Temple, Canterbury, the Ringwood Lodge No. 382, being Sponsors. -
 Ringwood and District Historical Society
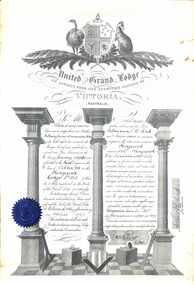
Certificate, United Grand Lodge of Victoria Membership - Collection of Masonic Degrees and Correspondence maintained by Aird family of Ringwood, Victoria
Certification that Brother Arthur James Bromwich Aird was regularly received into the Free Masonry on 6th January AL5926 and was admitted to the 3rd Degree on 6th October, 1926, in the Ringwood Lodge No. 382. Certificate signed and blue seal attached on 24th January, 1927. -
 Ringwood and District Historical Society
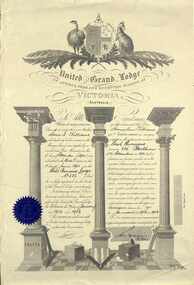
Certificate, United Grand Lodge of Victoria Membership - Collection of Masonic Degrees and Correspondence maintained by Aird family of Ringwood, Victoria
Certification that Brother Samuel Williams was regularly received into the Free Masonry on 5th December AL5950 and was admitted to the 3rd Degree on 5th June, 1951, in the East Burwood Lodge No. 686. Certificate signed and blue seal attached on 17th January, 1952. -
 Ringwood and District Historical Society
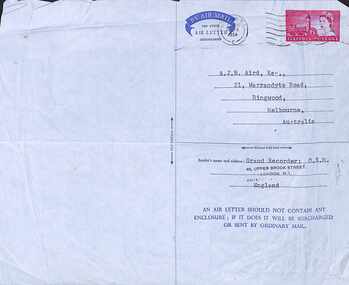
Letter, Grand Council of the Order of the Secret Monitor - Collection of Masonic Degrees and Correspondence maintained by Aird family of Ringwood, Victoria
... Road Ringwood North melbourne Blue postmarked Airmail/Air ...Blue postmarked Airmail/Air Letter from Grand Council, O.S.M. London, dated 13th April, 1959 to A.J.B. Aird regarding accepting the Office of Past Grand Standard Bearer and ability to attend the Grand Conclave Meeting for Investiture on 13th June, 1959, at the Cafe Royal, London. -
 Ringwood and District Historical Society
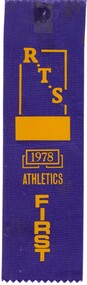
Photograph - Group, Ringwood Technical School 1978 Athletics First place Ribbon, 1978
Blue Ribbon with Gold lettering. First Place 1978 Athletics. (Presented to Mark McDonald)R.T.S 1978 Athletics FIRSTrts, ringwood tech