Showing 390 items
matching along the track
-
 Melbourne Tram Museum
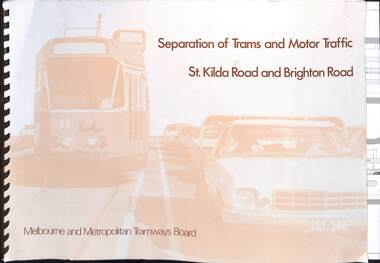
Document, Melbourne & Metropolitan Tramways Board (MMTB), "Separation of Trams and Motor Traffic - St Kilda Road and Brighton Road", May 1979
Document prepared to provide the concepts for separation of traffic along St Kilda Road and Brighton Road using safety bars, and reserved sections of roadway between Princes Bridge and Glen Huntly Road. Dated May 1979. Has an introduction, and notes the widening of St Kilda Road south of Cochrane St and its impact. Has colour photo of Z89 in Nicholson St where the Safety bars had been installed to separate traffic, installation of Safety Zones, photos of Gothenburg, Amsterdam, and Hanover showing traffic separation, graphs showing tram passenger movement in the am peak and road usage. Looks extensively at the Domain Interchange at Park and Domain Road and the suggested layout - which was implemented in Nov. 1986. Includes a photo of a very long line of trams northbound at this intersection which has undergone many changes location, to become during 2025 the entry to Anzac station. Six drawings show the proposed separation of traffic between Alexandra Ave and Glen Huntly RoadDemonstrates a planning document to separate road traffic from trams along St Kilda Road.Comb bound document titled "Separation of Trams and Motor Traffic - St Kilda Road and Brighton Road" - 12 sheets + card covers, some full colour pages with some sheets folded.tramways, st kilda road, traffic control, domain interchange, domain road, reserved track -
 Melbourne Tram Museum
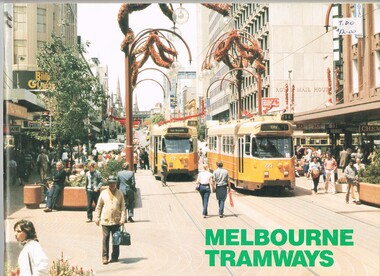
Book, David Keenan, "Melbourne's Tramways", 1985
Book - 84 pages black and white on gloss paper + colour card covers, centre stapled, titled "Melbourne's Tramways", written by David Keenan, published by Transit Press's in 1985. Gives an overview of the Melbourne, tramway development, the system itself including operation, fares, tickets, crew training, tramcars and their maintenance, track, power supply, tram routes, depots and allocation at the time. Has maps of the system, Preston workshops, depots, tramway track types, electrical system and services details of routes, running times and service frequencies along with many photographs. Includes photos of emergencies, track work and other aspects of the system in 1984. 'Has a sticker in the top right hand corner "TDO $12.00"trams, tramways, melbourne, tramways, history, trackwork, depots, fares, tickets, training, tram routes, tramcars, maintenance, power supply, maps, operations -
 Melbourne Tram Museum
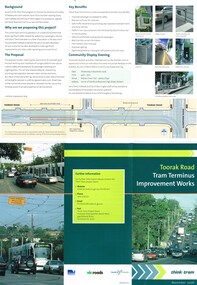
Pamphlet, Yarra Trams, "Toorak Road Tram Terminus Improvement Works", Nov. 2006
... the redevelopment proposals of the Toorak Road terminus. Shows the track... of the Toorak Road terminus. Shows the track plan and proposed stop ...Pamphlet, folded to DL size, printed on full gloss paper titled "Toorak Road Tram Terminus Improvement Works", dated Nov. 2006 and part of the "Think Tram" project outlining the redevelopment proposals of the Toorak Road terminus. Shows the track plan and proposed stop, along with the curve into Glenferrie Road. Gives details of the proposal and consultative meetings. Gives details of the VicRoads think tram project contacts. Two copies held. The proposal did not proceed. Another proposal was prepared for Feb. 2015 and was not well received by the City of Stonington. See the local Leader dated 19/2/2015. Work to rebuild the tram stop planned by a Yarra Trams notice of 19-11-2015 to be undertake work at the intersection between 16-11-15 and 3-12-15.trams, tramways, yarra trams, toorak rd, route 8, superstops -
 Melbourne Tram Museum
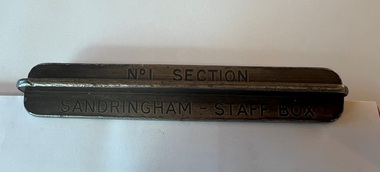
Functional object - Sandringham tramway - section staff, 1920s
Item used on the Victorian Railways Sandringham - Black Rock tram line for the short section of the single track of the line between the railway station in Station Street and the depot entrance in Bay Road. Tram drivers were required to carry this to prevent a head-on collision on the single-line section. Image 3 shows the driver placing the item in the "staff box" outside the depot. Image from the DVD "VR Tramways in the 1950s", with permission from Effectch the Producer. The Newport Railway Museum holds the other staffs for this line along with a damaged one (or two) for the same section - see photo 4 for the Black Rock to Beaumaris Section.Demonstrates an item used to safely work trams on the Sandringham - Black Rock - Beaumaris tram line.Two sections of steel intermeshed to form a cross and stamped.Stamped "No. 1 Section" and "Sandringham - Staff Box"trams, tramways, safeworking, sandringham, section staff -
 Melbourne Tram Museum
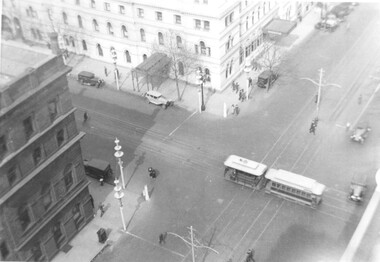
Photograph, Menzies Hotel and the Goldsborough & Mort Woolstore with a cable tram crossing William Street in Bourke Street, c1937
The photograph shows a cable tram in Bourke St, crossing over the electric tram track in William Street. The Menzies Hotel 1867 (see reference) is in the background, along with the Goldborough Mort Woolstore building 1862 on the opposite corner. Also in the photo are the Melbourne Centenary "Lollypop" street decorations of 1934. The photo appears to be taken from the roof of the Shell Building in William Street. Yields information about the Menzies Hotel and the intersection of Bourke and William St. Photograph, black and white, plain papertrams, tramways, cable tram, bourke st, william st, menzies hotel, goldsborough mort, melbourne centenary -
 Melbourne Tram Museum
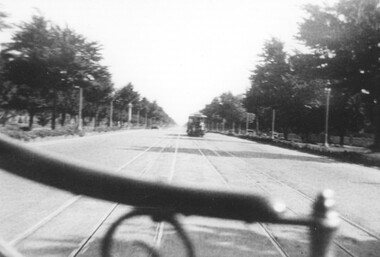
Photograph, St Kilda Road from a cable tram, c1910
The photograph shows the view from the front seat of a cable tram travelling along St Kilda Road with another cable tram on the other track. The photo shows, though out of focus, the median strip trees, street lights and the rock kerb markers known as "dragon teeth". The line was converted to electric traction in 1925/26. See also item 5894 for another image.Yields information about St Kilda Road, possibly in the 1910s.Photograph, black and white, plain papertrams, tramways, cable tram, st kilda road, grip car -
 Melbourne Tram Museum
Postcard, Rose Stereograph Co, "Looking over Princes Bridge & The Yarra, Melbourne", c1941
Rose Series postcard No. P 201, titled "Looking over Princes Bridge & The Yarra, Melbourne" with a view including Princes Bridge Railway Station, Batman Ave. tram terminus with two trams, The Yarra River, the bridge, and the entrance to Flinders St station. The south west curve track from Swanston Street into Flinders Street is visible along with various Safety Zones at the tram stop.Yields information about St Kilda Road, Princes Bridge c1941Postcard - printed real photograph with Rose Stereograph Co. name on the rear. Two copies held.tramways, flinders st station, st kilda road, princes bridge station, princes bridge, yarra river, flinders st, trams -
 Melbourne Tram Museum
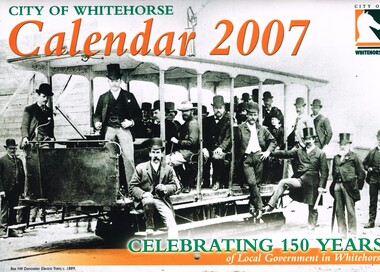
Ephemera - Calendar, City of Whitehorse, "City of Whitehorse Calendar 2007 - Celebrating 150 Years", 2006
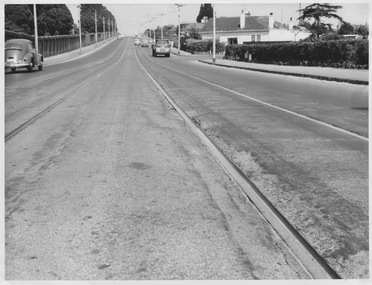
Calendar - 16 pages - card cover, full colour, titled "City of Whitehorse Calendar 2007 - Celebrating 150 Years", featuring a photograph of the Box Hill - Doncaster featuring a photograph of the opening of the Box Hill to Doncaster tramway of 1889 along with many other historical photographs. Includes a photo in Oct. of the Station St - Whitehorse Road intersection with a Box Hill to Blackburn bus. Marks on the road look like a tram track that has been buried, but just marks on the road. Gives the photo credits.trams, tramways, city of whitehorse, box hill, doncaster, whitehorse road -
 Melbourne Tram Museum
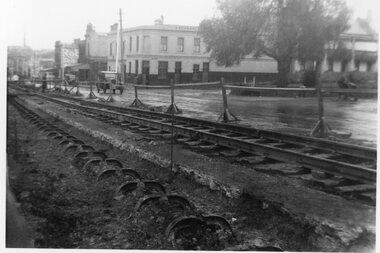
Photograph - Cable tram track removal Abbotsford St, 1935
Photograph of track reconstruction of conversion of the cable to electric tramway in Abbotsford near the corner with Canning St, about August 1935. .1 - has the old cable track excavated before the yokes were cut of and the new track - rails and sleepers laid on the previous road bed. In the background is the Homebush Hotel. In the background is a shop advertising Robur Tea. .2 - similar photo but looking along the line of yokes. with the building on the east side which have all since undergone two demolitions. The former hotel building remains but has been converted to set of apartments.Yields information about the removal of cable tram track in Abbotsford St North Melbourne.Set of two Black & White Photographs. Two copies of each held.Has the TMSV Sales stamp on the rear.trams, tramways, cable trams, abbotsford st, conversion -
 Melbourne Tram Museum
Pamphlet, Public Transport Victoria (PTV), "Buses replace trams along St Kilda Road and Route 58", November 2022
Issued for track realignment works at the site of Anzac station, Domain Interchange, between 27 November and 17 December 2022. Gives details of the replacement and alternative bus routes. Produced by the PTV and Metrotunnel Authority. Yields information about track work at the site of Anzac station late 1922.Pamphlet - full colour DL 4 fold.trackwork, tramways, st kilda road, anzac station, domain interchange -
 Melbourne Tram Museum
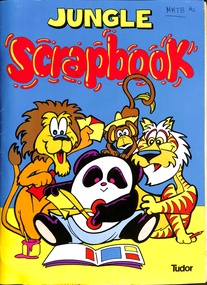
Ephemera - Jungle Scrapbook, "MMTB #2", 1987 to 2003
Collection of newspaper clippings pasted into the scrapbook by the donor. Covers the period 1987 to 2003 when the Melbourne tram system underwent large changes. Contains the following cuttings: 1 - Our trams keep rolling along - Herald Sun 9/8/1991 2 - Old trams will stay on track - The Sun - 8/8/1991 - featuring Joan Kirner at the front of tram 3 - Getting our bid on track - Olympic bid tram - Z4, - The Sun 9/3/1990 4 - Tram tours lead tourist bid - using a Y class - The Sun, 8/6/1992 5 - Spring St - city circle trackwork - The Sun 17/9/1993 6 - Track tokens mark tram trial - Bendigo battery tram - Bendigo Advertiser 11/4/1990 7 - $184 million commitment to build new vehicles - B2 class, 130 trams, Comeng 8 - The light rail project - Gail Moody - The Sun 1/7/1987 9 - Bet and shop on trams - Trust - Herald Sun 17/8/1993 10 - A clean sweep by star Paul - Paul Hudson and X 217 - Herald Sun 20/11/1991 11 - Tramway lines up 75th Anniversary - Progress Press 20-11-1991 12 - Public Notice - Spring and Bourke track works - The Met - Herald Sun 17/9/1993 13 - in the Heart of Hawthorn - Progress Press March 1993 14 - Peak hour boost pledge - Alan Brown - Herald Sun 9/7/1993 15 - Photo of Gas and Fuel buildings under construction - 1966, Herald sun 31/12/1993 16 - Drive brings comic relief - Victor Borge - Herald Sun 19/2/1994 17 - City circle tram loop - two cuttings - 28/4/1994 18 - Trust slams new-look trams - Herald Sun 8/2/1994 19 - Public notice - track works - Nicholson and Victoria - Herald Sun 18/2/1994 20 - Free trams draw fire - Herald Sun 12/4/1994 21 - Tram launce chaos - 29/4/1994 22 - Life and love as the tram trundles on - Ted Hopkins - Weekend - 15/4/1995 23 - Tram city Dan McDonnell - Weekend - 15/4/1995 24 - Favorites out for tram day - three associated cuttings tram parade - Herald Sun 19/4/1995 25 - The A to Z of Melbourne's trams - Herald Sun 19/4/1995 26 - Trams out for a night on the town - Box Hill testing - Whitehorse leader 23/4/2003 27 - Trams rolling - Box Hill opening - Whitehorse leader 7/5/2003 28 - Bracks launches tram route and residents riled about bottleneck - Whitehorse leader 7/5/2003 29 - A century of trams in Bendigo (Kym Smith) - Bendigo Advertiser 14/4/2003 30 - MP calls for fair go for old tramways (Medicals) - Bendigo Advertiser - 12/4/2003 31 - House of the rising tram - Mentone tramcar bodies 32 - Back on track - Sydney trams - Daily Telegraph 11/8/1997 33 - New look trams just the ticket - Sydney - Daily Telegraph 11/8/1997 34 - Dark ages end for light rail - Daily Telegraph 1997 35 - A trip down memory lane - Sydney - The Age 21/8/1997 36 - End of the Line - sale of Elwood bus depot - New Home 6/12/1996 37 - Bidders line up for tram and train - The Age 17/5/1999 38 - Holding the line - The Herald Sun 8/3/1998 39 - Advert - Who will be Melbourne's tram museum operator - Weekend Australian 16-9-1995 40 - Trams take to sport - new Melbourne park route - Herald Sun 4/6/1999Yields information about the Melbourne tram network in the 1990sScrap book - Tudor - 32 plain sheets + printed card covers, centre stapled.tramways, melbourne, bendigo, newspapers, tram 4, olympics, joan kirner, tourist tram, city circle, w class, tram, box hill, elwood bus depot, tmsv, museums, tram museums, batman ave, victor borge -
Melbourne Tram Museum
Document - Specification - set of 7 - worker ammenties etc, Melbourne & Metropolitan Tramways Board (MMTB), mid 1950s
Seven documents for the supply and delivery of equipment and sheds for track workers - All undated. 1 - "Five oil-fired 25 gallon urns for boiling water" - 4 sheets 2 - "Two (2) mobile bitumen heaters - oil fired" - 6 sheets 3 - "Six (6) mobile tool boxes" - 4 sheets 4 - "Three hundred (300) barricade posts and six hundred (600) barricade rails - 4 sheets 5 - "Five (5) portable gangers' offices" - 5 sheets 6 - "Two (2) portable lamp cabins" - 7 sheets 7 - "Four (4) mobile conveniences" - 4 sheetsYields information about the MMTB tender for track workers facilities and equipment.Set of seven documents - foolscap sheets stapled in top left hand corner and hole punched along the top edge.mmtb, tramways, contracts, purchases, trackwork, tools -
 Melbourne Tram Museum
Photograph - Digital Image, Kevin O'Reilly, series of three images of the Hawthorn Bridge over the Yarra, c1930, c1930's
Image from CD (Compact Diskette for use in computers) - see Reg Item 135. A series of three images of the Hawthorn Bridge over the Yarra, c1930, during the era with problems with the bridge. See separate article for more details. Richmond 6, Richmond, Richmond 3 on the CD as original files. .1 - Looking from the south west, at the Hawthorn bridge with the temporary wooden bridge being constructed on the south side. Has the cable tram depot in the photo and part of the Burnley racing course. Temporary track on the north side of the steel bridge and crossings can be seen. .2 - Looking along Bridge Road to the east with Hawthorn Bridge in the middle of the photograph. Shows the industrial and residential areas, Hawthorn Railway Station and part of the Burnley Race course, the cable tram depot building. W class tram in Church St Hawthorn and W class tram crossing the bridge on the north side temporary track. Note the cable tram used as a shelter on the north east corner of the bridge. .3 - Looking south along River St towards Bridge Road, with the Yarra River and Hawthorn Bridge on the left side of the photograph. Shows the industry in the area at the time, wool and skin Merchants, north side of the cable depot, housing and the outlook to the river!trams, tramways, hawthorn, yarra river, burnley, richmond, hawthorn bridge -
 Melbourne Tram Museum
Photograph - Digital Image, Kevin O'Reilly, looking west over St Kilda Junction from Prahran, Late 1920's
Image from CD (Compact Diskette for use in computers) - see Reg Item 135. Image titled "St Kilda 1" on CD, of looking west over St Kilda Junction from Prahran. Has St Kilda tramway Jtn (St Kilda Road, Fitzroy St, Barkly St, Brighton Road, Wellington St and Punt Road in the photograph, along with St Kilda Railway Station and the "Junction Oval". No trams visible in photograph. Late 1920's or early 1930's - all tram tracks electric.trams, tramways, st kilda junction, st kilda railway station, fitzroy st, brighton rd -
 Melbourne Tram Museum
Photograph - Black & White Photograph/s, 1950's? to 1960's
Black and white photograph of the area where the works or service or scrubber trams were parked at South Melbourne Depot. Has offices and shed in the background along with the depot water tank. Photo taken in the late 1950's early 1960's. In the view are No. 8 (later 8W), 10 (later 10W) and possibly No. 7 (later 7W) - cannot see the number but the photo matches that of the tram on page 76 of Destination City - 5th Edition) Printed on Fujichrome paper. Not known who took the photograph or when it was printed.Stamped in black ink on back "TMSV Sales"trams, tramways, south melbourne depot, scrubber tram, track cleaner, tram 7, tram 8, tram 10, tram 7w, tram 8w, tram 10w -
 Melbourne Tram Museum
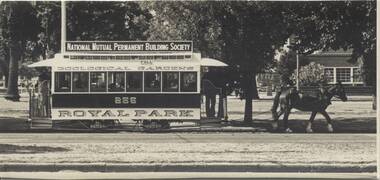
Photograph - Set of 3 Black & White Photograph/s, John Dare, 1975
Set of three photograph by John Dare, 9/3/1975 of the operation of the TMSV horse Royal Park Zoo tram, No. 256, in the South Melbourne Football ground loop. .1 - Side of view of the tram with horse. .2 - With "Seven Colour Television Tram" passing on the inbound track. .3 - general view of the tram. The adtrams article (http://www.vicsig.net/index.php?page=trams&article=adtrams) accessed 22/8/2013 gives the advertising tram as SW6 900. image i4 - scan of three back of the photographs.On .1 and .3 - On rear ink "Recently restored horse tram was one of the highlights of the Labour Day weekend when it operated on a loop of track opposite the South Melbourne Football Ground. 9/3/75". Along with the ARHS Photo collection and John Dare name and address stamp. On .2 - as for .1, but with the additional words "Here it is seen paralleling the seven colour television tram"trams, tramways, horse trams, tmsv, south melbourne loop, advertising trams, tram 256, tram 900 -
 Melbourne Tram Museum
Photograph - Double track High St, Kew, 1960s or 1970s
Photograph shows double track section of tramway in High St, Kew looking southwest towards Childers St. The rails appear slightly sunken into the bitumen covered roadway, the Kew cemetery wall is prominent along the left of the roadway and numerous motor vehicles feature in the mid and background dating the photograph as 1960s or 1970s.Yields information about section of track before relaying in mas concrete. Black and white photographm&mtb, high st, kew, doulbe track, sunken track, childers st -
 Whitehorse Historical Society Inc.
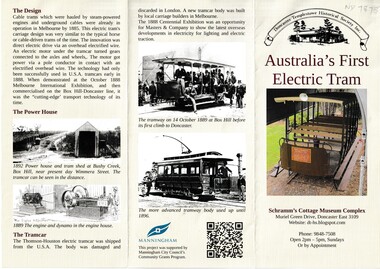
Pamphlet - Historical Resource, Manningham City Council, Australia's First Electric Tram, 2022
A4 folded twice coloured pamphlet picturing Australia's first electric tram which ran from Box Hill to Doncaster in the late 1880's.A4 folded twice coloured pamphlet picturing Australia's first electric tram which ran from Box Hill to Doncaster in the late 1880's.non-fictionA4 folded twice coloured pamphlet picturing Australia's first electric tram which ran from Box Hill to Doncaster in the late 1880's.tram, tram services, schramm's cottage -
 Flagstaff Hill Maritime Museum and Village
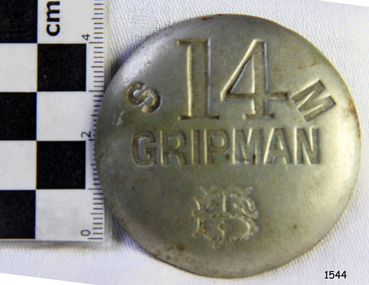
Badge - Gripman Badge, Stokes & Sons, Jul 1916 - Nov. 1919
This cable tram Gripman’s badge, or driver’s badge, was part of a tram driver’s uniform. The inscriptions on the front of the badge identify it as belonging to Gripman number 14, at the South Melbourne Car House depot of the Tramways Board. The Gripman Badge would be re-issued whenever another Gripman takes over the position. Cable trams were invented in America in 1873. In Melbourne, cable trams were in use from 1885 until 1940, with a network of up to 1200 cable cars or 'dummies' and trailers travelling at around 9.5 miles (15km) per hour along 46 miles (74km) of double tracks. The Gripman drove the dummy car, operating the heavy levers to connect the gripping gears to the cable installed in a slot in the road. To turn at intersections he would skilfully disconnect, freewheel around the corner and carefully reconnect to the continuously operating steel cable. Large winding gears in an Engine House along the line pulled the cable along, powered by steam engines and later electric engines. The gripping gears were in the centre of the car's floor with seating all around the sides, a dangerous place for curious children. , whose worried parents would guide them into the tram that was towed behind the dummy car. The Melbourne Tramways Board operated the cable trams between July 1916 and November 1919 after taking over from the privately operated Melbourne Tramway and Omnibus Company. In 1919, the Melbourne and Metropolitan Tramways Board (MMTB) took over the Tramways Board. Stokes & Sons: - The maker of the badge, Thomas Stokes, migrated to Melbourne from Birmingham in 1854 and set up business in Mincer Lane as a die-sinker, producing medals, tokens, buttons and silverware, and an engraving service. He moved to Flinders Lane in 1856. After a time, in 1894, the business became Stokes & Sons Pty: Ltd, electroplates and badge makers at Post Office Place in Melbourne. The maker's mark 'Stokes & Sons' was made on badges until 1962. LOCAL CONNECTION: -t was common practice to recycle the used cables from the tramway. For example, the Wollaston Bridge in Warrnambool, Victoria, is suspended by recycled cable tram Melbourne. (Other recycled cables were used for fencing wire.) -Portland's cable tram is an example of the cable trams used in Melbourne from 1885 to 1940.This badge was used to identify a Gripman who operated a cable car tram's dummy car for the Tramways Board in Melbourne between 1916 and 1919. It represents the need for people to be able to identify workers in the service industry, a need still addressed today by staff ID badges and digital identification. The badge also represents the period in Melbourne's history when cable cars were used for public transport for over four decades, gradually changing from steam to electric power. Trams still have an important role in Melbourne's public transport. Badge, round hollow metal dome with two open metal guides on the back. A cable tram Gripman (driver) badge with embossed inscriptions on the front and stamped on the back. There is a logo of entwined letters T and B on the front. It identifies Gripman number 14, South Melbourne, Tramway Board. It was made by Stokes & Sons of Melbourne. Impressed into the front: "S / 14 / M" "GRIPMAN" Logo intertwined "T" and "B" Embossed on reverse "STOKES &o SONS"flagstaff hill, flagstaff hill maritime museum and village, warrnambool, maritime museum, maritime village, great ocean road, shipwreck coast, badge, gripman, stokes & sons, numesmatics, tramway, tram, tram driver, uniform, cable tram, identification, cable car driver, tramway board, south melbourne, melbourne tramways board, tb, mtb, mmtb, melbourne and metropolitan tramways board, tramway button, gripman button, id, identification badg, staff badge, name badge, employee, grip car, dummy car -
 Wangaratta RSL Sub Branch
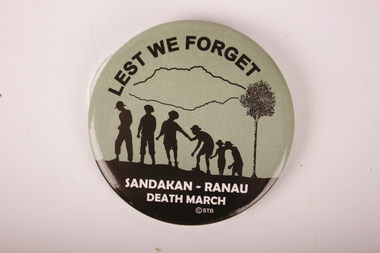
Badge, unknown
... staggered for about 260 kilometres along jungle tracks. Many died ...Badge commemorating the Sandakan death marches, one of the worst atrocities suffered by Australian troops during WWII.Australian prisoners were sent to Sandakan in 1942 to build an airstrip. At first they were treated reasonably well. Gradually, however, rations were reduced and bashings increased. By late 1944, with Allied forces advancing toward Borneo, the Japanese decided to send about 2,000 Australian and British prisoners westward to Ranau, in Borneo’s rugged interior. Weak and sick prisoners staggered for about 260 kilometres along jungle tracks. Many died on the way, their bodies never recovered. Those unable to continue were killed; those too weak to march had been left behind in Sandakan, where all died or were killed. Only six – all Australians – out of about a thousand sent to Ranau survived the war. The Sandakan “death march” remains the greatest single atrocity committed against Australians in war.Circular badge with green background and black text and figures. Six soldiers are silhouetted next to a tree. Safety pin clasp on back."LEST WE FORGET" "Sandakan Ranau / Death March"pow, world war two, death march, sandakan death marches, borneo -
Melbourne Tram Museum
Photograph - Dummy and staff outside Brunswick Car Shed, c1926
Photograph shows Dummy or Grip Car on run-out track outside Brunswick Car Shed in Sydney Road, Brunswick. Lined up in the foreground along the side of the Dummy are approx 20 tram crew and other staff, most in assorted uniforms with unbuttoned jackets. While the photo's reproduction is poor, the destination board reads 'H. B. Railway' (Hobson's Bay Railway) once located at the Flinders and Elizabeth Streets terminus. This early railway became part of the Victorian Railways in 1878, well before the opening of the Brunswick cable line in 1887 and this photograph c1890. Photo from C B Thomas collection.Yields information about Brunswick Car Shed and Sydney RoadBlack and white photograph with notes on rear.In ink "8" and "K McC"tramcars, tramways, cable trams, dummy, grip car, hobsons bay railway, elizabeth street, flinders street, brunswick car shed, sydney road -
 Melbourne Tram Museum
Photograph - Dummy and staff outside Brunswick Car Shed, c1890
Photograph shows Dummy or Grip Car on run-out track outside Brunswick Car Shed in Sydney Road, Brunswick. Lined up in the foreground along the side of the Dummy are approx 20 tram crew and other staff, most in assorted uniforms with unbuttoned jackets. While the photo's reproduction is poor, the destination board reads 'H. B. Railway' (Hobson's Bay Railway) once located at the Flinders and Elizabeth Streets terminus. This early railway became part of the Victorian Railways in 1878, well before the opening of the Brunswick cable line in 1887 and this photograph c1890. Photo from C B Thomas collection.Yields information about Brunswick Car Shed and Sydney RoadBlack and white photograph with notes on rear.In ink "8" and "K McC"tramcars, tramways, cable trams, dummy, grip car, hobsons bay railway, elizabeth street, flinders street, brunswick car shed, sydney road -
 Ballarat Heritage Services
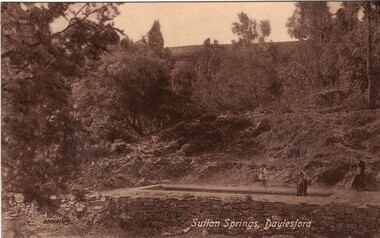
Photograph - Photograph - Black and White, Sutton Spring, Daylesford
Emerging from the base of Wombat Creek Sutton Spring has two mineral water pumps. The spring is named after the Sutton brothers of Cornwell, who discovered it while looking for alluvial gold along Wombat Creek in the 1850s. By 1900, a trench had been dug to expose the spring, and a pipe had been driven through the spring eye. Sandstone rockwork encircled the trench. On 27 February 1907 the Sutton Mineral Spring Reserve was gazetted. By that time the trench had been enlarged and rendered, and a lean-to shelter had been built over the approach track. In 1927 Wombat Creek was rerouted allowing the land around the spring to be cleared and pipework repaired. Five bores were dug in 1929 and equipped with hand pumps. The bores were all shallower than 9.7 m. An attempt was made to replace one of these bores with a new bore, however it was not possible due to ground instability. These two bores are the oldest of all the mineral springs open to the public. Also in 1929 Council contemplated encouraging private enterprise to establish a ‘hydrobath’ similar to those in Europe, after mineral water had been discovered flowing from several other vents in sandstone and slate strata below the typical level of the creek. However, the option was not enacted although at the time to capture the flow another bore to a depth of 15m was sunk. In 1936 architect P. Scott Williams adopted a similar notion and examined the prospect of establishing a Hydropathic establishment above Sutton Springs, assuming a reliable mineral water supply could be found. That idea also lapsed. In October 1997 the Sutton Spring trench was restored to enable the public to again take mineral water at the spring. The restoration included clearing the sides of the creek and removing willow root growth. In 2002 a major overhaul of the trench and its underground works was undertaken and all plumbing replaced. This involved re-routing the creek through sandbagging, covering the spring eye with geofabric and then concrete. Unfortunately due to ongoing water quality issues, public access to take water from the trench was closed, however the trench can still be viewed.A mineral water spring at Daylesford is surrounded by a drystone wall. mineral water, sutton spring, daylesford, central springs, p. scott williams -
Melbourne Tram Museum
Archive (Series), Melbourne & Metropolitan Tramways Board (MMTB), Darling and Koornang Road extensions from Carnegie, 1937
Melbourne and Metropolitan Tramways BoardRecord of correspondenceLetters in date orderDetails correspondence both internal and external with Councils about a possible tram line along Waverley Road, Darling Rd, Koornang Rd to the the Carnegie tram terminus in Trugannini Road. Inlcudes cost estimate, and sketch plan.tramways, new track, extensions, correspondence, darling road, carnegie, koornang rdtramways, new track, extensions, correspondence, darling road, carnegie, koornang rd -
 Bendigo Historical Society Inc.
Photograph - JOHN WILLIAMS COLLECTION: TRAM WITH CATHEDRAL IN BACKGROUND
Colour photograph: Bendigo Tramways tram on tracks in front of Cathedral, High Street, Bendigo. Cathedral in background of photo, trees along High Street. Could be early 2000's image.bendigo, tramways, tram no. 25 -
 Melbourne Tram Museum
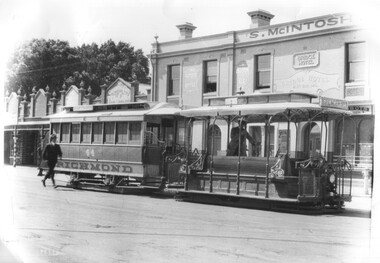
Photograph - Cable trams - Bridge Road Richmond terminus, A G Renwick, 1/1924
The photograph shows a cable tram set with trailer 44 at the Bridge Road Richmond terminus. The S McIntosh's Bridge Hotel is in the background, along with four shops including the Oriental Cafe for Tea and Grills. It would appear that the gripman is ready to leave though a male passenger seems to be hurrying forward to catch the tram. The typed caption records that the dummy is No. 12, the photograph is dated Jan. 1924 and notes the slotted depot lead out track in the foreground. Also discusses the ventilator cones on the grip car, following the installation of electric lights. Photo by A G Renwick. Second print, would have been the original view from which the first one has been taken from.Yields information about the Bridge Road Richmond terminus Jan. 1924Black and white photo with a typed caption attached. Second image - a vertical photo with notes on the rear.See second image. In pencil "163" in top right hand corner and "cable, Bridge Rd line"tramcars, tramways, cable trams, richmond, bridge road, tram 44, tram 12 -
 Ballarat Tramway Museum
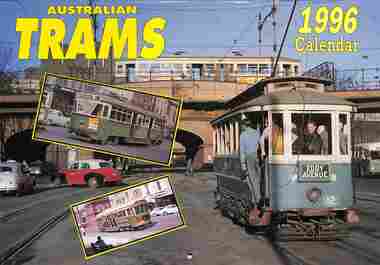
Ephemera, Topmill Pty Ltd, "Australian Trams - 1996 Calendar", 1995
1996 Calendar" containing cull colour photographs of Sydney, Adelaide, Bendigo, Ballarat, Melbourne, Fremantle 29 and Victor Harbor. All photos by D Ellerton. Produced by Topmill Pty Ltd and distributed by Gordon & Gotch Pty Ltd. Features July - Ballarat tram 17 crossing Sturt St from Lydiard St North, 5-3-1963. Tram has the destination of Bell St. November - Bendigo 16, at Charing Cross, 11-3-1960, Eaglehawk, with the motorman selling a ticket to a passenger. Rear cover - Bendigo 17 at Eaglehawk, 11-3-1960 at the end of the double track.Demonstrates a Topmill Calendar for 1996 featuring Australian trams.Wall Calendar - heavy card covers, 12 gloss art pages inside, titled "Australian Trams - 1996 Calendar" containing full colour photos. Has a punched hole along the top edge to enable wall use. Provides dates for holidays, school holidays and Pension payment days and phases of the moon.trams, tramways, ballarat, bendigo, calendar, tram 17, tram 16 -
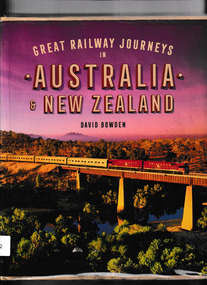 Victorian Railway History Library
Book, Bowden, David, Great Railway Journeys in Australia & New Zealand, 2017
A look at 35 trips that highlight some of the most interesting, scenic and rewarding railway journeys in Australia and New Zealand. They include the renowned long-distance journeys, such as The Indian Pacific in Australia that takes travellers on a three-day trip from Perth to Sydney or the The Northern Explorer in New Zealand’s North Island that stretches from Wellington to Auckland, as well as those that traverse stunning scenery, such as New Zealand’s TranzAlpine train or the Spirit of the Outback in Australia. There are also routes on which restored steam locomotives operate and other lines included for the wonder of their engineering. Trains are a great way to travel in these countries, taking you at ground level past superb scenery that often cannot be seen by any other means of transport. David Bowden’s entertaining text describes the route, the major features of interest along the way and any special technical details about the locomotive or the track.index, ill, maps, p.157.non-fictionA look at 35 trips that highlight some of the most interesting, scenic and rewarding railway journeys in Australia and New Zealand. They include the renowned long-distance journeys, such as The Indian Pacific in Australia that takes travellers on a three-day trip from Perth to Sydney or the The Northern Explorer in New Zealand’s North Island that stretches from Wellington to Auckland, as well as those that traverse stunning scenery, such as New Zealand’s TranzAlpine train or the Spirit of the Outback in Australia. There are also routes on which restored steam locomotives operate and other lines included for the wonder of their engineering. Trains are a great way to travel in these countries, taking you at ground level past superb scenery that often cannot be seen by any other means of transport. David Bowden’s entertaining text describes the route, the major features of interest along the way and any special technical details about the locomotive or the track.railroad travel - australia, railroad travel - new zealand -
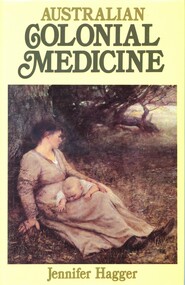 Alfred Hospital Nurses League - Nursing Archive
Book - Illustrated book, Jennifer Hagger 1939, Australian Colonial Medicine, 1979
A record of the development of medical care in Australia from the First Fleet to the late nineteenth century.Illustrated book with dustjacket. Book has an olive green cover with title, author's surname, publishe's name and mark embossed in silver on the spine. Dust jacket has a yellow background with dark and light olive print. On the front cover is an illustration of a woman with a baby ('On the wallby track' 1896 by Frederick McCubbin)Title is printed above, and author's name below this illustration. Title, author's surname , publisher's name and mark are also printed on the spine non-fictionA record of the development of medical care in Australia from the First Fleet to the late nineteenth century. medicine-australia- to [ca.1900], medicine-australia-history -
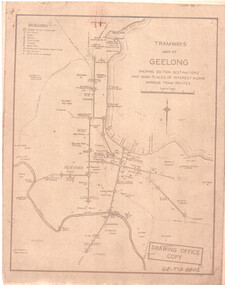 Ballarat Tramway Museum
Drawing, State Electricity Commission of Victoria (SECV), "Tramways Map of Geelong", 1930s
SEC Drawing GE-T13-8802, "Tramways Map of Geelong" shewing section destinations and main places of interest along various tram routes. Undated, prior to the construction of the Beach route in 1940. See item 3469 for a larger drawing. Scanned in both colour and greyscale.Yields information about the Geelong system prior to the construction of the Beach route in 1940.Map or drawing photocopied onto heat sensitive paper - quarto size.tramways, geelong, maps, map, track layout