Showing 532 items matching "charing cross bendigo"
-
 Ballarat Tramway Museum
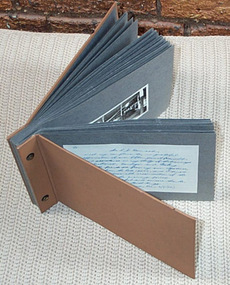
Album - Photo Album, Keith Kings, Jul. 1970
... at Charing Cross 21 1921 Photo of Bendigo Birneys 28 and 29... terminus. 20 1920 Photo of Bendigo 18 at Charing Cross 21 1921 ...Album comprises heavy cardboard covers with brown Rexene covers, with inside papers of heavy dark grey photo album paper, 36 leaves of dark grey photo paper and two brass interscrews within black grommets. See Condition Details re damage to back cover. Album contains 32 photos - personal prints of Keith Kings. Title page has been hand written to Les Denmead, dated 6/7/1970, thanking Mr. Denmead for his assistance over the years. Photos divided into the three SEC Provincial Tramway cities, each with a typed name proceeding the set of photos. Two further photos of Geelong were at the rear of the album, but were not in position when catalogued. One of these photos may be Reg. Item 1874 - photo of Geelong scrubber tram. Each of the photographs have been separately registered, as shown in the table below. Scanned images made of front and back of the photos. Back has Keith Kings ID number, description, notes and date of photo. Conservation Notes prepared - within the cataloguing sheet - see related documents. Folio Reg. Notes Item No. 1 Handwritten note to Mr. L. J. Denmead from Keith Kings. 2 Title sheet – “BALLARAT” 3 1903 Small photo of SEC Monogram from Geelong No. 1 1904 Photo of SEC plaques etc at Wendouree office 4 1905 Photo of front of Wendouree Parade depot – 1957 - with trams 40 and 25 in photo. 5 1906 Photo of Ballarat 23 at depot 6 1907 Photo of Ballarat 29 in depot. 7 1908 Photo of Ballarat 17 in Wendouree Parade 8 1909 Photo of Ballarat 21 at depot. 9 1910 Photo of Ballarat 15 and 31 in Sturt St. 10 1911 Photo of Ballarat No. 40 Sturt St. 11 1912 Photo of Ballarat No. 38 – Wendouree Parade 12 1913 Photo of Scrubber car in depot. 13 Title sheet – “BENDIGO” 14 1914 Photo of Bendigo depot 15 1915 Photo of Bendigo No. 17, 1949. 16 1916 Photo of Bendigo 22 and 4 at Eaglehawk. 17 1917 Photo of Bendigo 12 at Golden Square. 18 1918 Photo of Bendigo 13 and 26 at Eaglehawk terminus. 19 1919 Photo of Bendigo 17 (bogie) at Quarry Hill terminus. 20 1920 Photo of Bendigo 18 at Charing Cross 21 1921 Photo of Bendigo Birneys 28 and 29 at Charing Cross 22 1922 Photo of original sprinkler and track cleaning car in Bendigo depot 23 1923 Photo of Bendigo 2nd track cleaning car 24. 1924 Photo of trams at Manchester Loop, 1958. 25. Title sheet – “GEELONG” 26 1925 Photo of Geelong 19 in front of the depot. 27 1926 Photo of Geelong depot 28 1927 Photo of Geelong No. 3 at East terminus 29 1928 Photo of Geelong No. 23 outside depot. 30 1929 Photo of Geelong No. 16 at Eastern Park terminus. 31 1930 Photo of Geelong No. 28 at depot 32 1931 Photo of Geelong Birney No. 14 at Eastern Park terminus. 33 1932 Photo of Geelong No. 32 at Moorabool St. 34 1933 Photo of Geelong No. 37 outside depot 35 1934 Photo of Geelong No. 39 at West terminus 36. No photo – marks of four corners remained. 37 – back cover No photo – marks of four corners remained. Photos not to be taken out of the album unless for photographic copying. Use image files. Photo Album - The Commercial Photo Album - No. 1 - 36 leaves. See hand written note from Keith Kings to Mr. L. J. Denmead. Dated 6/7/70.trams, tramways, ballarat, bendigo, geelong, photo album -
 Ballarat Tramway Museum
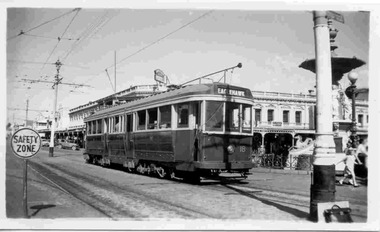
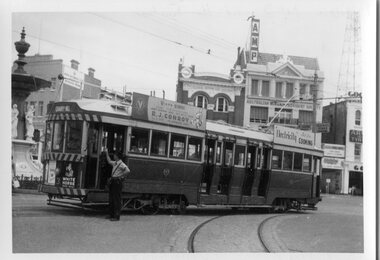
Photograph - Black & White Photograph/s, Keith Kings, 11/04/1953 12:00:00 AM
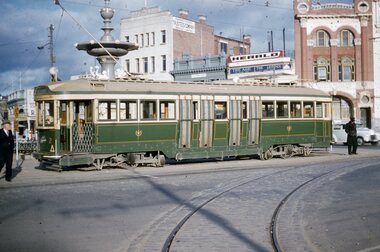
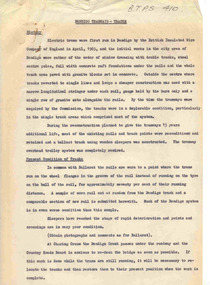
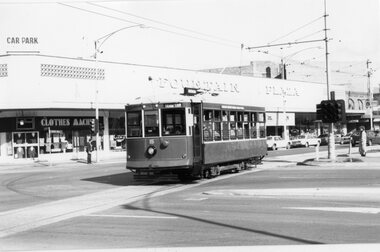
... of SEC Bendigo tram 18 at Charing Cross. Date of photo 11/4/1953... Bendigo tram 18 at Charing Cross. Date of photo 11/4/1953. Tram ...Black and White photograph contained with Reg. Item 1902 - Photo Album from Keith Kings to Les Denmead 1970. Photograph of SEC Bendigo tram 18 at Charing Cross. Date of photo 11/4/1953. Tram showing destination of Eaglehawk. Has "City Club Hotel" in the background, a Safety Zone sign to the left of the photo. Note bag and folder or envelope on pole closest to photographer. Tram converted for "one-man" operation. Keith Kings No. H(e)(1) Scanning: i - image file, p - presentation file, b - back of photograph.Stamp in top left hand corner and handwritten number with "K.S. Kings No. H(e)(1) Copyright reserved". In blue ink "Bendigo / No.18, as converted for "One-man" operation. / Charing Cross. 11/4/53"trams, tramways, bendigo, charing cross, city club hotel, one man trams, tram 18 -
 Ballarat Tramway Museum
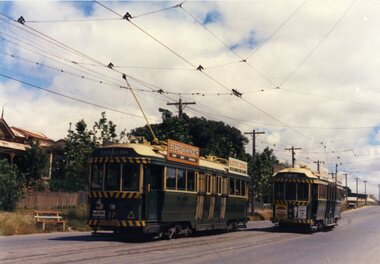
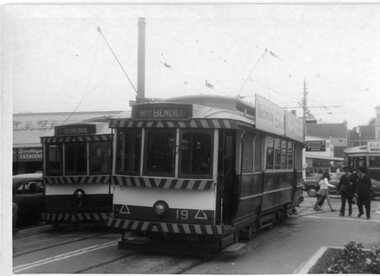
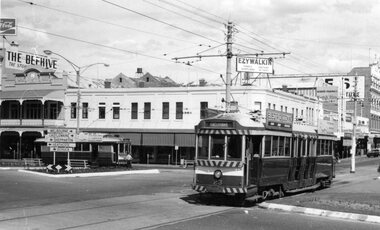
Photograph - Black & White Photograph/s, Keith Kings, 24/09/1961 12:00:00 AM
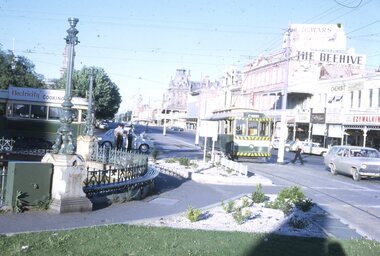
... Beehive Building Charing Cross tram 28 tram 29 Stamp in top left ...Black and White photograph contained with Reg. Item 1902 - Photo Album from Keith Kings to Les Denmead 1970. Photograph of SEC Bendigo trams 28 and 29 at Charing Cross. Date of photo 24/9/1961. Both trams have the tiger stripes and dash canopy lighting added, but not the large white stripe above the headlight. Both trams have "Nothing Beats Briquettes for Heat" roof advertisements. The Beehive building in the background and other buildings on the east side of Pall Mall. Keith Kings No. L(n)(17) Scanning: i - image file, p - presentation file, b - back of photograph.Stamp in top left hand corner and handwritten number with "K.S. Kings No. L(n)(17) Copyright reserved". In blue ink "Bendigo / Nos. 28 and 29. / Birney Safety Cars. / Charing Cross 24/9/61"trams, tramways, bendigo, beehive building, charing cross, tram 28, tram 29 -
 Ballarat Tramway Museum
Photograph - Colour Photograph/s, 23/11/1962 12:00:00 AM
967.1 - Colour postcard size print of SEC Bendigo trams 4 and 17 at a crossing Loop on the Eaglehawk line. Photo dated 21.11.1962. Printed on AGFA paper. Both trams fitted with dash canopy lighting, but no large white strip under the driver's windows. 17 showing destination of "Eaglehawk", has two SEC ads on the side re Electric Cook and a White Horse whiskey ad on front panel. Tram 4 showing destination of "Quarry Hill", has two ad panels on roof and two ads on front panel including one Cohn's' Drinks. 967.2 - Colour postcard size print of SEC Bendigo tram 26 in Mitchell St. crossing Hargreaves St. heading for Charing Cross. Photo dated 21.11.1962. Printed on AGFA paper. Trams fitted with dash canopy lighting, but no large white strip under the driver's windows. Has two roof ads and one ad on rear drivers panel. In background of photo are the buildings along Mitchell St. looking down along Mitchell St and into View St. Has Plaza theatre sign in photo above tram. On right hand side, is a van marked "Carrier M. Slattery". Tram has destination of "Quarry Hill" in rear box. 967.3 - Colour postcard size print of SEC Bendigo tram 19 on the North Bendigo line. Photo dated 21.11.1962. Printed on AGFA paper. Trams fitted with dash canopy lighting, but no large white strip under the driver's windows. Has destination "Nth Bendigo" and SEC roof ads and drivers panel ad for Briquettes.On rear top left hand corner "21.11.62" in very wavy handwriting typical of an aged person.bendigo, eaglehawk, mitchell st., north bendigo, tram 4, tram 17, tram 26, tram 19 -
 Ballarat Tramway Museum
Photograph - Colour Photograph/s, 23/11/1962 12:00:00 AM
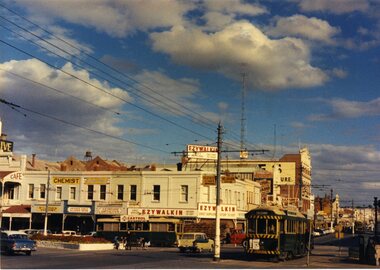
... Parade Ballarat Ballarat goldfields Bendigo Pall Mall Charing ...Colour postcard size print of SEC Bendigo trams 26 and a single trucker at Charing Cross with Mitchell St. in the background. Photo dated 21.11.1962. Printed on AGFA paper. Both trams fitted with dash canopy lighting, but no large white strip under the driver's windows. 26 showing destination of "Eaglehawk" with two SEC ads and another ad on the front dash panel. Single trucker has a Castrol ad on the roof. In the background are various buildings along the east side of Pall Mall and along Mitchell St. Pole by the front of 26 has directional signs "Melbourne" and "Heathcote / Echuca". On rear top left hand corner "21.11.62" in very wavy handwriting typical of an aged person.bendigo, pall mall, charing cross, tram 26 -
 Ballarat Tramway Museum
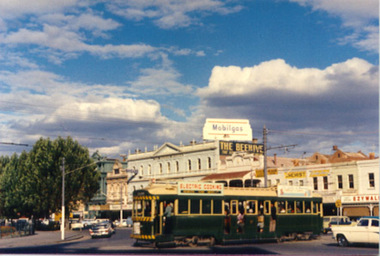
Photograph - Colour Photograph/s, 1962?
... at Charing Cross. Photo undated, but could be 21.11.1962. Printed... Parade Ballarat Ballarat goldfields Bendigo Pall Mall Charing ...Colour postcard size print of an SEC Bendigo Bogie tram at Charing Cross. Photo undated, but could be 21.11.1962. Printed on AGFA paper. Tram fitted with dash canopy lighting, but no large white strip under the driver's windows. Photo out of focus. Has a SEC roof ad and another ad on the roof, non SEC. In background are the various buildings along Pall Mall. Tram well loaded with passengers. Can see the Ezywalkin, The Beehive and large a Mobilgas sign. Two copies held.bendigo, pall mall, charing cross -
 Ballarat Tramway Museum
Photograph - Colour Photograph/s, 1960's
... Bendigo trams 7 and 21 at Charing Cross. Printed on AGFA paper ...Colour postcard size print of an SEC Bendigo trams 7 and 21 at Charing Cross. Printed on AGFA paper. Photo taken during last years of Bendigo. Trams have dash canopy lighting and large white strip under the driver's windows. Tram 21 showing "North Bendigo" and 7 showing "Golden Square" destinations. Photo has Cenotaph, fountain and buildings on the south east corner of Mitchell St and Pall Mall in background.bendigo, pall mall, charing cross, tram 7, tram 21 -
 Ballarat Tramway Museum
Photograph - Colour Photograph/s, 1960's
... Bendigo trams 7 and 21 at Charing Cross with two bogie trams ...Colour postcard size print of an SEC Bendigo trams 7 and 21 at Charing Cross with two bogie trams by fountain. Printed on AGFA paper. Photo taken during last years of Bendigo. Trams have dash canopy lighting and large white strip under the driver's windows. Tram 21 showing "North Bendigo" and 7 showing "Golden Square" destinations. Taken at same time as 971. Photo has Cenotaph, fountain and buildings on the south side Charing Cross in the background, including ANZ bank and RACV office.bendigo, pall mall, charing cross, tram 7, tram 21 -
 Ballarat Tramway Museum
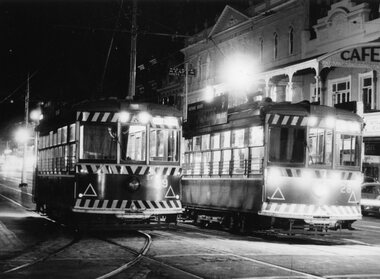
Photograph - Black & White Photograph/s, early 1960's
... Bendigo Charing Cross tram 28 tram 29 Black and White print ...Black and White print of Bendigo SECV Bendigo trams 29 and 28 (Birney's) at night at the Charing Cross terminus for the Golden Square - North Bendigo route. Trams have dash canopy lights, but no large white strip under the drivers windows. Photo not dated but appears to be at during early 1960's. Has the Beehive Stores building, "Dad and Dave Cafe" and "W.I. Jones Chemist" store in the background. Tram 28 has a SECV briquette ad on the roof.trams, tramways, pall mall, bendigo, charing cross, tram 28, tram 29 -
 Ballarat Tramway Museum
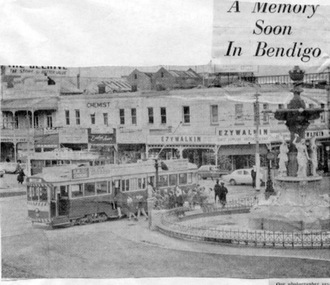
Newspaper, Bendigo Advertiser, " A memory Soon in Bendigo", 19/07/1968 12:00:00 AM
... Closure Charing Cross Newspaper cutting, undated, from Bendigo ...Newspaper cutting, undated, from Bendigo Advertiser (?) with a photo of a bogie car on the Eaglehawk route at Charing Cross, with the Alexandra Fountain in the foreground. Caption refers to the State Cabinet decision the previous day to close the Bendigo system, which would date the item as 19/7/1968. Item has been glued onto a sheet of foolscap paper - white.trams, tramways, bendigo, closure, charing cross -
 Ballarat Tramway Museum
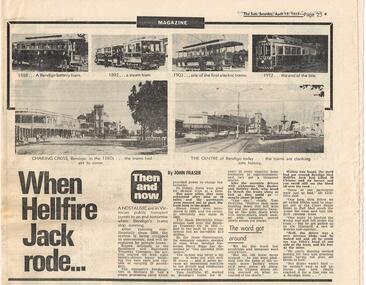
Newspaper, Herald & Weekly Times Ltd, When Hellfire Jack rode...", 15/04/1972 12:00:00 AM
... towards Charing Cross from the Post Office in 1880 and 1972... Closure Hellfire Jack Charing Cross 1037 - Newspaper clipping from ...1037 - Newspaper clipping from The Sun (Melbourne), April 15, 1972 in the Magazine section of the newspaper, called 'Then and Now' about the closure the following day of the Bendigo tramways. Gives an outline history of the tramway system, and two stories about the tramways, one about a driver named "Hellfire Jack" and an accident between a tram he was driving and a horse pulled dray loaded with tomatoes. Has six small photos on the top of the item, four of trams and two of Bendigo looking towards Charing Cross from the Post Office in 1880 and 1972. 1037.1 - added 23/10/2004 - duplicate cutting. Item written by John Fraser.trams, tramways, bendigo, closure, hellfire jack, charing cross -
 Ballarat Tramway Museum
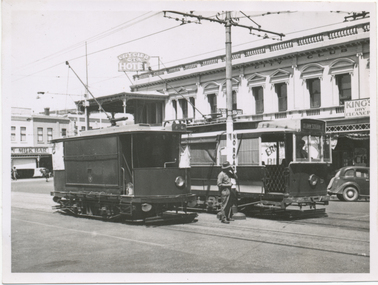
Photograph - Black & White Photograph/s, John Buckland, 23/12/1946 12:00:00 AM
Black and white photograph of Bendigo track cleaner/sprinkler and ESCo No. 9 at the Pall Mall tram stop just to the south of the Fountain at Charing Cross. ESCo 9 has been modified (See Kings Bendigo Tramways p54). Sprinkler car has trolley pole facing Golden Square, as has No. 9. Pole by the trams have signs "ALL CARS STOP HERE" and a "NO ROAD" sign. Photo taken 23/12/1946. 676.1 - Black and White print contained within the Wal Jack Bendigo and Geelong Album, see Reg Item 5003 for more details. Added 2/7/2013. See The Bendigo Tramways, K.S.Kings On rear typed is "SECV Bendigo Tramways Car 9 and Track Grinder at Charing Cross 23/12/1946" and stamped in but rh corner "Photograph by John Buckland" trams, tramways, bendigo, esco, work trams, tram sprinkler, scrubber, tram 9 -
 Ballarat Tramway Museum
Document - Calendar, Topmill Pty Ltd, "Australian Trams 1999 Calendar", 1998
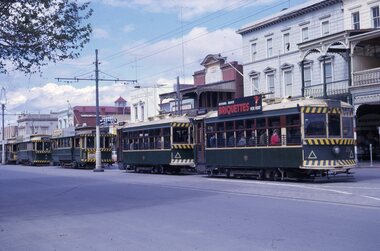
24 Page full colour calendar featuring Australian Trams, published by Top mill Pty Ltd. Cover (1299i5) features Sydney trams outside Central station in Eddy Ave. Other cities represented - Brisbane, Sydney, Adelaide, Perth, Fremantle, Bendigo, Ballarat, Sydney light rail, Hobart and Melbourne. Photos by Hugh Ballment, Dale Budd, Robert Merchant, Arthur Perry and the Sydney Tramway Museum. Priced at $9.95, and has "Parkholme Newsagency and Toys" sticker over bar code section, giving the same price. Distributed by Gordon and Gotch. Ballarat trams - 1299i1 - 33 at depot during hail storm on 20/8/1971 and 1299i2 - BTM trams 14 and 26 at Carlton St. during BTM operations 1970's or early 1980's. Used for month of June. Bendigo trams - 1299i3 - No. 4 at Eaglehawk terminus - 1/2/1971 and 1299i4 - trams 28, 2, 23 and two single truckers at Charing Cross 1970. Used for month of May.tramways, trams, australian trams, ballarat, bendigo, museums -
 Ballarat Tramway Museum
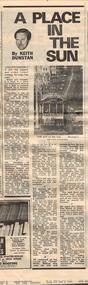
Newspaper, Herald Sun, "A Place in the Sun", 17/04/1972 12:00:00 AM
Newspaper clipping from The Melbourne Sun, dated Monday 17/4/1972, column written by Keith Dunstan titled "A place in the sun" detailing the events, musings and some identities names of the closure of the Bendigo tramway system the previous day. Has a photo of No. 26 climbing View St from Charing Cross. One of a large group of newspaper cuttings from John Bainbridge, 7/4/02. Item has been folded for inclusion within a scrap book. Has a piece of plain paper Secured to the back of the portion that was not Secured to the scrap book itself. For full print of the photograph, see Reg Item 3888.bendigo, tramway closure, last tram -
 Ballarat Tramway Museum
Slide - 35mm slide/s - set of 13, Peter Moses, 1974
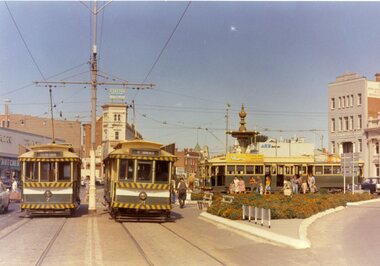
... Birney cars / Charing Cross" in blue ink and in red ink “20”. .6... “15”. .5 - "1974 Bendigo two Birney cars / Charing Cross ...Set of 13 colour slides, 7 on Kodak cardboard mounts and 6 on Agfa colour plastic mounts. .1 - Bendigo Trust, Birney trams 28 and 30 at Central Deborah Mine terminus. No. 30 has a 3BO Roof advertisement. .2 - ditto .3 - ditto with the Central Deborah mine and buildings in the background. .4 - No. 30 inbound in High St. with Sacred Heart Cathedral in the background (spire under construction) .5 - Nos. 30 and 28 crossing at Charing Cross with the Fountain Plaza building and the fountain in the background. .6 - No. 28 north bound in Pall Mall, after leaving Charing Cross with the Shamrock Hotel in the background. .7 - Photo showing track and centre poles in View St. looking west - no overhead. Has AMOCO service station near McKenzie St. .8 - No. 28 taken from cab of No. 30, in McCrae St, at end of double track. .9 - No. 28 turning from McCrae St. into Nolan St. .10 - No. 28 in Nolan St. with Lake Weeroona rowing sheds in the background. .11 - No. 19 in now Tramway Ave (then Arnold St.) running into depot .12 - No. 19 outside Bendigo depot .13 - ditto Slides taken by Peter Moses, during the winter of 1974 (no leaves on the trees).On the rear of all the slides "P. Moses" in black ink. .1 - "1974 Bendigo Central Deborah Mine" in blue ink and in red ink “16”. .2 - "1974 Bendigo two Birney cars / Central Deborah Mine" in blue ink and in red ink “18”. .3 - "1974 Bendigo trams at Central Deborah Mine" in blue ink and in red ink “17”. .4 - "1974 Bendigo High St / tram near Sacred Hearth Cathedral" in blue ink and in red ink “15”. .5 - "1974 Bendigo two Birney cars / Charing Cross" in blue ink and in red ink “20”. .6 - "1974 Bendigo No. 28 Pall Mall" in blue ink and in red ink “8”. .7 - "1974 Bendigo / Old Tramline View St." in black ink and in red ink “5”. .8 - "1974 Bendigo, McRae St. (Pall Mall)" and in red ink "9". .9 - "1974 Bendigo, Lake Weeroona, / tram " and in red ink "10". .10 - "1974 Bendigo, Lake Weeroona" and in red ink “11”. .11 - "1974 Bendigo / Outside depot" and in red ink “24”. .12 - "1974 Bendigo / Outside depot" and in red ink “25”. .13 - "1974 Bendigo / Depot" and in red ink “26”.tramways, trams, bendigo, central deborah, bendigo trust, sacred hearth cathedral, north bendigo, depot, tram 19, tram 28, tram 30 -
 Ballarat Tramway Museum
Slide - 35mm slide/s, Peter Moses, Jan. 1969
... Charing Cross tram 6 On the rear of the slide "Jan. 1969 Bendigo ...Photo of SEC Bendigo No. 6 crossing Mitchell St, north bound for North Bendigo, while a bogie tram waits to depart Charing Cross, east bound for Quarry Hill. Three SEC crew members standing by the front of the bogie tram and an inspector crossing the road near No. 6. Has part of the fountain in the view. Also in the photo are The Beehive building, and advertisement for Dewars whiskey and a shop front for "Ezywalkin" shoes. The bogie tram has a SEC roof advertisement "Electricity Best for cooking". Kodak cardboard mount slide, taken by Peter Moses, Jan. 1969.On the rear of the slide "Jan. 1969 Bendigo:" in blue ink, "P. Moses" in black ink and other side of the slide in red ink “22”.tramways, trams, bendigo, charing cross, tram 6 -
 Ballarat Tramway Museum
Slide - 35mm slide/s, Wal Jack, 3/09/1958 12:00:00 AM
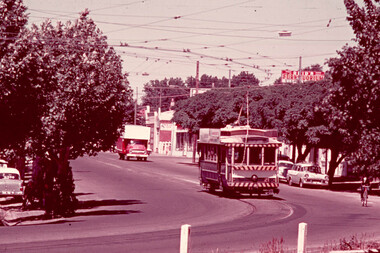
Bendigo, bogie tram No. 2 standing alongside the fountain before proceeding to Eaglehawk. Tram fitted with small reflective triangles on front panels, all blinds drawn and gate closed. Has fountain in background and shops on the west side of Charing cross.'7 55 am Wed 3 Sept. 1958, Tram No. 2 at Fountain, Bendigo'tramways, trams, bendigo, tram 2 -
 Ballarat Tramway Museum
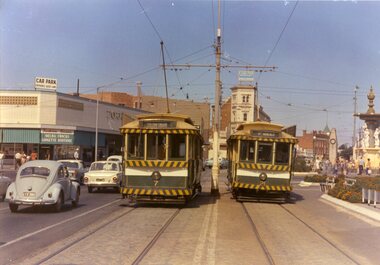
Slide - 35mm slide/s, Wal Jack, 20/10/1962 12:00:00 AM
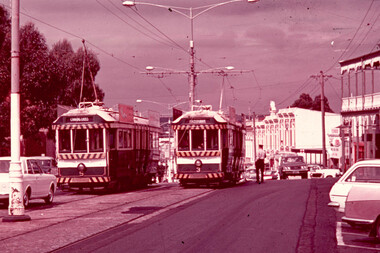
... Mall Charing Cross tram 28 tram 30 tram 21 tram 7 tram 19 'Pall ...Bendigo, trams 28, 30, 21, 7, and 19 in Pall Mall heading for Charing Cross, on 20-10-1962, as part of a ARHS tour.'Pall Mall, 28,30,21,7,19, 20-10-1962'tramways, trams, bendigo, pall mall, charing cross, tram 28, tram 30, tram 21, tram 7, tram 19 -
 Ballarat Tramway Museum
Photograph - Black & White Photograph/s, Ian Barkla, 30/08/1969 12:00:00 AM
... Mall Charing Cross Tram 19 7 On rear in black biro "Bendigo 19 ...Black and white photograph of Bendigo 7 and 19 at Charing Cross, with the end of a Bogie tram in the background. Bendigo 19 has destination of "Nth Bendigo", 7 of "Golden Square". Both trams have the large white strip under the dash canopy lighting. In background is a driver and conductor walking towards 19. Tram 19 has two large SEC roof ads. Taken 30-8-1969. On Kodak paper.On rear in black biro "Bendigo 19 at the Fountain, 30-8-69 / Ex 185 MMTB"trams, tramways, bendigo, pall mall, charing cross , tram 19, 7 -
 Ballarat Tramway Museum
Photograph - Black & White Photograph/s, Ian Barkla, c1960
... Black and white photograph of Bendigo 3 at Charing Cross... Charing Cross Tram 3 On rear in black biro "Bendigo No. 3 ...Black and white photograph of Bendigo 3 at Charing Cross, with the Fountain in left hand edge of photograph. Photo shows the curve from View St. into Pall Mall. Tram has "White Horse" whiskey ad and another ad on the drivers dash panel, an SEC roof ad on the rear of the tram and R.J.Conroy's Victa Mowers roof ad on the front of the tram. Conductor in a short sleeved shirt, is standing at front of tram talking to the driver. AMP and CML buildings in background. Tram has been fitted with dash canopy lighting, but not the enlarged white strip. Not dated.On rear in black biro "Bendigo No. 3 at the Fountain ' Ex Geelong 32, Ex 122 MMTB".trams, tramways, bendigo, charing cross , tram 3 -
 Ballarat Tramway Museum
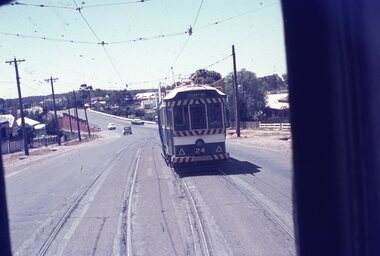
Slide - 35mm slide/s - set of 4, Travis Jeffrey, c1970
... Gully Charing Cross Mitchell St View St tram 24 tram 25 tram 26 ...A set of five plastic mount (black base, white cover) of Bendigo trams, c1970. Photo by Travis Jeffrey. .1 - BE46 - 558 - No. 24 in Jobs Gully Loop from the front window of another bogie tram. No. 24 has the destination of Quarry Hill. .2 - BE45 - 557 - No. 25 arriving at Charing Cross, from the window of another tram. .3 - BE61 - 574 - Looking west along View St with two bogie trams in the distance. .4 - BE49 - 561 - No. 26 in Mitchell St, from the front window of another tram with a Newsagent selling The Age, The Sun, The Bendigo Advertiser and The Herald in the background. .5 - BE20 - three trams at a loop, at the top of a hill on the Eaglehawk line - c1960 - 15, 17 and another bogie tram. tramways, trams, bendigo, jobs gully, charing cross, mitchell st, view st, tram 24, tram 25, tram 26, tram 15, tram 17 -
 Ballarat Tramway Museum
Slide - 35mm slide/s - set of 8, Carolyn Dean, 24/09/1970 12:00:00 AM
... . Tramways trams Bendigo Charing Cross Mitchell St Eaglehawk tram 5 ...Set of photographs of operations, near the central area, in particular Charing Cross.Set of 13 Kodak slides, white cardboard of Bendigo trams. Taken 24.9.1970 by Carolyn Dean. .1 - "1" - No. 5 enroute to Eaglehawk passing former poppet head. .2 - "2" - Possibly No. 4 enroute to Eaglehawk - side on view (same ads shown on .4) .3 - "3" - View looking down onto Charing Cross from North East corner with single truck and Bogie car arriving. Has Ezywalkin, Maples and the Beehive buildings in the background. .4 - "7" - No 4, with destination of Eaglehawk, Mitchell St, near end of double track, with Shell Service station alongside. .5 - "8" - Alexandria Fountain, Charing Cross, with bogie tram behind. Has the Ezywalkin and The Beehive buildings in the view as well. .6 - "9" - No. 6 arriving at Charing Cross. Has the Ezywalkin and The Beehive buildings in the view as well. .7 - "10" - Bogie tram and single trucker at Charing Cross. Has the Ezywalkin and The Beehive buildings in the view as well. .8 - "11" - No. 7 departing ditto. Has the Ezywalkin and The Beehive buildings in the view as well. .Each slide has in corner a number in pencil and the first one the date of "24-9-70".tramways, trams, bendigo, charing cross, mitchell st, eaglehawk, tram 5, tram 4, tram 6, tram 7 -
 Ballarat Tramway Museum
Document - Report, State Electricity Commission of Victoria (SECV), "Bendigo Tramways Track", 1960's
... at Charing Cross. Trams tramways Bendigo SEC ESCo History Track ...Yields historical notes about the method of track construction in Bendigo, the poor condition of the rails at the time of the report and the need to do work at Charing Cross.Typed foolscap sheet note or report titled "Bendigo Tramways - Tracks". Gives notes on the track construction methods of ESCo and reconstruction by the SEC. In the section titled 'Present Condition of Tracks". Note says need to obtain photographs and comments as for Ballarat. Also mentions that the CRB is anxious to re-deck the bridge running under Charing Cross - written date? Probably written for a report into the tramways by the SEC as part of a recommendation to close them. Appears to have been written in Ballarat, no mention of Geelong, so assume sometime in the 1960's.'BTPS 410" in top right hand corner.trams, tramways, bendigo, sec, esco, history, track, charing cross -
 Ballarat Tramway Museum
Photograph - Black & White Photograph/s - set of 7, 16/04/1972 12:00:00 AM
Yields information about the final day of the Bendigo tramways and some of the tramcars used.Set of seven black and white photographs of the day Bendigo Tramways closed 16-4-1972. Taken on Agfa paper. Has printing date of 18.8.72 stamped on rear. All have been used for display purposes. .1 - 25 leaving the depot .2 - 2 at Charing Cross, bound for Eaglehawk - has Ezywalkin Store in background. .3 - 18 crossing another tram at a loop on the Eaglehawk line. .4 - 28 at Charing Cross showing Special .5 - 26 inside depot, with Borough of Eaglehawk sign on the front bumper and bunting around the tram. .6 - 29 leaving the depot .7 - 26 in the final parade, with "Destination Eaglehawk" on a roof mounted advertisement board, with the Beehive building in the background and Coca Cola advertisement on top of the building. Photographer not known.3549.8 - has "photo No. 8" on rear and been marked out for publication. tramways, trams, bendigo, closure, eaglehawk, tram 25, tram 2, tram 18, tram 28, tram 26, tram 29 -
 Ballarat Tramway Museum
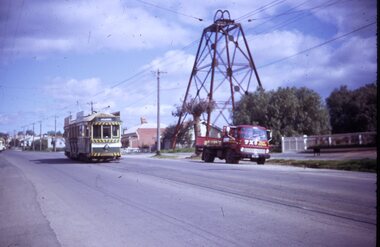
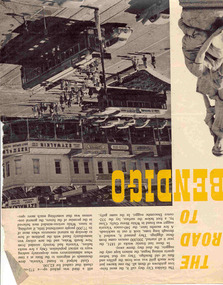
Newspaper, The Walkabout Magazine, "The Road to Bendigo", Oct. 1974
... . Bendigo Eaglehawk Charing Cross Three double sided sheets from ...Yields information about the final day of the Bendigo tramways and some of the tramcars used.Three double sided sheets from "The Walkabout" magazine, October 1964, titled "The Road to Bendigo". Five printed pages featuring photographs of Bendigo, its buildings, its history stories, gold mining days and other information, including three illustrations containing trams. .1 - Charing Cross with bogies and single trucker - taken early 1960's. Photo by A. Doney. Features the intersection, with Ezywalkin store. Note the "Jeffrey's bread" roof advertisement on the single trucker. .2 - Bogie tram on the Eaglehawk route prior to any nearby housing development - reclaimed mining land - has Castrol roof advertisement - photo by Claver P Carroll. .3 - No. 6 outside The Beehive stores - 3BO - photo by Claver P Carroll. bendigo, eaglehawk, charing cross -
 Ballarat Tramway Museum
Photograph - Black & White Photograph/s, George Bishop, Dec. 1971
... (Bendigo System) at Charing Cross. / G. Bishop photo."... in ink "SEC trams No. 19 and 23 (Bendigo System) at Charing Cross ...Black and white photographs of Bendigo No. 23 and 19 at Charing Cross 12/1971. No. 23 has destination of Eaglehawk. The Beehive and Ezywalkin buildings in the background. No. 19 in the distance. Both trams have SEC Electric Cooking Roof Advertisements. Photos by George Bishop. .On the back of the photo in ink "SEC trams No. 19 and 23 (Bendigo System) at Charing Cross. / G. Bishop photo."tramways, trams, bendigo, charing cross, pall mall, tram 19, tram 23 -
 Ballarat Tramway Museum
Photograph - Black & White Photograph/s, George Bishop, c1980
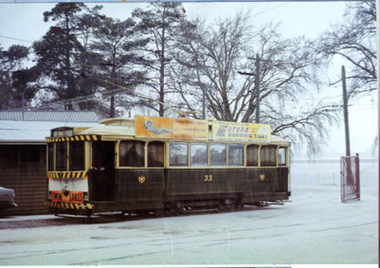
... Charing Cross tram 15 On the back of the photos in ink "Tram Tour ...Black and White photograph of Birney No. 15 at Charing Cross, northbound, c1980.s Tram operating a Bendigo Tramways talking tram tour. Has the Fountain Plaza in the background. Photo by George Bishop.On the back of the photos in ink "Tram Tour, Charing Cross Car 15 / G. Bishop photo"tramways, trams, bendigo, charing cross, tram 15 -
 Ballarat Tramway Museum
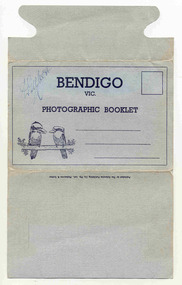
Postcard - Folder set, Valentine & Sons Publishing Co, "Bendigo Photographic Booklet", 1940's
... Mall Charing Cross Mitchell St Has "D. Gilbert" in ink on cover ...Set of 9 black and white views of Bendigo printed on a folded strip, glued within a light grey colour light weight cardboard folder, titled "Bendigo Photographic Booklet". Booklet printed with an address area with title and kookaburras. Produced by The Valentine Publishing Co. Pty Ltd Melbourne & Sydney The rear has a slit on the rear cover that allowed the folder to be secured. Pictures are: 1. Mitchell St 2. The Lookout Tower 3. Conservatory Gardens 4. Shamrock Hotel 5. The Lake, Upper Reserve 6. The Pall Mall 7. Civic Buildings 8. Soldiers Memorial Hall and Post Office 9. Alexandria Fountain, Bendigo with a single trucker, M class type tram, prior to alterations, but in SEC colour scheme of the mid 1930's Made during 1940, with photographs of the 1930's as well given motor cars in the photo. Has "D. Gilbert" in ink on cover.trams, tramways, bendigo, pall mall, charing cross, mitchell st -
 Ballarat Tramway Museum
Slide - 35mm slide/s, Dave Macartney, Dec. 1968
White cardboard mount, 35mm slide, from the Association of Railway Enthusiast's film strip titled "Provincial Tramway Film Strip" of Bendigo No. 21 in High St (Calder Highway), near Short St, outbound to Golden Square. Photo taken after the tram has passed the photographer. Has Reid's Furntuorium sign in the background. The film strip notes (Reg. Item 2560), provided the following caption details: "The "GOLDEN SQUARE" line followed the Calder Highway toward Melbourne for a couple of miles. Here, 21 is outbound not far from Charing Cross - Dec '68 (Dave Macartney)" See image btm2583p.tif for high level scan of image. Stamped on base of slide "11792" and written in ink on top edge "21 on Golden Square"tramways, trams, are, film strip, high st, golden square, tram 21 -
 Ballarat Tramway Museum
Slide - 35mm slide/s, Max Michell, Apr. 1972
White cardboard mount, 35mm slide, from the Association of Railway Enthusiast's film strip titled "Provincial Tramway Film Strip" of Bendigo trams Nos. 3 and 5 in View St., near Rowan St. No. 3 has destination of Eaglehawk, while No. 5, inbound has destination of Charing Cross. An SEC Employee is standing by the rear of No. 3 The film strip notes (Reg. Item 2560), provided the following caption details: "Bogie cars 3 & 5 (running out of course due to an earlier failure) meet on the double track at the Bendigo end of the "EAGLEHAWK" Line - Apr. '72 (Max Michell)" See image btm2592p.tif for high level scan of image. Stamped on base of slide "11802" and written in ink on top edge "No 3 & 5 Eaglehawk line Bendigo"tramways, trams, are, film strip, view st, bendigo, tram 3, tram 5