Showing 22103 items matching " work "
-
 Ambulance Victoria Museum
Record, employees pay, Metropolitan Ambulance Service, January 1992 to January 1993, 1992 to 1993
Pay and hours worked records for Metropolitan Ambulance Service staff. Loose documents, both electronically and manually created, bound at left side.Audit log time bank record entry -
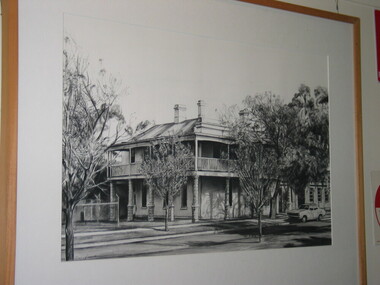 Brimbank City Council Art Collection
Drawing, The Hunt Club, 1985
James worked as a tutor in art with Sunshine community arts program.James worked as a tutor in art with Sunshine community arts program. A charcoal drawing of the Hunt Club building on Ballarat Road, Deer Park. - AR0001charcoal, drawing, gary, james, hunt club -
 Federation University Art Collection
Artwork, A. Janczewski, Painting by A. Janczewski, 1990, 1990
This work used to hang at the entrance to the Geology Department at LaTrobe University.A colourful painting on composition board of a representation of a magnified geological specimen. If you have information on this artwork or artist please leave a message in the comment box below.artist, artwork, janczewski, geology -
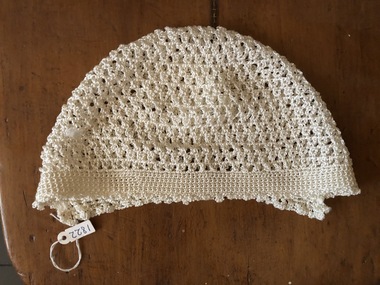 Mont De Lancey
Clothing - Baby bonnet
Hand worked by Grandma Tassel, donated by Neil and Cheryl Tassel.A cream coloured silk hand crocheted baby bonnet. One inch (1") of single crochet edging is a feature. No ties are attached.baby bonnets, baby clothing -
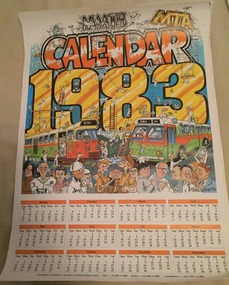 Melbourne Tram Museum
Ephemera - Calendar, Augustine, "MTA 1983", 1982
See also item 7851 for a momento featuring his work.Single sheet colour calendar for 1983, published by the Metropolitan Transit Authority (MTA), successors to the Melbourne and Metropolitan Tramways Board. Large portion of the calendar features the changeover from the MMTB to the MTA - eg green colours replacing the orange. Also on the base of the cartoon by Augustine is a number of caricatures of well known MMTB/MTA personnel. On top of the calendar has the letters M&MTB being demolished and those of the MTA being positioned. Printed on heavy cartridge paper. Two copies held.trams, tramways, melbourne, mmtb, mta, calendar -
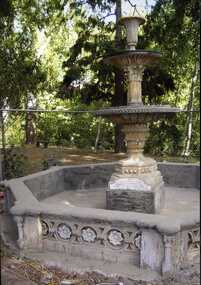 Clunes Museum
Photograph
THE RESTORATION WORK WAS CARRIED OUT BY LESLIE CAREY AND DAVID COLEMANTWENTY-FIVE PHOTOGRAPHS CONCERNING THE RESTORATION OF THE QUEENS PARK FOUNTAIN .1 CD .2 PHOTOCOPY OF PHOTOGRAPH OF FOUNTAIN .3 PHOTOGRAPH OF DAMAGED AREA OF FOUNTAINqueens park, fountain, queens park fountain -
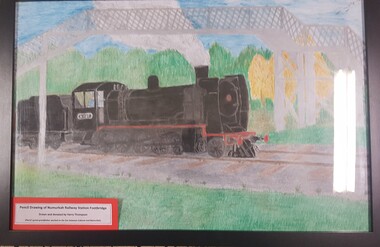 Numurkah & District Historical Society
Pencil Drawing of Numurkah Railway Station & Walkbridge
Harry Thompson's grandfather worked on the Cobram to Numurkah rail line. Pencil Drawing of Numurkah Railway Station and Walkbridge.. Artist: Harry Thompson harry thompson, railway, numurkah, station, walkbridge, footbridge -
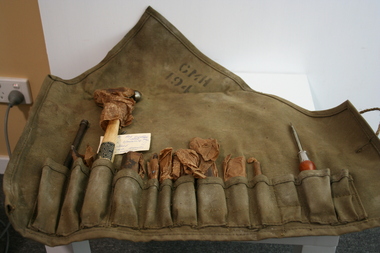 Trafalgar Holden Museum
Tool - Military GMH tool set
Tool set prepared for A.I.F. for general maintenance work. 1944Made by GMH for military purposesArmy green canvas satchel containing basic tool setGMH 1944military, tool, kit -
 Geoffrey Kaye Museum of Anaesthetic History
Education kit - Model, Acupuncture
This model is used as an educational or reference tool for guiding acupuncturists in their work.White rubber human model, with acupuncture points annotated across the model. Stored in lidded in a brown cardboard box with a decorated envelope which presumably held acupuncture needles.acupuncture, reference model, educational model -
 Lakes Entrance Historical Society
Postcard - Merrangbaur House, 1910 c
given to donor by family of a woman who worked there before 1920Sepia toned post card showing early photograph of Merrangbaur House when it was run by Mrs McGuiness showing original hip roof with additional guest accommodation Lakes Entrance Victoriaguesthouses, historic houses -
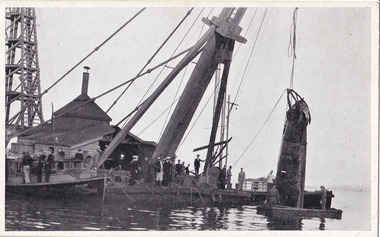 The Beechworth Burke Museum
Postcard, 30/07/1942
The postcard image depicts a salvage team winching a Japanese midget submarine that was involed in the attack on Sydney Harbour on May 31st, 1942, out of the waters of the Sydney Harbour. The winch and salvage team are situated in front of a dock shed on a pier.On the 31st of May 1942, in the midst of World War Two, Sydney found itself under attack from three Japanese midget submarines that entered Sydney Harbour under the cover of night. The first submarine became trapped in anti-torpedo nets and the third submarine was sunk in Taylor Bay. The second submarine fired on the heavy cruiser the USS Chicago. One of the torpedoes exploded near the depot ship the HMAS Kuttabul, killing 21 sailors.Black and white rectangular postcard printed on cardReverse: 7525-5/ POST CARD/ This postcard is a/ souvenir of the Exhibition/ of Japanese Midget Sub-/ marines sunk in Sydney Har-/ bour on the night of Sunday,/ May 31st, 1942, the night/ that the first attack on/ Sydney by a foreign power/ took place and was/ frustrated./ 30th JULY 1942/ SERIAL No. 6/ The salvage part at work on a Japanese midget/ submarine/ Bringing the sub/ to the surface/military album, beechworth, burke museum, ww2, world war two, wwii, maritime, sydney harbour, sydney, japanese, japan, submarine -
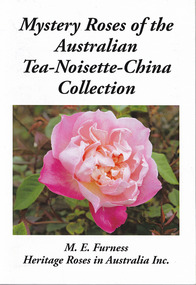 Marysville & District Historical Society
Booklet - Paperback booklet, Margaret Furness, Mystery Roses of the Australian Tea-Noisette-China Collection, 2022
A booklet containing descriptions and photographs of tea roses found in Australia.Front cover has a photograph of a pink rose. The title of the book is in black lettering across the upper edge with the author's name along the lower edge. Reverse of book has a photograph of a cream rose with the blurb regarding the book above the photograph.non-fictionA booklet containing descriptions and photographs of tea roses found in Australia.tea roses, australia, heritage roses in australia inc -
 National Vietnam Veterans Museum (NVVM)
Uniform - Uniform, RAN, Identity Disc, 1968 (Approximate)
A red round coin with text "CR Thompson 64535 RC" tight with a small robe"CR Thompson 64535 RC" Identity Disc Royal Australian Navy c1968 An asbestos identity disc or 'dog tag', of the type issued only to Navy personnel who worked in such hot spaces as the ship's engine room, to prevent burning which could occur with metal dog tags. Donated by Christopher R Thompson HMAS Vampire (1966) and HMAS Parramatta (1968)ran, dog tags, hmas vampire, hmas parramatta -
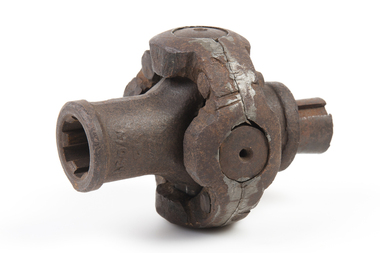 Uniting Church Archives - Synod of Victoria
Ford A car transmission joint collar ring, 1930s
Displayed July 1930 at the Methodist Conference.Collar ring for Ford A transmission joint.A010.2 - framed explanation of piece: "Bush repair job - was accomplished over 200 miles from a garage with no tools other than those on the track. It took an old prospector 8 days of constant work before the Patrol Padre, accompanied by the Rev. Col. A.T. Holden, Director of the Methodist Inland Mission, was able to drive his vehicle safely back to base.methodist inland mission -
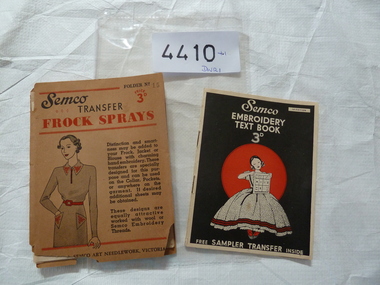 Stawell Historical Society Inc
Memorabilia - Realia, Semco Transfers Frock Sprays, 1930's
NeedleworkBooklet contains sheets of tissue paper Fautley's size , B also iron on transfers. Semco Transfer Frock Sprays BookletSemco Transfer Frock Sprays Folder No.15 Price 3DDistiction and smartness may be added to your frock, jacket or blouse with charming hand embroidery. These transfers are specifically designed for this purpose and can be used on the collar, pockets or anywhere on the garment. If desired additional sheets may be obtained. These designs are equally attractive worked with wool or Semco Embroidery Threads. Semco Art Needlework, Victoriastawell -
 Melbourne Legacy
Book, Melbourne Legacy Benefactors
This book is a record, made in honour of generous benefactors who have donated to the cause of Legacy. There is no date on the book as to when the donations were made or when the book was created.This is a record of members of the public who have gave generous donations to assist Legacy help the families of deceased service personnel.Blue hardcover bound book, cream pages pages with navy blue Torch emblem in top right corner of each page. The pages have a gold edge.Front cover has the Torch logo embossed in gold with 'Melbourne Legacy Benefactors' in gold lettering. Each page has a name of a donor in Prussian Blue ink with gold scroll work. About half the book is written in, the rest are blank. Inside back cover is a note in pencil "Writing is Talens Gouache Prussian Blue" and "by Terry Pepperell 95706846". There is no date in the book.honour roll, donations -
Linton Mechanics Institute and Free Library Collection
Book - Novel, Chambers, Robert W, The cambric mask, 1900
v. ; 325 p. : dark blue-black cover, with title embossed in gold. Title and author's name embossed in gold on spine. fictionfiction, robert w. chambers, kaleno/pitfield mechanics' institute -
 Mission to Seafarers Victoria
Photograph - Photograph, Sepia, Allan Charles Quinn, Goonawarra - looking forward, 13 January 1946
This photograph is taken from the deck of the Goonawarra and belongs with the Allan Charles Quinn collection. Allan worked on the Goonawarra during 1946. The Goonawarra worked between Sydney, Melbourne, Palmyro Island, San Francisco, Los Angeles, Panama Canal, Le Havre and Goteborg.This is a photograph from the Allan Charles Quinn collection which is a collection of photographs and letters that depict the life of a young man who has gone to sea to work in the era immediately following World War II.Black and white photograph looking forward from the deck of the GoonawarraBlack ink on reverse: Monkey Island looking/ forward on Goonawarra/ at Melbourne/ 13 Jan 1946goonawarra, sydney, melbourne, falmouth, goteborg, le havre, france, allan charles quinn, panama canal, los angeles, san francisco, palmyro island -
 Ballarat Tramway Museum
Document, City of Ballarat, "Statement regarding tram tracks at Bridge Mall", 21-11-2023
The two items concern the work being undertaken at the time by the City of Ballarat to reconstruct Bridge St Mall. The City of Ballarat notes the archaeological significance of the works. The photograph shows some of the rail being excavated. Understood that the work is being done in four stages.Demonstrates the work to return road traffic to Bridge St BallaratReport downloaded from the City of Ballarat website - 21-11-2023 and digital image from [email protected] received by email 21-11-2023bridge st, bridge mall, city of ballarat, roadworks -
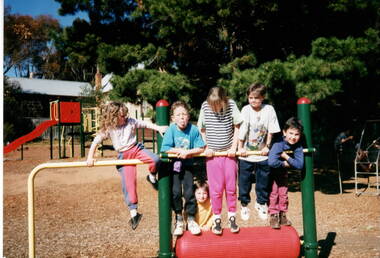 Sunbury Family History and Heritage Society Inc.
Photograph, Playground equipmemt, 1994
In the early 1990s extensive work work was done to the outdoor areas of the Bulla Primary School, which included a school garden and modern playground equipment. The photograph shows three pieces of the equipment installed in the playground, namely a slide, a climbing frame and balancing equipment. The improvements to the outdoor area at Bulla Primary School gave the students a wider range of extra-curricular activities. The local community were also invited to assist with these activities.A coloured photograph of three girls and two boys playing on playground equipment with a little girl behind the group on the ground. One boy is poking out his tongue at the camera. He photograph was taken with a conventional non-digital camera.A school building is in the background.playground equipment, bulla primary school -
Vision Australia
Text, RVIB Life Member
Professor Lawrence McCredie was awarded a Life Member certificate for his work with the Board, which began in 1956 and continued until the merger in 2005. The first blind person to be appointed, he was President of the Board for five years and worked as a Law professor at Monash University.1 x A4 cream coloured page with blue, gold and black print.The RVIB Lighthouse symbol and words 'Royal Victorian Institute for the Blind' are at the head of the page. Royal Victorian Institute for the Blind Life Member This is to certify that Professor Lawrence McCredie was this day 26th February Appointed a Life Member in honour of exemplary service to people who are blind or vision impaired By the Order of the Board of Directors G.Blyth President D. Kent Chief Executive Officerroyal victorian institute for the blind, professor lawrence mccredie -
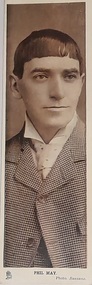 Hymettus Cottage & Garden Ballarat
Work on paper - Bookmark, Phil May
Phil May was England's leading black and white artist and his work appeared in most of the illustrated publications. He spent two years in Sydney contracted to the Bulletin where his work appeared between 1886 and 1894 and amounted to over 800 drawings.A British bookmark issued by Tuck but of significance in Australia due to Phil May's time here. He also spent a sojourn in Paris sharing digs with Charles Conder and John Longstaff.caricaturist, art, the bulletin, england, sydney, postcard bookmark, phil may -
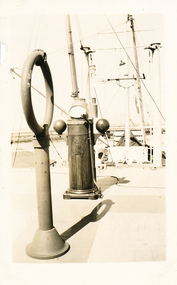
Melbourne Tram Museum
Document - Digital image - Domain and St Kilda Roads - overhead works, Public Transport Victoria (PTV), April 2025
Pamphlet or document for the reconnection of the the overhead at Anzac station interchange to the previous overhead in Domain Road. The work was planned for the weekend of 13/6 to 16/6 2025. Gives a map of the work site, works and that they were no changes to planned tram services. Published by the PTV.Yields information about the Domain Road tracks at Anzac Station.Digital image of a four page document.tramways, trams, domain road, overhead, anzac station -
 Wodonga & District Historical Society Inc
Memorabilia - World War I Ashtray, Howard Nation, c1915
This ash tray was given to a member of the Wodonga community by a veteran of World War 1 who served in the Royal Navy. The ashtray was made during "spare time" on board from discarded shell casings. The veteran, Howard Nation, came to Australia after the war and worked in several rural areas including Bairnsdale, Victoria. He spent time doing general farm labouring work and also occasionally worked on fishing trawlers operating out of Lakes Entrance.This ash tray represents the ingenuity of servicemen during World War 1.An ashtray made during WW1 from the discarded shell casings.war memorabilia, world war 1 -
 Wyndham Art Gallery (Wyndham City Council)
Photograph, Fassih Keiso, Evidence of Absence, 2018
Fassih Keiso was born 1956 in Syria and has lived and worked in Melbourne since 1993. He describes the influence of having lived in both countries for significant amounts of time as informing the cross-cultural themes characterizing his interdisciplinary practice. His work employs various media from painting to photography, performance, video, and installation. Each work is governed by a central idea that usually links Arabic contemporary life, culture, and politics with broader global issues.photography, cross-cultural, arabic contemporary life -
 Warrnambool and District Historical Society Inc.
Booklets Fletcher Jones, 001143.1 Project Book 001143.2 Booklet:Plusites 001143.3 Flyer, Mid 20th century
Fletcher Jones Clothing Factory was a key industry in Warrnambool from 1948 to its closure in 2005. The business was founded by David Fletcher Jones (1897-1977), a clothing manufacturer and retailer who worked as a hawker in the Western District following service with the A.I.F. in World War One. In 1924 Fletcher Jones opened three shops in Liebig Street selling men’s wear, hosiery and linen and operating a small tailoring business. He moved his shop to another location in Liebig Street and began to concentrate on men’s trousers production. In 1946 he opened a shop in Collins Street in Melbourne and eventually had stores and factories all over Australia. In Warrnambool he opened his factory at Pleasant Hill in Flaxman Street in 1948 and became a major Warrnambool employer, with over 1000 employees at one time. He transformed his business into a co-operative, with the name, ‘Fletcher Jones and Staff’ registered in 1947. The business diversified into other ranges of clothing for men and women but failed to compete with cheaper overseas clothing imports and the factory and shops were closed in the early 21st century. 001143.1 Project Book. This project book tells the story of the establishment and development of the Fletcher Jones company across the various stores which were established in Melbourne, Adelaide, Sydney, Geelong and Hobart. It explores the philosophy behind the business and milestones achieved and the factory gardens. The book itself provides an example of schoolwork completed in the mid 20th century. 001143.2 Booklet: Plusites: This is a staff booklet which has items of interest relating to staff such as births deaths and marriages. It tells of renovations and happenings in regard to the various shops around the country as well as trading figures. It tells of the royal visit of 1954 and other social events and items of interest around the various shops. 001143.3 Flyer :The text on this flyer also tells the story of the development of the Fletcher Jones brand to the point where there in the year2000 retail expansion was still happening but the Warrnambool workforce had shrunk from over 1000 at the peak to approximately 200. The company had commenced importing a range of clothing by this time These three items present different views of a company which was an important part of industry in Warrnambool for over 60 years in the latter part of the 20th century. The founder was one of Warrnambool’s most well respected people and many district people had connections to the firm. 001143.1 Project Book. Brown mottled card cover with cream insert for personal details. Back cover plain cream. It contains a student’s project work on the Fletcher Jones company. Some is handwritten and also contains a number of black and white photographs throughout the book. A coloured map of Australia is in the middle pages. 001143.2 Booklet: Plusites. White light card cover with dark blue text and diagram. Bottom left of page has a map of the coastline of Victoria. 20 pages. 001143.3 Flyer. Advertising Flyer re factory direct sales at Warrnambool. Black text with maroon border and Fletcher jones logo at the bottom and 4 photographs at the top. 001143.1 Project Book. T Cronin 4B WHS 001143.2 Booklet: Plusites. Vol 1 No 1 June 1954. 001143.3 Flyer fletcher jones, warrnambool history, fletcher jones and staff pty ltd -
 Flagstaff Hill Maritime Museum and Village
Domestic object - Bowl, Late 19th or early 20th Century
The Process of Making Pottery Decorating, Firing, Glazing, Making, Technical There is a rhythm and flow to clay. It can’t be done all at once! Even the making process! It can take weeks to get everything done, especially if you can only work on your pottery once a week! Even though we have three hour classes, it’s often just not enough time! Here is an overview of some of the processes so you have a bit more grasp on some of the technical stuff! Step One – Design There are SO many ideas out there for making stuff in clay! From delicate porcelain jewellery, through to heavy sculptural work and everything in between. Deciding your direction is sometimes not that easy – when you first start, try everything, you will naturally gravitate to the style that you enjoy! The options and variations are endless and can get a wee bit overwhelming too! Check in with me before you start to ensure your ideas will work, what order you might do things, how you could achieve the look you are seeking and any other technical data required! Step Two – Making Clay is thixotropic. This means that as you work with it, the clay first gets sloppier and wetter, before is begins to dry in the atmosphere. For most things, you simply can’t do all parts of the project at once. An example of work order might look like: Get last weeks work out from the shelves Prepare clay for today’s work – roll your clay, prepare balls for throwing, make the first stage of a pinch pot) Clean up last week’s work and put it on the shelf for bisque firing Check that you have any glazing to do – and do enough of it that you will have time to finish your main project Do the next step of your next project – there might be a further step that can’t be complete immediately, in that case, wrap your work well and put onto the shelves. Letting your work rest for a while can really help keep your work clean and professional looking. Many things require bagging under plastic to keep it ready for work the next week – put your name on the outside of the bag so you can find your work easily. We have stickers and markers. Consider how you want to decorate your work – coloured slip can be applied at a fairly wet stage (remembering that it will make your work even wetter!). Trying to apply slip to dry clay won’t work! If you want to do sgraffito – you will need to keep the work leather hard (a state of dryness where you can still work the clay with a little effort and a little water and care). Step Three – Drying Most of the time your work can go into the rack uncovered to let it dry out for the following week. If you want to continue forming or shaping you will need to double bag your work – put your work on a suitable sized bat and put the bat in a bag so the base of the bag is under the bat, then put another bag over the top of the work and tuck the top of the bag under the bat. If you want to trim (or turn) your thrown work the following week, it should also be double bagged. If your work is large, delicate, or of uneven thicknesses, you should lightly cover your work for drying. When considering the drying process, bare in mind the weather, humidity and wind! The hotter and dryer, the faster things dry and work can dry unevenly in the shelves – this can lead to cracking – another time to lightly cover your work for drying. Step Four – Trimming and Cleaning Up Your work is dry! It is called greenware now and it is at it’s most fragile! Handle everything with two hands. I often refer to soft hands – keep everything gentle and with your fingers spread as much as possible. Try to not pick up things like plates too much, and always with both hands! Before your work can be bisque fired it should be “cleaned up”. You work won’t go into the kiln if it has sharp edges – when glazed, sharp edges turn into razor blades! Use a piece of fly wire to rub the work all over – this will scratch a little so be light handed. Use a knife or metal kidney to scrape any areas that require a bit more dynamic treatment than the fly wire offers! Finally, a very light wipe over with a slightly damp sponge can help soften and soothe all of your edges and dags! Trimming thrown work: If you are planning to trim (or turn) your thrown work (and you should be), make sure you bag it well – your work should be leather hard to almost dry for easiest trimming. Use this step to finish the work completely – use a metal kidney to polish the surface, or a slightly damp sponge to give a freshly thrown look. Wipe the sponge around the rim after trimming, and check the inside of the pot for dags! Trimming slip cast work: Usually I will trim the rims of your work on the wheel the following day to make that stage easier, however you will still need to check your work for lumps and bumps. Last but not least – check that your name is still clearly on the bottom of your work. Step Five – Bisque Firing When the work is completely dry it can go into the bisque kiln. The bisque kiln is fired to 1000°C. This process burns off the water in the clay as well as some of the chemically bound water. The structure of the clay is not altered that much at this temperature. Inside the bisque kiln, the work is stacked a little, small bowl inside a larger bowl and onto a heavy plate. Smaller items like decorations or drink coasters might get stacked several high. Consideration is paid to the weight of the stack and shape of the work. A bisque kiln can fire about one and a half times the amount of work that the glaze kiln can fire. The firing takes about 10 hours to complete the cycle and about two days to cool down. Once it has been emptied the work is placed in the glaze room ready for you to decorate! Step Six – Glazing Decorating your work with colour can be a lot of fun – and time consuming! There are three main options for surface treatment at this stage: Oxide Washes Underglazes Glazes Washes and underglazes do not “glaze” the work – It will still need a layer of glaze to fully seal the clay (washes don’t need glaze on surfaces not designed for food or liquid as they can gloss up a little on their own). Underglazes are stable colourants that turn out pretty much how they look in the jar. They can be mixed with each other to form other colours and can be used like water colours to paint onto your work. Mostly they should have a clear glaze on top to seal them. Oxides are a different species – the pink oxide (cobalt) wash turns out bright blue for instance. They don’t always need a glaze on top, and some glazes can change the colour of the wash! The glazes need no other “glaze” on top! Be careful of unknown glaze interactions – you can put any combination of glaze in a bowl or on a plate, but only a single glaze on the outside of any vertical surface! Glazes are a chemical reaction under heat. We don’t know the exact chemicals in the Mayco glazes we use. I can guess by the way they interact with each other, however, on the whole, you need to test every idea you have, and not run the test on a vertical surface! Simply put, glaze is a layer of glass like substance that bonds with the clay underneath. Clay is made of silica, alumina and water. Glaze is made of mostly silica. Silica has a melting point of 1700°C and we fire to 1240°C. The silica requires a “flux” to help it melt at the lower temperature. Fluxes can be all sorts of chemicals – a common one is calcium – calcium has a melting point of 2500°C, however, together they both melt at a much lower temperature! Colourants are metal oxides like cobalt (blue), chrome (green through black), copper (green, blue, even red!), manganese (black, purple and pink) iron (red brown), etc. Different chemicals in the glaze can have dramatic effects. for example, barium carbonate (which we don’t use) turns manganese bright pink! Other elements can turn manganese dioxide brown, blue, purple and reddish brown. Manganese dioxide is a flux in and of itself as well. So, glazes that get their black and purple colours, often interact with other glazes and RUN! Our mirror black is a good example – it mixes really well with many glazes because it fluxes them – causes them to melt faster. It will also bring out many beautiful colours in the glazes because it’s black colouring most definitely comes from manganese dioxide! Glaze chemistry is a whole subject on it’s own! We use commercial Mayco glazes on purpose – for their huge range of colour possibilities, stability, cool interactions, artistic freedom with the ability to easily brush the glazes on and ease of use. We currently have almost 50 glazes on hand! A major project is to test the interactions of all glazes with each other. That is 2,500 test tiles!!!! I’m going to make the wall behind the wheels the feature wall of pretty colours! Step Seven – Glaze (Gloss or sometimes called “Glost”) Firing Most of the time this is the final stage of making your creation (but not always!) The glaze kiln goes to 1240°C. This is called cone 6, or midrange. It is the low end of stoneware temperatures. Stoneware clays and glazes are typically fired at cone 8 – 10, that is 1260 – 1290°C. The energy requirement to go from 1240°C to 1280°C is almost a 30% more! Our clay is formulated to vitrify (mature, turn “glass-like”) at 1240°, as are our glazes. A glaze kiln take around 12 hours to reach temperature and two to three days to cool down. Sometimes a third firing process is required – this is for decoration that is added to work after the glaze firing. For example – adding precious metals and lustres. this firing temperature is usually around 600 – 800°C depending upon the techniques being used. There are many students interested in gold and silver trims – we will be doing this third type of firing soon! After firing your work will be in the student finished work shelves. Remember to pay for it before you head out the door! There is a small extra charge for using porcelain clay (it’s more than twice the price of regular clay), and for any third firing process! Once your work has been fired it can not turn back into clay for millennia – so don’t fire it if you don’t like it! Put it in the bucket for recycling. https://firebirdstudios.com.au/the-process-of-making-pottery/ The bowl is an example of kitchenware used in the 19th century and still in use today.Bowl white ceramic. Crack on side. Badly stained.Backstamp very faint and unable to be read.flagstaff hill, warrnambool, shipwrecked-coast, flagstaff-hill, flagstaff-hill-maritime-museum, maritime-museum, shipwreck-coast, flagstaff-hill-maritime-village, mixing bowl, food preparation, kitchen equipment, ceramic -
 Flagstaff Hill Maritime Museum and Village
Domestic object - Bowl
The Process of Making Pottery Decorating, Firing, Glazing, Making, Technical There is a rhythm and flow to clay. It can’t be done all at once! Even the making process! It can take weeks to get everything done, especially if you can only work on your pottery once a week! Even though we have three hour classes, it’s often just not enough time! Here is an overview of some of the processes so you have a bit more grasp on some of the technical stuff! Step One – Design There are SO many ideas out there for making stuff in clay! From delicate porcelain jewellery, through to heavy sculptural work and everything in between. Deciding your direction is sometimes not that easy – when you first start, try everything, you will naturally gravitate to the style that you enjoy! The options and variations are endless and can get a wee bit overwhelming too! Check in with me before you start to ensure your ideas will work, what order you might do things, how you could achieve the look you are seeking and any other technical data required! Step Two – Making Clay is thixotropic. This means that as you work with it, the clay first gets sloppier and wetter, before is begins to dry in the atmosphere. For most things, you simply can’t do all parts of the project at once. An example of work order might look like: Get last weeks work out from the shelves Prepare clay for today’s work – roll your clay, prepare balls for throwing, make the first stage of a pinch pot) Clean up last week’s work and put it on the shelf for bisque firing Check that you have any glazing to do – and do enough of it that you will have time to finish your main project Do the next step of your next project – there might be a further step that can’t be complete immediately, in that case, wrap your work well and put onto the shelves. Letting your work rest for a while can really help keep your work clean and professional looking. Many things require bagging under plastic to keep it ready for work the next week – put your name on the outside of the bag so you can find your work easily. We have stickers and markers. Consider how you want to decorate your work – coloured slip can be applied at a fairly wet stage (remembering that it will make your work even wetter!). Trying to apply slip to dry clay won’t work! If you want to do sgraffito – you will need to keep the work leather hard (a state of dryness where you can still work the clay with a little effort and a little water and care). Step Three – Drying Most of the time your work can go into the rack uncovered to let it dry out for the following week. If you want to continue forming or shaping you will need to double bag your work – put your work on a suitable sized bat and put the bat in a bag so the base of the bag is under the bat, then put another bag over the top of the work and tuck the top of the bag under the bat. If you want to trim (or turn) your thrown work the following week, it should also be double bagged. If your work is large, delicate, or of uneven thicknesses, you should lightly cover your work for drying. When considering the drying process, bare in mind the weather, humidity and wind! The hotter and dryer, the faster things dry and work can dry unevenly in the shelves – this can lead to cracking – another time to lightly cover your work for drying. Step Four – Trimming and Cleaning Up Your work is dry! It is called greenware now and it is at it’s most fragile! Handle everything with two hands. I often refer to soft hands – keep everything gentle and with your fingers spread as much as possible. Try to not pick up things like plates too much, and always with both hands! Before your work can be bisque fired it should be “cleaned up”. You work won’t go into the kiln if it has sharp edges – when glazed, sharp edges turn into razor blades! Use a piece of fly wire to rub the work all over – this will scratch a little so be light handed. Use a knife or metal kidney to scrape any areas that require a bit more dynamic treatment than the fly wire offers! Finally, a very light wipe over with a slightly damp sponge can help soften and soothe all of your edges and dags! Trimming thrown work: If you are planning to trim (or turn) your thrown work (and you should be), make sure you bag it well – your work should be leather hard to almost dry for easiest trimming. Use this step to finish the work completely – use a metal kidney to polish the surface, or a slightly damp sponge to give a freshly thrown look. Wipe the sponge around the rim after trimming, and check the inside of the pot for dags! Trimming slip cast work: Usually I will trim the rims of your work on the wheel the following day to make that stage easier, however you will still need to check your work for lumps and bumps. Last but not least – check that your name is still clearly on the bottom of your work. Step Five – Bisque Firing When the work is completely dry it can go into the bisque kiln. The bisque kiln is fired to 1000°C. This process burns off the water in the clay as well as some of the chemically bound water. The structure of the clay is not altered that much at this temperature. Inside the bisque kiln, the work is stacked a little, small bowl inside a larger bowl and onto a heavy plate. Smaller items like decorations or drink coasters might get stacked several high. Consideration is paid to the weight of the stack and shape of the work. A bisque kiln can fire about one and a half times the amount of work that the glaze kiln can fire. The firing takes about 10 hours to complete the cycle and about two days to cool down. Once it has been emptied the work is placed in the glaze room ready for you to decorate! Step Six – Glazing Decorating your work with colour can be a lot of fun – and time consuming! There are three main options for surface treatment at this stage: Oxide Washes Underglazes Glazes Washes and underglazes do not “glaze” the work – It will still need a layer of glaze to fully seal the clay (washes don’t need glaze on surfaces not designed for food or liquid as they can gloss up a little on their own). Underglazes are stable colourants that turn out pretty much how they look in the jar. They can be mixed with each other to form other colours and can be used like water colours to paint onto your work. Mostly they should have a clear glaze on top to seal them. Oxides are a different species – the pink oxide (cobalt) wash turns out bright blue for instance. They don’t always need a glaze on top, and some glazes can change the colour of the wash! The glazes need no other “glaze” on top! Be careful of unknown glaze interactions – you can put any combination of glaze in a bowl or on a plate, but only a single glaze on the outside of any vertical surface! Glazes are a chemical reaction under heat. We don’t know the exact chemicals in the Mayco glazes we use. I can guess by the way they interact with each other, however, on the whole, you need to test every idea you have, and not run the test on a vertical surface! Simply put, glaze is a layer of glass like substance that bonds with the clay underneath. Clay is made of silica, alumina and water. Glaze is made of mostly silica. Silica has a melting point of 1700°C and we fire to 1240°C. The silica requires a “flux” to help it melt at the lower temperature. Fluxes can be all sorts of chemicals – a common one is calcium – calcium has a melting point of 2500°C, however, together they both melt at a much lower temperature! Colourants are metal oxides like cobalt (blue), chrome (green through black), copper (green, blue, even red!), manganese (black, purple and pink) iron (red brown), etc. Different chemicals in the glaze can have dramatic effects. for example, barium carbonate (which we don’t use) turns manganese bright pink! Other elements can turn manganese dioxide brown, blue, purple and reddish brown. Manganese dioxide is a flux in and of itself as well. So, glazes that get their black and purple colours, often interact with other glazes and RUN! Our mirror black is a good example – it mixes really well with many glazes because it fluxes them – causes them to melt faster. It will also bring out many beautiful colours in the glazes because it’s black colouring most definitely comes from manganese dioxide! Glaze chemistry is a whole subject on it’s own! We use commercial Mayco glazes on purpose – for their huge range of colour possibilities, stability, cool interactions, artistic freedom with the ability to easily brush the glazes on and ease of use. We currently have almost 50 glazes on hand! A major project is to test the interactions of all glazes with each other. That is 2,500 test tiles!!!! I’m going to make the wall behind the wheels the feature wall of pretty colours! Step Seven – Glaze (Gloss or sometimes called “Glost”) Firing Most of the time this is the final stage of making your creation (but not always!) The glaze kiln goes to 1240°C. This is called cone 6, or midrange. It is the low end of stoneware temperatures. Stoneware clays and glazes are typically fired at cone 8 – 10, that is 1260 – 1290°C. The energy requirement to go from 1240°C to 1280°C is almost a 30% more! Our clay is formulated to vitrify (mature, turn “glass-like”) at 1240°, as are our glazes. A glaze kiln take around 12 hours to reach temperature and two to three days to cool down. Sometimes a third firing process is required – this is for decoration that is added to work after the glaze firing. For example – adding precious metals and lustres. this firing temperature is usually around 600 – 800°C depending upon the techniques being used. There are many students interested in gold and silver trims – we will be doing this third type of firing soon! After firing your work will be in the student finished work shelves. Remember to pay for it before you head out the door! There is a small extra charge for using porcelain clay (it’s more than twice the price of regular clay), and for any third firing process! Once your work has been fired it can not turn back into clay for millennia – so don’t fire it if you don’t like it! Put it in the bucket for recycling. https://firebirdstudios.com.au/the-process-of-making-pottery/ This bowl is an example of kitchenware used in the 19th century and still in use today.Bowl white ceramic plain that has two sets of edging around lip. Inside bowl has plaster designed to look like cooking mixture.flagstaff hill, warrnambool, shipwrecked-coast, flagstaff-hill, flagstaff-hill-maritime-museum, maritime-museum, shipwreck-coast, flagstaff-hill-maritime-village, kitchen equipment, ceramic -
 Flagstaff Hill Maritime Museum and Village
Domestic object - Bowl, J & G Meakin, Late 19th or early 20th Century
The Process of Making Pottery Decorating, Firing, Glazing, Making, Technical There is a rhythm and flow to clay. It can’t be done all at once! Even the making process! It can take weeks to get everything done, especially if you can only work on your pottery once a week! Even though we have three hour classes, it’s often just not enough time! Here is an overview of some of the processes so you have a bit more grasp on some of the technical stuff! Step One – Design There are SO many ideas out there for making stuff in clay! From delicate porcelain jewellery, through to heavy sculptural work and everything in between. Deciding your direction is sometimes not that easy – when you first start, try everything, you will naturally gravitate to the style that you enjoy! The options and variations are endless and can get a wee bit overwhelming too! Check in with me before you start to ensure your ideas will work, what order you might do things, how you could achieve the look you are seeking and any other technical data required! Step Two – Making Clay is thixotropic. This means that as you work with it, the clay first gets sloppier and wetter, before is begins to dry in the atmosphere. For most things, you simply can’t do all parts of the project at once. An example of work order might look like: Get last weeks work out from the shelves Prepare clay for today’s work – roll your clay, prepare balls for throwing, make the first stage of a pinch pot) Clean up last week’s work and put it on the shelf for bisque firing Check that you have any glazing to do – and do enough of it that you will have time to finish your main project Do the next step of your next project – there might be a further step that can’t be complete immediately, in that case, wrap your work well and put onto the shelves. Letting your work rest for a while can really help keep your work clean and professional looking. Many things require bagging under plastic to keep it ready for work the next week – put your name on the outside of the bag so you can find your work easily. We have stickers and markers. Consider how you want to decorate your work – coloured slip can be applied at a fairly wet stage (remembering that it will make your work even wetter!). Trying to apply slip to dry clay won’t work! If you want to do sgraffito – you will need to keep the work leather hard (a state of dryness where you can still work the clay with a little effort and a little water and care). Step Three – Drying Most of the time your work can go into the rack uncovered to let it dry out for the following week. If you want to continue forming or shaping you will need to double bag your work – put your work on a suitable sized bat and put the bat in a bag so the base of the bag is under the bat, then put another bag over the top of the work and tuck the top of the bag under the bat. If you want to trim (or turn) your thrown work the following week, it should also be double bagged. If your work is large, delicate, or of uneven thicknesses, you should lightly cover your work for drying. When considering the drying process, bare in mind the weather, humidity and wind! The hotter and dryer, the faster things dry and work can dry unevenly in the shelves – this can lead to cracking – another time to lightly cover your work for drying. Step Four – Trimming and Cleaning Up Your work is dry! It is called greenware now and it is at it’s most fragile! Handle everything with two hands. I often refer to soft hands – keep everything gentle and with your fingers spread as much as possible. Try to not pick up things like plates too much, and always with both hands! Before your work can be bisque fired it should be “cleaned up”. You work won’t go into the kiln if it has sharp edges – when glazed, sharp edges turn into razor blades! Use a piece of fly wire to rub the work all over – this will scratch a little so be light handed. Use a knife or metal kidney to scrape any areas that require a bit more dynamic treatment than the fly wire offers! Finally, a very light wipe over with a slightly damp sponge can help soften and soothe all of your edges and dags! Trimming thrown work: If you are planning to trim (or turn) your thrown work (and you should be), make sure you bag it well – your work should be leather hard to almost dry for easiest trimming. Use this step to finish the work completely – use a metal kidney to polish the surface, or a slightly damp sponge to give a freshly thrown look. Wipe the sponge around the rim after trimming, and check the inside of the pot for dags! Trimming slip cast work: Usually I will trim the rims of your work on the wheel the following day to make that stage easier, however you will still need to check your work for lumps and bumps. Last but not least – check that your name is still clearly on the bottom of your work. Step Five – Bisque Firing When the work is completely dry it can go into the bisque kiln. The bisque kiln is fired to 1000°C. This process burns off the water in the clay as well as some of the chemically bound water. The structure of the clay is not altered that much at this temperature. Inside the bisque kiln, the work is stacked a little, small bowl inside a larger bowl and onto a heavy plate. Smaller items like decorations or drink coasters might get stacked several high. Consideration is paid to the weight of the stack and shape of the work. A bisque kiln can fire about one and a half times the amount of work that the glaze kiln can fire. The firing takes about 10 hours to complete the cycle and about two days to cool down. Once it has been emptied the work is placed in the glaze room ready for you to decorate! Step Six – Glazing Decorating your work with colour can be a lot of fun – and time consuming! There are three main options for surface treatment at this stage: Oxide Washes Underglazes Glazes Washes and underglazes do not “glaze” the work – It will still need a layer of glaze to fully seal the clay (washes don’t need glaze on surfaces not designed for food or liquid as they can gloss up a little on their own). Underglazes are stable colourants that turn out pretty much how they look in the jar. They can be mixed with each other to form other colours and can be used like water colours to paint onto your work. Mostly they should have a clear glaze on top to seal them. Oxides are a different species – the pink oxide (cobalt) wash turns out bright blue for instance. They don’t always need a glaze on top, and some glazes can change the colour of the wash! The glazes need no other “glaze” on top! Be careful of unknown glaze interactions – you can put any combination of glaze in a bowl or on a plate, but only a single glaze on the outside of any vertical surface! Glazes are a chemical reaction under heat. We don’t know the exact chemicals in the Mayco glazes we use. I can guess by the way they interact with each other, however, on the whole, you need to test every idea you have, and not run the test on a vertical surface! Simply put, glaze is a layer of glass like substance that bonds with the clay underneath. Clay is made of silica, alumina and water. Glaze is made of mostly silica. Silica has a melting point of 1700°C and we fire to 1240°C. The silica requires a “flux” to help it melt at the lower temperature. Fluxes can be all sorts of chemicals – a common one is calcium – calcium has a melting point of 2500°C, however, together they both melt at a much lower temperature! Colourants are metal oxides like cobalt (blue), chrome (green through black), copper (green, blue, even red!), manganese (black, purple and pink) iron (red brown), etc. Different chemicals in the glaze can have dramatic effects. for example, barium carbonate (which we don’t use) turns manganese bright pink! Other elements can turn manganese dioxide brown, blue, purple and reddish brown. Manganese dioxide is a flux in and of itself as well. So, glazes that get their black and purple colours, often interact with other glazes and RUN! Our mirror black is a good example – it mixes really well with many glazes because it fluxes them – causes them to melt faster. It will also bring out many beautiful colours in the glazes because it’s black colouring most definitely comes from manganese dioxide! Glaze chemistry is a whole subject on it’s own! We use commercial Mayco glazes on purpose – for their huge range of colour possibilities, stability, cool interactions, artistic freedom with the ability to easily brush the glazes on and ease of use. We currently have almost 50 glazes on hand! A major project is to test the interactions of all glazes with each other. That is 2,500 test tiles!!!! I’m going to make the wall behind the wheels the feature wall of pretty colours! Step Seven – Glaze (Gloss or sometimes called “Glost”) Firing Most of the time this is the final stage of making your creation (but not always!) The glaze kiln goes to 1240°C. This is called cone 6, or midrange. It is the low end of stoneware temperatures. Stoneware clays and glazes are typically fired at cone 8 – 10, that is 1260 – 1290°C. The energy requirement to go from 1240°C to 1280°C is almost a 30% more! Our clay is formulated to vitrify (mature, turn “glass-like”) at 1240°, as are our glazes. A glaze kiln take around 12 hours to reach temperature and two to three days to cool down. Sometimes a third firing process is required – this is for decoration that is added to work after the glaze firing. For example – adding precious metals and lustres. this firing temperature is usually around 600 – 800°C depending upon the techniques being used. There are many students interested in gold and silver trims – we will be doing this third type of firing soon! After firing your work will be in the student finished work shelves. Remember to pay for it before you head out the door! There is a small extra charge for using porcelain clay (it’s more than twice the price of regular clay), and for any third firing process! Once your work has been fired it can not turn back into clay for millennia – so don’t fire it if you don’t like it! Put it in the bucket for recycling. https://firebirdstudios.com.au/the-process-of-making-pottery/This bowl was made by renowned pottery company J & G Meakin of England. The firm was established in the mid-1800's. The bowl is an example of kitchenware used in the 19th century and still in use today.Bowl; white ceramic, round and tapering inwards towards base. Made by J and G Meakin England.On base, 'Ironstone China Reg SOL 391413' with symbolflagstaff hill, flagstaff hill maritime museum and village, warrnambool, maritime museum, maritime village, great ocean road, shipwreck coast, mixing bowl, food preparation, j & g meakin, pottery, stoke-on-trent, kitchen equipment, ceramic -
 Flagstaff Hill Maritime Museum and Village
Domestic object - Plate
The Process of Making Pottery Decorating, Firing, Glazing, Making, Technical There is a rhythm and flow to clay. It can’t be done all at once! Even the making process! It can take weeks to get everything done, especially if you can only work on your pottery once a week! Even though we have three hour classes, it’s often just not enough time! Here is an overview of some of the processes so you have a bit more grasp on some of the technical stuff! Step One – Design There are SO many ideas out there for making stuff in clay! From delicate porcelain jewellery, through to heavy sculptural work and everything in between. Deciding your direction is sometimes not that easy – when you first start, try everything, you will naturally gravitate to the style that you enjoy! The options and variations are endless and can get a wee bit overwhelming too! Check in with me before you start to ensure your ideas will work, what order you might do things, how you could achieve the look you are seeking and any other technical data required! Step Two – Making Clay is thixotropic. This means that as you work with it, the clay first gets sloppier and wetter, before is begins to dry in the atmosphere. For most things, you simply can’t do all parts of the project at once. An example of work order might look like: Get last weeks work out from the shelves Prepare clay for today’s work – roll your clay, prepare balls for throwing, make the first stage of a pinch pot) Clean up last week’s work and put it on the shelf for bisque firing Check that you have any glazing to do – and do enough of it that you will have time to finish your main project Do the next step of your next project – there might be a further step that can’t be complete immediately, in that case, wrap your work well and put onto the shelves. Letting your work rest for a while can really help keep your work clean and professional looking. Many things require bagging under plastic to keep it ready for work the next week – put your name on the outside of the bag so you can find your work easily. We have stickers and markers. Consider how you want to decorate your work – coloured slip can be applied at a fairly wet stage (remembering that it will make your work even wetter!). Trying to apply slip to dry clay won’t work! If you want to do sgraffito – you will need to keep the work leather hard (a state of dryness where you can still work the clay with a little effort and a little water and care). Step Three – Drying Most of the time your work can go into the rack uncovered to let it dry out for the following week. If you want to continue forming or shaping you will need to double bag your work – put your work on a suitable sized bat and put the bat in a bag so the base of the bag is under the bat, then put another bag over the top of the work and tuck the top of the bag under the bat. If you want to trim (or turn) your thrown work the following week, it should also be double bagged. If your work is large, delicate, or of uneven thicknesses, you should lightly cover your work for drying. When considering the drying process, bare in mind the weather, humidity and wind! The hotter and dryer, the faster things dry and work can dry unevenly in the shelves – this can lead to cracking – another time to lightly cover your work for drying. Step Four – Trimming and Cleaning Up Your work is dry! It is called greenware now and it is at it’s most fragile! Handle everything with two hands. I often refer to soft hands – keep everything gentle and with your fingers spread as much as possible. Try to not pick up things like plates too much, and always with both hands! Before your work can be bisque fired it should be “cleaned up”. You work won’t go into the kiln if it has sharp edges – when glazed, sharp edges turn into razor blades! Use a piece of fly wire to rub the work all over – this will scratch a little so be light handed. Use a knife or metal kidney to scrape any areas that require a bit more dynamic treatment than the fly wire offers! Finally, a very light wipe over with a slightly damp sponge can help soften and soothe all of your edges and dags! Trimming thrown work: If you are planning to trim (or turn) your thrown work (and you should be), make sure you bag it well – your work should be leather hard to almost dry for easiest trimming. Use this step to finish the work completely – use a metal kidney to polish the surface, or a slightly damp sponge to give a freshly thrown look. Wipe the sponge around the rim after trimming, and check the inside of the pot for dags! Trimming slip cast work: Usually I will trim the rims of your work on the wheel the following day to make that stage easier, however you will still need to check your work for lumps and bumps. Last but not least – check that your name is still clearly on the bottom of your work. Step Five – Bisque Firing When the work is completely dry it can go into the bisque kiln. The bisque kiln is fired to 1000°C. This process burns off the water in the clay as well as some of the chemically bound water. The structure of the clay is not altered that much at this temperature. Inside the bisque kiln, the work is stacked a little, small bowl inside a larger bowl and onto a heavy plate. Smaller items like decorations or drink coasters might get stacked several high. Consideration is paid to the weight of the stack and shape of the work. A bisque kiln can fire about one and a half times the amount of work that the glaze kiln can fire. The firing takes about 10 hours to complete the cycle and about two days to cool down. Once it has been emptied the work is placed in the glaze room ready for you to decorate! Step Six – Glazing Decorating your work with colour can be a lot of fun – and time consuming! There are three main options for surface treatment at this stage: Oxide Washes Underglazes Glazes Washes and underglazes do not “glaze” the work – It will still need a layer of glaze to fully seal the clay (washes don’t need glaze on surfaces not designed for food or liquid as they can gloss up a little on their own). Underglazes are stable colourants that turn out pretty much how they look in the jar. They can be mixed with each other to form other colours and can be used like water colours to paint onto your work. Mostly they should have a clear glaze on top to seal them. Oxides are a different species – the pink oxide (cobalt) wash turns out bright blue for instance. They don’t always need a glaze on top, and some glazes can change the colour of the wash! The glazes need no other “glaze” on top! Be careful of unknown glaze interactions – you can put any combination of glaze in a bowl or on a plate, but only a single glaze on the outside of any vertical surface! Glazes are a chemical reaction under heat. We don’t know the exact chemicals in the Mayco glazes we use. I can guess by the way they interact with each other, however, on the whole, you need to test every idea you have, and not run the test on a vertical surface! Simply put, glaze is a layer of glass like substance that bonds with the clay underneath. Clay is made of silica, alumina and water. Glaze is made of mostly silica. Silica has a melting point of 1700°C and we fire to 1240°C. The silica requires a “flux” to help it melt at the lower temperature. Fluxes can be all sorts of chemicals – a common one is calcium – calcium has a melting point of 2500°C, however, together they both melt at a much lower temperature! Colourants are metal oxides like cobalt (blue), chrome (green through black), copper (green, blue, even red!), manganese (black, purple and pink) iron (red brown), etc. Different chemicals in the glaze can have dramatic effects. for example, barium carbonate (which we don’t use) turns manganese bright pink! Other elements can turn manganese dioxide brown, blue, purple and reddish brown. Manganese dioxide is a flux in and of itself as well. So, glazes that get their black and purple colours, often interact with other glazes and RUN! Our mirror black is a good example – it mixes really well with many glazes because it fluxes them – causes them to melt faster. It will also bring out many beautiful colours in the glazes because it’s black colouring most definitely comes from manganese dioxide! Glaze chemistry is a whole subject on it’s own! We use commercial Mayco glazes on purpose – for their huge range of colour possibilities, stability, cool interactions, artistic freedom with the ability to easily brush the glazes on and ease of use. We currently have almost 50 glazes on hand! A major project is to test the interactions of all glazes with each other. That is 2,500 test tiles!!!! I’m going to make the wall behind the wheels the feature wall of pretty colours! Step Seven – Glaze (Gloss or sometimes called “Glost”) Firing Most of the time this is the final stage of making your creation (but not always!) The glaze kiln goes to 1240°C. This is called cone 6, or midrange. It is the low end of stoneware temperatures. Stoneware clays and glazes are typically fired at cone 8 – 10, that is 1260 – 1290°C. The energy requirement to go from 1240°C to 1280°C is almost a 30% more! Our clay is formulated to vitrify (mature, turn “glass-like”) at 1240°, as are our glazes. A glaze kiln take around 12 hours to reach temperature and two to three days to cool down. Sometimes a third firing process is required – this is for decoration that is added to work after the glaze firing. For example – adding precious metals and lustres. this firing temperature is usually around 600 – 800°C depending upon the techniques being used. There are many students interested in gold and silver trims – we will be doing this third type of firing soon! After firing your work will be in the student finished work shelves. Remember to pay for it before you head out the door! There is a small extra charge for using porcelain clay (it’s more than twice the price of regular clay), and for any third firing process! Once your work has been fired it can not turn back into clay for millennia – so don’t fire it if you don’t like it! Put it in the bucket for recycling. https://firebirdstudios.com.au/the-process-of-making-pottery/Ceramics have evolved over thousands of years.White earthenware dinner plate. Crazing evident all over.Backstamped ‘Made in England S LTD’flagstaff hill, warrnambool, shipwrecked-coast, flagstaff-hill, flagstaff-hill-maritime-museum, maritime-museum, shipwreck-coast, flagstaff-hill-maritime-village, ceramics, tableware