Showing 6060 items matching " street signs"
-
 Ballarat Tramway Museum
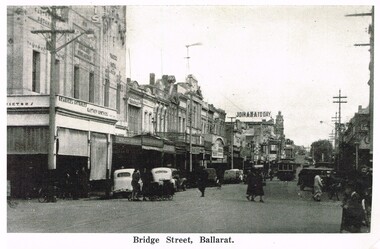
Postcard, "Bridge Street Ballarat", Original 1930's copy 2016
Yields information about the appearance of Bridge St in the late 1930's.Copy of black and white photograph of Bridge St, late 1930's with a single truck, possibly 12, in the viewpoint. Has a number of motor cars parked, looks west. In the view is a shop possibly with a sign "Grazers Butchers" and a "Join ANA Today". trams, tramways, bridge st, tram 671 -
 Ballarat Tramway Museum
Negative - Set of 3, Campbell Duncan, 2/07/1971 12:00:00 AM
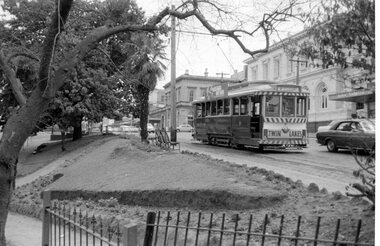
Yields information about tram operations and the street views in Wendouree Parade near Gardens Loop and signage at the Loop.Set of 3 photographs taken on 28/2/1971 by Campbell Duncan of trams in Wendouree Parade at the Gardens .1 - No. 34 departing Gardens Loop to Mt Pleasant, with the Kiosk in the background. .2 - ditto and a very quiet road. .3 - Tram stop signs at Gardens Loop. See also Reg Item 6696 for the photo of the tram arriving at the loop.trams, tramways, wendouree parade, gardens loop, tram 34 -
 Ballarat Tramway Museum
Negative - Set of 3, Campbell Duncan, 10/08/1971 12:00:00 AM
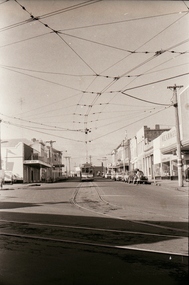
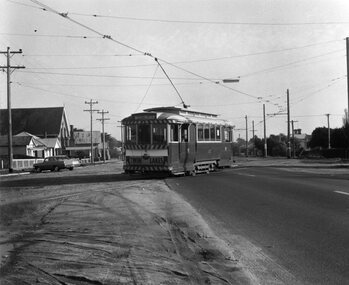
Yields information about tram operations and the street views at Stones Corner.Set of 3 photographs taken on 10/8/1971 by Campbell Duncan of trams in the Main of No. 31 approaching the junction with Bridge St and Victoria St. The tram has the destination of Gardens via Drummond North and a Twin Lakes sign. In the background are the Avery Scales store, Wearwell and Stones Corner. Shows the overhead arrangements at this location.trams, tramways, main road, stones corner, tram 31 -
 Ballarat Tramway Museum
Photograph - Digital image Set of 5, George Coop, 1968 - 1970
Yields information about the tram operations at or near the Titanic Bandstand in Sturt St.Five (5) Digital images taken by George Coop during the period 1968 - 1970, of SEC trams in Sturt St, between Lydiard and Grenville Streets on the north side of Sturt St. .1 - Tram 11, descending the hill by the Titanic bandstand with the Post Office in the background. Trams has a Twin Lakes advert, Bliss Bombs and the destination of Mt Pleasant. .2 - Tram 31 ditto, except destination of Victoria St. .3 - Tram 13 with bandstand in the view - for Mt Pleasant. .4 - Tram 33, with a lady and man carrying a box descending the footpath. Tram has the destination of Victoria St and a Twin Lakes sign. .5 - Tram 26, at corner of Sturt and Camp Streets, with the Owen Williams store in the background. trams, tramways, sturt st, tram 11, tram 31, tram 13, tram 33, tram 26 -
 Ballarat Tramway Museum
Photograph - Black & White Photograph/s, Charles Craig, mid 1950's
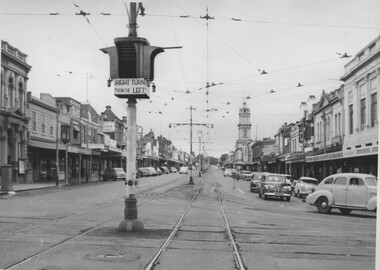
Photograph of the intersection of Ryrie and Moorabool Streets Geelong looking West along Ryrie St, showing the bar type traffic lights and that right hand turns were done from the left lane. Note the Safety zone sign. Two prints held - one large and one small in a vertical form with the traffic lights featured.. trams, tramways, geelong, ryrie st, moorabool st, traffic lights, safety zone -
 Ballarat Tramway Museum
Photograph - Black & White Photograph/s, Charles Craig, mid 1950's
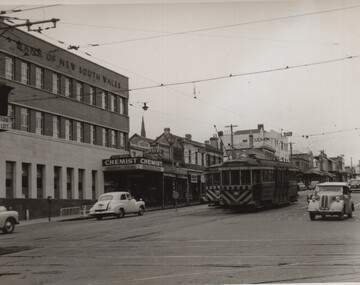
Photograph of the intersection of Ryrie and Moorabool Streets Geelong looking south along Moorabool St, with two bogie trams in Ryrie St, both with safety or hazard stripes. Trams have the destination of Belmont and North. Has the Bank of NSW in the view, E. A. O'Meara Chemist advertising Kodak film and the Geelong Nursery Nook. Adjacent to the tram for Belmont is the safety zone sign. trams, tramways, geelong, ryrie st, moorabool st, traffic lights -
 Ballarat Tramway Museum
Photograph - Black & White Photograph/s, Charles Craig, 1971
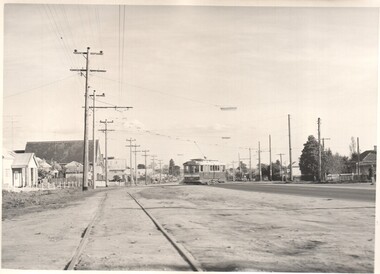
Yields information about the appearance of Albert St where the tram crossed at Ophir St, Sebastopol. Black and White photograph of a single trucker tram, with a Twin Lakes sign crossing Albert St, near Ophir St en route to Sebastopol. Shows the street scene at the time. Photo by Charles Craig - during 1971. trams, tramways, albert st, sebastopol, ophir st -
 Ballarat Tramway Museum
Photograph - Black & White Photograph/s - set of 3, Charles Craig, 1971
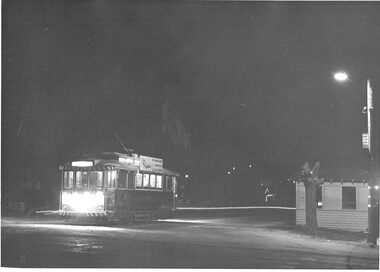
Yields information about the appearance and use of the Lydiard St terminus at night.Set of three black and white photographs of No.30 at the Lydiard St North terminus at night. Has the tram stop shelter in the view and the tram stop signs. Tram fitted with a SEC All electric cooking roof advert. Tram has the destination of Sebastopol. .1 - photo with shelter in the view - three copies .2 - photo with the terminus and street lights .3 - as for .1, but on the side of the street, has the lights of Ballarat in the view. Photo by Charles Craig - during 1971. trams, tramways, lydiard st north, night photo, tram 30 -
 Ballarat Tramway Museum
Photograph - Black & White Photograph/s, Charles Craig, 1971
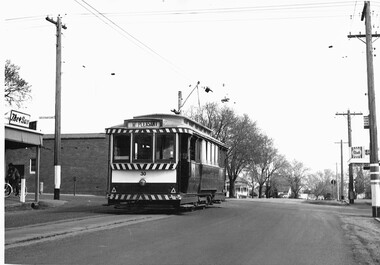
Yields information about the Mt Pleasant terminus just before the closure of the SEC operated system,Black and white photographs of No. 30 at the Mt Pleasant terminus, with the shops on each corner in the view. Adverts for The Sun, Streets Ice Cream. Pole on the right hand side has a "Car Stop Here" and "End of Section" sign. Tram has the destination of Mt. Pleasant. Photo by Charles Craig, probably August 1971.trams, tramways, barkly st, mt pleasant, signs, tram 30 -
 Ballarat Tramway Museum
Photograph - Black & White Photograph/s, Negative, Ellis Collection, c1950
Yields information about the appearance of Bridge St and the use of the trams c1950.Black and white photograph of a bogie tram 22 west bound in Bridge St. Has a group of ladies on either side of the road waiting to board? Note the signs on the poles on either side of the roadway. Has the Waratah Motors, Roger David stores on the west side of the street. c1950. Note the road lifting over the Yarrowee River bridge. The two signs on either side of the road "No Parking over 1 hour Park 1 Foot from kerb" Negative number 1140. Negative scanned at 2400dpi. On the top edge of one of the prints "same as 1094"trams, tramways, ballarat, bridge st, signs, tram 22 -
 Ballarat Tramway Museum
Slide - 35mm slide/s, Keith Caldwell, 16/03/1963 12:00:00 AM
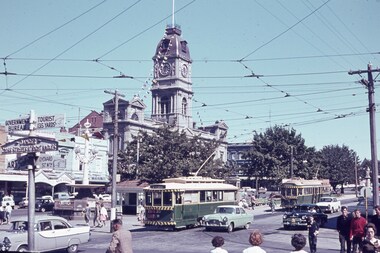
... , Art Gallery and a cast sign "Danger Cross Street at Right... of a busy scene at the corner of Sturt and Lydiard Streets. Tram 30 ...Yields information about traffic conditions at the intersection of Sturt and Lydiard St and tram operations.Agfa colour slide, white cardboard mount, photo by Keith Caldwell on 16/3/1963 of: Photo of a busy scene at the corner of Sturt and Lydiard Streets. Tram 30 for Mt Pleasant and a Twin Lakes sign is departing the City terminus while No. 36 for Lydiard St North is arriving. The Town Hall and Georges Sea Food shop are in the photo along with a sign on the Post Office steps advising the location of the Government Tourist Bureau, Art Gallery and a cast sign "Danger Cross Street at Right Angles".In ink "16.3.63"tramways, trams, sturt st, lydiard st, city, town hall, tram 30, tram 36 -
 Ballarat Tramway Museum
Postcard, Murray Views, Murray Views No. 29 - Sturt Street Looking West, Ballarat Vic.", c1955
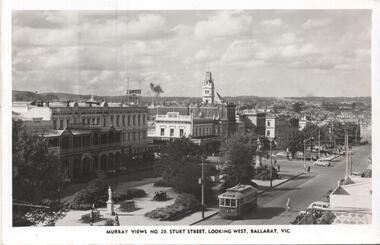
Postcard - black and white - titled Murray Views No. 29 - Sturt Street Looking West, Ballarat Vic.", actually looking east from Doveton St towards Black Hill and Grenville St. Has tram 32 westbound to Gardens via Drummond St North. Divided back postcard with details of the maker on the right hand side, MV symbol and a space for a stamp. In the view are Lester House, Tunbridges, Crockers and the Post Office Tower. A Plume sign is also visible.Yields information about the appearance of Sturt St in the early 1950's, tram operations, buildings and motor vehicles.Postcard - divided back, unused Murray Viewstrams, tramways, sturt st, doveton st, tram 30 -
 Ballarat Tramway Museum
Postcard, Rose Stereograph Co, "Sturt Street showing Town Hall, Ballarat Vic.", early 1930's
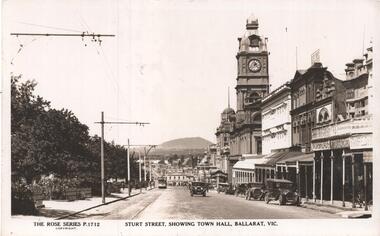
The photo is of Sturt St showing Town Hall Ballarat Vic, looking east towards Grenville St from Doveton St. An ESCo tram is in the far distance, possibly with a Vote No sign along with a few early motor cars. In the view are Stansfield and Smith, F. Gallagher, Morseheads, Myer, The Bucks Head Hotel, and a sign for Rolfes. Note - very similar in location to item 8242, an earlier Rose Series photo with the same number 1712. Two copies held.Yields information about the appearance of Sturt St in the early 1930's, tram operations, buildings and motor vehicles.Postcard - black and white - titled The Rose Series P1712 - A divided back postcard with the rose symbol, publisher details on the left side and that it is a real photograph. trams, tramways, sturt st, doveton st, town hall, esco, rose postcards -
 Ballarat Tramway Museum
Photograph - Black & White Photograph/s - set of 2, Richard Gilbert, c August 1971
Yields information about tramway operations in Sturt St west. Series of 2 Black and white photographs of trams using the Hospital corner curves. .1 - No. 12 east bound in Sturt St West with the destination of Mt Pleasant. Has a Twin Lakes sign. Near the intersection with Russell or Morrison Streets at the Victoria Park loop. .2 - West bound (NO. 11?) about to enter the Victoria Park Loop trams, tramways, sturt st west, russell st, victoria park, tram 12, tram 11? -
 Moorabbin Air Museum
Article (Item) - RAAF bases & photo of FENTON sign
-
Moorabbin Air Museum
Sign (Item) - Metal plate with Operating Instruction Decal - 500 Gallon Liquid Oxygen Storage Tank 9905-66-032-2009
... Moorabbin Air Museum Moorabbin Airport 12 First Street ... -
 Ballarat Tramway Museum
Photograph - Black & White Photograph/s, c1956
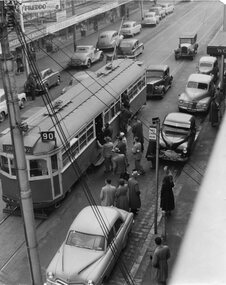
Black and white photograph of W6 994 in Smith St. Collingwood/Fitzroy, in bound on route 90 to City - Spencer St., picking up passengers at a tram stop. Pole obscuring front of tram. Tram has destination "City Spencer St" and run number "P44" Tram appears to be fairly crowded already. Photo taken c1956 with a number of motor cars in the street including some Holdens. In the background are a number of shop fronts, with signs for "Singer Sewing Machines", "Freddo frogs", "Peters Ice Cream", Davies Hardware, John Cornish. On the side of the photograph is the first part of a Woolworths store front. The address of the John Cornish, Mercer, was 205 Smith St. Fitzroy and Woolworths were at 182 -184 Smith St. Collingwood. See 1968 Sands and McDougal Director of Victoria for Smith St. details.trams, tramways, mmtb, smith st., w6 class, bourke st., tram w6 994 -
 Ballarat Tramway Museum
Slide - 35mm slide/s - set of 6, Noel Simons, 22/05/1971 12:00:00 AM
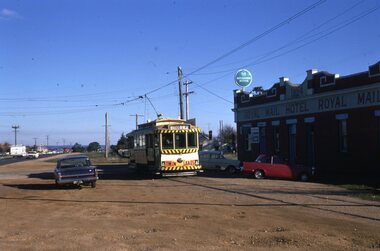
Set of 6 Kodachrome transparencies taken on 22/5/1971. 1171.1 - Tram 33 at Sebastopol terminus, showing destination of Lydiard St. Nth, with Royal Mail Hotel in the background and three parked cars. Tram has "Twin Lakes" sign on front dash. 1171.2 - as for 1171.1 but taken from other side of tram, has hotel in part of photo. Shows arrangement of tram terminus signs on a pole in the background. 1171.3 - Tram 26 just after arrival at the Lydiard St. terminus, with passengers getting off and driver about to swap ends. Destination has been changed to Sebastopol. Has Lydiard St. shelter in the right edge of the photo. 1171.4 - as for 1171.3 - but with pole turned and looking back along street towards city. Shows the undulating nature of the street. 1171.5 - Tram 26 outbound in Albert St. for Sebastopol, crossing the street near Ophir St. Has a motor cyclist stopped for tram and shows tram stop on the west side of the road. 1171.6 - Tram 26, close up of tram at the Sebastopol terminus with two cars parked along side. Tram has destination of Lydiard St. Nth.1171.1 - "No. 33 at Sebastopol Terminus" and initials "BC" in bottom left hand corner. 1171.2 - "No. 33 at Sebastopol Terminus" and initials "BC" in bottom left hand corner. 1171.3 - "No. 26 at Lydiard St. North terminus" and initials "BC" in bottom left hand corner. 1171.4 - "No. 26 at Lydiard St. North terminus" and initials "BC" in bottom left hand corner. 1171.5 - "No. 26 crossing from left side of Albert St. Sebastopol to right side near Ophir St." and initials "BC" in bottom left hand corner. 1171.6 - No. 26 at Sebastopol Terminus" and initials "BC" in bottom left hand corner. All slides have date stamp of "22 May 1971" in purple ink and Kodak developing date of "Jun 71M7" in red ink. tramways, trams, sebastopol, lydiard st nth, royal mail hotel, tram stops, tram 33, tram 26 -
 Ballarat Tramway Museum
Slide - 35mm slide/s - set of 4, Noel Simons, Apr. 1967
Set of 2 slides made from the Association of Railway Enthusiast Provincial Tramways film strip, possibly during April 1967. 1192.1 and 1192.3 mounted in Kodak Ready Mounts. The others in plain white mounts. Slides dated Dec. 1968. 1192.1 - No. 21 out bound to Golden Square in High St., between Wattle and Vine Streets. Photo taken after tram has passed photographer. Has a sign for "Reid's Furnituorium" in the background. 1192.2 - Bendigo No. 28 dressed up as Myers Christmas tram, passing the Post Office and Courts in Pall Mall. 1192.3 - Bendigo No. 23 at Needle Loop en route to Eaglehawk. Tram has two SEC roof ads, one "Electric Cooking" and the other "Everything fine in my all electric kitchen". 1192.4 - Bendigo scrubber parked at the end of the main depot lead, alongside the depot office buildings.Details in blue ink, date hand stamped in purple ink. 1192.1 - "No. 21 heads along High St for Golden Square between Wattle and Vine Streets." 1192.2 - "Birney No. 28 in Christmas Garb, traverses Pall Mall en route to North Bendigo". 1192.3 - "No. 23 at Needle Loop on its run to Eaglehawk". 1192.4 - "Scrubber car at Bendigo Depot".tramways, trams, north bendigo, bendigo, bridge st loop, depot, tram 21, tram 23, tram 28, tram scrubber -
 Ballarat Tramway Museum
Slide - 35mm slide/s - set of 20, Noel Simons, 21/05/1971 12:00:00 AM
Set of 20 transparencies taken on 21/5/1971 on Kodak mounts. 1197.1 - Bendigo No. 5 en route to Eaglehawk at Creeth St Long Gully. Tram has a SEC roof ad and Cinzano roof ad. 1197.2 - No 5 approaching Needle Loop between Long Gully and California Gully. On left hand side is the City of Bendigo sign, indicating city boundary. 1197.3 - As for 1197.2 but actually entering loop. Photo taken after tram has passed photographer. 1197.4 - No. 26 bound for Eaglehawk descending the railway bridge near Eaglehawk, at Jobs Gully. 1197.5 - as for 1197.4, but after crossing bridge, now ascending a hill. Photo taken after tram has passed photographer. 1197.6 - No. 26 climbing High St. hill Eaglehawk, nearing end of Double track, bound for Quarry Hill. Shows centre of the road poles. 1197.7 - As for 1197.6, with tram entering single track section. Photo taken after tram has passed photographer. Has a BP service station in the background. 1197.8 - No. 26 (bound for Quarry Hill) crossing No. 17 (Eaglehawk) at Job's Gully Loop. 1197.9 - No. 17 climbing railway bridge at Job's Gully, en route to Eaglehawk. Photo taken after tram has passed photographer. 1197.10 - No.26 bound for Quarry Hill, leaving Long Gully Loop? Has the Creeth St. church in l197.l in the far background. Photo taken after tram has passed photographer. 1197.11 - Tramway Point work at the northern end of Long Gully Loop. 1197.12 - No. 17 en route for Quarry Hill turning into View St. from Bamard St. Tram has SEC roof ads "Everything fine in my all electric Kitchen' and 'Electric Cooking is Matchless'. 1197.13 - as for 1197.12, but tram has turned into View St and about to enter the double line track. Photo taken after tram has passed photographer. 1197.14 - No. 21 enters Nolan St after turning from MacRae St. en route to Bendigo. Note sign on its own post noting tram turns "Beware Tram Turns" and stop sign on adjacent pole "Trams stop on Request". No. 21 has two SEC roof ads. 1197.15 - No. 21 in Nolan St. after turning from Bridge St. (White Hills Road). Note signal light for Bridge St. loop on pole corner of street. Photo taken after tram has passed photographer. 1197.16 - No. 2 bound for Eaglehawk at unknown location. 1197.17 - Tram stop sign on a pole "CARS STOP BY REQUEST" 1197.18 - No. 5 in Carpenter St.? en route to Quarry Hill. 1197.19 - No. 28 has just arrive at Golden Square terminus, passengers are disembarking and the trolley pole is being turned. Golden Square Hotel in the background. 1197.20 - No. 28 at Golden Square terminus. Has a "Nothing beats Briquettes for hear roof ad. Information written on in black ink and date stamped on purple ink. 1197.1 - "No. 5 at Creeth St. Long Gully" 1197.2 - "No. 5 approaching Needle Loop between Long Gully and California Gully" 1197.3 - "No. 5 at Needle Loop between Long Gully and California Gully" 1197.4 - "No. 26 crossing railway bridge at Job's Gully near Eaglehawk" 1197.5 - "No. 26 just after crossing railway bridge at Job's Gully near Eaglehawk/ 1197.6 - "No. 26 in High St. Eaglehawk" 1197.7 - "No. 26 at end of double track in High St. Eaglehawk" 1197.8 - "Nos. 26 and 17 crossing at Job's Gully Loop" 1197.9 - "No. 17 crossing railway bridge at Job's Gully near Eaglehawk". 1197.10 - "No. 26 at Long Gully" 1197.11 - 'Northern end of points at Long Gully Loop". 1197.12 - "No. 17 turning into View St. from Bamard St. Bendigo". 1197.13 -'No. 17 at beginning of double track in View St. after leaving Bamard St. Bendigo. 1197.14 - "No. 21 enters Nolan St. from MacRae St. Bendigo." 1197.15 - "No. 21 in Nolan St. Bendigo just after leaving White Hills Road." 1197.16 - "No. 2" 1197.18 - "No. 5" 1197.19 - "Birney car No. 28 at Golden Square Terminus" 1197.20 "Birney car No. 28 at Golden Square Terminus" tramways, trams, bendigo, long gully, railway bridge, jobs gully, trackwork, nolan st, quarry hill, tram stops, golden square, tram 2, tram 5, tram 17, tram 21, tram 26, tram 28 -
 Ballarat Tramway Museum
Slide - 35mm slide/s - set of 32, Noel Simons, 25/02/1971 12:00:00 AM
Set of 31 transparencies taken on 25/2/1972 on Kodak mounts. 1201.1 - Bendigo No. 26 in Bond St. just after leaving Long Gully en route for Quarry Hill. Has Norris Supermarket in background. Has two SEC roof ads. 1201.2 - No. 26 climbing View St. from Charing Cross en route to Eaglehawk. Has ANZ bank and AMOCO service station in background. 1201.3 - as for 1201.3, but after tram has passed photographer. Has buildings west of Mackenzie St. in photograph. 1201.4 - Tram stop and centre of the road pole with two "CARS STOP BY REQUEST" signs mounted on pole at the corner of Mackenzie St. 1201.5 - same position as for 1201.3, but with No. 5 descending the street. 1201.6 - same position as for 1201.2, but with No. 5 descending the street. Photo taken after tram has passed photographer. 1201.7 - No. 7 in Nolan St. from across the park at Lake Weeroona. 1201.8 - No. 7 entering McCrae St from Nolan St. - distant view. Note "TRAM "sign on left hand side under tree and overhead in McCrae St. from former track that once was in this street. 1201.9 - No. 7 in High St. with Cathedral in background. Tram en route to North Bendigo. Note scaffolding around Cathedral main spire area. 1201.10 - No. 7 crossing Bendigo Creek bridge in High St. near Golden Square. Has a Caltex Service station in the background. 1201.11 - No. 7 at Golden Square terminus with Sunburst Fruit Juices and a Peters Ice cream delivery vans alongside. 1201.12 - as for 1201.11 but photo taken from behind tram, with the end of the rails in the photograph. 1201.13 - No. 7 and 21 in Pall Mall at Charing Cross with No. 5 in the background. Taken some distance away from the location. 1201.14 - No. 7 at Golden Square terminus, taken a short distance from the tram terminus. Shows Milk Bar on right hand side and the hotel on the left hand side. Taken from the south side of the roadway. 1201.15 - as from 1201.14 but taken from the north side of the roadway. 1201.16 - No 5 waiting at California Gully loop. Distant photo showing surrounds 1201.17 - No. 5 en route for Quarry Hill crossing No. 26 at California Gully. 1201.18 - No. 26 at Eaglehawk terminus with Eaglehawk Town Hall and Post Office in background. 1201.19 - No. 21 arriving at Charing Cross en route to North Bendigo. Has Alexandra Fountain in the background, ANZ bank RACV building, and other buildings on the north side of Pall Mall or Nolan St. 1201.20 - No. 26 en route for Quarry Hill at Charing Cross, with crew standing by front door. Has Colonial Mutual life building, Armstrong Tyre Service (Firestone) and a sign for Cohns Drinks in the background. 1201.21 - as for 1201.20 but with No. 5 en route to Eaglehawk now in photograph. 1201.22 - No. 26 at Quarry Hill terminus. 1201.23 - No. 26 at Quarry Hill terminus, view of front portion of tram only from a gate at the Bendigo cemetery. 1201.24 - Track at the end of the Quarry Hill line showing the point blades of the former "Y" terminus and the overhead for this. 1201.25 - No. 2 at the Quarry Hill terminus, looking along the former Trackwork. 1201.26 - as for 1201.25 1201.27 - number not used. 1201.28 - Golden Square terminus from some distance from the actual terminus, showing the Warning sign "TRAM" for motorists from the south. No. 7 at the terminus. 1201.29 - No. 7 passing through the Golden Square shopping centre. Numerous cars and pedestrians. Tram en route for North Bendigo. 1201.30 - No. 7 in High St. Golden Square, en route for North Bendigo. Photo taken after tram has passed photographer. 1201.31 - No. 7 in High St. just past Wattle St. with the Cathedral in the background. Tram has two SEC roof ads good side on photo, 'Everything's fine in my all electric kitchen' and 'Electrical cooking - clean, quick, economical'. 1201.32 - No. 7 in High St. nearing Wattle St. Has Cathedral in the background. Photo taken after tram has passed photographer.Information written on in black ink and date stamped on purple ink. 1201.1 - "No. 26 in Bond St just after leaving Long Gully" 1201.2 - "No. 26 climbing View St. from Charing Cross" 1201.3 - "No. 26 ascending View St. from Charing Cross (At Mackenzie St.)" 1201.4 - "View St. & Mackenzie St." 1201.5 - "No. 5 in View St. near Mackenzie St." 1201.6 - "No. 5 in View St. nearing Charing Cross." 1201.7 - "No. 7 in Nolan St. seen from Lake Weeroona Park." 1201.8 - "No. 7 entering McRae St. from Nolan St. Note "TRAM" warning sign on left. 1201.9 - "No. 7 in High St. passing Short St." 1201.10 - "No. 7 crossing Bendigo Creek bridge in High St. near Golden Square." 1201.11 - "No. 7 at Golden Square terminus" 1201.12 - "No. 7 at Golden Square terminus" 1201.13 - "No 7, 21 and 5 at Charing Cross" 1201.14 - "No. 7 at Golden Square terminus" 1201.15 - "No. 7 at Golden Square terminus" 1201.16 - "No 5 waiting at California Gully loop." 1201.17 - "Nos. 5 and 26 crossing at California Gully loop" 1201.18 - "No. 26 at Eaglehawk terminus" 1201.19 - "No. 21 arriving at Charing Cross from Golden Square" 1201.20 - "No. 26 at Charing Cross" 1201.21 - "Nos. 5 and 26 at Charing Cross." 1201.22 - "No. 26 at Quarry Hill terminus" 1201.23 - "No. 26 at Quarry Hill terminus seen through the gates of the Bendigo Cemetery." 1201.24 - "Quarry Hill terminus showing remains for former double track layout abandoned before 1964." 1201.25 - "No. 2 at Quarry Hill terminus" 1201.26 - "No. 2 at Quarry Hill terminus" 1201.28 - "The Southern approach to Golden Square with No. 7 standing at the terminus, "TRAM" warning sign on the left. 1201.29 - "No. 7 passing through Golden Square Shopping Centre" 1201.30 - "No. 7 in High St. Golden Square" 1201.31 - "No. 7 in High St. passing Wattle St." 1201.32 - "No. 7 in High St. nearing Wattle St."tramways, trams, bendigo, bond st., view st., nolan st., high st., eaglehawk, california gully, charing cross, quarry hill, trackwork, tram 2, tram 5, tram 7, tram 21, tram 26 -
 Ballarat Tramway Museum
Photograph - Black & White Photograph/s, Robert Green, 28/03/1970 12:00:00 AM
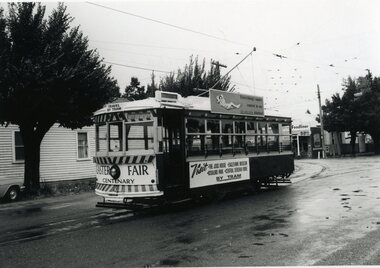
Black and white photograph of SEC Bendigo Birney No. 28 decorated for the Centenary Easter Fair, in Arnold St. at the corner of MacCrae Street, Bendigo, Saturday 28 March 1970. Photo by R.W. Green. Tram has destination of "Nth Bendigo", sign on front dash panel "Easter Fair Centenary" and on side panel "Visit the Joss House, Eaglehawk Museum, Rosalind Park, Central Deborah Mine by Tram". Photo taken on a rainy day. Roof advertisement SEC - "Everything's fine in my all Electric Kitchen"On rear in black ink "Bendigo Birney No. 28 decorated for the Centenary Easter Fair in Arnold Street at the corner of MacCrae Street. / Saturday 28 March 1970." Stamped on rear of photo in black ink "R.W. Green / Copyright Reserved / No. . . ." Paper has a stamp "H429" in blue green ink.trams, tramways, easter fair, arnold st, decorated trams, tram 28 -
 Ballarat Tramway Museum
Postcard, Biscay Greetings, Bourke St Melbourne
Colour postcard with serrated edges of Bourke St. Melbourne from Parliament house with MMTB Z8 and about 6 W7's in photo, along with many motor vehicles. Also shown are the Safety Zones and stops. In image are buildings along either side of Bourke St., featuring the sign of the Salvation Army City Temple in the top left hand corner, Mittys, and a Kwikasair van by the outbound safety zone. Tram Z8 has destination of "CITY - SPENCER ST." and showing route 89. On rear of card is name of company "Biscay" and caption "New Z class tram in Bourke Street, Melbourne Victoria." and card number BG98 in dark brown ink, along with space for stamp and address. See Destination City re introduction of Z class trams (1975)trams, tramways, bourke st, melbourne, z class trams, tram 2 -
 Ballarat Tramway Museum
Postcard, Nucolorvue postcards - Bendigo
Series of six (6) Nucolorvue postcards with serrated edges of scenes around Bendigo featuring Bendigo trams under the operation of either the SECV or the Bendigo Trust. 963.1 - "The Cenotaph and Alexandra Fountain" at Charing Cross. Has Bendigo bogie car in background. Also the Beehive building and Ezywalkin shoes. Nucolorvue postcard BE41 on rear and other information in green ink. 963.2 - "Tram No. 25, a maximum traction car built in 1916. Now operated by The Bendigo Trust between Central Deborah Mine and Emu Point." Features No. 25 in Bendigo Trust colours with Coca Cola and Bendigo Timber Co ads on the roof. On nearby pole is a "Bendigo Talking Vintage Tram" signs. In background is the Beehive building and other buildings near Charing Cross. Nucolorvue postcard BE52 on rear and other information in green ink. 963.3 - "Birney Tram No. 30 decorated for a Royal Tour occasion. The Bendigo trust operates this tram and others on a tourist service between Central Deborah Mine and the Chinese Joss House at Emu Point." Features No. 30 decorated for a visit of Prince Charles, 26/10/1974 with crown, Australian and English flags. Has Myer building in the background. On adjacent pole are two signs "Cars stop on Request". Nucolorvue postcard BE 44 on rear and information in green ink. 963.4 - "The Central Deborah Gold Mine and a vintage tram operated by the Bendigo Trust" Features Birney No. 28 at the mine terminus. Nucolorvue postcard BE48 on rear and other information in green ink. 963.5 - "Charing Cross Bendigo Vic." featuring SECV trams 5, 19 and other bogie car crossing street heading for Quarry Hill. Has Fountain Plaza building in background. Nucolorvue and other information in brown ink. 963.6 - "The Sacred Heart Cathedral looking from High St." Has tram 25 in Bendigo Trust colour running along street in front of Cathedral. Work to complete the spire on the Cathedral underway. Nucolorvue postcard BE47 and other information on rear in green ink. Bendigo Vintage Talking Trams - K.S.Kingstrams, tramways, bendigo, the bendigo trust, charing cross, royal visit, tram 37 -
 Ballarat Tramway Museum
document - Correspondence, Melbourne and Metropolitan Tramways Board (MMTB), 1963 - 1965
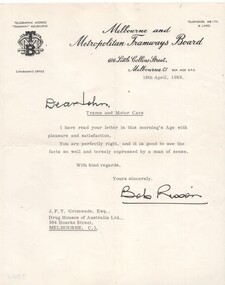
990.1 -Typed letter from Chairman of M&MTB (Robert (Bob) Risson to Mr. John Grimwade dated 18 April 1963, concerning an letter in the Age written by J. Grimwade about Trams and Motor Cars. Written on M&MTB letterhead, with "Dear John" and author's signature "Bob Risson" handwritten in. Has been folded into four for posting. On quarto size paper, with watermark "Loganvale / Parchment / Made in Britain". Gives M&MTB phone numbers, postal and street address and telegraphic address on letterhead. 990.2 - Typed letter from Chairman of M&MTB (Robert (Bob) Risson to Mr. John Grimwade dated 29 April 1965, concerning tramcar design and deputy chairman (Mr. Kirby) forthcoming overseas trip. Written on M&MTB letterhead, with "Dear John" and author's signature "Bob" handwritten in. Has been folded into six for posting. On quarto size paper, with a watermark "? / RAG ? / Made in Australia". Gives M&MTB phone numbers, postal and street address and telegraphic address on letterhead, different design to 990.1, including phone number. Above the "Dear John" an imprint from of another sheet of paper, has been imposed on the sheet - grease mark? about 15 in diameter. 990.3 - Copy of interoffice memo from Deputy Chairman (Mr. Kirby) on yellow paper, dated 27 April 1965, replying to Chairmans memo of 26 April 1965, about the design of new trams, with steps inside the doorways. Signed by Mr. Kirby. Has been folded for mailing. Has left hand edge partly folded in. 990.4 - Copy of interoffice memo from Chairman (R. Risson) to Deputy Chairman, about a suggestion by Mr. Grimwade about running boards and the width of trams. Notes Chairman's view that the policy of running boards was deliberate in order that cars collided with them first rather than the tram body. On blue paper. Signed by the Chairman. Has been folded for mailing. Item 990.2 to 990.4 stapled in top left hand corner.Signatures and names tram, trams, melbourne, footboards, tram steps, mmtb, tramcar design -
 Ballarat Tramway Museum
Photograph - Black & White Photograph/s, Chris Wurr, late 1960's or early 1970's
Yields information about the tram crossover point in Albert St Sebastopol during the last few years of the tramways and the condition of the roadway at the time.Black and White photograph of SEC tram No. 12 crossing Albert St. from east to west side at Ophir St. late 1960's or early 1970's. Tram has destination of SEBASTOPOL, and Twin Lakes sign on rear. Photo taken after tram has passed photographer. Photo by Chris Wurr. Photo shows sealed road (to Colac) and tram stop sign on west side of road. Photocopy made 4/1999 for display purposes. Copy 2 added 27/7/2007, ex Alan Bradley photographs.On rear, in black stamp ink "Photo by Chris Wurr / 12 Truscott Street, Ararat 3377 / (053) 523403 Copy 2 - Additional words to above "Donated to BTPS by and"trams, tramways, albert st., sebastopol, tram 12 -
 Ballarat Tramway Museum
Newspaper, The Courier Ballarat, "No longer needed", 7/09/1971 12:00:00 AM
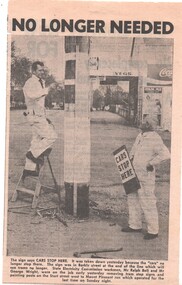
Yields information about the closure of the system and how the various small tasks, eg removal of tram stop signs were undertaken. The newspaper item details the name of the people.Newspaper clipping from The Courier, 7/9/1971 titled ""No longer needed" with a photo of two SEC workmen removing tram stop signs and painting poles on the Mt Pleasant route in Barkly St. Photo taken the previous day, following the closure of the route on Sunday. Has a photo of Mr. Ralph Bell and Mr George Wright. At corner with Cobden St. Has a Milk Bar in the background, advertising Streets Ice creek, Coca Cola, Briquettes and Vincent's Cold and Flu tablets. See Reg Item 3771 for a copy of the original photograph and a larger view of the scene. Second copy added 27/10/05. trams, tramways, mt pleasant, closure, tram stops, barkly st. -
 Ballarat Tramway Museum
Postcard, Nu-color-vue or Nucolorvue Productions, Ballarat tram No. 11 at dusk
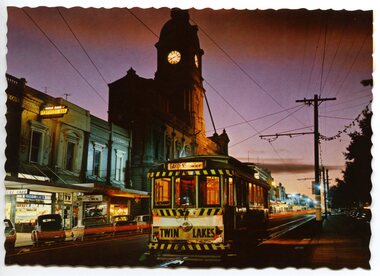
Colour postcard with serrated edges of Ballarat tram No. 11 at dusk in Sturt St, just west of Lydiard St. with Town Hall in background. Tram has destination of "GARDENS via Drummond Nth", with a "TWIN LAKES" sign on rear driver's apron of tram. On pole in front of tram is tram stop sign and a section sign. Pole painted with tram stop sign as well. On rear , printed in dark green ink is the card details etc. "Ballarat, Victoria, Looking to the City Hall, Sturt Street at sunset." Nucolorvue car, BT 65. \ trams, tramways, ballarat, town hall, sturt st, tram 834 -
 Ballarat Tramway Museum
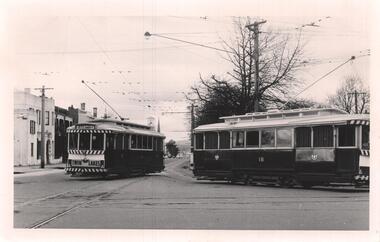
Photograph - Black & White Photograph/s, Dave Macartney, 4/08/1968 12:00:00 AM
Black and white photograph of SEC Nos 12 and 18 meeting at the corner of Drummond Street and Sturt St. Taken by Dave Macartney 4/8/1968. Both trams inbound. No. 12 turning from Drummond St. Nth, showing "Depot via Drummond Nth" and No. 18 ex Sebastopol line. Both trams have the blinds drawn. Tram 12 has a "Twin Lakes" sign. Colour photocopy, laminated, of this photograph on display 5/2000 at 02-02-06. See also Reg Item 2139 for another print of this scene, but differently framed. 1412.1 - same photo, differently framed. Added 10/11/2005 - to be 01-01-70. trams, tramways, hospital corner, sturt st, junction, tram 18, tram 12 -
 Ballarat Tramway Museum
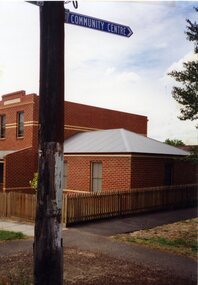
Photograph - Colour Photograph/s - set of 25, Neville Gower, 7/02/1997 12:00:00 AM
Group of twenty five photographs taken on 7/2/1997 of some power poles around Ballarat that still carry the paintwork, faded and worn, of the SEC tramway system tram stops. 1652.1 - North East corner of Drummond Street South and Sebastopol St. 1652.2 - ditto 1652.3 - North east corner of Drummond St. South and La Trobe St. - with bus stop sign 1652.4 - ditto 1652.5 - North corner of Drummond St. South and Skipton St. 1652.6 - ditto 1652.7 - North east corner of Ripon St. North and Sturt St with King Chicken and Seafood shop in the background. 1652.8 - ditto looking down Sturt St. 1652.9 - South West corner of Ripon St. North and Sussex Streets 1652.10 - ditto 1652.11 - Power pole east side of Ripon St North between Mair and Sturt Streets 1652.12 - South west corner of Mair and Ripon North Streets 1652.13 - ditto 1652.14 - North East corner of Mair and Ripon Streets 1652.15 - ditto 1652.16 - ditto 1652.17 - North west corner of Burbank and Macarthur St 1652.18 - ditto 1652.19 - North east corner of Drummond St. North and Webster St. 1652.20 - ditto 1652.21 - Powerlines between Doveton and Dawson in Sturt St. 1652.22 - South corners of Sturt and Doveton Streets 1652.23 - ditto 1652.24 - ditto 1652.25 - ditto Negatives and envelope for the prints with the Reg Item 1652 sheet in documents folder. Photo folder with handwritten notes and negatives with Catalogue Worksheet.tram stops, drummond st., ripon st, sturt st