Showing 684 items matching "stored trams"
-
 Ballarat Tramway Museum
Photograph - Digital image set of 6, 27/06/1971 12:00:00 AM
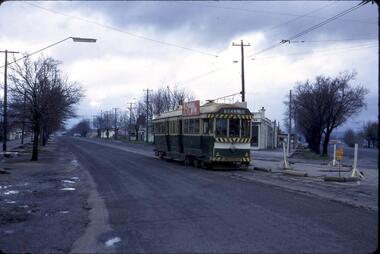
Yields information about the SEC Ballarat trams in the months before the closure of the SEC Tramway system. Yields information about the streetscape.Set of six Digital images, scanned from slides by Graeme Cleak, scanning by Peter Winspur 9/2011. .1 - Slide FQ16 - No. 41, outbound at the south end of Drummond St south about to turn into Skipton St, with the destination of Bell St. .2 - slide FQ18 - No. 41, outbound to Sebastopol terminus, Albert St, just before the terminus itself. .3 - slide FQ21 - No. 41, inbound Albert St Sebastopol with the Sebastopol Town Hall in the background. Tram has a "Bliss Bombs" roof advertisement on the side, "Make Bliss, Not Love". .4 - slide FQ22 - Trams 26 and 41, crossing at Grey St Sebastopol Loop. No. 41 has destination of Grey St. .5 - slide FQ27 - Trams 27 and 37, crossing at the Hamilton Ave loop, No. 41 inbound - with destination of Victoria St at the Hamilton Ave loop with the "Stonehenge" fence house in the background. Sturt St West. .6 - slide FS29 - No. 37 at Grenville St, Sturt St intersection with Bridge St in the background. Tram has the destination of View Point and is entering the loop itself. The destination was no longer in use at the time of the photograph and would indicate that the destination has been arranged. In the background is the Woolworths Big W store and the Dickins Food Store. All photos taken on 27/6/1971. trams, tramways, drummond st sth, sebastopol, grey st, albert st, sturt st west, grenville st, tram 41, tram 26, tram 27, tram 37 -
 Ballarat Tramway Museum
Photograph - Digital image, c1971
Yields information about Ballarat streetscape and its trams in the closing days of the SEC tramway system.Digital image from a black and white print of tram 13 leaving the Grenville St intersection with Sturt St with many passengers. Two men waiting for a tram adjacent to the small shelter. Has the Dickins Food Store, The Spot Cafe and Family Footwear store in the background. Photo by Marc Dahlstrom c1971. On rear is the Marc Dahlstrom stamp.trams, tramways, sturt st, grenville st, tram 13 -
 Ballarat Tramway Museum
Photograph - Digital image, c1971
Yields information about Ballarat streetscape and its trams in the closing days of the SEC tramway system.Digital image from a black and white print of tram 31 climbing the hill in Sturt St up to Lydiard St, shows the steepness of the hill. Tram has two Johnnie Walker whisky roof advertisements, a Twin Lakes sign and is showing Special. In the background are a Discount store, a Thrifty furniture van, Cooks Private Hotel, the Commonwealth Bank and the National Mutual Building. Photo by Marc Dahlstrom c1971.On rear is the Marc Dahlstrom stamp.trams, tramways, sturt st, lydiard st, tram 31 -
 Ballarat Tramway Museum
Photograph - Black & White Photograph/s, Chris Wurr, early 1970's
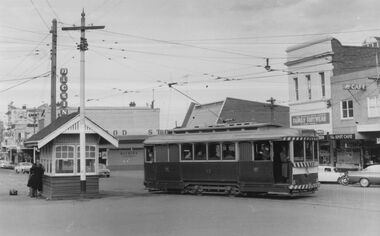
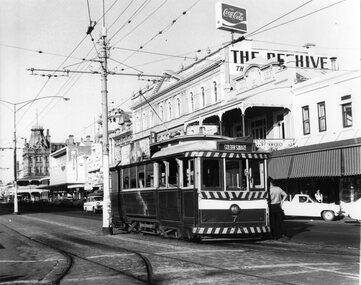
Yields information about the appearance of Bendigo Birney trams early 1970's and the McCrae St area.Black and White Photograph of Bendigo No. 7, in Pall Mall, at Charing Cross, with the destination of Golden Square. An inspector is leaning against the front door of the tram. Has in the background, The Beehive building, Coca Cola advertisement, Myers store and Stoneman's Shamrock Hotel. Photo Chris Wurr, early 1970's. "Photo by Chris Wurr" stamped on the rear.trams, tramways, bendigo, charing cross, pall mall, tram 7 -
 Ballarat Tramway Museum
Photograph - Black & White Photograph/s, Chris Wurr, early 1970's
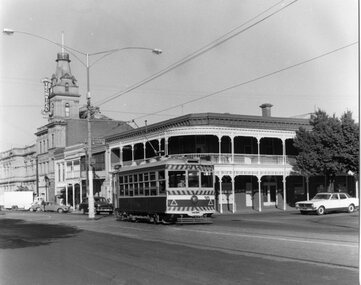
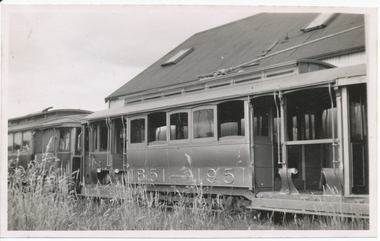
... the appearance of Bendigo Birney tram No. 11, stored at the depot ...Yields information about the appearance of Bendigo Birney tram No. 11, stored at the depot, following an accident. Was not returned to service until after the SEC closed the tram system.Black and White Photograph of Bendigo No. 30, Birney, inbound to Charing Cross, McRae St, Bendigo, at Baxter St intersection? with the Bendigo Technical College in the background. Note the direction sign for "Heathcote". Tram has the destination of Golden Square. Photo Chris Wurr, early 1970's. "Photo by Chris Wurr" stamped on the rear.trams, tramways, bendigo, mccrae st, tram 30 -
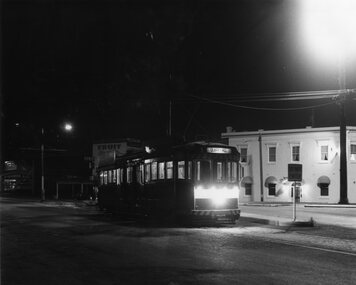 Ballarat Tramway Museum
Photograph - Black & White Photograph/s, Chris Wurr, Jan. 1971
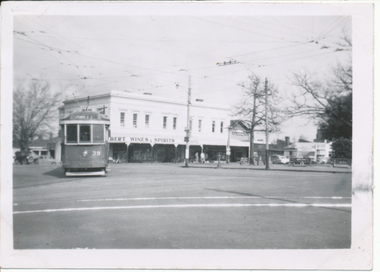
Black and White Photograph of Bendigo No. 2 at the Eagle Hawk terminus, Jan. 1971, night photograph. Tram has the destination of Quarry Hill. In the background is the Foodland Store, a Milk bar. The tram has arrived at the terminus, the trolley pole has been turned, but the headlights and dash canopy lights have yet to be turned. Tram has the destination of Quarry Hill. Photo Chris Wurr, early 1970's. "Photo by Chris Wurr" stamped on the rear. In top left hand corner, in ink "71)" and "Bendigo (SEC) Tramways / 1.1971 / Eaglehawk Terminus"trams, tramways, bendigo, eaglehawk, night photo, tram 2 -
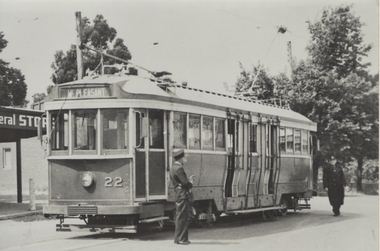 Ballarat Tramway Museum
Photograph - Black & White Photograph/s, mid 1940's to early 1950's
Black and white print of Ballarat No. 22 at the Mt Pleasant terminus, mid 1940's to early 1950's prior to its renumbering. The crew is swapping ends. The tram has the destination of Mt Pleasant. In the background is the General Store at the time. On rear in ink "HTT 11 = MMTB N 117 = Ball 22 Renumbered 37"trams, tramways, mt pleasant, tram 22 -
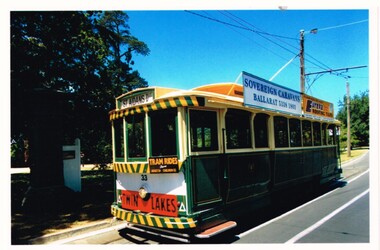 Ballarat Tramway Museum
Photograph - Colour Photograph/s - set of 3, Earl Ewers, 9/11/2014 12:00:00 AM
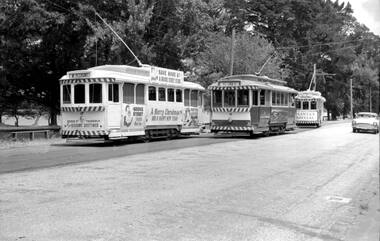
Set of three colour prints of tram 33 and the advertising boards. .1 - No. 33 at Carlton St with the Twin Lakes dash panel advert, Sovereign Caravans and Eureka tile roof advertisements. .2 - the old Eureka Tile and Twin Lakes advertising signs stored in the depot along 3 road wall. Notes the "star" is missing on the new sign. .3 - Photo of the new Eureka tiles roof Advertisements sign. Image of the star added to the sign - see i5 - taken 1/4/2015 by WAD and emailed to Earl. Taken by Earl Ewers, 9/11/2014, printed on Kodak Royal paper.See images 6262i4 for notes on the rear of each photo.trams, tramways, carlton st, advertisements, roof ads, twin lakes, tram 33 -
 Ballarat Tramway Museum
Slide - 35mm slide/s - set of 10, Campbell Duncan, Jan. 1971
Set of 10 Ferraniacolor slides - cardboard mounts taken on either 10/1/71 or 16/1/71. .1 - Birney No. 30, Golden Square line, inbound near Cathedral with car yard in background. .2 - ditto, with Cathedral gardens in background. .3 - single trucker, with two SEC roof adverts, entering Nolan St enroute to North Bendigo. Shows the driver sitting in a side on shot. A 4 square store in the background, with a fading advert for "Peeled Tomatoes". .4 - No. 6 turning from Nolan St into McCrae St with 4 square store in background. .5 - No. 26 at Quarry Hill with cemetery in background. .6 - No. 6 at the North Bendigo Terminus .7 - No. 26 outbound to Eaglehawk on the Railway Overbridge, Mt Korong Road. .8 - No. 17 (inbound to City and Quarry Hill) and another bogie crossing at a loop on the Eaglehawk line. Both trams have SEC roof adverts. The driver of the outbound car is boarding the tram. Based on .9, it is No. 3 at Long Gully. .9 - No. 3 waiting at Long Gully Loop . .10 - No. 26 at Quarry Hill terminus, with destination of Eaglehawk.In ink on slide: .1 - "1/2 mile out on Golden Square line - 10/1/71 (Sun)." .2 - "1/2 mile out on Golden Square line - 10/1/71" .3 - "Has just rounded curve near lake Weeroona on North Bendigo line - 10/1/71 (Sun)." .4 - "16/1/71" .5 - " 10/1/71 (Sun)." .6 - "North Bendigo terminus, 16/1/71 (Sat)" .7 - "10/1/71 (Sun) c 3pm" .8 - "Cross Eaglehawk line - 10/1/71 (Sun)." .9 - "Jackson St Loop on E'Hk line awaiting up - 10/1/71 " .10 - "Quarry Hill terminus Bendigo - - 10/1/71"tramways, trams, bendigo, golden square, high st, nolan st, north bendigo, quarry hill, long gully, railway bridge, tram 30, tram 6, tram 26, tram 17, tram 3 -
 Ballarat Tramway Museum
Newspaper, The Courier Ballarat, "No trams for at lease a decade", Aug. 2002
Yields information about the view of the City of Ballarat Mayor about the proposal for a Ballarat Tourist based tramway in 2002.Newspaper clipping from the Courier, Thursday 1 August 2002, with the title ""No trams for at lease a decade", reporting on comments made by Mayor David Vendy about the possibility of trams in Ballarat, at least 10 years and following up on the Tuesday night meeting at the Town Hall with the consultants and residents. Has a photo of David Vendy on BTM Tram 13 (has the signs inside) superimposed on Sturt St with the Town Hall and Myers store in the background. Article written by Andrew Molloy. Item has the date, source and page written in ink.ballarat revival, btm, city tramway, town hall -
 Ballarat Tramway Museum
Document - Specification, Melbourne and Metropolitan Tramways Board (MMTB), "Window Glass Specifications", c1973
... description, store schedule, metric and imperial size and tram type... description, store schedule, metric and imperial size and tram type ...Photocopy of a MMTB / MTA sheet giving the various glass sizes and specifications for W class trams only. Gives description, store schedule, metric and imperial size and tram type fitted to.trams, tramways, tramcars, specification -
 Ballarat Tramway Museum
Photograph - Digital image, 1905
Yields information about the appearance of Sturt St and an ESCo tram soon after opening of the Ballarat tramway system and demonstrates postcard printing.Digital image of a postcard of an ESCo tram westbound in Sturt St Ballarat after crossing over Armstrong St. 1905c as the tram has not been fitted with destination boxes. Has the Snows store on the left hand side of the photograph along with people crossing the street and telegraph and power wires. Has the buildings on the north side of Sturt St in the view. Has the title "Sturt St Ballarat". Sourced by Ron Scholten 31/1/2016.trams, tramways, sturt st, armstrong st, esco, postcards -
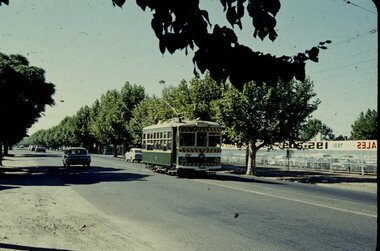
 Ballarat Tramway Museum
Slide - 35mm slide/s - set of 4, Dave Simpson, late 1960's early 1970's
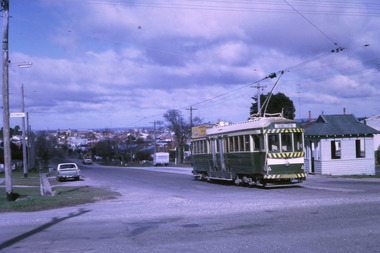
Yields information about Stones Corner and the traffic situation in Bridge St.Set of four 35mm slides - Anscochrome white plastic mounts of Stones Corner, corner of Bridge St, Victoria St and Main Road. .1 - shows the overhead arrangements, with a tram about to enter Bridge St from Main Road. Has the Caltex service station in the background, also advert or roof signs for Viscount Ambassador Caravans, K&O (Digger) Schonell Sports Cycles and Electrical store. .2 - No. 26 inbound with many passengers - showing Mt Pleasant - could be running a Special. .3 - ditto with many cars in the photograph. .4 - tram 39 about to enter Bridge St from Main Road - has a red letter box on corner.tramways, trams, main road, bridge st, victoria st, stones corner, tram 26, tram 39 -
 Ballarat Tramway Museum
Photograph - Digital image, Murray Views, Murray Views No. 29 - Sturt Street Looking West, Ballarat Vic.", 1948
... of Sturt St. looking North East from Town Hall with tram 32... from Town Hall with tram 32 westbound. Tunbridge store (now ...Digital image from the Wal Jack Ballarat Album of Photo of Sturt St. looking North East from Town Hall with tram 32 westbound. Tunbridge store (now demolished in photo), Murray Views Photo No. 29. See image i2 for rear of photograph, and 8971 for the actual postcard. See also Reg Item 189 for a larger wider version of this card.Yields information about the appearance of Sturt St looking towards the Post Office c1948.Digital image of a postcard from an album compiled by Wal Jack, loaned to the Museum.On rear of postcard in ink "No. 32 1948"trams, tramways, sturt st, tram 32 -
 Ballarat Tramway Museum
Photograph - Digital image, Wal Jack, 8/01/1952 12:00:00 AM
Yields information about Ballarat 's No. 23 and No. 16 being stored at the rear of the depot.Digital image from the Wal Jack Ballarat Album of No. 23 in the depot back yard at the Ballarat depot with tram No. 16. Photographed 8-1-1952. See image i2 for rear of photograph. See image i3 for hi res scan of print. See image i4 for hi res scan of negativeWritten on rear in ink "SEC Ballarat Tramways, Nos 23 - 16 outside depot Wendouree 8-1-52" and the Wal Jack stamp in the top right hand corner, with number T25PC written in. See Reg Item 7726 for another similar photograph.trams, tramways, gold tram, depot, tram 23, tram 16 -
 Ballarat Tramway Museum
Photograph - Digital image, 1956
Yields information about the appearance of the Hospital corner and trams using the junction.Digital image from the Wal Jack Ballarat Album of photographs of No. 39 en route to Lydiard St North turning from Drummond St south into Sturt St. Photograph unknown - has a ?berts Wine and Spirits store in the background. Reg Item 7645 gives the name of the store as H. F. Herbert See image i2 for rear of photograph. on rear in green ink "Hospital Corner"trams, tramways, hospital corner, sturt st, drummond st, tram 39 -
 Ballarat Tramway Museum
Photograph - Colour Print/s, Stephen Butler, c1978
Yields information about the Bungaree off site storage site.Group of people visiting the BTPS off site store at Sebastopol - 1978 AGM?trams, tramways, btps, off site storage, temporary storage, tram 14 -
 Ballarat Tramway Museum
Photograph - Digital image, Mal Rowe, 21/12/1967 12:00:00 AM
Demonstrates the use of the Santa Trams or decorated trams in Ballarat for the Christmas season. Yields information about their decorations.Digital Image of the two 1967 Santa Trams crossing with tram 18 at Depot Loop 21/12/1967. Tram 17 dressed as the Bridge St traders Santa tram and No. 32 as the Myers sponsored Santa Tram. Tram 17 as the destination of Mt Pleasant, No. 18 - Victoria St and No. 32 - Special. Photo by Mal Rowe. -------- Original Message -------- Subject: [TramsDownUnder] Happy Christmas and ... [1 Attachment] Date: Sat, 21 Dec 2013 10:10:13 +1100 From: Mal Rowe trams, tramways, secv, santa tram, myers, bridge st traders, tram 17, tram 18, tram 32 -
 Ballarat Tramway Museum
Photograph - Digital image Set of 10, Tony Smith, 1971
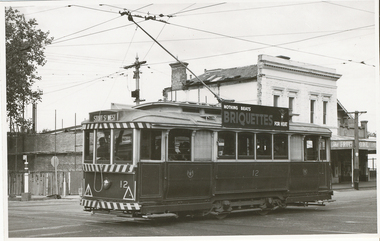
Yields information about Ballarat Tramways and trams prior to the closure of the tramway system.Set of 10 digital images of Ballarat trams prior to closure, scanned from original slides by Tony Smith, 1971 prior to closure of the system. .1 - 37 at the Lydiard St North terminus, with the shelter in the background. .2 - 33 at the Mount Pleasant terminus, has the corner store with a "The Sun" advertisement and the general store on the right side of the road in the background. Has signs for Streets Ice Cream and Coca Cola. Also has the tram stop signs - painted pole and enamel sign. .3 -33 arriving at the Mt Pleasant terminus with the conductor stepping off the back step, a lady walking across to the tram. Tram has a Twin Lakes sign. .4 - 11 at Victoria St terminus, with conductor turning the pole. Tram has a Twin Lakes sign. IN the background is the rail bridge over the Eureka line and a shelter. .5 - 11 in bound from Victoria St, shows the bleakness of the street at the time. Tram has Twin Lakes and a SEC Briquettes signs. .6 - 12 outbound to Mt Pleasant in Main St and the corner with Humffray St. Tram has a Twin Lakes sign. .7 - 11 in bound from Victoria St, in Bridge St, with junction in background. Tram has Twin Lakes and a SEC Briquettes signs. In the background are Rodda's, C.W. Pennant wall papers and Gill and O'Keffe footwear stores. .8 - 21 in Wendouree Parade, in bound to Victoria St, with the Lake in the background, near Macarthur St. .9 - 21 ditto, nearing the Macarthur St junction. Has the shelter and tram stop signage for View Point in the background. .10 - 34 sitting on the depot fan, 2 road, ready to run out. Has Mt Pleasant as the destination.trams, tramways, lydiard st north, mount pleasant terminus, victoria st, main st, bridge st, wendouree parade, macarthur st, view point, depot, tram 37, tram 33, tram 11, tram 12, tram 21, tram 34 -
 Ballarat Tramway Museum
Photograph - Digital image Set of 10, Tony Smith, 1971
... , with passengers getting onto the tram. Has the Town Hall, Myers store... trammies standing alongside the tram. Has Racey's store and the SEC ...Yields information about Ballarat Tramways and trams prior to the closure of the tramway system.Set of 10 digital images of Ballarat trams prior to closure, scanned from original slides by Tony Smith, 1971 prior to closure of the system. .1 - 42 in Barkly St - at top of hill, outbound to Mt Pleasant. Note the fire alarm on the right hand side of the photo. .2 - 42 and 21 crossing at Grant St Loop, Barkly St, Mt Pleasant. 42 outbound, 21 inbound. .3 - 34 and 21 crossing at Parker St Loop, with Ballarat College in the background. 42 in bound to City and Mt Pleasant, 21 showing Sturt St. West. .4 - 21, Wendouree Parade at the south end of the old parking loop. .5 - 42 and 21 crossing at Gardens Loop. 42 showing Mt Pleasant, 21 Gardens via Sturt St West. .6 - ditto .7 - 41 showing Special at intersection of Ripon St and Sturt St with a single trucker tram ex View Point waiting to turn into Sturt St. 41 has two Johnnie Walker Whiskey roof advertisements. .8 - Two single truckers - not well focused - 21? and 13? crossing at Mill St loop, has the hospital in the background. Conductor leaning out of the door on the outbound tram. .9 - 42, bogie tram and a single trucker at the City terminus (Sturt and Lydiard Sts). Has a group of SEC trammies standing alongside the tram. Has Racey's store and the SEC offices in the background. 42 has a briquettes roof advert. .10 - 34 in Sturt St, at the City terminus, with passengers getting onto the tram. Has the Town Hall, Myers store, Gemmola's Pharmacy in the background. Tram has the destination of Gardens via Drummond St. Nth. Has two trammies (crews) standing alongside the tram stop sign.trams, tramways, sturt st west, barkly st, grant st, parker st loop, sturt st, view point, ripon st, mill st loop, crews, town hall, tram 42, tram 21, tram 34, tram 41, tram 42 -
 Ballarat Tramway Museum
Photograph - Digital image Set of 10, Tony Smith, 1971
Yields information about Ballarat Tramways and trams prior to the closure of the tramway system.Set of 10 digital images of Ballarat trams prior to closure, scanned from original slides by Tony Smith, 1971 prior to closure of the system. The following photos have suffered colour change and showing some deterioration - fungal growth. .1 - 13 (Sturt St West) and 27 (Victoria St with Twin Lakes sign) crossing at King St loop with St Alipius church in the background. .2 - 13 (Sturt St West) and 17? (Mt Pleasant) crossing at Parker St loop, with the Ballarat College in the background. .3 - Single trucker, inbound, approaching the Parker St Loop, showing Mt Pleasant. .4 - 30 in Sturt St, descending the hill to Grenville St, with other trams in the background, including Woolworths Big W and the Dickins Store. Also has the 8 hour monument. 30 showing City. .5 - 37 running Special, no passengers, crossing Lydiard St Nth, heading for Grenville St. Has the Titanic bandstand, Mechanics Institute in the background. .6 - 33 and three other single truckers in the City Loop - has the Ballarat Gas Co and other buildings in the background. .7 - 37 showing Special passing 33 and other trams parked in the City Loop. Has Dickins, Ballarat Gas Co, Edmonds, Patersons store in the background. .8 - 17 crossing Lydiard St Nth in Sturt St. 17 has destination of Gardens via Drummond Nth, and a Twin Lakes sign. Includes the T&G sign in the background. .9 - 31, a single trucker and bogie tram crossing at Depot loop, Wendouree Parade - 31 showing Victoria St. .10 - 17 waiting in Gardens Loop, showing Mt Pleasant.trams, tramways, king st, victoria st, sturt st west, sturt st, grenville st, city loop, gardens loop, wendouree parade, tram 13, tram 27, tram 30, tram 37, tram 33, tram 17, tram 31 -
 Ballarat Tramway Museum
Photograph - Digital image Set of 10, Tony Smith, 1971
Yields information about Ballarat Tramways and trams prior to the closure of the tramway system.Set of 10 digital images of Ballarat trams prior to closure, scanned from original slides by Tony Smith, 1971 prior to closure of the system. .1 - 13 at the Parker St loop, Sturt St west waiting for another tram to arrive - Mercedes Benz car pull out around the stationary tramcar. .2 - 13 and another single trucker at the City terminus, north side of Sturt St. Note the conductor in the distance with a point bar about to hop onto the tram turning into Lydiard St North. Has the Post Office in the background. .3 - 26 arriving at the City stop, with the Mechanics Institute and Cooks Provide Hotel in the background. Tram has destination of Gardens via Drummond St North. .4 - 33 and 12 in Lydiard St Nth at Sturt St. 33 (Lydiard St Nth), 12 (Sebastopol). Has the post office and other buildings in the background .5 - 12 and 26 at city stop, south side with Town Hall and Myers in the background. 12 has destination of Sebastopol. .6 - 12 at intersection of Drummond St and Sturt St with Mobil petrol station in background and ad for Marshall batteries. Has the tram stop sign on the left hand side. Tram has destination of Sebastopol and a Twin Lakes sign. .7 - 30 northbound in Drummond St south at Sturt St about to turn into Sturt St. Has destination of Lydiard St Nth. Has the Southern Cross hotel in the background. .8 - 31 turning from Drummond St North into Sturt St, en route to Victoria St with the Shell service station in the background. Hospital Corner. Tram has roof advertisements for Johnnie Walker whisky. .9 - 30 and 31 (from above photos) in Sturt St. .10 - Tony Smith standing on the doorstep of 26 at Mt Pleasant terminus. Has the store in the background with The Sun and Robur tea adverts. trams, tramways, parker st loop, sturt st west, sturt st, conductors, drummond st, hospital corner, mt pleasant, tram 13, tram 26, tram 12, tram 30, tram 33 -
 Ballarat Tramway Museum
Photograph - Digital image Set of 10, Tony Smith, 5/09/1971 12:00:00 AM
Yields information about Ballarat Tramways and trams prior to the closure of the tramway system.Set of 10 digital images of Ballarat trams prior to closure, scanned from original slides by Tony Smith, 1971 prior to closure of the system. This set of slides, possibly on the last weekend of Mt Pleasant services - closure took place on 5/9/1971. . .1 - 17 at the City terminus, north side. Tram showing the destination of Sebastopol and has a Twin Lakes sign. .2 - 26 at the city terminus, south side with Geommola's Pharmacy and Kodak Film advert and Town Hall in the background. .3 - 43 at the City terminus, north side, with destination of Mt Pleasant. Has a number of men at the tram stop. .4 - 14 leaving Bridge St, crossing Grenville St into Sturt St, with destination of City. Has the Dickins and Woolworths Big W store in the background. .5 - 43 at Mt Pleasant terminus with conductor boarding the tram. Tram has destination of Gardens via Sturt St West. In the background is the corner store with adverts for The Sun, Womens Weekly, Coca Cola and Robur Tea. .6 - 43 and 26 Barkly St, about to arrive at the Grant St loop. Both trams inbound. .7 - 43, 26 and 27 at Grant St loop. .8 - 12 (Lydiard St Nth) and another bogie tram at the city terminus north with the Town Hall in the background. .9 - 39 outbound in Barkly St to Mt Pleasant - note the new bus stop signs on either side of the tram. 10 - 27 (City) and 26 turning from Barkly St into Main St with the Ampol petrol station, a general store advertising Escort cigarettes and The Age in the background . On the right hand side is a fish and chips shop advertising crays and drinks.trams, tramways, sturt st, city, grenville st, bridge st, mt pleasant, barkly st, grant st, main st, closure, tram 17, tram 26, tram 43, tram 14, tram 12, tram 27, tram 39 -
 Ballarat Tramway Museum
Photograph - Digital image Set of 10, Tony Smith, 5/09/1971 12:00:00 AM
Yields information about Ballarat Tramways and trams prior to the closure of the tramway system.Set of 10 digital images of Ballarat trams prior to closure, scanned from original slides by Tony Smith, 1971 prior to closure of the system. This set of slides, possibly on the last weekend of Mt Pleasant services - closure took place on 5/9/1971. .1 - 13 outbound in Barkly St, Mt Pleasant - with another single trucker and the Ballarat Fire Station in the background. .2 - Bogie tram and single trucker at Grant St Loop. Has the Mobile service station on the right hand side. Note the family sitting on the steps of a house on the left side watching proceedings. .3 - 14 (Mt Pleasant) and 39 ditto. .4 - 27? and 39 crossing at the Morrison St loop. .5 - 14 and another single trucker at Mt Pleasant terminus. Has the corner store in the background with adverts for Robur Tea, Womens Weekly and Coca Cola. .6 - 39 and two single truckers at the Mt Pleasant terminus. .7 - View looking south along Ripon St from Mair St, with power station buildings on the right hand side. Shows the power distribution poles on the street. .8 - Scrubber tram on 0 road with tennis court alongside. .9 - 40 running special in Wendouree Parade, near the Haddon St intersection. .10 - 40 turning from Macarthur St into Drummond St Nth.trams, tramways, mt pleasant, barkly st, grant st, victoria park, sturt st west, ripon st, view st, depot, wendouree parade, drummond st nth, macarthur st, closure, tram 14, tram 39, tram 13, tram 26, tram scrubber, 40 -
 Ballarat Tramway Museum
Photograph - Digital image Set of 10, Tony Smith, 19/09/1971 12:00:00 AM
Yields information about Ballarat Tramways and trams prior to the closure of the tramway system.Set of 10 digital images of Ballarat trams prior to closure, scanned from original slides by Tony Smith, 1971 prior to closure of the system. This set of slides appears to be the last day of operations - 19/9/1971 .1 - Photo taken from Cooks Hotel balcony overlooking three bogie trams parked in the City Loop with Big W and Dickins store in the background. .2 - 42 in Albert St, showing destination of Sebastopol, though could be north bound near Ophir St. .3 - 42 crossing Ophir St to the north. .4 - 42 (Lydiard St Nth), 34 (Sebastopol) crossing at the Bell St loop .5 - 42, 35 and another bogie tram at ditto - note the neat line of photographers and one person (bounding) around. .6 - 34 and 35 leaving the Grey St loop southbound. .7 - 34 and 35 southbound in Albert St passing the Borough of Sebastopol Town Hall .8 - 34 nearing the Sebastopol terminus in Albert St .9 - 35 ditto .10 - 35 ditto after passing the camera looking towards the terminus.trams, tramways, sturt st, sebastopol, albert st, city loop, ophir st, bell st, grey st, borough of sebastopol, closure, tram 42, tram 34, tram 35 -
 Ballarat Tramway Museum
Photograph - Digital image Set of 7, Tony Smith, 19/09/1971 12:00:00 AM
Yields information about Ballarat Tramways and trams prior to the closure of the tramway system.Set of 7 digital images of Ballarat trams prior to closure, scanned from original slides by Tony Smith, 1971 prior to closure of the system. This set of slides appears to be the last day of operations - 19/9/1971 .1 - 34 at the Sebastopol terminus - shows the trolley pole guide in the overhead. .2 - 34 and another bogie tram at Sebastopol with the driver and conductor posing with a family. Also note the bus stop sign on the pole by the front tram. .3 - 35 at the Sebastopol terminus .4 - 39 southbound in Drummond St south at the Bell St loop .5 - 39 passing roadworks in Bell St. .6 - 37 parked in city Loop showing Special .7 - front end of an ex HTT bogie tram in Sturt St, with Gear Chemist and Edments Hartleys store in the background.trams, tramways, sebastopol, trolley wire, albert st, drummond st, bell st, closure, tram 34, tram 35, tram 39 -
 Ballarat Tramway Museum
Photograph - Black & White Photograph/s, Lloyd Rogers, 21/03/1962 12:00:00 AM
Yields information about the appearance of Hospital Corner in the early 1960's and trams that used the area.Black and white photograph of Ballarat tram No. 30 followed by No. 34 leaving Drummond St south and crossing Sturt St, Hospital corner. No. 30 has the destination of City and No. 34, Lydiard St North. In the background is the construction of the liquor store on the south west corner by J Wier. Dated 21/3/1962. Printed on Agfa Gevaert paper in a postcard format. In the front of No. 30 can be seen a child hanging onto the door and pillar. No. 34 has SEC Electricity cooking advertisement. Photo by Lloyd Rogers.In ink "Ballarat Cars 30 and 34 entering Sturt St from Sebastopol route. 21/3/1962. and the number "4/43". In the top left hand corner "30 ex M?"trams, tramways, sturt st, drummond st sth, hospital corner, passengers, tram 30, tram 34 -
 Ballarat Tramway Museum
Photograph - Black & White Photograph/s, Lloyd Rogers, 13/12/1961 12:00:00 AM
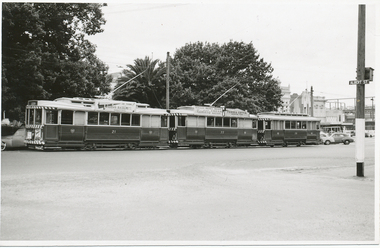
... and the construction of the Big W store. Trams tramways City Loop Sturt St tram ...Yields information about the appearance of trams parked in the City loop during early 1960's and the construction of the Big W store.Black and white photograph of Ballarat trams 21, 33 and 26 in the City Loop. Dated 13/12/1961. Printed on Agfa Gevaert paper in a postcard format. 21 - has a roof advertisement fort A. H. Collins of Sebastopol for Timber and The Age and another on the dash panel. 32 - has roof adverts for Penfold Cream Sherry cream and Eureka Terra Cotta tiles. In the background, a building (possibly the future Big W) is under construction in Grenville St. Photo by Lloyd Rogers.In ink "Ballarat trams Nos. 21, 33, 26, Sturt St 13/12/1961 and 3/19". In pencil: "21 - ex 10 Alaide, 33- ex M 189, 26 - ex M 111"trams, tramways, city loop, sturt st, tram 21, tram 33, tram 26 -
 Ballarat Tramway Museum
Photograph - Black & White Photograph/s, Lloyd Rogers, 21/03/1962 12:00:00 AM
Yields information about the appearance of tram No. 12 in the early 1960's and the Sturt St streetscape.Black and white photograph of Ballarat tram 12 in Sturt St, at the intersection of Drummond St with the destination of Sturt St West. Dated 21/3/1962. Printed on Agfa Gevaert paper in a postcard format. Has the construction of the future liquor store in the background. Also note the small tram stop pole. No. 12 has a roof advert for SEC Briquettes. In the background is The Fruit Bowl shop. Photo by Lloyd Rogers.In ink "Ballarat car 12 in Sturt St 21/3/1962 and 3/43". In pencil: "ex 71 J"trams, tramways, sturt st, hospital corner, drummond st, tram 12 -
 Ballarat Tramway Museum
Photograph - Digital image, Tramway Museum Society of Victoria (TMSV), c1930
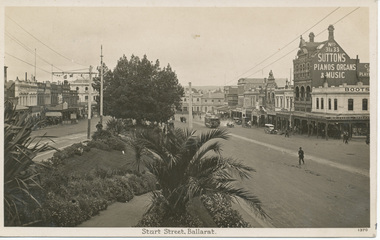
Yields information the appearance of Sturt St from Lydiard St looking east, with a number of vehicles and building sin the background.Digital image from the Wal Jack Ballarat Album of a postcard looking south east from the intersection of Sturt and Lydiard St with Suttons store and Boots in the background - c1930 with a number of motor cars in the street scene. Post card has title "Sturt St Ballarat" and number "1370". Manufacture of postcard not shown. For rear of postcard - see image i2.On rear of photograph in pencil "Ballarat Railway Station 27-12-32" and "3d" in the stamp box.trams, tramways, sturt st, esco