Showing 609 items matching "wanted"
-
 National Wool Museum
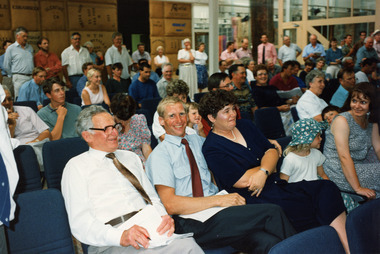
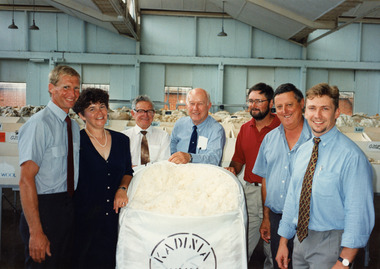
Photograph - Appledore Family, Growers Gallery, National Wool Centre, Geelong, 11 January 1995
This photograph depicts people gathered in the Growers Gallery on the 11th January, 1995 at the National Wool Centre, Geelong. It shows the emotions of Murray, Ian and Kaye Appledore while bidding took place for the million dollar bale. The wool was shorn from sheep of the Wyndarra and Rockbank bloodlines. A flock of 290 sheep were kept undercover at Kadinia, the property of the Appledore family from Brim in the Wimmera district of Victoria. Their record-breaking wool was produced by giving the sheep a special diet and providing each one with a UV-protective coat. Around 180 fleeces were selected for the million dollar bale. The sale of the first bale of wool measuring below 14 microns was held in the Auction Room here at the National Wool Museum. Bidding began at 40,000 (cents a kilogram) and steadily increased until there were only two bidders left. The bidders represented the Japanese firm Aoki International and Loro Piana of Italy. The hammer fell at 1,030,000 cents per kilogram, with Aoki International paying $1,194,800 for the 116kg bale. The fleece was scoured (cleaned) at the Goulburn Wool Scour, New South Wales. The degree of preparation and care taken with the task was extreme. The Scour closed production three days before and was extensively cleaned. On the day of scouring 12 tonnes of 17 micron wool was washed to condition the water, then nine bales of extra super fine wool, worth over $300,000 was washed as a trial run. Toabo Agaki Japan was employed to process the scoured wool into suit cloth. Taobo required the scoured wool to contain 0.5% residual grease, 12% moisture and a yield of 83kg. These requirements were met. The entire staff of the Scour wanted to be part of washing the best wool in the world. Without asking for payment both the night shift and afternoon shift crews assisted the day shift in the task. The bale was fed into the scour in seven minutes and fitted into three bowls, half the scour. It completely disappeared into the dryer and the last wool was fed before the first wool was out. The clean wool was hand-packed into cardboard cartons and freighted to Japan. Aoki International, based in Yokohama Japan, cut three suit lengths from the cloth, then blended the remaining wool into an exclusive line of commercially-available suits. These suits are labelled Kadinia.Colour photograph showing an interior view of rows of people seated and standing in room.michael crooks, auctioneer, wool industry, million dollar bale, geelong, auction, kadinia, appledore, keith jackson, sale room -
 National Wool Museum
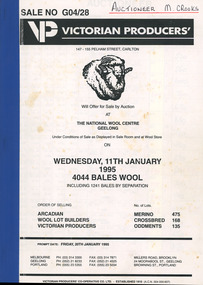
Document - Victorian Producers' Sale Catalogue, National Wool Centre, Geelong, Victorian Producers' Co-operative Limited, 11 January 1995
This sales catalogue was the one used by Auctioneer Michael Crooks on 11th January 1995 when the million dollar bale was sold at the National Wool Centre, Geelong. The wool was shorn from sheep of the Wyndarra and Rockbank bloodlines. A flock of 290 sheep were kept undercover at Kadinia, the property of the Appledore family from Brim in the Wimmera district of Victoria. Their record-breaking wool was produced by giving the sheep a special diet and providing each one with a UV-protective coat. Around 180 fleeces were selected for the million dollar bale. The sale of the first bale of wool measuring below 14 microns was held in the Auction Room here at the National Wool Museum. Bidding began at 40,000 (cents a kilogram) and steadily increased until there were only two bidders left. The bidders represented the Japanese firm Aoki International and Loro Piana of Italy. The hammer fell at 1,030,000 cents per kilogram, with Aoki International paying $1,194,800 for the 116kg bale. The fleece was scoured (cleaned) at the Goulburn Wool Scour, New South Wales. The degree of preparation and care taken with the task was extreme. The Scour closed production three days before and was extensively cleaned. On the day of scouring 12 tonnes of 17 micron wool was washed to condition the water, then nine bales of extra super fine wool, worth over $300,000 was washed as a trial run. Toabo Agaki Japan was employed to process the scoured wool into suit cloth. Taobo required the scoured wool to contain 0.5% residual grease, 12% moisture and a yield of 83kg. These requirements were met. The entire staff of the Scour wanted to be part of washing the best wool in the world. Without asking for payment both the night shift and afternoon shift crews assisted the day shift in the task. The bale was fed into the scour in seven minutes and fitted into three bowls, half the scour. It completely disappeared into the dryer and the last wool was fed before the first wool was out. The clean wool was hand-packed into cardboard cartons and freighted to Japan. Aoki International, based in Yokohama Japan, cut three suit lengths from the cloth, then blended the remaining wool into an exclusive line of commercially-available suits. These suits are labelled Kadinia.Bound paper booklet, approximately 35 pages, with printed and handwritten text.Front: [handwritten] AUCTIONEER M. CROOKS Front: [printed] SALE NO G04/28 / VICTORIAN PRODUCERS' / 147-155 PELHAM STREET, CARLTON / Will Offer for Sale by Auction / AT / THE NATIONAL WOOL CENTRE / GEELONG / Under Conditions of Sale as Displayed in Sale Room and at Wool Store / ON / WEDNESDAY, 11TH JANUARY / 1995 / 4044 BALES WOOL / INCLUDING 1241 BALES BY SEPARATIONmichael crooks, auctioneer, wool industry, million dollar bale, geelong, auction, kadinia, appledore, keith jackson, sale room, geelong wool centre -
 National Wool Museum
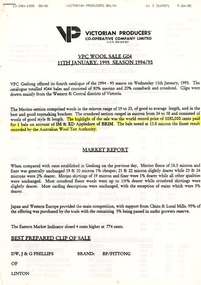
Document - Victorian Producers' Market Report, Victorian Producers' Co-operative Limited, 11 January 1995
Victorian Producers Market Report, featuring details of the sale of the million dollar bale on Wednesday 11th January, 1995 in Geelong. The wool was shorn from sheep of the Wyndarra and Rockbank bloodlines. A flock of 290 sheep were kept undercover at Kadinia, the property of the Appledore family from Brim in the Wimmera district of Victoria. Their record-breaking wool was produced by giving the sheep a special diet and providing each one with a UV-protective coat. Around 180 fleeces were selected for the million dollar bale. The sale of the first bale of wool measuring below 14 microns was held in the Auction Room here at the National Wool Museum. Bidding began at 40,000 (cents a kilogram) and steadily increased until there were only two bidders left. The bidders represented the Japanese firm Aoki International and Loro Piana of Italy. The hammer fell at 1,030,000 cents per kilogram, with Aoki International paying $1,194,800 for the 116kg bale. The fleece was scoured (cleaned) at the Goulburn Wool Scour, New South Wales. The degree of preparation and care taken with the task was extreme. The Scour closed production three days before and was extensively cleaned. On the day of scouring 12 tonnes of 17 micron wool was washed to condition the water, then nine bales of extra super fine wool, worth over $300,000 was washed as a trial run. Toabo Agaki Japan was employed to process the scoured wool into suit cloth. Taobo required the scoured wool to contain 0.5% residual grease, 12% moisture and a yield of 83kg. These requirements were met. The entire staff of the Scour wanted to be part of washing the best wool in the world. Without asking for payment both the night shift and afternoon shift crews assisted the day shift in the task. The bale was fed into the scour in seven minutes and fitted into three bowls, half the scour. It completely disappeared into the dryer and the last wool was fed before the first wool was out. The clean wool was hand-packed into cardboard cartons and freighted to Japan. Aoki International, based in Yokohama Japan, cut three suit lengths from the cloth, then blended the remaining wool into an exclusive line of commercially-available suits. These suits are labelled Kadinia.Two pages held with staple in top left corner with printed black text.Front: [printed] VP / VICTORIAN PRODUCERS' / CO-OPERATIVE COMPANY LIMITED / A. C. N. 004 059 607 / VPC WOOL SALE G04 / 11TH JANUARY, 1995 SEASON 1994/95michael crooks, auctioneer, wool industry, million dollar bale, geelong, auction, kadinia, appledore, keith jackson, sale room, geelong wool centre -
 National Wool Museum
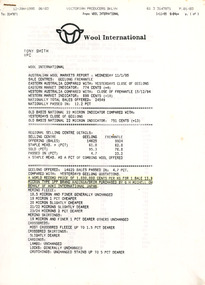
Document - Australian Wool Markets Report, Wool International, 11 January 1995
Australian Wool Markets Report, featuring details of the sale of the million dollar bale on Wednesday 11th January, 1995 in Geelong. The wool was shorn from sheep of the Wyndarra and Rockbank bloodlines. A flock of 290 sheep were kept undercover at Kadinia, the property of the Appledore family from Brim in the Wimmera district of Victoria. Their record-breaking wool was produced by giving the sheep a special diet and providing each one with a UV-protective coat. Around 180 fleeces were selected for the million dollar bale. The sale of the first bale of wool measuring below 14 microns was held in the Auction Room here at the National Wool Museum. Bidding began at 40,000 (cents a kilogram) and steadily increased until there were only two bidders left. The bidders represented the Japanese firm Aoki International and Loro Piana of Italy. The hammer fell at 1,030,000 cents per kilogram, with Aoki International paying $1,194,800 for the 116kg bale. The fleece was scoured (cleaned) at the Goulburn Wool Scour, New South Wales. The degree of preparation and care taken with the task was extreme. The Scour closed production three days before and was extensively cleaned. On the day of scouring 12 tonnes of 17 micron wool was washed to condition the water, then nine bales of extra super fine wool, worth over $300,000 was washed as a trial run. Toabo Agaki Japan was employed to process the scoured wool into suit cloth. Taobo required the scoured wool to contain 0.5% residual grease, 12% moisture and a yield of 83kg. These requirements were met. The entire staff of the Scour wanted to be part of washing the best wool in the world. Without asking for payment both the night shift and afternoon shift crews assisted the day shift in the task. The bale was fed into the scour in seven minutes and fitted into three bowls, half the scour. It completely disappeared into the dryer and the last wool was fed before the first wool was out. The clean wool was hand-packed into cardboard cartons and freighted to Japan. Aoki International, based in Yokohama Japan, cut three suit lengths from the cloth, then blended the remaining wool into an exclusive line of commercially-available suits. These suits are labelled Kadinia.Three pages held with staple in top left corner with printed black text.Front: [printed] Wool International / TONY SMITH / VPC / WOOL INTERNATIONAL / AUSTRALIAN WOOL MARKETS REPORT: WEDNESDAY 11/1/95michael crooks, auctioneer, wool industry, million dollar bale, geelong, auction, kadinia, appledore, keith jackson, sale room, geelong wool centre -
 National Wool Museum
Photograph - Million Dollar Bale, National Wool Centre, Geelong, 11 January 1995
This photograph shows Grower Ian Appledore, Auctioneer Michael Crooks and Wool Manager Keith Jackson posing with the million dollar bale after it was sold on 11th January 1995 in Geelong. The wool was shorn from sheep of the Wyndarra and Rockbank bloodlines. A flock of 290 sheep were kept undercover at Kadinia, the property of the Appledore family from Brim in the Wimmera district of Victoria. Their record-breaking wool was produced by giving the sheep a special diet and providing each one with a UV-protective coat. Around 180 fleeces were selected for the million dollar bale. The sale of the first bale of wool measuring below 14 microns was held in the Auction Room here at the National Wool Museum. Bidding began at 40,000 (cents a kilogram) and steadily increased until there were only two bidders left. The bidders represented the Japanese firm Aoki International and Loro Piana of Italy. The hammer fell at 1,030,000 cents per kilogram, with Aoki International paying $1,194,800 for the 116kg bale. The fleece was scoured (cleaned) at the Goulburn Wool Scour, New South Wales. The degree of preparation and care taken with the task was extreme. The Scour closed production three days before and was extensively cleaned. On the day of scouring 12 tonnes of 17 micron wool was washed to condition the water, then nine bales of extra super fine wool, worth over $300,000 was washed as a trial run. Toabo Agaki Japan was employed to process the scoured wool into suit cloth. Taobo required the scoured wool to contain 0.5% residual grease, 12% moisture and a yield of 83kg. These requirements were met. The entire staff of the Scour wanted to be part of washing the best wool in the world. Without asking for payment both the night shift and afternoon shift crews assisted the day shift in the task. The bale was fed into the scour in seven minutes and fitted into three bowls, half the scour. It completely disappeared into the dryer and the last wool was fed before the first wool was out. The clean wool was hand-packed into cardboard cartons and freighted to Japan. Aoki International, based in Yokohama Japan, cut three suit lengths from the cloth, then blended the remaining wool into an exclusive line of commercially-available suits. These suits are labelled Kadinia.Colour photograph showing three men standing around a bale of wool.michael crooks, auctioneer, wool industry, million dollar bale, geelong, auction, kadinia, appledore, keith jackson, sale room, geelong wool centre -
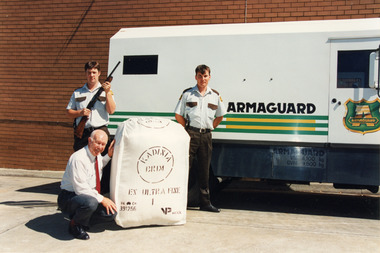 National Wool Museum
Photograph - Armed Guards with Million Dollar Bale, 11 January 1995
This photograph shows armed guards and Wool Manager Keith Jackson posing with the million dollar wool bale after it was sold by auctioneer Michael Crooks on the 11th January, 1995 in Geelong. The wool was shorn from sheep of the Wyndarra and Rockbank bloodlines. A flock of 290 sheep were kept undercover at Kadinia, the property of the Appledore family from Brim in the Wimmera district of Victoria. Their record-breaking wool was produced by giving the sheep a special diet and providing each one with a UV-protective coat. Around 180 fleeces were selected for the million dollar bale. The sale of the first bale of wool measuring below 14 microns was held in the Auction Room here at the National Wool Museum. Bidding began at 40,000 (cents a kilogram) and steadily increased until there were only two bidders left. The bidders represented the Japanese firm Aoki International and Loro Piana of Italy. The hammer fell at 1,030,000 cents per kilogram, with Aoki International paying $1,194,800 for the 116kg bale. The fleece was scoured (cleaned) at the Goulburn Wool Scour, New South Wales. The degree of preparation and care taken with the task was extreme. The Scour closed production three days before and was extensively cleaned. On the day of scouring 12 tonnes of 17 micron wool was washed to condition the water, then nine bales of extra super fine wool, worth over $300,000 was washed as a trial run. Toabo Agaki Japan was employed to process the scoured wool into suit cloth. Taobo required the scoured wool to contain 0.5% residual grease, 12% moisture and a yield of 83kg. These requirements were met. The entire staff of the Scour wanted to be part of washing the best wool in the world. Without asking for payment both the night shift and afternoon shift crews assisted the day shift in the task. The bale was fed into the scour in seven minutes and fitted into three bowls, half the scour. It completely disappeared into the dryer and the last wool was fed before the first wool was out. The clean wool was hand-packed into cardboard cartons and freighted to Japan. Aoki International, based in Yokohama Japan, cut three suit lengths from the cloth, then blended the remaining wool into an exclusive line of commercially-available suits. These suits are labelled Kadinia.Colour photograph showing three men with a bale of wool in front of an armaguard truck. Two of the men are armed guards standing either side of the wool bale, one is holding a shotgun. Another man in a suit and tie is crouching near the bale.gavel, michael crooks, auctioneer, wool industry, million dollar bale, geelong, auction, kadinia, appledore, keith jackson, armed guards, armaguard -
 Uniting Church Archives - Synod of Victoria
Plaque - Portrait plaque, James Heeley, c1820
Portrait plaque of a bare headed profile bust of John Wesley left, made of bronze gilt and mounted on dark brown wood. The plaque has paper on the back on which text is printed including manufacturer's details for re-ordering. On front: "SEAL OF THE METHODIST CONFERENCE" On back: " SEAL OF THE METHODIST CONFERENCE/ THE REVD. JOHN WESLEY NAT 1709, OB. 1791/WHAT HATH GOD WROUGHT, rev. printed label in twenty lines, TO THE METHODIST CONNECTION AT LARGE/ THE WANT OF A NEW METHODIST CHAPEL IN BIRMINGHAM/ CORRESPONDENT TO THE SIZE AND RESPECTABILITY OF THE TOWN, HAS LONG BEEN FELT BY THE FRIENDS OF METHODISM, A CONSIDERABLE NUMBER OF WHOM CANNOT BE ACCOMODATED IN THE CENTRAL CHAPEL. SUBSCRIPTIONS FOR THE ERECTION OF A COMMODIOUS PLACE OF WORSHIP HAVE ALREADY COMMENCED AND THE PROFIT ARISING FROM THE SALE OF THEIS INTERESTING PIECE WILL BE SACREDLY APPROPRIATE TO THE SAME PURPOSE. THE PURCHASERS OF THESE MEDALS WIL BE MANIFESTING THEIR LIBERALITY AT THE SAME TIME AS THE PIECE ITSELF WILL OPERATE AS A MOMENTO OF OUR OBLIGATION TO THE LASBOURS AND LEARNING OF THAT APOSTOLIC MAN TO WHOM WE ARE INDEBTED FOR OUR RICHEST BLESSINGS. IT WILL ALSO REMIND US THAT WE ARE ONE BODY THROUGHOUT THE WORLD. AND WITH THESE ENLARGED VIEWS NO UNDERTAKING CAN BE TOO GREAT FOR US TO ACCOMPLISH AND SURELY THEN NO FRIEND OF METHODISM WILL BE WITHOUT ONE OF THESE IMPRESSIONS IN HIS POSSESSION. THE FRIENDS IN EVERY CIRCUIT MAY BE SUPPLIED BY APPLYING TO JAMES HEELEY MANUFACTURER OF FINE STEEL TOYS, GREAT CHARLES STREET BIRMINGHAM. JANY. 1ST 1820 ENGRAVED AND PRINTED BY R. PEART, 38 BULL STREET BIRMINGHAM."rev john wesley, rev james watkin -
 Coal Creek Community Park & Museum
Music Sheets
A selection of 36 music sheets. Numbers against each song title has been written by the original owner. 1 - Ginger Headed Feller 2 - Dreamy Hawaiian Moon 3 - Small Fry 4 - A Little Kiss At Twilight 7 - Musical Comedy Favourites Pt 1 & 2 9 - Moonlight in Waikiki 12 - You're Pretty as a Picture / My Own 19 - Sweethearts and Wooden Shoes (2 Copies) 20 - One Day When We Were Young 24 - Who Do You Think You Saw Last Night? / You're Lovely Madam 25 - Thanks For Everything / I Found My Yellow Basket 27 - Josephine / I'm Singing a Song for the Old Folks 30 - Romany / The Park Parade 31 - A Song of Old Hawaii / So little Time 83 - A Pretty Girl is like a Melody / You 101 - One Never Knows, Does One / Goodnight My love 103 - Someone to Care For Me / Rainbow on the Rive 105 - Miracles Sometimes Happen / I Want the Whole World to Love You 112 - The Coronation Waltz 116 - Looking Around Corners For You / There's That Look in Your Eyes Again 117 - May I Have The Next Romance With You? / Head Over Heels in Love 118 - Harbour Lights / There's Yoo-hoo in Your Eyes 146 - Its The Natural Thing to Do / The Moon Got In My Eyes 150 - The Little Boy Santa Forgot / Have You Ever Been In Heaven 152 - Where an Old Spanish Town Used To Be / Once In A While 154 - You're a Sweetheart / My Fine Feathered Friend 157 - Sweet Someone / Broadway's Gone Hawaii 158 - Always and Always / A Gypsy Told Me 160 - Got A Pair Of New Shoes / A Serenade to the Stars 161 - Down Where the Trade Winds Blow / Hawaii Calls 163 - More Than Ever / Let's Give love Another Chance 165 - A Foggy Day / Rosalie 166 - Who Are We To Say / Shadows on the Moon 169 - Melody Farm / The One I Love 170 - Moonshine Over Kentucky / An Old Straw Hat 175 - On The Sentimental Side / My Heart is Taking Lessonspencil and blue ink numbering system. -
The Beechworth Burke Museum
Audio - Oral History, Jennifer Williams, Max Suter, 29 June 2000
Mr Max Sutor was born in South Australia. He first began his work as a marine engineer at the Mildura Irrigation Trusts, moving later to the Melbourne Harbour Trusts. After a number of years as an engineer, he moved into farming at Gippsland and joined the prison service several years after during the late 1960s. He was first stationed at Morwell River Prison in South Gippsland, transferring to McLeod Prison in 1972 and finally to Beechworth in 1974 as senior prison and stores officer. He would assist in the organisation, obtaining and distribution of food and medication to prisoners. The prison, at the time, was of medium security and held high security prisoners, with an estimated amount of 108 prisoners to 23 staff. Mr Suter showed a great push in showing humility towards prisoners, wanting to avoid animosity against them by never looking at their records to treat them equally. His choice of kind behaviour towards prisoners had clearly influenced their own, especially during manual labor. The prison had worked cooperatively with a local farm, having their prisoners assist in the farm work. Attitudes inevitably changed positively for several prisoners. Whilst he held no control over their actions at the farm, he still became well trusted and liked amongst the prisoners, as they would continue to go to him for assistance and questions. Mr Suter had also worked as an instigator of finding drugs within each prison he has worked within. This led him to study the variations, and being a member of the Parents and Citizens Association at the high school his children attended, as well as Community Service Director of a Rotary club, he wanted to educate parents in guidance for those unsure on how to conduct actions against such behaviours. From his first seminar, a police surgeon told him that three drug users were found by their parents. This oral history recording was part of a project conducted by Jennifer Williams in the year 2000 to capture the everyday life and struggles in Beechworth during the twentieth century. This project involved recording seventy oral histories on cassette tapes of local Beechworth residents which were then published in a book titled: Listen to what they say: voices of twentieth century Beechworth. These cassette tapes were digitised in July 2021 with funds made available by the Friends of the Burke.Mr Max Suter's account on his time and experience as a senior prison officer at Beechworth Prison is historically and socially significant for the cultural heritage of the region. His recounts of his time working within the prison and out in local parent and community associations held a positive effect on the awareness and behaviours of the Beechworth area, and provides detailed information on the duties and complications working in a 20th century rural prison, as well as the lack of local awareness from adults with young influential children. This oral history account is socially and historically significant as it is a part of a broader collection of interviews conducted by Jennifer Williams which were published in the book 'Listen to what they say: voices of twentieth-century Beechworth.' While the township of Beechworth is known for its history as a gold rush town, these accounts provide a unique insight into the day-to-day life of the town's residents during the 20th century, many of which will have now been lost if they had not been preserved.This is a digital copy of a recording that was originally captured on a cassette tape. The cassette tape is black with a horizontal white strip and is currently stored in a clear flat plastic rectangular container. It holds up 40 minutes of recordings on each side.Max Suterlisten to what they say, beechworth, oral history, burke museum, max suter, beechworth prison, farming, drug awareness -
 Federation University Historical Collection
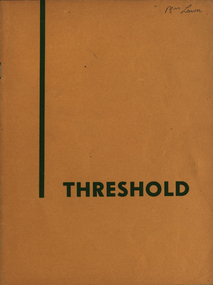
Booklet, Threshold: The Magazine of the Ballarat Girls' Technical School, 1959, 1959
1959 was the first issue of 'Threshold'. In 1951 thirty girls started a junior technical course for the first time in Ballarat, under the Principal of the Ballarat School of Mines. By 1959 it had increased enormously with an enrolment of 284 students, and its own headmistress. The early school took place in the Dana Street Primary School and a large portion of the Ballarat Technical Art School. It was not thought necessary for girls to produce a magazine, but Joan Hood (Kirner) was determined that the girls would have the same opportunity as the boys. “When I went out teaching, I went to Ballarat Girls Tech, where I met [husband] Ron who was at Ballarat Boys Tech. They were seen as tough schools, and I saw the disadvantage faced by these girls who were at the lowest of the low of the education rung – and yet there were some fantastic girls there who needed equal opportunity. So I think it was teaching that cemented in my mind that people don’t get an even go – and in particular girls. It didn’t take me too long to realise blokes were largely empowered. And it was teaching that cemented how equity and empowerment for women could be achieved through education.” Sarah Capper: You graduated from Melbourne University in 1958, and as mentioned, began work as a teacher in Ballarat. You married Ron in 1960 and received one of those government letters asking you to resign - JK: Yes, I think it burnt a hole in my pocket when I brought it home! We were both teachers, and I said to Ron, “Well, you got married – where’s your letter?!” That really clarified that the world wasn’t quite even, even in this profession that I’d always wanted and loved. I didn’t get superannuation – I think I got something like 100 pounds as pay in lieu of permanent service. And that wasn’t just me – that was a whole generation. Fancy that – that’s what it said – “pay in lieu of permanent service”. So that made me livid. If I hadn’t been a feminist before then, I certainly was by then. I realised the distribution of power was different for women and men. http://sheilas.org.au/2014/02/a-bonza-joan-kirner/, accessed 06/06/2015 The four houses of the Ballarat Girls' Technical School were Bass House, Sturt House, Flinders House and Mitchell House. Orange and green soft covered magazine of 24 pages. Includes a message from the headmistress, Fay Moore, and a photograph of the Magazine Committee featuring teacher Joan Hook (later Joan Kirner, Premier of Victoria). Information and a photograph is given for the following personalities: Sandra McHenry, Sylvia Rowe, Heather Young, Beverley Davis, Lorna Robertson, Janice Hunter, Margaret Ayars, Margaret Veal, Heather O'Brien, Hilary Batt, Leone Davies, Marlene Drever, Janet Smith.ballarat girls' technical school, joan hood, joan kirner, fay moore, i.e. harris, faye hilton, marilyn miller, lesley cutts, margaret jones, moira blair, rosemary davies, lorraine button, vivienne guy, lorraine krankovich, loralie crabbe, beverley davis, shirley dean, lorrice campbell, hilary batt, valerie stewat, sandra mchenry, joy henderson -
 NMIT (Northern Melbourne Institute of TAFE)
Photograph: Mr. George Thomas Teacher and Councillor CTS 1937-1972
Mr. George Thomas' connection with Collingwood Technical School began as a junior technical student at Collingwood in 1913. He then became an apprentice in the electrical trades during which time he also undertook a Diploma course in Electrical Engineering. Mr Thomas was appointed as a teacher (part-time) of Electrical Wiring at Collingwood in 1922 having had previous experience teaching in Geelong at the Gordon Institute of Technology. In 1930 Mr Thomas became a full-time teacher in Electrical Trades, the year of the commencement of the Apprenticeship Commission in Victoria. In 1937 he was instrumental in introducing electroplating as a trade whereas it had previously only been taught as a section of the Electrical Trades. This was a period of severe economic constraints following the Great Depression and spending on education was limited. Needing the latest knowledge of industrial practices, Mr Thomas canvassed electroplating industries around Melbourne seeking employment opportunities and met with favourable responses. He approached Quinton’s electroplating firm in North Melbourne with the proposal to work for them on Saturday mornings without payment. In return for his labour, he asked to be taught the basics of the trade. During the week he was able to impart his knowledge to his students. Initially, he wanted to develop electroplating as an outlet for the Youth Employment Training Scheme. Once the class was firmly established, he submitted a proposal to the Education Department to establish an Electroplating Department, and this became the first of its kind in the southern hemisphere. He gave up teaching in 1939 to become the Northcote City Electrical Engineer where he served for 26 years. During this time he was also a Consulting Electrical Engineer to Box Hill and Port Melbourne Councils. His association with Collingwood Technical School (and later, College) continued, first as an examiner on the State Electricity Commission (SEC) panel and from 1947 as a member of the School Council. He was president of the Council in 1961 and 1962. He also represented the College on the Northern Regional Council and participated in the selection of Electrical Trades teachers. For four years, 1967-1971, he represented the metropolitan Technical Schools and Colleges on the Council of the Monash University, in which capacity he gave outstanding service to technical education. George H. Thomas attended his first Council meeting on June 12, 1947 and remained on the Council until the secondary and post-secondary sections were separated in 1981 – a period in excess of 34 years. (See Scott p36).Black and white photographs of Mr. George Thomas who had a long association with Collingwood Technical School and Collingwood Technical College, spanning the years 1937-1972. He began his connection with the school as a teacher and went on to become a member of the School Council. He introduced Electroplating as a trade to be taught at Collingwood Technical School in 1937. (Scott p36) The photographs include one of Mr. George Thomas in Monash University regalia 1971. Another of Collingwood Technical School Council 1972 with Mr. Thomas. Images also include an excerpt from Mr. Scott's history.collingwood technical school, george h. thomas, electroplating course, nmit -
 National Wool Museum
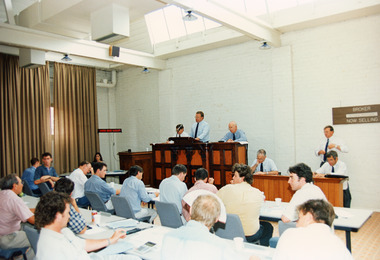
Photograph - Sale Room, National Wool Centre, Geelong, 11 January 1995
This photograph shows bidding underway for the million dollar bale in the Sale Room on the 11th January, 1995 at the National Wool Centre, Geelong. People depicted include Sale Team Baxter Murray, Auctioneer Michael Crooks and Wool Manager Keith Jackson. The wool was shorn from sheep of the Wyndarra and Rockbank bloodlines. A flock of 290 sheep were kept undercover at Kadinia, the property of the Appledore family from Brim in the Wimmera district of Victoria. Their record-breaking wool was produced by giving the sheep a special diet and providing each one with a UV-protective coat. Around 180 fleeces were selected for the million dollar bale. The sale of the first bale of wool measuring below 14 microns was held in the Auction Room here at the National Wool Museum. Bidding began at 40,000 (cents a kilogram) and steadily increased until there were only two bidders left. The bidders represented the Japanese firm Aoki International and Loro Piana of Italy. The hammer fell at 1,030,000 cents per kilogram, with Aoki International paying $1,194,800 for the 116kg bale. The fleece was scoured (cleaned) at the Goulburn Wool Scour, New South Wales. The degree of preparation and care taken with the task was extreme. The Scour closed production three days before and was extensively cleaned. On the day of scouring 12 tonnes of 17 micron wool was washed to condition the water, then nine bales of extra super fine wool, worth over $300,000 was washed as a trial run. Toabo Agaki Japan was employed to process the scoured wool into suit cloth. Taobo required the scoured wool to contain 0.5% residual grease, 12% moisture and a yield of 83kg. These requirements were met. The entire staff of the Scour wanted to be part of washing the best wool in the world. Without asking for payment both the night shift and afternoon shift crews assisted the day shift in the task. The bale was fed into the scour in seven minutes and fitted into three bowls, half the scour. It completely disappeared into the dryer and the last wool was fed before the first wool was out. The clean wool was hand-packed into cardboard cartons and freighted to Japan. Aoki International, based in Yokohama Japan, cut three suit lengths from the cloth, then blended the remaining wool into an exclusive line of commercially-available suits. These suits are labelled Kadinia.Colour photograph showing an interior view of people seated at rows of tables with an auctioneers stand at front of the room.michael crooks, auctioneer, wool industry, million dollar bale, geelong, auction, kadinia, appledore, keith jackson, sale room -
 National Wool Museum
Photograph - Million Dollar Bale, National Wool Centre, Geelong, Gordon Robertson, 11 January 1995
This photograph shows Growers Ian Appledore, Kaye Appledore and Murray Appledore, Wool Manager Keith Jackson, Wool Classer Phillip Gibson, Geoff Allibon and Brendan Dart posing with the million dollar bale after it was sold on 11th January 1995 in Geelong. The wool was shorn from sheep of the Wyndarra and Rockbank bloodlines. A flock of 290 sheep were kept undercover at Kadinia, the property of the Appledore family from Brim in the Wimmera district of Victoria. Their record-breaking wool was produced by giving the sheep a special diet and providing each one with a UV-protective coat. Around 180 fleeces were selected for the million dollar bale. The sale of the first bale of wool measuring below 14 microns was held in the Auction Room here at the National Wool Museum. Bidding began at 40,000 (cents a kilogram) and steadily increased until there were only two bidders left. The bidders represented the Japanese firm Aoki International and Loro Piana of Italy. The hammer fell at 1,030,000 cents per kilogram, with Aoki International paying $1,194,800 for the 116kg bale. The fleece was scoured (cleaned) at the Goulburn Wool Scour, New South Wales. The degree of preparation and care taken with the task was extreme. The Scour closed production three days before and was extensively cleaned. On the day of scouring 12 tonnes of 17 micron wool was washed to condition the water, then nine bales of extra super fine wool, worth over $300,000 was washed as a trial run. Toabo Agaki Japan was employed to process the scoured wool into suit cloth. Taobo required the scoured wool to contain 0.5% residual grease, 12% moisture and a yield of 83kg. These requirements were met. The entire staff of the Scour wanted to be part of washing the best wool in the world. Without asking for payment both the night shift and afternoon shift crews assisted the day shift in the task. The bale was fed into the scour in seven minutes and fitted into three bowls, half the scour. It completely disappeared into the dryer and the last wool was fed before the first wool was out. The clean wool was hand-packed into cardboard cartons and freighted to Japan. Aoki International, based in Yokohama Japan, cut three suit lengths from the cloth, then blended the remaining wool into an exclusive line of commercially-available suits. These suits are labelled Kadinia.Colour photograph showing three six men and one woman standing around a bale of wool.michael crooks, auctioneer, wool industry, million dollar bale, geelong, auction, kadinia, appledore, keith jackson, sale room, geelong wool centre -
 Mont De Lancey
Card - Postcards, early 1900's
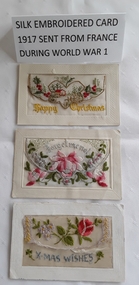
Greeting cards sent during WW1 - 1917, 1918. Owned and sent by R.T. Mitchell to his daughter Anne.Three silk embroidered postcards, sent from France during World War 1, from R.J. Mitchell to his daughter Anne. There are also two black and white postcards.1. Handwritten in grey pencil on the back of the Forget-Me-not card: 31/5/1917 'Dear Anne I got a letter from you a few days ago and am glad to know you are well and got plenty of work to do. How is school getting on, do you still want to be a teacher well if you do mind you are a good one. Your loving fatherr. 2. X-mas wishes: France 5th 1918. Dear Annie Received your birthday thank you very much How are you getting on with your scholarship. Hope you have a very happy christmas Lots of love your affe father R.J.Mitchell 3. handwritten in grey pencil on the back of the Happy Christmas card 'Somewhere in Belgium Oct 15th, 1917 Dear Anne Received your letter of July 3rd. Am sorry pearl has ben so bad, hope she is alright again now. Well I am keeping quite well we are having plenty of rain although it is fine today. Hope you have a veery merry Christmas Loads of love Your affec father R J Mitchell'. 4. Carte Postale - Postcard 5/1918postcards, greeting cards -
 Eltham District Historical Society Inc
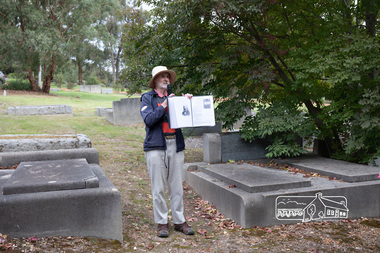
Photograph, Peter Pidgeon, Grave of Charlotte Amelia Taylor, Lillian Jane Taylor and Robert David Taylor, Eltham Cemetery, 5 April 2021
Robert David Taylor was a farmer who lived in Eltham all his life and died in 1934 at the age of 76. Mr and Mrs Bowman lived in York Street; Taylor was their neighbour. In 1933 he subdivided his land, the plan showing a proposed Grey Street flanked by residential blocks for sale. Mrs Bowman bought one: her family would be able to walk through it and along Grey Street to Henry Street, thus providing quicker access to the railway station. But Taylor retained ownership of Grey Street itself. He fenced it off at each end and charged the Bowmans with trespass when they used it. The matter went to Court. The ruling was that Mrs Bowman could use Grey Street, as she owned land in it, but her husband could not. (Taylor also accused the Bowmans of having broken the fences, but could not prove it.) Taylor had wanted to subdivide his land in 1914. Plans were submitted to Council and were approved, but the subdivision did not proceed. In 1919, Taylor doctored the plans to make it appear that a totally different subdivisional arrangement had been approved. The Titles Office immediately detected fraud, and the Crown charged Taylor with forgery and counterfeiting. But charges were later dropped (reason not recorded). He was an Eltham Shire Councillor between 1911 and 1920. In 1920, Council charged him with illegally felling 91 eucalyptus trees in Eltham Park (60% of them in a healthy condition), presumably to be sold as firewood. He was imprisoned pending trial. Taylor claimed that he had acquired from another man the right to remove timber and sued the Council for wrongful prosecution. The case eventually went to the State Full Court, with judgement given in favour of Council, on the grounds that any right acquired by Taylor covered only the removal of logs and refuse, not sound green timber. And his position as Councillor precluded him from acquiring the right anyway. Robert David Taylor was also a Trustee of the Wesleyan Church owned land at Lot 20 Henry Street, originally purchased in January 1855 for a chapel and from which David and Catherine Clark first ran their private school, the forerunner of the Eltham Primary School. The land was sold in November 1901 to the Hope of Eltham Tent No. 195 Victoria District Independent Order of Rechabites, for which his brother William John Taylor was a Trustee and became the home of the Eltham Rechabite Hall. In December 1921 it was again sold, this time to the community for use as the Eltham Public Hall, Robert David Taylor being a member of the Committee.Born Digitaleltham cemetery, gravestones, charlotte amelia taylor, eltham district historical society, heritage excursion, lillian jane taylor, richard pinn, robert david taylor -
 Mission to Seafarers Victoria
Print - Reproduction, Petition, The Photography Department (Jeremy Dillon), Captains' Petition, 2016
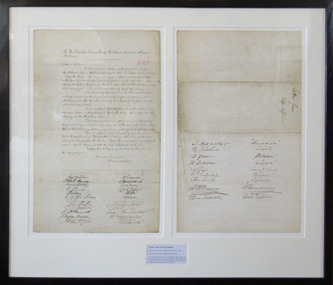
This is a reproduction of the original 1897 Captains' petition to build a Central Institute on the Yarra river. "To the Executive Committee of the Victorian Seamen's Mission, Melbourne. "Ladies and Gentleman, "We, the undersigned captains of several ships now lying at the Melbourne wharves think it most desirable that the Victorian Seamen's Mission, being the mission that has for so many years shown a most part their interest in the spiritual, moral, and social well-being of the seamen of all nationalities, shall him on the banks of the Yarra an institute such as that at Port Melbourne, where sailors of every grade could profitably and pleasantly spend their evenings. At almost every other seaport in the world such institutions are being provided for seamen, and we are satisfied from our opinion of the Melbourne public that the matter needs only to be prominently brought under their notice to be accomplished. We are confident that the good work of the mission is being hampered by its not having such a place near the shipping at the Melbourne wharves. Our crews are at present placed at a great dis advantage through not having an institute more convenient to the scene of their labours than that at Port Melbourne, which, on a very wet or a very hot, is not easily reached. If a site could be obtained immediately above the Gasworks but on the other side of Flinders street extension, that is to say, on the lower part of the land on which the Harbour Trust offices are built, it would be most convenient for the shipping on both the north and south side of the river. Trusting that it may be possible to do some thing to meet this long felt want, We suscribe ourselves, Yours respectfully, Geo.H Steven, master ship Dharwar; Thos. Curd, master ship Narcissus; James Horne, master ship Loch Garry; T.Tait, master ship Loch Ryan; T. Nilsen, master ship Hebe; G. Ch Christian, master ship Anna; R.E. Peasley, master ship Seminole; Wm. Martin, master ship Loch Ness; T.C. Martin, master ship Loch Tay; W.H. Bennett, master ship Loch Vennachar; J. Raglan Brodie, master s.s. Warrnambool; James E. Coles, master ship Mermerus; J. H. Walker, master ship Hinemoa; R.J. Johns, master ship Ariel; D. Gorchem (sic. Gerckens), master ship Matador; H. Petersen, master ship Nesaia; Wm. J. Reid, master s.s. Star of New Zealand; A. F. Svhanstrom, master ship Hermes; Alex. Smith, master ship Sophocles; W. Y. Bunn, master ship Carmanian; William Anderson, master ship Loch Katrine."Framed and mounted reproduction of Captains' petitionpetition, seamen's mission, yarra river, captains, victoria, melbourne, ships, australia-wharf, signatures, 717-flinders-street-docklands, maritime welfare services, mission to seafarers, mission to seamen, mermerus, captain coles, sir john coode, loch line, loch ness, loch gary, loch ryan, ss warrnambool, loch tay, loch vennachar, matador, nesaia, d. gerckens, h. petersen, a.f. svhanstrom, hermes, ariel, loch katrine, william anderson, dharwar, narcissus, hebe, anna, hinemoa, sophocles, carmanian, early origins, 2016, exhibitions -
Glen Eira Historical Society
Document - Caulfield Elderly Citizens’ Association
Contains 15 items: 1/Blank paper with letterhead of the Caulfield Elderly Citizens’ Association – President, Mrs Cr. G. E. Wallace, MBE, JP. (Gladys Wallace, later Gladys Machin) 2/Handwritten minutes of public meetings, Caulfield Elderly Citizens’ Association, held 02/10/1952 (two pages). 27 were in attendance, a Ladies’ Committee had been formed. 3/Minutes (typewritten; one page) of the third public meeting of the Caulfield Elderly Citizens’ Association, Caulfield Town Hall, 03/02/1953. 4/Minutes (typewritten, one page) of the Caulfield Elderly Citizens Association held 10/04/1953-minutes seem incomplete. 5/Caulfield Elderly Citizens Association Honary Secretary’s First Annual Report for the year ended 28/02/1954 (typewritten, three pages). Notes that the Association had 542 financial members. 6/Caulfield Elderly Citizens Association – first Annual Meeting, held 18/03/1954 (typewritten, 3 pages). 62 attended this AGM. 7/ Caulfield Elderly Citizens Association. Second Annual Meeting held 30/03 (no date stated but 1955 is meant). The report opens to the balance sheet for the year ending 28/02/1955. 91 were in attendance. 8/Caulfield Elderly Citizens Association – Revenue Statement from 01/03/1956 to 30/06/1957. The Association had 12,151 pounds in its accumulated fund, with 1,489 in expenditures in 1956-57. 9/’Some Questions – Answers Wanted’ – list (one page) of 18 questions arising out of the Association’s 1960-61 report. Unsigned, without response. 10/Caulfield Elderly Citizens Association – minutes of meeting held on 07/08/1961. 11/Invitations (3 copies) to attend the eight annual meeting of the Caulfield Elderly Citizens Association, to be held on 07/08/1961, with Agenda of the Meeting. 12/Invitations (5 copies) to attend the Ninth Annual Meeting of the Caulfield Elderly Citizens Association, 19/07/1962, with Agenda of the Meeting. 13/Caulfield Elderly Citizens Association – Minutes of the Eight Annual Meeting held 07/08/1962 (although 1961 may have been meant) (3 copies). 14/Minutes of Ninth annual meeting Elderly Citizens Association 19/09/1962. 15/Typewritten ‘List of Members who have passed away’, listed by year from 1955 through 1962, 75 names with no further information.caulfield elderly citizens association, caulfield aged people associations, elderly citizens clubs, elderly people meetings, wallace cr g. e. mrs, wallace gladys, machin gladys -
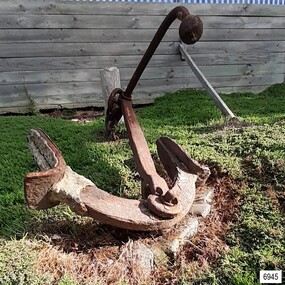 Flagstaff Hill Maritime Museum and Village
Equipment - Anchor, John Trotman, 1852 to early 1900s
This Trotman’s pattern stock anchor is the southernmost anchor on display at Flagstaff Hill’s Anchor Graveyard. This large Trotman design anchor was patented in 1852 by John Trotman and was widely used on merchant ships. On April 15th 2001 around midday this anchor was raised from the seabed of Lady Bay, Warrnambool, by the crew from Birdon Dredging, who had been hired to dredge the Harbour. The spokesperson Steve Walker, who worked for the firm, said that the anchor and long chain were found after the chain became tangled in the cutter blade of the dredging equipment. The anchor was lifted from the water and onto the Breakwater then a front-end loader placed it onto a truck that then delivered it to Flagstaff Hill Maritime Museum & Village. Howard Nichol, Museum Manager at the time, had estimated the anchor to be up to 130 years old. The previous Museum Manager, Peter Ronald, who was also a diver, had identified the anchor as a Trotman’s type and similar to those used on some of the major wrecks in the region. According to Nicholl, Museum staff believed it was possible that the anchor is one of two used as a mooring line that had been used to catch driving vessels and prevent ships from washing aground on the sand bar. The mooring line was shown as a dotted line on the 1890 chart of Lady Bay, approved by Lieutenant Stanley of the British Admiralty. by Lieutenant Stanley [British Admiralty]. The location of the anchor corresponds to a point on that map and the length of the chain supports that theory. “The map is quite a detailed survey of the Bay and it shows two anchors with buoys on the ends with probably about 100 yards of chain stretched between them. The ships would drop anchor and was the chain as a snag because this was a treacherous bay before the Breakwater was built and this was a way to eliminate that problem, "said Nichol. The mooring chain was put in place to catch drifting vessels during wild stormy weather. It was identified. ABOUT TROTMAN’S ANCHORS- The British Admiralty wanted an anchor design that had more holding power. The Committee of 1852 on Anchors was appointed to assess and report on the qualities of various anchors including Trotman’s anchors. Trotman’s pattern anchor received the highest score. The anchor is similar to the Admiral’s design but features arms that pivot when the anchor settles and the upper fluke moves to rest against the shank. The anchor then sits lower, which in turn greatly reduces the chances of the anchor’s chain, cable or rope getting tangled. The top of the shank has a fitting that allows a quick release of the anchor’s chain if this becomes necessary. This Trotman’s anchor is significant as a part of the maritime history of the Port of Warrnambool regardless of whether it belonged to one of the 29 ships that were stranded or wrecked in Lady Bay. The anchor is connected to the many attempts to maintain Warrnambool as a safe and manageable port, including the various plans for the construction of the Breakwater.Anchor: an iron Trotman’s pattern style with a rectangular-section shank that is wider in the middle and has a base that extends on two opposite sides in a ‘fork prong’ manner. A crescent-shaped, double-ended arm is fitted into the base of the shank with a bolt, enabling it to pivot. Each arm has a fluke in the shape of an upward palm with an attached metal plate that forms a horn at the back of the palm. A long, round-section pipe is fitted to the top of the shank at 90 degrees to the arms; one side has an elbow bend parallel to the arms, and both ends have an attached metal sphere. The pivoting ring at the top of the shank can be lifted for a quick release of the chain.flagstaff hill, warrnambool, maritime village, maritime museum, shipwreck coast, great ocean road, anchor, mooring, trotman, lady bay, breakwater, admiralty, ship equipment, stock anchor, john trotman, 1852 patent, 2001, birdon dredging, steve walker, howard nichol, peter ronald, british admiralty, lieutenant stanley, committee of 1852 on anchors -
 Sunshine and District Historical Society Incorporated
Honour Board - PAST PRESIDENTS of the SUNSHINE and DISTRICT FRIENDLY SOCIETIES DISPENSARY
Friendly Societies originated in the industrial areas of the United Kingdom. The first society in Victoria was formed in 1839 and by 1913 more than half of the Victorian population was insured by Friendly Societies in some fashion. The societies were financed by Members' subscriptions and offered health benefits and other welfare services, before these services were provided by the government. Doctors were paid by the societies to treat members free of charge, and Dispensaries were established to provide members with subsidised quality medicines. The Sunshine and District Friendly Societies Dispensary was established on the 1st of March 1930 with a membership of 896, and it was located in Sun Crescent Sunshine. The membership grew to 1052 within 4.5 years, and the number of prescriptions dispensed in the 6 months prior to November 30,1935 totalled 10,535. The Dispenser was Mr. C. H. Semmens. Most Friendly Societies operated democratically with office bearers changed regularly to prevent power cliques. The Sunshine Dispensary appears to have operated in the same way as the societies that owned it. The Advocate of 10 July 1936 reports that the seven newly elected office bearers or delagates were from the Friendly Societies; A.N.A., M.U.I.O.O.F., P.A.F.S., and G.U.O.O.F. The names of all the seven people can be found on the Honour Board, indicating that they each have served at least one term as President of the Sunshine Dispensary. The health professions and the Labour Governments of the 1940's wanted to see the involvement of Friendly Societies in health care broken. The Commonwealth Free Medicine Plan appears to have been drawing customers away from Friendly Societies Dispensaries in general. The Sunshine Dispensary placed several advertisements in the Sunshine Advocate during late 1950 urging members to remain loyal to it. By the 1980's the increase in entrepreneurial clinics and the availability of take away medicine helped to vastly diminish the involvement of Friendly Societies in health care provision. The 1936 Sunshine Advocate refers to the Sunshine and District United Friendly Societies Dispensary, with the same office bearers as the Presidents on the Honour Board but on which the 'United' is missing from the name of the Dispensary. The 1950 advertisements were placed by Sunshine U.F.S. Dispensary of 23 Sun Crescent. It is thought that all three names refer to the same business, but the writer stands to be corrected. The above is a compilation of information sourced from Sunshine Advocates published in January and July 1936, and in September, October and November 1950. It also draws on an article written by Elizabeth Willis and published online by the the Department of History (University of Melbourne), and on an article written by Mr. Bill Kelly of the Australian Friendly Societies Pharmacies Association, and also on an article by Museum Victoria Australia. Corrections to what has been written are welcome from interested readers.The Honour Board provides a historical record of the Presidents that served 61 terms on the Board of the Sunshine and District Friendly Societies Dispensary. It also provides a reminder that when a government does not adequately look after the welfare needs of its citizens, the people can band together to find ways of helping each other. The Sunshine Dispensary no longer exists, and a more recently established Community Pharmacy which operated in Hampshire Road could not compete against the discount pharmacies that have taken over. These new pharmacies sell a wide range of profitable product lines, as well as dispensing traditional prescription medications.Brown stained wood particle board with picture frame type edging. The board has six straight sides however it is not typical hexagon shaped. The top is composed of three straight short edges to give an almost rounded edge to an otherwise oblong shaped bottom section. On the board in gold coloured lettering are the names of 'brothers' and 'sisters' who served a total of 61 terms as PRESIDENTS of the SUNSHINE AND DISTRICT FRIENDLY SOCIETIES DISPENSARY, which was established on the 1st of March 1930. Eight of the men served more than one term with BRO. I. MILLER serving four terms, and BRO. F. RICHER serving three. The three women SISTER. I. REWELL, SISTER. C. JOHNSON, and SISTER. M.S. ARMSTRONG served one term each. There is no indication of when each person served, but it is believed that the term length was around six months and that the list is in chronological order. This conclusion results from seeing that BRO. W. ROONEY is the 11th listed President, and that the Sunshine Advocate of 10 July 1936 states that he was elected as the new President.sunshine and district friendly societies dispensary, honour board, 1st march 1930, 1/3/1930, sunshine u.f.s. dispensary, semmens, rooney, miller, richer, armstrong, rewell, johnson -
 Sunshine and District Historical Society Incorporated
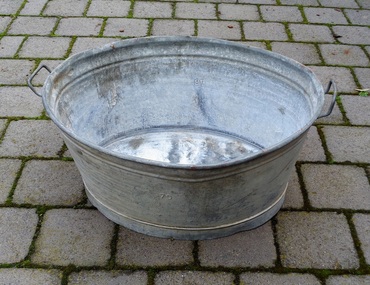
Galvanised Wash Tub, Probably Circa 1940's
Many displaced people who migrated to Australia after World War 2 brought similar tubs with them as part of their luggage. The tubs were valued by the migrants because they were used for washing clothes and other laundry items, and for bathing children and even adults. The tub in our possession was brought out to Australia in 1950 by the Pierzak family who eventually settled in North Sunshine, Victoria. The following story about the Pierzak family has been provided by the daughter Halina Wlodarczyk (nee Pierzak). The father Stanislaw Pierzak was born on the 26th of July 1916 in Zbrza, and the mother Teodozja (Teodozia) Szalas on the 5th of March 1919 in Goleciny, both villages in the Kielce district of Poland. In 1940 they were both taken by the German Army to work as slave labour on farms in Germany. Stanislaw worked in the Saxonia area and Teodozja near Dillingen. The work was hard, and when Teodozja contracted pneumonia she was told that she would not be given any food if she did not work. After the war the displaced persons, as they were called, were settled in various barracks and camps organised by the United States Army. Stanislaw and Teodozja married in Gablingen, Bavaria, Germany, and Halina was born in the camp at Gablingen in 1949. The displaced people were given the choice of several countries if they wanted to migrate from war torn Germany, and so the Pierzak family chose Australia. The Pierzak family set sail from Naples, Italy aboard the ship General M. B. Stewart and arrived in Sydney on the 17th of April 1950. The men and women had to stay in separate quarters, and many passengers were so sick that they did not think they would survive the journey. In Australia they lived in migrant camps in NSW at Bathurst, Orange, Parkes and Cowra. To pay off their fares to Australia migrants were required to work under contract for 2 years. Stanislaw Pierzak worked in Broken Hill NSW returning to visit his family every 3 to 4 months. The son John was born in the Red Cross building at the Parkes camp in 1952. In 1953 the whole family moved to Melbourne and lived in a converted garage in Victor Street, North Sunshine. In 1954 the family bought a bungalow on a block of land in Compton Parade, North Sunshine, where eventually they built a house. Stanislaw Pierzak worked at Steelweld in Ashley Street, Braybrook travelling there on his bicycle, while Teodozja Pierzak found work at Smorgon in West Footscray. Stanislaw and Teodozja Pierzak lived in North Sunshine for the rest of their lives, and Mrs Pierzak always said that Sunshine was the best place in the world.Tubs like this which belonged to displaced people were highly valued possessions and are of historic significance. They were brought out to Australia after World War 2 by many migrating displaced families. The tubs were used for washing activities in the camps in Germany, and the migrant camps in Australia, and also when people lived in bungalows in Australia before they built houses with laundries and bathrooms.Oval shaped galvanised iron tub with two rigid handles, one at each end. The top of the tub is larger than the base. The galvanising is deteriorating in some parts which show a whitish appearance. There are some small dents, and a few chips in the galvanising where surface rust has appeared.The number 70 is stamped on both sides.washing tub, galvanised tub, laundry, bath, displaced persons, immigration, general m. b. stewart, galvanized tub, pierzak, galvanised wash tub -
 8th/13th Victorian Mounted Rifles Regimental Collection
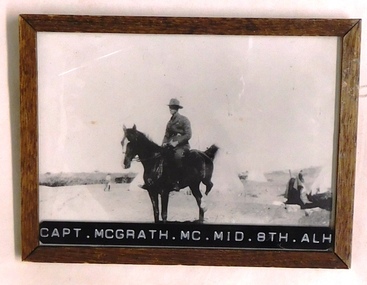
Photograph - McGrath, 1918 circa
William 'Lauchie' McGrath, an accountant with Australian Mercantile Land & Finance (AML&F), enlisted in AIF in September 1914. He was posted to 8th Light Horse regiment with the No 268 and rank of trooper. He rose through the ranks, serving at Gallipoli, Egypt and Palestine reachin the rank of Captain/Adjutant of the regiment. The 8th Light Horse Regiment AIF was raised at Broadmeadows Victoria in September 1914 under the command of Lieutenant Colonel Alexander White and formed part of the 3rd Light Horse Brigade. The regiment served at Gallipoli where in a courageous but ill-fated charge at the Nek on 7 August 1915 it suffered horrendous casualties including Lieutenant Colonel White. Rebuilt in Egypt under the command of Lieutenant Colonel Leslie Maygar VC the regiment went on the serve throughout the Middle East Campaign. Colonel Maygar died of wounds at Beersheba when the regiment was attacked by enemy aircraft while waiting to follow up the successful charge of the 4th LH Brigade on 30 October 1917. The 8th Light Horse AIF was disbanded in 1919, but soon after re-raised as the 8th (Indi) Light Horse in the Citizen Military Forces, superseding 16th (Indi) Light Horse. McGrath wrote the History of the regiment (See 3091.901) Following his return to Australia he took up farming in the Upper Murray, On 10 February 1924, a community picnic was being held at a creek below his Jingellic homestead when a maniac armed with a rifle came out of the scrub and proceeded to shoot indiscriminately int the party. No reason was ever given but it was presumed that he wanted to kill one man who was not among the five he hit. McGrath got the women and children into the creek and organised the other wounded - he had already been hit in the chest - into cover before running over open ground for his rifle in the house. In all he stopped five bullets but the gunman bolted once McGrath appeared with his own weapon.Some weeks later he was captured getting milk from a dairy and declared insane. One of the five victims died that day, one some months later, one had to use a stick for the rest of his life and McGrath was forced to give up the farm and return to his old job as an accountant. He was awarded the silver medal of the Royal Humane Society of NSW and the silver medal of the Royal Shipwreck Relief & Humane Society of NSW. The latter body felt the water in the creek made it appropriate to also make the award. McGrath enlisted again in World War Two, serving firstly as 2/ic Broadmeadows Camp and later 2/ic the Officer Commanding 12th Garrison Battalion. Framed black and white photograph of mounted officer with tents in background.Across lower edge of frame "Capt. McGrath. MC.. MID. 8th Australian Light Horse"mcgrath, 8th, light horse, garrison, royal humane society nsw -
 Melbourne Legacy
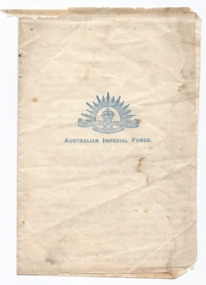
Document, Australian Imperial Force, 1918
A leaflet issued by General William Birdwood to the AIF troops just after the Armistice on 11 November 1918 to end the first world war. 'To the officers, Non-Commissioned Officers and Men of the Australian Imperial Force. It is now just four that we have been serving together, often through days of hardship and peril, and often through times of well-deserved success. During this time I hope and think we have come to know each other well and I trust we realised how rightly we have confidence in each other. No words of mine can possibly express all I feel for the magnificent work which has been done by the Australian soldier during these long four years. It is well known and recognised, not only throughout the British Empire, but throughout the world - and now we have peace in sight, and peace after a victory in which the Australian soldier has taken so large a share. Even then, with peace there are still difficult times before us. Faith in our recent foe cannot quickly be established, and it may be that some little time yet we shall be able to relax no precautions, until we are assured of the complete and honest fulfilment of our terms. Then will come the difficult time of demobilisation, and it is regarding this that I wish to make a personal appeal to every single member of the AIF in the full confidence that it will be met as every other appeal to face and tackle the strongest positions has ever been met by the Australian solider. Never has the name of Australia stood higher than it does now throughout the world, thanks to the bravery of her soldiers, and it sup to everyone one of us to see that this is maintained, and that no reproach can be cast on the Australian Flag owing to any behaviour of ours. The time of demobilisation will undoubtedly be difficult and irksome - I fully realise what great personal self-restraint will certainly be required - but if each individual of us makes up his mind to do his best during these times, realising the good name we bear, I feel confident that all will go well. I want you to remember that everything possible will be done to look after and help the troops during this period, while every energy will be strained to get men back to their homes as soon as this possibly can be done. You will have to realise, however. that there is a great shortage of shipping, and that there must be a considerable inevitable delay. Play the game, boys, during this time, as you have always done, and add still more to the deep debt of gratitude which will always be acknowledged to you by the Empire and remembered by me as your comrade and commander. In the field, 14 November 1918.' (Signed) 'W Birdwood'.A rare example of a notice to troops about the Armistice.A leaflet issued by General Birdwood to AIF troops to commemorate the end of World War 1.world war one, soldier -
 Flagstaff Hill Maritime Museum and Village
Domestic object - Bowl, Late 19th or early 20th Century
The Process of Making Pottery Decorating, Firing, Glazing, Making, Technical There is a rhythm and flow to clay. It can’t be done all at once! Even the making process! It can take weeks to get everything done, especially if you can only work on your pottery once a week! Even though we have three hour classes, it’s often just not enough time! Here is an overview of some of the processes so you have a bit more grasp on some of the technical stuff! Step One – Design There are SO many ideas out there for making stuff in clay! From delicate porcelain jewellery, through to heavy sculptural work and everything in between. Deciding your direction is sometimes not that easy – when you first start, try everything, you will naturally gravitate to the style that you enjoy! The options and variations are endless and can get a wee bit overwhelming too! Check in with me before you start to ensure your ideas will work, what order you might do things, how you could achieve the look you are seeking and any other technical data required! Step Two – Making Clay is thixotropic. This means that as you work with it, the clay first gets sloppier and wetter, before is begins to dry in the atmosphere. For most things, you simply can’t do all parts of the project at once. An example of work order might look like: Get last weeks work out from the shelves Prepare clay for today’s work – roll your clay, prepare balls for throwing, make the first stage of a pinch pot) Clean up last week’s work and put it on the shelf for bisque firing Check that you have any glazing to do – and do enough of it that you will have time to finish your main project Do the next step of your next project – there might be a further step that can’t be complete immediately, in that case, wrap your work well and put onto the shelves. Letting your work rest for a while can really help keep your work clean and professional looking. Many things require bagging under plastic to keep it ready for work the next week – put your name on the outside of the bag so you can find your work easily. We have stickers and markers. Consider how you want to decorate your work – coloured slip can be applied at a fairly wet stage (remembering that it will make your work even wetter!). Trying to apply slip to dry clay won’t work! If you want to do sgraffito – you will need to keep the work leather hard (a state of dryness where you can still work the clay with a little effort and a little water and care). Step Three – Drying Most of the time your work can go into the rack uncovered to let it dry out for the following week. If you want to continue forming or shaping you will need to double bag your work – put your work on a suitable sized bat and put the bat in a bag so the base of the bag is under the bat, then put another bag over the top of the work and tuck the top of the bag under the bat. If you want to trim (or turn) your thrown work the following week, it should also be double bagged. If your work is large, delicate, or of uneven thicknesses, you should lightly cover your work for drying. When considering the drying process, bare in mind the weather, humidity and wind! The hotter and dryer, the faster things dry and work can dry unevenly in the shelves – this can lead to cracking – another time to lightly cover your work for drying. Step Four – Trimming and Cleaning Up Your work is dry! It is called greenware now and it is at it’s most fragile! Handle everything with two hands. I often refer to soft hands – keep everything gentle and with your fingers spread as much as possible. Try to not pick up things like plates too much, and always with both hands! Before your work can be bisque fired it should be “cleaned up”. You work won’t go into the kiln if it has sharp edges – when glazed, sharp edges turn into razor blades! Use a piece of fly wire to rub the work all over – this will scratch a little so be light handed. Use a knife or metal kidney to scrape any areas that require a bit more dynamic treatment than the fly wire offers! Finally, a very light wipe over with a slightly damp sponge can help soften and soothe all of your edges and dags! Trimming thrown work: If you are planning to trim (or turn) your thrown work (and you should be), make sure you bag it well – your work should be leather hard to almost dry for easiest trimming. Use this step to finish the work completely – use a metal kidney to polish the surface, or a slightly damp sponge to give a freshly thrown look. Wipe the sponge around the rim after trimming, and check the inside of the pot for dags! Trimming slip cast work: Usually I will trim the rims of your work on the wheel the following day to make that stage easier, however you will still need to check your work for lumps and bumps. Last but not least – check that your name is still clearly on the bottom of your work. Step Five – Bisque Firing When the work is completely dry it can go into the bisque kiln. The bisque kiln is fired to 1000°C. This process burns off the water in the clay as well as some of the chemically bound water. The structure of the clay is not altered that much at this temperature. Inside the bisque kiln, the work is stacked a little, small bowl inside a larger bowl and onto a heavy plate. Smaller items like decorations or drink coasters might get stacked several high. Consideration is paid to the weight of the stack and shape of the work. A bisque kiln can fire about one and a half times the amount of work that the glaze kiln can fire. The firing takes about 10 hours to complete the cycle and about two days to cool down. Once it has been emptied the work is placed in the glaze room ready for you to decorate! Step Six – Glazing Decorating your work with colour can be a lot of fun – and time consuming! There are three main options for surface treatment at this stage: Oxide Washes Underglazes Glazes Washes and underglazes do not “glaze” the work – It will still need a layer of glaze to fully seal the clay (washes don’t need glaze on surfaces not designed for food or liquid as they can gloss up a little on their own). Underglazes are stable colourants that turn out pretty much how they look in the jar. They can be mixed with each other to form other colours and can be used like water colours to paint onto your work. Mostly they should have a clear glaze on top to seal them. Oxides are a different species – the pink oxide (cobalt) wash turns out bright blue for instance. They don’t always need a glaze on top, and some glazes can change the colour of the wash! The glazes need no other “glaze” on top! Be careful of unknown glaze interactions – you can put any combination of glaze in a bowl or on a plate, but only a single glaze on the outside of any vertical surface! Glazes are a chemical reaction under heat. We don’t know the exact chemicals in the Mayco glazes we use. I can guess by the way they interact with each other, however, on the whole, you need to test every idea you have, and not run the test on a vertical surface! Simply put, glaze is a layer of glass like substance that bonds with the clay underneath. Clay is made of silica, alumina and water. Glaze is made of mostly silica. Silica has a melting point of 1700°C and we fire to 1240°C. The silica requires a “flux” to help it melt at the lower temperature. Fluxes can be all sorts of chemicals – a common one is calcium – calcium has a melting point of 2500°C, however, together they both melt at a much lower temperature! Colourants are metal oxides like cobalt (blue), chrome (green through black), copper (green, blue, even red!), manganese (black, purple and pink) iron (red brown), etc. Different chemicals in the glaze can have dramatic effects. for example, barium carbonate (which we don’t use) turns manganese bright pink! Other elements can turn manganese dioxide brown, blue, purple and reddish brown. Manganese dioxide is a flux in and of itself as well. So, glazes that get their black and purple colours, often interact with other glazes and RUN! Our mirror black is a good example – it mixes really well with many glazes because it fluxes them – causes them to melt faster. It will also bring out many beautiful colours in the glazes because it’s black colouring most definitely comes from manganese dioxide! Glaze chemistry is a whole subject on it’s own! We use commercial Mayco glazes on purpose – for their huge range of colour possibilities, stability, cool interactions, artistic freedom with the ability to easily brush the glazes on and ease of use. We currently have almost 50 glazes on hand! A major project is to test the interactions of all glazes with each other. That is 2,500 test tiles!!!! I’m going to make the wall behind the wheels the feature wall of pretty colours! Step Seven – Glaze (Gloss or sometimes called “Glost”) Firing Most of the time this is the final stage of making your creation (but not always!) The glaze kiln goes to 1240°C. This is called cone 6, or midrange. It is the low end of stoneware temperatures. Stoneware clays and glazes are typically fired at cone 8 – 10, that is 1260 – 1290°C. The energy requirement to go from 1240°C to 1280°C is almost a 30% more! Our clay is formulated to vitrify (mature, turn “glass-like”) at 1240°, as are our glazes. A glaze kiln take around 12 hours to reach temperature and two to three days to cool down. Sometimes a third firing process is required – this is for decoration that is added to work after the glaze firing. For example – adding precious metals and lustres. this firing temperature is usually around 600 – 800°C depending upon the techniques being used. There are many students interested in gold and silver trims – we will be doing this third type of firing soon! After firing your work will be in the student finished work shelves. Remember to pay for it before you head out the door! There is a small extra charge for using porcelain clay (it’s more than twice the price of regular clay), and for any third firing process! Once your work has been fired it can not turn back into clay for millennia – so don’t fire it if you don’t like it! Put it in the bucket for recycling. https://firebirdstudios.com.au/the-process-of-making-pottery/ The bowl is an example of kitchenware used in the 19th century and still in use today.Bowl white ceramic. Crack on side. Badly stained.Backstamp very faint and unable to be read.flagstaff hill, warrnambool, shipwrecked-coast, flagstaff-hill, flagstaff-hill-maritime-museum, maritime-museum, shipwreck-coast, flagstaff-hill-maritime-village, mixing bowl, food preparation, kitchen equipment, ceramic -
 Flagstaff Hill Maritime Museum and Village
Domestic object - Bowl
The Process of Making Pottery Decorating, Firing, Glazing, Making, Technical There is a rhythm and flow to clay. It can’t be done all at once! Even the making process! It can take weeks to get everything done, especially if you can only work on your pottery once a week! Even though we have three hour classes, it’s often just not enough time! Here is an overview of some of the processes so you have a bit more grasp on some of the technical stuff! Step One – Design There are SO many ideas out there for making stuff in clay! From delicate porcelain jewellery, through to heavy sculptural work and everything in between. Deciding your direction is sometimes not that easy – when you first start, try everything, you will naturally gravitate to the style that you enjoy! The options and variations are endless and can get a wee bit overwhelming too! Check in with me before you start to ensure your ideas will work, what order you might do things, how you could achieve the look you are seeking and any other technical data required! Step Two – Making Clay is thixotropic. This means that as you work with it, the clay first gets sloppier and wetter, before is begins to dry in the atmosphere. For most things, you simply can’t do all parts of the project at once. An example of work order might look like: Get last weeks work out from the shelves Prepare clay for today’s work – roll your clay, prepare balls for throwing, make the first stage of a pinch pot) Clean up last week’s work and put it on the shelf for bisque firing Check that you have any glazing to do – and do enough of it that you will have time to finish your main project Do the next step of your next project – there might be a further step that can’t be complete immediately, in that case, wrap your work well and put onto the shelves. Letting your work rest for a while can really help keep your work clean and professional looking. Many things require bagging under plastic to keep it ready for work the next week – put your name on the outside of the bag so you can find your work easily. We have stickers and markers. Consider how you want to decorate your work – coloured slip can be applied at a fairly wet stage (remembering that it will make your work even wetter!). Trying to apply slip to dry clay won’t work! If you want to do sgraffito – you will need to keep the work leather hard (a state of dryness where you can still work the clay with a little effort and a little water and care). Step Three – Drying Most of the time your work can go into the rack uncovered to let it dry out for the following week. If you want to continue forming or shaping you will need to double bag your work – put your work on a suitable sized bat and put the bat in a bag so the base of the bag is under the bat, then put another bag over the top of the work and tuck the top of the bag under the bat. If you want to trim (or turn) your thrown work the following week, it should also be double bagged. If your work is large, delicate, or of uneven thicknesses, you should lightly cover your work for drying. When considering the drying process, bare in mind the weather, humidity and wind! The hotter and dryer, the faster things dry and work can dry unevenly in the shelves – this can lead to cracking – another time to lightly cover your work for drying. Step Four – Trimming and Cleaning Up Your work is dry! It is called greenware now and it is at it’s most fragile! Handle everything with two hands. I often refer to soft hands – keep everything gentle and with your fingers spread as much as possible. Try to not pick up things like plates too much, and always with both hands! Before your work can be bisque fired it should be “cleaned up”. You work won’t go into the kiln if it has sharp edges – when glazed, sharp edges turn into razor blades! Use a piece of fly wire to rub the work all over – this will scratch a little so be light handed. Use a knife or metal kidney to scrape any areas that require a bit more dynamic treatment than the fly wire offers! Finally, a very light wipe over with a slightly damp sponge can help soften and soothe all of your edges and dags! Trimming thrown work: If you are planning to trim (or turn) your thrown work (and you should be), make sure you bag it well – your work should be leather hard to almost dry for easiest trimming. Use this step to finish the work completely – use a metal kidney to polish the surface, or a slightly damp sponge to give a freshly thrown look. Wipe the sponge around the rim after trimming, and check the inside of the pot for dags! Trimming slip cast work: Usually I will trim the rims of your work on the wheel the following day to make that stage easier, however you will still need to check your work for lumps and bumps. Last but not least – check that your name is still clearly on the bottom of your work. Step Five – Bisque Firing When the work is completely dry it can go into the bisque kiln. The bisque kiln is fired to 1000°C. This process burns off the water in the clay as well as some of the chemically bound water. The structure of the clay is not altered that much at this temperature. Inside the bisque kiln, the work is stacked a little, small bowl inside a larger bowl and onto a heavy plate. Smaller items like decorations or drink coasters might get stacked several high. Consideration is paid to the weight of the stack and shape of the work. A bisque kiln can fire about one and a half times the amount of work that the glaze kiln can fire. The firing takes about 10 hours to complete the cycle and about two days to cool down. Once it has been emptied the work is placed in the glaze room ready for you to decorate! Step Six – Glazing Decorating your work with colour can be a lot of fun – and time consuming! There are three main options for surface treatment at this stage: Oxide Washes Underglazes Glazes Washes and underglazes do not “glaze” the work – It will still need a layer of glaze to fully seal the clay (washes don’t need glaze on surfaces not designed for food or liquid as they can gloss up a little on their own). Underglazes are stable colourants that turn out pretty much how they look in the jar. They can be mixed with each other to form other colours and can be used like water colours to paint onto your work. Mostly they should have a clear glaze on top to seal them. Oxides are a different species – the pink oxide (cobalt) wash turns out bright blue for instance. They don’t always need a glaze on top, and some glazes can change the colour of the wash! The glazes need no other “glaze” on top! Be careful of unknown glaze interactions – you can put any combination of glaze in a bowl or on a plate, but only a single glaze on the outside of any vertical surface! Glazes are a chemical reaction under heat. We don’t know the exact chemicals in the Mayco glazes we use. I can guess by the way they interact with each other, however, on the whole, you need to test every idea you have, and not run the test on a vertical surface! Simply put, glaze is a layer of glass like substance that bonds with the clay underneath. Clay is made of silica, alumina and water. Glaze is made of mostly silica. Silica has a melting point of 1700°C and we fire to 1240°C. The silica requires a “flux” to help it melt at the lower temperature. Fluxes can be all sorts of chemicals – a common one is calcium – calcium has a melting point of 2500°C, however, together they both melt at a much lower temperature! Colourants are metal oxides like cobalt (blue), chrome (green through black), copper (green, blue, even red!), manganese (black, purple and pink) iron (red brown), etc. Different chemicals in the glaze can have dramatic effects. for example, barium carbonate (which we don’t use) turns manganese bright pink! Other elements can turn manganese dioxide brown, blue, purple and reddish brown. Manganese dioxide is a flux in and of itself as well. So, glazes that get their black and purple colours, often interact with other glazes and RUN! Our mirror black is a good example – it mixes really well with many glazes because it fluxes them – causes them to melt faster. It will also bring out many beautiful colours in the glazes because it’s black colouring most definitely comes from manganese dioxide! Glaze chemistry is a whole subject on it’s own! We use commercial Mayco glazes on purpose – for their huge range of colour possibilities, stability, cool interactions, artistic freedom with the ability to easily brush the glazes on and ease of use. We currently have almost 50 glazes on hand! A major project is to test the interactions of all glazes with each other. That is 2,500 test tiles!!!! I’m going to make the wall behind the wheels the feature wall of pretty colours! Step Seven – Glaze (Gloss or sometimes called “Glost”) Firing Most of the time this is the final stage of making your creation (but not always!) The glaze kiln goes to 1240°C. This is called cone 6, or midrange. It is the low end of stoneware temperatures. Stoneware clays and glazes are typically fired at cone 8 – 10, that is 1260 – 1290°C. The energy requirement to go from 1240°C to 1280°C is almost a 30% more! Our clay is formulated to vitrify (mature, turn “glass-like”) at 1240°, as are our glazes. A glaze kiln take around 12 hours to reach temperature and two to three days to cool down. Sometimes a third firing process is required – this is for decoration that is added to work after the glaze firing. For example – adding precious metals and lustres. this firing temperature is usually around 600 – 800°C depending upon the techniques being used. There are many students interested in gold and silver trims – we will be doing this third type of firing soon! After firing your work will be in the student finished work shelves. Remember to pay for it before you head out the door! There is a small extra charge for using porcelain clay (it’s more than twice the price of regular clay), and for any third firing process! Once your work has been fired it can not turn back into clay for millennia – so don’t fire it if you don’t like it! Put it in the bucket for recycling. https://firebirdstudios.com.au/the-process-of-making-pottery/ This bowl is an example of kitchenware used in the 19th century and still in use today.Bowl white ceramic plain that has two sets of edging around lip. Inside bowl has plaster designed to look like cooking mixture.flagstaff hill, warrnambool, shipwrecked-coast, flagstaff-hill, flagstaff-hill-maritime-museum, maritime-museum, shipwreck-coast, flagstaff-hill-maritime-village, kitchen equipment, ceramic -
 Flagstaff Hill Maritime Museum and Village
Domestic object - Bowl, J & G Meakin, Late 19th or early 20th Century
The Process of Making Pottery Decorating, Firing, Glazing, Making, Technical There is a rhythm and flow to clay. It can’t be done all at once! Even the making process! It can take weeks to get everything done, especially if you can only work on your pottery once a week! Even though we have three hour classes, it’s often just not enough time! Here is an overview of some of the processes so you have a bit more grasp on some of the technical stuff! Step One – Design There are SO many ideas out there for making stuff in clay! From delicate porcelain jewellery, through to heavy sculptural work and everything in between. Deciding your direction is sometimes not that easy – when you first start, try everything, you will naturally gravitate to the style that you enjoy! The options and variations are endless and can get a wee bit overwhelming too! Check in with me before you start to ensure your ideas will work, what order you might do things, how you could achieve the look you are seeking and any other technical data required! Step Two – Making Clay is thixotropic. This means that as you work with it, the clay first gets sloppier and wetter, before is begins to dry in the atmosphere. For most things, you simply can’t do all parts of the project at once. An example of work order might look like: Get last weeks work out from the shelves Prepare clay for today’s work – roll your clay, prepare balls for throwing, make the first stage of a pinch pot) Clean up last week’s work and put it on the shelf for bisque firing Check that you have any glazing to do – and do enough of it that you will have time to finish your main project Do the next step of your next project – there might be a further step that can’t be complete immediately, in that case, wrap your work well and put onto the shelves. Letting your work rest for a while can really help keep your work clean and professional looking. Many things require bagging under plastic to keep it ready for work the next week – put your name on the outside of the bag so you can find your work easily. We have stickers and markers. Consider how you want to decorate your work – coloured slip can be applied at a fairly wet stage (remembering that it will make your work even wetter!). Trying to apply slip to dry clay won’t work! If you want to do sgraffito – you will need to keep the work leather hard (a state of dryness where you can still work the clay with a little effort and a little water and care). Step Three – Drying Most of the time your work can go into the rack uncovered to let it dry out for the following week. If you want to continue forming or shaping you will need to double bag your work – put your work on a suitable sized bat and put the bat in a bag so the base of the bag is under the bat, then put another bag over the top of the work and tuck the top of the bag under the bat. If you want to trim (or turn) your thrown work the following week, it should also be double bagged. If your work is large, delicate, or of uneven thicknesses, you should lightly cover your work for drying. When considering the drying process, bare in mind the weather, humidity and wind! The hotter and dryer, the faster things dry and work can dry unevenly in the shelves – this can lead to cracking – another time to lightly cover your work for drying. Step Four – Trimming and Cleaning Up Your work is dry! It is called greenware now and it is at it’s most fragile! Handle everything with two hands. I often refer to soft hands – keep everything gentle and with your fingers spread as much as possible. Try to not pick up things like plates too much, and always with both hands! Before your work can be bisque fired it should be “cleaned up”. You work won’t go into the kiln if it has sharp edges – when glazed, sharp edges turn into razor blades! Use a piece of fly wire to rub the work all over – this will scratch a little so be light handed. Use a knife or metal kidney to scrape any areas that require a bit more dynamic treatment than the fly wire offers! Finally, a very light wipe over with a slightly damp sponge can help soften and soothe all of your edges and dags! Trimming thrown work: If you are planning to trim (or turn) your thrown work (and you should be), make sure you bag it well – your work should be leather hard to almost dry for easiest trimming. Use this step to finish the work completely – use a metal kidney to polish the surface, or a slightly damp sponge to give a freshly thrown look. Wipe the sponge around the rim after trimming, and check the inside of the pot for dags! Trimming slip cast work: Usually I will trim the rims of your work on the wheel the following day to make that stage easier, however you will still need to check your work for lumps and bumps. Last but not least – check that your name is still clearly on the bottom of your work. Step Five – Bisque Firing When the work is completely dry it can go into the bisque kiln. The bisque kiln is fired to 1000°C. This process burns off the water in the clay as well as some of the chemically bound water. The structure of the clay is not altered that much at this temperature. Inside the bisque kiln, the work is stacked a little, small bowl inside a larger bowl and onto a heavy plate. Smaller items like decorations or drink coasters might get stacked several high. Consideration is paid to the weight of the stack and shape of the work. A bisque kiln can fire about one and a half times the amount of work that the glaze kiln can fire. The firing takes about 10 hours to complete the cycle and about two days to cool down. Once it has been emptied the work is placed in the glaze room ready for you to decorate! Step Six – Glazing Decorating your work with colour can be a lot of fun – and time consuming! There are three main options for surface treatment at this stage: Oxide Washes Underglazes Glazes Washes and underglazes do not “glaze” the work – It will still need a layer of glaze to fully seal the clay (washes don’t need glaze on surfaces not designed for food or liquid as they can gloss up a little on their own). Underglazes are stable colourants that turn out pretty much how they look in the jar. They can be mixed with each other to form other colours and can be used like water colours to paint onto your work. Mostly they should have a clear glaze on top to seal them. Oxides are a different species – the pink oxide (cobalt) wash turns out bright blue for instance. They don’t always need a glaze on top, and some glazes can change the colour of the wash! The glazes need no other “glaze” on top! Be careful of unknown glaze interactions – you can put any combination of glaze in a bowl or on a plate, but only a single glaze on the outside of any vertical surface! Glazes are a chemical reaction under heat. We don’t know the exact chemicals in the Mayco glazes we use. I can guess by the way they interact with each other, however, on the whole, you need to test every idea you have, and not run the test on a vertical surface! Simply put, glaze is a layer of glass like substance that bonds with the clay underneath. Clay is made of silica, alumina and water. Glaze is made of mostly silica. Silica has a melting point of 1700°C and we fire to 1240°C. The silica requires a “flux” to help it melt at the lower temperature. Fluxes can be all sorts of chemicals – a common one is calcium – calcium has a melting point of 2500°C, however, together they both melt at a much lower temperature! Colourants are metal oxides like cobalt (blue), chrome (green through black), copper (green, blue, even red!), manganese (black, purple and pink) iron (red brown), etc. Different chemicals in the glaze can have dramatic effects. for example, barium carbonate (which we don’t use) turns manganese bright pink! Other elements can turn manganese dioxide brown, blue, purple and reddish brown. Manganese dioxide is a flux in and of itself as well. So, glazes that get their black and purple colours, often interact with other glazes and RUN! Our mirror black is a good example – it mixes really well with many glazes because it fluxes them – causes them to melt faster. It will also bring out many beautiful colours in the glazes because it’s black colouring most definitely comes from manganese dioxide! Glaze chemistry is a whole subject on it’s own! We use commercial Mayco glazes on purpose – for their huge range of colour possibilities, stability, cool interactions, artistic freedom with the ability to easily brush the glazes on and ease of use. We currently have almost 50 glazes on hand! A major project is to test the interactions of all glazes with each other. That is 2,500 test tiles!!!! I’m going to make the wall behind the wheels the feature wall of pretty colours! Step Seven – Glaze (Gloss or sometimes called “Glost”) Firing Most of the time this is the final stage of making your creation (but not always!) The glaze kiln goes to 1240°C. This is called cone 6, or midrange. It is the low end of stoneware temperatures. Stoneware clays and glazes are typically fired at cone 8 – 10, that is 1260 – 1290°C. The energy requirement to go from 1240°C to 1280°C is almost a 30% more! Our clay is formulated to vitrify (mature, turn “glass-like”) at 1240°, as are our glazes. A glaze kiln take around 12 hours to reach temperature and two to three days to cool down. Sometimes a third firing process is required – this is for decoration that is added to work after the glaze firing. For example – adding precious metals and lustres. this firing temperature is usually around 600 – 800°C depending upon the techniques being used. There are many students interested in gold and silver trims – we will be doing this third type of firing soon! After firing your work will be in the student finished work shelves. Remember to pay for it before you head out the door! There is a small extra charge for using porcelain clay (it’s more than twice the price of regular clay), and for any third firing process! Once your work has been fired it can not turn back into clay for millennia – so don’t fire it if you don’t like it! Put it in the bucket for recycling. https://firebirdstudios.com.au/the-process-of-making-pottery/This bowl was made by renowned pottery company J & G Meakin of England. The firm was established in the mid-1800's. The bowl is an example of kitchenware used in the 19th century and still in use today.Bowl; white ceramic, round and tapering inwards towards base. Made by J and G Meakin England.On base, 'Ironstone China Reg SOL 391413' with symbolflagstaff hill, flagstaff hill maritime museum and village, warrnambool, maritime museum, maritime village, great ocean road, shipwreck coast, mixing bowl, food preparation, j & g meakin, pottery, stoke-on-trent, kitchen equipment, ceramic -
 Flagstaff Hill Maritime Museum and Village
Domestic object - Plate
The Process of Making Pottery Decorating, Firing, Glazing, Making, Technical There is a rhythm and flow to clay. It can’t be done all at once! Even the making process! It can take weeks to get everything done, especially if you can only work on your pottery once a week! Even though we have three hour classes, it’s often just not enough time! Here is an overview of some of the processes so you have a bit more grasp on some of the technical stuff! Step One – Design There are SO many ideas out there for making stuff in clay! From delicate porcelain jewellery, through to heavy sculptural work and everything in between. Deciding your direction is sometimes not that easy – when you first start, try everything, you will naturally gravitate to the style that you enjoy! The options and variations are endless and can get a wee bit overwhelming too! Check in with me before you start to ensure your ideas will work, what order you might do things, how you could achieve the look you are seeking and any other technical data required! Step Two – Making Clay is thixotropic. This means that as you work with it, the clay first gets sloppier and wetter, before is begins to dry in the atmosphere. For most things, you simply can’t do all parts of the project at once. An example of work order might look like: Get last weeks work out from the shelves Prepare clay for today’s work – roll your clay, prepare balls for throwing, make the first stage of a pinch pot) Clean up last week’s work and put it on the shelf for bisque firing Check that you have any glazing to do – and do enough of it that you will have time to finish your main project Do the next step of your next project – there might be a further step that can’t be complete immediately, in that case, wrap your work well and put onto the shelves. Letting your work rest for a while can really help keep your work clean and professional looking. Many things require bagging under plastic to keep it ready for work the next week – put your name on the outside of the bag so you can find your work easily. We have stickers and markers. Consider how you want to decorate your work – coloured slip can be applied at a fairly wet stage (remembering that it will make your work even wetter!). Trying to apply slip to dry clay won’t work! If you want to do sgraffito – you will need to keep the work leather hard (a state of dryness where you can still work the clay with a little effort and a little water and care). Step Three – Drying Most of the time your work can go into the rack uncovered to let it dry out for the following week. If you want to continue forming or shaping you will need to double bag your work – put your work on a suitable sized bat and put the bat in a bag so the base of the bag is under the bat, then put another bag over the top of the work and tuck the top of the bag under the bat. If you want to trim (or turn) your thrown work the following week, it should also be double bagged. If your work is large, delicate, or of uneven thicknesses, you should lightly cover your work for drying. When considering the drying process, bare in mind the weather, humidity and wind! The hotter and dryer, the faster things dry and work can dry unevenly in the shelves – this can lead to cracking – another time to lightly cover your work for drying. Step Four – Trimming and Cleaning Up Your work is dry! It is called greenware now and it is at it’s most fragile! Handle everything with two hands. I often refer to soft hands – keep everything gentle and with your fingers spread as much as possible. Try to not pick up things like plates too much, and always with both hands! Before your work can be bisque fired it should be “cleaned up”. You work won’t go into the kiln if it has sharp edges – when glazed, sharp edges turn into razor blades! Use a piece of fly wire to rub the work all over – this will scratch a little so be light handed. Use a knife or metal kidney to scrape any areas that require a bit more dynamic treatment than the fly wire offers! Finally, a very light wipe over with a slightly damp sponge can help soften and soothe all of your edges and dags! Trimming thrown work: If you are planning to trim (or turn) your thrown work (and you should be), make sure you bag it well – your work should be leather hard to almost dry for easiest trimming. Use this step to finish the work completely – use a metal kidney to polish the surface, or a slightly damp sponge to give a freshly thrown look. Wipe the sponge around the rim after trimming, and check the inside of the pot for dags! Trimming slip cast work: Usually I will trim the rims of your work on the wheel the following day to make that stage easier, however you will still need to check your work for lumps and bumps. Last but not least – check that your name is still clearly on the bottom of your work. Step Five – Bisque Firing When the work is completely dry it can go into the bisque kiln. The bisque kiln is fired to 1000°C. This process burns off the water in the clay as well as some of the chemically bound water. The structure of the clay is not altered that much at this temperature. Inside the bisque kiln, the work is stacked a little, small bowl inside a larger bowl and onto a heavy plate. Smaller items like decorations or drink coasters might get stacked several high. Consideration is paid to the weight of the stack and shape of the work. A bisque kiln can fire about one and a half times the amount of work that the glaze kiln can fire. The firing takes about 10 hours to complete the cycle and about two days to cool down. Once it has been emptied the work is placed in the glaze room ready for you to decorate! Step Six – Glazing Decorating your work with colour can be a lot of fun – and time consuming! There are three main options for surface treatment at this stage: Oxide Washes Underglazes Glazes Washes and underglazes do not “glaze” the work – It will still need a layer of glaze to fully seal the clay (washes don’t need glaze on surfaces not designed for food or liquid as they can gloss up a little on their own). Underglazes are stable colourants that turn out pretty much how they look in the jar. They can be mixed with each other to form other colours and can be used like water colours to paint onto your work. Mostly they should have a clear glaze on top to seal them. Oxides are a different species – the pink oxide (cobalt) wash turns out bright blue for instance. They don’t always need a glaze on top, and some glazes can change the colour of the wash! The glazes need no other “glaze” on top! Be careful of unknown glaze interactions – you can put any combination of glaze in a bowl or on a plate, but only a single glaze on the outside of any vertical surface! Glazes are a chemical reaction under heat. We don’t know the exact chemicals in the Mayco glazes we use. I can guess by the way they interact with each other, however, on the whole, you need to test every idea you have, and not run the test on a vertical surface! Simply put, glaze is a layer of glass like substance that bonds with the clay underneath. Clay is made of silica, alumina and water. Glaze is made of mostly silica. Silica has a melting point of 1700°C and we fire to 1240°C. The silica requires a “flux” to help it melt at the lower temperature. Fluxes can be all sorts of chemicals – a common one is calcium – calcium has a melting point of 2500°C, however, together they both melt at a much lower temperature! Colourants are metal oxides like cobalt (blue), chrome (green through black), copper (green, blue, even red!), manganese (black, purple and pink) iron (red brown), etc. Different chemicals in the glaze can have dramatic effects. for example, barium carbonate (which we don’t use) turns manganese bright pink! Other elements can turn manganese dioxide brown, blue, purple and reddish brown. Manganese dioxide is a flux in and of itself as well. So, glazes that get their black and purple colours, often interact with other glazes and RUN! Our mirror black is a good example – it mixes really well with many glazes because it fluxes them – causes them to melt faster. It will also bring out many beautiful colours in the glazes because it’s black colouring most definitely comes from manganese dioxide! Glaze chemistry is a whole subject on it’s own! We use commercial Mayco glazes on purpose – for their huge range of colour possibilities, stability, cool interactions, artistic freedom with the ability to easily brush the glazes on and ease of use. We currently have almost 50 glazes on hand! A major project is to test the interactions of all glazes with each other. That is 2,500 test tiles!!!! I’m going to make the wall behind the wheels the feature wall of pretty colours! Step Seven – Glaze (Gloss or sometimes called “Glost”) Firing Most of the time this is the final stage of making your creation (but not always!) The glaze kiln goes to 1240°C. This is called cone 6, or midrange. It is the low end of stoneware temperatures. Stoneware clays and glazes are typically fired at cone 8 – 10, that is 1260 – 1290°C. The energy requirement to go from 1240°C to 1280°C is almost a 30% more! Our clay is formulated to vitrify (mature, turn “glass-like”) at 1240°, as are our glazes. A glaze kiln take around 12 hours to reach temperature and two to three days to cool down. Sometimes a third firing process is required – this is for decoration that is added to work after the glaze firing. For example – adding precious metals and lustres. this firing temperature is usually around 600 – 800°C depending upon the techniques being used. There are many students interested in gold and silver trims – we will be doing this third type of firing soon! After firing your work will be in the student finished work shelves. Remember to pay for it before you head out the door! There is a small extra charge for using porcelain clay (it’s more than twice the price of regular clay), and for any third firing process! Once your work has been fired it can not turn back into clay for millennia – so don’t fire it if you don’t like it! Put it in the bucket for recycling. https://firebirdstudios.com.au/the-process-of-making-pottery/Ceramics have evolved over thousands of years.White earthenware dinner plate. Crazing evident all over.Backstamped ‘Made in England S LTD’flagstaff hill, warrnambool, shipwrecked-coast, flagstaff-hill, flagstaff-hill-maritime-museum, maritime-museum, shipwreck-coast, flagstaff-hill-maritime-village, ceramics, tableware -
 Flagstaff Hill Maritime Museum and Village
Domestic object - Plate, Johnson Bros
The Process of Making Pottery Decorating, Firing, Glazing, Making, Technical There is a rhythm and flow to clay. It can’t be done all at once! Even the making process! It can take weeks to get everything done, especially if you can only work on your pottery once a week! Even though we have three hour classes, it’s often just not enough time! Here is an overview of some of the processes so you have a bit more grasp on some of the technical stuff! Step One – Design There are SO many ideas out there for making stuff in clay! From delicate porcelain jewellery, through to heavy sculptural work and everything in between. Deciding your direction is sometimes not that easy – when you first start, try everything, you will naturally gravitate to the style that you enjoy! The options and variations are endless and can get a wee bit overwhelming too! Check in with me before you start to ensure your ideas will work, what order you might do things, how you could achieve the look you are seeking and any other technical data required! Step Two – Making Clay is thixotropic. This means that as you work with it, the clay first gets sloppier and wetter, before is begins to dry in the atmosphere. For most things, you simply can’t do all parts of the project at once. An example of work order might look like: Get last weeks work out from the shelves Prepare clay for today’s work – roll your clay, prepare balls for throwing, make the first stage of a pinch pot) Clean up last week’s work and put it on the shelf for bisque firing Check that you have any glazing to do – and do enough of it that you will have time to finish your main project Do the next step of your next project – there might be a further step that can’t be complete immediately, in that case, wrap your work well and put onto the shelves. Letting your work rest for a while can really help keep your work clean and professional looking. Many things require bagging under plastic to keep it ready for work the next week – put your name on the outside of the bag so you can find your work easily. We have stickers and markers. Consider how you want to decorate your work – coloured slip can be applied at a fairly wet stage (remembering that it will make your work even wetter!). Trying to apply slip to dry clay won’t work! If you want to do sgraffito – you will need to keep the work leather hard (a state of dryness where you can still work the clay with a little effort and a little water and care). Step Three – Drying Most of the time your work can go into the rack uncovered to let it dry out for the following week. If you want to continue forming or shaping you will need to double bag your work – put your work on a suitable sized bat and put the bat in a bag so the base of the bag is under the bat, then put another bag over the top of the work and tuck the top of the bag under the bat. If you want to trim (or turn) your thrown work the following week, it should also be double bagged. If your work is large, delicate, or of uneven thicknesses, you should lightly cover your work for drying. When considering the drying process, bare in mind the weather, humidity and wind! The hotter and dryer, the faster things dry and work can dry unevenly in the shelves – this can lead to cracking – another time to lightly cover your work for drying. Step Four – Trimming and Cleaning Up Your work is dry! It is called greenware now and it is at it’s most fragile! Handle everything with two hands. I often refer to soft hands – keep everything gentle and with your fingers spread as much as possible. Try to not pick up things like plates too much, and always with both hands! Before your work can be bisque fired it should be “cleaned up”. You work won’t go into the kiln if it has sharp edges – when glazed, sharp edges turn into razor blades! Use a piece of fly wire to rub the work all over – this will scratch a little so be light handed. Use a knife or metal kidney to scrape any areas that require a bit more dynamic treatment than the fly wire offers! Finally, a very light wipe over with a slightly damp sponge can help soften and soothe all of your edges and dags! Trimming thrown work: If you are planning to trim (or turn) your thrown work (and you should be), make sure you bag it well – your work should be leather hard to almost dry for easiest trimming. Use this step to finish the work completely – use a metal kidney to polish the surface, or a slightly damp sponge to give a freshly thrown look. Wipe the sponge around the rim after trimming, and check the inside of the pot for dags! Trimming slip cast work: Usually I will trim the rims of your work on the wheel the following day to make that stage easier, however you will still need to check your work for lumps and bumps. Last but not least – check that your name is still clearly on the bottom of your work. Step Five – Bisque Firing When the work is completely dry it can go into the bisque kiln. The bisque kiln is fired to 1000°C. This process burns off the water in the clay as well as some of the chemically bound water. The structure of the clay is not altered that much at this temperature. Inside the bisque kiln, the work is stacked a little, small bowl inside a larger bowl and onto a heavy plate. Smaller items like decorations or drink coasters might get stacked several high. Consideration is paid to the weight of the stack and shape of the work. A bisque kiln can fire about one and a half times the amount of work that the glaze kiln can fire. The firing takes about 10 hours to complete the cycle and about two days to cool down. Once it has been emptied the work is placed in the glaze room ready for you to decorate! Step Six – Glazing Decorating your work with colour can be a lot of fun – and time consuming! There are three main options for surface treatment at this stage: Oxide Washes Underglazes Glazes Washes and underglazes do not “glaze” the work – It will still need a layer of glaze to fully seal the clay (washes don’t need glaze on surfaces not designed for food or liquid as they can gloss up a little on their own). Underglazes are stable colourants that turn out pretty much how they look in the jar. They can be mixed with each other to form other colours and can be used like water colours to paint onto your work. Mostly they should have a clear glaze on top to seal them. Oxides are a different species – the pink oxide (cobalt) wash turns out bright blue for instance. They don’t always need a glaze on top, and some glazes can change the colour of the wash! The glazes need no other “glaze” on top! Be careful of unknown glaze interactions – you can put any combination of glaze in a bowl or on a plate, but only a single glaze on the outside of any vertical surface! Glazes are a chemical reaction under heat. We don’t know the exact chemicals in the Mayco glazes we use. I can guess by the way they interact with each other, however, on the whole, you need to test every idea you have, and not run the test on a vertical surface! Simply put, glaze is a layer of glass like substance that bonds with the clay underneath. Clay is made of silica, alumina and water. Glaze is made of mostly silica. Silica has a melting point of 1700°C and we fire to 1240°C. The silica requires a “flux” to help it melt at the lower temperature. Fluxes can be all sorts of chemicals – a common one is calcium – calcium has a melting point of 2500°C, however, together they both melt at a much lower temperature! Colourants are metal oxides like cobalt (blue), chrome (green through black), copper (green, blue, even red!), manganese (black, purple and pink) iron (red brown), etc. Different chemicals in the glaze can have dramatic effects. for example, barium carbonate (which we don’t use) turns manganese bright pink! Other elements can turn manganese dioxide brown, blue, purple and reddish brown. Manganese dioxide is a flux in and of itself as well. So, glazes that get their black and purple colours, often interact with other glazes and RUN! Our mirror black is a good example – it mixes really well with many glazes because it fluxes them – causes them to melt faster. It will also bring out many beautiful colours in the glazes because it’s black colouring most definitely comes from manganese dioxide! Glaze chemistry is a whole subject on it’s own! We use commercial Mayco glazes on purpose – for their huge range of colour possibilities, stability, cool interactions, artistic freedom with the ability to easily brush the glazes on and ease of use. We currently have almost 50 glazes on hand! A major project is to test the interactions of all glazes with each other. That is 2,500 test tiles!!!! I’m going to make the wall behind the wheels the feature wall of pretty colours! Step Seven – Glaze (Gloss or sometimes called “Glost”) Firing Most of the time this is the final stage of making your creation (but not always!) The glaze kiln goes to 1240°C. This is called cone 6, or midrange. It is the low end of stoneware temperatures. Stoneware clays and glazes are typically fired at cone 8 – 10, that is 1260 – 1290°C. The energy requirement to go from 1240°C to 1280°C is almost a 30% more! Our clay is formulated to vitrify (mature, turn “glass-like”) at 1240°, as are our glazes. A glaze kiln take around 12 hours to reach temperature and two to three days to cool down. Sometimes a third firing process is required – this is for decoration that is added to work after the glaze firing. For example – adding precious metals and lustres. this firing temperature is usually around 600 – 800°C depending upon the techniques being used. There are many students interested in gold and silver trims – we will be doing this third type of firing soon! After firing your work will be in the student finished work shelves. Remember to pay for it before you head out the door! There is a small extra charge for using porcelain clay (it’s more than twice the price of regular clay), and for any third firing process! Once your work has been fired it can not turn back into clay for millennia – so don’t fire it if you don’t like it! Put it in the bucket for recycling. https://firebirdstudios.com.au/the-process-of-making-pottery/Ceramics have evolved over thousands of years.A white earthenware side plate with a gadroon edge. Has water marks and chips on front.‘Johnson Bros England Reg No 15587’flagstaff hill, warrnambool, shipwrecked-coast, flagstaff-hill, flagstaff-hill-maritime-museum, maritime-museum, shipwreck-coast, flagstaff-hill-maritime-village, johnson bros, ceramics, tableware -
 Flagstaff Hill Maritime Museum and Village
Domestic object - Plate, Alfred Meakin
The Process of Making Pottery Decorating, Firing, Glazing, Making, Technical There is a rhythm and flow to clay. It can’t be done all at once! Even the making process! It can take weeks to get everything done, especially if you can only work on your pottery once a week! Even though we have three hour classes, it’s often just not enough time! Here is an overview of some of the processes so you have a bit more grasp on some of the technical stuff! Step One – Design There are SO many ideas out there for making stuff in clay! From delicate porcelain jewellery, through to heavy sculptural work and everything in between. Deciding your direction is sometimes not that easy – when you first start, try everything, you will naturally gravitate to the style that you enjoy! The options and variations are endless and can get a wee bit overwhelming too! Check in with me before you start to ensure your ideas will work, what order you might do things, how you could achieve the look you are seeking and any other technical data required! Step Two – Making Clay is thixotropic. This means that as you work with it, the clay first gets sloppier and wetter, before is begins to dry in the atmosphere. For most things, you simply can’t do all parts of the project at once. An example of work order might look like: Get last weeks work out from the shelves Prepare clay for today’s work – roll your clay, prepare balls for throwing, make the first stage of a pinch pot) Clean up last week’s work and put it on the shelf for bisque firing Check that you have any glazing to do – and do enough of it that you will have time to finish your main project Do the next step of your next project – there might be a further step that can’t be complete immediately, in that case, wrap your work well and put onto the shelves. Letting your work rest for a while can really help keep your work clean and professional looking. Many things require bagging under plastic to keep it ready for work the next week – put your name on the outside of the bag so you can find your work easily. We have stickers and markers. Consider how you want to decorate your work – coloured slip can be applied at a fairly wet stage (remembering that it will make your work even wetter!). Trying to apply slip to dry clay won’t work! If you want to do sgraffito – you will need to keep the work leather hard (a state of dryness where you can still work the clay with a little effort and a little water and care). Step Three – Drying Most of the time your work can go into the rack uncovered to let it dry out for the following week. If you want to continue forming or shaping you will need to double bag your work – put your work on a suitable sized bat and put the bat in a bag so the base of the bag is under the bat, then put another bag over the top of the work and tuck the top of the bag under the bat. If you want to trim (or turn) your thrown work the following week, it should also be double bagged. If your work is large, delicate, or of uneven thicknesses, you should lightly cover your work for drying. When considering the drying process, bare in mind the weather, humidity and wind! The hotter and dryer, the faster things dry and work can dry unevenly in the shelves – this can lead to cracking – another time to lightly cover your work for drying. Step Four – Trimming and Cleaning Up Your work is dry! It is called greenware now and it is at it’s most fragile! Handle everything with two hands. I often refer to soft hands – keep everything gentle and with your fingers spread as much as possible. Try to not pick up things like plates too much, and always with both hands! Before your work can be bisque fired it should be “cleaned up”. You work won’t go into the kiln if it has sharp edges – when glazed, sharp edges turn into razor blades! Use a piece of fly wire to rub the work all over – this will scratch a little so be light handed. Use a knife or metal kidney to scrape any areas that require a bit more dynamic treatment than the fly wire offers! Finally, a very light wipe over with a slightly damp sponge can help soften and soothe all of your edges and dags! Trimming thrown work: If you are planning to trim (or turn) your thrown work (and you should be), make sure you bag it well – your work should be leather hard to almost dry for easiest trimming. Use this step to finish the work completely – use a metal kidney to polish the surface, or a slightly damp sponge to give a freshly thrown look. Wipe the sponge around the rim after trimming, and check the inside of the pot for dags! Trimming slip cast work: Usually I will trim the rims of your work on the wheel the following day to make that stage easier, however you will still need to check your work for lumps and bumps. Last but not least – check that your name is still clearly on the bottom of your work. Step Five – Bisque Firing When the work is completely dry it can go into the bisque kiln. The bisque kiln is fired to 1000°C. This process burns off the water in the clay as well as some of the chemically bound water. The structure of the clay is not altered that much at this temperature. Inside the bisque kiln, the work is stacked a little, small bowl inside a larger bowl and onto a heavy plate. Smaller items like decorations or drink coasters might get stacked several high. Consideration is paid to the weight of the stack and shape of the work. A bisque kiln can fire about one and a half times the amount of work that the glaze kiln can fire. The firing takes about 10 hours to complete the cycle and about two days to cool down. Once it has been emptied the work is placed in the glaze room ready for you to decorate! Step Six – Glazing Decorating your work with colour can be a lot of fun – and time consuming! There are three main options for surface treatment at this stage: Oxide Washes Underglazes Glazes Washes and underglazes do not “glaze” the work – It will still need a layer of glaze to fully seal the clay (washes don’t need glaze on surfaces not designed for food or liquid as they can gloss up a little on their own). Underglazes are stable colourants that turn out pretty much how they look in the jar. They can be mixed with each other to form other colours and can be used like water colours to paint onto your work. Mostly they should have a clear glaze on top to seal them. Oxides are a different species – the pink oxide (cobalt) wash turns out bright blue for instance. They don’t always need a glaze on top, and some glazes can change the colour of the wash! The glazes need no other “glaze” on top! Be careful of unknown glaze interactions – you can put any combination of glaze in a bowl or on a plate, but only a single glaze on the outside of any vertical surface! Glazes are a chemical reaction under heat. We don’t know the exact chemicals in the Mayco glazes we use. I can guess by the way they interact with each other, however, on the whole, you need to test every idea you have, and not run the test on a vertical surface! Simply put, glaze is a layer of glass like substance that bonds with the clay underneath. Clay is made of silica, alumina and water. Glaze is made of mostly silica. Silica has a melting point of 1700°C and we fire to 1240°C. The silica requires a “flux” to help it melt at the lower temperature. Fluxes can be all sorts of chemicals – a common one is calcium – calcium has a melting point of 2500°C, however, together they both melt at a much lower temperature! Colourants are metal oxides like cobalt (blue), chrome (green through black), copper (green, blue, even red!), manganese (black, purple and pink) iron (red brown), etc. Different chemicals in the glaze can have dramatic effects. for example, barium carbonate (which we don’t use) turns manganese bright pink! Other elements can turn manganese dioxide brown, blue, purple and reddish brown. Manganese dioxide is a flux in and of itself as well. So, glazes that get their black and purple colours, often interact with other glazes and RUN! Our mirror black is a good example – it mixes really well with many glazes because it fluxes them – causes them to melt faster. It will also bring out many beautiful colours in the glazes because it’s black colouring most definitely comes from manganese dioxide! Glaze chemistry is a whole subject on it’s own! We use commercial Mayco glazes on purpose – for their huge range of colour possibilities, stability, cool interactions, artistic freedom with the ability to easily brush the glazes on and ease of use. We currently have almost 50 glazes on hand! A major project is to test the interactions of all glazes with each other. That is 2,500 test tiles!!!! I’m going to make the wall behind the wheels the feature wall of pretty colours! Step Seven – Glaze (Gloss or sometimes called “Glost”) Firing Most of the time this is the final stage of making your creation (but not always!) The glaze kiln goes to 1240°C. This is called cone 6, or midrange. It is the low end of stoneware temperatures. Stoneware clays and glazes are typically fired at cone 8 – 10, that is 1260 – 1290°C. The energy requirement to go from 1240°C to 1280°C is almost a 30% more! Our clay is formulated to vitrify (mature, turn “glass-like”) at 1240°, as are our glazes. A glaze kiln take around 12 hours to reach temperature and two to three days to cool down. Sometimes a third firing process is required – this is for decoration that is added to work after the glaze firing. For example – adding precious metals and lustres. this firing temperature is usually around 600 – 800°C depending upon the techniques being used. There are many students interested in gold and silver trims – we will be doing this third type of firing soon! After firing your work will be in the student finished work shelves. Remember to pay for it before you head out the door! There is a small extra charge for using porcelain clay (it’s more than twice the price of regular clay), and for any third firing process! Once your work has been fired it can not turn back into clay for millennia – so don’t fire it if you don’t like it! Put it in the bucket for recycling. https://firebirdstudios.com.au/the-process-of-making-pottery/Ceramics have evolved over thousands of years.Earthenware dessert plate, cream colour. Made by Alfred Meakin, England. Backstamped ‘Alfred Meakin England’. flagstaff hill, warrnambool, shipwrecked-coast, flagstaff-hill, flagstaff-hill-maritime-museum, maritime-museum, shipwreck-coast, flagstaff-hill-maritime-village, alfred meakin, ceramics, earthenware, kitchenware -
 Flagstaff Hill Maritime Museum and Village
Domestic object - Jug
The Process of Making Pottery Decorating, Firing, Glazing, Making, Technical There is a rhythm and flow to clay. It can’t be done all at once! Even the making process! It can take weeks to get everything done, especially if you can only work on your pottery once a week! Even though we have three hour classes, it’s often just not enough time! Here is an overview of some of the processes so you have a bit more grasp on some of the technical stuff! Step One – Design There are SO many ideas out there for making stuff in clay! From delicate porcelain jewellery, through to heavy sculptural work and everything in between. Deciding your direction is sometimes not that easy – when you first start, try everything, you will naturally gravitate to the style that you enjoy! The options and variations are endless and can get a wee bit overwhelming too! Check in with me before you start to ensure your ideas will work, what order you might do things, how you could achieve the look you are seeking and any other technical data required! Step Two – Making Clay is thixotropic. This means that as you work with it, the clay first gets sloppier and wetter, before is begins to dry in the atmosphere. For most things, you simply can’t do all parts of the project at once. An example of work order might look like: Get last weeks work out from the shelves Prepare clay for today’s work – roll your clay, prepare balls for throwing, make the first stage of a pinch pot) Clean up last week’s work and put it on the shelf for bisque firing Check that you have any glazing to do – and do enough of it that you will have time to finish your main project Do the next step of your next project – there might be a further step that can’t be complete immediately, in that case, wrap your work well and put onto the shelves. Letting your work rest for a while can really help keep your work clean and professional looking. Many things require bagging under plastic to keep it ready for work the next week – put your name on the outside of the bag so you can find your work easily. We have stickers and markers. Consider how you want to decorate your work – coloured slip can be applied at a fairly wet stage (remembering that it will make your work even wetter!). Trying to apply slip to dry clay won’t work! If you want to do sgraffito – you will need to keep the work leather hard (a state of dryness where you can still work the clay with a little effort and a little water and care). Step Three – Drying Most of the time your work can go into the rack uncovered to let it dry out for the following week. If you want to continue forming or shaping you will need to double bag your work – put your work on a suitable sized bat and put the bat in a bag so the base of the bag is under the bat, then put another bag over the top of the work and tuck the top of the bag under the bat. If you want to trim (or turn) your thrown work the following week, it should also be double bagged. If your work is large, delicate, or of uneven thicknesses, you should lightly cover your work for drying. When considering the drying process, bare in mind the weather, humidity and wind! The hotter and dryer, the faster things dry and work can dry unevenly in the shelves – this can lead to cracking – another time to lightly cover your work for drying. Step Four – Trimming and Cleaning Up Your work is dry! It is called greenware now and it is at it’s most fragile! Handle everything with two hands. I often refer to soft hands – keep everything gentle and with your fingers spread as much as possible. Try to not pick up things like plates too much, and always with both hands! Before your work can be bisque fired it should be “cleaned up”. You work won’t go into the kiln if it has sharp edges – when glazed, sharp edges turn into razor blades! Use a piece of fly wire to rub the work all over – this will scratch a little so be light handed. Use a knife or metal kidney to scrape any areas that require a bit more dynamic treatment than the fly wire offers! Finally, a very light wipe over with a slightly damp sponge can help soften and soothe all of your edges and dags! Trimming thrown work: If you are planning to trim (or turn) your thrown work (and you should be), make sure you bag it well – your work should be leather hard to almost dry for easiest trimming. Use this step to finish the work completely – use a metal kidney to polish the surface, or a slightly damp sponge to give a freshly thrown look. Wipe the sponge around the rim after trimming, and check the inside of the pot for dags! Trimming slip cast work: Usually I will trim the rims of your work on the wheel the following day to make that stage easier, however you will still need to check your work for lumps and bumps. Last but not least – check that your name is still clearly on the bottom of your work. Step Five – Bisque Firing When the work is completely dry it can go into the bisque kiln. The bisque kiln is fired to 1000°C. This process burns off the water in the clay as well as some of the chemically bound water. The structure of the clay is not altered that much at this temperature. Inside the bisque kiln, the work is stacked a little, small bowl inside a larger bowl and onto a heavy plate. Smaller items like decorations or drink coasters might get stacked several high. Consideration is paid to the weight of the stack and shape of the work. A bisque kiln can fire about one and a half times the amount of work that the glaze kiln can fire. The firing takes about 10 hours to complete the cycle and about two days to cool down. Once it has been emptied the work is placed in the glaze room ready for you to decorate! Step Six – Glazing Decorating your work with colour can be a lot of fun – and time consuming! There are three main options for surface treatment at this stage: Oxide Washes Underglazes Glazes Washes and underglazes do not “glaze” the work – It will still need a layer of glaze to fully seal the clay (washes don’t need glaze on surfaces not designed for food or liquid as they can gloss up a little on their own). Underglazes are stable colourants that turn out pretty much how they look in the jar. They can be mixed with each other to form other colours and can be used like water colours to paint onto your work. Mostly they should have a clear glaze on top to seal them. Oxides are a different species – the pink oxide (cobalt) wash turns out bright blue for instance. They don’t always need a glaze on top, and some glazes can change the colour of the wash! The glazes need no other “glaze” on top! Be careful of unknown glaze interactions – you can put any combination of glaze in a bowl or on a plate, but only a single glaze on the outside of any vertical surface! Glazes are a chemical reaction under heat. We don’t know the exact chemicals in the Mayco glazes we use. I can guess by the way they interact with each other, however, on the whole, you need to test every idea you have, and not run the test on a vertical surface! Simply put, glaze is a layer of glass like substance that bonds with the clay underneath. Clay is made of silica, alumina and water. Glaze is made of mostly silica. Silica has a melting point of 1700°C and we fire to 1240°C. The silica requires a “flux” to help it melt at the lower temperature. Fluxes can be all sorts of chemicals – a common one is calcium – calcium has a melting point of 2500°C, however, together they both melt at a much lower temperature! Colourants are metal oxides like cobalt (blue), chrome (green through black), copper (green, blue, even red!), manganese (black, purple and pink) iron (red brown), etc. Different chemicals in the glaze can have dramatic effects. for example, barium carbonate (which we don’t use) turns manganese bright pink! Other elements can turn manganese dioxide brown, blue, purple and reddish brown. Manganese dioxide is a flux in and of itself as well. So, glazes that get their black and purple colours, often interact with other glazes and RUN! Our mirror black is a good example – it mixes really well with many glazes because it fluxes them – causes them to melt faster. It will also bring out many beautiful colours in the glazes because it’s black colouring most definitely comes from manganese dioxide! Glaze chemistry is a whole subject on it’s own! We use commercial Mayco glazes on purpose – for their huge range of colour possibilities, stability, cool interactions, artistic freedom with the ability to easily brush the glazes on and ease of use. We currently have almost 50 glazes on hand! A major project is to test the interactions of all glazes with each other. That is 2,500 test tiles!!!! I’m going to make the wall behind the wheels the feature wall of pretty colours! Step Seven – Glaze (Gloss or sometimes called “Glost”) Firing Most of the time this is the final stage of making your creation (but not always!) The glaze kiln goes to 1240°C. This is called cone 6, or midrange. It is the low end of stoneware temperatures. Stoneware clays and glazes are typically fired at cone 8 – 10, that is 1260 – 1290°C. The energy requirement to go from 1240°C to 1280°C is almost a 30% more! Our clay is formulated to vitrify (mature, turn “glass-like”) at 1240°, as are our glazes. A glaze kiln take around 12 hours to reach temperature and two to three days to cool down. Sometimes a third firing process is required – this is for decoration that is added to work after the glaze firing. For example – adding precious metals and lustres. this firing temperature is usually around 600 – 800°C depending upon the techniques being used. There are many students interested in gold and silver trims – we will be doing this third type of firing soon! After firing your work will be in the student finished work shelves. Remember to pay for it before you head out the door! There is a small extra charge for using porcelain clay (it’s more than twice the price of regular clay), and for any third firing process! Once your work has been fired it can not turn back into clay for millennia – so don’t fire it if you don’t like it! Put it in the bucket for recycling. https://firebirdstudios.com.au/the-process-of-making-pottery/The form of the jug has been in use for many centuries.Stoneware jug. Two tone brown glaze with pierced lip behind spout. Spout chipped.None.flagstaff hill, warrnambool, shipwrecked-coast, flagstaff-hill, flagstaff-hill-maritime-museum, maritime-museum, shipwreck-coast, flagstaff-hill-maritime-village, jug, ceramic jug -
 Eltham District Historical Society Inc
Photograph, Shire of Eltham War Memorial, Memorial Park, Garden Hill, Kangaroo Ground; Eltham Heritage Tour, 24 May 1992, 24/05/1992
ELTHAM HERITAGE TOUR The Society excursion on 24th May 1992 was arranged by David Bick, leader of the team carrying out the Shire's heritage study. David selected a number of sites or buildings identified in the study, some of them lesser known components of the Shire's heritage. The tour commenced at the Eltham Shire Office at 10.00 am. Travel was by private car and mini-bus with stops at about twelve locations for commentary by David.It included a short walk in Hurstbridge and lunch at Kinglake. Highlights of the tour included: - 10 am Leave from Shire Offices - 3 Important Trees - A Physical Link to Eltham's First Settlers - Toorak Mansion Gates - A Surviving Farm House - An Intact Circa 1900 Main Street - First Settlers - Gold Miners, and Timber-getters - An Early Hotel - A Pioneering Homestead - Changing Eltham Shire - 20th Century - 4 pm Afternoon Tea and Finish Tour Extract from ELTHAM CULTURAL HERITAGE TOUR (Newsletter No. 85, July 1992, by Bettina Woodburn) "Now we drove through stands of pines to the Kangaroo Ground Lookout Tower, a most unusual War Memorial, World War I. The tower and a shed/residence (it had a chimney) were built from local sandstone. Below to the south and east of Melbourne spread 'suburbia'. Close by the landscape seemed so contrived - English fields and hedgerows! Although only about twenty inches deep, the soil of this ancient volcano, its crater lost under subsequent weathering, was rich, deserving the name of "Garden Hill". Now native trees are taking over again. In Kangaroo Ground itself stand the inevitable Store, School and Church - and two Norfolk pines and a monkey puzzle tree." On November 11th 1926 the Shire of Eltham War Memorial Tower at Kangaroo Ground was opened. It is regarded as one of Melbourne’s most outstanding lookout towers. It commands a magnificent 360 degree panorama from Kinglake across the Diamond Valley to Macedon and the You Yangs. It is built on a peak which was once a volcano, 237 metres above sea level. After World War one a memorial cairn was erected on the site, and in 1925 a committee of public-minded citizens began to plan for a tower. Many generous donations of material and money were forthcoming so that in 1926 the Governor General Lord Stonehaven was able to unveil the plaque before a crowd of 500 people. There was some concern in the 1960s when the Forests Commission wanted to build a firespotters cabin on the top. At first R.S.L. branches opposed the idea, but it was realised that this use could combine with its use as a tourist attraction, and would ensure its maintenance for the future, Today the Kangaroo Ground tower provides one of the best views around Melbourne and is a fitting memorial to those who died in two world wars. From: Historic items for Diamond Valley Community Radio September 1990 (EDHS collection) Record of the Society's history and activities and highlighting various aspects of the Heritage Study undertaken by David Bick used to create the future heritage overlay for the Shire of Eltham and later Nillumbik Shire.Roll of 35mm colour negative film, 4 stripsKodak Gold 100 5095culture, events, garden hill, kangaroo ground, kangaroo ground memorial, memorial park, shire of eltham war memorial tower, war memorials