Showing 2456 items
matching photo card
-
 Flagstaff Hill Maritime Museum and Village
Photograph - Coastal Scene, Foyle Photographic Studio, Loch Ard Gorge Port Campbell, 1889-1919
... . He owned “Foyle’s Photo Card Studios” in Liebig St.... He owned “Foyle’s Photo Card Studios” in Liebig St ...The photograph shows the popular tourist attraction, Loch Ard Gorge, which is located along the Great Ocean Road in Victoria, near Port Campbell. The gorge is named after the famous sailing ship, the LOCH ARD, that was wrecked there in 1878. Only two of the 54 passengers and crew survived. FOYLE “Foyle” written on the photograph is the name of Foyle’s Photographic studio. At the time of the photograph, the studio was owned by both Charles and Lilian Foyle (sometimes known as Lillian or Lily), either of whom could have taken this photograph. They also worked together at a later date on the photographs, sketches and paintings of the famous and historical Pioneers’ Honour Board, which is currently on view in the Warrnambool Library. Foyles Photography was the studio of James Charles Foyle. He owned “Foyle’s Photo Card Studios” in Liebig St, Warrnambool, which operated between 1889 – 1919. A letter to the editor (by Mr Edward Vidler) in the Melbourne Argus, 3rd August 1907, mentions that in that year Warrnambool would celebrate the 60th anniversary of its proclamation as a town, and that talented local artist Miss Lily Foyle would paint 200 portraits in watercolour of the pioneers who settled in the district prior to 1860. The Pioneer Honour Board can still be seen on display in the Warrnambool Library. In the Warrnambool Standard, Dec. 1917, “Mr Foyle’s studio was awarded the contract to decorate rail cars on newly opened Trans-Continental railway, assisted by his sister, Miss Findlay.” HISTORY OF THE LOCH ARD The LOCH ARD belonged to the famous Loch Line which sailed many ships from England to Australia. Built-in Glasgow by Barclay, Curdle and Co. in 1873, the LOCH ARD was a three-masted square-rigged iron sailing ship. The ship measured 262ft 7" (79.87m) in length, 38ft (11.58m) in width, 23ft (7m) in depth and had a gross tonnage of 1693 tons. The LOCH ARD's main mast measured a massive 150ft (45.7m) in height. LOCH ARD made three trips to Australia and one trip to Calcutta before its final voyage. LOCH ARD left England on March 2, 1878, under the command of Captain Gibbs, a newly married, 29-year-old. She was bound for Melbourne with a crew of 37, plus 17 passengers and a load of cargo. The general cargo reflected the affluence of Melbourne at the time. Onboard were straw hats, umbrella, perfumes, clay pipes, pianos, clocks, confectionary, linen and candles, as well as a heavier load of railway irons, cement, lead and copper. There were items included that intended for display in the Melbourne International Exhibition in 1880. The voyage to Port Phillip was long but uneventful. At 3 am on June 1, 1878, Captain Gibbs was expecting to see land and the passengers were becoming excited as they prepared to view their new homeland in the early morning. But LOCH ARD was running into a fog which greatly reduced visibility. Captain Gibbs was becoming anxious as there was no sign of land or the Cape Otway lighthouse. At 4 am the fog lifted. A man aloft announced that he could see breakers. The sheer cliffs of Victoria's west coast came into view, and Captain Gibbs realised that the ship was much closer to them than expected. He ordered as much sail to be set as time would permit and then attempted to steer the vessel out to sea. On coming head-on into the wind, the ship lost momentum, the sails fell limp and LOCH ARD's bow swung back. Gibbs then ordered the anchors to be released in an attempt to hold its position. The anchors sank some 50 fathoms - but did not hold. By this time LOCH ARD was among the breakers and the tall cliffs of Mutton Bird Island rose behind the ship. Just half a mile from the coast, the ship's bow was suddenly pulled around by the anchor. The captain tried to tack out to sea, but the ship struck a reef at the base of Mutton Bird Island, near Port Campbell. Waves broke over the ship and the top deck was loosened from the hull. The masts and rigging came crashing down knocking passengers and crew overboard. When a lifeboat was finally launched, it crashed into the side of LOCH ARD and capsized. Tom Pearce, who had launched the boat, managed to cling to its overturned hull and shelter beneath it. He drifted out to sea and then on the flood tide came into what is now known as LOCH ARD Gorge. He swam to shore, bruised and dazed, and found a cave in which to shelter. Some of the crew stayed below deck to shelter from the falling rigging but drowned when the ship slipped off the reef into deeper water. Eva Carmichael had raced onto the deck to find out what was happening only to be confronted by towering cliffs looming above the stricken ship. In all the chaos, Captain Gibbs grabbed Eva and said, "If you are saved Eva, let my dear wife know that I died like a sailor". That was the last Eva Carmichael saw of the captain. She was swept off the ship by a huge wave. Eva saw Tom Pearce on a small rocky beach and yelled to attract his attention. He dived in and swam to the exhausted woman and dragged her to shore. He took her to the cave and broke and opened the case of brandy, which had washed up on the beach. He opened a bottle to revive the unconscious woman. A few hours later Tom scaled a cliff in search of help. He followed hoof prints and came by chance upon two men from nearby Glenample Station three and a half miles away. In a state of exhaustion, he told the men of the tragedy. Tom returned to the gorge while the two men rode back to the station to get help. By the time they reached LOCH ARD Gorge, it was cold and dark. The two shipwreck survivors were taken to Glenample Station to recover. Eva stayed at the station for six weeks before returning to Ireland, this time by steamship. In Melbourne, Tom Pearce received a hero's welcome. He was presented with the first gold medal of the Royal Humane Society of Victoria and a £1000 cheque from the Victorian Government. Concerts were performed to honour the young man's bravery and to raise money for those who lost family in the LOCH ARD disaster. Of the 54 crew members and passengers on board, only two survived: the apprentice, Tom Pearce and the young woman passenger, Eva Carmichael, who lost all of her family in the tragedy. Ten days after the LOCH ARD tragedy, salvage rights to the wreck were sold at auction for £2,120. Cargo valued at £3,000 was salvaged and placed on the beach, but most washed back into the sea when another storm developed. The wreck of LOCH ARD still lies at the base of Mutton Bird Island. Much of the cargo has now been salvaged, and some of it was washed up into what is now known as LOCH ARD Gorge. Cargo and artefacts have also been illegally salvaged over many years before protective legislation was introduced. One of the most unlikely pieces of cargo to have survived the shipwreck was a Minton porcelain peacock - one of only nine in the world. The peacock was destined for the Melbourne International Exhibition in 1880. It had been well packed, which gave it adequate protection during the violent storm. Today, the Minton peacock can be seen at the Flagstaff Hill Maritime Museum in Warrnambool. From Australia's most dramatic shipwreck it has now become Australia's most valuable shipwreck artefact and is one of very few 'objects' on the Victorian State Heritage Register.Flagstaff Hill’s collection of artefacts from LOCH ARD is significant for being one of the largest collections of artefacts from this shipwreck in Victoria. It is significant for its association with the shipwreck, which is on the Victorian Heritage Register (VHR S417). The collection is significant because of the relationship between the objects, as together they have a high potential to interpret the story of the LOCH ARD. The LOCH ARD collection is archaeologically significant as the remains of a large international passenger and cargo ship. The LOCH ARD collection is historically significant for representing aspects of Victoria’s shipping history and its potential to interpret sub-theme 1.5 of Victoria’s Framework of Historical Themes (living with natural processes). The collection is also historically significant for its association with the LOCH ARD, which was one of the worst and best-known shipwrecks in Victoria’s history. Foyle's photographs date from the late 19th century to the early 20th century, representing a time of growth in the Warrnambool district and a time when the still relatively new technology of photography was more available to the community.Photograph of Loch Ard Gorge. This sepia coloured rectangular photograph is mounted on a brown cardboard backing that has a wood grain pattern. The photograph has an inscription above it, below it, and in the bottom left corner. It was made for the purpose of a presentation by the Port Campbell Progress Association. Printed above the photograph "PRESENTED BY THE PORT CAMPBELL / PROGRESS ASSOCIATION". Printed below the photograph "LOCH ARD GORGE / PORT CAMPBELL". Hand written on bottom left corner "Foyle". flagstaff hill, warrnambool, shipwrecked coast, flagstaff hill maritime museum, maritime museum, shipwreck coast, flagstaff hill maritime village, great ocean road, loch line, loch ard, captain gibbs, eva carmichael, tom pearce, glenample station, mutton bird island, loch ard gorge, photograph, port campbell, port campbell progress association, foyle photograph, foyle photographic studio warrnambool, warrnambool photo studio -
 Melbourne Tram Museum
Album - Photo Album, Melbourne & Metropolitan Tramways Board (MMTB), Construction of depots and workshops, mid 1920's
... Photo Album - brown manila card sheets as covers... as list of the photographs. Photo Album - brown manila card sheets ...Photo Album - brown manila card sheets as covers, containing 20 blue card sheets trimmed with white binding tape and held by two brass clips, containing the following photographs: South Melbourne depot - substation, construction, steelwork, inspection pits, offices, girders. overhead stores Preston Workshops - body shop, timber sheds, machine shop, steelwork, crane runways Sydney Harbour bridge steelwork. Three loose photos. For individual photo images of each page see: \dbtext\hawthtramcoll\photo collections\htd5526 - KC Painter Material /Early MMTB Depots-album images KCP01 to KCP20 KCP01_MMTB-depot-construction_cover.jpg KCP02_SouthMelbourne-1.jpg KCP03_SouthMelbourne-2.jpg KCP04_SouthMelbourne-3.jpg KCP05_SouthMelbourne-4.jpg KCP06_SouthMelbourne-5.jpg KCP07_PrestonWorkshops-1.jpg KCP08_PrestonWorkshops-2.jpg KCP09_PrestonWorkshops-3.jpg KCP10_PrestonWorkshops-4.jpg KCP11_PrestonWorkshops-5.jpg KCP12_PrestonWorkshops-6.jpg KCP13_PrestonWorkshops-7.jpg KCP14_PrestonWorkshops-8.jpg KCP15_PrestonWorkshops-9.jpg KCP15_PrestonWorkshops-10.jpg KCP16_Kew-extensions-1.jpg KCP17_Kew-extensions-2.jpg KCP18_OverheadDepot_SouthMelbourne.jpg KCP19_WaterTower_SouthMelbourne.jpg KCP20_SydneyHarbour-Unknown.jpgLetter "MMTB", "R T Alsop"? and "7" in ink on front cover as well as list of the photographs.trams, tramways, photo album, south melbourne depot, preston workshops, kew depot, sydney, substation, construction, buildings -
 Flagstaff Hill Maritime Museum and Village
Postcard - People, Bill Ferrier - rescuer, 11th November, 1905
... a photographic studio in Melbourne 1882 1887, then opened “Foyle’s Photo... “Foyle’s Photo Card Studios” in Liebig St, Warrnambool. James Foyle ...The postcard shows a photograph of William Ferrier, the 25-year-old Warrnambool fisherman from South Warrnambool whose rescue of two sailors from the wrecked La Bella made him an overnight National hero, quoted as “one of the most heroic rescues in Victoria’s shipwreck history”. The La Bella was wrecked on 10th November 1905 and the photograph was taken on the next day. In the photograph, William Ferrier is seated in the centre, with four of the five survivors beside him: (from left to right) Leonard Robertson, R. Payne, Oscar Rosenholme and Jack Noake. The photograph was taken by Foyle Photography Studio in Warrnambool, originally owned by James Charles Foyle. He previously had a photographic studio in Melbourne 1882 1887, then opened “Foyle’s Photo Card Studios” in Liebig St, Warrnambool. James Foyle died on 13th July 1905 and his son and daughter, Charles and Lilian Foyle continued on with the business until 1945. This photograph was most likely taken by either Charles or Lilian Foyle. The story of William Ferrier’s brave act follows on below … The ship from which the sailors were rescued was the three-masted, iron and steel barquentine the La Bella, built in Norway in 1893. She was one of two iron and steel ships by Johan Smith, the company was one of the leading shipping families in Tvedestrand, Norway. She was significant to Norwegian shipping, being one of only 27 iron and steel ships ever built in Norway. She was registered in New Zealand and engaged from 1902 in inter-colonial trading of timber in the Pacific, between New Zealand and Australia and was often in Port Phillip Bay, Victoria. On 5th October 1905, the twelve-year-old La Bella left Lyttleton, New Zealand carrying a cargo of timber bound for Warrnambool, Australia. She was manned by a crew of twelve: the Master, (Captain Mylius, previously 1st Mate of La Bella, appointed Captain to La Bella on 6th February 1903) 2 Mates, Cook, six able seamen, one ordinary seaman and a boy. Bad weather en route caused her to shelter at Burnie on Tasmania's North West coast. On November 10th, the 37th day of her journey, La Bella approached Warrnambool. Captain Mylius steered her towards Lady Bay Channel in heavy south-west seas and evening mist. He ordered the helmsman to steer for the light. As the ship came round, a tremendous sea struck her on the port quarter, causing her to breach broadside in a northwesterly direction into breakers. The helm was brought round twice more, but each time heavy seas broke over her, the third time throwing the La Bella on to a submerged reef in Lady Bay now known as La Bella Reef (about 100 yards from the Warrnambool breakwater). The sea was so rough that it even wrenched a one-and-a-half ton anchor from its fastenings and into the sea. As Captain Mylius headed to the steel wheelhouse, intending to send up a rocket flare, a huge sea slammed the steel door into him (resulting in massive bruising front and back) Despite his injuries he still managed to set off a blue light, which he held up in his hands. La Bella’s lifeboats were filled with seawater and broke up on their chocks. The blue light was the first indication to people on the shore that there was a ship in distress. The Harbour Master, Captain Roe (who lived in the Harbour Master’s House opposite Flagstaff Hill), organised a group of volunteers to crew the lifeboat because the trained crew was unavailable; the crewmen were working on a steamer in Port Fairy at the time. He then poured oil onto the water to try and smooth the sea. At around 11 pm three of the crew took shelter in the steel forecastle but the sea crashed into it and broke it up. While the rest of the crew and onlookers watched helplessly in the moonlight the bodies were washed away into the sea, never to be seen again. Some of the crew lashed themselves to the weather rail to keep from being washed away. Watson, the ordinary seaman, became tangled in the rigging lines and was too weak to move, so the 2nd Mate, Robertson, put a line onto him so that he wouldn’t wash off. Around 11 pm three of the crew were unconscious from exhaustion. The situation on La Bella was becoming dangerous. The 2nd Mate moved to the ‘house’ and soon afterwards the ship slipped in the heavy sea. The lashings of the 1st Mate and the ‘boy’ Denham had kept them safe until about 2 am when they were washed overboard; no one was able to help. One by one, the exhausted crew were being washed overboard, too weak to hold on any longer. During the night the La Bella had broken into two and the deckhouse ran out towards the sea. Two more men drowned when trying to reach the lifeboat. By sunrise, the only survivors of the twelve were the Master, 2nd Mate and three seamen. Early in the morning, Captain Roe used the rocket apparatus on shore to try and shoot a line to the ship for a safer rescue but each attempt fell short of the target. Several attempts were made by the lifeboat to rescue the stricken sailors, but the rough conditions made this difficult for the boat to get close enough to the ship and the lifeboat had to return to shore. During a final attempt to reach the ship Captain Mylius ordered his men to jump into the sea. Leonard Robertson, 2nd mate, jumped and swam towards the lifeboat, taking hold of the boat hook offered to him. Oscar Rosenholme managed to reach the boat floating on a piece of timber from the ship’s load and a third survivor, Noake, also made the boat. Along with the lifeboat rescue crew, 25-year-old William Ferrier rowed his small dingy through the heavy seas and managed to rescue the Captain, whom he landed on the breakwater. Ferrier then returned to the ship to attempt a final rescue, losing his oars and rowlocks into the high sea. Using just a spare paddle he skulled towards the La Bella, reaching her stern in time to cut loose the lone surviving sailor, Payne, from the lashing that held him to the ship; the terrified sailor dropped from the ship and into the dingy. Shortly after the last man was rescued, the La Bella was lifted by a huge wave and crashed back down on the reef; she broke up and sank. The ordeal had lasted ten hours. The survivors were taken to the nearby Bay View Hotel and gratefully received warm food and clothing, medical attention and a place to sleep. In the following days, an unidentified body of a young person had washed ashore; it was either Watson or Denham. The body was buried in the Warrnambool cemetery with an appropriate gravestone and inscription. William Ferrier became a national hero as news of the daring rescue spread. In recognition of his bravery in the two daring rescues, he was awarded the Silver Medal for Bravery by the Royal Humane Society and was honoured in the letter from the Prime Minister and the Parliament of the Commonwealth, telegrams and a cheque for £20 from the Governor-General, over £150 subscribed by the public, including Warrnambool and district and readers of The Argus, and a gold medal from the Glenelg Dinghy Club of South Australia. Ferrier’s rescue efforts are one of the most heroic in Victoria’s shipwreck history. (William Ferrier’s son, Frank, received a similar award almost fifty years later when he helped rescue four members of the crew on the yacht Merlan after it ran on to a reef near the Point Lonsdale Lighthouse. ) The wreck of La Bella now lies on her port side in 13 metres of sheltered water inside the reef she struck. The bow section is relatively intact and part of the stern has drifted north-easterly towards the mouth of the Hopkins River. The reef the La Bella struck now bears its name. Those five rescued from the La Bella were Captain George Mylius, Leonard Robertson (2nd Mate, 21 years old), R. Payne, Oscar Rosenholme and Jack Noake. Those seven who lost their lives were Mr Coulson (1st mate), Charles Jackman (cook) Gustave Johnson, Pierre Johann and Robert Gent (all able seamen), Harry Watson (ordinary seaman) and Jack Denham (ship’s boy), Captain Mylius was found guilty of careless navigation; he had sailed into the bay without the services of a pilot. His Master Certificate was suspended for twelve months. Later he was also charged with manslaughter of one of the crew who had died when the La Bella was wrecked but found not guilty. The event’s adverse publicity and damage to his career took a toll on his health and he died of a heart attack six months after the wreck; he was only thirty-seven. His body was buried in the Melbourne General Cemetery. The La Bella was “the best documented of all sailing ships owned in New Zealand”. Her record books, ship logs, correspondence and supporting papers are still available. At the time of the tragedy, she was owned by Messers David C.Turnbull and Co. of Timaru, New Zealand timber merchants and shipping agents, who had purchased her on 13th December 1901. A detailed account of the last journey of La Bella can be read in “Leonard Robertson, the Whangaroa & La Bella” written by Jack Churchouse, published in 1982 by Millwood Press Ltd, Wellington, NZ. As well as this postcard, Flagstaff Hill’s La Bella Collection includes a photograph of the wrecked La Bella, a brass rail holder and the letter from the Prime Minister and other Members of Parliament that was sent to William Ferrier to commend him for his bravery. Some 15 – 17 ships are believed to have sunk in Lady Bay, but only two have been discovered on the seafloor; the “La Bella” and the “Edinburgh Castle”. Both wrecks are popular diving sites and are preserved as significant historical marine and marine archaeological sites. This postcard is part of the La Bella Collection and is significant at both a local and state level. Its connection to the La Bella shipwreck and the rescue of five survivors highlights the dangers of Victoria’s Shipwreck Coast. The photograph of William Ferrier and four of the five survivors demonstrates the bravery of ordinary Australians who risked their lives to save victims of shipwrecks along the coast. The postcard is significant to the history of Warrnambool as it portrays William Ferrier, a local fisherman whose descendants continue to live in the area. It highlights the way of life of people who lived in coastal towns in 19th century Victoria and the effects of shipwrecks upon them. The postcard connects to the congratulatory letter which was sent to William Ferrier by the Prime Minister and Government of Australia and demonstrates the importance they attached to his efforts for Victoria and to Australia. The postcard is also an example of the photography of Foyle Photographers who were in the town of Warrnambool from the late 1800’s. Charles and Lillian Foyle took over the business when their father James died in 1905. Lillian Foyle is significant as the first woman photographer in Warrnambool. It is not known whether Charles of Lillian took this photograph. This postcard is significant because of its association with the sailing ship “La Bella”. The “La Bella” is of local and state and national significance. It is one of the only two shipwrecks discovered in Lady Bay, Warrnambool, out of the 15-17 shipwrecks in the bay. Sepia photograph of William (Bill) Ferrier (seated in the middle), heroic rescuer of two crew members of the La Bella, wrecked at Warrnambool. The photograph is a postcard and shows five men dressed formally in suits and hats. Printed below the photograph are the name and place of the photographer, a royal crest and the details of two patrons of the photographer. Also below the photograph are some handwritten words in black pen. On the back of the postcard is a handwritten message in the same writing as the front.Printed on the front of the card is “Foyle, WARRNAMBOOL” “PATRONS: / HIS ROYAL HIGHNESS THE DUKE OF CORNWALL & YORK. / HIS EXCELLENCY LORD BRAS_ EY, R.O.B.” Handwritten on the front of the card is “Bill Ferrier / rescuer / Oh my hero _ _ _ “ Handwritten on the back of the card is a message. “La Bella” Wrecked off W.Bool Breakwater Nov. 1906 (_ _ _ _ show night) Payne Noake Rosenholme Robertson and Capt Mylius (saved) (moonlight bright) Watson (_ _ _ _ boy) Richwoud [possibly Richmond] drowned” and signed “Desdewoua [possibly Desdemona] Slogos”la bella, foyle, william ferrier, bill ferrier, lady bay, 1905, 10th november 1905, 11th november 1905, parliament of the commonwealth, royal humane society medal, flagstaff hill, warrnambool, shipwrecked coast, flagstaff hill maritime museum, maritime museum, shipwreck coast, flagstaff hill maritime village -
 Bendigo Historical Society Inc.
Photograph - HILDA HILL COLLECTION: BLACK AND WHITE PHOTOS
... Photos Double Sided Card Total of 8 depicting family life towards... Photos Double Sided Card Total of 8 depicting family life towards ...Hilda Hill Collection. Combination Sepia & Black & White Photos Double Sided Card Total of 8 depicting family life towards the end of the First World War in 1918 up until July 1924. A comparison exists between life at 'The Ranch' ? In Eppalock in 1918 versus life at 'The Ranch' in 1924. lady standing at the front of the house with left arm raised to shade her eyes dressed in a dark coloured dress, light coloured cover on chair in background at 'the Ranch' June 1918. Oval black and white photo of Doreen at Durvol, dressed in black skirt and white shirt with black school? Tie June 1918. Proud parents with baby sitting in pram, both p[parents are wearing dark coloured hats dark clothing and white shirts, pram is boat style body with large rear wheels and smaller front wheels. White picket fence in background, May 1918. Also on this page is a reference to 'The Ranch' July 1924 in white, but no photo. Claire and Doreen sitting on lawn area, small garden to left, row of decorative plants in semi circle, dead tree centre background and other trees to left and right background, S.H.L.C. 24 Sept 1918. Boys' Flag Drill - repatriation Upper Reserve 19 October 1918. Group of people, all but one females, all in white at No. 7 reservoir happy 9 January 1919. Al and Marie sitting, Al in all white and hatless, Marie in white blouse and black waistcoat with black tie, foreground shows large rocks, background has trees in distance, No.7 reservoir 9 January 1919. Childrens folk dance at Upper Reserve, All children dressed in white, large round hat in foreground, and suited man in hat walking past 19 October 10918.Hilda Hill Personal Collectionaustralia, history, post war life -
 Ballarat Tramway Museum
Album - Photo Album, c1970
... Photo album containing 16 colour prints. Photo album has... 16 colour prints. Photo album has heavy card covers, covered ...Set of 16 photos of Ballarat tram system taken 1970c on a tour by an unknown Qld based person.Photo album containing 16 colour prints. Photo album has heavy card covers, covered in black textured plastic containing 12 clear plastic photo sleeves held with a white comb binder. Photos of Ballarat prior to closure, c1970. Photographer unknown. Donated by Peter Hyde of Brisbane Tramway Museum to BTM 3/2/2010, from a deceased estate. Photos apparently taken on a tram tour. .1 - No. 42 and a single trucker inbound in Sturt St. .2 - taken from tram ascending Bakery St hill in Victoria St. .3 - End of No. 42, with the destination "Haddon St via Drummond Nth" .4 - No. 11 and 42 in Lydiard St Nth, near the railway station. No. 11 showing special. .5 - photo of three people on the tour. .6 - Trams reversing at the Victoria St terminus .7 - ditto .8 - 11, 42 and 12? in Lydiard St North by railway station. .9 - Three trams at Sebastopol terminus. .10 - View in Albert St Sebastopol looking north along the track on the side of the road. .11 - View of the tram crossing in Albert St. .12 - 27 and 42 crossing Albert St Sebastopol. .13 - View of Albert St from the tram, north of the crossing looking at the reserved track 14. - Lydiard St North looking south .15 - 42 at the railway level crossing. .16 - View south of the railway level crossing, three trams, with passengers alighting.trams, tramways, ballarat, albert st, sebastopol, victoria st, sturt st, lydiard st nth, railway crossing -
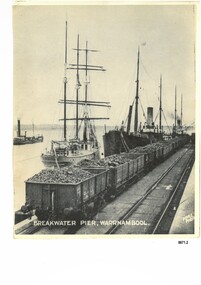 Flagstaff Hill Maritime Museum and Village
Photograph - Vessels at Breakwater Pier, Warrnambool, Foyle Photographic Studio, circa 1906
... owned by James Charles Foyle. He owned “Foyle’s Photo Card... Charles Foyle. He owned “Foyle’s Photo Card Studios” in Liebig St ...This photograph was one of ten photographs donated to Flagstaff Hill Maritime Museum and Village by Fred Trewartha. Frederick John Fox Trewartha (Fred) was a well-known Warrnambool businessman. He was born in Beeac near Geelong in 1920 and came to Warrnambool with his family as a very young child. He was apprenticed to his father John, as a saddler and later opened his own shop on Raglan Parade. He then moved into working with tarpaulins and canvases for the trucking industry. Fred was keenly interested in photography (and was a member of the Warrnambool Cine Club), yachting and boat building. He kept his yacht moored at Port Fairy for many years and participated in sailing events locally and interstate. He also built boats with his sons. He had the opportunity to meet many older sailors and it's thought this photo (and others in the set) may have been given to him by one of these men. Fred Trewartha died in 2016 in Warrnambool. The three identifiable ships in this picture are the "Speculant", the "S. S. Barrabool" and the "S. S. Flinders" - coastal trading vessels that regularly came and went from Warrnambool. The steamer on the left hasn't been identified. The barquentine SPECULANT was a steel, three-masted sailing ship built in 1895 in Inverkeithing, Scotland, registered in Warrnambool, Victoria and wrecked at Cape Paton, Victoria, 10th February 1911. The SPECULANT had been involved in the timber trade between the United Kingdom and Russia, until sold to its Warrnambool owners and timber merchants Messrs. P.J. McGennan & Co. (Peter John McGennan) in 1902 for 3000 pounds and had her sailed to Warrnambool as her new port. Peter John McGennan was born in 1844 and worked as a builder and cooper in Holyhead, Anglesea, Wales. He immigrated to Australia in 1869 as a free settler and arrived in Warrnambool in 1871 and undertook management of a property in Grassmere for Mr. Palmer. Peter met his wife Emily in South Melbourne and they married in 1873. They had ten children including Harry who lived to 1965, and Andrew who lived until 1958. (The other children were their four brothers - John who was killed in the Dardenalles aged 35, Frederick who died aged 8, Peter who died aged 28, Frank who died aged 5 weeks - and four sisters - Beatrice who died age 89, Edith who died aged 49, Blanche who died aged 89 and Eveline who died aged 48.) In 1874 Peter starting a boating establishment on the Hopkins River. In 1875 he opened up a Coopers business in Kepler Street next to what was Bateman, Smith and Co., moving to Liebig Street, next to the Victoria Hotel, in 1877. In 1882 he then moved to Lava Street (which in later years was the site of Chandlers Hardware Store). He was associated with the establishment of the Butter Factory at Allansford. He started making Butter Boxes to his own design and cheese batts for the Butter Factory. In 1896 established a Box Factory in Davis Street Merrivale, employing 24 people at its peak, (it was burnt down in 1923); and in Pertobe Road from 1912 (now the Army Barracks building). Peter was a Borough Councillor for Albert Ward from 1885 to 1891, he commenced the Foreshore Trust (including the camping grounds along Pertobe Road), and he was an inaugural Director of the Woollen Mill in Harris Street, buying an extensive share-holding in 1908 from the share trader Edward Vidler. They lobbied the Town Hall to have a formal ‘Cutting’ for the waters of the Merri River to be redirected from its natural opening south of Dennington, to its existing opening near Viaduct Road, in order to have the scourings from the wool at the Woollen Mill discharged into the sea. He sold Butter Boxes around the state, and had to ship them to Melbourne by rail. Peter’s purchase of the SPECULANT in 1902 enabled him to back-load white pine from Kaipara, New Zealand to Warrnambool to make his butter boxes then, to gain profitability, buy and ship potatoes and other primary produce bound to Melbourne. (McGennan & Co. had also owned the LA BELLA, which had traded in timber as well, until she was tragically wrecked with the loss of seven lives, after missing the entrance channel to Warrnambool harbour in 1905. It appears that the SPECULANT was bought to replace the LA BELLA.) In 1911 the SPECULANT had been attempting to depart Warrnambool for almost the entire month of January to undergo docking and overhaul in Melbourne. A month of east and south-easterly winds had forced her to remain sheltered in Lady Bay, Warrnambool apart from one morning of northerlies, when an attempt was made to round Cape Otway; she had to return to shelter in Portland after failing to make any headway. With only 140 tons of sand ballast aboard, the ship would not have been easy to handle. Captain Jacobsen and his crew of nine, mainly Swedes, decided to make for Melbourne, leaving Portland Harbour on 5th February 1911. By the 9th they had reached Cape Otway, where they encountered a moonless night, constant heavy rain, and a heavy sea with a south-easterly wind blowing. After safely rounding Cape Otway the course was changed to east, then north-east to take the vessel to a point six miles off Cape Patton, following the orders of Captain Jacobsen, who told the crew to be very careful with the steering, as the wind and sea was running to leeward. The patent log (used to measure speed) had been out of order for the last four months as no-one in Warrnambool was able to fix it: it was intended to have it repaired in Melbourne. In the meantime the crew measured the vessel's speed by looking over the side and estimating wind strength. This compounded the difficulties of imprecise positioning, as the strong cross wind and sea were acting on the lightly laden vessel to steadily drive it towards the shore. At 3.30am on Friday 10 February 1911 Captain Jacobsen and the first mate were looking over the side of the vessel when they heard the sound of breakers and suddenly struck the rocks. The crew immediately knew they had no chance of getting the SPECULANT off, and attempted to rescue themselves by launching the lifeboat, which was instantly smashed to pieces. One of the crew then volunteered to take a line ashore, and the rest of the crew were all able to drag themselves to shore, some suffering hand lacerations from the rocks. Once ashore they began to walk along the coast towards Lorne, believing it was the nearest settlement. Realising their mistake as dawn broke they returned westwards to Cape Patton, and found a farm belonging to Mr C. Ramsden, who took them in and gave them a change of clothes and food. After resting for a day and returning to the wreck to salvage some of their personal possessions, at 10am on Saturday they set out for Apollo Bay, a voyage that took six hours, sometimes wading through flooded creeks up to their necks. The Age described the wreck as "listed to starboard. All the cabin is gutted and the ballast gone. There is a big rock right through the bottom of her, and there is not the slightest hope of getting her off". A Board of Marine inquiry found that Captain Jacobson was guilty of careless navigation by not taking steps to accurately verify the position of the vessel with respect to Cape Otway when the light was visible and by not setting a safe and proper course with respect to the wind and sea. It suspended his certificate for 6 months and ordered him to pay costs. The location of the wreck site was marked for a long time by two anchors on the shoreline, until in 1970 the larger of the two anchors was recovered by the Underwater Explorers' Club and mounted on the foreshore at Apollo Bay. The bell from the wreck was also donated to the Apollo Bay Surf Lifesaving Club but is recorded to have been stolen. Rusting remains of the wreck can still be found on the shoreline on the southern side of, and directly below Cape Patton. Parts of the SPECULANT site have been buried by rubble from construction and maintenance works to the Great Ocean Road, as well as by naturally occurring landslides. Peter J McGennan passed away in 1920. The Gates in the western wall of the Anglican Church in Henna Street/Koroit St are dedicated to him for his time of community work, which is matched with other prominent Warrnambool citizens; Fletcher Jones, John Younger, J.D.E (Tag) Walter, and Edward Vidler. After Peter J McGennan's death Harry, Andrew and Edith continued to operate the family business until July 11th 1923 when the company was wound up. (Andrew lived in Ryot Street Warrnambool, near Lava Street.) Harry McGennan (Peter and Emily’s son) owned the Criterion Hotel in Kepler Street Warrnambool (now demolished). His son Sid and wife Dot lived in 28 Howard Street (corner of Nelson Street) and Sid managed the Criterion until it was decided by the family to sell, and for he remained Manager for the new owners until he retired. Harry commenced the Foreshore Trust in Warrnambool around 1950. The McGennan Carpark in Pertobe Road is named after Harry and there are Memorial-Stone Gates in his memory. (The Gates were once the original entrance to the carpark but are now the exit.). The Patent Log (also called a Taffrail log) from the SPECULANT, mentioned above, and a number of photographs, are now part of the Collection at Flagstaff Hill Maritime Village.. The S. S. Flinders was built by A. J. Inglis, Ltd, Pointhouse, Glasgow in 1878 for the "Tasmanian Steam Navigation Company', Hobart which merged with the "Union Steamship Company" of New Zealand and it was later sold to the firm "McIlwraith, McEacham and Company". It was built of iron and was 1000 tons and 227 feet, 1 inch long. It was described as "splendidly fitted up for the carriage of passengers and her cargo space was also very large". In the saloon about 130 passengers could be accommodated while the second class had sufficient room for one hundred passengers. In 1890, the S. S. Flinders would leave Melbourne on Mondays and Thursdays at 5 pm and reach Warrnambool the following morning at 8 am. On the return it would leave Warrnambool on Wednesdays and Saturdays at 5 pm and reach Melbourne the following morning. In 1896, the Weekly Times described the "steamer Flinders (otherwise known as "the Warrnambool mailboat") as "as good a sample of a seagoing steamer as there is trading on the Victorian Coast at the present time". In April 1896 newspaper reports noted the S. S. Flinders took 2915 bags of potatoes from Warrnambool to Melbourne (the largest shipment of that season) as well as 50 tons of tinned rabbits from the Hamilton Preserving Factory. It was also noted that particularly during the Christmas period, there were excessive demands for berths from holiday makers wanting to enjoy a holiday in Warrnambool. In May 1903, the S. S. Flinders narrowly escaped destruction when an explosion and subsequent fire occurred during the passage from Melbourne to Warrnambool. A drum (which apparently contained carbide of calcium) exploded and blew off a hatch cover. As the steamer got to within a mile or two of Warrnambool, smoke was seen coming out of the hold and (unknown to the passengers) flames had taken hold. The crew quickly got to work - closing down all the hatches and pumping water into the hold through a hole in the saloon floor. There were 30 or 40 cases of kerosene on board. The Flinders continued on to Warrnambool and berthed at the Breakwater. The passengers all went ashore - many unaware of the danger they had been in. A telephone message was sent to the local Fire Brigade Station however the fire was extinguished before the firemen and their equipment arrived. After the hold was checked, the Flinders was certified as seaworthy and left for Portland. The Flinders continued to transport Western District produce as well as passengers from Warrnambool to Melbourne until 1906 when (due to a decrease in shipping trade during the Winter and the availability of train services) the Flinders was replaced by the smaller steamer "Dawn" and in 1907 when it was sold to the "Adelaide Steamship Company" for use in the Western Australia coastal trade, it was replaced by the "S. S. Barrabool". The S. S. Barrabool was a coastal steamer built by "Palmer Shipbuilding and Iron Company Limited" in Jarrow, Durham in 1874. It was bought by "Howard Smith Ltd" who was a pioneer in the coal trade between Melbourne and Newcastle. Howards Smith's early fleet contained ships named after local hills and mountains -"You Yangs", "Macedon", "Dandenongs" and "Barrabool". Later they extended their fleet to include ships that were well known in Warrnambool including the "Dawn" and the "Edina". The S. S. Barrabool had a chequered start and was nicknamed the "Great Australian Ram" because of the numerous accidents it was involved in. Between 1875 and 1883 it collided with three other vessels - sinking the "Queensland" on August 3rd, 1876, near Wilson's Promontory and sinking the "Bonnie Dundee" on 10th March 1879 off Lake Macquarie, New South Wales (with the loss of five lives). In August 1884 the Barrabool collided with the steamer "Birksgate" in Port Jackson causing considerable damage to "Birksgate". However in a newspaper article published in the "Truth" in March 1899 the S. S. Barrabool was described as "one of the fine old type of vessels" and "still a stout a craft as ever". The article was describing the practice of a "two-mate" system on board many ships (the Barrabool being one) whereby the company only employs two men (a first and second mate who must alternate watches of four hours each) rather than three mates who work four hours on and eight hours off. It was suggested that ships employing the "two-mate" system may find their insurance policies "null and void" should an accident occur. However the writer did note that the Barrabool was "officered by a captain and first and second mates .. whom it would be impossible to find more capable officers amongst the maritime fleet of the colonies". Between 1900 and 1909 the Barrabool was making regular trips along the east coast of Australia, carrying coal to Hobsons Bay (Melbourne) from Newcastle, Bellambi and Sydney. In 1907 it was brought in as a temporary replacement on the Melbourne to Warrnambool route for the S.S. Flinders. In 1912 the S. S. Barrabool ran aground off the Fitzroy River in Queensland and was found to be uneconomic to repair. It was brought back to Sydney and converted into a hulk. In August 1952 it was towed 17 miles off Sydney and scuttled. “Foyle” written on the photograph is the name of Foyle’s Photographic studio - originally owned by James Charles Foyle. He owned “Foyle’s Photo Card Studios” in Liebig St, Warrnambool, which operated between 1889 – 1919 At the time of the photograph the studio was owned by both Charles and Lilian Foyle (sometimes known as Lillian or Lily), either of whom could have taken this photograph. They also worked together at a later date on the photographs, sketches and paintings of the famous and historical Pioneers’ Honour Board.This photograph is a significant record of three of the well-known coastal traders (the "Speculant", the "S. S. Barrabool" and the "S. S. Flinders") that sailed along the southwest coast of Victoria for many years - transporting goods and passengers between Melbourne and Warrnambool.A black and white photograph titled "Breakwater Pier, Warrnambool". A line of coal trucks on rails are on the Breakwater. There are three ships (one sailing ship and two steamers) moored at the pier. In the left side of the picture is another ship. The name of the photographer is printed in the lower right corner. On the back of the photograph are the handwritten names of the moored ships written in blue pen. It also has the handwritten name, town and telephone number of the donor. In the bottom right hand corner is an upside down stamped number in black ink.Front of photograph - "BREAKWATER PIER, WARRNAMBOOL." "FOYLE PHOTO" Back of photograph - "Sailing Ship" "Speculant sail ship" "Barrabool coal ship" "Flinders Passenger ship" Name of donor W'Bool (and telephone number) "K-7148 M" (stamped upside down)flagstaff hill maritime museum and village, warrnambool, great ocean road, shipwreck coast, speculant, barque speculant, p. j. mcgennan, peter john mcgennan, speculant wreck, captain jacobsen, s. s. flinders, steamer flinders, a. j. inglis ltd, tasmanian steam navigation company, mcilwraith mceacham and company, warrnambool mailboat, coastal steamer, s. s. barrabool, howard smith ltd, two-mate system, coal ship, dawn, edina, lady bay, breakwater, warrnambool breakwater, foyle, foyle photographic studio warrnambool -
 Melbourne Tram Museum
Album - Photo Album, Brian Weedon, Tramway photos, 1970 to 1980's
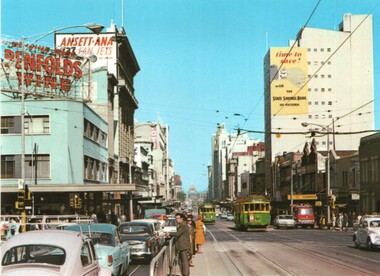
... Photo Album - green card slip case containing heavy grey... 512 tram 303 tram 965 tram 671 tram 1035 tram 637 Photo Album ...Photo Album - green card slip case containing heavy grey card covers front and rear, front protective page and 12 photo pages with adhesive surface and clear plastic sheet cover - on cardboard sheet bound by a heavy white comb binder marked "Photo Album" on the front inside cover. Each page has scanned to a pdf file. Page 1 - newspaper cutting and two photos of Ballarat No. 27 completing 1,000,000 miles. Item from "A Place in the Sun" written by Keith Dunstan. Photo of tram 27 by the Ballarat Courier. Date of Photo. 29/6/1968, taken prior to the TMSV Tour of that date. Black and white photograph of a group of the passengers on No. 27 during the celebration of the tram reaching 1,000,000 (million) miles in Ballarat. Glenys George, Brian Weedon, John Fitzsimons, Graeme Turnball, Paul Nicholson, Barry George and Kevin Clark. Page 2 - black and white photograph of Geelong Nos 2, 8, 4, 1 and another 4 wheel tramcar and a open cab motor bus photographed within the interior of Geelong depot, prior to 1924. From notes provided by David O'Neill, 12/2003, advises that bus driver is either Bill Hamaling or Charles Stafford. Gentlemen next to No. 8 could be Vic Phipps. Page 3 - Black and White photograph of Geelong No. 7 - c1912, soon after opening with driver, conductor and passengers. Shows the magnetic brake shoe. Page 4 - Black and White photograph of Geelong Cross bench tram No. 11 in Corio Tce, now Brougham St outside Marks Hotel. Tram has the destination of Newtown. Page 5 - Black and White photograph - T 180, showing "Pyrotechnic Fty" possibly on No. 9 Road at Malvern Depot Page 6 - Black and White photograph of L 105 prior to any modifications - see also Reg Item 2498 for another print. - ditto - interior view show off centre seats in the drop centre. Page 7 - Black and White photographs of W308 and W1 419 - - see also Reg Item 3422 for another print. Page 8 - Black and White photograph of W3 665 Page 9 - Black and White photograph of W4 670 - - see also Reg Item 3154 for another print. - ditto Interior view. Page 10 - Black and White photograph of SW6 850 with the dash canopy lighting - as built. - ditto Interior view - - see also Reg Item 674 and 3426 for another prints. Page 11 - not used. Page 12 - Black and White photographs of Y469 and X2 674 (This tram was later renumbered 680 - see page 30 of Destination City 5th Edition). - - see also Reg Item 3161 an d 3427 respectively for another prints. Page 13 - Black and White photographs of Y1 611 and an interior view - - see also Reg Item 3160 for another print. Page 14 - Set of 6 colour prints of Bendigo 28 decorated as the 1968 Myer Christmas tram, Birney 23 and 29. Page 15 - Set of 4 colour prints of Bendigo 3, 17, 6 and 17, Page 16 - Colour print of traffic and trams on Princes Bridge with Batman Ave terminus in the view. - Postcard of Swanston St looking south just north of Lonsdale St with W2 432 and another W2. See 3558.1 for a loose copy of the postcard - NuColorVue No. BP 1060-1 - titled on rear "A view towards the Shrine during peak traffic" Has signs advertising Penfolds Wines, Ansett-ANA, State Savings Bank and Foys. Page 17 - Set of two colour postcards - W2 405 and another tram southbound in St Kilda Road with the Prince Henry hospital in the background and Bourke St with W7 1026 and other trams in the view. Page 18 - Set of two photographs of W2's in Collins St at Spring St, with No. 512 in the view. Page 19 - View looking across the Gardens with two W2 class trams in Macarthur St. - W2 637 at corner of Collins and Exhibition St - see also Reg Item 1999 for another print. Page 20 - set of three colour photographs - W2 303 in bound on St Kilda Road, destination City, Route 4D, see also Reg Item 324 - W7 965 turning from Queens Road into St Kilda Road at St Kilda Junction. - W4 671 at South Melbourne Depot. Page 21 - not used Page 22 - MMTB Bus 702 Mark VI MMTB Freighter body and W7 1035 Page 23 - not used Page 24 - SEC coal locomotive 108 at night. Most photographs are MMTB Official. Listed 22-5-2019trams, tramways, melbourne, geelong, ballarat, bendigo, postcards, l class, interiors, new trams, mmtb, t class, w class, w1 class, w3 class, w4 class, sw6 class, y class, x2 class, princes bridge, batman ave, swanston st, st kilda rd, bourke st, collins st, macarthur st, st kilda junction, w7 class, buses, secv, tram 27, tram 2, tram 8, tram 1026, tram 4, tram 1, tram 11, tram 105, tram 308, tram 419, tram 665, tram 670, tram 850, tram 469, tram 674, tram 611, tram 23, tram 29, tram 17, tram 3, tram 6, tram 28, tram 405, tram 29, tram 432, tram 1017, tram 512, tram 303, tram 965, tram 671, tram 1035, tram 637 -
 Ballarat Tramway Museum
Album - Postcards & Photographs - Vic Solomons and others - Australian Tramways, Vic Solomons, 2023
... Hobart 17 Post Card Macquarie St Hobart Unknown Hobart 18 Photo... Hobart 17 Post Card Macquarie St Hobart Unknown Hobart 18 Photo ...Contains 184 images of postcards and photographs collected primarily by Vic Solomons of Sydney, with others from the collection of Wal Jack and Warren Doubleday. Covers almost all of Australia's tramway systems. 1 Post Card Hay St Perth Looking East No 3 Unknown Perth 2 Post Card Cars 30 & 90 both on Route 19 pass in Barrack St looking South Perth WA 1935.02.18 Perth 3 Post Card Hay St Looking East Perth WA Unknown Perth 4 Post Card William St Perth WA Unknown Perth 5 Post Card Perth from Shaftsbury Hotel Unknown Perth 6 Post Card Hay St Perth WA Looking East Unknown Perth 7 Post Card Barrack St Perth Unknown Perth 8 Post Card Murray Views No 3 High St Showing Town Hall Fremantle WA Unknown Fremantle 9 Post Card High St Fremantle WA Unknown Fremantle 10 Post Card View of Bolder City Golden Mile in the Background (Section No 1) 1908.08.20 Kalgoolie 11 Post Card Hannan St Kalgoolie 1900.08.19 Kalgoolie 12 Post Card Hannan St Kalgoolie WA (No 2) Unknown Kalgoolie 13 Post Card Intersection Hannan & Maritana Sts Kalgoolie WA Unknown Kalgoolie 14 Post Card Hannan St Kalgoolie Unknown Kalgoolie 15 Post Card Lane Street Bolder City Unknown Kalgoolie 16 Post Card Hobart Double Deck Tram Unknown Hobart 17 Post Card Macquarie St Hobart Unknown Hobart 18 Photo Liverpool Street Hobart Unknown Hobart 19 Photo Hobart 21 Unknown Hobart 20 Photo Hobart 14 in Elizabeth St Hobart Unknown Hobart 21 Post Card Macquarie St Hobart Unknown Hobart 22 Post Card Macquarie St Hobart Tas Unknown Hobart 23 Photo Double Decker Tram 3 at G.P.O. Hobart Tas No 31 Unknown Hobart 24 Post Card Double Decker Tram 19 Hobart Tas A B Series No 24 Unknown Hobart 25 Photo Hobart Municipal Tramways Tas No 95 Unknown Hobart 26 Post Card Elizabeth St Hobart Unknown Hobart 27 Post Card Elizabeth St Hobart Unknown Hobart 28 Post Card Elizabeth St Hobart Unknown Hobart 29 Post Card Elizabeth St Hobart Tas Unknown Hobart 30 Post Card HMT 21 with crew at Beach Road Terminus Unknown Hobart 31 Post Card HMT 9 & another with crew at Beach Road Terminus. Front cover photo of Destination GPO 1921.01.00 Hobart 32 Post Card Cascade Road and Mount Wellington Hobart Unknown Hobart 33 Post Card Elizabeth St Hobart Unknown Hobart 34 Post Card Elizabeth St Hobart Unknown Hobart 35 Post Card Elizabeth St Hobart 1915.04.07 Hobart 36 Post Card Macquarie St Hobart Tas Unknown Hobart 37 Post Card Macquarie St showing Post Office Hobart 1908.03.12 Hobart 38 Post Card Hobart Municipal Tramways 21 Unknown Hobart 39 Post Card Elizabeth St Hobart Tas Unknown Hobart 40 Post Card Liverpool Street Hobart Unknown Hobart 41 Post Card Electric Tram Launceston Tas 446 W J Little Photo 1919.02.08 Launbceston 42 Post Card Launceston Tram no 3 1911.08.30 Launbceston 43 Post Card Launceston Tram no 3 passes tram No 1 Unknown Launbceston 44 Post Card Tram 6 at Trevallyn a popular suburb Launceston Tasmania Unknown Launbceston 45 Post Card Tram 7 at Trevallyn Road Terminus Launceston Tasmania Unknown Launbceston 46 Post Card Tram 4 in Brisbane St Launceston Unknown Launbceston 47 Post Card Tram 9 in Brisbane St Launceston Tasmania Unknown Launbceston 48 Post Card Camerom Street Launceston Tasmania Unknown Launbceston 49 Post Card Murray Views No 15 Jetty Road Glenelg Terminus 1962-02-08 Adelaide 50 Post Card Bay Tram at Jetty Road Terminus Glenelg SA Unknown Adelaide 51 Post Card Tram 3 in King William Street Adelaide S Aust Unknown Adelaide 52 Post Card Valentine Series No 3065 The Old Horse Tram Victor Harbour Unknown Victor Harbour 53 Post Card Bourke Street Melbourne with Cable Car Looking East 1904.04.25 Melbourne 54 Post Card Opening of New Electric Tramway Elsternwick 1913-11-13 Melbourne 55 Post Card Cable trams in Clarendon St Sth Melb Unknown Melbourne 56 Post Card Pall Mall from Charing Cross Bendigo Unknown Bendigo 57 Post Card Tram 4 & 7 pass at The Fountain and Mitchell Street Bendigo Vic Rose Series P 3198 Unknown Bendigo 58 Post Card M&MTB 133 at Charing Cross bound for Eaglehawk Bendigo Vic Murray Views No 45 Unknown Bendigo 59 Post Card Pall Mall Bendigo Vic Unknown Bendigo 60 Post Card Charing Cross & Mitchell St Bendigo Trams passing 1919.00.00 Bendigo 61 Post Card Pall Mall Looking East Unknown Bendigo 62 Post Card Electric Trams and City Hotel Bendigo Vic Unknown Bendigo 63 Post Card Moorabool Street Geelong V 23 Unknown Geelong 64 Post Card Murray Views No 3 Moorabool Street Geelong Vic Unknown Geelong 65 Post Card The Rose Series P 2487 Ryrie Street Geelong Vic Unknown Geelong 66 Post Card Southern Cross Series 2696 Ryrie Stret Geelong Vic Unknown Geelong 67 Post Card The Rose Series P 1490 Ryrie Street Geelong Vic 1920-03-04 Geelong 68 Post Card Valentine Series No 1568 Lower Sturt Street Ballarat Unknown Ballarat 69 Post Card Rose Series P 1710 Sturt Street Ballarat Victoria Unknown Ballarat 70 Post Card Sturt Street Ballarat Victoria Unknown Ballarat 71 Post Card Horse Tram In Sturt Street Ballarat 1905.11.10 Ballarat 72 Post Card Sturt Street Ballarat Looking North-West Unknown Ballarat 73 Post Card Shoppes Square Sturt Street Ballarat Looking North Unknown Ballarat 74 Post Card Junction Sturt and Lydiard Streets Ballarat 1909-09-01 Ballarat 75 Post Card The Electric Supply Co Souvenir Tram Ticket No 3085of the opening of Electric System August 18 1905 1905.08.18 Ballarat 76 Post Card Sturt Street Ballarat Victoria 1907.11.25 Ballarat 77 Post Card Off to the Gardens Electric Tram Ballarat Unknown Ballarat 78 Post Card Sturt Street Ballarat 1907.04.16 Ballarat 79 Post Card Sturt Street Ballarat Looking East Electric tram with Double Deck Trailer 1911.04.17 Ballarat 80 Post Card Sturt Street Ballarat Looking East Unknown Ballarat 81 Post Card Sturt Street Ballarat Looking West 1911.03.01 Ballarat 82 Post Card Town Hall and Sturt Street Ballarat Unknown Ballarat 83 Post Card Lydiard Street Ballarat 1906.11.23 Ballarat 84 Post Card Looking North along Adelaide Street from George Street Brisbane Sidues Series No 764 Unknown Brisbane 85 Post Card Looking South along Queen Street from the Creek Street Intersection Brisbane Qld Sirues Series No 1379 Unknown Brisbane 86 Post Card George Street from near Supreme Court Brisbane Unknown Brisbane 87 Post Card Queen and Eagle Streets Brisbane 1907.07.04 Brisbane 88 Post Card Queen Street showing His Majesty’s Theatre Brisbane Unknown Brisbane 89 Post Card Queen Street Treasury Building 1908.01.20 Brisbane 90 Post Card G P O and Queen Street Brisbane Unknown Brisbane 91 Post Card Queen Street Brisbane Looking from Wharf Street Unknown Brisbane 92 Post Card Customs House Brisbane 1905.02.16 Brisbane 93 Post Card Queen St Brisbane 1905.09.16 Brisbane 94 Post Card Queen St Brisbane 1907.11.19 Brisbane 95 Post Card Treasury Buildings Brisbane Unknown Brisbane 96 Post Card Queen and Eagle Streets Brisbane Unknown Brisbane 97 Post Card The Valley Corner Brisbane Unknown Brisbane 98 Post Card Brisbane Queen Street opposite General Post Office Unknown Brisbane 99 Post Card North Quay and Milton Beach Brisbane Q Unknown Brisbane 100 Post Card Victoria Bridge Brisbane South Side 1907.08.14 Brisbane 101 Post Card Victoria Bridge Brisbane Unknown Brisbane 102 Post Card Breakfast Creek Bridge Brisbane Q Unknown Brisbane 103 Post Card Melbourne Street Station South Brisbane Queensland Unknown Brisbane 104 Post Card General Post Office Queen Street Brisbane 1955.09.23 Brisbane 105 Post Card Customs House Brisbane 1904.11.04 Brisbane 106 Post Card Queen St Brisbane 1919.11.00 Brisbane 107 Post Card Queen St Brisbane Sidues Series No 627 Unknown Brisbane 108 Post Card Creek Street Brisbane Queensland Unknown Brisbane 109 Post Card Customs House and Garden Reach Brisbane Queensland 1910.00.08 Brisbane 110 Post Card Queen and Creek Streets Brisbane 1909.06.07 Brisbane 111 Post Card Queensland National Bank andd Queen Street Brisbane Queensland Unknown Brisbane 112 Post Card Queen Street and Treasury Buildings Brisbane 0000.09.07 Brisbane 113 Post Card Queen Street showing “Courier” Buildings Brisbane Unknown Brisbane 114 Post Card Intersection George & Roma Streets Brisbane Q 1916.05.11 Brisbane 115 Post Card Adelaide Street Brisbane Q Unknown Brisbane 116 Post Card G P O Queen Street Brisbane Q Unknown Brisbane 117 Post Card Treasury Building Brisbane 1906.03-20 Brisbane 118 Post Card Queen and Eagle Streets Brisbane 1907.02.01 Brisbane 119 Post Card Queen St Brisbane Unknown Brisbane 120 Post Card Queen St Brisbane Q Unknown Brisbane 121 Post Card Victoria Bridge Brisbane 1906.07.30 Brisbane 122 Post Card An Unusual View showing Head of Queen Street Victoria Bridge & South SideSuburbs Brisbane Q Unknown Brisbane 123 Post Card Petries Bight Brisbane Q Unknown Brisbane 124 Post Card South End Victoria Bridge Brisbane Q Unknown Brisbane 125 Post Card Customs House Brisbane Unknown Brisbane 126 Post Card Photo of toastrack car circa 1910 Unknown Brisbane 127 Post Card Treasury Buildings Brisbane Unknown Brisbane 128 Post Card East Street Rockhampton with Steam Tram & trailer Unknown Rockhampton 129 Post Card Post Office Rockhampton with steam tram Unknown Rockhampton 130 Post Card East Street Rockhampton with Steam Trams Rose Series P 7154 Unknown Rockhampton 131 Post Card William Street Rockhampton Rose Series P 7156 Unknown Rockhampton 132 Post Card Central East Street Rockhampton Q with Steam Trams Unknown Rockhampton 133 Photo Sturt St Ballarat Unknown Ballarat 134 Photo Bridge Street Ballarat Unknown Ballarat 135 Post Card George St Sydney Unknown Sydney 136 Post Card Elizabeth St Sydney Unknown Sydney 137 Post Card Railway Square Unknown Sydney 138 Post Card Sydney Harbor Bridge - pending receipt 139 Post Card Kings Cross - Mowbray Series with description on rear from C Roy G Field Unknown Sydney 140 Post Card Kings Cross - Mowbray Series with description on rear from C Roy G Field Unknown Sydney 141 Post Card Central Railway Station Sydney - Rose Series P6033 1954-01-26 Sydney 142 Post card William Street Darlinghurst looking towards City - Rose Series P6602 unknown Sydney 143 Post Card Circular Quay Sydney - Rose Series P6680 Unknown Sydney 144 Post Card View at Manly NSW - Rose Series B1003 Unknown Sydney 145 Post Card Hunter St Newcastle NSW - Rose Series P7843 Unknown Newcastle 146 Post Card Bank Corner Newcastle NSW - Mowbray Series No. 155 Unknown Newcastle 147 Post Card Hunter St Newcastle NSW Unknown Newcastle 148 Post Card Criterion Hotel Hunter St Newcastle NSW Unknown Newcastle 149 Photo Horse tram at Newtown Station 1894 to 1898 - PTC photo c1894 Newtown 150 Photo Steam tram motor No 3 at Railway Square 1879 1879 Sydney 151 Photo Railway steam tram c1900 with a horse drawn double deck bus c1900 Sydney 152 Photo Steam motor 5A and doubled deck bus Unknown Sydney 153 Photo Steam motor 53A with detail notes on rear 1922 Sydney 154 Photo Cable tram set at Milsons Point ferry terminal c1900 Sydney 155 Photo Early Sydney electric car - Ocean St - Rose Bay Unknown Sydney 156 Photo George St looking souoth c1905 c1905 Sydney 157 Photo Tram 165 at Circular Quay Unknown Sydney 158 Photo Tramcar ferry or transporter at The Spit Unknown Sydney 159 Photo tram 882 George St at Marti Place, 1937 1937 Sydney 160 Photo Tram 826 Railway Sq area Unknown Sydney 161 Photo Railway Sq in background, Broadway with double decker bus and toastrack car late 1930s Sydney 162 Photo Coupled St Pitt St? - photo Ben Parle Feb. 1950 Sydney 163 Photo Electric tram No. 2 - North Sydney with side trolley pole running Unknown Sydney 164 Photo George St - Horden's Corner Unknown Sydney 165 Photo George St at Martin Place c1920 Sydney 166 Photo Castlereagh St Sydney c1928 c1928 Sydney 167 Photo Railway Sqare c1920 c1920 Sydney 168 Photo Darling St Countereweight Unknown Sydney 169 Photo Trolley bus depot Unknown Sydney 170 Photo Trolley bus No. 14 Unknown Sydney 171 Photo Newcastle Railway Station with steam tram - Wharf Road?? Unknown Newcastle 172 Photo High St West Maitland - steam tram Unknown Maitland 173 Photo High St West Maitland - steam tram Unknown Maitland 174 Post Card Argent St near tram terminal Broken Hill NSW c1900 Broken Hill 175 postcard Argent St looking south Broken Hill - with Ken Magor's notes on rear Unknown Broken Hill 176 Photo Toronto - steam tram 61A Unknown Toronto 177 Photo 124A trial run 1911? Sutherland - Cronulla line 1911 Sutherland 178 Photo 103A at a tram stop Unknown Sydney 179 Photo Cable tram set at Crows Nest terminus grip car 12, trailer 22 Unknown Sydney 180 Photo Cable tram Queens Square Sydney 1903 Sydney 181 Photo cars 2078 and 2077 Chatswood late 1950s Sydney 182 Photo car 1877 Balmain area late 1950s Sydney 183 Photo Trolley bus - Rockdale destination Late 1950s Sydney 184 Photo Broken Hill steam tram - motor 18A North Tram Unknown Broken Hill 185 Photo Millars Point Sydney NSW - ferry/tram interchange, unknown Sydney All items imaged including the rear or back where there was writing of information. All files stored on the Museum's Photo Collections directory. Demonstrates through the medium of many images, Australian tramway systems and Ballarat's place in them.Album - heavy card covers, plastic lined with postcard or 6x4 photo sleeves.australia, tramways, postcards, photographs, steam trams, horse trams, cable trams, trolley buses -
 The Beechworth Burke Museum
Photograph - Photograph - Reproduction, c.1870s
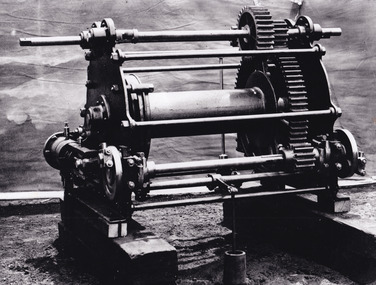
This photograph shows a piece of gold mining equipment identified as a mine winch, possibly an air winch cylinder of 1870s RG Ford's Patent design. Throughout the history of mining for gold and other precious materials, the windlass or winch (pictured) was used to bring up buckets full of soil from the bottom of a mine. This soil was then searched for gold/metals before being relocated to a different area. Due to the size and complexity of this particular piece of equipment, this winch may have been used to raise and lower mine carts to the entrance of the mine (often used in coal mining) and could have been used in raising cages up and down (acting as elevators) containing miners if the mine was particularly deep. The actual use of this particular item in the Beechworth locality is undocumented but these are some possibilities based on the use of these pieces of equipment in other mining locations. Mining can have a largely detrimental impact to the environment and therefore, the study of machinery like the one depicted in this photograph can help researches to reconstruct the methods and technologies used in the late 1800s and early 1900s. This particular item appears to have been removed from it's original site where it would have been used to assist with mining. It is possible that this photograph has been taken for recording purposes or as part of a machinery exhibition. Prior documentation records that this piece of equipment had connections to the Rocky Mountains Mining Company. Today, the Rocky Mountains Gold Mining company is famous in Beechworth for having been instrumental in the creation of the Rocky Mountain tunnel. Construction for this tunnel began in 1859 when a group of 12 men blasted a 400ft long tailrace though the rock beneath the town of Beechworth. Today, the 800ft tunnel, completed in 1871, is a popular tourist attraction but during the decades of gold mining, the purpose of this tunnel was to divert water away from the main sluicing operations so miners could better access gold and precious materials. The tunnel was used for this purpose for many years, later becoming useful for the Zwar Brother's tannery and currently as an outfall drain for Lake Sambell. This area continued to be mined until the early 1900s. The period when this item was in use is unclear but it is estimated to have been in the 1870s based on the design and appearance of the image. The gold works at the Rocky Mountain Tunnel closed in the early 1920s but the impact of mining remains in Beechworth today and therefore the study of photographs like this one which contain mining equipment can further understanding of mining in this region.This photograph has historic and research potential for study on the gold mining of the Beechworth region and types of equipment used to locate gold after the initial gold rush of 1853-1854 which resulted in the discovery of the surface gold and required miners to dig deeper to access precious metals. The clarity of the photo, and its good preserved condition, means it can continue to be used for research. This photo is part of a collection of six photos all within the Burke Museum Collection which depict mining equipment.Square black and white photograph on card.7793.1beechworth, mining, goldmining, goldmining equipment, beechworth burke museum -
 The Beechworth Burke Museum
Photograph - Postcard, R Warren, 1920
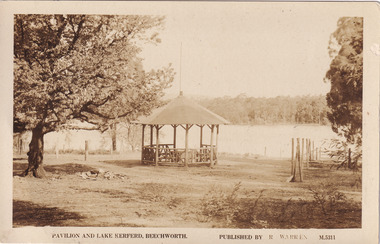
These photographs are of Lake Kerferd and the Pavilion. There are no people in the first image but in the second image there are a man and women sitting on the railing of the pavilion. The Pavilion sits in a picnic ground and there are a few trees around it. Lake Kerferd is significant to Beechworth and the surrounding area because it was the main source of water for the community. In addition, it is also significant because this photograph indicates that it was a popular picnic spot during the beginning of the twentieth century. Sepia rectangular postcard printed on paper 2960.1- Obverse: Pavilion and Lake Kerferd, Beechworth / Published by R Warren / M.5311/ 2960.1- Reverse: POST CARD / Correspondence / Address Only / 2960.2-Obverse: Picnic Grounds, Lake Kerferd, Beechworth / Real Photo Series / M.5949/ 2960.2-Reverse: Published by the Valentine Publishing Co Pty (indecipherable) Queen St (indecipherable) / Valentines / Real Photo Series/ lake kerferd, beechworth, picnic, outing, park, trees, lake, picnic grounds, victoria, district views, pavilion, warren, photograph, 1920 -
 Orbost & District Historical Society
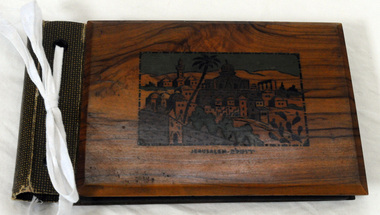
album, 1942
This album was possibly sent as a Christmas gift to the Answer family in 1942. It was compiled by Corporal Eric Edward Answer (born 5.3.1906) - VX 26353 of the 9 Division Provost Company.He was born in Wairewa Victoria and ensilsted on 27.6.1940. He was discharged on 26.1 1944. His next of kin is noted as Muriel Answer.These personal photographs give an insight into the human element of World War 11 ensuring that those who were part of the Orbost community and played a vital role during this time are remembered.A photo album of 20 photo. It has a wooden (possibly olive wood) cover with an etching of Jerusalem on the front. It has cloth binding tied with white tape. The inside pages are brown card.Corporal E. Answer M.T. 2/23 Aust. Inf. Bn Abroad Albury's Own Christmas 1942 ww11 answer-corporal -
 Orbost & District Historical Society
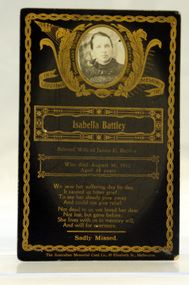
memorial card, 1912
This memorial card follows a style that was commonly used in the 1890s. The size of the card make it useful for presentation and handing out. There was a remarkably large production of memorial and funeral cards in Australia during the latter 19th and early 20th centuries and the style did not change (and many of the styles are still in effect today). Many of the card companies, in this case ‘The Memorial Card Co.,’ located at 143 King St, Sydney, published standardised plates which had areas for customisation. The card has the area for name, photograph, date of death and age. Poetry was often standardised, but could be requested at the behest of the person who commissioned the card Isabella Battley (nee Goad) was born in 1867, in Smythesdale, Victoria, Australia. She was married to James E. Battley when she died aged 45. James E. Battley was a director of the butter Factory in Orbost in 1915. Their son Ernest Albert Battley enlisted in the AIF from Orbost in 1916. His father is listed as Next of Kin and his mother as deceased. James was remarried to Eda May Battley (born Sargent) in 1914. He passed away in 1925, at age 57 Memorial cards are often treasured for a long time, and often become part of family history. The Battley family was an earlyn Orbost family.A black memorial card printed in memory of Isabella Battley. It has gold printed writing, a gold etched border and wreath. There is a photo of Isabella Battley and a memorial poem.memorial battley mourning -
 Orbost & District Historical Society
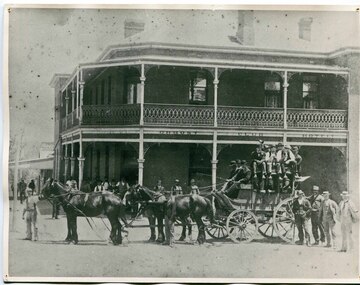
black and white photograph, C 1890s
The first hotel built in Orbost was the Club in 1885 an old wooden place on the corner built for J. A. Petersen of the Mitchell Hotel Bairnsdale, with the licence in the name of Mr Thomas Maguire (stepson of Petersen). William Archer was the proprietor at the time of the photograph. The coach driver was Sam Dyer and the coach is leaving for the goldfields at Combienbar. In June 1889 there was a rush to Mackenzie River, about 28 miles from Orbost, on Twelve Mile Creek. An estimated 80 men rushed the ground, but yields were patchy and large numbers eventually left. They were coming and going almost daily.The Club Hotel was the first hotel built in Orbost and remains a significant building in the town. It was an important hub for the township with many whole town meetings held there.A faded black / white photograph (with two copies) with a horse-drawn carriage loaded with men and the Orbost Club Hotel behind them. The photo is on a grey buff card.on back - " H. Adams. Driven by Sam Dyer - Leaving for the Combienbar Goldfields"orbost-club-hotel combienbar-goldfields -
 Orbost & District Historical Society
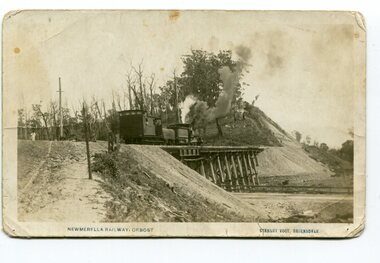
postcard, Vogt. W.S, first half 20th century
This photograph is of a train on the small rail bridge which crosses over the Burn Road Newmerella cutting. In 1912 work was underway to complete the Bairnsdale to Orbost section of the railway. This meant the end of river transport for the area. The railway was opened on April 10 1916 and closed in 1987. The letter written on the card is from Hilda Graham to her uncle.This item is associated with the history of the Orbost-Bairnsdale railway line and therefore reflects the role that the rail line played in the social and economic history of Orbost.A black / white postcard photograph showing a train engine crossing on a small rail bridge. On the back is a handwritten letter.Photo caption - "NEWMERELLA RAILWAY, ORBOST STANLEY VOGT"newmerella east-gippsland-railway -
 Orbost & District Historical Society
black and white photograph, 1897
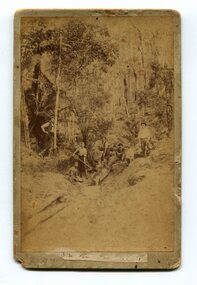
The photo shows miners looking for gold at Dead Horse Creek at Club Terrace. The subjects are unknown.This is a pictorial record of gold mining in East Gippsland in the late 19th century.A yellowed black / white photograph on grey buff card. It is of seven men in the bush mining for gold.on back - "Dead Horse Creek - Club Terrace, 1897"gold-mining gold-panning-club-terrace dead-horse-creek-gold -
 Orbost & District Historical Society
black and white photograph, late 19th / early 20th century
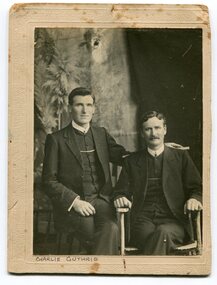
There is no information with this item. It may be associated with the Guthrie family of Bendoc. ( Peter Guthrie’s Grandfather was John Charles Guthrie, (born 1880), and the photo is of his brother Charles Henry Guthrie (born 1884 at Bendoc - from Patricia and Peter Guthrie who farm sheep and cattle at Bendoc).This photograph is associated with the Guthrie family , early settlers in Bendoc.A black / white photograph on a thick cream coloured buff card. It is of two me, both seated with one of the men resting an arm along the back of the other man's chair. It appears to be a studio portrait.on front - "Charlie Guthrie" on back - "Charlie Guthrie"guthrie-charles -
 Orbost & District Historical Society
stereoscopic photos, Between 1912 and 1967
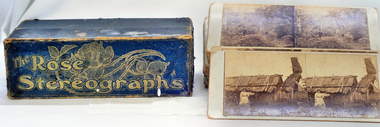
One box of assorted stereoscopic sepia photos. A pile of loose cards - assorted scenes.On lid-"The Rose Stereographs". On photos-Copywright -1914 by Geo. Rose. Back of some cards-handwritten J. McDonald. Each card is numbered. Stamped -Herodotus Studio - Hawthorne G.C. Greenham photographersteregraph postcards audio-visual rose-stereograph -
 The Beechworth Burke Museum
Photograph - Carte de Visite, James Bray, 1870
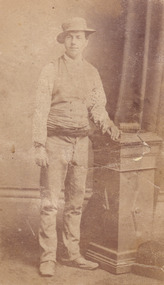
A Carte de Visite (hereafter CdV) (also known as a calling card) was popular within the mid-19th Century. It is a small card with a photographic portrait mounted on it. These cards were exchanged during the Victorian era (peaking in the 1860s) between families and friends. This particular CdV was captured by James Bray in c.1870. Bray who worked as a professional photographer in Camp Street Beechworth from 1870-1891. He was one of four men who photographed the Kelly Gang after the siege in Glenrowan in 1880. He is also renowned for his previous work photographing members of the Kelly gang. Depicted in this photograph is Isaiah “Wild” Wright. Wright was born in approximately 1846 in County Monaghan, Ireland. At age 11, Wright arrived with his father John Wright, mother Margaret and younger siblings in Victoria on the 9th of July 1857. They sailed on the ship ‘Carleton’ which left from Liverpool in England. Wright was stood 5 foot 11 inches tall and had brown hair with hazel eyes. He had a scar on the inside corner of his left eyebrow, a large scar on his right cheek and a scar on the back of his head. Over the years in Australia, Wright was sentenced on numerous (particularly of horse theft) charges and spent time in Pentridge, Hulk Sacramento and Hulk Sandridge. Wright married Bridget Lloyd in 1973. Through this marriage he was connected to the Kelly family as Bridget’s mother was one of Ellen Kelly’s (Ellen was the mother of Edward “Ned” Kelly) sisters. Wright is famous for his participation in the horse stealing incident of 1871 and subsequent bare knuckle fight against Ned Kelly that occurred in 1874. In 1878, Bridget and Isaiah Wright became parents to John "Jack" Thomas Wright. Jack Wright was an Australian rules footballer who played for Geelong in the Victorian Football League 1902-1906. Wright passed away on the 29th of May 1911.This photograph is part of the Burke Museum "Kelly album" which includes a significant collection of photographs and artefacts connected to Ned Kelly and the Kelly Gang. Ned Kelly and his gang have become ingrained in Australian popular culture and thus many museums, art galleries and private collections house material connected to the Kelly story which allows the events and people to be researched and interpreted. Individuals like Isaiah “Wild” Wright played an essential part in the Kelly story which have been enlarged and adapted for popular culture. The study of these individuals thorugh their images and records can help researchers to correctly interpret their involvement with Ned Kelly and the Kelly gang. Artefacts and photographs pertaining to the Kelly gang are particularly valuable for Australian museums. This particular photograph is significant for its connection to Beechworth photographer James Bray who is responsible for many images depicting members of the Kelly Gang. Sepia oval CDV printed on Card. Obverse: J.E. Bray/ Photo Reverse: 10238 Portrait & Landscape/ Photographer J E Bray Signature Beechworth/ Victoria/ Negatives Kept. Copies 5I/. Each May/ Be Had By Forwarding Name And Address/ Accompanied With Remittance To/ The Amount Of Order/ Photographs Coloured In Watercolourskelly album, kelly gang, beechworth, wild wright, boxing, burke museum, imperial hotel, bare-knuckle boxing, isaiah wright, ned kelly, isaiah wild wright, horse theft, hulk sacramento, calling card, pentridge, james bray, cdv, carte de visite -
 The Beechworth Burke Museum
Photograph - Carte de Visite, James Bray, 1870
This photograph was taken in c.1870 and depicts Aaron Sherrtt who is best known for his involvements with, and eventual assassination by, the Kelly gang. He stands upright in the image with his arm leaning on a podium which reaches his hip. He is wearing an outfit for which he was infamous. Richard Warren, son of the proprietor of the Ovens and Murray Advertiser once stated that “anyone seeing [Aaron] coming down Ford Street would ask, “Who the hell’s this? Some advance agent for the circus?”’. The outfit Aaron wore for this particular photoshoot is reminiscent of this quote. He wears an unusual spotted shirt with a waistcoat and a sash is tied at his waist. He wears boots which turn up slightly at the toes. The hat is a “pork pie” hat which is worn in the typical “Greta Mob” style with the chinstrap under the nose. Aaron Sherritt was born in 1854 in Prahran, Melbourne, to Irish Protestant parents John and Anne. Sherritt stood at 5 foot 10. He had hazel eyes, dark brown hair and pale olive skin. Sherritt was childhood friends with Kelly Gang member, Joe Byrne, having previously attended the same school. Both men had a reputation for stealing horses and on one occasion, after stealing and butchering a cow, Sherritt and Byrne were convicted to six months in Beechworth Gaol (1876). Sherritt, along with Byrne, were reportedly recruited by Ned Kelly in 1877 in stealing stock; however, Sherritt never became a fully-fledged member of the Kelly Gang. Nevertheless, Sherritt scouted for the Kelly Gang in 1878. He later struck a deal with the police (specifically, with Chief Commissioner Standish) to save Joe Byrne's life in exchange for leading the police to the other members of the Gang. From then on, Aaron Sherritt lived the dangerous life of a double agent, providing police with what is assumed today to have been outdated or incorrect information in return for money. On the 26th of June 1880, Aaron Sherritt was murdered in the Woolshed Valley. He was approximately 23-25 years old at death. This event marked the start of the Kelly gang’s last days. Sherritt was murdered by Byrne in front of his wife, 15 year old and heavily pregnant Ellen “Belle” Sherritt and her mother Ellen Barry. Also in the Sherritt dwelling on this particular night were four policemen. The intention behind Sherritt’s murder was for the police to send word to Melbourne that the Kelly gang had murdered Sherritt and a police train would be sent to Glenrowan where the rest of the Kelly gang were waiting. This plan did not go as predicted and ultimately the Kelly gang fell at Glenrowan in 1880. This photograph was taken by James Bray who worked as a professional photographer in Camp Street Beechworth from 1870-1891. He was one of four men who photographed the Kelly Gang after the siege in Glenrowan in 1880. He is also renowned for his previous work photographing members of the Kelly gang. This photograph is part of the Burke Museum "Kelly album" which includes a significant collection of photographs and artefacts connected to Ned Kelly and the Kelly Gang. Ned Kelly and his gang have become ingrained in Australian popular culture and thus many museums, art galleries and private collections house material connected to the Kelly story which allows the events and people to be researched and interpreted. Artefacts and photographs pertaining to the Kelly gang are particularly valuable for Australian museums. This particular photograph is significant for its connection to Beechworth photographer James Bray who is responsible for many images depicting members of the Kelly Gang. The photograph is also of artistic significance as an example of a Carte de Viste dating to 1880 and it's connection to Aaron Sherritt.Sepia rectangular photograph printed on card. Obverse: J.E.Bray./ Photo/ Beechworth Reverse: Portrait & Landscape/ Photographer 5/ Aaron Sherritt J E Bray Signature Beechworth/ Victoria Beware (almost erased out) Negatives Kept. Copies 5I/.Each May/ Be Had By Forwarding Name And Address/ Accompanied With Remittance To/ The Amount Of Order/ Photographs Coloured In Water Colours 10237. kelly album, woolshed valley, 1870s, kelly gang, joe byrne, ned kelly, aaron sherritt, james bray, beechworth, burke museum -
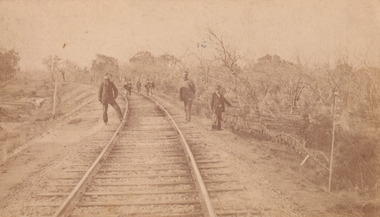 The Beechworth Burke Museum
Photograph - Carte de Visite, William E Barnes
This Carte-de-visite (CdV) taken by renowned Wangaratta based photographer William Edward Barnes previously belonged to the donor's grandfather, Daniel Mullins who was a Police Officer stationed at Glenrowan soon after the Kelly gang siege. Today, the siege has become an important part of Australian culture and Ned Kelly and the Kelly Gang (comprising of Ned Kelly, Dan Kelly, Steve Hart and Joe Byrne) has become ingrained in Australian history and mythology. A CdV is a sepia toned photograph mounted on card and is generally of a small size. This particular style was first patented by Andre Adolphe Eugene Disdéri (1819-1889) in 1854. In 1857, the CdV was introduced to England and after photographs of Queen Victoria, Prince Albert and their family were taken using CdV in 1860 the popularity of this method reached a peak. In this photograph, eight men stand along the railway line near Glenrowan. The photo dates to shortly after 1880 and references the attempt by the Kelly gang to derail a police train in June 1880 on those very tracks. Ultimately, this plan failed and the police train was never derailed. Ned Kelly and the Kelly gang took their final stand at Glenrowan which has been immortalised through Australian popular culture.This photograph is part of the Burke Museum "Kelly album" which includes a significant collection of photographs and artefacts connected to Ned Kelly and the Kelly Gang. Ned Kelly and his gang have become ingrained in Australian popular culture and thus many museums, art galleries and private collections house material connected to the Kelly story which allows the events and people to be researched and interpreted. Artefacts and photographs pertaining to the Kelly gang are particularly valuable for Australian museums. This particular photograph is significant for its connection to Wangaratta based photographer William Edward Barnes and to the Glenrowan Siege of June 1880. Taken at an unknown time, after the siege at Glenrowan, this image depicts eight gentlemen standing about the railway line near Glenrowan. This is a reference to the Kelly gang's plan to derail a train which would barrel up to Glenrowan after news reached Melbourne that Aaron Sherritt had been shot by Joe Byrne in the Woolshed Valley. This image is important for its artistic information that it can provide about the Kelly story and the fashion and streetscape of Glenrowan.This sepia coloured Carte de Visite is attached to yellow cardboard. The obverse of the photo depicts the railway line near Glenrowan around 1880s. The rails are positioned in the centre of the image and are made on an incline of earth. In the foreground are three men, two standing next to the rails and one slightly off to the right of the image. In the background are trees which line the side of the rails and slightly in front of these trees is a group of five men standing on the rails. The reverse of the image is yellow card and contains printed and pencil writing. The printed writing is in the centre of the card. It reveals that the photographer was William E Barnes from Wangaratta. The pencil writing provides the inscription stating that the photo was taken near Glenrowan around the time of Ned Kelly.Pencil: Railway line near / Glen Rowan / Kelly's time / Printed: W. E. Barnes / Photographer / Wangaratta / BMM 8089 /kelly album, glenrowan, glenrowan siege, carte-de-visite, glenrowan railway, ned kelly, kelly gang, last stand, colonial australia, kelly siege, train, railway line, railway, sepia, photography, william e barnes, william barnes -
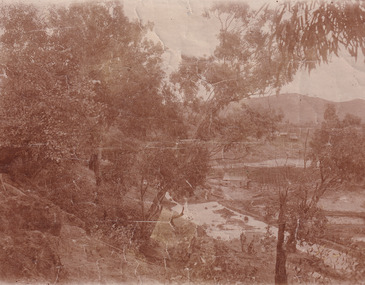 The Beechworth Burke Museum
Photograph, 1907-8
The photo from 1907-8 is a sepia print, depicting a small valley with building at base. There are flumes visible above areas of water, trees on hills and a few small cottages on the hillside. Cock's Pioneer Gold & Tin Sluicing Co NZ No 2 Site. The photo was taken of Matthews Gully looking west. Sluicing was undertaken in the area from 1900 to 1942 with some short breaks between these periods. The image depicts a location mined by Cocks Pioneer Gold and Tin Sluicing Company (as recorded on the annotation on the card mount) The Cocks Pioneer Gold and Tin Mines N.L was one of El Dorado's two largest open cut sluicing mines of the 20th Century. The other was named the Cocks El Dorado Gold Dredging Company. The Cocks Pioneer Mines operated from 1901 until 1941 and found a total of 117,378 ounces of Gold and 1,673 tones of tin concentrates over these years. The Cocks company was formed in 1898 and operated until 1941. Open cut sluicing involved the use of high-powered hoses which used the centrifugal sand pump system (known as hydraulic sluicing) which broke down the soil which was then processed for gold and other precious metals. From 1914 , four years after this image was captured, the company reformed to Cocks Pioneer Gold and Tin Mines NL (previously it was known as Cocks Pioneer Sluicing Co) and undertook large scale sluicing operations until 1929 and then 1934-1941. El Dorado is located on Reedy Creek and is surrounded by forested country to the north and east. It is 20 km east of Wangaratta in Victoria's regional north-east. John Cock was the son of a Cornish minor who arrived in El Dorado in 1858. Cock founded his gold and tin mining company which ran successfully for many years in the El Dorado region. It was an open cut sluicing company because of the abandonment of underground mining after this was deemed too dangerous. In 1935 Cock's El Dorado Company commissioned the floating dredge which is still visible in El Dorado today. The dredge was built by the Thompson engineering works, Castlemaine, and weighed over 2,000 tones and today has a place on the Victorian Registers of historic buildings. Interestingly, the name El Dorado does not derive from the gold in the region, but from the Barambogie pastoral run completed by William Baker in 1840-1841. Gold was discovered in El Dorado 1854 but the gold was too deep for individual prospectors to find, it required the use of heavy machinery.The search for gold is ingrained into the history of Victoria and therefore, images like this one which portray an open cut sluicing site can reveal important information for society and technology for the date when the photograph was taken. This image is of important historical significance for its ability to convey information about sluicing and the methods used to find gold in 1910. It also shows a location where sluicing was undertook which provides insight into the impact of sluicing on the environment at a time when it was done. This image is important for current research into the history of El Dorado, a small regional location near Wangaratta in Victoria's North East. Therefore, this image has the capacity to be beneficial for research into society and the motivations of those living and working in this region during this period and therefore, has social significance. The Beechworth Burke Museum has additional images relating to gold sluicing and El Dorado which can be analysed and studied alongside images like this one.Sepia coloured rectangle photograph printed on gloss photographic paper Reverse: 1997. 2613/ A02613/ No2 site/ Matthews Gully/ Cocks Pioneer G&T. ?? Co NZ/ No2 Site looking West/ 1907-8/ (7)sluicing, hydraulic sluicing, 1907, 1908, mining, cock's pioneer gold & tin sluicing co nz, nz, site no 2, matthews gully, west, valley, building, cottages, hillside, trees, water, gold and tin mine -
 The Beechworth Burke Museum
Postcard, George Rose, c.1945
The Rose Stereograph Company first began producing postcards, identified as the 'P' series (like this particular example) in 1913 and continued in this business until 1967 after which they switched to machine manufactured colour postcards printed by an external company. These were produced by Victorian-era photographer George Rose (1861-1942) often reputed as one of the best photographers in Australia during the later 19th Century and early 20th Century. Rose was born in 1861 in Clunes and began his photography business in 1880 when he founded the Rose Stereograph Company. He later switched to producing postcards after stereographs lost popularity in the early 1920s. The Mayday Hills Hospital was one of these locations photographed by George Rose and published as a postcard. Beechworth's Mayday Hills was chosen as the site of Victoria's newest asylum, at the time, due to the landscape and altitude. The hilltop atmosphere and the native fauna, it was argued, would assist in the cure of the patients kept at the hospital (Wood 1985, 122). The positioning of the hospital had a beneficial effect on the rural town. A pamphlet published by James Ingram and Son (1849) reveal that famous landmarks in Beechworth which included the Post Office, Gaol, Courthouse and Asylum "demonstrate the appreciation of Beechworth by the Government not only as as important district center, but also as a site unrivaled as a sanitarium". There were other locations in contention at the time, but ultimately Beechworth was chosen (Craig 2000,33). Prior to the creation of the Asylum in Beechworth, those charged with having mental illnesses or, as it was termed, "insanity" were unable to be properly cared for in the Gaol (which is where they were often sent). John Buckley Castieau wrote, in 1861 for the Ovens and Murray Advertiser, that the Gaol was unable to properly care for those classified then as "insane" but that they would endeavor to treat them above the other inmates (which he notes is not always the case in other establishments). Castieau wrote this in favour of supporting the building of the Mayday Hills Hospital in Beechworth. It was stated that at the time the Mayday Hills Hospital was built, there were 83 prisoners kept in the Gaol who were to be rehoused to the Hospital on the grounds of "insanity". The classification as someone as "insane", in this period of time is a reflection on the inability to cure and understand illnesses of the mind during the mid to late 1800s. Opening on the 24th of October 1867, the Mayday Hills Hospital was originally named the "Ovens Lunatic Asylum", a title which is very much a product of its time. Whilst controversial, changes to the name is part of the history of the Hospital and can provide much insight into the understanding of mental illness throughout history and the use/disuse of this term provides information into the reception/changing opinions of mental illness in society. The Hospital would later become known as the "Mayday Hills Asylum" and/or "Mayday Hills Hospital" with the latter being the most commonly used title. An article in the Ovens and Murray Advertiser notes that on the 7th of March 1865, the foundation stone of the Hospital was laid (it would officially open in 1867) and that it was such a moment of accomplishment and joy for Beechworth that a letter to the editor even suggested that there should be a holiday dedicated to the day the foundation stone as laid. This reveals an extent to which the townspeople of early Beechworth valued the construction of the Hospital in their town. It provided the town with a sense of prestige and honour. At first glance, the remains of the Mayday Hills Hospital in Beechworth, Victoria, inspire tragedy, trauma and beauty. The buildings themselves, with their Italianate style Renaissance architecture designed by J.J. Clark (Craig 2000, 49 & Smith 2016, 203) reflect a bygone period of European and Australian history. The gardens provide a sense of tranquility and beauty. The experience of those within these walls remains a valuable area of study to provide a more complete understanding. This particular hospital is considered the fourth of its like and one of three identified as the largest of their kind. The Mayday Hills Hospital is a sister to the Kew and Ararat Asylums in Melbourne which are both located in relative proximity. Understanding the role of the Mayday Hills Hospital in Beechworth history is integral to understanding the development of the goldfields town, but also for providing important information as to the history of caring for, and the reception of, mental illnesses in Australian and wider European history. Mayday Hills provides a case study which can be researched through oral history, an analysis of the grounds/buildings and through images like this postcard which portray the structure in a highly deliberate manner. Images like this depict the strong façade of the Hospital and provide a glimpse into the tranquility of the gardens. This has been done deliberately to provide a sense of comfort and healing about the building to those looking from the outside. Further research into the importance of the Hospital in Beechworth and it's connection to the town will be supported through images like these kept in the Mayday Hills photo album in the collection of the Burke Museum.Pale sepia toned rectangular postcard printed on matte card.Obverse: THE ROSE SERIES P. 4689 / COPYRIGHT / ADMINISTRATIVE OFFICES, MENTAL HOSPITAL, BEECHWORTH, VIC / Reverse: Published by the Rose Stereograph Co. / Armadale, Victoria / POST CARD / THE "ROSE" SERIES / DE LUXE / A REAL PHOTOGRAPH / PRODUCED IN AUSTRALIA /mayday hills, asylum, mental hospital, hospital, beechworth -
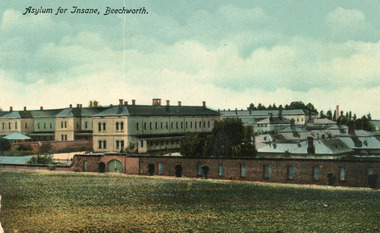 The Beechworth Burke Museum
Postcard, C. F. Falk, c.1930
This postcard contains a depiction of the Mayday Hills Hospital in Beechworth, Victoria from the direction of Farm Hill, circa 1930. It was designed by C.F.Falk in Beechworth and printed in Saxony which is a landlocked state of Germany which borders the states of Brandenburg, Saxony-Anhalt, Thuringia, Bavaria and the countries of Poland and the Czech Republic. The depiction is a painting of the Mayday Hill Hospital which portrays the extensive buildings an HaHa wall (many of which have not survived to the present day). It provides a unique opportunity to reconstruct this historical site as it may have looked in approximately 1930. Beechworth's Mayday Hills was chosen as the site of Victoria's newest asylum, at the time, due to the landscape and altitude. The hilltop atmosphere and the native fauna, it was argued, would assist in the cure of the patients kept at the hospital (Wood 1985, 122). The positioning of the hospital had a beneficial effect on the rural town. A pamphlet published by James Ingram and Son (1849) reveal that famous landmarks in Beechworth which included the Post Office, Gaol, Courthouse and Asylum "demonstrate the appreciation of Beechworth by the Government not only as as important district center, but also as a site unrivaled as a sanitarium". There were other locations in contention at the time, but ultimately Beechworth was chosen (Craig 2000, 33). The extent of buildings displayed in this postcard helps convey the imposing and enormity of the structure before decommission. Prior to the creation of the Asylum in Beechworth, those charged with having mental illnesses or, as it was termed, "insanity" were unable to be properly cared for in the Gaol (which is where they were often sent). John Buckley Castieau wrote, in 1861 for the Ovens and Murray Advertiser, that the Gaol was unable to properly care for those classified then as "insane" but that they would endeavor to treat them above the other inmates (which he notes is not always the case in other establishments). Castieau wrote this in favour of supporting the building of the Mayday Hills Hospital in Beechworth. It was stated that at the time the Mayday Hills Hospital was built, there were 83 prisoners kept in the Gaol who were to be rehoused to the Hospital on the grounds of "insanity". The classification as someone as "insane", in this period of time is a reflection on the inability to cure and understand illnesses of the mind during the mid to late 1800s. The title on the obverse of this photograph as "Asylum for Insane, Beechworth" reflects a bygone era and attitude to mental health. Beechworth's Mayday Hills was chosen as the site of Victoria's newest asylum, at the time, due to the landscape and altitude. Opening on the 24th of October 1867, the Mayday Hills Hospital was originally named the "Ovens Lunatic Asylum", a title which is very much a product of its time. Whilst controversial, changes to the name is part of the history of the Hospital and can provide much insight into the understanding of mental illness throughout history and the use/disuse of this term provides information into the reception/changing opinions of mental illness in society. The Hospital would later become known as the "Mayday Hills Asylum" and/or "Mayday Hills Hospital" with the latter being the most commonly used title. An article in the Ovens and Murray Advertiser notes that on the 7th of March 1865, the foundation stone of the Hospital was laid (it would officially open in 1867) and that it was such a moment of accomplishment and joy for Beechworth that a letter to the editor even suggested that there should be a holiday dedicated to the day the foundation stone as laid. This reveals an extent to which the townspeople of early Beechworth valued the construction of the Hospital in their town. It provided the town with a sense of prestige and honour.At first glance, the remains of the Mayday Hills Hospital in Beechworth, Victoria, inspire tragedy, trauma and beauty. The buildings themselves, with their Italianate style Renaissance architecture designed by J.J. Clark (Craig 2000, 49 & Smith 2016, 203) reflect a bygone period of European and Australian history. The gardens provide a sense of tranquility and beauty. The experience of those within these walls remains a valuable area of study to provide a more complete understanding. This particular hospital is considered the fourth of its like and one of three identified as the largest of their kind. The Mayday Hills Hospital is a sister to the Kew and Ararat Asylums in Melbourne which are both located in relative proximity. Understanding the role of the Mayday Hills Hospital in Beechworth history is integral to understanding the development of the goldfields town, but also for providing important information as to the history of caring for, and the reception of, mental illnesses in Australian and wider European history. Mayday Hills provides a case study which can be researched through oral history, an analysis of the grounds/buildings and through images like this postcard which portray the structure in a highly deliberate manner. Images like this depict the strong façade of the Hospital and provide a glimpse into the tranquility of the gardens. This has been done deliberately to provide a sense of comfort and healing about the building to those looking from the outside. Further research into the importance of the Hospital in Beechworth and it's connection to the town will be supported through images like these kept in the Mayday Hills photo album in the collection of the Burke Museum.Colour rectangular postcard printed on cardObverse: Asylum for Insane, Beechworth. / Reverse: C.F. Faulk, Beechworth. Printed in Saxony. POST CARD / ADDRESS ONLY / AFFIX / STAMP / B 2298 / 1997.2457 /mental hospital, insane asylum, mayday hills mental hospital, beechworth, mayday hills, asylum, gold town, north-east victoria, ararat asylum, kew asylum -
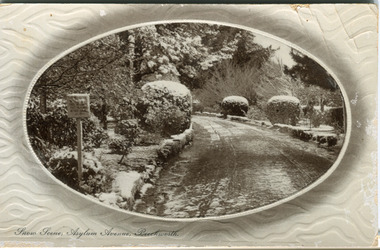 The Beechworth Burke Museum
Postcard, R & B Hall, c.1930
This postcard was published by R. & B. Hall in Beechworth and printed in Saxony, circa 1930. Saxony is a landlocked state of Germany which borders the states of Brandenburg, Saxony-Anhalt, Thuringia, Bavaria and the countries of Poland and the Czech Republic. This particular postcard is embossed with a pattern which surrounds the middle image in the center of the card. This image depicts Asylum Avenue which leads to the Mayday Hills Asylum in Beechworth, Victoria. What makes this scene particularly interesting is the appearance of snow which is rare in Beechworth. The road depicted on the postcard has track marks made by a car with thin wheels. Beechworth's Mayday Hills was chosen as the site of Victoria's newest asylum, at the time, due to the landscape and altitude. The hilltop atmosphere and the native fauna, it was argued, would assist in the cure of the patients kept at the hospital (Wood 1985, 122). The positioning of the hospital had a beneficial effect on the rural town. A pamphlet published by James Ingram and Son (1849) reveal that famous landmarks in Beechworth which included the Post Office, Gaol, Courthouse and Asylum "demonstrate the appreciation of Beechworth by the Government not only as as important district center, but also as a site unrivaled as a sanitarium". There were other locations in contention at the time, but ultimately Beechworth was chosen (Craig 2000, 33). Prior to the creation of the Asylum in Beechworth, those charged with having mental illnesses or, as it was termed, "insanity" were unable to be properly cared for in the Gaol (which is where they were often sent). John Buckley Castieau wrote, in 1861 for the Ovens and Murray Advertiser, that the Gaol was unable to properly care for those classified then as "insane" but that they would endeavor to treat them above the other inmates (which he notes is not always the case in other establishments). Castieau wrote this in favour of supporting the building of the Mayday Hills Hospital in Beechworth. It was stated that at the time the Mayday Hills Hospital was built, there were 83 prisoners kept in the Gaol who were to be rehoused to the Hospital on the grounds of "insanity". The classification as someone as "insane", in this period of time is a reflection on the inability to cure and understand illnesses of the mind during the mid to late 1800s. Beechworth's Mayday Hills was chosen as the site of Victoria's newest asylum, at the time, due to the landscape and altitude. Opening on the 24th of October 1867, the Mayday Hills Hospital was originally named the "Ovens Lunatic Asylum", a title which is very much a product of its time. Whilst controversial, changes to the name is part of the history of the Hospital and can provide much insight into the understanding of mental illness throughout history and the use/disuse of this term provides information into the reception/changing opinions of mental illness in society. The Hospital would later become known as the "Mayday Hills Asylum" and/or "Mayday Hills Hospital" with the latter being the most commonly used title. An article in the Ovens and Murray Advertiser notes that on the 7th of March 1865, the foundation stone of the Hospital was laid (it would officially open in 1867) and that it was such a moment of accomplishment and joy for Beechworth that a letter to the editor even suggested that there should be a holiday dedicated to the day the foundation stone as laid. This reveals an extent to which the townspeople of early Beechworth valued the construction of the Hospital in their town. It provided the town with a sense of prestige and honour.At first glance, the remains of the Mayday Hills Hospital in Beechworth, Victoria, inspire tragedy, trauma and beauty. The buildings themselves, with their Italianate style Renaissance architecture designed by J.J. Clark (Craig 2000, 49 & Smith 2016, 203) reflect a bygone period of European and Australian history. The gardens provide a sense of tranquility and beauty. The experience of those within these walls remains a valuable area of study to provide a more complete understanding. This particular hospital is considered the fourth of its like and one of three identified as the largest of their kind. The Mayday Hills Hospital is a sister to the Kew and Ararat Asylums in Melbourne which are both located in relative proximity. Understanding the role of the Mayday Hills Hospital in Beechworth history is integral to understanding the development of the goldfields town, but also for providing important information as to the history of caring for, and the reception of, mental illnesses in Australian and wider European history. Mayday Hills provides a case study which can be researched through oral history, an analysis of the grounds/buildings and through images like this postcard which portray the structure in a highly deliberate manner. Images like this depict the strong façade of the Hospital and provide a glimpse into the tranquility of the gardens. This has been done deliberately to provide a sense of comfort and healing about the building to those looking from the outside. Further research into the importance of the Hospital in Beechworth and it's connection to the town will be supported through images like these kept in the Mayday Hills photo album in the collection of the Burke Museum.Pale coloured rectangular postcard printed on matte embossed card.Obverse: Snow Scene; Asylum Avenue, Beechworth. / Reverse: POST CARD / ADDRESS ONLY / Published by R. & B. Hall, Beechworth. / Printed in Saxony. / 3447 [crossed out] / 1997.2492 / AFFIX STAMP /asylum, asylum avenue, beechworth, snow north-east vic, victoria, snow scene, mayday hills, mayday hills hospital, mental hospital, colonial attitudes, mental health, history, town development, postcard -
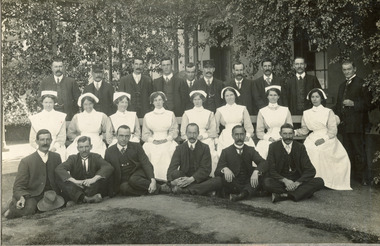 The Beechworth Burke Museum
Photograph
Photographed in the early 1900s, this black and white photograph depicts 25 members of the Mayday Hills Hospital Staff. Six men sit in front of the group (Mr Imhose stands fourth from the left in front row), upon the ground and behind them, in bright white clothing, sit eight female nurses upon a long bench (one of these nurses is identified on the rear as Miss A.J. Ross). Behind these women stand 10 men. The men are all wearing dark clothing and several have 'Kepi' style hats. The staff photograph was captured by Frazer and Vallance Photographers Melbourne. This image was originally combined with 1997.2491 but these images have since been torn apart and catalogued separately. Beechworth's Mayday Hills was chosen as the site of Victoria's newest asylum, at the time, due to the landscape and altitude. The hilltop atmosphere and the native fauna, it was argued, would assist in the cure of the patients kept at the hospital (Wood 1985, 122). The positioning of the hospital had a beneficial effect on the rural town. A pamphlet published by James Ingram and Son (1849) reveal that famous landmarks in Beechworth which included the Post Office, Gaol, Courthouse and Asylum "demonstrate the appreciation of Beechworth by the Government not only as as important district center, but also as a site unrivaled as a sanitarium". There were other locations in contention at the time, but ultimately Beechworth was chosen (Craig 2000, 33). Prior to the creation of the Asylum in Beechworth, those charged with having mental illnesses or, as it was termed, "insanity" were unable to be properly cared for in the Gaol (which is where they were often sent). John Buckley Castieau wrote, in 1861 for the Ovens and Murray Advertiser, that the Gaol was unable to properly care for those classified then as "insane" but that they would endeavor to treat them above the other inmates (which he notes is not always the case in other establishments). Castieau wrote this in favour of supporting the building of the Mayday Hills Hospital in Beechworth. It was stated that at the time the Mayday Hills Hospital was built, there were 83 prisoners kept in the Gaol who were to be rehoused to the Hospital on the grounds of "insanity". The classification as someone as "insane", in this period of time is a reflection on the inability to cure and understand illnesses of the mind during the mid to late 1800s. Opening on the 24th of October 1867, the Mayday Hills Hospital was originally named the "Ovens Lunatic Asylum", a title which is very much a product of its time. Whilst controversial, changes to the name is part of the history of the Hospital and can provide much insight into the understanding of mental illness throughout history and the use/disuse of this term provides information into the reception/changing opinions of mental illness in society. The Hospital would later become known as the "Mayday Hills Asylum" and/or "Mayday Hills Hospital" with the latter being the most commonly used title. An article in the Ovens and Murray Advertiser notes that on the 7th of March 1865, the foundation stone of the Hospital was laid (it would officially open in 1867) and that it was such a moment of accomplishment and joy for Beechworth that a letter to the editor even suggested that there should be a holiday dedicated to the day the foundation stone as laid. This reveals an extent to which the townspeople of early Beechworth valued the construction of the Hospital in their town. It provided the town with a sense of prestige and honour.At first glance, the remains of the Mayday Hills Hospital in Beechworth, Victoria, inspire tragedy, trauma and beauty. The buildings themselves, with their Italianate style Renaissance architecture designed by J.J. Clark (Craig 2000, 49 & Smith 2016, 203) reflect a bygone period of European and Australian history. The gardens provide a sense of tranquility and beauty. The experience of those within these walls remains a valuable area of study to provide a more complete understanding. This particular hospital is considered the fourth of its like and one of three identified as the largest of their kind. The Mayday Hills Hospital is a sister to the Kew and Ararat Asylums in Melbourne which are both located in relative proximity. Understanding the role of the Mayday Hills Hospital in Beechworth history is integral to understanding the development of the goldfields town, but also for providing important information as to the history of caring for, and the reception of, mental illnesses in Australian and wider European history. Mayday Hills provides a case study which can be researched through oral history, an analysis of the grounds/buildings and through images like this postcard which portray the structure in a highly deliberate manner. Images like this depict the strong façade of the Hospital and provide a glimpse into the tranquility of the gardens. This has been done deliberately to provide a sense of comfort and healing about the building to those looking from the outside. Further research into the importance of the Hospital in Beechworth and it's connection to the town will be supported through images like these kept in the Mayday Hills photo album in the collection of the Burke Museum.Black and white rectangular photograph printed on photographic paper mounted on cardHandwriting reads: "Mental Hospital / Beechworth / Miss A. J. Ross / about 82 in 1944".mental asylum, beechworth, mayday hills, mayday hills hospital, victoria, mental health, history of mental illness, treatment of metal illness, asylum, hospital for mentally unwell, miss a.j. ross, nurse, staff, doctors -
 The Beechworth Burke Museum
Photograph
Photographed in the early 1900s, this black and white photograph depicts 25 members of the Mayday Hills Hospital Staff. Five men sit in front of the group, upon the ground and behind them, in bright white clothing, sit eight female nurses upon a long bench (one of these nurses is identified on the rear as Miss A.J. Ross). Behind these women stand 12 men. The men are all wearing dark clothing and several have 'Kepi' style hats. The staff photograph was captured by Frazer and Vallance Photographers Melbourne. This image was originally combined with 1997.2490 but these images have since been torn apart and catalogued separately. Beechworth's Mayday Hills was chosen as the site of Victoria's newest asylum, at the time, due to the landscape and altitude. The hilltop atmosphere and the native fauna, it was argued, would assist in the cure of the patients kept at the hospital (Wood 1985, 122). The positioning of the hospital had a beneficial effect on the rural town. A pamphlet published by James Ingram and Son (1849) reveal that famous landmarks in Beechworth which included the Post Office, Gaol, Courthouse and Asylum "demonstrate the appreciation of Beechworth by the Government not only as as important district center, but also as a site unrivaled as a sanitarium". There were other locations in contention at the time, but ultimately Beechworth was chosen (Craig 2000, 33). Prior to the creation of the Asylum in Beechworth, those charged with having mental illnesses or, as it was termed, "insanity" were unable to be properly cared for in the Gaol (which is where they were often sent). John Buckley Castieau wrote, in 1861 for the Ovens and Murray Advertiser, that the Gaol was unable to properly care for those classified then as "insane" but that they would endeavor to treat them above the other inmates (which he notes is not always the case in other establishments). Castieau wrote this in favour of supporting the building of the Mayday Hills Hospital in Beechworth. It was stated that at the time the Mayday Hills Hospital was built, there were 83 prisoners kept in the Gaol who were to be rehoused to the Hospital on the grounds of "insanity". The classification as someone as "insane", in this period of time is a reflection on the inability to cure and understand illnesses of the mind during the mid to late 1800s. Opening on the 24th of October 1867, the Mayday Hills Hospital was originally named the "Ovens Lunatic Asylum", a title which is very much a product of its time. Whilst controversial, changes to the name is part of the history of the Hospital and can provide much insight into the understanding of mental illness throughout history and the use/disuse of this term provides information into the reception/changing opinions of mental illness in society. The Hospital would later become known as the "Mayday Hills Asylum" and/or "Mayday Hills Hospital" with the latter being the most commonly used title. An article in the Ovens and Murray Advertiser notes that on the 7th of March 1865, the foundation stone of the Hospital was laid (it would officially open in 1867) and that it was such a moment of accomplishment and joy for Beechworth that a letter to the editor even suggested that there should be a holiday dedicated to the day the foundation stone as laid. This reveals an extent to which the townspeople of early Beechworth valued the construction of the Hospital in their town. It provided the town with a sense of prestige and honour.At first glance, the remains of the Mayday Hills Hospital in Beechworth, Victoria, inspire tragedy, trauma and beauty. The buildings themselves, with their Italianate style Renaissance architecture designed by J.J. Clark (Craig 2000, 49 & Smith 2016, 203) reflect a bygone period of European and Australian history. The gardens provide a sense of tranquility and beauty. The experience of those within these walls remains a valuable area of study to provide a more complete understanding. This particular hospital is considered the fourth of its like and one of three identified as the largest of their kind. The Mayday Hills Hospital is a sister to the Kew and Ararat Asylums in Melbourne which are both located in relative proximity. Understanding the role of the Mayday Hills Hospital in Beechworth history is integral to understanding the development of the goldfields town, but also for providing important information as to the history of caring for, and the reception of, mental illnesses in Australian and wider European history. Mayday Hills provides a case study which can be researched through oral history, an analysis of the grounds/buildings and through images like this postcard which portray the structure in a highly deliberate manner. Images like this depict the strong façade of the Hospital and provide a glimpse into the tranquility of the gardens. This has been done deliberately to provide a sense of comfort and healing about the building to those looking from the outside. Further research into the importance of the Hospital in Beechworth and it's connection to the town will be supported through images like these kept in the Mayday Hills photo album in the collection of the Burke Museum.Black and white rectangular photograph printed on photographic paper mounted on cardFrazer & Vallance Photographers Melbournemental asylum, beechworth -
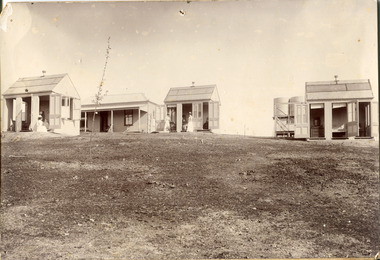 The Beechworth Burke Museum
Photograph
This photograph was captured in approximately 1900 and depicts the on site nurses homes. During the 1880s, these detached cottages were constructed and provided accommodation for the staff (in this case, the nurses) who lived within the hospital walls. Within the image are weatherboard buildings, a number of nurses and water tanks. Beechworth's Mayday Hills was chosen as the site of Victoria's newest asylum, at the time, due to the landscape and altitude. The hilltop atmosphere and the native fauna, it was argued, would assist in the cure of the patients kept at the hospital (Wood 1985, 122). The positioning of the hospital had a beneficial effect on the rural town. A pamphlet published by James Ingram and Son (1849) reveal that famous landmarks in Beechworth which included the Post Office, Gaol, Courthouse and Asylum "demonstrate the appreciation of Beechworth by the Government not only as as important district center, but also as a site unrivaled as a sanitarium". There were other locations in contention at the time, but ultimately Beechworth was chosen (Craig 2000, 33). Prior to the creation of the Asylum in Beechworth, those charged with having mental illnesses or, as it was termed, "insanity" were unable to be properly cared for in the Gaol (which is where they were often sent). John Buckley Castieau wrote, in 1861 for the Ovens and Murray Advertiser, that the Gaol was unable to properly care for those classified then as "insane" but that they would endeavor to treat them above the other inmates (which he notes is not always the case in other establishments). Castieau wrote this in favour of supporting the building of the Mayday Hills Hospital in Beechworth. It was stated that at the time the Mayday Hills Hospital was built, there were 83 prisoners kept in the Gaol who were to be rehoused to the Hospital on the grounds of "insanity". The classification as someone as "insane", in this period of time is a reflection on the inability to cure and understand illnesses of the mind during the mid to late 1800s. Opening on the 24th of October 1867, the Mayday Hills Hospital was originally named the "Ovens Lunatic Asylum", a title which is very much a product of its time. Whilst controversial, changes to the name is part of the history of the Hospital and can provide much insight into the understanding of mental illness throughout history and the use/disuse of this term provides information into the reception/changing opinions of mental illness in society. The Hospital would later become known as the "Mayday Hills Asylum" and/or "Mayday Hills Hospital" with the latter being the most commonly used title. An article in the Ovens and Murray Advertiser notes that on the 7th of March 1865, the foundation stone of the Hospital was laid (it would officially open in 1867) and that it was such a moment of accomplishment and joy for Beechworth that a letter to the editor even suggested that there should be a holiday dedicated to the day the foundation stone as laid. This reveals an extent to which the townspeople of early Beechworth valued the construction of the Hospital in their town. It provided the town with a sense of prestige and honour.At first glance, the remains of the Mayday Hills Hospital in Beechworth, Victoria, inspire tragedy, trauma and beauty. The buildings themselves, with their Italianate style Renaissance architecture designed by J.J. Clark (Craig 2000, 49 & Smith 2016, 203) reflect a bygone period of European and Australian history. The gardens provide a sense of tranquility and beauty. The experience of those within these walls remains a valuable area of study to provide a more complete understanding. This particular hospital is considered the fourth of its like and one of three identified as the largest of their kind. The Mayday Hills Hospital is a sister to the Kew and Ararat Asylums in Melbourne which are both located in relative proximity. Understanding the role of the Mayday Hills Hospital in Beechworth history is integral to understanding the development of the goldfields town, but also for providing important information as to the history of caring for, and the reception of, mental illnesses in Australian and wider European history. Mayday Hills provides a case study which can be researched through oral history, an analysis of the grounds/buildings and through images like these. Images like these depict the strong façade of the Hospital and provide a glimpse into the tranquility of the gardens. This has been done deliberately to provide a sense of comfort and healing about the building to those looking from the outside. Further research into the importance of the Hospital in Beechworth and it's connection to the town will be supported through images like these kept in the Mayday Hills photo album in the collection of the Burke Museum.Black and white rectangular photograph printed on photographic paper mounted on card"Early nurses quarters, Beechworth Mental Hospital, now May Day Hills Hospital."may day hills hospital, nurses quarters, beechworth, mayday hills, asylum -
 The Beechworth Burke Museum
Photograph
This photograph is a copy of that captured in approximately 1900 and depicts the on site nurses homes. During the 1880s, these detached cottages were constructed and provided accommodation for the staff (in this case, the nurses) who lived within the hospital walls. Within the image are weatherboard buildings, a number of nurses and water tanks. Beechworth's Mayday Hills was chosen as the site of Victoria's newest asylum, at the time, due to the landscape and altitude. The hilltop atmosphere and the native fauna, it was argued, would assist in the cure of the patients kept at the hospital (Wood 1985, 122). The positioning of the hospital had a beneficial effect on the rural town. A pamphlet published by James Ingram and Son (1849) reveal that famous landmarks in Beechworth which included the Post Office, Gaol, Courthouse and Asylum "demonstrate the appreciation of Beechworth by the Government not only as as important district center, but also as a site unrivaled as a sanitarium". There were other locations in contention at the time, but ultimately Beechworth was chosen (Craig 2000, 33). Prior to the creation of the Asylum in Beechworth, those charged with having mental illnesses or, as it was termed, "insanity" were unable to be properly cared for in the Gaol (which is where they were often sent). John Buckley Castieau wrote, in 1861 for the Ovens and Murray Advertiser, that the Gaol was unable to properly care for those classified then as "insane" but that they would endeavor to treat them above the other inmates (which he notes is not always the case in other establishments). Castieau wrote this in favour of supporting the building of the Mayday Hills Hospital in Beechworth. It was stated that at the time the Mayday Hills Hospital was built, there were 83 prisoners kept in the Gaol who were to be rehoused to the Hospital on the grounds of "insanity". The classification as someone as "insane", in this period of time is a reflection on the inability to cure and understand illnesses of the mind during the mid to late 1800s. Opening on the 24th of October 1867, the Mayday Hills Hospital was originally named the "Ovens Lunatic Asylum", a title which is very much a product of its time. Whilst controversial, changes to the name is part of the history of the Hospital and can provide much insight into the understanding of mental illness throughout history and the use/disuse of this term provides information into the reception/changing opinions of mental illness in society. The Hospital would later become known as the "Mayday Hills Asylum" and/or "Mayday Hills Hospital" with the latter being the most commonly used title. An article in the Ovens and Murray Advertiser notes that on the 7th of March 1865, the foundation stone of the Hospital was laid (it would officially open in 1867) and that it was such a moment of accomplishment and joy for Beechworth that a letter to the editor even suggested that there should be a holiday dedicated to the day the foundation stone as laid. This reveals an extent to which the townspeople of early Beechworth valued the construction of the Hospital in their town. It provided the town with a sense of prestige and honour.At first glance, the remains of the Mayday Hills Hospital in Beechworth, Victoria, inspire tragedy, trauma and beauty. The buildings themselves, with their Italianate style Renaissance architecture designed by J.J. Clark (Craig 2000, 49 & Smith 2016, 203) reflect a bygone period of European and Australian history. The gardens provide a sense of tranquility and beauty. The experience of those within these walls remains a valuable area of study to provide a more complete understanding. This particular hospital is considered the fourth of its like and one of three identified as the largest of their kind. The Mayday Hills Hospital is a sister to the Kew and Ararat Asylums in Melbourne which are both located in relative proximity. Understanding the role of the Mayday Hills Hospital in Beechworth history is integral to understanding the development of the goldfields town, but also for providing important information as to the history of caring for, and the reception of, mental illnesses in Australian and wider European history. Mayday Hills provides a case study which can be researched through oral history, an analysis of the grounds/buildings and through images like these. Images like these depict the strong façade of the Hospital and provide a glimpse into the tranquility of the gardens. This has been done deliberately to provide a sense of comfort and healing about the building to those looking from the outside. Further research into the importance of the Hospital in Beechworth and it's connection to the town will be supported through images like these kept in the Mayday Hills photo album in the collection of the Burke Museum.Black and white rectangular photograph printed on photographic paper mounted on cardmayday hills, nurse, weatherboard, watertank, mayday hills hospital, asylum, mental health, kew, ararat, mental hospital, beechworth, gold town -
 The Beechworth Burke Museum
Photograph - Postcard
The photograph is of the Powder Magazine and gorge in Beechworth. The Magazine was built for six hundred and ninety-seven pounds in 1859 by "T Dawson and company." However, the walls were constructed later in 1860 by "Atchison and Lumsden," a different building firm. The Beechworth Magazine was one of many made by the government for the storage of gunpowder. However, the building eventually stopped being used as the mining decreased in the area, finally becoming unsused with the invention of nitro-glycerine compounds. The magazine was created to hold large quantities of gunpowder and much of its design was to hinder the prospective of damage. These safety features included double arched foundations and an arched inner roof, which would move a possible explosion upwards. Also, a process of lighting conductors, ventilation and heavy granite walls were incorporated in the designThe photograph shows historic significance due to its association with the mining era in Beechworth in the late 1800s. The photo shows the Powder Magazine after construction in 1960, most likely when it was storing gunpowder during a signifiant time period for the region.Black and white rectangular postcard printed on cardObverse: No 2 POWDER MAGAZINE BEECHWORTH. BUILT OF LOCAL GRANITE IN 1859-60. Reverse: KODAK / POST CARD / CORRESPONDANCE. ADDRESS ONLYbeechworth, powder magazine, gunpowder, mining, beechworth powder magazine, explosives, atchison and lumsden, t dawson and company, gorge, granite, granite building, 1860 -
 The Beechworth Burke Museum
Photograph, Kathy Adamo, "Lit by a Bygone Era", 1980s
The photograph was submitted to the Indigo Shire Photo Competition by Kathy Adamo in the 1980s. The photo depicts two old gas lamps outside the Court House in Beechworth. The Court House was built in 1856 after Beechworth became known as the legal headquarters in northeast Victoria. The Court House has held a number of trials over the years including many high-profile cases such as the Ned Kelly Trials.Black and white rectangular photo printed on paper mounted on black card.Reverse: TO Indigo Shire Council Photo Comp / Title 'Lit By A Bygone Era' / 05. BMM 8832 / Gas Lamps Outside Courthouse Beechworth / From / Kathy Adamo / RMB 4057 / Wangaratta / 21 6742 / Contents / Nikon F301 28-105 / Exposure Unknown / Most Historicalned kelly, 1956, beechworth, beechworth court house, indigo shire, indigo shire photo competition, kathy adamo, 1980s, gas lamps, lit by a bygone era