Showing 1533 items
matching ballarat north gardens
-
 Ballarat Tramway Museum
Slide - 35mm slide/s, Peter Moses, Aug. 1971
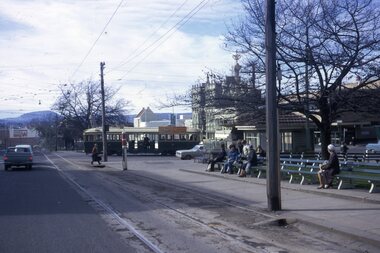
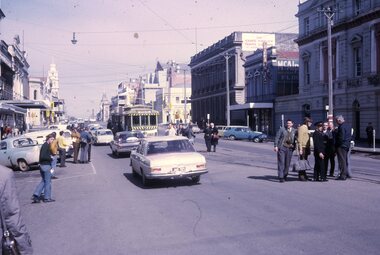
Colour slide - Photo of SEC Ballarat Tram No. 35 crossing Sturt St. from Lydiard St. North. Photo taken from the north side of Sturt St. Photo shows the tram stop arrangements for east bound trams in Sturt St. with passengers waiting on the seats. Tram has "Everything's under control in my all electric kitchen" SEC roof advertisement panel. Kodak cardboard mount slide, taken by Peter Moses August 1971.On back of slide in red ink "Ballarat / into Sturt St from Lydiard St." and in top left hand corner in black ink "P. Moses".tramways, trams, sturt st, lydiard st north, tram stops, tram 35 -
 Ballarat Tramway Museum
Slide - 35mm slide/s, Peter Moses, Aug. 1971
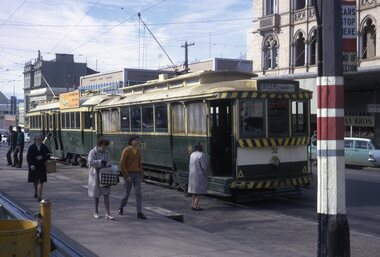
Colour slide - Photo of SEC Ballarat Trams No. 32 and 35 at the Sturt St. south side "City" terminus. No. 32 has destination of "Gardens via Drummond Nth" and No. 35 has "Everything's under control in my all electric kitchen" SEC roof advertisement panel. Photo shows passengers boarding tram and stop signage arrangements. Has buildings on the south side of Sturt and Lydiard in the background. Kodak cardboard mount slide, taken by Peter Moses August 1971. Image btm2047ia - cleaned up by Peter Waugh 9/2021.On back of slide in blue ink "N32 Ballarat Sturt St. terminus." and in bottom left hand corner in black ink "P. Moses".tramways, trams, sturt st, lydiard st north, tram stops, tram 35, tram 32 -
 Ballarat Tramway Museum
Slide - 35mm slide/s, Peter Moses, Aug. 1971
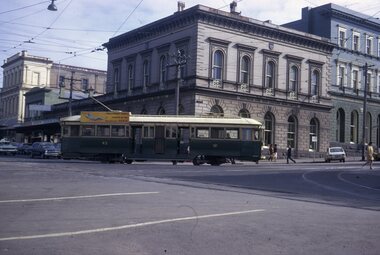
Photo of SEC Ballarat Tram No. 43 turning from Sturt St. into Lydiard St North with the ANZ Bank building in the background. No. 43 has "Everything's under control in my all electric kitchen" SEC roof advertisement panel. Also in the background is the SEC offices building. Photo shows the Brill 22E trucks turning or curving around the curve. Kodak cardboard mount slide, taken by Peter Moses August 1971.On back of slide in red ink "N43 Ballarat / Turning into Lydiard St." and in bottom right hand corner in black ink "P. Moses" on the reverse side of slidetramways, trams, sturt st, lydiard st, anz, tram 43 -
 Ballarat Tramway Museum
Slide - 35mm slide/s, Peter Moses, Aug. 1971
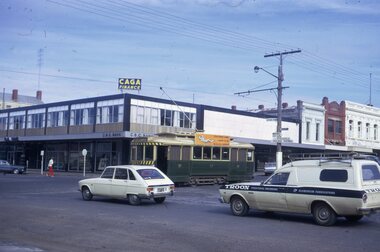
Photo of SEC Ballarat Tram No. 17 east bound in Sturt St, after crossing Doveton St. In the photograph are the buildings on the north side of Sturt St., including the CBC Bank building with a CAGA Finance sign on the top of the building . No. 17 has "Everything's under control in my all electric kitchen" SEC roof advertisement panel. Kodak cardboard mount slide, taken by Peter Moses August 1971.On back of slide in light black ink "N17 Ballarat / Sturt St. " and in bottom left hand corner in black ink "P. Moses".tramways, trams, sturt st, doveton st, cbc bank, tram 17 -
 Ballarat Tramway Museum
Slide - 35mm slide/s, Peter Moses, Aug. 1971
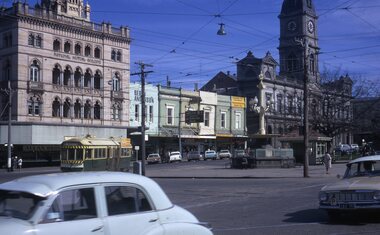
Photo of SEC Ballarat Tram No. 39 completing its turn from Lydiard St. North into Sturt St. with the buildings between Lydiard St and Armstrong visible in the photo including the Town Hall and the National Mutual building. Shows the median strip along Sturt St. Kodak cardboard mount slide, taken by Peter Moses August 1971.On back of slide in red ink "Ballarat / Sturt St." and in bottom left hand corner in black ink "P. Moses" .tramways, trams, sturt st, town hall, national mutual, tram 39 -
 Ballarat Tramway Museum
Slide - 35mm slide/s, Peter Moses, Aug. 1971
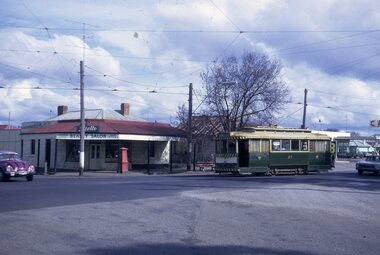
Photo of SEC Ballarat Tram No. 27 turning from Macarthur St into Drummond St. North. Has a Beauty Salon on the corner and a service station behind the tram. Shows the Post Box in front of the Beauty Salon. Name of the Salon "?otte" Kodak cardboard mount slide, taken by Peter Moses August 1971.On back of slide in black ink "No. 27, Ballarat / Cnr Macarthur Drummond Sts Old Cemetery" .tramways, trams, macarthur st, drummond st. nth, tram 27 -
 Ballarat Tramway Museum
Slide - 35mm slide/s, Peter Moses, 21/08/1971 12:00:00 AM
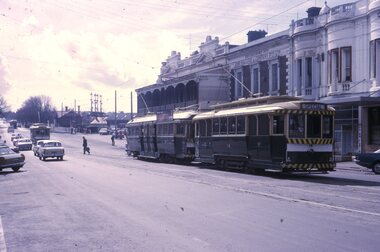
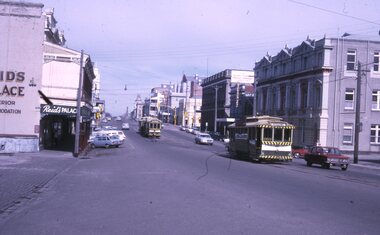
Photo of SEC Ballarat No. 14 and possibly No. 42 (Briquette roof advertisement and features on the same special trams in Reg. item 2064) waiting in Lydiard St. North for the arrival of the ARHS special on Saturday 21/8/1971 to undertake the last tour of Ballarat Tramways, prior to the closure of the system. The first line closure (Victoria St.) took place the following day. Has Reid's Coffee Palace building in the background and other buildings on the east side of Lydiard St. North. Two other single truck cars in the photo as are the railway gates at the station. Kodak cardboard mount slide, taken by Peter Moses 21 August 1971.On back of slide in light black ink "N14 Ballarat / ARHS / 4 trams special Lydiard St" and "P. Moses" in black ink in the upper right hand side of the slide.tramways, trams, arhs, lydiard st north, railway crossing, tram 14, tram 42 -
 Ballarat Tramway Museum
Slide - 35mm slide/s, Peter Moses, 21/08/1971 12:00:00 AM
Photo of SEC Ballarat 26, with No. 14 and possibly No. 42 (Briquette roof advertisement and features on the same special trams in Reg. item 2064) waiting in Lydiard St. North for the arrival of the ARHS special on Saturday 21/8/1971 to undertake the last tour of Ballarat Tramways, prior to the closure of the system. The first line closure (Victoria St.) took place the following day. Has Reid's Coffee Palace building in the background and other buildings on the east and west side of Lydiard St. North. No. 26 has an SEC briquettes roof advertisement Kodak cardboard mount slide, taken by Peter Moses 21 August 1971.On back of slide in light black ink "Ballarat / ARHS outside station / special trams Lydiard St." and "P. Moses" in black ink in the upper right hand side of the slide.tramways, trams, arhs, lydiard st, tram 26 -
 Ballarat Tramway Museum
Slide - 35mm slide/s - set of 4, Peter Moses, 21/08/1971 12:00:00 AM
Series of four photographs featuring the Special trains on the occasion of the ARHS special train on Saturday 21/8/1971 to undertake the last tour of Ballarat Tramways, prior to the closure of the system. The first line closure (Victoria St.) took place the following day. .1 - R761 just arrival in platform 2 of the Special train. .2 - ditto .3 - R761 shunting across the Lydiard St. with the Victoria Hotel in the background. .4 - R761 leaving Ballarat station (note slide from a different roll of film). Kodak cardboard mount slide, taken by Peter Moses 21 August 1971. Note: Train/tram tour operated in conjunction with the TMSV.On back of slide: .1 - In black ink "Ballarat / R761 Station" and "P. Moses" in bottom left hand corner. .2 - In black ink "Ballarat / R761 ARHS Train / Ballarat Station" and "P. Moses" in bottom left hand corner. .3 - In blue ink "Ballarat / R761 shunting" and in upper left hand corner "P. Moses". .4 - In red ink "Ballarat / ARHS Train departs" and on other side of slide "P. Moses" in black ink.tramways, trams, arhs, lydiard st north, ballarat railway station -
 Ballarat Tramway Museum
Slide - 35mm slide/s, Peter Moses, 21/08/1971 12:00:00 AM
Photo of SEC Ballarat trams waiting in Lydiard St. North for the passengers to travel on the ARHS/ TMSV specials on Saturday 21/8/1971 to undertake the last tour of Ballarat Tramways, prior to the closure of the system. The first line closure (Victoria St.) took place the following day. The organising group is discussing the arrangements with the SEC tramway inspector. Bob Whitehead, Len Millar, Keith Kings, Eildon Hogan, Jim Dowell and the Inspector? Kodak cardboard mount slide, taken by Peter Moses 21 August 1971.On the rear of the slide in black ink "Ballarat Lydiard St. / ARHS Specials" and "P. Moses" in the bottom right hand corner.tramways, trams, arhs, lydiard st north -
 Ballarat Tramway Museum
Slide - 35mm slide/s, Peter Moses, 21/08/1971 12:00:00 AM
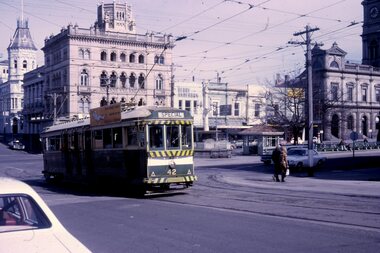
Photo of No. 42 waiting to turn from Lydiard St. North to Sturt St. on 21/8/1971, while running the ARHS/TMSV special trams. Has National Mutual, Town Hall and Craigs Hotel in the background. Tram is showing "Special" and is fitted with SEC roof advertisement "Everything's is under control in my all electric kitchen". Kodak cardboard mount slide, taken by Peter Moses 21 August 1971.On the rear of the slide in black ink "Ballarat / ARHS special from Lydiard St into Sturt St." and "P. Moses" in the bottom right hand corner.tramways, trams, arhs, lydiard st north, sturt st. -
 Ballarat Tramway Museum
Slide - 35mm slide/s - set of 2, Peter Moses, 21/08/1971 12:00:00 AM
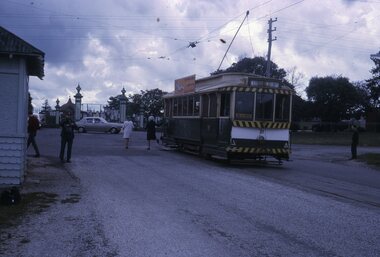
Photo of SEC Ballarat No. 21 at the Lydiard St. North terminus. No. 21 fitted with a SEC "Everything's under control in my all electric kitchen" roof advertisement. .1 - Soon after arrival of the tram at the terminus. Destination showing "Lydiard St. Nth". Cemetery in the background. .2 - Waiting for departure. Destination showing "Sebastopol". Shows view down Lydiard St Nth and shelter at the terminus. Kodak cardboard mount slide, taken by Peter Moses 21 August 1971.On the rear of the slides in black ink. .1 - "N21 Ballarat / Lydiard Nth terminus" and "P. Moses" in the bottom right hand corner on the other side of the slide. .2 - "N21 Ballarat / Lydiard Nth terminus" and "P. Moses" in the bottom right hand corner on the other side of the slide.tramways, trams, lydiard st north, cemetery, tram 21 -
 Ballarat Tramway Museum
Slide - 35mm slide/s, Peter Moses, 21/08/1971 12:00:00 AM
Photo of SEC Ballarat No. 31 west bound in Victoria St. Ballarat, just past King St. North, entering the King St. loop. Tram fitted with a Twin Lakes sign, two Johnnie Walker whiskey roof advertisements and has destination of "Gardens via Sturt St. W". Note the new bus stop sign in position. This photo was taken on the 2nd last day of operation. Has St. Alipius church in the background. Kodak cardboard mount slide, taken by Peter Moses 21 August 1971.On the rear of the slides in blue ink "Ballarat / Victoria St." and "P. Moses" in the bottom left hand corner in black ink.tramways, trams, victoria st, king st, bus stops, tram stops, tram 21 -
 Ballarat Tramway Museum
Slide - 35mm slide/s, Peter Moses, 21/08/1971 12:00:00 AM
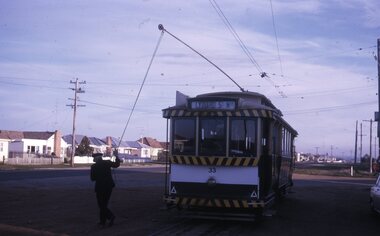
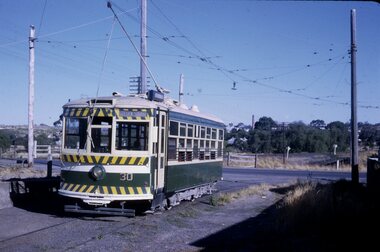
Photo of SEC Ballarat No. 33 at the Sebastopol terminus, with the driver turning the pole. Taken just before sunset. Tram has destination of Lydiard St. North. Kodak cardboard mount slide, taken by Peter Moses 21 August 1971 - assumed to be the date.On the rear of the slides in red ink "Ballarat / changing poles Sebastopol terminus." and "P. Moses" in the top left hand corner in black ink.tramways, trams, sebastopol, tram 33 -
 Ballarat Tramway Museum
Slide - 35mm slide/s, Peter Moses, Jan. 1969
Photo of SEC Ballarat No. 31 east bound in Sturt St. with a destination of Mt. Pleasant, taken from the east of Drummond St. North. Tram about to pick up a passenger at the tram stop. Tram has two Johnnie Walker Whiskey roof advertisements. Kodak cardboard mount slide, taken by Peter Moses assumed Jan. 1969.On the rear of the slide "P. Moses" along bottom right hand corner in black ink.tramways, trams, sturt st, drummond st, tram 31 -
 Ballarat Tramway Museum
Slide - 35mm slide/s, Peter Moses, Jan. 1969
Photo of SEC Ballarat No. 14 crossing Sturt St, entering Drummond St. North with the Ballarat Base Hospital building in the background. Tram has a Cinzano roof advertisement and a Twin Lakes sign on the back of the tram. Kodak cardboard mount slide, taken by Peter Moses assumed Jan. 1969.On the rear of the slide "P. Moses" along bottom right hand corner in black ink.tramways, trams, hospital corner, sturt st, drummond st, tram 14 -
 Ballarat Tramway Museum
Slide - 35mm slide/s - set of 4, Peter Moses, Jan. 1969
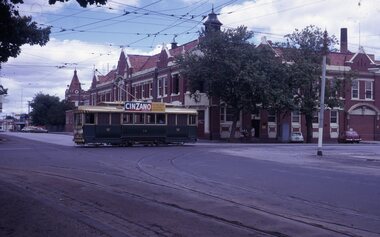
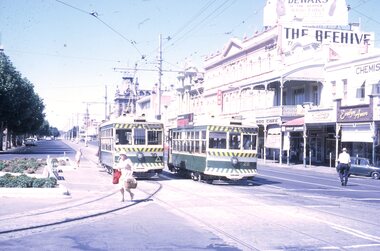
Set of four colour slides taken at Charing Cross Bendigo, Jan. 1969. .1 - Trams 30 and 28 travelling to North Bendigo and Golden Square respectively. Has the Beehive building in the background, along with W.M.I. Jones Chemist, Evelyn Amor shop, Dewars Whiskey rooftop advertisement. 28 has a SEC Briquettes roof advertisement. .2 - As above but with the front or bogie tram in the photo. Also has A. G. Treloar Optician's shop. Kodak cardboard mount slide, taken by Peter Moses, Jan. 1969. .3 - Close up photo of Birney No. 30, with 28 in the background. .4 - No. 28 leaving for Golden Square with the Plaza building, the Cenotaph, and the City Family Hotel in the background. Kodak cardboard mount slide, taken by Peter Moses, Jan. 1969.On the rear of all the slides "P. Moses" in black ink .1 - "Bendigo Charing Cross" and in red ink "19" .2 - "Bendigo three trams / Charing Cross" and in red ink "21" .3 - "Bendigo" and in red ink "23" .4 - "Bendigo Charing Cross" and in red ink "14". tramways, trams, bendigo, tram 28, tram 30 -
 Ballarat Tramway Museum
Slide - 35mm slide/s - set of 3, Peter Moses, Jan. 1969
Set of two colour slides taken at the North Bendigo terminus and another in Pall Mall, Bendigo, Jan. 1969. .1 - No. 30 at North Bendigo terminus - has destination "Golden Square" .2 - Interior view of Birney tram with crew members numbers 22, 29 and three seated passengers. .3 - View of Pall Mall looking north from the tram stop - has the Shamrock Hotel in the distance and other buildings on the east side of the street, including a 3BO (Bendigo radio) sign. Kodak cardboard mount slide, taken by Peter Moses, Jan. 1969.On the rear of all the slides "P. Moses" in black ink .1 -"Bendigo / North Bendigo terminus" in blue ink, and in red ink “12” .2 - " Jan 1969 Bendigo / Inside Brill car" in blue ink .3 - "Bendigo Pall Mall" in black ink and in red ink “7”.tramways, trams, bendigo, north bendigo, birney, tram crews, pall mall, tram 30 -
 Ballarat Tramway Museum
Slide - 35mm slide/s - set of 13, Peter Moses, 1974
Set of 13 colour slides, 7 on Kodak cardboard mounts and 6 on Agfa colour plastic mounts. .1 - Bendigo Trust, Birney trams 28 and 30 at Central Deborah Mine terminus. No. 30 has a 3BO Roof advertisement. .2 - ditto .3 - ditto with the Central Deborah mine and buildings in the background. .4 - No. 30 inbound in High St. with Sacred Heart Cathedral in the background (spire under construction) .5 - Nos. 30 and 28 crossing at Charing Cross with the Fountain Plaza building and the fountain in the background. .6 - No. 28 north bound in Pall Mall, after leaving Charing Cross with the Shamrock Hotel in the background. .7 - Photo showing track and centre poles in View St. looking west - no overhead. Has AMOCO service station near McKenzie St. .8 - No. 28 taken from cab of No. 30, in McCrae St, at end of double track. .9 - No. 28 turning from McCrae St. into Nolan St. .10 - No. 28 in Nolan St. with Lake Weeroona rowing sheds in the background. .11 - No. 19 in now Tramway Ave (then Arnold St.) running into depot .12 - No. 19 outside Bendigo depot .13 - ditto Slides taken by Peter Moses, during the winter of 1974 (no leaves on the trees).On the rear of all the slides "P. Moses" in black ink. .1 - "1974 Bendigo Central Deborah Mine" in blue ink and in red ink “16”. .2 - "1974 Bendigo two Birney cars / Central Deborah Mine" in blue ink and in red ink “18”. .3 - "1974 Bendigo trams at Central Deborah Mine" in blue ink and in red ink “17”. .4 - "1974 Bendigo High St / tram near Sacred Hearth Cathedral" in blue ink and in red ink “15”. .5 - "1974 Bendigo two Birney cars / Charing Cross" in blue ink and in red ink “20”. .6 - "1974 Bendigo No. 28 Pall Mall" in blue ink and in red ink “8”. .7 - "1974 Bendigo / Old Tramline View St." in black ink and in red ink “5”. .8 - "1974 Bendigo, McRae St. (Pall Mall)" and in red ink "9". .9 - "1974 Bendigo, Lake Weeroona, / tram " and in red ink "10". .10 - "1974 Bendigo, Lake Weeroona" and in red ink “11”. .11 - "1974 Bendigo / Outside depot" and in red ink “24”. .12 - "1974 Bendigo / Outside depot" and in red ink “25”. .13 - "1974 Bendigo / Depot" and in red ink “26”.tramways, trams, bendigo, central deborah, bendigo trust, sacred hearth cathedral, north bendigo, depot, tram 19, tram 28, tram 30 -
 Ballarat Tramway Museum
Slide - 35mm slide/s, Peter Moses, Jan. 1969
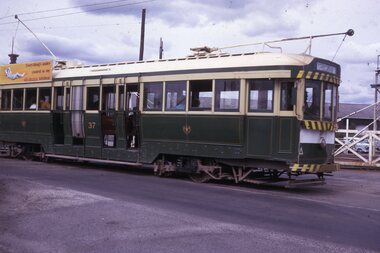
Photo of SEC Ballarat No.37 passing through the railway gates at Ballarat Railway Station, Lydiard St. North, with the destination of "Sebastopol". Tram has a SEC "Everything's under control in my all-electric kitchen". Kodak cardboard mount slide, taken by Peter Moses assumed Jan. 1969, dated only "Jan", but date lines up with Bendigo slides and type of numbering. Could be 1970.On the rear of the slides in black ink "P. Moses" along bottom left hand corner in black ink.tramways, trams, railway crossing, lydiard st, tram 37 -
 Ballarat Tramway Museum
Slide - 35mm slide/s, Peter Moses, Jan. 1969
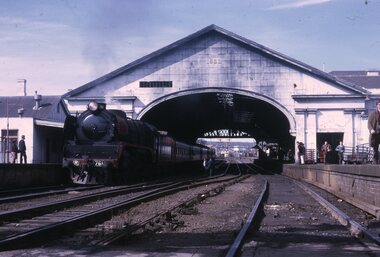
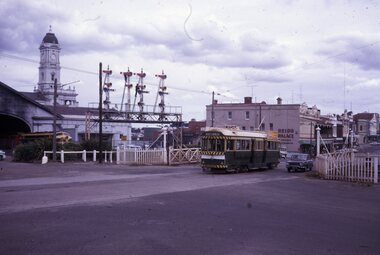
Photo of SEC Ballarat No.41 passing through the railway gates at Ballarat Railway Station, Lydiard St. North, with the destination of "Lydiard St Nth". Tram has a SEC "Everything's under control in my all-electric kitchen". Reid's Coffee Palace is in the background. Photo shows the Ballarat Railway Station clock tower, part of the train shed and the signals on the station side of the gates. A "B" class locomotive on a passenger train is standing in platform 1 of the station. Kodak cardboard mount slide, taken by Peter Moses assumed Jan. 1969, dated only "Jan", but date lines up with Bendigo slides and type of numbering. Could be 1970.On the rear of the slides in black ink "P. Moses" along bottom left hand corner in black ink.tramways, trams, railway crossing, lydiard st, railway station, reid's coffee palace, tram 41 -
 Ballarat Tramway Museum
Slide - 35mm slide/s - set of 2, Peter Moses, Jan. 1969
2059.1 - Photo of SEC Ballarat No.41 passing through the railway gates at Ballarat Railway Station, Lydiard St. North, with the destination of "Sebastopol". Tram has a SEC "Everything's under control in my all electric kitchen". Reid's Coffee Palace is the background. Photo shows the Ballarat Railway station clock tower, part of the train shed and the signals on the station side of the gates and another bogie tram waiting at the end of the double track in Lydiard St. for No. 41 to pass. 2059.2 - ditto, but with the two trams passing each other. The Provincial Hotel is also in the photograph. Kodak cardboard mount slide, taken by Peter Moses assumed Jan. 1969, dated only "Jan", but date lines up with Bendigo slides and type of numbering. Could be 1970.On the rear of the slides in black ink "P. Moses" along bottom left hand corner in black ink.tramways, trams, railway crossing, lydiard st, railway station, reid's coffee palace, provincial hotel, tram 41 -
 Ballarat Tramway Museum
Slide - 35mm slide/s, Peter Moses, Jan. 1969
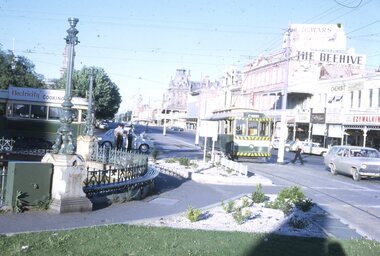
Photo of SEC Bendigo No. 6 crossing Mitchell St, north bound for North Bendigo, while a bogie tram waits to depart Charing Cross, east bound for Quarry Hill. Three SEC crew members standing by the front of the bogie tram and an inspector crossing the road near No. 6. Has part of the fountain in the view. Also in the photo are The Beehive building, and advertisement for Dewars whiskey and a shop front for "Ezywalkin" shoes. The bogie tram has a SEC roof advertisement "Electricity Best for cooking". Kodak cardboard mount slide, taken by Peter Moses, Jan. 1969.On the rear of the slide "Jan. 1969 Bendigo:" in blue ink, "P. Moses" in black ink and other side of the slide in red ink “22”.tramways, trams, bendigo, charing cross, tram 6 -
 Ballarat Tramway Museum
Photograph - Black & White Photograph/s, Dave Macartney, 25/07/1961 12:00:00 AM
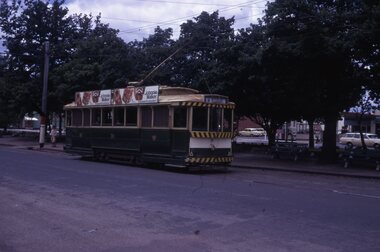
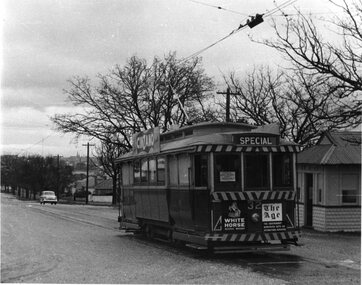
Black and white photograph of Ballarat No. 32 soon after arrival at the Lydiard St. terminus on 23/7/1961. Tram showing SPECIAL on a Victorian School Railway Clubs Association Tour (VSRCA). Photo taken by Dave Macartney. Date was shown as 25/7, but later corrected - 12/2006 Tram has Cinzano roof advertisements and advertisements for White Horse Whiskey and The Age newspaper on the front dash panel. In the background is the shelter at the terminus. Photo also shows the trolley pole pan placed at a terminus to assist with the location of the trolley pole at night. See Reg Item 7092 for a report and 6668 for the tour booking form.tramways, trams, lydiard st north, vsrca, trolley poles, tram 32 -
 Ballarat Tramway Museum
Slide - 35mm slide/s, Keith Kings, 20/10/1962 12:00:00 AM
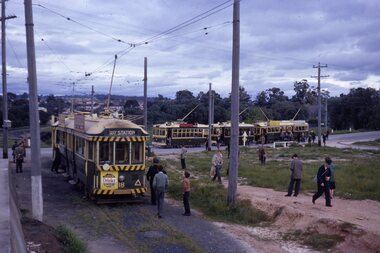
Bendigo, trams 18,26,29,11 and 5 at North Bendigo terminus, taken from the hill at the terminus looking back towards Bendigo, with tram 18 at terminus. Trams part of a special tour for the ARHS special train, on 20-10-1962. Tram 18 has 'Kohn drinks' ad on front panel, and SEC roof ads on other trams. Photo by Keith Kings.Stamped on 'K.S.Kings etc.', and in blue ink 'K(k)(386), 1/2509 f5.6 20/10/62, ARHS, Convoy A specials, 18,26,29,11,5 at North Bendigo terminus'tramways, trams, bendigo, north bendigo, arhs, tram 18, tram 26, tram 29, tram 11, tram 5 -
 Ballarat Tramway Museum
Slide - 35mm slide/s, Wal Jack, 6/01/1963 12:00:00 AM
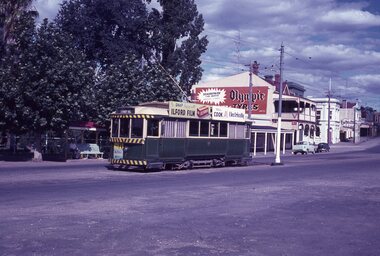
Bendigo No. 7 at Eaglehawk tram terminus, 6-1-1963. Tram has been fitted with lights and warning stripes. On front panel is Hutton's hams, and roof ads for Ilford film and 'Cook with electricity'. In background is park, shops on the north side of the terminus, including a large 'Olympic' tyres advertisement. Tram has destination of 'Quarry Hill''Ex Ballarat 19, SEC Bendigo No. 7, at Eaglehawk terminus, 6-1-63'tramways, trams, bendigo, eaglehawk, tram 7 -
 Ballarat Tramway Museum
Photograph - Black & White Photograph/s, Geoff Grant, 7/04/1956 12:00:00 AM
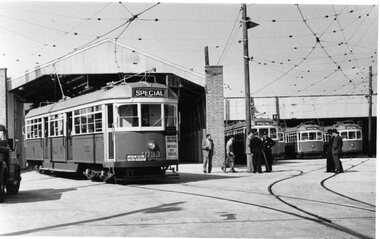
Black & White photo of M&MTB tram No. 1033 at North Fitzroy tram depot, prior to going on an AETA tour on 7/4/1956. Tram showing destination of "SPECIAL", has auxiliary board of "AETA", an AETA tour board on front bumper and panel on front dash "SOLVE TRAFFIC CONGESTION, MOVE PEOPLE NOT VEHICLES". Trams 1027 and 1029 in depot fan and others with numbers obscured. See also Reg item 1620.2 for negative of this item.On rear in btm rh corner, "Geoff Grant, 7 Apr 1956 Victoria"trams, tramways, melbourne, north fitzroy depot, aeta, tours , tram 1033 -
 Ballarat Tramway Museum
Photograph - Black & White Photograph/s, Geoff Grant, 25/06/1955 12:00:00 AM
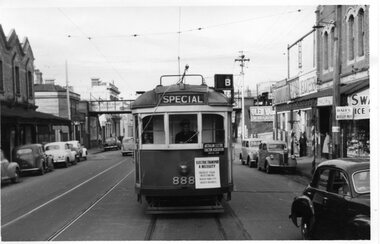
Black & white photo of M&MTB tram No. 888 from rear cab of 877 while on AETA tour of 25/6/1955 in Victoria Street, North Richmond, just to the west of the North Richmond Station, Victoria Street railway bridge. Numerous parked cars of the era in the street, and shops on both sides of street. Tram 888 has destination of "SPECIAL", carrying AETA auxiliary board and a board on front dash of tram that says "ELECTRIC TRANSPORT A NECESSITY , PROTECTS YOUR INVESTMEST, BUILDS YOUR CITY, CREATES BUSINESS"On typed paper on rear, "Shot out of the Rear cabin of 877 showing 888 tailing us on AETA Bourke St. tour. June 25 1955" and "Geoff Grant" stamp in btm rh cnr.trams, tramways, victoria st, bourke st, aeta, north richmond , tram 888 -
 Ballarat Tramway Museum
Functional Object - Trolley Wire Sample
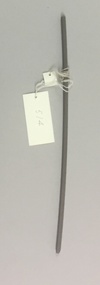
Piece of worn trolley wire (copper, probably cadmium copper) taken from north bound trolley wire between poles 9 and 17 (Loop and St. Aidans Drive) on 4/3/1997 during replacement operations. Is badly worn on one side. OK on the other side - slightly curve with worn side on the outside of the curve. Green (Oxidized) and sides, dark brown on top. Has been cut at either end. Images added 3-12-2016 See p14 of Section 65 of ICS Manual Tramway systems etc. London c1921.ballarat, overhead, fittings, trolley wire -
 Ballarat Tramway Museum
Functional Object - Trolley Wire Sample
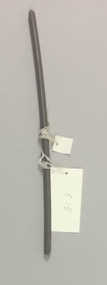
Piece of partly worn trolley wire taken from North bound wire between poles 9 and 17 (Loop & St Aidans Drive) on 4/3/97, during replacement operations. Is slightly curved, and only partly worn, both grooves are still good. Has been cut from other wire. See sketch on original worksheet for colours of wire. Images added 3-12-2016ballarat, overhead, fittings, trolley wire