Showing 878 items
matching route 2
-
 Melbourne Legacy
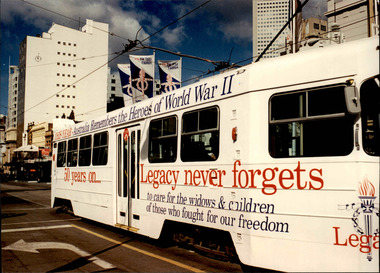
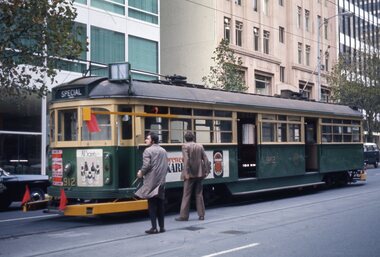
Photograph, Legacy Week 1995, 1995
A photo of a tram painted to promote Legacy in 1995 which was the 50th Anniversary of the end of World War II. Wording on the tram says: "This year - Australia remembers the Heroes of World War II / 50 years on / Legacy never forgets to care for the widows and children of those who fought for our freedom". It appeared in The Answer in June 1995 after it had been launched on May 2nd by President David Millie and Public Transport Minister, Mr Alan Brown. The ribbon was cut by Junior Legatees Kim Anderson and Peter Hazelager. "The distinctive white tram will be running on routes around Melbourne for at least six months and our thanks go to the Public Transport Corporation for making it possible.A record of a way to promote Legacy during Legacy Week in 1995.Colour photo x 2 of a tram painted to promote to Legacy.legacy promotion, tram -
 Ballarat Tramway Museum
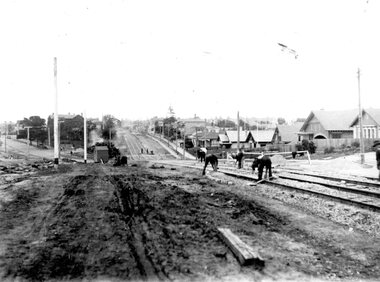
Photograph - Geelong Tramway North line
Men laying sleeper tram tracks for the North tram route along The Esplanade. In the midddle distance, the double track towards the city is in Mercer St. (now The Esplanade South). The street off to the left is Victoria Tce., (now Western Beach Road). 1928Black and white print on paper.GRS710/25/1/10 and 25-10, written on the reverse in paper. The No., 2 inside a circle, written on the reverse in ink.geelong tramway, geelong tramway laying sleeper tracks -
 Ballarat Tramway Museum
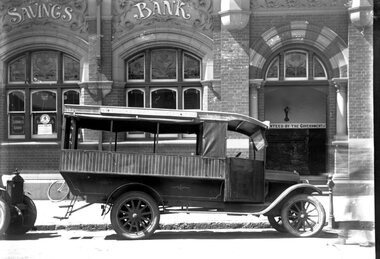
Photograph - Geelong vintage bus
Private bus parked outside the former lavishly signed State Savings Bank in Moorabool St on the SE corner with Corio St. The bus provided a direct route to West Geelong (Church St and possibly to the stockyards west of Pakington St, via Clarence and Elizabeth Sts. The tram route via Aberdeen St would have taken considerably longer. 1920s.Black and white print on paper.GSR710/20/1/14 and 20-14 written on the reverse in pencil. The No. 2 inside a circle written on the reverse in ink.geelong private bus, geelong state savings bank -
 Melbourne Tram Museum
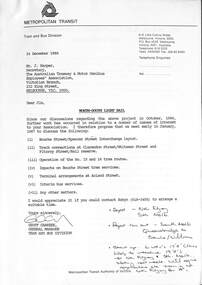
Letter, Metropolitan Transit Authority (MTA), "North - South Light Rail", 12/1986
Letter from Geoff Carkeek, MTA Tram and Bus Division General Manager to J Harper, Secretary ATMOEA dated 24/12/1986 regarding the North - South Light Rail proposal (St Kilda and Port Melbourne lines) and the conversion to light rail, and impacts on existing tram services. Includes a note on the proposed termination of route 15 and 16 trams at St Kilda Railway station. Includes two drawings - St Kilda Station - Fitzroy St using the former VR St Kilda station forecourt rather than the platforms which were actually later used, and Clarendon St - Port Junction layout.Yields information about the conversion of the St Kilda Railway project.Letter - photocoped - 6 A4 and 2 A3 folded sheets, part stapled.light rail, conversion, st kilda, port junction, atmoea, st kilda railway station -
 Melbourne Tram Museum
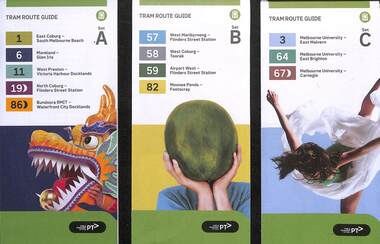
Ephemera, Public Transport Victoria (PTV), "Tram Route Guide", 2/2024
... . .1 - Set A - Routes 1, 6, 11, 19 and 86 .2 - Set B - Routes.... .1 - Set A - Routes 1, 6, 11, 19 and 86 .2 - Set B - Routes ...Route Guides published Feb. 2024, by Public Transport Victoria listing the stops, interchanges with bus and other tram services, ticketing zones, estimated frequencies with adverts for Night tram services, TramTracker and Myki tickets. On the rear is a large map, and a short summary of the routes list in the guide. .1 - Set A - Routes 1, 6, 11, 19 and 86 .2 - Set B - Routes 57, 58, 59 and 82 .3 - Set C - Routes 3, 64 and 67 .4 - Set D - Routes 48, 70, 75, 78 and 109 .5 - Set E - Routes 5, 6, 16, 58 and 72 .6 - Set F - Routes 12, 30, 35, 96 See item 2279 for an earlier versions.Demonstrates a PTV published tram route guide of 2024.Set of 6 pamphlets folded A2 to DL sheets, full colour.trams, tramways, timetables, route guides, maps, route 1, route 3, route 5, route 6, route 11, route 19, route 86, route 57, route 58, route 59, route 82, route 64, route 67, route 48, route 70, route 75, route 78, route 109, route 16, route 72, route 12, route 30, route 35, route 96 -
 Ballarat Tramway Museum
Functional object - Destination Roll, State Electricity Commission of Victoria (SECV), " Geelong" (black background) - side destination roll, 1946
Destination roll used to indicate to passengers the destination or route of the tram. At night the roll was backlit by two light bulbs fitted to the destination box on the tram. Item used in Geelong until 1956. Based on the handwritten marking, painted in July 1946. Used on the side destinations of either the Pengelley or the trams built for MESCo trams such as Geelong No. 2. See Reg Item 2906 for another smaller side destination roll and 4122 for a wide roll fitted to bogie tram No. 39 and 9618 wide roll fitted to a Pengelley tram. Destinations have the same arrangement to that of item 2906.Yields information and demonstrates aspects about Geelong's destination rolls used in trams up to 1956 when the system closed.Destination roll - white lettering on black background - using black paint leaving the lettering transparent at night. Uses a book binders cloth. Attached to a wooden blind roller, as used in the destination box to keep the blind tight. Wooden roller has a "Hartshorns" and "Stewart Gladstone" name lable attached to it.In pencil as base of roll "Taubmans Black 4-7-46 JS" tram, trams, geelong, destination roll -
 Melbourne Tram Museum
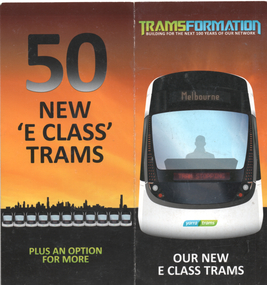
Pamphlet, "Tramsformation - our new E class trams", c2013
Pamphlet produced by Yarra Trams at the time of the construction of the first 50 E class tras. Gives design features, where being built, initial use on route 96, changes to depot allocation of trams, and other network changes. E class trams commenced running during 2013.Yields information about the introduction of the E class tram in 2013.Pamphlet - 2 fold DL full colour.tramways, tramcars, e class, route 96, new trams -
 Ballarat Tramway Museum
Slide - Set of 6, Warren Doubleday, Operation of Ballarat 36 in Melbourne, Sept. 1971
Photos taken during the operation of Ballarat No. 36 promoting Tourism Week, South St Competitions, Begonia Festival and Sovereign Hill during the week following the closure of the SEC operated Ballarat tram system. 1 - Outside Flinders St station with W2 513 behind - 20-9-1971 2 - tram 1024 promotion Channel O in St Kilda Road - 20-9-1971 3 - tram 36 in St Kilda Road - 21-9-1971 4 - On the King St overoass with W2 390 (Spencer St. route 48) behind - 21-9-1971 5 - Park St South Melbourne, cross over - 21-9-1971 6 - running into South Melbourne Depot. - 23-9-1971 Yields information about the operation of Ballarat 36 in Melbourne for tourism promotion.Set of 6 Kodachrome colour slides - cardboard mounts or green card mount.Have the photographer's slide numbers written on them.trams, tramways, closure, tram 36, ballarat tourism, st kilda road, king st overpass, tram 1024, tram 390 -
 Melbourne Tram Museum
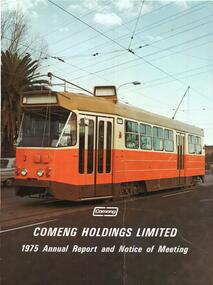
Document - Illustration/s, Letter/s, Commonwealth Engineering - Comeng, "Comeng Holdings Limited 1975 Annual Report and Notice of Meeting", Nov. 1975
.1 - Illustration of Z3 3 on the front cover of "Comeng Holdings Limited 1975 Annual Report and Notice of Meeting" with the Comeng Logo. Tram appears not to have been fitted with its route number and destination equipment. .2 - Letter on stippled paper, Comeng letterhead, with raised printing and watermarked "Z Mattpost" addressed to the donor supplying copies of the cover to him. Dated 19/11/1975. Signed by G. McArley Secretary.trams, tramways, z class, comeng, letterhead, annual reports, tram 3 -
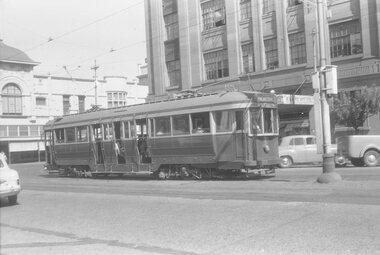
 Melbourne Tram Museum
Postcard, Rose Stereograph Co, "Collins Street Melbourne", late 1940s
Rose Series postcard No. P 202, titled "Collins Street Melbourne" with a view from Russell St looking west. W2 class 574 (East Preston, route 9) is climbing the hill with another four W2's in the view as well. There is a horse-drawn delivery cart (milk? - Marche ?) parked on the north side of the street. 2 - Coloured postcard - does not have the company name on the rear. Only coloured Rose series seen as at 1/2025 by the Museum.Yields information about Collins St, late 1940sPostcard - printed real photograph with Rose Stereograph Co. name on the rear. Second copy has been coloured printed.tramways, collins st, tram 574, w2 class, trams -
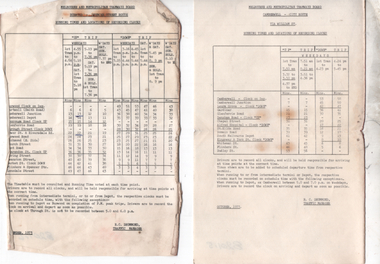 Melbourne Tram Museum
Document, Melbourne & Metropolitan Tramways Board (MMTB), "Running Timetable and Locations of Recording Clocks", 1973
Set of 7 timetable information sheets titled "Running Timetable and Locations of Recording Clocks" for various tram routes - signed R. C. Drummond Traffic Manager. Gives running times for sections during various parts of the day, early am, am peak, mid period, pm peak, weekdays, Saturdays and Sundays, and evening and the location of Bundy Clocks. See items 1442 and 5530 for other examples. 1 - Toorak - City - June 1973 2 - Prahran - North Richmond and St Kilda Road and North Richmond - August 1973 3 - Prahran - City - August 1973 4 - Camberwell - City via Swanston St - Oct. 1973 5 - Camberwell - City via William St - Oct. 1973 6 - Burwood - Spencer St - Nov. 1973 7 - Wattle Park - Princes Bridge - Dec. 1973Demonstrates a MMTB Employee timetable information.Set of 7 small printed sheets.tramways, timetables, schedules, bundy clock, mmtb -
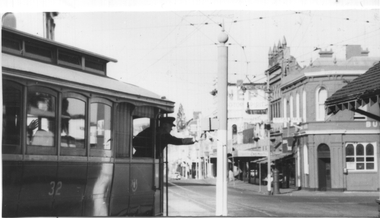 Ballarat Tramway Museum
Photograph - Grenville St signal switch, Keith Kings, 12/4/1958
Photograph shows the motorman of tram 32 selecting the correct signal light for his passage into Bridge St to either the Victoria St or Mt Pleasant Routes. Also allowed the tram to shunt at the intersection and return along Sturt St. See page 44 of the photographer's book, The Ballarat Tramways published in Sept. 1971 - item 114. Has the Buckshead Hotel in the background. Dated 12/4/1958. Yields information about the operation of the Bridge St / Grenville St signal.Black and white photograph with photographers details and information on rear - Keith Kings No. A(l)(13)See image 2ballarat, trams, tramways, sturt st, bridge st, tram 32, signals, forest city signals, grenville st -
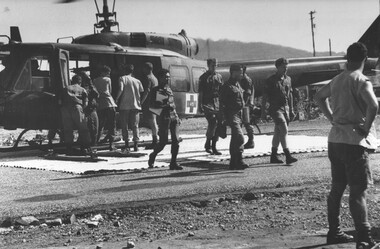 National Vietnam Veterans Museum (NVVM)
Photograph, Gibbons, Denis, Wounded VC Soldier 2
Denis Gibbons (1937 – 2011) Trained with the Australian Army, before travelling to Vietnam in January 1966, Denis stayed with the 1st Australian Task Force in Nui Dat working as a photographer. For almost five years Gibbons toured with nine Australian infantry battalions, posting compelling war images from within many combat zones before being flown out in late November 1970 after sustaining injuries. The images held within the National Vietnam Veterans Museum make up the Gibbons Collection. A black and white photograph of 1st Australian Field Hospital, Vung Tau, Vampire Helicopter pad,, US Army Dustoff 45 casavac helicopter, delivers wounded VietCong, South Vietnamese Army Interpreter and medics en route to triage, background medics receive other wounded.photograph, 1st australian field hospital, vung tau, vampire helicopter pad, dustoff, viet cong, gibbons collection catalogue, wounded viet cong soldier, medics, south vietnames army intelligence, denis gibbons -
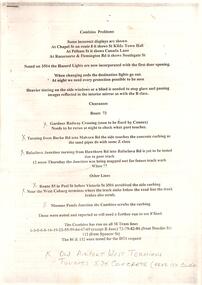 Melbourne Tram Museum
Document - Report, Swanston Trams, "Combino Problems", 2002
Set of 3 reports on A4 sheets about Combino trams. Only top sheet scanned. .1 - 4 pages with hand written notes titled "Combino Problems" - listing many issues on various route during the commissioning phase, includes an email dated 28/2/2002 from Russell Brooks re a meeting of 27/8/2002 and issues from the meeting. .2 - 3 A4 pages titled "Combino Meeting - Minutes" of a meeting of 26/9/2002, following from above meeting. .3 - 1 A4 page of a meeting of 23/11/2002 notes.trams, tramways, siemens, combino, unions, new trams, commissioning -
 Melbourne Tram Museum
Slide - Set of 5, Ron Scholten, May. 1973
Set of five colour slides, white/red cardboard, Duplicates by Pacific Film Laboratories of tram 912 in the City area testing clearances around safety zones, as part of the development of the Z class tram. Done on a Sunday morning. .1 - Bourke St showing the various equipment or protrusions attached to the tram in order to test clearances to safety zones at crossings. .2 - about to travel through a crossover. .3 - using the Queen or William St crossover. Tram has adverts for Tolleys Brandy and PGF Golf clubs. .4 - ditto - with tram 1021 running a route 97 to North Fitzroy Park St. .5 - ditto- with adverts for Williamson Real Estate and All Saints winery. See also Reg Item 3795 for Black and White and Reg Item 4611 for photos of the event and the use of car 1018.All have a running number "1204" to "1208" and "912" written on the slide.trams, tramways, sw6 class, testing, safety zone, bourke st, safety, z class, north fitzroy, route 97, tram 912 -
 Ballarat Tramway Museum
Album - Postcards & Photographs - Vic Solomons and others - Australian Tramways, Vic Solomons, 2023
Contains 184 images of postcards and photographs collected primarily by Vic Solomons of Sydney, with others from the collection of Wal Jack and Warren Doubleday. Covers almost all of Australia's tramway systems. 1 Post Card Hay St Perth Looking East No 3 Unknown Perth 2 Post Card Cars 30 & 90 both on Route 19 pass in Barrack St looking South Perth WA 1935.02.18 Perth 3 Post Card Hay St Looking East Perth WA Unknown Perth 4 Post Card William St Perth WA Unknown Perth 5 Post Card Perth from Shaftsbury Hotel Unknown Perth 6 Post Card Hay St Perth WA Looking East Unknown Perth 7 Post Card Barrack St Perth Unknown Perth 8 Post Card Murray Views No 3 High St Showing Town Hall Fremantle WA Unknown Fremantle 9 Post Card High St Fremantle WA Unknown Fremantle 10 Post Card View of Bolder City Golden Mile in the Background (Section No 1) 1908.08.20 Kalgoolie 11 Post Card Hannan St Kalgoolie 1900.08.19 Kalgoolie 12 Post Card Hannan St Kalgoolie WA (No 2) Unknown Kalgoolie 13 Post Card Intersection Hannan & Maritana Sts Kalgoolie WA Unknown Kalgoolie 14 Post Card Hannan St Kalgoolie Unknown Kalgoolie 15 Post Card Lane Street Bolder City Unknown Kalgoolie 16 Post Card Hobart Double Deck Tram Unknown Hobart 17 Post Card Macquarie St Hobart Unknown Hobart 18 Photo Liverpool Street Hobart Unknown Hobart 19 Photo Hobart 21 Unknown Hobart 20 Photo Hobart 14 in Elizabeth St Hobart Unknown Hobart 21 Post Card Macquarie St Hobart Unknown Hobart 22 Post Card Macquarie St Hobart Tas Unknown Hobart 23 Photo Double Decker Tram 3 at G.P.O. Hobart Tas No 31 Unknown Hobart 24 Post Card Double Decker Tram 19 Hobart Tas A B Series No 24 Unknown Hobart 25 Photo Hobart Municipal Tramways Tas No 95 Unknown Hobart 26 Post Card Elizabeth St Hobart Unknown Hobart 27 Post Card Elizabeth St Hobart Unknown Hobart 28 Post Card Elizabeth St Hobart Unknown Hobart 29 Post Card Elizabeth St Hobart Tas Unknown Hobart 30 Post Card HMT 21 with crew at Beach Road Terminus Unknown Hobart 31 Post Card HMT 9 & another with crew at Beach Road Terminus. Front cover photo of Destination GPO 1921.01.00 Hobart 32 Post Card Cascade Road and Mount Wellington Hobart Unknown Hobart 33 Post Card Elizabeth St Hobart Unknown Hobart 34 Post Card Elizabeth St Hobart Unknown Hobart 35 Post Card Elizabeth St Hobart 1915.04.07 Hobart 36 Post Card Macquarie St Hobart Tas Unknown Hobart 37 Post Card Macquarie St showing Post Office Hobart 1908.03.12 Hobart 38 Post Card Hobart Municipal Tramways 21 Unknown Hobart 39 Post Card Elizabeth St Hobart Tas Unknown Hobart 40 Post Card Liverpool Street Hobart Unknown Hobart 41 Post Card Electric Tram Launceston Tas 446 W J Little Photo 1919.02.08 Launbceston 42 Post Card Launceston Tram no 3 1911.08.30 Launbceston 43 Post Card Launceston Tram no 3 passes tram No 1 Unknown Launbceston 44 Post Card Tram 6 at Trevallyn a popular suburb Launceston Tasmania Unknown Launbceston 45 Post Card Tram 7 at Trevallyn Road Terminus Launceston Tasmania Unknown Launbceston 46 Post Card Tram 4 in Brisbane St Launceston Unknown Launbceston 47 Post Card Tram 9 in Brisbane St Launceston Tasmania Unknown Launbceston 48 Post Card Camerom Street Launceston Tasmania Unknown Launbceston 49 Post Card Murray Views No 15 Jetty Road Glenelg Terminus 1962-02-08 Adelaide 50 Post Card Bay Tram at Jetty Road Terminus Glenelg SA Unknown Adelaide 51 Post Card Tram 3 in King William Street Adelaide S Aust Unknown Adelaide 52 Post Card Valentine Series No 3065 The Old Horse Tram Victor Harbour Unknown Victor Harbour 53 Post Card Bourke Street Melbourne with Cable Car Looking East 1904.04.25 Melbourne 54 Post Card Opening of New Electric Tramway Elsternwick 1913-11-13 Melbourne 55 Post Card Cable trams in Clarendon St Sth Melb Unknown Melbourne 56 Post Card Pall Mall from Charing Cross Bendigo Unknown Bendigo 57 Post Card Tram 4 & 7 pass at The Fountain and Mitchell Street Bendigo Vic Rose Series P 3198 Unknown Bendigo 58 Post Card M&MTB 133 at Charing Cross bound for Eaglehawk Bendigo Vic Murray Views No 45 Unknown Bendigo 59 Post Card Pall Mall Bendigo Vic Unknown Bendigo 60 Post Card Charing Cross & Mitchell St Bendigo Trams passing 1919.00.00 Bendigo 61 Post Card Pall Mall Looking East Unknown Bendigo 62 Post Card Electric Trams and City Hotel Bendigo Vic Unknown Bendigo 63 Post Card Moorabool Street Geelong V 23 Unknown Geelong 64 Post Card Murray Views No 3 Moorabool Street Geelong Vic Unknown Geelong 65 Post Card The Rose Series P 2487 Ryrie Street Geelong Vic Unknown Geelong 66 Post Card Southern Cross Series 2696 Ryrie Stret Geelong Vic Unknown Geelong 67 Post Card The Rose Series P 1490 Ryrie Street Geelong Vic 1920-03-04 Geelong 68 Post Card Valentine Series No 1568 Lower Sturt Street Ballarat Unknown Ballarat 69 Post Card Rose Series P 1710 Sturt Street Ballarat Victoria Unknown Ballarat 70 Post Card Sturt Street Ballarat Victoria Unknown Ballarat 71 Post Card Horse Tram In Sturt Street Ballarat 1905.11.10 Ballarat 72 Post Card Sturt Street Ballarat Looking North-West Unknown Ballarat 73 Post Card Shoppes Square Sturt Street Ballarat Looking North Unknown Ballarat 74 Post Card Junction Sturt and Lydiard Streets Ballarat 1909-09-01 Ballarat 75 Post Card The Electric Supply Co Souvenir Tram Ticket No 3085of the opening of Electric System August 18 1905 1905.08.18 Ballarat 76 Post Card Sturt Street Ballarat Victoria 1907.11.25 Ballarat 77 Post Card Off to the Gardens Electric Tram Ballarat Unknown Ballarat 78 Post Card Sturt Street Ballarat 1907.04.16 Ballarat 79 Post Card Sturt Street Ballarat Looking East Electric tram with Double Deck Trailer 1911.04.17 Ballarat 80 Post Card Sturt Street Ballarat Looking East Unknown Ballarat 81 Post Card Sturt Street Ballarat Looking West 1911.03.01 Ballarat 82 Post Card Town Hall and Sturt Street Ballarat Unknown Ballarat 83 Post Card Lydiard Street Ballarat 1906.11.23 Ballarat 84 Post Card Looking North along Adelaide Street from George Street Brisbane Sidues Series No 764 Unknown Brisbane 85 Post Card Looking South along Queen Street from the Creek Street Intersection Brisbane Qld Sirues Series No 1379 Unknown Brisbane 86 Post Card George Street from near Supreme Court Brisbane Unknown Brisbane 87 Post Card Queen and Eagle Streets Brisbane 1907.07.04 Brisbane 88 Post Card Queen Street showing His Majesty’s Theatre Brisbane Unknown Brisbane 89 Post Card Queen Street Treasury Building 1908.01.20 Brisbane 90 Post Card G P O and Queen Street Brisbane Unknown Brisbane 91 Post Card Queen Street Brisbane Looking from Wharf Street Unknown Brisbane 92 Post Card Customs House Brisbane 1905.02.16 Brisbane 93 Post Card Queen St Brisbane 1905.09.16 Brisbane 94 Post Card Queen St Brisbane 1907.11.19 Brisbane 95 Post Card Treasury Buildings Brisbane Unknown Brisbane 96 Post Card Queen and Eagle Streets Brisbane Unknown Brisbane 97 Post Card The Valley Corner Brisbane Unknown Brisbane 98 Post Card Brisbane Queen Street opposite General Post Office Unknown Brisbane 99 Post Card North Quay and Milton Beach Brisbane Q Unknown Brisbane 100 Post Card Victoria Bridge Brisbane South Side 1907.08.14 Brisbane 101 Post Card Victoria Bridge Brisbane Unknown Brisbane 102 Post Card Breakfast Creek Bridge Brisbane Q Unknown Brisbane 103 Post Card Melbourne Street Station South Brisbane Queensland Unknown Brisbane 104 Post Card General Post Office Queen Street Brisbane 1955.09.23 Brisbane 105 Post Card Customs House Brisbane 1904.11.04 Brisbane 106 Post Card Queen St Brisbane 1919.11.00 Brisbane 107 Post Card Queen St Brisbane Sidues Series No 627 Unknown Brisbane 108 Post Card Creek Street Brisbane Queensland Unknown Brisbane 109 Post Card Customs House and Garden Reach Brisbane Queensland 1910.00.08 Brisbane 110 Post Card Queen and Creek Streets Brisbane 1909.06.07 Brisbane 111 Post Card Queensland National Bank andd Queen Street Brisbane Queensland Unknown Brisbane 112 Post Card Queen Street and Treasury Buildings Brisbane 0000.09.07 Brisbane 113 Post Card Queen Street showing “Courier” Buildings Brisbane Unknown Brisbane 114 Post Card Intersection George & Roma Streets Brisbane Q 1916.05.11 Brisbane 115 Post Card Adelaide Street Brisbane Q Unknown Brisbane 116 Post Card G P O Queen Street Brisbane Q Unknown Brisbane 117 Post Card Treasury Building Brisbane 1906.03-20 Brisbane 118 Post Card Queen and Eagle Streets Brisbane 1907.02.01 Brisbane 119 Post Card Queen St Brisbane Unknown Brisbane 120 Post Card Queen St Brisbane Q Unknown Brisbane 121 Post Card Victoria Bridge Brisbane 1906.07.30 Brisbane 122 Post Card An Unusual View showing Head of Queen Street Victoria Bridge & South SideSuburbs Brisbane Q Unknown Brisbane 123 Post Card Petries Bight Brisbane Q Unknown Brisbane 124 Post Card South End Victoria Bridge Brisbane Q Unknown Brisbane 125 Post Card Customs House Brisbane Unknown Brisbane 126 Post Card Photo of toastrack car circa 1910 Unknown Brisbane 127 Post Card Treasury Buildings Brisbane Unknown Brisbane 128 Post Card East Street Rockhampton with Steam Tram & trailer Unknown Rockhampton 129 Post Card Post Office Rockhampton with steam tram Unknown Rockhampton 130 Post Card East Street Rockhampton with Steam Trams Rose Series P 7154 Unknown Rockhampton 131 Post Card William Street Rockhampton Rose Series P 7156 Unknown Rockhampton 132 Post Card Central East Street Rockhampton Q with Steam Trams Unknown Rockhampton 133 Photo Sturt St Ballarat Unknown Ballarat 134 Photo Bridge Street Ballarat Unknown Ballarat 135 Post Card George St Sydney Unknown Sydney 136 Post Card Elizabeth St Sydney Unknown Sydney 137 Post Card Railway Square Unknown Sydney 138 Post Card Sydney Harbor Bridge - pending receipt 139 Post Card Kings Cross - Mowbray Series with description on rear from C Roy G Field Unknown Sydney 140 Post Card Kings Cross - Mowbray Series with description on rear from C Roy G Field Unknown Sydney 141 Post Card Central Railway Station Sydney - Rose Series P6033 1954-01-26 Sydney 142 Post card William Street Darlinghurst looking towards City - Rose Series P6602 unknown Sydney 143 Post Card Circular Quay Sydney - Rose Series P6680 Unknown Sydney 144 Post Card View at Manly NSW - Rose Series B1003 Unknown Sydney 145 Post Card Hunter St Newcastle NSW - Rose Series P7843 Unknown Newcastle 146 Post Card Bank Corner Newcastle NSW - Mowbray Series No. 155 Unknown Newcastle 147 Post Card Hunter St Newcastle NSW Unknown Newcastle 148 Post Card Criterion Hotel Hunter St Newcastle NSW Unknown Newcastle 149 Photo Horse tram at Newtown Station 1894 to 1898 - PTC photo c1894 Newtown 150 Photo Steam tram motor No 3 at Railway Square 1879 1879 Sydney 151 Photo Railway steam tram c1900 with a horse drawn double deck bus c1900 Sydney 152 Photo Steam motor 5A and doubled deck bus Unknown Sydney 153 Photo Steam motor 53A with detail notes on rear 1922 Sydney 154 Photo Cable tram set at Milsons Point ferry terminal c1900 Sydney 155 Photo Early Sydney electric car - Ocean St - Rose Bay Unknown Sydney 156 Photo George St looking souoth c1905 c1905 Sydney 157 Photo Tram 165 at Circular Quay Unknown Sydney 158 Photo Tramcar ferry or transporter at The Spit Unknown Sydney 159 Photo tram 882 George St at Marti Place, 1937 1937 Sydney 160 Photo Tram 826 Railway Sq area Unknown Sydney 161 Photo Railway Sq in background, Broadway with double decker bus and toastrack car late 1930s Sydney 162 Photo Coupled St Pitt St? - photo Ben Parle Feb. 1950 Sydney 163 Photo Electric tram No. 2 - North Sydney with side trolley pole running Unknown Sydney 164 Photo George St - Horden's Corner Unknown Sydney 165 Photo George St at Martin Place c1920 Sydney 166 Photo Castlereagh St Sydney c1928 c1928 Sydney 167 Photo Railway Sqare c1920 c1920 Sydney 168 Photo Darling St Countereweight Unknown Sydney 169 Photo Trolley bus depot Unknown Sydney 170 Photo Trolley bus No. 14 Unknown Sydney 171 Photo Newcastle Railway Station with steam tram - Wharf Road?? Unknown Newcastle 172 Photo High St West Maitland - steam tram Unknown Maitland 173 Photo High St West Maitland - steam tram Unknown Maitland 174 Post Card Argent St near tram terminal Broken Hill NSW c1900 Broken Hill 175 postcard Argent St looking south Broken Hill - with Ken Magor's notes on rear Unknown Broken Hill 176 Photo Toronto - steam tram 61A Unknown Toronto 177 Photo 124A trial run 1911? Sutherland - Cronulla line 1911 Sutherland 178 Photo 103A at a tram stop Unknown Sydney 179 Photo Cable tram set at Crows Nest terminus grip car 12, trailer 22 Unknown Sydney 180 Photo Cable tram Queens Square Sydney 1903 Sydney 181 Photo cars 2078 and 2077 Chatswood late 1950s Sydney 182 Photo car 1877 Balmain area late 1950s Sydney 183 Photo Trolley bus - Rockdale destination Late 1950s Sydney 184 Photo Broken Hill steam tram - motor 18A North Tram Unknown Broken Hill 185 Photo Millars Point Sydney NSW - ferry/tram interchange, unknown Sydney All items imaged including the rear or back where there was writing of information. All files stored on the Museum's Photo Collections directory. Demonstrates through the medium of many images, Australian tramway systems and Ballarat's place in them.Album - heavy card covers, plastic lined with postcard or 6x4 photo sleeves.australia, tramways, postcards, photographs, steam trams, horse trams, cable trams, trolley buses -
 Bendigo Military Museum
Photograph - A Section, 1st Topographic Survey Troop, Vung Tau, Vietnam, 1966
This is a set of 12 photographs of A Section, 1st Topographic Survey Troop taken from the 25th of May to the 12th of June 1966 during their deployment to Vung Tau, Vietnam. Led by OC CAPT Bob Skitch, the ten personnel from A Section 1st Topo Svy Tp and six personnel from supporting units were the first contingent from the Royal Australian Survey Corps deployed to provide topographic support to the Australian Task Force in Vietnam. They arrived in Saigon, Vietnam on the 10th of June 1966 enroute to the Australian Reinforcement Unit (ARU) “back beach” camp in Vung Tau. The ten RA Svy technical personnel from 1st Topo Svy Tp deployed were: WO2 David Christie, SGT Stan Campbell, SGT Dave King, CPL Jim Roberts, CPL Dennis Duquemin, CPL Des Ceruti, SPR Derek Chambers, SPR Brian Firns, SPR Joe O’Connor and SPR Ron Smith. External personnel deployed were: WO2 Snow Rollston from Northern Command Field Survey Unit, T/CPL Peter Clarke – orderly room corporal, T/CPL Alan Carew – Technical Storeman, SPR Stan Johns – Map Storeman, SPR Boots Campbell – batman/driver and PTE BNF Brunning – cook. The ship featured in photos .1P and .2P was the aircraft carrier HMAS Sydney on its 4th voyage to Vietnam. On board were SGT Stan Campbell and SPR Brian Firns, tasked to manage A Section’s stores and equipment. The rest of A Section deployed to Vietnam by air on the chartered Qantas 707B ‘City of Longreach'. A Section’s main tasks were to establish a Theatre Grid, map compilation and map revision; Engineer Survey Support in the camp and to the civil community; give assistance to the Cordon Search Missions by producing large scale plots from aerial photos with every house and fence etc plotted; and then reproduce these by silk screening usually, within a 24-hour period. RA Svy’s support concluded with the withdrawal of Australian troops from Vietnam in 1972. More information on the A Section, 1st Topographic Survey Troop and the Army Survey Regiment’s supporting role is provided in pages 89 to 94 of Valerie Lovejoy’s book 'Mapmakers of Fortuna – A history of the Army Survey Regiment’ ISBN: 0-646-42120-4.This is a set of 12 photographs of A Section, 1st Topographic Survey Troop (1st Topo Svy Tp), taken from the 25th of May to the 12th of June 1966 during their deployment to Vung Tau, Vietnam. The black and white photographs were printed on photographic paper and are part of the Army Survey Regiment’s Collection. The photographs were scanned at 300 dpi. .1) &.2) - Photo, black & white, 1966. HMAS Sydney departing Woolloomooloo wharf en-route to Vietnam. .3) - Photo, black & white, 1966. A Section 1 Topo Svy Tp relaxing in a bar before deployment. OC CAPT Bob Skitch in centre of photo. .4) - Photo, black & white, 1966. Unidentified A Section 1 Topo Svy Tp personnel and troops from other units relaxing in a bar before deployment. .5) - Photo, black & white, 1966. A Section 1 Topo Svy Tp personnel arrival by bus at Saigon (Tan Son Nhut) Airport. OC CAPT Bob Skitch 4th from right. .6) - Photo, black & white, 1966. A Section 1 Topo Svy Tp personnel boarding the USAF Hercules aircraft enroute from Saigon (Tan Son Nhut) Airport to Vung Tau Airfield. OC CAPT Bob Skitch on left. .7) - Photo, black & white, 1966. A Section 1 Topo Svy Tp personnel and troops from other units boarding the USAF Hercules aircraft enroute from Saigon (Tan Son Nhut) Airport to Vung Tau Airfield. .8) & .9) - Photo, black & white, 1966. A Section 1 Topo Svy Tp personnel arrive at the Australian Reinforcement Unit (ARU) “back beach” camp. .10) - Photo, black & white, 1966. A Section 1 Topo Svy Tp personnel in oppressive conditions work on map products. .11) - Photo, black & white, 1966. Group photo of A Section 1 Topo Svy Tp. OC CAPT Bob Skitch on far right. .12) - Photo, black & white, 1966. Group photo of A Section 1 Topo Svy Tp. OC CAPT Bob Skitch 3rd from right.Annotated with the photo set - ‘ DET 1 Topo Svy Tp Vung Tau 25 May to 12 of Jun 66’royal australian survey corps, rasvy, army survey regiment, army svy regt, fortuna, asr, 1st topographical survey troop -
 Ballarat Tramway Museum
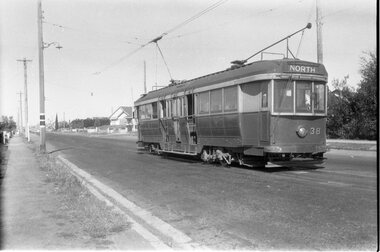
Negative - Geelong Belmont terminus tram 38, Laurie Gallop, early 1956
Photo shows Geelong No. 38 at the Belmont terminus, High Street with the return destination of North. Note the compulsory tram stop on the left-hand pole. One of a set of photos was taken between 15/2/1956 and 3/3/1956 when services operated only between Belmont and North before the final closure of the Belmont route on 25/31956 and that bogie tram 31 is not shown on the board, having gone to Ballarat on 15/2/1956 - see item 5554. See item 8213 for an article on the Geelong system by Keith Kings. Yields information about the Belmont tram terminus prior to closure.Black and white Negative - 120 sizetram stops, tramways, high st, geelong, tram 38, belmont -
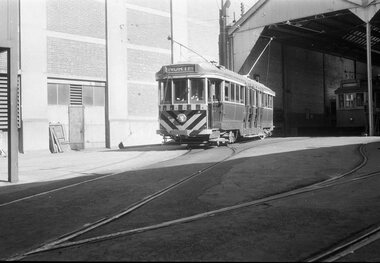
 Ballarat Tramway Museum
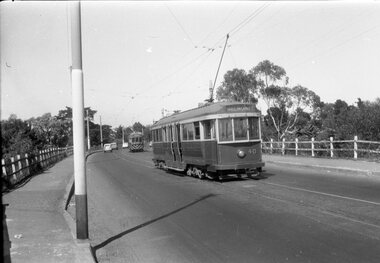
Negative - Geelong trams 33 & 40 Barwon Bridge, Laurie Gallop, early 1956
Photo shows Geelong trams 33 & 40 in Moorabool St just south of the Barwon Bridge on the long crossing loop. Based on the running board at item 8267, most likely tram No. 33. One of a set of photos was taken between 15/2/1956 and 3/3/1956 when services operated only between Belmont and North before the final closure of the Belmont route on 25/31956 and that bogie tram 31 is not shown on the board, having gone to Ballarat on 15/2/1956 - see item 5554. See item 8213 for an article on the Geelong system by Keith Kings. Yields information about the Geelong operations toward the closure of the tram system.Black and white Negative - 120 sizetramways, geelong, moorabool st, tram 33, tram 40, barwon river -
 Ballarat Tramway Museum
Negative - Tram 40 - Moorabool & Malop Streets, Laurie Gallop, early 1956
Photo shows Geelong 40 on its way to North Geelong, turning from Moorabool St into Malop St. In the background are now the National Mutual and Market Square buildings. One of a set of photos was taken between 15/2/1956 and 3/3/1956 when services operated only between Belmont and North before the final closure of the Belmont route on 25/31956 and that bogie tram 31 is not shown on the board, having gone to Ballarat on 15/2/1956 - see item 5554. See item 8213 for an article on the Geelong system by Keith Kings. Yields information about the Geelong operations toward the closure of the tram system.Black and white Negative - 120 sizetramways, geelong, moorabool st, malop st, tram 40 -
 Ballarat Tramway Museum
Negative - Geelong scrubber at depot, Laurie Gallop, early 1956
The photo shows the Geelong scrubber on the front of No. 2 road with No. 16 behind and No. 19 alongside. One of a set of photos was taken between 15/2/1956 and 3/3/1956 when services operated only between Belmont and North before the final closure of the Belmont route on 25/31956 and that bogie tram 31 is not shown on the board, having gone to Ballarat on 15/2/1956 - see item 5554. See item 8213 for an article on the Geelong system by Keith Kings. Yields information about the Geelong operations toward the closure of the tram system and in particular the Geelong scrubber or track cleaning tram.Black and white Negative - 120 sizetramways, geelong, geelong depot, scrubber, geelong 16, geelong 19 -
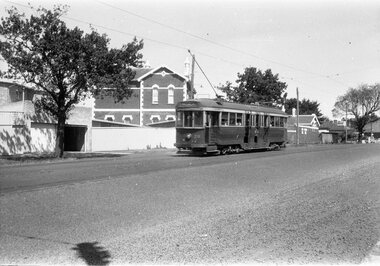
 Ballarat Tramway Museum
Negative - Tram 40 at the North terminus, Laurie Gallop, early 1956
Photo shows Geelong tram 40 at the North Terminus, with the Pilkington glass factory behind. The tram has the destination of Belmont. One of a set of photos was taken between 15/2/1956 and 3/3/1956 when services operated only between Belmont and North before the final closure of the Belmont route on 25/31956 and that bogie tram 31 is not shown on the board, having gone to Ballarat on 15/2/1956 - see item 5554. See item 8213 for an article on the Geelong system by Keith Kings. Yields information about the Geelong operations toward the closure of the tram system and the North terminus.Black and white Negative - 120 sizetramways, geelong, geelong depot, tram 40, north -
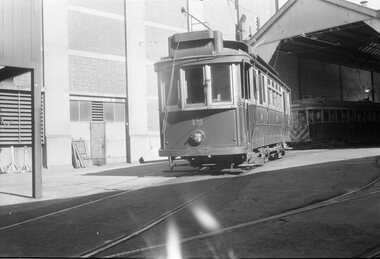
 Ballarat Tramway Museum
Negative - Tram 33 Geelong depot, Laurie Gallop, early 1956
Photo shows Geelong 33 on No. 5 road at Geelong depot being driven out with the destination set to North. One of a set of photos was taken between 15/2/1956 and 3/3/1956 when services operated only between Belmont and North before the final closure of the Belmont route on 25/31956 and that bogie tram 31 is not shown on the board, having gone to Ballarat on 15/2/1956 - see item 5554. See item 8213 for an article on the Geelong system by Keith Kings. Yields information about the Geelong operations toward the closure of the tram system.Black and white Negative - 120 sizetramways, geelong, geelong depot, tram 33 -
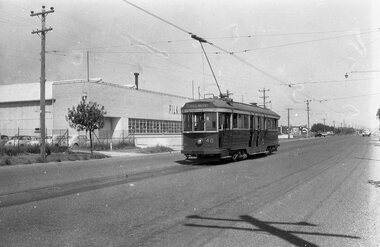
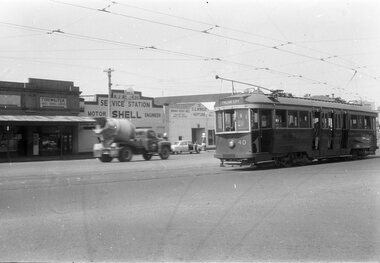 Ballarat Tramway Museum
Negative - Tram 40 - Mercer St, city end, early 1956
Photo shows Geelong tram 40 Mercer St, city end. The tram has the destination of North. In the background is a typewriter shop, R J Reynolds? Shell service station and S G Winkler Service station with a Neptune sign. The driver has his hand on the air brake and the controller with the front driver's window open. One of a set of photos was taken between 15/2/1956 and 3/3/1956 when services operated only between Belmont and North before the final closure of the Belmont route on 25/31956 and that bogie tram 31 is not shown on the board, having gone to Ballarat on 15/2/1956 - see item 5554. See item 8213 for an article on the Geelong system by Keith Kings. Yields information about the Geelong operations toward the closure of the tram system.Black and white Negative - 120 sizetramways, geelong, tram 40, north, mercer st -
 Ballarat Tramway Museum
Negative - Tram 38 Mercer Street, Laurie Gallop, early 1956
Photo shows Tram 38 Mercer Street, near The Esplanade with the destination of Belmont. One of a set of photos was taken between 15/2/1956 and 3/3/1956 when services operated only between Belmont and North before the final closure of the Belmont route on 25/31956 and that bogie tram 31 is not shown on the board, having gone to Ballarat on 15/2/1956 - see item 5554. See item 8213 for an article on the Geelong system by Keith Kings. Yields information about the Geelong operations toward the closure of the tram system.Black and white Negative - 120 sizetramways, geelong, tram 38, mercer st -
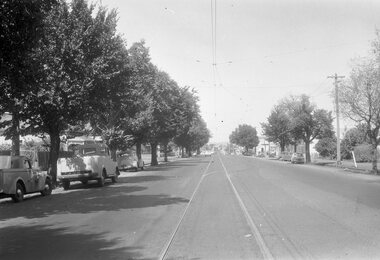 Ballarat Tramway Museum
Negative - Moorabool St, looking south at the Kardinia Park loop, Laurie Gallop, early 1956
Photo shows Moorabool St, looking south at the Kardinia Park loop. One of a set of photos was taken between 15/2/1956 and 3/3/1956 when services operated only between Belmont and North before the final closure of the Belmont route on 25/31956 and that bogie tram 31 is not shown on the board, having gone to Ballarat on 15/2/1956 - see item 5554. See item 8213 for an article on the Geelong system by Keith Kings. Yields information about the Geelong tram system.Black and white Negative - 120 sizetramways, geelong, moorabool st, kardinia park loop -
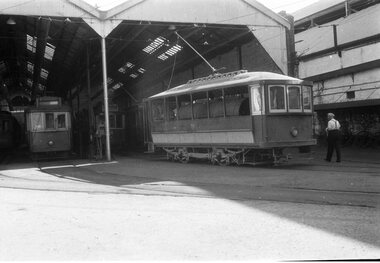
 Ballarat Tramway Museum
Negative - Tram 19 at Geelong Depot, Laurie Gallop, early 1956
Photo shows Tram 19 at Geelong Depot One of a set of photos was taken between 15/2/1956 and 3/3/1956 when services operated only between Belmont and North before the final closure of the Belmont route on 25/31956 and that bogie tram 31 is not shown on the board, having gone to Ballarat on 15/2/1956 - see item 5554. See item 8213 for an article on the Geelong system by Keith Kings. Yields information about the Geelong operations toward the closure of the tram system.Black and white Negative - 120 sizetramways, geelong, geelong depot, tram 19 -
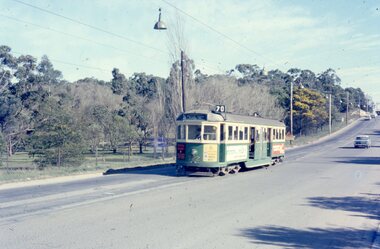 Melbourne Tram Museum
Photograph - Four colour slides - Wattle Park Single Line, Warren Doubleday, 1-8-1970
Set of four photographs taken at the time of the conversion of the Wattle Park route, in Riversdale Road from single line to double track between Warragul Road and the terminus, alongside Wattle Park itself. Yields information on the single line operation of the Wattle Park line prior the conversion to double track operation.Set of four colour Anscochrome slides, of single line operations on the Wattle Park line. .1 - W5 722 on Wattle Park single line, Sat. p.m. .2 - W2 388 meets W2 344 on Wattle park loop - shows the commencement of roadworks. .3 - SW5 853 from the park .4 - W5 738 at Warragul Road - shows the gates to Wattle park and the Caltex Service Station sign.Has photographers slide numbers on each slide.wattle park, route 70, riversdale rd, w2 class, w5 class, sw5 class, trackwork, tram 722, tram 388, tram 853, tram 738, trams, tramways -
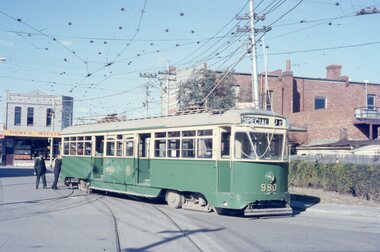 Melbourne Tram Museum
Photograph - Five color slides - tram PCC 980, 9-8-1970
Set of four colour slides taken during the Monash Railway club tour on 9-8-1970 using PCC 980 from Malvern Tram Depot. The route number and destinations are for show only. Photographs by Warren Doubleday.Yields information on Monash Railway club tour, the trams used and the locations.Set of five Anscochrome colour slides, of Melbourne tram PCC 980 on a Monash Railway Club tour - 9-8-1970 .1 - PCC 980 on the depot access tracks for Malvern Tram Depot in Coldblo Road .2 - With the Malvern Tram Depot in the view .3 - In Dandenong Road at Hawthorn Road .4 - Crossing Hawthorn Road - has a tram shelter in the view. .5 - About to use the then new Nolan St (now Southbank Blvd) crossover.Has photographers slide numbers on each slide.monash railway club, tram 980, malvern depot, hawthorn road, dandenong road, nolan st, tramways, trams, pcc class -
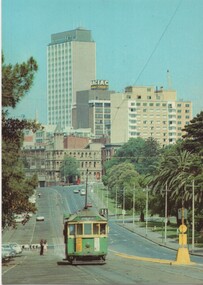 Melbourne Tram Museum
Postcard - National View, Nucolorvue Publishing, Wellington Parade Melbourne, early 1970's
One of a series of postcards published by National View by Murfett Publishers Australia. Has the details on the rear with place for a stamp, address etc, and logo. Shows W2 546 (Spencer St Route 38), possibly about to pick up passengers at the Jolimont Road Stop. At the time Wellington Parade was effectively a one-way street with extensive car parking on the south side. Shows a Safety Zone on the north side of the tram tracks. Has the CRA building, the hotel on the corner of Flinders and Spring St that was demolished for Shell House. See Reg Item 3555 for a later view by the same company.Yields information about the appearance of Wellington Parade, Jolimont, mid to late 1970's.Postcard - National View - plain edges, Wellington Parade looking west towards the CBD. Card No. P-1014-2w2 class, postcard, souvenir, wellington parade, route 38, tram 546, national view