Showing 7308 items
matching cross-fertilisation
-
 Whitehorse Historical Society Inc.
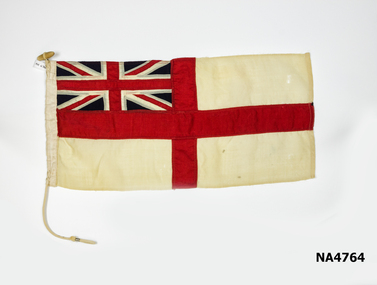
Flag - White Ensign, 1914
The ensign was in the Mitcham R.S.L. collection and transferred to W.H.S. when the RSL closed.Flag with cream background with Union Jack in top left hand corner. Red 'St Georges' cross length and width of flag. White Ensign also called St Georges Ensign used by British Navy 1914 - 1918 War. Cotton binding on left hand side with toggle and rope attached. 'Tom Wright' printed on binding in blue and purple ink. Rope is secured by metal clip.'TOM WRIGHT' Captain O.M. Watts Ltd London W1flags, maritime -
 Whitehorse Historical Society Inc.
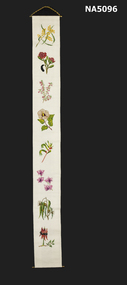
Decorative object - Wall hanging
Domestic object demonstrating Australian State Floral symbolsA cross stitched wall hanging on a brass hanger. The white cotton background has the Australian native flower emblems in a line down the centre. Firstly the Australian emblem - golden Wattle, then New South Wales - Waratah, Victoria - Common Heath, Northern Territory -Sturt's Desert Rose, West Australia - Kangaroo paw, Queensland - Cooktown Orchid, Tasmania - Blue Gum, West Australia - Sturt Desert pea.embroidery, australian floral emblems -
 Lakes Entrance Regional Historical Society (operating as Lakes Entrance History Centre & Museum)
Photograph, 1905c
Second photograph identicalBlack and white photograph showing pioneer man Jack Curtis sitting outside his slab hut, wearing shirt and tie. Cross cut saw leaning against hut, hand saw hanging from slab chimney, long handle axe leaning against stump, dish on stump, single furrow plough near hut. Dense bush behind hut, Webbs Corner Bunga VictoriaJack Curtis 1905-6 outside his homecoast -
 Ballarat Tramway Museum
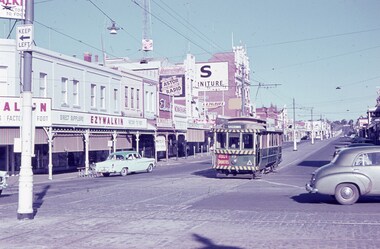
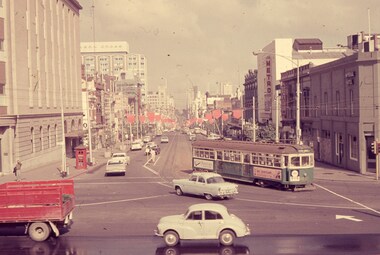
Slide - 35mm slide/s, Keith Caldwell, 11/03/1962 12:00:00 AM
Yields information about tram 19 in Bendigo and Mitchell St and its similarities with Ballarat.Agfa colour slides, white cardboard mount, photo by Keith Caldwell 11-3-1962 of: Bendigo 19 about to cross Pall Mall in Mitchell St with the Ezywalkin shoe store in the background and other shops. Tram has the destination of Eaglehawk and has a Briquettes advert on the front dash panel. Signs include Pye, Ezywalkin, A. G. Palmers, Edmonds, Monaghans, Astor Radio and R. White.on the slide stamped in red ink "SUS23102" and in ink "Bendigo 11.3.62 Caldwell" and other pencil markings.tramways, trams, bendigo, mitchell st, tram 19 -
 Ballarat Tramway Museum
Photograph - Black & White Photograph/s
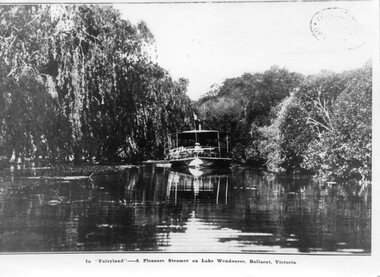
Reproduction copy of a black and white photograph showing "a pleasure steamer" - Golden City - passing through Fairyland, Lake Wendouree, Ballarat. Has remnant of a stamp in the top right hand corner. Photo has caption "In 'Fairyland' - A Pleasure Steamer on Lake Wendouree, Ballarat, Victoria". Printed on Kodak paper. Has ARHS Vic Div photo collection stamp on rear side, but crossed out in blue ink.See abovetrams, tramways, ballarat, lake wendouree, paddle steamer, golden city -
 Ballarat Tramway Museum
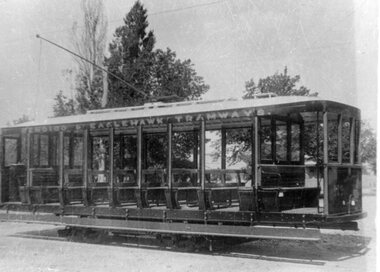
Photograph - Black & White Photograph/s, Electric Supply Co. of Vic (ESCo), 1913
Black and white photograph of a Bendigo Single Truck cross bench tramcar (either 17 or 18) when built new in 1913. Tram has words "Bendigo and Eaglehawk Tramways" on top rail above windows. Photograph appears to be a photo of another print, with black ink "15" in the bottom left hand corner on the newer print on copy 1 of the item only. See page 30 of Destination Eaglehawktrams, tramways, bendigo, cross bench tram -
 Ballarat Tramway Museum
Functional Object - Trolley Wire Sample
Sample of trolley wire taken from overhead (South wire) ear 12C, which has worn flat under ear, with metal flow to side,- good grooves and short length past ear and worn to one side at the other end. See Reg item 514 for wire size details. See sketch on original worksheet for cross sections and colours. Images added 3-12-2016ballarat, overhead, fittings, trolley wire -
 Ballarat Tramway Museum
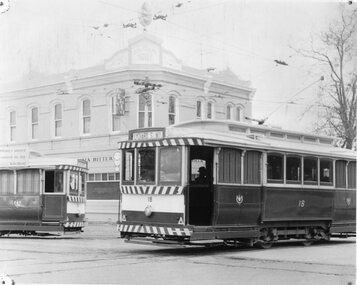
Photograph - Black & White Photograph/s - set of 2, Dave Macartney, 4/08/1968 12:00:00 AM
Black & white photograph of Ballarat trams 18 and 28 at the intersection of Drummond St and Sturt St with Southern Cross Hotel in background. Close up photo of 18 with Lydiard St. Nth destination and 21 with Sebastopol destination. Photo shows complex of trackwork at this location. 531.1 - same photo, but differently framed, building more central. Held in 01-01-70. Added 10/11/2005.trams, tramways, ballarat, sebastopol, drummond st , tram 18, tram 28 -
 Ballarat Tramway Museum
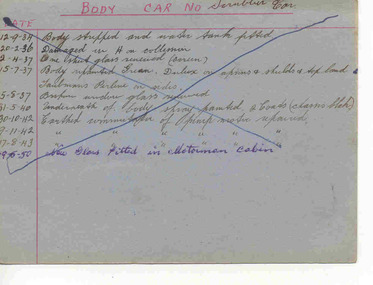
Administrative record - Tramcar - Record Card, State Electricity Commission of Victoria (SECV), "Body Car No. Scrubber", 1934 and 1950
Yields information about the work done to the body of the scrubber tram, primarily in the first 9 years.SECV Tramcar Record Card - for the Body of tramcar - Scrubber Car. Blue grey card - ruled in red ink, with "Date" and "Body Car No." in red ink, with notes on the work done to the body of SECV Scrubber car from 12/9/1934 to 19-6-1950. Entries have been crossed out and "39" and "Car No. 39", written on the card, indicating its further use as a header card.tramcar bodies, secv, records, workshop records -
 The 5th/6th Battalion Royal Victoria Regiment Historical Collection
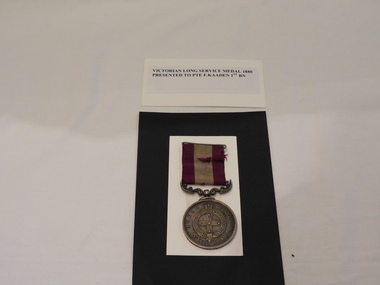
Medal - Victorian Long Service Medal 1880- Presented to PTE F.KAADEN 1st BN
Awarded for long and efficient sevice in the colonial era Silver Medal mounted on a decorative arm. Ribbon is made up of two 9mm Violet Bars set astride a 14 mm off white bar. Ribbon is susbended by a silver hanging loop Obverse face has a St. George Cross with 5 stars inside of a belt surmounted by a crown. This is surrounded by the words Local forces Victoria. The Reverse of the medal has " For long and efficient service" embossed on itFranz Kaaden PTE 1st Battn Inf BDE5/6rvr, officers and sergeants, long service medal, victorian, colonial -
 Melbourne Tram Museum
Slide, Keith Caldwell, 10/03/1966 12:00:00 AM
Agfa colour blue white plastic mount, photo by Keith Caldwell of SW6 861 in Royal Parade Brunswick, about to cross into Sydney Road at Brunswick Road. Tram running a route 19, North Coburg. Has adverts for T&G insurance and Stillwells Ford. In the view are the Bundy clock, with tram stop signage, a steel shelter, a drinking fountain and a statue on the plantation. 10/3/1966In ink "10 iii 66"trams, tramways, sw6 class, north coburg, route 19, sydney rd, brunswick rd, royal parade, bundy clock, shelters, tram 861 -
 Melbourne Tram Museum
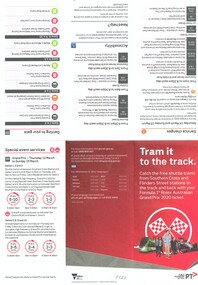
Pamphlet, Public Transport Victoria (PTV), "Tram it to the track", Mar. 2020
Pamphlet - 6 fold DL, titled "Tram it to the track", produced for the 2020 Grand Prix, which did not occur due to COVID-19. Details the various shuttle services from Southern Cross or Flinders St Station to the Albert Park circuit, service changes, dates (12/3 to 15/3/2020). Map of the tram and race track on the inside. Has PTV and Victorian Government logos.trams, tramways, grand prix, covid-19, albert park, events -
 Melbourne Tram Museum
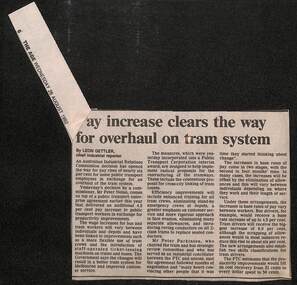
Newspaper, The Age, "Pay increase clears the way for overhaul of tram system", 28/08/1992 12:00:00 AM
Newspaper clipping, The Age 28/8/1992, titled "Pay increase clears the way for overhaul of tram system", written by Leon Gettler, Industrial reporter about the Australian Industrial Relations Commission decision that would allow pay rises in exchange of tram system overhaul of productivity, operations and restructure including cross linking, training, standbys, allowances and other arrangements. Peter Parkinson chaired the strategic committee.trams, tramways, budgets, ptc, unions, public transport, funding, operations -
 Melbourne Tram Museum
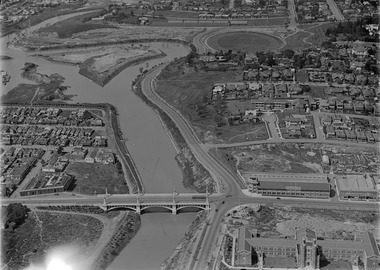
Photograph - Digital Image, Kevin O'Reilly, Richmond looking east along the Yarra River, c1930's
Image from CD (Compact Diskette for use in computers) - see Reg Item 135. Image titled "Richmond 7" on CD, of looking east along the Yarra River where the Church St Bridge Richmond crosses the River, Alexandra Ave. Has an ex HTT Maximum Traction tram crossing the bridge. Shows now Herring Island after the Yarra River was cut through to form the island.trams, tramways, richmond, chapel st, church st, yarra river -
 Melbourne Tram Museum
Slide, Keith Caldwell, 14/03/1966 12:00:00 AM
Perutz colour slide, grey plastic mount, photo by Keith Caldwell of W7 1033, route 90, Northcote Dundas St, turning from Bourke St into Spring St. Tram has an advert for the show "My Fair Lady" and Bradmill Sheets. In the background are a number of other trams, the Imperial Hotel, the Metro Theatre, the Southern Cross Hotel and the Windsor Hotel bar. 14/3/1966In ink "Bourke 14.3.66" and a purple date stamp.trams, tramways, bourke st, w7 class, route 90, spring st, tram 1033 -
 Bendigo Historical Society Inc.
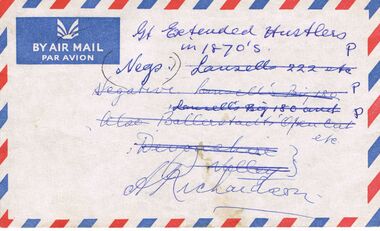
Negative - GREAT EXTENDED HUSTLERS MINE BENDIGO
Photo Negative enclosed in Air Mail envelope. Written on front of envelope: ' Gt Extended Hustlers in 1870's (negs). Crossed out text says: ' Lansells 222 etc, negative Lansell's Big 180, Also Ballerstedts open cut etc. Devonshire Valley, A. Richardson'. On back of envelope: Hustlers Mine Bendigo Courtesy Royal Historical Society Miss J. Parry Wills Street Bendigo.bendigo, gold mining, great extended hustlers gold mine -
 National Vietnam Veterans Museum (NVVM)
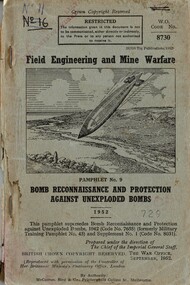
Booklet, British Army, Field Engineering and Mine Warfare: Pamphlet No. 9: Bomb Reconnaissance and Protection Against Unexploded Bombs, 1952, 1952
A brownish/blue coloured cover with black inforation on thefront. Top left hand corner written in blue and black biro No 11 and No 16 (this one is crossed out. Top right hand corner reads W.O. Code No. 8730. In the centre of the cover there is a picture of a bomb heading towards the ground. There are two metal staples down the left hand side. Part of the side of spine of the booklet is badly damaged.british armed forces - service manuals, field engineering, mine warfare, bomb reconnaissance -
 Bendigo Military Museum
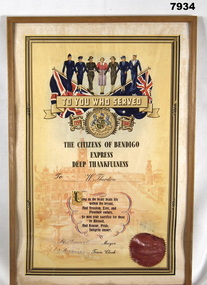
Certificate - CERTIFICATE, FRAMED WW2, City of Bendigo
Items in the collection re: "William Anthony (Bill) THEODORE DSM". Refer Cat No. 7926P for his service record.Certificate - cream coloured paper with black and cream coloured print. Illustrated in colour with Navy, Army, Airforce and Nursing personnel above crossed flags - Union Jack and Australian above scroll work and City of Bendigo. Coat of Arms/crest bracketed by dates "1939 - 1945". Red coloured embossed "City of Bendigo" Seal lower right. Frame - clear varnished timber with cardboard backing, no glass.Inscription on certificate - "TO YOU WHO SERVED/ THE CITIZENS OF BENDIGO/ EXPRESS/ DEEP THANKFULLNESS/ TO "W. THEODORE"/ Long as the heart beats life/ with in the breast/ And Freedom, Love and Plenitude endure/ So may your sacrifice for these/ be Blessed/ And Honour, Pride, Integrity ensure/ "A. Truscott" Mayor/ ??? Town Clerk".framed accessories, certificate, ww2, ran, william anthony theodore dsm -
 Flagstaff Hill Maritime Museum and Village
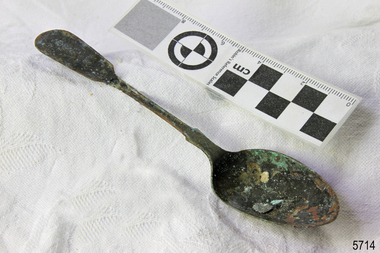
Domestic object - Spoon, c. 1878
This tea spoon is from the wreck of the LOCH ARD, a Loch Line ship of 1,693 tons which sailed from Gravesend, London, on 2 March 1878 with 17 passengers and a crew of 36 under Captain George Gibbs. “The intention was to discharge cargo in Melbourne, before returning to London via the Horn with wool and wheat”. Instead, on 1 June 1878, after 90 days at sea, she struck the sandstone cliffs of Mutton Bird Island on the south west coast of Victoria, and sank with the loss of 52 lives and all her cargo. The manifest of the LOCH ARD listed an array of manufactured goods and bulk metals being exported to the Colony of Victoria, with a declared value of £53,700. (202 bills of lading show an actual invoice value of £68, 456, with insurance underwriting to £30,000 of all cargo). Included in the manifest is the item of “Tin hardware & cutlery £7,530”. This teaspoon is one of 482 similar items of electro-plated cutlery from the LOCH ARD site, comprising spoons and forks of various sizes but all sharing the same general shape or design and metallic composition. 49 of these pieces display a legible makers’ mark — the initials “W” and “P” placed within a raised diamond outline, which is in turn contained within a sunken crown shape — identifying the manufacturer as William Page & Co of Birmingham. An electroplater’s makers’ marks, unlike sterling silver hallmarks, are not consistent identifiers of quality or date and place of manufacture. A similar line of five impressions was usually made to impress the consumer with an implication of industry standards, but what each one actually signified was not regulated and so they varied according to the whim of the individual foundry. In this case, the maker’s marks are often obscured by sedimentary accretion or removed by corrosion after a century of submersion in the ocean. However sufficient detail has survived to indicate that these samples of electro-plated cutlery probably originated from the same consignment in the LOCH ARD’s cargo. The following descriptions of maker’s marks are drawn from 255 tea spoons, 125 dessert spoons, and 99 table forks. These marks are clearly visible in 66 instances, while the same sequence of general outlines, or depression shapes, is discernible in another 166 examples. 1. A recessed Crown containing a raised Diamond outline and the initials “W” and “P” (the recognised trademark of William Page & Co) 2. An impressed Ellipse containing a raised, pivoted, Triangle in its lower part and bearing a Resurrection Cross on its upper section (a possible dissenting church symbol reflecting religious affiliation); OR a rounded Square impression containing a raised, ‘lazy’, letter “B” (possibly mimicking sterling silver hallmark signifying city of manufacture i.e. Birmingham) 3. An impressed rounded Square filled with a raised Maltese Cross (the base metal composite of nickel silver was also known as ‘German silver’ after its Berlin inventors in 1823) 4. A recessed Circle containing a Crab or Scarab Beetle image; OR a recessed Circle containing a rotated ‘fleur de lys’ or ‘fasces’ design 5. A depressed Diamond shape enclosing a large raised letter “R” and a small raised letter “D” (mimicking the U.K. Patent Office stamp which abbreviated the term ‘registered’ to “RD”, but also included date and class of patent) Suggested trade names for William Page & Co’s particular blend of brass plating are ‘roman silver’ or ‘silverite’. This copper alloy polishes to a lustrous gold when new, discolouring to a murky grey with greenish hue when neglected. HISTORY OF THE LOCH ARD The LOCH ARD belonged to the famous Loch Line which sailed many ships from England to Australia. Built in Glasgow by Barclay, Curdle and Co. in 1873, the LOCH ARD was a three-masted square rigged iron sailing ship. The ship measured 262ft 7" (79.87m) in length, 38ft (11.58m) in width, 23ft (7m) in depth and had a gross tonnage of 1693 tons. The LOCH ARD's main mast measured a massive 150ft (45.7m) in height. LOCH ARD made three trips to Australia and one trip to Calcutta before its final voyage. LOCH ARD left England on March 2, 1878, under the command of Captain Gibbs, a newly married, 29 year old. She was bound for Melbourne with a crew of 37, plus 17 passengers and a load of cargo. The general cargo reflected the affluence of Melbourne at the time. On board were straw hats, umbrella, perfumes, clay pipes, pianos, clocks, confectionary, linen and candles, as well as a heavier load of railway irons, cement, lead and copper. There were items included that intended for display in the Melbourne International Exhibition in 1880. The voyage to Port Phillip was long but uneventful. At 3am on June 1, 1878, Captain Gibbs was expecting to see land and the passengers were becoming excited as they prepared to view their new homeland in the early morning. But LOCH ARD was running into a fog which greatly reduced visibility. Captain Gibbs was becoming anxious as there was no sign of land or the Cape Otway lighthouse. At 4am the fog lifted. A man aloft announced that he could see breakers. The sheer cliffs of Victoria's west coast came into view, and Captain Gibbs realised that the ship was much closer to them than expected. He ordered as much sail to be set as time would permit and then attempted to steer the vessel out to sea. On coming head on into the wind, the ship lost momentum, the sails fell limp and LOCH ARD's bow swung back. Gibbs then ordered the anchors to be released in an attempt to hold its position. The anchors sank some 50 fathoms - but did not hold. By this time LOCH ARD was among the breakers and the tall cliffs of Mutton Bird Island rose behind the ship. Just half a mile from the coast, the ship's bow was suddenly pulled around by the anchor. The captain tried to tack out to sea, but the ship struck a reef at the base of Mutton Bird Island, near Port Campbell. Waves broke over the ship and the top deck was loosened from the hull. The masts and rigging came crashing down knocking passengers and crew overboard. When a lifeboat was finally launched, it crashed into the side of LOCH ARD and capsized. Tom Pearce, who had launched the boat, managed to cling to its overturned hull and shelter beneath it. He drifted out to sea and then on the flood tide came into what is now known as LOCH ARD Gorge. He swam to shore, bruised and dazed, and found a cave in which to shelter. Some of the crew stayed below deck to shelter from the falling rigging but drowned when the ship slipped off the reef into deeper water. Eva Carmichael had raced onto deck to find out what was happening only to be confronted by towering cliffs looming above the stricken ship. In all the chaos, Captain Gibbs grabbed Eva and said, "If you are saved Eva, let my dear wife know that I died like a sailor". That was the last Eva Carmichael saw of the captain. She was swept off the ship by a huge wave. Eva saw Tom Pearce on a small rocky beach and yelled to attract his attention. He dived in and swam to the exhausted woman and dragged her to shore. He took her to the cave and broke open case of brandy which had washed up on the beach. He opened a bottle to revive the unconscious woman. A few hours later Tom scaled a cliff in search of help. He followed hoof prints and came by chance upon two men from nearby Glenample Station three and a half miles away. In a state of exhaustion, he told the men of the tragedy. Tom returned to the gorge while the two men rode back to the station to get help. By the time they reached LOCH ARD Gorge, it was cold and dark. The two shipwreck survivors were taken to Glenample Station to recover. Eva stayed at the station for six weeks before returning to Ireland, this time by steamship. In Melbourne, Tom Pearce received a hero's welcome. He was presented with the first gold medal of the Royal Humane Society of Victoria and a £1000 cheque from the Victorian Government. Concerts were performed to honour the young man's bravery and to raise money for those who lost family in the LOCH ARD disaster. Of the 54 crew members and passengers on board, only two survived: the apprentice, Tom Pearce and the young woman passenger, Eva Carmichael, who lost all of her family in the tragedy. Ten days after the LOCH ARD tragedy, salvage rights to the wreck were sold at auction for £2,120. Cargo valued at £3,000 was salvaged and placed on the beach, but most washed back into the sea when another storm developed. The wreck of LOCH ARD still lies at the base of Mutton Bird Island. Much of the cargo has now been salvaged and some was washed up into what is now known as LOCH ARD Gorge. Cargo and artefacts have also been illegally salvaged over many years before protective legislation was introduced. One of the most unlikely pieces of cargo to have survived the shipwreck was a Minton porcelain peacock - one of only seven in the world. The peacock was destined for the Melbourne International Exhibition in 1880. It had been well packed, which gave it adequate protection during the violent storm. Today, the Minton peacock can be seen at the Flagstaff Hill Maritime Museum in Warrnambool. From Australia's most dramatic shipwreck it has now become Australia's most valuable shipwreck artefact and is one of very few 'objects' on the Victorian State Heritage Register The LOCH ARD shipwreck is of State significance – Victorian Heritage Register S 417. Flagstaff Hill’s collection of artefacts from LOCH ARD is significant for being one of the largest collections of artefacts from this shipwreck in Victoria. It is significant for its association with the shipwreck, which is on the Victorian Heritage Register (VHR S417). The collection is significant because of the relationship between the objects, as together they have a high potential to interpret the story of the LOCH ARD. The LOCH ARD collection is archaeologically significant as the remains of a large international passenger and cargo ship. The LOCH ARD collection is historically significant for representing aspects of Victoria’s shipping history and its potential to interpret sub-theme 1.5 of Victoria’s Framework of Historical Themes (living with natural processes). The collection is also historically significant for its association with the LOCH ARD, which was one of the worst and best known shipwrecks in Victoria’s history. Unrestored tea spoon from the wreck of the LOCH ARD. The spoon design has a flattened fiddle-back handle, with a thin stem or shank, flared collar, and elongated bowl. The spoons metallic composition is a thin layer of brass alloy which has partially corroded back to a nickel-silver base metal. Only 10% of original electroplate seems to be remaining, with another 10% of spoon surface bearing some verdigris. Appears to be a small piece of silver plate from another source stuck to bowl. One of five makers marks is discernible (3) Maltese Cross.flagstaff hill maritime museum, shipwreck coast, great ocean road, loch line, loch ard, mutton bird island, loch ard gorge, electroplated cutlery, loch ard shipwreck, nickel silver, william page & co, birmingham, brass plating, makers marks -
 Flagstaff Hill Maritime Museum and Village
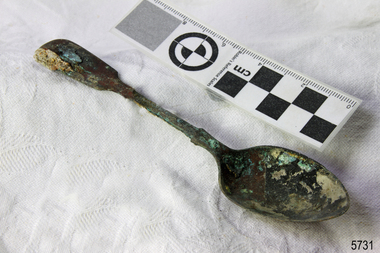
Domestic object - Spoon, circa 1878
This tea spoon is from the wreck of the LOCH ARD, a Loch Line ship of 1,693 tons which sailed from Gravesend, London, on 2 March 1878 with 17 passengers and a crew of 36 under Captain George Gibbs. “The intention was to discharge cargo in Melbourne, before returning to London via the Horn with wool and wheat”. Instead, on 1 June 1878, after 90 days at sea, she struck the sandstone cliffs of Mutton Bird Island on the south west coast of Victoria, and sank with the loss of 52 lives and all her cargo. The manifest of the LOCH ARD listed an array of manufactured goods and bulk metals being exported to the Colony of Victoria, with a declared value of £53,700. (202 bills of lading show an actual invoice value of £68, 456, with insurance underwriting to £30,000 of all cargo). Included in the manifest is the item of “Tin hardware & cutlery £7,530”. This teaspoon is one of 482 similar items of electro-plated cutlery from the LOCH ARD site, comprising spoons and forks of various sizes but all sharing the same general shape or design and metallic composition. 49 of these pieces display a legible makers’ mark — the initials “W” and “P” placed within a raised diamond outline, which is in turn contained within a sunken crown shape — identifying the manufacturer as William Page & Co of Birmingham. An electroplater’s makers’ marks, unlike sterling silver hallmarks, are not consistent identifiers of quality or date and place of manufacture. A similar line of five impressions was usually made to impress the consumer with an implication of industry standards, but what each one actually signified was not regulated and so they varied according to the whim of the individual foundry. In this case, the maker’s marks are often obscured by sedimentary accretion or removed by corrosion after a century of submersion in the ocean. However sufficient detail has survived to indicate that these samples of electro-plated cutlery probably originated from the same consignment in the LOCH ARD’s cargo. The following descriptions of maker’s marks are drawn from 255 tea spoons, 125 dessert spoons, and 99 table forks. These marks are clearly visible in 66 instances, while the same sequence of general outlines, or depression shapes, is discernible in another 166 examples. 1. A recessed Crown containing a raised Diamond outline and the initials “W” and “P” (the recognised trademark of William Page & Co) 2. An impressed Ellipse containing a raised, pivoted, Triangle in its lower part and bearing a Resurrection Cross on its upper section (a possible dissenting church symbol reflecting religious affiliation); OR a rounded Square impression containing a raised, ‘lazy’, letter “B” (possibly mimicking sterling silver hallmark signifying city of manufacture i.e. Birmingham) 3. An impressed rounded Square filled with a raised Maltese Cross (the base metal composite of nickel silver was also known as ‘German silver’ after its Berlin inventors in 1823) 4. A recessed Circle containing a Crab or Scarab Beetle image; OR a recessed Circle containing a rotated ‘fleur de lys’ or ‘fasces’ design 5. A depressed Diamond shape enclosing a large raised letter “R” and a small raised letter “D” (mimicking the U.K. Patent Office stamp which abbreviated the term ‘registered’ to “RD”, but also included date and class of patent) Suggested trade names for William Page & Co’s particular blend of brass plating are ‘roman silver’ or ‘silverite’. This copper alloy polishes to a lustrous gold when new, discolouring to a murky grey with greenish hue when neglected. HISTORY OF THE LOCH ARD The LOCH ARD belonged to the famous Loch Line which sailed many ships from England to Australia. Built in Glasgow by Barclay, Curdle and Co. in 1873, the LOCH ARD was a three-masted square rigged iron sailing ship. The ship measured 262ft 7" (79.87m) in length, 38ft (11.58m) in width, 23ft (7m) in depth and had a gross tonnage of 1693 tons. The LOCH ARD's main mast measured a massive 150ft (45.7m) in height. LOCH ARD made three trips to Australia and one trip to Calcutta before its final voyage. LOCH ARD left England on March 2, 1878, under the command of Captain Gibbs, a newly married, 29 year old. She was bound for Melbourne with a crew of 37, plus 17 passengers and a load of cargo. The general cargo reflected the affluence of Melbourne at the time. On board were straw hats, umbrella, perfumes, clay pipes, pianos, clocks, confectionary, linen and candles, as well as a heavier load of railway irons, cement, lead and copper. There were items included that intended for display in the Melbourne International Exhibition in 1880. The voyage to Port Phillip was long but uneventful. At 3am on June 1, 1878, Captain Gibbs was expecting to see land and the passengers were becoming excited as they prepared to view their new homeland in the early morning. But LOCH ARD was running into a fog which greatly reduced visibility. Captain Gibbs was becoming anxious as there was no sign of land or the Cape Otway lighthouse. At 4am the fog lifted. A man aloft announced that he could see breakers. The sheer cliffs of Victoria's west coast came into view, and Captain Gibbs realised that the ship was much closer to them than expected. He ordered as much sail to be set as time would permit and then attempted to steer the vessel out to sea. On coming head on into the wind, the ship lost momentum, the sails fell limp and LOCH ARD's bow swung back. Gibbs then ordered the anchors to be released in an attempt to hold its position. The anchors sank some 50 fathoms - but did not hold. By this time LOCH ARD was among the breakers and the tall cliffs of Mutton Bird Island rose behind the ship. Just half a mile from the coast, the ship's bow was suddenly pulled around by the anchor. The captain tried to tack out to sea, but the ship struck a reef at the base of Mutton Bird Island, near Port Campbell. Waves broke over the ship and the top deck was loosened from the hull. The masts and rigging came crashing down knocking passengers and crew overboard. When a lifeboat was finally launched, it crashed into the side of LOCH ARD and capsized. Tom Pearce, who had launched the boat, managed to cling to its overturned hull and shelter beneath it. He drifted out to sea and then on the flood tide came into what is now known as LOCH ARD Gorge. He swam to shore, bruised and dazed, and found a cave in which to shelter. Some of the crew stayed below deck to shelter from the falling rigging but drowned when the ship slipped off the reef into deeper water. Eva Carmichael had raced onto deck to find out what was happening only to be confronted by towering cliffs looming above the stricken ship. In all the chaos, Captain Gibbs grabbed Eva and said, "If you are saved Eva, let my dear wife know that I died like a sailor". That was the last Eva Carmichael saw of the captain. She was swept off the ship by a huge wave. Eva saw Tom Pearce on a small rocky beach and yelled to attract his attention. He dived in and swam to the exhausted woman and dragged her to shore. He took her to the cave and broke open case of brandy which had washed up on the beach. He opened a bottle to revive the unconscious woman. A few hours later Tom scaled a cliff in search of help. He followed hoof prints and came by chance upon two men from nearby Glenample Station three and a half miles away. In a state of exhaustion, he told the men of the tragedy. Tom returned to the gorge while the two men rode back to the station to get help. By the time they reached LOCH ARD Gorge, it was cold and dark. The two shipwreck survivors were taken to Glenample Station to recover. Eva stayed at the station for six weeks before returning to Ireland, this time by steamship. In Melbourne, Tom Pearce received a hero's welcome. He was presented with the first gold medal of the Royal Humane Society of Victoria and a £1000 cheque from the Victorian Government. Concerts were performed to honour the young man's bravery and to raise money for those who lost family in the LOCH ARD disaster. Of the 54 crew members and passengers on board, only two survived: the apprentice, Tom Pearce and the young woman passenger, Eva Carmichael, who lost all of her family in the tragedy. Ten days after the LOCH ARD tragedy, salvage rights to the wreck were sold at auction for £2,120. Cargo valued at £3,000 was salvaged and placed on the beach, but most washed back into the sea when another storm developed. The wreck of LOCH ARD still lies at the base of Mutton Bird Island. Much of the cargo has now been salvaged and some was washed up into what is now known as LOCH ARD Gorge. Cargo and artefacts have also been illegally salvaged over many years before protective legislation was introduced. One of the most unlikely pieces of cargo to have survived the shipwreck was a Minton porcelain peacock - one of only seven in the world. The peacock was destined for the Melbourne International Exhibition in 1880. It had been well packed, which gave it adequate protection during the violent storm. Today, the Minton peacock can be seen at the Flagstaff Hill Maritime Museum in Warrnambool. From Australia's most dramatic shipwreck it has now become Australia's most valuable shipwreck artefact and is one of very few 'objects' on the Victorian State Heritage Register. The LOCH ARD shipwreck is of State significance – Victorian Heritage Register S 417. Flagstaff Hill’s collection of artefacts from LOCH ARD is significant for being one of the largest collections of artefacts from this shipwreck in Victoria. It is significant for its association with the shipwreck, which is on the Victorian Heritage Register (VHR S417). The collection is significant because of the relationship between the objects, as together they have a high potential to interpret the story of the LOCH ARD. The LOCH ARD collection is archaeologically significant as the remains of a large international passenger and cargo ship. The LOCH ARD collection is historically significant for representing aspects of Victoria’s shipping history and its potential to interpret sub-theme 1.5 of Victoria’s Framework of Historical Themes (living with natural processes). The collection is also historically significant for its association with the LOCH ARD, which was one of the worst and best known shipwrecks in Victoria’s history. Unrestored tea spoon from the wreck of the LOCH ARD. The spoon design has a flattened fiddle-back handle, with a thin stem or shank, flared collar, and elongated bowl. The spoons metallic composition is a thin layer of brass alloy which has partially corroded back to a nickel-silver base metal. Approximately 15% of original electroplating survives with some verdigris. 15% of surface has encrustation, on handle and also on back of bowl. Three of five makers marks are partially distinguishable on lower rear of handle: (2) Lazy "B" (3) Maltese Cross (4) Fleur de Lys.flagstaff hill, warrnambool, shipwrecked coast, flagstaff hill maritime museum, maritime museum, shipwreck coast, flagstaff hill maritime village, great ocean road, loch line, loch ard, captain gibbs, eva carmichael, tom pearce, glenample station, mutton bird island, loch ard gorge, electroplated cutlery, loch ard shipwreck, nickel silver, william page & co, birmingham, brass plating, makers marks -
 Bendigo Historical Society Inc.
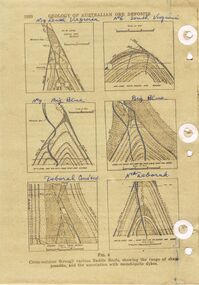
Document - REEFS AND SPURS ON BENDIGO GOLDFIELD
Three pages of information (copied ) regarding reefs and spurs on Bendigo Goldfield. Page 1020 'Geology of Australian ore deposits', drawings labelled in blue biro: No 19 level Virginia Mine, No 6 level South Virginia; No 9 level, Big blue, Big Blue, Deborah Cons'ted ( consolidated?) North Deborah. On bottom ' cross sections through various saddle reefs, showing the range of shape possible, and the association with monchiquite dykes' Page 1021 ( cont) Virginia South Extended; 3000ft New Chum Rly; Catherine Reef, Spurs in Carlisle. On bottom ' Cross sections through a trough reef, 'double' saddle reef and spurry systems. Final page: mines listed and descriptions of workings: Golden Age, Johnson's Reef Extended, Golden Pyke, Constellation, Great Northern, Virginia, Specimen Hill United, New Argus, Clarence United, North Argus, South New Moon.bendigo, mining, reefs and spurs -
 Bendigo Historical Society Inc.
Photograph - DAWN SMITH COLLECTION: PHOTOS OF BENDIGO, c1929
Black & White Photograph Alexandra Fountain, Bendigo Souvenir Tourism Set Rose Collection Series c1929. Alexandra Fountain is regarded as one of Bendigo, Victoria, Australia's most prominent landmarks and monuments. The fountain is located in Bendigo's "Charing Cross", the intersection of View Street and Pall Mall. Haring Cross effectively stands at the centre of the city and is one of Bendigo's busiest and most prominent intersections. The fountain stands opposite to the main entrance of Rosalind Park. Alexandra Fountain was funded from the proceeds of the Bendigo Juvenile Industrial Exhibition (1879), a £500 gift from George Lansell and a further £700 from the Sandhurst City Council (now the City of Greater Bendigo). The fountain was designed by W. C. Vahland,] a local architect responsible for some of the cities most prominent buildings.The fountain was named in honour of Alexandra, Princess of Wales and the grand opening (5 July 1881) was attended by her sons Prince Albert and Prince George.bendigo, tourism, alexandra fountain bendigo -
 Bendigo Military Museum
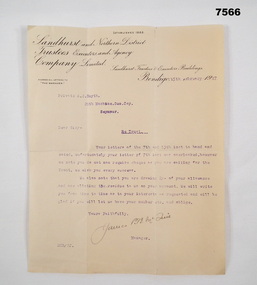
Letter - LETTER, SANDHURST TRUSTEES, 15th February 1917
The letter describes various financial arrangements, the letter has him in 20th MGC. Alexander Cross Smyth, No 559, enlisted 19.10.16, age 27 years 2 months in 8th Reinforcements 10th Machine Gun Company. Embarked for England 14.2.1917, embark for France 5.6.1917, detached to “A” Burial unit 9.4.1919, detached to Australian Graves Services 20.8.1919, RTA 22.10.1921, discharged from the AIF 2.2.1922. letter describes various financial arrangements. Letter refers to 20th MGC.Business correspondence. Brown with letterhead. Purple type, addressed to Private A.C. Smyth, signed by manager.Hand-written signature, addressed to Private A.C. Smyth, 20th Machine Gun Company, Seymourletter, ww1, 20th -
 Warrnambool and District Historical Society Inc.
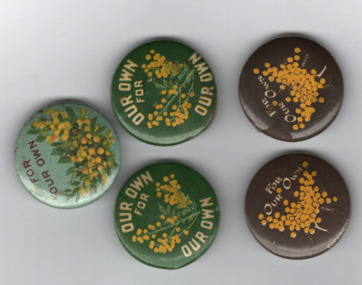
Badges, Our Own for our own, C 1910
These badges appear to have been issued as part of Wattle Day celebrations in the period 1910 to 1919. The use of wattle as an Australian symbol was strong during the pre-Federation and Federation days and was particularly promoted by the Australian Natives Association, a prominent campaigner for Federation. Wattle Day was established in Melbourne, Sydney and Adelaide in 1910 and the wattle symbol was a strong one for servicemen serving overseas in World War One and wattle badges and pins were used to raise funds for wartime funds for such organizations as the Red Cross.These badges are of interest as an example of the strong national sentiment engendered in Australia by World War One.Five small circular badges in tones of brown and green. .1 light green background with bunch of yellow wattle below. Text in brown at the top. .2 Brown background with yellow wattle flowers and cream text. .3 Dark green background with yellow wattle flowers.Our own for our own.wattle day celebrations, australian natives association, world war one and wattle badges, warrnambool -
 Warrnambool and District Historical Society Inc.
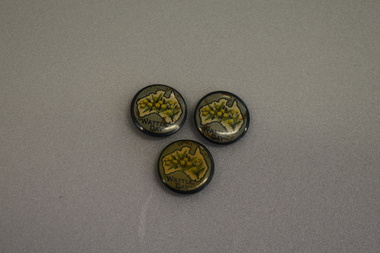
Badges, Wattle Day
These badges appear to have been issued as part of Wattle Day celebrations in the period 19910 to 1919. The use of wattle as an Australian symbol was strong during the pre- Federation and Federation days and was particularly promoted by the Australian Natives Association, a prominent campaigner for Federation. Wattle Day was established in Melbourne, Sydney and Adelaide in 1910 and the wattle symbol was a strong one for servicemen serving overseas in World War One and wattle badges and pins were used to raise funds for funds such organisations as the Red Cross.These badges are of interest as an example of the strong national sentiment engendered on Australia by World War One..1 circular metal concave badge featuring a cream map of Australia with dark green outline. An image of wattle flowers and leaves is in the centre of the map. Surrounding the map is a pale green border with text. The edge is dark green. It has a pin clip on the reverse. .2 As above .3 As above .1 WATTLE DAY .2 WATTLE DAY .3 WATTLE DAY -
 Bendigo Military Museum
Letter - LETTERS WW1, STEVE FLETT, c.1915 - 1919
Stephen Nicholas Flett No 97 joined the AIF in A Coy 25th Batt on 10.2.1915 age 29 years 7 months. Embarked for Egypt 29.6.1915, embark for Gallipoli 4.9.1915, hospital 20.12.1915 with Jaundice, return to Egypt 30.12.1915, rejoins unit 5.3.1916, embark for France 14.3.1916, hospital 29.3.1916 with Mumps, then Orchitis, rejoin unit 30.4.1916, promoted Cpl 30.10.1916, KIA 14.11.1916 at Flers France. There are 4 statements to the Red Cross re his death all different but appears to be KIA by a sniper..1) To Frances dated 2 May 15 from Steve Flett 25 BN .2) To sister dated 8 Nov 15 from Steve on Gallipoli .3) To sister dated 15 Nov 15 from brother Steve on Gallipoli .4) - .6) To mother dated 29 Oct 16 from Steve, France .7) To sister dated 12 Sep 16 from Steve, France .8) To Frances dated 7 Jun 16 from brother Steve, France .9) To sister dated 9 Apr 16 from S N Flett No 7 Gen Hosp, France .10) To mother from Steve dated 5 Sep 09, Chillagoe .11) Page 2 of above .12) To sister from Steve Flett dated 18 Sep 12, Chillagoe .13) Page 2 of above .14) To Neil & Annie from Uncle Steve, undated .15) Poem headed 'Newhall Busay", 11 lines, no author's namedocuments - letters, military history -
 Mission to Seafarers Victoria
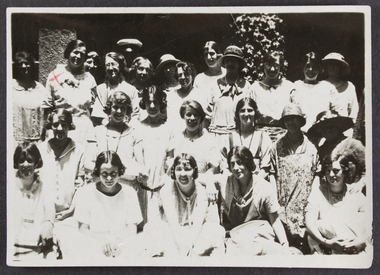
Photograph - Photograph, Black and white, Farewell party in courtyard Missions to Seamen for Mrs Weller, January 1929
In January 1929, two parties were organised in the honour of the Wellers as they left Melbourne. Reverend Weller had been appointed assistant superintendent to the headquarters of the Missions to Seamen in London. They boarded the Osterley on the 22 January. Unfortunately Mrs Weller died in 1934. Many ladies on the photograph are yet to be identified. Refer to the identification numbers: 7 - Alexina Weller (nee Caley) (marked by red cross). 8 - Alice Sibthorpe Tracy 20 - Ethel Godfrey 23 - Dora walker Group portrait of the Ladies Harbour Light Guild in the cloister at the Mission to Seamen Flinders Street. Written in blue ink at the back: Farewell party in courtyard Missions to Seamen for Mrs Wellerlhlg, alexina weller (nee caley), dora walker, ethel augusta godfrey, alice sibthorpe tracy -
 Kiewa Valley Historical Society
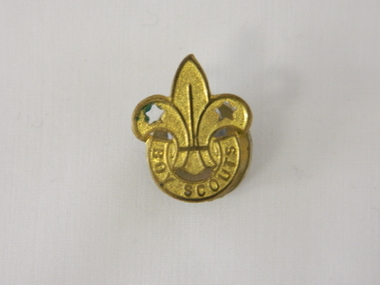
Badge Boy Scout, circa mid to late 1900's
This badge, which was used in the mid to late 1900's (Scouts started in Australia in 1909) clearly demonstrates that the families in the Kiewa Valley although slightly remote were still able to participate in one of the prime "boy" only social groups. The Boy Scouting movement brought together boys from all the socio-economic areas in the Australian population. The scouting group applied the concept of self sufficiency and friendship to all its membership. It was an avenue to cross the boundaries of distance and regional mores. Many of the boys in the Kiewa Valley and its regions would have been more "in tune" with the core principles of the scouting movement because being in a rural environment and "living on the land" was a day to day part of their life. What was an important aspect to they was the "mateship" and the belonging to a very large, and international, group of "like minded" boys. This avenue of interacting with a larger group of boys cut through the "small population" mores of a rural and at times isolated environment. This Boy Scouting activity was both mentally and physically significant to growing boys within the Kiewa Valley as it opened up the world to them.This brass badge has a front formed in a half circle base supporting a "Fleur de Leis" in a spear shape with "cut outs" at the appropriate places to provide the emphasis needed to project the form. Attached to the badge is a crescent moon shaped pronged frame for attaching the badge to lapels or collars or button eyelets. On the bottom scroll "BOY SCOUTS" and on the back type fastener "STOKES & SONS" below this "Melb".societies, boy scouts, apparel badges, numismatics badges -
Glen Eira Historical Society
Article - St. Clement’s Church of England, Elsternwick
This file contains two items: 1/An article from Southern Cross, dated 15/12/1993, detailing proposed eviction of ‘Little Kids Occasional Care Centre’ if Brighton Hyundai go through with plans to enlarge their parking storage area in the current Miller Street, St. Clement’s Church Hall. 2/An article from the Port Phillip Leader, dated 03/04/2012, about the increased attendances of churches, mentioning Rev. Rowan Fairbairn of St. Clement’s Anglican Church.southern cross, leigh howard, elsternwick, kindergartens, st. clement’s church of england, st. clement’s anglican church, halls, miller st., brighton rd., glenhuntly rd., hotham st., hislop john rev., richtman shana, north caulfield, pearce sue, stephens katie, grossbard alain cr., little kids contact and occasional care centre, brighton hyundai, caulfield council, thurston richard, fairbairn rowan rev., st. clement’s anglican church, nepean highway -
Glen Eira Historical Society
Newspaper - MACHIN, Gladys
Two items about this former Mayor and Councillor for Caulfield: 1/One photocopied article noted as the Chadstone Press, 1977, highlighting the achievements of Gladys from 1950 to 1971. Includes a black and white photograph. She was the first female Councillor and Mayor for the City of Caulfield. 2/Newspaper article from the Southern Cross dated 10/09/1980; includes a black and white photograph; and mentions that Gladys would be receiving an award for her welfare achievements from the Develop Victoria Council.machin gladys, mayor, caulfield, nurse, world war 1, wallace gordon captain, councillors, senior citizens, meals on wheels, youth centre, maple street, machin les, youth clubs, caulfield voluntary workers shop, gladys machin senior citizens' club, elderly citizens club, cedar street, caulfield hospital, blair max, blair mrs, wallace gladys, nurses, world war 1914-1918, hawthorn road, south caulfield, caulfield south, caulfield town hall, birch street, glenhuntly road, booran road, murrumbeena road, king street, magnolia street, gardenvale road, polling booths, camden garage , burr madge, webster geo, elsternwick, gunn ernest, leschen robert, sailors soldiers and airmens mothers' association of victoria, repatriation committee, travellers aid society, awards, develop victoria council