Showing 6352 items
matching no. 17
-
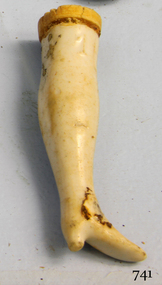
![Ceramic doll]s leg, cream and beige, with shape of shoe on the end](/media/collectors/4f729f6597f83e03086016ea/items/521602bb19403a17c4b9fa5a/item-media/52a7cc472162ef1d94e8449b/item-fit-380x285.jpg) Flagstaff Hill Maritime Museum and Village
Flagstaff Hill Maritime Museum and VillageLeisure object - Doll's Leg, ca 1878/
This is part of a child's toy, a doll with ceramic legs. It was recovered from the wreck of the Loch Ard. A brief history of the Loch Ard (1873-1878): - The sailing ship Loch Ard was one of the famous Loch Line ships that sailed from England to Australia. Barclay, Curdle and Co. built the three-masted iron vessel in Glasgow in 1873. It had sailed three trips to Australia and one trip to Calcutta before its fateful voyage. Loch Ard left England on March 2, 1878, under the command of recently married, 29-year-old Captain Gibbs. It was bound for Melbourne with a crew of 37, plus 17 passengers. The general cargo reflected the affluence of Melbourne at the time. Onboard were straw hats, umbrellas, perfumes, clay pipes, pianos, clocks, confectionery, linen and candles, and a heavier load of railway irons, cement, lead and copper. Other cargo included items intended for display in the Melbourne International Exhibition of 1880. The Loch Ard had been sailing for three months and was close to its destination on June 1, 1878. Captain Gibbs had expected to see land at about 3 am but the Loch Ard ran into a fog that greatly reduced visibility and there was no sign of land or the Cape Otway lighthouse. The fog lifted at 4 am and the sheer cliffs of Victoria's west coast were much closer to them than Captain Gibbs expected. He tried to manage the vessel but failed and the ship struck a reef at the base of Mutton Bird Island, near Port Campbell. The top deck loosened from the hull, and the masts and rigging crashed down, knocking passengers and crew overboard. The lifeboat was launched by Tom Pearce but crashed into the side of Loch Ard and capsized. He clung onto its overturned hull and sheltered under it. He drifted out to sea and the tide brought him back to what is now called Loch Ard Gorge. He swam to shore and found a cave for shelter. A passenger, Eva Carmichael, had raced onto the deck to find out what was happening and was confronted by towering cliffs above the ship. She was soon swept off the ship by a huge wave. Eva saw Tom Pearce on a small rocky beach and yelled to attract his attention. He swam out and dragged her to the shelter of the cave. He revived her with a bottle of brandy from a case that had washed up on the beach. Tom scaled a cliff in search of help and followed some horse hoof prints. He came from two men from Glenample Station, three and a half miles away. He told the men of the tragedy and then returned to the gorge while the two men rode back to the station to get help. They reached Loch Ard Gorge and took the two shipwreck survivors to Glenample Station to recover. Eva stayed at the station for six weeks before returning to Ireland by steamship. In Melbourne, Tom Pearce received a hero's welcome and was presented with a medal and some money. Of the 54 crew members and passengers on board, only two survived: the apprentice, Tom Pearce and the young woman passenger, Eva Carmichael, who lost her family in the tragedy. Flagstaff Hill’s collection of artefacts from LOCH ARD is significant for being one of the largest collections of artefacts from this shipwreck in Victoria. It is significant for its association with the shipwreck, which is on the Victorian Heritage Register (VHR S417). The collection is significant because of the relationship between the objects, as together they have a high potential to interpret the story of the LOCH ARD. The LOCH ARD collection is archaeologically significant as the remains of a large international passenger and cargo ship. The LOCH ARD collection is historically significant for representing aspects of Victoria’s shipping history and its potential to interpret sub-theme 1.5 of Victoria’s Framework of Historical Themes (living with natural processes). The collection is also historically significant for its association with the LOCH ARD, which was one of the worst and best known shipwrecks in Victoria’s history. China doll's leg, cream and beige ceramic, foot shaped at the end of the leg. Recovered from the wreck of the Loch Ard. flagstaff hill, warrnambool, shipwrecked coast, flagstaff hill maritime museum, maritime museum, shipwreck coast, flagstaff hill maritime village, great ocean road, loch line, loch ard, captain gibbs, eva carmichael, tom pearce, glenample station, mutton bird island, loch ard gorge, china dolls leg, doll's leg, china doll's leg, doll's limb, ceramic doll -
 Flagstaff Hill Maritime Museum and Village
Leisure object - Doll's Leg, ca 1878
This ceramic leg is part of a child's doll. It was recovered from the wreck of the Loch Ard. A brief history of the Loch Ard (1873-1878): - The sailing ship Loch Ard was one of the famous Loch Line ships that sailed from England to Australia. Barclay, Curdle and Co. built the three-masted iron vessel in Glasgow in 1873. It had sailed three trips to Australia and one trip to Calcutta before its fateful voyage. Loch Ard left England on March 2, 1878, under the command of recently married, 29-year-old Captain Gibbs. It was bound for Melbourne with a crew of 37, plus 17 passengers. The general cargo reflected the affluence of Melbourne at the time. Onboard were straw hats, umbrellas, perfumes, clay pipes, pianos, clocks, confectionery, linen and candles, and a heavier load of railway irons, cement, lead and copper. Other cargo included items intended for display in the Melbourne International Exhibition of 1880. The Loch Ard had been sailing for three months and was close to its destination on June 1, 1878. Captain Gibbs had expected to see land at about 3 am but the Loch Ard ran into a fog that greatly reduced visibility and there was no sign of land or the Cape Otway lighthouse. The fog lifted at 4 am and the sheer cliffs of Victoria's west coast were much closer to them than Captain Gibbs expected. He tried to manage the vessel but failed and the ship struck a reef at the base of Mutton Bird Island, near Port Campbell. The top deck loosened from the hull, and the masts and rigging crashed down, knocking passengers and crew overboard. The lifeboat was launched by Tom Pearce but crashed into the side of Loch Ard and capsized. He clung onto its overturned hull and sheltered under it. He drifted out to sea and the tide brought him back to what is now called Loch Ard Gorge. He swam to shore and found a cave for shelter. A passenger, Eva Carmichael, had raced onto the deck to find out what was happening and was confronted by towering cliffs above the ship. She was soon swept off the ship by a huge wave. Eva saw Tom Pearce on a small rocky beach and yelled to attract his attention. He swam out and dragged her to the shelter of the cave. He revived her with a bottle of brandy from a case that had washed up on the beach. Tom scaled a cliff in search of help and followed some horse hoof prints. He came from two men from Glenample Station, three and a half miles away. He told the men of the tragedy and then returned to the gorge while the two men rode back to the station to get help. They reached Loch Ard Gorge and took the two shipwreck survivors to Glenample Station to recover. Eva stayed at the station for six weeks before returning to Ireland by steamship. In Melbourne, Tom Pearce received a hero's welcome and was presented with a medal and some money. Of the 54 crew members and passengers on board, only two survived: the apprentice, Tom Pearce and the young woman passenger, Eva Carmichael, who lost her family in the tragedy. Flagstaff Hill’s collection of artefacts from LOCH ARD is significant for being one of the largest collections of artefacts from this shipwreck in Victoria. It is significant for its association with the shipwreck, which is on the Victorian Heritage Register (VHR S417). The collection is significant because of the relationship between the objects, as together they have a high potential to interpret the story of the LOCH ARD. The LOCH ARD collection is archaeologically significant as the remains of a large international passenger and cargo ship. The LOCH ARD collection is historically significant for representing aspects of Victoria’s shipping history and its potential to interpret sub-theme 1.5 of Victoria’s Framework of Historical Themes (living with natural processes). The collection is also historically significant for its association with the LOCH ARD, which was one of the worst and best known shipwrecks in Victoria’s history. China doll's leg, cream colour with beige top. Shoe shape is formed at the end of the leg. .Recovered from the wreck of the Loch Ard.flagstaff hill, warrnambool, shipwrecked coast, flagstaff hill maritime museum, maritime museum, shipwreck coast, flagstaff hill maritime village, great ocean road, loch line, loch ard, captain gibbs, eva carmichael, tom pearce, glenample station, mutton bird island, loch ard gorge, china dolls leg, doll's leg, ceramic doll leg, porcelain doll's leg -
 Flagstaff Hill Maritime Museum and Village
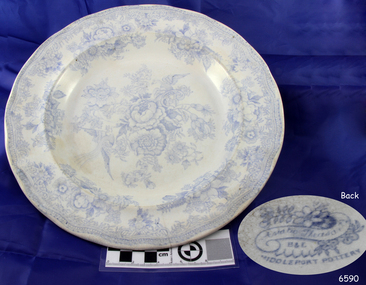
Ceramic - Plate, Minton Potteries, ca 1878
This plate is one of a collection of plates with the Asiatic Pheasant design from recovered from the wreck o the Loch Ard. A brief history of the Loch Ard (1873-1878): - The sailing ship Loch Ard was one of the famous Loch Line ships that sailed from England to Australia. Barclay, Curdle and Co. built the three-masted iron vessel in Glasgow in 1873. It had sailed three trips to Australia and one trip to Calcutta before its fateful voyage. Loch Ard left England on March 2, 1878, under the command of recently married, 29-year-old Captain Gibbs. It was bound for Melbourne with a crew of 37, plus 17 passengers. The general cargo reflected the affluence of Melbourne at the time. Onboard were straw hats, umbrellas, perfumes, clay pipes, pianos, clocks, confectionery, linen and candles, and a heavier load of railway irons, cement, lead and copper. Other cargo included items intended for display in the Melbourne International Exhibition of 1880. The Loch Ard had been sailing for three months and was close to its destination on June 1, 1878. Captain Gibbs had expected to see land at about 3 am but the Loch Ard ran into a fog that greatly reduced visibility and there was no sign of land or the Cape Otway lighthouse. The fog lifted at 4 am and the sheer cliffs of Victoria's west coast were much closer to them than Captain Gibbs expected. He tried to manage the vessel but failed and the ship struck a reef at the base of Mutton Bird Island, near Port Campbell. The top deck loosened from the hull, and the masts and rigging crashed down, knocking passengers and crew overboard. The lifeboat was launched by Tom Pearce but crashed into the side of Loch Ard and capsized. He clung onto its overturned hull and sheltered under it. He drifted out to sea and the tide brought him back to what is now called Loch Ard Gorge. He swam to shore and found a cave for shelter. A passenger, Eva Carmichael, had raced onto the deck to find out what was happening and was confronted by towering cliffs above the ship. She was soon swept off the ship by a huge wave. Eva saw Tom Pearce on a small rocky beach and yelled to attract his attention. He swam out and dragged her to the shelter of the cave. He revived her with a bottle of brandy from a case that had washed up on the beach. Tom scaled a cliff in search of help and followed some horse hoof prints. He came from two men from Glenample Station, three and a half miles away. He told the men of the tragedy and then returned to the gorge while the two men rode back to the station to get help. They reached Loch Ard Gorge and took the two shipwreck survivors to Glenample Station to recover. Eva stayed at the station for six weeks before returning to Ireland by steamship. In Melbourne, Tom Pearce received a hero's welcome and was presented with a medal and some money. Of the 54 crew members and passengers on board, only two survived: the apprentice, Tom Pearce and the young woman passenger, Eva Carmichael, who lost her family in the tragedy. This plate is significant for its connection to the potters Minton. It is also significant for its connection with the wreck of the sailing ship Loch Ard. The Loch Ard shipwreck is significant for Victoria and is registered on the Victorian Heritage Register (S 417). Flagstaff Hill has a varied collection of artefacts from Loch Ard and its collection is significant for being one of the largest accumulations of artefacts from this notable Victorian shipwreck. The group gives a snapshot of history, enabling us to interpret the story of this tragic event and the lives of the people involved. The collection is also archaeologically significant as it represents aspects of Victoria's shipping history that allow us to interpret Victoria's social and historical themes of the time. The collection's historical significance is that it is associated unfortunately with the worst and best-known shipwreck in Victoria's history.China dinner plate, scalloped rim. Floral arrangement with Asiatic Pheasant design, made by Middleport Pottery. Recovered from the wreck of the Loch Ard. Within cartouche "B & L / MIDDLEPORT POTTERY" and an 'L" handwritten in black pen.flagstaff hill, warrnambool, flagstaff hill maritime museum and village, shipwreck coast, great ocean road, plate, minton, loch ard, asiatic pheasant design -
 Flagstaff Hill Maritime Museum and Village
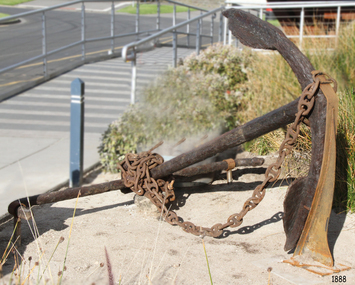
Anchor, Before 1831
Historical Information: The anchor is from the wooden sailing ship CHILDREN, which was wrecked at Childers Cove east of Warrnambool on the 15th of January 1839 with the loss of 16 lives. The Children anchor was raised from the wreck site by Flagstaff Hill Divers; Peter Ronald, Garry Hayden (Terang, still), Tim Goodall (now Warrnambool), and Colin Goodall (now Warrnambool), on Sunday 3rd January 1974. A week or so later it was dragged up the cliffs and taken to Warrnambool. It is now on display near the entrance to the Maritime Village and Museum. It appears to be a Pering’s Improved Anchor, developed at Portsmouth after 1813. The addition of broad curvature to the anchor arms provided a stronger purchase than the pre-existing Admiralty Old Pattern Long Shanked Anchor with straight arms. However, the evidence of hammer-welding the separate pieces of the arms and palms to the central shank (peaked crown and flat palms) suggests the manufacture is before the 1831 Rodger’s Anchor design, (which cast both arms and their flukes as one piece that was then attached to the shank by a bolt through the crown). This identification seems consistent with the date of the CHILDREN’s construction in 1824. The CHILDREN was a three masted barque with a wooden hull built at Liverpool in England. She was bought by the Henty family of Portland (Australia Felix) in 1837 for regular coastal trading between Van Diemens Land, the Port Phillip District of New South Wales and South Australia. Only 255 tons burden (92 feet in length, with a beam of 25 feet and depth of 17 feet), she sailed from Launceston bound for Adelaide in late December1838, on her first Australian voyage and under the English master who had brought her out – Captain H. Browne. On board the CHILDREN were 24 passengers, including 9 children; the captain and 14 crew; livestock of 1500 sheep, 8 bullocks and 7 horses; general cargo of beef, pork, tobacco, tripe, butter, limejuice, horse hair, currants, lead shot, beer and spirits; 5,000 house bricks from London; and six whaling boats with associated whaling gear. The vessel was battered by gale force north-westerly winds shortly after setting out from Launceston on 11 January 1839 and adverse sailing conditions persisted for the next four days. At 11 pm on the 15th of January 1839, and many miles north and east of the captain’s navigated position, the CHILDREN struck the Pinnacle, a limestone stack off Childers Cove. Within half an hour the ship was completely destroyed. As well as the loss of livestock and cargo, 16 passengers and crew perished, including the captain, six men, one woman and eight children. In 1931 shifting sands at Childers Cove uncovered the skeleton of an adult male. In 1951 another two skeletons were exposed by storms, an adult male and a child. In 1963 some district scuba divers retrieved a small signal-cannon from the site. And in 1974 Flagstaff Hill recovered the anchor and some house bricks. The shipwreck of the CHILDREN is of state significance – Victorian Heritage Register No. S116.A large forged-wrought iron anchor from the wreck of the CHILDREN. Flat hammer-welded flukes on opposing curved arms and a peaked crown. It has a metal (elbowed) stock or cross-bar and a heavy duty pinned shackle (not ring) for the anchor chain. It is in fair condition but extensively corroded after 135 years on seabed (supported on display) .warrnambool, shipwreck coast, flagstaff hill, shipwrecked coast, flagstaff hill maritime village, flagstaff hill maritime museum, shipwreck artefact, maritime museum, the children, childers cove, anchor, pering’s improved anchor, 1839 shipwreck. -
 Flagstaff Hill Maritime Museum and Village
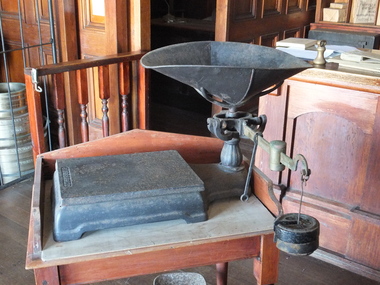
Functional object - Platform Scales, Thaddeus Fairbanks, 1880-1910
Thaddeus Fairbanks (1796 –1886) was an American inventor. of heating and cook stoves, cast iron ploughs, and other items. His greatest success was the invention and manufacture of the platform scale, which allowed the weighing of large objects accurately. Fairbanks was born in Brimfield, Massachusetts, on January 17, 1796, the son of Joseph Fairbanks (1763–1846) and Phebe (Paddock) Fairbanks (1760–1853). His uncle was Ephraim Paddock, the brother of Phebe Paddock. In 1815 he moved to St. Johnsbury, Vermont, and set up a wheelwright's shop above his father's gristmill. In 1820 he married Lucy Peck Barker and In 1824 he built an iron foundry. his brother Erastus joined him to establish E. and T. Fairbanks, a partnership to manufacture heating stoves, cast iron ploughs a design for which he patented in 1826. In 1830 Fairbanks and Erastus became interested in the raising and processing of hemp. Fairbanks went on to patent a hemp and flax dressing machine and became the manager of the St. Johnsbury Hemp Company. He also built a set of scales that would measure large loads of hemp accurately, as there were no reliable scales at the time. Upon the success of building these scales, his brothers recommended that he make and sell these for general use. Fairbanks' most famous invention then became the platform scale for weighing heavy objects. These are commonly known as the Fairbanks Scales, for which he patented his original design in 1830. Before this time, accurate weighing of objects required hanging them from a balancing beam as a result, particularly heavy or ungainly objects could not be weighed accurately. A platform scale, if large enough, could weigh an entire wagon. By placing a full wagon on the scale, unloading it, and then placing it on the scale when empty, it became possible to easily and accurately calculate the weight and value of farm produce and other loads. In 1834 Fairbanks and his brother formed "E. and T. Fairbanks and Company" to manufacture and sell these platform scales. These scales were well known in the United States and around the world resulting in the company doubling in volume every three years from 1842 to 1857. There was a temporary slow down during the American Civil War, however, the business took off again after the war. Their partnership was incorporated in 1874 into a firm known as "Fairbanks Scale Company". These platform scales revolutionized weighing methods of large loads and have been in use ever since. Portable platform scales are found in almost every hardware store, physician's office, and manufacturing factory throughout the United States and the world. The first railway track platform scale patent was granted to Fairbanks on January 13, 1857, as Patent No. 16,381. In 1916 the company was purchased by ”Fairbanks, Morse and Company”. Ownership of the company has since changed several times, but Fairbanks Scales continue to be made in St. Johnsbury Vermont to this day. Fairbanks had received 43 patents in his lifetime with the last one at the age of 91. He died on April 12, 1886, and is buried at St. Johnsbury, Vermont, at the Mount Pleasant Cemetery. An early example circa 1900 of the first type of platform scales used in a grocery store. This design for accurately measuring goods that were sold over the counter revolutionised the weighing of goods throughout the world. Platform scale metal black with removable tray & pan. Has horizontal brass arm with a brass slide weight black removable weight hook and 2 x 2 lb. weights. Fairbanksflagstaff hill, warrnambool, shipwrecked-coast, flagstaff-hill, flagstaff-hill-maritime-museum, maritime-museum, shipwreck-coast, flagstaff-hill-maritime-village -
 Flagstaff Hill Maritime Museum and Village
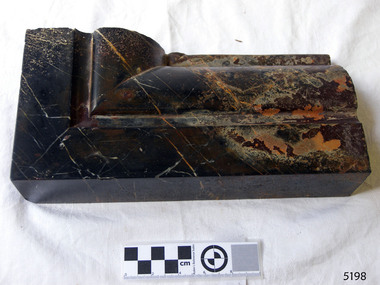
Decorative object - Marble, Before 1878
A brief history of the Loch Ard (1873-1878): - The sailing ship Loch Ard was one of the famous Loch Line ships that sailed from England to Australia. Barclay, Curdle and Co. built the three-masted iron vessel in Glasgow in 1873. It had sailed three trips to Australia and one trip to Calcutta before its fateful voyage. Loch Ard left England on March 2, 1878, under the command of recently married, 29-year-old Captain Gibbs. It was bound for Melbourne with a crew of 37, plus 17 passengers. The general cargo reflected the affluence of Melbourne at the time. Onboard were straw hats, umbrellas, perfumes, clay pipes, pianos, clocks, confectionery, linen and candles, and a heavier load of railway irons, cement, lead and copper. Other cargo included items intended for display in the Melbourne International Exhibition of 1880. The Loch Ard had been sailing for three months and was close to its destination on June 1, 1878. Captain Gibbs had expected to see land at about 3 am but the Loch Ard ran into a fog that greatly reduced visibility and there was no sign of land or the Cape Otway lighthouse. The fog lifted at 4 am and the sheer cliffs of Victoria's west coast were much closer to them than Captain Gibbs expected. He tried to manage the vessel but failed and the ship struck a reef at the base of Mutton Bird Island, near Port Campbell. The top deck loosened from the hull, and the masts and rigging crashed down, knocking passengers and crew overboard. The lifeboat was launched by Tom Pearce but crashed into the side of Loch Ard and capsized. He clung onto its overturned hull and sheltered under it. He drifted out to sea and the tide brought him back to what is now called Loch Ard Gorge. He swam to shore and found a cave for shelter. A passenger, Eva Carmichael, had raced onto the deck to find out what was happening and was confronted by towering cliffs above the ship. She was soon swept off the ship by a huge wave. Eva saw Tom Pearce on a small rocky beach and yelled to attract his attention. He swam out and dragged her to the shelter of the cave. He revived her with a bottle of brandy from a case that had washed up on the beach. Tom scaled a cliff in search of help and followed some horse hoof prints. He came from two men from Glenample Station, three and a half miles away. He told the men of the tragedy and then returned to the gorge while the two men rode back to the station to get help. They reached Loch Ard Gorge and took the two shipwreck survivors to Glenample Station to recover. Eva stayed at the station for six weeks before returning to Ireland by steamship. In Melbourne, Tom Pearce received a hero's welcome and was presented with a medal and some money. Of the 54 crew members and passengers on board, only two survived: the apprentice, Tom Pearce and the young woman passenger, Eva Carmichael, who lost her family in the tragedy. The shipwreck of the Loch Ard is of significance for Victoria and is registered on the Victorian Heritage Register ( S 417). Flagstaff Hill has a varied collection of artefacts from Loch Ard and its collection is significant for being one of the largest accumulation of artefacts from this notable Victorian shipwreck. The collections object is to also give us a snapshot into history so we are able to interpret the story of this tragic event. The collection is also archaeologically significant as it represents aspects of Victoria's shipping history that allows us to interpret Victoria's social and historical themes of the time. The collections historically significance is that it is associated unfortunately with the worst and best-known shipwreck in Victoria's history. Piece of marble cut from the corner of a fireplace surround. Black marble with brown highlights. Carved boarder. Recovered rom the Loch Ard. Noneflagstaff hill, warrnambool, shipwrecked coast, flagstaff hill maritime museum, maritime museum, shipwreck coast, flagstaff hill maritime village, great ocean road, loch line, loch ard, captain gibbs, eva carmichael, tom pearce, glenample station, mutton bird island, loch ard gorge, fireplace surround, marble, black marble -
 Flagstaff Hill Maritime Museum and Village
Domestic object - Wine Glass Stem and Base, ca 1878
The wine glass has been handblown, as shown by the ripple effect in the stem and base. A brief history of the Loch Ard (1873-1878): - The sailing ship Loch Ard was one of the famous Loch Line ships that sailed from England to Australia. Barclay, Curdle and Co. built the three-masted iron vessel in Glasgow in 1873. It had sailed three trips to Australia and one trip to Calcutta before its fateful voyage. Loch Ard left England on March 2, 1878, under the command of recently married, 29-year-old Captain Gibbs. It was bound for Melbourne with a crew of 37, plus 17 passengers. The general cargo reflected the affluence of Melbourne at the time. Onboard were straw hats, umbrellas, perfumes, clay pipes, pianos, clocks, confectionery, linen and candles, and a heavier load of railway irons, cement, lead and copper. Other cargo included items intended for display in the Melbourne International Exhibition of 1880. The Loch Ard had been sailing for three months and was close to its destination on June 1, 1878. Captain Gibbs had expected to see land at about 3 am but the Loch Ard ran into a fog that greatly reduced visibility and there was no sign of land or the Cape Otway lighthouse. The fog lifted at 4 am and the sheer cliffs of Victoria's west coast were much closer to them than Captain Gibbs expected. He tried to manage the vessel but failed and the ship struck a reef at the base of Mutton Bird Island, near Port Campbell. The top deck loosened from the hull, and the masts and rigging crashed down, knocking passengers and crew overboard. The lifeboat was launched by Tom Pearce but crashed into the side of Loch Ard and capsized. He clung onto its overturned hull and sheltered under it. He drifted out to sea and the tide brought him back to what is now called Loch Ard Gorge. He swam to shore and found a cave for shelter. A passenger, Eva Carmichael, had raced onto the deck to find out what was happening and was confronted by towering cliffs above the ship. She was soon swept off the ship by a huge wave. Eva saw Tom Pearce on a small rocky beach and yelled to attract his attention. He swam out and dragged her to the shelter of the cave. He revived her with a bottle of brandy from a case that had washed up on the beach. Tom scaled a cliff in search of help and followed some horse hoof prints. He came from two men from Glenample Station, three and a half miles away. He told the men of the tragedy and then returned to the gorge while the two men rode back to the station to get help. They reached Loch Ard Gorge and took the two shipwreck survivors to Glenample Station to recover. Eva stayed at the station for six weeks before returning to Ireland by steamship. In Melbourne, Tom Pearce received a hero's welcome and was presented with a medal and some money. Of the 54 crew members and passengers on board, only two survived: the apprentice, Tom Pearce and the young woman passenger, Eva Carmichael, who lost her family in the tragedy. The shipwreck of the Loch Ard is of significance for Victoria and is registered on the Victorian Heritage Register ( S 417). Flagstaff Hill has a varied collection of artefacts from Loch Ard and its collection is significant for being one of the largest accumulation of artefacts from this notable Victorian shipwreck. The collections object is to also give us a snapshot into history so we are able to interpret the story of this tragic event. The collection is also archaeologically significant as it represents aspects of Victoria's shipping history that allows us to interpret Victoria's social and historical themes of the time. The collections historically significance is that it is associated unfortunately with the worst and best-known shipwreck in Victoria's history. Wine glass part, stem and base only. Glass has been hand blown. Recovered from the Loch Ard wreck.Noneflagstaff hill, warrnambool, shipwrecked coast, flagstaff hill maritime museum, maritime museum, shipwreck coast, flagstaff hill maritime village, great ocean road, loch line, loch ard, captain gibbs, eva carmichael, tom pearce, glenample station, mutton bird island, loch ard gorge, wine glass, handmade drinking glass, blown glass -
 Ballarat Heritage Services
Photograph - Photograph - Colour, Clare Gervasoni, Nimon's Bridge, 1999, 04/10/1999
Nimons Bridge was built in 1890, as part of the then Ballarat-Linton railway. The bridge is 17 spans with tall timber piers of four driven piles each, with triple sets of diagonal cross-bracing and walers and a single row of longitudinal horizontal bracing between piers. The spans are of a uniform twenty feet (6.1 metres), originally supported by four 21-inch x 9-inch (535 mm x 230 mm) Kauri timber beams per span, following the standard V.R. design of the period. When the superstructure was rebuilt after the 1953 fire, the timber beams were replaced with two 24-inch (610mm) deep rolled-steel-joists on each span. These are marked 'Lancashire Steel Co., Scotland' and are believed to have been second-hand. The deck of transverse-timber planks is 103.6 metres in length. Overall the bridge has an impressive appearance with its exceptionally tall triple-cross-braced piers creating a 'three-tiered' effect, with the deck 19.2 metres above the Woady Yaloak River. The Ballarat-Skipton line closed in 1985. Nimons Bridge has been recently restored, as part of the Ballarat-Skipton Rail Trail. How is it significant? Nimons Bridge is significant for technical, historic and aesthetic reasons at a State level. Why is it significant? Nimons Bridge is technically significant as Victoria's fourth-tallest timber trestle bridge when built, and as the third-tallest surviving example. It is also the second-largest composite bridge combining traditional timber piers with RSJ spans and a timber deck and falls within a select group of fewer than ten timber railway bridges with horizontal longitudinal bracing between the piers and three sets of double cross-bracing on its tallest piers, creating a visually striking 'three tiered' effect that enhances its viaduct form. Nimons Bridge is historically significant as having served initially the mining community at Linton, then the Western District agricultural area and in later years a kaolin quarry at Pittong. Nimons Bridge is historically significant as a representative of the 'light' branch line methodology that stimulated the explosion of railway construction in Victoria during the 1880s, and provides an interesting contrast with the more solid and vastly more expensive railway viaducts built in similar terrain on Victorian main lines, at Moorabool and Taradale, in the late 1850s. Approached by a deep cutting and high embankment at either end, the bridge represents a very cost-effective late 19th century engineering solution to the characteristic physiography of western Victoria with flat basalt plains intersected by deep wide valleys occasionally subject to severe flooding. Nimons Bridge is aesthetically significant for its visually impressive viaduct form, crossing a deep and steep-sided valley that is part of a rich cultural landscape. Within close proximity of the bridge are mullock dumps, tailings, shaft sites and other relics of the deep-lead alluvial mining era. The bridge is the most visually spectacular timber-trestle rail bridge in Western Victoria and is among the most spectacular timber-trestle rail bridges surviving anywhere in Victoria. It is part of the Ballarat-Skipton Rail Trail. Classified by the National Trust :02/10/2000 (http://vhd.heritagecouncil.vic.gov.au/places/67986)Colour photograph of a log bridge known as Nimon's Bridge.ballarat-linton, nimons bridge, nimon's bridge, log bridge, viaduct, timber-trestle rail bridge -
 Brighton Historical Society
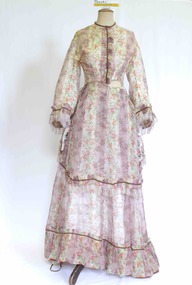
Clothing - Dress, Day dress, circa 1870
The donor and family of this gown were long-term Brighton residents, and the gowns were held by them as family heirlooms prior to donation to Brighton Historical Society. Originally owned by Elizabeth Emma Adams and Cecilia Elizabeth Adams, it is believed that the dress was brought to Australia by either a half brother, James Smith Adams, or a younger sister, Sophia Charlotte Louisa Adams (later known as Mother Rose Columba Adams). Elizabeth and Cecilia were the daughters of James Smith Adams (a squire, 1780-1860) and Elizabeth Emma McTaggart (1793-1843) of Tower House, Woodchester in Gloucester, a property which Elizabeth later inherited. Originally a monastery, Tower House had been converted into a stately home after the Reformation. According to information originally provided by the donor, both this dress and the dress T0004.3 were made for Elizabeth and Cecilia, to be worn at the young Queen Victoria’s first 'drawing room ball' following the end of court mourning in 1838 for her uncle William IV who died in 1837. In 1838 Cecilia would have been twelve years old and Elizabeth would have been ten years old. It is possible that the dress T0004.3 was worn by one of the girls to this event as it is of appropriate dimensions for a child of that age, although its design is very formal and adult. However, it is unlikely that either of the girls wore this dress at the ball due to the size and styling of the dress. It is likely that the dress belonged to one of the girls, but was worn at a later date. Elizabeth was born on 30 June 1828 at Tower House and died on 1 May 1909. She created a scandal when she eloped with her first husband, Thomas Charles Gardiner at the age of 18. The validity of the marriage was later formally investigate and, while it was confirmed as valid, a second church wedding was subsequently held. Thomas died in 1878. Elizabeth subsequently remarried Reverend R. E. Blackwell, but was widowed again by 1889. Cecilia was born on 17 December 1826 and died in 1902 a spinster recluse in England. At the inquest into Cecelia's death in 1904 it was revealed that she had clearly come from a family of means as her home was filled to the brim with highly valuable goods, many in boxes. She was buried in the family vault at Woodchester. Elizabeth and Cecilia's sister Sophia converted to Roman Catholicism in 1851 and became a nun, taking the religious name 'Rose Columba'. In 1883 Mother Rose Columba led a group of eight to Australia, answering a call for Dominican sisters to nurse the sick in Adelaide. Upon arrival, she founded St. Dominic's Priory and the Church of Perpetual Adoration in North Adelaide, using her inheritance to build the chapel. Elizabeth's second son, George Henry Somerset, who inherited the Adams family estate dropped the 'i' in Gardiner and added the maiden name of his grandmother. Therefore, the family name has now become Gardner McTaggart. These Adams family entries have been updated with information provided by Dr Herbert Gardner McTaggart, great-grandson of George Henry Somerset in April 2016. Mr McTaggart contacted the society after finding our entries online.A hand sewn white purple, pink, green, blue and yellow floral silk chiffon dress from circa 1870. The dress consists of two pieces worn together as a dress. This dress has received a great deal of mending and alteration and so it is difficult to be sure of what constitutes its original state. The following description is of its current state. The bodice has a high neck with a simple shallow band collar, an olive braid and a press stud closure. The bodice fastens down the centre front with ten hook and eyes closures and two sets of ribbon ties . The bodice has three darts providing shaping into the waistline. The bodice finishes at the waist and gently tapers towards the front creating a 'V' line. Down the centre front from the neck to the waist concealing the bodice opening is a pressed pleated ruffle of the dress fabric and a line of olive braid. The dress features pagoda sleeves finished at the hem with pressed pleated ruffle of the dress fabric, a line of olive braid and a silk fringe of 4 cm pale pink and white. The skirt part of the bodice section attaches to the front of the dress with two hooks and eyes on the left hand side of the waist. The fabric drops down to approximately the knees at the front, curving up and splitting on either side over the hip. The edge of this piece is also trimmed with a pressed pleated ruffle of the dress fabric and a line of olive braid. Just below the hip on either side is a large bow of pink, cream, purple and green taffeta. The bodice at the back is shaped with four panels into the waistline. Where it joins the bodice skirt the skirt is pleated, creating fullness. The skirt of the dress ensemble secures at the waist on the left hand side. At the front it has two pleats (that may have been repositioned during repair), and is fully gathered at the back. At the front the dress falls to the floor whilst at the back it is longer to accommodate the bustle and possibly a small train.cecilia elizabeth adams, elizabeth emma adams, 1870s fashion, tower house, woodchester, james smith adams, elizabeth emma mctaggart, mary rose columba adams, sophia charlotte louisa adams -
 Wodonga & District Historical Society Inc
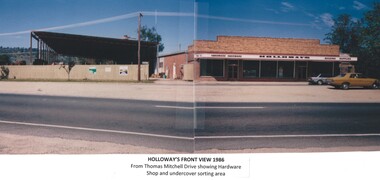
Photograph - Holloways Building Supplies
Eric Holloway began spot milling timber at age of 17. He borrowed fifty pound from an uncle in 1934 to purchase a McCormick Deering tractor and saw bench. He went from farm to farm cutting timber for farmers. For a time, he worked on Shelley Station spot milling with WS Walker and Son. In approximately 1946 Arthur and Eric Holloway established a saw mill at Shelley. Another brother Ernie, a builder and returned soldier, worked with them from time to time. Using timber sawn in the mill he built eight basic houses for the mill workers. The brothers employed many migrants: - Yugoslav, Czechs, Russians, Ukrainians, Serbs as well as other hardworking people. This meant there were families, so Ernie also built and furnished a school at Shelley. Application was made for a teacher from the Education Department. At the Shelley mill the workers used ex-army blitzes, GM trucks (for carting logs) army ducks and a centurion tank for parts. The timber from the mill was trucked to Albury and Wodonga, customers being FA Stowe and Mates Timber. The army was also a big customer with Holloways supplying timber for the army huts that were built at Bandiana. A timber mill that had been built at Tallangatta by State Rivers and Water for the purpose of establishing New Tallangatta, was purchased by Holloway Brothers as an extension of their Shelley operation. In 1954 a new mill was built at Granite Flat on the Omeo Highway and the Shelley operation closed. Ernie Holloway was involved in the building of the mill and accommodation houses in Mitta Mitta. The mill workers travelled from Mitta to work each day. Holloways Building Supplies was established at 49 Tallangatta Rd Wodonga at this time. It was established on four house blocks with a little shed, with more land being acquired as the operation expanded. The brothers realized that it would be more profitable to set up their own timber outlet to supply their customers. Arthur Holloway continued to run the sawmills while Eric Holloway concentrated on the Wodonga business. A hardware store, offices and joinery were built as demand continued for building materials. All the timber arriving in the yard from the mill was hand sorted, providing employment for many. With the milling and timber outlets Holloways provided employment for approximately forty staff. The next generation of the Holloway family became involved. A Hyster forklift was purchased which allowed for bulk handling of the timber. Land was purchased in Sanyo Drive where timber was cleated and dried. Select grade timber, F17 dry framing, builders hardware and tools were sold. Holloways endeavoured to be a one stop shop for framing and fitting out of houses. In 1989 the business was sold to Mt Beauty Timbers who later on sold to Dahlsens. The timber mill was decommissioned. The Holloway family retained the ownership of the premises of 49 Thomas Mitchell Drive leasing to Dahlsens until that operation was moved to Albury in 2013. In 2014 the lease land was sold to two local businesses. Leigh Martin Marine purchased the parcel of land adjoining their business. Lester and Son purchased the remaining block and demolished the premises. A funeral parlour was built on that site.These photos are significant because they document the story of an important Wodonga business.A series of coloured photographs depicting aspects of Holloways Building Supplies business in Wodonga.holloways wodonga, wodonga businesses, timber industry -
 Melbourne Tram Museum
Album - Robert Thomson Slide Collection - box 17, 1999 to 2001
Photo - see pdf file for further information. Number Date Brief Description Box 17 RT396 Nov. 99 A 239 arriving Batman Ave Route 70 RT397 Nov 99 W7 1012 running Special, Clarendon St RT398 Nov 99 A 300, Port Melbourne, Mont Albert route 109 RT399 Nov 99 A 286 Port Melbourne line, route 109 RT400 Nov 99 Z3 223 Carlisle St St Kilda, route 69 – with destination set for return Kew Cotham Road RT401 Nov 99 W7 1005 Swanston St route 8 with Christmas decorations – route 8 RT402 Nov 99 Z3 140 Swanston St route 8 with Christmas decorations – route 11 RT403 Nov 99 Z3 144 Swanston and Bourke with “Give way to passengers ”sign – route 1 RT404 Nov 99 Z3s 144 and 196 Swanston St – with sign “Tram stop ahead” RT405 Nov 99 W6 977 Swanston St – route 8 and Z1 72 RT406 Nov 99 11W and City Circle SW5 723 – Spencer and Collins Sts RT407 Nov 99 SW6 960 University terminus, route 16 RT408 Nov 99 SW6 960 University terminus with Z2 108 and other trams RT409 Nov. 99 A 234 Wattle Park terminus, route 70 RT410 Nov 99 New track docklands with old shipping shed in the view. RT411 Nov 99 Flinders St extension Docklands new track RT412 Nov 99 A 255 route 109 Port Melbourne terminus with former station building RT413 Nov 99 SW6 954 Route 16, Ackland St terminus with a Z3 behind. RT414 Nov 99 Restraurant tram 442, Esplanade. RT 415 Nov 2000 Z27 and Z1 Balaclava Junction RT416 Nov 2000 A 278 route 109 Port Melbourne terminus with former station building RT417 Nov 2001 B2 2010 in Yarra livery, Bourke St at Spencer St RT418 Nov 2001 B2 2108 turning from Bourke into Spencer St (route 96) followed by another B2 2048? RT 419 Nov 2001 Z 80 and another two Zs in Swanston St RT420 Nov 2001 Z137 and other Z’s in Swanston St RT421 Nov 2001 Z82 Swanston st RT422 Nov 2001 Z3 169 Wests Road, West Maribyrnong terminus with another Z arriving. Route 57 RT423 Nov 2001 West Maribyrnong terminus board with Swanston Trams signage RT424 Nov 2001 Z3 172 route 82, Wests Road RT425 Nov 2001 A class Flinders St extension route 48 in Yarra Trams livery RT426 Nov 2001 11W Bourke St with MTOCco building in the background. Demonstrates the work of Robert Thomson in photography, collection and/or production of slidesAssembled album in a black presentation folder of 31 colour slides, collected or produced by Robert Thomson. A list of all photographs with details has been compiled. All rights reserved for all photos., melbourne, tramways, trams, tram 239, route 70, batman ave, tram 1012, clarendon st, tram 300, port melbourne, route 109, tram 223, tram 69, tram 1005, route 8, swanston st, tram 140, tram 144, tram 196, tram 977, tram 72, tram 11w, tram 723, city circle, tram 960, tram 108, tram 234, wattle park, docklands, trackwork, flinders st, tram 255, tram 954, tram 442, tram 27, tram 1, tram 278, tram 2010, tram 2108, tram 80, tram 137, tram 82, tram 169, wests road, west maribyrnong, swanston trams, tram 172, route 82, route 48, bourke st, mtoco -
 Bendigo Military Museum
Photograph - Army Survey Regiment Open Day, Fortuna, Bendigo, 1982
This is a set of 25 photographs of an Open Day held at the Army Survey Regiment, Bendigo in 1982. Although most of the photos were taken outdoors, a technical tour may have been conducted through the production areas of Air Survey, Cartographic and Lithographic Squadrons. .1) - Photo, black and white, 1982. Unidentified civilian visitors. CO LTCOL Peter Eddy on right. .2) - Photo, black and white, 1982. Unidentified personnel and civilian visitors. .3) &.4) - Photos, black and white, 1982. Unidentified personnel and civilian visitors, SPR Janet (Chopping) Justin, .5) - Photo, black and white, 1982. Unidentified personnel and civilian visitors. .6) - Photo, black and white, 1982. Unidentified personnel and civilian visitors by CPL Le-Anne (Smallshaw) Shirley. .7) to .10) - Photos, black and white, 1982. Unidentified personnel and civilian visitors. .11) - Photo, black and white, 1982. Unidentified personnel and civilian visitors. Centre of photo - Bendigo Lord Mayor Dr. Joseph Pearce, CO LTCOL Peter Eddy on right. .12) - Photo, black and white, 1982. Unidentified personnel and civilian visitors. Bendigo Lord Mayor Dr. Joseph Pearce delivers his speech. .13) to .14) - Photos, black and white, 1982. Unidentified civilian visitors. Centre of photo - Bendigo Lord Mayor Dr. Joseph Pearce delivers his speech, CO LTCOL Peter Eddy on right. .15) - Photo, black and white, 1982. Unidentified personnel and civilian visitors. Bendigo Lord Mayor Dr. Joseph Pearce delivers his speech. .16) - Photo, black and white, 1982. Unidentified civilian visitors. CO LTCOL Peter Eddy delivers his speech. .17) - Photo, black and white, 1982. Unidentified civilian visitors. Unidentified dignitary delivers his speech. .18) - Photo, black and white, 1982. CO LTCOL Peter Eddy leads unidentified civilian visitors and Bendigo Lord Mayor Dr. Joseph Pearce to Fortuna’s front steps. .19) &..20) - Photos, black and white, 1982. CO LTCOL Peter Eddy on Fortuna’s front steps briefs Bendigo Lord Mayor Dr. Joseph Pearce and unidentified civilian visitors. .21) - Photo, black and white, 1982. CO LTCOL Peter Eddy on briefs Bendigo Lord Mayor Dr. Joseph Pearce and unidentified civilian visitors in Fortuna’s front foyer. .22) &..23) - Photos, black and white, 1982. Unidentified pipes and drums band. .24) &..25) - Photos, black and white, 1982. CPL Megan (McBurney) Reynolds briefs unidentified civilian visitors at the front of Fortuna Villa near the Pompeii Fountain.royal australian survey corps, rasvy, army survey regiment, army svy regt, fortuna, asr -
 Bendigo Military Museum
Photograph - Farewell to MAJ John Sinclair, Army Survey Regiment, Fortuna, Bendigo, 1978
This is a set of 20 photographs featuring MAJ John Sinclair being farewelled by several officers of the Army Survey Regiment at Fortuna, Bendigo in 1978. MAJ Sinclair served in the Australian Army from 1973 to 1978. It is evident in these photos this was his last day at Fortuna. This is a set of 20 photographs featuring MAJ John Sinclair and several officers of the Army Survey Regiment at Fortuna, Bendigo in 1978. The photographs are on 35mm negative film. They are part of the Army Survey Regiment’s Collection. The photographic negatives were scanned at 96 dpi. There are additional photos in this set that have not been scanned due to poor quality or low historical value. .1) - Photo, black and white, 1978. L to R: unidentified, MAJ John Sinclair. .2) - Photo, black and white, 1978. L to R: MAJ John Sinclair, CAPT Dennis Puniard. .3) - Photo, black and white, 1978. MAJ John Sinclair. .4) - Photo, black and white, 1978. L to R: MAJ John Sinclair, MAJ Sam Schwartz EXCH-US. .5) - Photo, black and white, 1978. L to R: MAJ Ian Whittington EXCH-UK, MAJ John Sinclair. .6) - Photo, black and white, 1978. MAJ John Sinclair. .7) - Photo, black and white, 1978. L to R: MAJ John Sinclair, CAPT Don Maskew. .8) - Photo, black and white, 1978. L to R: MAJ John Sinclair, CO LTCOL Bob Skitch. .9) - Photo, black and white, 1978. L to R: unidentified Indonesian officer, MAJ Peter Eddy MAJ Frank Bryant, MAJ John Sinclair. .10) - Photo, black and white, 1978. MAJ John Sinclair, MAJ Robin Wilson. .11) to .12) - Photo, black and white, 1978. MAJ John Sinclair. .13) - Photo, black and white, 1978. CAPT Don Maskew, MAJ John Sinclair. .14) - Photo, black and white, 1978. L to R: CO LTCOL Bob Skitch, MAJ John Sinclair. .15) - Photo, black and white, 1978. L to R: MAJ John Sinclair, MAJ Sam Schwartz EXCH-US, CAPT Don Maskew. .16) - Photo, black and white, 1978. L to R: CAPT Terry Edwards, CAPT Gary Kenney, MAJ John Sinclair. .17) to .18) - Photo, black and white, 1978. MAJ John Sinclair. .19) - Photo, black and white, 1978. L to R: CO LTCOL Bob Skitch, MAJ John Sinclair. .20) - Photo, black and white, 1978. MAJ John Sinclair.Film negative sleeve labelled: “Farewell to MAJ Sinclair Undated” .1P to .20P – No personnel are identified.royal australian survey corps, rasvy, army survey regiment, army svy regt, fortuna, asr -
 Bendigo Historical Society Inc.
Document - MCCOLL, RANKIN AND STANISTREET COLLECTION: NEW STAR GOLD MINE HARRIETVILLE NL, SOUTH BLUE CONSOLIDATED SYNDICATE
McColl Rankin & Stansitreet, New Star Gold Mine Harrietville NL. Collection of documents in envelope. a/ Agreement with the unregistered mining syndicate South Blue Consolidated Syndicate and Gold Exploration (Victoria) Co ML application No. 9982 for a Gold Mining Lease of land at Bendigo on Southern Extension of the Sheepshead or Red White & Blue Line of Reef. Dated: 17/6/1932. Signatures: James Phillips, Stanistreet, J M Leed, C J Michelsen, Jardine?, ? MacKay. 2 pages. b/ Harry Raymond Johnson & Ellis Douglas McDonnel Doyle on behalf of a No Liablity Company to be formed, application for Gold Mining Lease NO. 7514 (Beechworth). Vendors are taking steps to a Company to be entitled New Star Gold Mine Harrietville. Signed: ??, E ? McDoyle, ??, McColl Rankin & Stanistreet, ?? Dated:1/5/19/33. 2 pages. c/ Indenture between Ellis Douglas McDonnell Doyle, Harry Raymond Johnson and New Star Gold Mine Harrietville NL the company was formed on 27/6/1933 registered and incorporated. Dated 28/6/1933. Signed: Ke?, E D M Doyle, ? Murphy, Mary R Johnson, J Nicolsen, G ?, Stanistreet. 2 pages. d/ Memo attached to 2 page letter. Re: adjustment of number of shares for Mr King. Letter acknowledging receipt of paid shares. Dated 25/7/1933. Signed C B King, ?? Page 2 lists brokerage etc for shares. Dated 11/7/1933. e/ Memo & 3 page letter. Memo re surveyor for Dargo. Allotted shares exceeds available shares. Letter: To Wonnangatta Gold Reefs Syndicate regarding purchase of lease hold property in Mining District of Gippsland. Dated 28/6/1934. Signed ?? Page 2, Balance of monies advanced from R A Rankin. Page 3, costs Re Golden Butterfly Mine. f/ Agreement to lease property in Mining District of Gippsland Mining Lease No's 5187 & 5195 Black Snake Creek Dargo, blue print map of Mine included of No.5187. Dated 28/6/1934. Signed: Keohan?, ??, G ?, Geo Kingsley, Stanistreet. 4 pages. g/ An option to purchase certain Applications for Gold Mining Leases. Date: 28/6/34. Signitures: ? M Neill, ??, G ?, J Nichelsen, Stanistreet. 2 Pages.cottage, miners -
 Ballarat Tramway Museum
Photograph - Colour Photograph/s, Austin Brehaut, Mar. 1999
Set of 23 photographs taken by Austin Brehaut during March and April 1999 of power poles along the former tram routes that still have signs of the former tram stops. An accompanying note (scanned) written by Austin Brehaut is reproduced below in Other Information - see related documents. 1096.1 - Sturt St at Doveton St., south (down) side. .2 - Drummond St. Sth (east side) outside St. Patrick's School between Dana and Eyre St. .3 - Drummond St. Sth, cnr Urquhart St. (east side) .4 - Drummond St. Sth, cnr South St. (east side) .5 - Drummond St. Sth, cnr Sebastopol St. (east side) .6 - Drummond St. Sth, cnr Latrobe St. (east side) .7 - Drummond St. Sth, cnr Darling St. .8 - Sturt St. cnr Ripon St. (North East side) .9 - Ripon St. Nth, cnr Sussex St. .10 - Ripon St. Nth, cnr Mair St. (South West Corner) .11 - Ripon St. Nth, cnr Mair St. (North East Corner) .12 - Macarthur St. cnr Burbank St. (up side) .13 - Lydiard St. Nth, cnr Clarendon St. (east side) .14 - Lydiard St. Nth, cnr Howard St. (west side) .15 - Lydiard St. Nth, cnr Gregory St. (west side) .16 - Lydiard St. Nth, cnr Howitt St. (west side) .17 - Lydiard St. Nth, near Walker St., (east side) .18 - Lydiard St. Nth, cnr Landsborough St. (east side) .19 - Barkly St. cnr Main Road (up side) .20 - Barkly St. near Haymes Cres (down side) .21 - Barkly St., near Young St. (down side) .22 - Barkly St, Cameron St (up side) .23 - Barkly St., at Cobden St. terminus (west side) .1 - April 99, .2 > .10, 9/3/99, .11 > .18 - March 1999, .19 > .23 - April 1999. See also Reg. Item 768.1 > 768.6 for another group of tram stop photos in Drummond St. in 1997. On Fujifilm paper.On rear of each photo in blue ink is location at date at the top of the photo and in the bottom right hand corner - initials "APB"tram stops, power poles, barkly st., lydiard st. nth, ripon st., sturt st., drummond st. sth -
 Melbourne Tram Museum
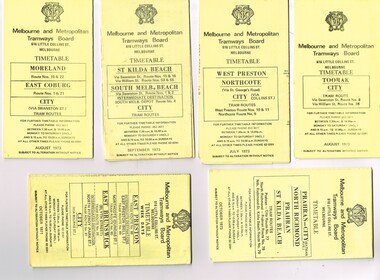
Ephemera - Timetable/s, Melbourne & Metropolitan Tramways Board (MMTB), "MMTB Tram Timetables", 1971 and 1973
Set of 20 MMTB Tram timetables, folded sheets, generally 10 sections, providing timetables for specific routes, day of week giving information on tram times at specific time points, route map, sections and fares and organisation address - 616 Little Collins St. Melbourne. All printed on yellow paper unless noted otherwise. .1 - Route 8 and 38, Toorak - City - August 1973 .2 - Route 9, 10 and 11, West Preston, Northcote - City - July 1973 .3 - Route - 1, 2, 4, 15, 16, 53, 55 - St Kilda Beach, south Melbourne Beach - City - September 1973 .4 - Route 1, 21, 15, 22 - Moreland, East Coburg - City - August 1973 .5 - Route 77, 78, 79 - Prahran - City, North Richmond, St Kilda Beach - October 1973 .6 - Route 88, 89, 90, 97 - East Preston, East Brunswick - City - October 1971 .7 - ditto - printed on green paper for Saturdays and Sundays. .8 - Route 59 - Essendon - City - June 1961 .9 - Route 8 - Toorak - City - Oct 1961, printed on yellow paper .10 - Routes 48, 40, 41, 37 and 74, 75, 76, 28 - North Balwyn or Burwood to City - March 1972 lists all the short routes by name and printed on yellow paper. .11 - Route 55, 56 and 68 - West Coburg - City or Domain Road - March 1972 - printed on yellow paper. .12 - Routes 48, 24, 40, 41, 29, 74, 75, 76 and 28 - North Balwyn or Burwood to City - March 1976 - printed on yellow paper. .13 - as for .12, Saturdays and Sundays - printed on green paper, ,14. - Route 19, 20 and 18 - Coburg - March 1972 - includes connecting bus to Upfield ,15 - Routes 1, 21, 15 and 22 - Moreland and East Coburg - March 1972 .16 - Routes 64, 65, 62 and 61 - East Brighton - June 1973 .17 - Route 3 - East Malvern - June 1973 ,18 - Route 5, 35 - June 1973 .19 - Route 82 - Footscray - Moonee Ponds - Oct. 1974 - bus Saturday afternoons and Sundays .20 - Route 67, 37 and 66 - Carnegie - June 1973trams, tramways, mmtb, timetables, melbourne, upfield, fares, route 1, route 2, route 3, route 4, route 5, route 8, route 9, route 10, route 11, route 15, route 16, route 18, route 19, route 20, route 21, route 22, route 38, route 35, route 37, route 53, route 55, route 66, route 67, route 77, route 78, route 79, route 88, route 89, route 90, route 96, route 97, route 59, route 48, route 40, route 41, route 37, route 74, route 75, route 76, route 82, route 28, route 55, route 56, route 68, route 29, route 24 -
 Melbourne Tram Museum
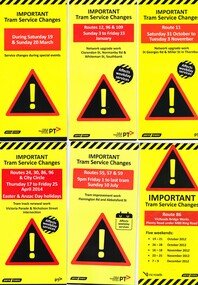
Pamphlet, Yarra Trams, "Important Tram Service Changes", 2012 to 2016
Set of 24 pamphlets, DL size when folded, Full colour, titled "Important Tram Service Changes", giving details of interruptions to the tram system due to Roadworks or events. Have been number .1 to .3 and .5 to .26. Have the logos of Yarra Trams, VicRoads, PTV, .1 - Grand Prix 2016 .2 - Roadworks - Clarendon St, Normandy Road and Whiteman St Southbank, track reconstruction of Southbank or Port junction accessible tram stops, 3/1/16 to 15/1/16 - put in siding for the Restaurant Tram .3 - Route 11 - reconstruction of junction into Preston Workshops - Oct. 2015 .5 - Victoria Parade and Nicholson St intersection reconstruction - April 2014 .6 - Reconstruction of junction - Abbotsford St and Flemington Road - July 2016 .7 - Route 86, VicRoads bridge works - Plenty Road - Oct. to Dec. 2012 .8 - Route 70, Swan St, Burnley track renewal - June 2012 .9 - as for .7 .10 - Route 70, Riversdale Road, Camberwell track renewal, Nov. 2012 .11 - Chapel and Carlisle Sts, Trackwork - June 2013 .12 - ditto .13 - Route 86 - Gertrude and Smith Streets Collingwood .14 - Route 78 and 79 - track renewal Chapel St Sept. 2013 .15 - Elizabeth St track reconstruction and accessible tram stops - Oct. 2013 - see also Reg Item 859. .16 - Tram track renewal, Mt Alexander Road - Ormond Road and Kent St - Routes 55 and 59 - Feb. 2014 .17 - St Kilda Road, between Southbank Blvd and Park St - Feb. 2014 .18 - Overhead Renewal Camberwell depot - March 2014 .19 - Gilbert Road and Miller St - track and overhead renewal - July 2014 .20 - Tram stop works - Melbourne and Olympic Park - August 2014 .21 - Tram stop works - Melbourne Town Hall - Collins St - August 2014 .22 - Matthews Ave, Airport West, route 59 - September 2014 .23 - Tram stop works, Flinders St - Sept. 2014 .24 - Tram stop works - Bourke and Swanston St - Oct. 2014 .25 - Tram stop works - Flinders Jan. 2015 .26 - Elizabeth St works - May and July 2013trams, tramways, grand prix, trackwork, overhead, southbank, tram stops, route 11, victoria parade, nicholson st, preston workshops, abbotsford st, flemington rd, route 86, chapel st, carlisle st, gertrude st, smith st, riversdale rd, swan st, route 70, route 55, route 59, mount alexander rd, st kilda rd, camberwell depot, gilbert rd, miller st, collins st, route 59, matthews ave, flinders st, port junction -
 Melbourne Tram Museum
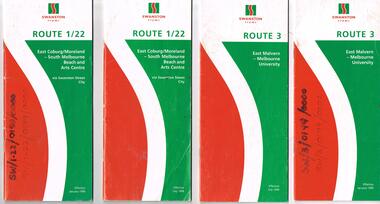
Ephemera - Timetable, Swanston Trams, Set of Swanston Trams timetables, 1999
Set of Swanston Trams timetables, red white green cover with route number on cover, giving details of popular destination, check points, use of Metcards and contact details, tram hire, frequency, a Welcome to Swanston Trams, description of route and route map. Has a fold out with a feed back form. .1 - Route 1/22 - East Coburg / Moreland - South Melbourne Beach and Arts Centre - January 1999 - 40 pages. .2 - ditto - July 1999. .3 - Route 3 - East Malvern - University - July 1999 - 28 pages .4 - ditto - January 1999 .5 - Route 5 - Malvern (Burke Rd) - University - July 1999 - 24 pages .6 - Route 6 - Glen Iris - City - January 1999 - 28 pages .7 - ditto - July 1999. .8 - Route 8 - Toorak - January 1999 - 32 pages .9 - ditto July 1999 .10 - Route 16 - St Kilda Beach - University - January 1999 - 28 pages .11 - ditto July 1999 .12 - Route 19 - North Coburg - City - January 1999 - 48 pages .13 - ditto July 1999 .14 - Route 55 - West Coburg - Domain Interchanges via William St - January 1999 - 32 pages .15 - ditto July 1999 .16 - Route 57 - West Maribyrnong - City - January 1999 .17 - ditto July 1999 .18 - Route 59 - Airport West - City - June 1999 .19 - Route 64 - East Brighton - University - January 1999 - 28 pages .20 - ditto July 1999 .21 - Route 67 - Carnegie - City - January 1999 - 28 pages .22 - ditto July 1999 .23 - Route 69 - Kew Cotham Rd - St Kilda Beach - January 1999 - 28 pages .24 - ditto July 1999 .25 - Route 72 - Camberwell - University - January 1999 - 28 pages .26 - ditto July 1999 .27 - Route 78/79 - North Richmond - Prahran or St Kilda Beach - January 1999 - 28 pages .28 - ditto July 1999 .29 - Route 82 - Moonee Ponds - Footscray - January 1999 - 20 pages .30 - ditto July 1999Some have number notes and notes written inside about changes or errors in ink. See History.trams, tramways, swanston trams, tram services, timetables, route 1, route 22, route 3, route 5, route 6, route 8, route 16, route 19, route 55, route 57, route 59, route 64, route 67, route 69, route 72, route 78, route 79, route 82 -
 Melbourne Tram Museum
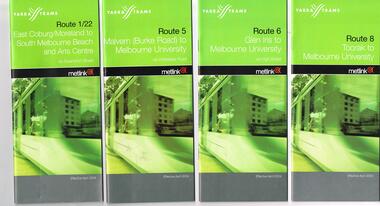
Ephemera - Timetable, Yarra Trams, Set of 22 Yarra Trams timetables, 2003 and 2004
Set of 22 Yarra Trams timetables, green grey cover with route number on cover, giving details of popular destination, check points, use of Metcards and contact details, tram hire, frequency, a Welcome to Swanston Trams, description of route and route map. .1 - Route 1/22 - East Coburg / Moreland - South Melbourne Beach and Arts Centre - April 2004 - 36 pages. .2 - Route 5 - Malvern (Burke Rd) - University - April 2004 - 32 pages. .3 - Route 6 - Glen Iris - City - April 2004 - 20 pages. .4 - Route 8 - Toorak - April 2004 - 20 pages. .5 - Route 16 - St Kilda Beach - University - April 2004 - 24 pages. .6 - Route 48 - North Balwyn to Docklands - May 2003 - 28 pages .7 - Route 57 - West Maribyrnong - City - April 2004 - 28 pages. .8 - Route 59 - Airport West - City - April 2004 - 32 pages. .9 - Route 64 - East Brighton - University - April 2004 - 28 pages. .10 - Route 67 - Carnegie - City - April 2004 - 20 pages. .11 - Route 70 - Wattle Park - City - May 2003 - 24 pages .12 - Route 72 - Camberwell - University - April 2004 - 28 pages. .13 - Route 78/79 - North Richmond - Prahran or St Kilda Beach - April 2004 - 20 pages .14 - Route 82 - Moonee Pond - Footscray - April 2004 - 20 pages. .15 - Route 109 - Port Melbourne to Box Hill - May 2003 - 28 pages. .16 - Route 112 - Sth Melbourne/St Kilda Beach to West Preston - May 2003 - 44 pages. .17 - Route 3 - East Malvern to Melbourne University - April 2004 - 20 pages .18 - Route 16 - Melbourne University to Kew - Oct. 2004 - 40 pages with fold out map .19 - Route 24 - North Balwyn to LaTrobe St and Route 30 - St Vincent's Plaza to Flinders St via Docklands - 8 pages. .20 - Route 69 - Kew (Cotham Road) to St Kilda Beach - April 2004 .21 - Route 86 - Bundoora to Central Pier - May 2003 .22 - Route 96 - St Kilda Beach to East Brunswick - Sept 2002Some have number notes and notes written inside about changes or errors in ink. See History.trams, tramways, yarra trams, tram services, timetables, route 1, route 3, route 22, route 5, route 6, route 8, route 16, route 24, route 30, route 48, route 57, route 59, route 64, route 67, route 69, route 70, route 72, route 78, route 79, route 86, route 96, route 109, route 112 -
 Melbourne Tram Museum
Document - Folder, William Pollock, "The Melbourne Cable Tramway System", c1940
Folder - heavy red covers with two screw sets containing a photocopy of a report by William Pollock, prepared after the closure of the cable tram system titled ""The Melbourne Cable Tramway System". Image numbers listed: Folder – htd4715i1 Inside of folder – htd4715i2.jpg Report –Photocopy of a 14 foolscap sheets, paper titled “The Melbourne Cable Tramway System” by William Pollock, describing the system in detail, listing 26 appendices. Has notes on each Power Station, including a table of opening, closing, power produced and cables, fuel, permanent way (track), cables, underground gear, tunnels, flooding and the grip. Image – htd4714i3.pdf Appendix 1 – Handwritten table “Cost the Melbourne Tramway System” – photocopied special size sheet folded. See image htd4715i4.jpg 2 – Drawing – Typical Power House layout - image htd4715i5.jpg 3 – Drawing – Head of Cable Driver – htd4715i6.jpg 4 – Drawing – Rope Drive – htd4715i7.jpg 5 – Photocopy of a Fuel and Water test sheet for the Esplanade Power House – two sheets – 14/5/1918 – htd4715i8.jpg and htd4715i9.jpg 6 – Section of Cable Tram track – htd4715i10.jpg 7 – Tar Burner used by MTOC 1893 – 1900 - htd4715i11.jpg 8 – Yoke Bracket for line drums – A1 Pulley – htd4715i12.jpg 9 – Tunnel Yoke – htd4715i13.jpg 10 – Elevating Wheel or Pulley with shield plate – htd4715i14.jpg 11 – Curve Pulleys, curve drum and rubbing bar – 2 sheets – htd4715i15.jpg and htd4715i16.jpg 12 – Curve or Conical drum – htd4715i17.jpg 13 – Cable Separating pulley or cone line drum – htd4715i18.jpg 14 – Yoke Pulley or General Pulley – htd4715i19.jpg 15 – Yoke Bracket for Drums – htd4715i20.jpg 16 – Automatic Switch Gear – htd4715i21.jpg 17 – Hand operated switch gear – htd4715i22.jpg 18 – Hand pickup – htd4715i23.jpg 19 & 20 – Photo of bunched strands and damaged cable – htd4715i24 21 – Diagram of Rope – Clarendon St Rope No. 41 – htd4715i25.jpg 22 – Strand Alarm – htd4715i26.jpg 23 – Rope History – two sheets – htd4715i27 and htd4715i28.jpg 24 – Rope Splice – htd4715i29.jpg 25 – Cable Grip – htd4715i30.jpg 26 – Crown Pulley – two sheets – htd4715i30 and htd4715i31trams, tramways, drawings, tramcars, cable trams, trackwork, mto co, reports -
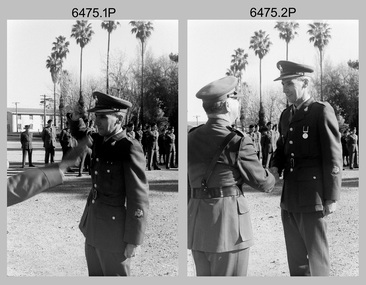 Bendigo Military Museum
Photograph - Army Survey Regiment – CO’s Parade and Defence Force Service Medal Presentations, Fortuna Villa, Bendigo, c1977
This set of 18 photographs were taken at a CO’s parade at the Army Survey Regiment, Bendigo in c1977. LTCOL George Ricketts presented the Defence Force Service Medal to personnel in recognition of 15 years of efficient remunerated service, or the Clasp for 5 years of additional service. See item 6071.2P for a group photo of LTCOL George Ricketts with the medal recipients.This is a set of 18 photographs of a CO’s parade and the presentation of the Defence Force Service Medal, at the Army Survey Regiment, Bendigo in c1977. The black & white photographs are on 35mm negative film and are part of the Army Survey Regiment’s Collection. The photographs were scanned at 96 dpi. .1) to 2) - Photo, black & white, c1977. LTCOL George Ricketts presents medal to WO1 Joe Farrington. .3) - Photo, black & white, c1977. LTCOL George Ricketts presents medal to WO1 Ike Lever. .4) - Photo, black & white, c1977. LTCOL George Ricketts presents medal to RSM WO1 Aub Harvey. .5) - Photo, black & white, c1977. LTCOL George Ricketts presents medal to ex-serviceman John Rankine. .6) - Photo, black & white, c1977. LTCOL George Ricketts presents medal to CPL Ian ‘Lofty’ Turner. .7) - Photo, black & white, c1977. LTCOL George Ricketts presents medal to SGT Peter Saunders. .8) - Photo, black & white, c1977. LTCOL George Ricketts presents medal to SGT Ross Hyde. .9) - Photo, black & white, c1977. Unidentified squadron marching past Fortuna Villa. In background 2nd from left – SGT Bob Williams. In foreground L to R: WO1 Jim ‘Triple J’ Jefferies, CPL Neville Stone, CPL Andy Wilson. .10) - Photo, black & white, c1977. Unidentified squadron marching past Fortuna Villa. .11) & .12) - Photo, black & white, c1977. Unidentified squadron marching past Fortuna Villa. In foreground L to R: WO1 Jim ‘Triple J’ Jefferies, CPL Neville Stone, CPL Andy Wilson, CPL Bruce Gordon. .13) - Photo, black & white, c1977. Medal recipient ex-serviceman John Rankine with family after medal presentation. .14) & .15) - Photo, black & white, c1977. Centre: CAPT Terry Edwards with medal recipients L to R: SGT Peter Saunders and SGT Jim Mulqueen. .16) - Photo, black & white, c1977. Medal recipient RSM WO1 Aub Harvey with family after medal presentation. .17) - Photo, black & white, c1977. CO LTCOL Peter Constantine AM after medal presentation. .18) - Photo, black & white, c1977. Medal recipient SGT Jim Mulqueen with family after medal presentation.No personnel are identified.royal australian survey corps, rasvy, army survey regiment, army svy regt, fortuna, asr -
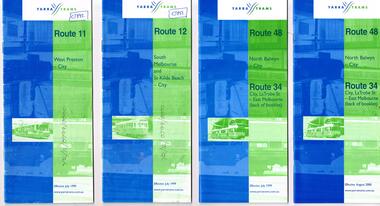 Melbourne Tram Museum
Ephemera - Timetable, Yarra Trams, Set of 15 Yarra Trams timetables, 7/1999 to 9/2001
Set of 15 Yarra Trams timetables, blue green cover with route number on cover, giving details of popular destination, check points, use of Metcards and contact details, tram hire, frequency, Some include maps. .1 - Route 11 - West Preston - City - July 1999 - 24 Pages .2 - Route 12 - South Melbourne and St Kilda Beach - City - July 1999 - 24 pages .3 - Route 48 and Route 34 - North Balwyn - City or via Latrobe St - East Melbourne, includes references to Routes 23, 24, 27 and 30 - July 1999 - 28 pages, includes a small map. .4 - ditto - August 2000 .5 - ditto - September 2001 .6 - Route 70 - Wattle Park - City - October 1999 - 24 pages .7 - Route 70 - Wattle Park - City via MCG - December 2000 - 24 pages - includes a map .8 - Route 75 - East Burwood - City - July 1999 - - 24 pages .9 - ditto - August 2000 .10 - Route 86 - Bundoora RMIT - Colonial Stadium via Bourke St - March 2000 - 28 page. .11 - Route 96 - St Kilda Beach - East Brunswick -March 2000 - 24 pages .12 - Route 109 - Mont Albert - Port Melbourne - July 1999 - includes references to route 23, 24, 27. 30 and 34 - 36 pages .13 - Route 109 - ditto includes La Trobe St services - September 2001 - 36 pages .14 - Route 112 - South Melbourne - St Kilda Beach to West Preston via City, including temporary combination of routes 11 and 12, route 11 and Route 12 - August 2000 - 48 pages. .15 - Route 112 - notes that it the combination of Routes 11 and 12 - September 2001 - 48 pages. .16 - Route 11 - West Preston - City - Nov. 1998 - 24 pages .17 - Route 48 - North Balwyn - City - Dec. 1998 - 24 pages .18 - Route 34 and 48 - North Balwyn - City and City LaTrobe - East Melbourne - August 2000 - 32 pages .19 - Route 109 - Port Melbourne - Mont Albert - Nov. 1998 - 24 pages.Some have notes such as "OPR", and number notes and notes written inside about changes or errors in ink. See History.trams, tramways, yarra trams, tram services, timetables, route 11, route 48, route 34, route 23, route 24, route 27, route 30, route 70, route 75, route 86, route 96, route 109, route 112 -
 Bendigo Military Museum
Photograph - Royal Australian Survey Corps - Map Production Processes, c1990
This is a collection of 20 photographs of Royal Australian Survey Corps phases of map production at the School of Military Survey, Bonegilla, the Army Survey Regiment, Bendigo, and the Army Map Depot, Bandiana circa 1990. Colour photos are on 35mm slide film and were scanned at 96 dpi. They are part of the Army Survey Regiment’s Collection. Photo .1P was probably taken on a survey station overlooking Lake Hume near Albury-Wodonga. The field party occupying the survey station was likely from a Map Control Survey course conducted by the School of Military Survey, Bonegilla. This survey station was part of a geodetic network used in field survey training and RASvy’s Lake Hume Test Range. Photos .3P to .16P were taken at the Army Survey Regiment, Bendigo and photos .17P & .18P were taken at the Army Map Depot, Bandiana. Photo .19P depicts a map of RASvy’s ARA units before the disbandment of 5th Field Survey Squadron, Perth and 2nd Field Survey Squadron, Sydney in 1990. This is a collection of 20 photographs of map production processes taken at the School of Military Survey, Bonegilla, the Army Survey Regiment, Bendigo, and the Army Map Depot, Bandiana circa 1990. Colour photos are on 35mm slide film and were scanned at 96 dpi. They are part of the Army Survey Regiment’s Collection. Photo .2P is printed on photographic and scanned at 300 dpi. .1) – Photo, colour, c1980s. Geodetic Surveying: AN/PRR-14 Geoceiver antenna on hill surrounding Lake Hume. Series 3 Land Rover, field party tent and survey station beacon in background. .2) – Photo, black & white, c1980s. Geodetic Surveying: AN/PRR-14 Geoceiver antennas set up at the School of Military Survey, Bonegilla, Victoria. .3) – Photo, colour, c1990. Aerotriangulation: Wild PUG4 point transfer device, SSGT Bruce Hammond. .4) – Photo, colour, c1990. Aerotriangulation: Zeiss (Jena) Stecometer, SSGT Bruce Hammond. .5) – Photo, colour, c1990. Aerotriangulation: computer tape maintenance, SSGT Noel McNamara. .6) – Photo, colour, c1990. AUTOMAP 2: computer tape maintenance, SPR Nadine (Paul) Read. .7) - Photo, colour, c1990s. AUTOMAP 2: Optronics 4040 scanning/film output in Lithographic Squadron, SGT Sherri (Dally) Burke. .8) - Photo, colour, c1990s. AUTOMAP 2: Benson verification plotter output, SPR Nadine (Paul) Read. .9) – Photo, colour, c1990. Aerotriangulation: data management, SGT Neil ‘Ned’ Kelly. .10) & .11) - Photo, colour, c1990s. AUTOMAP 2: Wild B8 Aviograph stereoplotter Feature Extraction, unidentified technician. .12) - Photo, colour, c1990s. AUTOMAP 2: Graphic Edit Workstation, SPR Nadine (Paul) Read. .13) - Photo, colour, c1990s. AUTOMAP 2: Graphic Edit Workstation, SPR Dawn Hoadley. .14) & .15) - Photo, colour, c1990s. AUTOMAP 2: Graphic Edit Workstation, unidentified technician. .16) – Photo, colour, c1990s. Heidelberg Speedmaster 102 computer-controlled five colour lithographic offset printing press. .17) & .18) – Photo, colour, c1990s. Army Map Depot, unidentified storeman, Bandiana. .19) – Photo, colour, c1990. RASvy ARA Unit Locations before disbandment of field units in Perth and Sydney. .20) – Photo, colour, c1990. Set of overlapping aerial photography..1P, .3P to .20P - Some equipment is identified on the frame of the 35mm slides.royal australian survey corps, rasvy, army survey regiment, army svy regt, fortuna, asr, school of military survey, army map depot -
 Bendigo Military Museum
Album - ALBUM, LETTERS WW2, C.WW2
Herbert Trangmar Allan, refer Cat No 2755.4 for his extensive service records and awards.Pink, hard cover photo album used as a holder to display letters. .1) Letter from C in C Gen HQ Melbourne, 17.4.1942. From Gen BLAMEY to Major H T ALLAN 2/17 AIF. .2) MID Certificate dated 30.12.1941. Major H T ALLAN M C. .3) Letter dated 24.12.1944 from HQ 1Aust Corps to 'Blue' from 'Morshead'. .4) Letter dated 18.4.1946 from OIC NSW Echelon & Records to Mrs G M ALLAN, Bellevue, NSW, notifying her of Award of Mention in Despatches. It refers to NX12229 Lt Col Herbert Trangmar ALLAN HQ 5 Base Sub Area. .5) Letter dated 14.4.1945 from OIC NSW Echelon & Records to Mrs G M ALLAN notifying her of Award of Mention in Despatches. It refers to NX12229 Major T/Col Herbert Trangmar ALLAN, Finschhafen Base Sub Area. .6) Newspaper cutting titled Many NSW Men Receive Bravery Awards. Up to 31.3.1944. Marked down near bottom of the cutting is MID for T/LT Colonel H T ALLAN OBE MC ED. .7) Memo dated 11.1944 from 5 Aust Base Sub Area. Cover note for Record of Service for NX12229 Lt/Col H T ALLAN 5 Aust Base Sub Area. .8) Letter dated 2.8.1942 from NSW L of C Area Sydney to Mrs G M ALLAN Bellevue, NSW, notifying her of MID for Maj H T ALLAN MC NX12229 for his services 2.1941 - 7.1941. Signed by Lt Col H J Bennett. .9) Letter dated 14.4.1945 from OIC NSW Echelon & Records, Sydney to NX12229 Lt Col H T ALLAN HQ 5 Aust Base Sub Area. Aust Honours & Awards. MID. .10) Letter 7.12.1950 from HQ Eastern Command Vic Barracks Paddington to Col H T ALLAN OBE MC ED R of O. Watsons Bay re Change of address to 2MD. .11) Memo dated 28.12.1944 from HQ 1st Army AIF to 5 Aust Base Sub Area re Confirmation of Promotion of NX12229 Major H T ALLAN to Lt Colonel. .12) MID Certificate dated 15.3.1945 for Maj CT / LT Col H T ALLAN OBE MC ED Finschhafen Base Sub Area. .13) MID Certificate dated 19.7.1945 for Major CT / LT Col H T ALLAN OBE MC ED, Finschhafen Base Sub Area. .14) MID Certificate dated 21.2.1946 for LT Col H T ALLAN OBE MC ED, HQ 5 Aust Base Sub Area. .15) Letter. Letterhead is of Parliament of the Commonwealth Federal Members Rooms, Sydney, dated 1.12.1941. To: Dear Mr Allan. From: W M Hughes. Handwritten on 3 sheets of paper using 4 sides. Subject matters such as fighting, AIF, loss of HMAS Sydney, the Russian front. .16) Letter & envelope. Letter: Dated 18.4.? Letterhead: Guards Club Brook St W1. To: Dear ALLAN From: BIRDWOOD of ANZAC. Subject: Their friendship - then they have to deal with 'loathsome Japs & Germans'. Envelope. OHMS, 2-1/2 penny stamp. To: Major H T ALLAN MC & OBE AMF. C/o Defence Dept Melb, Australia. On the bottom is signature of BIRDWOOD M. Readdressed to C/o 9th Div HQ Abroad. Envelope rear is franked: PO 3D JE 42. .17) Memo dated 18.6.1946. From: HQ 8MB. To: H/Col H T ALLAN ANG PcB Rabaul. Releaes of NX12229 Lt Col (T/Col) H T ALLAN OBE MC. Posted to Retired list 7.5.1946. .18) Memo dated 6.11.1946. From: OIC, 2nn Echelon AHQ. AMF. To: Lt Col H T ALLAN OBE MC ED. C/- Mrs G M ALLAN, Queens Club, King St. Sydney NSW. .19) Letter dated 8.8.1941. Letterhead of Minister for the Navy. To: Dear Major ALLAN. From: W HUGHES. Subject: All facets of WWII to date & prospective war with Japan. .20) Memo dated 31.8.1945. From: AMF OIC NSW Echelon & Records. To: Mrs E M ALLAN, King St Sydney. Re: MID for NX12229 Maj (T / LT Col) Herbert Trangmar ALLAN OBE MC ED Finschhafen Base Sub Area.letters, albums, certificates, awards -
 Melbourne Tram Museum
Letter - Correspondence, Melbourne & Metropolitan Tramways Board (MMTB), "Trolley Buses", 1922-23
File containing correspondence between the MMTB Chief Engineer Mr. Strickland and various companies, including Railless Ltd, Australian General Electric, English Electric / Dick Kerr and its UK consultants Heap and Digby between the period August 1922 and January 1923. Includes drawings, technical specifications and a book titled "AEC Railless Trolley Bus Specification", date stamped 15/8/1922. For a scan of this document see htd535-trolleybus.pdf (imaging not working correctly for this database as at 9-8-14) For a listing of the contents of this file and of Reg Item 535, see Related Documents - htd535-536list.pdf Item 535 - Trolley Buses Listed from top of file, in order found. Letters generally to/from MMTB Chief Engineer. Date Type, contents and notes 18/11/1922 Letter to Metro Vickers from Chief Engineer re Railless trams 12/1/1923 Letter to Aust GE re railless trams Not likely to proceed at this time. 11/1/1923 Letter from Aust GE Co. providing photographs, drawings, BTH, pamphlets, and general information. Includes photo of Tee-side trolley bus No. 17. No other papers with this item. 6/9/1922 Letter to Aust. GE asked for particulars and drawings of motor omnibuses These three items pinned together. 5/9/1922 Letter to Chief Engineer from Aust. GE provided up to date figures on BTH Railless vehicles. These three items pinned together. 31/8/1922 Letter to Aust GE returning folded of data in relation to petrol and petrol electric cars. These three items pinned together. 24/10/1922 Letter to Heap & Digby, thanks for information, but unlikely to use trolley buses due to poor road conditions where they could be used in terms of revenue. 14/9/1922 Letter from Heap & Digby, inclosing photos of Railless Ltd vehicles supplied to Bloemfontein South Africa and testing. These two items clipped together with drawing No. SK 14-8, showing Mexborough gradients. 28/8/1922 Letter from AEC to Heap & Digby re trolley buses, construction costs and practicality of shipping these to Aust. Includes the Mexborough test results. These two items clipped together with drawing No. SK 14-8, showing Mexborough gradients. 3/8/1922 to 31/10/22 Correspondence between MMTB and H&D regarding the Bloemfontein vehicles. Pinned together. 17/11/1922 Letter from Metro Vickers to MMTB providing details (no photos or drawings) of trolley buses – four pages. 18/1/1923 Letter to H&D thanking him for information and a paper ready by a Mr. Munro. 31/8/1922 Letter to Metro Vic – Melbourne asking whether Westinghouse had developed standard lines of motors for railless cars. 4/10/1922 Letter to Aust GE thanking for info. 2/10/1922 Letter from Aust GE providing two cuttings about railless vehicles in Birmingham and the cost of tram track construction. Papers Contained within a green strip of cloth. 26/9/1922 Letter from H&D providing info from EE – Dick Kerr Preston works equipment used by Railless Ltd. EE Specification for DK 26B Trackless trolley motors 18/9/1922 Letter from EE to H&D providing info on 20HP motors, 40HP, and other information. Blueprint – drawing 2810 – DK 26 Motor Performance curves for above motor Blueprint – No. 1312D – controller diagram Pamphlet – EE – tramcar Type D automatic circuit Breakers. Publication No. 230, dated 9/1920. Ditto, Form A, drawings No 3565, 1/1/19. Performance curves – blueprint – Type DK85A Blueprint – 4449 – outline of controller DK, Type D, form B. Blueprint – P2002M034 – DK85 Motor. EE specification for Traction Motor DK85 Modified from a tram motor. EE blueprint P2102F021, traction control wiring for form D controller. EE blueprint P2103F033 – outline of controller type SE1, form C and D. EE blueprint P2102Z011 – wiring diagram for type SE1 form controller. Performance curves for DK85A motor. EE blueprint – P2102F025 – diagram of connections (wiring) for Type SE1, form D controller. Blueprint – EE drawing – P2002M036 – DK85 motor with ball bearings. Single documents. Date Type Notes 27/9/1922 Letter to H&D acknowledging AEC Trackless trolley bus specification. 15/8/1922 Letter from H&D forwarding above specification String bound book – AEC Railless Trolley Bus Specification – stamped 15/8/22 Scanned as a separate document. 4/9/1922 Letter from Metro Vic. Melbourne advising that they have no information on Westinghouse Motors for use in railless cars, but seeking same.trams, tramways, trolley buses, melbourne, mmtb, aec, heap and digby, english electric, railless, dick kerr, general electric -
 Eltham District Historical Society Inc
Book, Gwendoline G. W. Davies, Poems - G. Davies, 1933-1934
Gwendoline (Gwenda) Grace Watson Davies, only daughter of Mr. William Watson Davies and Mrs. Grace Davies (nee Hayes) of Arthur Street, Eltham was born in Newport, 18 February 1908. Gwenda grew up in Arthur Street and when she left school she was employed as an officer at the State Bank of Victoria, Chief Accountants Department, Head Office, Elizabeth Street, Melbourne. During 1933-1934 in her early to mid-twenties, Gwenda wrote a series of poems which were captured in three books: one a leather bound three-ring binder with personalised gold embossing on the cover and two paper booklets held together by pink ribbon. These poems are a reflection of her childhood days, home, her mother, her environment, pioneering days and other miscellaneous subjects including one example titled “EIGHTEEN YEARS TO-DAY”, an homage to the brave men of Gallipoli. On October 20, 1937 after ten years of service, Gwenda submitted her letter of resignation effective November 26th as she was to be married in the near future to Fred Jones. Frederick Geoffrey Jones, born 7 January 1911, third son of Mr. and Mrs. W. Jones of Napoleon Street, Eltham, married Gwenda at the Eltham Methodist Church on 27 November 1937. They made their home at ‘Llangollen’, Arthur Street, Eltham, a new house Fred had constructed earlier that year opposite the Shire Offices. Their residence was recorded in the Electoral Rolls from 1963-1980 as 6 Arthur Street, Eltham which was situated on the corner of Arthur Street and present-day Commercial Place. In the 1970s their home was sold and demolished to make way for the new shops. They built a new home at the top of the hill in Bible Street. In the Electoral Rolls for 1943-1980, Frederick’s occupation was recorded as a Plumber’s Assistant. Fred was also a long-standing member of the Eltham Cemetery Trust. He was first appointed 26 April 1944 and resigned 17 July 1957 to be appointed to the Warringal and Eltham Joint Trust where he served till February 1980. He then re-joined the Eltham Cemetery Trust and served a further 14 years till his resignation on 24 August 1994. In total, Fred represented the interests of Eltham Cemetery for 50 years (1944-1994). Gwenda and Fred were blessed with a son, Frederick William Jones in March 1942. Sadly, Frederick only lived two days and was buried at Eltham Cemetery on March 11. It is not known whether his grave is marked. A second son, Geoffrey Morris Jones arrived 25 November 1944 but he sadly contracted polio as a child. A fall down the front steps of Fred and Gwenda’s new home in Bible Street culminated in Geoff’s death from a heart attack whilst in transit to the Austin Hospital on February 6, 1979, at age 34. He was also interred in the Eltham Cemetery. Geoff was posthumously awarded the British Empire Medal for his services to fire safety at the CFA. A small man, handicapped from his childhood polio, he had figured prominently in the area as an active Apex member and as group officer for the 13 local brigades in the CFA Lower Yarra Group. His work for the CFA, all voluntary, included writing a fire-fighting manual and the innovation of aerial fire spotting and weekly fire reports. Gwendoline and Fred were presented with Geoff’s B.EM. award at Government House. Four years later on the anniversary of Geoff’s death, Gwenda could not sleep and collapsed in the hallway at home from a heart attack, 6 February 1983 at age 74. She was interred with her son Geoff, at Eltham Cemetery on February 9th. Fred died 31 July 1997 at age 86 and was also interred at Eltham Cemetery. A memorial plaque to Gwenda, Fred and Geoff lies within the lawn cemetery at Eltham Cemetery. In February 2022 Gwenda’s book of Poems along with a copy of her letter of resignation from the State Bank of Victoria and a news clipping about the Autumn Show held in the Public Hall at Eltham (opposite her home with Fred) in which Gwenda is listed as having entered Cream Puffs and a Swiss Roll into the Cooking section, were donated to the St Vincent’s de Paul Society in Bega, N.S.W.. A dedicated volunteer there researched their origins and desirous for these items to return ‘home’, posted them to the Eltham District Historical Society for which we are most appreciative. EIGHTEEN YEARS TO-DAY “Tell me why you’re dreaming, Daddy” Said my little son to me, So, I told him all about it, As he sat upon my knee. I told him of that Sunday morn, ‘Twas eighteen years to-day, When the men of Australasia, Joined the mighty fray. How they landed on that foreign shore, And fought the gallant fight, Of how they nobly won the day, And put the Turks to flight. We saw the cliffs before us, To be scaled ‘mid shot and shell, And our comrades fell around us - - - - I remember it - - - so well. There are some who’ll sleep forever, On a hill that’s called Lone Pine, And the twenty-fifth of April, Is famous for all time. And so to keep their memory green, We march each Anzac Day, To pay tribute to those Heroes, Who gave their lives that day. - Anzac Day 1933 And in reflections to Gwenda’s childhood home in Arthur Street: HOME Where do my thoughts ever wander? Where do my thoughts always roam? To a little old house, on the top of a hill, To the place, that I call “Home Sweet Home.” No matter where-ever I travel, On land, or away on the foam. My thoughts will return, and my heart ever yearn, To the place, that I call “Home Sweet Home”. - 2/7/1933 Sources: Book of Poems, G. Davies Letter of Resignation, 1937, Oct. 20, G.G.W. Davies Births Deaths and Marriages Victoria New House at Eltham (1937, September 10). Advertiser (Hurstbridge, Vic. : 1922 – 1939), p. 6. Retrieved May 12, 2022, from http://nla.gov.au/nla.news-article56845735 Family Notices (1937, December 17). Advertiser (Hurstbridge, Vic. : 1922 – 1939), p. 3. Retrieved May 12, 2022, from http://nla.gov.au/nla.news-article56846386 Geoff Jones, Proud Memory, unknown newspaper clipping, 1979 1979 Birthday Honours, Wikipedia, https://en.wikipedia.org/wiki/1979_Birthday_Honours Australian Electoral Rolls, Ancestry.com Family Trees, Ancestry.com Eltham Cemetery, Deceased Search findagrave.com Personal recollections, Joan Castledine The poetry by Gwendoline Davies provides an insight into life growing up in Eltham and the early 1930s. A long time resident, Gwendoline, her husband Fred Jones and son Geoff Jones were fully dedicated to the Eltham community for over 50 years.1. Brown leather bound three-ring binder with personalised gold embossing on the cover 20.5 x 14.5 cm, Walkers Loose Leaf Book, pages typed with some pasted in colour illustrations, alphabeticised dividers (some tabs missing), 21 leafs (some blank) 2. Two paper booklets held together by pink ribbon 15.5 x 12 cm, typed, some with colour illustrations, pages numbered (rh only) 12 pages and 25 pages and paper cover 3. Newspaper clipping 4. Letter sized hand written page in ink folded in three and damaged by foxing and insectsanzac day, arthur street, napoleon street, cfa, eltham cemetery, eltham cemetery trust, frederick geoffrey jones, geoffrey morris jones b.e.m., grace davies (nee hayes), gwendoline grace watson jones (nee davies), llangollen, lower yarra group, poems, william watson davies -
 Ballarat Tramway Museum
Ephemera, Wal Jack, Wal Jack notebook, 1940's
Demonstrates Wal Jack's records, hand written in a recycled notebook. Note - several sheets have been cut from the book - appear to be done before use by Wal. The crossed out sheets have not been imaged - these have been transferred by Wal to Reg Item 5507 and re-ordered. Image 30 shows a sample of a crossed out page. See related documents for a pdf file of the contents. Scan No. BTM5623iX Page No. Title or Subject Notes 1 Front 2 Inside Cover Addresses for Jack McLean, John Buckland Trooper Larsen Inside front cover. 3 1 Note re NSWT steam tram motor, MMTB PCC import issues, Peter Duckett seeking info and Photo of Julien’s battery tram on test in Melbourne 4 2 MMTB No. 8, 4, photos, Tyrell’s of Sydney photos, Perth 63 dimensions and MMTB plans for Domain Road & St Kilda Rd Jtn. 5 3 Notes re NSWGR P32, VR locos at Wodonga 13/10/1941, SAR V Class V143, SAR locos – W and Wx 6 4 NSW Private locos, Woy Woy quarry and AGL at Mortlake 5 Blank 6 Blank 7 7 First cable trams – links to photos T154, 29, 154 (Adelaide) 8 8 T156, Powelltown, Ray Pearson Negs 9 9 QR B18 ¼ locos, Ray Pearson’s scrap book, PMTT Zeppelin style trams, MMTB T class locations and 178/179 rebuilding. 10 10 Hawthorn horse tramway, VR Black Rock terminus sketch 11 11 NSW Tramways, Ryde, MMTB L class, Geelong tramway notes 12 12 Locomotive “Ballarat” in WA, Brisbane and various contacts. 13 13 Notes re VR News – 1943, H class, derailments, max speeds, Koondrook tramway and Geelong level crossing. Individual typed sheets pasted onto page – loose within book. 14 to 17 14/17 List of MMTB trams to 877 and work trams Some errors noted. 18 18 Newspaper cutting – Tram Record Day revenue (Brisbane 10/1943), Steam Trams at Journey’s end – Sydney – 6/1943 list of equipment being sold by Sydney Ferries, at Parramatta, 6/1943. MMTB Tram crossings in Melbourne, list of Sydney photos sent to Wal. Cuttings and Individual typed sheets pasted onto page. 19 19 Midland locos WA, VR open wagon stencils and a siding at Mt. Evelyn. Individual typed sheets pasted onto page. 20 20 Note re Sydney four wheel tourist trams and Hawthorn Max. Traction cars locations c1945. 21 to 23 21/23 Notes on Geelong Bogie trams and carrying flags for declaration of Newtown and Chilwell as a city – 1/10/1949 (See also Reg Item 5641) 24 to 26 24/26 Notes on Wellington Corporation Tramcars 37 27 Kelburn – Karoi cable line Wellington 28 to 29 28/29 Auckland Tramway Board tramcars notes 30/31 Blank 30 32/33 Notes on Ballarat tramcars – ESCo Crossed out 34/37 Ditto – SEC Crossed out 38 Music for the people notes Crossed out 39 Notes on Ballarat trams with tail lights Crossed out 40/43 Notes on Ballarat bogie trams Crossed out 44/45 Notes on SEC tram controllers, dead man and truck lengths. Crossed out 31 45 List of Ballarat Destination roll – Dec 1949 32, 33 46/47 Notes on Bendigo Bogie Trams – 1940’s 34 48 Bendigo Destination roll on a Birney tram Easter 1950, notes on tram tail lights and fares on the Bendigo system. 49 Blank – though headed “Bendigo Birney Trams” 50 Notes trams used on special days in Ballarat Crossed out 51 Ditto and No. 24 and 23 Crossed out 52 Ditto, 15, 11, 23 and Gold tram Crossed out 53 Notes on 34 caused delays, 5/1950, and use of 23 as gold tram Crossed out 54 Notes on repair to track at Sturt and Drummond 6/1951 Crossed out - see Reg Item 7720. 55 Notes on track work in Ballarat early 1950’s Crossed out 56/57 Notes on 33, 37, pay as you enter signs and 1953 special workings Crossed out 58/60 Notes trams used on special days in Ballarat Crossed out 61/64 Blank 35 65 “Salute to the Cable Tram” – transcription of text from Truck and Bus Transportation (July 1948) 36, 37 66/67 Continued from above and list cable tram routes, opening, closing, length and route colours. 38 68 List of photos in Truck and Bus Transportation, Anniversary Issue July 1948 of cable trams. 69 Blank 39 70 Notes on Brunswick TT, Fitzroy TT colours, Adelaide Service trams and MMTB route lengths. 40 71 Notes on HTT colours, tramcars, PMTT trams and colours and NMETL colours, trams and route destination signs 41 72 Notes on MMTB routes, cable and other Melbourne tram disposals, and sale of cable trams and storage at Brunswick. 42 73 Blank - page was headed Lugarno, Switzerland and Italian border 42 Handwritten sheet – photos to get – R. Field and Peter Duckett. 43, 44 74/75 Listing of trains on all lines leaving Ballarat and days run. 45 77 Listing of negatives sent to K. Rogers in 1944 and list of MMTB Max. Traction bogie trams 117 to 138 and disposal 46 77 Listing of MMTB trams, - appears to be something to do with photos or negs held. 47 78 Listing of Ray’s (Pearson) negs /photos of Brisbane trams and other railway photos. 79 Blank 48 80 Prices of pine timber in 4/1942, list of photos “I want”, notes re VR Train length, Ironbark Gully bridge, 3817 in Harden smash 7/1948 and 1948 Ballarat destination roll. Partly crossed out. Rear Cover. Has a strong association with Wal Jack, his work to collect and record both railway and tramway information. Yields information about tramways in Ballarat, Bendigo, Geelong and other cities tramways and railways.Grey covered book with black binding containing 40 lined sheets (80 pages) with handwritten notes with the front cover partly cut out and the words "Jewellery & Engraving" book written in. Contains some newspaper clippings and pasted typed notes as listed below. The image number of each sheet is given. See individual pdf files. trams, tramways, mmtb, ballarat, bendigo, sydney, brisbane, railways, geelong, new zealand, victorian railways, sec, esco -
 Melton City Libraries
Book, Frederick Myers work notebooks/diaries, 1923-1933
FREDERICK THOMAS MYERS Born 20th February 1877 at Melton Married Martha Mary Watson 30th April 1908 at the Manse 101 Gore Street Fitzroy according to the rites of the church (Cong) – Congregational. Died Bacchus Marsh and District War Memorial Hospital 30th April 1963 Frederick lived in Melton all his life. Work Notebooks/ diary 1901 – 1905 No 1 1901 Shearing Tally Rockbank, 1901, 1902. Lists 3 Combs 6.0, 12 Cutters 5.0, Tab 1.6 Jongebloed account – Tobacco, matches sardines. Shearing shed 1904 Tuppal 20 Aug. Daily Tally of sheep shorn Total 1730 E C Shopping list - 6 pages of household items, Leader, Age and Weekly Times Tomato Sauce- recipe written in ink Toolern Road Hours worked 35 ½ Reverse order from back cover – Harwood 29th Aug 1902 Shearing Tally 1083 November 1902 - List of dates Mon- Sat. Nov 3rd - Fri Dec 5th E Chalmer. Tally of hours worked. Jan 1903 Thur 1st - 31st Toohey Keilor Road, Feb – March 14th Payment L75:4:9 J Walker April 1903 – 23rd 18 Cutters 7:6 5 Combs 10:0 2 Tab 3:0 Ticket 15:0 Total 1:15:6 Tucker 3:12:6 Other pages are calculations related to hours worked and amounts The notebook contains 26 pages with some blank and other torn out. It measures 2 ½ x 4 inches with a hard black cover. FREDERICK MYERS Workbook/ Diary No 2 Opening 5 pages – Gottfried Jongebloed account - paid 2/11/04 List of grocery and household items. E Chalmer -Pr Boots, 8:9 Tab 1:8 Leader 3’ Reverse order Eynesbury 7th Oct 1904 Shearing Tally 1635 Tucker payment L1:18:6 Tuppal 20th Aug 1904 Tally 1636 [ 4 weeks and 4 days] Feb 1905 Melton 1st – 13, Toolern Rd 14th , April Braybrook Rd. Melton town, G Hobbs Boundary Rd, Melton May G Hobbs 2 pages of food expenses and amount paid Simpson & Co – Butcher account and amount paid Mon 5th –July 22nd Toohey days and hour worked 34 yards Tuppal 20th Aug additional list 1735 Eynesbury 3rd Oct additional list 2093 Diagram 3 drawings in ink –a type of tool Nov 21 1904 List Dunmore Stn Orford Vic Barwidgee Stn Caramut Vic Wharparanna Stn via Tocumural N.S.W. Puckawidgee vis Aug Deniliquin N.S.W. Bundure Stn via Aug Jerilderie Trawalla Ballarat Oct Woorywooryte Oct Vic Yancannia Bourke July Pretty Tower Stn Beaufort November Size of Notebook 2 ¼ x 5 inches. WORK NOTEBOOK 1909, 1910 Wandook 17th Aug 1909. 21 days of shearing 1248 Total. Payment L14 ?? Boomanoomana 23 Sept 1909. 17 days shearing 1124 Total. L13.12.9 Eynesbury 20th Oct 1909. 17 days shearing 1587 Total L17. 13.0 Cobran Aug 13 1910 Studs Rams Total 3397 List of expenses includes 12 cutters, 3 combs, Union ticket, matches, tobacco stamps. Miller, J Egan. Eynesbury Oct 1910 Total 1467 Lal Lal Nov 21 Total 1172 For Backache Tincture of Gentian Compound one ounce Syrup of Rhubarb one ounce Liquid Barkola Compound one ounce Syrup of Ginger five ounce Dose a teaspoonful after each meal and one at bedtime John Collins, Woodside Via Yarram Yarram Mr Fisken Lal Lal Via Yendon Woodlawn Deniliquin 15th October Oct 12th 1911 Eucla Jarrett Barfold 21,000 7? Shearers Clark Moir Estate 10th Aug 1910-1911 Income amounts Shearing income. Mc Donald – thrasher Keating Toohey Cobran 1911 Studs and Rams 1793 Cobran 14th Aug per man 1500 Golf Hill 26th Sept per man 1900 Cobran 14th Aug Cut out 23rd Sept 2368 payment L21..19..4 [after expenses] Spring Plains Oct 2nd 1022 Total Barfold 2636 Total Chaffcutting J.B. Loft Feb 17th - 31 ½ hours John Minns Toohey Started Deep Creek Whelahan Ballarat Rd May 25th Mr J Walker Koohnamu Stn via Junta S.A. N Aitken Bringlibit via Kyneton Income list 1911 to 1912 and amounts earned Cobran L29..0..9 , Spring Plains Barfold L42..6..3, John Minns L4..8..0, J.B. Loft L3..0..6, D Whelahan L22.. 6..0, E Toohey L15.. 1..0, = total L123..2..6 John Minns 12..0, JB Loft 4.. D Whelahan L10..2..0, Barrie L11..5. Total Amount L145..5..6. Cobran 1912 15th Aug 1922 total Rams double. Expenses include 12 + 6 Cutters, 2+2+2 Combs, Political fund, Ticket, Mess Account, Hut Keeper, Hospital, Cook Total L11..8..3. Station Rd - L11..2..9. Golf Hill Sept 26 Cut out 31 Oct Total 2332 Lal Lal Nov 6th 19th 1912 6 days Total 1066 Contracts – Cameron, Barrie, McKay, Toohey, Stn Rd ? Cobran 1913 – Aug 14- 1913 Total 1621 Cobran 1621 Kyneton Park 515 Golf Hill 2144 Lal Lal 1066 Total 5,346 1913 – 1914 Income 5, 350 sheep Local contracts E. Barrie, Greig, Weir, S Barrie, Jongebloed, Burton, E Toohey, Total L133..3..0. Trench & Moran L19..8..0. End of front section of Notebook Work notebooks belonging to Frederick Myers local identities -
 Kiewa Valley Historical Society
18 small black and white photographs of the Bogong High Plains, 1948
These photos of the Bogong High Plains were all taken by Ronald George Thorn who was a cadet engineer with the State Electricity Commission. He worked on the Kiewa scheme from 1948 to 1950 doing overhead line construction and maintenance plus electrical design and drawing work. They are from his personal collection and a record of his time in the Kiewa area.Pictorial history of personal involvement in the the early days of the Kiewa Scheme.18 small black and white photographs all taken on the Bogong High Plains.Photo 1 Wallace's Hut. Photo 2 Ruined Castle - Looking towards Pretty Valley December 1948. Photo 3 Ruined Castle - Looking towards Pretty Valley December 1948. Photo 4 Ruined Castle - Looking Down Valley December 1948. Photo 5 - Mt. McKay from Ruined Castle October 1948. Photo 6 View from Rocky Valley Camp October 1948. Photo 7 Mt. Feather Top from Ruined Castle October 1948. Photo 8 View from Ruined Castle looking downwards towards Beauty October 1948. Photo 9 Rocky River from gauging station October 1948. Photo 10 Rocky Valley River from main road October 1948. Photo 11 View along little Arthur Fire Track October 1948. Photo 12 View along main road. Looking towards Beauty Valley October 1948. Photo 13 View from Little Arthur Fire Track October 1948. Photo 14 Frying Pan Spur from Rocky Valley Road October 1948. Photo 15 Mt. Bogong from Big Hill Fire Track October 1948. Photo 16 View from Big Hill Fire Track October 1948. Photo 17 Mt. Feathertop from Ruined Castle October 1948. Photo 18 Mt. Fainter from Ruined Castle October 1948. (All of the above is hand written on the back of photos in ink). bogong high plains; r g thorn; secv; kiewa hydro electric scheme; pictorial history -
 Bendigo Military Museum
Photograph - PHOTOGRAPHS WW1, Originals: 1915
The photos in the collection relate to Thomas Robert JONES No 1982 AIF. Refer Reg No 1377 for his service details..1) - .22) Photos, black / white, showing men, training, the desert, Dardanelles, Turkish prisoners, leaving Egypt. .23) - .44) Enlargement copies of photos .1) - .22), sepia.Hand written on the rear in pen: .1) Housing parade on the desert Egypt, bugler band 6th Battalion. .2) Australian Field Artillery exercising horses near the pyramids. .3) Some of the buglers of the 6th Battalion with their identification disks as eyeglasses. .4) Serving out rations. .5) 6th Battalion having a short halt during a route march on the desert. .6) 18 Pounder Field Gun Australian Artillery. .7) 'Come to the Cook House Door' 6th Battalion AIF. .8) Lieut WATSON - Machine Gun being vaccinated by Lieut BALFE A Coy. Both these Officers are amongst the fallen. .9) 6th Battalion AIF preparing to leave Mena Camp for the Dardanelles. .10) A Turk captured on the morning of 25th April 1915 on board the troop ship Galeka. .11) Wounded alongside of hospital ship Galeka. .12) HMS Vengeance at the Dardanelles. .13) Hospital ship Sudan off Gaba Tepe. .14) Observation balloon off Cape Helles. .15) British Destroyer off Cape Helles. .16) Cape Helles, Dandanelles. .17) Turkish prisoners captured at the Suez _ _ _ Barracks, Cairo. .18) Turkish prisoners. .19) <> Guides near pyramids Mena. .20) Method of irrigation on the Nile, Egypt. .21) Going on leave into Cairo. .22) View of Cairo mosques in foreground taken from the Citadel. .23) - .44) On rear in stamp form: Dennis Major, 7 Bancroft St Bendigo Vic 3550. Tel & fax 03 544 2445 photography, military, ww1