Showing 588 items
matching bendigo photographer
-
 Ballarat Tramway Museum
Slide - 35mm slide/s, Eldon Hogan, Oct. 1966
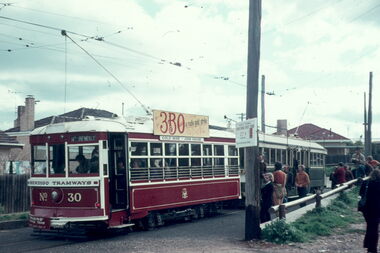
Colour slide of four Birney Trams on the North Bendigo line, Oct. 1966, SPER Tour, lead by tram No. 11, followed by No. 30. People alongside the tram on a wet day. Photographer Eldon Hogan, AGFA Slide, blue plastic with white plastic on reverse.In ink "SPER Bendigo Oct. '66"tramways, trams, sper, bendigo, birney, tram 11, tram 30 -
 Ballarat Tramway Museum
Slide - 35mm slide/s, Eldon Hogan, mid 1970's
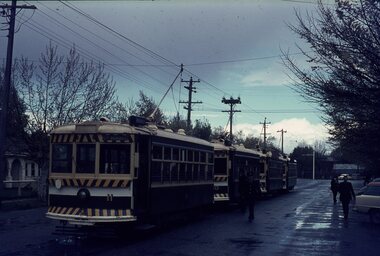
Colour slide of Birney tram No. 30 at the North Bendigo Terminus in Bendigo Trust colours, mid 1970's and a SEC Bogie tram behind. Possibly on an ARE tour. Photographer Eldon Hogan, AGFA Slide, blue plastic with white plastic on reverse.tramways, trams, sper, bendigo, birney, north bendigo, tram 30 -
 Ballarat Tramway Museum
Photograph - Black & White Photograph/s - set of 32, Eldon Hogan, 4/06/1965 12:00:00 AM
Yields information about a 1924 Jelbart Engine manufacturing display in Sturt St and the street scene and peoples clothing at the time.Set of 32 black and white photographs of an Association of Railway Enthusiasts tour to Bendigo and trams 4/7/1965. The photos are not necessarily in photographic order. .1 - 30 on the Eaglehawk terminal track, beyond the normal terminus. .2 - 30 & 29 High St Eaglehawk. .3 - ditto with a poppet head in the background. .4 - 30 at one of the crossing loops .5 - 30 at Eaglehawk terminus extension .6 - ditto. .7 - ditto .8 - cleaning out the track .9 - showing the location of the track at Eaglehawk terminus and its extension .10 - cleaning out track .11 - a portable shed adjacent to the track .12 - A view of the two Birneys travelling in the empty country. .13 - ditto .14 - 19 and 18 at Golden Square .15 - Bendigo tram depot - creek crossing .16 - Scrubber at the depot .17 - 28 and 19 at the North Bendigo terminus .18 - 18 and 30 on the Golden Sq line .19 - 28 and 19 at the North Bendigo terminus .20 - ditto. .21 - 28 and 19 near the depot entry. .22 - 28 and 30 Pall Mall .23 - 28 at North Bendigo .24 - 17 and 19 and 6 at Quarry Hill .25 - 28 and 30 Mitchell St .26 - 19, 6 and 21 Quarry Hill .27 - 19 and 6 Quarry Hill .28 - 28 and 6 at the depot entry .29 - ditto .30 - 18 and 30, Golden Sq line .31 - 25 at depot .32 - 6 and 19 Charing Cross. Photographer Eldon Hogan. Printed on Kodak Paper .33 - roll of negatives of some of the above photos - stored in box 83 as well. trams, tramways, are, bendigo, eaglehawk, quarry hill, golden square, north bendigo, tram 30, tram 29, tram 28, tram 6, tram 19, tram 25, tram 17, tram 18 -
 Ballarat Tramway Museum
Photograph - Digital image Set of 20, 1971-72
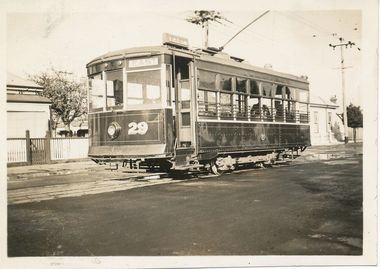
Set of 20 digital images of Bendigo Tramways, 1972 at or before closure while on a tram tour by Stuart Lodington. .1 - No. 29 at the North Bendigo terminus .2 - No. 29 just past the Bendigo end of the double track in High St Eaglehawk, with a BP dealer in the background. .3 - Night photo of No. 18 at a terminus, showing "Eaglehawk" .4 - ditto .5 - Night photo of No. 24 at Eaglehawk with Leo A Hughes Photographer in the background. The Tram has "Johnnie Walker whiskey" roof adverts. .6 - No. 29 outbound in Thunder St with a train passing over the bridge in the background. .7 - view from the front window of a tram on the Eaglehawk line with a large "display event float" in the foreground and tram approaching a crossing loop. .8 - No. 29 at North Bendigo .9 - view of High St Eaglehawk looking east from the terminus, showing the track and centre poles. .10 - No. 29 outbound on the North Bendigo line turning from either Nolan St or Caledonia St, running a special. .11 - No. 7 departing North Bendigo for Golden Square. .12 - No. 3 and 18 at Charing Cross. No. 3 has two SEC roof Advertisements .13 - No. 7 at North Bendigo with the trolley pole being reversed. .14 - No. 24 at Quarry Hill with Northern Terrazzo in the background with the driver alongside .15 - No. 7 and No.6 at Charing Cross with the Beehive buildings in the background. .16 - No. 7 at North Bendigo terminus .17 - ditto .18 - No. 24 at Quarry Hill with Northern Terrazzo in the background with the conductor alongside. .19 - ditto .20 - No. 26 and other bogie tram in View St near Charing Cross with the Armstrong Tyre Service building and signs for Cohn's Drinks and T&G in the view.trams, tramways, bendigo, eaglehawk, quarry hill, golden square, depot, north bendigo, charing cross, tram 29, tram 18, tram 24, tram 3, tram 7, tram 6, tram 26 -
 Ballarat Tramway Museum
Photograph - Two Bendigo Tramways Co. Ltd steam trams and trailers at Charing Cross, William Ninnis, 1898
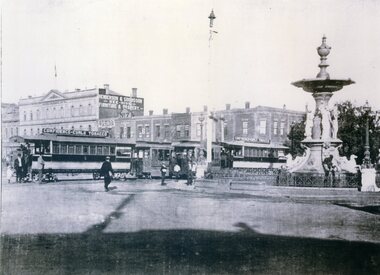
... and reprinting) of a image of two Bendigo Tramways Co. Ltd steam trams... Parade Ballarat Ballarat goldfields trams tramways Bendigo Steam ...Black and White reproduction (copy by scanning and reprinting) of a image of two Bendigo Tramways Co. Ltd steam trams and trailers at Charing Cross. Appears to be trailers 3 and 4. Understood to be 1898. Shown as a William Ninnis photographer, held by the Bendigo Historical Society (crossed out) and Creative Image Photographic Collection, Both trailers have roof advertisements "Confidence-Curls Tobacco" and in the background is Henderson & Goodisson? Beehive building, advertising Furniture and Drapery. Also J. T. Mill Tailor. .1 - Black and White copy print contained within the Wal Jack Bendigo and Geelong Album, see Reg Item 5003 for more details. Added 1/7/2013In pencil "The Fountain 1898 / Bendigo Historic Society Inc Collection (crossed out) / Photographer William Ninnis" and in ink "Creative Image Photographic Collection". .1 - in ink on rear "Steam Trams at the Fountain" and in the bottom right hand corner "P.W. Duckett"trams, tramways, bendigo, steam trams, trailers, charing cross, tram 3, tram 4 -
 Ballarat Tramway Museum
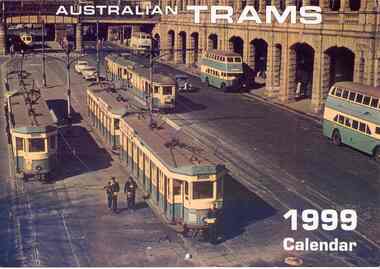
Document - Calendar, Topmill Pty Ltd, "Australian Trams - 1999 Calendar", 1998
Yields information about tramway operations post WW2 throughout Australia tramway cities.Wall Calendar - heavy card covers, 12 gloss art pages inside, titled "Australian Trams - 1999 Calendar" containing cull colour photographs of Sydney, Brisbane, Adelaide, Perth, Bendigo, Ballarat, Hobart, Melbourne, and a list of Australian and New Zealand tramway museums. Ballarat featured in June, 33 in the depot yard during a hail storm - 20/8/1971 - photographer not given. Has a punched hole along the top edge to enable wall use. Provides dates for holidays, school holidays and Pension payment days and phases of the moon. Produced by Topmill Pty Ltd and distributed by Gordon & Gotch Pty Ltd. Photos by Hugh Ballment, Dale Budd, Robert Merchant, Arthur Perry and Sydney Tramway Museum.tramways, trams, ballarat, bendigo, melbourne, adelaide, hobart, brisbane, sydney -
 Ballarat Tramway Museum
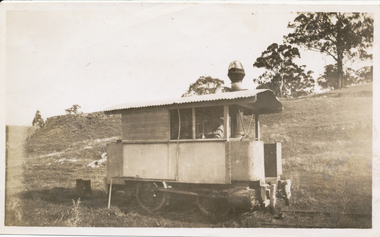
Photograph - Former Bendigo Steam motors at David Mitchell Estate, Ray Pearson, c1930
Two black and white photographs of former Bendigo steam motor No. 2 at the David Mitchell estate railway, Lilydale district, photographed c1930. Reference Light railways 208, August 2009, page 9.Yields information about a former Bendigo steam motor.Black and White copy print contained within the Wal Jack Bendigo and Geelong Album, see Reg Item 5003 for more details. .1 - On rear in ink "Steam motor from the Bendigo steam tramway's (rebuilt). This was taken at the David Mitchell Estate at Lilydale used to run to the Mt Evelyn about 6 miles. Broken up after this photo was taken" Similar notes on rear of Ken Magor collections with the additional detail of photographer - Ray Pearson.trams, tramways, bendigo, steam trams, light railways, tram 2 -
 Ballarat Tramway Museum
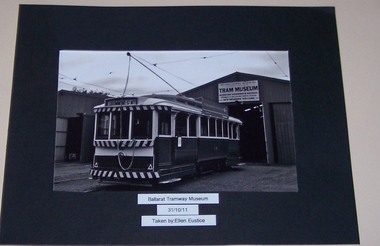
Photograph - Black and White photograph - mounted, Ellen Eustice, 30/10/2011 12:00:00 AM
Demonstrates the work of the Ballarat Tramway Museum and has a strong association with the photographer and photo competition.Mounted digital print of SEC Ballarat Tram No. 14 outside the BTM Depot, 31/10/2011 - photographed by Ellen Eustice. Made for the Ballarat Agricultural and Pastoral Society 2011 show, printed on Fujifilm paper. Exhibit 5. Tram has the destination of Drummond St North, and the Bendigo Bank roof advertisement. Details of photograph on the front and rear of the photograph.trams, tramways, btm, depot, showgrounds, tram 14 -
 Ballarat Tramway Museum
Photograph - Black & White Photograph/s, mid to late 1950's
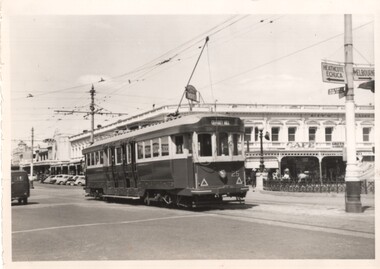
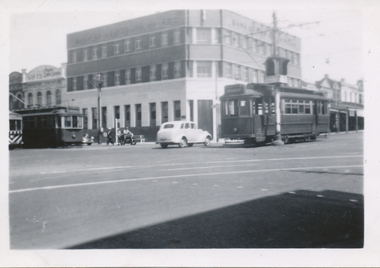
Black and white photograph of Bendigo 25, late 1950's crossing the highway at Charing Cross and about to enter Mitchell St. Tram has the destination of Quarry Hill. In the background is City Club Hotel. On the right hand side of the photograph is a direction sign and tram stop sign. Photographer unknown - see history of object.In the rear in ink "Bendigo"trams, tramways, bendigo, charing cross, mitchell st, quarry hill, tram 25 -
 Ballarat Tramway Museum
Photograph - Black & White Photograph/s, mid to late 1950's
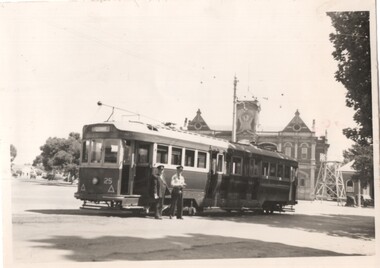
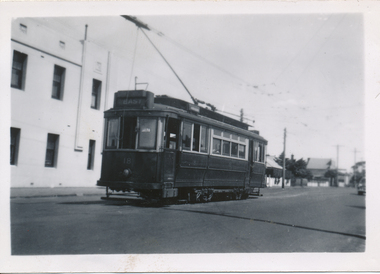
Black and white photograph of Bendigo 25, at Eaglehawk terminus with the driver and conductor alongside the tram. Has the Eaglehawk Town Hall in the background. Note the fire training stand on the right hand side of the photograph. Photographer unknown - see history of object. See Keith Kings, The Bendigo Tramways, re the fitting of reflective tape in 1956, page 59.In the rear in ink "Bendigo"trams, tramways, eaglehawk, tram 25 -
 Ballarat Tramway Museum
Photograph - Black & White Photograph/s, mid to late 1950's
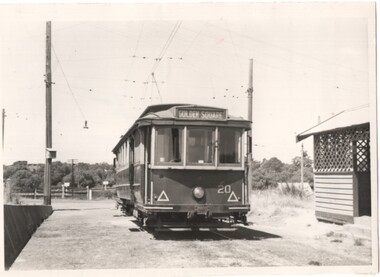
Black and white photograph of Bendigo 20 at the North Bendigo terminus. Tram showing the destination of Golden Square. Has the tram shelter at the terminus in the photograph. Photographer unknown - see history of object. See Keith Kings, The Bendigo Tramways, re the fitting of reflective tape in 1956, page 59.In the rear in ink "Bendigo"trams, tramways, north bendigo, tram 20 -
 Ballarat Tramway Museum
Photograph - Black & White Photograph/s, mid to late 1950's
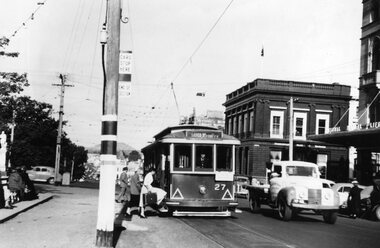
Demonstrates the use of the trams in the city area of Ballarat, late 1950's and their use.Black and white photograph of Ballarat 27, loading passengers at the intersection of Sturt and Lydiard St, City, late in a summer evening. Tram has the destination of Gardens via Sturt St West and an auxiliary board, but it cant be read. A number of passengers are boarding. Has the Commonwealth Bank building in the background, and the tram stop signs on the pole in front of the photo. Photographer unknown - see history of object. See Keith Kings, The Bendigo Tramways, re the fitting of reflective tape in 1956, page 59.In the rear in pencil - "Ballarat"trams, tramways, city, sturt st, lydiard st, tram 27 -
 Ballarat Tramway Museum
Photograph - Black & White Photograph/s, mid to late 1950's
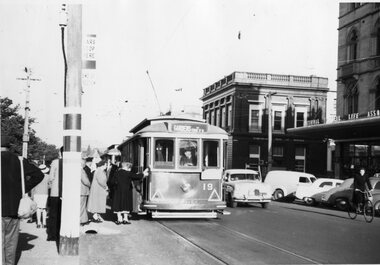
Demonstrates the use of the trams in the city area of Ballarat, late 1950's and their use.Black and white photograph of Ballarat 19, loading passengers at the intersection of Sturt and Lydiard St, City, late in a summer evening. Tram has the destination of Gardens via Sturt St West and an auxiliary board, but it cant be read. Many passengers are boarding. Has the Commonwealth Bank building in the background, and the tram stop signs on the pole in front of the photo. Photographer unknown - see history of object. See Keith Kings, The Bendigo Tramways, re the fitting of reflective tape in 1956, page 59.In the rear in pencil - "Ballarat"trams, tramways, city, sturt st, lydiard st, tram 19 -
 Ballarat Tramway Museum
Photograph - Black & White Photograph/s, mid to late 1950's
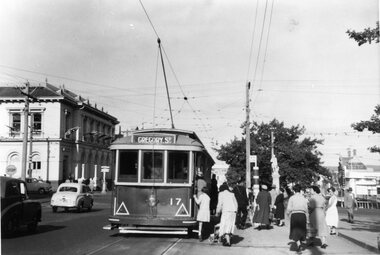
Demonstrates the use of the trams in the city area of Ballarat, late 1950's and their use.Black and white photograph of Ballarat 17, loading passengers at the intersection of Sturt and Lydiard St, City, late in a summer evening. Tram has the destination of Gregory St. Many passengers are or waiting to boarding. Has the Post Office in the background and Robert Burns statue. Note most of the passengers are women. Photographer unknown - see history of object. See Keith Kings, The Bendigo Tramways, re the fitting of reflective tape in 1956, page 59.In the rear in pencil - "Ballarat"trams, tramways, city, sturt st, lydiard st, tram 17 -
 Ballarat Tramway Museum
Photograph - Black & White Photograph/s, mid to late 1950's
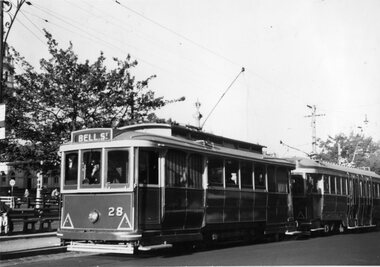
Demonstrates the use of the trams in the city area of Ballarat, late 1950's and their use.Black and white photograph of Ballarat 28 and a bogie tram at the Sturt St City stop, south side. No. 28 has the destination of Bell St. The driver is awaiting the bells to proceed. Photographer unknown - see history of object. See Keith Kings, The Bendigo Tramways, re the fitting of reflective tape in 1956, page 59.In the rear in pencil - "Ballarat"trams, tramways, city, sturt st, lydiard st, tram 28 -
 Ballarat Tramway Museum
Photograph - Black & White Photograph/s, mid to late 1950's
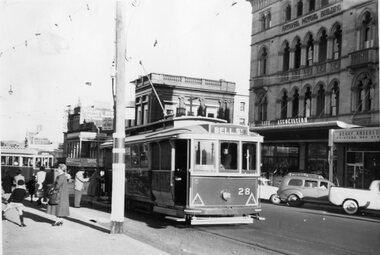
Demonstrates the use of the trams in the city area of Ballarat, late 1950's and their use.Black and white photograph of Ballarat 28 and a bogie tram at the Sturt St City stop, south side. No. 28 has the destination of Bell St. In the background are the Commonwealth Bank, Berry Anderson printers and the National Mutual building. A number of passengers are boarding the tram. Photographer unknown - see history of object. Keith Kings, The Bendigo Tramways, re the fitting of reflective tape in 1956, page 59.In the rear in pencil - "Ballarat"trams, tramways, city, sturt st, lydiard st, tram 28 -
 Ballarat Tramway Museum
Photograph - Black & White Photograph/s, mid to late 1950's
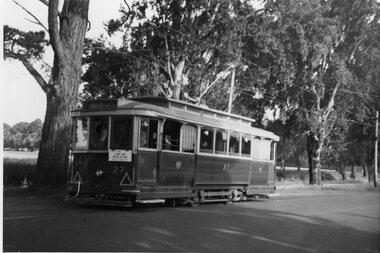
Yields information about Wendouree Parade and the Carlton St crossing loop area.Black and white photograph of Ballarat 27 in Wendouree Parade, Carlton St crossing loop. It appears (the photo is not well focused) to have the destination of Gardens via Sturt St West. The auxiliary board cannot be read. Photographer unknown - see history of object. Keith Kings, The Bendigo Tramways, re the fitting of reflective tape in 1956, page 59.In the rear in ink - "Ballarat"trams, tramways, wendouree parade, carlton st, tram 27 -
 Ballarat Tramway Museum
Photograph - Black & White Photograph/s, mid to late 1950's
Yields information about Lydiard St Nth area and a group of school boys posing for the photographer.Black and white photograph of Ballarat 34 at the Lydiard St North terminus with a group of school boys in uniform posing for the photographer. The tram has the destination of Sebastopol. Photographer unknown - see history of object. See Keith Kings, The Bendigo Tramways, re the fitting of reflective tape in 1956, page 59.In the rear in pencil - "Ballarat"trams, tramways, lydiard st nth, tram 34 -
 Ballarat Tramway Museum
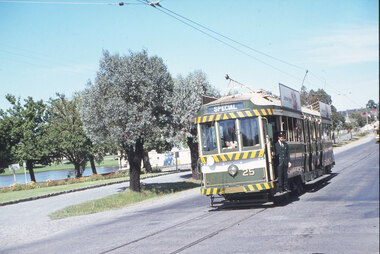
Slide - 35mm slide/s - set of 20, Eldon Hogan, 22/05/1971 12:00:00 AM
Set of 20 35mm Agfa colour blue and white plastic mount slide - featuring photos taken during an Association of Railway Enthusiasts Tour by Eldon Hogan. Folder had the date "22/5/1971" on it. Scanned on the Canon scanner at the depot 15/12/2005 at the time of the installation of the scanner. .1 - No. 25 in Nolan St with Lake Weeroona in the background. .2 - Three Birneys at the Depot junction, 30 and 29 with Conoles Hotel, McCrae St in the background. .3 - No. 5 in front of the Shamrock Hotel, Pall Mall .4 - No. 29 in front of the Shamrock Hotel with Stonemasons sign in the background. .5 - No. 18 ditto .6 - No. 30 and another Birney at the Quarry Hill terminus .7 - No. 24 southbound High St at the Violet St intersection with a "Mine Open" sign in the foreground and the Cathedral in the background. .8 - No. 19 at the Golden Square terminus, with the Golden Square Hotel in the background. .9 - No. 29 - side on view, North Bendigo line? Thunder St? .10 - No. 30 crossing the railway overbridge, inbound from Eaglehawk with a number of photographers in the foreground. .11 - No. 29? ditto .12 - No. 5 outbound - side on view, Thunder St, North Bendigo line? .13 - No. 29 and 30 at the intersection of High St and Brazier St with Church or School hall in the background. .14 - ditto .15 - ditto .16 - No. 25 and the two Birneys at the Eaglehawk terminus. .17 - No. 29 and two other trams at ditto .18 - No. 30 and 19 adjacent to the Lake View Hotel, McCrae St .19 - No. 5 and 25 crossing on the Eaglehawk Line, Ironbark? .20 - No. 29 at Quarry Hilltramways, trams, bendigo, lake weeroona, pall mall, golden square, eaglehawk, quarry hill, tram 25, tram 30, tram 29, tram 5, tram 18, tram 19, tram 24, tram 25 -
 Ballarat Tramway Museum
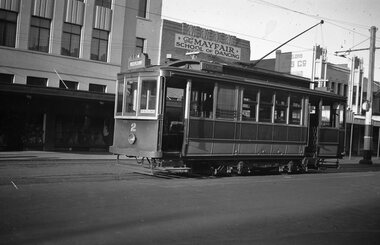
Photograph, Wal Jack, Geelong No. 2 in Ryrie St, 1940
Black and White print contained within the Wal Jack Bendigo and Geelong Album, see Reg Item 5003 for more details. Photo of Geelong No. 2 in Ryrie St, 1940. No details of photographer but given it is a 120 negative, most likely Wal Jack. Tram has the destination of Chilwell. The Mayfair School of Dancing is in the background. Wal's album notes provides the date of 1940. i1 - scan of print in the album i2 - rear of image i3 - scan of negative at 3200dpi added 17/6/2020.trams, tramways, geelong, ryrie st, tram 2 -
 Ballarat Tramway Museum
Photograph - Black & White Photograph/s, 1940
Black and White print contained within the Wal Jack Bendigo and Geelong Album, see Reg Item 5003 for more details. Photo of Geelong No. 3 in Moorabool St. 1940. No details of photographer on rear. Tram has the destination of East. In the background is a sign for Berger Paints and F&M Ritchie? Wal's album notes provides the date of 1940. Printed on Kodak Velox Paper. On rear in ink "84 Geelong Tramways, State Electricity Commission, No. 3 One of their original trams I believe. They ride very steady and smooth. Duncan and Fraser body. The Brush Electrical Engineering Co. Ltd, Loughborough England, long wheel base truck."trams, tramways, geelong, moorabool st, tram 3 -
 Ballarat Tramway Museum
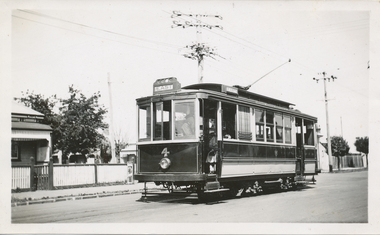
Photograph - Black & White Photograph/s, 1940
Black and White print contained within the Wal Jack Bendigo and Geelong Album, see Reg Item 5003 for more details. Photo of Geelong No. 4 at the Chilwell terminus, 1940, no details of photographer. Tram has the destination of East. A lady is seated in the front talking to the driver. Wal's album notes provides the date of 1940. Printed on "Selo" paper. On the rear in blue ink "Geelong No. 4" in ink.trams, tramways, geelong, chilwell, tram 4 -
 Ballarat Tramway Museum
Photograph - Black & White Photograph/s, late 1940s?
Black and White print contained within the Wal Jack Bendigo and Geelong Album, see Reg Item 5003 for more details. Photo of Geelong No. 5 in Moorabool St, late 1940's. No details of photographer. Has the T&G building, Savoia Cafe, The Commercial Bank of Australia in the background. Photo has been glued onto the album sheet.trams, tramways, geelong, moorabool st, tram 5 -
 Ballarat Tramway Museum
Photograph - Black & White Photograph/s, Ken Magor?, c1940
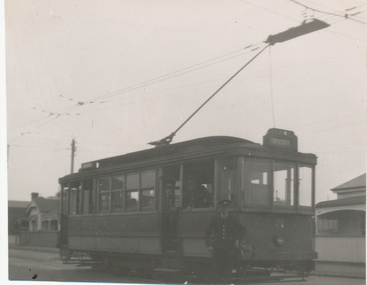
Black and White print contained within the Wal Jack Bendigo and Geelong Album, see Reg Item 5003 for more details. Photo of Geelong No. 8 at the West terminus. The tram has the destination of West and has a driver standing by the rear of the tram. Photographer Ken Magor? - same hand writing as Reg Item 5837. c1940? On rear in pencil " SEC Geelong No. 8 at West terminus"trams, tramways, geelong, west, tram 8 -
 Ballarat Tramway Museum
Photograph - Black & White Photograph/s, 8/01/1956 12:00:00 AM
Black and White print contained within the Wal Jack Bendigo and Geelong Album, see Reg Item 5003 for more details. Photo of Geelong No. 5 in Ryrie St at intersection with Moorabool St. Tram has the destination of City. In the background are Bank of New South Wales building, a set of bar lights and three other trams. Photographer not known. Dated 8/1/1956. On rear in ink "Car No. 5 on shuttle run Ryrie St to Beach on last day of running this service 8/1/56"trams, tramways, geelong, ryrie st, moorabool st, tram 5 -
 Ballarat Tramway Museum
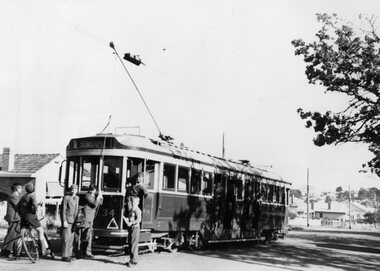
Photograph - Black & White Photograph/s, Jul. 1915
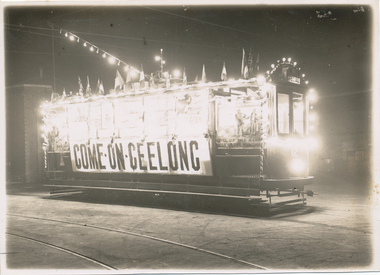
Black and White print contained within the Wal Jack Bendigo and Geelong Album, see Reg Item 5003 for more details. Photo of Geelong No. 12 at the Geelong depot July 1915, decorated and used by the National Defence Association as a recruiting tram. Has many lights and flags on the tram and the words "Come on Geelong" on the sides. See Inscriptions for further details. No details as to photographer or source. On rear in pencil "National Defence Association Recruiting car. This contained a brass band which played along the various routes. A speaker travelled with the car. The tram would stop at predetermined positions to allow of appeal for recruits." "July 1915".trams, tramways, geelong, decorated trams, world war 1, tram 12 -
 Ballarat Tramway Museum
Photograph - Black & White Photograph/s, c1940
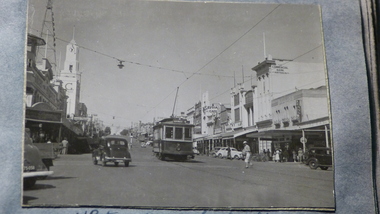
Black and White print contained within the Wal Jack Bendigo and Geelong Album, see Reg Item 5003 for more details. Photo of No. 27 in Moorabool St, at the intersection of Moorabool St and Corio Terrace. The tram line in the background continues onto the Wharf terminus. The tram has the destination of Eastern Park. A uniformed man - policeman? and motor cycle are at the corner of the two streets. In the background is weighbridge building. The P&O building is on the right hand side. Photographer unknown, but similar handwriting on the back of the other prints. Printed on Velox paper. On rear in ink "88 Geelong tramways No. 27, purchased from Adelaide. Original Birney Safety car, imported from USA. 6 in service."trams, tramways, geelong, ryrie st, eastern park, tram 27 -
 Ballarat Tramway Museum
Photograph - Black & White Photograph/s, Wal Jack, Jun. 1939
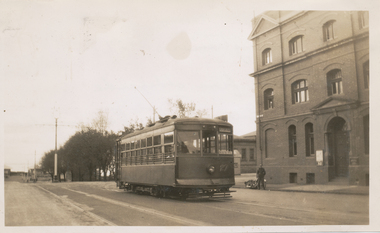
Black and White print contained within the Wal Jack Bendigo and Geelong Album, see Reg Item 5003 for more details. Photo of No.29 at the Chilwell terminus with houses behind. The tram has the destination of East. Photographer unknown, but similar handwriting on the back of the other prints such as Reg Item 5850. Printed on Kodak Velox paper. i1 - scan of print in the album i2 - rear of image i3 - scan of negative at 3200dpi added 6/6/2020. On rear in ink "Geelong Tramways No. 29 Chilwell terminus June 1939 ex Adelaide 302."trams, tramways, geelong, chilwell, tram 29 -
 Ballarat Tramway Museum
Photograph - Black & White Photograph/s, 8/01/1956 12:00:00 AM
Black and White print contained within the Wal Jack Bendigo and Geelong Album, see Reg Item 5003 for more details. Photo of No. 17 to Belmont (right) and No 18 to West at the intersection of Moorabool and Ryrie Streets 8-1-1956. Photographer unknown. In the background is the Bank of New South Wales Building and a gifts building. The pole in the centre has a bar traffic light. Has written in ink on the rear "Intersection Ryrie and Moorabool Sts 8/1/56, Geelong"trams, tramways, geelong, ryrie st, moorabool st, tram 17, tram 18 -
 Ballarat Tramway Museum
Photograph - Black & White Photograph/s Geelong 18 at West terminus, 8/01/1956
Photo of No. 18 at West, 2.30pm, last day of operations 8-1-1956. Photographer unknown - same as 5854. Tram has the destination of East. Black and White print contained within the Wal Jack Bendigo and Geelong Album, see Reg Item 5003 for more details. Two copies held. Has written in ink on the rear "No 18 at top of Packingham St (terminus) 2.30pm 8/1/56, Geelong"trams, tramways, geelong, pakington st, west, tram 18