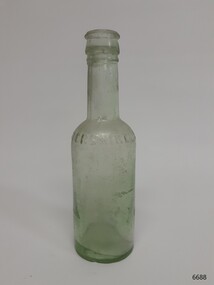
Showing 825 items
matching green glass.
-
 Kiewa Valley Historical Society
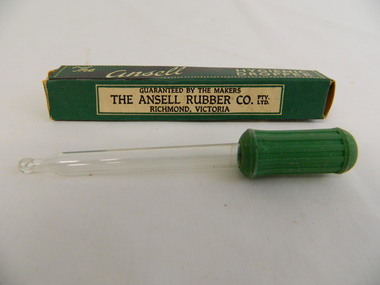
Dropper - Medical
... Cardboard green and white box with white writing on all... been opened. Inside: Clear glass dropper with a green rubber ...This medical / hospital dropper was used in the Tawonga District General Hospital which was built in the 1950's specifically for the increase in population due to the Kiewa Hydro Scheme.Shows the development of hospital equipment. Provenance: Used in the Tawonga District General Hospital which was remote and therefore required good equipment. Good condition and good interpretation capacity.Cardboard green and white box with white writing on all faces except where it has been opened. Inside: Clear glass dropper with a green rubber end.Box: 2 opposite faces have: 'The Ansell Hygienic / Dropper.' One face: 'Guaranteed by the Makers / The Ansell Rubber Co. Pty / Ltd / Richmond, Victoria.' Opposite face; Boxed for Hygienic Reasons / Guaranteed made from pure rubber'dropper, medical, hospital, first aid, ansell rubber co. pty. ltd -
 Kiewa Valley Historical Society
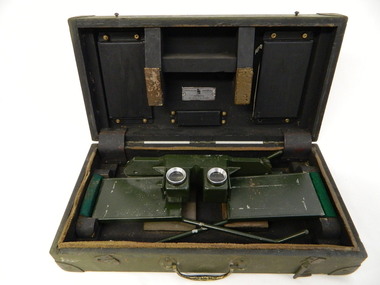
Stereoscope
The stereoscope was an interpretation device used to interpret aerial photography and the landscape. It was used by National Parks Victoria located at Mt Beauty to look at aerial photos so that they showed up the relief of the topography and therefore looked 3D.Used by National Parks Victoria staff located at the Mt Beauty office during the 1970's and early 1980's.Dark green wooden box with padded protection around the perimeter and on lid where 2 rectangular pieces of wood touch the stereoscope. The box is fitted with wooden dividers that fit around the stereoscope. The stereoscope is green metal with folding legs and sides attached to allow the stereoscope to sit on a surface. The instrument has 2 round glass ('mirrored viewing lens') cylinders eye distance apart, that allow light in from the side swinging doors. The amount of light is constricted by a rectangular piece of metal at the top of each leg. The box has swing clips used to close it and a metal swing handle all on the front side.The hinges are reinforced (and offer protection) by additional rubber pieces at each end. Inside the box is a brush made of bristle with a wooden handle - used for cleaning.Outside and top of box: written in black: No. 1026. On blue tape beneath: Mirror stereoscope 1026. written in black centre top of box: W10/WKA.0233. On front edge of box written in black: W10/WKA 0233. Inside box lid on silver plaque: Stereoscope Universal/ Made in / Australia / Die Casters Ltd. Victorianational parks victoria. stereoscope. aerial photographs. scientific instrument. mt beauty. 3d -
 Kiewa Valley Historical Society
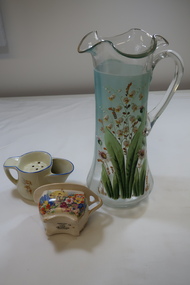
Jugs x 3 - water, milk and shaving
Ron White owned these jugs during his lifetime. Popular circa 1940s.Ron White owned these jugs. See KVHS 12821. Water Jug - tall glass jug with thin pale green 'plastic?' 'coating' wrapped around it. The cover has painted in colour -flowers and leaves. The lip is wavy with a clear plastic cover pulled over it. The handle is attached to the top half in the shape of an ear.The base is wider than the the top.Handblown. 2. Milk Jug - Unusual shaped small rectangular cream coloured jug with a handle at one end and a pouring lip at the opposite end. It sits on a four legged base and is decorated with coloured flowers and a cottage on each side. 3. Shaving Jug - Solid ceramic cream coloured jug with 7 holes in main area with a handle on one side and a pouring lip on the other. The jug is decorated with 3 small pictures of the countryside. The lip of the jug is defined in blue.1. Nil 2. At the base: "Hampton/ Ivory/ Swinnertons / England" 3. At the base: "Empire / Ivory ware/ England" and embossed also at the base "261 / England / 12?"ron white, ceramic and glass jugs, kitchenware, bathroomware -
 Warrnambool and District Historical Society Inc.
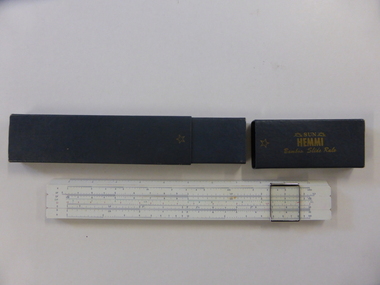
Instruments, Slide Rule, C1955
A slide rule is an instrument which is used to carry out mathematical calculations. William Oughtred is credited with its invention in 1621, however many others including Isaac Newton have made improvements or modifications over the years. From 1625 to 1800 there were approximately 40 different styles brought forward. with the following 100 years sees over 250 designs created.There have been different versions and modifications to suit scientific, mathematical and engineering requirements. It is interesting to note that many of the buildings of the 19th and 20th centuries have been designed with the use of slide rules. Their use has declined in the last 25-30 years with the advent of computers and specialist calculators.While not directly linked in any way to the history of Warrnambool, this slide rule would have been a item in use by students doing maths at upper secondary level as well as other applications which would make it a familiar object to many people.Coated bamboo with sliding metal framed glass panel or cursor . The bamboo is in three sections with the middle section movable. It is marked in various graduated measurements mainly in dark blue but with some in green and red.It is inside a dark grey rectangular box with a slide off lid on one end.There is a celluloid panel on the back with a conversion table printed on it. There is an accompanying 67 page manual with a pale green cover with black text. On slide rule:Sun Hemmi Japan No 2664S On box: Sun Hemmi Japan No 2664S warrnambool, hemmi slide rule, bamboo slide rule -
 Invermay Local History Association
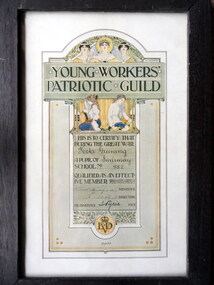
Framed Award Certificate, Unknown framer, Young Workers' Patriotic Guild, Certificate issued by Victorian Education Dept 1918
Paper certificate under glass plate in timber frame. Ornate certificate printed using four colour process, portrait format. Features very simple, dark stained frame.The certificate features wording certifying 'that during the Great War Neta Greening, a pupil of Invermay School No. 882 qualified as an effective member' of the Young Workers' Patriotic Guild [Victoria]. Certificate no. 13,422 issued 1918. Signed by W. Hutchinson, Minister; F. Tate, Director [VED] and Miss I. Ryrie, Headmaster. -
 Ringwood and District Historical Society
Display case and 4 books, Lillian Horner memorial Prize presented to Miss J.D.Paddock in 1956 for distinguished work as an infant teacher in Ringwood, 1956
The Lillian Horner Memorial Prize was awarded to Miss Daisy Paddock for distinguished work as an infant teacher. Lillian Horner was a pioneer in infant teaching. She was born in May 1873 and died in February 1938. She encouraged mothers to interest themselves directly in the work of her infant grades so laid the foundations for the first Mother's Club. An annual prize of books was given to the infant teacher adjudged most worthy in a school under the Education Department, Victoria. to perpetuate her memory. In 1956 Daisy Paddock from Ringwood S.S.2997 won the prize. The books were The First Year in School by E.R. Boyce, The Merry-go-round by James Jeeves, One Little Boy by Julian Press, The Fairy Green by Rose Fyleman and Lavenders Blue,A Book of Nursery Rhymes by Kathleen Lines. The presentation case was made by former pupils who were then attending Ringwood Technical College.Wooden display case with metal plaque. Box with glass and wooden lid fastened by a brass clasp fixed by 4 wooden struts to a wooden tray base enclosing 5 books +Additional Keywords: Paddock, J.D. / Lillian Hornerpresented to Miss J.D. Paddock ,the Lillian Horner Memorial Prize 1956 -
 Orbost & District Historical Society
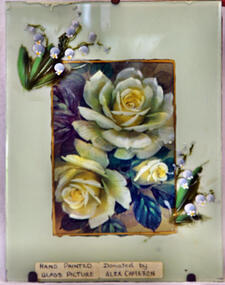
ornament, early 19th century
This item is an example of a hand crafted item made to personalise and add aesthetic value to a homes.Hand painted glass picture showing roses and blue bells on a light green background. On a wooden board with stand.ornament painting glass-painting handcraft -
 Orbost & District Historical Society
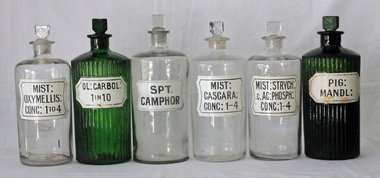
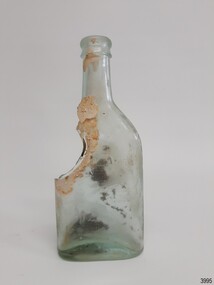
bottles, late 19th - 1930s ?
These bottles were used at the pharmacies in Orbost. Chemists who worked in Orbost included Henry Cottman; James Alfred Dubois Williams; Harry Arthur Murray; Miss P.E .Mason (Phyllis Estelle?); Miss Sybil Monica Buzza; Thomas James Frayer; Australia Shaw; James David Torley; John William Zimmer; Dalkeith William Steele; William Thomas Hollingsworth; E.E. Cohen; R.S. Anderson; Frances John Perry Faith Everard Pardew and Charles Anthony Wurf.Medicinal bottles are probably the largest and most diverse group of bottles. The practices of early pharmacists are revealed through these glass bottles. The items have a clear association with Orbost.Six large glass bottles - four clear and two green. All have narrow necks with glass stoppers and are clearly labelled with black print on a white background. Each of the the two coloured glass bottles have a fluted surface. These apothecary bottles were used to dispense medications and also for show or display purposes. The labels under glass bottles had a recessed section that the label was placed into. The label was then covered with a thin piece of glass to prevent the label from becoming damaged by the bottles contents. 3210.1 - "MIST ; OXYMELLIS : CONC : 1 TO 4" 3210.2 - " OL : CARBOL : 1 IN 10" 3210.3 - "SPT. CAMPHOR" 3210.4 - "MIST : CASCARA: CONC: 1 - 4" 3210.5 - "MIST : STRYCH: c. AC : PHOSPH CONC : 1 - 4" 3210.6 - "PIG : MANDL : ": bottles-pharmaceutical chemists-orbost medicine -
 Orbost & District Historical Society
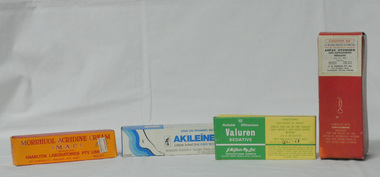
cardboard containers, second half 20th century
These items were used or were available for sale by chemists in Orbost. Chemists who worked in Orbost included Henry Cottman; James Alfred Dubois Williams; Harry Arthur Murray; Miss P.E .Mason (Phyllis Estelle?); Miss Sybil Monica Buzza; Thomas James Frayer; Australia Shaw; James David Torley; John William Zimmer; Dalkeith William Steele; William Thomas Hollingsworth; E.E. Cohen; R.S. Anderson; Frances John Perry Faith Everard Pardew and Charles Anthony Wurf.The practices of early pharmacists are revealed through these glass bottles. The items have a clear association with Orbost.Four rectangular cardboard medication boxes. 3210.17 is orange with red print. It has a small white price sticker from "Zimmer Phcy Orbost $1.02". it contains a tube of unused cream with an information sheet. 3210.18 is white with blue and black print. It has a small white price sticker from " Zimmer Phcy Orbost $4.19". It contains a tube and information sheet. 3210.19 is yellow and white with green print. It contains ten yellow tablets in cellophane. 3210,20 is a red cardboard box with black and red print. It contains a glass atomiser and instructions, a box with ASPAXADRENE in a brown glass bottle with a white lid. there is a price sticker " TORLEY'S PHCY Orbost- $6.75"3210.17 - MORRHUOL ACRIDINE CREAM (M.A.C.) HAMILTON LABORATORIES PTY LTD..." 3210.18 - AKILEINE - PROFESSIONAL FOOT CARE SUPERACTIVE CREAM FOR ROUGH DRY FEET.....distributed by George Hagley Pty Ltd.... 3210.19 - 10 Reliable Efficacious Valuren Sedative J McGloin Pty Ltd...... 3210.20 - CAUTION S3 to be used strictly as directed - ASPAX ATOMISER and ASPAXADRENE INHALANT A,H, CRUNDALL PTY LTD......medications orbost-pharmacies zimmer-john containers-medications -
 Orbost & District Historical Society
medications, 1940s - second half 20th century
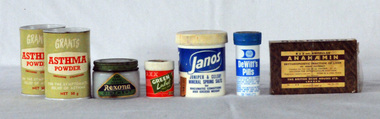
... print. 3217.3 is a white glass jar with a green metal lid... pharmacists are revealed through these glass bottles. The items have ...These items were used or were available for sale by chemists in Orbost. Chemists who worked in Orbost included Henry Cottman; James Alfred Dubois Williams; Harry Arthur Murray; Miss P.E .Mason (Phyllis Estelle?); Miss Sybil Monica Buzza; Thomas James Frayer; Australia Shaw; James David Torley; John William Zimmer; Dalkeith William Steele; William Thomas Hollingsworth; E.E. Cohen; R.S. Anderson; Frances John Perry Faith Everard Pardew and Charles Anthony Wurf. The practices of early pharmacists are revealed through these glass bottles. The items have a clear association with Orbost. Seven containers. Six are cylindrical and one rectangular. 3217.1 and 3217.2 are pale green cylindrical 50 g containers with metal lids labelled "GRANTS ASTHMA POWDER" in red and white print. 3217.3 is a white glass jar with a green metal lid and a paper triangular label with white and navy print label, " REXONA OINTMENT".3217.4 is a small white cylindrical container with a red label with white print on green, "GREEN LABEL PILLS". 3217.5 is a white cylindrical plastic container with blue print, "JANOS JUNIPER CELERY MINERAL SPRINGS SALTS". 3217.6 is an empty narrow cylindrical blue and white container labelled, "DEWITTS PILLS". 3217.7 is a rectangular cardboard box, mottled brown with a white label and gown print,"6 X 2ml AMPOULES ANAEHAEMIN".medications-orbost-pharmacies containers-medications chemist pharmaceuticals -
 Orbost & District Historical Society
Functional object - pharmaceutical items, medication, 20th century
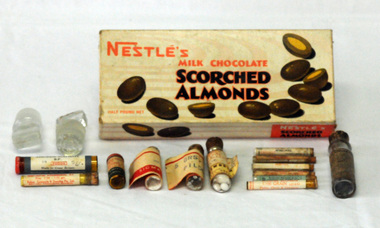
These items were used or were available for sale by chemists in Orbost. Chemists who worked in Orbost included Henry Cottman; James Alfred Dubois Williams; Harry Arthur Murray; Miss P.E .Mason (Phyllis Estelle?); Miss Sybil Monica Buzza; Thomas James Frayer; Australia Shaw; James David Torley; John William Zimmer; Dalkeith William Steele; William Thomas Hollingsworth; E.E. Cohen; R.S. Anderson; Frances John Perry Faith Everard Pardew and Charles Anthony Wurf.The practices of early pharmacists are revealed through these glass bottles. The items have a clear association with Orbost. A Nestle's Milk Chocolate Scorched Almonds box used as a container. 3219.2 is a brown cylindrical container with a red lid and a grey and white label, "ATROPINE SULPHATE". 3219.3 is a small clear glass container with cork stopper and paper labels, in red and black print, "SIGMA POISON HYOSCIN HYDROBORON BP" and stamped in purple "5 GRAINS". 3219.4 is a clear glass cylinder with a cork stopper and a white paper label with "SIGMA POISON 5 GRS PILOCARPIN. HCL " in red and black print. 3219.5 is a small stained plastic cylinder with a red lid. The brown contents have stained the inside. It has a paper label of red print on white, and white print on green, "PHYSOSTIGMINE SALICYCLATE BP".3210.6 is a clear gloss narrow plastic container containing powder. It is labelled, "POISON HOMATROPINE HYDROBROMIDE BP".There are six thin glass cylindrical phials with cork stoppers and paper labels, two clear glass stoppers and two glass cylindrical containers with cork stoppers.medicine, chemicals, pharmacy, orbost, phial -
 Orbost & District Historical Society
bottle, mid 20th century
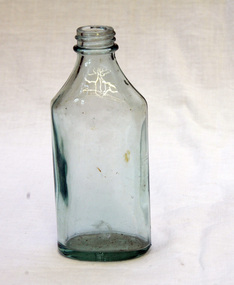
... bottle. It is tinted green. bottle The Australian Glass Company ...Groves McVitty were wholesale grocers, wine and spirit merchants, tea and coffee importers, manufacturers of Medallion brand foods. The company was located at 8-12 Market Street, Melbourne . Its own Medallion brand products included everyday staples such as shoe polish, flour, sugar, teas, cough syrup, furniture polish and Barnes brand honey.A clear glass bottle. It is tinted green.On bottom - letters 'G' & 'M' inside 'A' 15M - 6 8 Medallionbottle medallion -
 Orbost & District Historical Society
mantel clock, late 1840's
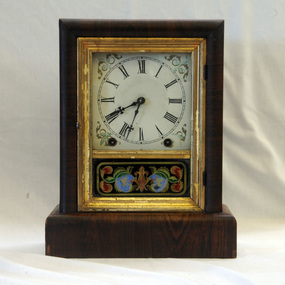
This clock was brought out to Australia in 1849. it was then bought in Ballarat by Samuel Richardson in 1865 and brought to Orbost when he settled there. The Richardson family was one of the very early settler families to establish themselves in the Orbost district. Samuel Richardson was builder of the Paddle Steamer Curlip. This clock may have been used as a marine clock. The Richardson family was one of the very early settler families to establish themselves in the Orbost district. Samuel Richardson was builder of the Paddle Steamer Curlip. A wooden mantle clock in a rectangular cabinet. It has pendulum striking. The face has blue and gold decorations. the numerals are Roman. The face surround is white and the numerals black.There is a glass door with red,blue and green decorations on the lower quarter. There is a faded printed label behind the clock and pendulum.Scratched onto the back: "To Australia in 1849. Samuel Richardson bought this clock in Ballarat1865" -
 Orbost & District Historical Society
souvenir glass, 1994
This souvenir wine glass was made for celebration of the centenary of the Orbost Football Club in 1994. The Orbost football club players were known as the Busters and wore green and gold guernseys. An Orbost football team has participated in the East Gippsland League since the early 20th century. In 2003 in response to a dwindling population, the Snowy Rovers and Orbost Football Clubs were driven to merge into the Orbost Snowy RoversOrbost Football Club through its many changes has always been an important social fabric of the Orbost community. Sport is often regarded as an important part of life in rural Australia, contributing to community identity, sense of place, social interaction and good health. A clear wine glass produced for the centenary of the Orbost Football Club -1894-1994. On an oval (representing a football) is O F C with "ORBOST FOOTBALL CLUB" in a banner above and "CENTENARY YEAR 1894 -1994" in a banner below. all written in gold. On an oval (representing a football) is O F C with "ORBOST FOOTBALL CLUB" in a banner above and "CENTENARY YEAR 1894 -1994" in a banner below. all written in gold.souvenir wine-glass orbost-football-club -
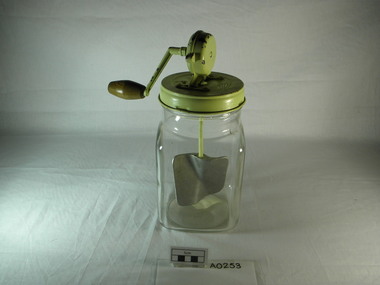 Cheese World Museum
Butter Churn, Taco butter churn, 1880 (estimated)
These glass churns came in several different sizes. A 3 and 1/2 pint vessel could churn 2 pints of cream into butter. A similar glass churn is advertised in the mail order catalogue for D & W Chandler Ltd, Melbourne. Issue No.49, page 168. Listed as 'Butter machines (Glass) Makes butter equal to the best wooden churn, and quicker. Prices-2 qts, 9/6; 3 quts, 13/3; 4 qts, 14/6 each.'Taco butter churn with square clear glass jar with round mouth and round green painted metal lid with a small wedge of airholes. The lid has a round turning mechanism with attached wooden handle. A shaft with a metal paddle goes down into the jar to beat the cream. A paper label is attached to the bottom.'Taco Burnley England' on turning mechanism on lid, 'British Foreign Pats Pending' on reverse. 'Made in England' imprinted on base. Paper label attached to base 'Kraft Foods Ltd' 'M.G.'butter, allansford, dairy industry, dairy utensils, butter churns, kraft foods ltd, taco -
 Flagstaff Hill Maritime Museum and Village
Domestic object - Bowl, Late 19th or early 20th Century
The Process of Making Pottery Decorating, Firing, Glazing, Making, Technical There is a rhythm and flow to clay. It can’t be done all at once! Even the making process! It can take weeks to get everything done, especially if you can only work on your pottery once a week! Even though we have three hour classes, it’s often just not enough time! Here is an overview of some of the processes so you have a bit more grasp on some of the technical stuff! Step One – Design There are SO many ideas out there for making stuff in clay! From delicate porcelain jewellery, through to heavy sculptural work and everything in between. Deciding your direction is sometimes not that easy – when you first start, try everything, you will naturally gravitate to the style that you enjoy! The options and variations are endless and can get a wee bit overwhelming too! Check in with me before you start to ensure your ideas will work, what order you might do things, how you could achieve the look you are seeking and any other technical data required! Step Two – Making Clay is thixotropic. This means that as you work with it, the clay first gets sloppier and wetter, before is begins to dry in the atmosphere. For most things, you simply can’t do all parts of the project at once. An example of work order might look like: Get last weeks work out from the shelves Prepare clay for today’s work – roll your clay, prepare balls for throwing, make the first stage of a pinch pot) Clean up last week’s work and put it on the shelf for bisque firing Check that you have any glazing to do – and do enough of it that you will have time to finish your main project Do the next step of your next project – there might be a further step that can’t be complete immediately, in that case, wrap your work well and put onto the shelves. Letting your work rest for a while can really help keep your work clean and professional looking. Many things require bagging under plastic to keep it ready for work the next week – put your name on the outside of the bag so you can find your work easily. We have stickers and markers. Consider how you want to decorate your work – coloured slip can be applied at a fairly wet stage (remembering that it will make your work even wetter!). Trying to apply slip to dry clay won’t work! If you want to do sgraffito – you will need to keep the work leather hard (a state of dryness where you can still work the clay with a little effort and a little water and care). Step Three – Drying Most of the time your work can go into the rack uncovered to let it dry out for the following week. If you want to continue forming or shaping you will need to double bag your work – put your work on a suitable sized bat and put the bat in a bag so the base of the bag is under the bat, then put another bag over the top of the work and tuck the top of the bag under the bat. If you want to trim (or turn) your thrown work the following week, it should also be double bagged. If your work is large, delicate, or of uneven thicknesses, you should lightly cover your work for drying. When considering the drying process, bare in mind the weather, humidity and wind! The hotter and dryer, the faster things dry and work can dry unevenly in the shelves – this can lead to cracking – another time to lightly cover your work for drying. Step Four – Trimming and Cleaning Up Your work is dry! It is called greenware now and it is at it’s most fragile! Handle everything with two hands. I often refer to soft hands – keep everything gentle and with your fingers spread as much as possible. Try to not pick up things like plates too much, and always with both hands! Before your work can be bisque fired it should be “cleaned up”. You work won’t go into the kiln if it has sharp edges – when glazed, sharp edges turn into razor blades! Use a piece of fly wire to rub the work all over – this will scratch a little so be light handed. Use a knife or metal kidney to scrape any areas that require a bit more dynamic treatment than the fly wire offers! Finally, a very light wipe over with a slightly damp sponge can help soften and soothe all of your edges and dags! Trimming thrown work: If you are planning to trim (or turn) your thrown work (and you should be), make sure you bag it well – your work should be leather hard to almost dry for easiest trimming. Use this step to finish the work completely – use a metal kidney to polish the surface, or a slightly damp sponge to give a freshly thrown look. Wipe the sponge around the rim after trimming, and check the inside of the pot for dags! Trimming slip cast work: Usually I will trim the rims of your work on the wheel the following day to make that stage easier, however you will still need to check your work for lumps and bumps. Last but not least – check that your name is still clearly on the bottom of your work. Step Five – Bisque Firing When the work is completely dry it can go into the bisque kiln. The bisque kiln is fired to 1000°C. This process burns off the water in the clay as well as some of the chemically bound water. The structure of the clay is not altered that much at this temperature. Inside the bisque kiln, the work is stacked a little, small bowl inside a larger bowl and onto a heavy plate. Smaller items like decorations or drink coasters might get stacked several high. Consideration is paid to the weight of the stack and shape of the work. A bisque kiln can fire about one and a half times the amount of work that the glaze kiln can fire. The firing takes about 10 hours to complete the cycle and about two days to cool down. Once it has been emptied the work is placed in the glaze room ready for you to decorate! Step Six – Glazing Decorating your work with colour can be a lot of fun – and time consuming! There are three main options for surface treatment at this stage: Oxide Washes Underglazes Glazes Washes and underglazes do not “glaze” the work – It will still need a layer of glaze to fully seal the clay (washes don’t need glaze on surfaces not designed for food or liquid as they can gloss up a little on their own). Underglazes are stable colourants that turn out pretty much how they look in the jar. They can be mixed with each other to form other colours and can be used like water colours to paint onto your work. Mostly they should have a clear glaze on top to seal them. Oxides are a different species – the pink oxide (cobalt) wash turns out bright blue for instance. They don’t always need a glaze on top, and some glazes can change the colour of the wash! The glazes need no other “glaze” on top! Be careful of unknown glaze interactions – you can put any combination of glaze in a bowl or on a plate, but only a single glaze on the outside of any vertical surface! Glazes are a chemical reaction under heat. We don’t know the exact chemicals in the Mayco glazes we use. I can guess by the way they interact with each other, however, on the whole, you need to test every idea you have, and not run the test on a vertical surface! Simply put, glaze is a layer of glass like substance that bonds with the clay underneath. Clay is made of silica, alumina and water. Glaze is made of mostly silica. Silica has a melting point of 1700°C and we fire to 1240°C. The silica requires a “flux” to help it melt at the lower temperature. Fluxes can be all sorts of chemicals – a common one is calcium – calcium has a melting point of 2500°C, however, together they both melt at a much lower temperature! Colourants are metal oxides like cobalt (blue), chrome (green through black), copper (green, blue, even red!), manganese (black, purple and pink) iron (red brown), etc. Different chemicals in the glaze can have dramatic effects. for example, barium carbonate (which we don’t use) turns manganese bright pink! Other elements can turn manganese dioxide brown, blue, purple and reddish brown. Manganese dioxide is a flux in and of itself as well. So, glazes that get their black and purple colours, often interact with other glazes and RUN! Our mirror black is a good example – it mixes really well with many glazes because it fluxes them – causes them to melt faster. It will also bring out many beautiful colours in the glazes because it’s black colouring most definitely comes from manganese dioxide! Glaze chemistry is a whole subject on it’s own! We use commercial Mayco glazes on purpose – for their huge range of colour possibilities, stability, cool interactions, artistic freedom with the ability to easily brush the glazes on and ease of use. We currently have almost 50 glazes on hand! A major project is to test the interactions of all glazes with each other. That is 2,500 test tiles!!!! I’m going to make the wall behind the wheels the feature wall of pretty colours! Step Seven – Glaze (Gloss or sometimes called “Glost”) Firing Most of the time this is the final stage of making your creation (but not always!) The glaze kiln goes to 1240°C. This is called cone 6, or midrange. It is the low end of stoneware temperatures. Stoneware clays and glazes are typically fired at cone 8 – 10, that is 1260 – 1290°C. The energy requirement to go from 1240°C to 1280°C is almost a 30% more! Our clay is formulated to vitrify (mature, turn “glass-like”) at 1240°, as are our glazes. A glaze kiln take around 12 hours to reach temperature and two to three days to cool down. Sometimes a third firing process is required – this is for decoration that is added to work after the glaze firing. For example – adding precious metals and lustres. this firing temperature is usually around 600 – 800°C depending upon the techniques being used. There are many students interested in gold and silver trims – we will be doing this third type of firing soon! After firing your work will be in the student finished work shelves. Remember to pay for it before you head out the door! There is a small extra charge for using porcelain clay (it’s more than twice the price of regular clay), and for any third firing process! Once your work has been fired it can not turn back into clay for millennia – so don’t fire it if you don’t like it! Put it in the bucket for recycling. https://firebirdstudios.com.au/the-process-of-making-pottery/ The bowl is an example of kitchenware used in the 19th century and still in use today.Bowl white ceramic. Crack on side. Badly stained.Backstamp very faint and unable to be read.flagstaff hill, warrnambool, shipwrecked-coast, flagstaff-hill, flagstaff-hill-maritime-museum, maritime-museum, shipwreck-coast, flagstaff-hill-maritime-village, mixing bowl, food preparation, kitchen equipment, ceramic -
 Flagstaff Hill Maritime Museum and Village
Domestic object - Bowl
The Process of Making Pottery Decorating, Firing, Glazing, Making, Technical There is a rhythm and flow to clay. It can’t be done all at once! Even the making process! It can take weeks to get everything done, especially if you can only work on your pottery once a week! Even though we have three hour classes, it’s often just not enough time! Here is an overview of some of the processes so you have a bit more grasp on some of the technical stuff! Step One – Design There are SO many ideas out there for making stuff in clay! From delicate porcelain jewellery, through to heavy sculptural work and everything in between. Deciding your direction is sometimes not that easy – when you first start, try everything, you will naturally gravitate to the style that you enjoy! The options and variations are endless and can get a wee bit overwhelming too! Check in with me before you start to ensure your ideas will work, what order you might do things, how you could achieve the look you are seeking and any other technical data required! Step Two – Making Clay is thixotropic. This means that as you work with it, the clay first gets sloppier and wetter, before is begins to dry in the atmosphere. For most things, you simply can’t do all parts of the project at once. An example of work order might look like: Get last weeks work out from the shelves Prepare clay for today’s work – roll your clay, prepare balls for throwing, make the first stage of a pinch pot) Clean up last week’s work and put it on the shelf for bisque firing Check that you have any glazing to do – and do enough of it that you will have time to finish your main project Do the next step of your next project – there might be a further step that can’t be complete immediately, in that case, wrap your work well and put onto the shelves. Letting your work rest for a while can really help keep your work clean and professional looking. Many things require bagging under plastic to keep it ready for work the next week – put your name on the outside of the bag so you can find your work easily. We have stickers and markers. Consider how you want to decorate your work – coloured slip can be applied at a fairly wet stage (remembering that it will make your work even wetter!). Trying to apply slip to dry clay won’t work! If you want to do sgraffito – you will need to keep the work leather hard (a state of dryness where you can still work the clay with a little effort and a little water and care). Step Three – Drying Most of the time your work can go into the rack uncovered to let it dry out for the following week. If you want to continue forming or shaping you will need to double bag your work – put your work on a suitable sized bat and put the bat in a bag so the base of the bag is under the bat, then put another bag over the top of the work and tuck the top of the bag under the bat. If you want to trim (or turn) your thrown work the following week, it should also be double bagged. If your work is large, delicate, or of uneven thicknesses, you should lightly cover your work for drying. When considering the drying process, bare in mind the weather, humidity and wind! The hotter and dryer, the faster things dry and work can dry unevenly in the shelves – this can lead to cracking – another time to lightly cover your work for drying. Step Four – Trimming and Cleaning Up Your work is dry! It is called greenware now and it is at it’s most fragile! Handle everything with two hands. I often refer to soft hands – keep everything gentle and with your fingers spread as much as possible. Try to not pick up things like plates too much, and always with both hands! Before your work can be bisque fired it should be “cleaned up”. You work won’t go into the kiln if it has sharp edges – when glazed, sharp edges turn into razor blades! Use a piece of fly wire to rub the work all over – this will scratch a little so be light handed. Use a knife or metal kidney to scrape any areas that require a bit more dynamic treatment than the fly wire offers! Finally, a very light wipe over with a slightly damp sponge can help soften and soothe all of your edges and dags! Trimming thrown work: If you are planning to trim (or turn) your thrown work (and you should be), make sure you bag it well – your work should be leather hard to almost dry for easiest trimming. Use this step to finish the work completely – use a metal kidney to polish the surface, or a slightly damp sponge to give a freshly thrown look. Wipe the sponge around the rim after trimming, and check the inside of the pot for dags! Trimming slip cast work: Usually I will trim the rims of your work on the wheel the following day to make that stage easier, however you will still need to check your work for lumps and bumps. Last but not least – check that your name is still clearly on the bottom of your work. Step Five – Bisque Firing When the work is completely dry it can go into the bisque kiln. The bisque kiln is fired to 1000°C. This process burns off the water in the clay as well as some of the chemically bound water. The structure of the clay is not altered that much at this temperature. Inside the bisque kiln, the work is stacked a little, small bowl inside a larger bowl and onto a heavy plate. Smaller items like decorations or drink coasters might get stacked several high. Consideration is paid to the weight of the stack and shape of the work. A bisque kiln can fire about one and a half times the amount of work that the glaze kiln can fire. The firing takes about 10 hours to complete the cycle and about two days to cool down. Once it has been emptied the work is placed in the glaze room ready for you to decorate! Step Six – Glazing Decorating your work with colour can be a lot of fun – and time consuming! There are three main options for surface treatment at this stage: Oxide Washes Underglazes Glazes Washes and underglazes do not “glaze” the work – It will still need a layer of glaze to fully seal the clay (washes don’t need glaze on surfaces not designed for food or liquid as they can gloss up a little on their own). Underglazes are stable colourants that turn out pretty much how they look in the jar. They can be mixed with each other to form other colours and can be used like water colours to paint onto your work. Mostly they should have a clear glaze on top to seal them. Oxides are a different species – the pink oxide (cobalt) wash turns out bright blue for instance. They don’t always need a glaze on top, and some glazes can change the colour of the wash! The glazes need no other “glaze” on top! Be careful of unknown glaze interactions – you can put any combination of glaze in a bowl or on a plate, but only a single glaze on the outside of any vertical surface! Glazes are a chemical reaction under heat. We don’t know the exact chemicals in the Mayco glazes we use. I can guess by the way they interact with each other, however, on the whole, you need to test every idea you have, and not run the test on a vertical surface! Simply put, glaze is a layer of glass like substance that bonds with the clay underneath. Clay is made of silica, alumina and water. Glaze is made of mostly silica. Silica has a melting point of 1700°C and we fire to 1240°C. The silica requires a “flux” to help it melt at the lower temperature. Fluxes can be all sorts of chemicals – a common one is calcium – calcium has a melting point of 2500°C, however, together they both melt at a much lower temperature! Colourants are metal oxides like cobalt (blue), chrome (green through black), copper (green, blue, even red!), manganese (black, purple and pink) iron (red brown), etc. Different chemicals in the glaze can have dramatic effects. for example, barium carbonate (which we don’t use) turns manganese bright pink! Other elements can turn manganese dioxide brown, blue, purple and reddish brown. Manganese dioxide is a flux in and of itself as well. So, glazes that get their black and purple colours, often interact with other glazes and RUN! Our mirror black is a good example – it mixes really well with many glazes because it fluxes them – causes them to melt faster. It will also bring out many beautiful colours in the glazes because it’s black colouring most definitely comes from manganese dioxide! Glaze chemistry is a whole subject on it’s own! We use commercial Mayco glazes on purpose – for their huge range of colour possibilities, stability, cool interactions, artistic freedom with the ability to easily brush the glazes on and ease of use. We currently have almost 50 glazes on hand! A major project is to test the interactions of all glazes with each other. That is 2,500 test tiles!!!! I’m going to make the wall behind the wheels the feature wall of pretty colours! Step Seven – Glaze (Gloss or sometimes called “Glost”) Firing Most of the time this is the final stage of making your creation (but not always!) The glaze kiln goes to 1240°C. This is called cone 6, or midrange. It is the low end of stoneware temperatures. Stoneware clays and glazes are typically fired at cone 8 – 10, that is 1260 – 1290°C. The energy requirement to go from 1240°C to 1280°C is almost a 30% more! Our clay is formulated to vitrify (mature, turn “glass-like”) at 1240°, as are our glazes. A glaze kiln take around 12 hours to reach temperature and two to three days to cool down. Sometimes a third firing process is required – this is for decoration that is added to work after the glaze firing. For example – adding precious metals and lustres. this firing temperature is usually around 600 – 800°C depending upon the techniques being used. There are many students interested in gold and silver trims – we will be doing this third type of firing soon! After firing your work will be in the student finished work shelves. Remember to pay for it before you head out the door! There is a small extra charge for using porcelain clay (it’s more than twice the price of regular clay), and for any third firing process! Once your work has been fired it can not turn back into clay for millennia – so don’t fire it if you don’t like it! Put it in the bucket for recycling. https://firebirdstudios.com.au/the-process-of-making-pottery/ This bowl is an example of kitchenware used in the 19th century and still in use today.Bowl white ceramic plain that has two sets of edging around lip. Inside bowl has plaster designed to look like cooking mixture.flagstaff hill, warrnambool, shipwrecked-coast, flagstaff-hill, flagstaff-hill-maritime-museum, maritime-museum, shipwreck-coast, flagstaff-hill-maritime-village, kitchen equipment, ceramic -
 Flagstaff Hill Maritime Museum and Village
Domestic object - Bowl, J & G Meakin, Late 19th or early 20th Century
The Process of Making Pottery Decorating, Firing, Glazing, Making, Technical There is a rhythm and flow to clay. It can’t be done all at once! Even the making process! It can take weeks to get everything done, especially if you can only work on your pottery once a week! Even though we have three hour classes, it’s often just not enough time! Here is an overview of some of the processes so you have a bit more grasp on some of the technical stuff! Step One – Design There are SO many ideas out there for making stuff in clay! From delicate porcelain jewellery, through to heavy sculptural work and everything in between. Deciding your direction is sometimes not that easy – when you first start, try everything, you will naturally gravitate to the style that you enjoy! The options and variations are endless and can get a wee bit overwhelming too! Check in with me before you start to ensure your ideas will work, what order you might do things, how you could achieve the look you are seeking and any other technical data required! Step Two – Making Clay is thixotropic. This means that as you work with it, the clay first gets sloppier and wetter, before is begins to dry in the atmosphere. For most things, you simply can’t do all parts of the project at once. An example of work order might look like: Get last weeks work out from the shelves Prepare clay for today’s work – roll your clay, prepare balls for throwing, make the first stage of a pinch pot) Clean up last week’s work and put it on the shelf for bisque firing Check that you have any glazing to do – and do enough of it that you will have time to finish your main project Do the next step of your next project – there might be a further step that can’t be complete immediately, in that case, wrap your work well and put onto the shelves. Letting your work rest for a while can really help keep your work clean and professional looking. Many things require bagging under plastic to keep it ready for work the next week – put your name on the outside of the bag so you can find your work easily. We have stickers and markers. Consider how you want to decorate your work – coloured slip can be applied at a fairly wet stage (remembering that it will make your work even wetter!). Trying to apply slip to dry clay won’t work! If you want to do sgraffito – you will need to keep the work leather hard (a state of dryness where you can still work the clay with a little effort and a little water and care). Step Three – Drying Most of the time your work can go into the rack uncovered to let it dry out for the following week. If you want to continue forming or shaping you will need to double bag your work – put your work on a suitable sized bat and put the bat in a bag so the base of the bag is under the bat, then put another bag over the top of the work and tuck the top of the bag under the bat. If you want to trim (or turn) your thrown work the following week, it should also be double bagged. If your work is large, delicate, or of uneven thicknesses, you should lightly cover your work for drying. When considering the drying process, bare in mind the weather, humidity and wind! The hotter and dryer, the faster things dry and work can dry unevenly in the shelves – this can lead to cracking – another time to lightly cover your work for drying. Step Four – Trimming and Cleaning Up Your work is dry! It is called greenware now and it is at it’s most fragile! Handle everything with two hands. I often refer to soft hands – keep everything gentle and with your fingers spread as much as possible. Try to not pick up things like plates too much, and always with both hands! Before your work can be bisque fired it should be “cleaned up”. You work won’t go into the kiln if it has sharp edges – when glazed, sharp edges turn into razor blades! Use a piece of fly wire to rub the work all over – this will scratch a little so be light handed. Use a knife or metal kidney to scrape any areas that require a bit more dynamic treatment than the fly wire offers! Finally, a very light wipe over with a slightly damp sponge can help soften and soothe all of your edges and dags! Trimming thrown work: If you are planning to trim (or turn) your thrown work (and you should be), make sure you bag it well – your work should be leather hard to almost dry for easiest trimming. Use this step to finish the work completely – use a metal kidney to polish the surface, or a slightly damp sponge to give a freshly thrown look. Wipe the sponge around the rim after trimming, and check the inside of the pot for dags! Trimming slip cast work: Usually I will trim the rims of your work on the wheel the following day to make that stage easier, however you will still need to check your work for lumps and bumps. Last but not least – check that your name is still clearly on the bottom of your work. Step Five – Bisque Firing When the work is completely dry it can go into the bisque kiln. The bisque kiln is fired to 1000°C. This process burns off the water in the clay as well as some of the chemically bound water. The structure of the clay is not altered that much at this temperature. Inside the bisque kiln, the work is stacked a little, small bowl inside a larger bowl and onto a heavy plate. Smaller items like decorations or drink coasters might get stacked several high. Consideration is paid to the weight of the stack and shape of the work. A bisque kiln can fire about one and a half times the amount of work that the glaze kiln can fire. The firing takes about 10 hours to complete the cycle and about two days to cool down. Once it has been emptied the work is placed in the glaze room ready for you to decorate! Step Six – Glazing Decorating your work with colour can be a lot of fun – and time consuming! There are three main options for surface treatment at this stage: Oxide Washes Underglazes Glazes Washes and underglazes do not “glaze” the work – It will still need a layer of glaze to fully seal the clay (washes don’t need glaze on surfaces not designed for food or liquid as they can gloss up a little on their own). Underglazes are stable colourants that turn out pretty much how they look in the jar. They can be mixed with each other to form other colours and can be used like water colours to paint onto your work. Mostly they should have a clear glaze on top to seal them. Oxides are a different species – the pink oxide (cobalt) wash turns out bright blue for instance. They don’t always need a glaze on top, and some glazes can change the colour of the wash! The glazes need no other “glaze” on top! Be careful of unknown glaze interactions – you can put any combination of glaze in a bowl or on a plate, but only a single glaze on the outside of any vertical surface! Glazes are a chemical reaction under heat. We don’t know the exact chemicals in the Mayco glazes we use. I can guess by the way they interact with each other, however, on the whole, you need to test every idea you have, and not run the test on a vertical surface! Simply put, glaze is a layer of glass like substance that bonds with the clay underneath. Clay is made of silica, alumina and water. Glaze is made of mostly silica. Silica has a melting point of 1700°C and we fire to 1240°C. The silica requires a “flux” to help it melt at the lower temperature. Fluxes can be all sorts of chemicals – a common one is calcium – calcium has a melting point of 2500°C, however, together they both melt at a much lower temperature! Colourants are metal oxides like cobalt (blue), chrome (green through black), copper (green, blue, even red!), manganese (black, purple and pink) iron (red brown), etc. Different chemicals in the glaze can have dramatic effects. for example, barium carbonate (which we don’t use) turns manganese bright pink! Other elements can turn manganese dioxide brown, blue, purple and reddish brown. Manganese dioxide is a flux in and of itself as well. So, glazes that get their black and purple colours, often interact with other glazes and RUN! Our mirror black is a good example – it mixes really well with many glazes because it fluxes them – causes them to melt faster. It will also bring out many beautiful colours in the glazes because it’s black colouring most definitely comes from manganese dioxide! Glaze chemistry is a whole subject on it’s own! We use commercial Mayco glazes on purpose – for their huge range of colour possibilities, stability, cool interactions, artistic freedom with the ability to easily brush the glazes on and ease of use. We currently have almost 50 glazes on hand! A major project is to test the interactions of all glazes with each other. That is 2,500 test tiles!!!! I’m going to make the wall behind the wheels the feature wall of pretty colours! Step Seven – Glaze (Gloss or sometimes called “Glost”) Firing Most of the time this is the final stage of making your creation (but not always!) The glaze kiln goes to 1240°C. This is called cone 6, or midrange. It is the low end of stoneware temperatures. Stoneware clays and glazes are typically fired at cone 8 – 10, that is 1260 – 1290°C. The energy requirement to go from 1240°C to 1280°C is almost a 30% more! Our clay is formulated to vitrify (mature, turn “glass-like”) at 1240°, as are our glazes. A glaze kiln take around 12 hours to reach temperature and two to three days to cool down. Sometimes a third firing process is required – this is for decoration that is added to work after the glaze firing. For example – adding precious metals and lustres. this firing temperature is usually around 600 – 800°C depending upon the techniques being used. There are many students interested in gold and silver trims – we will be doing this third type of firing soon! After firing your work will be in the student finished work shelves. Remember to pay for it before you head out the door! There is a small extra charge for using porcelain clay (it’s more than twice the price of regular clay), and for any third firing process! Once your work has been fired it can not turn back into clay for millennia – so don’t fire it if you don’t like it! Put it in the bucket for recycling. https://firebirdstudios.com.au/the-process-of-making-pottery/This bowl was made by renowned pottery company J & G Meakin of England. The firm was established in the mid-1800's. The bowl is an example of kitchenware used in the 19th century and still in use today.Bowl; white ceramic, round and tapering inwards towards base. Made by J and G Meakin England.On base, 'Ironstone China Reg SOL 391413' with symbolflagstaff hill, flagstaff hill maritime museum and village, warrnambool, maritime museum, maritime village, great ocean road, shipwreck coast, mixing bowl, food preparation, j & g meakin, pottery, stoke-on-trent, kitchen equipment, ceramic -
 Flagstaff Hill Maritime Museum and Village
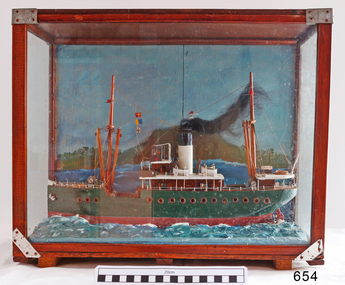
Craft - Ship Model, Eumeralla
Ship model Eumeralla steamship with one funnel, two masts portholes in hull, set against a coastal scene with lighthouse. Ship is painted green. Model is in a wooden framed glass case. Split on background scene. Case strengthened by metal brackets at top corners and bottom front corners. flagstaff hill, warrnambool, shipwrecked-coast, flagstaff-hill, flagstaff-hill-maritime-museum, maritime-museum, shipwreck-coast, flagstaff-hill-maritime-village -
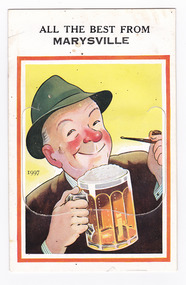 Marysville & District Historical Society
Postcard (item) - Novelty postcard, Valentine Publishing Co. Pty. Ltd, ALL THE BEST FROM MARYSVILLE, 1940's-1960's
A novelty postcard with pull-out strip of 9 miniature photographs that was produced by the Valentine Publishing Co as a souvenir of Marysville.A novelty postcard with pull-out strip of 9 miniature photographs that was produced by the Valentine Publishing Co as a souvenir of Marysville.ALL THE BEST FROM/ MARYSVILLE 1997 PRINTED PAPER MAILING NOVELTY TO OPEN RAISE FLAP From VALENTINE'S "MAIL NOVELTY" POST CARD COPYRIGHT Printed in Great Britain Tomarysville, victoria, postcard, souvenir, valentine publishing co, crossways cabaret (image 1), taggerty river (image 2), acheron way (image 3), blacks spur road (image 4), nicholl's lookout (image 5), main street marysville (image 6), sugarloaf bay eildon (image 7), steavenson falls (image 8), cumberland falls (image 9) -
 Flagstaff Hill Maritime Museum and Village
Container - Medicine Bottle, J.C. Ayer & Co, 1868-1878
... Clear glass bottle with a green tinge. The bottle has... "AYER" Clear glass bottle with a green tinge. The bottle has ...The glass medicine bottle is an example of an early 20th-century medicine bottle. Moulton glass was blown into a two-piece mould and a tool with an inscription was used to stamp the base. The mouth was added after the bottle was blown. The bottle has encrustations and residue on the surface of the glass. The cargo of the Falls of Halladale included medicine. It was made by Ayer & Co. and its shape and maker's mark matches one of Ayer's early style bottles that contained J.C. Ayer's Hair Vigor, which was made from about 1868 to 1915. James C. Ayer, born in Connecticut, US in 1818, was a medicine manufacturer. His first medicine was Cherry Pectoral, for pulmonary illness. His medicine was very popular in the 1850s. Ayer died in 1878. A section of his home town Groton Junction was nameed 'Ayer' in his honour. The FALLS of HALLADALE 1886 – 1908: - The sailing ship Falls of Halladale was an iron-hulled, four-masted barque, used as a bulk carrier of general cargo. She left New York in August 1908 bound for Melbourne and Sydney. In her hold was general cargo consisting of roof tiles, barbed wire, stoves, oil, benzene, and many other manufactured items. After three months at sea and close to her destination, a navigational error caused the Falls of Halladale to be wrecked on a reef off the Peterborough headland on the 15th of November, 1908. The captain and 29 crew members survived, but her cargo was largely lost, despite two salvage attempts in 1908-09 and 1910. The Court of Marine Inquiry in Melbourne ruled that the foundering of the ship was entirely due to Captain David Wood Thomson's navigational error, not too technical failure of the Clyde-built ship. The Falls of Halladale was built in1886 by Russell & Co., at Greenock shipyards on the River Clyde, Scotland for Wright, Breakenridge & Co of Glasgow. The ship had a sturdy construction built to carry maximum cargo and was able to maintain full sail in heavy gales, one of the last of the 'windjammers' that sailed the Trade Route. She and her sister ship, the Falls of Garry, were the first ships in the world to include fore and aft lifting bridges. The new raised catwalk-type decking allowed the crew to move above the deck in stormy conditions. The medicine bottle is an example of medicine containers in the late 19th to early 20th century. It is also significant for its association with the historic cargo ship Falls of Halladale, wrecked in local waters in the early 20th century. The ship is listed on the Victorian Heritage Register, No. S255. It was one of the last ships to sail the Trade Routes and one of the first vessels to have fore and aft lifting bridges. The ship is an example of the design, materials and fittings of a late-19th-century sailing vessel. Its cargo represents several aspects of Victoria’s shipping trade. The wreck is now protected as a Historic Shipwreck under the Commonwealth Historic Shipwrecks Act 1976.Clear glass bottle with a green tinge. The bottle has a rolled applied lip, narrow mouth, slim neck, rounded shoulders and straight rectangular body and an indented base. The body has side seams and irregular thicknesses of glass. Glass has imperfections and bubbles, and one shoulder is missing. An embossed inscription is on the base. The bottle was recovered from the wreck of the Falls of Halladale. "AYER"flagstaff hill, maritime museum, maritime village, warrnambool, great ocean road, shipwreck coast, falls of halladale, iron ship, four-masted ship, sailing ship, clipper ship, windjammer, shipwreck, peterborough, 1908 shipwreck, russell & co., fore and aft lifting bridges, medicine bottle, health care, ayer, j c ayer & co., james c ayer, hair vigor, men's hair care, personal care -
 Blacksmith's Cottage and Forge
Bobbins - lace making, Untitled, early 20th century
These bobbins were given to donor by her aunt and were part of the set on which the donor learned to make Nine Pin edging when she was 8 years old. (approx 1911) 2 wooden lacemaker bobbins, decorated on ends with coloured glass beads attached with wire. Bobbin one has 4 red beads, 4 clear beads, 2 black beads and 1 white bead with green and red colour band. Bobbin two has 2 brown beads, 2 blue beads, 1 black bead and 1 clear bead. Bobbins have shaped and turned shafts. bobbins lace, wood turning, hand craft -
Blacksmith's Cottage and Forge
Insulator, Unknown
... Heavy glass, lightly tinted green, insulator... Marsh goldfields Used on telegraph poles. electrical glass ...Used on telegraph poles.Heavy glass, lightly tinted green, insulator4 ::::::::: CCGelectrical, glass, technology, coloured, insulator -
Federation University Historical Collection
Pamphlet, University of Ballarat Australian Studies Centre, University of Ballarat Conference Pamphlet, 12/1999
A conference in memory of Kevin Livingston to celebrate the role the Irish in Ballarat played in the formation of the nation..1) Light green tri-folded A4 pamphlet .2) Program for the 'Through Irish Eyes' Conference, A conference held in memory of Associate Professor Kevin T. Livinsgston by the University of Ballarat Australian Studies Centre, 3-5 December 1999. Speakers were: * Anne Beggs Sunter - 'irish Republican Echoes at Eureka * Jill Blee - 'Portrait of a Ballarat Irishman/woman * Dianne (Leonard) Cahir - 'The Irishness of Dunnstown * Dianne Campbell - Sir Henry Cuthbert * Dermot Clancy - Colonial Clergy - All Hallows College and the Australian Mission in the 19th Century. * Anne Cunningham - Dom bernard Smith's Australian Mission * Mella Cusack - Relations between the Young Irelanders and the Catholic Clergy in Australia * John Daykin - He that is Not With Me is Against Me: The Role of the Irish in the Defeat of conscription, Ballarat 1916-1917 * Dr Frances Devlin Glass - '[T]ouches of nature that make the world kin: Furphy, Race and Anxiety' * Helen Kinloch - Bernard O'Dowd,, and dreams of a Golden age in Australia' * Associate Professor Rederic Lacey - 'Exploring Pathways Towards reconciliation Through Encountering Our Shared Histories' * Dymphna Lonergan - 'Sounds Irish' * Dr David Lucy - ' Remarks on the Decline of Irish Language' * Patrick McCormack - The Irish Factor in the Campaign for Federation in New South Wales * Siobhan McHugh - 'In Search of Soul: One Irishwoman's Journey in Australia' * Ken Mansell * Dr Val Noone - 'the Irish in collingwood 1860-1900: Family Tree Meets historical Record * Ambassador Richard Anthony O'Brien * Terrence O'neill-FitzSimons - "Francis Thomas Cusack-Russell' * Professor Bob Reece - 'The making of the Eureka Film' * Edward O'Reilly - 'John Boyle-O'Reilly: Journeys and Monuments * Dr Chris Watson - 'Around the Boree Log and the identity of Irish Australians' * Dorothy Wickham - 'Saints or Sinners?: The Influence on Ballarat's Female refuge by Irish Women' * Christine Wright - 'A Stately Landmark: Adam Loftus Lynn .3) newspaper article on the conference from The Courier, 06/12/1999 - 'Irish Celebrate Their Role in City'Black print on light green paperaustralian studies, university of ballarat, kevin livingston, mt helen campus, "through irish eyes", jill blee, david james, rod lacey, val noone, dianne campbell, christine wright, terence o'neill-fitzsimons, helen kinloch, diane cahir, dorothy wickham, edward reilly, mella cusack, anne beggs-sunter, patrick mccormack, anne cunningham, shane carmody, dermot clancy, francis devlin-glass, chris watson, david lucy, dymphna lonergan, richard o'brien, bob reece, peter kennedy, gough whitlam, australian studies, university of ballarat, kevin livingston, mt helen campus, "through irish eyes", jill blee, david james, rod lacey, val noone, dianne campbell, christine wright, terence o'neill-fitzsimons, helen kinloch, diane cahir, dorothy wickham, edward reilly, mella cusack, anne beggs-sunter, patrick mccormack, anne cunningham, shane carmody, dermot clancy, francis devlin-glass, chris watson, david lucy, dymphna lonergan, richard o'brien, bob reece, peter kennedy, gough whitlam, genealogy, family history, irish australians, irish -
 Federation University Historical Collection
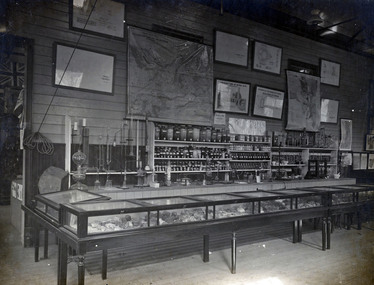
Photograph - Photograph (Black & White), Ballarat School of Mines Chemistry Room, c 1900
This image was taken at the height of the Ballarat school of Mines world wide fame.Black and white photograph mounted onto green card showing an interior chemistry classroom at the Ballarat school of Mines. Chemicals and apparatus line one wall, and geological specimens are housed in glass cases. Posters line the wall. On lower section of photograph 'Section Chemistry Room S.M.B. mines Dept Vic.ballarat school of mines, mines department, geology, chemisty -
 Federation University Historical Collection
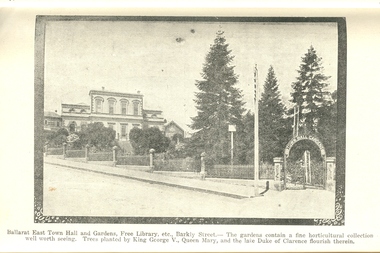
Book, Guide to Ballarat the Beautiful, 1923, 1923
The image of Ballarat Trustees relates to a building on the corner of Mair and Lydiard Streets. In 2010 it was used as Cuthberts law firm.Grey/green soft covered book. Includes photographs and map. Themes include: Ballarat History pre gold, mining, Eureka Stockade, Lake Wendouree, South Street, Grand National Eisteddfod of Australasia, schools, Black Hill, Lake Burrumbeet, Creswick, Buninyong. Illustrations and advertisement include: Sturt Street,James Smith, Ballarat Town Hall, Ballarat East Town Hall, Rowlands, Ballarat brewing Co., Royal Standard Brewery, steam train, Lake Wendouree, J.S. Vickery & Son, trout, Berry, Anderson & co., Ballarat Botanical Gardens and hot houses, Claxton Memorial Fountain, statues, New Imperial Gold Mine, Art Gallery of Ballarat, St Patrick's College, Ballarat Grammar School, Ballarat School of Mines, Ballarat College, Sunnyside Woollen Mills, Ballarat Agricultural High School, Passenger Steamer on Lake Wendouree, Moorabool Falls, Lal Lal Falls, Grosvenor Square, Netherby, Buninyong, Ballarat Motor Garage.ballarat, cuthberts, ballarat trustees, sturt street, tram, trams, ballarat town hall, crag's hotel, sun foundry, eureka aerated waters and brewing co, d. lem, chinese practioner, chinese herbalist, hugh v. mckay, sunshine harvester, gordon brothers, central business college, george hotel, edwards pyrites furnace, long's biscuits, ballarat eisteddfod, george farmer, ballarat botanical gardens, eureka stockade, lake wendouree, ballarat school of mines, moorabool falls, kirks reservoir, ballarat post office, hepburn lagoon, star of the east mine, emu river, ballarat observatory, statues, angus' rialto cafe, carlyon's hotel, clarendon ladies' college, j.e, sang, ballarat coffee palace, stansfield and smith, ballaray brewing company, phoenix brewery, rotal standard brewery, john macleod co, robert sim and co, cobb and co\eagle foundry, j.j. goller and co., mt buninyong lookout, ballarat town hall ballarat east gardens, hot house, glass house, statuary pavilion new imperial gold mining co.,, art gallery of ballarat, st patrick's college, ballarat agricultural high school, lake wendouree steamer, grass trees at mt clear, mount clear, lake burrumbeet, newlyn reservoir trout, lal lal falls, grosvenor square, netherby, ramelli's motor garage, buninyong gold obelisk, memorial, imperial gold mine, botanical gardens lily pond and fernery -
 Flagstaff Hill Maritime Museum and Village
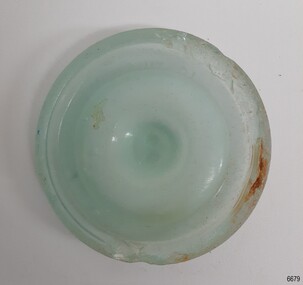
Functional object - Cap Liner, 1908
... Glass cap liner, green opaque moulded disc with indented... (indecipherable) Glass cap liner, green opaque moulded disc with indented ...A cap liner is an item that helps to seal the contents in a container to avoid spoiling the contents. This cap liner was recovered from the Falls of Halladale shipwreck. The Falls of Halladale was an iron-hulled, four-masted barque, used as a bulk carrier of general cargo. She left New York in August 1908 bound for Melbourne and Sydney. In her hold was general cargo consisting of roofing tiles, barbed wire, stoves, oil, and benzene as well as many other manufactured items. After three months at sea and close to her destination, a navigational error caused the Falls of Halladale to be wrecked on a reef off the Peterborough headland on the 15th of November, 1908. The captain and 29 crew members survived, but her cargo was largely lost, despite two salvage attempts in 1908-09 and 1910. The Court of Marine Inquiry in Melbourne ruled that the foundering of the ship was entirely due to Captain David Wood Thomson's navigational error, not too technical failure of the Clyde-built ship. The Falls of Halladale was built in1886 by Russell & Co., at Greenock shipyards on the River Clyde, Scotland for Wright, Breakenridge & Co of Glasgow. She was one of several designs of the Falls Line of ships named after waterfalls in Scotland. The company had been founded between 1870- 1873 as a partnership between Joseph Russell, Anderson Rodger, and William Todd Lithgow. During the period 1882-92 Russell & Co. standardised designs, which sped up their building process so much that they were able to build 271 ships during that time. The Falls of Halladale had a sturdy construction built to carry maximum cargo and was able to maintain full sail in heavy gales, one of the last of the 'windjammers' that sailed the Trade Route. She and her sister ship, the Falls of Garry, were the first ships in the world to include fore and aft lifting bridges. Previous to this, heavily loaded vessels could have heavy seas break along the full length of the deck, causing serious injury or even death to those on deck. The new raised catwalk-type decking allowed the crew to move above the deck in stormy conditions. The Falls of Halladale shipwreck is listed on the Victorian Heritage Register (No. S255). She was one of the last ships to sail the Trade Routes. She is one of the first vessels to have fore and aft lifting bridges. She is an example of the remains of an International Cargo Ship and also represents aspects of Victoria’s shipping industry. The wreck is protected as a Historic Shipwreck under the Commonwealth Historic Shipwrecks Act (1976).Glass cap liner, green opaque moulded disc with indented ring and two pontil marks. Inscription on the top (undecipherable). Recovered from Falls of Halladale wreck. Embossed inscription (indecipherable)flagstaff hill, warrnambool, shipwrecked-coast, flagstaff-hill, flagstaff-hill-maritime-museum, maritime-museum, shipwreck-coast, flagstaff-hill-maritime-village, cap liner, falls of halladale, russell & co., glass liner, glass seal -
 Flagstaff Hill Maritime Museum and Village
Container - Sauce Bottle, 1878
... Clear glass bottle with a green tinge. The bottle has..." and around shoulder "WORCESTERSHIRE SAUCE" Clear glass bottle ...This Worcestershire Sauce bottle was made by Lee & Perkins. It was hand blown into a two-piece mould, snapped off the blowing rod and then had a separate mouth applied to the neck, as evidenced by the side seams, ripples in the body, join below the mouth, bubbles in the glass and a push-up base that is uneven in thickness. The Loch Ard got its name from ”Loch Ard” a loch that lies to the west of Aberfoyle, and the east of Loch Lomond. It means "high lake" in Scottish Gaelic. The vessel belonged to the famous Loch Line which sailed many vessels from England to Australia. The Loch Ard was built in Glasgow by Barclay, Curdle and Co. in 1873, the vessel was a three-masted square-rigged iron sailing ship that measured 79.87 meters in length, 11.58 m in width, and 7 m in depth with a gross tonnage of 1693 tons with a mainmast that measured a massive 45.7 m in height. Loch Ard made three trips to Australia and one trip to Calcutta before its fateful voyage. Loch Ard left England on March 2, 1878, under the command of 29-year-old Captain Gibbs, who was newly married. The ship was bound for Melbourne with a crew of 37, plus 17 passengers. The general cargo reflected the affluence of Melbourne at the time. Onboard were straw hats, umbrellas, perfumes, clay pipes, pianos, clocks, confectionery, linen and candles, as well as a heavier load of railway irons, cement, lead and copper. There were other items included that were intended for display in the Melbourne International Exhibition of 1880. The voyage to Port Phillip was long but uneventful. Then at 3 am on June 1, 1878, Captain Gibbs was expecting to see land. But the Loch Ard was running into a fog which greatly reduced visibility. Captain Gibbs was becoming anxious as there was no sign of land or the Cape Otway lighthouse. At 4 am the fog lifted and a lookout aloft announced that he could see breakers. The sheer cliffs of Victoria's west coast came into view, and Captain Gibbs realised that the ship was much closer to them than expected. He ordered as much sail to be set as time would permit and then attempted to steer the vessel out to sea. On coming head-on into the wind, the ship lost momentum, the sails fell limp and Loch Ard's bow swung back towards land. Gibbs then ordered the anchors to be released in an attempt to hold their position. The anchors sank some 50 fathoms - but did not hold. By this time the ship was among the breakers and the tall cliffs of Mutton Bird Island rose behind. Just half a mile from the coast, the ship's bow was suddenly pulled around by the anchor. The captain tried to tack out to sea, but the ship struck a reef at the base of Mutton Bird Island, near Port Campbell. Waves subsequently broke over the ship and the top deck became loosened from the hull. The masts and rigging came crashing down knocking passengers and crew overboard. When a lifeboat was finally launched, it crashed into the side of Loch Ard and capsized. Tom Pearce, who had launched the boat, managed to cling to its overturned hull and shelter beneath it. He drifted out to sea and then on the flood tide came into what is now known as Loch Ard Gorge. He swam to shore, bruised and dazed, and found a cave in which to shelter. Some of the crew stayed below deck to shelter from the falling rigging but drowned when the ship slipped off the reef into deeper water. Eva Carmichael a passenger had raced onto the deck to find out what was happening only to be confronted by towering cliffs looming above the stricken ship. In all the chaos, Captain Gibbs grabbed Eva and said, "If you are saved Eva, let my dear wife know that I died like a sailor". That was the last Eva Carmichael saw of the captain. She was swept off the ship by a huge wave. Eva saw Tom Pearce on a small rocky beach and yelled to attract his attention. He dived in and swam to the exhausted woman and dragged her to shore. He took her to the cave and broke the open case of brandy which had washed up on the beach. He opened a bottle to revive the unconscious woman. A few hours later Tom scaled a cliff in search of help. He followed hoof prints and came by chance upon two men from nearby Glenample Station three and a half miles away. In a complete state of exhaustion, he told the men of the tragedy. Tom then returned to the gorge while the two men rode back to the station to get help. By the time they reached Loch Ard Gorge, it was cold and dark. The two shipwreck survivors were taken to Glenample Station to recover. Eva stayed at the station for six weeks before returning to Ireland by steamship. In Melbourne, Tom Pearce received a hero's welcome. He was presented with the first gold medal of the Royal Humane Society of Victoria and a £1000 cheque from the Victorian Government. Concerts were performed to honour the young man's bravery and to raise money for those who lost family in the disaster. Of the 54 crew members and passengers on board, only two survived: the apprentice, Tom Pearce and the young woman passenger, Eva Carmichael, who lost her family in the tragedy. Ten days after the Loch Ard tragedy, salvage rights to the wreck were sold at auction for £2,120. Cargo valued at £3,000 was salvaged and placed on the beach, but most washed back into the sea when another storm developed. The wreck of Loch Ard still lies at the base of Mutton Bird Island. Much of the cargo has now been salvaged and some items were washed up into Loch Ard Gorge. Cargo and artefacts have also been illegally salvaged over many years before protective legislation was introduced in March 1982. One of the most unlikely pieces of cargo to have survived the shipwreck was a Minton majolica peacock- one of only nine in the world. The peacock was destined for the Melbourne 1880 International Exhibition. It had been well packed, which gave it adequate protection during the violent storm. Today the Minton peacock can be seen at the Flagstaff Hill Maritime Museum in Warrnambool. From Australia's most dramatic shipwreck, it has now become Australia's most valuable shipwreck artifact and is one of very few 'objects' on the Victorian State Heritage Register. The shipwreck of the Loch Ard is of significance for Victoria and is registered on the Victorian Heritage Register ( S 417). Flagstaff Hill has a varied collection of artefacts from Loch Ard and its collection is significant for being one of the largest accumulation of artefacts from this notable Victorian shipwreck. The collections object is to also give us a snapshot into history so we can interpret the story of this tragic event. The collection is also archaeologically significant as it represents aspects of Victoria's shipping history that allows us to interpret Victoria's social and historical themes of the time. The collections historically significance is that it is associated unfortunately with the worst and best-known shipwreck in Victoria's history.Clear glass bottle with a green tinge. The bottle has an applied mouth, seams from base to mouth, bubbles and impurities in the glass, and uneven glass thickness. Vertical and horizontal inscriptions are raised. The bottle once contained Worcestershire Sauce and was made by Lea and Perkins. Vertical; "LEA & PERKINS" and around shoulder "WORCESTERSHIRE SAUCE" flagstaff hill, flagstaff hill maritime museum and village, warrnambool, maritime museum, maritime village, great ocean road, shipwreck coast, sauce bottle, worcestershire sauce, shipwreck artefact, condiment bottle, loch ard artifacts, lea and perkins -
 Federation University Historical Collection
Scientific Instrument
Glass tube attached capped with metal and with a green plastic coated copper wire attached to conduct electricity. The other end of the tube narrows and has a metal 'prod' attached. The tube as a nother tube inside it which includes a spring made of fine wire. A small amount of thick liquid is present between both tubes.laboratory, testing, graham hood -
 Federation University Historical Collection
Book - Scrapbook, Ballarat School of Mines Invoices, 01/07/1895 - 05/05/1899
The invoices glued into the scrapbook relate to purchases from the Ballarat School of MinesA very large dark green hard covered volume with read leather face spine and corners. Black ornamental bands across the spine. Leather strap with buckle for securing covers when not in use. Plain pages of brown "wrapping paper". Receipts glued to pages, folded and then numbered consecutively by hand i blue pencil. First receipt No. 996 (01 July 1895), numbering restarts after 1000 (three times). Last receipt is No. 155 (05 May 1899).invoices, ballarat school of mines, tunbridges, pringle, receipts, w. hamer, plumber, eyres brothers, j.h. trotman, g. batchelor, n. guthridge, w. doepel, frank fiscalini, huddart, barker and co., a. gaunt, h. wardle and son, turron & mcgavin, e.e. campbell, g.f. hocking, william sutherland, f. vale, victoria insurance company, r. collie & co., walter cornell, john fiscalini, mcvitty & co, j. miller & co, a.g. corbett, ben franklin printing works, middleton & morris, melbourne glass bottle works co, eldon chambers, e.l. stubbs, j. jones, firewood, mrs soderstrom, museum, ballarat school of mines museum, hill & paine, h. hebestadt, f.w. commons, sculptor, cherry & robins, alex e. monsbourgh, alex purdie, andrew cant, ballarat star, frederick martell, goodfellows, evening echo, a.h. powell, phillately