Showing 1767 items
matching tramways bendigo
-
 Ballarat Tramway Museum
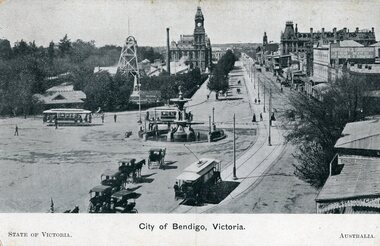
Postcard, State of Victoria, Charing Cross Bendigo with three trams, 1908
... for the visit of the American fleet in 1908. Trams tramways Bendigo ...Photograph of Charing Cross Bendigo with three trams in the view and a number of horse drawn cabs. Has Town Hall and other buildings in the background. Title of the postcard is "City of Bendigo, Victoria" In corners "State of Victoria" and "Australia" On rear of postcard are the words "The Commonwealth of Australia, Victoria Welcomes, The American Fleet Postcard", with the State of Victoria seal/symbol, place for a stamp, correspondence and address. Issued for the visit of the Great White Fleet, USA, 1908. See Google for the timing of the visit. See item 9081 for a similar photograph with a different crop.Demonstrates an item produced for the visit of the American fleet in 1908.Printed black and white postcard divided back unused.trams, tramways, bendigo, the great white fleet, charing cross -
 Melbourne Tram Museum
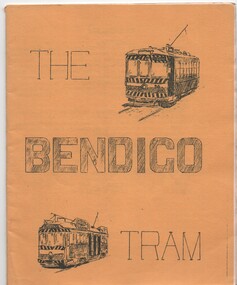
Book, A. Weston and typed by Geoff Clark, "The Bendigo Tram", 1971
... Trams tramways Bendigo Twenty page booklet on the history ...Twenty page booklet on the history, operation and tramcars of Bendigo, produced by the Nth Sydney Boys High School Railway Club in September 1971. Printed on a wax cut stencil process, with green covers, drawings, maps, track layout, fleet list, gives tentative closure dates, route descriptions, sketches, stapled on edge. Title "The Bendigo Tram". Inside front cover notes written by A. Weston and typed by Geoff Clark. See Reg item XXX for the Ballarat version.trams, tramways, bendigo -
 Melbourne Tram Museum
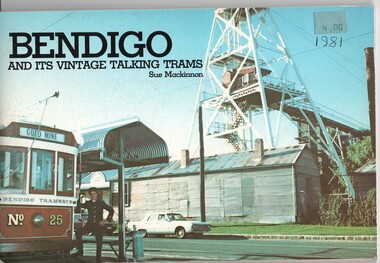
Book, Sue Mackinnon, "Bendigo and its Vintage Talking Trams", Dec. 1981
... Trams tramways Bendigo Battery Trams Bendigo Trust In the top ...Book - 100 pages, plus printed colour covers on gloss paper, centre stapled, titled "Bendigo and its Vintage Talking Trams", authored by Sue Mackinnon, published by the Bendigo Trust December 1981. Has many historic photos of Bendigo, trams in the streets of Bendigo and its then fleet of trams. Gives a history of the trams in Bendigo, including battery tram, steam, ESCo, SEC, the Trust, Central Deborah Gold Mine and its trammies. Has a centre page colour photos of the mine and one of the Birney. In the top right hand corner is a green price label "4.00".In the top right hand corner is a green price label "4.00" and written in ink underneath "1981"trams, tramways, bendigo, battery trams, bendigo trust -
 Melbourne Tram Museum
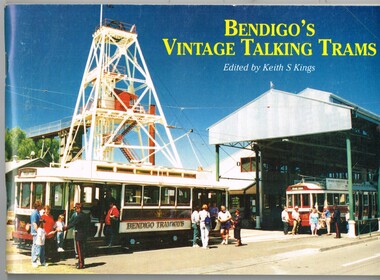
Book, Keith Kings, "Bendigo's Vintage Talking Trams", 1999
... Trams tramways Bendigo Battery Trams Bendigo Trust Page 1 note ...Book - 100 pages, plus printed colour covers on gloss paper, centre stapled, titled "Bendigo's Vintage Talking Trams", authored by Keith Kings1996, published by the Bendigo Trust December 1981. Has many historic photos of Bendigo, trams in the streets of Bendigo and its then fleet of trams. Gives a history of the trams in Bendigo, including battery tram, steam, ESCo, SEC, the Trust, Central Deborah Gold Mine and its trammies. Pages 49 to 52 - colour pages including a map of the route and staff and volunteers 30/10/1996.Page 1 note in ink "To Charles 20/2/97 Keith Kings"trams, tramways, bendigo, battery trams, bendigo trust -
 Melbourne Tram Museum
Photograph - Colour Print/s, Historic Electric Traction, Jan. 2006
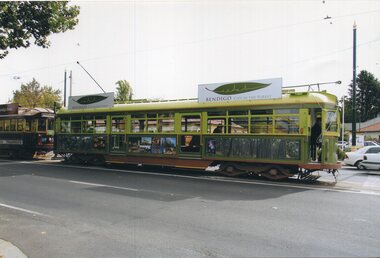
... Trams tramways Bendigo Advertising trams SW6 class tram 918 tram ...Colour print from the "Historic Electric Traction" collection of former MMTB SW6 918 as Bendigo Vintage Talking tram No. 34, c2006. In a Bendigo tourist colour scheme. Has a W2 behind. Historic Electric Traction - www.het.org.au - accessed 23/7/2020.On rear is the "Historic Electric Traction" stamp.trams, tramways, bendigo, advertising trams, sw6 class, tram 918, tram 34 -
 Melbourne Tram Museum
Photograph - Colour Photograph/s, Jeff Bounds, 27/11/1988 12:00:00 AM
... Trams tramways Bendigo W2 class Bridge St tram 456 tram 470 ...Colour print Ex Melbourne W2 class Nos. 456 & 470 on test run in Bridge St, at old loop, from cnr. Nolan St. / J. Bounds Photo 27/11/88" 456 has a The Met logo on the side.On rear in ink "Bendigo - Ex Melbourne W2 class Nos. 456 & 470 on test run in Bridge St, at old loop, from cnr. Nolan St. / J. Bounds Photo 27/11/88"trams, tramways, bendigo, w2 class, bridge st, tram 456, tram 470 -
 Melbourne Tram Museum
Photograph - Set of two Colour Prints, Jeff Bounds, 27/07/1991 12:00:00 AM
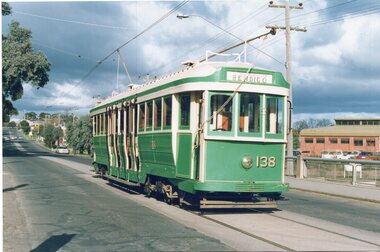
... Trams tramways Bendigo Nolan St Tours P Class tram 138 tram 24 ...Colour print of Bendigo Tram 24 dressed as its Melbourne number 138 (P class) operating a tour 27/7/1991 operated by Jeff Bounds, in Nolan St. Bendigo. .1 - In Nolan St at the creek bride. .2 - In Bridge St at Nolan St Corner.In ink on the back of each print: "Bendigo, Tram tour run by Jeff Bounds on Sat 27/7/91 before 138 (ex Bendigo 24) was exchanged to Melbourne for SW5 808."trams, tramways, bendigo, nolan st, tours, p class, tram 138, tram 24 -
 Melbourne Tram Museum
Photograph - Set of 4 Colour Print/s, Dennis O'Hoy, 8/04/1999 12:00:00 AM
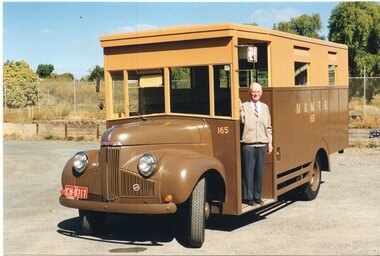
... Trams tramways Bendigo Buses Studebaker Munitions Factory ...Set of four Colour prints of Keith Kings and his Studebaker austerity or Munitions bus MMTB No. 165: Photo of the bus in Bendigo 8/4/1999, for the Easter Monday procession 5/4/1999. Photos by Dennis O'Hoy. 1 - Keith Kings standing on the front step. 2 - ditto 3 - showing the nature of the austere nature of the emergency wartime construction of these "Munitions" bus bodies. 4 - dittoDetails in ink on each photo.trams, tramways, bendigo, buses, studebaker, munitions factory, austerity buses, tram 165 -
 Melbourne Tram Museum
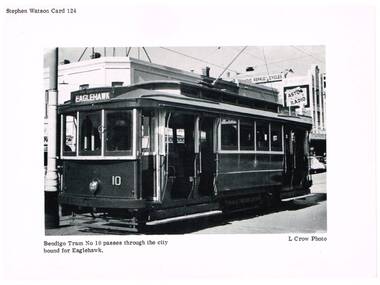
Photograph - Illustration/s, Stephen Watson, c1960
... Trams tramways Bendigo tram 10 . Printed illustration on light ...Printed illustration on light weight card, of Bendigo No. 10. Printed by Stephen Watson, as Card No. 124. Photo by L. Crow. Photo taken late 1950's or early 1960 prior to the application of dash canopy lighting and warning stripes. Photo in Mitchell St. Bendigo, with an advertisement for Astor Radio in the background. Tram has the destination of Eaglehawk..trams, tramways, bendigo, tram 10 -
 Ballarat Tramway Museum
Photograph - Glass plate - Bendigo tram 26 Eaglehawk, Keith Kings, 8/04/1950
... and the Eaglehawk Destination. Trams tramways Bendigo Bogie Trams tram 26 ...Photograph of No. 26 the Eaglehawk terminus, 8-4-1950, photo by Keith Kings. Has the Eaglehawk Town Hall in the background. Same as item 5783.Yields information about tram 26 and the Eaglehawk Destination.Glass plate negative.trams, tramways, bendigo, bogie trams, tram 26 -
 Ballarat Tramway Museum
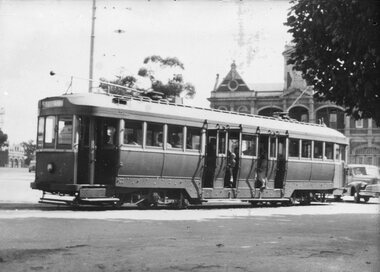
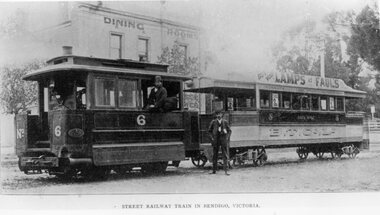
Photograph - Black & White Photograph/s, Peter Duckett, late 1890's?
... tramways Bendigo Steam Tram Motors Trailers tram 6 tram 5 ...Yields information about the appearance of Bendigo Birney trams during the 1950's, possibly during enthusiast tour.Black and White Photograph of Bendigo steam tram motor No. 2 and bogie trailer No. 5, 1890's?, photographed with a building marked "Dining Rooms" in the background. Has the driver in the steam tram motor and the conductor standing alongside. Trailer marked "B.T.Co. Ltd", possibly around the turn of the century. Earlier photos have the full company name. Trailer has roof advertisement "Buy your Lamps at Faull's" - oil? or electric? Taken from a postcard or a magazine - has the caption "Street Railway Train in Bendigo, Victoria", possibly North American origin given the language. Peter Duckett Collection.On the front, top left hand corner of the print "26" in ink within a circle. On rear, stamped in black ink "Photo supplied from P.W. Duckett Collection, All Rights Reserved, 69 Howitt Rd. Nth Caulfield 3161." On rear in ink "Motor 6 and Trailer 5" and a "William F Scott" address label.trams, tramways, bendigo, steam tram motors, trailers, tram 6, tram 5 -
 Ballarat Tramway Museum
Photograph - Black & White Photograph/s, Peter Duckett, late 1940's or early 1950's
... 4342. trams tramways Bendigo Depot Birney tram 29 On rear ...Yields information about the appearance of Bendigo's ESCo trams during the 1940's, prior to "modernisation", see Reg Item 4342.Black and White Photograph of Bendigo Birney tram No. 29 leaving the depot, with the destination of Eaglehawk. Photographed either late 1940's or early 1950's. Could be an enthusiast tour/ or visit, given the people in the background of the photograph. Peter Duckett Collection.On rear, stamped in black ink "Photo supplied from P.W. Duckett Collection, All Rights Reserved, 69 Howitt Rd. Nth Caulfield 3161."trams, tramways, bendigo, depot, birney, tram 29 -
 Ballarat Tramway Museum
Photograph - Black & White Photograph/s - set of 7, 16/04/1972 12:00:00 AM
... Set of seven black and white photographs of the day Bendigo... the final day of the Bendigo tramways and some of the tramcars used ...Yields information about the final day of the Bendigo tramways and some of the tramcars used.Set of seven black and white photographs of the day Bendigo Tramways closed 16-4-1972. Taken on Agfa paper. Has printing date of 18.8.72 stamped on rear. All have been used for display purposes. .1 - 25 leaving the depot .2 - 2 at Charing Cross, bound for Eaglehawk - has Ezywalkin Store in background. .3 - 18 crossing another tram at a loop on the Eaglehawk line. .4 - 28 at Charing Cross showing Special .5 - 26 inside depot, with Borough of Eaglehawk sign on the front bumper and bunting around the tram. .6 - 29 leaving the depot .7 - 26 in the final parade, with "Destination Eaglehawk" on a roof mounted advertisement board, with the Beehive building in the background and Coca Cola advertisement on top of the building. Photographer not known.3549.8 - has "photo No. 8" on rear and been marked out for publication. tramways, trams, bendigo, closure, eaglehawk, tram 25, tram 2, tram 18, tram 28, tram 26, tram 29 -
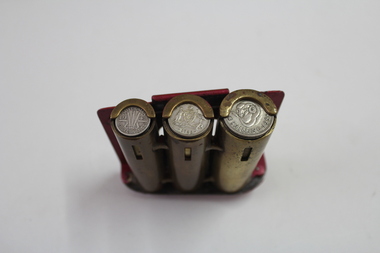 Bendigo Tramways (managed by the Bendigo Heritage Attractions)
Coin Holder, unknown
... Coin Holder used by staff on the Bendigo Tramways....Bendigo Tramways (managed by the Bendigo Heritage ...Coin Holder used by staff on the Bendigo Tramways.A pre-decimal, spring-loaded coin holder constructed using three various size brass tubes that are braise welded together. A red painted support bracket enables the holder to slide onto a belt. Designed to house threepences, sixpences and shillings.coin holder, tram -
 Bendigo Historical Society Inc.
Photograph - BENDIGO TRAMS, 1970s
... BENDIGO Tramways christmas Bendigo tram Royal celebration Myer ...Black and white photo of six trams lined up in Pall Mall opposite Rosiland Park. Christmas decorations visible on light poles. Taken by Jon Williams former staff member of Collins Booksellers.Nu Color Vuebendigo, tramways, christmas, bendigo, tram, royal celebration, myer, pall mall -
 Ballarat Tramway Museum
Newspaper - set of four, The Courier Ballarat, "Residents fight to save trams", 1967 -1968
... Government's proposal to close Ballarat and Bendigo Tramways 1... Ballarat and Bendigo Tramways 1 - The Age 8/8/1968 - 455 x 84 ...Set of four newspaper cuttings about the Victorian Government's proposal to close Ballarat and Bendigo Tramways 1 - The Age 8/8/1968 - 455 x 84 - providing details of the proposal, SEC employees, bus replacement, and keeping some trams in Ballarat for use at Sovereign Hill. Notes the politics in the Government over this matter. 2 - The Age 27/10/1967 - 47 x 43 - noting that the State Government had ordered the TRB to hold an enquiry 3 - undated and unsourced - "Battle for Trams by Petition" - Cr Roff of Save the Trams Committee - slow start on the petition. Notes the TRB recommendation to scrap the trams. 4 - The Sun - "Save tram committee will meet" - 28/10/1967 - 122 x 40 - quotes Cr Rolf of the Committee and the negative view of Cr A Nicholson.Yields information about the 1967/1968 proposal to closure both Ballarat and Bendigo Tramways. This proposal did not have the numbers in the upper house of the State Government.Set of four newspaper cuttings.Some have the newspaper source in ink along the top edge.tramways, closure, ballarat, bendigo, trb, cr roff, cr nicholson, petitions -
 Bendigo Historical Society Inc.
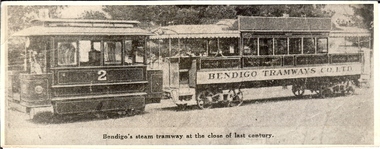
Photograph - BASIL MILLER COLLECTION: TRAMS
... Tramways Co. Inscription on bottom front: Bendigo's steam tramway..., showing sign Bendigo Tramways Co. Inscription on bottom front ...Steam tram No. 2 with carriage, showing sign Bendigo Tramways Co. Inscription on bottom front: Bendigo's steam tramway at the close of last century.person, individual, basil miller -
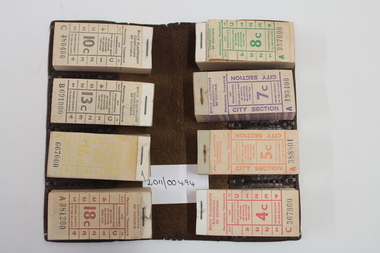 Bendigo Tramways (managed by the Bendigo Heritage Attractions)
Provinicial Tickets and Holder, circa 1970
... Used by Bendigo Tramway Conductors for the receipt...Bendigo Tramways (managed by the Bendigo Heritage ...Used by Bendigo Tramway Conductors for the receipt of payment, from customers.Leather ticket holder including unused books of Tramways tickets. Regional tickets include: 4, 5, 7, 8,10,13,16, &18 cent 4c Red C367800, 5c orange A388801, 7c purple A193400, 8c green A957000, 10c black C480400, 13c black B691000, 16c yellow A667000, 18c brown A381200.ticket, tram, sec -
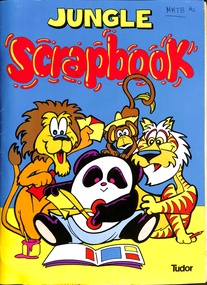 Melbourne Tram Museum
Ephemera - Jungle Scrapbook, "MMTB #2", 1987 to 2003
... tramways (Medicals) - Bendigo Advertiser - 12/4/2003 31 - House... tramways (Medicals) - Bendigo Advertiser - 12/4/2003 31 - House ...Collection of newspaper clippings pasted into the scrapbook by the donor. Covers the period 1987 to 2003 when the Melbourne tram system underwent large changes. Contains the following cuttings: 1 - Our trams keep rolling along - Herald Sun 9/8/1991 2 - Old trams will stay on track - The Sun - 8/8/1991 - featuring Joan Kirner at the front of tram 3 - Getting our bid on track - Olympic bid tram - Z4, - The Sun 9/3/1990 4 - Tram tours lead tourist bid - using a Y class - The Sun, 8/6/1992 5 - Spring St - city circle trackwork - The Sun 17/9/1993 6 - Track tokens mark tram trial - Bendigo battery tram - Bendigo Advertiser 11/4/1990 7 - $184 million commitment to build new vehicles - B2 class, 130 trams, Comeng 8 - The light rail project - Gail Moody - The Sun 1/7/1987 9 - Bet and shop on trams - Trust - Herald Sun 17/8/1993 10 - A clean sweep by star Paul - Paul Hudson and X 217 - Herald Sun 20/11/1991 11 - Tramway lines up 75th Anniversary - Progress Press 20-11-1991 12 - Public Notice - Spring and Bourke track works - The Met - Herald Sun 17/9/1993 13 - in the Heart of Hawthorn - Progress Press March 1993 14 - Peak hour boost pledge - Alan Brown - Herald Sun 9/7/1993 15 - Photo of Gas and Fuel buildings under construction - 1966, Herald sun 31/12/1993 16 - Drive brings comic relief - Victor Borge - Herald Sun 19/2/1994 17 - City circle tram loop - two cuttings - 28/4/1994 18 - Trust slams new-look trams - Herald Sun 8/2/1994 19 - Public notice - track works - Nicholson and Victoria - Herald Sun 18/2/1994 20 - Free trams draw fire - Herald Sun 12/4/1994 21 - Tram launce chaos - 29/4/1994 22 - Life and love as the tram trundles on - Ted Hopkins - Weekend - 15/4/1995 23 - Tram city Dan McDonnell - Weekend - 15/4/1995 24 - Favorites out for tram day - three associated cuttings tram parade - Herald Sun 19/4/1995 25 - The A to Z of Melbourne's trams - Herald Sun 19/4/1995 26 - Trams out for a night on the town - Box Hill testing - Whitehorse leader 23/4/2003 27 - Trams rolling - Box Hill opening - Whitehorse leader 7/5/2003 28 - Bracks launches tram route and residents riled about bottleneck - Whitehorse leader 7/5/2003 29 - A century of trams in Bendigo (Kym Smith) - Bendigo Advertiser 14/4/2003 30 - MP calls for fair go for old tramways (Medicals) - Bendigo Advertiser - 12/4/2003 31 - House of the rising tram - Mentone tramcar bodies 32 - Back on track - Sydney trams - Daily Telegraph 11/8/1997 33 - New look trams just the ticket - Sydney - Daily Telegraph 11/8/1997 34 - Dark ages end for light rail - Daily Telegraph 1997 35 - A trip down memory lane - Sydney - The Age 21/8/1997 36 - End of the Line - sale of Elwood bus depot - New Home 6/12/1996 37 - Bidders line up for tram and train - The Age 17/5/1999 38 - Holding the line - The Herald Sun 8/3/1998 39 - Advert - Who will be Melbourne's tram museum operator - Weekend Australian 16-9-1995 40 - Trams take to sport - new Melbourne park route - Herald Sun 4/6/1999Yields information about the Melbourne tram network in the 1990sScrap book - Tudor - 32 plain sheets + printed card covers, centre stapled.tramways, melbourne, bendigo, newspapers, tram 4, olympics, joan kirner, tourist tram, city circle, w class, tram, box hill, elwood bus depot, tmsv, museums, tram museums, batman ave, victor borge -
 Ballarat Tramway Museum
Slide - 35mm slide/s - set of 17, Noel Simons, 20/11/1962 12:00:00 AM
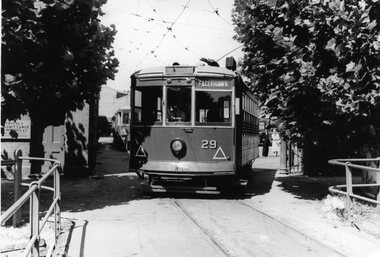
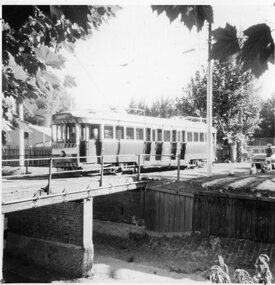
... " 1187.11 - "Truck of Bogie Car, Bendigo Tramways" 1187.12... Parade Ballarat Ballarat goldfields Tramways trams Bendigo Quarry ...Set of 17 transparencies taken on 20/11/1962 on Kodak mounts. 1187.1 - Bendigo No. 2 at the Quarry Hill terminus, showing destination of Quarry Hill. Has Cohns Drinks and Streets Ice Cream ads on dash panel, a SEC 'electric cooking' roof ad and another roof ad. Shows the Y terminus at this location, but tram standing just before it. Overhead in position. 1187.2 - as above, but closer up. 1187.3 - as above, but from the north side, showing cemetery in the background. 1187.4 - Bendigo No.3 at Eaglehawk terminus. Tram showing destination of Quarry Hill. Has the various buildings at Eaglehawk in the background including the Foodland store. Has Streets Ice cream and White Horse Whiskey ads on the dash panel. 1187.5 - Bendigo No. 18 at Garden Gully crossing loop, in bound, with destination of Eaglehawk. Passengers waiting for an Eaglehawk tram at the stop. Has a white horse whiskey ad on dash panel and SEC roof ads. Conductor standing in doorway looking out. 1187.6 - Bendigo No. 7 inbound in Nolan St. at cnr of McCrae St. showing destination of Golden Square. Has Streets Ice cream ad on dash panel and a Castrol Roof ad. 1187.7 - Bendigo No. 19 at the North Bendigo terminus with railway level crossing in background. Tram has a Cohns Drinks ad and an SEC 'Electric Cooking' roof ad. 1187.8 - Bendigo No. 2 at the Quarry Hill terminus, looking back into Bendigo, showing destination of Eaglehawk. 1187.9 - Bendigo No. 21 in McCrae St, near Nolan St outbound for North Bendigo. Photo taken after tram has passed photographer. 1187.10 - Bendigo Nos. 4 and 26 at Charing Cross in View St. with fountain alongside and the Beehive, Ezywalkin Buildings in the background. No. 26 has a Sandhurst Milk and SEC 'Electric Cooking' roof ad. 1187.11 - close up of 22E maximum traction truck and folded footstep. 1187.12 - Bendigo No. 19 at Charing Cross terminus, after tram has passed photographer, showing destination of North Bendigo, with the Beehive building in the background and passengers boarding tram. 1187.13 - Bendigo No. 11, turning from View St. into Pall Mall, showing Special with the conductor holding point bar. Has the Beehive and Ezywalkin Buildings in the background. 1187.14 - No. 7 at Charing Cross terminus, in Pall Mall, bound for Golden Square. Has the Beehive and Ezywalkin buildings in the background and passengers waiting at the tram stop. 1187.15 - No. 18 at the Charing Cross terminus, bound for Eaglehawk. Has the Beehive and Ezywalkin buildings in the background and passengers waiting at the tram stop. Also has the 'Safety Zone' sign in the photograph. 1187.16 - No. 2 at Quarry Hill terminus, night or dusk photo. Tram showing destination of Depot. 1187.17 - No. 26 at Charing Cross, night photo. Tram has destination of Quarry Hill, but is on the line for Eaglehawk. Photo looks along Mitchell St. Also shows Safety Zone sign. Information written on in black ink and date stamped on purple ink. 1187.1 - "No. 2 at Quarry Hill terminus Bendigo" 1187.2 - "No. 2 at Quarry Hill terminus Bendigo" 1187.3 - "No. 2 at Quarry Hill terminus Bendigo" 1187.4 - "No. 3 at Eaglehawk terminus" 1187.5 - "No. 18 in Mt Korong Road, Long Gully at cnr of Havilah Road (Eaglehawk Route)" 1187.6 - "No. 7 in Nolan St. Bendigo, at Cnr of McCrae St., near lake Weeroona, (North Bendigo Route)' 1187.7 - "No. 19 at North Bendigo terminus" 1187.8 - "No. 2 at Quarry Hill terminus" 1187.9 - "No. 21 in McCrae St. Bendigo, near Nolan St. (North Bendigo Route) 1187.10 - "4 and 26 at Alexandra Fountain, Charing Cross Bendigo" 1187.11 - "Truck of Bogie Car, Bendigo Tramways" 1187.12 - "No. 19 in Pall Mall at Charing Cross, Bendigo" 1187.13 - "Birney car No. 11 entering Pall Mall from View St. at Charing Cross Bendigo" 1187.14 - "No. 7 in Pall Mall at Charing Cross, Bendigo" 1187.15 - "No. 18 at Alexandra Fountain, Charing Cross, Bendigo" 1187.16 - "No. 2 at Quarry Hill terminus, Bendigo" 1187.17 - "No. 26 at Alexandra Fountain, Charing Cross, Bendigo" tramways, trams, bendigo, quarry hill, eaglehawk, north bendigo, maximum traction, night photo, tram 2, tram 3, tram 4, tram 7, tram 11, tram 18, tram 19, tram 21, tram 26 -
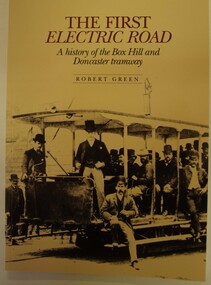 Bendigo Tramways (managed by the Bendigo Heritage Attractions)
BOOK, 'THE FIRST ELECTRIC ROAD A history of the Box Hill and Doncaster tramway' by Robert Green, 1989
... This item was donated to the Bendigo Tramways Depot...Bendigo Tramways (managed by the Bendigo Heritage ...This item was donated to the Bendigo Tramways Depot Archives by the author, Robert GreenThis is a history of the first electric tramway in Australia.The history of the first electric tramway in Australia, and the southern hemisphere, examining the conflicts and challenges faced by all those involved. -
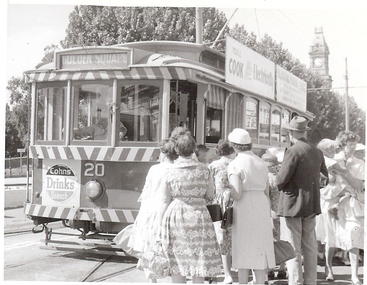 Bendigo Historical Society Inc.
Photograph - BASIL MILLER COLLECTION: TRAM - PALL MALL, 1950 - 60's
... Bendigo tramways... Bendigo tramways Pall Mall Bendigo Basil Miller unknown Black ...Black and white photo of No. 20 Tram picking up passengers in Pall Mall, destination Golden Square. Post Office tower in background. Sign 'Cohns Drinks Quench' on front of tram. People boarding and leaving tram. Women's clothing indicates photograph possibly taken in 1960's. unknownbendigo tramways, pall mall bendigo, basil miller -
 Bendigo Historical Society Inc.
Photograph - BASIL MILLER COLLECTION: CHARING CROSS, BENDIGO
... Bendigo tramways... basil miller Bendigo tramways Charing Cross Bendigo Charing ...Coloured post card, view of Alexandra Fountain and Pall Mall. Tram in forefront. View towards Pall Mall (north) Beehive and Ezywalkin buildings. Cars angle parked along Pall Mall. Approx. 1950/60's.Charing Cross, Bendigo, Victoria. Charing Corrs, with its historic Alexandra Fountain, is the hub of Bendigo from which roads radiate to most parts of the city. Plastichrome - Murfett Publishers P 62710.basil miller, bendigo tramways, charing cross bendigo -
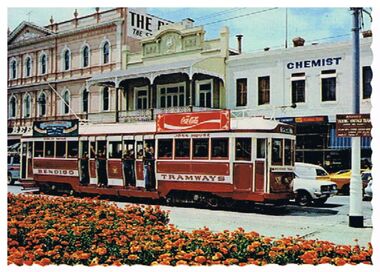 Bendigo Historical Society Inc.
Postcard - TRAM NO. 25, BENDIGO
... BENDIGO Tramways tram no. 25 Bendigo tramways Tram no. 25 Pall ...Postcard, color. Image shows tram no. 25 outside Beehive building, Pall Mall, Bendigo. Tram's livery is maroon and white. Coca Cola and Bendigo Timber Co. sign on roof. Garden of marigolds in foreground.Nu Color Vuebendigo, tramways, tram no. 25, bendigo, tramways, tram no. 25, pall mall, beehive -
 Bendigo Historical Society Inc.
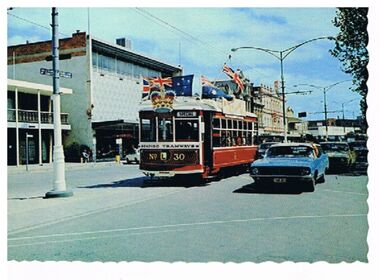
Postcard - BENDIGO TRAM NO. 30
... BENDIGO Tramways royal tram Bendigo tram Royal celebration Myer ...Coloured postcard. On back of card ' Birney Tram no. 30 decorated for a Royal Tour occasion. The Bendigo Trust operates this tram and others on a tourist service between Central Deborah Mine and the Chinese Joss House at Emu Point' Image shows Birney tram decorated with Union Jack and Australian flag on top, with crown on front of tram. Myer building on LH side of image.Nu Color Vuebendigo, tramways, royal tram, bendigo, tram, royal celebration, myer, pall mall -
 Tramway Heritage Centre
Photograph Album (part of), Ray Pearson's Photo Album - Trams of Victorian Railways, Ballarat, Bendigo, Geelong
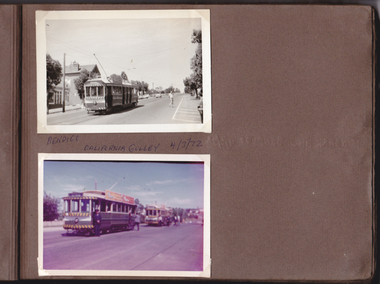
... bendigo tramways...-and-the-macedon-ranges bendigo tramways vintage trams bendigo tram ...Page 7 of Ray Pearson's Photo Album. Brown card page with two photographs (landscape format) placed on page using clear plastic photo corners. Both photographs depict trams around Bendigo. A hand written inscription is located between the two photographs. The brown paper is indented with text written on the facing page and also has minor damage in two places (top and bottom right) that looks like places where adhesive photocorners have been removed.Hand written inscription in biro between top and bottom photograph: BENDIGO / CALIFORNIA GULLEY 4/3/72bendigo tramways, vintage trams, bendigo tram, california gulley -
 Bendigo Historical Society Inc.
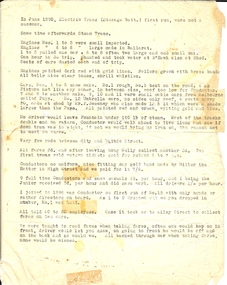
Document - BASIL MILLER COLLECTION: TRAMS - HISTORY
... Typewritten abbreviated history of Bendigo Tramways June... of Bendigo Tramways June 1890. One page. Document BASIL MILLER ...Typewritten abbreviated history of Bendigo Tramways June 1890. One page.person, individual, basil miller -
 Ballarat Tramway Museum
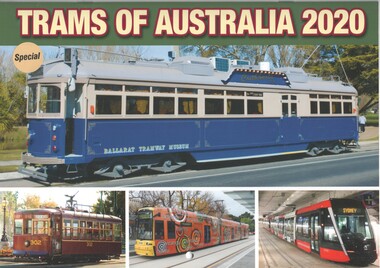
Document - Calendar, Topmill Pty Ltd, "Trams of Australia 2020", 2019
... photographs of Sydney, Brisbane, Adelaide, Perth, Bendigo, Ballarat...Ballarat Tramway Museum South Gardens Reserve Wendouree ...Wall Calendar - heavy card covers, 12 gloss art pages inside, titled "Trams of Australia 2020" containing cull colour photographs of Sydney, Brisbane, Adelaide, Perth, Bendigo, Ballarat, Gold Coast, Newcastle. Has a punched hole along the top edge to enable wall use. Provides dates for holidays, school holidays and Pension payment days and phases of the moon. Produced by Topmill Pty Ltd and distributed by Gordon & Gotch Pty Ltd. Ballarat photos feature Cuthberts939, 12 and 43, the latter at Sturt and Lydiard St intersection. Photos by Norma Perry, Richard Youll, Ben Parle, Maurice Kelly, Bill Angrove. Bendigo Tramways and BTM.tramways, trams, ballarat, bendigo, brisbane, sydney, gold coast, perth, rockhampton, newcastle -
 Bendigo Tramways (managed by the Bendigo Heritage Attractions)
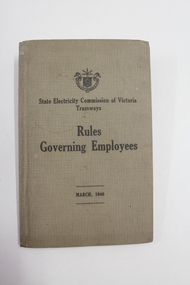
Rule Book, Rules Governing Employees, March 1948
... by the Hopgood family that belonged to Bendigo Tramways employee, Barry...Bendigo Tramways (managed by the Bendigo Heritage ...This object is part of a collection of items donated by the Hopgood family that belonged to Bendigo Tramways employee, Barry Hopgood.Small booklet with hard, brown cover.Sands & McDougall Pty Ltd (Publishers) -
 Bendigo Tramways (managed by the Bendigo Heritage Attractions)
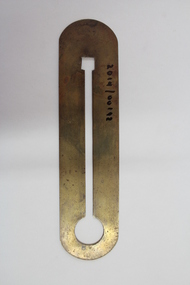
Button Polisher, unknown
... by the Hopgood family that belonged to Bendigo Tramways employee, Barry...Bendigo Tramways (managed by the Bendigo Heritage ...This object is part of a collection of items donated by the Hopgood family that belonged to Bendigo Tramways employee, Barry Hopgood.Oblong, slotted, brass object