Showing 1645 items
matching tram systems
-
 Ballarat Tramway Museum
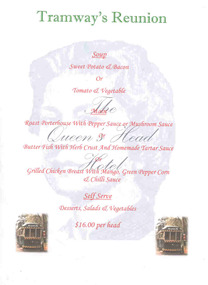
Ephemera - Menu, Neil Robe and Ballarat Tramway Museum, Tramway's Reunion dinner, Sep. 1971
Has a strong association with the reunion event arranged by Neil Robe to celebrate 30 years of closure of the SEC tramway in Ballarat., Has a strong association with the reunion event arranged by Neil Robe to celebrate 30 years of closure of the SEC tramway in Ballarat.1964.1 - Colour printed A4 sheet of paper as a Menu at the Queens Head Hotel, Humffray, Ballarat East for the "Tramway's Reunion" dinner on Saturday 15/9/2001 to celebrate the 30th anniversary of the closure of the Ballarat Tramway System. Printed with the Head of Queen Elizabeth II as a watermark, Hotel name overlain by the menu in red, with the name of the event at the top and two images of tram 38 in Wendouree Parade by a tram stop in both left and right hand corners. Printed using a colour bubble jet printer on plain A4 paper. Three copies held. Prepared by Neil Robe - dinner organiser. 1964.2 - A5 sheet photocopied with a Ballarat Tramway Museum 10cent ticket (A163000) blown up to fill the sheet and on the back - handwritten and photocopied - "Available for a complimentary ride on Sunday 16th September - remembering 30 years - S.E.C. Tramway Employees Reunion". Prepared by Richard Gilbert of the BTM. Given to the attendees of the dinner. See also Reg. Item No. 1968 for a photo of the attendees. 2nd copy of 1964.1 - ex Kevin Brookman, added 1/6/2009.2nd copy of 1964.1 added 1/6/2009.trams, tramways, employees, reunions, 30th anniversary -
 Ballarat Tramway Museum
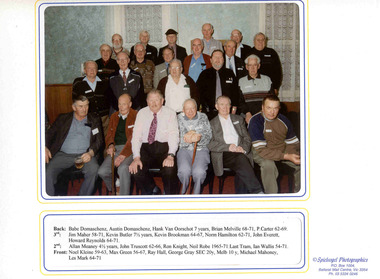
Memorabilia - Presentation Photograph Folder, Speilvogel Photographic, SEC Ballarat Tramway Employees photographed at the Queens Head Hotel, 2001
Yields information about the people who attended the 30anniversary reunion of the closure of the Ballarat Tramway system. Has a strong association with these people.Colour photograph of the former SEC Ballarat Tramway Employees photographed at the Queens Head Hotel on the occasion of the "Ballarat Tramways Past Employees' Reunion to mark 30 Years Closure of the Ballarat Tramways" on September 15, 2001. Photograph mounted within a white cardboard folder with the names of the attendees and period of service listed underneath. On the front cover has printed image of Ballarat 40 at Sebastopol with the name and date of the event printed on it. Folder prepared by Speilvogel Photographic, P.O. Box 1004, Ballarat Mail Centre, Vic. 3354. Featured in the photograph are: Babe Domaschenz, Austin Domaschenz, Han Van Oorschot, Brian Melville, P Carter, Jim Maher, Kevin Butler, Kevin Brookman, Norm Hamilton, John Everett, Howard Reynolds, Allan Meaney, John Truscott, Ron Knight, Neil Robe, Ian Wallis, Noel Kleine, Max Green, Ray Hall, George Gray, Michael Mahoney, Les Mark. 2nd copy of 1968 - ex Kevin Brookman, added 1/6/2009.trams, tramways, employees, reunions, tram crews -
 Ballarat Tramway Museum
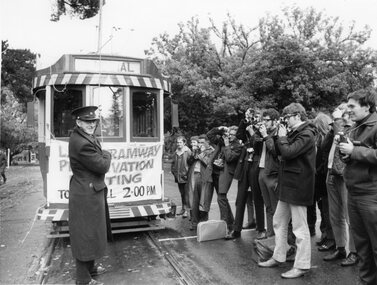
Slide - 35mm slide/s, Peter Moses, 21/08/1971 12:00:00 AM
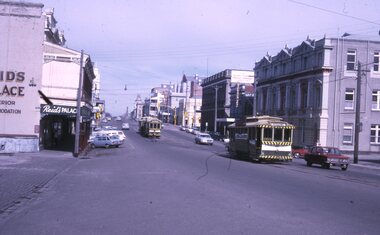
Photo of SEC Ballarat No. 14 and possibly No. 42 (Briquette roof advertisement and features on the same special trams in Reg. item 2064) waiting in Lydiard St. North for the arrival of the ARHS special on Saturday 21/8/1971 to undertake the last tour of Ballarat Tramways, prior to the closure of the system. The first line closure (Victoria St.) took place the following day. Has Reid's Coffee Palace building in the background and other buildings on the east side of Lydiard St. North. Two other single truck cars in the photo as are the railway gates at the station. Kodak cardboard mount slide, taken by Peter Moses 21 August 1971.On back of slide in light black ink "N14 Ballarat / ARHS / 4 trams special Lydiard St" and "P. Moses" in black ink in the upper right hand side of the slide.tramways, trams, arhs, lydiard st north, railway crossing, tram 14, tram 42 -
 Ballarat Tramway Museum
Slide - 35mm slide/s, Peter Moses, 21/08/1971 12:00:00 AM
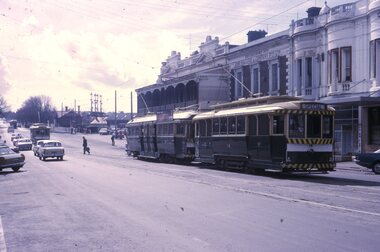
Photo of SEC Ballarat 26, with No. 14 and possibly No. 42 (Briquette roof advertisement and features on the same special trams in Reg. item 2064) waiting in Lydiard St. North for the arrival of the ARHS special on Saturday 21/8/1971 to undertake the last tour of Ballarat Tramways, prior to the closure of the system. The first line closure (Victoria St.) took place the following day. Has Reid's Coffee Palace building in the background and other buildings on the east and west side of Lydiard St. North. No. 26 has an SEC briquettes roof advertisement Kodak cardboard mount slide, taken by Peter Moses 21 August 1971.On back of slide in light black ink "Ballarat / ARHS outside station / special trams Lydiard St." and "P. Moses" in black ink in the upper right hand side of the slide.tramways, trams, arhs, lydiard st, tram 26 -
 Ballarat Tramway Museum
Slide - 35mm slide/s - set of 4, Peter Moses, 21/08/1971 12:00:00 AM
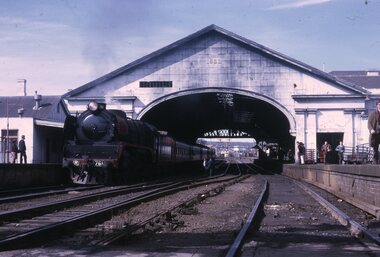
Series of four photographs featuring the Special trains on the occasion of the ARHS special train on Saturday 21/8/1971 to undertake the last tour of Ballarat Tramways, prior to the closure of the system. The first line closure (Victoria St.) took place the following day. .1 - R761 just arrival in platform 2 of the Special train. .2 - ditto .3 - R761 shunting across the Lydiard St. with the Victoria Hotel in the background. .4 - R761 leaving Ballarat station (note slide from a different roll of film). Kodak cardboard mount slide, taken by Peter Moses 21 August 1971. Note: Train/tram tour operated in conjunction with the TMSV.On back of slide: .1 - In black ink "Ballarat / R761 Station" and "P. Moses" in bottom left hand corner. .2 - In black ink "Ballarat / R761 ARHS Train / Ballarat Station" and "P. Moses" in bottom left hand corner. .3 - In blue ink "Ballarat / R761 shunting" and in upper left hand corner "P. Moses". .4 - In red ink "Ballarat / ARHS Train departs" and on other side of slide "P. Moses" in black ink.tramways, trams, arhs, lydiard st north, ballarat railway station -
 Ballarat Tramway Museum
Slide - 35mm slide/s, Peter Moses, 21/08/1971 12:00:00 AM
Photo of SEC Ballarat trams waiting in Lydiard St. North for the passengers to travel on the ARHS/ TMSV specials on Saturday 21/8/1971 to undertake the last tour of Ballarat Tramways, prior to the closure of the system. The first line closure (Victoria St.) took place the following day. The organising group is discussing the arrangements with the SEC tramway inspector. Bob Whitehead, Len Millar, Keith Kings, Eildon Hogan, Jim Dowell and the Inspector? Kodak cardboard mount slide, taken by Peter Moses 21 August 1971.On the rear of the slide in black ink "Ballarat Lydiard St. / ARHS Specials" and "P. Moses" in the bottom right hand corner.tramways, trams, arhs, lydiard st north -
 Ballarat Tramway Museum
Slide - 35mm slide/s - set of 2, Peter Moses, 21/08/1971 12:00:00 AM
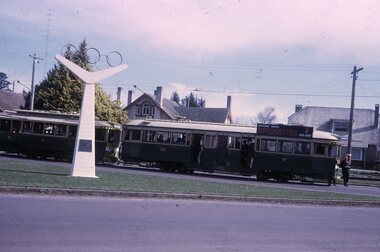
Photo of SEC Ballarat trams No. 42 and 11 during a photo stop in Wendouree Parade adjacent to the 1956 Olympic rings monument during the ARHS/TMSV tours prior to closure of the Ballarat Tramway system. .1 - 42 and 11 with monument in the foreground. No. 42 has a SEC briquette roof advertisement. .2 - 42 ditto with the St Therese of the Little Flower catholic church in the background. Kodak cardboard mount slide, taken by Peter Moses 21 August 1971.On the rear of the slides in black ink .1 - "N42, N11 / Ballarat/ Hamilton Ave." and "P. Moses" in the bottom left hand corner. .2 - "Ballarat / ARHS Special Hamilton Ave" and "P. Moses" in the bottom left hand corner.tramways, trams, wendouree parade, tram tour, olympics, tram 42, tram 11 -
 Ballarat Tramway Museum
Slide - 35mm slide/s - set of 2, Peter Moses, 21/08/1971 12:00:00 AM
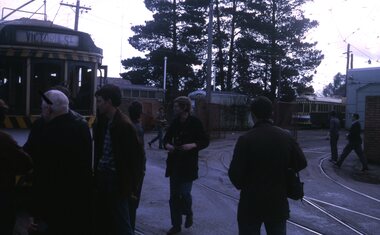
Photo of SEC Ballarat trams during a visit to the SEC Wendouree Parade depot during the ARHS/TMSV tours prior to closure of the Ballarat Tramway system. .1 - visitors at the depot with trams in the photo. .2 - that horse drawn milk cart again, taken near Barrett Ave. Kodak cardboard mount slide, taken by Peter Moses 21 August 1971.On the rear of the slides in black ink .1 - "Ballarat / ARHS special / Depot" and "P. Moses" in the bottom right hand corner. .2 - "Ballarat / Dairy Cart / Wendouree Pde / ARHS Special" and "P. Moses" near the top right hand corner.tramways, trams, wendouree parade, depot, milk cart, horse drawn vehicle -
 Ballarat Tramway Museum
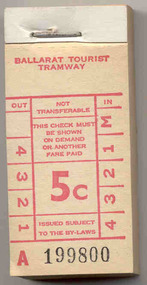
Ephemera - Ticket/s, Ballarat Tramway Museum (BTM), BTPS - 5c, Oct. 1975
Demonstrates the Museum's ticketing systems and ongoing production of tickets.Block of 200 tickets - red ink on off white paper, denomination 5c, lettered A 199800 to A 199999, headed Ballarat Tourist Tramway. The 200 tickets have been stapled onto a heavy cardboard back with a heavy metal staple. The tickets are in the style of the former State Electricity Commission of Victoria tramway tickets. Tickets in use as Museum entry tickets from mid 1972 at the depot, then as child single tickets in 1974 to 1975. See BTM Fare Chart. Also used as tickets for other purposes such as check tickets and 50c tickets over stamped, cash received checks as donations for many years. Printed 1971? See Fare structure of BTM/BTPStrams, tramways, btm, tickets -
 Ballarat Tramway Museum
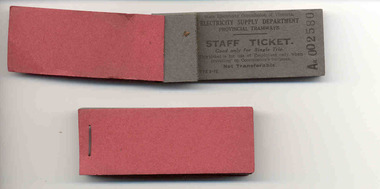
Ephemera - Ticket, State Electricity Commission of Victoria (SECV), SEC Provincial Tramways "Staff Ticket"
Demonstrates aspects of the SEC ticketing, governance and monitoring systems. The Pass or ticket could be issued to a SEC staff member to enable travel on the tramways while on business. Style remained very similar to the end of the tramways.Six blocks of SEC Provincial Tramways "Staff Ticket" and four individual tickets. Individual tickets printed on heavy dark grey (Grey 200 gsm card) with black printing. Ticket blocks consist of 50 printed tickets, with stubs, stapled with red cardboard covers. Ticket good for single trip only, of use by employees when travelling on Commission's business. Form No. TYE-2-19. Not known when printed, possibly 1960's maybe earlier. 2101.1 - Aa 002580 - 2599. Has "Tramway offices" written on back of block in black ink. 2101.2 - Aa 002800 - 2849. 2101.3 - Aa 002952 - 2999 2101.4 - Aa 002611 - 2649 2101.5 - Aa 002393 - 2399. Has "Traffic ? ? " written on back of block in black ink. 2101.6 - Aa 002650 - 2699 2101.7 - Aa 002491 2101.8 - Aa002492 2101.9 - Aa002493 2101.10 - Aa002494See notes re 2101.1 and 2101.5trams, tramways, tickets, staff tickets, employees pass -
 Ballarat Tramway Museum
Ephemera - Ticket/s, State Electricity Commission of Victoria (SECV), Tourist Ticket SEC 1/, 1943, overprinted 1947
Demonstrates ticketing systems in Ballarat and in particular the use of a tourist ticket to enable people to travel around the whole of Ballarat on the trams. Yields information about the ticketting system and how surplus stocks were overprinted for future use. The same ticket stock could be used in all three of the SEC provincial tramways.Set of four SECV - Ballarat Tourist Tickets - 1/- on light weight card, light manilla colour - printed originally for the years 1944, 1945 and 1946, overprinted in red ink for 1947, 1948 and 1949. See Reg. item 499 for another example of the original ticket. Printed in black ink/ Ticket Numbers BA202587, 202590, 202591 and 202600 in body of ticket. Static number (1 - 7) on left and right indicate when validated, the route used on. Each ticket has been stamped "CANCELLED" Form No. TYE 2-17 See Reg Item 4129 for further examples of the same ticket. trams, tramways, secv, ballarat, tourist ticket, tickets -
 Ballarat Tramway Museum
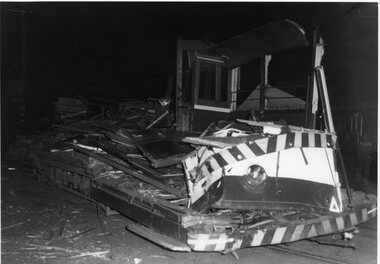
Photograph - Black & White Photograph/s - set of 2, The Courier Ballarat, 16/09/1970 12:00:00 AM
Yields information about the incidents/accidents that can occur on a street tramway system - collisions resulting in the rare virtual total demolition of a tram in Ballarat.Black and white photograph of SEC No. 20 after accident on 16/9/1970. See Kings, "Ballarat Tramways" p57 for further details. Taken in Victoria St. by Courier and published the following day. Tram has been almost completely demolished to the floor boards. Published the following day in The Courier. See also Reg. Item No. 1089 for better print of this photograph. See item 1088 for story in The Courier of 17/9/1970., 551.1 - Collected by Alan Bradley from the Ballarat Courier early 1980's. See Excel file "Record of Ballarat Courier Photos SEC era" (Archive Documents) for source of details. Wayne Kell, Pitman SEC 1968-1971 - advised 10/10/2020 that the driver did not work again. Normally two young ladies would travel together on that service and would sit on the right hand side of the car at the front. This night, only one travelled and she sat on the left hand side. See Reg Item 8125 for item. On rear "Copyright, The Ballarat Courier Proprietary Limited" in blue ink stamp.trams, tramways, ballarat, victoria st, accidents , tram 20 -
 Ballarat Tramway Museum
Photograph - Black & White Photograph/s, 1920s
Yields information about the ESCo / SEC employees based at Ballarat A Power station, with some names known or identified on the photograph.566 - black and white photographs, copy photograph of group of employees, photographed in front of Ballarat Powerhouse (later Ballarat A), with horse drawn vehicle in entry gate, over tram tracks and employees either standing or kneeling. Five employees, three men and two ladies are seated, and two are riding motor cycles. See attached notes for some names and details. This photo added 28/7/2007 - has a brown discolouration in the centre of the photo. Printed for Alan Bradley by John Phillips c1996. 566 - A4 photograph in AS Box 54. 566 A and B - 6 x 4 photographs in AS Box 52. Two part prints (enlargements) A & B of above photo - was original images added into the system. Printtrams, tramways, ballarat power station, personnel, esco, employees -
 Ballarat Tramway Museum
Photograph - Black & White Photograph/s - Last tram from Sebastopol, Greg Triplett, Sep. 1971
Black and white reproduction of photographs used to illustrate the closure of the SEC Ballarat System, published in Association of Railway Enthusiast's (ARE) Dec 1971 issue of their magazine. Centre page photo shows tram 40 at Hospital corner, prior to running into the depot, while on rear pages are night photos of tram 35 at Sebastopol terminus (Royal Mail Hotel in background) and No. 41? at the Lydiard St. north terminus. trams, tramways, ballarat, closure, last tram , tram 40, 35 and 41? -
 Ballarat Tramway Museum
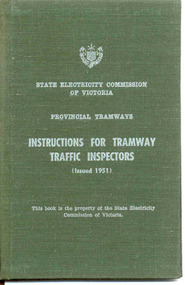
Document - Instruction Book, State Electricity Commission of Victoria (SECV), "Instructions for Tramway Traffic Inspectors", 1951
Demonstrates aspects of the SEC governance system in issuing By-laws for the travelling public, as part of their Act. Yields information about fares charged for tram services in Ballarat, Bendigo and Geelong. Issued to crews.Small book with 32 pages, 27 printed on, with green cloth hard covers, sewn into cover. On front cover, printed in white ink is SECV name, logo, words, "Provincial Tramways", "Instructions for Tramway Traffic Inspectors", "Issued 1951", and a note that the book remains the property of the SEC. Inside cover as above with location for name and date to whom book was issued to. Indexed. Contents gives rules for behaviour, ticket checking procedures, reports, traffic supervision, safety and accidents. Copies 2 and 3 on display in cabinet in 39 since 1992 until 10/04. Copies 4, 5 and 6 - each have BTPS Catalogue Number written in on title page. (revised 12/8/05) Copy 7 - added 17/1/2007 - issued to Dave Kellett. Copy 9 - added 6/12/15 - issued to Tramway Superintendent - Les Denmead - 25/7/1952. Full pdf scan added 28/5/2019. See Reg Item 7887 for a typed sheet that formed part of the book.Copies 4, 5 and 6, on title page, each have "Ballarat Tramway Preservation Society Catalogue No. 304" written in black ink on the top of the page. Copy 7 has "D.C. Kellett, 11-7-66" in ink on the first page.trams, tramways, rules, instructions, tramways, operations, management -
 Ballarat Tramway Museum
Negative - Black and white print from negative, Travis Jeffrey, 6/09/1959 12:00:00 AM
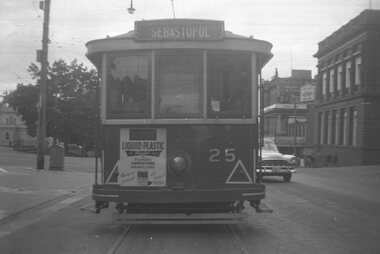
Negative No. N380 and black and white print made by a laser printer (stored in folder) of Ballarat No. 25 at the City Terminus, Sturt St, south side. Tram has destination of "Sebastopol" with a Bourne? Liquid Plastic (varnish) ad on the front panel of the tram. Has the Commonwealth bank in the background. Adjacent to a pole is a ESCo / SEC electrical connection / switch box on the left hand side of the tram, which is part of the power supply or distribution system. Date of photo on folder - 5/9/1959. Original negative rescanned 24/5/2020 and image file updated. Paper folder that contained the negative had "NR7A" in red ink, "BA7" in pencil, date stamp of "5 Sep 1959" on front, and on rear date stamps "26 Sep 1962" and "26 Sep 1962".trams, tramways, city terminus, sturt st, commonwealth bank, power supply, tram 25 -
 Ballarat Tramway Museum
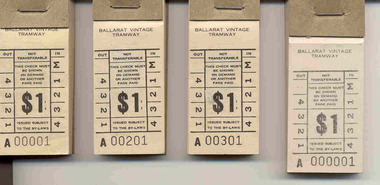
Ephemera - Ticket/s, Ballarat Tramway Museum (BTM), Block of 100 tickets - $1, 1987
Demonstrates the Museum's ticketing systems and ongoing production of tickets.Four Blocks of 100 tickets - black ink on off white paper, with ticket number in black ink denomination $1, headed Ballarat Vintage Tramway. On rear in black ink is an advertisement for the Tram Family Restaurant, corner Macarthur and Drummond St. North. The 100 tickets have been stapled onto a heavy brown cardboard back with a heavy metal staple and a small brown cardboard retaining strip or butt at the top of the ticket. 2432.1 - A00001 to A00100 (The first block collected at the time of issue 1/12/1987) 2432.2 - A00201 to A00300 (collected at the same time) 2432.3 - A00301 to A00400 (collected at the same time) 2433.4 - A00001 to A00100 (lighter black ink, larger block size the others, was part of a rejected run of tickets by the printer, printing too light, wrong type of paper and too large size to that ordered, rest of tickets were returned.) The tickets are in the style of the former State Electricity Commission of Victoria tramway tickets. Tickets in use as adult return fare from 1/12/87 to 30/6/91. Note last block issued 19/1/1991. Replaced with the 1/- tickets. See BTM fare chart, BTM Ticket issuing sheets.trams, tramways, btm, tickets -
 Ballarat Tramway Museum
Document - Photocopy, Ballarat Tramway Preservation Society (BTPS), BTPS "Submission to the Victorian Government for Financial Assistance", May. 1982
... Government for assistance for the a fire sprinkler system ($38,000... for the a fire sprinkler system ($38,000), rebuilding ESCo tram No. 12 ...Twenty Two page photocopy of a typed document titled "Submission to the Victorian Government for Financial Assistance", prepared by the BTPS, in May 1982. Document has been punched on the left hand side for a plastic comb binder. Has been stapled in the top left hand corner. Contains a request to the Victorian Government for assistance for the a fire sprinkler system ($38,000), rebuilding ESCo tram No. 12 and relaying of the Wendouree Parade track for $165,000. Gives details of each project, including a quotation from Wormald International dated 4/6/1980, a history of ESCo No. 12, including photos and the basis of costing for the reconstruction of Wendouree Parade trackwork. Footnote: The BTPS was not successful in any item.trams, tramways, btps, submissions, victorian government, trackwork, fire sprinkler -
 Ballarat Tramway Museum
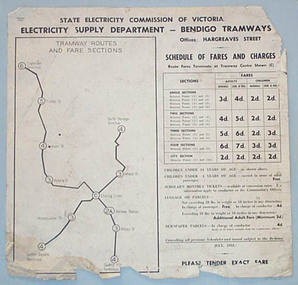
Poster, State Electricity Commission of Victoria (SECV), "Schedule of Fares and Charges - July 1951", Jul.1951
Demonstrates the way the SEC advised passengers in Ballarat and Bendigo how the fare and charges systems worked and yielded information about the fare charges in force at the time. A copy was provided in each tram behind framed glass.Printed sheet and mounted onto at least two other sheets of heavy blank paper to form a poster of a drawing showing Bendigo Tramways (SEC) Fares, Charges, and Section Map. Also gives charges for Scholar's Monthly tickets, Luggage, Parcels, Newspapers and Chartered trams. Fares in shillings and pence and decimal currency. Titled - "Schedule of Fares and Charges - July 1951". Shows offices as Hargreaves St. Has details of designer/draftsman and date "AVM/MM / 14/5/51" in top left hand corner. See images for digital photographs of the poster. Stored within a purpose made folder. In very poor order.trams, tramways, bendigo, fares, sections, map -
 Ballarat Tramway Museum
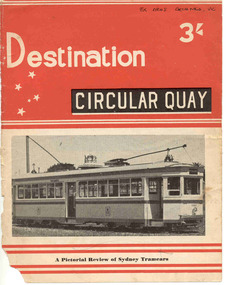
Book, Jack Richardson, "Destination Circular Quay", 1958
Forty page book including paper covers titled "Destination Circular Quay" edited by Jack Richardson, in association with N.L. Chinn and R.L. Young and published by Traction Publications, Destination Series No. 3 in 1958. Briefly details the tramways in Sydney operated by the Department of Government Transport, details each class of passenger rolling stock, with photographs, experimental cars, trailers, specialist cars, works trams, trolley buses, tram car ferry, Moore Park junction arrangements, notes re the Sydney Harbour Bridge, a map of the network in the near CBD area of Sydney and on the rear cover, a map of Sydney. Provides information on the South Pacific Electric Railway (reference Australian Electric Transport Museum), and other publications of Traction Publications. See htd1307i2.pdf for a scan of the book. Includes many photographs. .1 - Book - 56 pages + card cover, printed on semi gloss paper, centre stapled, with two colour covers - as for above. Printed 1967. Has a map of the Sydney system on the inside or the rear cover. The rear cover has a list of publications of the publisher. See htd1307i2.pdf for a scan of the book.On the front cover in black ink "Ex ARHS Archives Vic"trams, tramways, sydney, nswgt, tramcars -
 Ballarat Tramway Museum
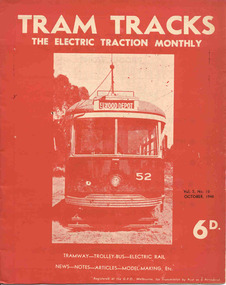
Magazine, Jack Richardson, "Tram Tracks - The Electric Traction Monthly", July to Dec 1948
Three issues of "Tram Tracks - The Electric Traction Monthly" of the Australian Electric Traction Association. Each issue has a standard cover, of the magazine name etc, and featuring a front end photo of Victorian Railways tram No. 52 with the destination of Elwood but are in different colours, all have been saddled stapled with a single staple. The Volume and date details have been over printed. Back covers inside covers have the same advertisements. The three issues contain advertisements for the Wee Folks productions, Wattle Park, G&R model railway parts, Richard Noble model electric motors, Hobbyco, Fleet scale model railway equipment, Masseys Sports, Lloyd's Hobbycraft, John Martin Ltd, Johnson's Variety Store, the ARLHS, Barnes Tennis Centre, The Model Dockyard, the American Subscription Agency, Robilt Models, Meadmore Model Engineering and Austral Bronze Pty Ltd, Hearns Hobbies, Christie Scale Model Railway Products and Traction Publications. 2466.1 - Vol. 3 No. 10 - 20 pages, Oct. 1948, with cover printed in red ink. Has articles on anti-tram propaganda, Alphington - Heidelberg duplication and Sydney's early electric trams - C and D class. Also has news items on Brisbane, Newcastle, Sydney, Melbourne, Sandringham - Black Rock, Hobart, Launceston, Perth, Sydney and Melbourne electric trains, Launceston Trolley Buses, AETA notes, and a caricature of the Editor, Jack Richardson. 2466.2 - Vol. 3 No. 11 - 24 pages, Nov. 1948, with cover printed in blue ink. Has articles on construction of tram track in Melbourne (Victoria Parade), Bourke St., tram-bus controversy, (Reg Ansett, Noel Gipps and USNR Commander Quinby), Sydney's early electric trams - C and D class continued. Also news items on Last tram to Mayfield, Sydney, Latrobe St. Melbourne, Adelaide, opening to Alamein, Melbourne show traffic, VR Trams and AETA notes. 2466.3 - Vol. 3 No. 12 - 16 pages, Dec. 1948, with cover printed in green ink. Has articles on Sydney's electric railways, Brisbane Tramways and an AETA Melbourne tour. News items cover Sydney, Newcastle, Melbourne, Geelong, Bendigo, Kalgoorlie, Melbourne and Sydney trains and AETA news. 2466.4 - Vol 3 - No. 7 - 20 pages - July 1948 with cover printed in red ink. Has articles on cost of building trams for Brisbane, Sydney and Melbourne, abandonment of VR trams, Newcastle, Sydney, centre page photo of Y1 611, Sydney Electric train system including map and AETA news. 2466.5 - Vol 3 - No. 9 - 20 pages - Sep 1948 with cover printed in blue ink. Has articles on Mr. T. G. Patterson, Acting Director of Commonwealth Road Transport and Chairman of Federal Road Safety Council (very anti tram), news from Brisbane, Launceston, Sydney, Newcastle, Burwood, cost of trams, impressions of transport in Europe and North America, Melbourne and Sydney electric trains, tramways of Newcastle and model notes and AETA news. 2466.6 - Vol. 3, No. 1 - Jan 1948 - 16 pages with photo of Brisbane 407, political news, direct Melbourne to Footscray line proposal, new trams, bogie trams in Ballarat, article on Melbourne cable trams, electric trains, AETA outing in Melbourne and various adverts for model railways. 2466.7 - Vol 3 No. 2 - Feb. 1948 - 16 pages - political news, Ballarat news, traffic in Sturt St and new bogie cars, Christchurch closure, cartoon by Mercier on Sydney Honesty box, Brisbane suburban electrification, general tramway and electric railway news and various adverts for model railways. 2466.8 - Vol. 3 No. 3 - March 1948, with photo of VR 52 on front cover, 16 pages, political news, closures, Reg Ansett offer to buy the Melbourne bus system, Newcastle News, SEC Transfer of cars between the three systems, tramways in the Maribyrnong area, map of Melbourne trams, cartoon by Mercier, Brisbane train electrification and general news. 2466.9 - Vol. 3 No. 6 - June 1948 - 12 pages - MMTB political news, new trams for Sydney, tramways of Newcastle, Invercargill, Sydney Suburban trains, and AETA General news. .6 to .9 added 24-3-18 - from consolidation of Melbourne Tram Museum and BTM collections - ex AETA. trams, tramways, electric traction, aeta, models, australian tramways, melbourne, sydney, brisbane, newcastle, costs, ballarat, footscray -
 Ballarat Tramway Museum
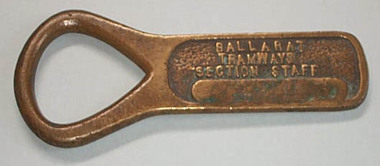
Functional Object - Section Staff, Electric Supply Co. of Vic (ESCo), "Sturt St. South St. "
Used as a means of authorising a tramcar to have sole use of the track between the named points to avoid head on collisions. Safeworking object - known as a section staff. Not known when made, but in use until the introduction of the electric signalling in the mid 1930's by the SEC. See also Reg Items 934 and 988 for details of use and other examples are at 1851, 52 and 53 and 4444 to 4448, , 4996 and 4497, 9037 and Reg item 934 and 988 for articles on the safeworking systems.Demonstrates aspects of Safeworking on the Ballarat Tramway system to c1936 when replaced by electric signals. Yields Information about the operation of Ballarat's trams and safeworking procedures.Cast brass item with a flat part recessed section with the words "BALLARAT TRAMWAYS SECTION STAFF" cast into the surface and a flat section underneath, flush with the outside edges in which the words "STURT ST. SOUTH ST. " stamped in. Has an open rounded end which forms a handle or a point where it could be hung on a peg.trams, tramways, staff, safeworking, tramway staffs, sec, signals -
 Ballarat Tramway Museum
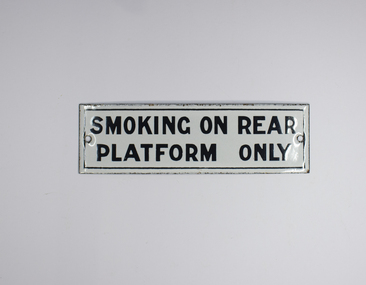
Sign, "Smoking on Rear Platform Only"
One of a group of signs that were fitted into tramcars in Ballarat, giving instructions to passengers about prams, behaviour, smoking, fare payment, talking to the motorman, instructions or information to drivers etc. Yields information about the sign manufacture, demonstrates the type of signs provided in tramcars.Enamel sign, blue capital letters and lines on white background, titled "Smoking on Rear Platform Only". One of a number similar signs donated to the Ballarat Tramway Preservation Society by the SEC following closure of the Ballarat Tramways system in 1971. Sign has a black enamel backing, with marks from the enamelling process. Removed from trams by the BTPS when smoking deemed unhealthy or came from SEC stores. Sign has two central screw holes at either end. .1 - as for above, but black capital letters - added 31/12/2010.trams, tramways, signs, smoking, tramcars -
 Ballarat Tramway Museum
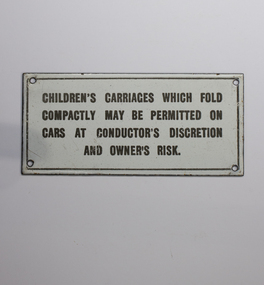
Sign, "Children's Carriages ....."
One of a group of signs that were fitted into tramcars in Ballarat, giving instructions to passengers about prams, behaviour, smoking, fare payment, talking to the motorman, instructions or information to drivers etc. Yields information about the sign manufacture, demonstrates the type of signs provided in tramcars.Enamel sign, black capital letters and lines on white background, titled "Children's Carriages which fold compactly may be permitted on cars at conductors discretion and owner's risk". One of a number similar signs donated to the Ballarat Tramway Preservation Society by the SEC following closure of the Ballarat Tramways system in 1971. Sign has a black enamel backing, with marks from the enamelling process. .1 - as above, rear of sign has many white paint brush marks enamelled into it - added 31/12/2010.trams, tramways, signs, prams, baby carriages, tramcars -
 Ballarat Tramway Museum
Sign, A. Simpson and Son Limited Enamellers of Pirie St Adelaide, "Passengers are requested ....."
One of a group of signs that were fitted into tramcars in Ballarat, giving instructions to passengers about prams, behaviour, smoking, fare payment, talking to the motorman, instructions or information to drivers etc. Yields information about the sign manufacture, demonstrates the type of signs provided in tramcars.Enamel sign, black capital letters and lines on white background, titled "Passengers are requested not to enter into conversation with the motorman when tram is in motion". One of a number similar signs donated to the Ballarat Tramway Preservation Society by the SEC following closure of the Ballarat Tramways system in 1971. Sign has a black enamel backing, with marks from the enamelling process. On the rear is part of a paper sign about mounting the sign with screws and not using nails and the name of the manufacturer "Simpson & S? Pirie Street......" (See Reg Item 4899 for the full manufacturers label) .1 - As for above, added 31/12/2010/ trams, tramways, tramcars, signs, motormen, passengers -
 Ballarat Tramway Museum
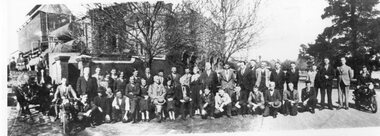
Photograph - Black & White Photograph/s - set of 2, The Age, 30/05/1971 12:00:00 AM
... system. tramways trams Lake Wendouree Charters Museum ...Has a strong association with the formation of the Ballarat Tramway Preservation Society, the people involved in the photograph and the closure of the SEC Ballarat system.Black and white photograph of a group of tram enthusiasts, standing in front of tram 36 photographed on May 30, 1971, used in "The Age "article on May 31 of the setting up of the BTPS by a group of young people the previous day. For the newspaper cutting see Reg. Item 1064. Photographed at Gardens Loop, Wendouree Parade. Tram has a banner advertising a meeting for the Lake Tramway Preservation meeting. Included in the catalogue worksheet is a letter seeking the permission to use the photo in the Museum's Fares Please! and the reply of The Age, seeking payment of $93.50. Was not published. Photograph purchased by the Museum from The Age, August 2002. 2487.1 - 2nd image of this scene, wider view and driver looking at the cameraman - has badge Number "41" Ex William F Scott. Reg Item 3626, image 3, gives No. 41 at the date of the list, unknown, as L. Bird. See also Reg Item 1064 for the newspaper clipping and btm 7033 for other photos of the event by Chris Phillips and tramcar notes. COPYRIGHT OF THE AGE NEWSPAPER - See paper with the worksheetsOn rear in blue ink "Copyright" stamp and details of the owners of the photograph "The Age" .2 - as above with date "1972" in pencil.tramways, trams, lake wendouree, charters, museum establishment, btps, tram 36 -
 Ballarat Tramway Museum
Book, H.P. James, "In Other Days", late 1930's
ESCo Employee Hours Work Record book that has been used by an ESCo/SEC inspector, H. P. James as a record / note book for his personal collection or papers or journal titled "In Other Days". Book sewn with string in 36 page sections, blank end papers, board covers with stipple paper out sides and Rexene cloth binding. Comprising plain paper end papers and 104 printed pages (52 leaves), with each sheet printed in black on feint ruled paper for recording the hours worked and other details of drivers and conductors employed by ESCo. Printed for daily use, with Day and date page headings - made out for the 1930's. Text generically printed feint ruled paper. Images: Book - i1 Inside front cover - i2 Members Certificate - i3 Photo of H.P. James and index page - i4 Has been used to gather mementos such as photos, articles, newspaper clippings, letters and other miscellaneous documents on Ballarat local history. Newspaper cuttings etc often have side notes written by Mr. James. Inside front cover has certificate recording Mr. James membership to the Ballarat Historical Society (on Australasian Historical Record Society paper) for 1937 - 1938. A side note records Mr. James elected as Vice President in 1939. Receipt signed by Edward Crimmins (See Reg. Item 2486) Has a table of contents for pages 1 to 65. Opposite is a photograph of Mr. James dressed for the Ballarat Tramways Social Club function - See Reg. Item No. 506 Primary items are: 1 - Newspaper cutting "A stroll along Bridge St. 50 years ago" - Nathan F. Speilvogel. 3 - Newspaper cutting "What I Remember of Early Ballarat" - James Sainsberry. 4 - Newspaper cutting "Magnet that Made Ballarat - New Monument Marks Gold Discovery" 7 - Newspaper cutting "Romance of a Ballarat Street Block" - Speilvogel 9 - Newspaper cutting "Sixty years of Dana St. School"- Speilvogel 11 - Newspaper cutting "The White Flat - its Transitions of Service - Historical Review" - J. Hargreaves 15 - Newspaper cutting "Memories of Russell Square - Fireman's Carnivals" - James 16 - Notes on the Alfred Hall 17 - Newspaper cutting - "Alfred Hall" - James 21 - Letter re Russell Square dated 24/2/38, J. McLeish 23 - Newspaper cutting "The First Train to Ballarat" 25 - Newspaper cutting "Story of Ballarat's Horse Trams 1887 to 1913", James - see Reg. Item 2489. 27 - Photos and Newspaper cutting of items re horse trams, and photo of ESCo No. 18 - See Reg. Items 2490, 2491 and 2492. 28 - ESCo opening ticket (See other Reg. Items 608 for examples of this) ticket No. 1595. 29 - Newspaper cutting "Story of Ballarat's Electric Trams", James, See Reg. Item 2493. 30 - Poster - SEC - Ballarat "The New System of Fares and Sections" - 3/10/1997 - See Reg. Item 2494. SEC - Tourist Ticket - See Reg. Item 2495 ESCo - 3d check ticket - See Reg. Item 2496 31 - Tickets and handwritten notes - with reference to page 51 ESCo 1d - See Reg. Item 2497 (2 No.) ESCo/SEC? - lunch hour weekly ticket - See Reg. Item 2498 ESCo/SEC? - Morning and evening weekly ticket - See Reg. Item 2499 ESCo/SEC? - 3d Adult Transfer - See Reg. Item 2500 ESCo/SEC? - 2d child Transfer - See Reg. Item 2501 ESCo - 1.1/2 child ticket - See Reg. Item 2502 ESCo - 3d Adult ticket - See Reg. Item 2503 Extract of an item titled "History of Ballarat Tramways", SEC Magazine, Feb. 1939 - See Reg. Item 2504 2d ESCo token (See other reg items 1794 and 1943 for details of this object) - sewn into page. 33 - Handwritten notes "Alfred Hall" 35 - Handwritten notes "Russell Square" 36, 37 - miscellaneous cuttings from the Courier for 1939 and 1940 39 - Newspaper cutting "South Street Band Contests" - cutting dated 27/10/1932. (See images - i5 to 41, 43, - ditto - contest results 44 - Photo of the Tramway Shelter in Sturt Street being removed - Courier dated 18/12/1923 - see Reg Item 2523. 45 - Extract of April 1938 from SEC Magazine, photos of the launch of the illuminated Ballarat Centenary tram - see Reg Item 2524. 47 - Newspaper cutting "Peeps into the Past" 48 - Listing of "Members of Returned Soldiers Band", Ballarat, dated 18/11/1919. 49 - Newspaper cutting "Ballarat, The Home of the Band Contests", dated 27/10/1932. 51 - Handwritten notes - "Tram Fares methods of collection" - See Reg. Item 2505. 53 - Newspaper cutting "100 years ago", Port Phillip Herald for 1840. 54 - Black and white photo of a gathering of people (tramway?) at the Showgrounds - See Reg. Item 2506 55 - Six black and white photos with handwritten notes ESCo 19 or 20 - See Reg. Item 2507 Group of ESCo employees by ESCo tram - See Reg. Item 2508 Photo of ESCo employee, Si Barker - See Reg. Item 2509 Photo of ESCo company bus - See Reg. Item 2510 (See also Reg Item 3813) Photo of No. 25 - Barkly St - See Reg. Item 2511 Photo of two ESCo employees - See Reg. Item 2512 56 - Loose newspaper cutting "San Francisco Struggle Buggies" - cable trams - The Age 15/3/1947 57 - Letter from Mr. Pringle of ESCo to Inspector James and Handwritten notes on ESCo management - See Reg. Item 2513 Handwritten notes on the token systems - See Reg. Item 2514 59 - Page titled "Bundy clocks and meters" but no notes 61 - Hand drawn map of Ballarat tramways with notes on tracks - horse, SEC and ESCo and loops - See Reg. Item 2515. 63 - Miscellaneous newspaper cuttings and photo of the Arch of Victory 64 - Photo of W. J.K. Dunstan ??? (has notes written on back, but difficult to read)* - Notes on rear of photo p64. "49 years in service W.J.K. Dunstan Office Manager Ballarat Branch Retired 18/3/46" 65 - Newspaper cutting "Old Victorian Schooldays, letters and reminiscences by past scholars". 67 - Newspaper cuttings - photo of Ballarat Choral Union and Urquhart St. school 69 - Newspaper cutting "Saint with a top hat" 71, 73 - Newspaper cutting "District Mining Disasters of By-Gone Days" - John Hargreaves 75 - Newspaper cutting "The Ballarat Courier" banners for 2/9/1939 - outbreak of World War Two - normal and a special edition. 77, 79 - Newspaper cutting "My Youth in Ballarat" - T.P. Long. 81 - Two photos and handwritten notes showing trams in Sturt St and the line up of horse trams - See Reg Item 2516. 83 - Newspaper cutting "Theatrical History - The Charlie Napier" - Speilvogel 85, 87 - Newspaper cutting "Story of the Eureka Stockade Monument" - Speilvogel 89 - Newspaper cutting "The Beginning of Buninyong" - Speilvogel 91 - Newspaper cutting "St. David's Day" 93, 95 - Newspaper cutting "From 1856 to 1894, Ballarat's Foremost Citizen Major (William Collard) Smith Recalled - J. Hargreaves. 97 - Newspaper cutting "All Electrical Exhibition / Ballarat's Electric Supply, its development" - 1936, See Reg. Item 2517. 98 - Loose photo of the ESCo Power station chimney and steeplejacks - See Reg. Item 2518. 98 - Loose sheet of paper about the origin of the ESCo trams - See Reg. Item 2525. 99 - Newspaper cutting - about Electricity in Ballarat and tramway services, and handwritten notes on ESCo Inspectors - See Reg. Item 2519 100, 101 - Newspaper cuttings - "Mr. Melbourne Day by Day" cartoon series and the artist's death notice dated 22/8/1939. 102 - Poster - Dana Street School Jubilee Re-union, has N. Speilvogel and H. James as joint secretaries. 103 - Newspaper cutting of various photos and a scene of a gold train at Bendigo 104 - Newspaper cuttings - Bob Menzies and Adolph Hitler and backs of Melbourne tram tickets - "School Boy Howlers". 105 - Letter in an envelope to H.P. James dated 11/10/1937, by a person about the building of the tram sheds at Wendouree - See Reg. Item 2520. Newspaper cutting of the opening of the tramway to Lydiard St. North from Gregory St. - See Reg. Item 2521 Loose item - 1/- SEC Tourist Ticket No. A2676 - See Reg. Item 2522.Many in pencil and inktrams, tramways, h.p. james, esco, horse trams, ballarat, civic history -
 Ballarat Tramway Museum
Newspaper, The Courier Ballarat, "Story of Ballarat's Horse Trams", 19/06/1937 12:00:00 AM
Newspaper clipping contained within Reg. Item 2488, page 25 and 27, from The Courier, Sat. 19 June 1937, titled "Story of Ballarat's Horse Trams", 1887 to 1913. Report of a paper presented to the Ballarat Historical Society by Inspector H. P. James the previous Tuesday night. Comprises four columns of text, pasted into the book titled "Of Other Days". General image of page 25 - see image btm2489i1.jpg. For page 27, see image btm2489i3.jpg - shows positioning of Reg. Items 2490, 91 and 92. Notes details of the genesis of the system, personalities involved with the construction, details of the works, depot, Duncan and Fraser car builders, early workers, formal opening, services, extension to Sebastopol, the horses, drivers, uniforms, (and on page 27) collection of fares, housing for the staff, horse feed (chart), passenger loads, conductors, rail and track cleaning and general operational notes. Has photo of a horse tram, with two drivers and conductors and handwritten note, remarking about the Conductor's "Receivers" in the photograph. See image btm2489i2.jpg Two hand written notes in ink, give details of Mr. Bob Haines and Matthew Buckley. Note Item Not formally Numbered.Numerous on page, mainly in ink.horse trams, sebastopol, crews, depot -
 Ballarat Tramway Museum
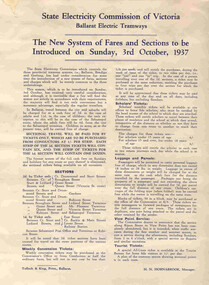
Poster, State Electricity Commission of Victoria (SECV), "The New System of Fares and Sections to be Introduced on Sunday, 3rd October 1937", Sep. 1937
... system of 1937 and yields information about the system. Trams ...Poster titled "The New System of Fares and Sections to be Introduced on Sunday, 3rd October 1937" produced by the SECV, Ballarat Electric Tramways. r. Provides information on the SEC control, the method of payment, sections, fares, weekly, school, scholars, luggage and parcel, View Point Services and Tourist Ticket. Signed by H. N. Hornabrook as Manager. Has printer's name, Tulloch and King in the bottom left-hand corner. See Reg. Item 8025 for individual copies and 8251 for the associated map/fare poster that was used in tramcars.Demonstrates the work the SEC undertook to provide information on the new ticket system of 1937 and yields information about the system.Poster contained within Reg. Item 2488, page 30, Numerous on page 31 in ink and penciltrams, tramways, sec, fares, sections, tickets -
 Ballarat Tramway Museum
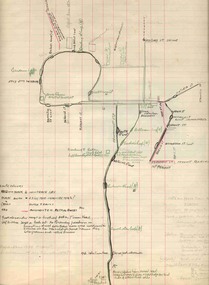
Map, H.P. James, Ballarat tramway system, 1939
Hand drawn map contained within Reg. Item 2488, page 61 of the Ballarat Tramway system. Note does not show the Drummond St. North line. Shows the loops, horse tram loops, depots, ESCo bus routes, and notes on horse tram loops. Prepared by H.P. James Scan btm2515i2 and 2515i3 show the hand written notes in light pencil. Note Item Not formally Numbered.trams, tramways, map, depot, esco, horse trams, bus routes, ballarat