Showing 2722 items
matching south side
-
![Scene in the Melbourne Botanical Gardens / [by] Nicholas Caire, circa 1876](/media/collectors/550653872162f11fb04854aa/items/577b5a2dd0cdd10948d09d9a/item-media/577b5a96d0cdd10948d0d84a/item-fit-380x285.jpg) Kew Historical Society Inc
Kew Historical Society IncPhotograph, Anglo-Australasian Photographic Company, Scene in the Melbourne Botanical Gardens, c. 1876
... from the Hill on the South Yarra side of the Gardens, shewing... the Hill on the South Yarra side of the Gardens, shewing ...Nicholas Caire was born on Guernsey in the Channel Islands in 1837. He arrived in Adelaide with his parents in about 1860. In 1867, following photographic journeys in Gippsland, he opened a studio in Adelaide. From 1870 to 1876 he lived and worked in Talbot in Central Victoria. In 1876 he purchased T. F. Chuck's studios in the Royal Arcade Melbourne. In 1885, following the introduction of dry plate photography, he began a series of landscape series, which were commercially successful. As a photographer, he travelled extensively through Victoria, photographing places few of his contemporaries had previously seen. He died in 1918. Reference: Jack Cato, 'Caire, Nicholas John (1837–1918)', Australian Dictionary of Biography.An original, rare photograph from the series 'Views of Victoria: General Series' by the photographer, Nicholas Caire (1837-1918). The series of 60 photographs that comprise the series was issued c. 1876 and reinforced a neo-Romantic view of the Australian landscape to which a growing nationalist movement would respond. Nicholas Caire was active as a photographer in Australia from 1858 until his death in 1918. His vision of the Australian bush and pioneer life had a counterpart in the works of Henry Lawson and other nationalist poets, authors and painters.Views of Victoria (General Series) No.30 / ‘Scene in the Melbourne Botanical Gardens’ / Albumen silver photograph mounted on boardOn Reverse: ‘The Scene of the present illustration is taken from the Hill on the South Yarra side of the Gardens, shewing in the distance the Government Domain. In the centre of the picture a portion of the Lake may be seen. This Lake is of considerable extent, and being surrounded by hills, the slopes of which contain many beautiful Fern Groves and Vistas of the densest foliage, adds greatly to the beauty and picturesqueness of the surrounding scenery.’nicholas caire (1837-1918), australia - landscape photography -
 Kiewa Valley Historical Society
Map - Kiewa on the Map, Guide to Kiewa Hydro-Electric Project
... '. Also in the other half, a 'Road Map to Kiewa' showing the south...' showing the south eastern side of Australia, mostly yellow ...Published by the SECV in 1950. They controlled the roads from Mt Beauty to the Bogong High Plains and all other roads within the Kiewa works area. The roads are not open to general tourist traffic. Conducted tours of the Kiewa area are operated by Eastern Road Lines Pty. Ltd., AlburyThe SECV constructed the KHES and controlled all roads within the Kiewa works area.Large colored map folded in half and then in 3. Front third is mostly blue and white with titles.. When opened the cover has black and white photos beside it with print and 'Please Note'. Also in the other half, a 'Road Map to Kiewa' showing the south eastern side of Australia, mostly yellow (the land) and blue (the sea). Inside the map is a close up map of "Ground Plan of Kiewa Hydro Electric Project' with a 'Key Map Showing Distances'.map of kiewa 1950, khes map -
 Whitehorse Historical Society Inc.
Photograph, Site of Blackburn Fibrous Plaster Works, 9/11/1962 12:00:00 AM
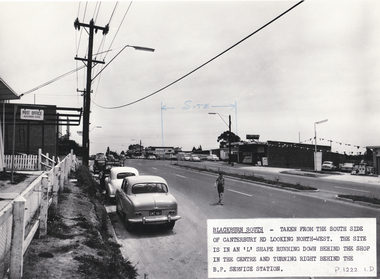
... Works, Canterbury Road, Blackburn South. On left hand side can... Plaster Works, Canterbury Road, Blackburn South. On left hand side ...The Blackburn South Post Office was in 1962 housed in a building originally built as a P.O. for the 1956 Olympics games. It was located in the grounds of the M.C.C. and was transported to the Blackburn South site. Demolished c1970s. Information supplied by Stan Hander, 34Drummond Street, Blackburn South. He worked near the P.O. during the Olympics.Black and white photo of site of Blackburn Fibrous Plaster Works, Canterbury Road, Blackburn South. On left hand side can be seen the Blackburn South Post Office ( see History below).blackburn fibrous plaster works, blackburn south post office., hander, stan, olympic games -
 Bendigo Historical Society Inc.
Postcard - MITCHELL STREET, BENDIGO, C1907
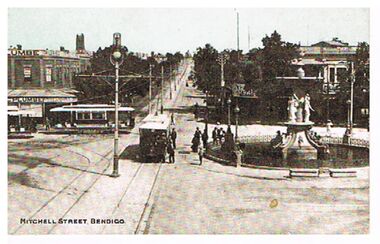
... ' on top and verandah of brick building. On south side of road.... On south side of road, on front of building ' City Club' On bottom ...Postcard, hand tinted. Image shows Charing Cross Bendigo, looking up Mitchell Street towards Railway line. Alexandra Fountain on RH side of image, tram heading up View Street in foreground. Two trams in Pall Mall, one a 'toast-rack' tram. Men standing near fountain and tram, woman in long dress in background behind fountain. Man on horseback coming down Mitchell Street. On north corner of Pall Mall and Mitchell ' C. Plumbe, Tailor' on top and verandah of brick building. On south side of road, on front of building ' City Club' On bottom of card: Mitchell Street, Bendigo. On rear of postcard ' Cole's Sunny Australian Series, 102 View. E.W. Cole, Book Arcade, Melbourne, Sydney, Adelaide. Wriitten on card in pen and addressed to ' Mrs. Russell, Post Office, Patho.' Message reads: A very happy Xmas to all at Patho P.O., arrived home safely, did not miss the train. Leaving on Sat. for Queenscliff. Kindest regards to all. A. Morcom.'bendigo, streetscape, mitchell street, charing cross, mitchell street, bendigo, trams, alexandra fountain -
 Ballarat Tramway Museum
Photograph - Black & White Photograph/s, Charles Rudd, c1890
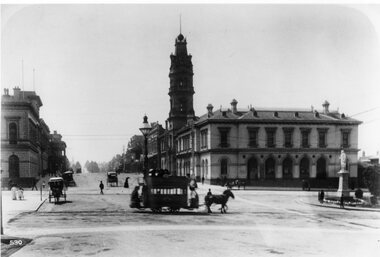
... to Grenville St. on the south side of Sturt St. (wrong side these days... is travelling east to Grenville St. on the south side of Sturt St ...Black and white print from the State Library of Victoria, June 1999 of a horse tram crossing the intersection of Sturt and Lydiard Street Ballarat c1890. Tram is travelling east to Grenville St. on the south side of Sturt St. (wrong side these days). Has the Ballarat Post Office building in the background with buildings on the north east side of Sturt St. as well. Has a number of horse drawn cabs in photo and women in white clothing holding umbrellas over their head indicating a hot day. In the right hand side of the photo is the statue of poet Robert Burns. Has number "530" in the bottom left hand corner of photograph. State Library Multimedia Source Catalogue gives the photographer as Charles Rudd, 1849 to 1901, date of photo 1889-1891. Copy made Oct. 2001 for the "gold, Gold GOLD" temporary exhibition - colour laser print onto card, with Velcro dots on rear. Stored in box D1 (Display Box) 02/2003. State Library Permission required to reproduce the photo.On rear in pencil in bottom left hand corner "Copy of H39358/10" and in centre along bottom edge "Reproduction Rights Reserved - Copied by State Library of Victoria".trams, tramways, sturt st, lydiard st, horse trams, post office, two way traffic -
 Ballarat Tramway Museum
Document - Report, Dave Macartney, "Horse Tram No. 1 Photo", c1985
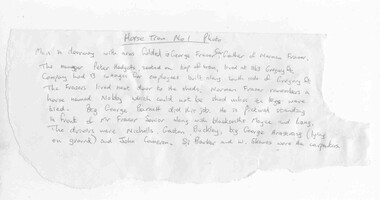
... cottages for employees building along south side of Gregory St... south side of Gregory St. The Frasers lived next door ...Yields information about the people around the photograph of the Horse Tram at the depot with the Duncan and Fraser name board in front and has a strong association with the people named in the document.Piece of torn paper headed "Horse Tram No. 1 Photo" listing details of the men around the photograph of Horse Tram No. 1 at the depot with the Duncan and Fraser name board in the front. Handwritten by Dave Macartney c1985 as advised by Norman Fraser (a relation to Farser of the Duncan and Fraser family) See Reg Item 765. "Man in doorway with arms folded is George Fraser Snr, father of Norman Fraser. The manager Peter Hodgetts, seated on top of tram, lived at 1163 Gregory St. Company had 13 cottages for employees building along south side of Gregory St. The Frasers lived next door to the sheds. Norman Fraser remembers a horse named Nobby which could not be shod unless its legs were tied. Big George Barnett did the job. He is pictured standing in from of Mr Fraser Senior along with blacksmiths Moyce and Lang. The drivers were Nicholls, Gaston, Buckley, big George Armstrong (lying on the ground) and John Cameron. Si Barker and W. Skewes were the carpenters." trams, tramways, horse trams, duncan fraser, depot -
 Ballarat Tramway Museum
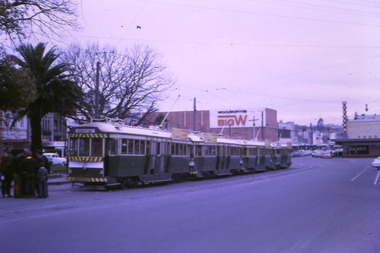
Photograph - Digital image Set of 7, Tony Smith, 19/09/1971 12:00:00 AM
... tram at the south side, night photo, has the Commonwealth Bank... Reg Item 6158.6. .2 - 42 at Sturt and Lydiard St, north side ...Yields information about Ballarat Tramways and trams prior to the closure of the tramway system.Set of 7 digital images of Ballarat trams prior to closure, scanned from original slides by Tony Smith, 1971 prior to closure of the system. This set of slides appears to be the last day of operations - 19/9/1971 .1 - Four bogie trams parked in city loop with Woolworth's Big W and Dickins in the background. Not well focused. first tram 37 - see Reg Item 6158.6. .2 - 42 at Sturt and Lydiard St, north side, night photo with crew standing by the tram stop sign. Has the post office in the background. .3 - bogie tram at the south side, night photo, has the Commonwealth Bank in the background. .4 - 39 (at the rear of the four bogie trams parked in the City loop), night photo, looking west. .5 - 42 at Sebastopol terminus with the Royal Mail Hotel in the background - night photo. .6 - bogie tram and 39 parked in the city loop - two have now departed. Has Dickins, Gear Chemist and Edments Hartleys stores in the background. .7 - 34 at Sturt and Lydiard St north side.trams, tramways, closure, night photo, city loop, post office, tram 37, tram 42, tram 39, tram 34 -
 Ballarat Tramway Museum
Photograph - Digital image, Rose Stereograph Co, c1930
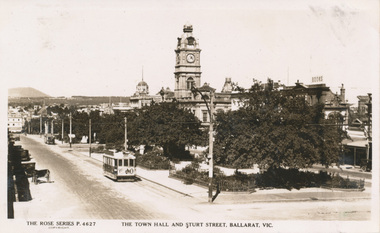
... NO"on the other! A black car on the south side appears to be a late 1920s... NO"on the other! A black car on the south side appears to be a late 1920s ...Yields information the appearance of Sturt St from Doveton St looking east and ESCo including the possibility of a horse tram being towed.Digital image from the Wal Jack Ballarat Album of Rose Series postcard No. 4627, of looking east from Doveton St along Sturt St with the Town Hall in the background. Two ESCo trams are in the photograph, the one nearest the camera with a "Vote No" advertisement on the back of the tram. The second tram, the furthermost from the camera appears to be towing a horse tram trailer. See image i3. Alan Bradley advised 22/12/11 - "The picture appears to be taken in 1930, which was the year of a local option referendum. There are several pics showing ESCo trams with "VOTE NO"on the ends. In my research someone noted a tram with "VOTE YES "on one end and "VOTE NO"on the other! A black car on the south side appears to be a late 1920s model. If the front tram is towing a horse tram trailer, it would be for the bicycle carrying service. Many employees on the morning shift rode to the depot to sign on, and signed off in the city so their bikes needed to be transported." Published by Rose Stereograph Co., Armadale Victoria. For rear of postcard - see image i2.trams, tramways, sturt st, esco, trailers -
 Ballarat Tramway Museum
Photograph - Black & White Photograph/s - set of 7, Keith Kings, 20/10/1962 12:00:00 AM
... - ditto photo taking from vacant land on the south side... in Thunder St. .6 - ditto photo taking from vacant land on the south ...Black and White print contained within the Wal Jack Bendigo and Geelong Album, see Reg Item 5003 for more details. Set of seven images of the ARHS Special tour of Bendigo on 20-10-1962. .1 - Trams 28, 30, 21, 7 and 19 in Pall Mall .2 - 18, 26, 29, 11 and 5 at the Bridge St loop on the North Bendigo line. .3 - 28, 30, 21, 7, 19 on "down" line and 18, 26, 29, 11, 5 and service car 3 on "up" line, View St Opposite Oval .4 - 28, 30, 21, 7, and 19 at Eaglehawk .5 - 28, 30, 21 in North Bendigo siding and 7 and 9 in Thunder St - photo taken in Thunder St. .6 - ditto photo taking from vacant land on the south side of the terminus, along with No. 6 the service tram. .7 - 28, 30, 21, 7, 19 in View St with Goodyear and Caltex signs in the photo and the Commercial Banking Company of Australia building in the background. Most printed on Ilford paper.On rear in ink. .1 - "28, 30, 21, 7, 19 Pall Mall 20-10-62" .2 - "Bendigo ARHS Convoy "A" on Bridge St loop, Nos. 18, 26, 29, 11, 5 20/10/62" with Keith Kings copy right stamp printed in top right hand corner and number "N(y)(12)" written in. .3 - "18, 26, 29, 11, 5 and service car 3 on "up" line, 28, 30, 21, 7, 19 on "down" View St 20-8-62" .4 - "28, 30, 21, 7, and 19 Eaglehawk 20-10-62" .5 - "19, 7 in, 28, 30, 21 in spur siding Nth Bendigo 20/10/62" .6 - "28, 30, 21, 7, 19 plus No. 6 service car Nth B/go 20/10/62" .7 - "Bendigo ARHS Convoy "B" - 28, 30, 21, 7, 19 Charing Cross, 20/10/62" with Keith Kings copy right stamp printed in top right hand corner and number "N(y)(14)" written in.trams, tramways, bendigo, arhs, tours, eaglehawk, north bendigo, view st, tram 28, tram 30, tram 21, tram 7, tram 19, tram 6, tram 18, tram 26, tram 29, tram 11, tram 3 -
 Whitehorse Historical Society Inc.
Photograph, Narmara Primary School, 13/01/1994 12:00:00 AM
... from South East corner. North side of Highbury Road between... photo of Narmara Primary School Site, looking East from South ...Coloured photo of Narmara Primary School Site, looking East from South East corner. North side of Highbury Road between Middleborough Road and Blackburn Road. Since demolished and site developed for housing.narmara primary school, warner, philip -
 Melbourne Tram Museum
Photograph - Black & White Photograph/s, 1960's
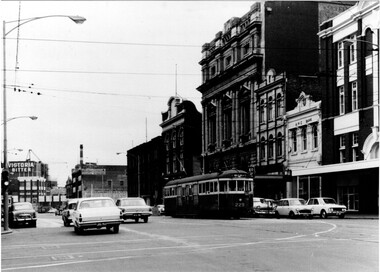
... Black and white photograph of trams W2 229, south bound... around it. Photo taken from the south west side of the Latrobe St ...Black and white photograph of trams W2 229, south bound in Swanston St, passing the now RMIT buildings. Has the Carlton United, Victoria Bitter buildings in the background. Tram has the destination of Malvern Darling Road, Route 4D. Photo taken early 1960's? given the cars around it. Photo taken from the south west side of the Latrobe St intersection. Has an ANZ bank and Storey hall in the background. Printed on Fujichrome paper. Not known who took the photograph or when it was printed.Stamped in black ink on back "TMSV Sales"trams, tramways, swanston st, rmit, latrobe st, darling rd, tram 229 -
 Bendigo Historical Society Inc.
Photograph - MINE SHED
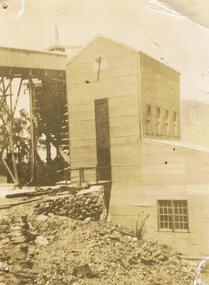
... attached beside, ore tramway on LH side. Possibly South New Moon... side. Possibly South New Moon Mine site Eaglehawk. Photograph ...Black and white photogrpah. Corrrugated iron shed, very large narrow rectangular opening in front. Smaller shed attached beside, ore tramway on LH side. Possibly South New Moon Mine site Eaglehawk.gold mines, mining equipment, south new moon mine site -
 Ballarat Tramway Museum
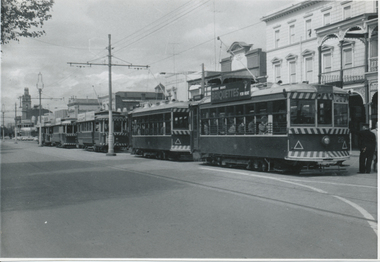
Postcard, ESCo tram just past the intersection of Doveton St. and Sturt St, c1906
... vehicles in the photograph. Shows buildings along the south side... along the south side of Sturt St. and part of the verandah ...Demonstrates aspects of Ballarat tramway operation with horse tram trailers, Sturt St buildings, yields information about the appearance of Ballarat in colour.Colour postcard, presented within a wooden framed image of an ESCo tram just past the intersection of Doveton St. and Sturt St. travelling east along the north side of Sturt. Street towing a heavily laden horse tram as a trailer. Photo appears to be taken soon after opening of the electric trams, as the tram does not have any destination box above the driver. Possibly summer 1905/1906. Numerous people in the street, some horse drawn vehicles in the photograph. Shows buildings along the south side of Sturt St. and part of the verandah of the building at the NE corner of Doveton St. For a list and description of the same base image see Archives file - "Notes on ESCo Tram towing a heavily loaded trailer" On rear is "Made in Germany", areas for correspond, a Victoria one penny postage stamp, an din the bottom right hand corner, "09 3851" The card has been addressed to a Miss Seymour "Larramea", Mulwala NSW. Has a handwritten note to her sister (signed Flo?) about a trip arrangements to Melbourne and other details. Date 13 April, but year not apparent. Has been postmark, Melbourne (appears)In pencil along top edge "9269 V and $5"trams, tramways, sturt st, trailers, horse tram, town hall, esco -
 Melbourne Tram Museum
Photograph - Framed Photographs, Department of Transport, "Presentation of an Essay to the Department of Transport Victoria, March 1994", Mar. 1994
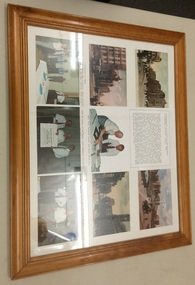
... north from the south side of the Yarra, Postcard of Flinders St..., Postcard of Queens Bridge Melbourne, looking north from the south ...Set of 9 postcard, document or images framed with a wooden frame at the time of the "Presentation of an Essay to the Department of Transport Victoria, March 1994". Has a white backing for postcards and photos, approx. 145 x 100. Items have been placed it appears on an under backing. Glazed, craftwood backing secured with staples into the frame. On the rear has a printed label with a red border on white paper with the number "27" in black. From Top left to bottom right: , Postcard of Swanston St with St Pauls, Note about the presentation and the work undertaken by Jack Cranston, Postcard of Queens Bridge Melbourne, looking north from the south side of the Yarra, Postcard of Flinders St, Photo of Jack Cranston with Minister for Transport, Alan Brown MP, Postcard of Collins St Melbourne, Photo of presentation party - Jack Cranston, Con O'Carroll, Robert Wilson, Graham Jones, Robert Green, John Keating and Alan Brown., Photo of Alan Brown, Jack Cranston and Kim Wells holding the Plans and Sections folder (see Reg Item 583)., Photo of Alan Brown and Jack Cranston.trams, tramways, cable trams, horse trams, mto co, melbourne -
 Melbourne Tram Museum
Photograph - Tramways Emergency Vehicles - R10, Melbourne & Metropolitan Tramways Board (MMTB), 1979
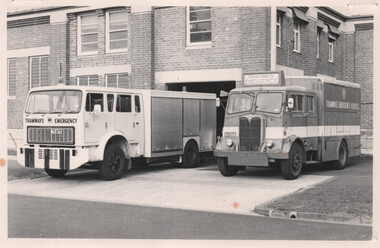
... emergency vehicles side by side at South Melbourne depot - when... emergency vehicles side by side at South Melbourne depot - when ...Black and white photograph of the "new" and "old" tramway emergency vehicles side by side at South Melbourne depot - when the new vehicle was being fitted out and equipment Shows the registration numbers of the vehicle. These are known by their radio call signs R10. See 1004 and 2528 for other photos.Yields information about the Tramway Emergency vehicle R10.Black and white photograph with staple marks around border.tramways, trams, emergency, mmtb, r10 vehicle, recovery, aec, south melbourne depot -
 Eltham District Historical Society Inc
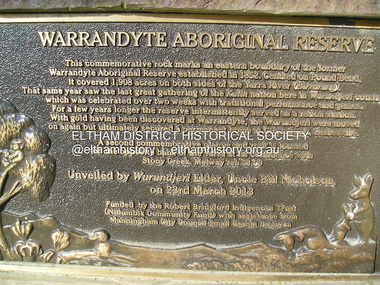
Photograph, Fay Bridge, Eastern boundary of former Warrandyte Aboriginal Reserve, North Warrandyte, 7 November 2016
... of the former Warrandyte Aboriginal Reserve on the north and south sides... of the former Warrandyte Aboriginal Reserve on the north and south sides ...Two bronze commemorative plaques on rocks, unveiled by Wurundjeri Tribe Council Elders, mark two eastern boundaries of the former Warrandyte Aboriginal Reserve on the north and south sides of the Yarra. This project was initiated by Nillumbik Reconciliation Group in close association with Reconciliation Manningham and the Wurundjeri Tribe Council, as a means of commemorating the last great corroboree of the Kulin Nation which was held at Pound Bend in March 1852. This plaque is on the Nillumbuk side of the Yarra, accessed via The Boulevard, North Warrandyte. The plaque is set on a rock approximately 50 metres before the turning circle at the end of The Boulevard. Plaque : Warrandyte Aboriginal Reserve This commemorative rock marks an eastern boundary of the former Warrandyte Aboriginal Reserve established in 1852. Centred on Pound Bend, it covered 1,908 acres on both sides of the Yarra River (Birrarung). That same year saw the last great gathering of the Kulin nation here in Wurundjeri country which was celebrated over two weeks with traditional performance and games. For a few years longer the reserve intermittently served as a ration station.With gold having been discovered at Warrandyte, the Wurundjeri were moved on again but ultimately secured a permanent home at Coranderrk, Healesville. A second commemorative plaque and rock is located on the opposite bank of the Yarra and its confluence with Stony Creek. Melway ref : 23 C 9 Unveiled by Wurundjeri Elder, Uncle Bill Nicholson on 23rd March 2013 Funded by the Robert Bridgford Indigenous Trust (Nillumbik Community Fund) with assistance from Manningham City Council Small Grants Program Ref: Monument Autralia https://monumentaustralia.org.au/themes/culture/indigenous/display/99680-warrandyte-aboriginal-reserve-fay bridge collection, 2016-11-07, aboriginal reserve, north warrandyte, plaques, warrandyte aboriginal reserve -
 Surrey Hills Historical Society Collection
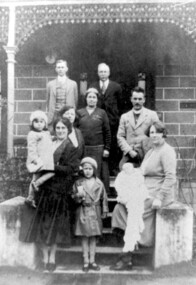
Photograph, Charles Henry Maling and family at 'The Willows', Shepreth Street, Surrey Hills (demolished), 1930s
... “The Willows” home of John Butler Maling on south side... Maling on south side of Whitehorse Road in Shepreth Street, near ...“The Willows” home of John Butler Maling on south side of Whitehorse Road in Shepreth Street, near Banool Road. He built 2-roomed mud brick cottage in about 1861 extending it in stages into a weatherboard Victorian villa as his family grew. John Butler Maling's uncle (also John Butler Maling lived nearby at 'Ancyra' at 26 Weybridge Street). 'The Willows' was situated on a small farm of c13 acres with a creek running through it, lined with willows. The house was demolished after J B Maling's death in 1931 when the land was subdivided, some of it having been previously bought by the Education Department for the site of Chatham Primary School. J B Maling trained his six sons as builders. Charles Henry and his family are pictured in this photo. Charles Henry Maling (1875-1953) married Katherine Mitchell (1875-1958) in 1901. They lived at 9 Benson Street, Surrey Hills but came to live at 'The Willows' for 5 years prior to 1931 to care for Charles' father. Charles and Katherine are the older man and woman centre back with daughter Ellen Grace, known as Nell (1882-1960) in the front of them. Right front seated on the pillar is daughter Jane Emma (1872-1980) with her baby. Her husband Robert Wilhelm (Bob) Sutherland is the younger man at the back. The occasion is thought to be the christening of their first child. The other people are Rev O Cordell, his wife Mary and their children who are friends visiting from Africa where the donor, Rev Charles Maling, son of Charles Henry Maling was working with the Church Mission Society. A black and white photograph of a group of people standing (one lady sitting) on the front steps of a house.the willows, house names, (mr) john butler maling, whitehorse road, banool road, balwyn, surrey hills, (mr) charles henry maling, (mrs) katherine maling, (miss) nell maling, (mrs) jane sutherland, (mr) bob sutherland, (rev) o cordell, (mrs) mary cordell -
 Orbost & District Historical Society
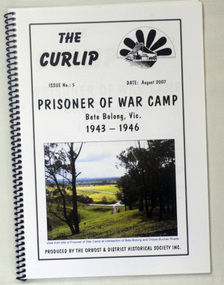
book, The Curlip - P.O.W.Camp Bete Bolong, Vic. 1943-1946, August 2007
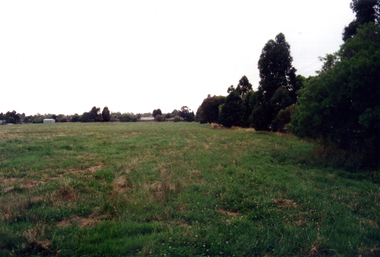
... Camp was located on the south side of the Buchan - Orbost Rd... Camp was located on the south side of the Buchan - Orbost Rd ...This is Issue No. 5 of "The Curlip". The magazine is a compilation of research from a trip by the Orbost & District Historical Society to Bete Bolong. The Bete Bolong Prisoner of War Camp was located on the south side of the Buchan - Orbost Rd. From November 1943 to November 1945, Italian prisoners of war were based at Bete Bolong, cultivating maize, peas, beans and other vegetables on local farms. Unlike other 'farming' prisoners of war, those at Bete Bolong did not live with the farming families, but at a Prisoner of War Control Centre on Crown land overlooking the Snowy River Flats. About fifty Italian prisoners lived at the centre, along with an Australian Military Force staff of approximately seven people. The prisoners were driven to and from the farms each day. Three of them apparently simply swam across the river to work. They worked a six day week, with Sundays off. Although they were provided with rations, both prisoners and staff maintained vegetable and flower gardens. They were also skilled at cooking 'anything' they could catch, and at making illegal "grappa". Very few of the Italians were experienced farm workers. Some of them used their skills to make things for the families they worked for; a cabinet-maker made furniture , a cobbler made shoes, etc. They interacted with the local community and, although they were not supposed to go within one kilometre of town, some were found at local dances on Saturday nights. As recreation the prisoners were allowed to walk along the road to the west of the camp. Local people from both sides of the river could hear them sing as they walked. The prisoners also helped to construct an 'ant bed' tennis court on a property adjacent to the centre. Although now overgrown, the site of the tennis court can still be discerned as a flat area above the site of the centre. (ref./vhd.heritagecouncil.vic.gov.au)This item is a useful reference tool on the history of the Prisoner of War Camp at Bete Bolong, Orbost.A spiral bound book with a clear plastic cover. On the front is a coloured photograph of a view from the site of the P.O.W. camp at the intersection of Bete Bolong and Buchan Roads at Bete Bolong. Above is the title "Prisoner of War Camp Bete Bolong, Vic. 1943-1946" in black print on a white background. p.o.w.-camp-orbost ww11 bete-bolong -
 Ballarat Tramway Museum
Photograph - Digital image Set of 10, 1971
... , south side, with Gardens via Sturt St on destination roll. Can..., Sturt St, south side, with Gardens via Sturt St on destination ...Yields information about Ballarat Tramways and trams prior to the closure of the tramway system.Set of 10 digital images of Ballarat trams prior to closure, scanned from original slides by Stuart Lodington, 1971 prior to closure of the system. .1 - No. 17 at the City Centre, Sturt St, south side, with Gardens via Sturt St on destination roll. Can see the ESCo switch box in the back and the stop and section sign on the adjacent pole. .2 - No. 26 at Sebastopol terminus alongside the Royal Mail Hotel. The tram has yet to turn the pole or the destination roll. Note the Bus Stop sign on the pole, just prior to closure. .3 - ditto .4 - No. 27 and 30 crossing in Skipton St at the Bell St loop (see also btm4975i3) .5 - No. 32, Gardens, about to enter the Carlton St loop, with Lake Wendouree in background, Wendouree Parade. .6 - No. 32 at Depot junction, good photo of depot trackwork entry area. .7 - No. 21, Wendouree Parade, Gardens area, north bound, showing Gardens via Sturt. .8 - No. 12, inbound on Sturt St west at a tram stop. Has destination of Mt. Pleasant. .9 - No. 27 at Lydiard St north terminus with the shelter in the background. .10 - No. 21 at Gardens Loop, tram has destination of Mt. Pleasant. Crews sitting in the saloon.trams, tramways, ballarat, sturt st, sebastopol, drummond st sth, wendouree parade, carlton st, depot, depot junction, trackwork, gardens, sturt st west, crews, tram 17, tram 26, tram 27, tram 32, tram 21, tram 12 -
 Melbourne Tram Museum
Slide - Set of 7, Keith Caldwell, 11/03/1962 12:00:00 AM
... the person crouching down on the south side of the bridge behind... the person crouching down on the south side of the bridge behind ...Set of 7 Agfa Colour slides, cardboard mounts, by Keith Caldwell dated 11.3.1962 of the transfer of cars from Footscray to the "Main System" the day after the system was closed. See Keith Kings history of Footscray notes. All trams running trolley wheels. .1 - Footscray depot cars X1 463, X2 678, X1 460 and X1 466 in Gordon St, about to turn into River Street. .2 - X2 678 turning from Nicholson St into Irving St. Footscray with the Rockmans Store in the background. This store was later demolished for the Ring Road. Also is J. Boltons Chemist shop advertising Kodak film and another shop advertising Darrell Lea Chocolates, Peters Icecream and ? Lopes fruit shop. .3 - X1 460 at same location. .4 - X2 678 crossing Maribyrnong River Bridge - note the person crouching down on the south side of the bridge behind the tram. .5 - X1 460 in Rosamond Road, just before the curve onto Williamson Rd. This site became the Bunnings site. The tram has a modified 21E truck. .6 - X2 468 as above with part of the curve in the view. Has an advertisement for Bon Stores of Hopkins St Footscray. .7 - X2 678 at ditto..1 - in ink - "Farewell Footscray" Sun 11.3.1962 - Footscray Depot cars departing areas en route to Main system." .2 - .7 all have "Footscray Sun 11.3.62"trams, tramways, footscray, closure, maribyrnong, gordon st, river st, irving st, maribyrnong river, bridges, x1 class, x2 class, rosamond rd, 21e trucks, tram 463, tram 678, tram 460, tram 466 -
 Melbourne Tram Museum
Photograph - Digital Image, Kevin O'Reilly, series of three images of the Hawthorn Bridge over the Yarra, c1930, c1930's
... wooden bridge being constructed on the south side. Has the cable... wooden bridge being constructed on the south side. Has the cable ...Image from CD (Compact Diskette for use in computers) - see Reg Item 135. A series of three images of the Hawthorn Bridge over the Yarra, c1930, during the era with problems with the bridge. See separate article for more details. Richmond 6, Richmond, Richmond 3 on the CD as original files. .1 - Looking from the south west, at the Hawthorn bridge with the temporary wooden bridge being constructed on the south side. Has the cable tram depot in the photo and part of the Burnley racing course. Temporary track on the north side of the steel bridge and crossings can be seen. .2 - Looking along Bridge Road to the east with Hawthorn Bridge in the middle of the photograph. Shows the industrial and residential areas, Hawthorn Railway Station and part of the Burnley Race course, the cable tram depot building. W class tram in Church St Hawthorn and W class tram crossing the bridge on the north side temporary track. Note the cable tram used as a shelter on the north east corner of the bridge. .3 - Looking south along River St towards Bridge Road, with the Yarra River and Hawthorn Bridge on the left side of the photograph. Shows the industry in the area at the time, wool and skin Merchants, north side of the cable depot, housing and the outlook to the river!trams, tramways, hawthorn, yarra river, burnley, richmond, hawthorn bridge -
 Federation University Historical Collection
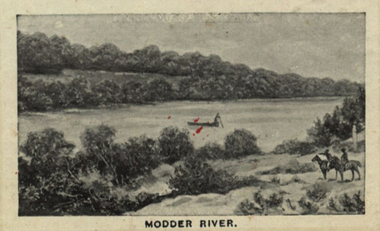
Photograph (black & White), Modder River - South Africa
... built on the south side of the river and on the smaller Riet... built on the south side of the river and on the smaller Riet ...When war broke out in 1899, and early target for the Boers was the diamond-mining centre of Kimberley. This was located near the point where the Transvaal, Orange Free State and Cape Colony met. General Sir Redvers Buller detached the 1st Division under Lieutenant General Lord Methuen to relieve the Siege of Kimberley. This decision was made partly for reasons of prestige. To capture Kimberley (which contained the famous imperialist and former Prime Minister of Cape Colony, Cecil Rhodes) would be a major propaganda victory for the British. Methuen's force advanced north and won two engagements against the Boers of the Orange Free State. Reinforcements from Transvaal under General Koos de la Rey arrived and he convinced the Boers to follow his plans for attacking the British. Instead of relying on the hills for protection and missing their targets, de la Rey proposed they make use of the flat veld and introduced them to the Mauser rifle with its flat trajectory. Trenches were built in the banks of the Modder River from which they could sweep the veld for a great distance. The trenches were built on the south side of the river and on the smaller Riet River where they meet at Modder River Station. Methuen's force began advancing towards the Modder planning to cross the river. The Boers opened fire and the British troops were unable to find cover on the veld. They had to lay flat so as not to be seen or hit. The British guns pounded the buildings near Modder River Station and the north bank of the river, missing the trenches on the south bank. The battle became a stalemate. The British found an opening on the Boer's right flank at Rosmead ford downstream and drove the Boers out of Rosmead. De la Rey drove them back into a small insecure bridgehead. The Boers feared they were vulnerable and withdrew during the night. Methuen reported that the battle had been "one of the hardest and most trying fights in the annals of the British army". Individual image from photographed poster of tobacco and cigarette cards.boers, diamind-mining, kimberley, transvaal, orange free state, cape colony, sir rdvers buller, lieutenant general lord methuen, siege of kimberley, cecil rhodes, general koos dde la rey, mauser rifle, veld, modder river, modder river station, trenches, riet river, rosmead -
 National Vietnam Veterans Museum (NVVM)
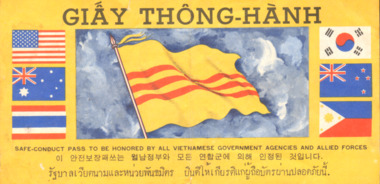
Document, Safe Conduct Pass+ Propaganda sheets
... side of South Vietnamese flag. All other pages are B&W except... and Philippines) on either side of South Vietnamese flag. All other pages ...Deep yellow in colour with black print. Six flags (USA, Australia, Thailand, Korea, New Zealand and Philippines) on either side of South Vietnamese flag. All other pages are B&W except the last page which has a river scene and pink flower.GIAY THONG-HANH "Safe conduct pass to be honored by all Vietnamese Government Agencies and Allied Forces" / Back signed by Nguyen Van Thienpermissive orders, pass, safe conduct, julian peter mcnamara, mcnamara, australian army, 3794332, trooper, royal australian armoured corps, national service, b squadron, a squadron, 1st armoured regiment -
 Ballarat Tramway Museum
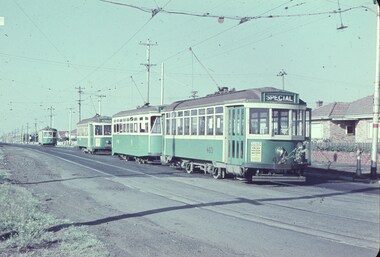
Slide - 35mm slide/s, Noel Simons, 21/11/1962 12:00:00 AM
... ' and Sandhurst Milk. In background are the buildings on the south side...' and Sandhurst Milk. In background are the buildings on the south side ...Set of 6 transparencies taken on 21/11/1962 on Kodak mounts. 1189.1 - Bendigo No.11 at Quarry Hill terminus. Photo taken looking in along the route. Tram has destination of North Bendigo. 1189.2 - No. 21 in Pall Mall bound for North Bendigo. Tram has roof ads for Mamouney's furniture and SEC. In the background are the National Bank building, Dad and Dave's Cafe and the Beehive Buildings and the London Pharmacy. 1189.3 - No. 2 in Mitchell St, just after crossing over railway bridge. Photo taken after tram has passed photographer. Has what appears to be an SEC road works crew in the background. Has destination of Quarry Hill. 1189.4 - No. 17 climbing Mitchell St. on the start of the single track section, just before crossing the railway bridge. Has destination of Quarry Hill and the large Maples building sign in the background. 1189.5 - as for 1189.4 but after tram has passed photographer. Has an Ilford film roof ad and an SEC roof ad. Railway bridge in the background. 1189.6 - No. 21 at Charing Cross with passengers boarding. Tram has destination of North Bendigo and roof ads for SEC 'Electric Cooking' and Sandhurst Milk. In background are the buildings on the south side of High St. Also has a SEC worker in white overalls sweeping the track.Information written on in black ink and date stamped on purple ink. 1189.1 - "Birney car No. 11 in High St. Bendigo at Golden Square terminus" 1189.2 - "No. 21 in Pall Mall Bendigo near Charing Cross" 1189.3 - "No. 2 in Mitchell St. Bendigo, just after crossing bridge over railway line (Quarry Hill route)" 1189.4 - "No. 17 in Mitchell St. Bendigo, climbing the hill the bridge over the railway line. (Quarry Hill route)" 1189.5 - "No. 17 in Mitchell St., Bendigo approaching bridge over Railway line (Quarry Hill route)" 1189.6 - "No. 21 at Charing Cross, Bendigo"tramways, trams, bendigo, golden square, pall mall, mitchell st., quarry hill, tram 2, tram 11, tram 17, tram 21 -
 Kew Historical Society Inc
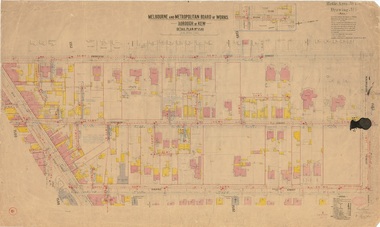
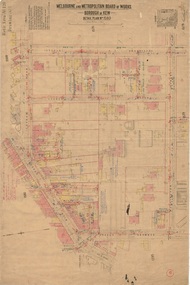
Plan, Melbourne & Metropolitan Board of Works : Borough of Kew : Detail Plan No.1581, 1904
... ’. Over time, Kew Junction and the south side of High Street have... and the south side of High Street have been reconfigured and widened, so ...The Melbourne and Metropolitan Board of Works (MMBW) plans were produced from the 1890s to the 1950s. They were crucial to the design and development of Melbourne's sewerage and drainage system. The plans, at a scale of 40 feet to 1 inch (1:480), provide a detailed historical record of Melbourne streetscapes and environmental features. Each plan covers one or two street blocks (roughly six streets), showing details of buildings, including garden layouts and ownership boundaries, and features such as laneways, drains, bridges, parks, municipal boundaries and other prominent landmarks as they existed at the time each plan was produced. (Source: State Library of Victoria)This plan forms part of a large group of MMBW plans and maps that was donated to the Society by the Mr Poulter, City Engineer of the City of Kew in 1989. Within this collection, thirty-five hand-coloured plans, backed with linen, are of statewide significance as they include annotations that provide details of construction materials used in buildings in the first decade of the 20th century as well as additional information about land ownership and usage. The copies in the Public Record Office Victoria and the State Library of Victoria are monochrome versions which do not denote building materials so that the maps in this collection are invaluable and unique tools for researchers and heritage consultants. A number of the plans are not held in the collection of the State Library of Victoria so they have the additional attribute of rarity.Original survey plan, issued by the MMBW to a contractor with responsibility for constructing sewers in the area identified on the plan within the Borough of Kew. The plan was at some stage hand-coloured, possibly by the contractor, but more likely by officers working in the Engineering Department of the Borough and later Town, then City of Kew. The hand-coloured sections of buildings on the plan were used to denote masonry or brick constructions (pink), weatherboard constructions (yellow), and public buildings (grey). The streets and built structures in this plan were surveyed in 1903 and released to contractors in 1904. In addition to the designation of building types by colour, the plan includes detailed descriptions of land use and ownership. While many buildings remain from this period, a number of the buildings represented have been demolished including the original Kew Town Hall, and the Congregational and Roman Catholic churches in Walpole Street. While the mansion ‘Illapa’ in Princess Street is still extant – now part of ‘Rylands’ – the neighbouring mansion ‘Elsmere’ was demolished some decades ago. Rivalling Illapa and Elsmere in size were two mansions in Walpole Street, one named on the plan as ‘Gnarlbine’. Over time, Kew Junction and the south side of High Street have been reconfigured and widened, so that the commercial buildings on the corner of Princess and High Street no longer exist. A surprising feature of this part of central Kew to the northwest of Kew Junction is the amount of vacant land. In a number of cases, this land is noted by the contractor as used for vegetable gardens.melbourne and metropolitan board of works, detail plans, maps - borough of kew, mmbw 1581, cartography -
 Kew Historical Society Inc
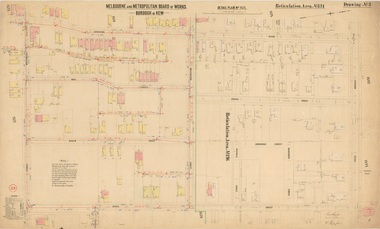
Plan, Melbourne & Metropolitan Board of Works : Borough of Kew : Detail Plan No.1571, 1904
... point for the survey was the south side of Wellington Street... point for the survey was the south side of Wellington Street ...The Melbourne and Metropolitan Board of Works (MMBW) plans were produced from the 1890s to the 1950s. They were crucial to the design and development of Melbourne's sewerage and drainage system. The plans, at a scale of 40 feet to 1 inch (1:480), provide a detailed historical record of Melbourne streetscapes and environmental features. Each plan covers one or two street blocks (roughly six streets), showing details of buildings, including garden layouts and ownership boundaries, and features such as laneways, drains, bridges, parks, municipal boundaries and other prominent landmarks as they existed at the time each plan was produced. (Source: State Library of Victoria)This plan forms part of a large group of MMBW plans and maps that was donated to the Society by the Mr Poulter, City Engineer of the City of Kew in 1989. Within this collection, thirty-five hand-coloured plans, backed with linen, are of statewide significance as they include annotations that provide details of construction materials used in buildings in the first decade of the 20th century as well as additional information about land ownership and usage. The copies in the Public Record Office Victoria and the State Library of Victoria are monochrome versions which do not denote building materials so that the maps in this collection are invaluable and unique tools for researchers and heritage consultants. A number of the plans are not held in the collection of the State Library of Victoria so they have the additional attribute of rarity.Digital copy of the original survey plan, issued by the MMBW to a contractor with responsibility for constructing sewers in the area identified on the plan within the Borough of Kew. The plan was at some stage hand-coloured, possibly by the contractor, but more likely by officers working in the Engineering Department of the Borough and later Town, then City of Kew. The hand-coloured sections of buildings on the plan were used to denote masonry or brick constructions (pink), weatherboard constructions (yellow), and public buildings (grey). This plan is part of a large and historically significant group of MMBW plans and maps that was donated to the Society by the Mr Poulter, City Engineer of the City of Kew in 1989. When the contracts were let for surveyors to identify and record the extant houses and landscapes within an area for the Board of Works, the contracts were let at separate times, hence the anomaly where two copies of Plan No.1571 exist in our collection. The first of these plans identifies the building materials used in houses bordering Fitzwilliam Street, Edgevale Road, May Street, Malin Street, Davis Street and Wellington Street. The cut off point for the survey was the south side of Wellington Street. By 1903 when the survey was undertaken many of the sites were already built on, particularly those facing Edgevale Road. The plan identifies the preponderance of weatherboard houses in the area. The other version of the plan identifies the buildings between Wellington Street and Cotham Road.melbourne and metropolitan board of works, detail plans, mmbw 1571, cartography -
 Bendigo Historical Society Inc.
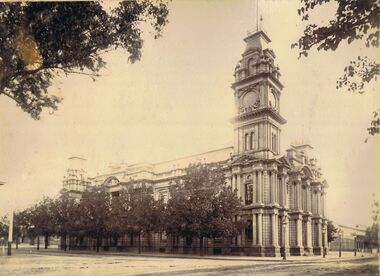
Photograph - BENDIGO TOWN HALL
... Hall taken from north side, looking south down Hargreaves... shows Bendigo Town Hall taken from north side, looking south ...Sepia image mounted on board. Image shows Bendigo Town Hall taken from north side, looking south down Hargreaves Street. Trees along north boundary of building. Gas lamps alongside kerb in Hargreaves Street. Market building visible alongside Town Hall.bendigo, buildings, bendigo town hall, bendigo, town hall, municipal buildings, hargreaves street -
 Bendigo Historical Society Inc.
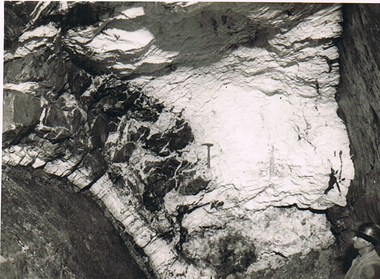
Photograph - MCCOLL, RANKIN AND STANISTREET COLLECTION: MONUMENT HILL MINE
... of south face showing western side of upper roof. On west side...' level 150' south of shaft. Picture of south face showing western ...Photograph. Black and white photo - "Monument Hill Mine 655'. Int stope below 640' level 150' south of shaft. Picture of south face showing western side of upper roof. On west side is main w fault. On the face is a rock hammer. Details at ? qtz and intrusions above it.photograph, landscape, monument hill mine 655 -
 Ballarat Tramway Museum
Slide - 35mm slide/s - set of 7, Noel Simons, 22/11/1962 12:00:00 AM
... on the south side of Sturt St. Note the Austin motor car by the tram... cars and pedestrians on the south side of Sturt St. Note ...Set of 7 Kodachrome transparencies taken on 22/11/1962. 1161.1 - trams 38 and 20 in Sturt St. West at the Russell St. loop. No. 20 has possibly terminated and is showing "CITY" while 38 is showing "Mt Pleasant" Both trams fitted with dash canopy lighting, but no large white stripe. 20 has a Twin Lakes sign. 1161.2 - tram 33 just before Gardens Loop in Wendouree Parade, with destination of "Victoria St." Has a Twin Lakes sign. 1161.3 - tram 39 at corner of Lydiard St. North and Sturt St. with Post Office in background. 1161.4 - tram 40 turning from Sturt St into Lydiard St. North with Post Office in background and showing destination of Lydiard St. North. A blue Holden with red stripes for the Radio Cabs co. is in the foreground, along with pedestrians. 1161.5 - tram 41 in Sturt St. at the City terminus, showing destination of Mt Pleasant with Post Office and ANZ Bank buildings in background. Numerous people waiting on the seats at the tram stop. 1161.6 - tram 13 in Sturt St. near Doveton St. showing destination of Bell St. Many cars and pedestrians on the south side of Sturt St. Note the Austin motor car by the tram showing a stop signal. Tram 13 has a Twin Lakes sign. 1161.7 - trams 13, 26, and 39 in the City Loop near Bridge St. Has Morseheads and Grenville St. tram shelter in the background.1161.1 - "38 and 20 crossing in Sturt St. Ballarat near Russell Street" - in blue and black ink. The "Russell St" is a later addition, over white out. 1161.2 - "33 near Botanic Gardens terminus, Wendouree Parade, Ballarat" 1161.3 - "No. 39 in Lydiard St. Ballarat at Cnr. of Sturt St." 1161.4 - "No. 40 entering Lydiard St. from Sturt St. Ballarat" 1161.5 - "No. 41 in Sturt St. Ballarat at cnr of Lydiard St." 1161.6 - "No. 13 in Sturt St. Ballarat, at Cnr. of Doveton St." 1161.7 - "Nos. 13, 26, and 39 in Sturt St. Ballarat near Bridge St." All have date stamp of "22 Nov. 1962" in purple ink. All black ink unless otherwise noted.tramways, trams, ballarat, sturt st. west, wendouree parade, lydiard st., city loop, taxis, radio cabs, tram 13, tram 20, tram 26, tram 33, tram 38, tram 39, tram 40, tram 41 -
 Kew Historical Society Inc
Plan, Melbourne and Metropolitan Board of Works, Borough of Kew : Detail Plan No.1580, 1904
... in the 1930s and 1950s involved the shops on the south side of High... involved the shops on the south side of High Street being ...The Melbourne and Metropolitan Board of Works (MMBW) plans were produced from the 1890s to the 1950s. They were crucial to the design and development of Melbourne's sewerage and drainage system. The plans, at a scale of 40 feet to 1 inch (1:480), provide a detailed historical record of Melbourne streetscapes and environmental features. Each plan covers one or two street blocks (roughly six streets), showing details of buildings, including garden layouts and ownership boundaries, and features such as laneways, drains, bridges, parks, municipal boundaries and other prominent landmarks as they existed at the time each plan was produced. (Source: State Library of Victoria)This plan forms part of a large group of MMBW plans and maps that was donated to the Society by the Mr Poulter, City Engineer of the City of Kew in 1989. Within this collection, thirty-five hand-coloured plans, backed with linen, are of statewide significance as they include annotations that provide details of construction materials used in buildings in the first decade of the 20th century as well as additional information about land ownership and usage. The copies in the Public Record Office Victoria and the State Library of Victoria are monochrome versions which do not denote building materials so that the maps in this collection are invaluable and unique tools for researchers and heritage consultants. A number of the plans are not held in the collection of the State Library of Victoria so they have the additional attribute of rarity.Original survey plan, issued by the MMBW to a contractor with responsibility for constructing sewers in the area identified on the plan within the Borough of Kew. The plan was at some stage hand-coloured, possibly by the contractor, but more likely by officers working in the Engineering Department of the Borough and later Town, then City of Kew. The hand-coloured sections of buildings on the plan were used to denote masonry or brick constructions (pink), weatherboard constructions (yellow), and public buildings (grey). The area represented in this detail plan has undergone significant change during the 20th century. The widening of High Street in the 1930s and 1950s involved the shops on the south side of High Street being demolished and later rebuilt to fit the widened street. Another significant loss was the mansion ‘Drayton’ fronting Wellington Street, owned at this stage by Susannah Fenton. Her family name would later to be given to Fenton Way, which was to be built over the grounds of the house following its demolition. The plan of the garden is particularly interesting, containing a batten dome fronting Wellington Street, an ornamental pond, a fountain and a brick and glass conservatory. The notes by the plumbing contractor on this plan are particularly detailed. Pink borders delineate the ownership of the varying parcels of land. Some of the better known owners listed include the real estate agent Cr. Henry de Castres Kellett (bt) and John Padbury, the funeral director. This particular plan provides a clear view of the configuration of the Kew Junction in 1903 and the commercial buildings that surrounded it.melbourne and metropolitan board of works, detail plans, maps - borough of kew, mmbw 1580, cartography