Showing 934 items matching "tram stop"
-
 Ballarat Tramway Museum
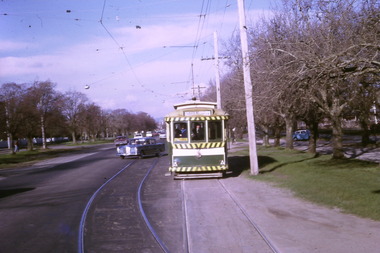
Slide - 35mm slide/s - set of 2, Noel Simons, Nov. 1970
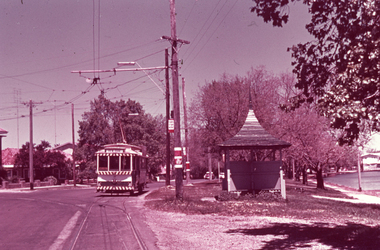
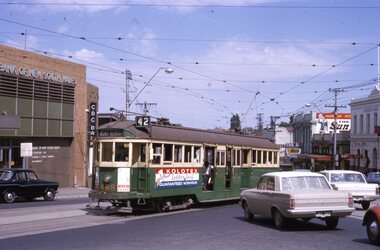
... on poles. Also has SEC tramway shelter alongside stop. Tram has... SEC tramway shelter alongside stop. Tram has destination ...Set of 2 Kodak Ready-mount with slides made from the Association of Railway Enthusiast Provincial Tramways film strip. 1166.1 - No. 31 at the View Point terminus, corner of Wendouree Parade and Macarthur St., shows tram and section arrangements on poles. Also has SEC tramway shelter alongside stop. Tram has destination of "View Point" 1166.2 - No. 38 crossing Albert St. en route to Sebastopol.1166.1 - "No. 21 at View Point terminus. Line of left is that for cars on "Gardens via Drummond St. Nth" route." 1166.2 - "No. 38 crossing Albert St. near Sebastopol terminus" All have date stamp of "Nov. 1970" in blue ink. Writing in blue ink.tramways, trams, view point, wendouree parade, albert st, sebastopol, tram 21, tram 38 -
 Ballarat Tramway Museum
Photograph - Colour Photograph/s - set of 25, Neville Gower, 7/02/1997 12:00:00 AM
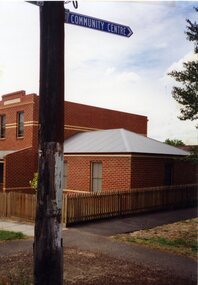
... , faded and worn, of the SEC tramway system tram stops. 1652.1... Parade Ballarat Ballarat goldfields Tram Stops Drummond St. Ripon ...Group of twenty five photographs taken on 7/2/1997 of some power poles around Ballarat that still carry the paintwork, faded and worn, of the SEC tramway system tram stops. 1652.1 - North East corner of Drummond Street South and Sebastopol St. 1652.2 - ditto 1652.3 - North east corner of Drummond St. South and La Trobe St. - with bus stop sign 1652.4 - ditto 1652.5 - North corner of Drummond St. South and Skipton St. 1652.6 - ditto 1652.7 - North east corner of Ripon St. North and Sturt St with King Chicken and Seafood shop in the background. 1652.8 - ditto looking down Sturt St. 1652.9 - South West corner of Ripon St. North and Sussex Streets 1652.10 - ditto 1652.11 - Power pole east side of Ripon St North between Mair and Sturt Streets 1652.12 - South west corner of Mair and Ripon North Streets 1652.13 - ditto 1652.14 - North East corner of Mair and Ripon Streets 1652.15 - ditto 1652.16 - ditto 1652.17 - North west corner of Burbank and Macarthur St 1652.18 - ditto 1652.19 - North east corner of Drummond St. North and Webster St. 1652.20 - ditto 1652.21 - Powerlines between Doveton and Dawson in Sturt St. 1652.22 - South corners of Sturt and Doveton Streets 1652.23 - ditto 1652.24 - ditto 1652.25 - ditto Negatives and envelope for the prints with the Reg Item 1652 sheet in documents folder. Photo folder with handwritten notes and negatives with Catalogue Worksheet.tram stops, drummond st., ripon st, sturt st -
 Ballarat Tramway Museum
Photograph - Digital image Set of 10, Tony Smith, 1971
... . Note the tram stop signs on the pole nearest to the Post Office... Mutual, Craig's Hotel in the background. Note the tram stop signs ...Yields information about Ballarat Tramways and trams prior to the closure of the tramway system.Set of 10 digital images of Ballarat trams prior to closure, scanned from original slides by Tony Smith, 1971 prior to closure of the system. .1 - 35 and 43 crossing at Urquhart St, Drummond St Sth. 35 outbound to Sebastopol, 43 to Lydiard St Nth. .2 - 35 in Lydiard St North, about to turn into Sturt St, with the Commonwealth Bank and National Mutual, Craig's Hotel in the background. Note the tram stop signs on the pole nearest to the Post Office. Tram has destination of Sebastopol. .3 - 39 and 41 at Grey St Loop, on a wet day. 39 showing Lydiard St Nth, 41 Special. .4 - two bogie trams (35?) and 41? Albert St, south of Grey St Loop. .5 - two bogies trams (41 and 35?) and a single trucker at the Sebastopol terminus. 41 showing Special. .6 - two bogies trams (41, 35?) and single trucker at the Grey St Loop, waiting for another bogie tram to arrive. Has a "Bounds" running alongside the tram. On a wet muddy day. .7 - two single truckers crossing at Gregory St loop, Lydiard St. Nth. - photo out of focus. .8 - 35 and single trucker crossing at ditto. .9 - 39 and another bogie tram waiting for two other trams to meet at Gregory St. loop. .10 - two single truckers crossing at the King St loop, Victoria St - out of focus and over exposed.trams, tramways, urquhart st, drummond st sth, lydiard st nth, sturt st, albert st, sebastopol, grey st loop, gregory st, king st, tram 35, tram 43, tram 39, tram 41 -
 Ballarat Tramway Museum
Photograph - Set of 8 colour 35mm slides of Ballarat Trams May 1971, Noel J Simons, 24/5/1971
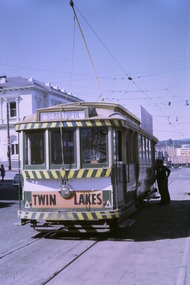
... ., with destination of Victoria St., passing a tram stop, with a seat... Wendouree Parade •Tram Stops •Bridge St •Sturt St. West •Murray St ...Shows a sample of photographs taken about 3 months before the Ballarat Tramway system commenced to close.Yields information about various Ballarat Trams and the streetscape at the time prior to closure in August and September 1971Set of 8 Kodachrome transparencies taken on 24/5/1971 1172.1 - Tram 27 in Wendouree Parade, near Barrett Ave., with destination of Victoria St., passing a tram stop, with a seat and "Warning Oncoming Trams" sign mounted on the pole. Tram has a Twin Lakes advertisement on the front dash and a unknown roof advertisement. See also Reg. Item No. 1174.3 for a later photograph. 1172.2 - No. 32 entering Bridge St. from Sturt St. Photo taken after tram has passed photographer. Has Woolworths and Dickins stores in the background, and many motor vehicles. Tram has destination of Mt Pleasant 1172.3 - No. 13 in bound along Sturt St. West, near Alfred St. looking west along Sturt St. West. Has destination of Mt. Pleasant. 1172.4 - as for 1172.3, but closer up. 1172.5 - No. 17 west bound along Sturt St. passing the Town Hall, with Myers and Queen Victoria's statue in the background. Taken from the north side of Sturt St. through the median strip. 1172.6 - No. 13 at the City terminus, on the south side of Sturt St. with the National Mutual and other buildings up to the Town Hall in the background, including the fountain and the city terminus shelter. 1172.7 - Bogie tram at the city terminus, on the south side of Sturt St. looking from the central median strip, westwards. Has Town Hall in background along with other buildings. 1172. 8 - as above but with Scrubber car behind a bogie tram. Shows fountain and ESCo control box by a pole.wendouree parade, •tram stops, •bridge st, •sturt st. west, •murray st., •sturt st, •town hall, •scrubber tram, tram 27, tram 32, tran 13, tram 17, ballarat, tramways, trams -
 Ballarat Tramway Museum
Photograph - Black & White Photograph/s, Lloyd Rogers?, 14/03/1954 12:00:00 AM
... St. On the pole in front of the tram is a "Cars Stop here... the appearance of SEC tram No. 38 decorated for the 1954 Royal visit ...Yields information about the appearance of SEC tram No. 38 decorated for the 1954 Royal visit to Ballarat and the Dawson St area.Black and white photograph of Ballarat tram No. 38 decorated for the Royal Visit in Sturt St - 14-3-1954 at the intersection with Dawson St. The tram has the destination of Victoria St. On the pole in front of the tram is a "Cars Stop here" and "End of Section" sign. In the background is - St Patricks Cathedral. Photo by Lloyd Rogers?On rear in ink "Ballarat Royal visit - Sturt St. 14-3-1954"trams, tramways, royal visit, sturt st, decorated trams, dawson st, tram 38 -
 Ballarat Tramway Museum
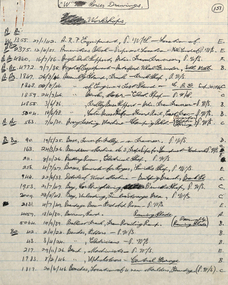
Album - Photo Album, Ron Scholten, c1980s
... operated trams 21 and an ex PMTT Bogie tram at the City stop... at the City stop in Sturt St Ballarat early 1960's with the short tram ...Photo Album - heavy plastic covered card sheets, marked "Photos" by NCL with brass binding screws, containing an index sheet five double sided transparent film sheets with the following photographs. 1 - Large format photos of trams 27, 14, 26 and 38 on the BTM depot fan. 2 - ditto but small format 3 - Large format photo of the same scene taken from the access track with trams 18 and 33 as well - - see also Reg Item 7223 4 - ditto but small format - see also Reg Item 7223 5a - photo of original shed prior to recovering with trams 33, 38 and 39 - - see also Reg Item 7224 5b - tram 38 - see also Reg Item 7227 5c - trams 38 and 26 5d - 18 on 6 road - - see also Reg Item 7226 6a - tram 33 6b - tram 671 and 13 6c - trams 33, 26 and 38 - see also Reg Item 7225 6d - trams 40 and 661 7a - depot fan from the gardens area - has date Jan. 91 underneath 7b - tram 38 in Wendouree Parade 7c - ditto at depot junction 7d - tram 26 at Carlton St with date 12-1-92 8a - old loop with 26 approaching - note the road condition with date of 12-1-1992 8b - horse tram 1 8c - 671 being prepared to have the Blue colour scheme applied. 8d - internal of horse tram 1 showing the Duncan and Fraser bellcord hanger. 9 - large format photo of 27 and 40 at loop. 10 - large format photo of SEC operated trams 21 and an ex PMTT Bogie tram at the City stop in Sturt St Ballarat early 1960's with the short tram stop pole and a conductor standing alongside No. 21. The Town Hall is in the background.trams, tramways, btps, depot, sturt st, wendouree parade, carlton st -
 Melbourne Tram Museum
Book, Lacy Lowe, Ceri Vaughan, "See Melbourne by Tram", 1982
... of 22 Melbourne tram routes with a stop description (not all... Trams tramways Melbourne Tram Routes Tram Stops Tourist Guides ...Book - 160 pages + card cover with maps on inside covers, titled "See Melbourne by Tram" written by de Lacy Lowe, illustrated by Ceri Vaughan, published 1982. Gives a description of 22 Melbourne tram routes with a stop description (not all stops covered) and sketches associated with the location. Has an index in the rear pages.trams, tramways, melbourne, tram routes, tram stops, tourist guides, illustrations -
 Melbourne Tram Museum
Document - List, Keith Kings, "W Series of Drawings", c1989
... , workshop layouts, tram or bus stop shelters, driving schools, wheel..., workshop layouts, tram or bus stop shelters, driving schools, wheel ...List - 21 quarto ruled sheets, hand written, titled "w Series of Drawings", listing in an alphabetical order of Workshop drawings, drawing number, date, size and title of the various information drawings for workshop equipment, depot equipment, trucks, some buses, cable car sheds, tennis courts, workshop layouts, tram or bus stop shelters, driving schools, wheel grinders, breakdown equipment. List includes drawings up to 1989. Sheets numbered 151 to 172trams, tramways, drawings, preston workshops, depots, buses, wheel grinder, cable trams -
 Melbourne Tram Museum
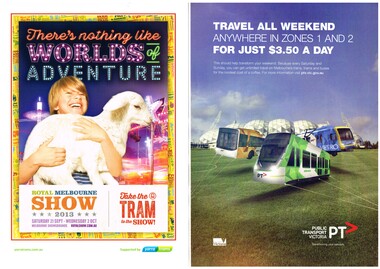
Pamphlet, Various, Travel all weekend anywhere in Zones 1 and 2 for $3.50/day, 2013 - 2014
... on trams/tram, railway stations stops etc. .1 - Travel all..., for distribution or display on trams/tram, railway stations stops etc ...Set of four pamphlets A4 size, for distribution or display on trams/tram, railway stations stops etc. .1 - Travel all weekend anywhere in Zones 1 and 2 for $3.50/day .2 - Royal show 2013 - take the tram to the show. .3 - Breathe Easy - tram shelters and platforms will be smoke free from 1/3/14. .4 - Victorian Seniors Festival for 2013 and free public transport. .5 - Reporting taggers to the Police or crime stoppers - Graffititrams, tramways, yarra trams, tickets, royal show, festival program, smoking, ptv, graffiti -
 Ballarat Tramway Museum
Slide - 35mm slide/s - set of 7, Noel Simons, 23/10/1965 12:00:00 AM
... an MFBB street fire alarm by the tram stop. 1179.5 - W2 566... fire alarm by the tram stop. 1179.5 - W2 566 (inbound route 42 ...Set of 7 Kodachrome transparencies taken on 23/10/1965 in Melbourne. 1179.1 - W2 488 (route 42, Mont Albert) at the corner of High St. and Cotham Road Kew. Taken from Kew Post Office, has Bank of New South Wales in the background, CBC bank and the Greyhound Hotel. Tram has ads for Kolotex stockings and Ryco oil filters. 1179.2 - SW2 436, in bound (route 45, City) leaving Cotham Road, about to join High St, Kew. Buildings on the south side of Cotham Road in photo. Tram has an ad along with others for Vincent's powders. 1179.3 - W2 545 (route 48, North Balwyn) in High St. Kew. Has Commercial bank in background along with other shops. 1179.4 - W2 648 (route 42, Mont Albert) turning from High St. South into High St at Kew Junction, with Clifton Hotel in background. Tram has an ad for Kenric clothes. Note an MFBB street fire alarm by the tram stop. 1179.5 - W2 566 (inbound route 42, City) at same location as 1179.5. Tram has a Jex and a Remy Martin Brandy ads. on front dash panel. 1179.6 - W2 572 entering Victoria Parade from Brunswick St. Fitzroy. Tram has a Jex and a Remy Martin Brandy ads. on front dash panel. Eastern Hill Fire Station and ICI building in background. 1179.7 - W2 378 (inbound, route 45, City) and W2 572, inbound, in Victoria Parade between Brunswick St and Gismo St. East Melbourne. Otherwise as for 1179.6.All have date stamp of "23 Oct 1965" in purple ink. All black ink unless otherwise noted. 1179.1 - "W2 488 Entering Cotham Rd. from High St. Kew" 1179.2 - "SW2 436 in Cotham Rd., Kew, about to enter High St." 1179.3 - "W2 545 in High Street Kew, nearly opposite Cotham Road" 1179.4 - "W2 648 entering High Street from High Street South, Kew". 1179.5 - "W2 566 entering High St. South from High St. Kew" 1179.6 - "W2 572 entering Victoria Pde from Brunswick St. East Melbourne" 1179.7 - "W2 378 and 572 in Victoria Pde between Brunswick and Gisborne Sts. East Melbourne."tramways, trams, kew, high st kew, cotham road, victoria parade, melbourne, tram 545, tram 488, tram 436, tram 648, tram 566, tram 572, tram 378 -
 Ballarat Tramway Museum
Slide - 35mm slide/s - set of 13, Noel Simons, 24/05/1971 12:00:00 AM
... with McCrae St. Passenger boarding tram at a tram stop. 1200.4... tram at a tram stop. 1200.4 - No 7 turning from Nolan ...Set of 13 transparencies taken on 24/5/1971 on Kodak mounts. 1200.1 - No. 7 en route to Golden Square turning from Bridge St. into Nolan St. Photo taken after tram has passed photographer. Tram has a briquettes roof ad. 1200.2 - No. 21 in McCrae St. just before Nolan St. Photo taken after tram has passed photographer. 1200.3 - No. 7 in Nolan St at corner with McCrae St. Passenger boarding tram at a tram stop. 1200.4 - No 7 turning from Nolan into McCrae St. with Golden Fleece service station in background. 1200.5 - No. 7 in Thunder St en route to North Bendigo. Photo taken after tram has passed photographer. 1200.6 - No. 5 en route to Eaglehawk just after leaving Needle Loop between Long Gully and California Gully. 1200.7 - No. 5 at the start of the double track in High St. Eaglehawk. 1200.8 - No. 5 at Eaglehawk terminus showing "Depot" with Leo A Hughes Photographer advertisement on building in background. 1200.9 - No. 5 at Eaglehawk terminus. Has two SEC roof ads 'Everything's fine in my all electric kitchen' and 'Electricity best for cooking'. 1200.10 - No. 5 at Eaglehawk terminus, with canon, war memorial outside Town Hall and Leo A Hughes Photographer advertisement on building in background. 1200.11 - No. 5 in McCrae St. about to enter Arnold St. and depot. Tram showing depot, has driver changing points. 1200.12 - No. 5 in Arnold St. Photo taken looking up the centre of the access track - shows the overhead at depot junction. 1200.13 - Depot entrance with signage at depot entrance and depot building in background.Information written on in black ink and date stamped on purple ink. 1200.1 - "No. 7 entering Nolan St. from Bridge St." 1200.2 -"No. 21 in McRae St. about to turn into Nolan St." 1200.3 - "No. 7 in Nolan St. at corner of McRae St." 1200.4 - "No. 7 turning from Nolan St. into McRae St." 1200.5 - "No. 7 in Thunder St. just after turning from Caledonia St." 1200.6 - "No. 5 just after leaving Needle Loop between Long Gully and California Gully. 1200.7 - "No. 5 in High St. Eaglehawk at start of double track." 1200.8 - "No. 5 at Eaglehawk terminus" 1200.9 - "No. 5 at Eaglehawk terminus" 1200.10 - "No. 5 at Eaglehawk terminus."\ 1200.11 - "No. 5 in McCrae St. about to enter Arnold St." 1200.12 - "No. 5 in Arnold St." 1200.13 - "Entrance to Bendigo Tram Depot, No. 5 running into shed."tramways, trams, bendigo, mccrae st, north bendigo, california gully, eaglehawk, depot, tram 5, tram 7, tram 21 -
 Ballarat Tramway Museum
Photograph - Digital image Set of 10, Tony Smith, 5/09/1971 12:00:00 AM
... of men at the tram stop. .4 - 14 leaving Bridge St, crossing..., with destination of Mt Pleasant. Has a number of men at the tram stop. .4 ...Yields information about Ballarat Tramways and trams prior to the closure of the tramway system.Set of 10 digital images of Ballarat trams prior to closure, scanned from original slides by Tony Smith, 1971 prior to closure of the system. This set of slides, possibly on the last weekend of Mt Pleasant services - closure took place on 5/9/1971. . .1 - 17 at the City terminus, north side. Tram showing the destination of Sebastopol and has a Twin Lakes sign. .2 - 26 at the city terminus, south side with Geommola's Pharmacy and Kodak Film advert and Town Hall in the background. .3 - 43 at the City terminus, north side, with destination of Mt Pleasant. Has a number of men at the tram stop. .4 - 14 leaving Bridge St, crossing Grenville St into Sturt St, with destination of City. Has the Dickins and Woolworths Big W store in the background. .5 - 43 at Mt Pleasant terminus with conductor boarding the tram. Tram has destination of Gardens via Sturt St West. In the background is the corner store with adverts for The Sun, Womens Weekly, Coca Cola and Robur Tea. .6 - 43 and 26 Barkly St, about to arrive at the Grant St loop. Both trams inbound. .7 - 43, 26 and 27 at Grant St loop. .8 - 12 (Lydiard St Nth) and another bogie tram at the city terminus north with the Town Hall in the background. .9 - 39 outbound in Barkly St to Mt Pleasant - note the new bus stop signs on either side of the tram. 10 - 27 (City) and 26 turning from Barkly St into Main St with the Ampol petrol station, a general store advertising Escort cigarettes and The Age in the background . On the right hand side is a fish and chips shop advertising crays and drinks.trams, tramways, sturt st, city, grenville st, bridge st, mt pleasant, barkly st, grant st, main st, closure, tram 17, tram 26, tram 43, tram 14, tram 12, tram 27, tram 39 -
 Ballarat Tramway Museum
Slide - 35mm slide/s - set of 2, Noel Simons, 24/11/1962 12:00:00 AM
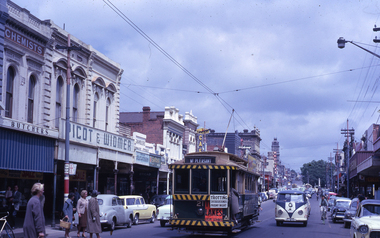
... shop alongside tram. Tram at a stop with people boarding... tram. Tram at a stop with people boarding. 1163.2 - No. 13 ...Set of 2 Kodachrome transparencies taken on 24/11/1962. 1163.1 - No. 21 in Bridge St., with destination of "Mt Pleasant" with a Twin Lakes advert and "Trotting Showgrounds Friday Night" auxiliary board on front dash panel. Also Picot & Widmer, chemists shop alongside tram. Tram at a stop with people boarding. 1163.2 - No. 13 and 30 crossing at the end of the double track in Sturt. St, at Grenville St. Both trams have Twin Lakes signs. Photo shows buildings either side of Sturt St.1163.1 - "No. 21 in Bridge St. Ballarat" 1163.2 - "No. 13 and 30 at foot of Sturt St. Ballarat" All have date stamp of "24 Nov. 1962" in purple ink. All black ink unless otherwise noted.tramways, trams, ballarat, bridge st, grenville st., sturt st., tram 13, tram 21, tram 30 -
 Ballarat Tramway Museum
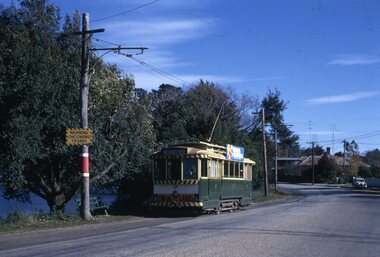
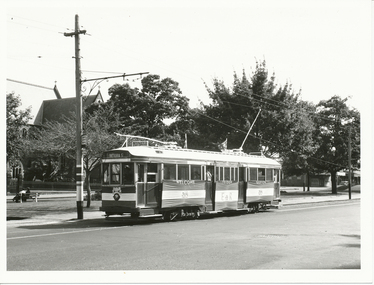
Photograph - Colour Photograph/s, Travis Jeffrey, 21/08/1971 12:00:00 AM
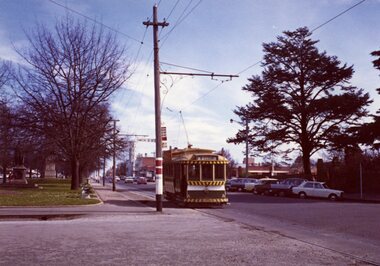
... adjacent to the tram has a compulsory stop sign and a "End... Parade Ballarat Ballarat goldfields Sturt St Dawson St Tram stops ...Colour photograph of Ballarat No. 17 at the intersection of Dawson St and Sturt St. inbound to the City terminus. Pole adjacent to the tram has a compulsory stop sign and a "End of Section Tram". Tram has destination Mt Pleasant and SEC roof advertisement "Everything's under control in my all electric kitchen". Photo on Agfa Paper and taken on Friday 21 August 1971.Stamps with faded green ink: "Photo by Chris Jeffrey / Number" with number "104PC/19" in blue ink and date stamp "Friday 21 August 1971" also in faded green ink.sturt st, dawson st, tram stops, end of section sign, tram 17 -
 Ballarat Tramway Museum
Photograph - Digital image Set of 10, Tony Smith, 1971
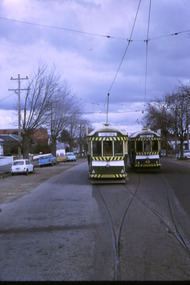
... alongside the tram stop sign.... the tram stop sign. Photograph Digital image Set of 10 Tony Smith ...Yields information about Ballarat Tramways and trams prior to the closure of the tramway system.Set of 10 digital images of Ballarat trams prior to closure, scanned from original slides by Tony Smith, 1971 prior to closure of the system. .1 - 42 in Barkly St - at top of hill, outbound to Mt Pleasant. Note the fire alarm on the right hand side of the photo. .2 - 42 and 21 crossing at Grant St Loop, Barkly St, Mt Pleasant. 42 outbound, 21 inbound. .3 - 34 and 21 crossing at Parker St Loop, with Ballarat College in the background. 42 in bound to City and Mt Pleasant, 21 showing Sturt St. West. .4 - 21, Wendouree Parade at the south end of the old parking loop. .5 - 42 and 21 crossing at Gardens Loop. 42 showing Mt Pleasant, 21 Gardens via Sturt St West. .6 - ditto .7 - 41 showing Special at intersection of Ripon St and Sturt St with a single trucker tram ex View Point waiting to turn into Sturt St. 41 has two Johnnie Walker Whiskey roof advertisements. .8 - Two single truckers - not well focused - 21? and 13? crossing at Mill St loop, has the hospital in the background. Conductor leaning out of the door on the outbound tram. .9 - 42, bogie tram and a single trucker at the City terminus (Sturt and Lydiard Sts). Has a group of SEC trammies standing alongside the tram. Has Racey's store and the SEC offices in the background. 42 has a briquettes roof advert. .10 - 34 in Sturt St, at the City terminus, with passengers getting onto the tram. Has the Town Hall, Myers store, Gemmola's Pharmacy in the background. Tram has the destination of Gardens via Drummond St. Nth. Has two trammies (crews) standing alongside the tram stop sign.trams, tramways, sturt st west, barkly st, grant st, parker st loop, sturt st, view point, ripon st, mill st loop, crews, town hall, tram 42, tram 21, tram 34, tram 41, tram 42 -
 Ballarat Tramway Museum
Photograph - Digital image Set of 10, Tony Smith, 5/09/1971 12:00:00 AM
... . A number of passengers waiting at the tram stop. .5 - 14 in Sturt.... A number of passengers waiting at the tram stop. .5 - 14 in Sturt ...Yields information about Ballarat Tramways and trams prior to the closure of the tramway system.Set of 10 digital images of Ballarat trams prior to closure, scanned from original slides by Tony Smith, 1971 prior to closure of the system. This set of slides, possibly on the last weekend of Mt Pleasant services - closure took place on 5/9/1971. . .1 - 30 rounding the curve from Lydiard St Nth to Sturt St. Tram has destination of Sebastopol. IN the background is the Commonwealth bank and the SEC cabinet switch isolator on the corner. .2 - 13 and another single trucker at the City terminus, north side with Racey's store and the SEC offices in the background. 13 has a Twin Lakes sign and the destination of Victoria St. .3 - 26 (Mt Pleasant) and 27 at the city terminus, with many passengers. Has the town hall in the background. .4 - 14 turning from Sturt St into Lydiard St (destination does not appear to be Lydiard St nth - City Oval?) with the ANZ bank in the background. A number of passengers waiting at the tram stop. .5 - 14 in Sturt St west near Pleasant St, at City Oval, with the pole being reversed by a "Bounds". Tram has the destination of City Oval. .6 - 13 west bound (showing Mt Pleasant) at Pleasant and Sturt St, with the VicRoads (CRB) offices and St Peters Anglican church in the background. .7 - 13 and 14 in Sturt St west, opposite City Oval (see .5 and .6) - trams reversing. .8 - 13 and 14 at Grenville St, about to cross into Bridge St from Sturt St. .9 - 14 at ditto - both trams for Mt Pleasant. Has the Patersons furniture store in the background. .10 - 30 eastbound in Sturt St, near Armstrong St with the Crockers store in the background. Tram showing "Special"trams, tramways, sturt st, electrical switching, city oval, lydiard st, pleasant st, grenville st, tram 30, tram 13, tram 26, tram 14 -
 Melbourne Tram Museum
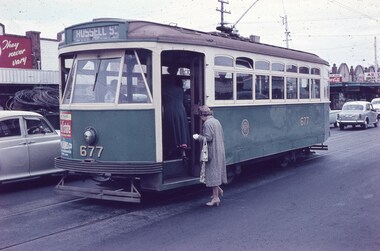
Slide - Set of 7, Keith Caldwell, 10/03/1960 12:00:00 AM
... . In the background is the bus stop and tram stop and the Trocadero Theatre.... In the background is the bus stop and tram stop and the Trocadero Theatre ...Set of 7 Agfa Colour slide, cardboard mount, by Keith Caldwell of 10 March 1960 - .1 - X2 677 - at the Williamstown Road terminus of the Footscray tram system. Tram photographed in Somerville Road, showing the return destination of Russell St. In the background are a row of shops. .2 - X1 460 turning from Leeds St into Barkly St. Tram has the destination of Ballarat Road. In the background is the bus stop and tram stop and the Trocadero Theatre side wall. See Image i6 for the Theatre. Has a Gant Motors advert. .3 - X1 467 out bound turning into Nicholson St from Irving St. Footscray with the Rockmans Store in the background. This store was later demolished for the Ring Road. Tram has adverts for Gant Motors and Swing Bridge Motors - Holdens. .4 - X1 460 turning from Barkly St into Leeds St, showing the destination of Ballarat Road. Has adverts for Calders watches and Coca Cola - drive safely. In the background is a cafe advertising Oysters, Grey Cigarettes and Vincents Powders. .5 - X1 464 turnings from Nicholson St into Irving St. Footscray with the Rockmans Store in the background. This store was later demolished for the Ring Road. Also is J. Boltons Chemist shop advertising Kodak film and another shop - ? dry cleaners, Footscray Fish Shop and Kings Hotel. Tram has adverts for Gant Motors and Doods Dry cleaning. There is a PMG truck parked outside Rockmans. .6 - X2 677 turning from Barkly St into Leeds St with the Trocadero Theatre in the background. Tram has the destination of Williamstown Road. Tram has an advert for Bridge and Webster. .7 - X1 467 outbound to Williamstown Road, turning from Leeds St into Irving St Footscray. Tram has adverts for Doods dry cleaning and Gant Motors.All hand stamped "10 Mar '60". .1 - marked "Footscray" .2 - "Footscray (NB curves)" .3 - to .7 "Footscray"trams, tramways, footscray, x2 class, russell st, williamstown rd, leeds st, ballarat rd, barkly st, nicholson st, irving st, tram 677, tram 460, tram 467, tram 464 -
 Melbourne Tram Museum
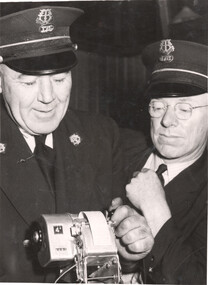
Photograph, The Herald, "Why people walked", 11/1953
... reference for the Trove link. The strike also stopped the tram... for the Trove link. The strike also stopped the tram services. Des ...Photograph shows tramway traffic inspectors looking at Gibson ticket machine that has caused a strike at the Footscray bus depot over the use of one-man buses. Details of the event are give in the Melbourne Herald 20/11/1953 - see first reference for the Trove link. The strike also stopped the tram services. Des Shooter Union Delegate was suspended over the issue - Reference trove link 2 and 3 for for developments of the story. Note the "traffic" numbers on the caps of the inspectors - see item 8336 for these.Yields information about a dispute at Footscray depot in 1953 over one man buses and ticket machines.Black and white photograph with an undated press cutting on the rear."Misc-trams-employees" in red ink, a unreadable date stamp and "Trams Vict" on rear in pencil.tramcars, tramways, drivers, buses, footscray, strikes, ticket machines, one-man buses -
 Ballarat Tramway Museum
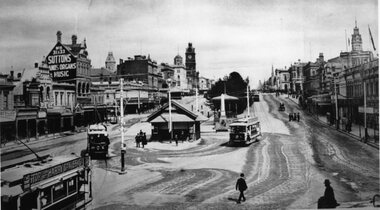
Photograph - Black & White Photograph/s, 1913
... , that appear to be the same tram, No. 5. It has a "Stop tram at Harry.... It has a "Stop tram at Harry Davies" roof advertisement sign ...Yields information the streetscape at the bottom of Sturt St, near Grenville St, the ESCo shelter and how the trams used the track, though in this case, the same tram appears three times.Black and White copy photograph of a photograph of the Grenville tram terminus, in Sturt St, featuring the buildings on either side of Sturt St. Has the ESCo shelter at the bottom of the street, which dates from 1907 (Page 49 of "The Golden City and its tramways"). Note that a weighing machine appears to be on the north side of the shelter. The photograph features three trams, that appear to be the same tram, No. 5. It has a "Stop tram at Harry Davies" roof advertisement sign. Also features the "Sutton Pianos organs and music" sign. Also a number of people crossing the street.tramways, trams, sturt st, grenville st, bridge st, esco, tram 5 -
Melbourne Tram Museum
Newspaper, The Sun, “Tramming it in comfort”, 24/03/1973 12:00:00 AM
... Equipped with stop lights and indicators. Melbourne’s newest tram... Equipped with stop lights and indicators. Melbourne’s newest tram ...Newspaper clipping titled: “Tramming it in comfort” The Sun, 24/3/73 Photo and text of Melbourne’s newest tram Equipped with stop lights and indicators. Melbourne’s newest tram made first appearance at Preston workshops. Orange undercoat. Wide gangways give tram a spacious look, brown padded seats for 48 people. Even heated. Will take another 5 years at present rate of production for 99 others. Transport minister, Wilcox, said can travel at 45 mph. Number of people travelling on trams has increased in the past six months.trams, tramways, prototype tramcar, bourke st, preston workshops, tram 1041 -
 Ballarat Tramway Museum
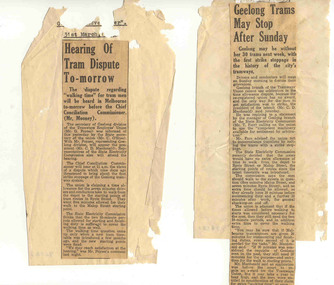
Newspaper, Geelong Advertiser, "Geelong Trams May Stop After Sunday", "Hearing Tram Dispute tomorrow", Mar. 1953
... "Geelong Trams May Stop After Sunday", "Hearing Tram... on the top. .1 - "Geelong Trams May Stop After Sunday" - date... type on the top. .1 - "Geelong Trams May Stop After Sunday ...Set of two newspaper cuttings, March 1953 regarding the roster, - one-man tram dispute in Geelong - 1953. Both cuttings pasted onto off white paper. and Newspaper name and date type on the top. .1 - "Geelong Trams May Stop After Sunday" - date obscured due to silver fish damage, some time between the 20th and the 29th - regarding a potential strike of Geelong tram crews due to grievances with the roster, walking times. Notes union had been re-registered at the time , but did not have an award. Quotes Mr. T. Farr, Mr. C. McDonald and that there were 85 men in the traffic branch. .2 - "Hearing Tram Dispute tomorrow" - dated 31st March 1953 - dispute to be heard by Chief Conciliation Commissioner, Mr, Mooney tomorrow. Notes Mr. G. Poyser - Geelong Secretary of the union, Mr. C. O'Shea - state Secretary. Dispute re time allowances.one man trams, geelong, unions, rosters, arbitration -
 Ballarat Tramway Museum
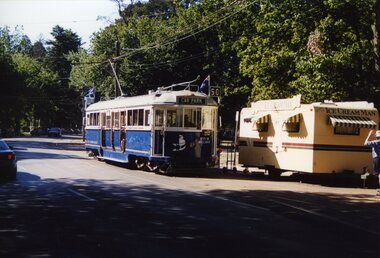
Photograph - Colour Photograph/s - set of 28, Warren Doubleday, 11/03/2002 12:00:00 AM
... Bourke St. with V214 behind the horse tram - "Tram Stop Ahead.... with V214 behind the horse tram - "Tram Stop Ahead" sign .18 ...Set of 28 photographs of the operation of the BTM during the Begonia Festival, including the loading of the Horse Tram for Melbourne on Sunday 10/3/2002, operation in Melbourne on 11/3/2002 and reloading in Bourke St. Taken by Warren Doubleday, on Kodak paper. 2013.1 - Tram 671, Wendouree Parade, 10/3/2002 at Depot Junction .2 - 33 at Loop .3 - 40 and 33 south of the loop, heading for Carlton St. .4 - ditto .5 - 671 returning to the loop from St. Aidans Drive .6 - 40 returning to the loop from Carlton St. .7 - 33 ditto .8 - Loading horse tram at Depot Junction - Alastair Reither .9 - ditto .10 - in St. Kilda Road, 11/3/2002 at about 7.30am .11 - ditto .12 - Tram in Moomba parade, 11/3/2002 - Reg Smith, Len Millar - horse Bear. .13 - ditto .14 - ditto .15 - ditto, after passing with the Ned Kelly's. .16 - ditto - and John Clowes on rear platform .17 - the line up near Bourke St. with V214 behind the horse tram - "Tram Stop Ahead" sign .18 - the line up from Bourke St. with Hawthorn 8 alongside. .19 - Being photographed - Arthur Cook, Roma Cook, Merle Clowes and John Clowes with other visitors .20 - ditto .21 - Malcolm tram, and BTM ten in the background .22 - BTM and Sydney Tramway Museum tent in the City Square area. .23 - Pushing the horse tram across Bourke St. - John Clowes. .24 - Loaded back on the Crane Heavy Haulage (Associated Towing) truck, looking north along Swanston St. .25 - ditto .26 - ditto, general scene in Swanston St. .27 - The towing truck and tram .28 - Hawthorn 8 and Milan 1692 crossing Bourke St. Negatives held on file with documents list.horse trams, depot junction, moomba, gardens loop, swanston st, tram 1, tram 33, tram 40, tram 671, tram 8, tram 214, tram 1692 -
 Ballarat Tramway Museum
Photograph - Digital image Set of 10, Tony Smith, 1971
... in background and ad for Marshall batteries. Has the tram stop sign... the tram stop sign on the left hand side. Tram has destination ...Yields information about Ballarat Tramways and trams prior to the closure of the tramway system.Set of 10 digital images of Ballarat trams prior to closure, scanned from original slides by Tony Smith, 1971 prior to closure of the system. .1 - 13 at the Parker St loop, Sturt St west waiting for another tram to arrive - Mercedes Benz car pull out around the stationary tramcar. .2 - 13 and another single trucker at the City terminus, north side of Sturt St. Note the conductor in the distance with a point bar about to hop onto the tram turning into Lydiard St North. Has the Post Office in the background. .3 - 26 arriving at the City stop, with the Mechanics Institute and Cooks Provide Hotel in the background. Tram has destination of Gardens via Drummond St North. .4 - 33 and 12 in Lydiard St Nth at Sturt St. 33 (Lydiard St Nth), 12 (Sebastopol). Has the post office and other buildings in the background .5 - 12 and 26 at city stop, south side with Town Hall and Myers in the background. 12 has destination of Sebastopol. .6 - 12 at intersection of Drummond St and Sturt St with Mobil petrol station in background and ad for Marshall batteries. Has the tram stop sign on the left hand side. Tram has destination of Sebastopol and a Twin Lakes sign. .7 - 30 northbound in Drummond St south at Sturt St about to turn into Sturt St. Has destination of Lydiard St Nth. Has the Southern Cross hotel in the background. .8 - 31 turning from Drummond St North into Sturt St, en route to Victoria St with the Shell service station in the background. Hospital Corner. Tram has roof advertisements for Johnnie Walker whisky. .9 - 30 and 31 (from above photos) in Sturt St. .10 - Tony Smith standing on the doorstep of 26 at Mt Pleasant terminus. Has the store in the background with The Sun and Robur tea adverts. trams, tramways, parker st loop, sturt st west, sturt st, conductors, drummond st, hospital corner, mt pleasant, tram 13, tram 26, tram 12, tram 30, tram 33 -
 Ballarat Tramway Museum
Slide - 35mm slide/s - set of 12, Noel Simons, 28 Feb. 1972
... contactors, tram stop and section signs mounted on pole. 1207.12..., tram stop and section signs mounted on pole. 1207.12 - No. 26 ...Set of 12 transparencies taken on 28/2/1972 on Kodak mounts. 1207.1 - Bendigo 26 and 2 at Charing Cross. 26 en route for Eaglehawk, 2 for Quarry Hill. Has the Colonial Mutual Life, Armstrong Tyre Service, and Australian Mutual Provident Society buildings and a Cohns Drinks ad. in the background. 1207.2 - as for 1207.1 but with Alexandra fountain in the foreground. 1207.3 - No. 2 in Mitchell St. heading for Quarry Hill. Photo taken after tram has passed photographer. Has buildings on either side of Mitchell St. in the background, including the Plaza Theatre. 1207.4 - No. 6 en route for Golden Square departing Charing Cross. Has the RACV and ANZ bank in the background. 1207.5 - No. 2 crossing Pall Mall to enter Charing Cross ex Quarry Hill, with the Fountain Plaza in the background. 1207.6 - No. 6 arriving Charing Cross ex Golden Square with No. 21 alongside. No. 21 has the SEC ad. 'Everything's fine in my all electric kitchen.' Has the City Family Hotel and the Fountain Plaza shopping centre in the background. 1207.7 - No. 5 at Charing Cross en route for Quarry Hill with No. 2 behind. No. 2 has two SEC roof ads, 'Everything s fine in my all electric kitchen' and 'Electricity best for cooking'. RACV building in the background. Tram crews are discussing the day in the front of the tram. 1207. 8 - No. 21 in High St. Bendigo with the Cathedral in the background. No. 21 has two SEC roof ads, 'Everything's fine in my all electric kitchen' and 'Electricity best for cooking'. 1207.9 - No. 6 in High St. Bendigo with the Cathedral in the background. 1207.10 - No. 6 in High St. Bendigo, just past Wattle St. Photo taken after the tram has passed the photographer from within the Highway Car Sales yard. 1207.11 - No. 26 bound for Eaglehawk at the end of the double track in View St., note signal contactors, tram stop and section signs mounted on pole. 1207.12 - No. 26 turning from View St. into Barnard St.Information written on in blue ink and date stamped on purple ink. 1207. 1- "Nos. 26 and 2 at Charing Cross." 1207.2 - "Nos. 26 and 2 at Charing Cross." 1207.3 - "No. 2 in Mitchell St. just after leaving Charing Cross." 1207.4 - "No.6 leaving Charing Cross for Golden Square." 1207.5 - "No. 2 arriving at Charing Cross from Quarry Hill." 1207.6 - "No. 21 waits at Charing Cross as No. 6 arrives from Golden Square." 1207.7 - "No 5 at Charing Cross with No. 2 lurking behind." 1207.8 - "No. 21 in High St. at cnr of Wattle St." 1207.9 - "No. 6 in High St. at cnr of Wattle St." 1207.10 - "No. 6 in High St. between Wattle and Vine Sts." 1207.11 - "No. 26 at end of double track in View St. near Barnard. St. 1207.12 - "No. 26 seen at dusk turning from View St. into Barnard St."tramways, trams, bendigo, charing cross, high st, view st., tram 2, tram 5, tram 6, tram 21, tram 26 -
 Melbourne Tram Museum
Album - Robert Thomson Slide Collection - box 17
... and 196 Swanston St – with sign “Tram stop ahead” RT405 Nov 99... “Tram stop ahead” RT405 Nov 99 W6 977 Swanston St – route 8 ...Photo - see pdf file for further information. Number Date Brief Description Box 17 RT396 Nov. 99 A 239 arriving Batman Ave Route 70 RT397 Nov 99 W7 1012 running Special, Clarendon St RT398 Nov 99 A 300, Port Melbourne, Mont Albert route 109 RT399 Nov 99 A 286 Port Melbourne line, route 109 RT400 Nov 99 Z3 223 Carlisle St St Kilda, route 69 – with destination set for return Kew Cotham Road RT401 Nov 99 W7 1005 Swanston St route 8 with Christmas decorations – route 8 RT402 Nov 99 Z3 140 Swanston St route 8 with Christmas decorations – route 11 RT403 Nov 99 Z3 144 Swanston and Bourke with “Give way to passengers ”sign – route 1 RT404 Nov 99 Z3s 144 and 196 Swanston St – with sign “Tram stop ahead” RT405 Nov 99 W6 977 Swanston St – route 8 and Z1 72 RT406 Nov 99 11W and City Circle SW5 723 – Spencer and Collins Sts RT407 Nov 99 SW6 960 University terminus, route 16 RT408 Nov 99 SW6 960 University terminus with Z2 108 and other trams RT409 Nov. 99 A 234 Wattle Park terminus, route 70 RT410 Nov 99 New track docklands with old shipping shed in the view. RT411 Nov 99 Flinders St extension Docklands new track RT412 Nov 99 A 255 route 109 Port Melbourne terminus with former station building RT413 Nov 99 SW6 954 Route 16, Ackland St terminus with a Z3 behind. RT414 Nov 99 Restraurant tram 442, Esplanade. RT 415 Nov 2000 Z27 and Z1 Balaclava Junction RT416 Nov 2000 A 278 route 109 Port Melbourne terminus with former station building RT417 Nov 2001 B2 2010 in Yarra livery, Bourke St at Spencer St RT418 Nov 2001 B2 2108 turning from Bourke into Spencer St (route 96) followed by another B2 2048? RT 419 Nov 2001 Z 80 and another two Zs in Swanston St RT420 Nov 2001 Z137 and other Z’s in Swanston St RT421 Nov 2001 Z82 Swanston st RT422 Nov 2001 Z3 169 Wests Road, West Maribyrnong terminus with another Z arriving. Route 57 RT423 Nov 2001 West Maribyrnong terminus board with Swanston Trams signage RT424 Nov 2001 Z3 172 route 82, Wests Road RT425 Nov 2001 A class Flinders St extension route 48 in Yarra Trams livery RT426 Nov 2001 11W Bourke St with MTOCco building in the background. Demonstrates the work of Robert Thomson in photography, collection and/or production of slidesAssembled album in a black presentation folder of 31 colour slides, collected or produced by Robert Thomson. A list of all photographs with details has been compiled. All rights reserved for all photos., melbourne, tramways, trams, tram 239, route 70, batman ave, tram 1012, clarendon st, tram 300, port melbourne, route 109, tram 223, tram 69, tram 1005, route 8, swanston st, tram 140, tram 144, tram 196, tram 977, tram 72, tram 11w, tram 723, city circle, tram 960, tram 108, tram 234, wattle park, docklands, trackwork, flinders st, tram 255, tram 954, tram 442, tram 27, tram 1, tram 278, tram 2010, tram 2108, tram 80, tram 137, tram 82, tram 169, wests road, west maribyrnong, swanston trams, tram 172, route 82, route 48, bourke st, mtoco -
 Ballarat Tramway Museum
Document - Instruction Book, Melbourne and Metropolitan Tramways Board (MMTB), "How to become an efficient conductor", 1960's
... accidents. Inside front cover is a list of Melbourne tram depots...Trams tramways MMTB Conductors Instructions Melbourne Depot ...Instruction Book - 20 pages, within manila card covers, titled ""How to become an efficient conductor", published by the Melbourne and Metropolitan Tramways Board. Gives details on how to be a conductor safely, collect fares, disputes, school concessions, ticket cancellation, accidents, and conduct. A list of dos and dents' employee benefits summary and two drawings showing the consequences of not securing the trolley pole under the hook and step accidents. Inside front cover is a list of Melbourne tram depots, giving stop number, and street. Handwritten addition regarding South Melbourne depot - short cut from St Kilda Road - folded printed sheet. No date on the documents - assumed 1960's.trams, tramways, mmtb, conductors, instructions, melbourne, depot -
 Melbourne Tram Museum
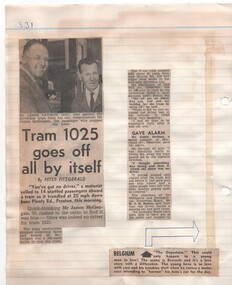
Newspaper, The Herald, "Tram 1025 goes off all by itself", c April 1969
... with the conductor stopped the tram just before Murray Road. Cutting undated... with the conductor stopped the tram just before Murray Road. Cutting undated ...Newspaper Clipping - set of one clippings adhered to one side of a sheet of ruled quarto paper with punched holes on the left hand side - from The Herald newspaper reporting on an event that morning when tram 1025 was travelling along Plenty Road Preston without a driver. Has a photo of James Davison a motorist who spotted the situation and of James McCougan who along with the conductor stopped the tram just before Murray Road. Cutting undated - cApril / May 1969. a comment from the MMTB Chairman, Mr. Risson.trams, tramways, accidents, drivers, runaway, plenty rd, tram 1025 -
 Melbourne Tram Museum
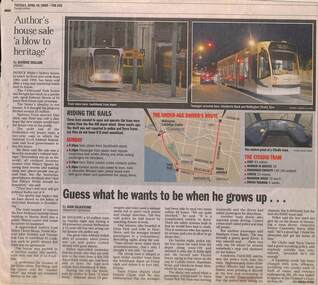
Newspaper, The Age, "Guess what he wants to be when he grows up..", 19/04/2006 12:00:00 AM
... was cut to stop the tram. Has photos of C classes at Southbank... was cut to stop the tram. Has photos of C classes at Southbank ...Newspaper cutting from The Age, 19/4/2005, titled "Guess what he wants to be when he grows up.." about the theft of a C class tram from Southbank depot on Sunday 17th by a youth. Gives details of the trip, passengers, the arrest and timings. Power was cut to stop the tram. Has photos of C classes at Southbank depot, and a view of the control panel and some specifications. Quotes Dennis Cliche of Yarra Trams and Senior Constable Barry Hills. Article by Dan Silkstone and Andrea Petrie.trams, tramways, theft of a tram, yarra trams, southbank depot, c class -
Melbourne Tram Museum
Newspaper, The Age, “Trams may join trains in huge strike action” "Pay row to hit trams" "Trams to stop as drivers plan strike action" "Rail strike cancelled" "More tram strife on the cards as pay dispute drags on" "Tram strife to restart" "Tram driver pay figures disputed", 2/07/2019 12:00:00 AM
... to launch work bans on Monday 26 August. 3 - “Trams to stop... to launch work bans on Monday 26 August. 3 - “Trams to stop ...Newspaper clippings titled: 1 - “Trams may join trains in huge strike action” Newspaper clipping from the Age 2/7/2019 by Timna Jacks More than 1500 Yarra Trams drivers, authorised officers and customer service staff may join Metro train staff in strike action in late July. The Rail, Tram and Bus Union is negotiating with public transport operators over its next enterprise bargaining agreement. 2 - “Pay row to hit trams” Newspaper clipping from the Age 15/8/2019 by Timna Jacks Tram services could be hit with a wave of cancellations and delays after about 1500 Yarra Tram drivers and customer service personnel voted to launch work bans on Monday 26 August. 3 - “Trams to stop as drivers plan strike action” Newspaper clipping from the Age 17/8/2019 by Timna Jacks Trams staff will stop work for 4 hours between 10am and 2pm on Friday August 30. 4 - “Rail strike cancelled” Newspaper clipping from the Age 20/8/2019 by Timna Jacks Train strike cancelled but tram strike will go ahead on Friday August 30. 5 - “Final bid to avert train, tram strikes” Newspaper clipping from the Age 9/8/2019 by Timna Jacks Yarra tram drivers and customer service staff have joined rail workers in taking industrial action against Yarra Trams. 6 - "Industrial Action Starts This Week" - 26 August 2019 PDF of notice from Rail Tram and Bus Union advising of disruptions to tram services. 7 - "Industrial action affecting Yarra Trams on Friday, 30 August 2019" PDF of email from PTV advising of disruptions to tram services. 8 - "Upcoming Industrial Action - Uniform Ban Cancelled" - 22 August 2019 PDF of notice from Rail Tram and Bus Union advising of cancellation of uniform ban. 9 - "Upcoming Industrial Action" - 14 August 2019 PDF of notice from Rail Tram and Bus Union advising of uniform ban and disruptions to tram services. 10 - "More tram strife on the cards as pay dispute drags on" - 31 August 2019 About 1500 tram workers stopped work yesterday for 4 hours. Negotiations to resume in the Fair Work Commission on Monday. The union wants a 6% annual pay rise over 3 years but Yarra Trams offering 3% over 4 years. 11 - Tram strikes to Restart - Nov and Dec. 2019 Newspaper clipping from the Age - by Timna Jacks Strike action to continue on 28 November and 5 December. 12 - "Tram driver pay figures disputed" - 7 December 2019 Newspaper clipping from the Age, by Noel Towell Tram drivers on strike again on Thursday 5 December 2019. Yarra Trams claim wage demand would result in drivers on average pay of $114K at end of 4 year deal, but union dispute these figures. 13 - "Tram strikes called off" - 26 February 2020 Newspaper clipping from the Age - by Timna Jacks Tram strikes scheduled for the grand prix called off after the government intervened to end the industrial dispute. 14 - "Pay rise for tram drivers" - 29 February 2020 Newspaper clipping from the Age - by Timna Jacks Tram drivers will get a 3.5% a year pay rise and Yarra Trams will employ fewer part timers than planned. Under the first 2 years of the contract, this would rise to 6%, then to 8% in 3rd year and 10% in the final year of new wage deal. Part time workers guaranteed minimum of 23 hours per week. 15 - "Bid to halt grand prix tram strike" - 21 February 2020 Newspaper clipping from the Age - by Sumeyya Ilanbey Government call on the Fair Work Commission to intervene to stop a tram strike during the grand prix.trams, tramways, public transport, unions, keolis downer, yarra trams -
 Melbourne Tram Museum
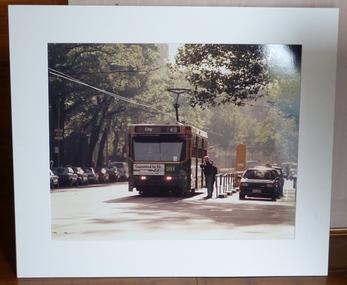
Photograph - Colour photograph - mounted, Yarra Trams or PTC?, mid 1990's?
... 281, westbound on Collins St at the Exhibition St stop. Tram... at the Exhibition St stop. Tram has the destination of City, Route 42 ...Colour print mounted within a large card frame of A class 281, westbound on Collins St at the Exhibition St stop. Tram has the destination of City, Route 42 and an Advertisements for Ford exhaust systems. In the driver's window is the run number "K38" Behind the tram is a W class tram that appears to be showing route 17. Photo could be early 1990's, route 42 became route 109 in 2003 when the extension opened to Box Hill. Route 17 ran until 2/1997. Having a run number will also assist in dating the photograph. (reference 'tramroutenumbers.pdf accessed from Yarra trams web site.) Has been wall mounted or mounted within a larger frame - tape tear marks on the rear.trams, tramways, collins st, a class, tram 281