Showing 1813 items matching "tramways - bendigo"
-
 Ballarat Tramway Museum
Slide - 35mm slide/s - set of 23, Noel Simons, 26/02/1972 12:00:00 AM
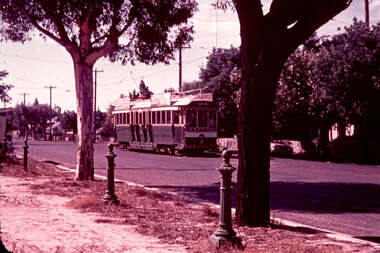
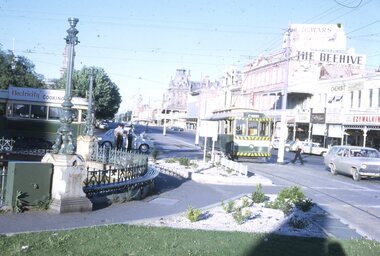
... Parade Ballarat Ballarat goldfields Tramways trams Bendigo Golden ...Set of 23 transparencies taken on 26/2/1972 on Kodak mounts. 1205.1 - Bendigo No. 25 on a special tour at Fire Station Loop, en route to Golden Square. 1205.2 - No. 21 and 25 crossing at Fire Station Loop, note photographers on the ground. No. 21 bound for North Bendigo. 1205.3 - as for 1205.3, but with trams departing loop and fire station in the background. 1205.4 - No. 25 at Golden Square Hotel with 'Rodda's Golden Square Hotel' in the background. Tram on a special tour, but showing destination of North Bendigo. 1205.5 - as for 1205.4 - but showing special. Has the end of the track in the photograph. 1205.6 - Nos. 7 and 25 (on a special tour) crossing at Myrtle St. Loop. 1205.7 - No. 7 leaving Myrtle St. loop with the mine poppet head in the background. Photo taken after tram has passed photographer. (Print made of this slide 10/2001 for use in the Gold Gold Gold exhibition of 10/2001 - See Reg. item 1979. 1205.8 - No. 25 entering depot. Tram showing 'special'. Tennis court on right has players. Photo taken after tram has passed photographer. 1205.9 - No. 24 (showing 'special') and No. 20 (showing 'Long Gully') at Bendigo Depot. 1205.10 - No. 24 on a special charter, leaving Bendigo depot. Tram has two 'Johnnie Walker' roof ads. 1205.11 - Bendigo depot with 29, 25 and a bogie car inside the depot doors. 1205.12 - As for 1205.11, but with 28 and 29. 1205.13 - No. 24 standing at front entrance of Bendigo depot with No. 20 in the background. 1205.14 - No. 24 running out into McCrae St showing special, with conductor on front step. 1205.15 - No. 24 in Caledonia St. at corner of Thunder St with the Gasworks in the background. 1205.16 - No. 5 en route for Quarry Hill at Charing cross with No. 26 (en route for Eaglehawk) about to arrive. Has former crossover at this location in the foreground. Has the Ezywalkin building in the background. 1205.17 - No. 5 and 26 at Charing Cross, with the Alexandra Fountain in the foreground and the Beehive and Ezywalkin buildings in the background. No.26 has two SEC roof ads. 1205.18 - Charing Cross looking along Pall Mall with trams 7 and 21 and 26 in the picture. 1205.19 - Charing Cross, with 21 departing for Golden Square and No. 5 heading for Quarry Hill. Has the Ezywalkin and the Beehive buildings in the background. 1205.20 - as for 1205.19, but a few moments later. Adjacent pole has a "NO ROAD" letter in reflectors vertically. 1205.21 - Charing Cross with Nos. 25, 21, 26 and 7, looking south from Pall Mall end. 1205.22 - No. 24 crossing Mitchell St. en route for Golden Square, showing 'special' with the Beehive and Ezywalkin buildings in the background. 1205.23 - Charing Cross with Nos. 24, 21 and 7 in the photo and Fountain Plaza in the background. Print of 1205.7 - stored in box D1.Information written on in blue ink and date stamped on purple ink. 1205.1 - "No. 25 at Fire Station Loop High Street, Golden Square." 1205.2 - "Nos. 25 and 21 crossing at Fire Station Loop, near Golden Square." 1205.3 - "Nos. 25 and 21 crossing at Fire Station Loop, near Golden Square." 1205.4 - "No. 25 at Golden Square terminus." 1205.5 - "No. 25 at Golden Square terminus." 1205.6 - "Nos. 7 and 25 crossing at Myrtle St. Loop." 1205.7 - "No. 7 leaving Myrtle St. Loop." 1205.8 - "No 25, entering Bendigo Depot." 1205.9 - "Nos. 20 and 24 at Bendigo Depot." 1205.10 - "No. 24 at Bendigo Depot." 1205.11 - "Nos. 25 and 29 at Bendigo Depot." 1205.12 - "Birney cars 29 and 28 at Bendigo Depot." 1205.13 - "No. 24 (with 20 beyond) at Bendigo Depot." 1205.14 - "No. 24 entering McCrae St. from Arnold St." 1204.15 - "No. 24 in Caledonia St. at cnr of Thunder St." 1204.16 - "No. 5 waits at Charing Cross as No. 26 arrives from Quarry Hill. Note remains of crossover abandoned on relocation in 1965." 1204.17 - "Nos. 5 and 26 at Charing Cross." 1204.18 - "Nos. 26, 7 and 21 at Charing Cross (No. 5 just visible behind No. 26)." 1204.19 - "No. 21 leaves Charing Cross for Golden Square as No. 5 starts off for Quarry Hill." 1204.20 - "No. 21 swings onto the single track Golden Square line as No. 5 heads into Mitchell St. towards Quarry Hill." 1204.21 - "Nos. 25, 21 and 26 watch No. 7 arrive at Charing Cross from Golden Square." 1204.22 - "No. 24 at Charing Cross crossing Mitchell St." 1204.23 - "Nos. 24, 21 and 7 at Charing Cross."tramways, trams, bendigo, golden square, myrtle st., fire station, depot, charing cross, tram 5, tram 7, tram 20, tram 21, tram 24, tram 25, tram 28, tram 29 -
 Ballarat Tramway Museum
Slide - 35mm slide/s - set of 6, Noel Simons, 28 Feb. 1972
... Parade Ballarat Ballarat goldfields Tramways trams Bendigo Hayes ...Set of 6 transparencies taken on 28/2/1972 on Kodak mounts. 1206.1 - Bendigo No. 5 at Hayes St. Loop, en route for Quarry Hill. 1206.2 - No. 5 at Garden Gully Loop, Mt. Korong road, Ironbark. en route to Quarry Hill. Note the water column in the background. 1206.3 - No. 5 in View St. Bendigo, with the Commodore Motel in the background. 1206.4 - No. 6 en route for Golden Square in Fire Station loop, with the fire station building in the background. Photo taken after tram has passed photographer. 1206.5 - No. 6 in High St., running through Golden Square Shopping Centre, en route for Golden Square. Photo taken after tram has passed photographer. 1206.6 - No. 6 arriving at Charing Cross, bound for North Bendigo, with the City Family Hotel, ANZ bank and the Cenotaph (war memorial) in the background.Information written on in blue ink and date stamped on purple ink. 1206.1 - "No. 5 at Hayes Loop, Ironbark." 1206.2 - "No. 5 at Garden Gully Loop, Mt. Korong road, Ironbark." 1206.3 - "No. 5 in View St. just after start of double track near Barnard St." 1206.4 - "No. 6 in High St. at Fire Station loop." 1206.5 - "No. 6 in High St. running through Golden Square shopping centre." 1206.6 - "No. 6 arriving at Charing Cross from Golden Square."tramways, trams, bendigo, hayes st. loop, garden gully loop, view st., golden square, charing cross, tram 5, tram 6 -
 Ballarat Tramway Museum
Slide - 35mm slide/s - set of 12, Noel Simons, 28 Feb. 1972
... Parade Ballarat Ballarat goldfields Tramways trams Bendigo ...Set of 12 transparencies taken on 28/2/1972 on Kodak mounts. 1207.1 - Bendigo 26 and 2 at Charing Cross. 26 en route for Eaglehawk, 2 for Quarry Hill. Has the Colonial Mutual Life, Armstrong Tyre Service, and Australian Mutual Provident Society buildings and a Cohns Drinks ad. in the background. 1207.2 - as for 1207.1 but with Alexandra fountain in the foreground. 1207.3 - No. 2 in Mitchell St. heading for Quarry Hill. Photo taken after tram has passed photographer. Has buildings on either side of Mitchell St. in the background, including the Plaza Theatre. 1207.4 - No. 6 en route for Golden Square departing Charing Cross. Has the RACV and ANZ bank in the background. 1207.5 - No. 2 crossing Pall Mall to enter Charing Cross ex Quarry Hill, with the Fountain Plaza in the background. 1207.6 - No. 6 arriving Charing Cross ex Golden Square with No. 21 alongside. No. 21 has the SEC ad. 'Everything's fine in my all electric kitchen.' Has the City Family Hotel and the Fountain Plaza shopping centre in the background. 1207.7 - No. 5 at Charing Cross en route for Quarry Hill with No. 2 behind. No. 2 has two SEC roof ads, 'Everything s fine in my all electric kitchen' and 'Electricity best for cooking'. RACV building in the background. Tram crews are discussing the day in the front of the tram. 1207. 8 - No. 21 in High St. Bendigo with the Cathedral in the background. No. 21 has two SEC roof ads, 'Everything's fine in my all electric kitchen' and 'Electricity best for cooking'. 1207.9 - No. 6 in High St. Bendigo with the Cathedral in the background. 1207.10 - No. 6 in High St. Bendigo, just past Wattle St. Photo taken after the tram has passed the photographer from within the Highway Car Sales yard. 1207.11 - No. 26 bound for Eaglehawk at the end of the double track in View St., note signal contactors, tram stop and section signs mounted on pole. 1207.12 - No. 26 turning from View St. into Barnard St.Information written on in blue ink and date stamped on purple ink. 1207. 1- "Nos. 26 and 2 at Charing Cross." 1207.2 - "Nos. 26 and 2 at Charing Cross." 1207.3 - "No. 2 in Mitchell St. just after leaving Charing Cross." 1207.4 - "No.6 leaving Charing Cross for Golden Square." 1207.5 - "No. 2 arriving at Charing Cross from Quarry Hill." 1207.6 - "No. 21 waits at Charing Cross as No. 6 arrives from Golden Square." 1207.7 - "No 5 at Charing Cross with No. 2 lurking behind." 1207.8 - "No. 21 in High St. at cnr of Wattle St." 1207.9 - "No. 6 in High St. at cnr of Wattle St." 1207.10 - "No. 6 in High St. between Wattle and Vine Sts." 1207.11 - "No. 26 at end of double track in View St. near Barnard. St. 1207.12 - "No. 26 seen at dusk turning from View St. into Barnard St."tramways, trams, bendigo, charing cross, high st, view st., tram 2, tram 5, tram 6, tram 21, tram 26 -
 Ballarat Tramway Museum
Slide - 35mm slide/s set of 7, Noel Simons, 29 Feb. 1972
... Parade Ballarat Ballarat goldfields Tramways trams Bendigo ...Set of 7 transparencies taken on 29/2/1972 on Kodak mounts. 1208.1 - Bendigo 18 (en route to Quarry Hill) and 2 (Eaglehawk) in the early morning at Charing cross with the Alexandra fountain and the Fountain Plaza building in the background. 1208.2 - No. 2 descending View St. Photo taken after tram has passed the photographer. 1208.3 - as for 1208.2 at Mackenzie St. intersection 1208.4 - No. 26 ascending View St. with the ANZ bank, T& G in the background. 1208.5 - as for 1208.4, but at Mackenzie St. intersection. Photo taken after tram has passed the photographer. 1208.6 - No. 18 in View St. seen from the lookout tower in Rosalind Park. 1208.7 - No. 7 en route to North Bendigo in Nolan St. Photographed across the Centenary Oval.Information written on in blue ink and date stamped on purple ink. 1208.1 - "Nos. 18 and 2 in the early morning sun at Charing Cross." 1208.2 - "No. 2 descending View St. towards Charing Cross." 1208.3 - "No. 2 in View St. passing Mackenzie St." 1208.4 - "No. 26 in View St. just after leaving Charing Cross." 1208.5 - "No. 26 climbing View St. past Mackenzie St." 1208.6 - "No. 18 climbing View St. seen from lookout tower in Rosalind Park." 1208.7 - "No. 7 in Nolan St. heading towards North Bendigo. / Last picture of a Bendigo tram."tramways, trams, bendigo, charing cross, view st., nolan st., tram 2, tram 7, tram 18, tram 26 -
 Ballarat Tramway Museum
Slide - 35mm slide/s - set of 4, Noel Simons, Apr. 1972
... Parade Ballarat Ballarat goldfields Tramways trams Bendigo ...Set of 4 transparencies - copy slides - possibly ARE film strip dated March 1972. 1209.2 and 1209.4 on Kodak Readymount mounts. 1209.1 - Bendigo 5, 6 and 28 on a special tram service in bound to the City on a tour in Caledonia St. about to enter Lucan St, or White Hills Road or Weeroona Ave. (mis match in names in various maps). Gas works in the background. No. 5 has a white disk on the rear of the tram. 1209.2 - Nos 2 and 26 at Charing Cross with the Fountain Plaza in the background. Both trams have the destination of Quarry Hill, though 26 is on the Eaglehawk bound track. 1209.3 - No. 19 at the Golden Square terminus, with the conductor or driver swinging the pole and Billy Rodda's Golden Square hotel in the background. 1209.4 - No. 7 at Fire Station loop, en route to North Bendigo, picking up a passenger with a pram. Part of a set of 20 slides made by the Association of Railway Enthusiast Provincial Tramways film strip. Reference Item 2560 details the ARE Film Strip and provide references to other slides.Information written on in blue ink and date stamped on purple ink. 1209.1 - "Nos 5, 6 and 28 in Caledonia St. about to enter Weeroona Ave." 1209.2 - "Nos 2 and 26 at Charing Cross." 1209.3 - "Swinging the pole on No. 19 at Golden Square Terminus." 1209.4 - "No. 7 inward bound from Golden Square stops at Fire Station Loop."tramways, trams, bendigo, charing cross, golden square, gas works, special trams, tram 2, tram 5, tram 6, tram 7, tram 19, tram 28 -
 Ballarat Tramway Museum
Slide - 35mm slide/s - set of 4, Noel Simons, Apr. 1972
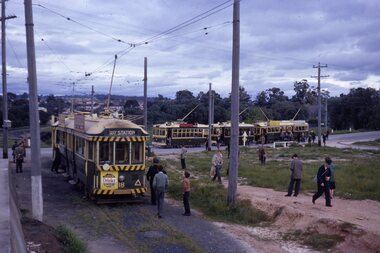
... Parade Ballarat Ballarat goldfields Tramways trams Bendigo Long ...Set of 4 transparencies - copy slides - possibly ARE film strip dated April 1972. 1210.3 on Kodak Readymount mount. 1210.1 - No. 3 arriving at Quarry Hill terminus. 1210.2 - Bogie car at Long Gully Loop, in the far distance, with a Hotel and the ESSO service station in between. Has Fosters Lager and Carlton signs on hotel. Note sign on the closet pole - "No standing between Notices" 1210.3 - Nos. 26 (Quarry Hill) and 25 (Eaglehawk) at Jobs Gully Loop. 1201.4 - No. 5 showing Charing Cross in bound for Charing Cross and No. 3 en route for Eaglehawk in View St. near the end of the double track. Appears to be SEC employee at the rear of No. 3. Part of a set of 20 slides made by the Association of Railway Enthusiast Provincial Tramways film strip. Reference Item 2560 details the ARE Film Strip and provide references to other slides.Information written on in blue ink and date stamped on purple ink. 1210.1 - "No. 3 arriving at Quarry Hill terminus." 1210.2 - "Bogie car at Long Gully Loop." 1210.3 - "Nos. 26 and 25 at Jobs Gully Loop." 1210.4 - "Nos 5 and 3 in View St. near the end of the double track."tramways, trams, bendigo, long gully, quarry hill, view st., tram 3, tram 5, tram 25, tram 26 -
 Ballarat Tramway Museum
Slide - 35mm slide/s, Noel Simons, Dec. 1972
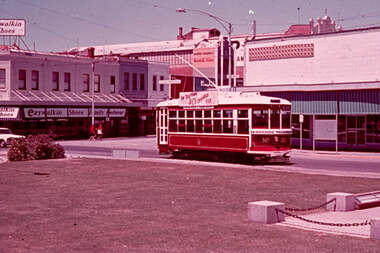
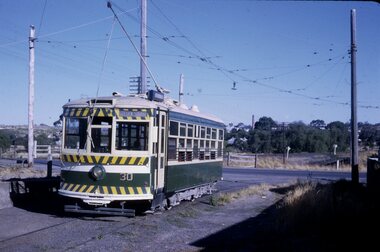
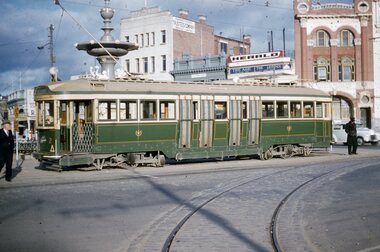
... Parade Ballarat Ballarat goldfields Tramways trams Bendigo ...One transparency on a Kodak Readymount mount, with dark blue border. Photo of Bendigo Trust No. 30 after repainting to the Bendigo trust colour scheme. Has a BCV Television roof ad. Has Fountain Plaza and Ezywalkin buildings in the background. Slide dated Dec. 1972.Information written on in blue ink and date stamped on purple ink. "Birney No. 30 restored to former livery at Charing Cross."tramways, trams, bendigo, charing cross, tram 30 -
 Ballarat Tramway Museum
Slide - 35mm slide/s set of 7, Noel Simons, 1972
... Parade Ballarat Ballarat goldfields Tramways trams Bendigo Long ...Set of 7 transparencies undated on PAKON mounts - appear to be early 1970's. 1212.1 - No. 18 about to enter the Long Gully loop with ESSO service station on the right hand side. 1212.2 - No. 6 in Mitchell Street bound for Charing Cross. Tram has destination of "Rly Station". Has buildings on the east side of Mitchell St. in the background. 1212.3 - No. 7 (North Bendigo) and 29 (Golden Square) crossing. Actual location? 1212.4 - "No 6 showing 'SPECIAL' at Eaglehawk terminus. Has the Foodland store and Fruit shop in the background. 1212.5 - No. 19 at Eaglehawk terminus, on the extension to the normal Eaglehawk terminus. Tram has showing 'Eaglehawk'. Tram has two SEC roof ads. 1212.6 - No. 25 and another Bogie car at Quarry Hill terminus on last day. 1212.7 - No. 18 and 29 at Quarry Hill terminus. No.. 18 showing 'Quarry Hill' - has two SEC roof ads 'Electric Cooking - Matchless' and 'Everything's fine in my all electric kitchen' and No. 29 has a briquettes roof ad.Information typed onto a white label stuck on the slide. 1212.1 - "No. 18 at Long Gully" 1212.2 - "No. 6 in Mitchell Street." 1212.3 - "7 and 29 Lake View Hotel" 1212.4 - "No. 6 at Eaglehawk" 1212.5 - "No. 19 at Eaglehawk Term." 1212.6 - "Last cars Quarry Hill." 1212.7 - "18 & 29 Quarry Hill"tramways, trams, bendigo, long gully, mitchell st., eaglehawk, quarry hill, last tram, tram 6, tram 7, tram 18, tram 19, tram 25, tram 29 -
 Ballarat Tramway Museum
Album - Photo Album, Keith Kings, Jul. 1970
... image files. Trams tramways Ballarat Bendigo Geelong Photo album ...Album comprises heavy cardboard covers with brown Rexene covers, with inside papers of heavy dark grey photo album paper, 36 leaves of dark grey photo paper and two brass interscrews within black grommets. See Condition Details re damage to back cover. Album contains 32 photos - personal prints of Keith Kings. Title page has been hand written to Les Denmead, dated 6/7/1970, thanking Mr. Denmead for his assistance over the years. Photos divided into the three SEC Provincial Tramway cities, each with a typed name proceeding the set of photos. Two further photos of Geelong were at the rear of the album, but were not in position when catalogued. One of these photos may be Reg. Item 1874 - photo of Geelong scrubber tram. Each of the photographs have been separately registered, as shown in the table below. Scanned images made of front and back of the photos. Back has Keith Kings ID number, description, notes and date of photo. Conservation Notes prepared - within the cataloguing sheet - see related documents. Folio Reg. Notes Item No. 1 Handwritten note to Mr. L. J. Denmead from Keith Kings. 2 Title sheet – “BALLARAT” 3 1903 Small photo of SEC Monogram from Geelong No. 1 1904 Photo of SEC plaques etc at Wendouree office 4 1905 Photo of front of Wendouree Parade depot – 1957 - with trams 40 and 25 in photo. 5 1906 Photo of Ballarat 23 at depot 6 1907 Photo of Ballarat 29 in depot. 7 1908 Photo of Ballarat 17 in Wendouree Parade 8 1909 Photo of Ballarat 21 at depot. 9 1910 Photo of Ballarat 15 and 31 in Sturt St. 10 1911 Photo of Ballarat No. 40 Sturt St. 11 1912 Photo of Ballarat No. 38 – Wendouree Parade 12 1913 Photo of Scrubber car in depot. 13 Title sheet – “BENDIGO” 14 1914 Photo of Bendigo depot 15 1915 Photo of Bendigo No. 17, 1949. 16 1916 Photo of Bendigo 22 and 4 at Eaglehawk. 17 1917 Photo of Bendigo 12 at Golden Square. 18 1918 Photo of Bendigo 13 and 26 at Eaglehawk terminus. 19 1919 Photo of Bendigo 17 (bogie) at Quarry Hill terminus. 20 1920 Photo of Bendigo 18 at Charing Cross 21 1921 Photo of Bendigo Birneys 28 and 29 at Charing Cross 22 1922 Photo of original sprinkler and track cleaning car in Bendigo depot 23 1923 Photo of Bendigo 2nd track cleaning car 24. 1924 Photo of trams at Manchester Loop, 1958. 25. Title sheet – “GEELONG” 26 1925 Photo of Geelong 19 in front of the depot. 27 1926 Photo of Geelong depot 28 1927 Photo of Geelong No. 3 at East terminus 29 1928 Photo of Geelong No. 23 outside depot. 30 1929 Photo of Geelong No. 16 at Eastern Park terminus. 31 1930 Photo of Geelong No. 28 at depot 32 1931 Photo of Geelong Birney No. 14 at Eastern Park terminus. 33 1932 Photo of Geelong No. 32 at Moorabool St. 34 1933 Photo of Geelong No. 37 outside depot 35 1934 Photo of Geelong No. 39 at West terminus 36. No photo – marks of four corners remained. 37 – back cover No photo – marks of four corners remained. Photos not to be taken out of the album unless for photographic copying. Use image files. Photo Album - The Commercial Photo Album - No. 1 - 36 leaves. See hand written note from Keith Kings to Mr. L. J. Denmead. Dated 6/7/70.trams, tramways, ballarat, bendigo, geelong, photo album -
 Ballarat Tramway Museum
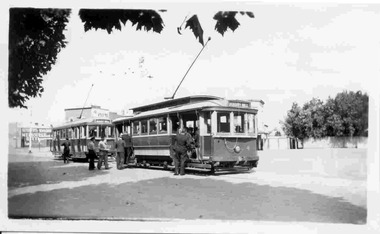
Photograph - Black & White Photograph/s, Keith Kings, Apr. 1949
... Ballarat Tramway Museum South Gardens Reserve Wendouree ...Black and White photograph contained with Reg. Item 1902 - Photo Album from Keith Kings to Les Denmead 1970. Photograph of SEC Bendigo trams 22 and 4 at the Eaglehawk terminus, Easter Monday April 1949. Notes as both cars in "unaltered" condition. Keith Kings No. B(z)(1) Scanning: i - image file, p - presentation file, b - back of photograph. Has buildings at terminus in background, with Plume and Melbourne Bitter beer signs.Stamp in top left hand corner and handwritten number with "K.S. Kings No. B(z)(1) Copyright reserved". In blue ink "Bendigo / No. 22 - unaltered closed combination car / No. 4 - unaltered open combination car. / Eaglehawk terminus / Easter Monday, 4/49"trams, tramways, eaglehawk, bendigo, tram 22, tram 4 -
 Ballarat Tramway Museum
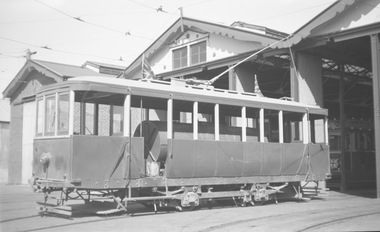
Photograph - B&W print of donated negative, 7/03/1954 12:00:00 AM
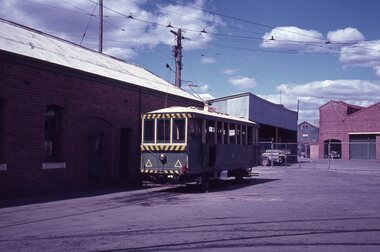
... Parade Ballarat Ballarat goldfields tramways trams Bendigo Depot ...Black and white print of a donated negative. Print made 8/1998. Photo of SEC Bendigo Scrubber tram at the Bendigo depot taken on 7-3-1954. Has Bendigo depot in background. The tram appears to have the English flag on the side of the tram. Part of the Ron Fluck Collection. high res scan of the negatives added 18/1/2019.tramways, trams, bendigo, depot, scrubber tram, tram scrubber -
 Ballarat Tramway Museum
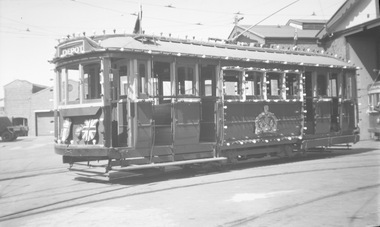
Photograph - B&W print of donated negative, 7/03/1954 12:00:00 AM
... Parade Ballarat Ballarat goldfields tramways trams Bendigo Depot ...Black and white print of a donated negative. Print made 8/1998. Photo of SEC Bendigo 22, decorated for the royal visit at the Bendigo depot taken on 7-3-1954. Has Bendigo depot in background. The tram has been decorated with coloured lights, a crown on the side of the tram, a British flag on the front and a Royal banner, featuring the letters "ER". Photo from the Ron Fluck collection. Image i1 high res scan of the negatives added 18/1/2019.tramways, trams, bendigo, depot, 22, decorated trams, tram 22 -
 Ballarat Tramway Museum
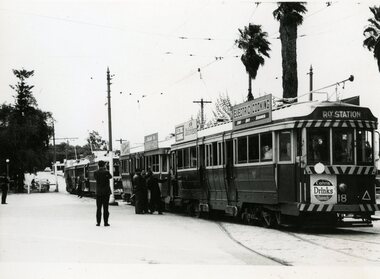
Photograph - Black & White Photograph/s, early 1960's
... Ballarat Tramway Museum South Gardens Reserve Wendouree ...Black and White print of Bendigo SECV Bendigo tram 18 and four other trams (two bogies and two Birneys) at Eaglehawk tram terminus on a tour. Tram has dash canopy lights, but no large white strip under the drivers windows. Photo not dated but appears to be during early 1960's. Tram 18 has destination of "Railway Station", also has a white disk indicating a tram in a convoy. Also has a good photo of the "Cohn's Drinks Quench" advertisement on the front dash panel, as well as two SEC roof ads.trams, tramways, eaglehawk, bendigo, tram tours, high st, specials, tram 18 -
 Ballarat Tramway Museum
Newspaper, Parade, "TRAMS ...." - tram 37 in Lydiard St North, Jan. 1970
... Ballarat Tramway Museum South Gardens Reserve Wendouree ...Clipping of three pages from "Parade" Jan. 1970, pages 20 to 22, of an article entitled "TRAMS . . . " featuring a story on trams in Australia, from horse to cable from electric trams to no trams except in Melbourne, Bendigo and Ballarat and one in SA. Features photo of the Pitt St. line in Sydney, Melbourne Cable tram, SEC Ballarat tram 37 (see image) and W2 329 in Wellington Parade Melbourne. Written by Brian Carroll. On off white paper, with some single colour overlays. Photo of 37 in Ballarat in Lydiard St. North, just south of Railway Station.trams, tramways, ballarat, bendigo, australian trams, melbourne -
 Ballarat Tramway Museum
Photograph - Illustration/s, Ballarat Views, 1950's mid
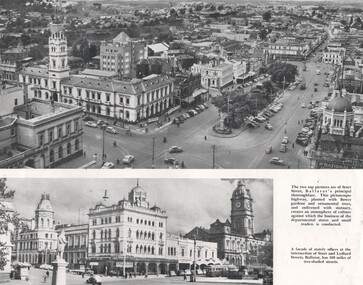
... Ballarat Tramway Museum South Gardens Reserve Wendouree ...Single sheet of printed paper, collected from a magazine (p59/60) with two black and white photos of Ballarat and one colour of Bendigo. Photo 1 - 260mm long x 122mm high, photo of north east Ballarat from Town Hall, looking out to Black Hill. Photo similar to Reg. No. 102, but buildings on corner of Grenville and Bridge St has a Plume sign instead of a Mobilgas Ad. This indicates early to mid 1950's. One tram in loop in one in Bridge St. Also has a "Neptune" sign in photograph. Photo 2 - 195mm long x 75mm high - from north east corner of Sturt and Lydiard Sts looking towards Town Hall and Craig's Hotel. Photo includes SEC bogie at tram stop and the front end of bus travelling east in Sturt St. Photo 3 - 230mm long x 156mm high - colour printed photo of Pall Mall, Bendigo from west side (by Post Office), looking towards the Shamrock Hotel. Photo includes signs for "COR Motor Spirit", "Tanox Paint" and the rear of a Bendigo to Huntly bus. See item Reg. No. 102trams, tramways, ballarat, bendigo, pall mall, oil companies -
 Ballarat Tramway Museum
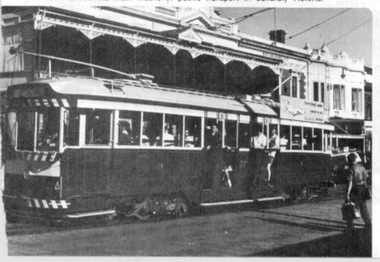
Photograph - Newspaper Clipping and Black & White Photograph/s, 16/04/1972 12:00:00 AM
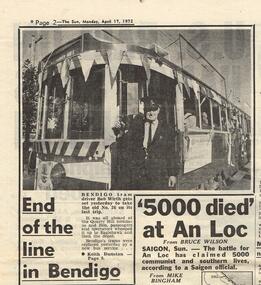
... Parade Ballarat Ballarat goldfields tramways trams Bendigo ...Newspaper clipping from The Melbourne Sun, dated Monday 17/4/1972, titled "End of the line in Bendigo" showing a photograph of Bendigo tram driver Bob Wirth standing by Bendigo No. 26 prior to its last trip to Eaglehawk and then the depot. One of a large group of newspaper cuttings from John Bainbridge, 7/4/02. .1 - black and white print of the photograph in fair order. Added 11-8-2016tramways, trams, bendigo, tramway closure, last tram -
 Ballarat Tramway Museum
Slide - 35mm slide/s, Peter Moses, Jan. 1969
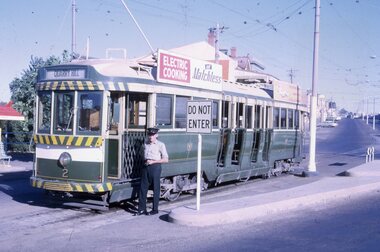
... Parade Ballarat Ballarat goldfields Tramways trams Bendigo ...Photo of SEC Bendigo No. 2 at Eaglehawk terminus. Tram has a crew member (driver) standing by the rear door and has SEC roof advertisements "Electric Cooking is Matchless" and "Everything's under control in my all-electric kitchen". Kodak cardboard mount slide, taken by Peter Moses, Jan. 1969.On the rear of the slide "Jan 1969 Eaglehawk terminus", "P.Moses" and on the other side of the slide, in red ink “2”.tramways, trams, bendigo, eaglehawk, tram 2 -
 Ballarat Tramway Museum
Slide - 35mm slide/s - set of 2, Peter Moses, Jan. 1969
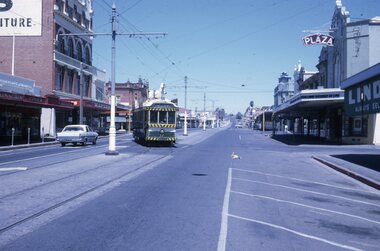
... Parade Ballarat Ballarat goldfields Tramways trams Bendigo ...Set of two photos of SEC Bendigo No. 17 in Mitchell St. Bendigo. .1 - No. 17 using the crossover. Has destination of "Eaglehawk". In the background are the Plaza theatre, Maples store and Coles store. Advised that the Sunday run outs in the late morning, early afternoon used this crossover to form the first Eaglehawk tram service. .2 - No. 17, with destination of "Quarry Hill", near the Railway station. Has a Wilkinson Sword and SEC "Electric Cooking serves you best", roof advertisements. Kodak cardboard mount slide, taken by Peter Moses, Jan. 1969.On the rear of the slide: .1 - in red ink "Bendigo Mitchell St." , "6" and "P. Moses" in black ink. .2 - "3" in red ink and "P. Moses" in black ink.tramways, trams, bendigo, mitchell st, quarry hill, tram 17 -
 Ballarat Tramway Museum
Slide - 35mm slide/s, Peter Moses, Jan. 1969
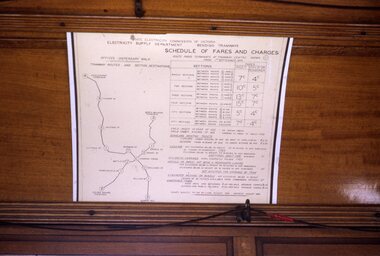
... Parade Ballarat Ballarat goldfields Tramways trams Bendigo ...Photo of the SEC Bendigo "Schedule of Fares and Charges" inside a tram. The fare chart appears to have been mounted on a large sheet of white cardboard. Note the red tape joining the bell cord. Kodak cardboard mount slide, taken by Peter Moses, Jan. 1969.On the rear of the slide "Jan. 1969 Bendigo/ Map of Routes" in blue ink, "P. Moses" in black ink and other side of the slide in red ink “1”.tramways, trams, bendigo, schedule of fares, map, fares -
 Ballarat Tramway Museum
Slide - 35mm slide/s, Peter Moses, Jan. 1969
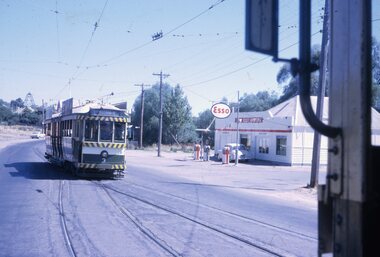
... Parade Ballarat Ballarat goldfields Tramways trams Bendigo ...Photo of the SEC Bendigo No. 3 entering Long Gully Loop, bound for Eaglehawk, while another bogie tram waits in the loop. In the background is an Esso service station, known as Long Gully Motors, and a poppet head on a hillside in the background. Kodak cardboard mount slide, taken by Peter Moses, Jan. 1969.On the rear of the slide "P. Moses" in black ink and other side of the slide in red ink “4”.tramways, trams, bendigo, eaglehawk, long gully, esso, tram 3 -
 Ballarat Tramway Museum
Slide - 35mm slide/s - set of 4, Peter Moses, Jan. 1969
... Parade Ballarat Ballarat goldfields Tramways trams Bendigo tram ...Set of four colour slides taken at Charing Cross Bendigo, Jan. 1969. .1 - Trams 30 and 28 travelling to North Bendigo and Golden Square respectively. Has the Beehive building in the background, along with W.M.I. Jones Chemist, Evelyn Amor shop, Dewars Whiskey rooftop advertisement. 28 has a SEC Briquettes roof advertisement. .2 - As above but with the front or bogie tram in the photo. Also has A. G. Treloar Optician's shop. Kodak cardboard mount slide, taken by Peter Moses, Jan. 1969. .3 - Close up photo of Birney No. 30, with 28 in the background. .4 - No. 28 leaving for Golden Square with the Plaza building, the Cenotaph, and the City Family Hotel in the background. Kodak cardboard mount slide, taken by Peter Moses, Jan. 1969.On the rear of all the slides "P. Moses" in black ink .1 - "Bendigo Charing Cross" and in red ink "19" .2 - "Bendigo three trams / Charing Cross" and in red ink "21" .3 - "Bendigo" and in red ink "23" .4 - "Bendigo Charing Cross" and in red ink "14". tramways, trams, bendigo, tram 28, tram 30 -
 Ballarat Tramway Museum
Slide - 35mm slide/s - set of 5, Peter Moses, Jan. 1969
... Parade Ballarat Ballarat goldfields Tramways trams Bendigo Depot ...Set of five colour slides taken the SEC Bendigo depot, Jan. 1969. .1 - inside depot, show two bogies and one Birney on one road and the pit arrangements. .2 - ditto, slightly different exposure .3 - trams 21, 24 and 5 at the front of the depot .4 - Scrubber tram by the depot extension. .5 - Looking across the depot yard with the scrubber in the foreground and depot in the background. Kodak cardboard mount slide, taken by Peter Moses, Jan. 1969. On the rear of all the slides "P. Moses" in black ink .1 - "Jan 1969 Bendigo / Depot" in blue ink and on the opposite side of the slide in red ink “28” .2 - "Jan 1969 Bendigo / Depot" in blue ink and on the opposite side of the slide in red ink “27” .3 - "Jan 1969 Bendigo / Tram Depot" in blue ink and on the opposite side of the slide in red ink “29” .4 - In red ink "31" .5 - "Jan 1969 Bendigo / Depot" in blue ink and on the opposite side of the slide in red ink “30”. tramways, trams, bendigo, depot, scrubber tram, tram 21, tram 24, tram 5 -
 Ballarat Tramway Museum
Slide - 35mm slide/s - set of 3, Peter Moses, Jan. 1969
... Parade Ballarat Ballarat goldfields Tramways trams Bendigo North ...Set of two colour slides taken at the North Bendigo terminus and another in Pall Mall, Bendigo, Jan. 1969. .1 - No. 30 at North Bendigo terminus - has destination "Golden Square" .2 - Interior view of Birney tram with crew members numbers 22, 29 and three seated passengers. .3 - View of Pall Mall looking north from the tram stop - has the Shamrock Hotel in the distance and other buildings on the east side of the street, including a 3BO (Bendigo radio) sign. Kodak cardboard mount slide, taken by Peter Moses, Jan. 1969.On the rear of all the slides "P. Moses" in black ink .1 -"Bendigo / North Bendigo terminus" in blue ink, and in red ink “12” .2 - " Jan 1969 Bendigo / Inside Brill car" in blue ink .3 - "Bendigo Pall Mall" in black ink and in red ink “7”.tramways, trams, bendigo, north bendigo, birney, tram crews, pall mall, tram 30 -
 Ballarat Tramway Museum
Slide - 35mm slide/s - set of 13, Peter Moses, 1974
... Parade Ballarat Ballarat goldfields Tramways trams Bendigo ...Set of 13 colour slides, 7 on Kodak cardboard mounts and 6 on Agfa colour plastic mounts. .1 - Bendigo Trust, Birney trams 28 and 30 at Central Deborah Mine terminus. No. 30 has a 3BO Roof advertisement. .2 - ditto .3 - ditto with the Central Deborah mine and buildings in the background. .4 - No. 30 inbound in High St. with Sacred Heart Cathedral in the background (spire under construction) .5 - Nos. 30 and 28 crossing at Charing Cross with the Fountain Plaza building and the fountain in the background. .6 - No. 28 north bound in Pall Mall, after leaving Charing Cross with the Shamrock Hotel in the background. .7 - Photo showing track and centre poles in View St. looking west - no overhead. Has AMOCO service station near McKenzie St. .8 - No. 28 taken from cab of No. 30, in McCrae St, at end of double track. .9 - No. 28 turning from McCrae St. into Nolan St. .10 - No. 28 in Nolan St. with Lake Weeroona rowing sheds in the background. .11 - No. 19 in now Tramway Ave (then Arnold St.) running into depot .12 - No. 19 outside Bendigo depot .13 - ditto Slides taken by Peter Moses, during the winter of 1974 (no leaves on the trees).On the rear of all the slides "P. Moses" in black ink. .1 - "1974 Bendigo Central Deborah Mine" in blue ink and in red ink “16”. .2 - "1974 Bendigo two Birney cars / Central Deborah Mine" in blue ink and in red ink “18”. .3 - "1974 Bendigo trams at Central Deborah Mine" in blue ink and in red ink “17”. .4 - "1974 Bendigo High St / tram near Sacred Hearth Cathedral" in blue ink and in red ink “15”. .5 - "1974 Bendigo two Birney cars / Charing Cross" in blue ink and in red ink “20”. .6 - "1974 Bendigo No. 28 Pall Mall" in blue ink and in red ink “8”. .7 - "1974 Bendigo / Old Tramline View St." in black ink and in red ink “5”. .8 - "1974 Bendigo, McRae St. (Pall Mall)" and in red ink "9". .9 - "1974 Bendigo, Lake Weeroona, / tram " and in red ink "10". .10 - "1974 Bendigo, Lake Weeroona" and in red ink “11”. .11 - "1974 Bendigo / Outside depot" and in red ink “24”. .12 - "1974 Bendigo / Outside depot" and in red ink “25”. .13 - "1974 Bendigo / Depot" and in red ink “26”.tramways, trams, bendigo, central deborah, bendigo trust, sacred hearth cathedral, north bendigo, depot, tram 19, tram 28, tram 30 -
 Ballarat Tramway Museum
Slide - 35mm slide/s, Peter Moses, Jan. 1969
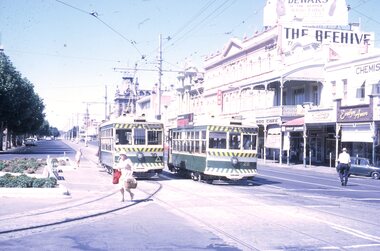
... Parade Ballarat Ballarat goldfields Tramways trams Bendigo ...Photo of SEC Bendigo No. 6 crossing Mitchell St, north bound for North Bendigo, while a bogie tram waits to depart Charing Cross, east bound for Quarry Hill. Three SEC crew members standing by the front of the bogie tram and an inspector crossing the road near No. 6. Has part of the fountain in the view. Also in the photo are The Beehive building, and advertisement for Dewars whiskey and a shop front for "Ezywalkin" shoes. The bogie tram has a SEC roof advertisement "Electricity Best for cooking". Kodak cardboard mount slide, taken by Peter Moses, Jan. 1969.On the rear of the slide "Jan. 1969 Bendigo:" in blue ink, "P. Moses" in black ink and other side of the slide in red ink “22”.tramways, trams, bendigo, charing cross, tram 6 -
 Ballarat Tramway Museum
Slide - 35mm slide/s, Keith Kings, 20/10/1962 12:00:00 AM
... Parade Ballarat Ballarat goldfields Tramways trams Bendigo North ...Bendigo, trams 18,26,29,11 and 5 at North Bendigo terminus, taken from the hill at the terminus looking back towards Bendigo, with tram 18 at terminus. Trams part of a special tour for the ARHS special train, on 20-10-1962. Tram 18 has 'Kohn drinks' ad on front panel, and SEC roof ads on other trams. Photo by Keith Kings.Stamped on 'K.S.Kings etc.', and in blue ink 'K(k)(386), 1/2509 f5.6 20/10/62, ARHS, Convoy A specials, 18,26,29,11,5 at North Bendigo terminus'tramways, trams, bendigo, north bendigo, arhs, tram 18, tram 26, tram 29, tram 11, tram 5 -
 Ballarat Tramway Museum
Slide - 35mm slide/s, Wal Jack, 3/09/1958 12:00:00 AM
... Parade Ballarat Ballarat goldfields Tramways trams Bendigo tram 2 ...Bendigo, bogie tram No. 2 standing alongside the fountain before proceeding to Eaglehawk. Tram fitted with small reflective triangles on front panels, all blinds drawn and gate closed. Has fountain in background and shops on the west side of Charing cross.'7 55 am Wed 3 Sept. 1958, Tram No. 2 at Fountain, Bendigo'tramways, trams, bendigo, tram 2 -
 Ballarat Tramway Museum
Slide - 35mm slide/s, Wal Jack, 6/01/1963 12:00:00 AM
... Parade Ballarat Ballarat goldfields Tramways trams Bendigo ...Bendigo, Scrubber tramcar in depot yard on blocks after truck and motors have been removed, 6-1-1963, with SEC electricity depot yard in background. Tramway offices on side.'SEC Bendigo, scrubber without truck, at depot Sunday 6/1/63'tramways, trams, bendigo, scrubber tram, scrubber -
 Ballarat Tramway Museum
Slide - 35mm slide/s, Wal Jack, 12/04/1959 12:00:00 AM
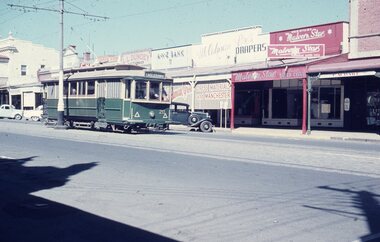
... Parade Ballarat Ballarat goldfields Tramways trams Bendigo tram ...Bendigo, SEC No. 20 with Eaglehawk destination, travelling west along Mitchell St, 12-4-1959. Tram has small white reflective triangles placed on front panels, , blinds drawn, centre of the road poles visible, and some parked cars. Has various shops in view, eg ANZ bank, Malvern Star bicycles, Holdmans? Bros. drapers'Bendigo, No. 20, Mitchell St, 12-4-59, W.Jack Photo'tramways, trams, bendigo, tram 20 -
 Ballarat Tramway Museum
Slide - 35mm slide/s, Wal Jack, 6/01/1963 12:00:00 AM
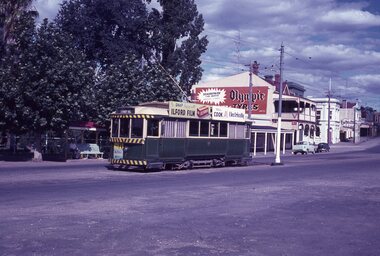
... Parade Ballarat Ballarat goldfields Tramways trams Bendigo ...Bendigo No. 7 at Eaglehawk tram terminus, 6-1-1963. Tram has been fitted with lights and warning stripes. On front panel is Hutton's hams, and roof ads for Ilford film and 'Cook with electricity'. In background is park, shops on the north side of the terminus, including a large 'Olympic' tyres advertisement. Tram has destination of 'Quarry Hill''Ex Ballarat 19, SEC Bendigo No. 7, at Eaglehawk terminus, 6-1-63'tramways, trams, bendigo, eaglehawk, tram 7