Showing 629 items
matching gardens loop
-
 Ballarat Tramway Museum
Slide - 35mm slide/s, Chas Bevan, 19/12/1970 12:00:00 AM
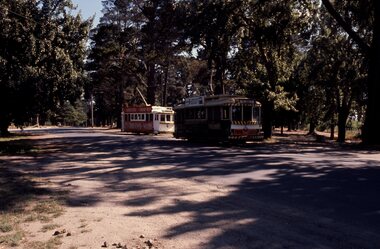
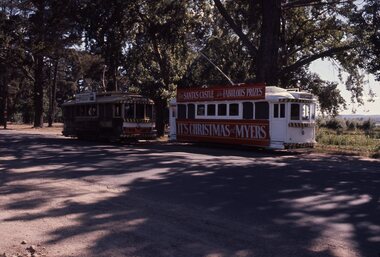
Yields information about the Carlton St loop area in Dec. 1970 (the wilds) and trams crossing at the loop.Colour slide - 35mm - of Ballarat single truckers No. 17 and 14 as the Christmas tram crossing at the Carlton St loop, Wendouree Parade; No 17 has the destination of Victoria St. Photo taken by Chas Bevan on Saturday 19-12-1970."Ballarat trams xing loop on lake line 19-12-70 - Myers Xmas"tramways, trams, carlton st, christmas trams, decorated trams, wendouree parade, tram 14, tram 17 -
 Ballarat Tramway Museum
Slide - 35mm slide/s, Chas Bevan, 19/12/1970 12:00:00 AM
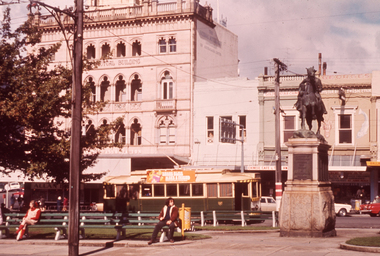
Yields information about the turn from Macarthur St into Wendouree Parade at View Point.Colour slide - 35mm - of Ballarat single trucker No. 27 turning from Macarthur St into Wendouree Parade at View Point junction. Has the tram stop signs, shelter in the photo. The tram has a Twin Lakes sign and the destination of Gardens via Drummond St North. Also shows the overhead arrangement for twin trolley wires. Photo taken by Chas Bevan on Saturday 19-12-1970."Ballarat tram 19-12-70 onto lake loop" in ink.tramways, trams, wendouree parade, view point, macarthur st, overhead, shelters, tram 27 -
 Ballarat Tramway Museum
Slide - 35mm slide/s, Chas Bevan, 19/12/1970 12:00:00 AM
Yields information about the Carlton St loop area in Dec. 1970 (the wilds) and trams crossing at the loop.Colour slide - 35mm - of Ballarat single truckers No. 17 and 14 as the Christmas tram crossing at the Carlton St loop, Wendouree Parade; No 17 has the destination of Victoria St. Photo taken by Chas Bevan on Saturday 19-12-1970."Ballarat trams (Myers Xmas) crossing loop on lake line 19-12-70"tramways, trams, carlton st, christmas trams, decorated trams, wendouree parade, tram 14, tram 17 -
 Ballarat Tramway Museum
Slide - 35mm slide/s - set of 2, Campbell Duncan, 22/08/1971 12:00:00 AM
Yields information about the operations of the Ballarat Tramway system prior to closure and some of the tours that were operated.Set of two Kodak - Kodachrome slide - cardboard mounts .1 - tram 13, at Tramway Centre, with Ballarat Town Hall in background. Photo shows the tram stop shelter, the fountain. Tram has a "Twin Lakes" sign. A number of people are waiting on seats. Photo taken 22/8/1971. .2 - SEC tram parked at depot loop Wendouree Parade? with possibly Eldon Hogan cleaning the destination box. - 22/8/1971.In ink on slide: .1 - "22 Aug 71, Tramway centre (Lydiard St), Town Hall behind." .2 - "Sun 22 Aug 71, whilst waiting for up, for cross"tramways, trams, wendouree parade, destination roll, depot loop, tram 13 -
 Ballarat Tramway Museum
Photograph - Digital image, c1925
Yields information about the appearance and the use of ESCo tram 12 in Victoria St and has a strong association with those photographed on the steps of the tram.Digital Copy of a photograph purchased by David Critchley from E-bay, of ESCo No. 12 in Victoria St Ballarat, c1925, possibly at the King St loop. Tram has the destination of Orphanage, a Viceroy Tea advertisement, a Coliseum roof advert and an "Pay as You Leave" sign. Note the positioning of the tram number on the route footsteps. The tram still has track brakes and the footstep boards are yet to be cut back or shortened. Tram has four men in suits standing on the running board with the driver or motorman in the doorway of the tram as well. Image not to be formally published without owners permission or knowledge.On the rear of the print is a stamp of "Alpha Print Box Hill" with the number "88"trams, tramways, esco, victoria st, orphanage, motormen, tram 12 -
 Ballarat Tramway Museum
Photograph - Black & White Photograph/s, Peter Duckett, 1940's
Yields information about the appearance of Bendigo steam tram motors and trailers.Black and White Photograph of Geelong No. 27, Birney tram, showing "Newtown" as the destination and a "Pay as You Enter" sign. Photo taken during the 1940's, before the tram went to Bendigo. Peter Duckett Collection. Dave O'Neil confirmed June 30/2009, photo taken at Aphrasia St, near Pleasant St Loop, the tram travelling to Newtown. The house behind the tram is still there.On rear, stamped in black ink "Photo supplied from P.W. Duckett Collection, All Rights Reserved, 69 Howitt Rd. Nth Caulfield 3161."trams, tramways, geelong, birney, newtown, tram 27 -
 Ballarat Tramway Museum
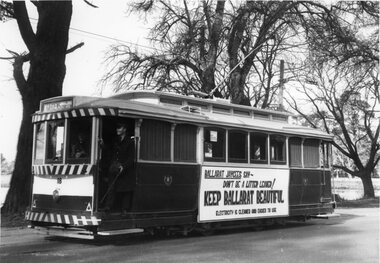
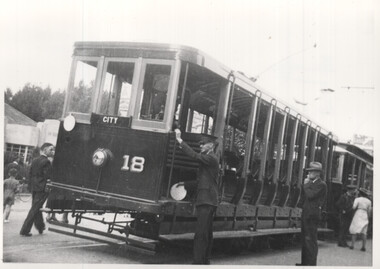
Photograph - Black & White Photograph/s - set of 2, The Courier Ballarat, 9/06/1970 12:00:00 AM
Black and White copy photograph taken by The Courier, taken on 9/06/1970, published 10/6/1970 of No. 18 with anti-litter advertisement sponsored by Ballarat Jaycees, at Carlton St loop. "Keep Ballarat Beautiful" and "Electricity is Cleaner and Easier to Use" - indicating that the SEC may have sponsored the Advertisements on the tram. Conductor standing in the doorway with a point bar. Tram has the destination of "Gardens via Sturt St." Collected by Alan Bradley from the Ballarat Courier early 1980's. See Excel file "Record of Ballarat Courier Photos SEC era" (Archive Documents) for source of details. 3760.1 - Copy of the original newspaper cutting added 9-11-2018 from donation of Glenise Kellett. Title of cutting "On schedule...with a message" - A hand written note on the cutting above the head line gives the possible name of the conductor with the point bar as "Van Orshot" Photo in box 01-01-77 Newspaper item in box 01-01-09in ink above the headline "Van Orshot"tramways, trams, carlton st, advertisements, jaycees, tram 18 -
 Ballarat Tramway Museum
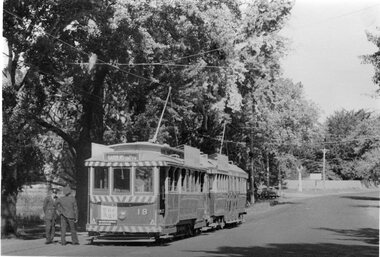
Photograph - Black & White Photograph/s, Dave Macartney, 21/04/1962 12:00:00 AM
Black and white photograph for SEC trams 18 and 37 at the Carlton St. Loop, Northbound in Wendouree Parade on 21/4/1962. Tram 18 is showing destination of "Gardens via Sturt St. West". Also has an "The Age" advertisement on drivers panel. Two crew members standing alongside the tram. Can see the Olympic monument in the background.In red ink on rear of photograph in three of the four corners "18 and 37 Carlton St. 21-4-62", "Keystone Ballarat" and "Neg 662-10".trams, tramways, carlton st, wendouree parade, crossing loop, keystone, tram 18, tram 37 -
 Ballarat Tramway Museum
Photograph - Black & White Photograph/s - set of 5 - tram operations on the Victoria St, Richard Gilbert, c August 1971
... St loop. .4 - No. 31 (to Gardens crossing No. 39) at the King.... Another tram has departed the King St loop. .3 - No. 13, (Gardens ...Yields information about the appearance of the Victoria St line shortly before the closure of the Victoria St line. Series of 5 Black and white photographs of tram operations on the Victoria St line prior to its closure in August 1971. .1 - View of the Victoria St terminus as you arrive in Ballarat from Melbourne, with the divided highway and a tram warning sign. Has a tram at the terminus. .2 - Tram 39, running a special tour with St Alipius church in the background. A new bus stop sing has been positioned. Another tram has departed the King St loop. .3 - No. 13, (Gardens via Sturt St West and a Twin Lakes sign) entering the King St loop. .4 - No. 31 (to Gardens crossing No. 39) at the King St loop. .5 - No. 31 leaving Stones Corner for Victoria St with Stones Corner building in the background along with the Caltex service station and Viscount Ambassador caravans.trams, tramways, victoria st, king st, stones corner, tram 39, tram 13, tram 31 -
 Ballarat Tramway Museum
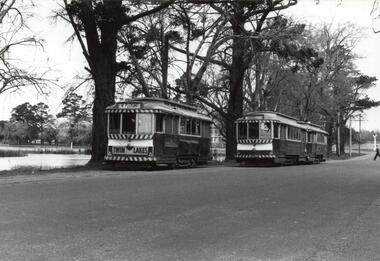
Photograph - Black & White Photograph/s - set of 2, Richard Gilbert, c August 1971
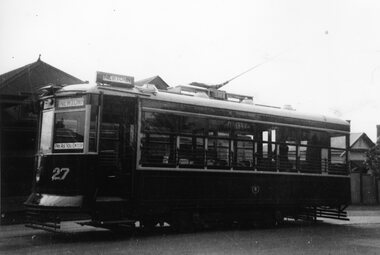
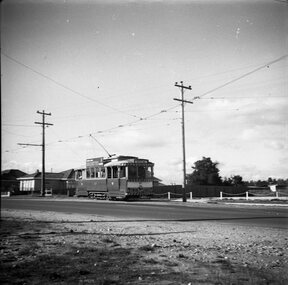
Yields information about the use of the Carlton St crossing loop prior to the closure of the tramway. Series of 2 Black and white photographs of trams using the Carlton St, Wendouree Parade crossing loop. .1 - tram 11 (with a Twin Lakes sign, Mt Pleasant) crossing tram 21 (Gardens via Sturt St West) and another single trucker. Has the signal and the Olympics Monument in the background. .2 - tram 27 and a bogie tram crossing. Tram 27 has the destination of Victoria St and a Twin Lakes sign. trams, tramways, carlton st, wendouree parade, tram 27, tram 11, tram 21 -
 Ballarat Tramway Museum
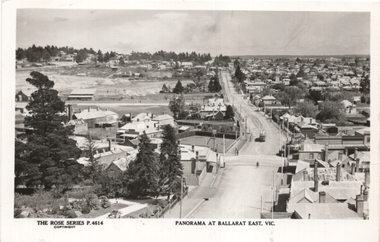
Postcard, Rose Stereograph Co, "Panorama at Ballarat East Vic", c1916
Photo looks west from the Ballarat Fire Station (East) tower, and has a good view looking along Barkly St. Shows the crossing loop between Eastwood and Main St with one tram in the view. Wal has dated the photo as 1914 in his album notes. On rear Wal Jack has written "Looking up Barkly St towards Mt Pleasant. Photo taken from Ballarat Fire Station about 1914-1916 period. Old type tram from Mt Pleasant about to turn into Main St. Note old passing loop behind tram. Loop removed to top of rise in centre background. Old Ballarat East Gardens on left and council yards, showing big tin shed in centre of picture. Locality much altered today." See item 5127 for a digital image.Yields information about the buildings and scene looking west from the Fire Station tower along Barkly St. East BallaratPostcard Black and white - Rose Series No P4614, Divided back. No publishers details on rear.See image 2 for Wal Jack's notes.tramways, trams, esco, ballarat east, barkly st -
 Ballarat Tramway Museum
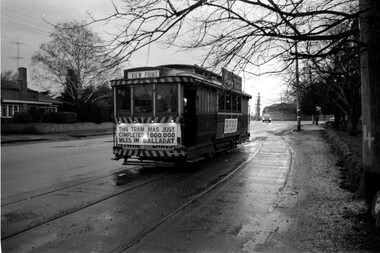
Photograph - Tram 27 Million Miles - Mal Rowe - 29/6/1968, 29/6/1968
Photo taken as part of the TMSV tour of the tramway system on a typical Ballarat winters day. Photo in the then disconnected View Point loop in Wendouree Parade. The fence of Ballarat A Power station can be seen in the background. Yields information about the purported achievement of tram 27 reaching 1,000,000 miles and the TMSV Tour. Shows the former View Point crossing loop. This figure was later found to be in error by about 100,000 miles.Digital image of a photograph by Mal Rowe of tram 27 at the former View Point Loop in Wendouree Parade 29/6/1968, during the Tramway Museum Society of Victoria tour to celebrate the tram doing 1,000,000 miles in Ballarat. tmsv, wendouree parade, view point, million miles, tram 27 -
 Ballarat Tramway Museum
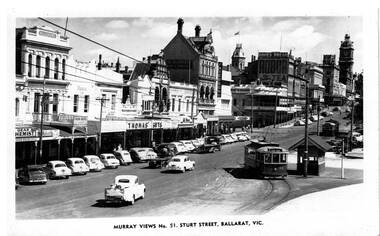
Postcard, Murray Views, Murray Views No. 51 Sturt St Ballarat, 1955c
Murray Views Postcard No. 51, of No. 30 passing the Sturt St shelter stop at Grenville St. Has Gear Chemist, Thomas's Gifts, Millegrens Union Hotel, Ballarat Gas Company, Patersons stores and on the Mechanics Institute Building, signs for Davies Bread and Robur Tea. Has another single trucker tram stored in the City Loop.Has a strong association with a Melbourne tram driver who assembled the scrap book and series of photos of Ballarat trams at the time of closure and with the collector of the 2nd card - Keith Kings.Postcard contained with Reg item 5988, a Stamford Kiwi School Scrap Book - card covers, 23 sheets, spiral bound, titled "Ballarat", prepared by Ellen Butland of Auckland following the closure of the SEC Ballarat Tramway system.In ink on rear of 2nd copy - "Ballarat No. 30 in Sturt St looking west over Grenville St, City" and the "KSK Collection" stamp.trams, tramways, ballarat, sturt st, city loop, tram 30, grenville st -
 Ballarat Tramway Museum
Photograph - Set of four black and white negatives of Ballarat trams, Warren Doubleday, 3-3-1968
Photos - 3-3-1968, of: .1 - Ballarat bogie tram 34 at Victoria St, before destination reset .2 - Tram No. 11 at the Sebastopol terminus, Albert St. Has a Twin Lakes advert. .3 - Tram No. 11 at the Lydiard St terminus, with a person and a crew member looking at the Twin Lakes sign. Tram has a roof advertisement for Briquettes. .4 - Ballarat No. 20, inbound to Lydiard St passing through the Skipton St crossing loop.Yields information about the operation of the Ballarat tramway system that was operated by the State Electricity Commission of Victoria.Set of four black and white negatives of Ballarat Tramways, 120 size. ballarat, trams, tramways, tram 34, victoria st, tram 11, sebastopol, twin lakes, briquettes, lyiard st north, tram 20, skipton st loop -
 Ballarat Tramway Museum
Photograph - Set of eight black and white negatives of Ballarat trams, Warren Doubleday, 20-4-1968
Photos 20-4-1968, of: .1 - Tram 27 crossing Albert St on its way to Sebastopol. .2 - Trams 27 and 33 at Sebastopol terminus. Tram 27 has a briquette advertisement. .3 - Reversing the pole of tram 27 at the Mt Pleasant terminus. .4 - Trams 27 and 28 cross at the Grey St loop on the Sebastopol line. .5 - Tram 20 at the intersection of Sturt and Lyons Streets. .6 - Tram 13 at the Grey St loop. .7 - Trams 27 and 13? at the Lydiard St terminus. .8 - Tram 31 westbound in Sturt Street at Dawson St with the Golden City Hotel in the background. The trackwork for the Dawson St crossover is in the view. Tram has the sign for Twin Lakes.Yields information about the operation of the Ballarat tramway system that was operated by the State Electricity Commission of Victoria.Set of eight black and white negatives of Ballarat Tramways, 120 size. ballarat, trams, tramways, sebastopol, albert st, tram 27, tram 33, briquettes, mt pleasant, grey st loop, lyons street, sturt street, tram 20, tram 13, dawson street, golden city hotel -
 Ballarat Tramway Museum
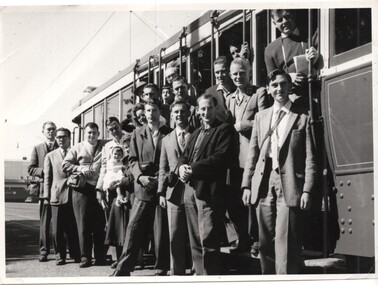
Photograph - AETA Group Ballarat - 21- 4 - 1962, The Courier Ballarat
Associated with an AETA tour during Easter 1962 of the Ballarat and Bendigo systems. In Ballarat trams 18 and 37 were used. The photo was taken in the City Loop in Sturt St at Grenville St. Photo taken on Saturday 21-4-1962 and published on Monday 23-4-1962.Yields information about the people who participated on the tour.Black and white photo of about 21 people leaning from tram 37 during the Australian Electric Traction Association (AETA) Easter meeting and Ballarat tour of 1962. See Record 5909 for associated newspaper clipping, Has the stamp of The Ballarat Courier on rear.ballarat, tours, sturt st, specials, tram 37, aeta tours -
 Ballarat Tramway Museum
photograph - Set of 3 Black & White - ESCo trams Bendigo - Easter, Peter Duckett, c1947
Set of three photographs of early Bendigo trams photographed by Peter Duckett, Easter Monday 1946 or 1947 1 - Bendigo 18 - note the white disc held by a crew member. View St at Charing Cross. Tram has the destination of City. 2 - Original car No. 9 (in final form) and open bench car, either 17 or 18, probably at Ironbark Gully loop. Tram has destination of Quarry Hill. 3 - Original ESCo cars - Charing Cross.Yields information about Bendigo trams during Easter 1946 or 1947Set of three black and white photographs by Peter Duckett.Details the image on the rear of the print in ink.bendigo, tramcars, esco, bendigo tramways, tram 18, tram 9, charing cross, easter -
 Ballarat Tramway Museum
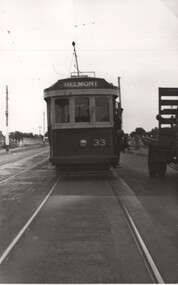
Photograph - Front of Geelong 33, Charles Craig, 29-3-1948
Photo shows the front of Geelong bogie tram No. 33, possibly at a crossing loop on the Belmont line.Yields information about the AETA's first Geelong tour in 1948 and the trams being operated on that day.Black and white photograph of Geelong No. 33tramways, trams, sec tramways, geelong, tram 33 -
 Ballarat Tramway Museum
Photograph - Colour print - tram 33 City Loop, Barry Pemberton, July 1970
Photo shows tram 33 parked in the City loop during an afternoon early to July 1970 The tram has a Twin Lakes sign and the destination of Mt Pleasant, along with an auxiliary board advertising "Alf Garnet at the Vegas 70 Cinema". In the background is the Dickins Food store and Thomas Jewellers. Note the Section Insulators above the tram on both tracks.Yields information about tram operations and advertising July 1970.Colour print - digital printed made 12/22Has notes on the rear of the print about the photographer, address and dates.tramways, tramcars, tram 33, city loop, ballarat, alf garnett, section insulators -
 Ballarat Tramway Museum
Document - Manuscript, Peter J Barry, "Signalling and Operations on the Tramway System in Bendigo", April 1990
Draft of an article with notes/additions by Keith Kiings on the signalling system and tramcar operations in Bendigo. Looks at the basic services, crossing loops, signalling, following movements (Bendigo used a white disc on the tram to indicate a following tram, Ballarat did not use this system), short workings, reversals, observations of actual workings. Includes a map drawn by Keith Kings in 1972. Published in the September 1990 issue of Somersault, by the Signalling Record Society of Victoria.Yields information about the operation of the Bendigo tramway system using the Forest City Signalling system.Six A4 pages of a draft of an article by Peter Barry and correspondence to Keith Kings re "Signalling and Operations on the Tramway System in Bendigo, April 1990.tramways, trams, bendigo, signalling, forest city, operations, crossing loops, srsv -
 Ballarat Tramway Museum
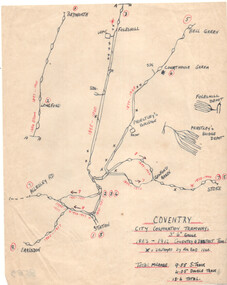
Drawing, Coventry City Corp Tramways
Wal Jack had an extensive range of correspondents throughout Australia and the world who often provided him with detailed drawings and notes on various tramway systems. Drawing shows the various lines, crossing loops, depots, routes with numbers and the location of bomb damage during 1940 air raids. The gauge of the system was 3'6". The Wikipedia reference reports that the system was closed as a result of extensive damage during the air raids. Not known who prepared the drawing.Yields information about Wal Jack's correspondents and their extensive work.Drawing - red and black ink on quarto paper, Coventry tramway system.letters, wal jack, drawings, maps, coventry, uk. -
 Ballarat Tramway Museum
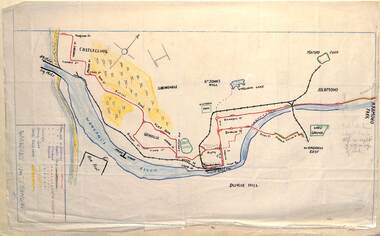
Drawing - Map or Plan, Wanganui Tramways NZ, 1945
Wal Jack had an extensive range of correspondents throughout Australia and the world who often provided him with detailed drawings and notes on various tramway systems. Drawing shows the various lines both railways and tramways, crossing loops, locations and features of the Wanganui NZ tramway system in 1945. Drawn by an unknown person; has an initial in the bottom right hand corner.Yields information about Wal Jack's correspondents and their extensive work.Drawing - red and black ink, colour pencil on foolscap paper of Wanganui Tramways NZ 1945letters, wal jack, drawings, maps, wanganui nz -
 Ballarat Tramway Museum
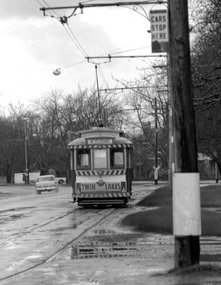
Photograph - Tram 21 Seymour St loop - Lydiard St North, late 1960s or early 1970s
Photograph shows Ballarat 21 descending the Lydiard St Hill at the Seymour St intersection, about the enter the loop. On the left can be seen a Forest City signal, and on the right part of the North Star Hotel, The tram has the destination of Sebastopol. In the background is a milk bar advertising The Sun, Herald and Peter's Ice-cream. Photographer unknown. Late 1960's or early 1970s.Yields information about tram 21 and tram services in Lydiard St North.Black and white print on paper.tramways, ballarat, lydiard st nth, seymour st, tram 21, north star hotel -
 Melbourne Tram Museum
Photograph - Candy Corner - St Kilda - opposite Luna Park - Esplanade, Early 1940s
Photograph shows the cafe and adjacent buildings on the area that was enclosed by Esplanade tram Loop or Luna Park loop. Known as "Candy Corner" on MMTB drawings and locally. The reference page 9 gives the background to the site and its use. The café was designed by Carlo Catani, who is also remembered as the landscape designer for other parts of St Kilda including Catani Gardens. It is now used by a McDonalds store. In front of the building is a board advertising or promoting World War 2 war-saving schemes for St Kilda streets. This dates the photos to early 1940s.Yields information about Candy Corner buildings Black and white photograph on paper.trams, tramways, luna park loop, candy corner, st kilda, esplanade, loops, carlo catani, world war 2, street savings scheme -
 Ballarat Tramway Museum
Slide - 35mm slide/s - set of 13, Noel Simons, 28/04/1971 12:00:00 AM
Set of 13 transparencies taken on 28/4/1971 on PAKON mounts. 1168.1 - No. 21 at City terminus - taken from North side of street. Has Boer War statue on right side and National Mutual building in the background. 1168.2 - No. 34 with destination "Sebastopol" in Sturt St., outside Town Hall, with National Mutual building in background. 1168.3 - No. 18 at corner of Sturt and Lydiard Sts with National Mutual building and Craigs Hotel in background. 1168.4 - 18 at intersection of Sturt and Dawson St. 1168.5 - No. 30 at intersection of Armstrong St and Sturt St. with Fletcher Jones building in background. 1168.6 - No. 14 at City Terminus, showing destination of "Victoria St." with Town Hall in the background. 1168.7 - No. 11 bound for Mt Pleasant, opposite Titanic Bandstand in Sturt St. Has a Twin Lakes advertisement on the front dash panel and an unknown roof advertisement. 1168.8 - No. 21 at bottom of Sturt St. approaching the Grenville St. junction, with Dickins Food Store and the Spot Cafe in the background. Tram has destination of "Victoria St". and a roof advertisement for a cigarette? company. 1168.9 - No. 26 and three other trams in City Loop, looking west along Sturt St., just after a heavy hail storm. 1168.10 - No. 21 at the intersection of Sturt St and Dawson St. with Golden City Hotel and the Ritzy Cafe in the background. Can see the Dawson St. crossover track, just after a heavy hail storm. 1168.11 - No. 21 and three other trams at City Loop looking east along the south side of Sturt St. See also image 1168i1a - cleaned up and edited by Peter Waugh April 2024 - used in the April 2024 issue of Fares Please. 1168.12 - No. 14 entering the South side of Sturt St. from Bridge St. with Dickins Store in the background and the Grenville St. shelter alongside the tram. 1168.13 - No. 37 at Sturt and Dawson St., eastbound, showing "Lydiard St. Nth" Has SEC roof advertisement on the side of the tram.1168.1 -"Sturt & Lydiard Sts" 1168.2 - "Town Hall" 1168.3 - "Sturt St & Dawson Sts" 1168.4 - "Sturt and Lydiard Sts" 1168.5 - "Sturt St." 1168.6 - "Sturt and Lydiard Sts" 1168.7 - "Sturt St." 1168.8 - "Bridge St." 1168.9 - "City Loop" 1168.10 -"Dawson & Sturt Sts." 1168.11 - "City Loop" 1168.12 - "Bridge St." All have date stamp of "28 Apr 1971" in purple ink on base. All blue ink unless otherwise noted.tramways, trams, town hall, sturt st., dawson st, armstrong st., grenville st, bridge st., titanic bandstand, tram 11, tram 14, tram 18, tram 21, tram 26, tram 30, tram 34, tram 37 -
 Ballarat Tramway Museum
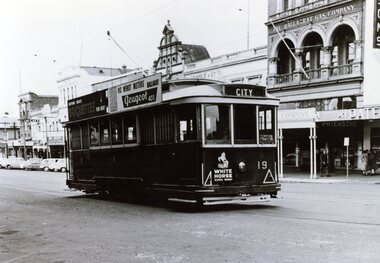
Photograph - Black & White Photograph/s, Ballarat 19 Sturt St, late 1950's or early 1960
Black and White photograph, of Ballarat No. 19, late 1950's or early 1960 in the City Loop in Sturt St. Has the median strip in the background. Tram has a roof advertisement for Castrol motor oil. Printed on Fuji-colour paper. 2nd copy added 6/1/15."TMSV Sales" stamp on rear. On rear of 2nd copy - P&M & MM J76 = BALL 19 = Bend 7.tramways, trams, sturt st, city loop, tram 19 -
 Ballarat Tramway Museum
Photograph - Black & White Photograph/s, Ballarat 19 Sturt St, late 1950's or early 1960
Black and White photograph, of Ballarat No. 19, late 1950's or early 1960 in the City Loop in Sturt St. Has the Ballaarat Gas Co building in the background along with other buildings on the south side of Sturt St. Tram has roof advertisements for Vic Wendt Motors, Peugeot 403, Briquettes SEC and a advertisement for Whitehorse Whisky on the front dash panel. Printed on Fuji-colour paper. 2nd copy added 6/1/15."TMSV Sales" stamp on rear.tramways, trams, sturt st, city loop, tram 19 -
 Ballarat Tramway Museum
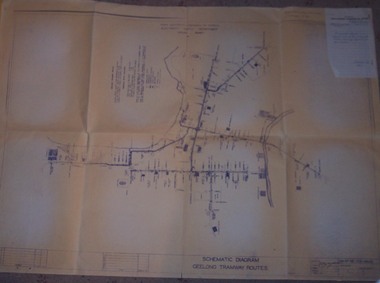
Drawing, State Electricity Commission of Victoria (SECV), "Schematic Diagram Geelong Tramway Routes", 1953
The drawing is very detailed showing streets, cross streets, route, loops, schools, woollen mills, ovals, sections, track phones, stops, route and track miles, pedestrian crossings, railway stations and notes on through route mileages.Print of a drawing showing in very good detail, the schematic layout of the Geelong Tram system. Produced in 1953 and sent to Tramway Supt. in 1970 for his records. Gives very detailed information on another SEC tramway system.Dyeline print of SEC Drawing No. GE-T13-8829, titled "Schematic Diagram Geelong Tramway Routes". Drawing prepared 27/8/1953. Stapled to the top right hand corner of the sheet is a SEC memo form from finance section, distribution services to the Dept. Tramway Superintendent, Ballarat, dated 6-2-1970 forwarding Les Denmead the plan. Was unstapled during the 1/2008 copying of the drawing. On top right hand corner of drawing, "Ballarat Tramway Preservation Society Catalogue No. 605" in ink and on rear in two places "Geelong Tramways" and one "BTPS 605"geelong, map, track layout, tram stops -
 Ballarat Tramway Museum
Photograph - Digital image Set of 2, Peter Bruce, No. 11 "Wendouree Parade", 1970s
Yields information about Wendouree Parade and the Hamilton Ave area and Sturt St West..Digital image, black and white, of No. 11, with a Twin Lakes sign running a Mt Pleasant service. .1 - In Sturt St west between Hamilton Ave and Russell St loop. .2 - In Wendouree Parade about to turn into Hamilton Ave. Note the Tram timetable on the pole on the right hand side of the photograph. Photo taken by Peter Bruce 1970's and 1971, prior to the closure of the Ballarat tramway system. Peter's Title of images: No. 11 "Wendouree Parade"trams, tramways, wendouree parade, sturt st west, mt pleasant, timetables, hamilton ave, tram 11 -
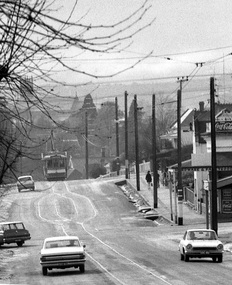 Ballarat Tramway Museum
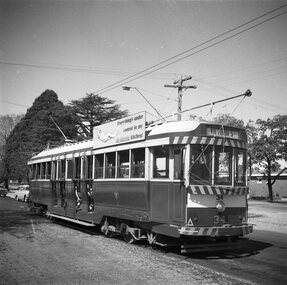
Photograph - Digital image Set of 3, Peter Bruce, Grant St Loop - Mt Pleasant, 1970s
Yields information about the Grant St Loop on the Mt Pleasant line.Digital image, black and white, series of three images of No. 31 entering, travelling through and leaving the Grant St Loop on the Mt Pleasant line. Taken with a telephoto lens at varying lengths. Has a Hardware and Fancy Goods shop on the right hand side. Photo taken by Peter Bruce 1970's and 1971, prior to the closure of the Ballarat tramway system. Peter's Title of image: "No. 31 Approach", "No. 31 into the loop" and "No. 31 leaves the loop"trams, tramways, mt pleasant, grant st, barkly st, tram 31