Showing 564 items matching "g. sides"
-
 National Vietnam Veterans Museum (NVVM)
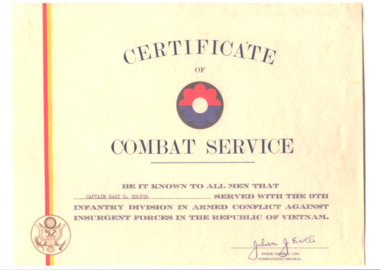
Document, Certificate of Combat Service
A copy of a Certificate of Combat Service. There is an insignia between Certificate and Combat Service. Under Combat Service reads Be it known to all men that Captain Gary G. Cooper served with the 9th Infantry Division in Armed conflict against insurgent forces in the Republic of Vietnam. Under this is the signature of Julian J Ewell - Major General USA. Commanding General Down the left hand side there is a red and yellow stripe with an US insignia near the bottom. The background of the certificate is in a beige marbled effect.certificate, certificate of combat service, united states, flt lt g.g. cooper, gary cooper (flgt lt.), 0219964, flight lieutenant, air pilots, distinguished flying cross, australian force vietnam, raaf, 9th infantry division, republic of vietnam -
 Bendigo Historical Society Inc.
Document - KOCH'S PIONEER QUARTZ MINING AND CRUSHING COMPANY, NO LIABILITY - SHARE CERTIFICATE
Koch's Pioneer Quartz Mining and Crushing Company, No Liability Long Gully Bendigo Share Certificate. Distinctive Numbers 48164 to 48213 in the name of William Grattan of St Kilda. Certificate Number 2930. Dated 7th December 1911. Signed by ?, Hugh Boyd, Directors and J. H. Craig, Manager. On the back is a map of the lease showing where the shaft is and a measurement of 450 yards from one side of the lease to the other beside the shaft. The lease is an irregular shape. Adjoining leases mentioned are Windmill Hill Co., G. Lansell's Sandhurst Mine, Cornish United Co. and the Hercules & Energetic Co. Arthur T. Walker, M. S. printed at the bottom. Albert Richardson Collectionmining, parish map, koch's pioneer, koch's pioneer quartz mining and crushing company, no liability, koch's pioneer quartz mining and crushing company, no liability share certificate, william grattan, hugh boyd, j h craig, arthur t walker, windmill hill co., g lansell's sandhurst mine, cornish united co., hercules & energetic co. -
 Lakes Entrance Historical Society
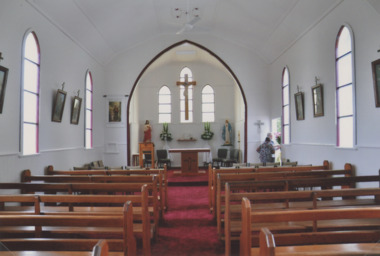
Photograph, Lakes Post Newspaper, St Joseph Roman Catholic Church Swan Reach Victoria
Reference E G Shire Heritage Study number 1236Colour photograph of interior of St Joseph Roman Catholic Church after refurbishment and re dedication built 1909 c on a rise on west side of Swan Reach Victoriareligion, churches -
 Geoffrey Kaye Museum of Anaesthetic History
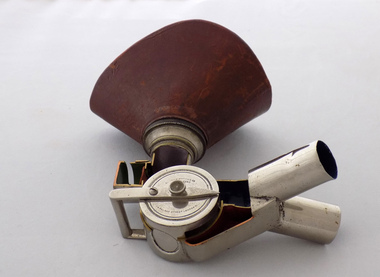
Equipment - Stopcock, Hewitt, George Barth & Co. Ltd, c. 1895
When Hewitt introduced his regulating stopcock in 1887, attempts were made to dilute the nitrous oxide with air and so obviate the element of asphyxiation. The method was to be seen in London, mainly in dentistry and minor surgery, so late as 1930. It was not very successful. To give even 10% of oxygen (which is not enough) the gas-mixture must contain 55% of air and 45% of nitrous oxide. The latter is thus so diluted by atmospheric nitrogen as to be incapable of producing anaesthesia except by asphyxiation. "Gas-air" was confined to analgesia, for example in midwifery. (Source: Penn catalogue)Brown leather facemask attached to metal inhaler and stopcock device that has been sectioned to reveal its inner workings. The various exposed channels have been painted either green, red, blue or purple.Engraved into side of stopcock: HEWITT'S / N20-02 / 1895 / G. Kaye sect. 1952. •Stamped into other side of stopcock: [indecipherable] BARTH & CO. / SOLE MAKERS / 54. POLAND STREET LONDON.W.frederic hewitt, stopcock, nitrous oxide, oxygen, gas-air -
 Geoffrey Kaye Museum of Anaesthetic History
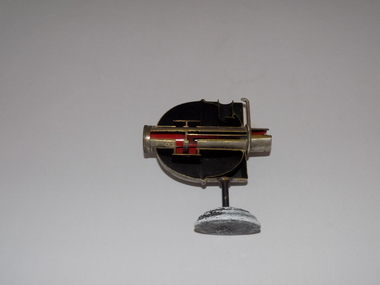
Equipment - Inhaler, Clover (sectioned)
... print on blue sticker: O.2.3. •Engraved on dome side of inhaler... side of inhaler: G. Kaye sect. 1939. Cross section of Clover's ...Dr. Joseph Clover (1825-1882), an English physician, first described his Portable Regulating Ether Inhaler on Jan. 20, 1877. Clover was an especially sought after anesthesiologist and early pioneer in the specialty. This was the best-known of many inhalers that Clover designed. The dome-shaped reservoir was turned to points on a control dial to gradually increase or decrease the percentage of the air that passed over the ether. Several inventors based new inhalers on this, while the original continued to be manufactured as late as the beginning of WWII. Dr Geoffrey Kaye sectioned equipment, enabling medical students to see the inner workings and gain insight into the engineering of the equipment.Cross section of Clover's inhaler attached to a circular metal base.Handwritten on white sticker at rear: P / 26 / B •White print on blue sticker: O.2.3. •Engraved on dome side of inhaler: G. Kaye sect. 1939.joseph clover, geoffrey kaye -
 Sunshine and District Historical Society Incorporated
Princess Mary 'Tin' - Bullet Pencil - War Service Medals, Circa 1914 -1918
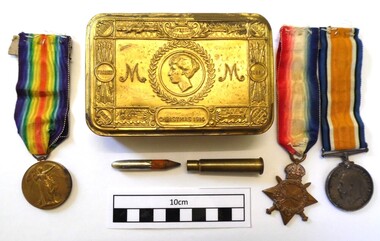
A 'Sailors & Soldiers Christmas Fund' created by Princess Mary had overwhelming response and so it was decided to give every person 'wearing the King's uniform on Christmas Day 1914' the brass tin along with a Christmas card and a picture of the princess, and items such as pipe, lighter, tobacco, and 20 cigarettes. Non-smokers and boys received a bullet pencil and a packet of sweets. Indian troops often received sweets and spices, and nurses received chocolates. Many of the items were sent separately from the boxes because of lack of space. Not all the tins could be sent out by Christmas and so those sent in January 1915 contained a New Year card. Shortage of brass meant that many did not received their tins until summer 1916, however by January 1919 some still did not receive them. After using up the contents many service people then used the tins to store small items. The brass tin, bullet pencil, and medals belonged to Pte George Nutting of the 2nd London regiment, and regimental number 2080/230442. After World War 1 George Nutting sailed for Melbourne on June 1, 1922 aboard the S.S. Borda. He then lived at several addresses in the Sunshine/Albion area including Dawson St, 32 King Edward Ave, and 15 Kamarooka St. At one stage he was involved in a window cleaning and gardening business, and both he and his wife Janet were very good dancers. George Nutting was also involved in the loyal Sunshine Lodge and was presented with a Past Grand's Collar in 1943. He lived at 15 Kamarooka St until he passed away on March 20th 1979 at the age of 85. The above information was sourced from http://www.kinnethmont.co.uk/1914-1918_files/xmas-box-1914.htm (accessed 1/3/2014), and from http://museumvictoria.com.au/collections/items/1329146/tin-princess-mary-s-Christmas-gift-1914 (accessed 1/3/2014), and from research work done by Eva and Marie of S&DHS.The Tin and Medals provide a visible historical record of the Christmas gift, and the awards that the average WW1 British service person received about 100 years ago. The bullet pencil may indicate that Pte G. Nutting was probably a non-smoker, at least around circa 1914.Brass rectangular box with an embossed and hinged lid. The lid features the profile of Princess Mary with an 'M' on each side, and the names of Britain's allies in 1914. The pencil fits into the brass bullet casing to give the appearance of a bullet. The WW1 British medals are: 1. 1914 - 1915 Star, 2. British War Medal 1914 - 1918 (Silver), 3. Allied Victory Medal.TIN: Imperium Brittanicum, Christmas 1914, Belgium, France, Servia, Japan, Russia, Monte Negro. MEDALS: 2080 Pte G. Nutting 2 - Lond.R g. nutting, princess mary tin, christmas 1914, bullet pencil, british ww1 medals, 1914 - 1915 star, british war medal 1914 - 1918, allied victory medal -
 Lakes Entrance Historical Society
Postcard - Mitchell river, Port of Bairnsdale Victoria, 1900 c
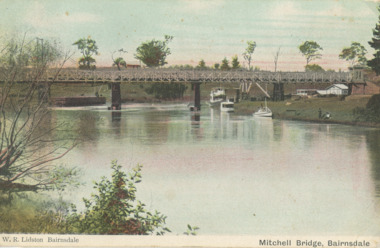
Wharf on the left side of the image was known as Top Wharf or Upper Wharf. Small house seen on eastern bank was home. Small house seen on eastern bank was home of Mr Healy Orchadist who sold fruit and grafted fruit trees. Big tree next to house was an enormous oak .Information from G ScarceTinted postcard showing first bridge over the Mitchell river, steamers and other boats at wharf on western bank known as Port of Bairnsdale Victoria. Also black and white photo of same view W.R. Lidston Bairnsdale Mitchell River Bairnsdaleboats and boating, rivers -
 Lakes Entrance Historical Society
Postcard - Mary Lydia Laughton/Correspondence, 1905
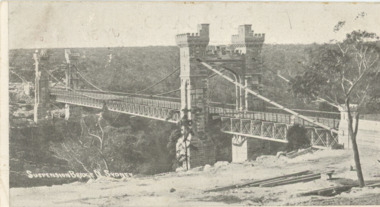
Posted 31.7.1905 from N. S. W. to Miss Laughton Kalimna Lakes Entrance Victoria Message says Please keep this card for my collection am getting a few more Yours GBlack and white postcard of suspension bridge North Sydney showing bushland in distance Sydney Australia.Plus second photo showing details of message on rear side.city, correspondence, hobbies, hotels -
 Bendigo Historical Society Inc.
Document - CURNOW COLLECTION: BUSINESS CHEQUES, 1920's
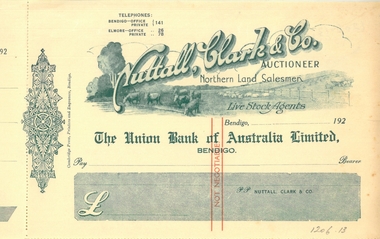
Collection of new (unused) business cheques, generally two per page; with perforation on LH side for cheque butt. A. G. D. Guthrie & Co. Pty Ltd; b. A. Meuers Pty Ltd; c. F. A. Howard Pty Ltd.; d. E. R. Draper; e. Potter Bros.; f. Foggit Jones Ltd.; g. Bendigo Lyric Photo Plays Limited; h. Ellis Nuttall; I. Cocking's, Bendigo (Esanda Bank, Bendigo); j. Farmers and Citizens Trustees Company; k. Nuttall, Clark & Co.person, individual, curnow collection, cheques -
 Bendigo Historical Society Inc.
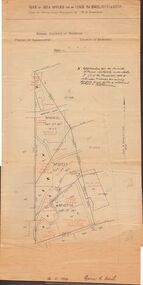
Document - MCCOLL, RANKIN AND STANISTREET COLLECTION: PLAN OF AREA LEASE 10425, 10733 AND 10734, 1934
Plan of area applied for on lease No 10425, 10733 and 10734. Applied for by Mr. R.A. Rankin. Plan shows Marong Road, state school site ; leases held by H.E. Kronk, Francis Gramann; T. Wearne; C.E. Foggitt; A. Pitcher, Crown land and Aur. licences also marked. Lease numbers marked on plan. Map signed on bottom by Garnet G. Birch on 26.11.1934. On top Rh side in black pen " applications for the Minister of Mines Authority under section 5 (1) of the Mines Act 1928 to enter upon and occupy for mining purposes such portion of allotments lodged on 19/2/35'gold, mining, lease, mining, leases, kronk, garnet g. birch -
 Bendigo Historical Society Inc.
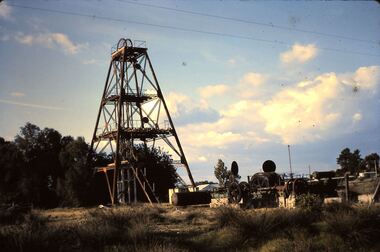
Slide - HORWOOD COLLECTION: NAPOLEON, c1850s
Napoleon mine was in Woodward Road, Golden Square.Horwood Collection. Napoleon Mine Woodward Road Golden Square. Air compressor along side. Markings:Napoleon Ward Ward Rd. G Square. Poppet head on LH side of image. Power lines evident in top of image.Kodakmine, gold, napolean, horwood collection. napoleon mine woodward road golden square. air compressor along side -
 Flagstaff Hill Maritime Museum and Village
Letter - William Ferrier, 14th November 1905
The letter to William Ferrier of South Warrnambool from the Prime Minister and the Parliament of the Commonwealth recognised the significance of William’s brave and courageous lifesaving act to the people of Australia; “They all feel that your conduct was worthy of the best deeds done by British sailors in the past and they are proud to know that Australia can produce such as you.” The story of that brave rescue follows on below … The ship from which the sailors were rescued was the three-masted, iron and steel barquentine the La Bella, built in Norway in 1893. She was one of two iron and steel ships by Johan Smith, The company was one of the leading shipping families in Tvedestrand, Norway. She was significant to Norwegian shipping, being one of only 27 iron and steel ships ever built in Norway. She was registered in New Zealand and engaged from 1902 in inter-colonial trading of timber in the Pacific, between New Zealand and Australia and was often in Port Phillip Bay, Victoria. On 5th October 1905, the twelve-year-old La Bella left Lyttleton, New Zealand carrying a cargo of timber bound for Warrnambool, Australia. She was manned by a crew of twelve: the Master, (Captain Mylius, previously 1st Mate of La Bella, appointed Captain to La Bella on 6th February 1903) 2 Mates, Cook, six able seamen, one ordinary seaman and a boy. Bad weather en route caused her to shelter at Burnie on Tasmania's North West coast. On November 10th, the 37th day of her journey, La Bella approached Warrnambool. Captain Mylius steered her towards Lady Bay Channel in heavy south-west seas and evening mist. He ordered the helmsman to steer for the light. As the ship came round, a tremendous sea struck her on the port quarter, causing her to breach broadside in a north-westerly direction into breakers. The helm was brought round twice more, but each time heavy seas broke over her, the third time throwing the La Bella on to a submerged reef in Lady Bay now known as La Bella Reef (about 100 yards from the Warrnambool breakwater). The sea was so rough that it even wrenched a one-and-a-half ton anchor from its fastenings and into the sea. As Captain Mylius headed to the steel wheelhouse, intending to send up a rocket flare, a huge sea slammed the steel door into him (resulting in massive bruising front and back) Despite his injuries he still managed to set off a blue light, which he held up in his hands. La Bella’s lifeboats were filled with seawater and broke up on their chocks. The blue light was the first indication to people on the shore that there was a ship in distress. The Harbour Master, Captain Roe (who lived in the Harbour Master’s House opposite Flagstaff Hill), organised a group of volunteers to crew the lifeboat because the trained crew was unavailable; the crewmen were working on a steamer in Port Fairy at the time. He then poured oil onto the water to try and smooth the sea. At around 11 pm three of the crew took shelter in the steel forecastle but the sea crashed into it and broke it up. While the rest of the crew and onlookers watched helplessly in the moonlight the bodies were washed away into the sea, never to be seen again. Some of the crew lashed themselves to the weather rail to keep from being washed away. Watson, the ordinary seaman, became tangled in the rigging lines and was too weak to move, so the 2nd Mate, Robertson, put a line onto him so that he wouldn’t wash off. Around 11 pm three of the crew were unconscious from exhaustion. The situation on La Bella was becoming dangerous. The 2nd Mate moved to the ‘house’ and soon afterwards the ship slipped in the heavy sea. The lashings of the 1st Mate and the ‘boy’ Denham had kept them safe until about 2 am when they were washed overboard; no one was able to help. One by one, the exhausted crew were being washed overboard, too weak to hold on any longer. During the night the La Bella had broken into two and the deckhouse ran out towards the sea. Two more men drowned when trying to reach the lifeboat. By sunrise, the only survivors of the twelve were the Master, 2nd Mate and three seamen. Early in the morning, Captain Roe used the rocket apparatus on shore to try and shoot a line to the ship for a safer rescue but each attempt fell short of the target. Several attempts were made by the lifeboat to rescue the stricken sailors, but the rough conditions made this difficult for the boat to get close enough to the ship and the lifeboat had to return to shore. During a final attempt to reach the ship Captain Mylius ordered his men to jump into the sea. Leonard Robertson, 2nd mate, jumped and swam towards the lifeboat, taking hold of the boat hook offered to him. Oscar Rosenholme managed to reach the boat floating on a piece of timber from the ship’s load and a third survivor, Noake, also made the boat. Along with the lifeboat rescue crew, 25-year-old William Ferrier rowed his small dingy through the heavy seas and managed to rescue the Captain, whom he landed on the breakwater. Ferrier then returned to the ship to attempt a final rescue, losing his oars and rowlocks into the high sea. Using just a spare paddle he skulled towards the La Bella, reaching her stern in time to cut loose the lone surviving sailor, Payne, from the lashing that held him to the ship; the terrified sailor dropped from the ship and into the dingy. Shortly after the last man was rescued, the La Bella was lifted by a huge wave and crashed back down on the reef; she broke up and sank. The ordeal had lasted ten hours. The survivors were taken to the nearby Bay View Hotel and gratefully received warm food and clothing, medical attention and a place to sleep. In the following days, an unidentified body of a young person has washed ashore; it was either Watson or Denham. The body was buried in the Warrnambool cemetery with an appropriate gravestone and inscription. William Ferrier became a national hero as news of the daring rescue spread. In recognition of his bravery in the two daring rescues, he was awarded the Silver Medal for Bravery by the Royal Humane Society and was honoured in the letter from the Prime Minister and the Parliament of the Commonwealth, telegrams and a cheque for £20 from the Governor-General, over £150 subscribed by the public, including Warrnambool and district and readers of The Argus, and a gold medal from the Glenelg Dinghy Club of South Australia. Ferrier’s rescue efforts are one of the most heroic in Victoria’s shipwreck history. (William Ferrier’s son, Frank, received a similar award almost fifty years later when he helped rescue four members of the crew on the yacht Merlan after it ran on to a reef near the Point Lonsdale Lighthouse. ) The wreck of La Bella now lies on her port side in 13 metres of sheltered water inside the reef she struck. The bow section is relatively intact and part of the stern has drifted north-easterly towards the mouth of the Hopkins River. The reef the La Bella struck now bears its name. Those five rescued from the La Bella were Captain George Mylius, Leonard Robertson (2nd Mate, 21 years old), R. Payne, Oscar Rosenholme and Jack Noake. Those seven who lost their lives were Mr Coulson (1st mate), Charles Jackman (cook) Gustave Johnson, Pierre Johann and Robert Gent (all able seamen), Harry Watson (ordinary seaman) and Jack Denham (ship’s boy), Captain Mylius was found guilty of careless navigation; he had sailed into the bay without the services of a pilot. His Master Certificate was suspended for twelve months. Later he was also charged with the manslaughter of one of the crew who had died when the La Bella was wrecked but found not guilty. The event’s adverse publicity and damage to his career took a toll on his health and he died of a heart attack six months after the wreck; he was only thirty-seven. His body was buried in the Melbourne General Cemetery. The La Bella was “the best documented of all sailing ships owned in New Zealand”. Her record books, ship logs, correspondence and supporting papers are still available. At the time of the tragedy, she was owned by Messers David C.Turnbull and Co. of Timaru, New Zealand timber merchants and shipping agents, who had purchased her on 13th December 1901. A detailed account of the last journey of La Bella can be read in “Leonard Robertson, the Whangaroa & La Bella” written by Jack Churchouse, published in 1982 by Millwood Press Ltd, Wellington, NZ. As well as this letter, Flagstaff Hill’s La Bella Collection includes a photograph of the wrecked La Bella, a brass rail holder and a postcard of William Ferrier with four of the survivors. Some 15 – 17 ships are believed to have sunk in Lady Bay, but only two have been discovered on the seafloor; the “La Bella” and the “Edinburgh Castle”. Both wrecks are popular diving sites and are preserved as significant historical marine and marine archaeological sites. This original congratulatory letter sent to William Ferrier by the Prime Minister and Government of Australia demonstrates the importance attached to his efforts for Victoria and to Australia. The letter is part of the La Bella Collection and is significant at both a local and state level. Its connection to the La Bella shipwreck and the rescue of five survivors highlights the dangers of Victoria’s Shipwreck Coast. The letter to William Ferrier from the Australian Government acknowledges the bravery of ordinary Australians who risked their lives to save victims of shipwrecks along the coast. The letter is significant to the history of Warrnambool as it honours William Ferrier, a local fisherman whose descendants continue to live in the area. It highlights the way of life of people who lived in coastal towns in 19th century Victoria and the effects of shipwrecks upon them. The letter connects to the postcard of William Ferrier with four of the five rescued crew, the photograph of the wreck of the La Bella and the artefact from the wreck, the rail holder. This letter is significant because of its association with the sailing ship “La Bella”. The “La Bella” is of local and state and national significance. It is one of the only two shipwrecks discovered in Lady Bay, Warrnambool, out of the 15-17 shipwrecks in the bay. Letter to William Ferrier of South Warrnambool from the Prime Minister and Members of Parliament commending him on his bravery. The printed letterhead includes a coat of arms in the top centre and the official address. The letter is very neatly hand written in black pen and includes 4 signatures of Members of Parliament. The rectangular paper is cream coloured with some yellow/brown discolouring. It has the letterhead on the right hand side of it and the written letter begins below the letterhead. The paper has been folded so that the right side becomes the cover page of the letter. The writing is continued onto the inside right hand page of the folded paper and the writing ends here. There is more recent writing on the bottom right hand corner of the back page. The paper has been officially folded in half a total 3 times and there is heavy discolouration on the sections that form the front and back of the folded letter. There is a 4th fold line that is less pronounced that the other folds and would make the paper the size to fit into a pocket. At several fold creases the paper has worn through. The edges of the paper have minor tears. The printed coat of arms is that of the House of Representatives. Underneath is printed “The Parliament of the Commonwealth, / Parliament House / Melbourne”. The hand written, letter is dated “14th November, 1905” and addressed to “Mr. William Ferrier / South Warrnambool” The letter begins “The Speaker, the Prime Minister and Members of the Ministry and its supporters, the Leader and Members of the Opposition, the Leader and Members of the Labour Party, being all the Members of the House of Representatives of the Federal Parliament of Australia” … It continues “desire to express to you their appreciation of your bravery in skulling out to the wreck of the “La Bella” at Warrnambool on Saturday, 11th November, 1905, and recovering therefrom two of the crew who were in imminent danger of their lives. They all feel that your conduct was worthy of the best deeds done by British sailors in the past and they are proud to know that Australia can produce such as you.” The letter is “Signed on behalf of the Members – Speaker (Frederick Holder ), Deputy Leader of the Opposition (Joseph Cook ), Prime Minister (Alfred Deakin), Leader of the Labour Party ( J.C. Watson)” On the back of the letter is blue ink handwriting “OWNER / G. FERRIER / TO. BE. PHOTOGRAPHED / 27-4-76”la bella, william ferrier, bill ferrier, lady bay, 1905, 10th november 1905, 11th november 1905, parliament of the commonwealth, prime minister, australian government, new zealand, flagstaff hill, warrnambool, shipwrecked coast, flagstaff hill maritime museum, maritime museum, shipwreck coast, flagstaff hill maritime village -
 Bendigo Military Museum
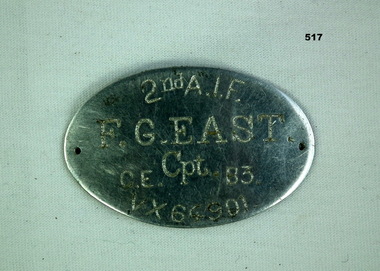
Accessory - IDENTITY DISCS, 1941
Frederick George East served WW1 and WW2. Refer 537 medals for service history also 516.7, 538.2.Personnel Identification tag , aluminum, oval shaped with 2 small holes for attachments. inscribed on both sides.Front: "2nd AIF, F. G. East CE Cpt. B3 VX64901" Rear: "P 2147 Wife Rita Sons Ivan and Norman"personal effects - identification, accessory -
 Melbourne Tram Museum
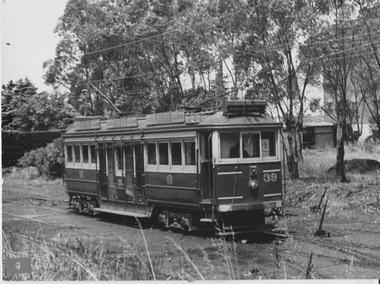
Photograph - VR tram 39
Photograph shows bogie car VR tram 39 with destination Elwood Depot, most likely on an outside track in the depot yard. The tram sits at a turnout surrounded by vegetation with trolley pole raised and all weather blinds down on the off-side. Male with hat ,perhaps workshop staff, appears to be in driver cabin. Yields information of Railways tramcar 39 and Elwood Depot Black and white photograph with letter G showing in lower left corner of print from previous collection. No notes on rear.victorian railways, elwood depot, vr tram 39 -
 Clunes Museum
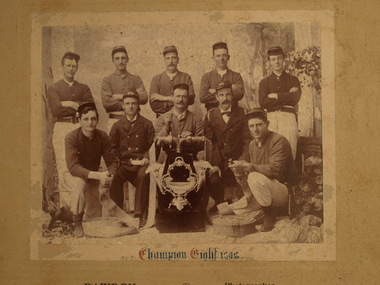
Photograph, CHAMPION EIGHT 1902, 1902
CLUNES FIRE BRIGADE WON THE CHAMPION EIGHT COMPETITION IN 1902. THEY WERE AWARDED A TROPY WHICH IS A FLUTED VASE ON A SILVER BASE WITH ORNATE FRAME HOLDING VAS AND TWO FLUTED TRUMPET VASES EITHER SIDE..1 COPY OF PHOTOGRAPH OF CLUNES FIRE BRIGADE CHAMPION EIGHT 1902 TEAM MEMBERS : W. POWER, B. HAWKS, M.C. CROWTHERS, G. PEARCE, ? MCKENZIE, F. MILES, G. HAY, ? MCKENZIE, P. KEMPSON, B. FEATONBY. .2 SEPIA COPY OF ABOVE, WITH INSCRIPTION ''CHAMPION EIGHT 1902'' .3 COPY OF SEPIA PHOTOGRAPH .4 ORIGINAL BLACK AND WHITE PHOTOGRAPH MOUNTED ON CARDBOARD .5 SEPIA COPY OF PHOTOGRAPH IN AN ORNATE WOODEN FRAME .4 CHAMPION EIGHT 1902 - BAWDEN PHOTOGRAPHER CLUNESlocal history, photography, fire brigade, trophy, champion eight, 1902 -
 Stawell Historical Society Inc
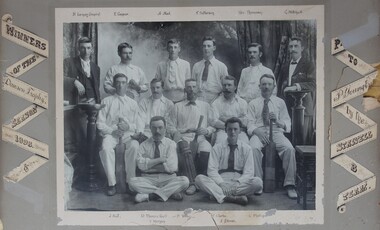
Photograph, Stawell Cricket Club Team with names 1898
Cricket Players Winners of Dawson Trophy 1898B/W Group Portrait of a group of males in three rows most weraing cricket whites. second from left back row is holding a cricket ball ist left centre row is holding a cricket bat. 3 left centre row is holding a bat and wearing pads far right is also holding a bat.On The Left Side: Winners of the Dawson Trophy Season 1893 & On The Right Side: P(resented) to P Young E(sq) by the Stawell B Team Top of Photo: H.Lemon ( Umpire), E Cooper, A Neil, T Patterson, Rev Thompson, G Mitchell. Bottom of Photo: J Neil, D Thomas (capt), P Young, F Clarke, L Phillips T. Morgan J Stuart stawell sport -
 Ballarat Tramway Museum
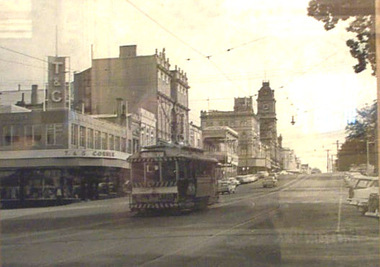
Photograph - SECV Ballarat 12 Sturt St at City Loop, John Phillips, 1968
Photo of Ballarat No. 12 with destination of Victoria St., westbound in Sturt St, passing the City Loop. No. 12 has a "Twin Lakes" sign on the back of the tram. In the background is the T&G Assurance Society building, the Vegas cinema and other buildings on the south side of St. St. See item 407 for a laminated print.Yields information about the vicinity of the Sturt St city loop and the buildings on the south side of Sturt St.Black and White photograph mounted on heavy cardboard backing with velcro dots on rear.trams, tramways, sturt st, city loop, town hall, tram 12 -
 Ballarat Tramway Museum
Photograph - SECV Ballarat 12 Sturt St at City Loop, John Phillips, 1968
Photograph of No. 12 heading up Sturt St. hill, passing City loop. Tram fitted with large white stripe, Twin Lakes sign under headlight. Destination showing Victoria St. Many Holdens in photograph and some Ford motor cars. Good photo of buildings on south side of Sturt St. at the time, T&G corner building in photo. See also item 2021 for another print.Yields information about the vicinity of the Sturt St city loop and the buildings on the south side of Sturt St.Black and white photograph, laminated.trams, tramways, ballarat, sturt st., city loop, tram 12 -
 National Vietnam Veterans Museum (NVVM)
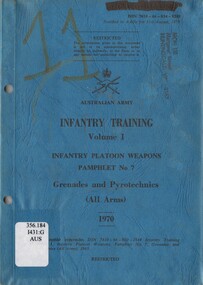
Booklet, Australian Army, Australian Army: Infantry Training, Volume 1, Infantry Platoon Weapons, Pamphlet No. 7: Grenades and Pyrotechnics (All Arms) (Copy 2) 1970, 1970
A blue coloured cardboard cover with black information on the front. Top right hand corner there is a black thick line and under this reads DSN 7610-66-034-9289. There is also the number 11 handwitten near the top left hand side.Under the Australian Army Insignia are the details of the booklet. There are two punch holes down the left hand side and the booklet is cover with a plastic cover which has a white sticker on it with 356.184 1432:G AUS on it. Amendment List No 1 is inside the booklet.booklet, australian army, infantry training, infantry platoon weapons, grenades and pyrotechnics -
 Trafalgar Holden Museum
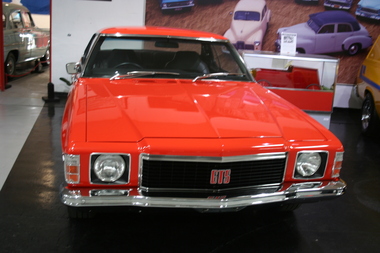
Vehicle - Holden HJ Monaro
Updated and improved version of the previous HQ model, with wrap around light fixtures, front and back, and a more pronounced grilleManufactured and sold by G M H.Holden HJ model 2 door GTS coupe, Mandarin red, black vents on both front mudguardsGTS insignia on front Grille, Monaro name both front quarter panels, GTS insignia both rear quarter panels as well as on RHS of boot lid. 5 Litre on boot lid left hand side.monaro, 2 door, coupe, holden gts -
 Flagstaff Hill Maritime Museum and Village
Document - Ticket, voyage, P & O Branch Service, P & O, Australia via The Cape Service, Bef.3rd June 1929
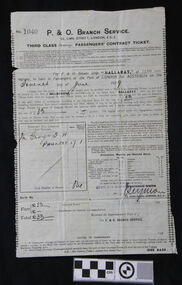
The bearer of this ticket was George Thomas Henry Phillpot, who was only 17 years old when he sailed on the S.S. Ballarat (II), built in 1921. (The first S.S. Ballarat was built in 1911 and sunk after being hit by a torpedo in 1917 while serving during WWI). George relates his trip from England to Australia, summarised as follows: He caught a bus from Bolton to Manchester, in the north west U.K., then the train from Manchester to London and the boat train to Tilbury Docks (near Gravesend). On the morning of June 7th 1929, the ship S.S. Ballarat sailed down the Thames estuary and into the English Channel. The next port of call was Southampton, UK, to take on board some technical equipment. The S.S. Ballarat then sailed through the Bay of Biscay. Instead of taking the customary route around the Cape of Good Hope, this trip, on her maiden voyage, was through the Suez Canal. She sailed through the Straits of Gibraltar, into the Mediterranean Sea and on to Malta, where George and others paid a local boat owner to take them ashore for a short time. They then sailed to Port Said, stopping to load cargo, then at night through the Suez Canal. They woke up early the next morning to watch the locals working on the banks of the canal. The excessive heat on board the ship caused much illness. As they travelled through the Red Sea, the heat and the smell of oil also caused sickness. On they went through the Arabian Sea to Colombo, the capital of Sri Lanka (which at that time was called Ceylon). A Navigation Slip, donated together with this ticket, shows the coordinates for a location 16 miles from Colombo. They again went ashore for a meal at four-pence a head and a bottle of lemonade for a penny. George and another passenger walked to the slums area and were shocked at the state of it compared to Britain’s slums. They then sailed via the Indian Ocean to Fremantle, stopping again for goods to be unloaded. While ashore, they played a game of soccer against the ship’s crew. Then on to Port Adelaide via the Great Australian Bight. Here they shopped for suitable clothing under the advice of some Australian passengers. They then arrived at Port of Melbourne on July 20th 1929, and two days later (on George’s mother’s birthday). George left for Warrnambool. He received his Citizenship Award in 1971. He conducted an electrical retail business in Liebig Street for many years. His son William became principal of the accounting business Sinclair and Wilson, on the retirement of Bill Sinclair, and was actively involved in support of many community organisations. His daughter-in-law, Glenys Phillpot, is actively involved in the Warrnambool community and local government. George was one of 3 orphans on the S.S. Ballarat. (The daughter and son-in-law of one of the other orphans also live in Warrnambool.) Herbert B.G. Larkin, whose rubber-stamped name appears on the ticket, later migrated to Australia and passed away in NSW in 1944. Of Historical Significance, this ticket is for the ship’s maiden voyage via the Suez Canal route (previously the ship travelled via the Cape of Good Hope). It is also the only existing ticket for the "S.S. Ballarat"(3rd) in our collection. Socially, it shows the fare, luggage restrictions, conditions and weekly provisions for a third-class passenger’s voyage from London to Melbourne, which has research potential. This ticket is also of significance to the Local Community, giving the background of the ancestor of a local family. It was also of Personal Significance to the bearer as he kept and preserved it in his possession for at least 46 years before donating it to our museum, together with a Navigation Slip, a map and a summary of his journey to Australia.Third Class steerage Passenger’s Contract Ticket, accompanied by the Navigation Slip, for passage on board the P & O line’s steamer, S.S. Ballarat, to Australia via the Cape Service, from Port of London to Port of Melbourne. The ticket contract is printed on both sides of a thin paper page. The documents have been completed by hand, and the pages have creases as though they have been folded. Details include the date of sailing, amount paid, and the signature of the P & O Branch Service’s representative. The contract ticket lists weekly provisions for the voyage, a disclaimer of the shipping company, a list of dangerous goods not to be carried on board, and fines. The page has straight edges, top and bottom, and perforated edges on the sides; some perforation holes are complete. A small fleur de lies is printed along the inside of each perforation, forming a decorative left and right border. Stamps and inscriptions are on the contract ticket and navigation slip, which also has a black and white photo of a steam ship.The ticket has been stamped in black, No. ‘1040’. Handwritten details are in black pen and ink. Date of departure: ‘Seventh June [192]9’ for the cost of,’33’ [poind], and the sum of ‘33’ pounds is acknowledged as received. ‘Mr George T.H. PHILLPOT’, the age is written as ‘17’, equal to the status of ‘1’ adult, the total number of persons is ‘One’. The fare is handwritten in pen £’33’ and the total £’33’. It has a purple stamp ‘HERBT. B G LARKIN’ and a crossed out stamp ‘FREDERICK WHITE, A handwritten signature ‘_Seymore’. Under the signature, the date is stamped ‘3 JUNE 1929’.warrnambool, shipwrecked coast, flagstaff hill, flagstaff hill maritime museum, maritime museum, shipwreck coast, flagstaff hill maritime village, s.s.ballarat, phillpot, 7 june 1929, george phillpot, george t.h. phillpot, third class passenger, steerage passenger, herbert b g larkin, ticket, voyage, p & o, australia via the cape, cape of good hope, suez canal, passengers’ contract ticket, navigation slip, s.s. ballarat, steamship, 1929, 3-6-1929, 7-6-1929, third-class, steerage, port of london, port of melboune, 33 pounds, george thomas henry phillpot, herbt. b g larkin, _seymore, bolton, manchester, english channel, southampton, bay of biscay, straits of gibraltar, maritia, port said, arabian sea, colombo, sri lanka, ceylon, indian ocean, fremantle, port adelaide, citizenship, 1971, herbert b.g. larkin, s.s. ballarat ii, -
 Ballarat Tramway Museum
Document, "Visit of Inspection Geelong Power Station", 11/1926
Typed extract from a The Melbourne Electric Supply Co. Ltd report on the visit to the Geelong Power Station by the Members of the Rotary Club of Geelong on 30/11/1926. Gives an itinerary, list of demonstrators and guides, extensive details of the power station equipment, notes on the tram depot, maintenance equipment, offices, facilities and Operations. Names listed: S Watson, Miss Cant, C McIntosh, R Norris, W Grundell, C Nairn, J Blake, A Milne, G Clarke, T Thomas, D Peddie, H Humphries, F Ponting, A Mollard, E Boyd, H Jeffries, D Davies, C Bennett, R Wilmot, J Wilks, E Williams.Yields information about the Geelong Power Station tour in 1926.Document - 13 quarto typed sheets, was stapled in top left hand corner. Has five punch holes on the left hand side.tramways, mesco, geelong, tours, geelong power station, rotary -
Ballarat Tramway Museum
Document, "Electric Supply", 10/1923
Typed extract from "Industrial Geelong", titled "Electric Supply", following a visit by the Institution of Civil Engineers 30/10/1923 compiled by G R King, Principal of the Gordon Institute of Technology. Describes the power station, its equipment, the size of the various components, capacities, the tramway rolling stock, track construction, and the mains and installation sections of MESCo.Yields information about the Geelong Power Station and MESCo operations in 1923.Document - 2 quarto typed sheets, stapled in top left hand corner. Has five punch holes on the left hand side.tramways, mesco, geelong, tours, geelong power station -
 Melbourne Tram Museum
Photograph - X1 class tram No. 467, G Rush, 30/1/1962
Photograph shows a rear view of X1 class tram No. 467 southbound turning from Irving St into Nicholson St, operating a service to the Williamstown Rd and Somerville Rd terminus.The destination blind shows 'Williamstown Rd' and many passengers are aboard. A number of shops and motor cars can be seen either side of the double tracks. This photograph was taken about six weeks before all three Footscray lines were closed on 10 March 1962.Yields information about X1 class 467 and the final weeks of the Footscray lines/Black and white print with note on rear.In pencil: "G Rush photo. 30 Jan 1962. Nicholson & Irving Street [sic] Footscray."destination blind, x1 class, williamstown rd, nicholson st, somerville rd, irving st, 467