Showing 860 items
matching hawthorn bridge
-
 Kew Historical Society Inc
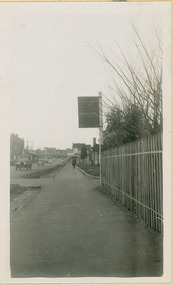
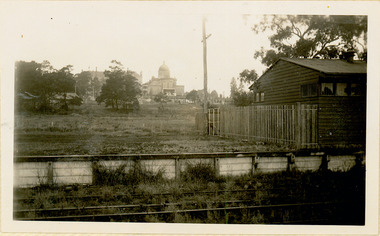
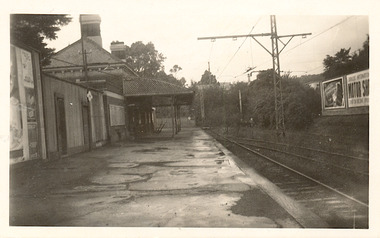
Photograph - Kew Railway Station: Denmark Street entrance, 1952, 1952
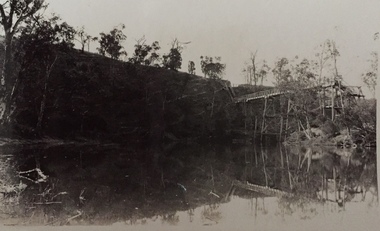
The Kew railway was opened in 1887, and diverged from the main (Box Hill–Lilydale) line about half-way between Hawthorn and Glenferrie. From the point of divergence the line was slightly less than one mile long, and it had only one intermediate station — Barker. There were four road over-bridges and two level crossings, including one over the busy Barkers Road. The line supported a passenger and goods service, and was electrified in December 1922, at the same time as the main line to Box Hill. There were a number of peak hour services which ran from Flinders Street station (Melbourne) to Kew, but in 1938 all but one of these were diverted to the Ashburton line, where traffic was growing. This had an adverse effect on Kew traffic, as passengers from Kew needed to cross over a footbridge at Hawthorn to change trains, and the main line trains were usually already crowded by the time they reached Hawthorn. At about the same time the off-peak trains were replaced by road buses. In 1952 all passenger trains were withdrawn, but the road bus service continued for many years. Goods trains were finally withdrawn in 1957, and the railway was dismantled in 1958-59. (Source: Frank Stamford, 'The Hawthorn - Kew Railway')Small black and white snapshot of the entrance to Kew Station from Denmark Street in 1952. The photograph, one of 12, is part of a larger album of newspaper clippings, timetables, tickets and photos relating to the Kew Railway Line, taken and compiled by Lachlan Richardson, while a resident of Kew. The album dates from the 1950s. The album is part of a larger subject file on the Kew Line, compiled over time by members of the Kew Historical Society.kew railway line, transport -- railways -- kew (vic.), kew branch line, kew railway station -
 Kew Historical Society Inc
Photograph - Kew Station 22/4/51, F3, 1952
The Kew railway was opened in 1887, and diverged from the main (Box Hill–Lilydale) line about half-way between Hawthorn and Glenferrie. From the point of divergence the line was slightly less than one mile long, and it had only one intermediate station — Barker. There were four road over-bridges and two level crossings, including one over the busy Barkers Road. The line supported a passenger and goods service, and was electrified in December 1922, at the same time as the main line to Box Hill. There were a number of peak hour services which ran from Flinders Street station (Melbourne) to Kew, but in 1938 all but one of these were diverted to the Ashburton line, where traffic was growing. This had an adverse effect on Kew traffic, as passengers from Kew needed to cross over a footbridge at Hawthorn to change trains, and the main line trains were usually already crowded by the time they reached Hawthorn. At about the same time the off-peak trains were replaced by road buses. In 1952 all passenger trains were withdrawn, but the road bus service continued for many years. Goods trains were finally withdrawn in 1957, and the railway was dismantled in 1958-59. (Source: Frank Stamford, 'The Hawthorn - Kew Railway')Small black and white snapshot of Kew Railway Station, looking south to Barker Station. The photograph, one of 12, is part of a larger album of newspaper clippings, timetables, tickets and photos relating to the Kew Railway Line, taken and compiled by Lachlan Richardson, while a resident of Kew. The album dates from the 1950s. The album is part of a larger subject file on the Kew Line, compiled over time by members of the Kew Historical Society.kew railway line, transport -- railways -- kew (vic.), kew branch line, kew railway station -
 Kew Historical Society Inc
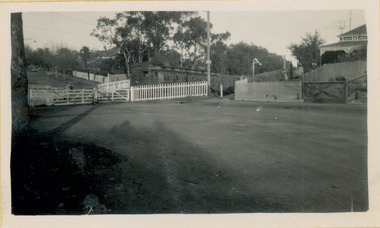
Photograph - Kew Branch Line : The Hawthorn Grove crossing, August 1952, 1952
The Kew railway was opened in 1887, and diverged from the main (Box Hill–Lilydale) line about half-way between Hawthorn and Glenferrie. From the point of divergence the line was slightly less than one mile long, and it had only one intermediate station — Barker. There were four road over-bridges and two level crossings, including one over the busy Barkers Road. The line supported a passenger and goods service, and was electrified in December 1922, at the same time as the main line to Box Hill. There were a number of peak hour services which ran from Flinders Street station (Melbourne) to Kew, but in 1938 all but one of these were diverted to the Ashburton line, where traffic was growing. This had an adverse effect on Kew traffic, as passengers from Kew needed to cross over a footbridge at Hawthorn to change trains, and the main line trains were usually already crowded by the time they reached Hawthorn. At about the same time the off-peak trains were replaced by road buses. In 1952 all passenger trains were withdrawn, but the road bus service continued for many years. Goods trains were finally withdrawn in 1957, and the railway was dismantled in 1958-59. (Source: Frank Stamford, 'The Hawthorn - Kew Railway')Small black and white snapshot of the Hawthorn Grove crossing, August 1952. The photograph, one of 12, is part of a larger album of newspaper clippings, timetables, tickets and photos relating to the Kew Railway Line, taken and compiled by Lachlan Richardson, while a resident of Kew. The album dates from the 1950s. The album is part of a larger subject file on the Kew Line, compiled over time by members of the Kew Historical Society.kew railway line, transport -- railways -- kew (vic.), kew branch line, hawthorn grove -- hawthorn (vic.), railway crossings -
 Kew Historical Society Inc
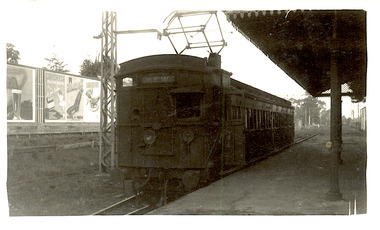
Photograph - Seven Carriage Train at Barker Station, 1952
The Kew railway was opened in 1887, and diverged from the main (Box Hill–Lilydale) line about half-way between Hawthorn and Glenferrie. From the point of divergence the line was slightly less than one mile long, and it had only one intermediate station — Barker. There were four road over-bridges and two level crossings, including one over the busy Barkers Road. The line supported a passenger and goods service, and was electrified in December 1922, at the same time as the main line to Box Hill. There were a number of peak hour services which ran from Flinders Street station (Melbourne) to Kew, but in 1938 all but one of these were diverted to the Ashburton line, where traffic was growing. This had an adverse effect on Kew traffic, as passengers from Kew needed to cross over a footbridge at Hawthorn to change trains, and the main line trains were usually already crowded by the time they reached Hawthorn. At about the same time the off-peak trains were replaced by road buses. In 1952 all passenger trains were withdrawn, but the road bus service continued for many years. Goods trains were finally withdrawn in 1957, and the railway was dismantled in 1958-59. (Source: Frank Stamford, 'The Hawthorn - Kew Railway')Small black and white snapshot of a seven carriage train approaching Barker Railway Station. The photograph, one of 12, is part of a larger album of newspaper clippings, timetables, tickets and photos relating to the Kew Railway Line, taken and compiled by Lachlan Richardson, while a resident of Kew. The album dates from the 1950s. The album is part of a larger subject file on the Kew Line, compiled over time by members of the Kew Historical Society."Seven Carriage Train at Barker Station"kew railway line, transport -- railways -- kew (vic.), barker railway station, kew branch line -
 Kew Historical Society Inc
Photograph - Farewell to 'Our Lady of Fatima'. Xavier College 22/4/51, 1952
The Kew railway was opened in 1887, and diverged from the main (Box Hill–Lilydale) line about half-way between Hawthorn and Glenferrie. From the point of divergence the line was slightly less than one mile long, and it had only one intermediate station — Barker. There were four road over-bridges and two level crossings, including one over the busy Barkers Road. The line supported a passenger and goods service, and was electrified in December 1922, at the same time as the main line to Box Hill. There were a number of peak hour services which ran from Flinders Street station (Melbourne) to Kew, but in 1938 all but one of these were diverted to the Ashburton line, where traffic was growing. This had an adverse effect on Kew traffic, as passengers from Kew needed to cross over a footbridge at Hawthorn to change trains, and the main line trains were usually already crowded by the time they reached Hawthorn. At about the same time the off-peak trains were replaced by road buses. In 1952 all passenger trains were withdrawn, but the road bus service continued for many years. Goods trains were finally withdrawn in 1957, and the railway was dismantled in 1958-59. (Source: Frank Stamford, 'The Hawthorn - Kew Railway')Small black and white snapshot of a train leaving Kew Station with the Xavier Chapel on the hill in the background, hence the ironic title provided by the photographer. The photograph, one of 12, is part of a larger album of newspaper clippings, timetables, tickets and photos relating to the Kew Railway Line, taken and compiled by Lachlan Richardson, while a resident of Kew. The album dates from the 1950s. The album is part of a larger subject file on the Kew Line, compiled over time by members of the Kew Historical Society."Farewell to 'Our Lady of Fatima'. Xavier College 22/4/51"kew railway line, transport -- railways -- kew (vic.), kew branch line, xavier college, kew railway station -
 Kew Historical Society Inc
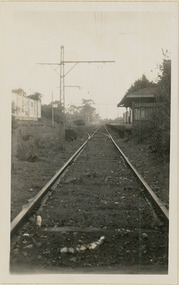
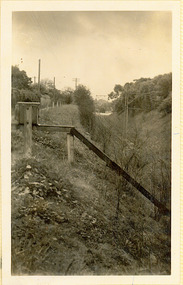
Photograph - Kew Branch Line: Looking along cutting towards Barker Station 22/4/51, 1952
The Kew railway was opened in 1887, and diverged from the main (Box Hill–Lilydale) line about half-way between Hawthorn and Glenferrie. From the point of divergence the line was slightly less than one mile long, and it had only one intermediate station — Barker. There were four road over-bridges and two level crossings, including one over the busy Barkers Road. The line supported a passenger and goods service, and was electrified in December 1922, at the same time as the main line to Box Hill. There were a number of peak hour services which ran from Flinders Street station (Melbourne) to Kew, but in 1938 all but one of these were diverted to the Ashburton line, where traffic was growing. This had an adverse effect on Kew traffic, as passengers from Kew needed to cross over a footbridge at Hawthorn to change trains, and the main line trains were usually already crowded by the time they reached Hawthorn. At about the same time the off-peak trains were replaced by road buses. In 1952 all passenger trains were withdrawn, but the road bus service continued for many years. Goods trains were finally withdrawn in 1957, and the railway was dismantled in 1958-59. (Source: Frank Stamford, 'The Hawthorn - Kew Railway')Small black and white snapshot looking along cutting towards Barker Station 22/4/51. The photograph, one of 12, is part of a larger album of newspaper clippings, timetables, tickets and photos relating to the Kew Railway Line, taken and compiled by Lachlan Richardson, while a resident of Kew. The album dates from the 1950s. The album is part of a larger subject file on the Kew Line, compiled over time by members of the Kew Historical Society."Looking along cutting towards Barker Station 22/4/51"kew railway line, transport -- railways -- kew (vic.), barker railway station, kew branch line -
 Kew Historical Society Inc
Photograph - The last train at Kew Station, August 1952
The Kew railway was opened in 1887, and diverged from the main (Box Hill–Lilydale) line about half-way between Hawthorn and Glenferrie. From the point of divergence the line was slightly less than one mile long, and it had only one intermediate station — Barker. There were four road over-bridges and two level crossings, including one over the busy Barkers Road. The line supported a passenger and goods service, and was electrified in December 1922, at the same time as the main line to Box Hill. There were a number of peak hour services which ran from Flinders Street station (Melbourne) to Kew, but in 1938 all but one of these were diverted to the Ashburton line, where traffic was growing. This had an adverse effect on Kew traffic, as passengers from Kew needed to cross over a footbridge at Hawthorn to change trains, and the main line trains were usually already crowded by the time they reached Hawthorn. At about the same time the off-peak trains were replaced by road buses. In 1952 all passenger trains were withdrawn, but the road bus service continued for many years. Goods trains were finally withdrawn in 1957, and the railway was dismantled in 1958-59. (Source: Frank Stamford, 'The Hawthorn - Kew Railway')Small black and white snapshot of the last passenger train at Kew Railway Station in 1952. The photograph, one of 12, is part of a larger album of newspaper clippings, timetables, tickets and photos relating to the Kew Railway Line, taken and compiled by Lachlan Richardson, while a resident of Kew. The album dates from the 1950s. The album is part of a larger subject file on the Kew Line, compiled over time by members of the Kew Historical Society."The last train at Kew Station, August 1952"kew railway line, transport -- railways -- kew (vic.), kew branch line, kew railway station -
 Kew Historical Society Inc
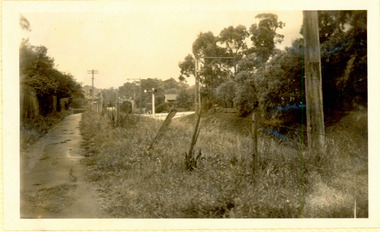
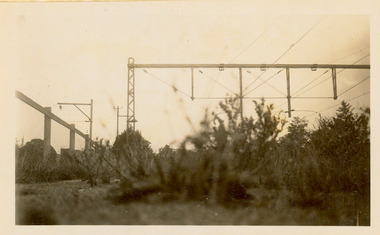
Photograph - Kew Branch Line: Weeds at Kew Station 14/51
The Kew railway was opened in 1887, and diverged from the main (Box Hill–Lilydale) line about half-way between Hawthorn and Glenferrie. From the point of divergence the line was slightly less than one mile long, and it had only one intermediate station — Barker. There were four road over-bridges and two level crossings, including one over the busy Barkers Road. The line supported a passenger and goods service, and was electrified in December 1922, at the same time as the main line to Box Hill. There were a number of peak hour services which ran from Flinders Street station (Melbourne) to Kew, but in 1938 all but one of these were diverted to the Ashburton line, where traffic was growing. This had an adverse effect on Kew traffic, as passengers from Kew needed to cross over a footbridge at Hawthorn to change trains, and the main line trains were usually already crowded by the time they reached Hawthorn. At about the same time the off-peak trains were replaced by road buses. In 1952 all passenger trains were withdrawn, but the road bus service continued for many years. Goods trains were finally withdrawn in 1957, and the railway was dismantled in 1958-59. (Source: Frank Stamford, 'The Hawthorn - Kew Railway')Small black and white snapshot of how the Kew Branch Line was allowed to run down. The photograph, one of 12, is part of a larger album of newspaper clippings, timetables, tickets and photos relating to the Kew Railway Line, taken and compiled by Lachlan Richardson, while a resident of Kew. The album dates from the 1950s. The album is part of a larger subject file on the Kew Line, compiled over time by members of the Kew Historical Society.kew railway line, transport -- railways -- kew (vic.), barker railway station, kew branch line -
 Kew Historical Society Inc
Photograph - Kew Railway Station, May 1950
The Kew railway was opened in 1887, and diverged from the main (Box Hill–Lilydale) line about half-way between Hawthorn and Glenferrie. From the point of divergence the line was slightly less than one mile long, and it had only one intermediate station — Barker. There were four road over-bridges and two level crossings, including one over the busy Barkers Road. The line supported a passenger and goods service, and was electrified in December 1922, at the same time as the main line to Box Hill. There were a number of peak hour services which ran from Flinders Street station (Melbourne) to Kew, but in 1938 all but one of these were diverted to the Ashburton line, where traffic was growing. This had an adverse effect on Kew traffic, as passengers from Kew needed to cross over a footbridge at Hawthorn to change trains, and the main line trains were usually already crowded by the time they reached Hawthorn. At about the same time the off-peak trains were replaced by road buses. In 1952 all passenger trains were withdrawn, but the road bus service continued for many years. Goods trains were finally withdrawn in 1957, and the railway was dismantled in 1958-59. (Source: Frank Stamford, 'The Hawthorn - Kew Railway')Small black and white snapshot of Kew Railway Station inMay 1950. The photograph, one of 12, is part of a larger album of newspaper clippings, timetables, tickets and photos relating to the Kew Railway Line, taken and compiled by Lachlan Richardson, while a resident of Kew. The album dates from the 1950s. The album is part of a larger subject file on the Kew Line, compiled over time by members of the Kew Historical Society."Kew Railway Station, May 1950"kew railway line, transport -- railways -- kew (vic.), kew branch line, kew railway station -
 Kew Historical Society Inc
Photograph - Kew Railway Station, 1951
The Kew railway was opened in 1887, and diverged from the main (Box Hill–Lilydale) line about half-way between Hawthorn and Glenferrie. From the point of divergence the line was slightly less than one mile long, and it had only one intermediate station — Barker. There were four road over-bridges and two level crossings, including one over the busy Barkers Road. The line supported a passenger and goods service, and was electrified in December 1922, at the same time as the main line to Box Hill. There were a number of peak hour services which ran from Flinders Street station (Melbourne) to Kew, but in 1938 all but one of these were diverted to the Ashburton line, where traffic was growing. This had an adverse effect on Kew traffic, as passengers from Kew needed to cross over a footbridge at Hawthorn to change trains, and the main line trains were usually already crowded by the time they reached Hawthorn. At about the same time the off-peak trains were replaced by road buses. In 1952 all passenger trains were withdrawn, but the road bus service continued for many years. Goods trains were finally withdrawn in 1957, and the railway was dismantled in 1958-59. (Source: Frank Stamford, 'The Hawthorn - Kew Railway')Small black and white snapshot of Kew Railway Station in 1950. The photograph, one of 12, is part of a larger album of newspaper clippings, timetables, tickets and photos relating to the Kew Railway Line, taken and compiled by Lachlan Richardson, while a resident of Kew. The album dates from the 1950s. The album is part of a larger subject file on the Kew Line, compiled over time by members of the Kew Historical Society."Kew Station / 14/51 / 22/4/51 F5"kew railway line, transport -- railways -- kew (vic.), kew branch line, kew railway station -
 Kew Historical Society Inc
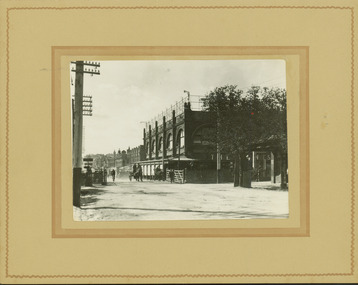
Photograph - Railway level crossing in Glenferrie Road, Glenferrie, E.J. Dower, c.1912
One of a series of photographs, taken by Edgar James Dower in the second decade of the twentieth century. Born and raised in Olinda, his family later moved to Surrey Hills. He worked as an adult as a clerk in the city office of the Metropolitan Gas Company, and in his role as a 'collector', he was able to photograph scenes including the construction of tramlines and associated buildings in Kew, Hawthorn, Camberwell and Surrey Hills. Later he established a real estate agency with his brother - the E.J. Dower Real Estate Agency, Dandenong Office.The image is an historically significant record of the development of transport infrastructure which was used to connect Victorians in the first two decades of the twentieth century. This development resulted from increases in population and the consequent extension of Melbourne's suburbs. The photographs, both individually and collectively, richly detail the labour of workers and the tools and machinery used to create and extend Melbourne's public transport network in the years preceding and during World War 1.Digital copy of an original mounted photograph showing Glenferrie Road Hawthorn, looking north towards the old railway level crossing that existed before the line was elevated on a bridge over Glenferrie Road. "The Don Store" at right is immediately behind the old railway level crossing. The tree and shops at left before the crossing were to be removed / demolished as part of the realignment of the train tracks.Annotated verso: "1914 [deleted]/1913 / Glenferrie Road showing railway gates / Taken just before the commencement of the regrading of railway line to Camberwell".theme --- travelling by tram, theme -- connecting victorians by transport and communications, glenferrie road -- hawthorn (vic.), railways -- hawthorn, the don store -- hawthorn (vic.) -
 Kew Historical Society Inc
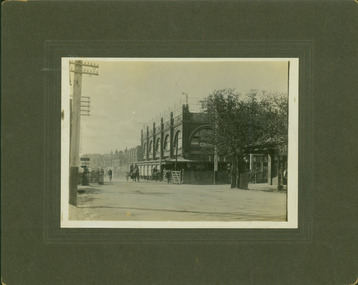
Photograph - Railway level crossing in Glenferrie Road, Glenferrie, E.J. Dower, 1912
One of a series of photographs, taken by Edgar James Dower in the second decade of the twentieth century. Born and raised in Olinda, his family later moved to Surrey Hills. He worked as an adult as a clerk in the city office of the Metropolitan Gas Company, and in his role as a 'collector', he was able to photograph scenes including the construction of tramlines and associated buildings in Kew, Hawthorn, Camberwell and Surrey Hills. Later he established a real estate agency with his brother - the E.J. Dower Real Estate Agency, Dandenong Office.The image is an historically significant record of the development of transport infrastructure which was used to connect Victorians in the first two decades of the twentieth century. This development resulted from increases in population and the consequent extension of Melbourne's suburbs. The photographs, both individually and collectively, richly detail the labour of workers and the tools and machinery used to create and extend Melbourne's public transport network in the years preceding and during World War 1.Digital copy of an original mounted photograph showing Glenferrie Road Hawthorn, looking north towards the old railway level crossing that existed before the line was elevated on a bridge over Glenferrie Road. "The Don Store" at right is immediately behind the old railway level crossing. The tree and shops at left before the crossing were to be removed / demolished as part of the realignment of the train tracks.Annotated verso: "Glenferrie Road, Glenferrie, showing railway gates and Walker's Store / Taken prior to the construction of electric tramline and the regrading of Camberwell Railway Line / Taken by E.J. Dower about 1912".theme --- travelling by tram, theme -- connecting victorians by transport and communications, glenferrie road -- hawthorn (vic.), railways -- hawthorn, the don store -- hawthorn (vic.) -
 Kew Historical Society Inc
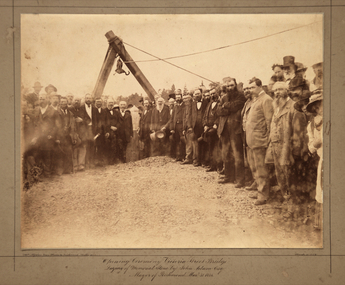
Photograph, Opening Ceremony Victoria Street Bridge: Laying of memorial stone by John Adam Esq. Mayor of Richmond, 1884
A formal group photograph of the grand opening of the Victoria Street Bridge on March 31 1884. The Argus was to report that: ‘The ceremony of laying the memorial stone of the Victoria-bridge, which connects Kew and Hawthorn with Richmond and Collingwood, was performed yesterday afternoon by the mayor of Richmond (Mr John Adam) in the presence of a large assemblage. Among the gentlemen present at yesterday’s proceedings were the mayor of Collingwood (Mr. M. Dwyer), the Mayor of Melbourne (Councillor C. Smith, M.L. A.) the mayor of Kew (Mr. Barnard), Mr. J. A. B. Koch and Mr. W. W. Shelley (ex mayors of Richmond), Mr. Joseph Bosisto, M.L.A., the Hon. L. L. Smith, Councillor De Mole (ex mayor of Kew), Mr. Jas. Lancashire and Mr. Winter (ex mayors of Ricmond), Mr. Walker (ex mayors of Collingwood), Mr. Johnson (engineer), Mr. C. Rowan, C.E. (engineer of the bridge alterations) and the town clerks of Richmond, Collingwood and Kew.’ Following the opening ceremony ‘… a ponderous steam roller was driven over the structure, with a view to test, or rather to demonstrate its stability … Most of the gentlemen present walked over the bridge, after which they were grouped by a photographer, with the memorial stone as a central feature, and several views of the scene were taken’.An original, rare silver albumen mounted and titled photograph of an important event in 19th century Melbourne.Original photograph mounted on display card of the opening of the Victoria Street Bridge. The original photograph is very faded and has been enhanced to improve the image's viewability.On the reverse of the card is an indecipherable stamp and an inscription identifying the photographers. "T. W. & C. A. McAlpine Bros, Photographers &., Campbell Parade East Richmond Melbourne March 31.1884victoria street bridge, john adam, m. dwyer, c. smith, barnard, j.a.b. koch, w.w. shelley, bridge, kew, collingwood, l.l. smith, joseph bosisto -
 Kew Historical Society Inc
Postcard, Victoria Street Bridge, Collingwood, 1905-1913
... and Abbotsford with Kew and Hawthorn. Victoria Street Bridge, Collingwood ...Victoria Bridge is a riveted and welded steel Warren truss bridge over the Yarra River completed in 1884 to a design by Fraser & Chase following a controversial design competition held in 1880. Funds for the bridge's construction were provided by the councils of Collingwood, Hawthorn, Kew and Richmond. The contract was awarded to Mr P. Platt. Charles Rowand was officially appointed Supervising Engineer in 1883. The winning design was based on the theoretical work of William Charles Kernot (1845-1909) who campaigned for economy in public works design and the application of scientific principles in engineering. ... The bridge was widened in 1890 by the addition of a third line of truss on new piers on the up stream side to carry horse trams. Work commenced in 1914 to convert the horse tramway to an electric tramway by the Prahran & Malvern Tramways Trust, part of the Trust's extension of its tramway into the eastern suburbs between 1913-18. In 1915 the bridge was further strengthened to accommodate the extra weight of electric trams and widened by the addition of two six feet cantilever footpaths. During this period the Prahran & Malvern Tramways Trust erected two ornamental gantries over the roadway to support overhead wires for the electric tramway. Further widening and reconditioning of the bridge took place in 1933, including the addition of four new welded trusses, two intermediate and two on the outside. The latter were supported on new cantilevered truss cross beams attached to the top of the piers. (Source: Heritage Victoria)Early and rare postcard of the Victoria Street Bridge linking Victoria Street and Barkers Road.Polychrome postcard of the Victoria Street Bridge which links Richmond and Abbotsford with Kew and Hawthorn.View from Harrison Cres embankment / former Xavier College boatshed on site of tree in foreground. / Chimney left corner - Wool Scoring Mils in Victoria St. / On horizon - Studley Villa, Studley House circa 1880s, Studley Hall / Chinese gardens to be seen behind three set of columns / M.J. Slatterypostcards -- yarra river, postcards -- bridges. -- greater melbourne (vic.), victoria street bridge -
 Kew Historical Society Inc
Photograph - North Arm Bridge, Lakes Entrance, Henry Beater Christian, 1920s
Henry Christian (c.1809-91) was one of the first settlers in Kew. He arrived in Victoria with his wife Agnes and son Orlando in 1855 on the Gypsy Queen. He established a rope-making business in Bulleen Road by 1858 but was declared insolvent two years later. In his final years, he was celebrated as one of the oldest living settlers of the district. His son, Orlando Henry Beater Christian (c.1853-1930) became a member of the Hawthorn Band and a foundation member of the Willsmere Swimming Club. Orlando and his wife Elizabeth had four children: Henry Beater (1886-1962), Ada Susannah May (1888-1962), Orlando Julius (1891-1917) and Lilian Adelaide ( -1956). Ada was to marry into the Washfold family. An item from an outstanding and diverse photographic collection, assembled by members of the Christian and Washfold families of Kew, comprising professional and amateur photography, depicting individuals, natural and settled environments and the interactions between these worlds. Photograph of Lake Arm Bridge at Lakes Entrance.Sent to Mavis and the boys [detailed text]landscape photography, lakes entrance (vic.), christian-washfold collection -
 Kew Historical Society Inc
Photograph - Zig-zag Bridge on the Yarra River at Kew, Henry Beater Christian, 1920-28
Henry Christian (c.1809-91), the grandfather of the photographer, was one of the first settlers in Kew. He arrived in Victoria with his wife Agnes and son Orlando in 1855 on the Gypsy Queen. He established a rope-making business in Bulleen Road by 1858 but was declared insolvent two years later. In his final years, he was celebrated as one of the oldest living settlers of the district. His son, Orlando Henry Beater Christian (c.1853-1930) became a member of the Hawthorn Band and a foundation member of the Willsmere Swimming Club. Orlando and his wife Elizabeth had four children of which Henry Beater Christian (1886-1962) was the eldest.Small black and white photograph of the Yarra River at Studley Park. In the middle ground, a man is paddling a canoe upstream. On the horizon, the tower and buildings of Raheen in Studley Park Road can be seen.henry christian (1886-1962), landscape photography, kew canoe club history — — photographs, yarra river -- studley park -- kew (vic.), christian-washfold collection -
 Kew Historical Society Inc
Photograph - Walkway, Zig-zag Bridge on the Yarra River at Kew, Henry Beater Christian, 1920-28
Henry Christian (c.1809-91), the grandfather of the photographer, was one of the first settlers in Kew. He arrived in Victoria with his wife Agnes and son Orlando in 1855 on the Gypsy Queen. He established a rope-making business in Bulleen Road by 1858 but was declared insolvent two years later. In his final years, he was celebrated as one of the oldest living settlers of the district. His son, Orlando Henry Beater Christian (c.1853-1930) became a member of the Hawthorn Band and a foundation member of the Willsmere Swimming Club. Orlando and his wife Elizabeth had four children of which Henry Beater Christian (1886-1962) was the eldest.Small black and white photograph of the walkway of the Zig-zag Bridge over the Yarra River at Studley Park.henry christian (1886-1962), landscape photography, yarra river -- studley park -- kew (vic.), zig-zag bridge -- yarra river -- kew (vic.), christian-washfold collection -
 Kew Historical Society Inc
Photograph - Zig-zag Bridge on the Yarra River at Kew, Henry Beater Christian, 1920-28
Henry Christian (c.1809-91), the grandfather of the photographer, was one of the first settlers in Kew. He arrived in Victoria with his wife Agnes and son Orlando in 1855 on the Gypsy Queen. He established a rope-making business in Bulleen Road by 1858 but was declared insolvent two years later. In his final years, he was celebrated as one of the oldest living settlers of the district. His son, Orlando Henry Beater Christian (c.1853-1930) became a member of the Hawthorn Band and a foundation member of the Willsmere Swimming Club. Orlando and his wife Elizabeth had four children of which Henry Beater Christian (1886-1962) was the eldest.Small black and white photograph of the Zig-zag Bridge over the Yarra River at Studley Park.henry christian (1886-1962), landscape photography, yarra river -- studley park -- kew (vic.), zig-zag bridge -- yarra river -- kew (vic.), christian-washfold collection -
 Kew Historical Society Inc
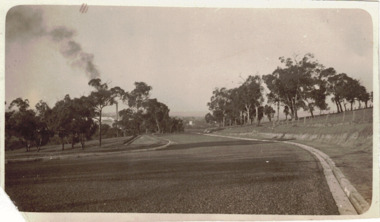
Photograph - The Boulevard at Kew, 1937
The Yarra Scenic Boulevard stretching from Hawthorn to the Chandler Highway was completed as a major project between 1933 and 1936 during a period of significant unemployment. Key dates in the construction this section the road include: 1933 when Kew Council supported the construction of the road from Studley Park to the Kew Asylum; and 1936 when the road from the Johnston Street Bridge to the Chandler Highway was opened. The inscription on the reverse of the photo 'Boulevard Fairfield' is misleading as there is no section of the Boulevard in Fairfield. A more likely interpretation is that it is a photograph of the Kew section of the Yarra Boulevard with the factories of Fairfield in the distance.Rare early photograph of the Yarra Boulevard, taken one year after the opening of the road. The photograph is an important historical record of the results of 'Susso' labor in the creation of major works in Melbourne by the Victorian Government. Original, black and white positive print of the Boulevard at Kew in 1937. Key aspects to note about the photograph is that the road is bituminised; that the gutters are concreted; that the kerb is constructed of concrete blocks; and that there is an unmade footpath on what appears to be the right hand side of the road. The landscape is sparsely treed, and those trees that remain are presumably remnant vegetation. At the right, the land is fenced. The land at the left falls away sharply to the river below. On the horizon, at left, there is an industrial complex including a tall chimney that is burning fuel creating smoke. "Boulevard Fairfield" great depression, susso projects, roads -- kew (vic.), yarra boulevard, yarra valley -
 The 5th/6th Battalion Royal Victoria Regiment Historical Collection
Plaque - 4th Brigade Plaque
4th BDE plaque, unknown the year madeunusual design of the plaque4th Bridge plaque, with the purple background material5/6 rvr, 5/6 rvr bhq, plaque, 4th bde -
 The 5th/6th Battalion Royal Victoria Regiment Historical Collection
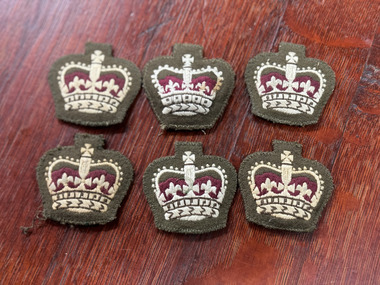
Uniform - Warrant Officer Crown, Warrant Officer Crown with green thread
British Army Household Bridge WO Warrant Officer SD Rank x 6 -
 The 5th/6th Battalion Royal Victoria Regiment Historical Collection
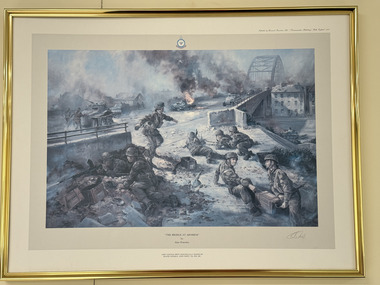
Painting - Painting the Battle of Arnhem
A copy of painting of the "Bridge at Arnhem" depicting the battle of Arnhem. The painting is painted by Alan Fearnky -
 Wodonga & District Historical Society Inc
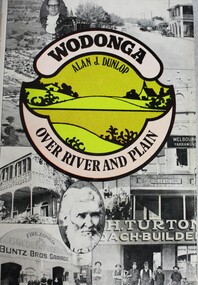
Book - Wodonga Over River and Plain, Alan J. Dunlop, 1976
A great local history of the Wodonga area. Starts with discussion of the Aboriginal inhabitants of the region and early contacts with European explorers and settlers. Explains the establishing of a customs post with its twin city Albury on the other side of the Murray River. The town grew subsequent to the opening of the first bridge across the Murray in 1860. Originally named Wodonga, its name was changed to Belvoir then later back to Wodonga.non-fictionA great local history of the Wodonga area. Starts with discussion of the Aboriginal inhabitants of the region and early contacts with European explorers and settlers. Explains the establishing of a customs post with its twin city Albury on the other side of the Murray River. The town grew subsequent to the opening of the first bridge across the Murray in 1860. Originally named Wodonga, its name was changed to Belvoir then later back to Wodonga.victoria. wodonga, settlers wodonga, indigenous australians wodonga -
 Flagstaff Hill Maritime Museum and Village
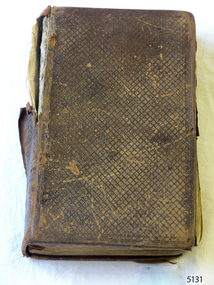
Book - Religious Book, The Holy Bible, 1836
This Holy Bible is entitled "The Holy Bible containing the Old and New Testaments, translated out of the original tongues: and with former translations diligently compared and revised by His Majesty's Spiritual Command." It was printed by Sir D. Hunter Blair and M.T. Bruce in Edinburgh, 1836, printers to the King's most Excellent Majesty, H.B.S." The Bible belonged to David and Alice Ellis, a young couple married in Dublin in 1855. It has been handed down in the Ellis family until it was donated, together with other personal effects, in 2004 by David and Alice’s granddaughter, daughter of David Ellis Junior. Alice treated the Bible as an important posession. On 6th October 1855 newlyweds David and Alice Ellis set sail for Australia in the brand new Schomberg, considered the most perfect clipper ship. She was built as an emigrant ship in Aberdeen and set sail from Liverpool on her maiden voyage, bound for Melbourne, Australia. She was loaded with 430 passengers plus cargo that included iron rails and equipment intended for building the Geelong Railway and a bridge over the Yarra from Melbourne to Hawthorn. On 27th December 1855, only one day from her Melbourne destination, the Schomberg was grounded on a sand-spit on the Victorian coast near Peterborough. The passengers and crew were all safely rescued by a passing small steamer, the SS Queen, which traded between Melbourne and Warrnambool, and taken to Melbourne. The passengers had been told, when leaving the sinking Schomberg, that all they could take with them was a small basket or handbag. A newspaper article later mentioned that one of the things Alice made space for in her basket was her Bible. (It is unclear whether Alice took any possessions with her onto the SS Queen, but a note accompanying the donation of the Bible and basket states that the items were “left on deck and salvaged as Schomberg went down”.) Another steamer was despatched from Melbourne to retrieve the passengers’ luggage from the Schomberg and Alice was reunited with all of her boxes of belongings. Other steamers helped unload the cargo until the change in weather made it too difficult. Although the Schomberg was wrecked there were no lives lost. At that time David was 23 years old (born in Wales, 1832) and his new bride Alice was 26 (born in Dublin, 1829). They had been given letters of introduction to people in Tasmania so they travelled there from Melbourne. However the couple only stayed on that island for about a year before they returned to the Western District of Victoria. David worked for Mr Neil Black as a gardener for a while then, when the land in the area was made available by the Victorian government, David and Alice claimed a selection of land on Noorat Road in the Terang district. They settled there for the remainder of their lives, expanding their property “Allambah” as opportunities arose. A document accompanying the donation lists the names of six children; William, Grace (c. 1859-1946), Thomas (c. 1866 – 1939), David (c. 1962 – 1953), James and Victor. David died on 13th April 1911, aged 79, at their property. Alice passed away the following year, November 1912, aged 83. Alice’s obituary described her as “a very homely, kindly-natured woman, who was highly esteemed by a large circle of friends; and she was also a firm adherent of the Presbyterian Church”. At the time of Alice’s death she left behind three sons and one daughter. Her daughter Grace Ellis was also a very active member of the Terang Presbyterian Church and a member of the PWMU (Presbyterian Women’s Missionary Union). She was also involved in the Red Cross and other charities. Grace passed away in 1946, aged 87. David and Alice Ellis were amongst the very earlies pioneers of the Terang district of Western Victoria. Their donated possessions are a sample of the personal effects of emigrants to Australia. The donated items are a sample of the personal goods carried aboard a significant migrant ship in 1855. They are also significant for their association with the Schomberg. The Schomberg, which is on the Victorian Heritage Register (VHR S612), has great historical significance as a rare example of a large, fast clipper ship on the England to Australia run, carrying emigrants at the time of the Victorian gold rush. She represents the technical advances made to break sailing records between Europe and Australia. Flagstaff Hill’s collection of artefacts from the Schomberg is significant for its association with the shipwreck, The collection is primarily significant because of the relationship between the objects, as together they have a high potential to interpret the story of the Schomberg. It is archaeologically significant as the remains of an international passenger Ship. It is historically significant for representing aspects of Victoria’s shipping history and for its association with the shipwreck and the ship, which was designed to be fastest and most luxurious of its day Bible, known as the Ellis - Schomberg Bible, with patterned brown leather cover. Printed by Sir D. Hunter Blair and M.T. Bruce, Edinburgh 1836. Bookmark of card placed within Bible’s pages is from Keswick Book Depot, Melbourne. Bible has hand written inscriptions inside front and back covers and has been well used. Bible was amongst the possessions of David and Alice Ellis, passengers on the Schomberg when wrecked in 1855.Scripture references and notes are hand written in pencil on front and back inner pages. Bookmark card has printed inscription; on front “BOOK MARK / KESWICK / BOOK / DEPOT / EVERYTHING / EVANGELISTIC / 315 COLLINS ST / MELBOURNE / CENT. 3013”, on back is line drawing of a stem of iris flowers above the verse “The entrance of Thy / words giveth light; it / giveth understanding / unto the Simple. Ps. 119-30” flagstaff hill, warrnambool, shipwrecked coast, flagstaff hill maritime museum, maritime museum, shipwreck coast, flagstaff hill maritime village, great ocean road, schomberg, holy bible, schomberg bible, d hunter blair and m t bruce, 1836 bible, 1855 shipwreck, peterborough shipwreck, ss queen, david ellis, alice ellis, allambah terang, dublin emigrants, terang presbyterian church, western district victoria -
 Victorian Railway History Library
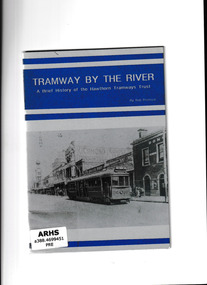
Booklet, Tramway Publications, Tramway by the river : a brief history of the Hawthorn Tramways Trust, 1993
... The Hawthorn Tramways Trust was established in 1914, and merged ...The Hawthorn Tramways Trust was established in 1914, and merged with the Melbourne and Metropolitan Tramways Board in 1920. The Hawthorn line operated via Bridge Road, Richmond. Horse drawn trams were withdrawn in 1916 prior to the introduction of cable trams. The booklet provides technical details about this line, as well as photographs.Ill, maps, p.17.non-fictionThe Hawthorn Tramways Trust was established in 1914, and merged with the Melbourne and Metropolitan Tramways Board in 1920. The Hawthorn line operated via Bridge Road, Richmond. Horse drawn trams were withdrawn in 1916 prior to the introduction of cable trams. The booklet provides technical details about this line, as well as photographs.tramways - melbourne, trams - melbourne - history -
 Flagstaff Hill Maritime Museum and Village
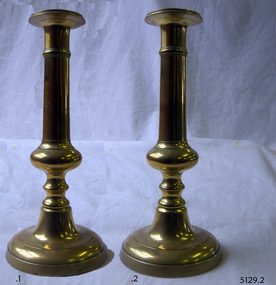
Functional object - Candlestick holder, C. 1855
This pair of brass candlesticks feature a internal candle stubb pusher that is pressed from underneath the base of the candlestick to push up the used candle stubb from inside the hollow candlestick. It once belonged to David and Alice Ellis, a young couple married in Dublin in 1855, possibly a wedding present. It has been handed down in the Ellis family until it was donated, together with other personal effects, in 2004 by David and Alice’s granddaughter, daughter of David Ellis Junior. On 6th October 1855 newlyweds David and Alice Ellis set sail for Australia in the brand new Schomberg, considered the most perfect clipper ship. She was built as an emigrant ship in Aberdeen and set sail from Liverpool on her maiden voyage, bound for Melbourne, Australia. She was loaded with 430 passengers plus cargo that included iron rails and equipment intended for building the Geelong Railway and a bridge over the Yarra from Melbourne to Hawthorn. On 27th December 1855, only one day from her Melbourne destination, the Schomberg was grounded on a sand-spit on the Victorian coast near Peterborough. The passengers and crew were all safely rescued by a passing small steamer, the SS Queen, which traded between Melbourne and Warrnambool, and taken to Melbourne. The passengers had been told, when leaving the sinking Schomberg, that all they could take with them was a small basket or handbag. A newspaper article later mentioned that one of the things Alice made space for in her basket was her Bible. (It is unclear whether Alice took any possessions with her onto the SS Queen, but a note accompanying the donation of the Bible and basket states that the items were “left on deck and salvaged as Schomberg went down”.) Another steamer was despatched from Melbourne to retrieve the passengers’ luggage from the Schomberg and Alice was reunited with all of her boxes of belongings. Other steamers helped unload the cargo until the change in weather made it too difficult. Although the Schomberg was wrecked there were no lives lost. At that time David was 23 years old (born in Wales, 1832) and his new bride Alice was 26 (born in Dublin, 1829). They had been given letters of introduction to people in Tasmania so they travelled there from Melbourne. However the couple only stayed on that island for about a year before they returned to the Western District of Victoria. David worked for Mr Neil Black as a gardener for a while then, when the land in the area was made available by the Victorian government, David and Alice claimed a selection of land on Noorat Road in the Terang district. They settled there for the remainder of their lives, expanding their property “Allambah” as opportunities arose. A document accompanying the donation lists the names of six children; William, Grace (c. 1859-1946), Thomas (c. 1866 – 1939), David (c. 1962 – 1953), James and Victor. David died on 13th April 1911, aged 79, at their property. Alice passed away the following year, November 1912, aged 83. Alice’s obituary described her as “a very homely, kindly-natured woman, who was highly esteemed by a large circle of friends; and she was also a firm adherent of the Presbyterian Church”. At the time of Alice’s death she left behind three sons and one daughter. Her daughter Grace Ellis was also a very active member of the Terang Presbyterian Church and a member of the PWMU (Presbyterian Women’s Missionary Union). She was also involved in the Red Cross and other charities. Grace passed away in 1946, aged 87. David and Alice Ellis were amongst the very earlies pioneers of the Terang district of Western Victoria. Their donated possessions are a sample of the personal effects of emigrants to Australia. The donated items are a sample of the personal goods carried aboard a significant migrant ship in 1855. They are also significant for their association with the Schomberg. The Schomberg, which is on the Victorian Heritage Register (VHR S612), has great historical significance as a rare example of a large, fast clipper ship on the England to Australia run, carrying emigrants at the time of the Victorian gold rush. She represents the technical advances made to break sailing records between Europe and Australia. Flagstaff Hill’s collection of artefacts from the Schomberg is significant for its association with the shipwreck, The collection is primarily significant because of the relationship between the objects, as together they have a high potential to interpret the story of the Schomberg. It is archaeologically significant as the remains of an international passenger Ship. It is historically significant for representing aspects of Victoria’s shipping history and for its association with the shipwreck and the ship, which was designed to be fastest and most luxurious of its day Candlestick holders, brass; pair of two candlestick holders each incorporating a candle pusher inside the stem (used to push up and eject the candle stump). Candlestick holders were amongst the possessions of David and Alice Ellis, passengers on the Schomberg when wrecked in 1855.schomberg, flagstaff hill, warrnambool, shipwrecked coast, flagstaff hill maritime museum, maritime museum, shipwreck coast, flagstaff hill maritime village, great ocean road, candlestick, candlestick with stubb pusher, 1855 shipwreck, peterborough shipwreck, ss queen, david ellis, alice ellis, allambah terang, dublin emigrants, terang presbyterian church, western district victoria, lighting, candlestick holders -
 Flagstaff Hill Maritime Museum and Village
Horse Brass
When the ship Schomberg was launched in 1855, she was considered the most perfect clipper ship ever to be built. James Blaine’s Black Ball Line had commissioned her to be built for their fleet of passenger liners. At a cost of £43,103, the Aberdeen builders designed her to sail faster than the quick clippers designed by North American Donald McKay. She was a three masted wooden clipper ship, built with diagonal planking of British oat with layers of Scottish larch. This luxury vessel was designed to transport emigrants to Melbourne in superior comfort. She had ventilation ducts to provide air to the lower decks and a dining saloon, smoking room, library and bathrooms for the first class passengers. At the launch of Schomberg’s maiden voyage, her master Captain ‘Bully’ Forbes, drunkenly predicted that he would make the journey between Liverpool and Melbourne in 60 days. Schomberg departed Liverpool on 6 October 1855 with 430 passengers and 3000 tons cargo including iron rails and equipment intended the build the Geelong Railway and a bridge over the Yarra from Melbourne to Hawthorn. The winds were poor as Schomberg sailed across the equator, slowing her journey considerably. She was 78 days out of Liverpool when she ran aground on a sand-spit near Peterborough, Victoria, on 27 December; the sand spit and the currents were not marked on Forbes’s map. Overnight, the crew launched a lifeboat to find a safe place to land the ship’s passengers. The scouting party returned to Schomberg and advised Forbes that it was best to wait until morning because the rough seas could easily overturn the small lifeboats. The ship’s Chief Officer spotted SS Queen at dawn and signalled the steamer. The master of the SS Queen approached the stranded vessel and all of Schomberg’s passengers were able to disembark safely. The Black Ball Line’s Melbourne agent sent a steamer to retrieve the passengers’ baggage from the Schomberg. Other steamers helped unload her cargo until the weather changed and prevented the salvage teams from accessing the ship. Local merchants Manifold & Bostock bought the wreck and cargo, but did not attempt to salvage the cargo still on board the ship. They eventually sold it on to a Melbourne businessman and two seafarers. After two of the men drowned when they tried to reach Schomberg, salvage efforts were abandoned.32 In 1975, divers from Flagstaff Hill, including Peter Ronald, found an ornate communion set at the wreck. The set comprised a jug, two chalices, a plate and a lid. The lid did not fit any of the other objects and in 1978 a piece of the lid broke off, revealing a glint of gold. As museum staff carefully examined the lid and removed marine growth, they found a diamond ring, which is currently on display in the Great Circle Gallery.33 Flagstaff Hill also holds ship fittings and equipment, personal effects, a lithograph, tickets and photograph from the Schomberg. Most of the artefacts were salvaged from the wreck by Peter Ronald, former director of Flagstaff Hill. The Schomberg, which is on the Victorian Heritage Register (VHR S612), has great historical significance as a rare example of a large, fast clipper ship on the England to Australia run, carrying emigrants at the time of the Victorian gold rush. She represents the technical advances made to break sailing records between Europe and Australia. Flagstaff Hill’s collection of artefacts from the Schomberg is significant for its association with the shipwreck. The collection is primarily significant because of the relationship between the objects, as together they have a high potential to interpret the story of the Schomberg. It is archaeologically significant as the remains of an international passenger Ship. It is historically significant for representing aspects of Victoria’s shipping history and for its association with the shipwreck and the ship, which was designed to be fastest and most luxurious of its day Small brass horse harness disc 1½" in diameter. Slight verdigris and encrustation. Recovered from the wreck of the Schombergwarrnambool, shipwrecked-coast, flagstaff-hill, flagstaff-hill-maritime-museum, maritime-museum, shipwreck-coast, flagstaff-hill-maritime-village, schomberg, shipwrecked-artefact, clipper ship, black ball line, 1855 shipwreck, aberdeen clipper ship, captain forbes, peterborough shipwreck, ss queen, horse harness, horse brass -
 Flagstaff Hill Maritime Museum and Village
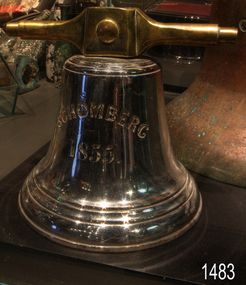
Functional object - Bell, Before 1855
This small ship’s bell, possibly a ‘mess’ or dining room bell, was the smaller of the two bells rescued by the crew of the Schomberg when it was wrecked in 1855. All of the crew from the Schomberg wreck survived. They carried the two ship’s bells with them as they made their way along the coast, eventually arriving at the home of settler, John Manning, who lived at Hopkins Point near Warrnambool. Manning acquired the Schomberg bells, presenting them to two Warrnambool churches; the smaller one to St Joseph’s Catholic Church and the larger bell to St John’s Presbyterian church. This small bell developed a crack after about a year at St Joseph's church and could no longer be used. Thomas Manifold imported a new bell for that church and the cracked belled was stored at his farm and stored. The property was sold years later to John Logan, who donated the discarded bell to the Warrnambool Museum when it first opened in 1886. The Curator, Joseph Archibald, displayed the bell in the entry. The small bell was repaired and re-plated by Briggs Marine in 1986. The larger Schomberg bell was installed in St John’s Presbyterian Church. In 1887 a ‘massive’ new bell, made in Victoria, was installed at the Presbyterian Church, so the old bell was transferred to the nearby Woodford Presbyterian authorities. During World War II the 1887 bell cracked, and could not be repaired. In 1983 the old Schomberg bell from the Woodford church was loaned to Flagstaff Hill Maritime Museum and Village. When the Schomberg was launched in 1855, she was considered the "Noblest” ship that ever floated on the water. Schomberg's owners, the Black Ball Line had commissioned the ship for their fleet of passenger liners. She was built by Alexander Hall of Aberdeen at a cost of £43,103 and constructed with 3 skins. One planked fore and aft and two diagonally planked, fastened together with screw-threaded trunnels (wooden rails). Her First Class accommodation was simply luxurious with velvet pile carpets, large mirrors, rosewood, birds-eye maple and mahogany timbers throughout, soft furnishings of satin damask, and an oak-lined library with a piano. Overall she had accommodation for 1000 passengers. At the launch, the Schomberg's 34-year-old master, Captain 'Bully' Forbes, had promised to reach Melbourne in sixty days stating, "with or without the help of God." Captain James Nicol Forbes was born in Aberdeen in 1821 and rose to fame with his record-breaking voyages on the famous Black Ball Line ships; Marco Polo and Lightning. In 1852 in the ship Marco Polo, he made the record passage from London to Melbourne in 68 days. Unfortunately, there were 53 deaths on the voyage, but the great news was off the record passage by Captain Forbes. In 1854 he took the clipper “Lighting” to Melbourne in 76 days and back in 63 days, this record was never beaten by a sailing ship. He often drove his crew and ship to breaking point to beat his previous records. He cared little for the comfort of the passengers. On this, Schomberg's maiden voyage, he was determined to break existing records. Schomberg departed Liverpool on her maiden voyage on 6th October 1855 flying a sign that read "Sixty Days to Melbourne". She departed with 430 passengers and 3000 tons of cargo including iron rails and equipment intended to build the Melbourne to Geelong Railway and a bridge over the Yarra from Melbourne to Hawthorn. She also carried a cow for fresh milk, pens for fowls and pigs, and 90,000 gallons of water for washing and drinking. She also carried 17,000 letters and 31,800 newspapers. The ship and cargo were insured for $300,000 a fortune for the time. The winds were poor as she sailed across the equator, slowing Schomberg's journey considerably. The land was first sighted on Christmas Day, at Cape Bridgewater near Portland, Captain Forbes followed the coastline towards Melbourne. Forbes was said to be playing cards when called by the third mate Henry Keen, who reported land about 3 miles off. Due in large part to the captain's regarding a card game as more important than his ship, it eventually ran aground on a sand spit near Curdie's Inlet (about 56 km west of Cape Otway) on 26th December 1855, 78 days after leaving Liverpool. The sand spit and the currents were not marked on Forbes's map. Overnight, the crew launched a lifeboat to find a safe place to land the ship’s passengers. The scouting party returned to Schomberg and advised Forbes that it was best to wait until morning because the rough seas could easily overturn the small lifeboats. The ship’s Chief Officer spotted the SS Queen at dawn and signalled the steamer. The master of the Queen approached the stranded vessel and all of Schomberg’s passengers and crew disembarked safely. The Black Ball Line's Melbourne agent sent a steamer to retrieve the passengers' baggage from the Schomberg. Other steamers helped unload her cargo until the weather changed and prevented the salvage teams from accessing the ship. Later one plunderer found a case of Wellington boots, but alas, all were for the left foot. Local merchants Manifold & Bostock bought the wreck and cargo but did not attempt to salvage the cargo still on board the ship. They eventually sold it on to a Melbourne businessman and two seafarers. In 1864 after two of the men drowned when they tried to reach Schomberg, salvage efforts were abandoned. In 1870, nearly 15 years after the wreck parts of the Schomberg had washed ashore on the south island of New Zealand. The wreck now lies in 825 meters of water and although the woodwork is mostly disintegrated the shape of the ship can still be determined due to the remaining railway irons, girders and the ship’s frame. A variety of goods and materials can be seen scattered about nearby.The bell is particularly significant in that along with other items from the wreck helped in part to having the legislation changed to protect shipwrecks, with far tighter controls being employed to oversee the salvaging of wreck sites. This bell forms part of the Schomberg collection at Flagstaff Hill maritime museum. The collection as a whole is of historical and archaeological significance at a State level. Flagstaff Hill’s collection of artefacts from the Schomberg is also significant for its association with the Victorian Heritage Registered Schomberg shipwreck (VHR S 612). The collection is of additional significance because of the relationship between the objects salvaged, as together they help us to interpret the story of the Schomberg. The collection as a whole is historically significant for representing aspects of Victoria's maritime history and its potential to interpret social and historical themes from society at the time of the wreck. A small ship’s bell. The bell bears the ship’s name and year of construction on one side and the name and address of the ship’s builders on the other. These details are deeply engraved into the metal and formed in bold upper-case lettering. The bell has two bell stands, a left and a right side. Both stands have an Iron pipe made into an inverted ‘Y’ shape with a hole made in the single length, and feet attached to a rectangular metal plate at the other two ends. Feet are bolted into a timber base that has a hole drilled through the centre for mounting. Bell's front; “SCHOMBERG” with “1855” below. Bell's back “HALL & SONS (crack splits letter “N”) / BUILDERS (in italics) / ABERDEEN” (crack splits letter “B”).flagstaff hill, flagstaff hill maritime museum and village, warrnambool, maritime museum, maritime village, great ocean road, shipwreck coast, schomberg, silver plated bell, mess bell, bell stands, captain ‘bully’ forbes, alexander hall and son, james baines and company, liverpool’s black ball line, bell, schomberg bell, ship's bell, small bell, st joseph's church, briggs marine -
 Melbourne Tram Museum
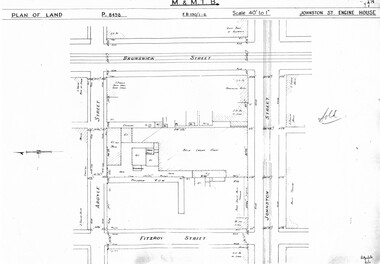
Drawing, Melbourne & Metropolitan Tramways Board (MMTB), "Johnston St Engine House", "Northcote Engine House", "Richmond Engine House", c1938
Set of four photocopied plans or drawings on A3 sheet of the "Johnston St Engine House", "Northcote Engine House" and "Richmond Engine House", c2/1938. .1 - Sheet 1 - P8498 - Plan showing land and surrounding streets for the "Johnston St Engine House" .1 - Sheet 2 - P8499 - Plan showing the layout of the engine house. Has a note sheets 1 and 2 that it has been sold .2 - P8506 -Plan showing land and surrounding streets for the "Northcote Engine House" - 2 copies held. .3 - P8607 - Plan showing Richmond Engine House and adjacent streets with sub-station next doortrams, tramways, drawings, depots, property, cable trams, winding houses, johnston st, northcote, richmond, hoddle st, bridge rd -
 Melbourne Tram Museum
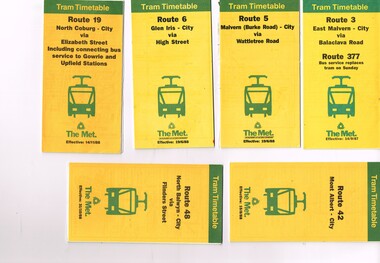
Ephemera - Timetable, The Met, Set of 12 Tram Timetables, produced by The Met, 1987 - 1989
Set of 12 Tram Timetables, produced by The Met for various routes, yellow cover with a green top band, multi fold horizontal sheet, giving a route map, description, notes, time points, information contact details and types of tickets (Neighbourhood and Travelcards) and where they could be purchased. .1 - Route 3 - East Malvern - City via Balaclava Road - replaced by bus 377 on Sundays - dated 14/9/1987 .2 - Route 5 - Malvern Burke Road - City via Wattletree Road - 19/6/1988 .3 - Route 6 - Glen Iris - City via High St - 19/6/1988 .4 - Route 19 - North Coburg - City via Elizabeth St including connecting bus service to Gowrie and Upfield stations - 14/11/1988 .5 - Route 42 - Mont Albert - City - 15/8/1988 .6 - Route 48 - North Balwyn - City via Flinders St - 31/10/1988 .7 - Route 55 - West Coburg - Domain Interchange via William St - 11/2/1987 .8 - Route 57 - West Maribyrnong - City via North Melbourne - Route 357 bus replaces tram on Sunday - 27/8/1989 .9 - Route 59 - Airport West - City via Essendon - 27/8/1989 .10 - Route 64 - East Brighton - City via Hawthorn Road - 14/9/1987 .11- Route 70 - Wattle Park (Elgar Road) Princes Bridge via Swan St - 31/10/1988 .12 - Route 86 - Bundoora - City via West Preston - 15/8/1988 Full Image of .4 added 9/4/17 following a query about route 19 timetables - see image i5.trams, tramways, timetables, tickets, tram services, route 3, route 5, route 6, route 19, route 42, route 48, route 55, route 57, route 59, route 64, route 70, route 86