Showing 2010 items
matching tram routes
-
 Eltham District Historical Society Inc
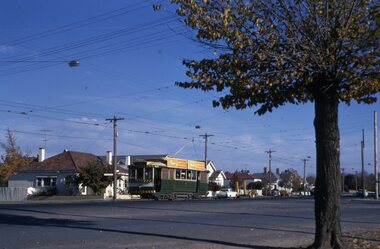
Photograph, Bendigo Tramways No. 26 en route to Eaglehawk outside the entrance to Bendigo Cemetery, Carpenter street, Quarry Hill, January 1972, Jan 1972
Looking south along Carpenter StreetDigital TIFF file Scan of 35mm Ilford FP3 black and white negative transparencybendigo, bendigo cemetery, bendigo tramways no. 26, carpenter street. quarry hill, eaglehawk, george coop collection, tram -
 Eltham District Historical Society Inc
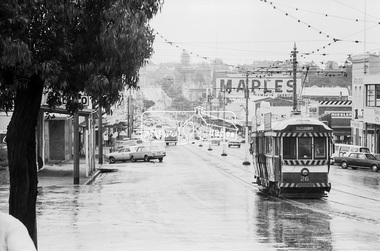
Photograph, Bendigo Tramways No. 26 descending Mitchell Street en route to Eaglehawk, January 1972, Jan 1972
Possibly Pall Mall, Bendigo, Mitchell StreetDigital TIFF file Scan of 35mm Ilford FP3 black and white negative transparencybendigo, bendigo tramways no. 26, eaglehawk, george coop collection, maples, pall mall, tram -
 Eltham District Historical Society Inc
Photograph, Bendigo Tramways No. 2 en route to Quarry Hill passes over the Mitchell Street Railway Bridge, Bendigo, January 1972, Jan 1972
Digital TIFF file Scan of 35mm Ilford FP3 black and white negative transparencybendigo, bendigo railway station, bendigo tramways no. 2, eaglehawk, george coop collection, mitchell street, railway line, tram -
 Eltham District Historical Society Inc
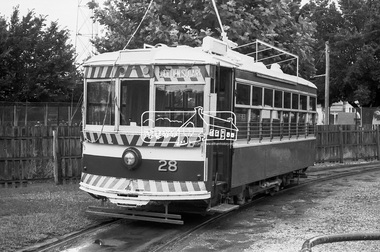
Photograph, Golden Square route Bendigo Tramways No. 28 parked, possibly near the Arnold Street Tram Depot, Bendigo, January 1972, Jan 1972
Birney (USA manufacture) tram carDigital TIFF file Scan of 35mm Ilford FP3 black and white negative transparencyarnold street depot, bendigo, bendigo tramways no. 28, eaglehawk, george coop collection, golden square, tram, birney (usa) tram car -
 Eltham District Historical Society Inc
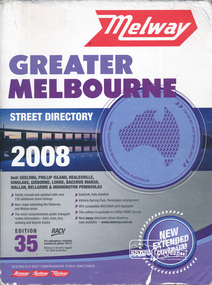
Book, Melway Greater Melbourne street directory 2008 : including Geelong, Phillip Island, Healesville, Kinglake, Gisborne, Lorne, Bacchus March, Wallan, Bellarine & Mornington Peninsulas; Edition 35, 2008, 2007
... routes information - train, tram, bus, walking and bicycle... routes information - train, tram, bus, walking and bicycle tracks ...Edition 35. 2008 Coloured detailed maps accessed by a street or location index. Cover: Totally revised and updated with over 730 additional street listings, new maps extending the Gisbourne and Wallan areas. The most comprehensive public transport routes information - train, tram, bus, walking and bicycle tracks. Eastlink fully detailed, Victoria Racing Club, Flemington enlargement, GPS compatible WGS/MGA Grid displayed, This editon is available in LARGE PRINT format, new eway electronic street directory now available - www.melway.com.au Special feature: New Hierachy of Roads Street directory, coloured maps, indexes, 1201 pagesstreets,roads,melbourne,map,melway -
 Tramway Heritage Centre
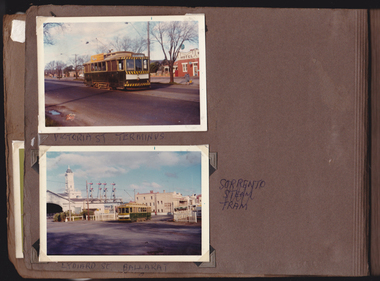
Photograph Album (part of), Ray Pearson's Photo Album - Trams of Victorian Railways, Ballarat, Bendigo, Geelong
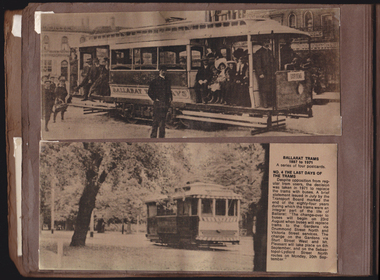
Page 2 of Ray Pearson's Photo Album. Brown card page with two photographs (landscape format) placed on page with plastic photo corners. The bottom photograph also has decorative metallic card photo corners beneath the newer plastic ones. Both photographs depict trams in streetscapes. The photo corner plastic is perishing and one photograph (top left) is loose on the page. Hand written inscriptions are written under the both photographs and also appear on the back of the loose photograph. One inscription beside the bottom photo is scribled out. Hand written inscription in biro under photographs. Top photo: VICTORIA ST TERMINUS Bottom photo: LYDIARD ST BALLARAT Beside bottom photo, scribbled out: SORRENTO STEAM TRAM To back of loose photograph - In top left corner with an underline: 8 To centre: Victoria St Terminus / Ent Route to Sardess / 20th Aug 1971 -
 Tramway Heritage Centre
Photograph Album (part of), Ray Pearson's Photo Album - Trams of Victorian Railways, Ballarat, Bendigo, Geelong
Page 4 of Ray Pearson's Photo Album. Brown card page with two metallic look postcards (landscape format) placed on page using clear plastic photo corners. Both postcard images depict trams in Ballarat. Both postcards have come loose of two of their photo corners (top and bottom on the left) and are not secure on the page.Printed text to back of postcard at top: BALLARAT TRAMS / 1887 to 1971 / A series of four postcards. / NO. 2 EARLY ELECTRIC TRAMS / Electric trams first ran in / Ballarat on 18th Aigust, 1905. / Twelve of the horse trams were / converted to electric cars by lengthening them at both ends. / Eight of the remaining horse / trams were used as trailers to / the motor cars. / The electric trams were / given a secret trial during the / previous night to the opening / date, but the drivers clanged / the gongs so much that it / brought people out of their / beds in night attire. They / formed an unofficial guard of / honour around Wendouree / Parade. / The trams were gaily decor- / ated for Opening Day. As the / line of cars came down Camp / Hill (Sturt Street) filled with / local dignitaries, the brakes on / the last car failed and it crashed / into the one in front. The win- / dows of both cars were / smashed, and the occupants / who had been sitting in state / made an undignified exit. / Seating accommodation was / from 32 to 36. Six small electric / trams were purchased from the / Sydney Tramways in 1905 and / were converted to a similar / pattern to the 12 re-built / Ballarat horse trams. In 1906 / two open summer cars with / open cross seats (popularly / called toast racks) / were intro- / duced. These trams were packed at week-ends with / families en route to picnic by / the lake. A fine printed vertical line runs down the centre of the blank writing space to the left of the body text. Above is written: POSTCARD Printed text to right of image on bottom postcard: BALLARAT TRAMS / 1887 to 1971 / A series of four postcards. / NO. 4 THE LAST DAYS OF THE TRAMS / Despite opposition from reg- / ular tram users, the decision / was taken in 1971 to replace / the trams with buses. A brief / statement issued in July by the / Transport Boar marked the / end of the eighty-four years / during which the trams were an / integral part of the life of / Ballarat: “The change-over to / buses will begin on 23rd / August when buses will replace / trams to the Gardens via / Drummond Street North and / Victoria Street services. The / change on the Gardens via / Sturt Street West and Mt. / Pleasant will take place on 6th / September, and on the Sebas- / topol-Lydiard Street North / routes on Monday, 20th Sep- / tember.” A fine printed vertical line runs down the centre of the blank writing space to the left of the body text. Above is written: POSTCARDpostcard, ballarat trams, ballarat tramways, vintage trams, tram postcard, electric trams -
 Melbourne Legacy
Photograph, Legacy Tram, 1995
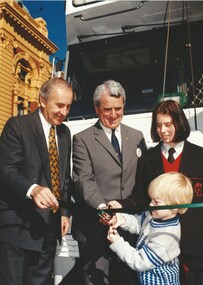
Photos from the 2 May 1995 when the Transport Minister, Mr Alan Brown and Legacy President David Millie unveiled banners at Flinders St Station saying "Australia Remembers". Also the launch of a tram by Junior Legatees Kim Anderson and Peter Hazelager. Another photo is a group of dignitaries in front of the tram. The tram was painted to promote Legacy in 1995 which was the 50th Anniversary of the end of World War II. Wording on the tram says: "This year - Australia remembers the Heroes of World War II / 50 years on / Legacy never forgets to care for the widows and children of those who fought for our freedom". It appeared in The Answer in June 1995 after it had been launched on May 2nd by President David Millie and Public Transport Minister, Mr Alan Brown. The ribbon was cut by Junior Legatees Kim Anderson and Peter Hazelager. "The distinctive white tram will be running on routes around Melbourne for at least six months and our thanks go to the Public Transport Corporation for making it possible." 01809.1 shows President Millie, Kim Anderson and Peter Hazelager. 01809.2 is Peter Hazelager being held by his mother, Margaret Anderson and Kim Anderson. 01809.4 is a Legatee, Minister Alan Brown, President Millie, a man in The MET uniform, Legatee Roger Greene.A record of a way to promote Legacy during Legacy Week in 1995.Colour photo x 6 of the launch of a tram painted to promote to Legacy at Flinders St Station.legacy promotion, answer, tram -
 Melbourne Legacy
Photograph, Legacy Tram, 1995
Photos of widows, legatees, President Millie and the Transport Minister riding in a tram that was decorated to promote Legacy in 1995. 1995 which was the 50th Anniversary of the end of World War II. Wording on the tram says: "This year - Australia remembers the Heroes of World War II / 50 years on / Legacy never forgets to care for the widows and children of those who fought for our freedom". It appeared in The Answer in June 1995 after the tram had been launched on May 2nd by President David Millie and Public Transport Minister, Mr Alan Brown. The ribbon was cut by Junior Legatees Kim Anderson and Peter Hazelager. "The distinctive white tram will be running on routes around Melbourne for at least six months and our thanks go to the Public Transport Corporation for making it possible." 01810.1 shows President David Mille, Legatee Roger Greene (seated in the centre) and others. 01810.2 shows David Millie with Minister for Transport Alan Brown. 01810.3 is Kim Anderson and her mother Margaret speaking with the Minister Legatee Lucky Luscombe is in 01810.6 and 01810.9 01810.7 shows legatee George Woodward with two widows eating snacks 01810.10 is a photo of 4 widows. Second from the left is Hazel McKean, then Lorraine Dalton, and Irene Noll on the right.A record of a way to promote Legacy during Legacy Week in 1995.Colour photo x 10 of a tram painted to promote to Legacy and widows riding the tram.legacy promotion, tram, answer -
 Melbourne Legacy
Photograph, Legacy Tram, 1995
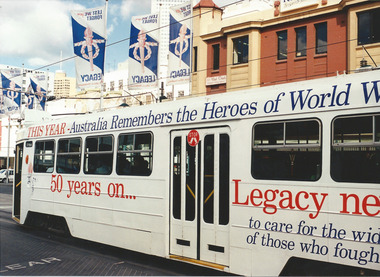
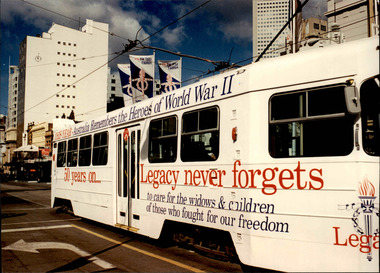
A photo of a tram painted to promote Legacy in 1995 which was the 50th Anniversary of the end of World War II. Wording on the tram says: "This year - Australia remembers the Heroes of World War II / 50 years on / Legacy never forgets to care for the widows and children of those who fought for our freedom". It appeared in The Answer in June 1995 after it had been launched on May 2nd by President David Millie and Public Transport Minister, Mr Alan Brown. The ribbon was cut by Junior Legatees Kim Anderson and Peter Hazelager. "The distinctive white tram will be running on routes around Melbourne for at least six months and our thanks go to the Public Transport Corporation for making it possible.A record of a way to promote Legacy during Legacy Week in 1995.Colour photo x 6 of a tram painted to promote to Legacy and widows riding the tram.Printed on the back " -
 Melbourne Legacy
Photograph, Legacy Week 1995, 1995
A photo of a tram painted to promote Legacy in 1995 which was the 50th Anniversary of the end of World War II. Wording on the tram says: "This year - Australia remembers the Heroes of World War II / 50 years on / Legacy never forgets to care for the widows and children of those who fought for our freedom". It appeared in The Answer in June 1995 after it had been launched on May 2nd by President David Millie and Public Transport Minister, Mr Alan Brown. The ribbon was cut by Junior Legatees Kim Anderson and Peter Hazelager. "The distinctive white tram will be running on routes around Melbourne for at least six months and our thanks go to the Public Transport Corporation for making it possible.A record of a way to promote Legacy during Legacy Week in 1995.Colour photo x 2 of a tram painted to promote to Legacy.legacy promotion, tram -
 Ballarat Tramway Museum
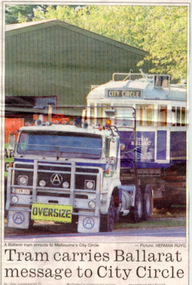
Newspaper, The Courier Ballarat, "Tram carries Ballarat message to City Circle", 24/02/1996 12:00:00 AM
Newspaper cutting from The Courier, Ballarat, Saturday 24/2/1996 of City of Ballarat Tram W4 671 leaving the depot on a low loader bound for Melbourne. Has front page colour photo of truck and tram at the rear of the depot in Gilles St. Tram has destination of 'City Circle'. Photo by Herman Ruyg. Accompanying item written by Ian Haberfield quoting Peter Hiscock about the tram and the running on the City Circle route in Melbourne. Also mentions Alan Brown, Public Transport Minister.trams, tramways, 671, btm, city of ballarat, city circle, melbourne -
 Ballarat Tramway Museum
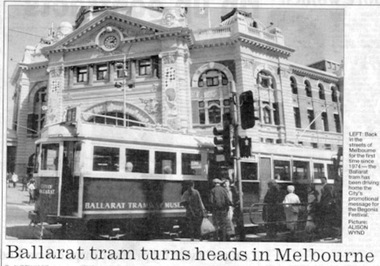
Newspaper, The Courier Ballarat, "Ballarat tram turns heads in Melbourne", 8/03/1996 12:00:00 AM
Newspaper cutting from The Courier, Ballarat, Friday 8/3/1996 of tram W4 671 running on the City Circle route with a black and white photo with Flinders St. station in the background. Picture and story by Alison Wynd. Quotes Warren Doubleday about the running of the tram in Melbourne, its promotional use and other details.trams, tramways, 671, btm, city of ballarat, city circle, melbourne -
 Ballarat Tramway Museum
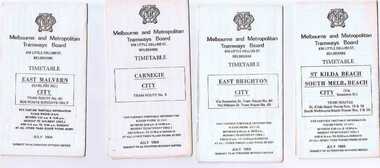
Ephemera - Timetable/s, Melbourne and Metropolitan Tramways Board (MMTB), Set of 24 MMTB Melbourne tram timetables, 1969
Set of 24 MMTB timetables for various routes, dated July 1969. Generally includes Sat and Suns, Good Friday and Christmas day as well as weekdays, unless noted otherwise. Also includes a map of the route, detailed time points, sections, connecting services, fares, and organisation address - 616 Little Collins St. Melbourne. Have been folded into ten portions. All on white paper unless noted otherwise. Items shown with an # - have a sticker modifying timetable information details on the front page. 1154.1 - Route 4 - Carnegie - City .2 - Route 4D - East Malvern (Darling Road) - City # .3 - Route 5 - Malvern Burk Road, - City # .4 - Route 6 - Glen Iris - City # .5 - Route 7 - Camberwell - City # .6 - Route 8 - Toorak - City # .7 - Routes 9, 10 and 12 - South Melbourne and St Kilda Beach - City (Brunswick St.) - via Collins St. .8 - Routes 10, 11 - West Preston and routes 9 & 9A Northcote .9 - Routes 15 & 22 - Moreland and 1 & 21 - East Coburg .10 - Route - 15 & 16 - St Kilda Beach and 1 & 2A - South Melbourne Beach - via Swanston St. .11 - Route 19 - North Coburg - City # .12 - Route 42 - Mont Albert - City # .13 - Routes 48 - North Balwyn and Burwood - City .14 - as above, but for Saturdays and Sundays on pink paper .15 - Routes 55 & 56, West Coburg - City - (William St.) - Domain Road. .16 - Route 57 - West Maribyrnong - City .17 - Route 59 - Essendon (Aerodrome) - City .18 - Route 64 & 65 - East Brighton - City .19 - Route 69 - Kew Cotham Road - St. Kilda Beach # .20 - Route 70 - Wattle Park - City # .21 - Routes 77 - Prahran - City, 78 - North Richmond - Prahran, 79 - North Richmond - St Kilda Beach .22 - Route 82 - Footscray to Moonee Ponds .23 - Route 88 - East Preston - City and Route 96, East Brunswick - City .24 - as above but for Saturdays and Sundays on pink paper. Images of a sample of documents added 16-11-2013.mmtb, timetables, melbourne -
 Ballarat Tramway Museum
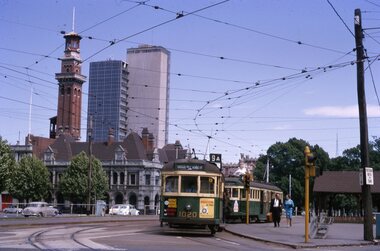
Slide - 35mm slide/s - set of 14, Noel Simons, 23/11/1962 12:00:00 AM
Set of 14 Kodachrome transparencies taken on 23/11/1962. 1162.1 - tram 38 turning into Lydiard St. North from Sturt St. with tram 20 in background. Many motor vehicles in photo. 1162.2 - as above, but a minute of so later. Has Mutual Life building in background as well as Town Hall. 1162.3 - No. 40 entering Albert St. from Skipton St. outbound to Sebastopol. 1162.4 - No. 40 near start of side of the road running in Albert St. heading to Sebastopol. 1162.5 - No. 40 at the City terminus, on the South side of Sturt St. Has Town Hall and other buildings along the south side of Sturt St. in the background. 1162.6 - No. 40 at Sebastopol terminus - shows arrangement of the signs at the terminus. 1162.7 - No. 40 and No. 38 crossing at loop between Sayle and Grey St. No. 40 inbound. 1162.8 - No. 40 turning from Drummond St. South to Sturt St. at Hospital Corner with Southern Cross Hotel in background. 1162.9 - No. 18 in Wendouree Parade near Forest St. heading east with destination of "Victoria St." 1162.10 - Nos 41 and 39 at Depot Junction. Both trams have SEC ads. 1162.11 - No. 39 turning into the depot from Wendouree Parade - showing destination of "Gardens via Drummond Nth" 1162.12- No. 17 at Lydiard St. North terminus, showing destination of "Grey St. Sebas". Has a Twin Lakes sign 1162.13 - ditto, but with trolley pole turned around. Has SEC Briquettes roof ad and Whitehorse whiskey ad on rear dash panel. 1162.14 - No. 40 outbound to Sebastopol crossing Albert St. 1162.1 -"Nos. 38 and 20 in Sturt St. Ballarat at corner of Lydiard St." 1162.2 - "No. 38 turns into Lydiard St. as No. 20 waits at stop in Sturt St. Ballarat" 1162.3 - "No. 40 entering Albert St. from Skipton St. Redan on Sebastopol route." 1162.4 - "No 40 at beginning of reserved track on Sebastopol route, Albert St. Redan." 1162.5 - "No. 40 in Sturt St. Ballarat near cnr. of Armstrong St." 1162.6 - "No. 40 at Sebastopol terminus" 1162.7 - "No. 38 and 40 crossing at Sayle St. Loop on Albert St. reserved track, Sebastopol route" 1162.8 - "No. 40 turning into Sturt St. from Drummond St." 1162.9 - "No. 18 in Wendouree Pde. Ballarat near tramway depot" 1162.10 - "No. 41 and 39 outside Ballarat tramway depot, Lake Wendouree in background" 1162.11 - "No. 39 entering tramway depot from Wendouree Parade, Ballarat" 1162.12 - "No 17 at Lydiard St. North terminus, Ballarat North" 1162.13 - "No 17 at Lydiard St. North terminus, Ballarat North" 1162.14 - "No. 40 crossing Albert St. Sebastopol as reserved track switches from left to right of road" All have date stamp of "23 Nov. 1962" in purple ink. All black ink unless otherwise noted.tramways, trams, ballarat, albert st., sturt st., sebastopol, grey st., hospital corner, wendouree parade, depot junction, lydiard st. north, tram 17, tram 18, tram 20, tram 38, tram 39, tram 40, tram 41 -
 Ballarat Tramway Museum
Slide - 35mm slide/s - set of 2, Noel Simons, Nov. 1970
Set of 2 Kodak Ready-mount with slides made from the Association of Railway Enthusiast Provincial Tramways film strip. 1166.1 - No. 31 at the View Point terminus, corner of Wendouree Parade and Macarthur St., shows tram and section arrangements on poles. Also has SEC tramway shelter alongside stop. Tram has destination of "View Point" 1166.2 - No. 38 crossing Albert St. en route to Sebastopol.1166.1 - "No. 21 at View Point terminus. Line of left is that for cars on "Gardens via Drummond St. Nth" route." 1166.2 - "No. 38 crossing Albert St. near Sebastopol terminus" All have date stamp of "Nov. 1970" in blue ink. Writing in blue ink.tramways, trams, view point, wendouree parade, albert st, sebastopol, tram 21, tram 38 -
 Ballarat Tramway Museum
Slide - 35mm slide/s - set of 9, Noel Simons, Sept. 1971
Set of 9 Kodak Ready-mount with slides made from the Association of Railway Enthusiast Provincial Tramways film strip. Reference Item 2560 details the ARE Film Strip, and provide references to other slides. See also Reg. item 1164. 1174.9 on plain white mount. 1174.1 - Tram 40 North bound for Lydiard St. North at the Railway Gates, with the gates closed. Tram carrying a heavy load of passengers. Railway station building and car park in background. Taken from the signal box. 1174.2 - Tram 12 bound for Gardens, photographed across the median strip plantation near Dawson St. Image i2a - adjusted 9/2021 to remove colour cast. 1174.3 - Tram 43 in bound along Wendouree Parade near Barrett Ave, passing a former tram stop and with "Warning Oncoming Trams" sign mounted on an adjacent pole. See also Reg. item 1172.1 for a photo taken in May 1971. This photo taken after the closure of the Victoria St. line, as the tram stop has been painted out. 1174.4 - Looking along the track to Sebastopol terminus on the west side of Albert St. - telephoto shot showing bogie tram in the far distance. Shows the nature of the track, poles, tram stop frequency and in the fare distance the terminus. Also show the trees that used to be along this section of the track. 1174.5 - No. 42 showing "Special" in Macarthur St. approaching Drummond St. north. Photo taken from under the verandah of a shop on the south side of the street that were many years later to become the Tramcar Restaurant. Note metal fence to cemetery. 1174.6 - Nos. 21 (Sebastopol) crossing 14 (Lydiard St. Nth) at the loop between Sayle and Grey St. Photo taken looking south. 1174.7 - No. 12 bound for Mt Pleasant, in Bridge St. about to stop at the junction for the two routes. Telephoto photo looking west along Bridge St. with many cars in the photo. Very few people on the street itself. 1174.8 - No. 30 and 17 at the City Terminus, on the north side of Sturt St. Taken from the Post Office corner with the Town Hall in the background. 1174.9 - No. 39 inbound along Sturt St. West. with many cars on the road. Bus stop on a pole on the other side of the road.1174.1 - "No. 40 on Lydiard St. North service waits at the level crossing at Ballarat Railway Station." 1174.2 - "No. 12 bound for 'Gardens' seen across the centre plantation in Sturt St." 1174.3 - "Barrett Ave." 1174.4 - "The Sebastopol route near the terminus" 1174.6 - "Nos. 21 and 14 crossing at Sayle St. Loop on Sebastopol route" 1174.7 - "No. 12 at Eastern end of Bridge St." 1174.8 - "Nos. 30 and 17 in Sturt St. at Cnr of Lydiard St." 1174.9 - "No. 39 City bound from 'Gardens" in Sturt St. West" All have date stamp of "Sep 1971" in black ink. Writing in blue ink.tramways, trams, lydiard st. nth, railway crossing, sturt st, wendouree parade, sebastopol, macarthur st., bridge st., sturt st. west, tram 12, tram 14, tram 17, tram 21, tram 30, tram 39, tram 40, tram 42, tram 43 -
 Ballarat Tramway Museum
Slide - 35mm slide/s - set of 11, Noel Simons, 23/10/1965 12:00:00 AM
Set of 11 Kodachrome transparencies taken on 23/10/1965 in Melbourne. 1178.1 - W7 1020 (on route 9A, Northcote via St Georges Road) with a W2 536 (Deepdene) behind at the corner of Victoria Parade and Brunswick St. East Melbourne or Fitzroy. Has Eastern Hill fire station and ICI building in background. 1020 has front dash panel ads for Queens Bridge Motors and Bridgestone tyres. 1178.2 - W5 759 (route 19, North Coburg) and W5 807 in Elizabeth St. Melbourne at the intersection of Bourke St. with the State Savings Bank building in the background. 759 has side ads, one of which is for CASTROL. 1178.3 -SW6 903 crossing Brunswick St. in Victoria Parade, Fitzroy bound for Deepdene, route 45. Photo taken after tram has passed photographer. 1178.4 - W7 1019 (route 96, East Brunswick Blyth St.) and W7 1010 (route 88 East Preston) in Nicholson St at intersection with Victoria Parade. A Herald newspaper truck is alongside 1019. 1178.5 - W7 1040 (route 96, East Brunswick Blyth St.) in Nicholson St at intersection with Albert St. Has Princess Theatre in the background. (High res scan added 26/10/2008 - copy to FOHTD) .1178.6 - W6 974 (route 89 East Preston Bell St.) in Bourke St. about to turn into Spring St. Has buildings on the south side of Bourke St in background, including Southern Cross Hotel. Note trees in tubs and red phone box by Windsor Hotel. 1178.7 - as for same location as 1178.6 - SW6 967 (route 96) and W6 971 (inbound - route 90 - City Spencer St.) 967 has Lucas ad on front dash. 1178.8 - W7 1013 (route 88 East Preston) photographed from W6 991 in Bourke St at corner of Russell St. Has Normans corner store, Treadways and Foys in background. 1178.9 - W2 553 (route 1 East Coburg) at the corner of Elizabeth St and Bourke St. Has the Leviathan, Roger David and Ezywalkin shops in the background. 1178.10 - W6 991 (route 88) and W7 (route 96) in Bourke St. at corner with Elizabeth St. Photo taken from the GPO steps. 991 has ads for BIC pens and CASTROL. In background are the State Savings Bank, Halls Books and McEwans shops. 1178.11 - Line up of north bound trams (3 +) lead by W2 449and southbound in Elizabeth St at corner of Collins St. Has Flinders St. station building in the background. Hi -res image of .10 added 22-12-2018All have date stamp of "23 Oct 1965" in purple ink. All black ink unless otherwise noted. 1178.1 - "W7 1020 turning into Brunswick St. from Victoria parade, East Melbourne (followed by W2 536) 1178.2 - "W5 799 and 807 in Elizabeth St. Melbourne at cnr. of Bourke St." 1178.3 - "SW6 903 entering reserved track in Victoria Parade, East Melbourne" 1178.4 - "W7 1019 and 1010 in Nicholson St. East Melbourne at Victoria Pde intersection" 1178.5 - "W7 1040 Melbourne's last tram (to date) in Nicholson St. at Albert St. intersection." 1178.6 - "W6 974 in Bourke St. Melbourne, about to turn into Spring St." 1178.7 - "W6 971 entering Bourke St. from Spring St. Melbourne, passes SW6 967 outward bound for East Brunswick" 1178.8 - "W7 1013 (seen from W6 991) in Bourke St. Melbourne crossing Russell St." 1178. 9 -"W2 553 in Elizabeth St. Melbourne at cnr of Bourke St." 1178.10 - "W6 991 and W7 1005 in Bourke St. Melbourne at cnr of Elizabeth St." 1178.11 - "W2 449 leads a line of Peak hour cars along Elizabeth St. Melbourne (at Collins St. corner)"tramways, trams, melbourne, victoria parade, nicholson st., brunswick st., bourke st, elizabeth st, tram 1020, tram 536, tram 799, tram 807, tram 903, tram 1019, tram 1010, tram 1040, tram 974, tram 967, tram 971, tram 1013, tram 553, tram 991, tram 1005, tram 449 -
 Ballarat Tramway Museum
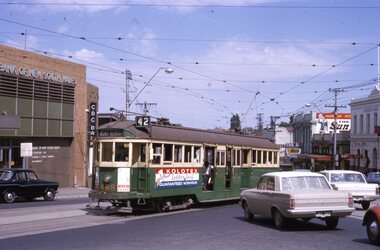
Slide - 35mm slide/s - set of 7, Noel Simons, 23/10/1965 12:00:00 AM
Set of 7 Kodachrome transparencies taken on 23/10/1965 in Melbourne. 1179.1 - W2 488 (route 42, Mont Albert) at the corner of High St. and Cotham Road Kew. Taken from Kew Post Office, has Bank of New South Wales in the background, CBC bank and the Greyhound Hotel. Tram has ads for Kolotex stockings and Ryco oil filters. 1179.2 - SW2 436, in bound (route 45, City) leaving Cotham Road, about to join High St, Kew. Buildings on the south side of Cotham Road in photo. Tram has an ad along with others for Vincent's powders. 1179.3 - W2 545 (route 48, North Balwyn) in High St. Kew. Has Commercial bank in background along with other shops. 1179.4 - W2 648 (route 42, Mont Albert) turning from High St. South into High St at Kew Junction, with Clifton Hotel in background. Tram has an ad for Kenric clothes. Note an MFBB street fire alarm by the tram stop. 1179.5 - W2 566 (inbound route 42, City) at same location as 1179.5. Tram has a Jex and a Remy Martin Brandy ads. on front dash panel. 1179.6 - W2 572 entering Victoria Parade from Brunswick St. Fitzroy. Tram has a Jex and a Remy Martin Brandy ads. on front dash panel. Eastern Hill Fire Station and ICI building in background. 1179.7 - W2 378 (inbound, route 45, City) and W2 572, inbound, in Victoria Parade between Brunswick St and Gismo St. East Melbourne. Otherwise as for 1179.6.All have date stamp of "23 Oct 1965" in purple ink. All black ink unless otherwise noted. 1179.1 - "W2 488 Entering Cotham Rd. from High St. Kew" 1179.2 - "SW2 436 in Cotham Rd., Kew, about to enter High St." 1179.3 - "W2 545 in High Street Kew, nearly opposite Cotham Road" 1179.4 - "W2 648 entering High Street from High Street South, Kew". 1179.5 - "W2 566 entering High St. South from High St. Kew" 1179.6 - "W2 572 entering Victoria Pde from Brunswick St. East Melbourne" 1179.7 - "W2 378 and 572 in Victoria Pde between Brunswick and Gisborne Sts. East Melbourne."tramways, trams, kew, high st kew, cotham road, victoria parade, melbourne, tram 545, tram 488, tram 436, tram 648, tram 566, tram 572, tram 378 -
 Ballarat Tramway Museum
Slide - 35mm slide/s - set of 17, Noel Simons, 20/11/1962 12:00:00 AM
Set of 17 transparencies taken on 20/11/1962 on Kodak mounts. 1187.1 - Bendigo No. 2 at the Quarry Hill terminus, showing destination of Quarry Hill. Has Cohns Drinks and Streets Ice Cream ads on dash panel, a SEC 'electric cooking' roof ad and another roof ad. Shows the Y terminus at this location, but tram standing just before it. Overhead in position. 1187.2 - as above, but closer up. 1187.3 - as above, but from the north side, showing cemetery in the background. 1187.4 - Bendigo No.3 at Eaglehawk terminus. Tram showing destination of Quarry Hill. Has the various buildings at Eaglehawk in the background including the Foodland store. Has Streets Ice cream and White Horse Whiskey ads on the dash panel. 1187.5 - Bendigo No. 18 at Garden Gully crossing loop, in bound, with destination of Eaglehawk. Passengers waiting for an Eaglehawk tram at the stop. Has a white horse whiskey ad on dash panel and SEC roof ads. Conductor standing in doorway looking out. 1187.6 - Bendigo No. 7 inbound in Nolan St. at cnr of McCrae St. showing destination of Golden Square. Has Streets Ice cream ad on dash panel and a Castrol Roof ad. 1187.7 - Bendigo No. 19 at the North Bendigo terminus with railway level crossing in background. Tram has a Cohns Drinks ad and an SEC 'Electric Cooking' roof ad. 1187.8 - Bendigo No. 2 at the Quarry Hill terminus, looking back into Bendigo, showing destination of Eaglehawk. 1187.9 - Bendigo No. 21 in McCrae St, near Nolan St outbound for North Bendigo. Photo taken after tram has passed photographer. 1187.10 - Bendigo Nos. 4 and 26 at Charing Cross in View St. with fountain alongside and the Beehive, Ezywalkin Buildings in the background. No. 26 has a Sandhurst Milk and SEC 'Electric Cooking' roof ad. 1187.11 - close up of 22E maximum traction truck and folded footstep. 1187.12 - Bendigo No. 19 at Charing Cross terminus, after tram has passed photographer, showing destination of North Bendigo, with the Beehive building in the background and passengers boarding tram. 1187.13 - Bendigo No. 11, turning from View St. into Pall Mall, showing Special with the conductor holding point bar. Has the Beehive and Ezywalkin Buildings in the background. 1187.14 - No. 7 at Charing Cross terminus, in Pall Mall, bound for Golden Square. Has the Beehive and Ezywalkin buildings in the background and passengers waiting at the tram stop. 1187.15 - No. 18 at the Charing Cross terminus, bound for Eaglehawk. Has the Beehive and Ezywalkin buildings in the background and passengers waiting at the tram stop. Also has the 'Safety Zone' sign in the photograph. 1187.16 - No. 2 at Quarry Hill terminus, night or dusk photo. Tram showing destination of Depot. 1187.17 - No. 26 at Charing Cross, night photo. Tram has destination of Quarry Hill, but is on the line for Eaglehawk. Photo looks along Mitchell St. Also shows Safety Zone sign. Information written on in black ink and date stamped on purple ink. 1187.1 - "No. 2 at Quarry Hill terminus Bendigo" 1187.2 - "No. 2 at Quarry Hill terminus Bendigo" 1187.3 - "No. 2 at Quarry Hill terminus Bendigo" 1187.4 - "No. 3 at Eaglehawk terminus" 1187.5 - "No. 18 in Mt Korong Road, Long Gully at cnr of Havilah Road (Eaglehawk Route)" 1187.6 - "No. 7 in Nolan St. Bendigo, at Cnr of McCrae St., near lake Weeroona, (North Bendigo Route)' 1187.7 - "No. 19 at North Bendigo terminus" 1187.8 - "No. 2 at Quarry Hill terminus" 1187.9 - "No. 21 in McCrae St. Bendigo, near Nolan St. (North Bendigo Route) 1187.10 - "4 and 26 at Alexandra Fountain, Charing Cross Bendigo" 1187.11 - "Truck of Bogie Car, Bendigo Tramways" 1187.12 - "No. 19 in Pall Mall at Charing Cross, Bendigo" 1187.13 - "Birney car No. 11 entering Pall Mall from View St. at Charing Cross Bendigo" 1187.14 - "No. 7 in Pall Mall at Charing Cross, Bendigo" 1187.15 - "No. 18 at Alexandra Fountain, Charing Cross, Bendigo" 1187.16 - "No. 2 at Quarry Hill terminus, Bendigo" 1187.17 - "No. 26 at Alexandra Fountain, Charing Cross, Bendigo" tramways, trams, bendigo, quarry hill, eaglehawk, north bendigo, maximum traction, night photo, tram 2, tram 3, tram 4, tram 7, tram 11, tram 18, tram 19, tram 21, tram 26 -
 Ballarat Tramway Museum
Slide - 35mm slide/s, Noel Simons, 21/11/1962 12:00:00 AM
Set of 17 transparencies taken on 21/11/1962 on Kodak mounts. 1188.1 - Bendigo No. 11 at Depot Junction McCrae and Arnold St. with driver/conductor changing points. 1188.2 - Bendigo No. 4 at Charing Cross, side on photo, with City Club Hotel and Alexandra Fountain in the background. Tram has Castrol and SEC 'Electric Cooking' ads. 1188.3 - Bendigo No. 4 climbing View St. after tram has passed photographer. Tram has Streets Ice Cream and Cohns Soft Drinks ad on rear dash panel. In the background are the buildings in View St., including the Princess Theatre. Tram has destination of Eaglehawk. 1188.4 - Trams 2 and 4 crossing at the California Gully or Thorpe St Loop. 1188.5 - Bendigo 4 in Mt Korong Road. Tram inbound with destination of Quarry Hill, just leaving Garden Gully Loop. 1188.6 - Bendigo 4 and 17 crossing at the Hayes St. or Iron Bark Gully Loop. No. 17 bound for Eaglehawk, No. 4, Quarry Hill. 17 has two SEC roof ads and a white horse whiskey ad. 1188.7 - No. 17 bound for Eaglehawk, soon after leaving California Gully. Has large mullock heap in background. 1188.8 - Bendigo 2 and 17 crossing at the Thorpe St. or California Gully Loop. Has butchers shop in background. 1188.9 - Bendigo 17 at the Eaglehawk terminus. Has destination of Quarry Hill. In background is the hotel and shops at the terminus, showing ads for "Melbourne Bitter". Tram has two SEC 'Electric Cooking' ads. Driver and conductor about to assist two lady passengers with a pram and baby. 1188.10 - No. 17 at Eaglehawk terminus, awaiting departure. Has Eaglehawk Town Hall and Post Office in background. Tram has a Whitehorse Whiskey ad on the front dash panel. 1188.11 - No. 3 in High St. Eaglehawk, with destination of Eaglehawk. Has the shops on the south side of High St. in the background, including the Eaglehawk fish shop. Tram has two roof ads, one an SEC roof ad, and Cohns Drinks and Streets Ice cream ads on front dash panel. 1188.12 - as above, but after tram has passed photographer. Note the centre of the road poles. 1188.13 - No. 2 outbound for Eaglehawk at the intersection of Mt. Korong Road and the Calder Highway. Photo taken after the tram has passed the photographer. Has an Ampol service station in the background. 1188.14 - No. 11 leaving the Bendigo depot, crossing the bridge, with the Scrubber car in the background. 1188.15 - No. 21 at the North Bendigo terminus. Tram has destination of Golden Square and Cohns drink ad on front dash and two roof ads on side. 1188.16 - No. 11 on Golden Square route, in High St. at intersection with Old High St. 1188.17 - No. 11 at the Golden Square terminus, conductor turning the pole. Hotel on the left side of the photo. Note the road works barrier and red flag behind the tram. Slide has an end of roll mark on the right hand side of the image.Information written on in black ink and date stamped on purple ink. 1188.1 - "Birney car No. 11 in McCrae St. at Cnr of Arnold about to run into depot, Bendigo" 1188.2 - "No. 4 at Alexandra Fountain, Charing Cross Bendigo" 1188.3 - "No. 4 climbing the View St. Hill from Charing Cross, Bendigo (Eaglehawk Route)" 1188.4 - "No. 4 and 2 at Thorpe St. Loop, California Gully" 1188.5 - "No. 4 in Mt Korong Rd., Long Gully, Near Havilah Rd. (Bendigo) (Eaglehawk Route)" 1188.6 - "Nos. 17 and 4 crossing on Hayes St. Loop, Ironbark, Bendigo" 1188.7 - "No. 17 soon after leaving California Gully (Eaglehawk Route)" 1188.8 - "No.2 and 17 crossing on Thorpe St. Loop, California Gully (Eaglehawk Route)" 1188.9 - "No. 17 at Eaglehawk terminus" 1188.10 - "No. 17 at Eaglehawk terminus" 1188.11 - "No. 3 in High St. Eaglehawk" 1188.12 - "No. 3 nearing Eaglehawk terminus" 1188.13 - "No. 2 in Mt. Korong Rd., Ironbark. Calder highway on left (Eaglehawk route) 1188.14 - "Birney car No. 11 leaving Bendigo depot. Scrubber car at rear" 1188.15 - "No. 21 at North Bendigo Terminus" 1188.16 - "Birney car No. 11 in High St. Bendigo at intersection with Old High Street (Golden Square Route)" 1188.17 - "Birney Car No. 11 at Golden Square terminus, High St., Bendigo". tramways, trams, bendigo, depot junction, charing cross, view st., eaglehawk, north bendigo, golden square, tram 2, tram 3, tram 4, tram 11, tram 17, tram 21, tram scrubber -
 Ballarat Tramway Museum
Slide - 35mm slide/s - set of 4, Noel Simons, Apr. 1967
... No. 23 at Needle Loop en route to Eaglehawk. Tram has two SEC... at Needle Loop en route to Eaglehawk. Tram has two SEC roof ads, one ...Set of 2 slides made from the Association of Railway Enthusiast Provincial Tramways film strip, possibly during April 1967. 1192.1 and 1192.3 mounted in Kodak Ready Mounts. The others in plain white mounts. Slides dated Dec. 1968. 1192.1 - No. 21 out bound to Golden Square in High St., between Wattle and Vine Streets. Photo taken after tram has passed photographer. Has a sign for "Reid's Furnituorium" in the background. 1192.2 - Bendigo No. 28 dressed up as Myers Christmas tram, passing the Post Office and Courts in Pall Mall. 1192.3 - Bendigo No. 23 at Needle Loop en route to Eaglehawk. Tram has two SEC roof ads, one "Electric Cooking" and the other "Everything fine in my all electric kitchen". 1192.4 - Bendigo scrubber parked at the end of the main depot lead, alongside the depot office buildings.Details in blue ink, date hand stamped in purple ink. 1192.1 - "No. 21 heads along High St for Golden Square between Wattle and Vine Streets." 1192.2 - "Birney No. 28 in Christmas Garb, traverses Pall Mall en route to North Bendigo". 1192.3 - "No. 23 at Needle Loop on its run to Eaglehawk". 1192.4 - "Scrubber car at Bendigo Depot".tramways, trams, north bendigo, bendigo, bridge st loop, depot, tram 21, tram 23, tram 28, tram scrubber -
 Ballarat Tramway Museum
Slide - 35mm slide/s - set of 24, Noel Simons, 20/05/1971 12:00:00 AM
Set of 24 transparencies taken on 20/5/1971 on Kodak mounts. 1195.1 - Bendigo 19 arriving at Charing Cross en route to North Bendigo with Fountain Plaza and the City Family Hotel in the background. No. 19 has two roof ads for the SEC. -'Electricity better for cooking' and 'Everything's under control in my all electric kitchen' 1195.2 - as above, but standing at the Charing cross stop, with the Beehive Stores and other buildings along the east side of Pall Mall in the background. 1195.3 - No 21 ex Golden Square crossing View St. trackwork in front of No. 25 waiting to depart for Quarry Hill. No.21 has two roof ads (as for No.19 in 1195.1) and No.25 has one SEC roof ad and another. Ezywalkin sign in the background, and Fountain Plaza. 1195.4 - as for 1195.3, but after 21 has arrived and 25 left for Quarry Hill. Has Ezywalkin store and the Beehive store in the background. 1195.5 - No. 5 at the Eaglehawk terminus. Photo taken with a cannon in foreground looking along High St. Eaglehawk. Has shops on the west side of High St. in the background. 1195.6 - No. 5 at the Eaglehawk terminus, close up of the rear of the tram - note tow bar arrangement. Has destination of Quarry Hill. 1195.7-Nos.25 and 5 crossing at the Thorpe St. Loop, California Gully. No. 25 bound for Eaglehawk (has SEC Briquette and electric cooking roof ads) and 5 en route for Quarry Hill with a SEC and Cinzano roof ad. 1195.8 - as for 1195.7, but after trams have passed each other. Has Borough Auto Service building in the background. 1195.9 - No. 5 in Mt Korong Road, towards Bamard Street, photo taken after tram has passed photographer. 1195.10 - No. 30 at the Golden Square terminus with the Milk Bar on the right hand side of the photograph. 1195.11 - No. 30 inbound at Fire Station Loop, High St. Golden Square. Has old fire station in the background. Passengers are boarding the tramcar. 1195.12 - No. 30 in High St, bound for North Bendigo between Vine and Wattle Streets. 1195.13 - No. 5 bound for Eaglehawk waits at Iron Bark Gully Loop, at Hayes St. 1195.14 - No. 5 and No. 2 crossing at Iron Bark Gully Loop. 1195.15 - No. 5 bound for Eaglehawk leaving the Manchester Loop, Long gully. 1195.16 - No. 5 passing William Street, Long Gully en route to Eaglehawk. 1195.17 - No. 5 just before the California Gully Crossing Loop. 1195.18 - Nos. 5 and 26 crossing at California Gully crossing Loop. No. 5 heading to Eaglehawk, 26, Quarry Hill. 1195.19 - No. 5 in High St. Eaglehawk with Bob Moyle's Victoria Hotel and the TAB in the background. 1195.20 - No. 5 in High St. Eaglehawk approaching the terminus. Photo taken after the tram has passed the photographer. Has Foodland store and J. Best Fruit supply in the background, along with Eaglehawk Town Hall. 1195.21 - No. 5 at the Eaglehawk terminus, photo taken along seldom used track along High St. 1195.22 - as for 1195.22 - but at the very end of the track. 1195.23 - No. 5 en route for Quarry Hill climbs High St. Eaglehawk with the Victoria Hotel and Eaglehawk Town Hall in the background. 1195.24 - No. 5 and 25 crossing at Jobs Gully Loop. Note 25 has a black on white destination roll, while No. 5 has a white on black destination roll. Information written on in black ink and date stamped on purple ink. 1195.1 - "No. 19 arrives at Charing Cross Bendigo from Golden Square" 1195.2 - "No. 19 about to leave Charing Cross for North Bendigo" 1195.3 - "No. 25 awaiting departure for Quarry Hill, watches No. 21 arrive at Charring Cross from Golden Square" 1195.4 - "No. 21 on North Bendigo service and No. 25 on Quarry Hill run await departure at Charing Cross" 1195.5 - "No. 5 at Eaglehawk terminus" 1195.6 - "No. 5 at Eaglehawk terminus" 1195.7 - "Nos. 5 and 25 crossing at Thorpe St. Loop, California". 1195.8 - "Nos. 25 and 5 crossing Thorpe St. Loop, California Gully". 1195.9 - "No. 5 descending Mt Korong Rd. towards Bamard St." 1195.10 - "Birney car No. 30 at Golden Square terminus" 1195.11 - "Birney car No. 30 in High Street near Thistle Street (Fire Station Loop)" 1195.12 - "No. 30 in High St. between vine and Wattle Streets" 1195.13 - "No. 25 at Hayes Street Loop Iron Bark". 1195.14 - "Nos. 2 and 5 crossing at Hayes Street Loop Iron Bark" 1195.15 - "No. 5 at Manchester Loop opposite Havilah Road, Long Gully" 1195.16 - "No. 5 passing William Street, Long Gully". 1195.17 - "No. 5 at California Gully" 1195,18 - "Nos. 26 and 5 at Thorpe St. Loop, California Gully". 1195.19 - "No. 5 in High St. Eaglehawk". 1195.20 - "No. 5 approaching Eaglehawk terminus" 1195.21 - "No. 5 at Eaglehawk terminus" 1195.22 - "No. 5 at Eaglehawk terminus" 1195.23 - "No. 5 in High St. Eaglehawk" tramways, trams, bendigo, charing cross, eaglehawk, california gully, golden square, iron bark gully, jobs gully, tram 2, tram 5, tram 19, tram 21, tram 25, tram 26, tram 30 -
 Ballarat Tramway Museum
Slide - 35mm slide/s - set of 20, Noel Simons, 21/05/1971 12:00:00 AM
Set of 20 transparencies taken on 21/5/1971 on Kodak mounts. 1197.1 - Bendigo No. 5 en route to Eaglehawk at Creeth St Long Gully. Tram has a SEC roof ad and Cinzano roof ad. 1197.2 - No 5 approaching Needle Loop between Long Gully and California Gully. On left hand side is the City of Bendigo sign, indicating city boundary. 1197.3 - As for 1197.2 but actually entering loop. Photo taken after tram has passed photographer. 1197.4 - No. 26 bound for Eaglehawk descending the railway bridge near Eaglehawk, at Jobs Gully. 1197.5 - as for 1197.4, but after crossing bridge, now ascending a hill. Photo taken after tram has passed photographer. 1197.6 - No. 26 climbing High St. hill Eaglehawk, nearing end of Double track, bound for Quarry Hill. Shows centre of the road poles. 1197.7 - As for 1197.6, with tram entering single track section. Photo taken after tram has passed photographer. Has a BP service station in the background. 1197.8 - No. 26 (bound for Quarry Hill) crossing No. 17 (Eaglehawk) at Job's Gully Loop. 1197.9 - No. 17 climbing railway bridge at Job's Gully, en route to Eaglehawk. Photo taken after tram has passed photographer. 1197.10 - No.26 bound for Quarry Hill, leaving Long Gully Loop? Has the Creeth St. church in l197.l in the far background. Photo taken after tram has passed photographer. 1197.11 - Tramway Point work at the northern end of Long Gully Loop. 1197.12 - No. 17 en route for Quarry Hill turning into View St. from Bamard St. Tram has SEC roof ads "Everything fine in my all electric Kitchen' and 'Electric Cooking is Matchless'. 1197.13 - as for 1197.12, but tram has turned into View St and about to enter the double line track. Photo taken after tram has passed photographer. 1197.14 - No. 21 enters Nolan St after turning from MacRae St. en route to Bendigo. Note sign on its own post noting tram turns "Beware Tram Turns" and stop sign on adjacent pole "Trams stop on Request". No. 21 has two SEC roof ads. 1197.15 - No. 21 in Nolan St. after turning from Bridge St. (White Hills Road). Note signal light for Bridge St. loop on pole corner of street. Photo taken after tram has passed photographer. 1197.16 - No. 2 bound for Eaglehawk at unknown location. 1197.17 - Tram stop sign on a pole "CARS STOP BY REQUEST" 1197.18 - No. 5 in Carpenter St.? en route to Quarry Hill. 1197.19 - No. 28 has just arrive at Golden Square terminus, passengers are disembarking and the trolley pole is being turned. Golden Square Hotel in the background. 1197.20 - No. 28 at Golden Square terminus. Has a "Nothing beats Briquettes for hear roof ad. Information written on in black ink and date stamped on purple ink. 1197.1 - "No. 5 at Creeth St. Long Gully" 1197.2 - "No. 5 approaching Needle Loop between Long Gully and California Gully" 1197.3 - "No. 5 at Needle Loop between Long Gully and California Gully" 1197.4 - "No. 26 crossing railway bridge at Job's Gully near Eaglehawk" 1197.5 - "No. 26 just after crossing railway bridge at Job's Gully near Eaglehawk/ 1197.6 - "No. 26 in High St. Eaglehawk" 1197.7 - "No. 26 at end of double track in High St. Eaglehawk" 1197.8 - "Nos. 26 and 17 crossing at Job's Gully Loop" 1197.9 - "No. 17 crossing railway bridge at Job's Gully near Eaglehawk". 1197.10 - "No. 26 at Long Gully" 1197.11 - 'Northern end of points at Long Gully Loop". 1197.12 - "No. 17 turning into View St. from Bamard St. Bendigo". 1197.13 -'No. 17 at beginning of double track in View St. after leaving Bamard St. Bendigo. 1197.14 - "No. 21 enters Nolan St. from MacRae St. Bendigo." 1197.15 - "No. 21 in Nolan St. Bendigo just after leaving White Hills Road." 1197.16 - "No. 2" 1197.18 - "No. 5" 1197.19 - "Birney car No. 28 at Golden Square Terminus" 1197.20 "Birney car No. 28 at Golden Square Terminus" tramways, trams, bendigo, long gully, railway bridge, jobs gully, trackwork, nolan st, quarry hill, tram stops, golden square, tram 2, tram 5, tram 17, tram 21, tram 26, tram 28 -
 Ballarat Tramway Museum
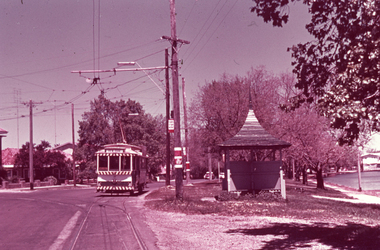
Slide - 35mm slide/s - set of 4, Noel Simons, 24/05/1971 12:00:00 AM
Set of 4 transparencies taken on 24/5/1971 on Kodak mounts. 1199.1 - No. 21 in High St. at junction with old High St., near Fire Station Loop. Tram has two SEC roof ads. 1199.2 - No. 21 in High St. between Shamrock and Thistle Sts. Photo taken after the tram has passed the photographer. 1199.3 - Photo of a green box containing timetables for the four Bendigo routes. Located at Charing Cross. 1199.4 - Bendigo No. 23 en route to Eaglehawk at Charing Cross, with two SEC roof ads 'Everything's fine in my all electric kitchen' and "Switch to electric cooking'. Has the Ezywalkin building and the Beehive building in the background. Information written on in black ink and date stamped on purple ink. 1199.1 - "No. 21 in High St. at junction with old High St., near Fire Station Loop." 1199.2 - "No. 21 in High St. between Shamrock and Thistle Sts." 1199.3 - "Bendigo Tramways timetable at Alexandra Fountain Charing Cross." 1199.4 - "No. 23 at Alexandra Fountain Charing Cross, Bendigo." tramways, trams, bendigo, timetables, charing cross, high st., tram 21, tram 23 -
 Ballarat Tramway Museum
Slide - 35mm slide/s - set of 13, Noel Simons, 24/05/1971 12:00:00 AM
Set of 13 transparencies taken on 24/5/1971 on Kodak mounts. 1200.1 - No. 7 en route to Golden Square turning from Bridge St. into Nolan St. Photo taken after tram has passed photographer. Tram has a briquettes roof ad. 1200.2 - No. 21 in McCrae St. just before Nolan St. Photo taken after tram has passed photographer. 1200.3 - No. 7 in Nolan St at corner with McCrae St. Passenger boarding tram at a tram stop. 1200.4 - No 7 turning from Nolan into McCrae St. with Golden Fleece service station in background. 1200.5 - No. 7 in Thunder St en route to North Bendigo. Photo taken after tram has passed photographer. 1200.6 - No. 5 en route to Eaglehawk just after leaving Needle Loop between Long Gully and California Gully. 1200.7 - No. 5 at the start of the double track in High St. Eaglehawk. 1200.8 - No. 5 at Eaglehawk terminus showing "Depot" with Leo A Hughes Photographer advertisement on building in background. 1200.9 - No. 5 at Eaglehawk terminus. Has two SEC roof ads 'Everything's fine in my all electric kitchen' and 'Electricity best for cooking'. 1200.10 - No. 5 at Eaglehawk terminus, with canon, war memorial outside Town Hall and Leo A Hughes Photographer advertisement on building in background. 1200.11 - No. 5 in McCrae St. about to enter Arnold St. and depot. Tram showing depot, has driver changing points. 1200.12 - No. 5 in Arnold St. Photo taken looking up the centre of the access track - shows the overhead at depot junction. 1200.13 - Depot entrance with signage at depot entrance and depot building in background.Information written on in black ink and date stamped on purple ink. 1200.1 - "No. 7 entering Nolan St. from Bridge St." 1200.2 -"No. 21 in McRae St. about to turn into Nolan St." 1200.3 - "No. 7 in Nolan St. at corner of McRae St." 1200.4 - "No. 7 turning from Nolan St. into McRae St." 1200.5 - "No. 7 in Thunder St. just after turning from Caledonia St." 1200.6 - "No. 5 just after leaving Needle Loop between Long Gully and California Gully. 1200.7 - "No. 5 in High St. Eaglehawk at start of double track." 1200.8 - "No. 5 at Eaglehawk terminus" 1200.9 - "No. 5 at Eaglehawk terminus" 1200.10 - "No. 5 at Eaglehawk terminus."\ 1200.11 - "No. 5 in McCrae St. about to enter Arnold St." 1200.12 - "No. 5 in Arnold St." 1200.13 - "Entrance to Bendigo Tram Depot, No. 5 running into shed."tramways, trams, bendigo, mccrae st, north bendigo, california gully, eaglehawk, depot, tram 5, tram 7, tram 21 -
 Ballarat Tramway Museum
Slide - 35mm slide/s - set of 25, Noel Simons, 26/02/1972 12:00:00 AM
Set of 25 transparencies taken on 26/2/1972 on Kodak mounts. 1204.1 - Bendigo No. 5 - just arrived at Manchester Loop near Havilah Road, Long Gully. Photo taken after tram has passed photographer. 1204.2 - No. 26 in Backhaus St. Long Gully passing William St, en route to Quarry Hill. Photo taken after tram has passed photographer. 1204.3 - No. 5 climbing the High St. Hill Eaglehawk, heading for Quarry Hill with the buildings on the West side of High St. in the background, including the Eaglehawk Town Hall. 1204.4 - as for 1204.3, but tram close up. 1204.5 - as for 1204.3, but after tram has passed photographer. 1204.6 - No. 5 at intersection of Mt Korong Road Ironbark and Calder Highway, with the AMPOL service 'station in the background. Photo taken after tram has passed photographer. 1204.7 - No. 26 en route to Quarry Hill shortly after leaving Needle Loop, passing William St., Long Gully. 1204.8 - No. 5 at California Gully Loop, picking up a passenger, with the shops at Long Gully in the background. Photo taken after tram has passed photographer. 1204.9 - No. 5 in Long Gully, en route to Quarry Hill. Photo taken after tram has passed photographer. 1204.10 - No. 2 at Eaglehawk terminus with the Eaglehawk Town Hall and Post Office in the background. Tram has two SEC roof ads. 1204.11 - No. 2 at Eaglehawk terminus, close up. 1204.12 - as for 1204.11, but through the park gates. 1204.13 - as for 1204.11, but with tram stop shelters in the foreground and buildings on the West side of High St in the background. 1204.14 - No. 2 in Mt. Korong Rd, midway between California Gully Loop and Needle Loop. Photo taken after tram has passed photographer. 1204.15 - No. 5 in Long Gully, en route to Quarry Hill. 1204.16 - as for 1204.15, but with trams departed loop. Has an ESSO service station in the background. 1204.17 - No. 26 leaves Charing Cross up View St.. Photo taken after tram has passed photographer. Has Armstrong Tyre Service, Cohns Drinks ad on a building and the T&G building in the background. Also Firestone ads on the tyre service building. 1204.18 - No. 5 waits at Charing Cross with the Alexandra Fountain in the background. Tram has two SEC roof ads, 'Everything s fine in my all electric kitchen' and 'Electricity Best for Cooking'. Has RACV, Colonial Mutual Life buildings in the background and the planting areas around Charing Cross gardens in the foreground. 1204.19 - No. 21 en route to North Bendigo arrives at Charing Cross, with passengers waiting to board. No. 5 in the background. In the background is the Fountain Gate Plaza building and the City Family Hotel. 1204.20 - as for 1204.19, but with No. 7 en route to Golden Square. 1204.21 - as for 1204.19, but closer up. 1204.22 - as for 1204.18 1204.23 - No. 25 in Nolan St. near the crossing of Bendigo Creek, running a special tram tour. 1204.24 - No. 25 on a special charter, in Weeroona Ave. at Cnr of Caledonia St. passing the Gas works. 1204.25 - Nos. 25 (showing Golden Square), 7 and 26 at Charing Cross. Has fountain in the background.Information written on in blue ink and date stamped on purple ink. 1204.1 - "No. 5 at Manchester Loop, near Havilah Rd. Long Gully." 1204.2 - "No. 26 in Backhaus St. Long Gully passing William St." 1204.3 - "No. 5 in High St. Eaglehawk." 1204.4 - "No. 5 in High St. Eaglehawk." 1204.5 - "No. 5 in High St. Eaglehawk." 1204.6 - "No. 5 in Mt. Korong Rd., Ironbark, passing Calder Highway Junctn." 1204.7 - "No. 26 shortly after leaving Needle Loop, passing William St., Long Gully. No. 5 cresting hill in distance." 1204.8 - "No. 5 at California Gully Loop." 1204.9 - "No. 5 in Long Gully" 1204.10 - "No. 2 at Eaglehawk terminus." 1204.11 - "No. 2 at Eaglehawk terminus." 1204.12 - "No. 2 at Eaglehawk terminus." 1204.13 - "No. 2 at Eaglehawk terminus." 1204.14 - "No. 2 in Mt. Korong Rd, midway between California Gully Loop and Needle Loop. 1204.15 - "Nos. 2 and 26 crossing at Long Gully." 1204.16 - "No. 26 leaves Long Gully loop for Eaglehawk as No. 2 pulls out of the far end towards Bendigo" 1204.17 - "No. 26 beginning the climb up View St. from Charing Cross." 1204.18 - "No. 5 at Charing Cross." 1204.19 - "No 21 arrives at Charing Cross from Golden Square while No. 5 awaits departure time for Eaglehawk." 1204.20 - "Nos. 7, 21, and 2 (behind which is No. 5) at Charing Cross." 1204.21 - "Nos. 7, 21, and 2 at Charing Cross." 1204.22 - "No. 5 at Charing Cross." 1204.23 - "No. 25 in Nolan St. near Bendigo creek crossing" 1204.24 - "No. 25 in Weeroona Ave. at cnr of Caledonia St." 1204.25 - "Nos. 25, 7, 26 and 2 (behind 26) at Charing Cross."tramways, trams, bendigo, eaglehawk, long gully, california gully, charing cross, north bendigo, tram 2, tram 5, tram 7, tram 21, tram 25, tram 26 -
 Ballarat Tramway Museum
Slide - 35mm slide/s - set of 23, Noel Simons, 26/02/1972 12:00:00 AM
Set of 23 transparencies taken on 26/2/1972 on Kodak mounts. 1205.1 - Bendigo No. 25 on a special tour at Fire Station Loop, en route to Golden Square. 1205.2 - No. 21 and 25 crossing at Fire Station Loop, note photographers on the ground. No. 21 bound for North Bendigo. 1205.3 - as for 1205.3, but with trams departing loop and fire station in the background. 1205.4 - No. 25 at Golden Square Hotel with 'Rodda's Golden Square Hotel' in the background. Tram on a special tour, but showing destination of North Bendigo. 1205.5 - as for 1205.4 - but showing special. Has the end of the track in the photograph. 1205.6 - Nos. 7 and 25 (on a special tour) crossing at Myrtle St. Loop. 1205.7 - No. 7 leaving Myrtle St. loop with the mine poppet head in the background. Photo taken after tram has passed photographer. (Print made of this slide 10/2001 for use in the Gold Gold Gold exhibition of 10/2001 - See Reg. item 1979. 1205.8 - No. 25 entering depot. Tram showing 'special'. Tennis court on right has players. Photo taken after tram has passed photographer. 1205.9 - No. 24 (showing 'special') and No. 20 (showing 'Long Gully') at Bendigo Depot. 1205.10 - No. 24 on a special charter, leaving Bendigo depot. Tram has two 'Johnnie Walker' roof ads. 1205.11 - Bendigo depot with 29, 25 and a bogie car inside the depot doors. 1205.12 - As for 1205.11, but with 28 and 29. 1205.13 - No. 24 standing at front entrance of Bendigo depot with No. 20 in the background. 1205.14 - No. 24 running out into McCrae St showing special, with conductor on front step. 1205.15 - No. 24 in Caledonia St. at corner of Thunder St with the Gasworks in the background. 1205.16 - No. 5 en route for Quarry Hill at Charing cross with No. 26 (en route for Eaglehawk) about to arrive. Has former crossover at this location in the foreground. Has the Ezywalkin building in the background. 1205.17 - No. 5 and 26 at Charing Cross, with the Alexandra Fountain in the foreground and the Beehive and Ezywalkin buildings in the background. No.26 has two SEC roof ads. 1205.18 - Charing Cross looking along Pall Mall with trams 7 and 21 and 26 in the picture. 1205.19 - Charing Cross, with 21 departing for Golden Square and No. 5 heading for Quarry Hill. Has the Ezywalkin and the Beehive buildings in the background. 1205.20 - as for 1205.19, but a few moments later. Adjacent pole has a "NO ROAD" letter in reflectors vertically. 1205.21 - Charing Cross with Nos. 25, 21, 26 and 7, looking south from Pall Mall end. 1205.22 - No. 24 crossing Mitchell St. en route for Golden Square, showing 'special' with the Beehive and Ezywalkin buildings in the background. 1205.23 - Charing Cross with Nos. 24, 21 and 7 in the photo and Fountain Plaza in the background. Print of 1205.7 - stored in box D1.Information written on in blue ink and date stamped on purple ink. 1205.1 - "No. 25 at Fire Station Loop High Street, Golden Square." 1205.2 - "Nos. 25 and 21 crossing at Fire Station Loop, near Golden Square." 1205.3 - "Nos. 25 and 21 crossing at Fire Station Loop, near Golden Square." 1205.4 - "No. 25 at Golden Square terminus." 1205.5 - "No. 25 at Golden Square terminus." 1205.6 - "Nos. 7 and 25 crossing at Myrtle St. Loop." 1205.7 - "No. 7 leaving Myrtle St. Loop." 1205.8 - "No 25, entering Bendigo Depot." 1205.9 - "Nos. 20 and 24 at Bendigo Depot." 1205.10 - "No. 24 at Bendigo Depot." 1205.11 - "Nos. 25 and 29 at Bendigo Depot." 1205.12 - "Birney cars 29 and 28 at Bendigo Depot." 1205.13 - "No. 24 (with 20 beyond) at Bendigo Depot." 1205.14 - "No. 24 entering McCrae St. from Arnold St." 1204.15 - "No. 24 in Caledonia St. at cnr of Thunder St." 1204.16 - "No. 5 waits at Charing Cross as No. 26 arrives from Quarry Hill. Note remains of crossover abandoned on relocation in 1965." 1204.17 - "Nos. 5 and 26 at Charing Cross." 1204.18 - "Nos. 26, 7 and 21 at Charing Cross (No. 5 just visible behind No. 26)." 1204.19 - "No. 21 leaves Charing Cross for Golden Square as No. 5 starts off for Quarry Hill." 1204.20 - "No. 21 swings onto the single track Golden Square line as No. 5 heads into Mitchell St. towards Quarry Hill." 1204.21 - "Nos. 25, 21 and 26 watch No. 7 arrive at Charing Cross from Golden Square." 1204.22 - "No. 24 at Charing Cross crossing Mitchell St." 1204.23 - "Nos. 24, 21 and 7 at Charing Cross."tramways, trams, bendigo, golden square, myrtle st., fire station, depot, charing cross, tram 5, tram 7, tram 20, tram 21, tram 24, tram 25, tram 28, tram 29 -
 Ballarat Tramway Museum
Slide - 35mm slide/s - set of 6, Noel Simons, 28 Feb. 1972
Set of 6 transparencies taken on 28/2/1972 on Kodak mounts. 1206.1 - Bendigo No. 5 at Hayes St. Loop, en route for Quarry Hill. 1206.2 - No. 5 at Garden Gully Loop, Mt. Korong road, Ironbark. en route to Quarry Hill. Note the water column in the background. 1206.3 - No. 5 in View St. Bendigo, with the Commodore Motel in the background. 1206.4 - No. 6 en route for Golden Square in Fire Station loop, with the fire station building in the background. Photo taken after tram has passed photographer. 1206.5 - No. 6 in High St., running through Golden Square Shopping Centre, en route for Golden Square. Photo taken after tram has passed photographer. 1206.6 - No. 6 arriving at Charing Cross, bound for North Bendigo, with the City Family Hotel, ANZ bank and the Cenotaph (war memorial) in the background.Information written on in blue ink and date stamped on purple ink. 1206.1 - "No. 5 at Hayes Loop, Ironbark." 1206.2 - "No. 5 at Garden Gully Loop, Mt. Korong road, Ironbark." 1206.3 - "No. 5 in View St. just after start of double track near Barnard St." 1206.4 - "No. 6 in High St. at Fire Station loop." 1206.5 - "No. 6 in High St. running through Golden Square shopping centre." 1206.6 - "No. 6 arriving at Charing Cross from Golden Square."tramways, trams, bendigo, hayes st. loop, garden gully loop, view st., golden square, charing cross, tram 5, tram 6 -
 Ballarat Tramway Museum
Slide - 35mm slide/s - set of 12, Noel Simons, 28 Feb. 1972
Set of 12 transparencies taken on 28/2/1972 on Kodak mounts. 1207.1 - Bendigo 26 and 2 at Charing Cross. 26 en route for Eaglehawk, 2 for Quarry Hill. Has the Colonial Mutual Life, Armstrong Tyre Service, and Australian Mutual Provident Society buildings and a Cohns Drinks ad. in the background. 1207.2 - as for 1207.1 but with Alexandra fountain in the foreground. 1207.3 - No. 2 in Mitchell St. heading for Quarry Hill. Photo taken after tram has passed photographer. Has buildings on either side of Mitchell St. in the background, including the Plaza Theatre. 1207.4 - No. 6 en route for Golden Square departing Charing Cross. Has the RACV and ANZ bank in the background. 1207.5 - No. 2 crossing Pall Mall to enter Charing Cross ex Quarry Hill, with the Fountain Plaza in the background. 1207.6 - No. 6 arriving Charing Cross ex Golden Square with No. 21 alongside. No. 21 has the SEC ad. 'Everything's fine in my all electric kitchen.' Has the City Family Hotel and the Fountain Plaza shopping centre in the background. 1207.7 - No. 5 at Charing Cross en route for Quarry Hill with No. 2 behind. No. 2 has two SEC roof ads, 'Everything s fine in my all electric kitchen' and 'Electricity best for cooking'. RACV building in the background. Tram crews are discussing the day in the front of the tram. 1207. 8 - No. 21 in High St. Bendigo with the Cathedral in the background. No. 21 has two SEC roof ads, 'Everything's fine in my all electric kitchen' and 'Electricity best for cooking'. 1207.9 - No. 6 in High St. Bendigo with the Cathedral in the background. 1207.10 - No. 6 in High St. Bendigo, just past Wattle St. Photo taken after the tram has passed the photographer from within the Highway Car Sales yard. 1207.11 - No. 26 bound for Eaglehawk at the end of the double track in View St., note signal contactors, tram stop and section signs mounted on pole. 1207.12 - No. 26 turning from View St. into Barnard St.Information written on in blue ink and date stamped on purple ink. 1207. 1- "Nos. 26 and 2 at Charing Cross." 1207.2 - "Nos. 26 and 2 at Charing Cross." 1207.3 - "No. 2 in Mitchell St. just after leaving Charing Cross." 1207.4 - "No.6 leaving Charing Cross for Golden Square." 1207.5 - "No. 2 arriving at Charing Cross from Quarry Hill." 1207.6 - "No. 21 waits at Charing Cross as No. 6 arrives from Golden Square." 1207.7 - "No 5 at Charing Cross with No. 2 lurking behind." 1207.8 - "No. 21 in High St. at cnr of Wattle St." 1207.9 - "No. 6 in High St. at cnr of Wattle St." 1207.10 - "No. 6 in High St. between Wattle and Vine Sts." 1207.11 - "No. 26 at end of double track in View St. near Barnard. St. 1207.12 - "No. 26 seen at dusk turning from View St. into Barnard St."tramways, trams, bendigo, charing cross, high st, view st., tram 2, tram 5, tram 6, tram 21, tram 26