Showing 651 items matching "station reserve"
-
 Ballarat Tramway Museum
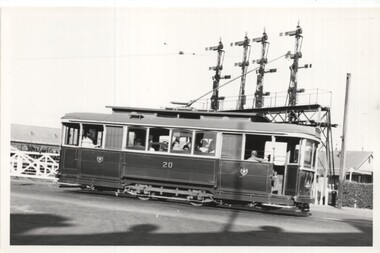
Photograph - Black & White - Tram 20 at Railway level crossing, Keith Kings, 22/1/1955
Shows trams at the Lydiard St level crossing gates and the signal gantry.Yields information about Ballarat tram No. 20 and the locationBlack and White photograph of SEC Ballarat tram No. 20 crossing the railway level crossing in Lydiard St North. Has the signal gantry in the background. Photo by Keith Kings 22/1/1955.On rear has the photographers file number (M)(d)(3)ballarat, lydiard st north, level crossing, railway station, tram 20 -
 Ballarat Tramway Museum
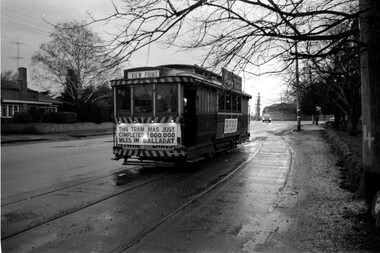
Photograph - Tram 27 Million Miles - Mal Rowe - 29/6/1968
Photo taken as part of the TMSV tour of the tramway system on a typical Ballarat winters day. Photo in the then disconnected View Point loop in Wendouree Parade. The fence of Ballarat A Power station can be seen in the background. Yields information about the purported achievement of tram 27 reaching 1,000,000 miles and the TMSV Tour. Shows the former View Point crossing loop. This figure was later found to be in error by about 100,000 miles.Digital image of a photograph by Mal Rowe of tram 27 at the former View Point Loop in Wendouree Parade 29/6/1968, during the Tramway Museum Society of Victoria tour to celebrate the tram doing 1,000,000 miles in Ballarat. tmsv, wendouree parade, view point, million miles, tram 27 -
 Ballarat Tramway Museum
Book, William. F. Scott, "Last Tram at Eleven - Tramways of Ballarat, Bendigo Geelong", 2008
Extensive history on the foundation of the three Victorian Provincial tramways, operations, tramcar lists and relationship to their private operation and power stations.. Foreword by Professor Weston Bate Yields detailed information about the history of the three SEC Provincial systems, in particular the construction history and their tramcars.Book - 212 pages on art paper with a gloss finish applied to photographs, sewn with glued end papers, folded dust jacket or cover titled "Last Tram at Eleven - Tramways of Ballarat, Bendigo Geelong". Written by William F Scott, published by Full Parallel Productions 2008. Has a cloth book mark. Has a Table of Contents, Index, many photographs, maps, liststramway history, ballarat, bendigo, geelong, tramcars, trams -
 Ballarat Tramway Museum
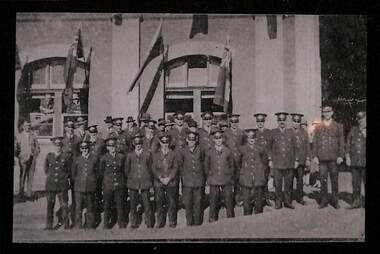
Photograph - Group of Geelong tramway crews standing in front of the Power Station
Shows a group of Geelong tramway crews and staff c1942/43Yields information on the uniforms worn by Geelong tramway crews and other staff.Copy photograph on black plastic type backing with black edges of a group of Geelong tramway employees, mostly in uniform standing in front of the Geelong Power station and tram depot in Brougham St, c1942/43.geelong, crews, power station, tramways -
 Ballarat Tramway Museum
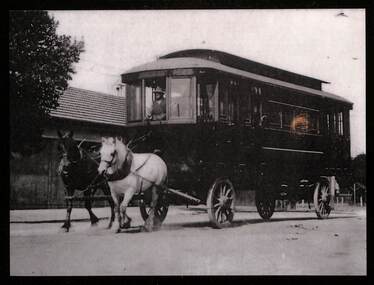
Photograph - Geelong tram body being delivered from the Railway Station c1924
Demonstrates the method of delivery of a tramcar body for Geelong from the railway station using a horse drawn jinker with the horse driver standing in the same location as a tram driver would have. Tramcar built by Pengelley of Adelaide. The tramcar bodies were delivered during 1924 and 1925.Yields information about the Pengelly built tramcars for Geelong c1924 and how tramcar bodies could be transported using a horse drawn jinker. At the time, the Geelong tram system operated by the Melbourne Electric Supply Co.Copy photograph on black plastic type backing with black edges of a Pengelley Adelaide built tramcar body for the Geelong tramway system being delivered 1924, from the Geelong Railway station.geelong, tramways, pengelley, tram bodies, horse drawn jinker -
 Ballarat Tramway Museum
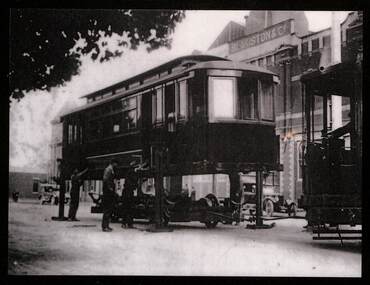
Photograph - Geelong tram body being fitted with a truck or wheelset
Provides information on how a tramcar body was fitted with a wheelset or truck (Brill Radiax EB1 type). Lifted on the jacks after delivery by a horse drawn jinker from the Railway Station (See Reg Item 8321) The wheel set is being pushed under the tramcar by another tramcar. Once fitted the tramcar would have been towed back into the depot and the motors etc connected. Has the Blakiston & Co. building in the background. Yields information about how tramcar bodies were lifted outside the Geelong tram depot in Brougham St in order to be made operational. Copy photograph on black plastic type backing with black edges of a Pengelley Adelaide built tramcar body on jacks being fitted with a truck or wheel set.geelong, tramways, pengelley, tram bodies, brill radiax truck, brougham st, trams -
 Ballarat Tramway Museum
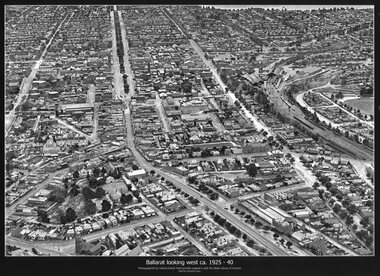
Photograph - Black & White copy, Charles Pratt, "Ballarat looking west ca 1925-40"
Original photograph by Charles Daniel Pratt, with the original image held by the State Library of Victoria. Edited by Richard Conn. Purchased by the Museum.Provides information about the appearance of Ballarat East and views across over the Railway Station to Lake Wendouree and along along Sturt St. Shows the nature of the Bridge St shopping centre and other places.Black & White copy photograph aerial view A4 size, titled "Ballarat looking west ca 1925-40" - looking along Sturt St with the Railway yards, Bridge St and Victoria St in the view. Some trams can be seen at Grenville St.ballarat, aerial photo, sturt st, victoria st -
 Ballarat Tramway Museum
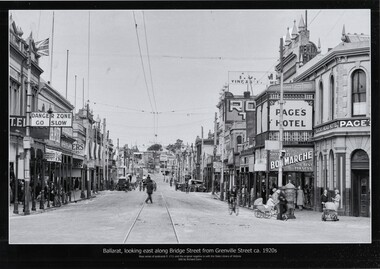
Photograph - Black & White copy photograph, Rose Stereograph Co, "Ballarat looking east along Bridge St from Grenville St c1920s"
Original photograph by Rose Series Postcard P1711 with the original image held by the State Library of Victoria. Edited by Richard Conn. Purchased by the Museum.Provides information about the appearance of Bridge St during the 1920's, shows the tram tracks and overhead. Has in the view a number of road signs, shops, Super Spirit, Shell, Junction Service Station, motor vehicles, cyclists, Bon Marche, ladies with prams, a post box and Page's Bucks Head Hotel.Black & White copy photograph view A4 size, titled "Ballarat looking east along Bridge St from Grenville St c1920s", from a Rose Series Postcard, P1711. Original image held by the State Library of Victoria.ballarat, grenville st, bucks head hotel, bridge st, road signs, bon marche, tramways -
 Ballarat Tramway Museum
Photograph - Series of 9 black and white photographs of Ballarat trams, Ellen Butland, 1971
.1 - No. 27 in Lydiard St North at Sturt St. .2 - Scene at Railway station in Lydiard St North following arrival of the ARHS tour train. .3 - Nos. 27, 42, 11 at Sebastopol terminus. .4 - No. 42 in Sturt St .5 - Nos. 27, 42, 11 at Sebastopol terminus. .6 - No. 11 in Sturt St .7 - No. 27 crossing Albert St Sebastopol. .8 - No. 42 in Lydiard St North at Sturt St. .9 - Nos. 27, 42, 11 at Lydiard St. North terminus. Note: - some of the captions under the photos have the wrong locations.Has a strong association with a Melbourne tram driver who assembled the scrap book and series of photos of Ballarat trams at the time of closure. Yields information about the tram operations.Set of nine black and white photographs contained with Reg item 5988, a Stamford Kiwi School Scrap Book - prepared by Ellen Butland of Auckland following the closure of the SEC Ballarat Tramway system."Ballarat, Australia 21-9-71" in ink along the top edge of the sheet.trams, tramways, ballarat, sturt st, sebastopol, tram 27, railway station, tram 42, tram 11 -
 Ballarat Tramway Museum
Photograph - Series of 7 black and white photographs of Ballarat trams, Ellen Butland, 1971
.1 - Nos. 27, 42, at Lydiard St. North terminus. .2 - No. 11 at Lydiard St North terminus .3 - Nos. 27, 42, 11 at Lydiard St. North terminus. .4 - Controls of No. 11 with keys in position .5 - Scene at Railway Station after touring the system .6 - Interior photo of No. 11 .7 - Second convoy at Railway Station unloading - includes No. 39 Note: - some of the captions under the photos have the wrong locations.Has a strong association with a Melbourne tram driver who assembled the scrap book and series of photos of Ballarat trams at the time of closure. Yields information about the tram operations.TRAMSet of seven black and white photographs contained with Reg item 5988, a Stamford Kiwi School Scrap Book - prepared by Ellen Butland of Auckland following the closure of the SEC Ballarat Tramway system.closure, arhs, tours, trams, tramways, ballarat, sturt st, lydiard st nth, sebastopol, tram 27, tram 42, tram 11, tram 39, interiors -
 Ballarat Tramway Museum
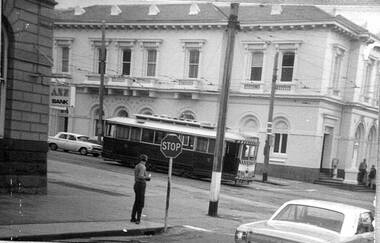
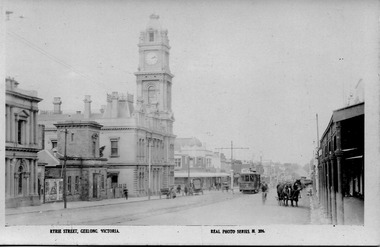
Photograph - Digital image of Geelong tram No. 2 in Ryrie St, 1920
The photograph, Real Photo Series M 324, shows Geelong No. 2, built by Duncan and Fraser of Adelaide in 1911 in its as-built configuration in Ryrie St with the former Geelong Post Office in the view. Next door to the Post Office is the Telegraph Station. Dated on the basis of a poster next to the Telegraph station advertising a 1920 film by Irene Castle. The full name of the film cannot be read, but starts with "The..." This tram is part of the collection at the Ballarat Tramway Museum. Yields information about Geelong No.2 and Ryrie St in particular the Geelong Post Office.Digital image of Geelong tram No. 2 in Ryrie St, 1920.geelong, geelong 2, mesco, geelong town, geelong post office, ryrie st, geelong telegraph station. -
 Ballarat Tramway Museum
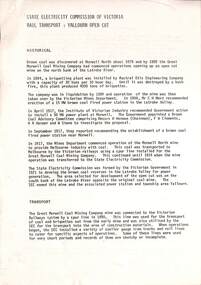
Document, 'State Electricty Commission of Victoria Rail Transport: Yallourn Open Cut"
Provides details of the history of SECV rail operations in the Yallourn and other power station open cuts and the transport of coal and the locomotives used in the Latrobe Valley operations of the SEC. Possibly prepared in the early 1980s. Rail operations on the interconnecting railway ceased in 2000. Shows outline diagrams of the steam, electric and diesel locomotives and the coal wagons.Provides information about the SEC Coal railways and their rolling stock used for power generation in Victoria.Report or document - 16 A4 pages titled Report - 'State Electricty Commission of Victoria Rail Transport: Yallourn Open Cut"sec tramways, power supply, secv, open cut mining, locomotives, interconnecting railway -
 Ballarat Tramway Museum
Postcard - Sturt Street Ballarat, Victoria, Rose Stereograph Co, 1920s?
Photo taken from the City Fire Brigade station at the corner of Sturt and Raglan Streets, looking east towards Mount Warrenheip. Has an eastbound ESCo tram. Photo shows the overhead structures, Harry Davies & Co. Drapers Importers, Ballarat Town Hall and the general view of the city. On the rear is a large Rose symbol and publisher details.Yields information about Sturt St during 1920sPostcard - Rose Series P 1717, Sturt Street looking east. Second copy - cigarette card size - 63mm x 87mmHas an address in Macarthur St, Ballarat on rear. Second copy has in ink "To Ken from Paul Kiwi4755"ballarat, sturt st, fire watch tower, harry davies -
 Ballarat Tramway Museum
Slide - R711 Ballarat Station - COTMA Conference 2000, David Verrier, 17-11-2000
Photo shows West Coast Railway locomotive R711 at Ballarat Station after hauling the special train for passengers for the 2000 COTMA Conference in Ballarat. The locomotive was provided by West Coast Railway who was running the Warnambool service at the time and was a suprise to the conference attendees.Demonstrates the use of a steam locomotive to transport passengers for a COTMA Conference in 2000.Kodak colour slide - plastic mount"Fri 17/11/00 R711 Ballarat"cotma, btm, r 711, steam locomotives, ballarat, west coast railway -
 Ballarat Tramway Museum
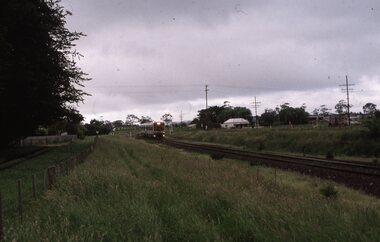
Slide - Set of 2 - COTMA 2000 Visit to Bungaree, David Verrier, 20-11-2000
Set of two slides taken during the 2000 COTMA Conference visit to the Ballarat Tramway Museum Bungaree station site of Sprinter rail cars 7008 & 7022 on Down Ballarat service at the former Bungaree station site on 20-11-2000Demonstrates rail services through the former Bungaree Rail stationSet of two Kodak colour slides - white plastic mountEach slide has details written on it.ballarat, specials, cotma, btm, bungaree, sprinter rail cars -
 Ballarat Tramway Museum
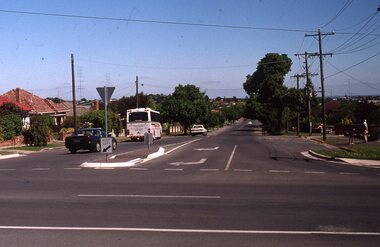
Slide - Set of 7 - Lydiard Street level crossing and tram terminus, David Verrier, 21-11-2000
Set of seven slides taken during the 2000 COTMA Conference visit to the Ballarat Tramway Museum depot on 21-11-2022 1 - Former Lydiard St North terminus looking south 2 - Ballarat Station with the temporarily closed Lydiard St level crossing. 3 - Ballarat Station with the temporarily closed Lydiard St level crossing. 4 - Ballarat Station good shed looking east 5 - Lydiard St level crossing with G521 on freight leaving 6 - Lydiard St level crossing with G521 on freight leaving 7 - Train on level crossingYields information about the Lydiard St Nth terminus in 2000 and the level crossing.Set of seven Kodak colour slides - white plastic mountEach slide has details written on it.ballarat, specials, cotma, lydiard st north, level crossing, g 521, railways -
 Ballarat Tramway Museum
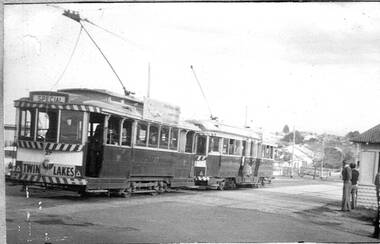
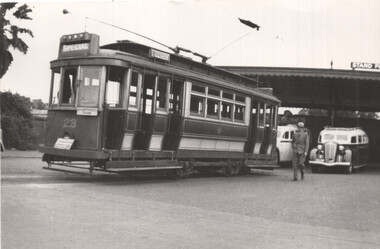
Photograph - Geelong Tram tour AETA, Charles Craig, 29-3-1948
Photos show the first AETA Provincial tram tour of 29-3-1948. The tour used Geelong tram 23. See also items 7234 to 7238 for other photos.Yields information about the AETA's first Geelong tour in 1948.Set of four Black and white photographs of the AETA tour to Geelong.Items 1 and 2 have the date on the rear in ink.tramways, trams, sec tramways, tram 23, geelong, geelong railway station -
 Ballarat Tramway Museum
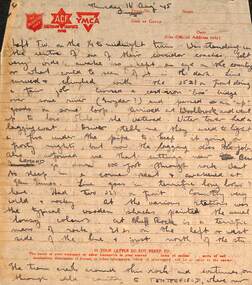
Letter - from Wal Larsen to Wal Jack re the Tenterfield railway, Wal Larsen, Aug 1945
Wal Jack had an extensive range of correspondents throughout Australia and the world who often prepared extensive notes and records for him. This letter from Wal Larsen of Bright, dated 16 Aug 1945 describes a trip to Tenterfield, notes on crews, their hats, station layouts and detailed map. With the letter is a plan of the station layouts of the West Tamworth to Barraba line dated 6-10-45. Demonstrates some of the correspondence that Wal Jack received from around the world and that of Wal Larsen.Letter - handwritten with ink on a set of four ruled Salvation Army - Australian Comfort Fund and YMCA printed sheets and a drawing on a foolscap sheet on the rear of Australian Military Forces for - "Return on Members of the Permanent forces entitled to Medical Attendance"letters, wal jack, railways, nsw, wal larsen, tenterfield, barraba, west tamworth, nswgr -
 Ballarat Tramway Museum
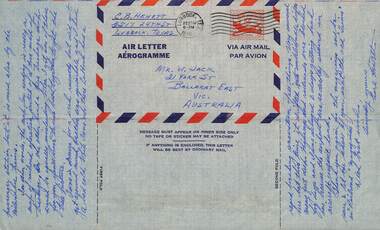
Letter - from C B Hewett of Texas to Wal Jack, Carl Hewett, 15/2/1956
Wal Jack had an extensive range of correspondents throughout Australia and the world who often prepared extensive notes and records for him. This letter from Carl Hewett of Lubbock Texas, USA, dated 15/2/1956 discusses railroad operations in the USA, stations and general railroad matters.Demonstrates some of the correspondence that Wal Jack received from around the world and that of Carl HewittLetter on light blue pre-printed Air letter of Aerogramme - light weight paper, postage prepaid with an image of a aeroplane in the stamp area.letters, wal jack, air mail, aerogrammes, carl hewitt, usa -
 Ballarat Tramway Museum
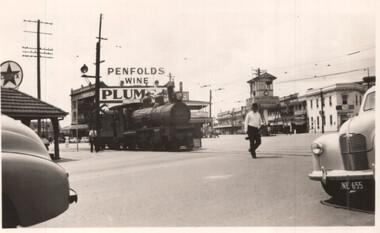
Photograph - QGR locomotive at Woolloongabba Brisbane, Keith Kings, 10/1/1951
Wal Jack swapped photographs with his correspondents. This photo by Keith Kings, a railway photograph of QGR locomotive 748 crossing the complex arrangements of tracks at Woolloongabba - three tram tracks, one trolley bus route. The photographer noted that trains could block all tram lines at times. Trains were always proceeded by a man carrying a red flag and ringing a bell. Has the tramway signal box in the background and a large Penfolds Wines advert on a building, a Caltex service station and an advert for Plume petrol.Demonstrates a photograph that would have been sent to Wal Jack by Keith Kings.Black and white photograph of QGR locomotive 748Has extensive details of the photograph on the rear. Keith Kings photo number E(k)(vii)letter, wal jack, keith kings, qgr, railways, woolloongabba -
 Ballarat Tramway Museum
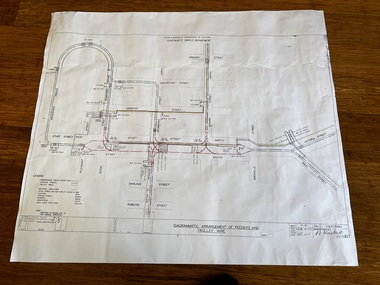
Drawing - VB4/7184C, State Electricity Commission of Victoria - Ballarat office, "Diagrammatic Arrangement of Feeders and Trolley Wire", 2-9-1958
Print of drawing number VB4/7184C "Diagrammatic Arrangement of Feeders and Trolley Wire", marked up in colour showing the various feeder and trolley wire arrangements for the central part of Ballarat and the Gardens line. Shows the detailed switch locations that enable the overhead to be isolated or changed when electrical work was being undertaken on the overhead that required it to be isolated. Shows how the various sections were fed from the power station. Revision C issued 2-9-1958.Yields information about the arrangement of the power supply to the trams from the power station and changes made to the system about 13 years prior to closure. Dyeline print on white paper of Drawing - "Diagrammatic Arrangement of Feeders and Trolley Wire" - VB4/7184Ctramways, ballarat, secv, trolley wire, feeder cables, overhead, power station, electrical engineering, electrical switching -
 Ballarat Tramway Museum
Document - Report, Parliament of Victoria, "The Yallourn coal reserves", May 1971
Report looked into the future of the Yallourn Township. Has a brief history of the location, the SEC power generation and its relationship the history of Vitoria. Lists the parliamentary inquiry board members, the witnesses, a table of the community organisations based at Yallourn township, coal reserves and costs. The Parliamentary Committee recommended that the SEC proposal be followed, that is close the township and mine the coal reserves that were under the township. Dated May 1971.Yallourn and other mines provided the brown coal for Ballarat B Power station and power Ballarat's tramways.Foolscap report - 6 sheets + 3 folded sheets, stapled on the left hand side and bound with black tape.Has the markings of the State Transport Library.yallourn, secv, brown coal, power supply, power engineering -
 Ballarat Tramway Museum
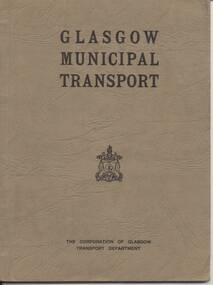
Book, Corporation of Glasgow Transport Department, "Glasgow Municipal Tramway", c1933
Book - 48 pages + 2 fold out maps + cover, card cover, bound, giving details of history of Glasgow tramways, power stations, substations, workshops, bus stations, training and underground railway. Commences at p41 - 92, could have been part of a larger document. Record reviewed and scanned images of cover added 5/9/13. trams, tramways, glasgow, uk, tramway, bus, underground -
 Ballarat Tramway Museum
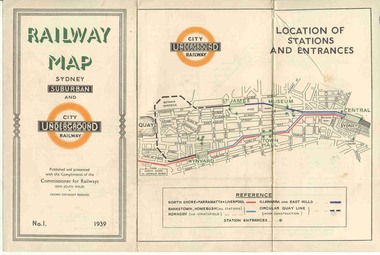
Map, NSWGR, "Railway Map of Sydney Suburban and Underground" - 1939, 1939
Light card or Heavy paper. Colour map showing location of Sydney stations and entrances and where the trains ran. Issued as No.1. Title "Railway Map of Sydney Suburban and Underground" - 1939. Handle with care - both copies.trams, tramways, sydney, railway map, suburban and underground, trams -
 Ballarat Tramway Museum
Newspaper, The Courier Ballarat, City Honored by six Royal Visits, Mar. 1938
Yields information about Ballarat and its locations or environs late 1938.Pages 11,12, 19 and 20 of the centenary of settlement in the Ballarat district by the Ballarat Courier - March 1938. See also items 186, 198 and 199. Page 11 Royal visits, banking in Ballarat, photos - NW section of Ballarat, railway station in foreground. Ads for J.McKay and Son, Roy Reeds (Men's store) and Ballarat Gas Co. Also photo of "The Corner" in Sturt St. - old Mining Exchange. Page 12 - full page ad for Morseheads, women's store. Page 19 - articles - Ballarat Lighting and Power, ESCo, SEC, electric trams. photos of the Arch of Victory, first electric tram, Lake Wendouree. Advertisements for Austin Spears (cycles), McDougall and Chisholm (drapers), W.E. Longhurst (bread) and the ES&A bank. Also article on South St. Society - music and elocution. Page 20 - articles - Ballarat Gas Co., horse and electric trams, agriculture in district and Ballarat's war record (WWI). Photos of work at Gong Gong Reservoir and Committeemen of the Ballarat Horticultural Society - 1859 to 1885. Ads for Ballarat College, Clarendon, Queens (girls) and Ballarat Grammar schools, Ern Craig Motors (Vauxhall) and Snows men's wear. Record reviewed and images of pages added 7-9-2013 and 10-9-2013trams, tramways, ballarat electricity, centenary, banking, transport, trams, esco -
 Ballarat Tramway Museum
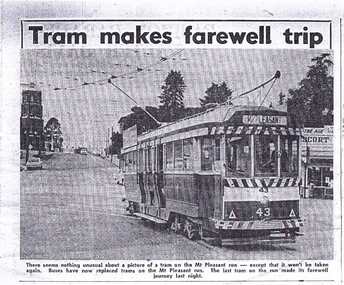
Document - Photocopies, Ballarat Tramway Museum (BTM), newspaper items - Ballarat closure, Mar. 1996
Photocopies of original newspaper clippings from the Ballarat Courier. Originals of cuttings held - see notes below. 278.1 - "Tram makes farewell trip" - photo of No. 43, near dusk on Mt. Pleasant route, fire station in background. - Sunday Sept. 5, 1971. - Courier Monday 6/9/1971 - A4 sheet. - (See Reg. Item 2907 for actual copy of cutting) 278.2. - "Last Journey for 39" - report on tram 39 last trip to Mt. Pleasant by Judy Graham - page 1 of Courier, 6/9/1971 - A4 sheet. - See Reg. Item 2908.1 for actual copy of cutting and 2908.2 for 2nd part on page 2. 278.3 - "Tram Change Uneventful" - report in the Courier of 24/8/1971, day after buses started on Victoria Street and photo of overhead dismantling (A4 sheet). - See Reg Item 1065 for actual copy of the cutting. 278.4. - "Many will miss tram" - report in Courier, Monday 23/8/1971 - following closure of Victoria St. route on 232/8/1971. Photo of No. 31 at Victoria St. (A3 sheet). (See Reg Item 1068 for actual copy of cutting). 278.5 - "Pieces of Tram History" - item in Courier of Wed. 22/9/1971 of tramway Supt. Mr. Denmead, handing over tokens and sample tickets to City of Ballarat - 2 photos - A3 sheet. - (See Reg Item 1846 for actual copy of cutting). Record updated 11/9/2013 for actual cuttings held. See Page 57 of KS Kings, "Ballarat Tramways"trams, tramways, ballarat, secv, closure -
 Ballarat Tramway Museum
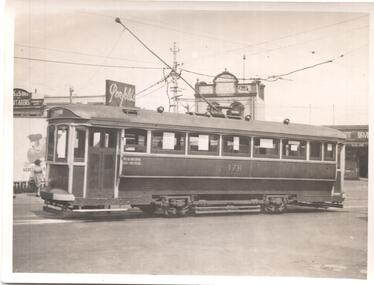
Photograph - Black & White Photograph/s, Wal Jack, 23/02/1942 12:00:00 AM
Black & white photograph of M&MTB T class 178 in Glenhuntly Road Elsternwick Railway station, 23-2-1942. Tram modified as a 1 man tram. Has shops in background. Tram possibly fitted with war time blackout mask. See Inscriptions for further details. Reimaged 17/7/2017 both front and back.On rear in ink, 'T308, M&MTB 'T' class No. 178 rebuilt as one man car. Glenhuntly Road Elsternwick (near Rly stn.) 23-2-42. Ex Melb. Brunswick & Coburg Tramways' car. W.Jack Photo.'trams, tramways, mmtb, t class, mbctt, elsternwick , tram 178 -
 Ballarat Tramway Museum
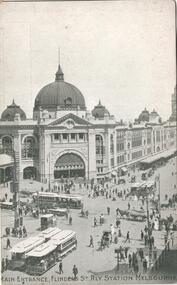
Postcard, Kookaburra and ?, Flinders St. Railway station
334.1 - Kookaburra Series No. 25 postcard, vertical format, view of the Swanston St entrance to Flinders St. Railway station with five sets of cable trams with horse drawn vehicles and many people. Photo is formally printed using a screen. Title 'Main Entrance, Flinders St. Rly Station Melbourne' along base. On rear in landscape format is areas for address, card number, a kookaburra symbol and saying, publisher notes and areas for address and correspondence. Off white card. c 1910. 334.2 - Photograph as a postcard of the Swanston St. entrance of Flinders St. Railway station from ground level with horse drawn vehicles and pedestrians in view. No motor cars in view or cable cars. c1910. On base in white ink (faded) handwriting 'Railway Station Melbourne'. On rear is name of object and areas for Address and Correspondence and '29'. trams, tramways, melbourne, flinders st. station, cable trams -
 Ballarat Tramway Museum
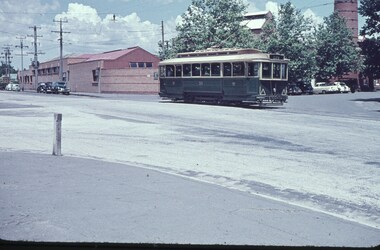
Slide - 35mm slide/s, Wal Jack, 13/01/1960 12:00:00 AM
Ballarat, SEC tram No. 32 in Ripon Street passing powerhouse, with chimney. Taken at intersection of Ripon and Wendouree Parade. Tram in SEC colours with large triangles as markings.'SEC Ballarat, No. 32 in Ripon St., View Point Line, 13.1.1960, W.Jack Photo' in blue ink on slidetramways, trams, view point, power station, ripon st, ballarat a power station, tram 32 -
 Ballarat Tramway Museum
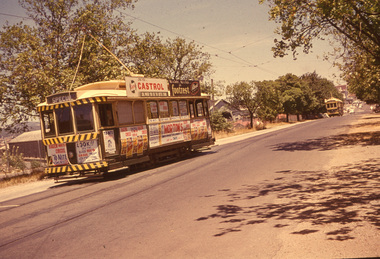
Slide - 35mm slide/s, Wal Jack, 5/01/1962 12:00:00 AM
Ballarat No. 31 covered on below windows with posters for Morton's Circus, ads for 'To-Nite'. Has Castrol and footrest shoes? roof ads. Tram travelling down Lydiard St, towards station, just left Seymour St. loop, following another bogie car. Both trams have dash canopy lights with small white strip. No. 31 showing 'SPECIAL' on destination.SEC Ballarat No. 31 with Morton's Circus Posters, Lydiard St. North, 5/1/62' in blue inktramways, trams, ballarat, morton's circus, lydiard st., seymour st. loop, tram 31