Showing 1964 items
matching victoria railway
-
 Hume City Civic Collection
Photograph, late 1980s
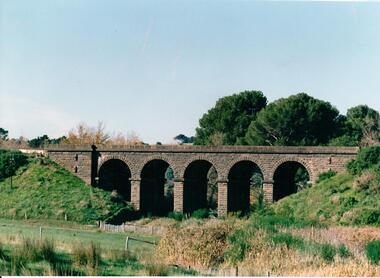
The five span masonry arch bridge over Blind Creek was one of the major constructions on the Melbourne to Echuca Railway. It was one of the first masonry rail bridges built in Victoria. Construction began in 1859 when the railway was extended from Sunbury and was designed by G C Darbyshire.A coloured photograph of the 5 arched bluestone rail bridge showing the grassy embankments on each side of the bridge and the creek flat at the base of the bridge. Some tree tops are visible on the other side of the bridge.bridges, transport, rail transport, darbyshire, g. c., blind creek, v line, george evans collection -
 Hume City Civic Collection
Photograph, late 1980s
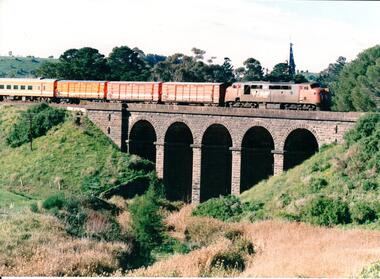
The five span masonry arch bridge over Blind Creek was one of the major constructions on the Melbourne to Echuca Railway. It was one of the first masonry rail bridges built in Victoria. Construction began in 1859 when the railway was extended from Sunbury and was designed by G C Darbyshire.A coloured photograph of the 5 arched bluestone rail bridge over Blind Creek with the embankments on either side and the tower of Rupertswood Mansion in the distance. A VLine diesel engine along with 3 goods carriages and a passenger carriage is on the bridge.bridges, transport, rail transport, darbyshire, g. c., blind creek, v line, george evans collection -
 Hume City Civic Collection
Photograph, 1980s
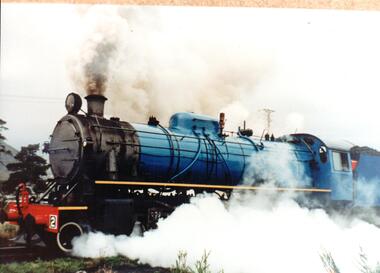
This is possibly a photograph which records trips made around Victoria of the 'Flying Scotsman' engine which was brought to Australia in late 1980s.A coloured photograph of a steam engine painted blue, black and red travelling under full steam along a rail track.steam engines, the flying scotsman, railways, george evans collection -
 Numurkah & District Historical Society
Photo - Wagons with wheat bags
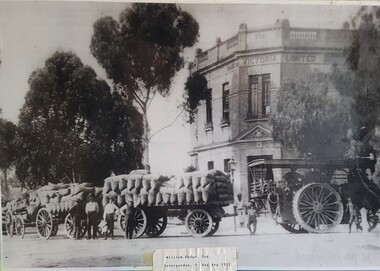
Laminated copy of a B&W photo showing steam tractor towing three wagons loaded with wheat bags on their way to the railway station, past the Bank of Victoria, corner of Melville & Knox Streets, Numurkah. Label: William Hodge, Esq. Invergordon, 9..bag average 1911see abovewheat bags, wagons, steam tractor, bank of victoria -
 Kew Historical Society Inc
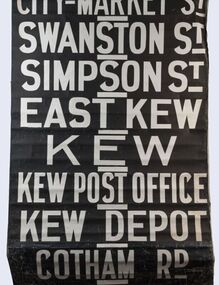
Functional object - Destination Roll, Melbourne & Metropolitan Tramways Board, 1960s
In an era predating the computerisation of equipment on public transport, where trams in Melbourne were driven by drivers and conductors sold fares, destinations were shown at the front and rear of the tram within a glazed box. A driver adjusted the roll to select each new trip destination. Given the length of rolls, in this case approximately nine metres, this could be a time consuming process. In addition to the named destination roll, each tram included a separate roll listing the route numbers.The roll was purchased at a Leski Auction in Armadale as part of a large group of tramways memorabilia including tram 'rolls' from New South Wales, Victoria, South Australia and Tasmania. The auction house described the collection as "The collection of destination blinds or rolls that forms the core of the Railways Trams & Buses Section (Lots 655 – 732) is the best we have ever offered and represents a life-time of collecting by an Adelaide enthusiast, now deceased." Melbourne & Metropolitan Tramways Board Tramways Destination Roll. Black and white paint on linen roll. Forty-eight named destinations including four depots - Camberwell, Hanna Street, Hawthorn, Kew. Multiple destinations in what is now the City of Boroondara (Kew, Hawthorn and Camberwell); including East Kew, Kew, Kew Post Office, Kew Depot, and Cotham Road.Named destinations beginning to end: “Olympic Park / Special / Football / Racecourse / Richmond / Burnley / Riversdale / Wattle Park - Warragul Rd / Wattle Park - Elgar Rd / City / Burwood / Hartwell / Bowen St / Camberwell Depot / Camberwell Jucn / Leura Grove / Gardener / Glenferrie Rd / Chapel St / St Kilda Rd / Camberwell / City / Lonsdale St / University / City via William St / Domain Rd / Hanna St Depot / South Melb & St Kilda Beach / Prahran / North Richmond / Windsor / Hawthorn Depot / Hawthorn / Spencer St / Toorak Rd / Swan & Church St Cnr / North Balwyn / City Flinders & Spencer Sts Corner / City - Market St / Swanston St / Simpson St / East Kew / Kew / Kew Post Office / Kew Depot / Cotham Rd / Malv Tn Hall"melbourne & metropolitan tramways board -
 Maldon Brass Band Inc.
Video, Maldon - Magical Marvelous Magnificent, 2017
Published on May 9, 2017 Visit the magical historic town of Maldon, declared Australia's first notable town by the National Trust of Australia. Home to remarkable shops and bustling with events throughout the year, Maldon retains an old world feel that was imprinted in Victoria's Gold Rush. Drone footage courtesy of Graham Hosking. With thanks to: Mount Alexander Shire Maldon Inc. Mr. Peter Thompson Maldon Twilight Dinner Maldon Brass Band Maldon Easter Fair and the wonderful people of Maldon.maldon hotel, victorian goldfields railway, maldon vintage machinery museum, gardens etcetera, maldon easter fair, teddy and me, wicked temptations, maldon market, cherrys ice cream, maldon twilight dinner, maldon fire brigade, vanilla spice christmas shop, maldon primary school, much ado general store, maldon brass band, the village patch, le sel, tarrangower, torchlight procession -
 Kew Historical Society Inc
Photograph - Kew Railway Station, Eva Grant, 1959
Eva Grant's three photograph albums, from which this individual photograph has been taken, contain important images of historic buildings in Kew, Victoria and Australia during the 1950s to the 1970s. The annotations in the album establish their date and provenance. Small black and white photograph of the Kew Railway Station in 1959. The photograph was taken by Kew Historical Society member Ms Eva Grant and placed in one of her scrapbooks (Historic Buildings, Kew, 1958-78). The photograph is from page 2."THE LAST PHASE. JAN 1959. KEW RAILWAY STATION"kew railway station -
 Kew Historical Society Inc
Container - Presentation Jewellery Box, 1948
In 1948, the citizens of Kew presented this jewellery box to the outgoing Mayor and Mayoress of Kew, Cr & Mrs W D Vaughan. In 2021, it returned to Kew, thanks to the generous donations of our Friends of the Collection. William David Vaughan to whom the jewel box was presented in 1948 was a publisher, politician and historian, born in 1897 at Heathcote. By 1922, he had become a publisher and Secretary of Victorian Newspapers Ltd. In October 1922, he married Muriel Gladys Frazer in Bendigo. He purchased 'Elsfield' in Cotham Road, renamed it 'Carramar', and resided there for almost fifty years. His wife, the Mayoress, was an accomplished pianist and entertained the wives of councillors and supported many charitable works from her home. In 1926, Vaughan founded a local newspaper, the Kew Advertiser. During his second term as Mayor, he was elected president of Melbourne Suburban Newspapers’ Association, In April 1947, he was appointed to and later became chairman of the Free Library Services Board. In 1960, he published his history of Kew - 'Kew's Civic Century'. Vaughan’s third term as Mayor in 1962-63 saw the erection of the pavilion at Victoria Park and the final clean-up of the Outer Circle Railway. He died in September 1976. This inlaid and engraved jewellery box was part of a larger donation made to the Mayor and Mayoress of Kew in 1948 by the citizens of the municipality. It is the only 'civic award' in the collection given to a former civic leader and complements the large collection of civic portraits in the collection. The box is additionally significant because of its association with William David Vaughan - newspaper proprietor, local politician, and local historian. A presentation jewellery box, she-oak with barber pole inlay adorned with an Australian silver plaque.Engraved inscription on silver plaque - "Presented to Cr & Mrs W.D. Vaughan With The Esteem And Appreciation Of The Citizens Of Kew And In Recognition Of their Services As Mayor And Mayoress 1947-48. 28th July 1948"w d vaughan, mayors of kew, kew advertiser, kew (vic.) -- history -
 Surrey Hills Historical Society Collection
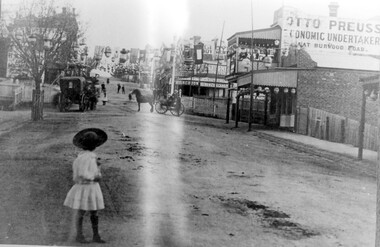
Photograph, Empire Day in Surrey Hills circa 1912
Empire Day celebrations were held from 1908-1912. Prior to the opening of the railway in 1893 the only public transport to Surrey Hills was the Melbourne-Lilydale horse coach which travelled to Surrey Hills down Victoria Street and Mont Albert Road. The fare to Union Road was 9 pence. Photo 16-4a was the number given to the original print provided by the State Savings Bank. Ken Hall made a negative from it, and the reprint of this was given the number 1459. This number was chosen as the catalogue number to avoid confusion with SHP4a. Photo provided by Surrey Hills branch of State Savings Bank of Victoria in 1978 for launch of Surrey Hills Neighbourhood Centre and was one of the first photos in the collection. The inscriptions on the reverse may indicate it was used in the Surrey Hills Neighbourhood News.Black and white photo of Union Road looking south towards Canterbury Road. The street is decorated with lanterns and the Union Jack and other flags for Empire Day celebrations. There is a young girl in the foreground looking towards the railway crossing where there is a horse drawn cab and a horse drawn cart. Business signage includes that for a butcher, Sneddon's Real Estate and Otto Preuss, Economic Undertaker.On rear: "113% "; "Enlarge to 172 mm" and 2 arrows, all in blue biro.union road, empire day celebrations, horse drawn vehicles, undertaker, sneddon real estate, businesses, union road shops, otto preuss -
 8th/13th Victorian Mounted Rifles Regimental Collection
Photograph
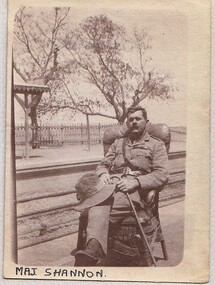
Major H. J. Shannon, a grazier from Wangaratta Victoria, served with 8th Australian Light Horse Regiment. Part of a collection of photographs taken by unknown photographer serving with 8th Light Horse Regiment in Middle East 1916-1918.The 8th Light Horse Regiment AIF was raised at Broadmeadows Victoria in September 1914 under the command of Lieutenant Colonel Alexander White and formed part of the 3rd Light Horse Brigade. The regiment served at Gallipoli where in a courageous but ill-fated charge at the Nek on 7 August 1915 it suffered horrendous casualties including Lieutenant Colonel White. Rebuilt in Egypt under the command of Lieutenant Colonel Leslie Maygar VC the regiment went on the serve throughout the Middle East Campaign. Colonel Maygar died of wounds at Beersheba when the regiment was attacked by enemy aircraft while waiting to follow up the successful charge of the 4th LH Brigade on 30 October 1917. The 8th Light Horse AIF was disbanded in 1919, but soon after re-raised as the 8th (Indi) Light Horse in the Citizen Military Forces, superseding 16th (Indi) Light Horse. It had its headquarters at Benalla with sub-units throughout the Upper Murray and Northeast Victoria. In December 1941, the regiment converted from horse to mechanised, initially as 8th Reconnaissance Battalion then in July 1942 it became 8th Cavalry Regiment and served in Northern Territory. As Japanese threat to the mainland declined the regiment was disbanded.Two black and white photographs of one officer seated beside railway siding, the other standing in desert." Maj Shannon" and Maj Shannon 1918 " -
 8th/13th Victorian Mounted Rifles Regimental Collection
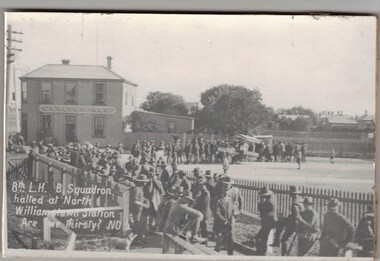
Photograph - 8LH at Broadmeadows 1914
The 8th Light Horse Regiment AIF was raised at Broadmeadows Victoria in September 1914 under the command of Lieutenant Colonel Alexander White and formed part of the 3rd Light Horse Brigade. The regiment served at Gallipoli where in a courageous but ill-fated charge at the Nek on 7 August 1915 it suffered horrendous casualties including Lieutenant Colonel White. Rebuilt in Egypt under the command of Lieutenant Colonel Leslie Maygar VC the regiment went on the serve throughout the Middle East Campaign. Colonel Maygar died of wounds at Beersheba when the regiment was attacked by enemy aircraft while waiting to follow up the successful charge of the 4th LH Brigade on 30 October 1917. The 8th Light Horse AIF was disbanded in 1919, but soon after re-raised as the 8th (Indi) Light Horse in the Citizen Military Forces, superseding 16th (Indi) Light Horse. Black and white photograph glued to fluted plastic backing showing large group of soldiers at railway station.8th LH B Squadron / halted at North / Williamspown Station / Are we thirsty? NO!8th, light horse, williamstown, world war one, wwi, aif -
 Kew Historical Society Inc
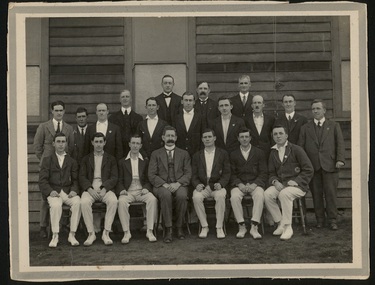
Photograph, 1st X1, Hawthorn East Melbourne Cricket Club, c. 1927
The East Melbourne Cricket Ground was a grass oval sports venue located at the corner of Wellington Parade and Jolimont Parade, in East Melbourne, Victoria, Australia. After the 1921 football season, the ground was closed and then demolished to make way for an extension of the Jolimont Yard railway sidings. In 1921, East Melbourne Cricket Club merged with the Hawthorn Cricket Club, following the loss of the former's ground, to become known as Hawthorn-East Melbourne (or the "Combine"). In 1989, after the club relocated to Glen Waverley, it dropped "East Melbourne" from its title until becoming Hawthorn-Waverley in 1994.Team photo of the Hawthorn East Melbourne Cricket Club, from the collection made by one of its players, Christopher Robinson, pictured middle row, 4th from right. The photo was probably taken at the Glenferrie Oval where the team played. The Club were First Grade Premiers in 1927-28hawthorn east melbourne cricket club, glenferrie oval, cricket, sport, christopher robinson -
![View of the Hanging Rock, near Mount Macedon / [by] Nicholas Caire, circa 1876](/media/collectors/550653872162f11fb04854aa/items/577745a4d0cdd10a5c1059fc/item-media/57774673d0cdd10a5c10a562/item-fit-380x285.jpg) Kew Historical Society Inc
Kew Historical Society IncPhotograph, Anglo-Australasian Photographic Company, View of the Hanging Rock, near Mount Macedon, c. 1876
Nicholas Caire was born on Guernsey in the Channel Islands in 1837. He arrived in Adelaide with his parents in about 1860. In 1867, following photographic journeys in Gippsland, he opened a studio in Adelaide. From 1870 to 1876 he lived and worked in Talbot in Central Victoria. In 1876 he purchased T. F. Chuck's studios in the Royal Arcade Melbourne. In 1885, following the introduction of dry plate photography, he began a series of landscape series, which were commercially successful. As a photographer, he travelled extensively through Victoria, photographing places few of his contemporaries had previously seen. He died in 1918. Reference: Jack Cato, 'Caire, Nicholas John (1837–1918)', Australian Dictionary of Biography.An original, rare photograph from the series 'Views of Victoria: General Series' by the photographer, Nicholas Caire (1837-1918). The series of 60 photographs that comprise the series was issued c. 1876 and reinforced a neo-Romantic view of the Australian landscape to which a growing nationalist movement would respond. Nicholas Caire was active as a photographer in Australia from 1858 until his death in 1918. His vision of the Australian bush and pioneer life had a counterpart in the works of Henry Lawson and other nationalist poets, authors and painters.Albumen Silver Photograph on Boardprinted in ink on support l.c.: VIEW OF THE "HANGING ROCK," NEAR MOUNT MACEDON. / COPYRIGHT REGISTERED. printed in ink (vertically) on support reverse u.c.l.: J.W. FORBES, Agent, printed in ink (vertically) on support reverse c.l.: ANGLO-AUSTRALASIAN PHOTOGRAPHIC COMPANY, MELBOURNE. printed in ink (vertically) on support reverse c.: VIEWS OF VICTORIA. / (GENERAL SERIES.) / No. 6. / VIEW OF THE "HANGING ROCK," NEAR MOUNT MACEDON. / The Hanging Rock is situated about 5 miles in a north-easterly direction from the Railway Station at Woodend, / and is a very picturesque spot. Its formation is singularly peculiar, consisting of gigantic masses of basaltic rock / thrown up on end in a projecting or hanging position. Our illustration represents but a portion of the Rock, as it / is not possible to obtain a view of the whole of it in one picture. The height of these large boulders of rock vary / from 150 to 200 feet. printed in ink (vertically) on support reverse l.c.l.: 10 Temple Court, Collins Street West.nicholas caire (1837-1918), landscape photography -
![View of the River Murray, near Echuca, showing the Railway Wharf with steamers unloading / [by] Nicholas Caire, circa 1876](/media/collectors/550653872162f11fb04854aa/items/57774776d0cdd10a5c111b2d/item-media/57774888d0cdd10a5c11c099/item-fit-380x285.jpg) Kew Historical Society Inc
Kew Historical Society IncPhotograph, Anglo-Australasian Photographic Company, View of the River Murray, near Echuca, showing the Railway Wharf with steamers unloading, c. 1876
Nicholas Caire was born on Guernsey in the Channel Islands in 1837. He arrived in Adelaide with his parents in about 1860. In 1867, following photographic journeys in Gippsland, he opened a studio in Adelaide. From 1870 to 1876 he lived and worked in Talbot in Central Victoria. In 1876 he purchased T. F. Chuck's studios in the Royal Arcade Melbourne. In 1885, following the introduction of dry plate photography, he began a series of landscape series, which were commercially successful. As a photographer, he travelled extensively through Victoria, photographing places few of his contemporaries had previously seen. He died in 1918. Reference: Jack Cato, 'Caire, Nicholas John (1837–1918)', Australian Dictionary of Biography.An original, rare photograph from the series 'Views of Victoria: General Series' by the photographer, Nicholas Caire (1837-1918). The series of 60 photographs that comprise the series was issued c. 1876 and reinforced a neo-Romantic view of the Australian landscape to which a growing nationalist movement would respond. Nicholas Caire was active as a photographer in Australia from 1858 until his death in 1918. His vision of the Australian bush and pioneer life had a counterpart in the works of Henry Lawson and other nationalist poets, authors and painters.albumen silver photograph on boardprinted in ink on support l.c.: VIEW ON THE RIVER MURRAY, NEAR ECHUCA, SHOWING THE RAILWAY WHARF WITH STEAMERS UNLOADING. / COPYRIGHT REGISTERED. printed in ink on support reverse c.: VIEWS OF VICTORIA. / (GENERAL SERIES.) / No. 7. / VIEW ON THE RIVER MURRAY, NEAR ECHUCA, SHOWING THE RAILWAY WHARF WITH STEAMERS UNLOADING. / The rapidly increasing traffic on the River Murray, with wool, timber, and other colonial produce, has called / into requisition no less than 400 steamers and over 1000 barges. To meet this growing emergency the Victorian / Government has expended several thousand pounds in the erection of a Railway Wharf which during the wool- / season presents a very busy scene, the crowded steamers laden with precious clip taxing to the utmost the / powers of the Railway Department in the process of unloading. The River here is about a quarter of a mile wide, / and is from 60 to 70 feet deep. printed in ink on support reverse l.c.l.: J.W. FORBES, Agent, printed in ink on support reverse l.c.: ANGLO-AUSTRALASIAN PHOTOGRAPHIC COMPANY, MELBOURNE. printed in ink on support reverse l.c.r.: 10 Temple Court, Collins Street West.nicholas caire (1837-1918), landscape photography, river murray, echuca -
![View of the railway tunnel through the big hill near Mount Herbert / [by] Nicholas Caire, circa 1876](/media/collectors/550653872162f11fb04854aa/items/57774c0fd0cdd10a5c13912e/item-media/57774c7dd0cdd10a5c13c1ab/item-fit-380x285.jpg) Kew Historical Society Inc
Kew Historical Society IncPhotograph, Anglo-Australasian Photographic Company, View of the railway tunnel through the big hill near Mount Herbert, c. 1876
... Photograph Photograph View of the railway tunnel through the big hill ...Nicholas Caire was born on Guernsey in the Channel Islands in 1837. He arrived in Adelaide with his parents in about 1860. In 1867, following photographic journeys in Gippsland, he opened a studio in Adelaide. From 1870 to 1876 he lived and worked in Talbot in Central Victoria. In 1876 he purchased T. F. Chuck's studios in the Royal Arcade Melbourne. In 1885, following the introduction of dry plate photography, he began a series of landscape series, which were commercially successful. As a photographer, he travelled extensively through Victoria, photographing places few of his contemporaries had previously seen. He died in 1918. Reference: Jack Cato, 'Caire, Nicholas John (1837–1918)', Australian Dictionary of Biography, National Centre of Biography, Australian National UniversityAn original, rare photograph from the series 'Views of Victoria: General Series' by the photographer, Nicholas Caire (1837-1918). The series of 60 photographs that comprise the series was issued c. 1876 and reinforced a neo-Romantic view of the Australian landscape to which a growing nationalist movement would respond. Nicholas Caire was active as a photographer in Australia from 1858 until his death in 1918. His vision of the Australian bush and pioneer life had a counterpart in the works of Henry Lawson and other nationalist poets, authors and painters.Albumen silver photograph on boardprinted in ink on support l.c.: VIEW OF THE RAILWAY TUNNEL THROUGH THE BIG HILL NEAR MOUNT HERBERT. / COPYRIGHT REGISTERED. printed in ink on support reverse c.: VIEWS OF VICTORIA. / (GENERAL SERIES.) / No. 10. / VIEW OF THE RAILWAY TUNNEL THROUGH THE BIG HILL NEAR MOUNT HERBERT. / This tunnel is situated on the Mount Alexander and Murray Railway Line, between Castlemaine and Sandhurst, / and is 431 yards long; the completion of this and the remaining portion of the line to Bendigo was celebrated by / great public feasting. The Tunnel is perfectly level, and the spectator is enabled to distinguish objects through it, / as may be seen by the illustration. printed in ink on support reverse l.c.l.: J.W. FORBES, Agent, printed in ink on support reverse l.c.: ANGLO-AUSTRALASIAN PHOTOGRAPHIC COMPANY, MELBOURNE. printed in ink on support reverse l.c.r.: 10 Temple Court, Collins Street West.nicholas caire, landscape photography, mount herbert, railways - victoria -
![The Punt, Echuca / [by] Nicholas Caire, circa 1876](/media/collectors/550653872162f11fb04854aa/items/57825721d0cdd1176ce1789a/item-media/57825765d0cdd1176ce19829/item-fit-380x285.jpg) Kew Historical Society Inc
Kew Historical Society IncPhotograph, Anglo-Australasian Photographic Company, The Punt, Echuca, c. 1876
Nicholas Caire was born on Guernsey in the Channel Islands in 1837. He arrived in Adelaide with his parents in about 1860. In 1867, following photographic journeys in Gippsland, he opened a studio in Adelaide. From 1870 to 1876 he lived and worked in Talbot in Central Victoria. In 1876 he purchased T. F. Chuck's studios in the Royal Arcade Melbourne. In 1885, following the introduction of dry plate photography, he began a series of landscape series, which were commercially successful. As a photographer, he travelled extensively through Victoria, photographing places few of his contemporaries had previously seen. He died in 1918. Reference: Jack Cato, 'Caire, Nicholas John (1837–1918)', Australian Dictionary of Biography.An original, rare photograph from the series 'Views of Victoria: General Series' by the photographer, Nicholas Caire (1837-1918). The series of 60 photographs that comprise the series was issued c. 1876 and reinforced a neo-Romantic view of the Australian landscape to which a growing nationalist movement would respond. Nicholas Caire was active as a photographer in Australia from 1858 until his death in 1918. His vision of the Australian bush and pioneer life had a counterpart in the works of Henry Lawson and other nationalist poets, authors and painters.Views of Victoria (General Series) No.34; ‘The Punt, Echuca’; Albumen silver photograph | Photo on card with Title and Description on reverse | Mounted 24 x 30 cm; Photo 12 x 17 cm.On Reverse: ‘The subject of this illustration is the principal crossing-place on the River Murray at Echuca, as regards the ordinary road traffic from the district of Riverina, New South Wales. After the periodical floods, the Punt is found to be insufficient for the large traffic; but this inconvenience will not be found to occur again to any great extent, as the new Railway Bridge from Moama will considerably lessen the road traffic through the Township of Echuca.’nicholas caire (1837-1918), echuca (vic), landscape photography -
 Kew Historical Society Inc
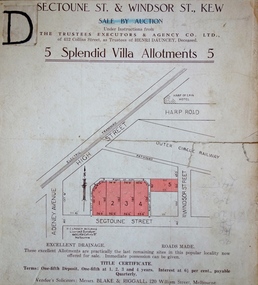
Plan, J R Mathers & McMillan, 5 Splendid vVlla Allotments,: Segtoune St. & Windsor St., Kew, 1928
Prue Sanderson, in her groundbreaking ‘City of Kew Urban Conservation Study : Volume 2 - Development History’ (1988), summarised the periods of urban development and subdivisions of land in Kew. The periods that she identified included 1845-1880, 1880-1893, 1893-1921, 1921-1933, 1933-1943, and Post-War Development. These periods were selected as they represented periods of rapid growth or decline in urban development. An obvious starting point for Sanderson’s groupings involved population growth and the associated economic cycles. These cycles also highlighted urban expansion onto land that was predominantly rural, although in other cases it represented the decline and breakup of large estates. A number of the plans in the Kew Historical Society’s collection can also be found in other collections, such as those of the State Library of Victoria and the Boroondara Library Service. A number are however unique to the collection.Subdivision plans are historically important documents used as evidence of the growth of suburbs in Australia. They frequently provide information about when the land was sold on which a built structure was subsequently constructed as well as evidence relating to surveyors and real estate and financial agents. The numerous subdivision plans in the Kew Historical Society's collection represent working documents, ranging from the initial sketches made in planning a subdivision to printed plans on which auctioneers or agents listed the prices for which individual lots were sold. In a number of cases, the reverse of a subdivision plan in the collection includes a photograph of a house that was also for sale by the agent. These photographs provide significant heritage information relating house design and decoration, fencing and household gardens.In 1928, five residential allotments bordering Segtoune and Windsor Streets were advertised for sale as part of a subdivision. Four of the blocks faced Segtoune Avenue. The auctioneers proclaimed the advantages of the sites: ‘Situate one minute from the High Street Electric Tram, which now runs direct to Spencer Street via Bridge Road and Flinders Street. Opposite the East Kew Railway Station (Outer Circle Line), which may be reopened In connection with the new Line from Kew to Doncaster; Adjacent lo the Kew Recreation Reserve, Sports Oval, and Swimming Bath; Half Minute from the Shopping Centre of East Kew, Accessible to the State School and Other Educational Centres’. The Harp of Erin Hotel and the route of the Outer Circle Railway line are marked on the plan. The Recreation Reserve and Sport Oval refer to Victoria Park. The Swimming Baths were located on the site of the current Kew Recreation Centre.subdivision plans - kew, segtoune street -- kew (vic.), windsor street -- kew (vic.) -
 Kew Historical Society Inc
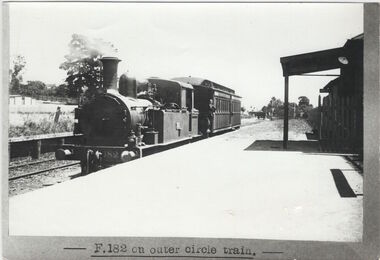
Print, F.182 on Outer Circle Train, circa 1928, c. 1905- c. 1928
This work forms part of the collection assembled by the historian Dorothy Rogers, that was donated to the Kew Historical Society by her son John Rogers in 2015. The manuscripts, photographs, maps, and documents were sourced by her from both family and local collections or produced as references for her print publications. Many were directly used by Rogers in writing ‘Lovely Old Homes of Kew’ (1961) and 'A History of Kew' (1973), or the numerous articles on local history that she produced for suburban newspapers. Most of the photographs in the collection include detailed annotations in her hand. The Rogers Collection provides a comprehensive insight into the working habits of a historian in the 1960s and 1970s. Together it forms the largest privately-donated collection within the archives of the Kew Historical Society.A photographic copy of a train on the outer circle railway, sourced from the collection of the La Trobe Library, State Library of Victoria, in the 1960s by Dorothy Rogers while undertaking research for 'A History of Kew' (1973)."Outer Circle Railway. Supplied by La Trobe Library"outer circle railway, dorothy rogers -
 Kew Historical Society Inc
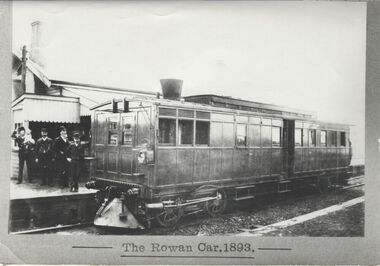
Photograph, The Rowan Car, 1893
This work forms part of the collection assembled by the historian Dorothy Rogers, that was donated to the Kew Historical Society by her son John Rogers in 2015. The manuscripts, photographs, maps, and documents were sourced by her from both family and local collections or produced as references for her print publications. Many were directly used by Rogers in writing ‘Lovely Old Homes of Kew’ (1961) and 'A History of Kew' (1973), or the numerous articles on local history that she produced for suburban newspapers. Most of the photographs in the collection include detailed annotations in her hand.The Rogers Collection provides a comprehensive insight into the working habits of a historian in the 1960s and 1970s. Together it forms the largest privately-donated collection within the archives of the Kew Historical Society.A print made by/for Dorothy Rogers in the 1960s from an original in the La Trobe Library (State Library of Victoria) showing one of the trains on the Outer Circle Railway."Train used on Outer Circle Railway 1893. Only ones available supplied by La Trobe Library"outer circle railway, rowan car, dorothy rogers -
 Sunbury Family History and Heritage Society Inc.
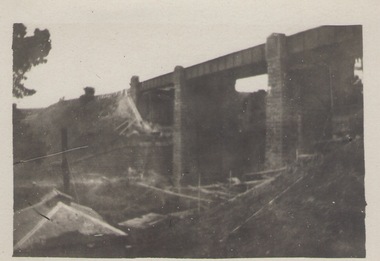
Photograph, Rupertswood Viaduct
... to be constructed in Victoria. Along the railway a number of famous bridges ...The stone bridge is one of the many bridges built along the Bendigo Rail Line. This one along with four others ar in Sunbury which were built in the late 1850s. his bridge spans the Ruoertswood Viaduct which is north of the Sunbury Station. The building in the LH corner was a pump house where water was pumped and taken to the water tower on Sunbury Station where the steam trains stopped to replenish the water tanks. The Bendigo Rail Line was the first Government owned and operated to be constructed in Victoria. Along the railway a number of famous bridges and tunnels were built and are of historical significance. The bridge spanning the Rupertswood Viaduct is one of them. A black and white photograph with a cream border of a high bridge spanning a deep valley. The roof of a small building is visible in the bottom LHS corner of the photograph.bridges, railways, rupertswood viaduct -
 Sunbury Family History and Heritage Society Inc.
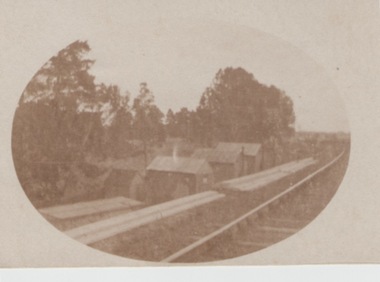
Photograph, c1900
The huts along the railway line were built to house 'navvies' who worked on and maintained the Bendigo-Echuca railway line. At the time this photo was taken, work was being undertaken on the railway line in the Sunbury area.The Bendigo-Echuca was one of Victoria's earliest government owned and operated regional rail systems. It was an important link with the river traffic along the Murray and Melbourne.An oval shaped sepia photograph within cream border of a row of small huts along a railway line. With trees forming a backdrop. railways, 'navvies' -
Whitehorse Historical Society Inc.
Book, Martin Nolan, 2000-2010
... reference to his police service. Railways Victoria Victoria. Police ...Autobiographical notes by Martin John Nolan, North Blackburn resident.Autobiographical notes by Martin John Nolan, North Blackburn resident. Much of the information relates to the operation of rail services in Victoria, with some reference to his police service.Autobiographical notes by Martin John Nolan, North Blackburn resident. railways, victoria, victoria. police force, nolan, martin -
 Flagstaff Hill Maritime Museum and Village
Ceramic - Tile, circa 1878
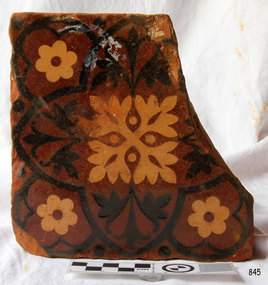
This Minton floor tile is from the wreck of the LOCH ARD along with other examples of this manufacture recovered from the wreck site and form part of the collection at Flagstaff Hill. The iron-hulled clipper ship from the Loch Line was heading for Port Phillip from London when it ran into the cliffs of Mutton Bird Island near Port Campbell and was wrecked on June 1st, 1878. The LOCH ARD was laden with high-value cargo including luxury goods intended for display at the Melbourne International Exhibition in 1880. One notable survivor from the ship’s freight manifest was the well-packed Minton porcelain peacock, a two-metre-high ceramic masterpiece of vivid glazed colours. The almost total loss of life and property from the LOCH ARD registered as a shocking tragedy for the Colony of Victoria, at a time when social confidence and economic optimism were otherwise high. The wealth generated from Gold and Wool was increasingly being spent on grandiose private residences and imposing public buildings. The demand for quality furnishings and fittings was therefore strong. Among the products consigned to burgeoning colonial markets by the Milton Pottery at Stoke upon Trent, were their new range of colourfully patterned but very durable floor tiles – ideal for the high-traffic spaces in the large civic buildings then being constructed in Australia and America. These new floor tiles were “encaustic”, meaning that their designs and colours were encased “within” the depth of the tile. Rather than their decorative patterns being glazed onto the surface of the tile, their inlaid designs were created during the manufacturing process, as “coloured slips” (or liquid clay) were poured into a deep pre-moulded casting. When fired, the resulting tile was colour-fast and design-fast. A brief history of the Loch Ard (1873-1878): - The sailing ship Loch Ard was one of the famous Loch Line ships that sailed from England to Australia. Barclay, Curdle and Co. built the three-masted iron vessel in Glasgow in 1873. It had sailed three trips to Australia and one trip to Calcutta before its fateful voyage. Loch Ard left England on March 2, 1878, under the command of recently married, 29-year-old Captain Gibbs. It was bound for Melbourne with a crew of 37, plus 17 passengers. The general cargo reflected the affluence of Melbourne at the time. Onboard were straw hats, umbrellas, perfumes, clay pipes, pianos, clocks, confectionery, linen and candles, and a heavier load of railway irons, cement, lead and copper. Other cargo included items intended for display in the Melbourne International Exhibition of 1880. The Loch Ard had been sailing for three months and was close to its destination on June 1, 1878. Captain Gibbs had expected to see land at about 3 am but the Loch Ard ran into a fog that greatly reduced visibility and there was no sign of land or the Cape Otway lighthouse. The fog lifted at 4 am and the sheer cliffs of Victoria's west coast were much closer to them than Captain Gibbs expected. He tried to manage the vessel but failed and the ship struck a reef at the base of Mutton Bird Island, near Port Campbell. The top deck loosened from the hull, and the masts and rigging crashed down, knocking passengers and crew overboard. The lifeboat was launched by Tom Pearce but crashed into the side of Loch Ard and capsized. He clung onto its overturned hull and sheltered under it. He drifted out to sea and the tide brought him back to what is now called Loch Ard Gorge. He swam to shore and found a cave for shelter. A passenger, Eva Carmichael, had raced onto the deck to find out what was happening and was confronted by towering cliffs above the ship. She was soon swept off the ship by a huge wave. Eva saw Tom Pearce on a small rocky beach and yelled to attract his attention. He swam out and dragged her to the shelter of the cave. He revived her with a bottle of brandy from a case that had washed up on the beach. Tom scaled a cliff in search of help and followed some horse hoof prints. He came from two men from Glenample Station, three and a half miles away. He told the men of the tragedy and then returned to the gorge while the two men rode back to the station to get help. They reached Loch Ard Gorge and took the two shipwreck survivors to Glenample Station to recover. Eva stayed at the station for six weeks before returning to Ireland by steamship. In Melbourne, Tom Pearce received a hero's welcome and was presented with a medal and some money. Of the 54 crew members and passengers on board, only two survived: the apprentice, Tom Pearce and the young woman passenger, Eva Carmichael, who lost her family in the tragedy. One of the most unlikely pieces of cargo to have survived the shipwreck was a Minton porcelain peacock - one of only nine in the world. The peacock was destined for the Melbourne International Exhibition in 1880. It had been well packed, which gave it adequate protection during the violent storm. Today, the Minton peacock can be seen at the Flagstaff Hill Maritime Museum in Warrnambool. From Australia's most dramatic shipwreck, it has now become Australia's most valuable shipwreck artefact and is one of very few 'objects' on the Victorian State Heritage Register. The Minton floor tile is significant for its hard-wearing yet attractive design. The shipwreck of the LOCH ARD is of State significance. Victorian Heritage Register S417. Flagstaff Hill’s collection of artefacts from LOCH ARD is significant for being one of the largest collections of artefacts from this shipwreck in Victoria. It is significant for its association with the shipwreck, which is on the Victorian Heritage Register (VHR S417). The collection is significant because of the relationship between the objects, as together they have a high potential to interpret the story of the LOCH ARD. The LOCH ARD collection is archaeologically significant as the remains of a large international passenger and cargo ship. The LOCH ARD collection is historically significant for representing aspects of Victoria’s shipping history and its potential to interpret sub-theme 1.5 of Victoria’s Framework of Historical Themes (living with natural processes). The collection is also historically significant for its association with the LOCH ARD, which was one of the worst and best-known shipwrecks in Victoria’s history. A square Minton floor tile with a black and apricot pattern against a chocolate brown background. There is a large chip missing. This decorative floor tile was recovered from the shipwreck of the LOCH ARD. On the back, or base, of the tile is inscribed the number “46” and the letters “Minton & Co Patent Stoke upon Trent”.flagstaff hill, warrnambool, shipwrecked coast, flagstaff hill maritime museum, maritime museum, shipwreck coast, flagstaff hill maritime village, great ocean road, loch line, loch ard, captain gibbs, eva carmichael, tom pearce, glenample station, mutton bird island, loch ard gorge, encaustic tile, melbourne international exhibition, floor tile, minton floor tile -
 Flagstaff Hill Maritime Museum and Village
Domestic object - Serving Dish, 1878
History of the Loch Ard: The Loch Ard got its name from ”Loch Ard” a loch which lies to the west of Aberfoyle, and the east of Loch Lomond. It means "high lake" in Scottish Gaelic. The vessel belonged to the famous Loch Line which sailed many vessels from England to Australia. The Loch Ard was built in Glasgow by Barclay, Curdle and Co. in 1873, the vessel was a three-masted square-rigged iron sailing ship that measured 79.87 meters in length, 11.58 m in width, and 7 m in depth with a gross tonnage of 1693 tons with a mainmast that measured a massive 45.7 m in height. Loch Ard made three trips to Australia and one trip to Calcutta before its fateful voyage. Loch Ard left England on March 2, 1878, under the command of 29-year-old Captain Gibbs, who was newly married. The ship was bound for Melbourne with a crew of 37, plus 17 passengers. The general cargo reflected the affluence of Melbourne at the time. Onboard were straw hats, umbrella, perfumes, clay pipes, pianos, clocks, confectionery, linen and candles, as well as a heavier load of railway irons, cement, lead and copper. There were other items included that were intended for display in the Melbourne International Exhibition of 1880. The voyage to Port Phillip was long but uneventful. Then at 3 am on June 1, 1878, Captain Gibbs was expecting to see land. But the Loch Ard was running into a fog which greatly reduced visibility. Captain Gibbs was becoming anxious as there was no sign of land or the Cape Otway lighthouse. At 4 am the fog lifted and a lookout aloft announced that he could see breakers. The sheer cliffs of Victoria's west coast came into view, and Captain Gibbs realised that the ship was much closer to them than expected. He ordered as much sail to be set as time would permit and then attempted to steer the vessel out to sea. On coming head-on into the wind, the ship lost momentum, the sails fell limp and Loch Ard's bow swung back towards land. Gibbs then ordered the anchors to be released in an attempt to hold its position. The anchors sank some 50 fathoms - but did not hold. By this time the ship was among the breakers and the tall cliffs of Mutton Bird Island rose behind. Just half a mile from the coast, the ship's bow was suddenly pulled around by the anchor. The captain tried to tack out to sea, but the ship struck a reef at the base of Mutton Bird Island, near Port Campbell. Waves subsequently broke over the ship and the top deck became loosened from the hull. The masts and rigging came crashing down knocking passengers and crew overboard. When a lifeboat was finally launched, it crashed into the side of Loch Ard and capsized. Tom Pearce, who had launched the boat, managed to cling to its overturned hull and shelter beneath it. He drifted out to sea and then on the flood tide came into what is now known as Loch Ard rd Gorge. He swam to shore, bruised and dazed, and found a cave in which to shelter. Some of the crew stayed below deck to shelter from the falling rigging but drowned when the ship slipped off the reef into deeper water. Eva Carmichael a passenger had raced onto the deck to find out what was happening only to be confronted by towering cliffs looming above the stricken ship. In all the chaos, Captain Gibbs grabbed Eva and said, "If you are saved Eva, let my dear wife know that I died like a sailor". That was the last Eva Carmichael saw of the captain. She was swept off the ship by a huge wave. Eva saw Tom Pearce on a small rocky beach and yelled to attract his attention. He dived in and swam to the exhausted woman and dragged her to shore. He took her to the cave and broke the open case of brandy which had washed up on the beach. He opened a bottle to revive the unconscious woman. A few hours later Tom scaled a cliff in search of help. He followed hoof prints and came by chance upon two men from nearby Glenample Station three and a half miles away. In a complete state of exhaustion, he told the men of the tragedy. Tom then returned to the gorge while the two men rode back to the station to get help. By the time they reached Loch Ard Gorge, it was cold and dark. The two shipwreck survivors were taken to Glenample Station to recover. Eva stayed at the station for six weeks before returning to Ireland by steamship. In Melbourne, Tom Pearce received a hero's welcome. He was presented with the first gold medal of the Royal Humane Society of Victoria and a £1000 cheque from the Victorian Government. Concerts were performed to honour the young man's bravery and to raise money for those who lost family in the disaster. Of the 54 crew members and passengers on board, only two survived: the apprentice, Tom Pearce and the young woman passenger, Eva Carmichael, who lost her family in the tragedy. Ten days after the Loch Ard tragedy, salvage rights to the wreck were sold at auction for £2,120. Cargo valued at £3,000 was salvaged and placed on the beach, but most washed back into the sea when another storm developed. The wreck of Loch Ard still lies at the base of Mutton Bird Island. Much of the cargo has now been salvaged and some items were washed up into Loch Ard Gorge. Cargo and artefacts have also been illegally salvaged over many years before protective legislation was introduced in March 1982. One of the most unlikely pieces of cargo to have survived the shipwreck was a Minton majolica peacock- one of only nine in the world. The peacock was destined for the Melbourne 1880 International Exhibition in. It had been well packed, which gave it adequate protection during the violent storm. Today the Minton peacock can be seen at the Flagstaff Hill Maritime Museum in Warrnambool. From Australia's most dramatic shipwreck it has now become Australia's most valuable shipwreck artifact and is one of very few 'objects' on the Victorian State Heritage Register. The shipwreck of the Loch Ard is of significance for Victoria and is registered on the Victorian Heritage Register ( S 417). Flagstaff Hill has a varied collection of artefacts from Loch Ard and its collection is significant for being one of the largest accumulation of artefacts from this notable Victorian shipwreck. The collections object is to also give us a snapshot into history so we can interpret the story of this tragic event. The collection is also archaeologically significant as it represents aspects of Victoria's shipping history that allows us to interpret Victoria's social and historical themes of the time. The collections historically significance is that it is associated unfortunately with the worst and best-known shipwreck in Victoria's history. Silver plated Serving Dish, insulated, with two layers of copper alloy. Noneflagstaff hill, warrnambool, shipwrecked-coast, flagstaff-hill, flagstaff-hill-maritime-museum, maritime-museum, shipwreck-coast, flagstaff-hill-maritime-village -
 Flagstaff Hill Maritime Museum and Village
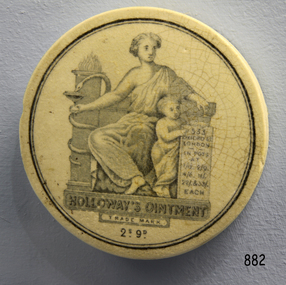
Ceramic - Lid, circa 1878
This ceramic lid is from a Holloway’s Ointment pot. It was retrieved from the wreckage of the LOCH ARD. The vessel was laden with an up-to-date, high-value cargo, including luxury items intended for the Melbourne International Exhibition in 1880. Britain exported her manufactures to the Australasian colonies and the Americas. Holloway’s Ointment was one nineteenth-century pharmaceutical product that was advertised in both these markets. The price of this particular jar and its contents was printed on the label as “2S 9D” (2 shillings and nine pence). This value calculated to the approximate price in 2014, would be £51.31 (UK pounds and decimal pence) or $85 AU ― quite an expensive ointment. The label also shows a picture of a stone tablet with the inscription "IN POTS AT 1/½, 2/9, 4/6,11/-, 22/- & 33/- EACH”, which is most likely the alternative prices that the ointment was available for in differently sized containers. Holloway’s claims for his “great remedy” included the cure of sores, wounds, ulcers and boils, gout, rheumatism, diphtheria, bronchitis, influenza, sore throats, coughs and colds, “all varieties of skin diseases”, scrofula, ringworm, scurvy, “dropsical swellings” and liver disease, piles, fistulas, and internal inflammation. The salve cream was said to penetrate the skin when rubbed on; purifying internal tissues and organs, cleansing all bodily fluids particularly the blood, and eradicating all disease from the body. Purchasers were assured that if Holloway’s Ointment alone did not affect immediate cure, then the combination of it and Holloway’s Pills (sold separately) most certainly would. Thomas Holloway began manufacturing and marketing his miraculous ointment from premises at 244 Strand in the 1840s, moving to the more prestigious address of 533 Oxford in the late 1860s. The London address was an important part of his promotional appeal and was displayed prominently on the packaging of his products. Holloway’s attention to marketing is also observed in the pseudo-Classical emblems that decorated his containers. The sign of a snake curled around a staff is a longstanding and commonly recognised symbol of the physician’s power to heal. Similar reference on this lid is also being made to an ancient goddess of healing and her healthy young offspring. History of the Loch Ard: The Loch Ard got its name from ”Loch Ard” a loch which lies to the west of Aberfoyle, and the east of Loch Lomond. It means "high lake" in Scottish Gaelic. The vessel belonged to the famous Loch Line which sailed many vessels from England to Australia. The Loch Ard was built in Glasgow by Barclay, Curdle and Co. in 1873, the vessel was a three-masted square-rigged iron sailing ship that measured 79.87 meters in length, 11.58 m in width, and 7 m in depth with a gross tonnage of 1693 tons with a mainmast that measured a massive 45.7 m in height. Loch Ard made three trips to Australia and one trip to Calcutta before its fateful voyage. Loch Ard left England on March 2, 1878, under the command of 29-year-old Captain Gibbs, who was newly married. The ship was bound for Melbourne with a crew of 37, plus 17 passengers. The general cargo reflected the affluence of Melbourne at the time. Onboard were straw hats, umbrella, perfumes, clay pipes, pianos, clocks, confectionery, linen and candles, as well as a heavier load of railway irons, cement, lead and copper. There were other items included that were intended for display in the Melbourne International Exhibition of 1880. The voyage to Port Phillip was long but uneventful. Then at 3 am on June 1, 1878, Captain Gibbs was expecting to see land. But the Loch Ard was running into a fog which greatly reduced visibility. Captain Gibbs was becoming anxious as there was no sign of land or the Cape Otway lighthouse. At 4 am the fog lifted and a lookout aloft announced that he could see breakers. The sheer cliffs of Victoria's west coast came into view, and Captain Gibbs realised that the ship was much closer to them than expected. He ordered as much sail to be set as time would permit and then attempted to steer the vessel out to sea. On coming head-on into the wind, the ship lost momentum, the sails fell limp and Loch Ard's bow swung back towards land. Gibbs then ordered the anchors to be released in an attempt to hold its position. The anchors sank some 50 fathoms - but did not hold. By this time the ship was among the breakers and the tall cliffs of Mutton Bird Island rose behind. Just half a mile from the coast, the ship's bow was suddenly pulled around by the anchor. The captain tried to tack out to sea, but the ship struck a reef at the base of Mutton Bird Island, near Port Campbell. Waves subsequently broke over the ship and the top deck became loosened from the hull. The masts and rigging came crashing down knocking passengers and crew overboard. When a lifeboat was finally launched, it crashed into the side of Loch Ard and capsized. Tom Pearce, who had launched the boat, managed to cling to its overturned hull and shelter beneath it. He drifted out to sea and then on the flood tide came into what is now known as Lochard Gorge. He swam to shore, bruised and dazed, and found a cave in which to shelter. Some of the crew stayed below deck to shelter from the falling rigging but drowned when the ship slipped off the reef into deeper water. Eva Carmichael a passenger had raced onto the deck to find out what was happening only to be confronted by towering cliffs looming above the stricken ship. In all the chaos, Captain Gibbs grabbed Eva and said, "If you are saved Eva, let my dear wife know that I died like a sailor". That was the last Eva Carmichael saw of the captain. She was swept off the ship by a huge wave. Eva saw Tom Pearce on a small rocky beach and yelled to attract his attention. He dived in and swam to the exhausted woman and dragged her to shore. He took her to the cave and broke the open case of brandy which had washed up on the beach. He opened a bottle to revive the unconscious woman. A few hours later Tom scaled a cliff in search of help. He followed hoof prints and came by chance upon two men from nearby Glenample Station three and a half miles away. In a complete state of exhaustion, he told the men of the tragedy. Tom then returned to the gorge while the two men rode back to the station to get help. By the time they reached Loch Ard Gorge, it was cold and dark. The two shipwreck survivors were taken to Glenample Station to recover. Eva stayed at the station for six weeks before returning to Ireland by steamship. In Melbourne, Tom Pearce received a hero's welcome. He was presented with the first gold medal of the Royal Humane Society of Victoria and a £1000 cheque from the Victorian Government. Concerts were performed to honour the young man's bravery and to raise money for those who lost family in the disaster. Of the 54 crew members and passengers on board, only two survived: the apprentice, Tom Pearce and the young woman passenger, Eva Carmichael, who lost her family in the tragedy. Ten days after the Lochard tragedy, salvage rights to the wreck were sold at auction for £2,120. Cargo valued at £3,000 was salvaged and placed on the beach, but most washed back into the sea when another storm developed. The wreck of Lochard still lies at the base of Mutton Bird Island. Much of the cargo has now been salvaged and some items were washed up into Lochard Gorge. Cargo and artefacts have also been illegally salvaged over many years before protective legislation was introduced in March 1982. One of the most unlikely pieces of cargo to have survived the shipwreck was a Minton majolica peacock- one of only nine in the world. The peacock was destined for the Melbourne 1880 International Exhibition in. It had been well packed, which gave it adequate protection during the violent storm. Today the Minton peacock can be seen at the Flagstaff Hill Maritime Museum in Warrnambool. From Australia's most dramatic shipwreck it has now become Australia's most valuable shipwreck artifact and is one of very few 'objects' on the Victorian State Heritage Register.The shipwreck of the Loch Ard is of significance for Victoria and is registered on the Victorian Heritage Register ( S 417). Flagstaff Hill has a varied collection of artefacts from Loch Ard and its collection is significant for being one of the largest accumulation of artefacts from this notable Victorian shipwreck of which the subject items are a small part. The collections objects give us a snapshot of how we can interpret the story of this tragic event. The collection is also archaeologically significant as it represents aspects of Victoria's shipping history that allows us to interpret Victoria's social and historical themes of the time. Through is associated with the worst and best-known shipwreck in Victoria's history. The ceramic lid off a Holloway’s Ointment container, retrieved from the wreckage of the LOCH ARD. The artefact is white with the pale blue image of a woman (seated) and a child (standing). The woman is draped in a soft white robe and her throne is beside a pillar that is entwined by a serpent. The child points to an inscribed stone tablet he is holding on the other side of seated woman. The front face of the lid, at the base of the woman on the throne, bears the label “HOLLOWAY’S OINTMENT”. Below this, in smaller letters, is written “TRADE MARK” and “2S.9D.” On the stone tablet pointed to by the child is inscribed “533 OXFORD ST. LONDON”, and beneath this, “IN POTS AT 1/½, 2/9, 4/6,11/-, 22/- & 33/- EACH”.flagstaff hill, warrnambool, flagstaff hill maritime museum, shipwreck coast, flagstaff hill maritime village, great ocean road, loch line, loch ard, captain gibbs, eva carmichael, tom pearce, glenample station, mutton bird island, loch ard gorge, holloway’s ointment, ceramic lid, pot lid, nineteenth-century medicines, pharmaceutical marketing -
 Flagstaff Hill Maritime Museum and Village
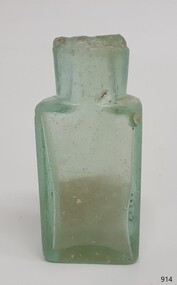
Container - Pill bottle, Circa 1878
This small pill bottle has been handmade by a glass blower. The battles and seamless concave sides and base show that the glass was blown into a shaped mould. The rough lip shows that the glass was snapped off at the mouth and roughly ground. This was an inexpensive way to produce a bottle. The bottle was recovered from the Loch Ard, wrecked in 1878. A brief history of the Loch Ard (1873-1878): - The sailing ship Loch Ard was one of the famous Loch Line ships that sailed from England to Australia. Barclay, Curdle and Co. built the three-masted iron vessel in Glasgow in 1873. It had sailed three trips to Australia and one trip to Calcutta before its fateful voyage. Loch Ard left England on March 2, 1878, under the command of recently married, 29-year-old Captain Gibbs. It was bound for Melbourne with a crew of 37, plus 17 passengers. The general cargo reflected the affluence of Melbourne at the time. Onboard were straw hats, umbrellas, perfumes, clay pipes, pianos, clocks, confectionery, linen and candles, and a heavier load of railway irons, cement, lead and copper. Other cargo included items intended for display in the Melbourne International Exhibition of 1880. The Loch Ard had been sailing for three months and was close to its destination on June 1, 1878. Captain Gibbs had expected to see land at about 3 am but the Loch Ard ran into a fog that greatly reduced visibility and there was no sign of land or the Cape Otway lighthouse. The fog lifted at 4 am and the sheer cliffs of Victoria's west coast were much closer to them than Captain Gibbs expected. He tried to manage the vessel but failed and the ship struck a reef at the base of Mutton Bird Island, near Port Campbell. The top deck loosened from the hull, and the masts and rigging crashed down, knocking passengers and crew overboard. The lifeboat was launched by Tom Pearce but crashed into the side of Loch Ard and capsized. He clung onto its overturned hull and sheltered under it. He drifted out to sea and the tide brought him back to what is now called Loch Ard Gorge. He swam to shore and found a cave for shelter. A passenger, Eva Carmichael, had raced onto the deck to find out what was happening and was confronted by towering cliffs above the ship. She was soon swept off the ship by a huge wave. Eva saw Tom Pearce on a small rocky beach and yelled to attract his attention. He swam out and dragged her to the shelter of the cave. He revived her with a bottle of brandy from a case that had washed up on the beach. Tom scaled a cliff in search of help and followed some horse hoof prints. He came from two men from Glenample Station, three and a half miles away. He told the men of the tragedy and then returned to the gorge while the two men rode back to the station to get help. They reached Loch Ard Gorge and took the two shipwreck survivors to Glenample Station to recover. Eva stayed at the station for six weeks before returning to Ireland by steamship. In Melbourne, Tom Pearce received a hero's welcome and was presented with a medal and some money. Of the 54 crew members and passengers on board, only two survived: the apprentice, Tom Pearce and the young woman passenger, Eva Carmichael, who lost her family in the tragedy. The glass pill bottle is associated with the shipwreck of the Loch Ard and of significance for Victoria as the wreck is registered on the Victorian Heritage Register ( S 417). Flagstaff Hill has a varied collection of artefacts from Loch Ard of which the pill bottle is one. Its collection is significant for being one of the largest accumulation of artefacts from this notable Victorian shipwreck of which the subject item is a small part. The collections objects give us a snapshot of how we can interpret the story of this tragic event. The collection is also archaeologically significant as it represents aspects of Victoria's shipping history that allows us to interpret Victoria's social and historical themes of the time. Through is associated with the worst and best-known shipwreck in Victoria's history.Small clear green-hue glass pill bottle, rectangular in shape and chipped lip. Sides and base are seamless and concave and varying thickness. Glass has bubbles and imperfections. A sticker is attached. Recovered from the wreck of the Loch Ard, flagstaff hill, flagstaff hill maritime museum and village, warrnambool, maritime museum, maritime village, great ocean road, shipwreck coast, loch ard, 1878 shipwreck, handblown bottle, pill bottle, small bottle, medicine bottle -
 Flagstaff Hill Maritime Museum and Village
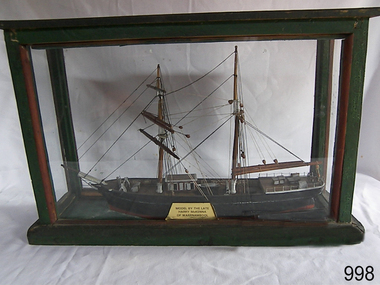
Craft - Ship Model, Mary Campbell, circa 1940
This ship model is of the sailing brigantine MARY CAMPBELL, which once belonged to Captain James Arthur Robilliard. The model was made by Harry McKenna, a well-known ship model maker and Warrnambool resident. CAPTAIN ROBILLIARD James Arthur Robilliard, sea captain and tent maker, was born in 19th April 1843 in St. Helier, Jersey, Channel Islands. He trained there in his father’s sail loft as a sail maker. He later became a skipper. His first job as a sailor was achieved in Liverpool, England. In 1875 James Robilliard migrated to Australia as mate on the “E.M. Young”. Captain Robilliard and his family were amongst the early settlers along the Curdies River in the Heytesbury district. In 1877 he became a Captain. On 14th November 1879 Captain Robilliard married Helen Beckett. James and Helen had ten children; James Arthur (Jnr), Henry William, Nellie Jessie, Alfred Albert, Rubena Nellie, De Jersy Norman, Clifford Beckett, Olive Ida, Frances Ridley Havergal and Nellie Elvie, all born in Victoria. THE MARY CAMPBELL The ship “Mary Campbell” was built by Alexander Newton Jnr. She was carvel planked, of iron bark and blue gum timber. The family shipyard was at Pelican, on the Manning River, NSW, and “Mary Campbell” was first launched by her builder in 1869 as “The Son”. Three months later she was renamed “Mary Campbell’ by her purchaser J. Campbell in Sydney. She was used to carry equipment for the Sydney Sugar Refinery’s Mill in Southgate, NSW. She then traded for the next 20 years between Australian ports and rivers along the east coast as well as regular ports in New Zealand. She was “recognised as one of the best carrying little vessels in the timber trade” (Sydney Morning Herald). She had several owners over this time, the last one being Captain James A. Robilliard. On 29th April 1889 “Mary Campbell”, in the charge of her owner, Captain James A Robilliard, was on her way from Clarence River, NSW to Melbourne, Victoria with a cargo of railway girders for the Melbourne Harbour Trust. Captain Robilliard encountered a storm off Port Macquarie. He sailed the vessel south to 25 miles (about 40km) east of Cape Hawke, near Tuncurry and Forster. At 7pm, he discovered that the cargo had shifted during the stormy seas and the heavy girders had damaged the hull, causing a leak. The pumps were inadequate to stem the fast flowing leak and over a meter of water filled the hull during the next 2 hours. Some of the crew began throwing the cargo overboard to lighten the vessel, hoping to keep it afloat until daylight. When the water reached over 2 meters in the hull they realised their efforts were in vain. At 1:30am on 30th April 1889 the crew left the vessel. They stood by in the lifeboat until 3am. The ship was sinking fast, so they left for the shore, looking for a safe place to beach their boat. While still miles off Cape Hawke all 7 crew members, including the Captain, were rescued by the Government Tug “Rhea” and taken to Port Macquarie hospital then returned to Sydney in the “Wellington”. Captain Robilliard managed to rescue his ship’s compass but no cargo was saved from the vessel. It had been under-insured, only covered for half its value, due to lack of funds. Many years later, in 1976, an anchor was caught up in the net of a trawler south of Forster and thought to be from the “Mary Campbell”. It was donated and installed in the Great Lakes Museum, Tuncurry, NSW. (The same museum also has a half-model of the hull of “Mary Campbell”.) The name of the last ship Captain Robilliard sailed is currently unknown, however he sailed that ship from the port of Marlborough, Queensland, carting steel railway girders for the Geelong-to-Camperdown line. On one trip it hit a storm, the cargo shifted and the ship was wrecked along the NSW coast. After this, Captain Robilliard exchanged sea life for farming in Peterborough. In about 1897, verging on retirement, Capt. Robiilliard superintended the Melbourne Sailors’ Home in Spencer Street, Melbourne, before being asked to leave this position in 1902 for trying to shut down the local hotel! At this time the Melbourne Sailors’ Home was about to change its location. On 6th May 1917 Captain James Arthur Robilliard J.P. died at Blackwood Park, in the Cobden district of Brucknell, which is now considered the first official Robilliard family homestead in Australia. He was buried in the Melbourne General Cemetery, Victoria. His wife Helen passed away in 1947. The Becket and Robilliard family names continue to be well known in the Western District Flagstaff Hill Maritime Village also has a ship’s compass in the collection that was also owned by Capt. J. Robilliard and was used on the ship Mary Campbell.This ship model of the MARY CAMPBELL is of local significance for its association with well known Warrnambool resident and ship model maker. The model is also significant for its association with the brigantine MARY CAMPBELL, a trading vessel that brought railway girders to the Melbourne Harbour Trust.Ship model "Mary Campbell", a two-masted vessel with black hull, brown masts and black rigging. In glass case with timber frame painted green. Painted on the bow in white “MARY CAMPBELL” Gold label with black print attached to display case “MODEL BY THE LATE HARRY McKENNA OF WARRNAMBOOL”flagstaff hill, warrnambool, shipwrecked coast, flagstaff hill maritime museum, maritime museum, shipwreck coast, flagstaff hill maritime village, great ocean road, marine artwork, model making, captain james arthur robilliard, j.a. robilliard, vessel mary campbell, ship mary campbell, melbourne sailors home, vessels, harry mckenna -
 Flagstaff Hill Maritime Museum and Village
Functional object - Deadeye, Barclay Curle & Co shipbuilders, 1873
This example of a sailing ship’s ‘dead-eye’ is from the wreck of the Loch Ard, which sank near Port Campbell in 1878. The Loch Ard got its name from ”Loch Ard” a loch which lies to the west of Aberfoyle, and the east of Loch Lomond. It means "high lake" in Scottish Gaelic. The vessel belonged to the famous Loch Line which sailed many vessels from England to Australia. The Loch Ard was built in Glasgow by Barclay, Curle and Co. in 1873, the vessel was a three-masted square-rigged iron sailing ship that measured 79.87 meters in length, 11.58 m in width, and 7 m in depth with a gross tonnage of 1693 tons with a mainmast that measured a massive 45.7 m in height. Loch Ard made three trips to Australia and one trip to Calcutta before its fateful voyage. Loch Ard left England on March 2, 1878, under the command of 29-year-old Captain Gibbs, who was newly married. The ship was bound for Melbourne with a crew of 37, plus 17 passengers. The general cargo reflected the affluence of Melbourne at the time. Onboard were straw hats, umbrella, perfumes, clay pipes, pianos, clocks, confectionery, linen and candles, as well as a heavier load of railway irons, cement, lead and copper. There were other items included that were intended for display in the Melbourne International Exhibition of 1880. The voyage to Port Phillip was long but uneventful. Then at 3 am on June 1, 1878, Captain Gibbs was expecting to see land. But the Loch Ard was running into a fog which greatly reduced visibility. Captain Gibbs was becoming anxious as there was no sign of land or the Cape Otway lighthouse. At 4 am the fog lifted and a lookout aloft announced that he could see breakers. The sheer cliffs of Victoria's west coast came into view, and Captain Gibbs realised that the ship was much closer to them than expected. He ordered as much sail to be set as time would permit and then attempted to steer the vessel out to sea. On coming head-on into the wind, the ship lost momentum, the sails fell limp and Loch Ard's bow swung back towards land. Gibbs then ordered the anchors to be released in an attempt to hold its position. The anchors sank some 50 fathoms - but did not hold. By this time the ship was among the breakers and the tall cliffs of Mutton Bird Island rose behind. Just half a mile from the coast, the ship's bow was suddenly pulled around by the anchor. The captain tried to tack out to sea, but the ship struck a reef at the base of Mutton Bird Island, near Port Campbell. Waves subsequently broke over the ship and the top deck became loosened from the hull. The masts and rigging came crashing down knocking passengers and crew overboard. When a lifeboat was finally launched, it crashed into the side of Loch Ard and capsized. Tom Pearce, who had launched the boat, managed to cling to its overturned hull and shelter beneath it. He drifted out to sea and then on the flood tide came into what is now known as Lochard Gorge. He swam to shore, bruised and dazed, and found a cave in which to shelter. Some of the crew stayed below deck to shelter from the falling rigging but drowned when the ship slipped off the reef into deeper water. Eva Carmichael a passenger had raced onto the deck to find out what was happening only to be confronted by towering cliffs looming above the stricken ship. In all the chaos, Captain Gibbs grabbed Eva and said, "If you are saved Eva, let my dear wife know that I died like a sailor". That was the last Eva Carmichael saw of the captain. She was swept off the ship by a huge wave. Eva saw Tom Pearce on a small rocky beach and yelled to attract his attention. He dived in and swam to the exhausted woman and dragged her to shore. He took her to the cave and broke the open case of brandy which had washed up on the beach. He opened a bottle to revive the unconscious woman. A few hours later Tom scaled a cliff in search of help. He followed hoof prints and came by chance upon two men from nearby Glenample Station three and a half miles away. In a complete state of exhaustion, he told the men of the tragedy. Tom then returned to the gorge while the two men rode back to the station to get help. By the time they reached Loch Ard Gorge, it was cold and dark. The two shipwreck survivors were taken to Glenample Station to recover. Eva stayed at the station for six weeks before returning to Ireland by steamship. In Melbourne, Tom Pearce received a hero's welcome. He was presented with the first gold medal of the Royal Humane Society of Victoria and a £1000 cheque from the Victorian Government. Concerts were performed to honour the young man's bravery and to raise money for those who lost family in the disaster. Of the 54 crew members and passengers on board, only two survived: the apprentice, Tom Pearce and the young woman passenger, Eva Carmichael, who lost her family in the tragedy. Ten days after the Lochard tragedy, salvage rights to the wreck were sold at auction for £2,120. Cargo valued at £3,000 was salvaged and placed on the beach, but most washed back into the sea when another storm developed. The wreck of Lochard still lies at the base of Mutton Bird Island. Much of the cargo has now been salvaged and some items were washed up into Lochard Gorge. Cargo and artefacts have also been illegally salvaged over many years before protective legislation was introduced in March 1982. One of the most unlikely pieces of cargo to have survived the shipwreck was a Minton majolica peacock- one of only nine in the world. The peacock was destined for the Melbourne 1880 International Exhibition in. It had been well packed, which gave it adequate protection during the violent storm. Today the Minton peacock can be seen at the Flagstaff Hill Maritime Museum in Warrnambool. From Australia's most dramatic shipwreck it has now become Australia's most valuable shipwreck artifact and is one of very few 'objects' on the Victorian State Heritage Register.The shipwreck of the Loch Ard is of significance for Victoria and is registered on the Victorian Heritage Register ( S 417). Flagstaff Hill has a varied collection of artefacts from Loch Ard and its collection is significant for being one of the largest accumulation of artefacts from this notable Victorian shipwreck of which the subject items are a small part. The collections objects give us a snapshot of how we can interpret the story of this tragic event. The collection is also archaeologically significant as it represents aspects of Victoria's shipping history that allows us to interpret Victoria's social and historical themes of the time. Through is associated with the worst and best-known shipwreck in Victoria's history.A weathered ship’s rigging deadeye, showing signs of submersion and erosion in sea water. The flat sides of this thick wooden disc have three holes drilled through in a triangular configuration.Noneflagstaff hill maritime museum, shipwreck coast, loch line, loch ard, captain gibbs, eva carmichael, tom pearce, glenample station, mutton bird island, loch ard gorge, deadeye, rigging -
 Flagstaff Hill Maritime Museum and Village
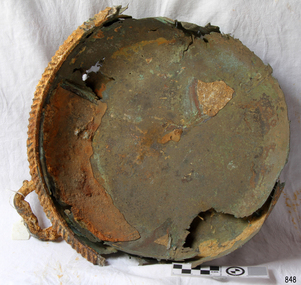
Equipment - Sharpening Stone, ca 1878
The sharpening stone can also be referred to as a whetstone, oil stone or honing stone. It is a well-worn double-sided sharpening stone retrieved from the wreck site of the Loch Ard. It is used to grind and hone the edges of metal blades and tools. ‘Natural’ sharpening stones like this one are quarried from ancient sedimentary rock that has metamorphosed from clay and volcanic ash to produce garnet crystals. Most modern stones are artificially produced, or ‘bonded’, abrasive stones, made by fusing clay and metal powder under heat and pressure. The softer yellow Corticule stone is found in thin vertical veins running through the more plentiful Belgian Blue rock. Coticule is a fine-grained and dense material that ‘cuts’ metal slowly but to a superior standard of sharpness and finish. The relatively coarser Belgian Blue is stronger and ‘cuts’ more quickly, but with a less polished finish. A double-sided whetstone is therefore valued for its increased durability (the harder BBW ‘backs’, or supports, the softer Coticule), and additional utility (the fine ‘grit’ of Coticule complements the coarser BBW to meet a range of sharpening needs). The blue-grey base of this stone is thinner than the remaining yellow Coticule on top. This suggests that the majority of grinding and honing work it has done on board the ship was for larger tools, rather than on surgical or shaving blades. Its rounded or spherical shaping may also be related to the ‘tumbling’ action of the sea on the ocean floor. History of the Loch Ard wreck: The Loch Ard got its name from ”Loch Ard” a loch that lies to the west of Aberfoyle, and the east of Loch Lomond. It means "high lake" in Scottish Gaelic. The vessel belonged to the famous Loch Line which sailed many vessels from England to Australia. The Loch Ard was built in Glasgow by Barclay, Curle & Co. in 1873, the vessel was a three-masted square-rigged iron sailing ship that measured 79.87 meters in length, 11.58 m in width, and 7 m in depth with a gross tonnage of 1693 tons with a mainmast that measured a massive 45.7 m in height. Loch Ard made three trips to Australia and one trip to Calcutta before its fateful voyage. Loch Ard left England on March 2, 1878, under the command of 29-year-old Captain Gibbs, who was newly married. The ship was bound for Melbourne with a crew of 37, plus 17 passengers. The general cargo reflected the affluence of Melbourne at the time. Onboard were straw hats, umbrellas, perfumes, clay pipes, pianos, clocks, confectionery, linen and candles, as well as a heavier load of railway irons, cement, lead and copper. There were other items included that were intended for display in the Melbourne International Exhibition of 1880. The voyage to Port Phillip was long but uneventful. Then at 3 am on June 1, 1878, Captain Gibbs was expecting to see land. But the Loch Ard was running into a fog which greatly reduced visibility. Captain Gibbs was becoming anxious as there was no sign of land or the Cape Otway lighthouse. At 4 am the fog lifted and a lookout aloft announced that he could see breakers. The sheer cliffs of Victoria's west coast came into view, and Captain Gibbs realised that the ship was much closer to them than expected. He ordered as much sail to be set as time would permit and then attempted to steer the vessel out to sea. On coming head-on into the wind, the ship lost momentum, the sails fell limp and Loch Ard's bow swung back towards land. Gibbs then ordered the anchors to be released in an attempt to hold their position. The anchors sank some 50 fathoms - but did not hold. By this time the ship was among the breakers and the tall cliffs of Mutton Bird Island rose behind. Just half a mile from the coast, the ship's bow was suddenly pulled around by the anchor. The captain tried to tack out to sea, but the ship struck a reef at the base of Mutton Bird Island, near Port Campbell. Waves subsequently broke over the ship and the top deck became loosened from the hull. The masts and rigging came crashing down knocking passengers and crew overboard. When a lifeboat was finally launched, it crashed into the side of Loch Ard and capsized. Tom Pearce, who had launched the boat, managed to cling to its overturned hull and shelter beneath it. He drifted out to sea and then on the flood tide came into what is now known as Lochard Gorge. He swam to shore, bruised and dazed, and found a cave in which to shelter. Some of the crew stayed below deck to shelter from the falling rigging but drowned when the ship slipped off the reef into deeper water. Eva Carmichael a passenger had raced onto the deck to find out what was happening only to be confronted by towering cliffs looming above the stricken ship. In all the chaos, Captain Gibbs grabbed Eva and said, "If you are saved Eva, let my dear wife know that I died like a sailor". That was the last Eva Carmichael saw of the captain. She was swept off the ship by a huge wave. Eva saw Tom Pearce on a small rocky beach and yelled to attract his attention. He dived in and swam to the exhausted woman and dragged her to shore. He took her to the cave and broke the open case of brandy which had washed up on the beach. He opened a bottle to revive the unconscious woman. A few hours later Tom scaled a cliff in search of help. He followed hoof prints and came by chance upon two men from nearby Glenample Station three and a half miles away. In a complete state of exhaustion, he told the men of the tragedy. Tom then returned to the gorge while the two men rode back to the station to get help. By the time they reached Loch Ard Gorge, it was cold and dark. The two shipwreck survivors were taken to Glenample Station to recover. Eva stayed at the station for six weeks before returning to Ireland by steamship. In Melbourne, Tom Pearce received a hero's welcome. He was presented with the first gold medal of the Royal Humane Society of Victoria and a £1000 cheque from the Victorian Government. Concerts were performed to honour the young man's bravery and to raise money for those who lost family in the disaster. Of the 54 crew members and passengers on board, only two survived: the apprentice, Tom Pearce and the young woman passenger, Eva Carmichael, who lost her family in the tragedy. Ten days after the Lochard tragedy, salvage rights to the wreck were sold at auction for £2,120. Cargo valued at £3,000 was salvaged and placed on the beach, but most washed back into the sea when another storm developed. The wreck of Lochard still lies at the base of Mutton Bird Island. Much of the cargo has now been salvaged and some items were washed up into Lochard Gorge. Cargo and artefacts have also been illegally salvaged over many years before protective legislation was introduced in March 1982. One of the most unlikely pieces of cargo to have survived the shipwreck was a Minton majolica peacock- one of only nine in the world. The peacock was destined for the Melbourne 1880 International Exhibition. It had been well packed, which gave it adequate protection during the violent storm. Today the Minton peacock can be seen at the Flagstaff Hill Maritime Museum in Warrnambool. From Australia's most dramatic shipwreck, it has now become Australia's most valuable shipwreck artifact and is one of very few 'objects' on the Victorian State Heritage Register. The shipwreck of the Loch Ard is of significance for Victoria and is registered on the Victorian Heritage Register ( S 417). Flagstaff Hill has a varied collection of artefacts from Loch Ard and its collection is significant for being one of the largest accumulation of artefacts from this notable Victorian shipwreck of which the subject items are a small part. The collections objects give us a snapshot of how we can interpret the story of this tragic event. The collection is also archaeologically significant as it represents aspects of Victoria's shipping history that allows us to interpret Victoria's social and historical themes of the time. Through is associated with the worst and best-known shipwreck in Victoria's history. A sharpening stone is also called a whetstone, oil, or honing stone. The stone is a worn double-sided rectangular block with rounded corners. There is a clear delineation between its coarser Belgian Blue base (grey colour) and its finer Belgian Coticule face (yellow colour). It bears sedimentary encrustation over one-third of its surface. flagstaff hill, warrnambool, shipwrecked coast, flagstaff hill maritime museum, maritime museum, shipwreck coast, flagstaff hill maritime village, great ocean road, loch line, loch ard, captain gibbs, eva carmichael, tom pearce, glenample station, mutton bird island, loch ard gorge, sharpening stone, whetstone, oilstone, double-sided stone, belgian coticule, belgian blue whetstone, oil stone, honing stone -
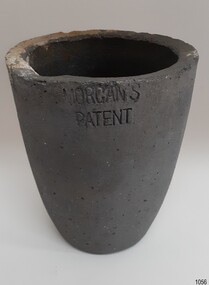 Flagstaff Hill Maritime Museum and Village
Functional object - Crucible, The Patent Plumbago Crucible Company, circa 1878
This crucible was raised from the wreck of the LOCH ARD. It is one of six similar relics, in a range of sizes, now in the Flagstaff Hill collection. All bear markings to indicate their manufacture by the Morgan brothers of Battersea, trading as the Patent Plumbago Crucible Co. A crucible is a container used for purifying and melting metals so that they can be cast in a mould to a predetermined shape and use. They must withstand extremely high temperatures, and abrupt cooling, and shed their contents with minimal adherence. The addition of graphite to the traditional firing clays greatly enhanced the durability of industrial crucibles in mid-Victorian Britain, a significant technological advance at a time of great activity in foundries and expansion of demand for refined metals. The Morgans first noticed the advantages of graphite crucibles at the Great Exhibition held in London in 1851. Initially, they contracted to be sole selling agents for the American-made products of Joseph Dixon and Co. from New Jersey, but in 1856 they obtained that firm’s manufacturing rights and began producing their own graphite crucibles from the South London site. The Morgans imported crystalline graphite in 4-5 cwt casks from the British colony of Ceylon (now Sri Lanka) and mixed it with conventional English (Stourbridge) clays to be fired in kilns. Their products were purchased by the Royal Mints in London and India, and exported to official mints in France and Germany. They were successful exhibitors of their crucibles and furnaces at the London Exhibition held in 1861 (Class 1, Mining, quarrying, metallurgy and mineral products, Exhibit 265, Patent Plumbago Crucible Co). The range of sizes represented by the six crucibles retrieved from the LOCH ARD, suggests they may have been part of a sample shipment intended for similar promotion in the Australian colonies ― at Melbourne’s International Exhibition to be held in 1880. The summary of the LOCH ARD cargo manifest, by Don Charlwood in ‘Wrecks and Reputations’, does not mention any crucibles, implying that they were not a large consignment of uniform items. A newspaper account of an 1864 tour of the Morgan brothers’ ‘Black Potteries’ at Battersea indicates: “All the pots were numbered according to their contents, each number standing for one kilogram, or a little over two pounds; a No. 2 crucible contains two kilogrammes; a No. 3, three kilogrammes, and so on.” These numbers are obscured by marine sediment on three of the crucibles in the Flagstaff Hill collection, but those legible on the remaining three are 5, 6, and 8. None of the six is of the same size from a visual appraisal. A brief history of the Loch Ard (1873-1878): - The sailing ship Loch Ard was one of the famous Loch Line of ships that sailed the long voyage from England to Australia. Barclay, Curdle and Co. built the three-masted iron vessel in Glasgow in 1873. It had sailed three trips to Australia and one trip to Calcutta before its fateful voyage. Loch Ard left England on March 2, 1878, under the command of recently married, 29-year-old Captain Gibbs. It was bound for Melbourne with a crew of 37, plus 17 passengers. The general cargo reflected the affluence of Melbourne at the time. Onboard were straw hats, umbrellas, perfumes, clay pipes, pianos, clocks, confectionery, linen and candles, and a heavier load of railway irons, cement, lead and copper. Other cargo included items intended for display in the Melbourne International Exhibition of 1880. The Loch Ard had been sailing for three months and was close to its destination on June 1, 1878. Captain Gibbs had expected to see land at about 3 am but the Loch Ard ran into a fog that greatly reduced visibility and there was no sign of land or the Cape Otway lighthouse. The fog lifted at 4 am and the sheer cliffs of Victoria's west coast were much closer to them than Captain Gibbs expected. He tried to manage the vessel but failed and the ship struck a reef at the base of Mutton Bird Island, near Port Campbell. The top deck loosened from the hull, and the masts and rigging crashed down, knocking passengers and crew overboard. The lifeboat was launched by Tom Pearce but crashed into the side of Loch Ard and capsized. He clung onto its overturned hull and sheltered under it. He drifted out to sea and the tide brought him back to what is now called Loch Ard Gorge. He swam to shore and found a cave for shelter. A passenger, Eva Carmichael, had raced onto the deck to find out what was happening and was confronted by towering cliffs above the ship. She was soon swept off the ship by a huge wave. Eva saw Tom Pearce on a small rocky beach and yelled to attract his attention. He swam out and dragged her to the shelter of the cave. He revived her with a bottle of brandy from a case that had washed up on the beach. Tom scaled a cliff in search of help and followed some horse hoof prints. He came from two men from Glenample Station, three and a half miles away. He told the men of the tragedy and then returned to the gorge while the two men rode back to the station to get help. They reached Loch Ard Gorge and took the two shipwreck survivors to Glenample Station to recover. Eva stayed at the station for six weeks before returning to Ireland by steamship. In Melbourne, Tom Pearce received a hero's welcome and was presented with a medal and some money. Of the 54 crew members and passengers on board, only two survived: the apprentice, Tom Pearce and the young woman passenger, Eva Carmichael, who lost her family in the tragedy. The shipwreck of the LOCH ARD is of State significance ― Victorian Heritage Register S417. Flagstaff Hill’s collection of artefacts from LOCH ARD is significant for being one of the largest collections of artefacts from this shipwreck in Victoria. It is significant for its association with the shipwreck, which is on the Victorian Heritage Register (VHR S417). The collection is significant because of the relationship between the objects, as together they have a high potential to interpret the story of the LOCH ARD. The LOCH ARD collection is archaeologically significant as the remains of a large international passenger and cargo ship. The LOCH ARD collection is historically significant for representing aspects of Victoria’s shipping history and its potential to interpret sub-theme 1.5 of Victoria’s Framework of Historical Themes (living with natural processes). The collection is also historically significant for its association with the LOCH ARD, which was one of the worst and best-known shipwrecks in Victoria’s history.A Morgan’s Patent graphite crucible No.8 (i.e. 8kgs capacity), one of a set. It was recovered from the wreck of the LOCH ARD. It is in its original grey colouring with minimal sediment accretion on the top rim. It rises in a slight curve from a flat circular base to a wider rim with a pouring lip. Maker’s marks on the side of the container clearly identify the manufacturer. The maker's details are stamped into the base around and within a circle. A white sticker is attached. Made by the Patent Plumbago Crucible Company at the Battersea Works in London. Number “8”. Letters “MORGAN’S PATENT”. Details on the base "MORGAN'S PATENT" "THE PATENT PLUMBAGO CRUCIBLE COMPANY" Symbol [8] above "BATTERSEA WORKS LONDON" Handwritten on a white sticker in black pen "LA/89"flagstaff hill, warrnambool, maritime museum, shipwreck coast, great ocean road, loch line, loch ard, captain gibbs, eva carmichael, tom pearce, glenample station, mutton bird island, loch ard gorge, graphite crucible, plumbago crucible, morgans crucible company, flagstaff hill maritime museum and village, fluxing pots, crucible, morgan’s patent, morgan brothers, patent plumbago crucible co, battersea works, london, port campbell